

Page 1
USER INSTRUCTIONS
CROS-FA model
Behind-the-ear
Page 2

2
Page 3

CONTENTS
THEWIDEXCROSTRANSMITTER .................................................
Thebattery .................................................................................................
Insertingthebattery .............................................................................
Batterydrawerwithoutanailgrip ..................................................
Rightleftidentification ........................................................................
Positioningthetransmitter ...................................................................
Removingthetransmitter ....................................................................
Turningthetransmitteronandoff .....................................................
Volumeadjustment ................................................................................
CLEANING ...................................................................................
Thetransmitter ....................................................................................
INCASEOFMALFUNCTION ........................................................
CARINGFORYOURTRANSMITTER ............................................
WARNINGS ................................................................................
ADVICE .......................................................................................
REGULATORYINFORMATION .....................................................
SYMBOLS ....................................................................................
3
Page 4
4
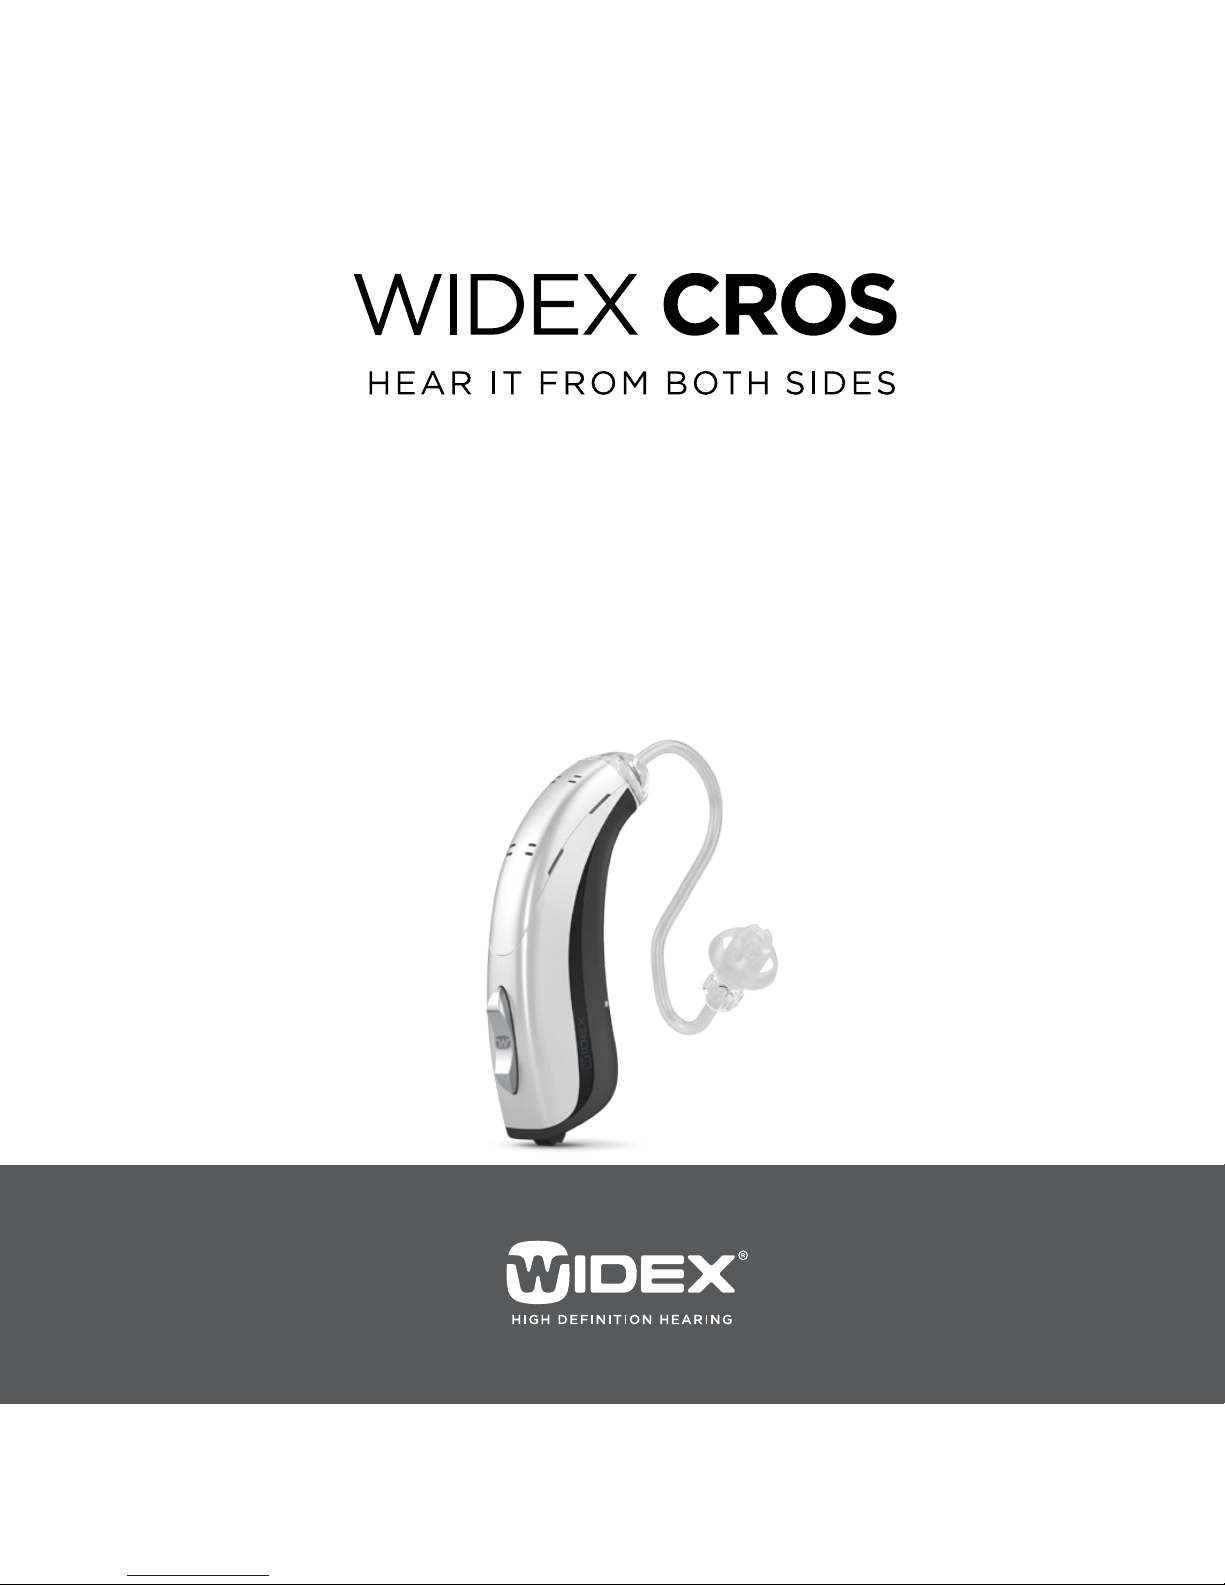
THE WIDEX CROS TRANSMITTER
The illustration below shows the WIDEX CROS transmitter without
the ear-set, which consists of a tube and an ear-tip or earmold.
Please refer to the separate ear-set user manual provided.
1. Microphone openings
2. Volume control
3. Program button (transmission on/off)
4. Battery drawer with nail grip
5. On/off switch
1
2
3
4 & 5
Page 5
5
NOTE
In addition to these user instructions, a separate user manual is
provided describing the various ear-set solutions available for your
transmitter.
WARNING
This booklet and the manual “Ear-sets for Widex BTE hearing aids”
contain important information and instructions. Read these booklets
carefully before you start using the transmitter.
NOTE
Your transmitter and ear-set may not look exactly as illustrated in this
booklet. We also reserve the right to make any changes considered
necessary.
Page 6

6
Intended use
The transmitter is intended for use as a device that picks up sound
at the ear on which it is worn and transmits it to a hearing aid on
the better ear.
Indications for use
The WIDEX CROS solution is indicated for individuals who are deaf
in one ear and have normal or impaired hearing in the other.
It is to be programmed by licensed hearing care professionals
(audiologists, hearing aid specialists, otolaryngologists) who are
trained in hearing (re)habilitation.
Description of device
The transmitter is worn on the deaf ear like an ordinary “behindthe-ear” hearing aid. It receives sound from the surroundings and
transmits it to a Widex wireless hearing aid worn on the better
ear, via a proprietary wireless technology called WidexLink.
Page 7
7
The battery
We recommend zinc-air batteries. Use a size 312 battery for the
transmitter.
To obtain replacement batteries, please consult your hearing care
professional. It is important to take note of the expiration date
and the recommendations on the battery pack regarding disposal
of used batteries.
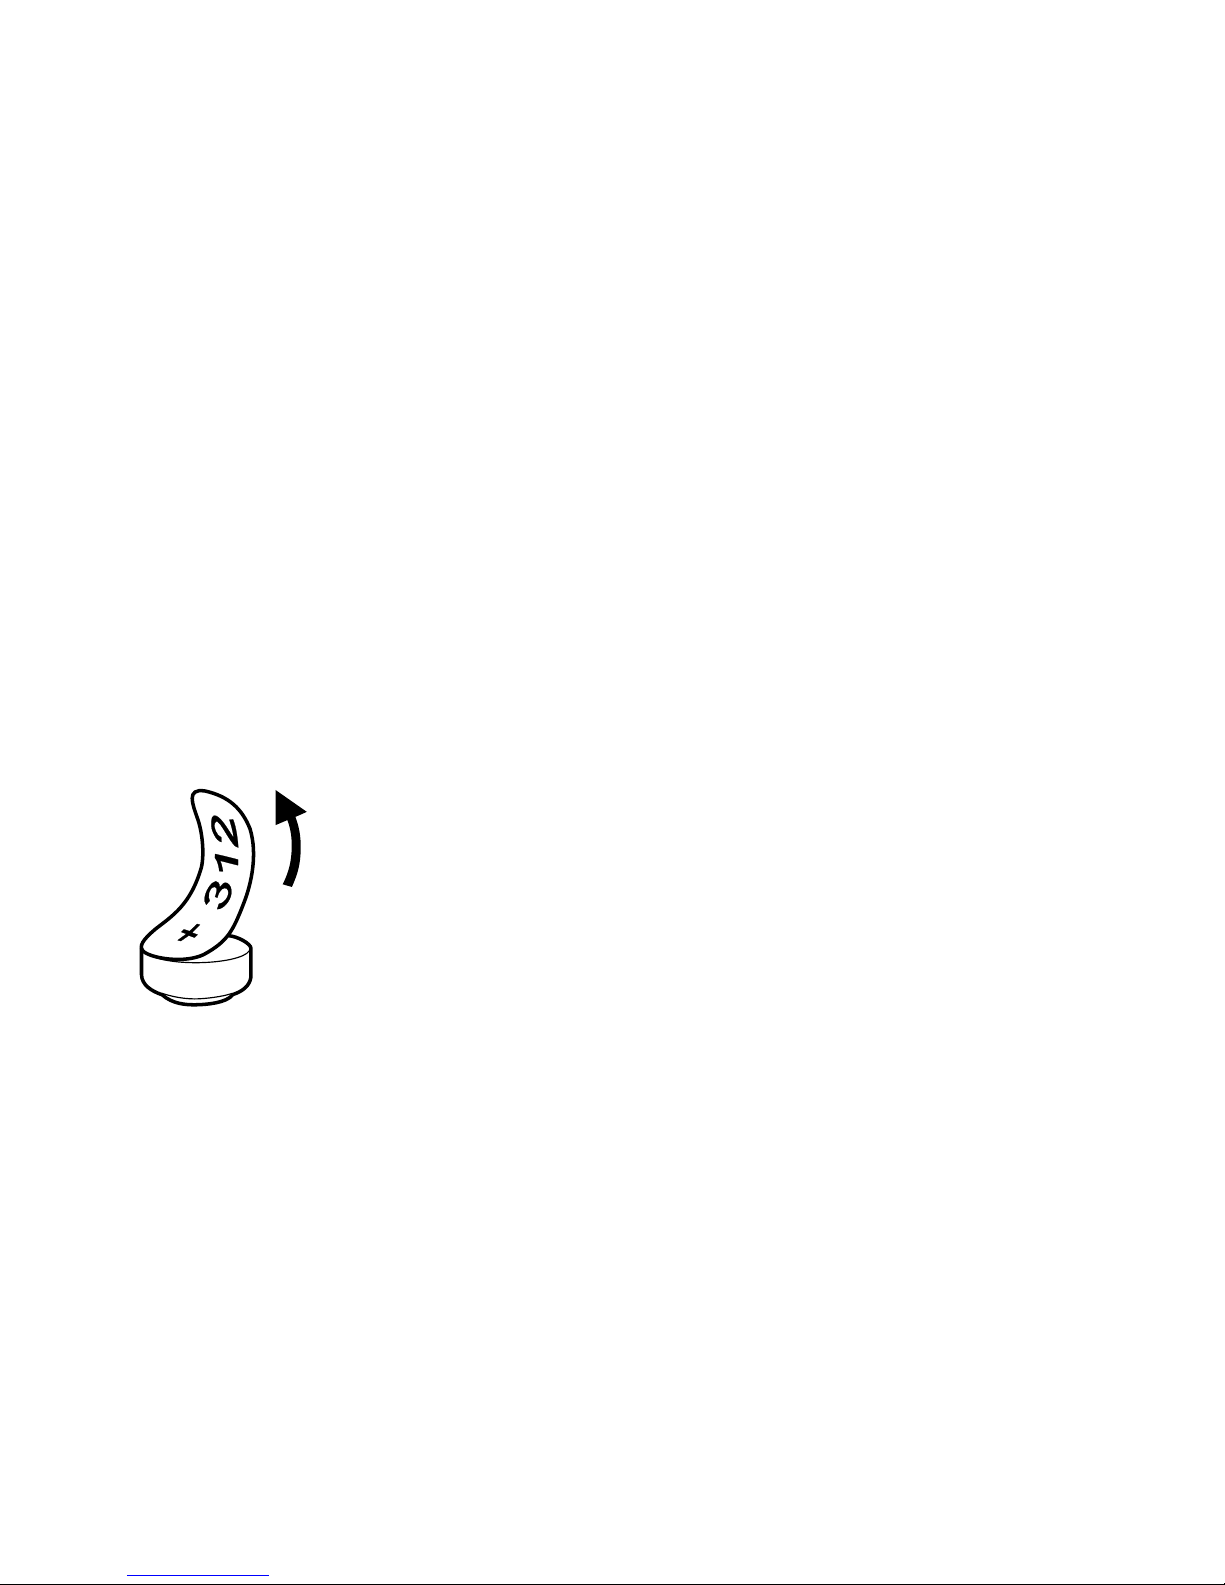
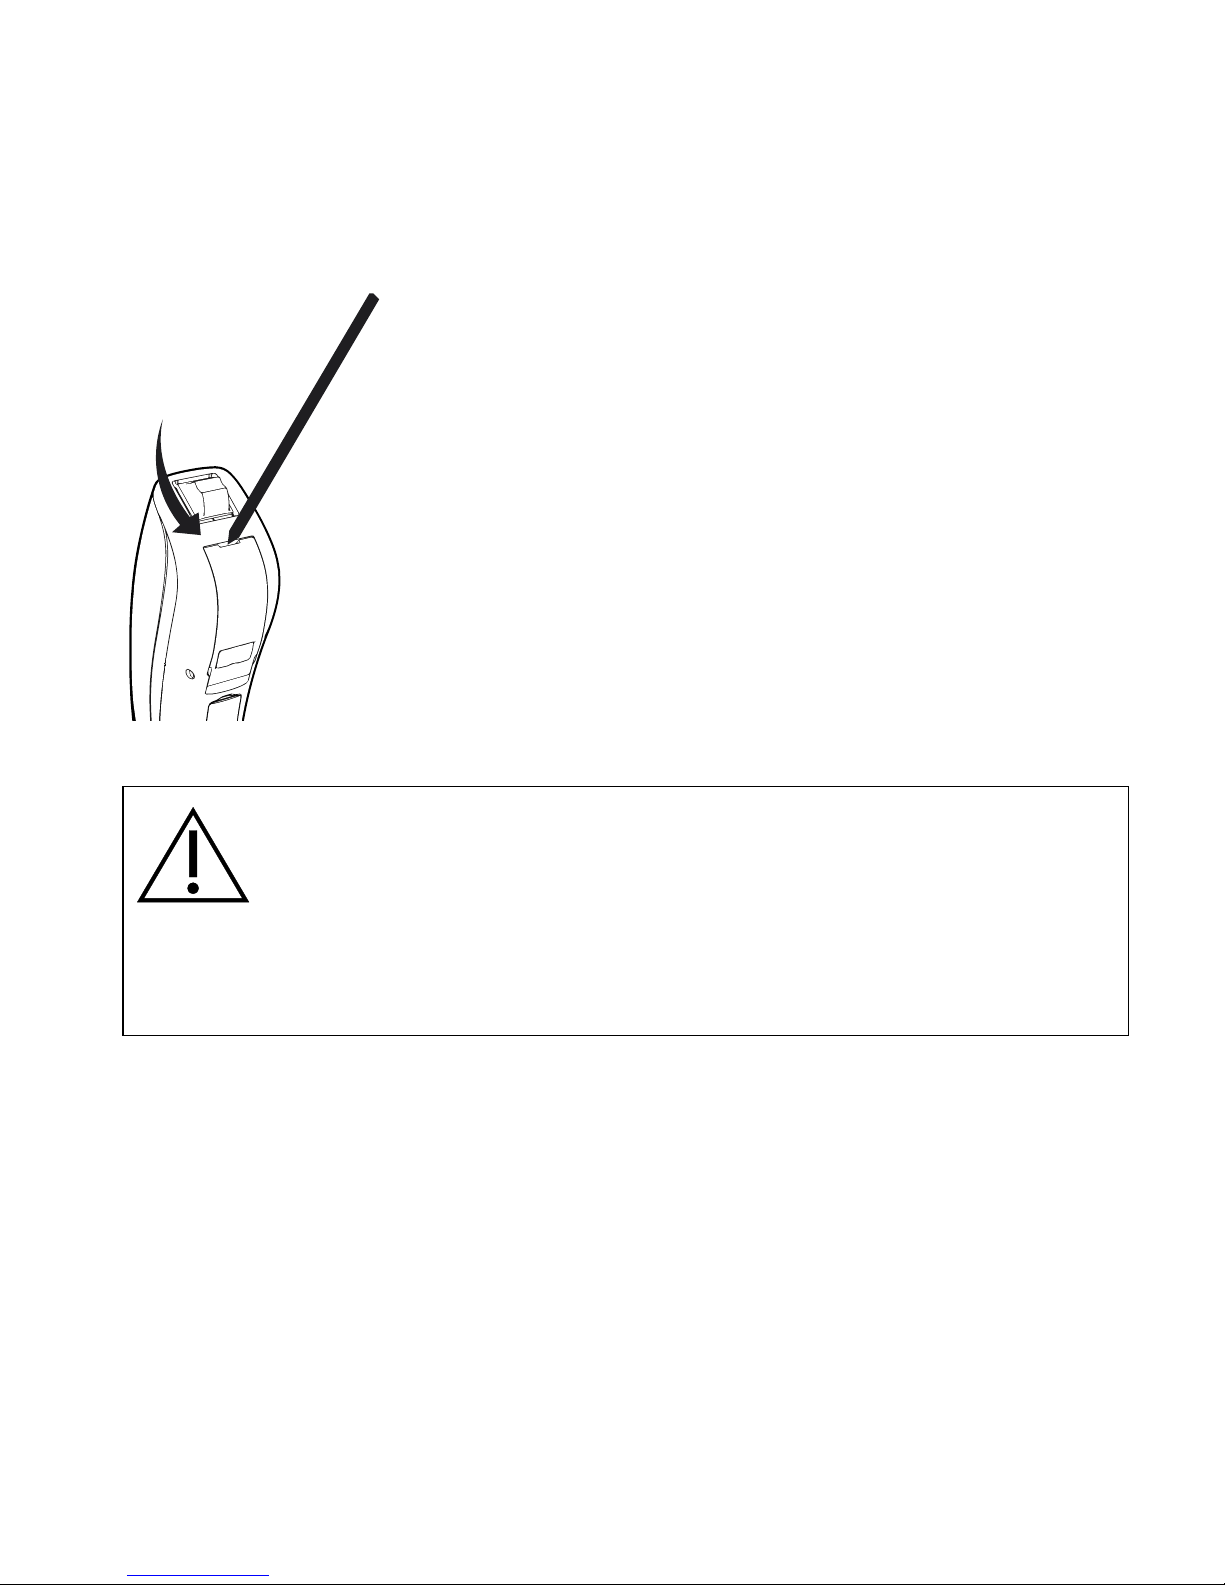
Inserting the battery
Before inserting a new battery, remember to
remove the adhesive tab. Once the tab has been
removed, wait 60 seconds before placing the battery into the transmitter.
Page 8
8
CAUTION
Do not use batteries if there is a sticky residue from the tab or other
unwanted substance, as this can cause the device to malfunction.
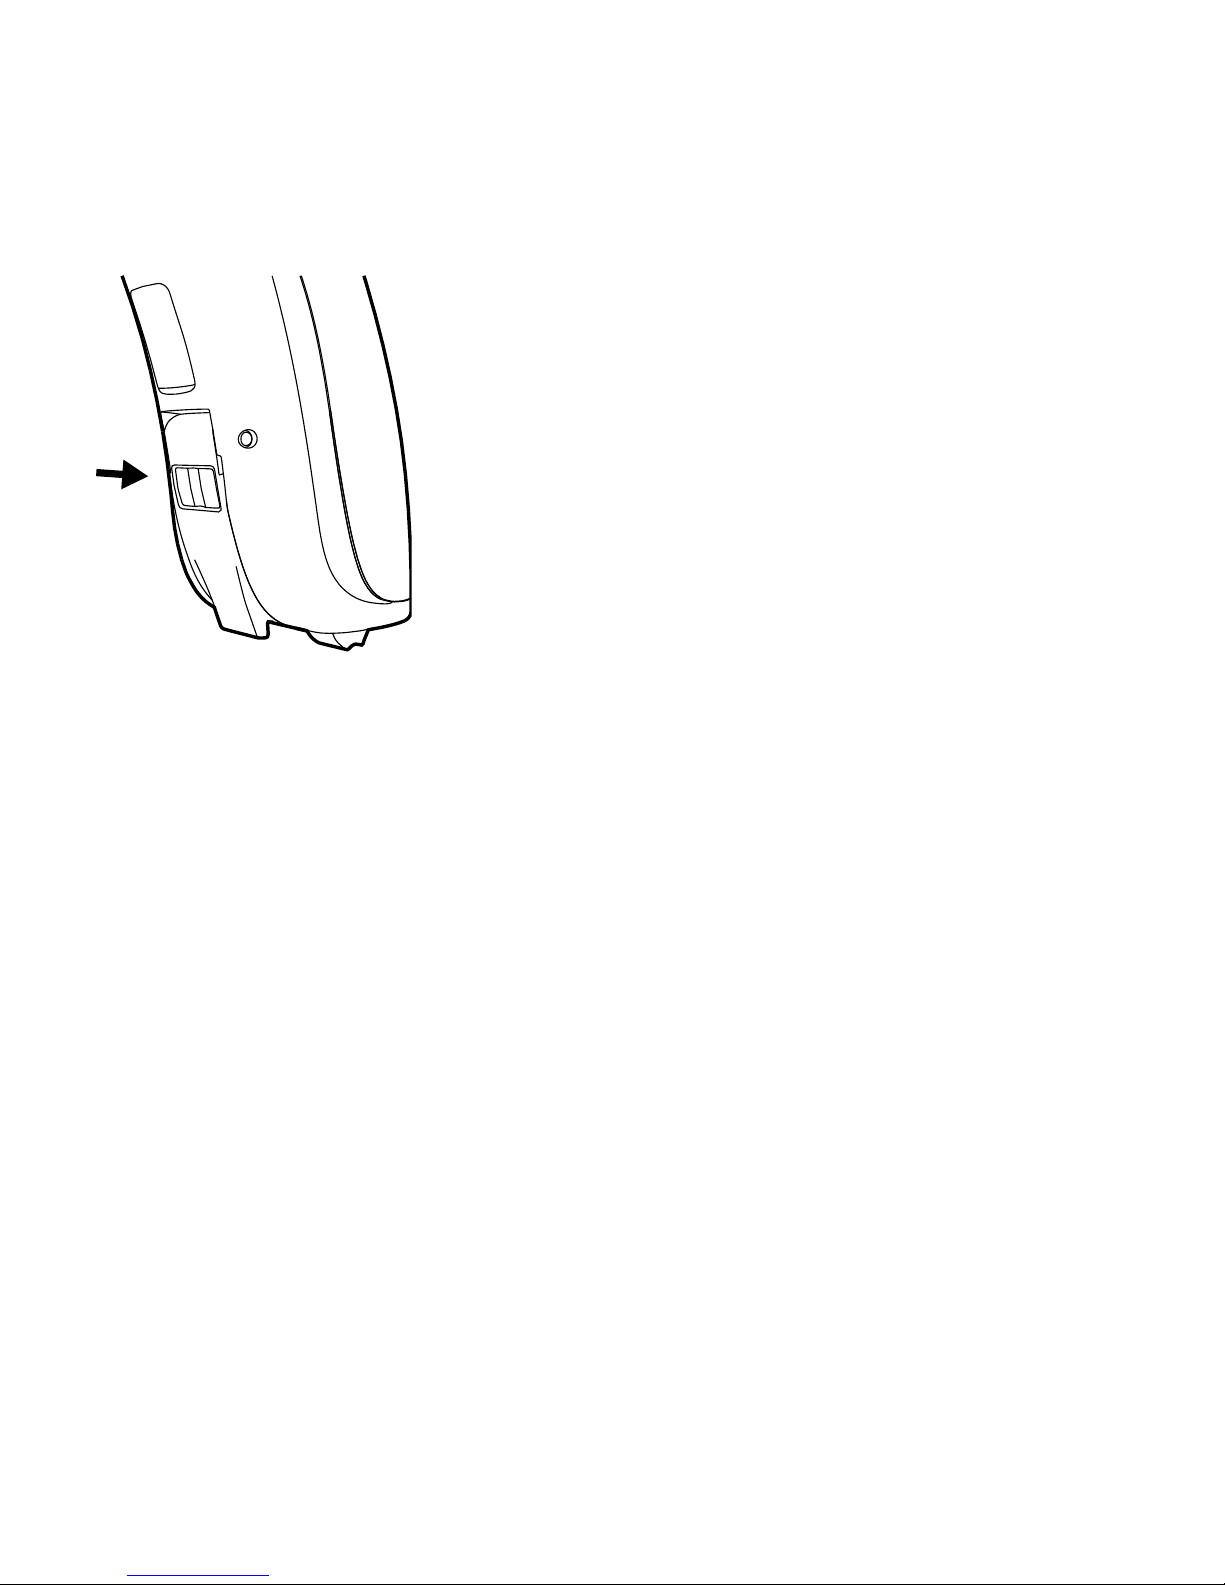
Use the nail grip to gently swing the battery
drawer open.
Page 9
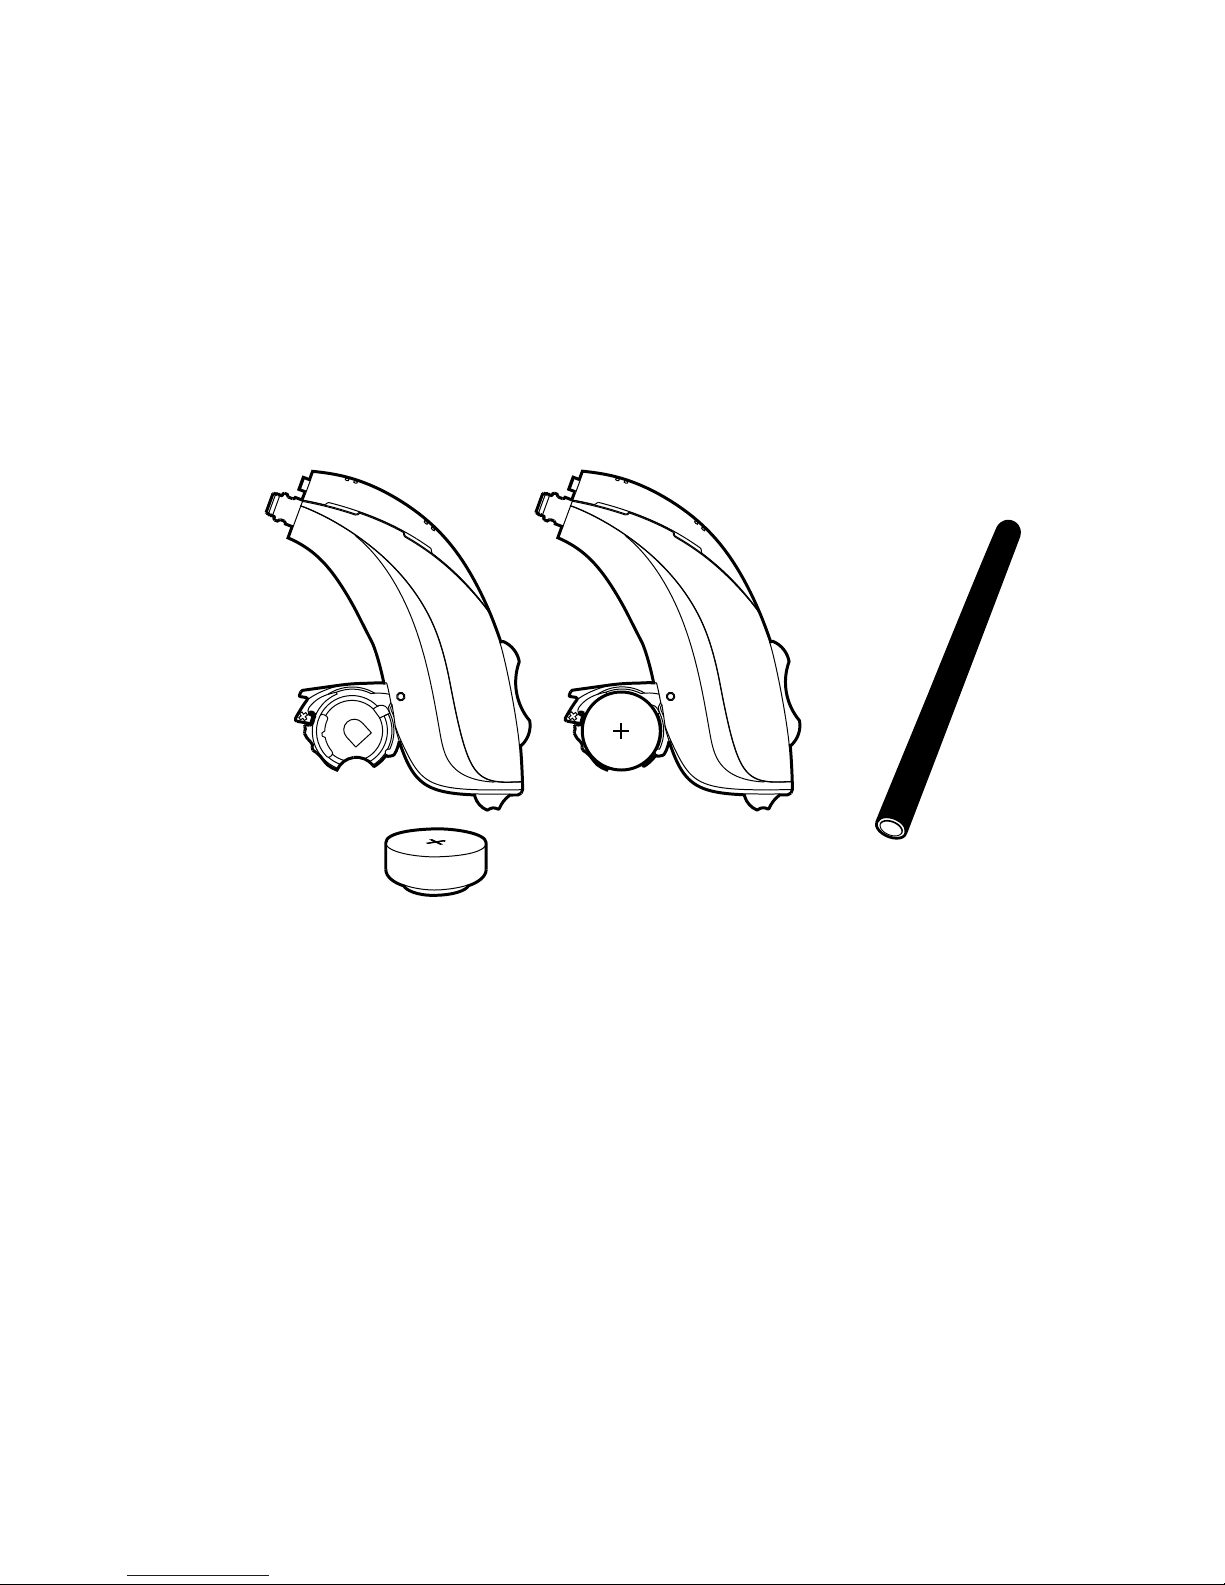
9
Place the battery in the drawer, so that the plus (+) sign on the
battery faces upward. You can use the battery magnet provided
to steer the battery into place.
If the battery drawer does not close easily, the battery is incorrectly
inserted.
Page 10

10
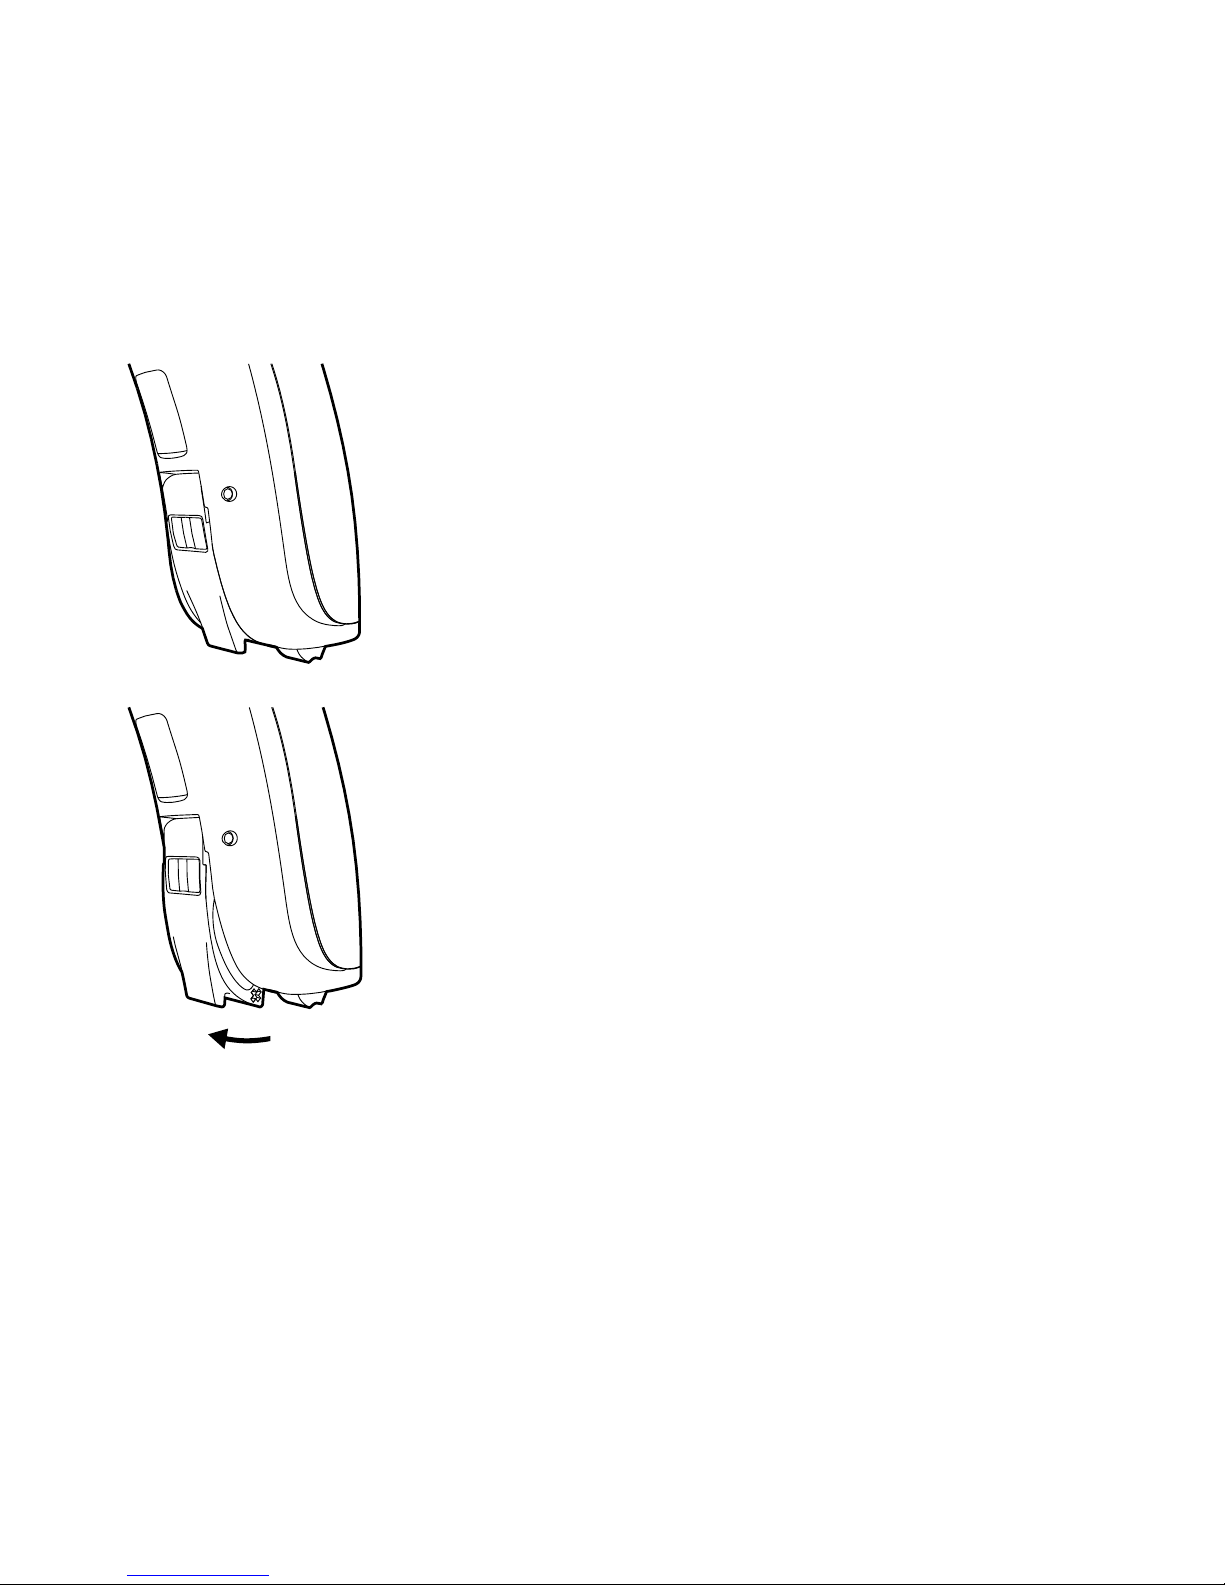
Battery drawer without a nail grip
The device may be provided with a battery
drawer without a nail grip. This type of
drawer can be a good choice if the device is
worn by a child. A special tool for opening the
drawer will be included with this drawer.
Page 11
11
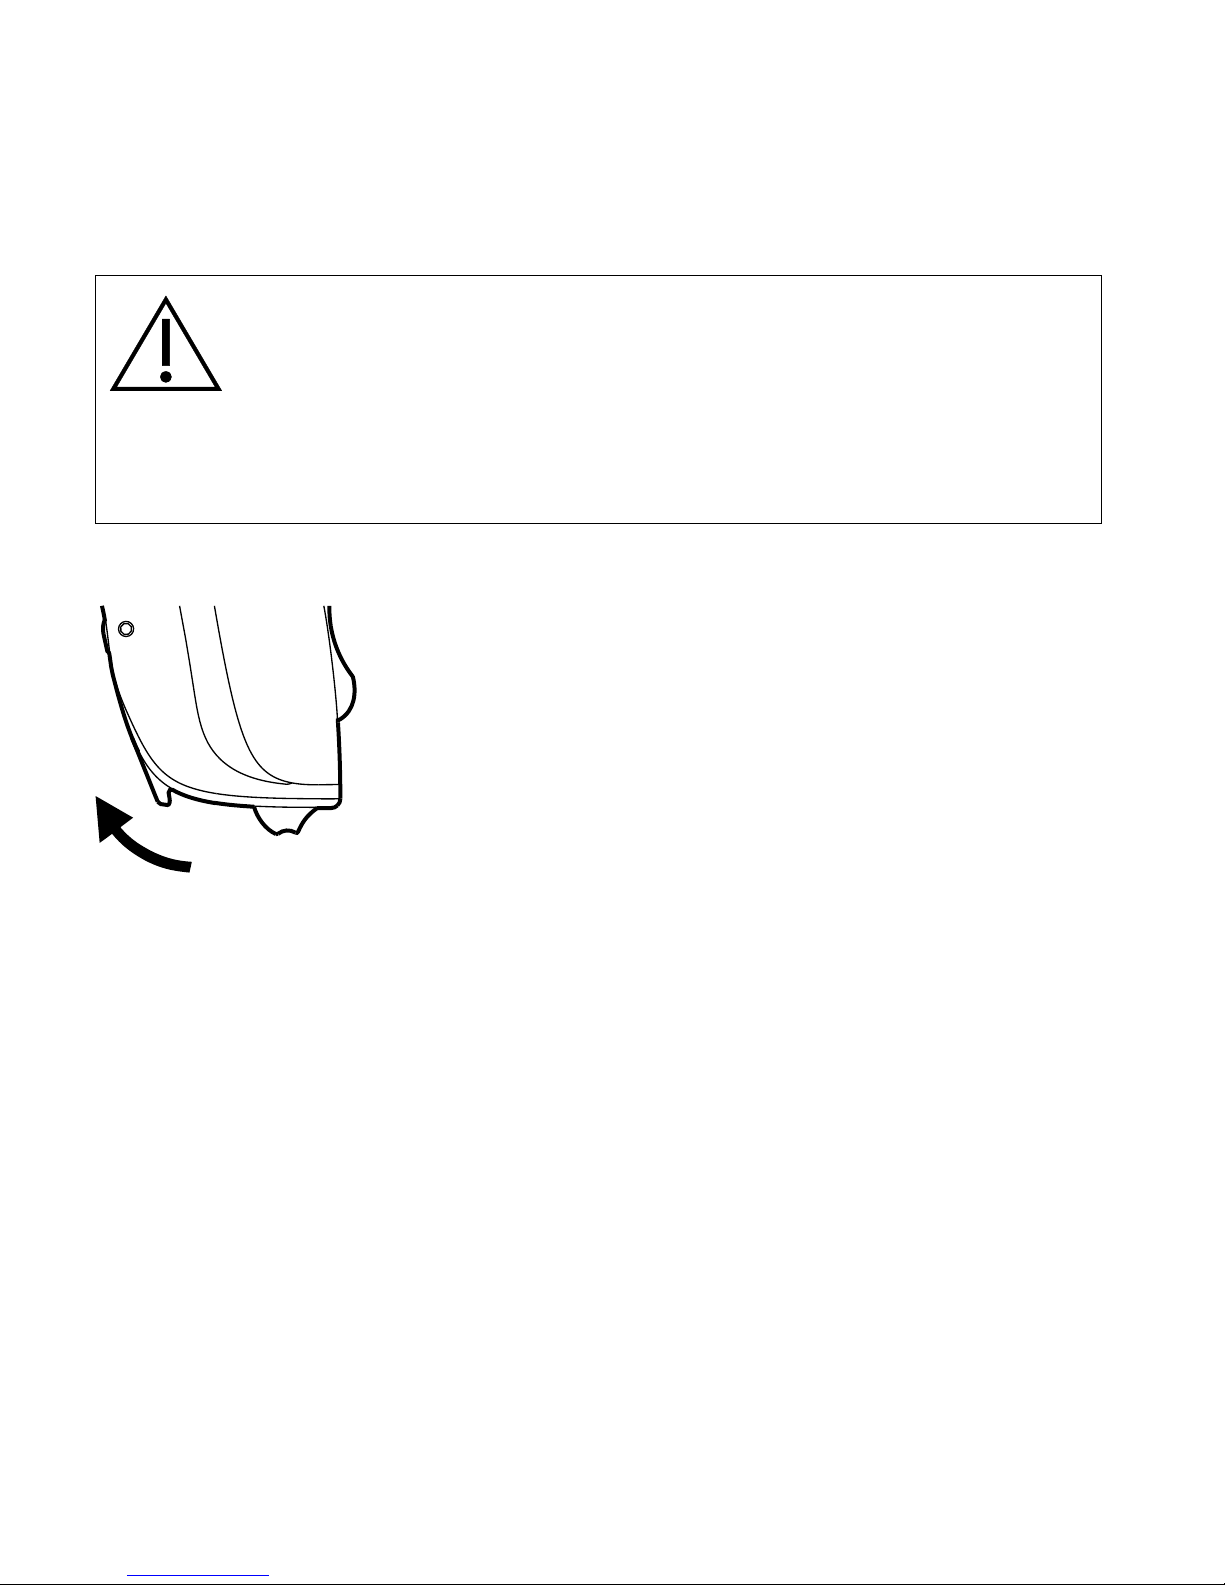
The battery drawer is opened as illustrated
WARNING
Never leave an exhausted battery in the transmitter. Exhausted batter-
ies may leak, damaging the device.
Page 12
12
Right/left identification
Your transmitter can be provided with a
colored mark for right/left identification
(red mark = right and blue mark = left).
The arrow shows the position of the
identification mark.
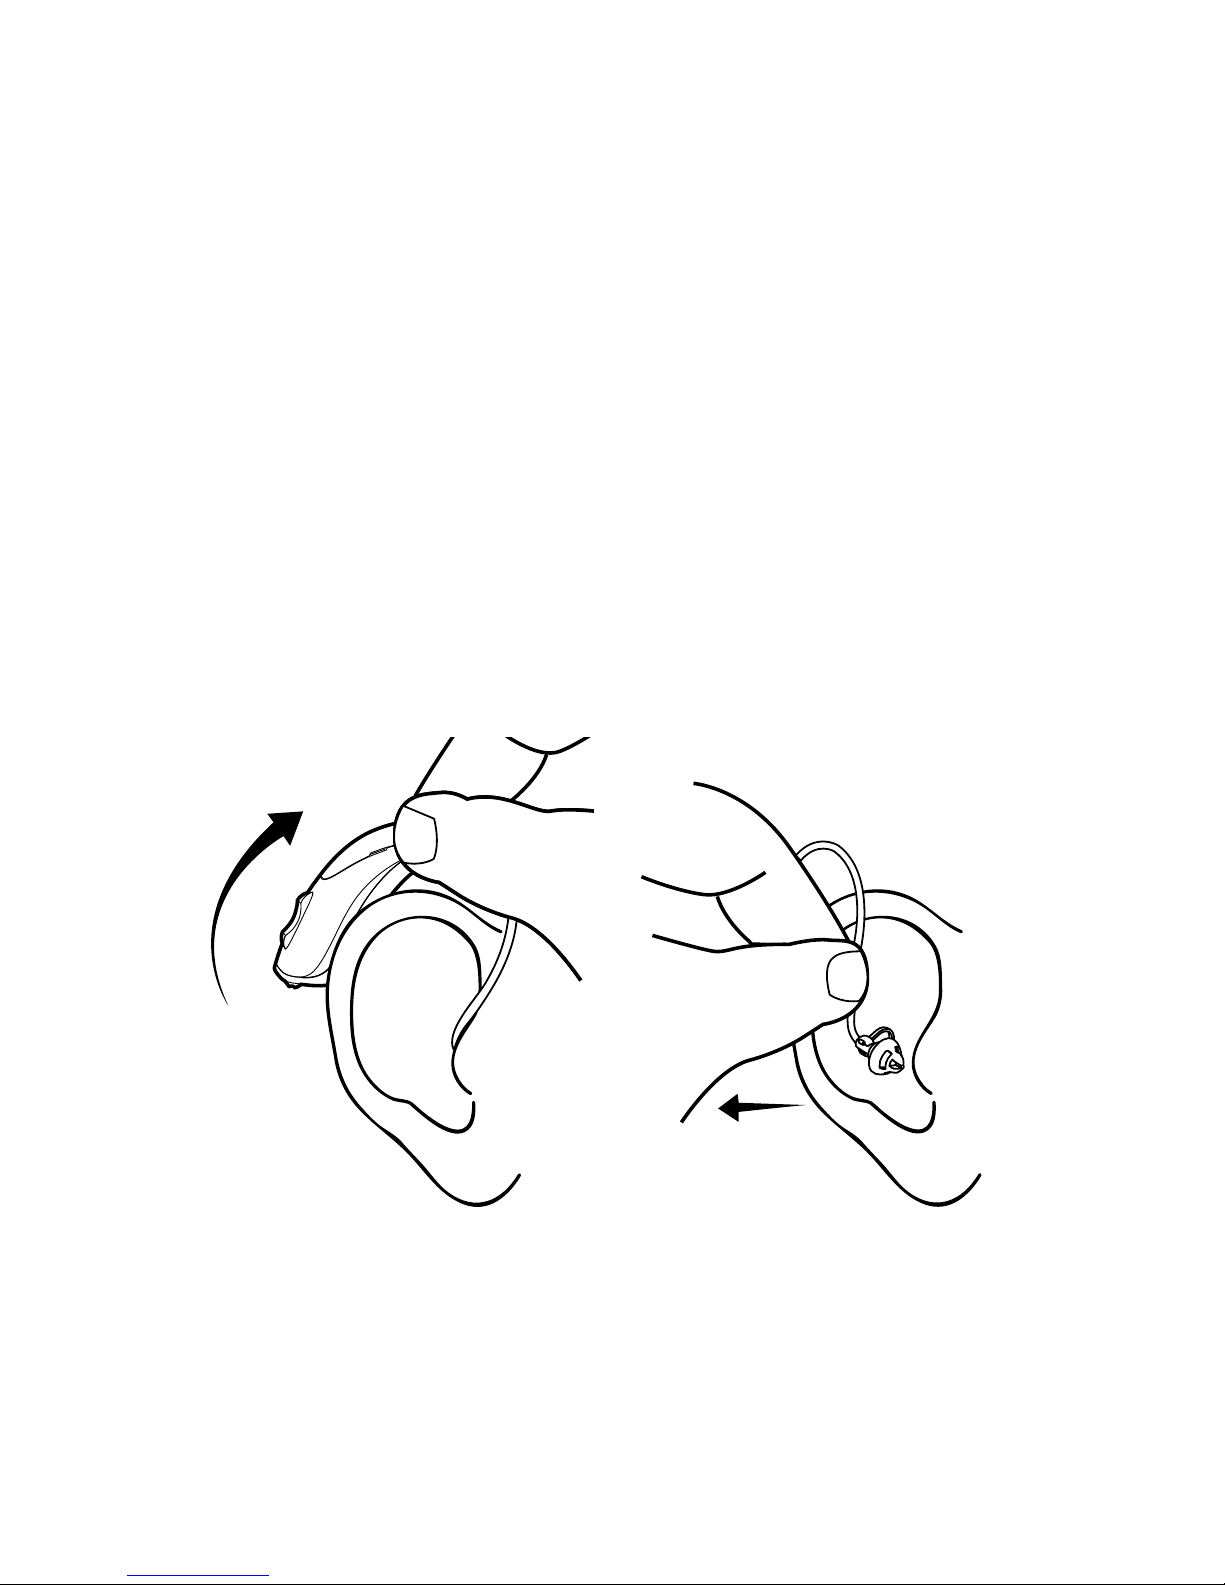
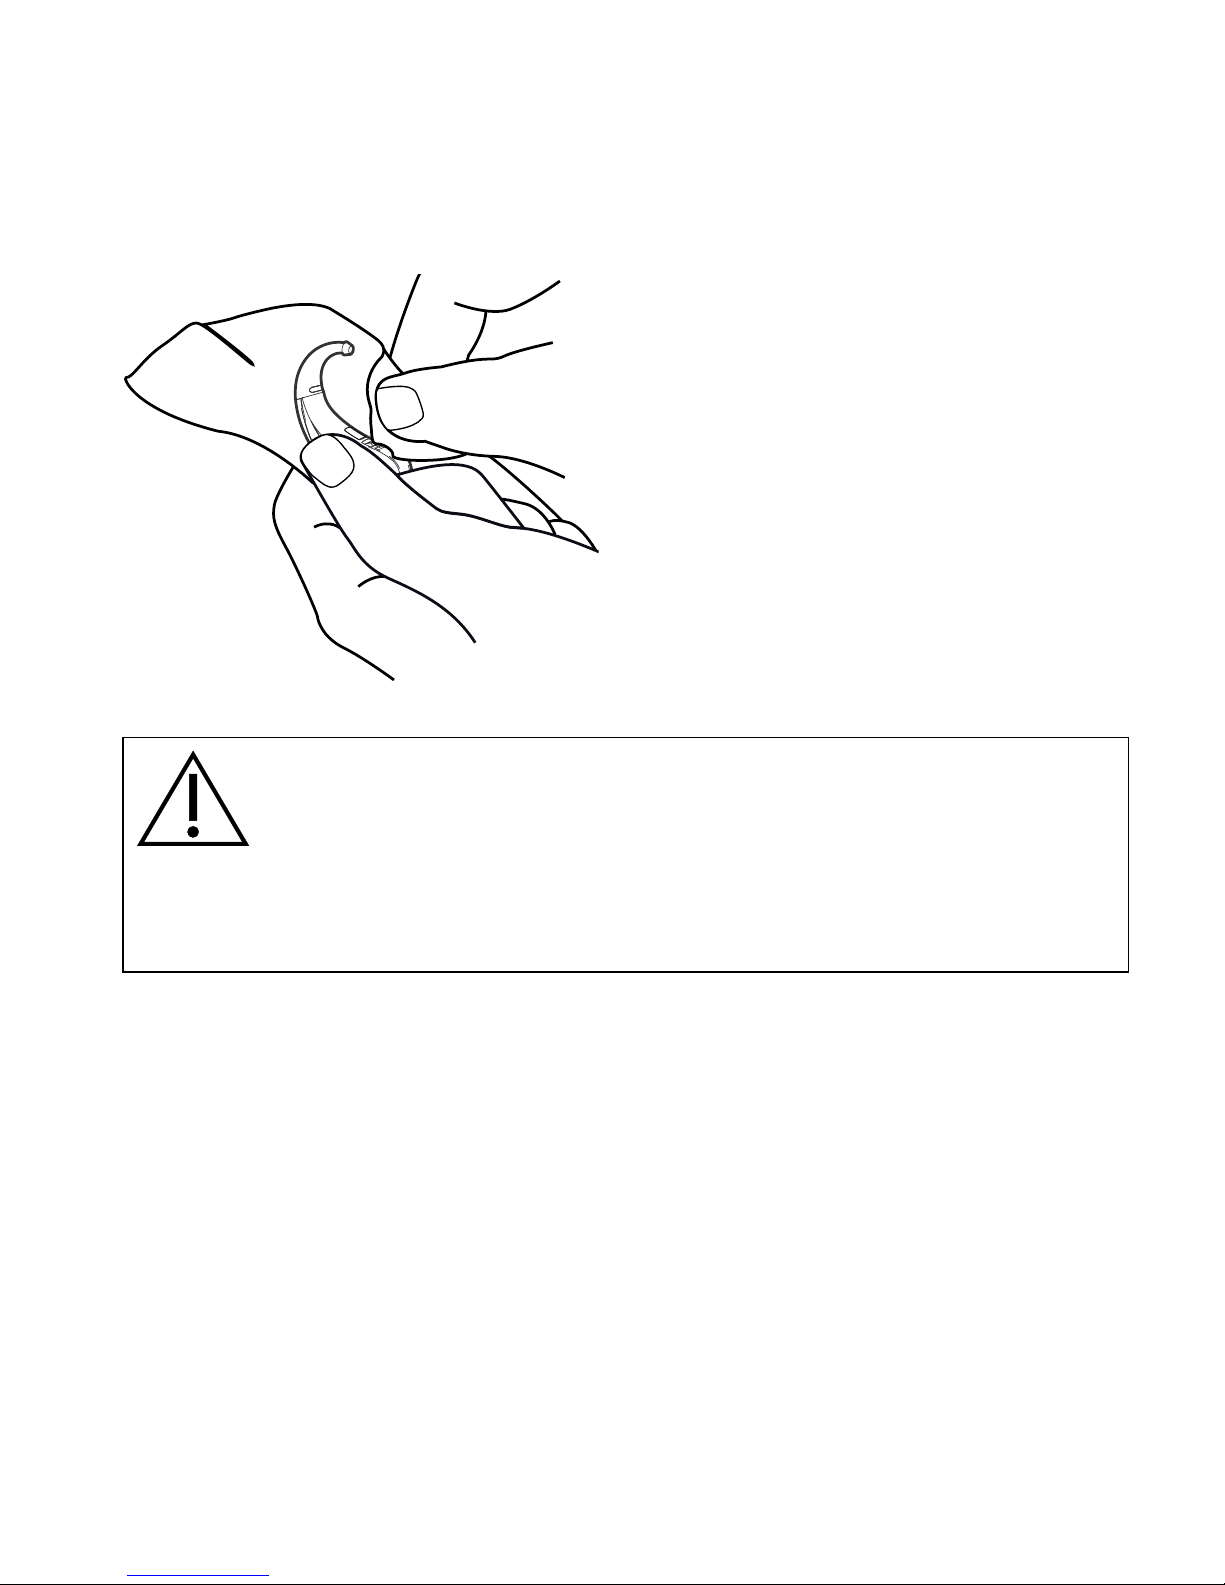
Positioning the transmitter
Insert the earpiece in the ear canal while holding the lower part of
the tube. It may help to pull the outer ear backwards and upwards
with the opposite hand.
Page 13

13
Place the transmitter behind the ear, so that the device and tube
rest comfortably on the ear, close to your head.
The illustrations show an open ear-tip. For further information on
ear-tip/earmold types, anchors and procedures, see the separate
ear-set user manual provided.
Page 14
14
Removing the transmitter
Remove the transmitter from its position behind the ear.
Carefully pull the earpiece out of the ear canal, while holding the
lower part of the tube. If the earpiece is provided with an extraction cord, take hold of this and carefully pull the ear-tip out of the
ear canal.
Page 15
15
Turning the transmitter on and off
Close the battery drawer to turn on the transmitter.
To turn it off, open the battery drawer slightly
to the first position where a click is felt.
Please remember to turn off the transmitter
when it is not in use. Remove the battery if the
device will not be used for several days.
Page 16

16
Transmission
With the transmitter turned on, press the program button to start
transmitting sound to the hearing aid on the better ear. Make sure
the hearing aid is also turned on.
To stop transmission, press the program button again. You will
hear a sound when transmission is started, and a message when
transmission is stopped, unless this function has been disabled.
NOTE:
If you have a DEX device, you need to turn off transmission by
pressing the program button in order to use the DEX.
Turn off the transmitter if you want to access different listening
programs in the hearing aid worn on the better ear.
Page 17
17
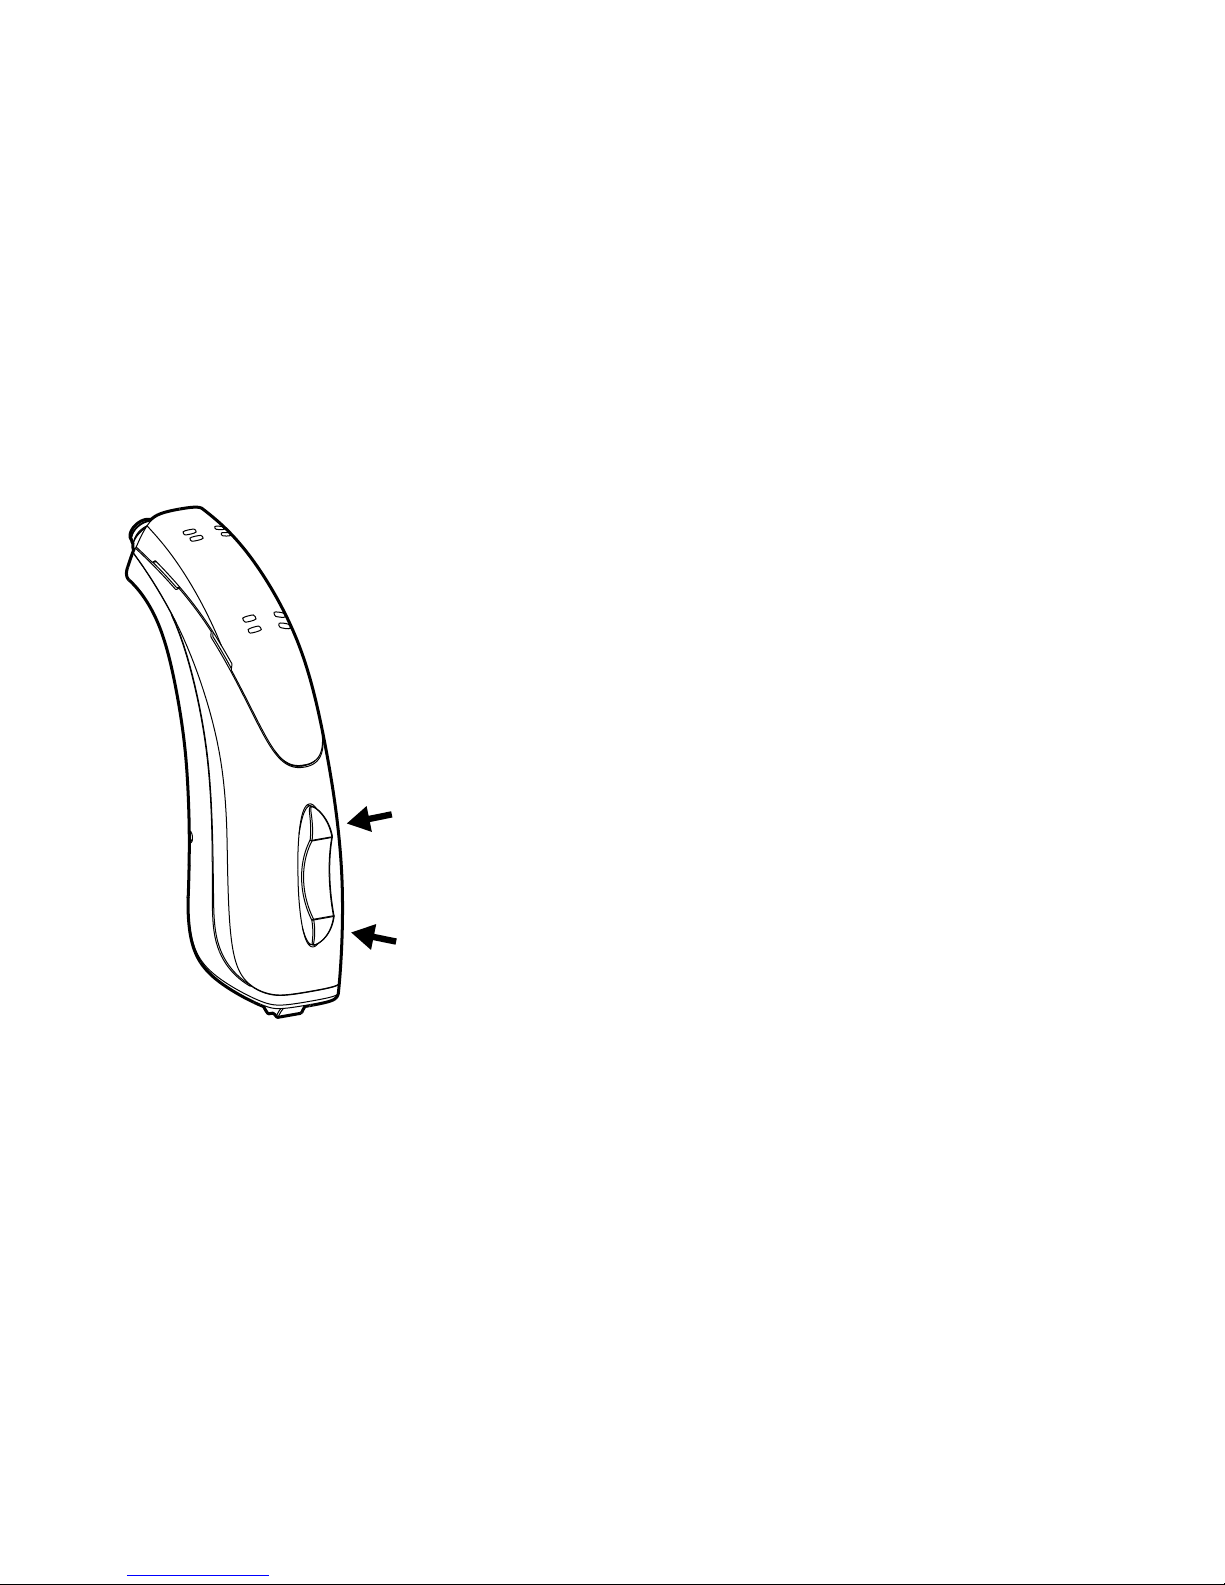
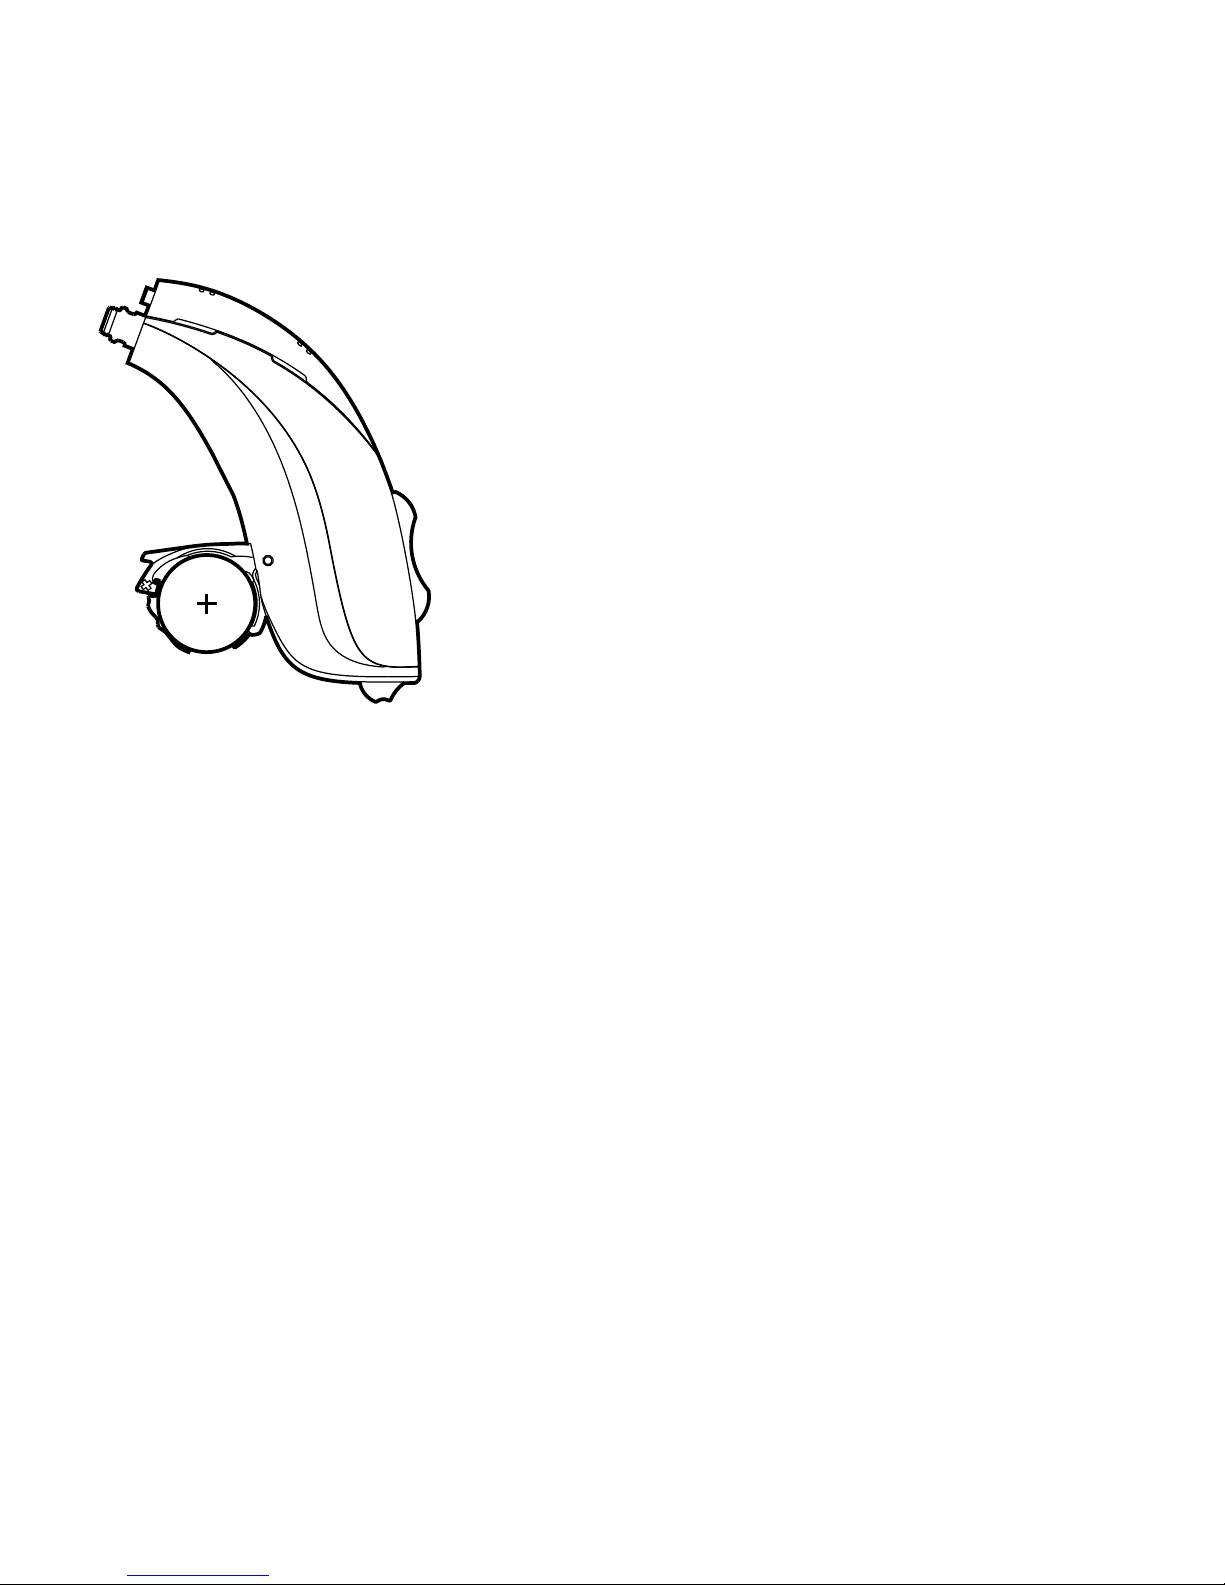
Volume adjustment
Your transmitter is provided with a volume control allowing you
to adjust the volume of the sound transmitted to the better ear.
Push the upper part of the volume
control to gradually raise the volume.
Push the lower part to gradually lower
the volume.
+
-
Page 18
18
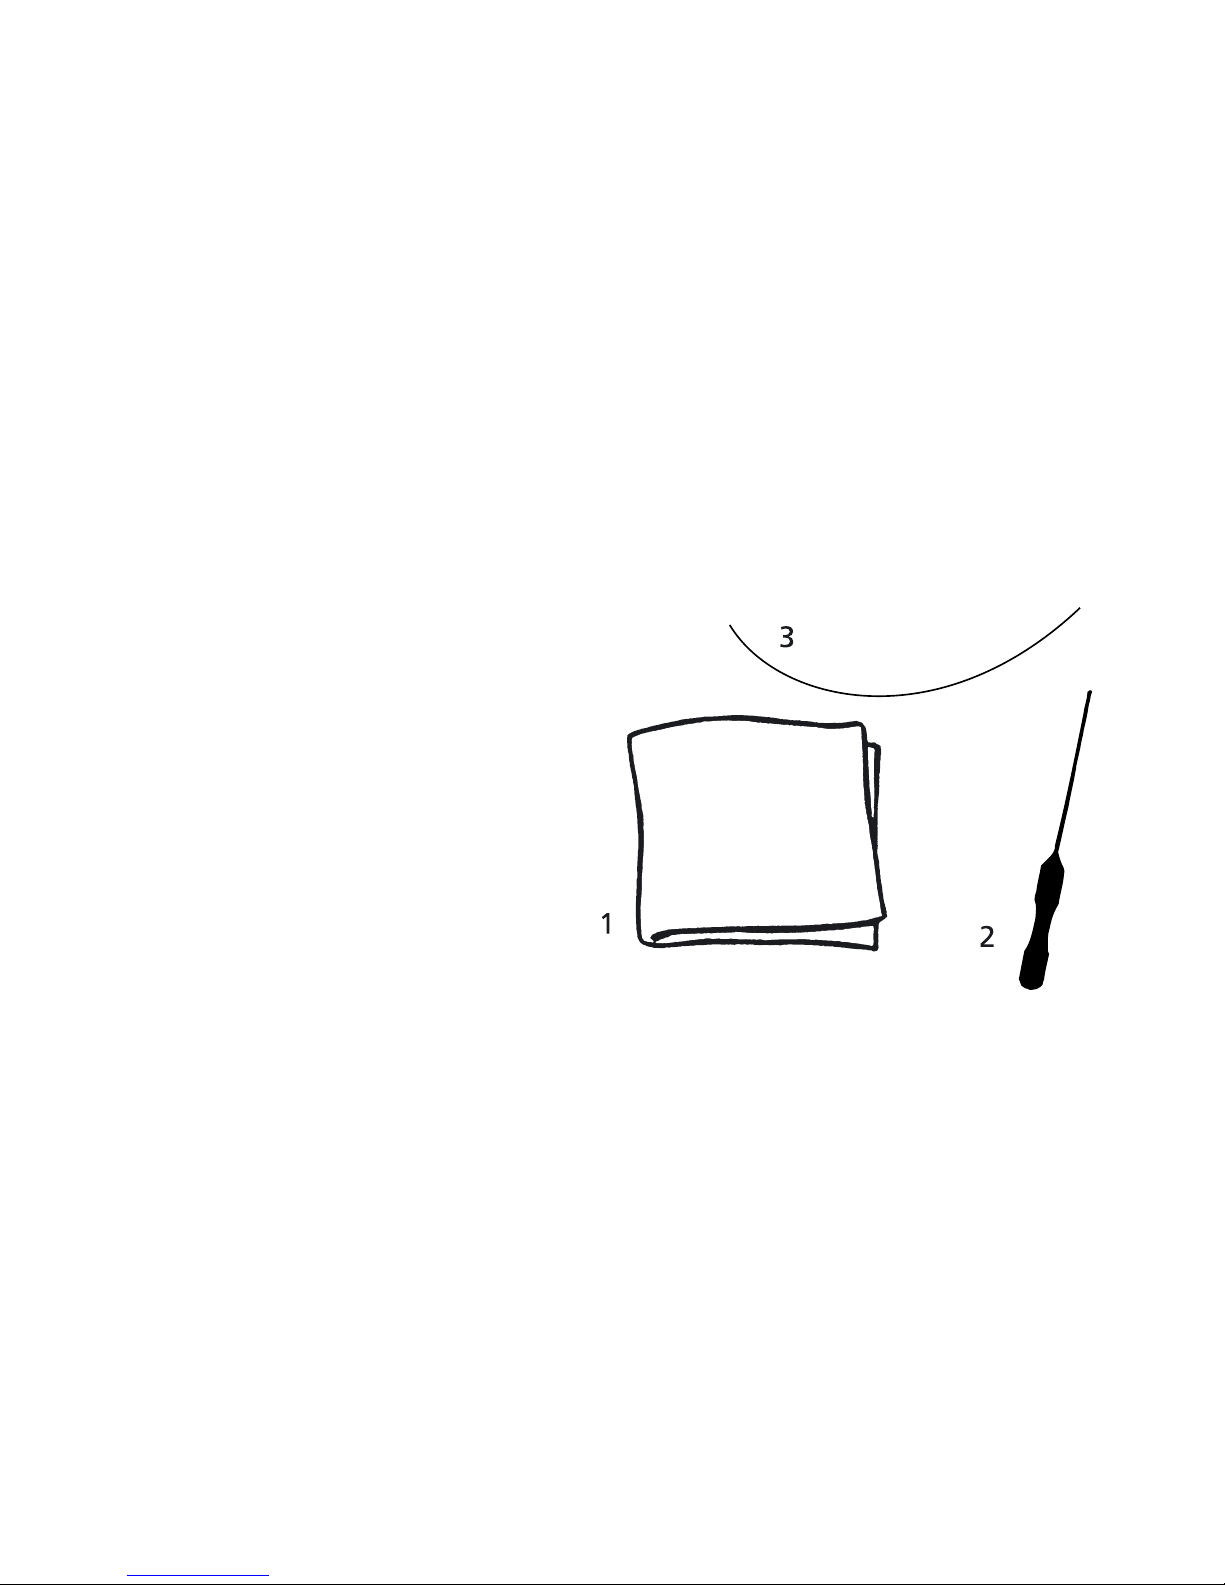
CLEANING
The following cleaning accessories are available for the transmitter and ear-set*. For cleaning the ear-set, see the user manual
“Ear-sets for Widex BTE hearing aids”.
1. Cloth
2. Wax removing tool
3. Cleaning thread
Contact your hearing care professional if you need additional
supplies of cleaning accessories.
* Selection depends on ear-set type.
Page 19
19
The transmitter
Clean the device with the soft
cloth after use.
WARNING
Never use water or cleaning solutions to clean the transmitter, as this
may cause it to malfunction.
Page 20
20
When the transmitter is not in use, keep
it in a warm, dry place with the battery
drawer open, to ventilate the device and
allow it to dry.
Page 21

21
IN CASE OF MALFUNCTION
Problem Possible cause Solution
The transmitter is
not transmitting
It is not turned on Make sure the battery
drawer is completely
closed
The battery does not
work
Insert a new battery
The program button is
not activated
Press the button
The hearing aid on the
better ear is not
turned on
Turn it on
Page 22

22
Problem Possible cause Solution
Intermittent
transmission. The
hearing aid
repeatedly
switches to “Master”
Transmitter battery
level low
Change the battery
Note: This information covers only the transmitter itself. See the
“Ear-sets for Widex BTE hearing aids” user manual for information specific to your ear-set.
If the problems persist, contact your hearing care professional for
assistance.
Page 23

23
CARING FOR YOUR TRANSMITTER
The transmitter is a valuable object and should be treated with
care. Here are some things you can do to prolong the life of your
device:
Page 24

24
CAUTION
• Turn off your transmitter when it is not in use. Remove the battery if
the device will not be used for several days.
• When the transmitter is not in use, keep it in its case in a dry location
out of reach of children and pets.
• Do not expose it to extreme temperatures or high humidity. Make
sure to dry it thoroughly after heavy perspiration such as that which
may occur during intense physical activity, e.g. playing sports.
• Avoid dropping your device – perform cleaning and battery changes
while holding it above a soft surface.
• Do not wear your transmitter while in the shower or swimming, or
when using a hair dryer, perfume, hair and body sprays or gels such
as suntanning lotions or creams.
Page 25

25
WARNINGS
WARNING
The transmitter and batteries can be dangerous if swal lowed or used
improperly. Swallowing or improper use can result in severe injury or
even fatalities. In case of ingestion, contact a physician immediately
and the 24 Hour National Button Battery Ingestion Hotline at (202)
625-3333.
• Keep the transmitter and its parts and batteries out of reach of
children and anyone else who might swallow such items or otherwise
cause injury to themselves. Do not change batteries in front of them
and do not let them see where you keep your battery supply. Discard
used batteries carefully.
• Batteries are very small and can easily be mistaken for pills or the
like. Never put a battery or device in your mouth for any reason as
you may risk swallowing it.
Page 26

26
• Risk of explosion if battery is replaced by an incorrect type or
recharged. Dispose of used batteries according to the instructions.
• The device is made of modern non-allergenic materials. Nonetheless,
in rare cases skin irritation may occur. If you notice skin irritation in or
around your ear or ear canal, contact your hearing care professional.
Page 27

27
WARNING
• Please note that when using the transmitter, you must allow regular
ventilation of the ear. If the ear is not adequately ventilated, there
may be a slightly increased risk of infection or disease in the ear
canal. We therefore recommend that you remove the device and
ear-set from your ear when you go to bed, to allow the ear canal to
be ventilated. If possible, you should also remove your device and
ear-set during the day if there are any periods when you do not need
them. Make sure that you clean and inspect your transmitter and
ear-set as required. If an ear infection or disease occurs, you should
seek medical attention and contact your hearing care professional
for advice on how to disinfect the various device parts. Do not under
any circumstances use alcohol, chlorine or similar substances for this
purpose.
• Regular use of a de-humidifier is recommended to help avoid mal-
function of the device.
Page 28

28
• Do not use the transmitter in mines or other areas with explosive
gases.
• Do not wear your transmitter during radiation, X-rays, MRIs, CT
or other medical treatments and scans. The emissions from these
procedures as well as from other types of radiation, such as that
in a microwave oven, can damage your device. Radiation from, for
example, room surveillance equipment, burglar alarms and cell
phones is weaker and will not damage the device, but may create
audible interference.
Page 29

29
WARNING
Interference with active Implants
• In order to show caution, we advise to follow the guidelines recom-
mended by manufacturers of defibrillators and pacemakers regarding use of cell phones:
• If you wear an active implantable device keep the Wireless Hearing
Aids and Hearing Aid Accessories such as wireless remote controls
or communicators at least 15 cm/6 inches away from the implant.
• If you experience any interference, do not use the hearing aids and
contact the manufacturer of the implant. Please note that interference can also be caused by power lines, electrostatic discharge,
airport metal detectors etc.
• If you have an active brain implant, please contact the manufacturer
of the implant for risk evaluation.
If you have an implantable device, we advise to keep magnets* at
least 15 cm/6 inches away from the implant. (*= can be specified as
Autophone magnet, hearing instrument case, magnet in a tool, etc.)
Page 30

30
CAUTION
• Your transmitter has been tested for interference according to
international standards. Nevertheless, it is possible that unforeseen
interference may occur in the device due to electromagnetic radiation from other products such as alarm systems, room surveillance
equipment and cell phones.
• Although your transmitter has been designed to comply with the
most stringent international electromagnetic compatibility standards, the possibility cannot be excluded that it may cause interference with other equipment, such as medical devices.
• Never try to open or repair the transmitter yourself (To be performed
by authorized personnel only).
Page 31

31
ADVICE
NOTE
• In most cases, using the transmitter infrequently will not permit you
to gain full benefit from it.
• The use of the transmitter is only part of hearing habilitation and
may need to be supplemented by auditory training and instruction
in lipreading.
• The use of the transmitter increases the risk of accumulation of
earwax. Contact your physician/ENT doctor if you suspect that a
plug of earwax has accumulated in your ear. It is a good idea to ask
your physician to clean your ears a couple of times a year.
Page 32

32
REGULATORY INFORMATION
The following Table summarizes the technical details of the WidexLink
technology as it is implemented in the DREAM™ hearing aids.
Hearing aids RC-DEX TM-DEX Bluetooth* -
NOAHlink
Antenna
type
Inductive
antenna
Inductive
antenna
Inductive
antenna
Embedded
ceramic
antenna
Antenna
dimensions
Ø1.8 mm,
L - 4.85 mm
Ø8 mm,
L – 20 mm
Ø6 mm,
L - 8 mm
NA
Modulation FSK FSK FSK FHSS/GFSK,
π/4 DPSK, 8
DPSK
Magnetic
Field
Strength (at
10 m
distance)
-54 dBμA/m -13 dBμA/m -26 dBμA/m NA
Page 33

33
Hearing aids RC-DEX TM-DEX Bluetooth* -
NOAHlink
Output
power
(EIRP**)
29 pW 21 nW 1.2 nW +4dB re.
1mW
Range < 1 m remote
unit to hearing
aid
< 30 cm
between hearing aids or
Hearing aid to
TM-DEX
< 1 m
remote unit
to hearing
aid
< 30 cm
between hearing aid and TMDEX
< 10 m
between PC
and
NOAHlink
Center
frequency
10.6 MHz 10.6 MHz 10.6 MHz 2.4 GHz
Channel Single channel
radio
Single channel radio
Single channel
radio
5 logical
channels
Bandwidth 660 kHz (-15
dB)
660kHz (-15
dB)
660kHz
(-15 dB)
1 MHz
Page 34

34
Hearing aids RC-DEX TM-DEX Bluetooth* -
NOAHlink
Data-rate 212 kbit/sec-
ond (raw
channel
capacity)
212 kbit/
second (raw
channel
capacity)
212 kbit/second
(raw channel
capacity)
2.1 Mbps
Data flow Simplex or
semi-duplex
capability
Simplex
capability
Simplex or
semi-duplex
capability
Time division duplex
(TDD)
Protocol Random
Access – no
collision avoidance
Random
Access – no
collision
avoidance
Random Access
– no collision
avoidance
Packetbased protocol, time
divided;
secure
Serial Port
Profile
(SPP)
* Bluetooth specification v2.0 + EDR published by the Bluetooth Special
Interest Group (SIG).
** EIRP = Equivalent isotropically radiated power.
Bluetooth Identifier: B01837
Reference number of QPN: NOAHlinkV1.2_412832_QPN_E1
Page 35

35
(Benefits) The use of wireless transmission allows convenient and synchronized control of hearing aid functions. The DREAM wireless hearing
aids share input information between the two partner hearing aids. In so
doing, the wearers would experience the following additional user benefits (only when wearing binaural DREAM hearing aids).
Synchronization of volume control settings between hearing aids – The
volume in both hearing aids will change when the VC is adjusted on one
ear.
Synchronization of listening programs between hearing aids – The same
listening program is used in both hearing aids when one is changed by
the user.
Surveillance of partner hearing aid – The hearing aid(s) will signal an alert
(“partner check”) when a hearing aid battery has expired, or that one of
the hearing aids has fallen off. In rare instances, a much stronger wireless
source nearby may activate this alert. This serves as an early warning to
the wearer of such service interruption.
Page 36

36
Coordination of compression – The DREAM hearing aids maintain the
intensity level difference between ears (inter-aural level difference, ILD).
In some situations where speech is presented to one side and noise the
other side, this coordinated action could enhance the relative loudness of
the speech sounds to the noise background and improve speech understanding for some wearers.
More accurate identification of feedback – The DREAM hearing aids distinguish between “true” hearing aid whistling (or feedback) and music sounds
to prevent unnecessary feedback cancellation and preserve natural sound
quality.
Page 37

37
(Contraindications)
• Congenital or traumatic deformity of the ear
• Active drainage from the ear within 90 days
• History of rapid progressive hearing loss within previous 90 days
• Acute or chronic dizziness
• Sudden unilateral hearing loss in previous 90 days
Page 38

38
RADIO TRANSMITTER / CABLES / TRANSDUCERS
The DREAM™ series hearing aid contains a radio transmitter / receiver
with the following
Radiotransmitterparameters
• Frequency (range): 10.6 MHz (10.2 – 11.0 MHz)
• Bandwidth (-15dB): 660 kHz
• Channel: Single channel radio
• Modulation: FSK
• Radiated output power: 29 pW / -75 dBm
• Magnetic field strength: -54 dBμA/m @ 10 m
• Duty Cycle: < 5 % (averaged over 1 hour of operation)
• Simplex or semi duplex capability
The radio receiver in the DREAM™ series hearing aid is using the same frequency and bandwidth as the transmitter.
Page 39

39
Cables and transducers:
No cables and transducers are used neither during normal use of the
DREAM™ series hearing aid nor during programming of the hearing aid.
Page 40

40
QUALITY OF SERVICE FOR WIRELESS TECHNOLOGY IN THE
WIDEXLINK SYSTEM
WidexLink wireless technology enables communication between two
partners of a binaural pair of DREAM hearing aids and with their matched
external devices. The requirements for the quality of service (QoS) vary
among the various components and their intended user scenarios.
For programming, these requirements include a BER (Bit Error Rate) better than 10
-3
, at a bitrate of 212 kbits/s, a semi-duplex transmission with a
required acknowledge, a transmission latency in each direction (2x) and
a receive-to-transmit mode (RX to TX) time. The data are saved in the
hearing aid even when transmission is interrupted.
During daily use, the requirements on audio streaming between hearing
aids include a BER better than 10-3. The communication is simplex with a
bitrate of 212 kbits/s. The additional audio decoding in this mode results
in a longer latency which is less than 10 ms. For remote control commands the QoS requirements include a BER better than 10-2. The lower
BER requirement results from redundant transmissions. Each key press
results in transmissions of 7 data packages of which only one is needed
for a successful communication.
Page 41

41
For inter-ear communication between hearing aids, a BER better than
10
-3
is required. The communication is updated every 50 ms (or 20 Hz).
The hearing aids continue to amplify based on the last saved settings
even when the transmission range is exceeded or when communication
is interfered.
Page 42

42
Wireless Security Measures
Security of the wireless signals is assured through device system design
that includes:
• Individual MAC address for each unit which is checked during each
transmission.
• A built-in pairing table which specifies valid and legitimate pairing
among units
• A proprietary Widex communication protocol which checks the package
numbers during each transmission.
• A Cyclic Redundancy Check (CRC) to check data validity and correct
errors.
Page 43

43
GUIDANCE AND MANUFACTURER’S DECLARATION
Electromagneticemissions
The DREAM™ series hearing aids are intended for use in the electromagnetic environment specified below. The customer or the user of a
DREAM™ series hearing aid should assure that it is used in such an environment.
Emissions test Compliance Electromagnetic environment -
guidance
RF emissions
CISPR 11
Group 1 The DREAM™ hearing aid uses RF
energy only for its internal function.
Therefore, its RF emissions are very
low and are not likely to cause any
interference in nearby electronic
equipment.
Page 44

44
RF emissions
CISPR 11
Class B The DREAM™ hearing aid is suitable
for use in all establishments, including domestic establishments and
those directly connected to the public low-voltage power supply network that supplies buildings used
for domestic purposes.
Harmonic emissions
IEC 61000-3-2
Not
applicable *)
Voltage fluctuations/ flicker
emissions IEC
61000-3-3
Not
applicable *)
*) Battery powered equipment
Page 45

45
Electromagneticimmunity
The DREAM™ series hearing aids are intended for use in the electro-
magnetic environment specified below. The customer or the user of a
DREAM™ series hearing aid should assure that it is used in such an environment.
Immunity
Test
IEC 60601
Test level
Compliance
level
Electromagnetic
environment –
guidance
Electrostatic
discharge
(ESD)
IEC
61000-4-2
± 6 kV contact
± 8 kV air
± 6 kV contact
± 8 kV air
Floors should be
wood, concrete or
ceramic tile. If floors
are covered with synthetic material, the
relative humidity
should be at least
30%.
Page 46

46
Immunity
Test
IEC 60601
Test level
Compliance
level
Electromagnetic
environment –
guidance
Electrical fast
transients/
burst
IEC
61000-4-4
± 2 kV for
power line
supplies
± 1 kV for
input/output
lines
Not
applicable *)
Not
applicable *)
Not
applicable *)
Surge
IEC
61000-4-5
± 1 kV line(s)
to line(s)
± 2 kV line(s)
to earth
Not
applicable *)
Not
applicable *)
Not
applicable *)
Page 47

47
Immunity
Test
IEC 60601
Test level
Compliance
level
Electromagnetic
environment –
guidance
Voltage dips,
short interruptions and
voltage variations on
power supply
input lines
IEC
61000-4-11
<5 % U
T
(>95 % dip
in UT) for
0.5 cycle
40 % UT
(60 % dip
in UT) for 5
cycles
70 % UT
(30 % dip
in UT) for 25
cycles
<5 % UT
(>95 % dip
in UT) for 5 s
Not
applicable *)
Not
applicable *)
Page 48

48
Immunity
Test
IEC 60601
Test level
Compliance
level
Electromagnetic
environment –
guidance
Power frequency
(50/60 Hz)
magnetic
field
IEC
61000-4-8
3 A/m 3 A/m Power frequency
magnetic fields
should be at levels
characteristic of a
typical location in a
typical commercial or
hospital environment
NOTE U
T
is the a.c. mains voltage prior to the application of the test
level.
*) Battery powered equipment
Page 49

49
Electromagneticimmunity–cont
The DREAM™ series hearing aids are intended for use in the electromagnetic environment specified below. The customer or the user of a
DREAM™ series hearing aid should assure that it is used in such an environment.
Page 50

50
Immunity
Test
IEC 60601
Test level
Compliance
level
Electromagnetic
environment – guidance
Portable and mobile RF
communications equipment
should be used no closer to
any part of the DREAM
TM
series hearing aid, including
cables, than the recommended separation distance
calculated from the equation
applicable to the frequency
of the transmitter.
Conducted
RF
IEC
61000-4-6
3 Vrms
150 kHz to
80 MHz
3 Vrms
Recommended separation
distance
d = 1.2
√P
Page 51

51
Radiated RF
IEC
61000-4-3
3 V/m
80 MHz to
2.5 GHz
3 V/m d = 1.2 √P
80 MHz to 800 MHz
d = 2.3 √P
800 MHz to 2.5 GHz
Page 52

52
Immunity
Test
IEC 60601
Test level
Compliance
level
Electromagnetic
environment – guidance
Where P is the maximum
output power rating of the
transmitter in watts (W)
according to the transmitter
manufacturer and d is the
recommended separation
distance in meters (m).
Field strengths from fixed RF
transmitters, as determined
by an electromagnetic site
survey
a
, should be less than
the compliance level in each
frequency range b.
Interference may occur in the
vicinity of equipment marked
with the following symbol:
Page 53

53
NOTE 1 At 80 MHz and 800 MHz, the higher frequency range applies.
NOTE 2 These guidelines may not apply in all situations. Electromagnetic propagation is affected by absorption and reflection from structures, objects and people.
a. Field strengths from fixed transmitters, such as base stations
for radio (cellular/cordless) telephones and land mobile radios, amateur radio, AM and FM radio broadcast and TV broadcast cannot be
predicted theoretically with accuracy. To assess the electromagnetic
environment due to fixed RF transmitters, an electromagnetic site survey should be considered. If the measured field strength in the location
in which the DREAM™ series hearing aid is used exceeds the applicable RF compliance level above, the DREAM™ series hearing aid should
be observed to verify normal operation. If abnormal performance is
observed, additional measures may be necessary, such as re-orienting
or re-locating the DREAM™ series hearing aid.
b. Over the frequency range 150 kHz to 80 MHz, field strengths should
be less than 3 V/m.
Page 54

54
Recommended separation distances
Recommended separation distances between portable and mobile RF
communication equipment and the DREAM™ series hearing aids.
The DREAM™ series hearing aids are intended for use in the electromagnetic environment in which RF disturbances are controlled. The customer
or the user of the DREAM™ series hearing aid can help prevent electromagnetic interference by maintaining a minimum distance between
portable and mobile RF communications equipment (transmitters) and
the DREAM™ hearing aids as recommended below, according to the maximum output power of the communications equipment.
Rated maximum
output power of
transmitter (W)
Separation distance according to frequency of
transmitter (m)
150 kHz to 80
MHz
d = 1.2
√P
80 MHz to
800 MHz
d = 1.2 √P
800 MHz to 2.5
GHz
d = 2.3 √P
0.01 0.12 0.12 0.23
0.1 0.38 0.38 0.73
1 1.2 1.2 2.3
Page 55

55
10 3.8 3.8 7.3
100 12 12 23
For transmitters rated at a maximum output power not listed above, the
recommended separation distance d in meters (m) can be estimated using
the equation applicable to the frequency of the transmitter, where P is the
maximum output power rating of the transmitter in watts (W) according
to the transmitter manufacturer.
NOTE 1 At 80 MHz and 800 MHz, the higher frequency range applies.
NOTE 2 These guidelines may not apply in all situations. Electromagnetic
propagation is affected by absorption and reflection from structures,
objects and people.
This DREAM™ hearing aid may be interfered with by other equipment
even if that other equipment complies with CISPR emission requirements.
Page 56

56
(EMI/EMC Compliance).
The DREAM™ hearing aid complies with the following EMC/EMI standards:
Standard Test type Note
47 CFR Part 15,
subpart C
RF emissions USA Federal Communications
Commission (FCC) requirements
for intentional radiators.
EN 300 330-2
V1.5.1
RF emissions
incl. Spurious
emission
EMC and radio spectrum matters
for Short Range Devices in the frequency range 9 kHz – 25 MHz
IEC 60601-12:2007
*adapted protocol
EMC emission
Immunity, RF
and ESD
Medical electrical equipment.
General requirements for basic
safety and essential performance.
Electromagnetic compatibility.
EN 301 489-3
V1.4.1
Immunity, RF
and ESD
Standard for Low Power Transmitters in the frequency range 9 kHz –
40 GHz
Page 57

57
IEC 6011813:2011
Immunity
RF Near Field
immunity test
International Product std. for hearing aids to ensure adequate immunity to radio interference from cell
telephones.
ANSI C63.192007
Immunity
RF Near Field
immunity test
American National Standard
Methods of measurement of
Compatibility between wireless
Communication Devices and
Hearing Aids
* The device was tested in only one orientation that represents the longest
length (or worst case scenario). This is acceptable because of the relative
small size of the device compared to the wavelength of the RF used in the
test.
Page 58

58
IMPORTANT NOTICE FOR PROSPECTIVE HEARING AID USERS
Good health practice requires that a person with a hearing loss have
a medical evaluation by a licensed physician (preferably a physician
who specializes in diseases of the ear) before purchasing a hearing
aid. Licensed physicians who specialize in diseases of the ear are often
referred to as otolaryngologists, otologists, or otorhinolaryngologists.
The purpose of medical evaluation is to assure that all medically treatable conditions that may affect hearing are identified and treated before
the hearing aid is purchased.
Following the medical evaluation, the physician will give you a written
statement that states that your hearing loss has been medically evaluated and that you may be considered a candidate for a hearing aid. The
physician will refer you to an audiologist or a hearing aid dispenser, as
appropriate, for a hearing aid evaluation.
The audiologist or hearing aid dispenser will conduct a hearing aid evaluation to assess your ability to hear with and without a hearing aid. The
hearing aid evaluation will enable the audiologist or dispenser to select
and fit a hearing aid to your individual needs.
Page 59

59
If you have reservations about your ability to adapt to amplification, you
should inquire about the availability of a trial-rental or purchase-option
program. Many hearing aid dispensers now offer programs that permit
you to wear a hearing aid for a period of time for a nominal fee after
which you may decide if you want to purchase the hearing aid.
Federal law restricts the sale of hearing aids to those individuals who
have obtained a medical evaluation from a licensed physician. Federal
law permits a fully informed adult to sign a waiver statement declining
the medical evaluation for religious or personal beliefs that preclude consultation with a physician. The exercise of such a waiver is not in your best
health interest and its use is strongly discouraged.
Children with hearing loss
In addition to seeing a physician for a medical evaluation, a child with a hearing loss should be directed to an audiologist for evaluation and rehabilitation since hearing loss may cause problems in language development and
the educational and social growth of a child. An audiologist is qualified by
training and experience to assist in the evaluation and rehabilitation of a child
with a hearing loss.
Page 60

60
FCC ID: TTY-DFA
IC: 5676B-DFA
Federal Communications Commission Statement
This device complies with part 15 of the FCC Rules. Operation is subject to
the following two conditions:
(1) This device may not cause harmful interference, and
(2) this device must accept any interference received, including interfer-
ence that may cause undesired operation.
NOTE:
This equipment has been tested and found to comply with the limits for a
Class B digital device, pursuant to part 15 of the FCC Rules. These limits are
designed to provide reasonable protection against harmful interference in
a residential installation. This equipment generates, uses and can radiate
radio frequency energy and, if not installed and used in accordance with
the instructions, may cause harmful interference to radio communications.
However, there is no guarantee that interference will not occur in a par-
Page 61

61
ticular installation. If this equipment does cause harmful interference to
radio or television reception, which can be determined by turning the
equipment off and on, the user is encouraged to try to correct the interference by one or more of the following measures:
— Reorient or relocate the receiving antenna.
— Increase the separation between the equipment and receiver.
— Connect the equipment into an outlet on a circuit different from that to
which the receiver is connected.
— Consult the dealer or an experienced radio/TV technician for help.
NOTE:
This equipment complies with FCC radiation exposure limits set forth for
an uncontrolled environment. This transmitter must not be co-located or
operating in conjunction with any other antenna or transmitter.
Changes or modifications to the equipment not expressly approved by
Widex could void the user’s authority to operate the equipment.
Page 62

62
Industry Canada Statement / Déclaration d’industrie
Canada
Under Industry Canada regulations, this radio transmitter may only operate using an antenna of a type and maximum (or lesser) gain approved for
the transmitter by Industry Canada.
To reduce potential radio interference to other users, the antenna type and
its gain should be so chosen that the equivalent isotropically radiated
power (e.i.r.p.) is not more than that necessary for successful communication.
This device complies with Industry Canada licence-exempt RSS
standard(s). Operation is subject to the following two conditions:
(1) this device may not cause interference, and
(2) this device must accept any interference, including interference that
may cause undesired operation of the device.
Conformément à la réglementation d’Industrie Canada, le présent émetteur radio peut fonctionner avec une antenne d’un type et d’un gain maximal (ou inférieur) approuvé pour l’émetteur par Industrie Canada.
Page 63

63
Dans le but de réduire les risques de brouillage radioélectrique à
l’intention des autres utilisateurs, il faut choisir le type d’antenne et son
gain de sorte que la puissance isotrope rayonnée équivalente (p.i.r.e.) ne
dépasse pas l’intensité nécessaire à l’établissement d’une communication
satisfaisante.
Le présent appareil est conforme aux CNR d’Industrie Canada applicables
aux appareils radio exempts de licence. L’exploitation est autorisée aux
deux conditions suivantes :
(1) l’appareil ne doit pas produire de brouillage, et
(2) l’utilisateur de l’appareil doit accepter tout brouillage radioélectrique
subi, même si le brouillage est susceptible d’en compromettre le fonctionnement.
Page 64

64
Hereby, Widex A/S declares that this CROS-FA is in compliance
with the essential requirements and other relevant provisions of
Directive 1999/5/EC.
A copy of the Declaration of Conformity can be found at:
http://www.widex.com/doc
Page 65

65
Electrical and electronic equipment (EEE) contains
materials, components and substances that can be
hazardous and present a risk to human health and
the environment when waste electrical and electronic equipment (WEEE) is not handled correctly.
Do not dispose of hearing aids, hearing aid accessories and batteries with ordinary household waste.
Hearing aids, batteries and hearing aid accessories should be
disposed of at sites intended for waste electrical and electronic
equipment, or given to your hearing care professional for safe
disposal. Proper disposal helps to protect human health and the
environment.
Page 66

66
SYMBOLS
Symbols commonly used by Widex A/S in medical device labelling
(labels/IFU/etc.)
Symbol Title/Description
Manufacturer
The product is produced by the manufacturer whose
name and address are stated next to the symbol. If appropriate, the date of manufacture may also be stated.
Date of manufacture
The date when the product was manufactured.
Use-by date
The date after which the product is not to be used.
Batch code
The product’s batch code (lot or batch identification).
Page 67

67
Symbol Title/Description
Catalog number
The product’s catalog (item) number.
Serial number
The product’s serial number.*
Keep away from sunlight
The product must be protected from light sources and/or
The product must be kept away from heat
Keep dry
The product must be protected from moisture and/or
The product must be kept away from rain
Lower limit of temperature
The lowest temperature to which the product can be
safely exposed.
Page 68

68
Symbol Title/Description
Upper limit of temperature
The highest temperature to which the product can be
safely exposed.
Temperature limits
The highest and lowest temperatures to which the product can be safely exposed.
Consult instructions for use
The user instructions contain important cautionary information (warnings/precautions) and must be read before
using the product.
Caution/Warning
Text marked with a caution/warning symbol must be read
before using the product.
Page 69

69
Symbol Title/Description
WEEE mark
“Not for general waste”
When the product is to be discarded, it must be sent to a
designated collection point for recycling and recovery.
CE mark
The product is in conformity with the requirements set
out in European CE marking directives.
Alert
The product is identified by R&TTE Directive 1999/5/EC as
an equipment Class 2 product with some restrictions on
use in some CE member states.
C-Tick mark
The product complies with EMC and radio spectrum regulatory requirements for products supplied to the
Australian or New Zealand market.
Page 70

70
Symbol Title/Description
Interference
Electromagnetic interference may occur in the vicinity of
the product.
*The six- or seven-digit number on the product is the serial number. Serial numbers may not always be preceded by
Page 71

71
Page 72

Manual no.:
9 514 0260 041 #03
CIB313/0514
WIDEX A/S Nymoellevej 6, DK-3540 Lynge, Denmark
www.widex.com
É[5qr0w6|;;fa;k]
 Loading...