

Page 1
Compass quick guide
ChildFit
When working with very young childr e n, it is not always possible to obtain all of the information
necessary for an accura te hearing aid fitting. To that end, W idex has developed the ChildFit procedur e
which differs f rom our usual fitting procedure. Child F it g ives you a very p r ecise estimated first f itting
based on only a fe w item s of information about the child. And in addition to our new ChildFit procedure,
the Widex Baby hearin g a id has been especially designed for inf a nts and young children.
Widex Baby
Follow the procedu r e below to perform a binaural fitting of W id ex Baby hearing aid s . For details re:
choosing the correct earwire size and assembly, see Compass video.
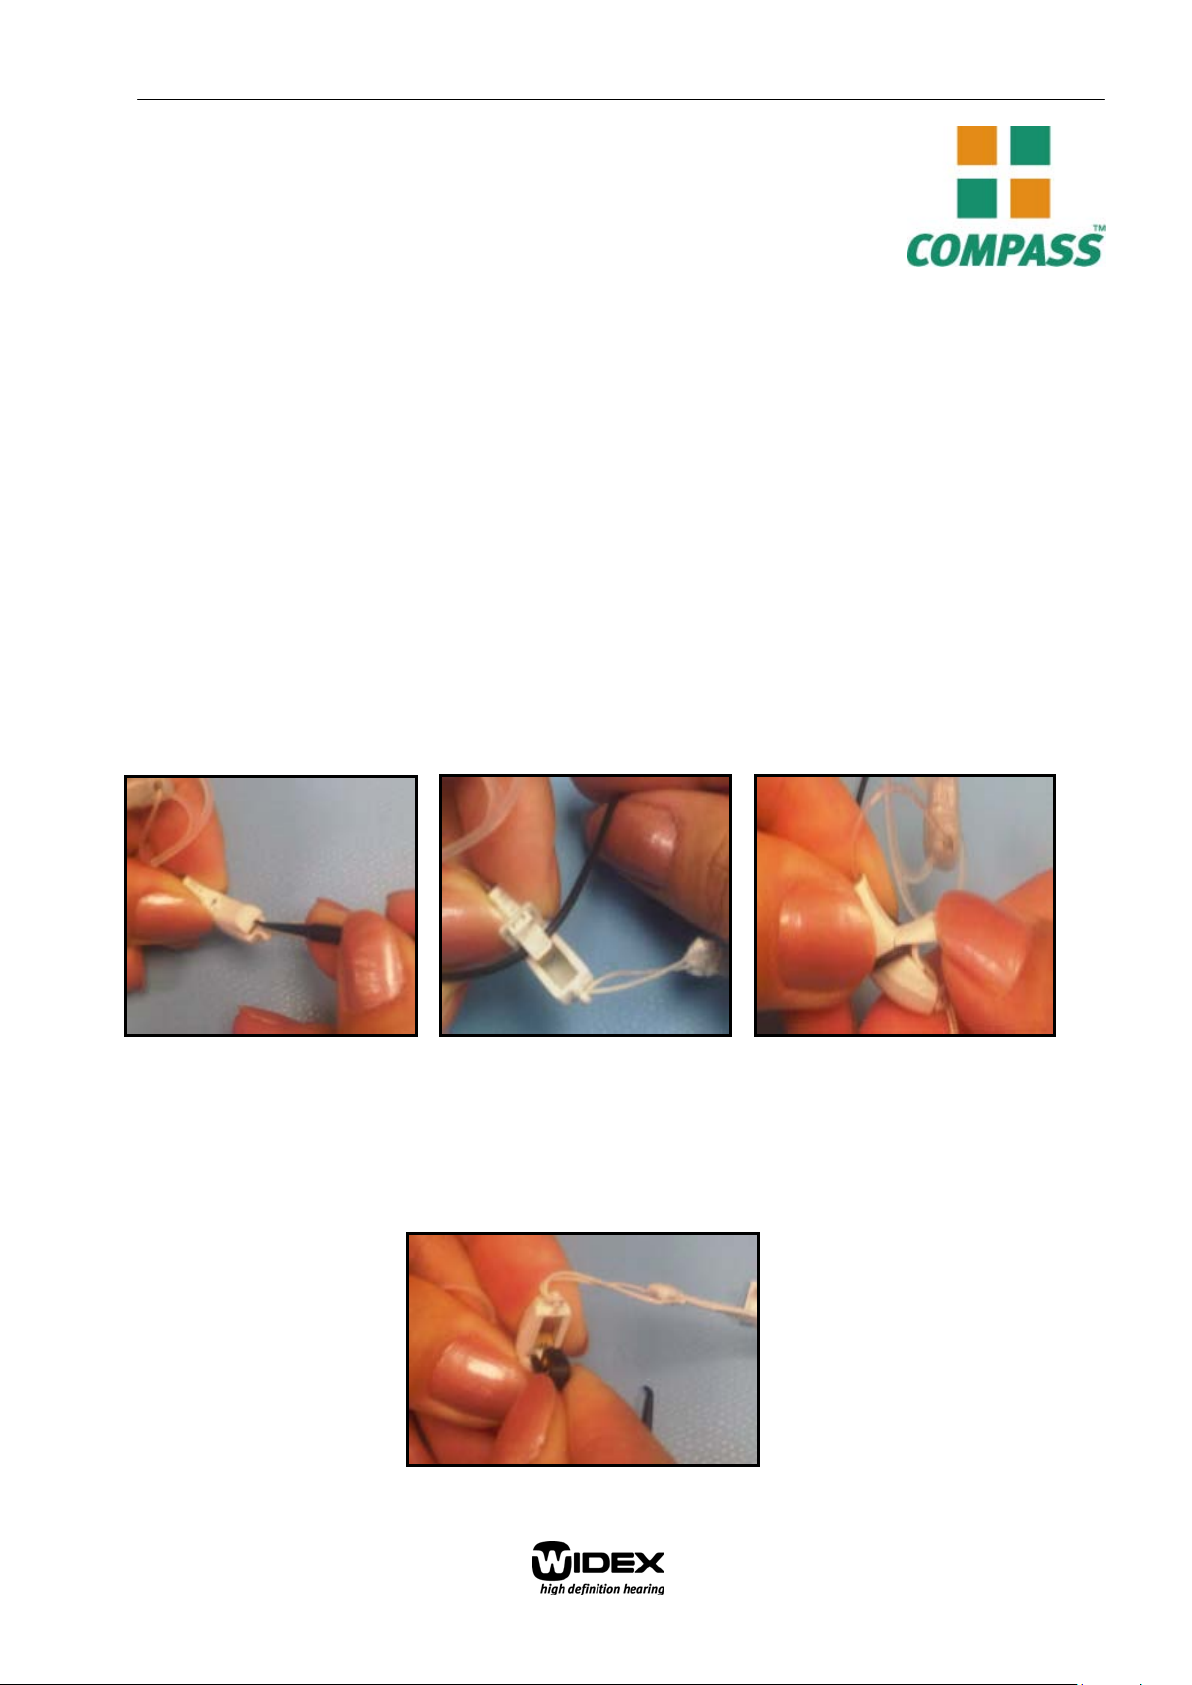
Step 1: Removal of the Baby hea r ing aid battery doors is required in order to attach the programming
cables. Please see instructions and pictures 1a, 1b, 1c , and 1d below:
I. Using tool open battery door (1a) and gently position the programming cable wire at the edge of
the door (1b)
II. Proceed to close the door, holding the cable firmly in place as shown below (1c)
1a
1b 1c
III. The door should gently pop off. Please do not attempt to remove door in any other manner to
avoid breakage.
IV. The programming adaptor is connected at the hinge area in the same manner as replacing a
battery door (1d).
1d
22/04/2010
Page 2
Compass quick guide
Before the fitting session
Audiometric information mus t be obtained before you f it hearing aids. For young children, this may have
been done by means of auditory brainstem au diometry (ABR), auditory steady state responses (ASSR),
or it may have been possible to meas ure a few behavioral thre s holds for the audiogram.
You can prepare for the fitting session in order to make it as short and easy for the child as possible.
Before your client arrives, you can do the following:
1. Select your client in your database, and open Compass.
2. Connect the hearing aids.
3. Select Detect connected hea r ing aid(s). Compass finds the hearing aids and displays the Online
communication window.
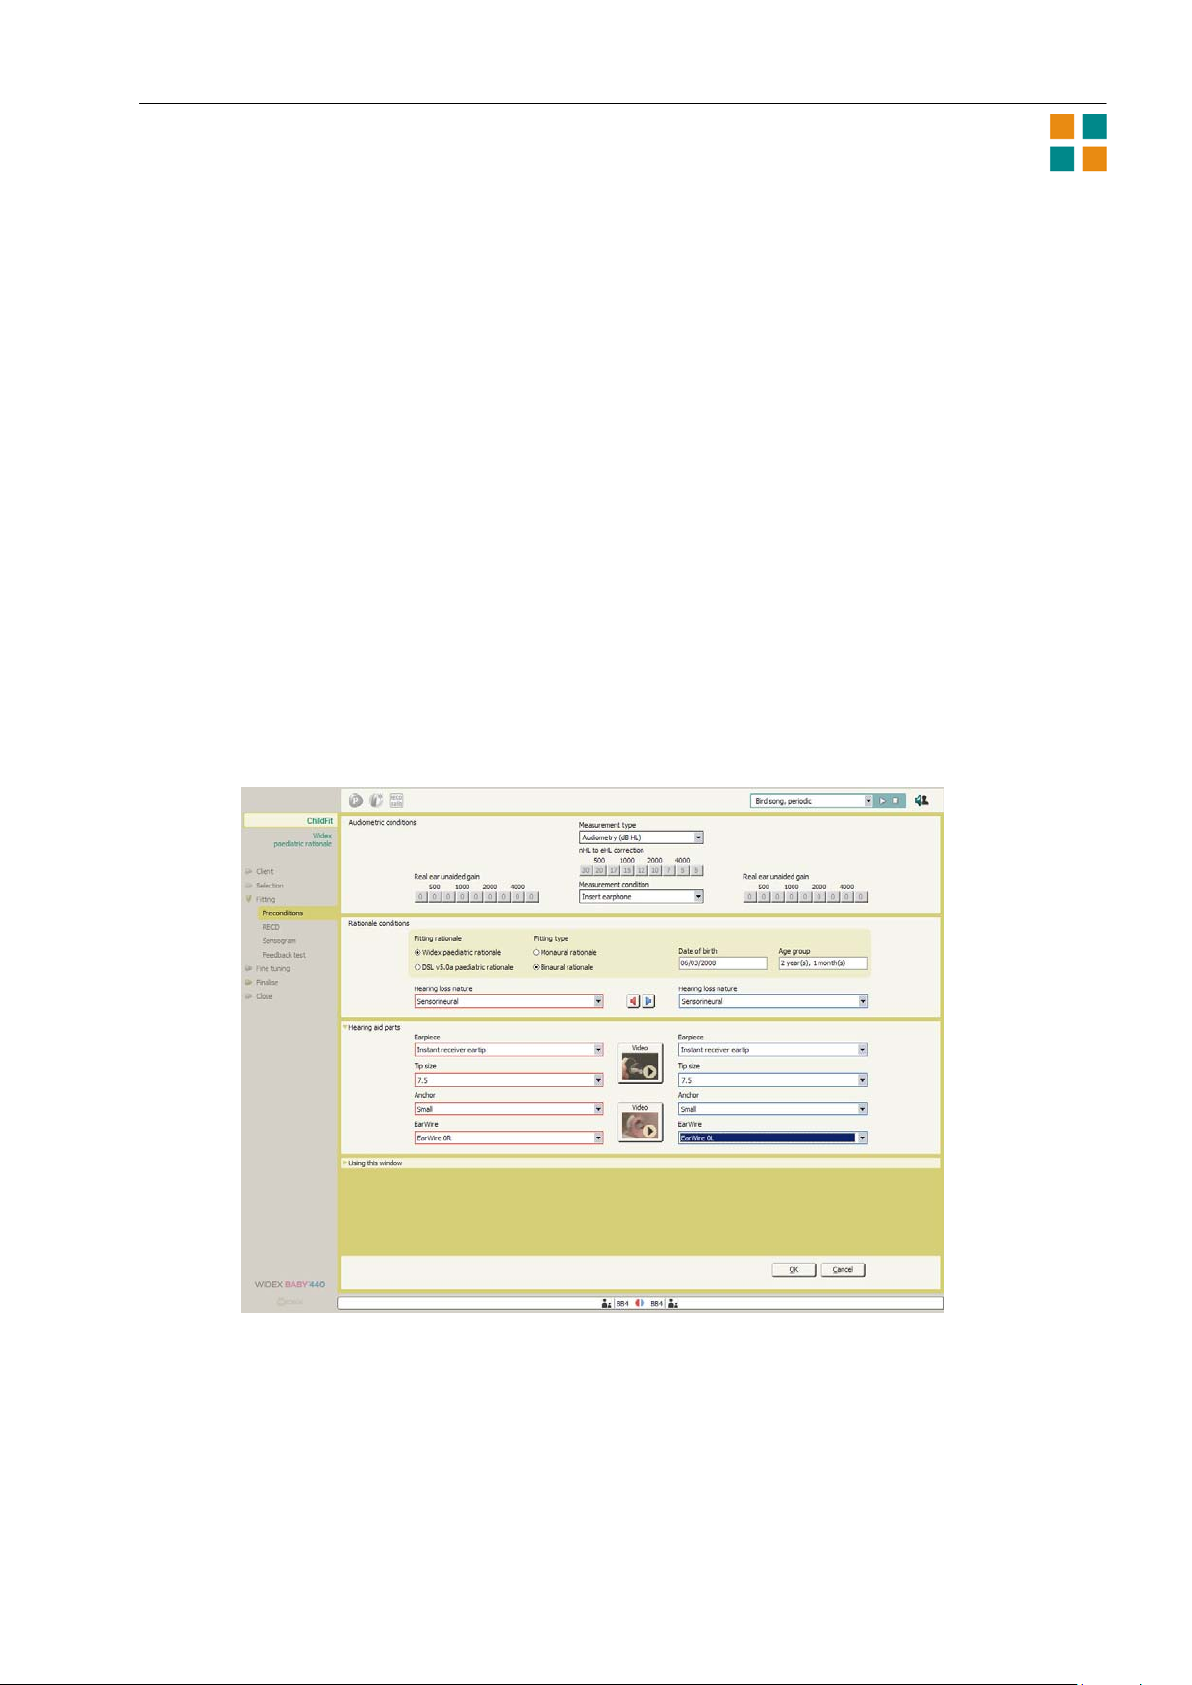
4. Select OK to open the Preconditions window, where you can change any of the conditions used in
connection with the fitting. For example, you may wish to change the information about the
conditions used for establishing the audiogra m in the database, or you may choose to change
the default Widex Pediatric Rationale to the Desired S ensation Level approach (DSLv5).
Page 2
Page 3
Compass quick guide
5. When you have finished defin in g the preconditions, select OK. Compass uses the age,
audiometric, an d pr e c ondition informa tion to estimate the fitting data and display it in the Fitting
window. The sound is turned on in the hearing aids at this poin t.
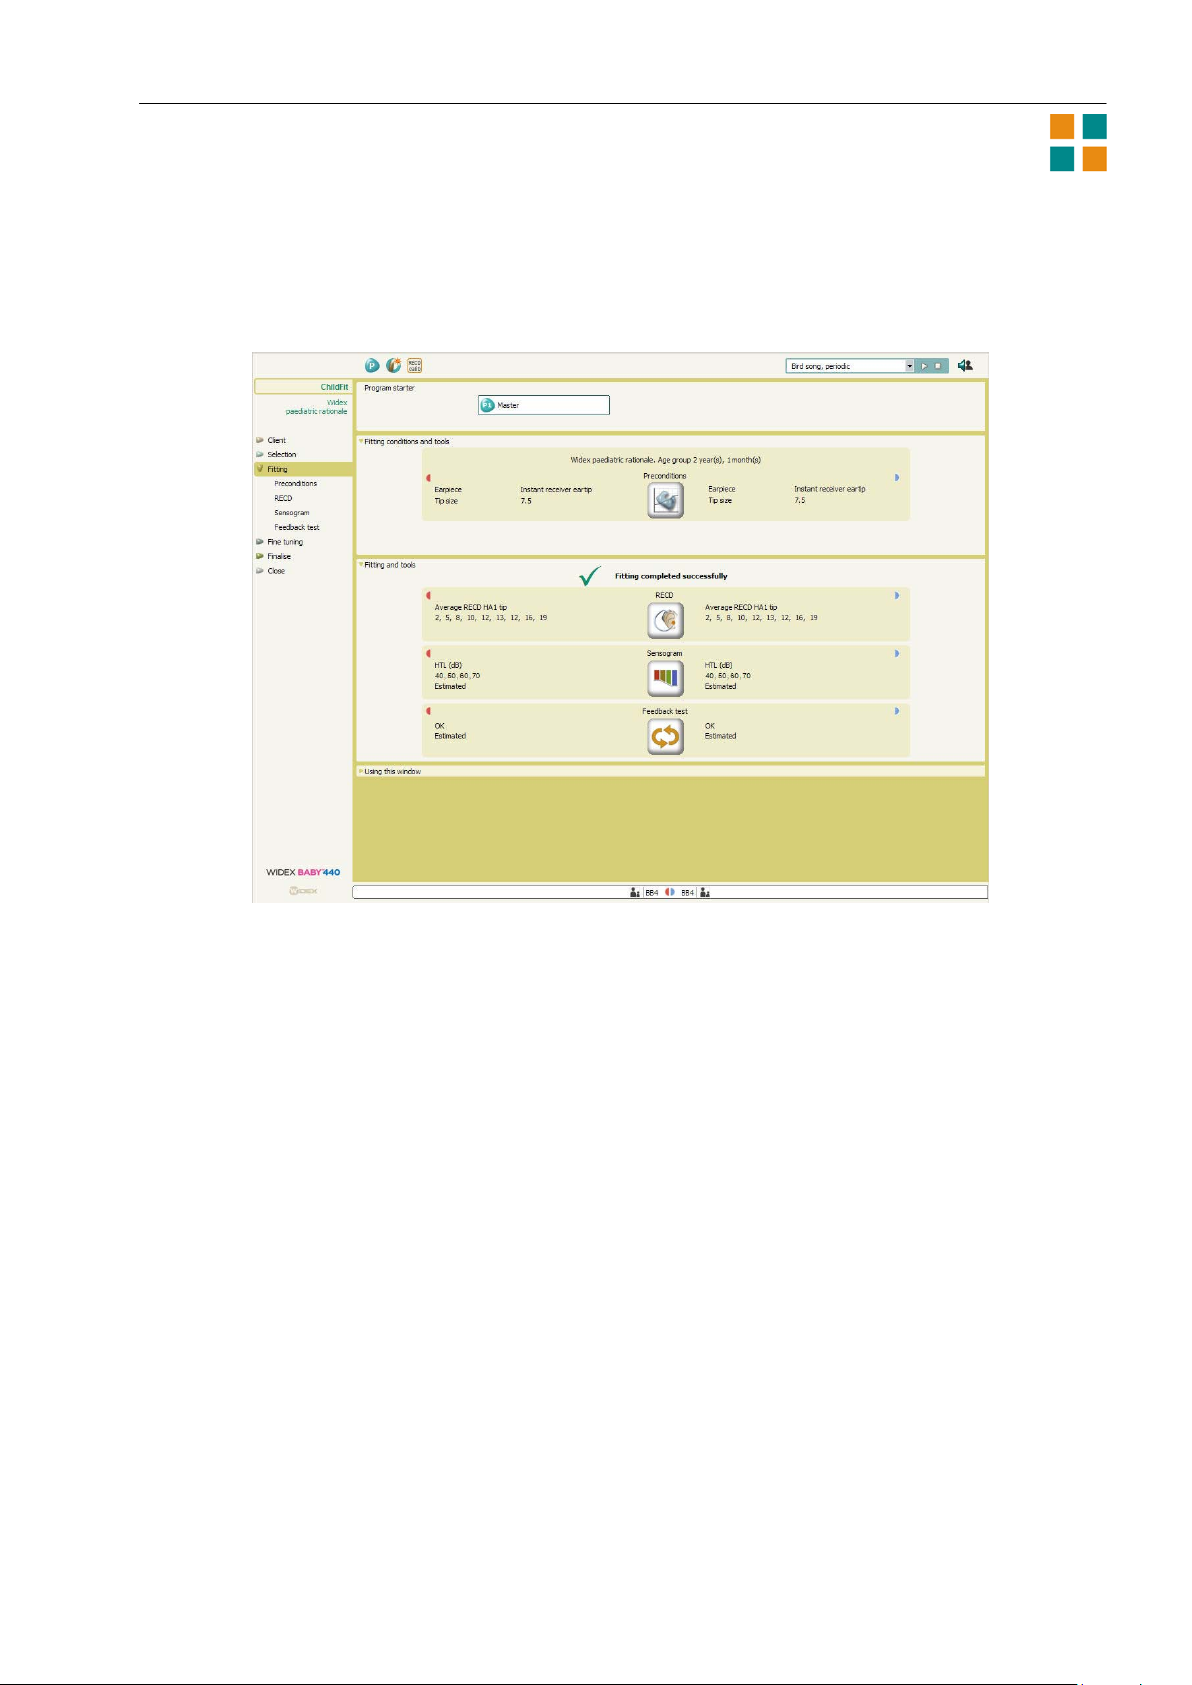
6. If you wish to obtain an in-situ RECD measurement, select th e RECD button to open the RECD
wizard. Then select Widex in-situ RECD to continue. When you have connected the hearing aid
parts and positioned the RECD probe, you are ready to calibrate and obtain the RECD
measurement. The calibra tion m a y be per formed as part of the hearing a id pre-fitting. From the
Fitting window, you can also open the Sensogram window or the Feedback test window , so that
you can obtain this informa tion.
The ChildFit procedure
When your client arrives f or the fitting session, do the following:
1. Explain the hearing aid fitting procedure to the parent ( or older c hild).
2. Make sure that Compass is open, and that the hearing aids are connected. If you wish to mute
the hearing aids, you can do this by means of the mute icons in the toolbar.
3. Place the hearin g a ids on the child’s ears, and make sure that the correct size of eartip or mold is
used.
4. If it is possible, you should perform an in-situ RECD measurement and a feedback test.
Depending on the child’s age, it may also be possi ble to obtain a Sen s og r a m.
Page 3
Page 4

Compass quick guide
2a 2b 2c
5. To perform a Widex in-situ RECD measurement, attach a Widex probe tube to the end of the
white RECD “grip”. Remove the hearing aid microphone cover as shown in 2a above. Position
the RECD microphone attachment a s shown, 2b. It should snap in place when positioned
properly. Insert the end of the probe tube into th e eartip (2b), and place on desktop in a quiet
environment for calibration (2c).
Remove the probe from the eartip and position it in the ch ild’s ear canal after otoscopy. After
performing a Widex in-situ RE CD measurement, be sure to remove the probe from the child’s ear
immediately af ter per f or m ing the measurement. R emove th e R ECD grip and reposition the
microphone cover.
If you are able to perform VRA or play au d iom etr y, proceed to the S ensogram window. After the
Sensogram, a feedback test m a y be per formed if the fitting room is quiet an d if the child is able
to remain quiet for th e test signals.
6. Confirm hearing aid fitting goals have been met by means of real ear or simulated real ear
measurements and/or behavioral testing if possib le. See [Fine-tuning] section for details re:
verification s et-up.
Depending on your ob s e r vations, you ma y decide not to make fine tuning adjustments during the first
visit, but in later sessions you may want to fine tune the hearing aids.
Questionnaires
The ChildFit procedure has two que s tionnaires that ar e very helpful in deter m ining how far th e ch ild is in
its development an d how well the hearing aids work for the c hild. They are accessible from the Client or
the Finalize sections of Compass.
Parent question na ire
This questionnaire is a list of p r a ctical questions about the hearing aid, how much the child uses it, and
how well it works for the child. The top of the Parent questionnaire window contain s information about
the child, and an option to print it.
The list of question s is below the basic information. Selec t the appropriate a nswer(s) for each question.
Some questions are followed by a lis t of radio buttons, and for these you can only enter one answer.
Other questions let you list more th a n one answer. These questions are followed by a number of check
boxes.
Hearing checklist
The second questionnaire is the Hearing checklist that can help you determin e whether the child is
developing as expected.
At the top of the Hearing checklist window you can see the child’s age and various data abou t the fitting
and the checklist. You can also print it, either as an empty list or w ith the data you have entered.
Page 4
Page 5

Compass quick guide
The checklist is s p lit up into six levels, each level cor res ponding to a certain age. Y ou can move between
the levels by means of the drop-down list a bove the questions.
Move to the relevan t level, and answer as many of the questions in the checklist as you can. For each
item, select the appropria te answer. You can choose between the answers Never, Sometimes and
Always. You can use the date field to indicate the date of the observation.
Fine tuning under ChildFit
When you have finished the basic fitting under ChildFit, you can use the fine tuning options to assure
that you have achieved the optimum hearing aid performanc e.
In many fine tuning windows selections are binaural, bu t you can turn off Binaural adjustment to
make changes to the right and lef t h ea r ing aids individually. When th e red a nd the blue parts of
the Binaural adjustment symbol are connected by a black ring, Binaural adjustment is turned on,
and when the two parts are separate, the feature is turned off.
Graphics
The standard view in Fine tuning is the SoundTrack er aided view. This shows the hearin g a id
performance for the current sound environment. You can use this view to check whether the hearing
aids are providin g the child with sufficient gain.
Besides the graph ic s views available f or PrecisionFit, you have one modified a nd two extra graphics
views under Ch ildFit:
Output vs. freque nc y . This view shows the long-term output and MPO responses as a function
of frequency. You can choose the input levels you want to d is play, and you c an choose to display
the targets.
Aided gain vs. fre quency. This view shows the long-term gain (REAG or coupler gain) as a
function of frequency. You can ch oos e the input levels you want to display, a nd you can choose
between the measurement s In-situ, 711 and 2cc.
Simulated aided thr esholds. The thresholds are calculated on the basis of the Sensogram
thresholds, adding the hearing aid gain and including all individua l fitting data. The simulated
aided thresholds can be tru s ted to predict the actual aided performance with the hearin g a ids
placed in the child’s ears.
You can find more information about the graphics vie ws in the Compass u ser’s manual.
Program starter
If you have defined more than one listening program in the hea r in g a ids , use the Program starter panel
in the upper part of the Fine tuning window to shift between th e dif ferent programs.
Fine tuning parameters
You can change the settings of the indiv idual listening progr ams and featur es using the Fine tuning
parameters. This section of Compass lets you adjust the in d ividual parameter s in the hearin g aids.
In the Gain settings panel you c an adjust the inser tion gain parameter s individually, or you can adjust
loud and soft sounds genera lly by means of the Loud sounds and Soft sounds settings.
Note: If you have selected the DSL fitting rationale for your fitting, available IG parameters are IG soft
and IG loud only, i.e., IG normal is not av a ilable. Therefore, for DSL this feature is n ot displayed. Please
refer to the solution guide for adv ice on how to perform fine tuning with the DSL fitting rationale.
The Feature settings panel contains the settings for Microph on e m odes , Speech and noise modes and
Feedback cancelling modes. Use the drop-down lists if you need to c hange any of the settings.
Page 5
Page 6

Compass quick guide
From the Fine tuning section of Compass you also have access to the Sound Diar y and the
Documentation windows. You can find information about these window s in the Compass user ’s manual.
ISTS test mode
The International Speech Test Signal (ISTS) is a s tan dard speech signal c onsisting of small s eg m ents of
female speech in different languages. This s ignal corresponds to a general speec h signal and can be used
for standardized measurements.
The graphics part of the ISTS test mode window shows the Output vs. frequency curves. You can choose
to see Insertion gain vs. frequency or Aided ga in vs. frequency curves instead. In the area between the
two graphics displays (left and r ight), you can def ine what to show in the gr aphics. The option s available
depend on the type of graphics y ou ha ve chosen.
At the bottom of the window you can see the present fine tu ning settings in th e hearing aids. All gain
settings and feature settin gs a r e displa yed, but you cannot ch a nge any settings from the ISTS test mode
window.
When you select the Activate test mode button, the test mode starts, using the graphic s s e ttings you
have defined. While the test mode is running, the Locator is set in the omni position, and other fea ture
settings remain as defin ed in the hearing aid. When you have finished using the test mode, selec t OK in
the Test mode active dialog box displayed on the screen.
The pictures below illustrate the test set-up in the Audios c an Verifit
TM
system. Use the disk-shaped
adapter and putty to attach the Baby hea r ing aid eartip to the HA-1 (ITE) coupler (3a-3b). If you are
using a custom earmold, the disk is not necessary. Position the hearing a id front microphone facing the
Verifit left loudspeaker (3c). This is particu larly important if you are not engaging the test mode.
Page 6
Page 7

Compass quick guide
3a 3b 3c
ChildFit tools
Besides the questionnaires you have access to a number of other tools that can help you make your
fitting as precise as p os sible. The tools are available fr om the toptool bar in the Fine tuning window.
Program manager
You can open the Program manager from Fitting or Fine tuning. Use this tool to define other
programs in the hearing aids besides the Master program.
ClearBand tool
This tool lets you adjust the high-frequency gain by means of tw o pa ra m eter s : One adjusts the
gain in the frequency range 5000-7000 Hz, and the other adjus ts th e ga in in the frequency
range 7000-10000 Hz.
MPO manager
The Maximum Power Output tool shows the prescribed MPO values in SPL and HL for the four
basic bands in the hearin g aid. Y ou c a n, however, change and lock th e M PO setting by means of
this tool.
Solution guide
You can open the Solution guide from the Fine tuning window. Use this tool if there is a specific
problem with the hearing aids. Compass can give you a number of possible sol utions to a
problem and change the relevant settings for you before you close the tool.
Compression view
Use the Compression v ie w tool to see compres sion threshold a nd compression r a tio d ata for the
low-level and the high-level compression s e gm e nts. The window shows the data for the four
basic frequencies in the hearing aid.
Recalculate
You can open the Recalculate tool from the Fine tuning window. Use this tool to set th e fine
tuning settings to the default values.
Page 7
Page 8

Compass quick guide
Finalize
Before you end a fitting, use the Finalize section to make sure that everything is set cor r e c tly and that
the parents have the nec essar y knowledge about their child’s hearing aids. The Finalize window shows
information abou t the fitting an d the adjustments y ou have made. This gives you an overview of the
hearing aid settings.
HA configuration
Use HA configuration to define the s e ttings of the visua l indicator (the light-emitting diode) on the
hearing aid. This indicator can flash whenever the hearing aid is on, or when a specific program is active
in the hearing aid.
RC matching
The remote control m ust be matched with the hearing aids before it can be used. The matching
procedure is a simple wizard in Comp a s s. Follow
the directions on the screen .
The Instruction tools are on-screen tools that let
you teach the parents how to use the hearin g aid
and the remote contr ol and how to clean and
maintain the hea ring aid.
Use the HA handling and the RC handling panels to
demonstrate how the hea ring aid and the remote
control work. I n the Toptool bar you find a 3D
tutor. Click an ic on at the top of the 3D tutor
window to activate the correspondin g pr ocedure.
When you have run the full procedure, numbered
buttons are displayed on your s c r een. Use these
buttons to play the in d ividual parts of the
procedure. You can repeat any difficult par ts of the
procedures as many times as necessary.
Page 8
 Loading...