


NR430BT
User’s manual

Copyright note
www.navroad.com
The product and the information contained herein may be
changed at an
This manual or any parts of it may not be reproduced,
tr
ansmitted in any form either electronically or
mechanically(including photo copying) without the express
written consent of NavRoad.
© Copyright 2006, NavRoad
All rights reserved
y time without prior notification.
Table of Contents
1. Safety Information
1.1 Caution
1.2 Normal Care
2. Product Information
2.1 Package Contents
2.2 Installing to the Vehicle
3. Basic Operations
3.1 Getting Start
3.2 Main Screen
3.3 Phone
3.4 Music
3.5 Photos
3.6 Movies
3.7 Settings
4. Service & Support
4.1 Technical Support
4.2 Registration
4.3 Maintenance & Troubleshooting Info.
4.4 Warranty Statement
5. Fact Sheet
5.1 Product Specification
2

Chapter 1
Safety Information
1.1 Caution…
Before starting installing or operating your navigation system,
Please be familiar with this Manual Completely for your safety.
Your unsuitable installation or operation of this device may cause
injury or death.
Safety Precautions
1. Use the car charger included with the package, using power
adapters other than the one provided will result in malfunction
and could prove dangerous.
2. Do not use the car charger in a wet environment. When
hands and fee
4. While using the car charger ensure that
ventilated. Do not let paper or other material cover the power
adaptor, as this will interfere with cooling. Do not use the power
t are wet, do not touch the car charger.
the area is well
adaptor whilst it is in a bag.
5. Do not attempt to repair the device. If device is damaged or is
in a wet environment, replace the device immediately.
6. About the battery
- Use only the original factory approved charger.
- A Lithium battery is built in to the device. To prevent fire or
s
kin burns, do not disassemble, pierce, impact, or expose the
battery to fire. The battery will crack, explode, or release
dangerous chemicals if placed in a fire.
7. Important instructions
- Note : Replacing with an incorrect battery may result in an
explosion
When disposing of the battery, follow the instructions. The
repl
- Regulations must be observed when recy
batteries.
- The battery should only be used in this device.
.
acement battery must be original factory approved.
cling or disposing of
1.2 Normal Care
The NavRoad NR430BT is constructed of high quality materials
and does not require user maintenance other than cleaning.
3

Cleaning the Unit
Clean the unit’s outer casing using a cloth dampened with a mild
det
ergent solution and the wipe dry. Avoid chemical cleaners
and solvents that can damage plastic components.
Caring for the Touch Screen
The touch screen is intended to be operated with a finger. Never
use a hard or sh
damage may result. Though a PDA stylus can also be used to
operate the touch screen, never attempt this while operating a
vehicle.
Clean the touch screen using a soft, clean, lint-free cloth. Use
water, isopropyl alcohol, or eyeglass cleaner if needed. Apply the
liquid to the cloth and gently wipe the touch screen.
arp object to operate the touch screen or
Protecting your NavRoad NR430BT
- Do not expose the unit to water or other forms of moisture;
the NavRoad NR430BT is not waterproof.
- Do not store the unit where prolonged exposure to extreme
temperat
permanent damage may result.
- To avoid theft, do not leave your NR430B
you leave your vehicle.
ures can occur (such as in the trunk of a car), as
T in plain sight when
4
Chapter 2
Product Information
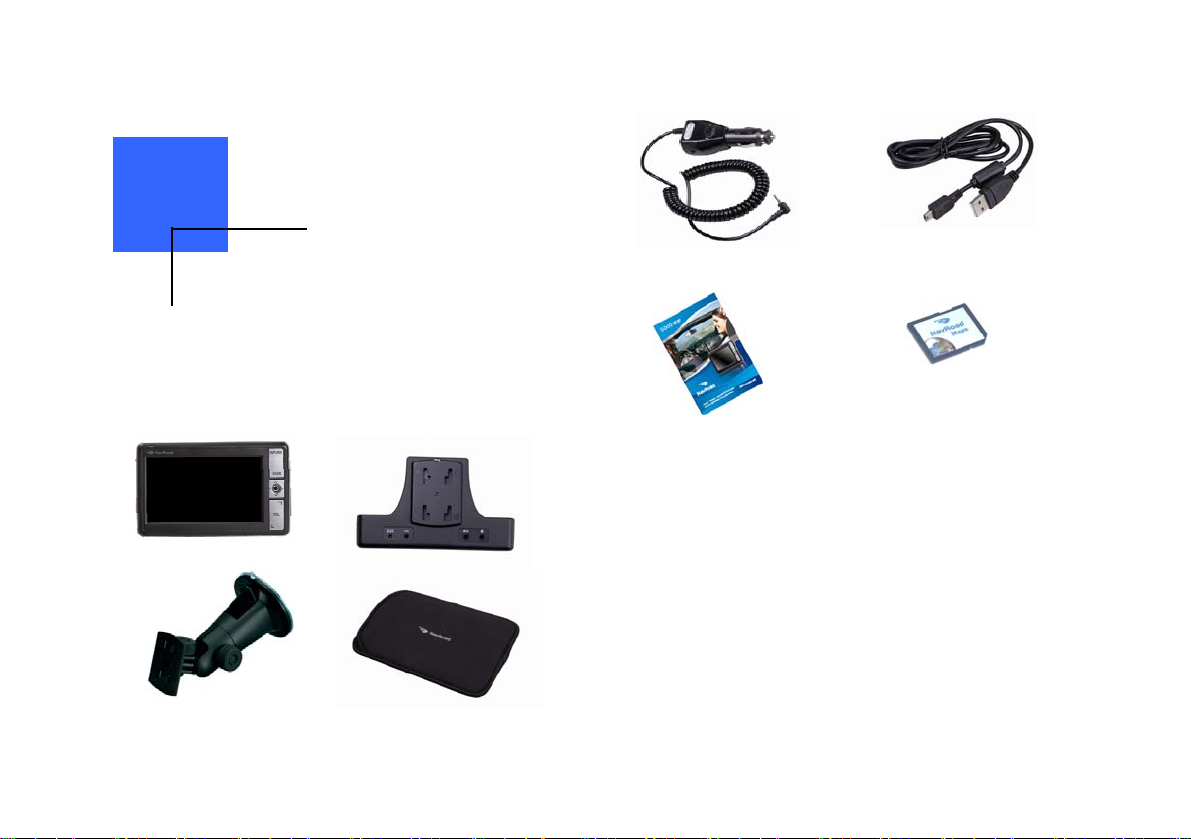
2.1 Package Contents
Please check the contents in the Box.
Manual
*depends on version
SD card with navigation software
and maps
*)
5
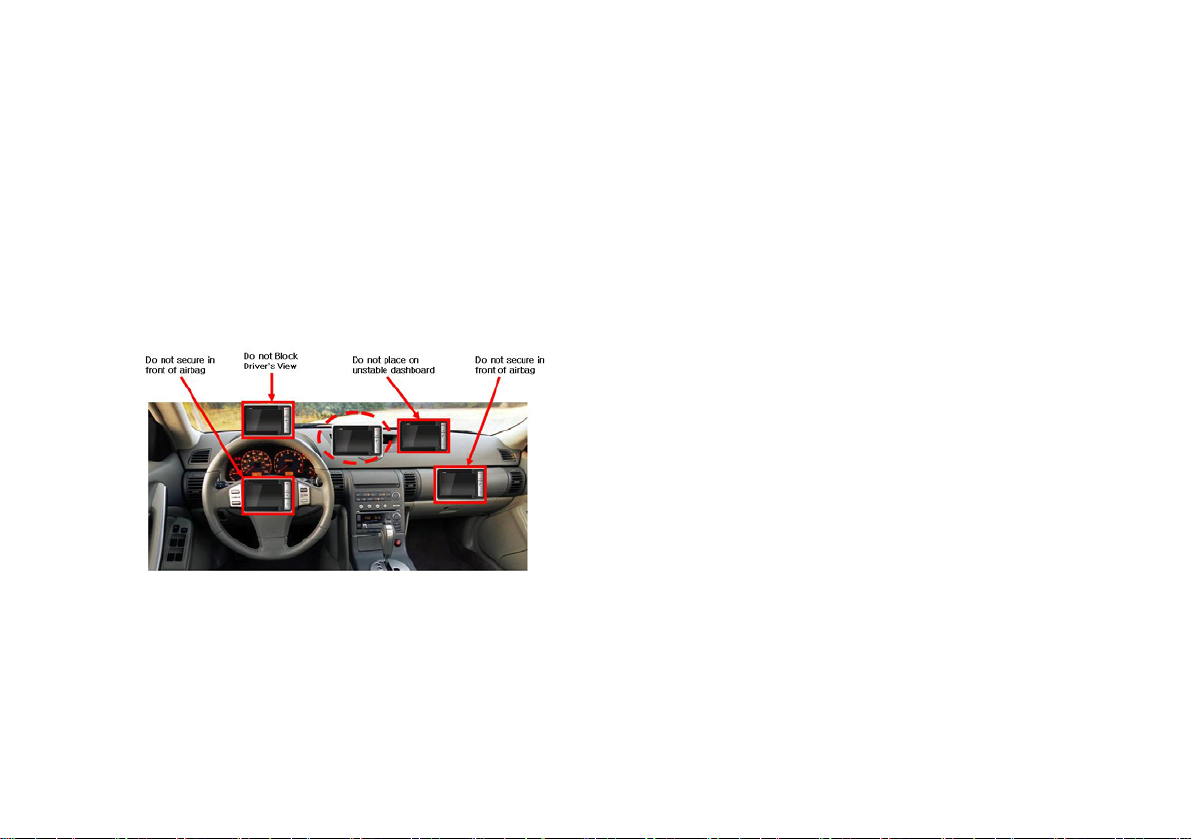
2.2 Installing to the Vehicle
Take care when mounting the NavRoad NR430BT in your vehicle,
whether using the windshield mount or other mount, that it does
not obstruct the driver’s view of the road. Make sure that the
placement of the NAVROAD NR430BT and cable does not
interfere with the operation of vehicle safety devices, such as air
bags. You assume the risks associated with damage to your
vehicle or vehicle’s occupants as a result of how you choose to
mount the NavRoad NR430BT.
1. Attach the windshield mount to the back of the docking cradle.
2. Press the windshield mount to the glass and slide the locking
lever toward
3. Insert the NavRoad NR430BT onto the docking cradle.
4. Plug the power cable into rear dc input of the docking cradle
as show
the glass.
n.
5. Plug the car charger into your vehicles cigarette lighter or 12
t receptacle.
vol
6. Installation is complete, and you are ready to turn the
Nav
Road NR430BT on and go.
6
Chapter 3
Basic Operations
3.1 Getting Start
Performing the initial Start Up
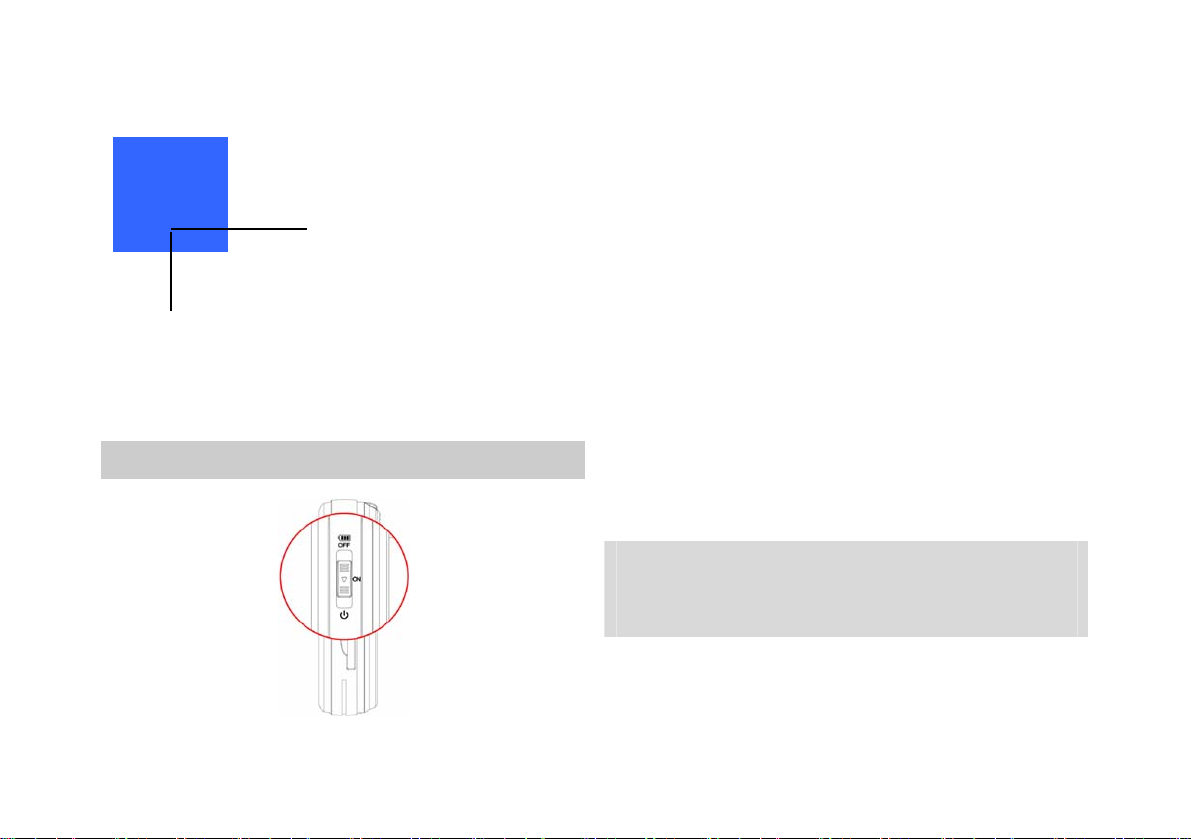
Slide the Battery ON/OFF switch the ON position.
Note : Always leave the Battery ON/OFF Switch in the ON
Position for normal operation.
Power ON/OFF
Your device turns on when pull down the bar switch to Power.
Follow the instructions on the Installation Poster to dock your
NavRoad NR430BT in your car. The first time you turn on your
NavRoad NR430BT, it may take up to 10 seconds to start. To
power off your NavRoad NR430BT, pull down the bar switch.
Locating your current position
Your NavRoad NR430BT must be outside to locate your current
position. The first time you start your NavRoad, it can take up to
5 minutes to find your current position. If it takes longer than 5
minutes, make sure that you are in an open place without tall
buildings or trees around you.
In the future, your position will be found much faster, normally
wi
thin a few seconds.
Once your NavRoad has located your current position, the
Driv
ing View is shown in full color and shows your position on
the map.
Note: Some vehicles have a heat reflective shield embedded in
the windshield that may prevent NavRoad NR430BT from
locating your current position. If this is a problem in your
vehicle, use the NavRoad NR430BT External Antenna Kit
(available as an accessory).
7
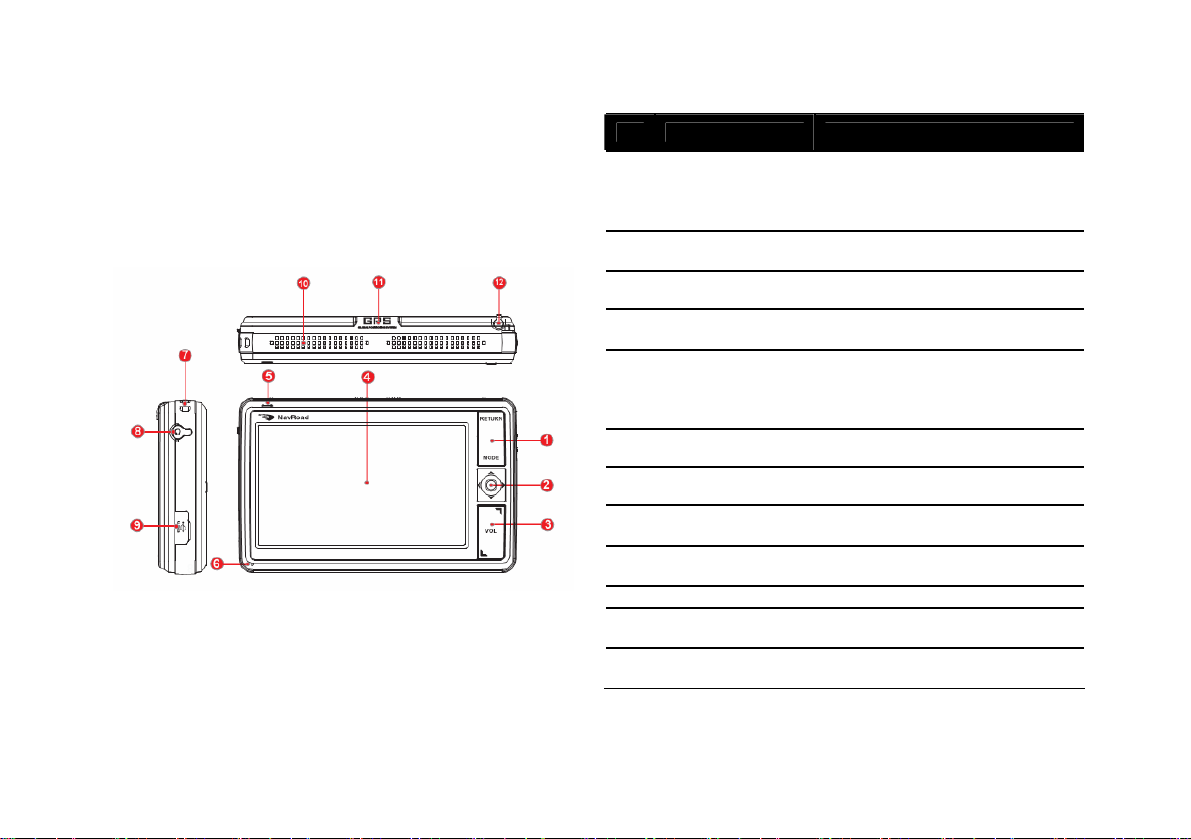
Understanding Hardware Components
1. Main Unit
Front, Left and Top Side Components.
Ref
Component Description
Display each menu screen and
eturn to the previous mode.
1 Menu Button
2 5 Way Joystick
3 Volume Control Adjusts the volume level
4 Touch Screen
5 Charge Indicator
6 MIC This is for receiving voice
7 Hand String Hole Hand string attaches to this hole
Headphone
8
9
10 Speaker Sends out sounds and voice
11 GPS Antenna
12 Stylus Pen
ctor
Conne
Mini-USB
ctor
Conne
r
For Hold function, please press
R
eturn key more than 2 seconds.
This is 5 way joysticks for
vigation and select menu.
na
Tap the screen with your fingertip
o select menu commands.
t
Glows in bright Red to indicate
hat the battery is charging, and
t
turns green when the battery is
fully charged
Connects to stereo headphones
Connects to the USB cable for
home charging or Sync.
Receives signals from the GPS
atellites overhead.
s
Using this stylus pen for tap the
screen and
to select menu.
8
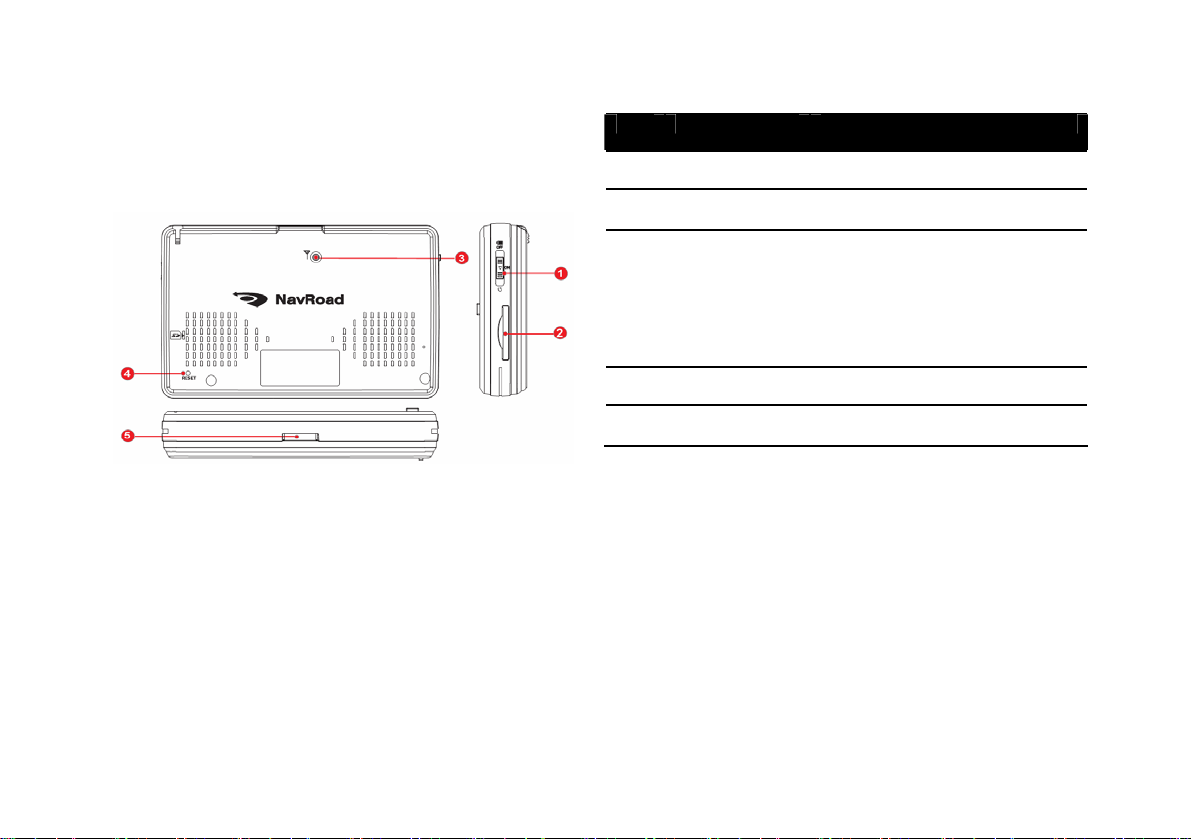
Rear, Right and Bottom, Side Components.
Ref Component Description
1 Power Button Turns on and off the device.
2 SD Slot Accepts a SD card for accessing
3 External Antenna
Connector
4 Reset Button Restarts your device(soft reset)
date such as MP3 music.
This Connector(under rubber dust
cover) allows use of an optional
external GPS antenna with
magnetic mount, which may be
positioned on top of the car for
better GPS signal reception in areas
with poor reception.
5 Docking Port This port should be connected with
docking cradle.
9
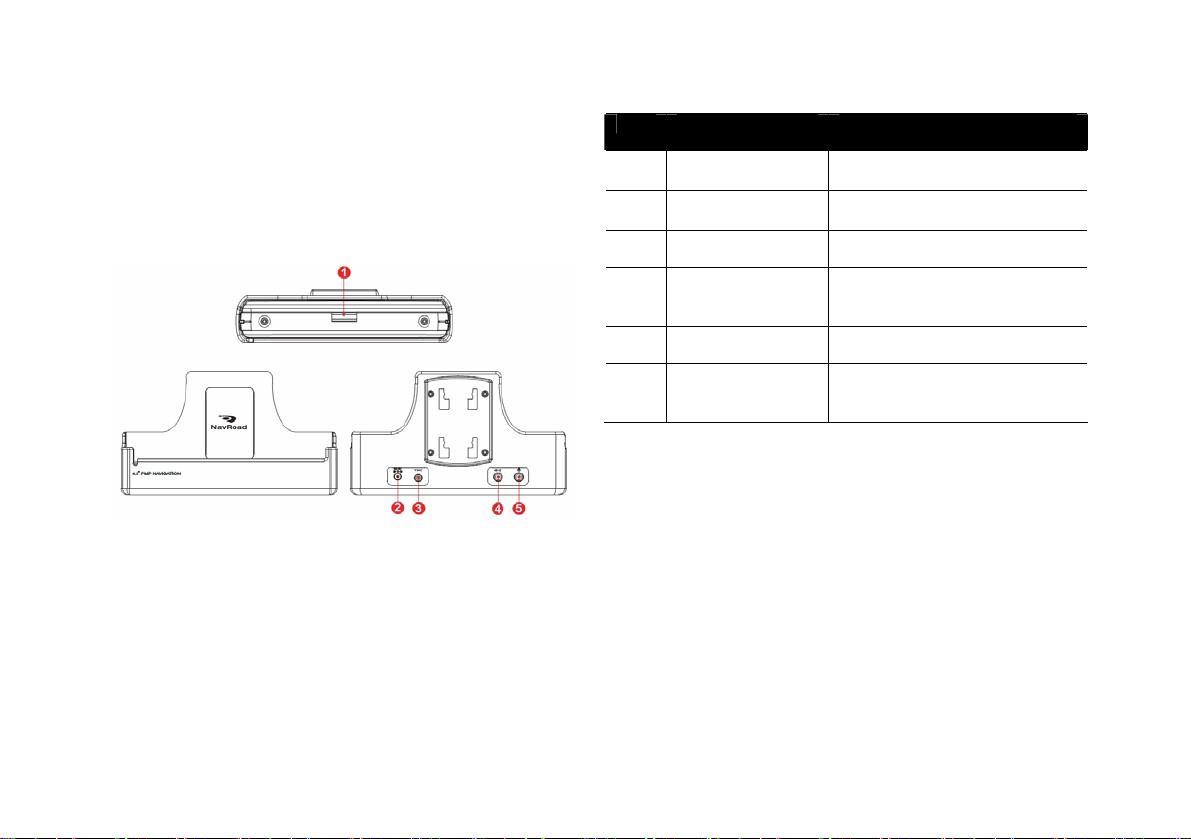
2. Docking Cradle
Front, Rear and Inner Side Components.
Ref Component Description
1 Docking Port This port should be connected
the NavRoad device
2 Push Button This button is working for
disconnect with NavRoad Device
3 DC Input DC 5V input
4 TMC Connector The TMC(Traffic Message
Channel) module for receiving
TMC information.
5 Audio out External Sound output
6 External MIC
Connector
External MIC input for better
voice receiving in hand-free
calling.
10

3.2 Main Screen
3.3 Phone
3.3.1 About Phone
Phone Menu allows you to use your device as a hands-free
device for a mobile phone supporting Bluetooth connection. You
can tap your device to place and receive phone calls instead of
picking up the mobile phone.
3.3.2 Pairing with a Mobile Phone
1. Tap the Phone button on the main screen and the Pair
Mode button. Bluetooth radio turns on.
2.
If this is the first time you use the program, your device
will switch to Pair Mode and wait for the pairing action from
your mobile phone maximum for 4 minutes. The connection
will be established as long as you initiate the pairing
process.
If prompted to enter the pincode (or passkey) on your
3.
mobile phone, tap the passkey specified by the NavRoad
NR430BT (dhe default is 1234) and tap OK.
4. You will see the Phone main screen after the pairing is
completed. The status bar at the bottom shows the name of
the mobile phone connected.
11

The next time you run the Phone program, your device will
automatically search and pair with one of the last connected
mobile phones.
NOTE:
• Your device must be in Pair Mode for the mobile phone to
discover your device. If you need to manually set your device to
Pair Mode, tap Pair Mode on the Phone main screen.
• Some mobile phones can automatically connect the handsfree service.
• Up to 5 sets of paired mobile phones can be stored. A 6th
paired mobile phone will replace the oldest one.
• The Phone program cannot access the data such as the
phone book and call history stored in a connected mobile phone.
3.3.3 Placing a Call
After pairing with your mobile phone, you can place a call using
any of the four buttons (Call, Call History, and Redial) on the
Phone main screen.
By tapping the Call button on the Phone main screen, you can
enter the telephone number with the onscreen keypad. After
entering the telephone number, tap
NOTE:
• To delete the last digit entered, tap the Backspace
button.
• The other two buttons allow you to switch to Home
and Call History screens
to place the call.
12

Call History
.
Tap the Call History button on the Phone main
screen to display the recent incoming, outgoing, or missed calls
together with information such as date, time, and duration of
each call.
Tap the respective button (incoming, outgoing, or missed ) to
view the last 20 calls of the selected type.
With an item selected, you can tap
to delete the item. To clear all items in the current list, tap
to dial the number,
Redial
Tap the Redial button on
the Phone main screen
to dial the last number you called or received.
3.3.4 Operations During a Call
During a call, four functions are available:
• If you need to input other numbers, such as an extension
13

number, tap to open the keypad and tap the
digits. The keypad will close when you tap the button again
or when there has been no input for 5 seconds.
• Tap
cannot hear you. To end the mute mode, tap the same
button again.
• Tap
to mute your sound so that the other party
to end the call.
• Tap to switch the call to your mobile phone.
To switch back to your device, tap the same button again.
3.3.5 Receiving a Call
When you have a call after pairing with a mobile phone, the
device rings and displays the Incoming Call screen.
To accept the call, tap .
To reject the call, tap
To mute the ring tone before receiving or rejecting, tap
.
.
14

3.3.6 Connecting Devices
Connect
By tapping the Connect button on the Phone main screen, you
can manually search the last paired mobile phones for an
available connection.
NOTE: To use the service of a remote device with
Bluetooth capability, make sure that the remote device is
in discoverable mode.
1. Tap Connect from Pho
nearby devices.
ne main screen to search for
Tap the device you want to use as a Hands-
3.
Free
4. When prompted to ente
phone, Please, input the passkey requested by the NavRoad
and tap OK.
or a Headset .
r the passkey in your mobile
Viewing Active Connections
After starting Phone menu, tap Connect to view the active
The device list appears on the screen. Tap the target
2.
device from the list of the devices.
connections. After you tap an item, you can tap
disconnect the selected device.
15
to

3.3.7 Pair Mode
By tapping the Pair Mode button on the Phone main screen,
you can manually set your device to Pair Mode. Within the
duration for 4 minutes, you can initiate the pairing process on
your mobile phone to discover your device as a hands-free
device or a Headset.
3.3.8 About Preference
Your device incorporates Bluetooth wireless communications
technology. Devices with Bluetooth capabilities can exchange
information over a distance of bout 10 meters (30 feet) without
requiring a physical connection.
Preference allows you to configure and use the Bluetooth
capabilities of your device.
Starting and Exiting Preference
1. Tap the Phone button on the Main Screen and then the
Preference button.
2. When the Phone screen appears, tab Preference
3. The Preference screen appears as shown below.
16

To exit the program, tap . You will be back to the
Phone screen.
Turning On/Off Bluetooth Radio
Whenever you start Preference, Bluetooth radio is turned on.
Exiting Preference doesn’t turn off Bluetooth radio. To turn off
Blu
etooth radio, tap in the Preference screen.
Configuring Preference
After starting Preference, tap to configure Hands Free settings.
The available options are:
• Home Numbe
number.
• Aut
o-Answer : You can tell your NR430BT to answer
every call automatically after a
certa
• Ring-
in time.
Tone : You can select one ring tone from 3 kinds of
ring tone which like to hear
r : Allows you to edit the your home
3.4 Music
3.4.1 Starting and Exiting Music Player
Music turns your device into a Music player. It features:
Playb
B
P
ack of MP3 files
asic Playback controls such as play, pause, stop, next and
previous
layback includes single selection playback, repeat, single
repeat, normal sequence and random sequence.
17

Tap the Music button on the Main menu to start the program.
The control panel appears on the screen where you can easily
control the player by tapping the control buttons.
To exit the program, tap
.
3.4.2 Preparing the MP3 Files for Your Device
Before using the program, have the MP3 files ready on a storage
card.
3.4.3 Playing MP3 Files
2. Tap the Mus
program.
3. The program will search for the MP3 files in your device and
e storage card. When MP3 files are detected, they will be
in th
showed to the play list.
4. To start the playback, tap Sele
list . To control the playback, use the control buttons as
described later.
ic button on the Home screen to start the
ct button from the MP3 file
1. If your files are in a storage card, insert the card into your
device.
18

3.4.4 MP3 Playback Controls
Control Button Name Description
Play/Pause Play or
/
Stop Stop the
RWD/F.FWD Play
/
Previous/Next Play the
/
Volume -/+ Increase or
/
e the
paus
playback.
pl
ayback.
nd or
Rewi
Fast
Forward
prev
ious or
next file.
decrease
the v
olume.
The
indicator on
the panel
shows the
current
volume
level.
Exit Close the
Playback
Mode
pro
gram
and return
to the
Home
screen.
Cycle
through the
following
modes:
Repeated
ayback of
pl
the all files
in the
folder
Single
pl
ayback of
the current
folder
Repeated
pl
ayback of
current file
Repeated
pl
ayback of
all files in
random
order
19

3.5 Photos
3.5.1 Starting and Exiting Photos
Photos allows you to view pictures in JPEG, GIF and BMP
formats and view the Tap the Photos button on the Main menu
to start the program.
3.5.2 Preparing the Pictures for Your Device
Before using the program, have the JPEG/GIF/BMP files ready on
a storage card.
3.5.3 Viewing Pictures in List View
1. If your files are in a storage card, insert the card into
your device.
2. Tap t
3
he Photos button on the Main menu to start the
program.
. The program will search the matching files in the specific
folder on a storage card. It then displays the pictures in the
list view. You can press the Up or Down arrow button to
go to next or previous page.
3.5.4 Viewing a Picture in Full Screen
When you tap or a picture once in the list view, the
picture is displayed in full screen.
To go back to the list view, tap anywhere on the screen to
display the P
3.5.6 Viewing the Slideshow
To view the slideshow of all your pictures, use one of the
following ways:
icture list view screen.
1. When
2. When in f
3. Sets
in the list view, tap
slideshow.
ull screen, tap anywhere on the picture to
return in the list view screen.
the length of time each slide is displayed before
to start the
moving on to the next slide. Tap
the button to switch to the next available option.
3.5.7 Rotating the picture
To rotate the picture, tap or in your favorites
direction.
20

3.6 Movie
3.6.1 Starting and Exiting Movie Player
Movie turns your device into a Movie player. It features:
Playb
B
Tap the Movie
The control panel appears on the screen where you can easily
control the player by tapping the control buttons.
ack of Movie files
asic Playback controls such as play, pause, stop, next and
previous
button on the Main menu to start the program.
Before using the program, have the Movie files ready on a
storage card.
3.6.3 Playing Movie Files
1. If your files are in a storage card, insert the card into
your device.
2. Tap t
3
he Movie button on the Main menu to start the
program.
. The program will search for the Movie files in the storage
card. When Movie files are detected, they will be added to
the Movie list.
To exit the program, tap
.
3.6.2 Preparing the Movie Files for Your Device
. To start the movie, tap Select button. To control the
4
playback, use the control buttons as described later.
3.6.4 Playing a Movie in Full Screen
21

When you tap or Movie screen once in the Movie
player view, the Movie is played in full screen.
To go back to the Movie screen, t
display the Movie player list
ap anywhere on the screen to
view screen.
3.6.5 Movie Playback Controls
Control Button Name Description
Play/Pause Play or
/
Stop Stop the
RWD/F.FWD Play
/
Previous/Next Play the
/
e the
paus
playback.
pl
ayback.
nd or
Rewi
Fast
Forward
prev
ious or
next file.
Volume -/+ Increase or
/
Exit Close the
dec
rease
the volume.
The
indicator on
the panel
shows the
current
volume
level.
pro
gram
and return
to the
Home
screen.
3.7 Settings
3.7.1 Starting and Exiting Settings
You can customize the system settings such as backlight
brightness, volume, and language. Once you change them again.
Tap the Settings button on the Home screen. The Settings
menu appears as shown
22

To exit Settings, tap .
The following sections describe the various buttons and their
functions.
3.7.2 Information
1. Tap the Settings button on the Main menu.
2. Tap t
he Information button.
3.7.3 Start Settings
1. Tap the Settings button on the Main menu.
2. Tap the Start Settings button.
23

To select the application which will run when swithing on the
device, tap Start with Specific Application. You can choose
from standard applications by tapping their appropriate icon.
You can select other application on the device or SD card by
apping
t
Then you can select the application from the list and tap OK to
confirm.
. Move the knob along the track bar to adjust the volume.
3
To decrease the volume, move the knob to the left. To
increase the volume, move the knob to the right.
24

3.7.4 Default Settings
1. Tap the Settings button on the Main menu.
2. Tap t
3. You can se
he Default Settings button.
t default to your device in this option and if
you click ‘Set Default’, your device will be back to default.
Please, take care of use this option.
3.7.5 Brightness
1. Tap the Settings button on the Main menu.
2. Tap t
3.
he Brightness button.
Click + or - to adjust the brightness of the backlight. To
darken the backlight, move the knob to the left. To lighten
the backlight, move the knob to the right.
3.7.6 Change Language
NOTE: To change the language of the Map navigation
software, use Map settings.
1. Tap t
2. Tap t
3.
he Settings button on the Main menu.
he Language button.
Tap the Up/Down arrow button to select the desired
language.
25

- automatically dim the LCD display when it is idle for a set
eriod of time.
p
4
. Tap OK the button for the new setting to take effect(Re-
booting).
3.7.7 Energy
To check the remaining power level of your battery and/or set
up the power saving feature:
1. Tap t
2. Tap t
3
You can set a timer to:
- automatically turn off your devic
period of time.
he Settings button on the Main menu.
he Energy button.
. The screen shows the remaining power of your battery.
e when it is idle for a set
3.7.8 Touch Screen
You can calibrate the touch screen if it is not responding
accurately to your taps.
1. Tap t
2. Tap t
3
4
26
he Settings button on the Main menu.
he Calibration button.
. Tap to start the calibration.
. Tap and hold the centre of the target.

5. When the target moves to another position, tap and hold
the center of the new target. Repeat each time to complete
the calibration process.
6. When compl
eted within 5 seconds, tap no. 6.
3.7.9 Date/Time settings
To set Date, Time and Timezone tap the time display at the
upper right corner of the display.
Set all required information and tap OK to con
firm.
27

Chapter 4
Service & Support
4.1 Technical Support
If you need technical assistance or “how-to” help, or if you have
a technical question about the functionality of your NAVROAD
product, please contact us on the Internet at
On this web page you can find Frequently Asked Questions and
the
ir answers and contact form.
Our Technical Support is available Monday through Friday, 10:00
a.m. to 4:00 p
contact form that will be returned within the next business day.
.m. CET. After hours, you may leave a message by
4.2 Registration
Please make sure to register your NAVROAD NR430BT at
www.navroad.com
latest product updates.
. By registering, you will be informed of the
www.navroad.com
.
4.3 Maintenance Info
To ensure the unit’s normal operation and extended life span,
please note the following while using and storing :
Keep dry
This product is not waterproof. If it comes into contact with
w
ater spray or is submerged it will seriously damage the
components, resulting in irreversible damage.
Do not drop the unit
If violently impacted or shocked, serious damage may be caused.
Avoid sudden temperature changes
Condensation may occur when entering a warm room on a cold
da
y. To prevent condensation from damaging the unit, please
place into an airtight plastic bag before sudden temperature
changes.
Keep away from strong magnetic fields
When using or storing, please keep away from strong
electromagne
tic/radioactive or magnetic field equipment.
Operating temperature
The products operating temperature is between 0
please do not operate under extreme temperatures.
Avoid exposure to sunlight
Please avoid long periods of sunlight or high temperature
exposu
re.
O
C - +40 OC;
28

Using the stylus
The LCD screen is easily scratched; please use only the stylu
operation. Do not use any other sharp objects on the screen to
avoid damaging the LCD screen.
Cleaning the screen
Using a soft clean cloth to wipe the screen is recommended; do
not u
se ordinary tissue to wipe the screen.
Do not disassemble
Please do not disassemble the product, this may void the
w
arranty and damage the unit.
Storage
When the product is not being used for a long period, please
s
tore in a cool and dry place. For long-term storage, keeping the
unit in a dry box is recommended.
Please do not keep the product in the following environments:
1. Unventilated and humid locations.
2. In a car window that is exposed to excessive amounts of
sun
light.
3. In an environment where humidity is over 80%.
Troubleshooting Info
Power cannot startup insufficient battery charge, please connect
to the adapter and r
No screen displayed
: After powering up, if the system
following
estart system.
does not respond, try the
s for
1. Connect adapter, restart system.
2. Reset system.
Display speed is too slow
1. Check if the battery is low on power.
2. Reset system.
Screen has no response
: Reset system.
Navigation GPS cannot display my current location
: Make sure your current location is not obstructed by buildings
or oth
er interferences.
29

Chapter 5
Fact Sheet
5.1 Product Specification
CPU Sams
Memory 6
Memory expansion SD card
Operating system Mi
GPS chipset Si
GPS antenna Embedded t
Battery Bu
Li
up to 4 h 30 min
Display 4
Resolution 480 x
Audio Bu
Bluetooth Sp
Connectors: 3,5 mm s
External G
Mini-USB
ung S3C2442, 400 MHz
4 MB ROM, 64 MB RAM
socket
®
crosoft
Windows CE.NET 5.0
RFstarIII™ 20 channels
ilt-in Rechargeable
-Polymer, 1800mAh
,3” QVGA TFT LCD,
ilt-in speakers
built-in microphone
ec. v1.1, v1.2, v2.0 Compliant
ype
272 px, 16 millions colors
tereo earphones jack
PS antenna
Docking station connectors: TMC
External m
External speakers
Charger
Dimensions (W x H x D):
Weight: 230g
antenna
icrophone
131.0 x 81.6 x 23.6 (mm)
30

Safety Approvals
* FCC compliance Information
This device complies with part
bject ot the following two conditions:
su
1)This device may not cause harmful interference, and
2)this device must accept any interference that may cause
undes
ed operation.
* FCC WARNING
This equipment may generate or use radio frequency energy.
Changes or modifications to this equipment may cause harmful
interf
the instruction manual. The user could lose the authority to
operate this equipment if an unauthorized change or
modification is made.
* CE USER INFRMATION
Hereby, WIDER Corp., Declares that this Bluetooth(M/N:
s in compliance with the essential requirements and other
i
Reievant provisions of Directive 1999/5/EC.
ir
erence unle
ss the modifications are expressly approved in
15 of FCC Rules, Operation is
NR430BT)
31
 Loading...