

WideOpenWest Ultra Quick Reference Manual
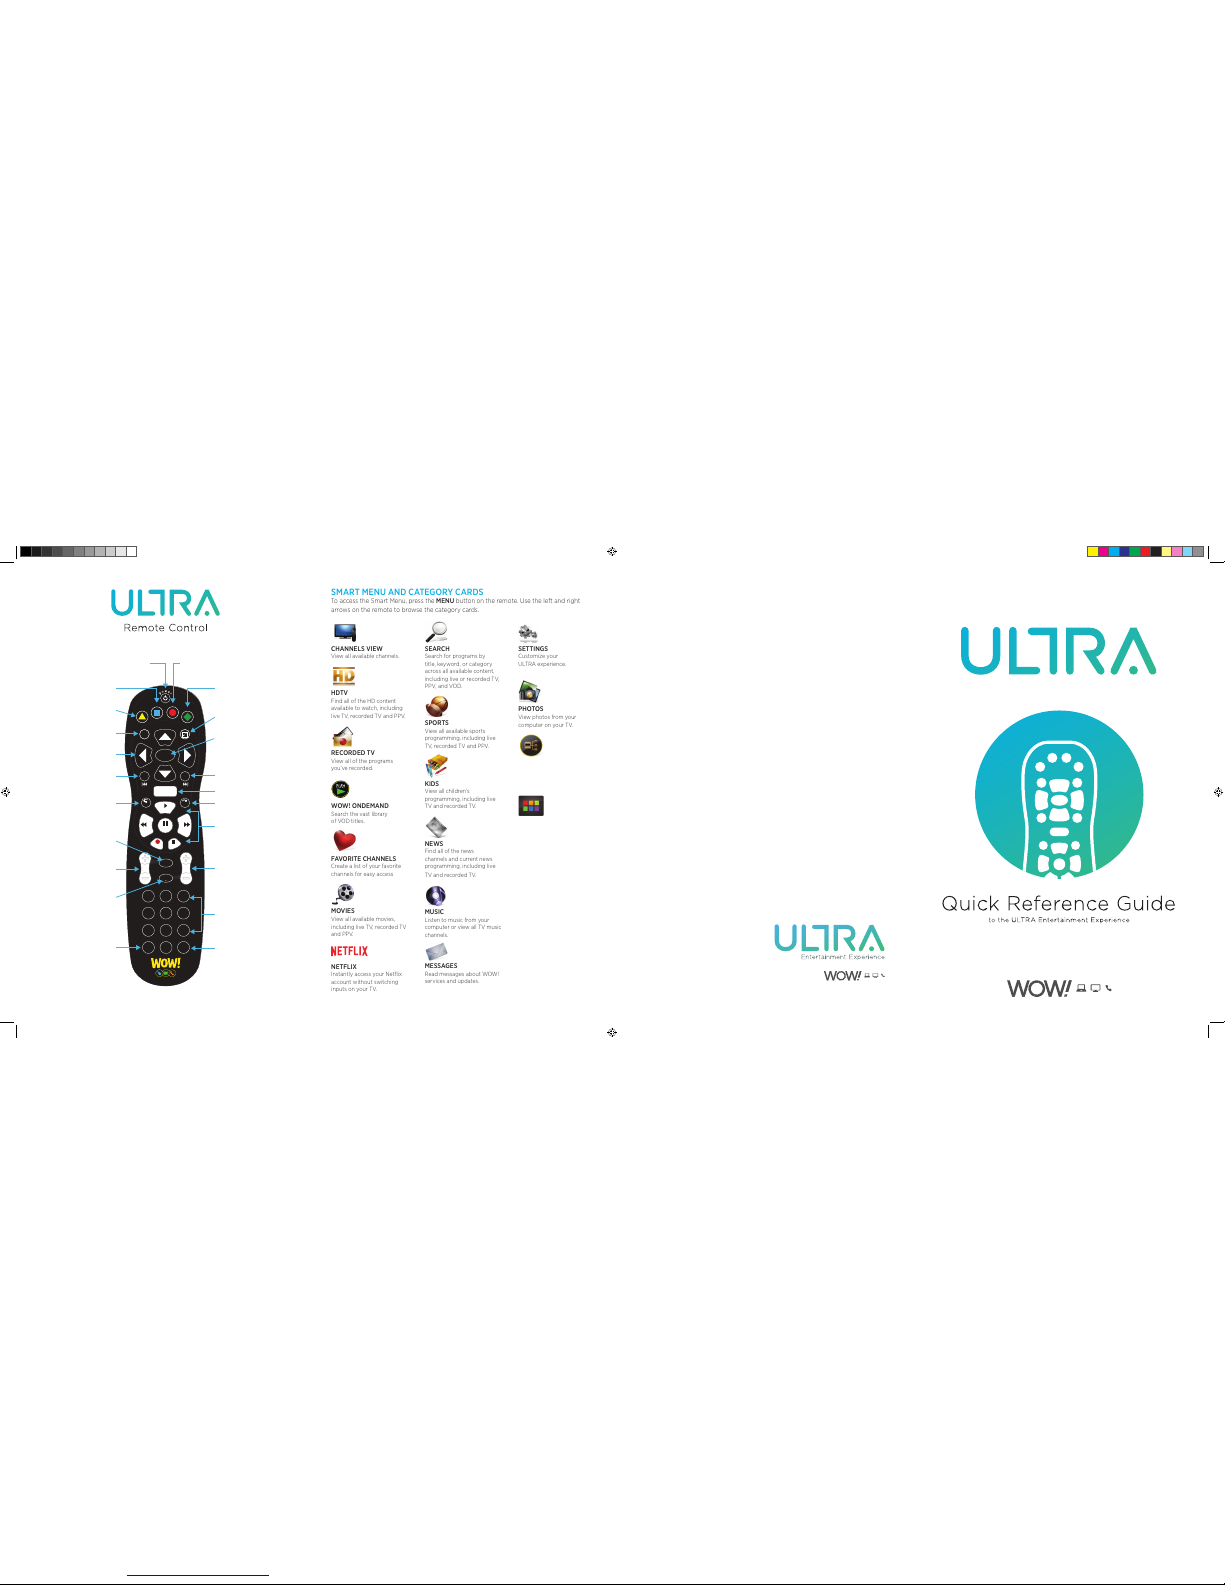
SMART MENU AND CATEGORY CARDS
To access the Smart Menu, press the MENU button on the remote. Use the left and right
arrows on the remote to browse the category cards.
CHANNELS VIEW
View all available channels.
HDTV
Find all of the HD content
available to watch, including
live TV, recorded TV and PPV.
RECORDED TV
View all of the programs
you’ve recorded.
WOW! ONDEMAND
Search the vast library
of VOD titles.
FAVORITE CHANNELS
Create a list of your favorite
channels for easy access
MOVIES
View all available movies,
including live TV, recorded TV
and PPV.
NETFLIX
Instantly access your Netflix
account without switching
inputs on your TV.
SEARCH
Search for programs by
title, keyword, or category
across all available content,
including live or recorded TV,
PPV, and VOD.
SPORTS
View all available sports
programming, including live
TV, recorded TV and PPV.
KIDS
View all children’s
programming, including live
TV and recorded TV.
NEWS
Find all of the news
channels and current news
programming, including live
TV and recorded TV.
MUSIC
Listen to music from your
computer or view all TV music
channels.
MESSAGES
Read messages about WOW!
services and updates.
SETTINGS
Customize your
ULTRA experience.
PHOTOS
View photos from your
computer on your TV.
HOMECONNECT
Access movies, music or
photos from your computer
on your TV.
STREAMLAND
Access online video content,
stream TV shows, movies and
get popular apps.
0
clear
TV
Input
7 8 9
pqrs tuv wxyz
4
ghi5jkl6mno
1
2
abc3def
vol ch
last
mute
rec
pause
play
rew fwd
stop
skipreplay
menu
back next
OK
info
ticker
live
TV
A
B
C
D
dvr liveTV
vod grid
Controls TV and/or Audio Device Power Display Grid Guide
Displays on Demand
(VOD) Library
Return to Live TV
Lists Recorded Shows
Toggles between the
Menu and Full Screen
Displays Program
Information
Selects Menu Options and
Programs from the Guide
Goes to Next Page
Skips Ahead 30Min.
When in the Guide
Displays Menu Options
Skips Ahead in Buered or
Recorded Content
Controls Live and
Recorded TV, Other Content
Changes Channels and
Pages in the Grid and Menu
Directly Tune to Channels
Changes Input on TV
(EG. Hdmi 1, Video 1,
& Component 1)
Navigates Menu and
Guide Options
Go to Previous Page
Rewinds Last 7 Seconds
Mute Audio On and O
Changes TV or
Receiver Volume
Takes You to Channel
Last Viewed
Deletes Character during
Text Entry or Removes Flip Bar
0517
Ultra_Quick_Reference Guide_051017.indd 1 5/10/17 10:34 AM

ONLINE TV MANAGEMENT
Through the WOW! Customer Home Page, you can manage your DVR and more while you’re
away from the TV.
• Log into your WOW! email account at wowway.net.
• Once logged in, click on the TV tab in the “Email, Phone, TV” box and then select “Manage
My TV.”
• From here, you can schedule recordings, manage recording settings, monitor how
much storage space you used, view full TV listings, and set parental controls.
FAVORITES
You can create a channel lineup of only your favorite channels.
To Add A Channel To Your Favorites:
• In the TV Channels category, tune to the channel you want to add and press INFO.
• Choose “add item to favorites.”
• You can delete a channel by selecting the channel and choosing “remove from favorites.”
Browse your Favorites channel lineup by selecting the Favorites category card. You can clear
the entire favorites list by selecting the Options card in the Favorites category, then choosing
“clear all” from the action menu.
ULTRA APPS
ULTRA has apps for the iPad, iPhone and Android devices available for download today.
ULTRA apps have full remote functionality and let you manage your DVR directly from your
mobile device. Visit wowway.com to view the full ULTRA App User Manual.
• Set up new DVR recordings
• Manage DVR recordings
• Use your mobile device as a remote control
• Search TV listings for up to two weeks out
• Set your favorite channels or hide channels from your lineup
HOW MUCH SPACE IS LEFT ON MY DVR TO RECORD SHOWS?
The Storage Meter lets you know how much space you have left to record more programs.
It’s located in two places in the Smart Menu. In Recorded TV, the Options card displays the
amount of space remaining. In Settings, select the Recording Space card.
WOW! VIDEO ONDEMAND
Search the vast library of movies, TV shows and events.
• Select the VOD category in the Smart Menu.
• You’ll see a list of video folders in the vertical band, as well as a My Rentals folder. When
you scroll over each folder, the available programs in each will appear in the preview panel
to the right. Press OK to select any of the folders in the VOD library.
When you see a program you like, press OK and you’ll get the following list of options:
• preview - Plays the trailer for the selected movie.
• lock - Uses Parental Controls to block access to that channel.
• buy - Purchases the movie so that you can watch it immediately.
ACCESSING MUSIC, PHOTOS, AND VIDEOS FROM YOUR COMPUTER
Select the HomeConnect category to view your music, photos and videos from
your connected computers. You need to set up a DLNA
®
server to view content on
ULTRA. Use the HomeConnect category to browse through your computer files and select
content to be added to shortcut folders for easy access.
To Add Content:
(Example is related to music, but the same can be done for photos and video files.)
1. Select the HomeConnect category.
2. Select the computer whose content you would like to add. Your computer must be on and
connected to the network. If one is not showing up, select Search for Media Servers and
choose “Search.”
3. Browse through that computer’s file structure until you find the music files.
4. Press OK and choose “add folder to my music” or “add item to my music.”
5. The music files or folder containing music files will automatically be added to the My Music
shortcut folder in both the HomeConnect category and the Music category.
To View Content:
1. In the HomeConnect category select the computer that you want to access and press OK.
2. To view content, select My Content and then choose either the My Music, My Photos, or
My Videos shortcut folder.
3. Select an individual file you would like to play and press OK.
4. If you have a folder selected and you would like to view a list of options for the content of
that folder press INFO.
There are four approved DLNA servers for various operating systems: Windows Media Player
(Windows), Twonky (Mac, Windows, Linux), TVersity (Windows) and PlayOn (Windows). For
more information on HomeConnect, please go online to the TV Apps section of Manage My
TV on the WOW! Customer Home Page.
© 2017 WideOpenWest Finance, LLC.
ULTRA EASY ACCESS
WHOLE-HOME HD DVR
6 HD Tuners Record 6 HD shows at one time.
Multi-Room Solution
Start a recorded show in one room, pause it and then continue watching it in
another room.
Easily Setup Recordings
Whether a movie, show or whole series, easily program your DVR with the Smart
Menu. You can even change your settings after a show has started to record.
Online DVR Management Schedule, delete or change settings for a recording online.
Lots of Storage
The 500GB hard drive lets you store up to 300 hours of SD programming or 75
hours of HD programming. The storage meter is easy to check to see how much
you have recorded.
Automatic Conflict
Detection
The system will let you know if you have a conflict that would impact your ability
to record an upcoming show.
External Hard Drive Expand your storage capacity by connecting an eSATA external Hard Drive.
ULTRA ADDITIONAL FEATURES
Play Photos, Videos and
Music on Your TV
Play personal photos, videos and music from your computer on your TV screen.
Parental Controls Set controls so certain shows require you to enter a PIN to watch.
Online Settings Manage individual set-top box settings, such as parental controls, remotely online .
Wireless Home Network Work on a computer anywhere in your home.
Netflix
Netflix subscribers can stream their favorite TV shows and movies instantly on their
ULTRA set top box. Simply log in with your existing Netflix account or sign up for
a free trial and begin watching your favorite shows and movies without having to
change inputs on your TV. Netflix streaming membership is required.
Mobile App
Use your iPhone, iPad, or Android device to manage your DVR and set recordings
when on the go, or use the app for your guide and remote control.
SMART MENU
TV Categories
View upcoming programs for Movies, Kids, News or Sports with programming
listings for live TV, PPV and recorded content, specific for those categories.
Search
Search for a program by keyword, title or category across all live TV, VOD and
recorded content.
Flip Bar
Allows you to view information on what is playing, what shows are coming or set
a recording all without having to change the channel.
Live TV Controls
Pause, play or rewind live TV. Watch a show on live TV, pause it, and continue
watching from where you left o in another room.
Favorites Set up a custom channel lineup, showing only the networks that you want to see.
Customize TV Listings Hide channels that you don’t want to show up in your main TV channels listing.
Grid Guide View listings with the Smart Menu or with a Grid Guide view.
VOD WOW! VOD oers access to 1000s of movies, free TV shows and events.
RECORDED TV
MANAGING RECORDED TV
The Recorded TV category lists all your recorded shows in alphabetical order. Episodes of a series
are grouped into folders and individual episodes are seen in the preview panel to the right.
The recorded show icons let you know the following:
The show is recording right now.
The show is scheduled to record.
The show is recorded and may be deleted when space is needed.
The show is recorded and will not delete unless deleted manually.
The Options card in the Recorded TV category lets you manage your recorded TV.
• Scheduled to Record in Options lets you see all the programs that are set to record. Here
you can also cancel a recording or alter your recording settings for each show. Just pick
the show you want to manage and press the INFO button.
• Recording Defaults in Options lets you determine your default preferences for how long to
keep a recording, how many episodes to record, when the recording starts and stops, and
whether to record first runs or repeats.
HOW TO SET A RECORDING & SERIES RECORDING
When watching a show: To record the show you are currently watching press RECORD and
the show will begin recording. If you are watching a show and want to record the series,
press INFO. Then select “Record Series.” A red dot means the program is recording.
Via the Search category: You can search for the show in the Search category by title, keyword
or category. Select the show in the results by pressing OK and then select “Record Once” or
“Record Series” in the action menu. A blue dot means the program is scheduled to be recorded.
In TV Channels category:
You can scroll through the TV channel lineup. When you find a show that
is in progress that you want to record either in the listing or in the preview panel, press record. If you
want to record an upcoming show, press INFO. An action menu will appear where you can select
“Record Once” or “Record Series.” A blue dot means the program is scheduled to be recorded.
AUTOMATIC CONFLICT MANAGEMENT
You can record or watch up to six shows at once. A conflict detection note will pop up if you
are already using all six tuners – which means that you may be recording five shows and
watching Live TV. If this happens, an action menu will show up automatically on the screen
giving you options to choose which recordings you want to keep.
HOW TO DELETE A RECORDING
Press the “A” button (also labeled as “DVR”), and then use the arrow buttons to highlight
a recording. Press the “Info” button to bring up options and again use the arrow button to
highlight the “Delete” option. Press the “OK” button twice to confirm your selection.
HOW TO CANCEL A LIVE RECORDING
Press the “A” button (also labeled as “DVR”), and then use the arrow buttons to highlight
a recording. Press the “Info” button to bring up options and again use the arrow button to
highlight the “Stop Recording” option. Press the “OK” button to confirm your selection, and
then highlight “YES” when presented, then press the “OK” button..
For more tips & support, visit wowway.com/support/ultra
Ultra_Quick_Reference Guide_051017.indd 2 5/10/17 10:34 AM
 Loading...