


WF360 POS PDA Quick Start Guide
Copyright
Copyright 2011-2013 Widefly Limited. All rights
reserved.
Product specifications and features are for reference
only and are subject to change without prior notice.
Declaration
This document is published by Widefly Limited
without any warranty.
Improvements and changes to this document
necessitated by typographical errors, inaccuracies of
current information, or improvements to programs
and/or equipment, may be made by Widefly Limited
any time and without notice. Such changes will,
however, be incorporated into new editions of this
Guide.
FCC Statement
This device complies with Part 15 of the FCC Rules.
Operation is subject to the following two conditions:
1. This device may not cause harmful interference, and
2. This device must accept any interference received,
including interference that may cause undesired
operation. Any changes or modifications not
expressly approved by the party responsible for the
compliance could void the users’ authority to operate
the equipment.

WF360 POS PDA Quick Start Guide
Important safety information
Please read this carefully before using WF360 POS PDA.
Always treat the product with care and keep it in a
clean and dust-free place.
Do not expose the unit to moisture or humidity.
Do not expose the unit to extreme high or low
temperatures.
Do not attempt to disassemble the unit
Use only the power adaptors, charging cradle and
batteries approved by Widefly Limited. The use of
any other type may invalidate any approval and
warranty.
The socket outlet for the power adaptor shall be
installed near the equipment and shall be easily
accessible.
No reverse polarity charging with other power
adaptors/chargers, they may have inverse polarity.
Never use the power adaptor/chargers if the plug is
damaged.
Never touch the charger/power adaptor if your
hands/feet are wet.
Do not expose the charger/power adaptor to water, it
may cause electrical fires.
Do not repair the charger/power adaptor by yourself
for your safety.
To reduce the risk of fire and burns, do not
disassemble, crush or puncture the battery.
Dispose of used batteries according to the
instructions.
Do not dispose of the battery in fire or water.
Do not let the metal contacts on the battery touch

WF360 POS PDA Quick Start Guide
other metal object. It could lead to short-circuit and
damage the battery.
Only approved batteries, chargers/power adaptors
that are designed for the model can be used with the
unit.
Risk of explosion if battery is replaced by an incorrect
type.
Do not exchange with wrong model battery. It may
cause explosion. Please dispose battery following
instruction.
To prevent possible hearing damage, do
not listen at high volume levels for long
periods.

WF360 POS PDA Quick Start Guide
Table of Contents
1. Overview................................................... 1
1.1.
WF360 Overview ................................. 1
1.2.
Inserting and Removing Battery .......... 5
1.3.
Charging Battery ................................. 6
1.4.
LED Light Status .................................. 7
1.5.
System Info ......................................... 8
2. Getting Started ......................................... 9
2.1.
Turn ON/OFF ....................................... 9
2.2.
System Sleep Mode & Wakeup ............10
2.3.
Wi-Fi Basic Settings ............................11
2.4.
Clean Reset ........................................13
3. Power Settings .........................................14
3.1.
Screen Saving .....................................14
3.2.
Configure Sleep Mode .........................15
WF360 POS PDA Quick Start Guide
P.1
1. Overview
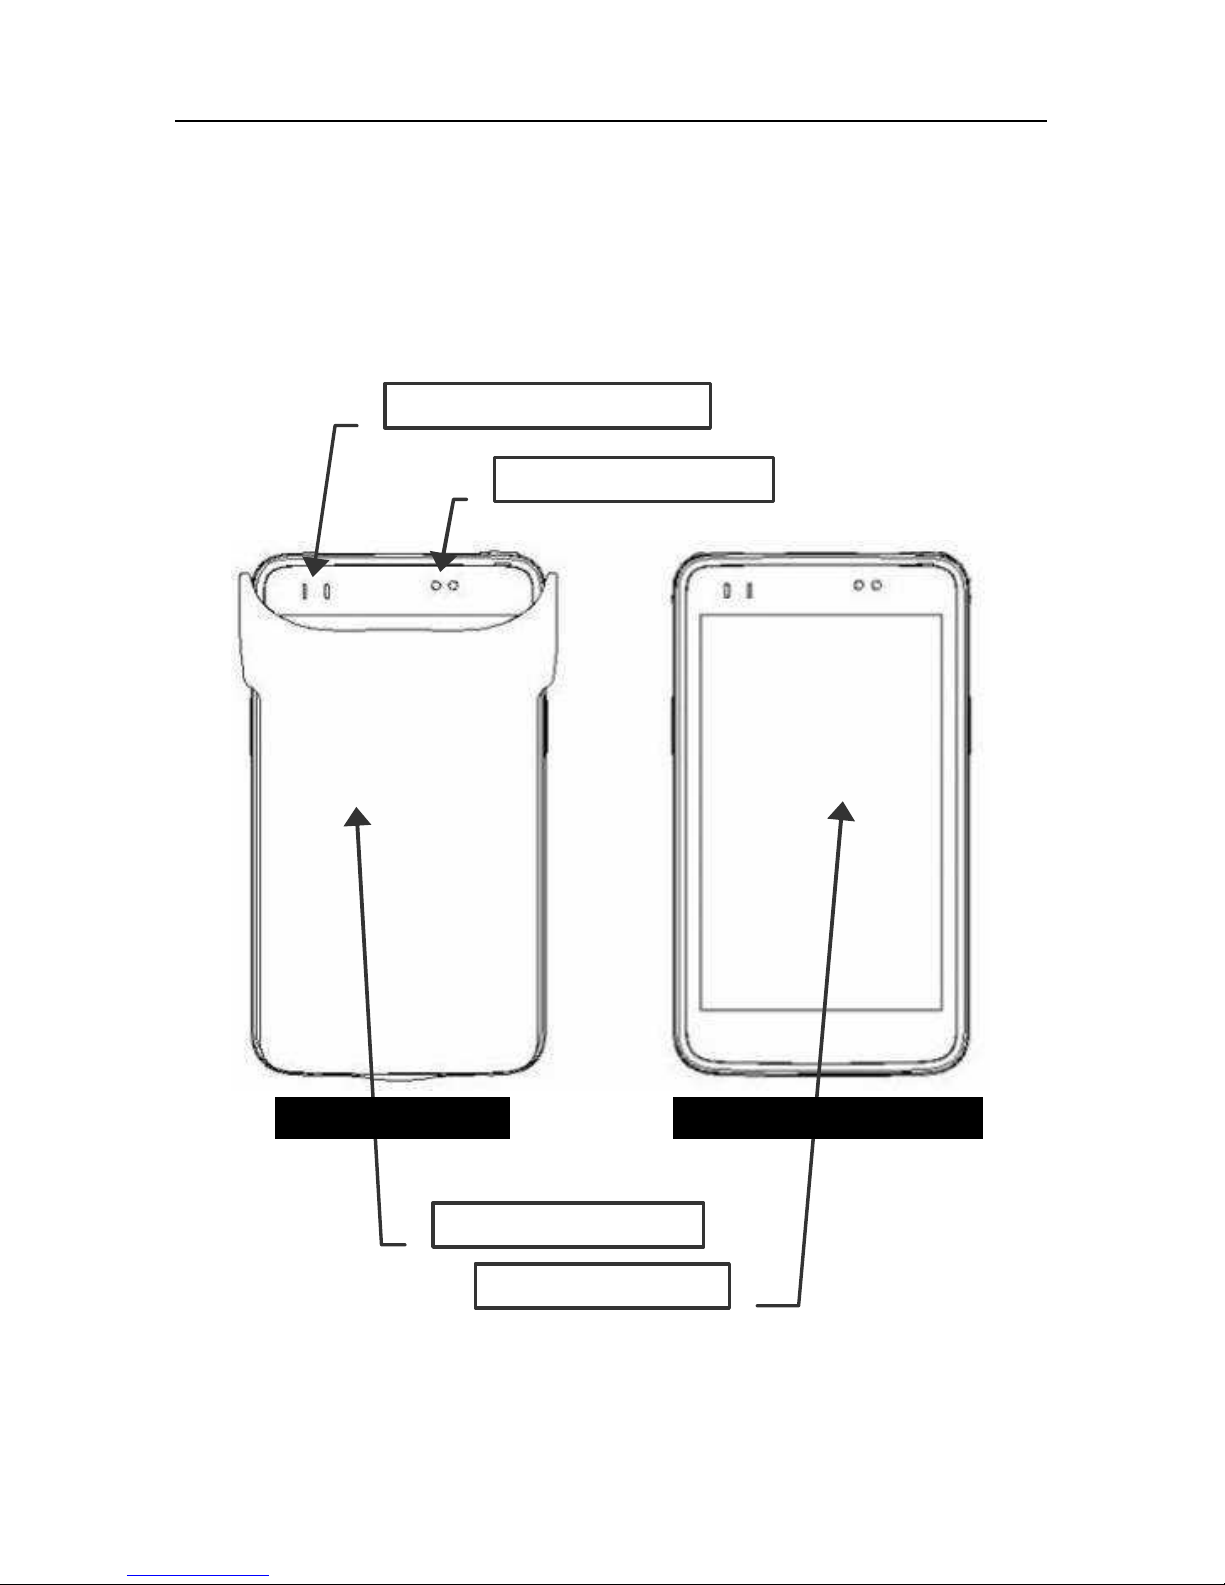
1.1. WF360 Overview
Main / Wi-Fi LED
Ambient Light Sensor
Protective Flip Cover
Touch Panel & LCD
Front
Without
Flip Cover
WF360 POS PDA Quick Start Guide
P.2
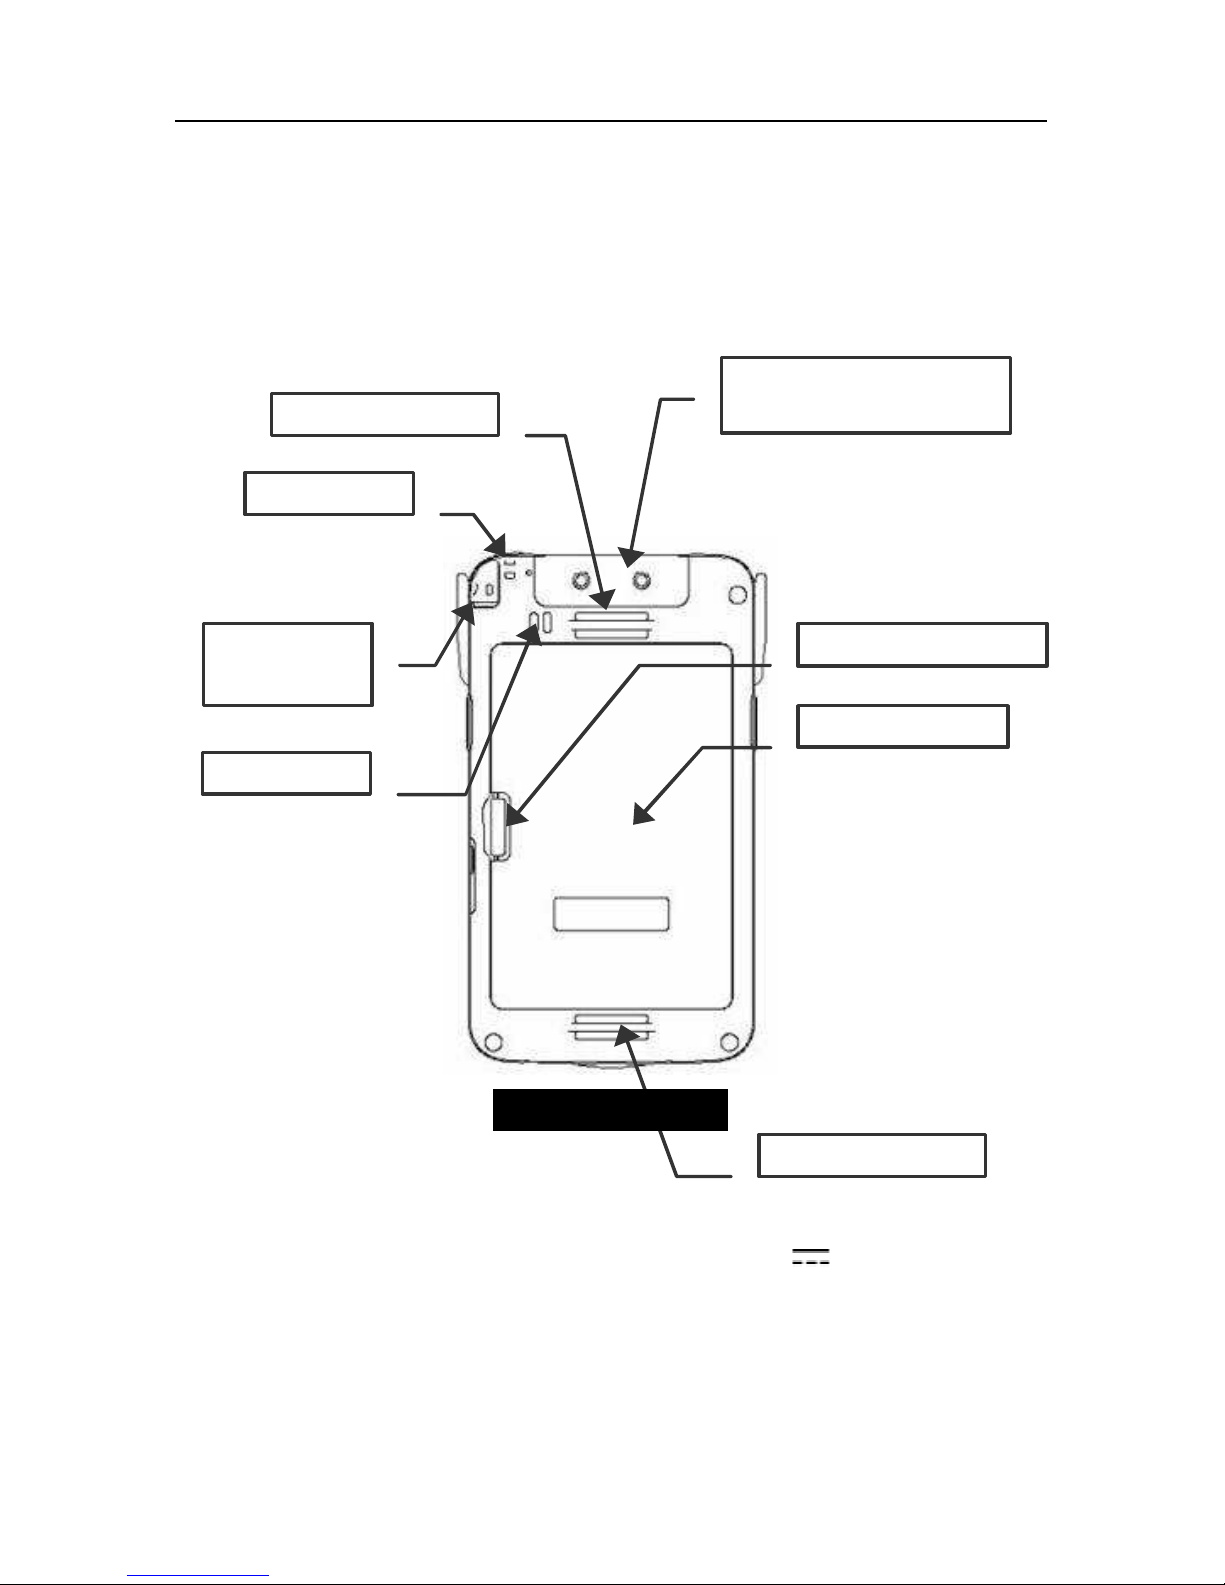
Note: the USB host was loaded with 5V
(DC),
maximum 500mA during normal condition.
USB Host for External
Detachable Devices
Hand Strap Hole
Speaker
Battery Cover
Hand Strap Hole
Battery Cover Latch
Stylus for
Reset Button
Strap Hole
Rear

WF360 POS PDA Quick Start Guide
P.3
Note: the USB port is for charging only
USB Host for External
Detachable Devices
Power Key
Shortcut Key (Left)
Shortcut Key (Right)
MicroSD Card Slot
Stylus for
Reset Button
Strap Hole
Strap Hole
USB (for Charging)
Headset Jack
Reset Key
Microphone
Bottom
Top
Left
Right

WF360 POS PDA Quick Start Guide
P.4

WF360 POS PDA Quick Start Guide
P.5
1.2. Inserting and Removing Battery
Inserting Battery
Align the battery metal contacts with the contacts
inside the battery compartment.
Press the battery downwards until it fits the battery
compartment. Push the battery until it is locked
automatically
Removing Battery
Turn off the PDA by press-and-holding the power key
and select “Power off”. (Please refer to 2.1 Turn
ON/OFF)
Open the battery cover. Push the battery lock to the
left and hold it.
Gently lift the battery by pulling the strap attached to
the battery top position.
Battery Lock

WF360 POS PDA Quick Start Guide
P.6
1.3. Charging Battery
The battery can be charged by the following:
Plug in the USB power adaptor to PDA’s bottom USB
socket.
Note: the USB terminal was loaded with 5V (DC),
500mA during normal condition.
USB Socket

WF360 POS PDA Quick Start Guide
P.7
1.4. LED Light Status
The LEDs has different status:
Main LED
Amber – battery is being charged
Green – battery full
Red – battery low
Wi-Fi LED
Blue flash quickly – Wi-Fi scanning
Blue flash slowly – Wi-Fi connected
Blue solid – Wi-Fi in sleep mode
Off –Wi-Fi off

WF360 POS PDA Quick Start Guide
P.8
1.5. System Info
From Settings > About, it displays unit’s S/N and ROM
Version/Date.
Note: S/N and ROM version info could also be seen
when PDA is booting up.

WF360 POS PDA Quick Start Guide
P.9
2. Getting Started
2.1. Turn ON/OFF
Turn ON
Press and hold the power key for 2 seconds and main
LED is green.
The unit displays a blue screen with displays S/N and
ROM info.
If low battery notification is seen with amber LED,
battery level is low and is insufficient to boot up the
unit. To restore to the minimum required power,
charge the unit for 10 to 15 minutes.
Turn OFF
Press and hold the power key for 1 second.
Press “Power off” to turn off the unit.

WF360 POS PDA Quick Start Guide
P.10
2.2. System Sleep Mode & Wakeup
System Sleep Mode (Power Saving)
To enter Sleep Mode when the screen is ON
Press power key or
Put the unit upside down for 5 seconds. (Please
refer to 3.3 G-Sensor)
Note:
“Sleep Mode” is a unique power saving feature
innovated by Widefly. Apart from its exceptionally
low power consumption like power off status, Wi-Fi
connection could still be kept.
This mode empowers “Always-on Wi-Fi” even the
system is in deep sleep status.
Solid blue Wi-Fi LED indicates sleep mode.
System Wakeup
To wakeup the system from “sleep mode”, simply press
power key.

WF360 POS PDA Quick Start Guide
P.11
2.3. Wi-Fi Basic Settings
1. From settings, tap the
Wi-Fi ON/OFF switch
2. Wi-Fi is turned ON.
Tap Wi-Fi to setup
3. Tap a network name
(SSID)
4. Enter password

WF360 POS PDA Quick Start Guide
P.12
5. Network connected
and locked
6. Press menu key >
Advance and Roam
Settings to display
connected AP info.

WF360 POS PDA Quick Start Guide
P.13
2.4. Clean Reset
Clean reset is a procedure restoring system to factory
default settings.
It could be performed by either below:
1. When Android system is running, goto Settings >
Backup & Reset, select “Factory data reset” and
then “Reset device”
2. When the unit is powered off, press-and-hold the
right button and turn on the unit. Wait until the
screen displays a green Android robot and
“Recovery mode” menu is seen. Use left/right
key as up/down key and power key as enter key.
Locate option “wipe data/factory reset” and press
power key. Locate “Yes – delete all user data”
start the “Clean reset”.

WF360 POS PDA Quick Start Guide
P.14
3. Power Settings
3.1. Screen Saving
From Settings > Display
Tap “Sleep” to configure screen off idle time.
Tap “Auto Sleep (upside down)” to configure the
time to auto screen off when the unit is upside.

WF360 POS PDA Quick Start Guide
P.15
3.2. Configure Sleep Mode
WF360 provides unique “Disable sleep mode” option
for apps that require maximum system and Wi-Fi
responsiveness while screen could be off.
To enable this feature, goto Settings > Display, select
“Disable sleep mode”.
NOTE: when sleep mode is disabled, background
apps and services could keep running and online with
the Wi-Fi connection. Apps requiring low network
latency and continuous network traffic, for example
Remote Desktop (RDP), could be benefited by this
option.
V1.2#01

WF360 POS PDA Quick Start Guide
P.16
Changes or modifications not expressly approved by the party
responsible for compliance could void the user’s authority to operate
the equipment.
This equipment has been tested and found to comply with the limits
for a Class B digital device, pursuant to Part 15 of the FCC Rules.
These limits are designed to provide reasonable protection against
harmful interference in a residential installation. This equipment
generates, uses and can radiate radio frequency energy and, if not
installed and used in accordance with the instructions, may cause
harmful interference to radio communications. However, there is no
guarantee that interference will not occur in a particular installation.
If this equipment does cause harmful interference to radio or
television reception, which can be determined by turning the
equipment off and on, the user is encouraged to try to correct the
interference by one or more of the following measures:
-- Reorient or relocate the receiving antenna.
-- Increase the separation between the equipment and receiver.
-- Connect the equipment into an outlet on a circuit different from
that to which the receiver is connected.
-- Consult the dealer or an experienced radio/TV technician for help.
This equipment complies with FCC radiation exposure limits set forth
for an uncontrolled environment. End user must follow the specific
operating instructions for satisfying RF exposure compliance. This
transmitter must not be co-located or operating in conjunction with
any other antenna or transmitter.
The portable device is designed to meet the requirements for
exposure to radio waves established by the Federal Communications
Commission (USA). These requirements set a SAR limit of 1.6 W/kg
averaged over one gram of tissue. The highest SAR value reported
under this standard during product certification for use when
properly worn on the body is 0.587 W/kg.
 Loading...