

WideBand 6000, 7000 User Manual

WideBand IP
Telep
hone
WideBand Corporation
User’s Manual
Models 6000/7000
4/21/2008

IP Phone User Manual
IP Phone User Manual
Table of Contents
Introduction ...................................................................................................................................... 4
Hardware Overview .................................................................................................................................. 4
Software Overview .................................................................................................................................... 4
Keypad Interface ................................................................................................................................ 5
Configure the IP Phone....................................................................................................................... 6
First Time Login ......................................................................................................................................... 6
Default Reset from Keypad ....................................................................................................................... 7
Default Setting .......................................................................................................................................... 7
Application Example .......................................................................................................................... 7
SIP-to-SIP Calling/Answering ..................................................................................................................... 7
SIP to Direct IP Calling ............................................................................................................................... 8
Direct IP to Direct IP Calling/Answering .................................................................................................... 8
Direct IP to Direct IP Calling within a NAT Router ..................................................................................... 8
3-Way Conference Call, Call Waiting, Call Hold ........................................................................................ 9
3-Way Conference Calling Application ................................................................................................. 9
Call Waiting Application ........................................................................................................................ 9
Call Hold Application ............................................................................................................................. 9
Call Transfer .......................................................................................................................................... 9
Call Forward .......................................................................................................................................... 9
Phone Configuration ........................................................................................................................ 10
System Information ................................................................................................................................. 10
Phone Book ............................................................................................................................................. 10
Phone Settings ........................................................................................................................................ 11
Call Forwarding ................................................................................................................................... 11
SNTP Setting ........................................................................................................................................ 12
Volume Setting.................................................................................................................................... 13
DND Setting ......................................................................................................................................... 13
Call Waiting Setting ............................................................................................................................. 13
Dial Plan .............................................................................................................................................. 14
Network .................................................................................................................................................. 15
2

WAN Settings ...................................................................................................................................... 15
LAN Settings ........................................................................................................................................ 16
DDNS Setting ....................................................................................................................................... 16
VLAN Settings ...................................................................................................................................... 17
PPTP Settings ...................................................................................................................................... 17
SIP Settings .............................................................................................................................................. 18
Service Domain ................................................................................................................................... 18
Port Settings ........................................................................................................................................ 19
Codec Settings..................................................................................................................................... 19
Codec ID Setting .................................................................................................................................. 20
DTMF Setting ...................................................................................................................................... 20
RPort Setting ....................................................................................................................................... 20
Other Settings ..................................................................................................................................... 20
NAT Trans ................................................................................................................................................ 21
STUN Setting ....................................................................................................................................... 21
Others...................................................................................................................................................... 21
Auto Configuration Setting ................................................................................................................. 21
ICMP Setting ....................................................................................................................................... 21
System Authority ..................................................................................................................................... 22
Save Changes .......................................................................................................................................... 22
Update ..................................................................................................................................................... 22
Reboot ..................................................................................................................................................... 23
Troubleshooting Configuration ......................................................................................................... 23
The LCD is showing “Ethernet Error!” ..................................................................................................... 23
The LCD is showing “No Service” ............................................................................................................ 23
DO NOT HEAR DIAL TONE? ..................................................................................................................... 23
Copyright © 2008 WideBand Corporation. All Rights Reserved. 04.08
3

Network Protocol
Tone
• SIP v1 (RFC 2543), v2 (RFC 3261)
• Ring Tone
Phone
Function
Codec
• Volume Adjustment
• G.711:64kb/s (PCM)
IP Assignment
• Static IP
Voice Quality
Security
• VAD: Voice activity detection
• HTTP 1.1 basic/digest authentication for Web setup
QoS
• ToS
F
ield
Call Function
NAT Traversal
• Call Hold
• STUN
Configuration
• Web Browser
DTMF Function
Firmware Upgrade
• In-Band DTMF
• TFTP
SIP Server
• Registrar Server (three SIP accounts)
IP Phone User Manual
Introduction
ll
hone, some setup
Menu for further
Two RJ
-
45 networking interface
s
haring
function of the phone adapter.
1
This user’s manual is for the WideBand IP Telephone, models 6000 and 7000. This user’s manual wi
explain the IVR instruction and web configuration for the IP phone. Before using the IP p
processes are required to make the phone work properly. Please refer to the Setup
information.
1.1 Hardware Overview
The IP phone has the following interfaces for Networking, and one power connector.
These two interfaces support 10/100Mps Fast Ethernet.
WAN: Connect to the ADSL modem or router.
LAN: Connect to your PC computer. You can then connect to the Internet through the Internet S
1.2 Software Overview
• IP/TCP/UDP/RTP/RTCP
• IP/ICMP/ARP/RARP/SNTP
• TFTP Client/DHCP Client/PPPoE Client
• Telnet/HTTP Server
• DNS Client
• NAT/DHCP Server
• G.723.1:6.3k / 5.3kb/s
• G.726:16k / 24k / 32k / 40kb/s (ADCPM)
• G.729A:8kb/s (CS-ACELP)
• G.729B:adds VAD & CNG to G.729
• CNG: Comfortable noise generator
• LEC: Line echo canceller
• Packet Loss Compensation
• Adaptive Jitter Buffer
• Call Waiting
• Call Forward
• Caller ID
• 3-way conference
• Ring Back Tone
• Dial Tone
• Busy Tone
• Programming Tone
• Speed Dial Key
• Phone Book
• Flash
• DHCP
• PPPoE
• MD5 for SIP authentication (RFC 2069/RFC 2617)
• IVR/Keypad
• Out-Band DTMF
• SIP Info
• Outbound Proxy
• HTTP
4

Key Name
Description
1 “,”, “!”, “?”, “1”, “
-“
2 “2”, “a”, “b”, “c”, “A”, “B”, “C”
3 “3”, “d”, “e”, “f”, “D”, “E”, “F”
4 “4”, “g”, “h”, “i", “G”, “H”, “I”
5 “5”, “j”, “k”, “l”, “J”, “K”, “L”
6 “6”, “m”, “n”, “o”, “M”, “N”, “O”
7 “7”, “p”, “q”, “r”, “s”, “P”, “Q”, “R”, “S”
8 “8”, “t”, “u”, “v”,
“T”, “U”, “V”
9 “9”, “w”, “x”, “y”, “z”, “W”, “X”, “Y”, “Z”
0 “0”,
“space”
* “*”, “.”, “:”, “@”
# Start dialing process
TRANSFER
Transfer to the other phone number
REDIAL
Redial the same number again
HOLD
Put the call on Hold
MUTE
Mute your side of the conversation
DND Do Not Disturb functionality
OK OK, accept setting
DEL Delete a word or phone number
UP/DOWN
The up and down keys
LEFT/RIGHT
The left and right keys
MENU
Show phone configuration menu
SPK Turn on/off Speaker Phone
Line1
– Line3
Available conversation lines
M1 – M5
The 5 speed dial numbers
Conf Three
-
way conferencing
Call In
The list of incoming calls
Call Out
The list of outgoing calls
Volume +/
- Alter volume settings
IP Phone User Manual
nterface
2 Keypad I
5
IP Phone User Manual
Configure the IP Phone
hone.
:
erver enabled. The default WAN port has
a
DHCP server.
First Time Login
STEP 1
- Power Up and Connect the Phone
•
WAN Port to a NAT Router or ADSL Modem using a Category 5 network
hould then light up, showing the date, time, and “No Service” if a SIP
Pick up the phone, and the LCD Panel will show “IP Dialing…”. You should hear a ring back
STEP 2
– Set Up the VoIP Account
•
the MENU key, then arrow
” and hit
lt
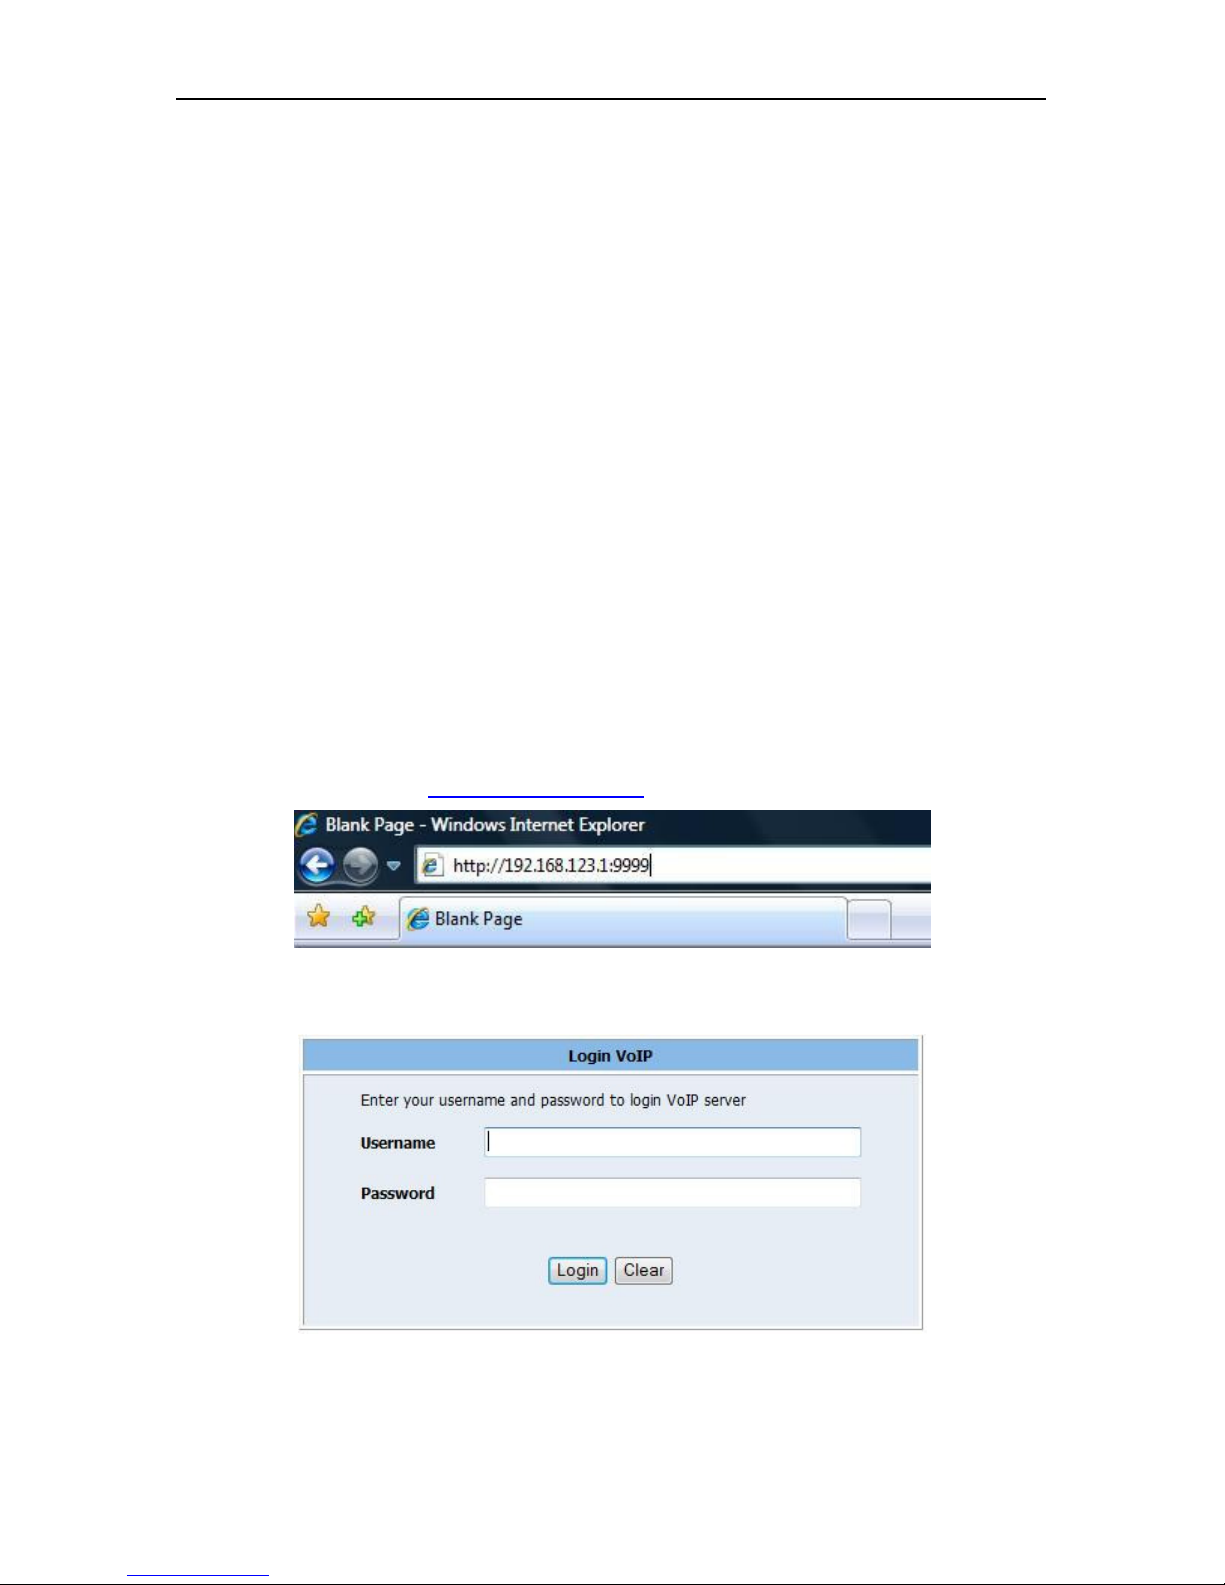
Next, from your PC, open a browser (Internet Explorer), and enter “http://<IP address of IP
Phone>:9999” (e.g.
http://192.168.123.1:9999
”
) as follows:
•
There is
account to log in, you can configure all of the setti
ngs.
•
hone.
3
The IP phone provides a built-in web server, so you can use a web browser to configure the p
First, open a browser and type the IP address of the phone, specifying port 9999. Example
http://192.168.123.1:9999
The default LAN port IP is 192.168.123.1, with a DHCP s
DHCP client enabled; the IP would be automatically assigned if it is connected to a network with
3.1
Connect the
cable. Then connect the LAN Port to a PC, also using a Category 5 network cable.
•
Connect the 9V power adapter to the phone’s power socket.
•
The LCD Panel s
account is not yet set up.
•
tone. If not, please make sure the RJ-45 WAN port is connected properly.
To find the phone’s IP address from the phone’s keypad, press
down to the “4. Network” option and hit ENTER. Then, arrow down to the “5. Status
ENTER. The MENU key is used for escape, and the ENTER key for selection. The defau
IP address is 192.168.123.1.
•
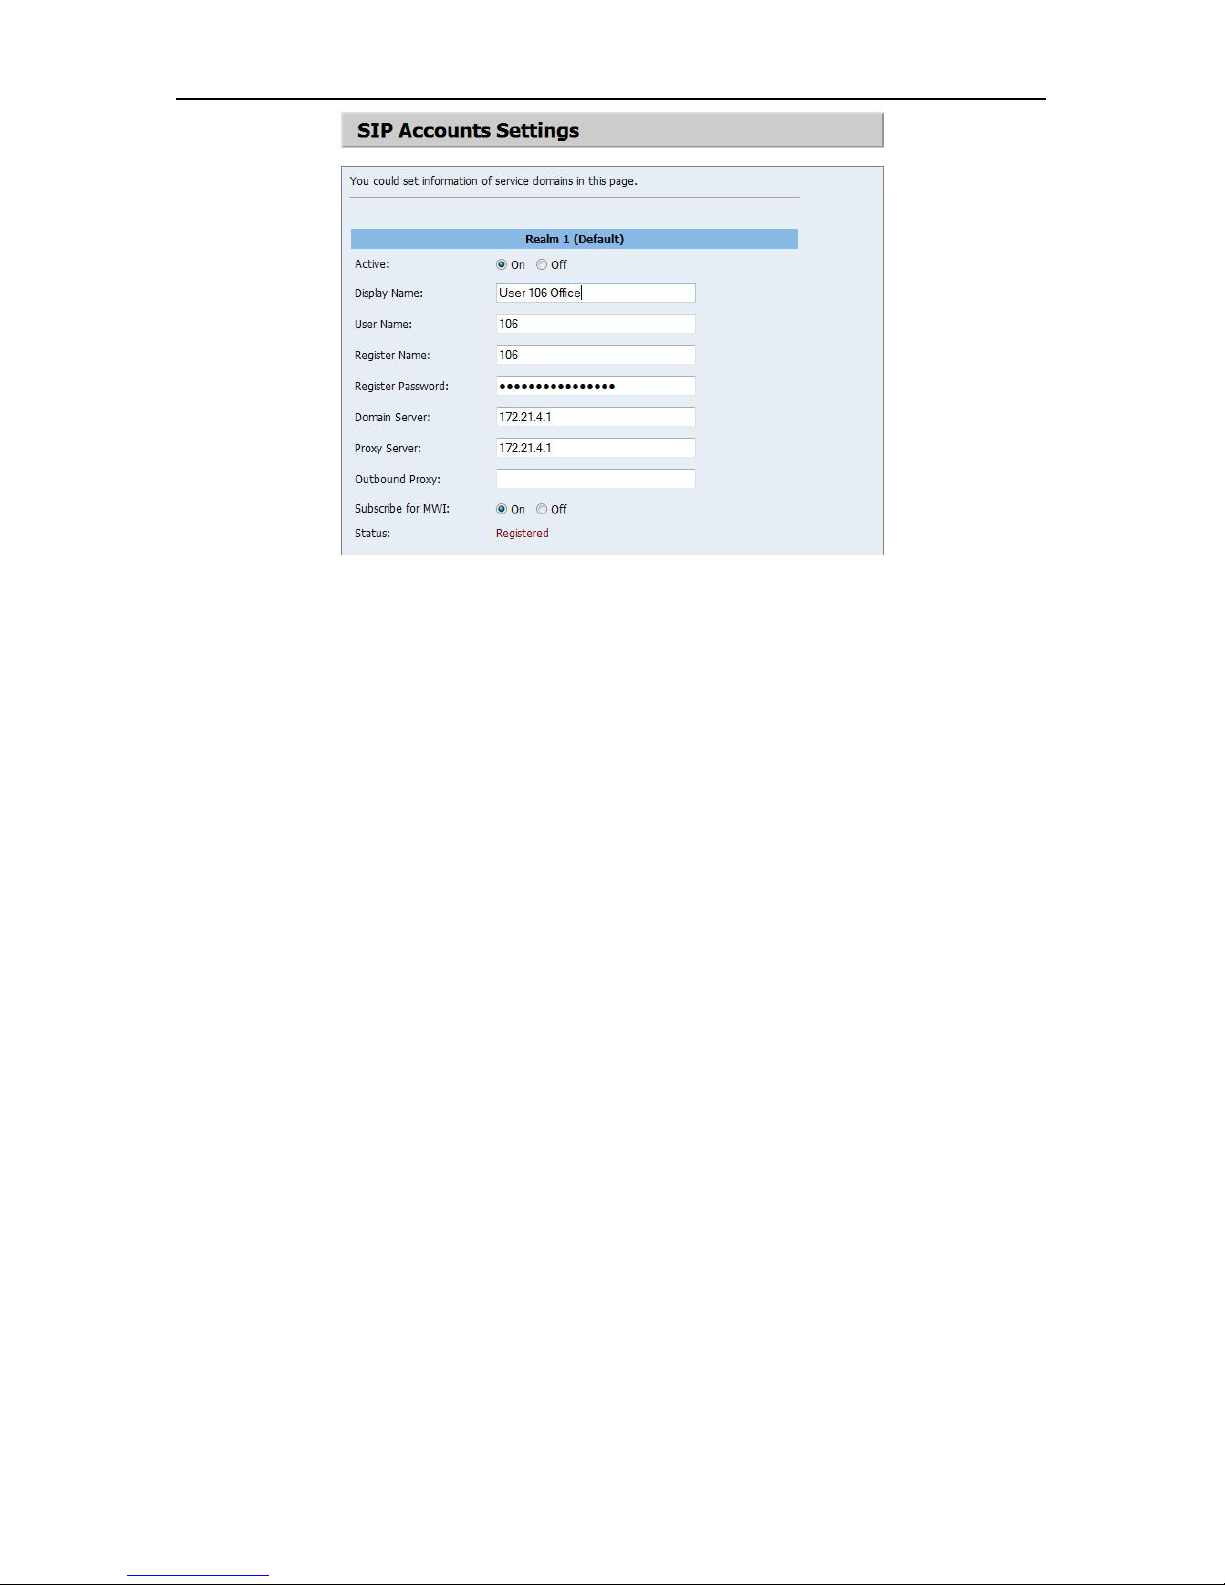
The default login settings are a user named “root”, with the password “test”.
another, limited account named “user”, also with the password “test”. If you use the root
Click “SIP Settings”->”Account Settings” to set up a SIP account in your IP p
6
IP Phone User Manual
Please refer to
section
5.5 for details.
Once you change the setting in the Web Management
Then, you will need to
save the settings.
•
after successful
STEP 3
– Make your First Call
•
Enter the phone number you would like to call, optionally ending with a ‘#’ (e.g. 1003#). The
‘#’tells the phone to call the number immediately. Dialing without # will not call until the auto
Default Reset from Keypad
the factory defaults using the phone’s keypad, press MENU, and arrow down to the “7.
Administrator” option, and press ENTER. Then, arrow down to the “3. Default setting” option, and
and
Then,
reboot the phone (option 7 in the Administrator menu).
Default Setting
LAN IP Address:
WAN IP Address:
Web Management Page
Application Example
SIP Calling/Answering
Applications:
NAT router.
SIP server
with
interface, please remember to click the “Submit” button on that page.
The LCD panel will show the date, time, and registered <phone number>
SIP registration.
Pick up the handset; you should now hear a dial tone.
•
dial timer (default=5 seconds) elapses.
3.2
To restore
press ENTER. Finally, select “1. Load default”. The LCD panel will read Loading Program,
System Initialized. Please use the MENU key for escape, and the ENTER key for selection.
3.3
192.168.123.1
Dynamic Address/DHCP
Login Name: root
Password: test
4
4.1 SIP-to-
Both parties are registered to a SIP server with either fixed real IP or private IP behind a
The SIP-to-SIP calling works when both calling and answering parties are registered to a
given registered phone numbers.
7
 Loading...