

Page 1
USER’S MANUAL
IF1911C (PA19ASX)
TFT LCD Monitor
Page 2

1
Table of Contents
Safety Instructions ............................................................................................... 2
Explanation of Graphical Symbols ................................................................................... 2
Precautions ..................................................................................................................... 3
On Safety ........................................................................................................................ 3
Your New LCD Monitor .......................................................................................... 5
Feature and Benefits ....................................................................................................... 5
Unpacking Your Monitor .................................................................................................. 5
Regulatory Information ......................................................................................... 6
FCC Information ............................................................................................................... 6
Setting up Your LCD Monitor ................................................................................. 8
Connecting Your LCD Monitor .......................................................................................... 8
Adjusting Your LCD Monitor .................................................................................. 9
Warm-up Time ................................................................................................................. 9
Main User Controls .......................................................................................................... 10
User Controls ..................................................................................................................10
OSD Function Controls ....................................................................................................11
Appendix .............................................................................................................. 13
Specifications (Monitor Main) .........................................................................................13
Electrical Specifications ..................................................................................................13
Mechanical Specification and Regulatory ........................................................................14
Power Management ........................................................................................................15
Pin Assignments .............................................................................................................16
Troubleshooting ..............................................................................................................17
Page 3
2
Safety Instructions
CAUTION
RISK OF ELECTRIC SHOCK
DO NOT OPEN
AVERTISSEMENT RISQUE DE CHOC ELECTRIQUE NE PAS OUVRIR
CAUTION:
TO REDUCE THE RISK OF ELECTRIC SHOCK,
DO NOT REMOVE COVER (OR BACK).
NO USER-SERVICEABLE PARTS INSIDE.
REFER SERVICING TO QUALIFIED SERVICE PERSONNEL.
LCD MONITOR
54IJ
E217340
WITH RESPECT TO ELECTRIC SHOCK,
FIRE AND MECHANICAL HAZARDS ONLY
IN ACCORDANCE WITH UL60601-10 AND
CAN/CSA C22.2 NO. 601.1,
MEDICAL EQUIPMENT CERTIFIED FOR CANADA
Grounding Reliability Can Only Be Achieved When The Equipment Is Connected
To An Equivalent Receptacle Marked “Hospital Only” or “Hospital Grade”.
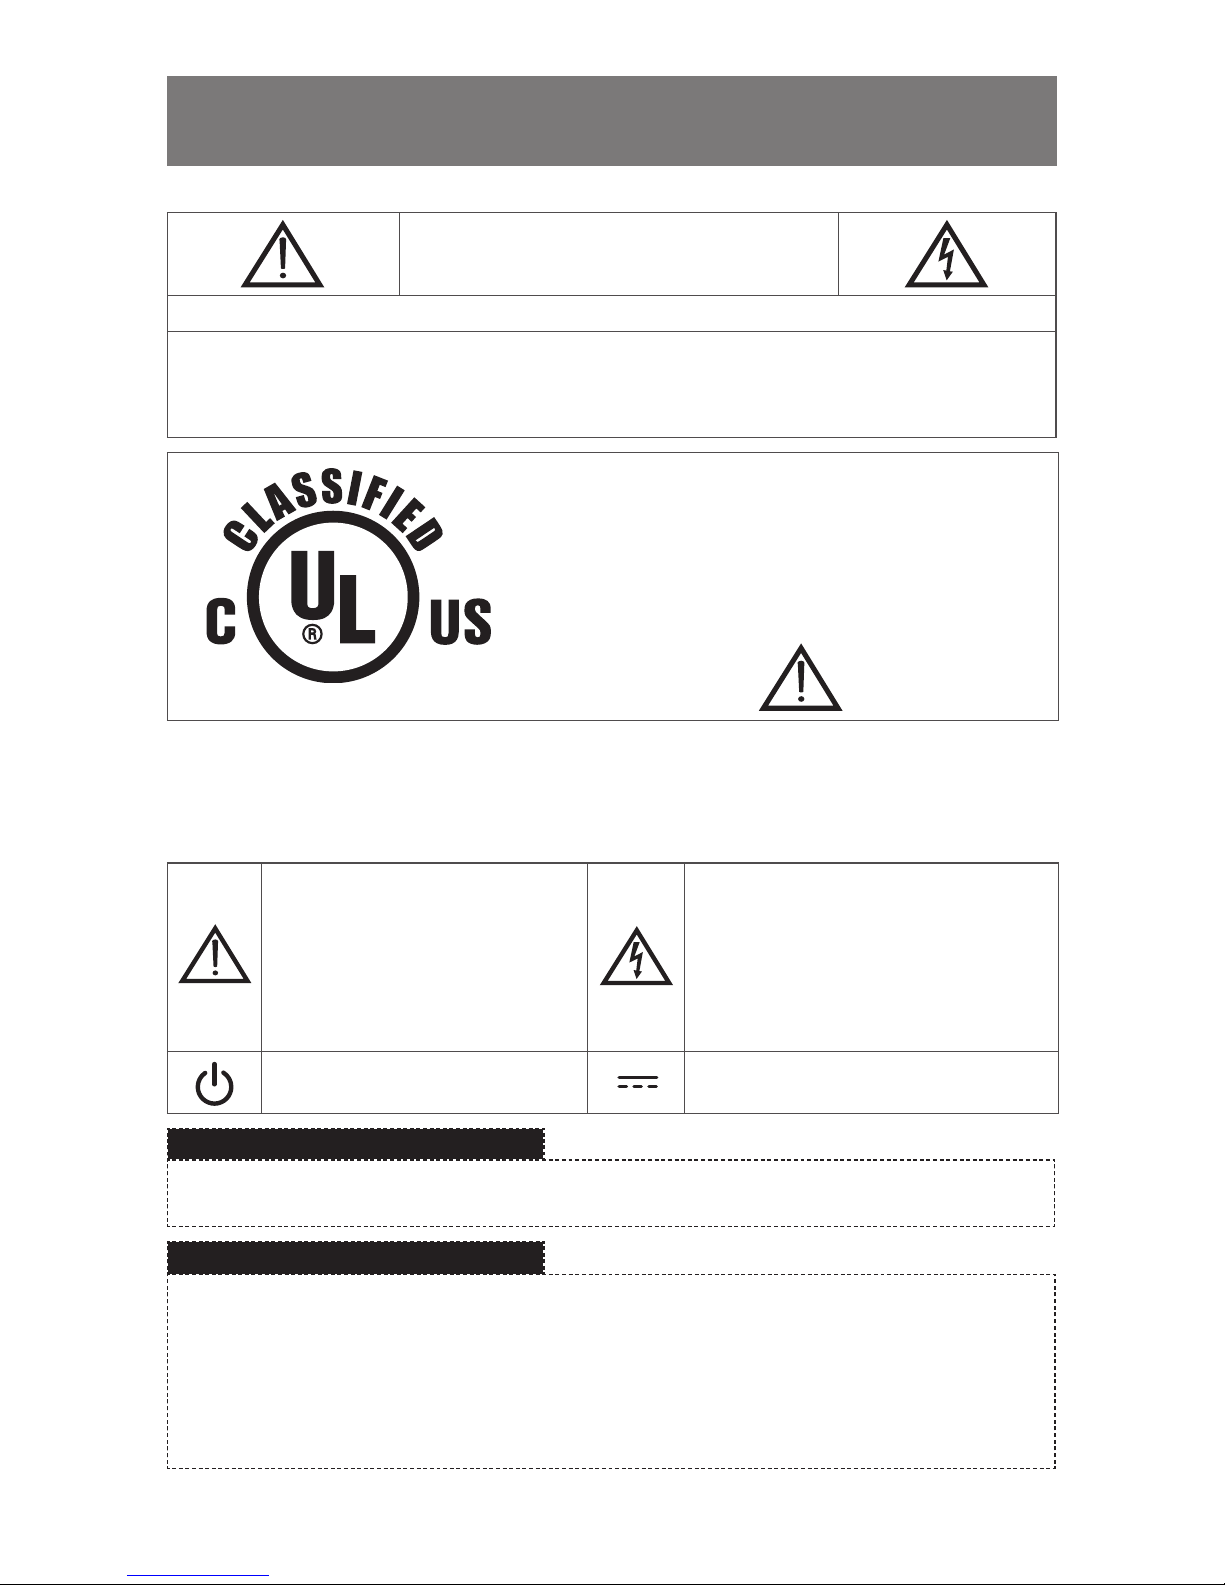
Explanation of Graphical Symbols
The exclamation point within an
equilateral triangle is intended to
alert the user to the presence of the
important operating and maintenance
(servicing) instructions in the literature
accompaning the appliance.
The lighting ash with arrowhead symbol,
within an equilateral triangle, is intended
to alert the be user to the presence of
un-insulated “dangerous voltage” within
the product’s enclosure that of may
sufcient magnitude to constitute a risk
of electric shock to persons.
Stand-by switch. Press to turn the
monitor on or off (Stand-by mode).
Direct current.
Warning
When the unit is used together with other equipment in the patient area, the equipment shall
be connected according to standard UL60601-1 and IEC60601-1.
Classification
• Protection against electric shock: Class l including AC/DC Adapter.
• Applied parts no applied parts.
• Protection against harmful ingress of water: ordinary IPXO.
• Degree of safety in the presence of flammable anesthetics mixture with air or with oxygen or
with nitrous oxide. Not suitable for use in the presence of a flammable anesthetics mixture
with air or with oxygen or with nitrous oxide.
• Mode of operation: Continuous.
Page 4
3
Safety Instructions
Precautions
On Safety
1. Before connecting the AC power cord to the DC adapter outlet, make sure the voltage
designation of the DC adapter corresponds to the local electrical supply.
2. Never insert anything metallic into the cabinet openings of the Liquid Crystal Display (LCD)
monitor ; doing so may create the danger of electric shock.
3. To reduce the risk of electric shock, do not remove cover. No user-serviceable parts inside.
Only a qualified technician should open the case of the LCD monitor.
4. Never use your LCD monitor if the power cord has been damaged. Do not allow anything to rest
on the power cord, and keep the cord away from areas where people can trip over it.
5. Be sure to hold the plug, not the cord, when disconnecting the LCD monitor from an electric
socket.
6. Unplug your LCD monitor when it is going to be left unused for an extended period of time.
7. Unplug your LCD monitor from the AC outlet before any service.
8. If your LCD monitor does not operate normally-in particular, if there are any unusual sounds
or smells coming from it-unplug it immediately am authorized dealer or service center.
Warning
Do not to touch signal input, signal output or other connectors, and the patient simultaneously.
Warning
External equipment intended for connection to signal input, signal output or other connectors,
shall comply with relevant IEC standard (e.g., IEC60950 for IT equipment and IEC60601 series
for medical electrical equipment).
In addition, all such combination - system - shall comply with the standard IEC60601-1-1, safety
requirements for medical electrical systems. Any person who connects external equipment to
signal input, signal output or other connectors has formed at system and is therefore
responsible for the system to comply with the requirements of IEC60601-1-1.
If, in doubt, contact qualified technician or your local representative.
Page 5

4
Safety Instructions
This TFT LCD Monitor is as accessory intended for use with Medical Equipment to display alpha,
numerical and graphical data.
On Installation
1. Openings in the LCD monitor cabinet are provided for ventilation. To prevent overheating,
these openings should not be blocked or covered. Also avoid using the LCD monitor on a bed,
sofa rug, or other soft surface. Doing so may block the ventilation openings in the bottom of
the cabinet. If you put the LCD monitor in a bookcase or some other enclosed space, be sure
to provide adequate ventilation.
2. Put your LCD monitor in a location with low humidity and a minimum of dust.
3. Do not expose the LCD monitor to rain or use it near water (in kitchens, near swimming pools,
etc.). If the LCD monitor accidentally gets wet, unplug it and contact an authorized dealer
immediately. You can clean the LCD monitor with a damp cloth if necessary, but be sure to
unplug the LCD monitor first.
4. Place your LCD monitor on a solid surface and treat it carefully.
5. Locate your LCD monitor near an easily accessible AC outlet.
6. High temperature can cause problems. Don’t use your LCD monitor in direct sunlight and keep
it away from heaters, stoves, fireplaces, and other sources of heat.
On Cleaning
The screen is made of thin glass with a plastic front surface and can be damaged if dropped, hit
or scratched. Do not clean the front panel with keton-type materials (e.g., acetone), ethyl alcohol,
toluene, ethyl acid, methyl, or chloride-these may damage the panel.
Panel: Clean with a soft woolen or cotton towel. Use a watery solution or a mild commercial
glass cleaning solution.
Cabinet: Clean with a soft cloth dampened with mild detergent and water. Repeat this with
water only and wipe dry with a dry cloth.
On Repacking
Do not throw away the carton and packing materials. They make an ideal container which to
transfer the unit. If you have any questions about this unit, contact your authorized dealer.
On Disposal
The lamps inside the display contain mercury which can pollute the environment if disposed
carelessly. Please contact our nearest representative office or your local environmental office in
case of disposal of this unit.
Contact
WIDE Corporation
456, Gomae-dong, Giheung-gu, Yongin-si, Gyeonggi-do 446-901, Republic of Korea
(TEL : +82-31-218-1600 FAX : +82-31-274-7400) http://www.widecorp.com
Page 6
5
Your New LCD Monitor
Feature and Benefits
• Dual design - Analog/Digital Interface
- Clear, Sharp and Crisp Image
• Flexibility - Portrait/Landscape Display
• Superior Spec - High Luminance/High Contrast Ratio
- Wide Viewing Angle
- Large Display Area (19˝)
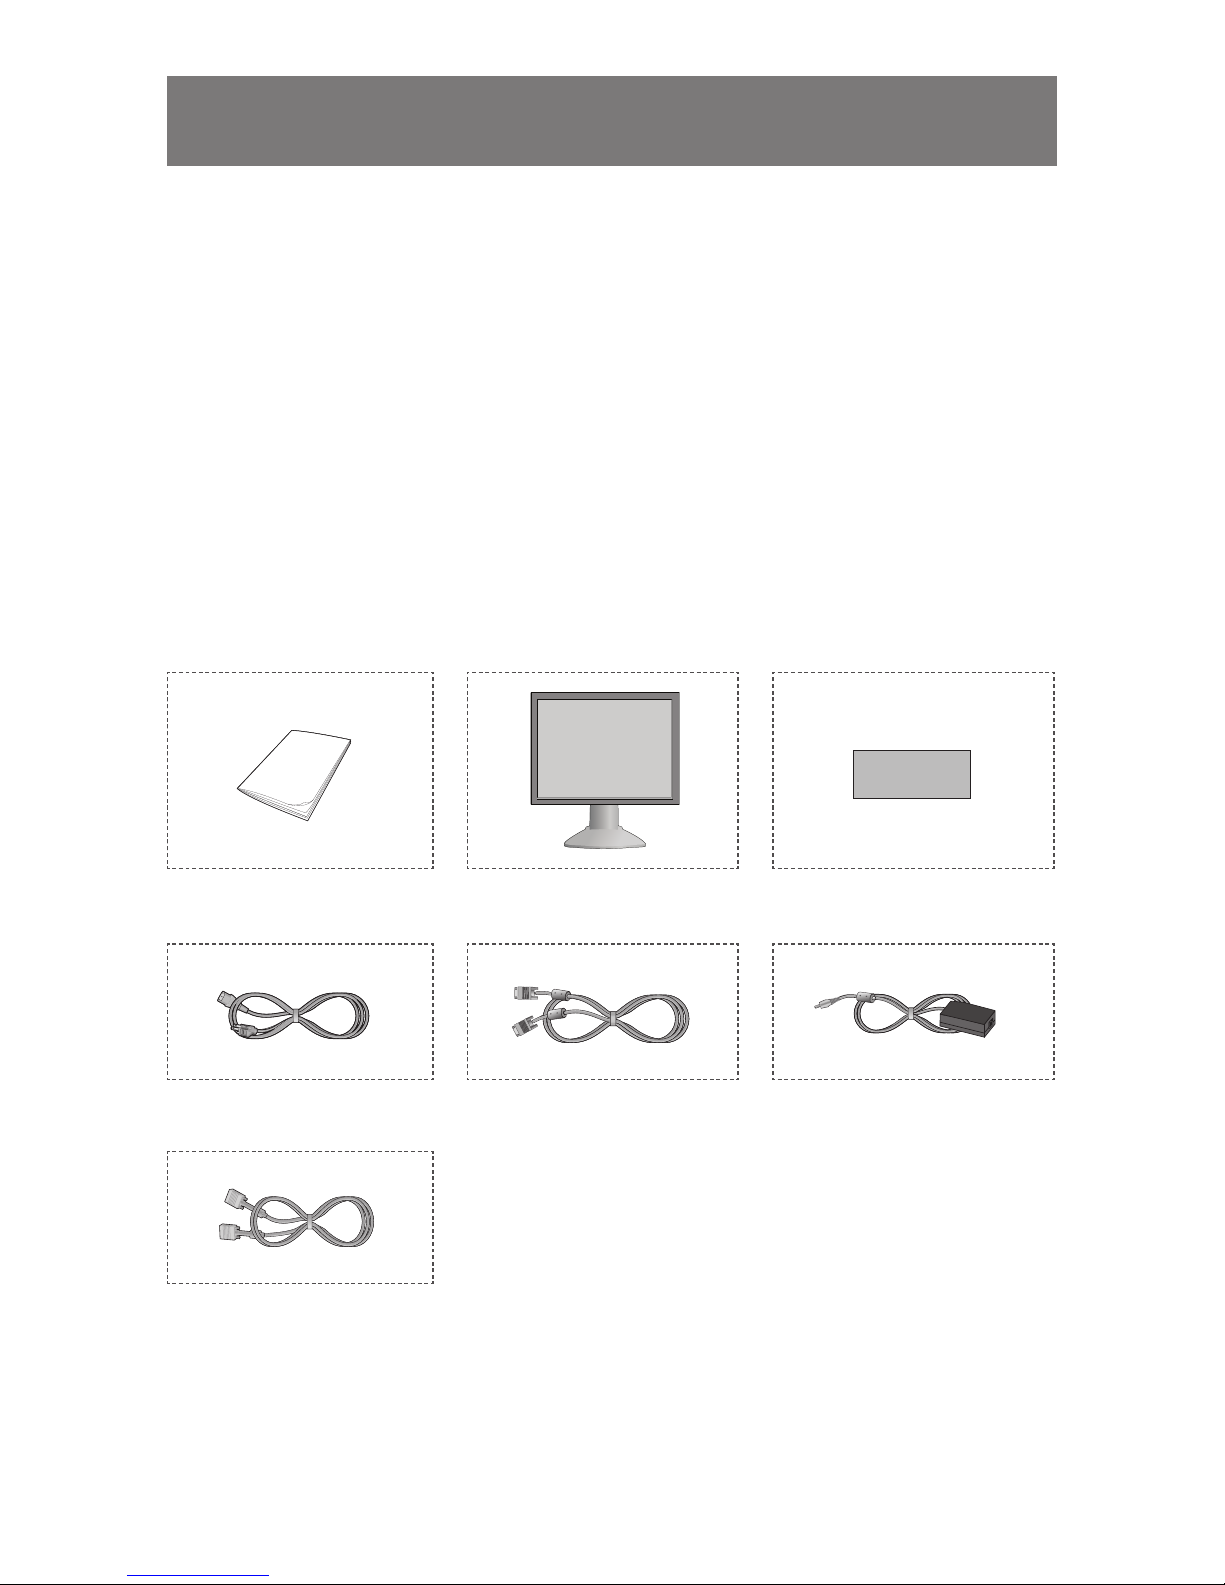
Unpacking Your Monitor
When you unpack the LCD monitor, make sure that you have items below.
Manual Monitor Warranty Card
(not available in all locations)
Power Cord DVI Signal Cable DC Adapter
15-Pin D-Sub Signal Cable
Page 7
6
Regulatory Information
FCC Information
User Instructions
The Federal Communications Commission Radio Frequency Interference Statement includes the
following warning:
• Reorient or relocate the receiving antenna.
• Increase the separation between the equipment and receiver.
• Connect the equipment into an outlet on a circuit different from that to which the receiver is
connected.
• Consult the dealer or an experienced radio/TV technician for help.
User Information
Changes or modifications not expressly approved by the party responsible for compliance could
void the user’s authority to operate the equipment.
If necessary, consult your dealer or an experienced radio/television technician for additional
suggestions. You may find the booklet called How to Identify and Resolve Radio/TV Interference
Problems helpful. This booklet was prepared by the Federal Communications Commission.
It is available from the U.S. Government Printing Office, Washington, DC 20402, Stock Number
004-000-00345-4.
NOTE
This equipment has been tested and found to comply with the limits for a Class B digital device,
pursuant to Part 15 of the FCC Rules. These limits are designed to provide reasonable protection
against harmful interference in a residential installation. This equipment generates, uses, and
can radiate radio frequency energy and, if not installed and used in accordance with the
instrutions, may cause harmful interference to radio communications. However, there is no
guarantee that interference will not occur in a particular installation. If this equipment does
cause harmful interference to radio or television receptions, which can be determined by turning
the equipment off and on, the user is encouraged to try to correct the interference by one or
more of the following measures:
Warning
User must use shielded signal interface cables to maintain FCC compliance for the product.
Page 8

7
Regulatory Information
Declaration of conformity for products Marked with FCC Logo
This device complies with Part 15 of the FCC Rules. Operation is subject to the following two
conditions: (1) this device may not cause harmful interference, and (2) this device must accept any
interference received, including interference that may cause undesired operation.
The party responsible for product compliance:
Provided with this monitor is a detachable power supply cord with IEC320 style terminations.
It may be suitable for connection to any UL Listed personal computer with similar configuration.
Before making the connection, make sure the voltage rating of the computer convenience outlet is
the same as the monitor and that the ampere rating of the computer convenience outlet is equal to
or exceeds the monitor voltage rating.
For 120 Volt applications, use only UL Listed detachable power cord with NEMA configuration
5-15P type (parallel blades) plug cap. For 240 Volt applications use only UL Listed Detachable
power supply cord with NEMA configuration 6-15P type (tandem blades) plug cap.
IC Compliance Notice
This Class B digital apparatus meets all requirements of the Canadian Interference-Causing
Equipment Regulations of ICES-003.
Page 9
8
Setting up Your LCD Monitor
Connecting Your LCD Monitor
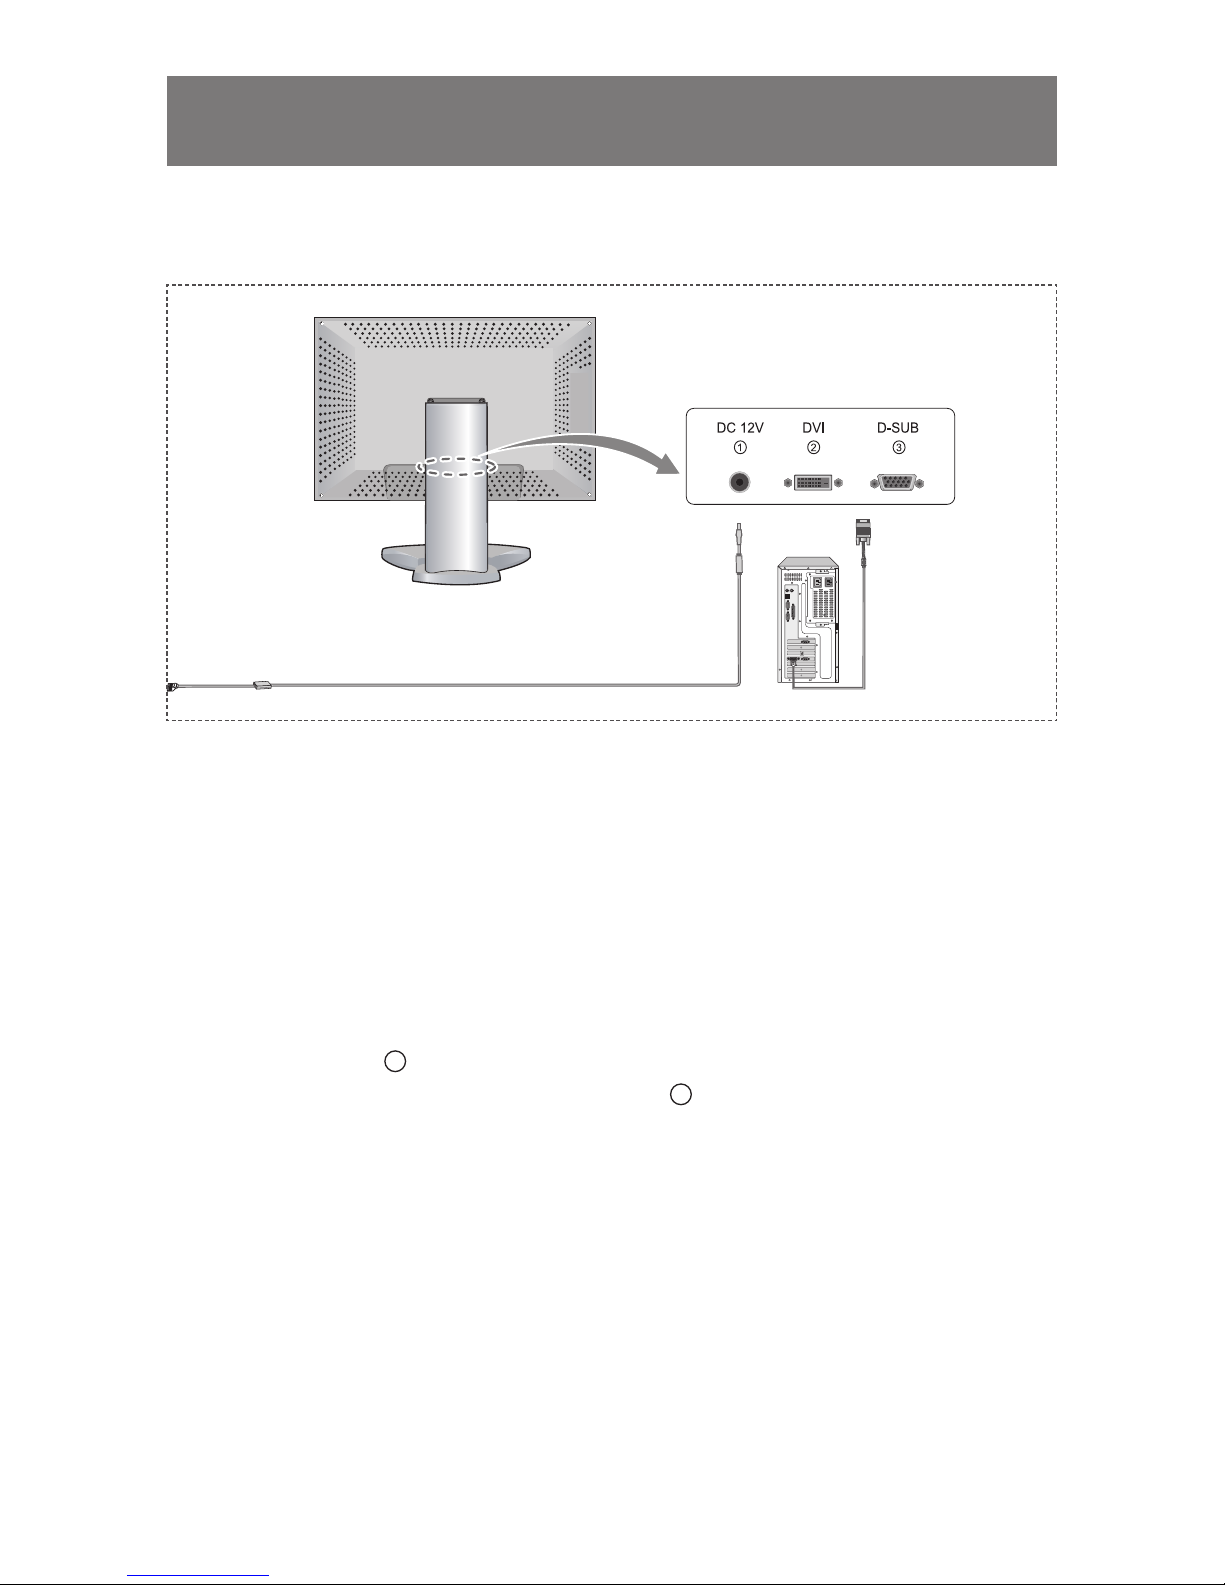
1. Power & Signal Input
1) Main Power Input : DC Power Input Jack from the AC to DC Adapter.
2) Digital Video Input : Digital Video Input connector (DVI) from the PC.
3) Analog Video Input : Analog Video Input connector (D-sub 15p) from the PC.
2. Connecting Cable
1) Connect the power cord to the DC adaptor and connect the adaptor plug to the DC12V
power connector 1 on the back of the monitor.
2) Connect the Digital video signal cable from PC to
2
.
3) Connect the 15-pin D-SUB (Analog) signal cable from PC Video connector to the Video port
on the back for your monitor.
4) Turn the monitor on, and the turn on the computer.
5) Recommended resolution of IF1911C (PA19ASX) is SXGA, 1280 x 1024.
Page 10

9
Adjusting Your LCD Monitor
Warm-up Time
All LCD monitors need time become thermally stable whenever you turn on the monitor after the
monitor be turned off for a couple of hours.
Therefore, to achieve more accurate adjustments for parameters, allow the LCD monitor to warm
(be on) for at least 20 minutes before making any screen adjustments.
Page 11
10
Adjusting Your LCD Monitor
Main User Controls
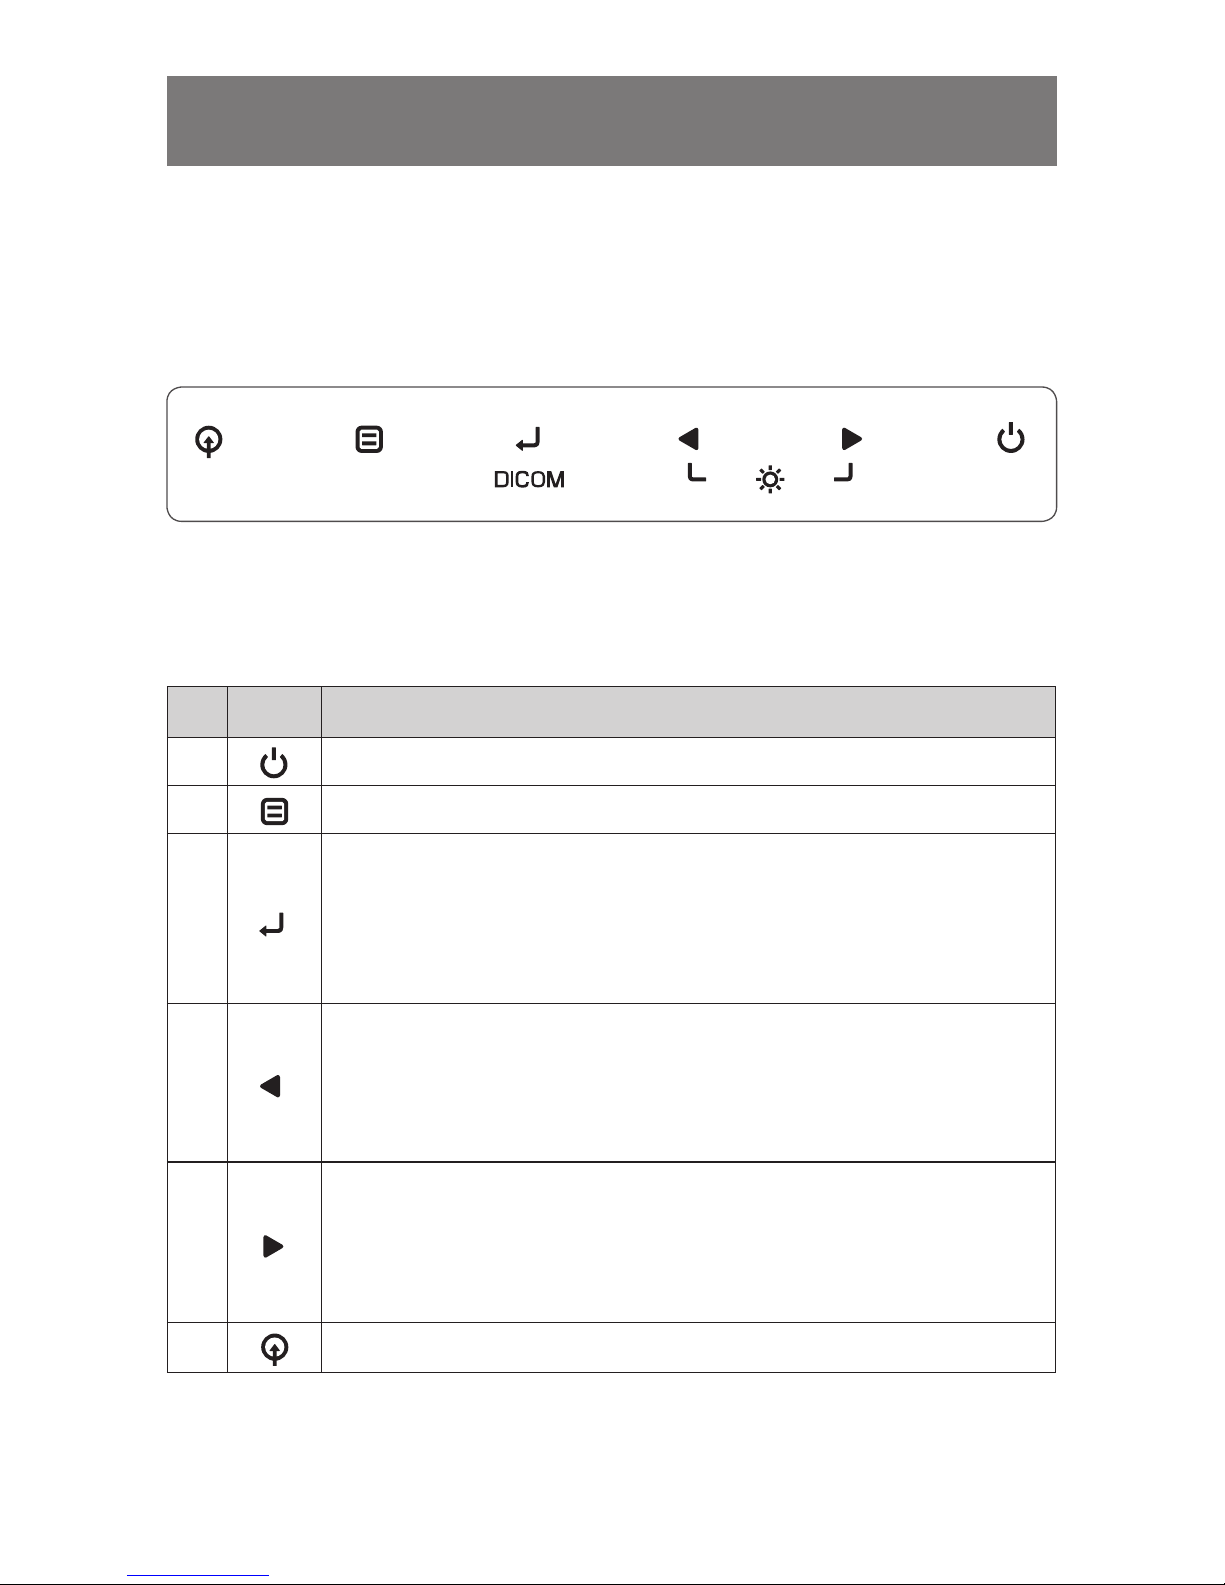
Your LCD monitor allows you to easily adjust the characteristics of the image being displayed.
All of these adjustments are made using the control buttons on the monitor. While you use these
buttons to controls, an OSD shows you their change.
User Controls
No Name Description
1
· Turns ON/OFF the monitor. Press key more then 0.5 sec.
2
· Activates the OSD menu or goes to previous menu.
3
· When the OSD menu is off
: Performs “DICOM” function.
· When the OSD menu is on:
: Selects the function that user wants.
· When press key more then 5 sec, toggle OSD lock and unlock.
4
· When the OSD menu is off
: Decreases the Dim Brightness function.
· When the OSD menu is on
: Decreases the adjustment of the selected function
: Moves the highlight icon UP to the function that wants.
5
· When the OSD menu is off
: Increases the Dim Brightness function.
· When the OSD menu is on
: Increases the adjustment of the selected function.
: Moves the highlight icon DOWN to the function that wants.
6
· Selects the input Signal among Analog RGB, Digital DVI.
Page 12
11
Adjusting Your LCD Monitor
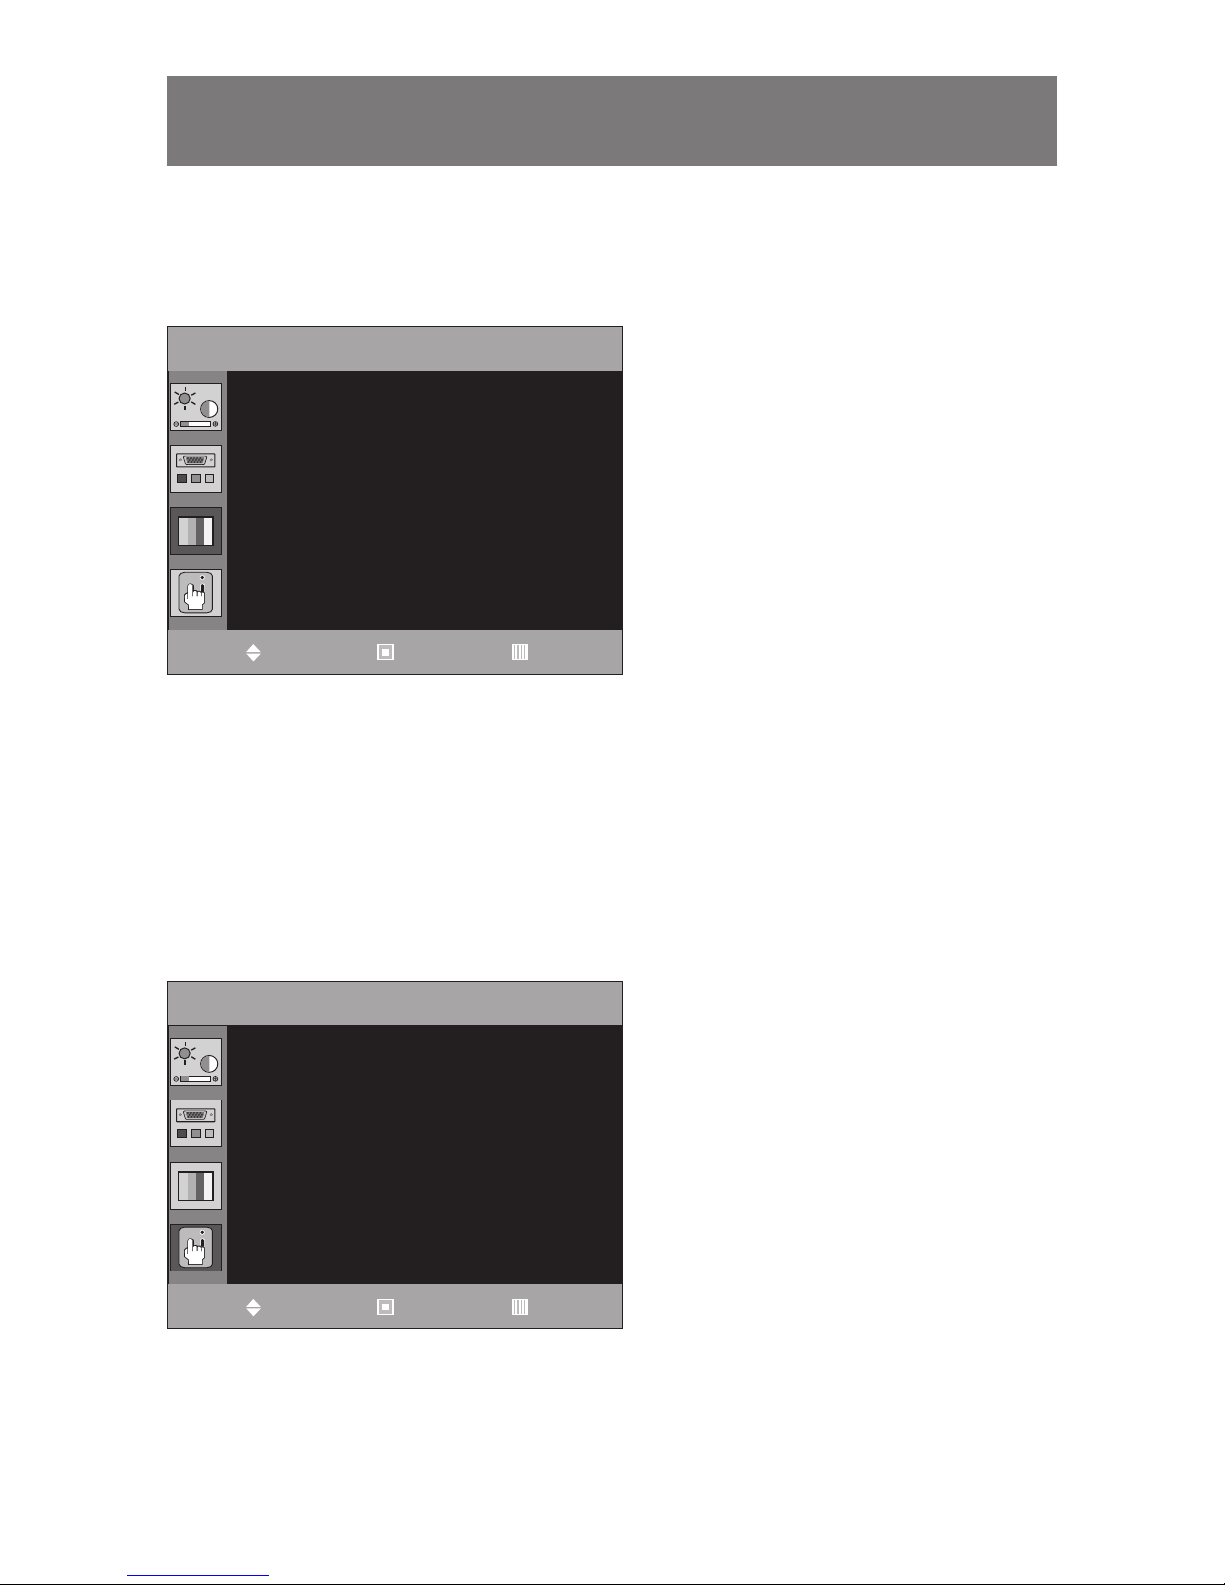
OSD Function Controls
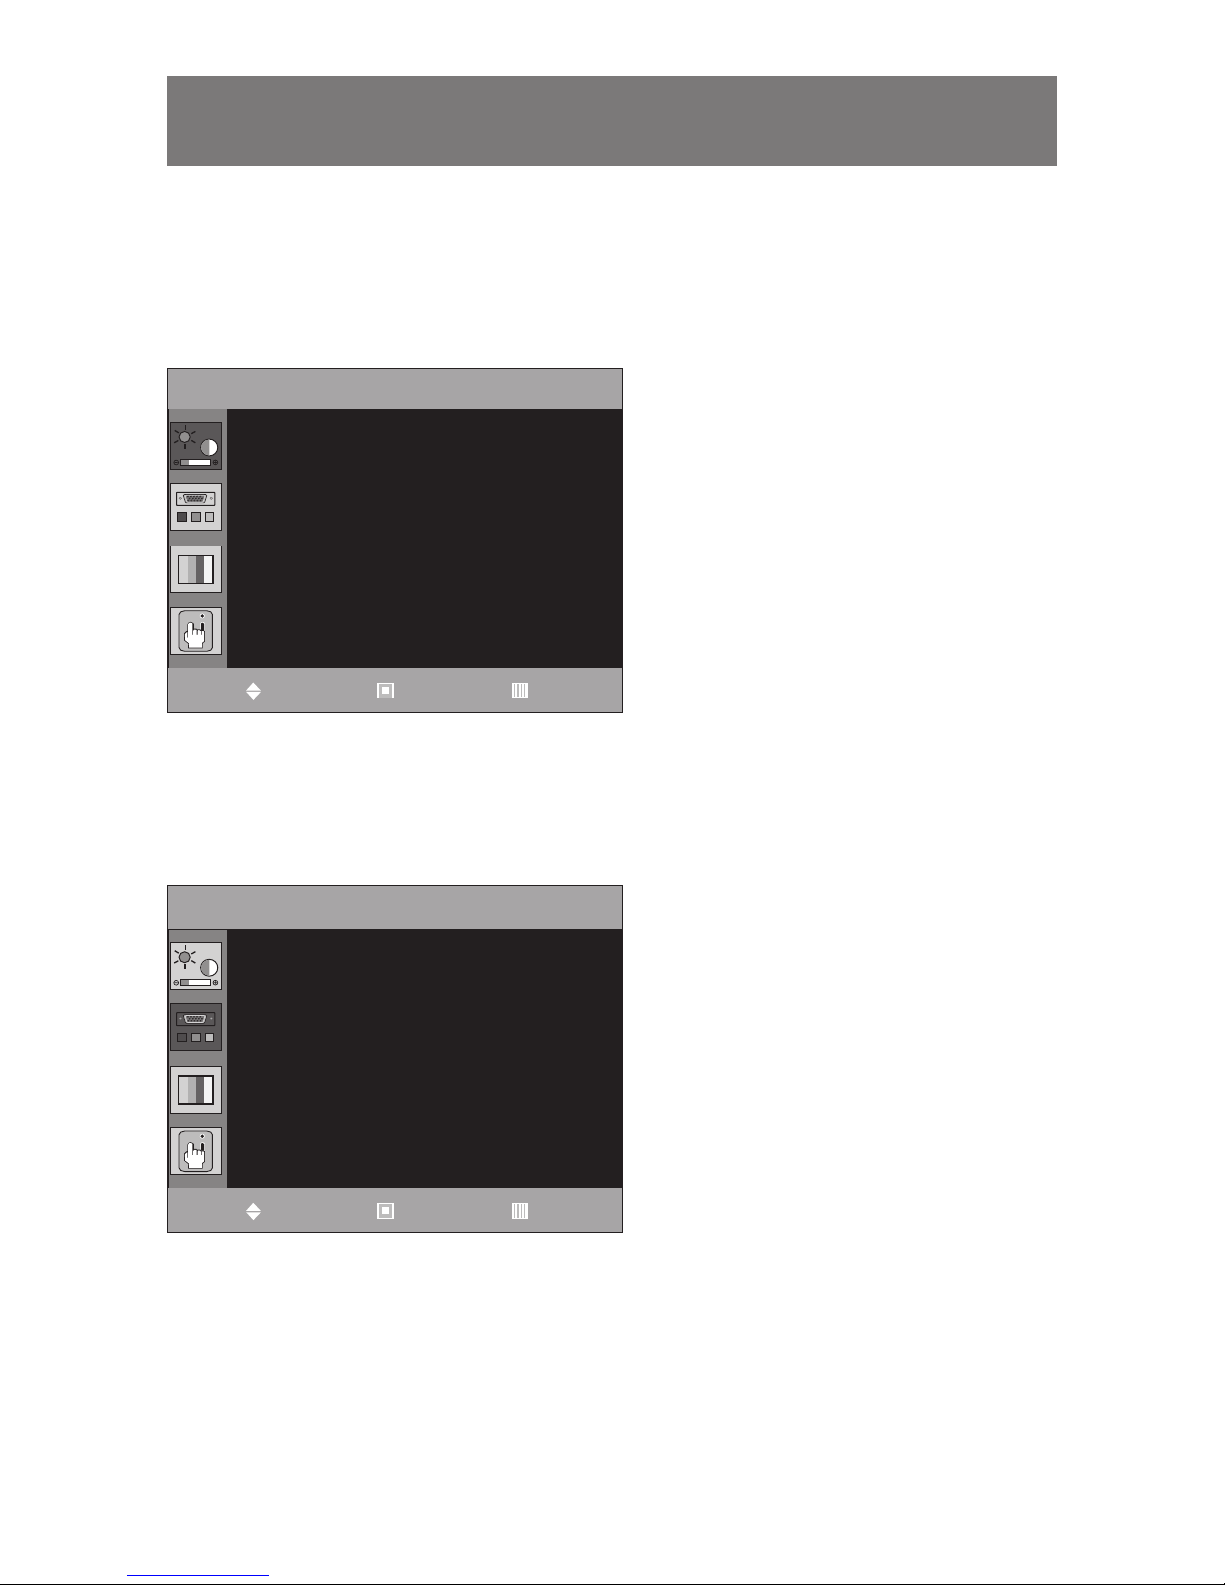
Picture
Input : Digital DVI, Analog RGB
Dim Brightness
Adjusts the brightness of backlight.
Brightness
Adjusts the brightness of PC RGB’s
brightness.
Contrast
Adjusts the contrast of PC RGB’s contrast.
Analog Setup
Input : Analog RGB
Auto Adjust
“Auto adjustment” allows the monitor to
self-adjust to the incoming video signal.
The values of phase, frequency and
position are adjusted automatically.
Frequency
Removes the noises. When frequency value
is wrong. The image has vertical lines
especially in 1 dot on and off.
Phase
Removes the noises. When phase value is
wrong, the image has horizontal lines
especially in 1 dot on and off.
H-Position
Adjusts the horizontal position of the
image.
V-Position
Adjusts the vertical position of the image.
Picture
: Move : Enter
: Exit
Dim Brightness
Brightness
Contrast
: 50
: 80
: 80
Analog Setup
: Move : Enter
: Exit
Auto Adjust
Frequency
Phase
H Position
V Position
: »
: 49
: 12
: 5
: 88
Page 13
12
Adjusting Your LCD Monitor
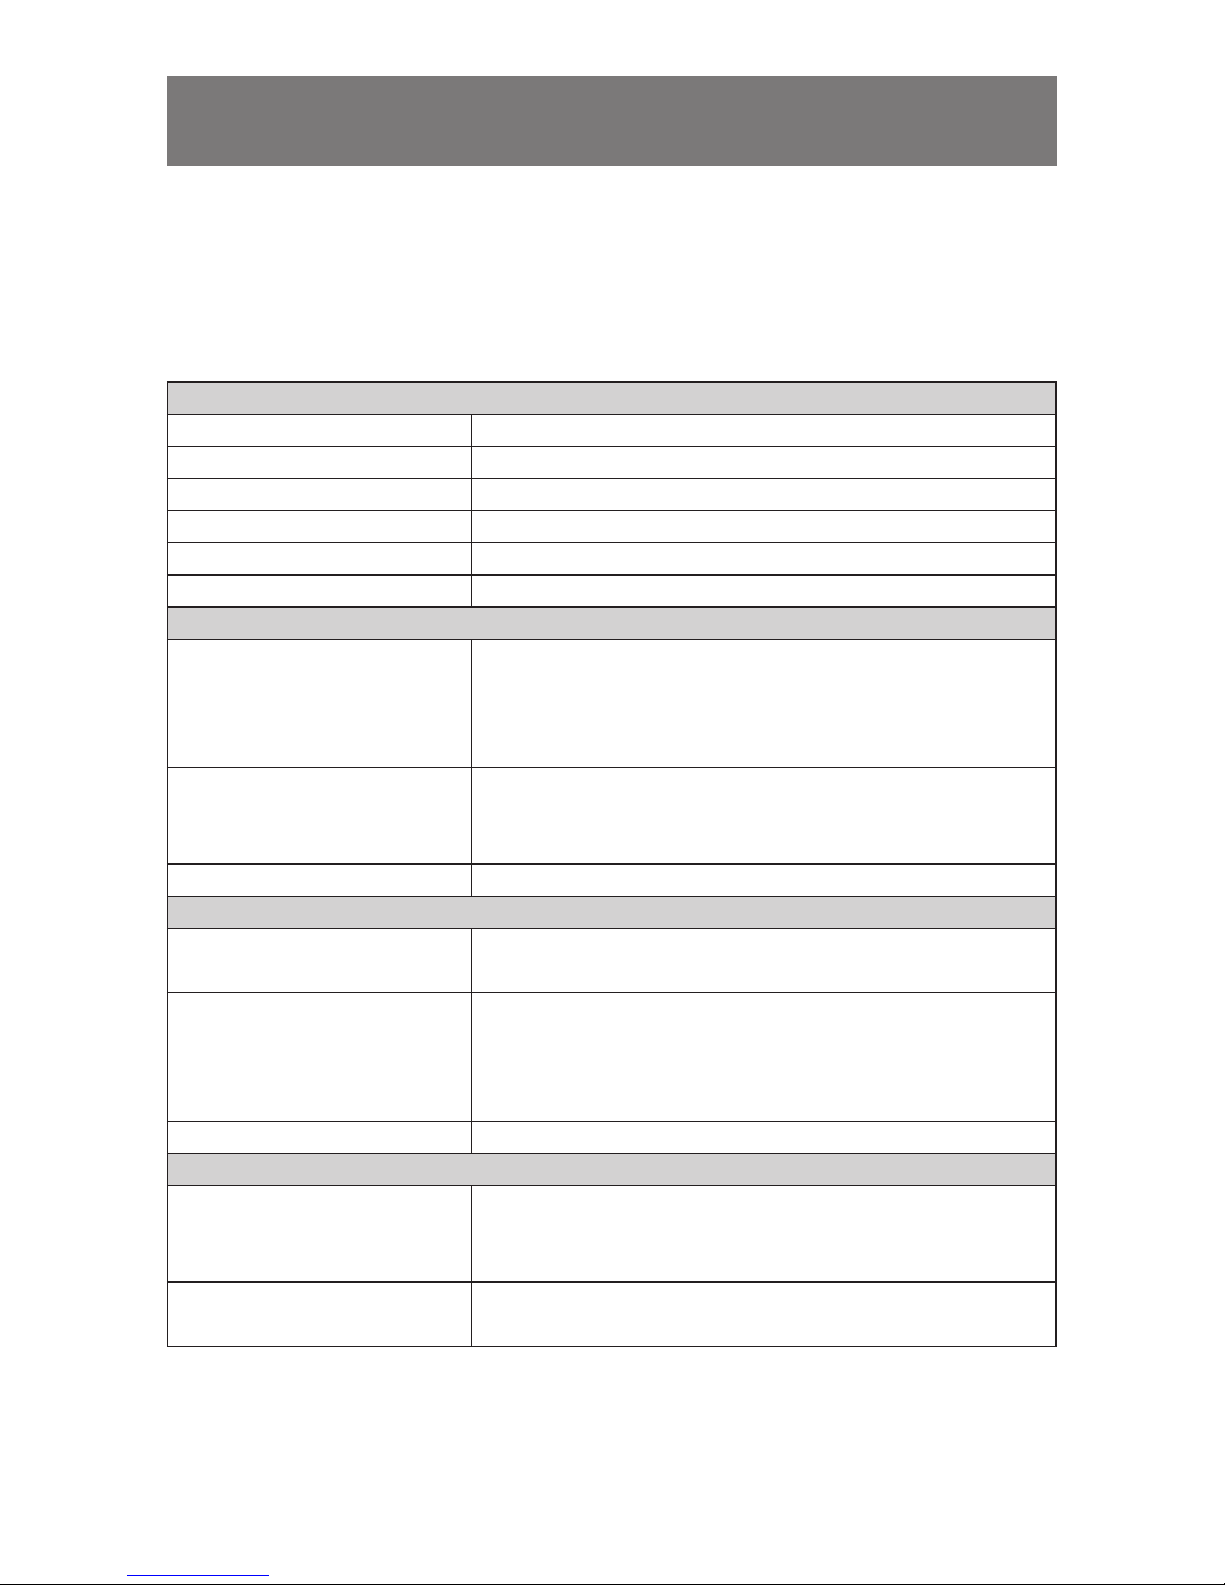
Setup
Input : Digital DVI, Analog RGB
DICOM Mode
Changes the DICOM mode. User can select
one mode among 5 DICOM modes.
(DICOM White, DICOM Blue, TEXT View
sRGB, USER)
SBC
Changes the SBC (Stable Brightness
Control) mode. SBC mode consists of 100,
150, 200, USER, OFF modes.
Language
Changes the OSD language.
English, German, France, Italian, Spanish.
Reset
Reset all values which user can adjust.
Information
Input : Displays current display mode.
Show the current user setting values
which includes input source, input signal
resolution and timing, brightness value,
contrast value, DICOM mode, SBC mode
and Firmware version.
Setup
: Move : Enter
: Exit
DICOM Mode
SBC
Language
Reset
: DICOM White
: 150
: English
: »
Information
: Move : Enter
: Exit
1280 x 1024
Brightness
Contrast
DICOM Mode
SBC
S/W Ver
60Hz
: 80
: 80
: DICOM White
: 150
: 01.00
Input Source Digital RGB
Page 14
13
Appendix
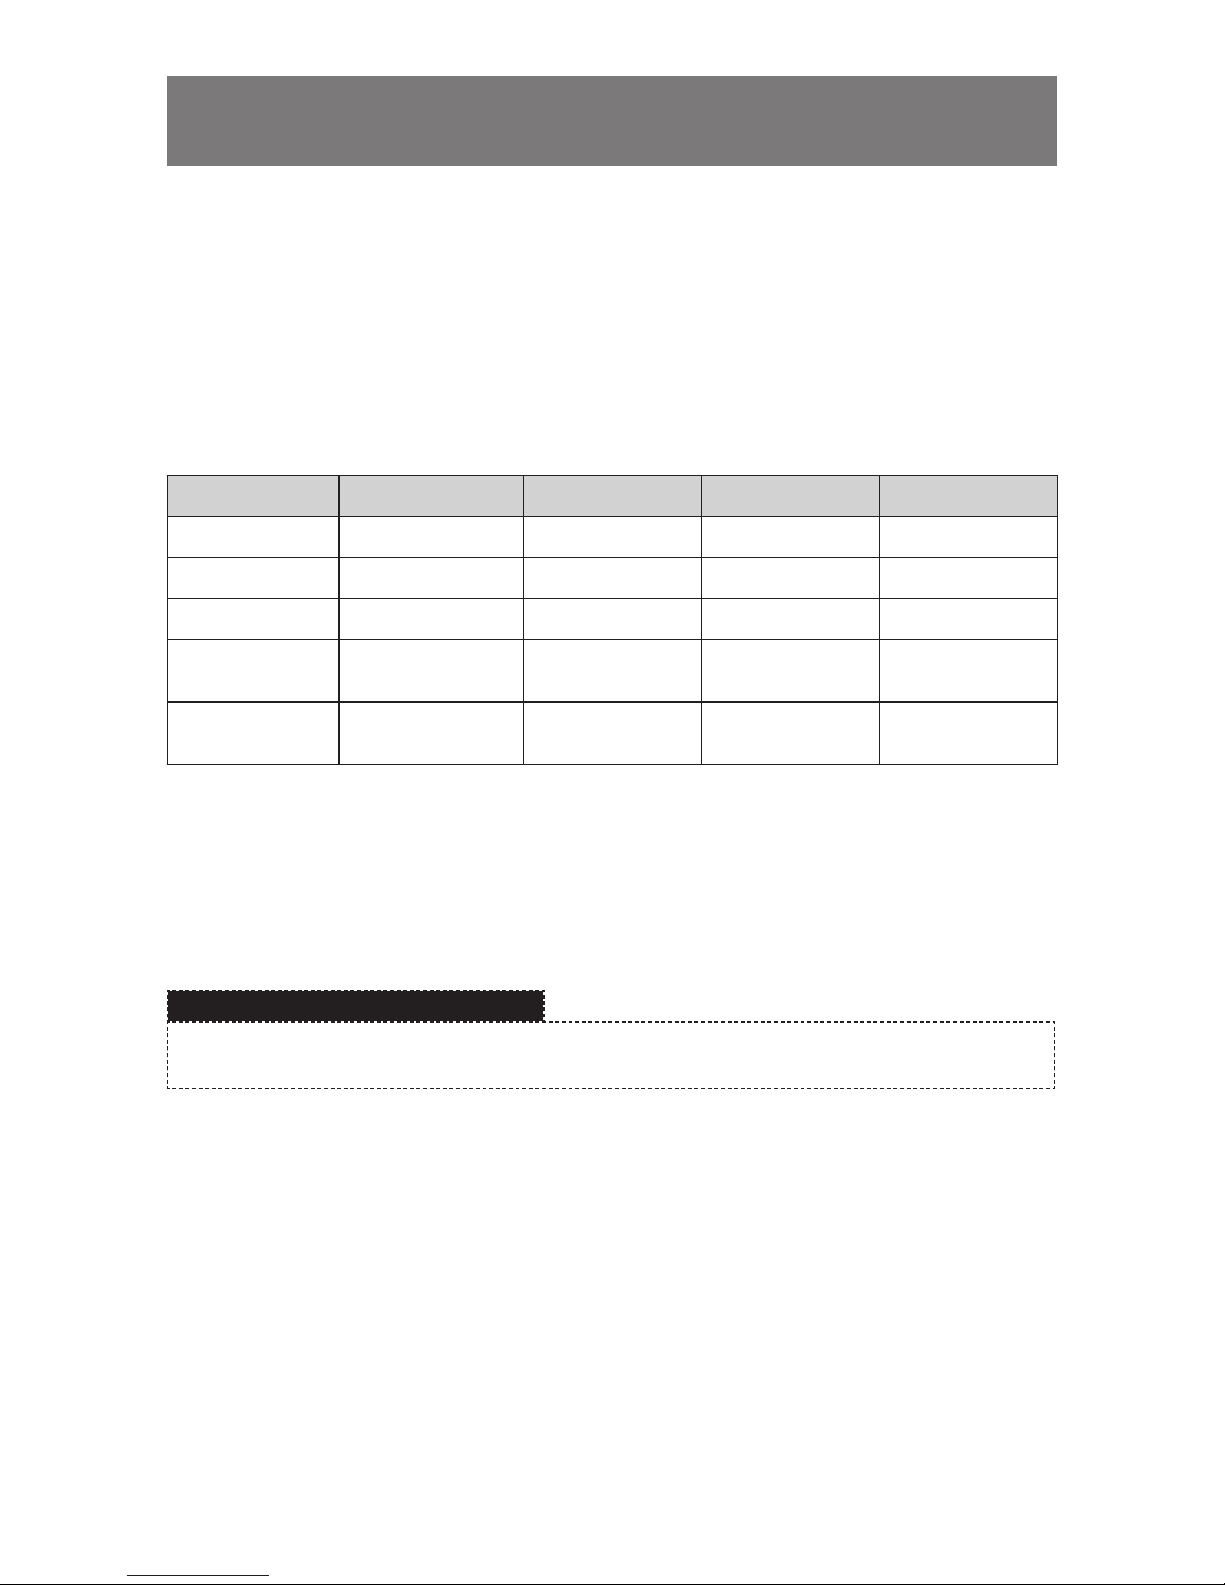
Specifications (Monitor Main)
Electrical Specifications
Panel Specifications
Panel Specification
Screen Size 19”
Viewable Image Size 376.32(H) x 301.056(V) mm
Display Resolution 1280 x 1024 pixels
Brightness 300 cd/m2
Contrast Ratio 1000:1
Viewing Angle 89°/ 89°/ 89°/ 89° (up/down/right/left)
Compatibility (Video Card)
VGA 640 x 350 70Hz
640 x 400 70Hz
640 x 480 60Hz to 75Hz
720 x 400 70Hz
SVGA 800 x 600 56Hz to 75Hz
1024 x 768 60Hz to 75Hz
1152 x 864 60Hz / 70Hz / 75Hz
SXGA 1280 x 1024 60Hz to 75Hz
Input Specification
Input Signal Analog 0.714Vp-p at 75Ω (D-SUB)
Digital 8bit
Sync. type Separate / Composite / Sync on Green
- Hsync : 15KHZ ~ 80KHz
- Vsync : 50HZ ~ 75Hz
- Dot CLK : 130MHz
Signal Cable 15Pin D-Sub / 24Pin DVI-D
Power Specification
Power Supply JEC KOREA Corp. , Model : MW116KA1249F0
Input : 100-240Vac, 1.0A, 50/60Hz
Output : 12Vdc, 6.67A
Power Consumption Typical : 45W
DPMS : 7W
Page 15

14
Appendix
Mechanical Specification and Regulatory
Mechanical Specification
361 x 437 x 77.2 (mm)
Dimension Portrait (with stand) : 361 x 493 x 200 (mm)
Landscape (with stand) : 437 x 456 x 200 (mm)
(w/o stand) : 361 x 437 x 77.2 (mm)
Weights (Unpacked) : 8.0kg
(Packed) : 13.0kg
Environmental Consideration
Operating Temperature : 0°C to 40°C / 32°F to 104°F
Humidity : 10% to 80%
Storage Temperature : –20°C to 60°C / –40°F to 140°F
Humidity : 5% to 95%
Regulatory
Approvals UL60601-1 / EN60601-1 / IEC601-1
FCC Class B
CE
VCCI
MIC
Features
User Controls Power
Brightness, Contrast, Clock, Phase, H/V-Position,
Auto-Adjust, DICOM mode changes, SBC, Input Select,
OSD-Language, Factory Reset, Information
• Design and specifications are subject to change without notice.
Page 16
15
Appendix
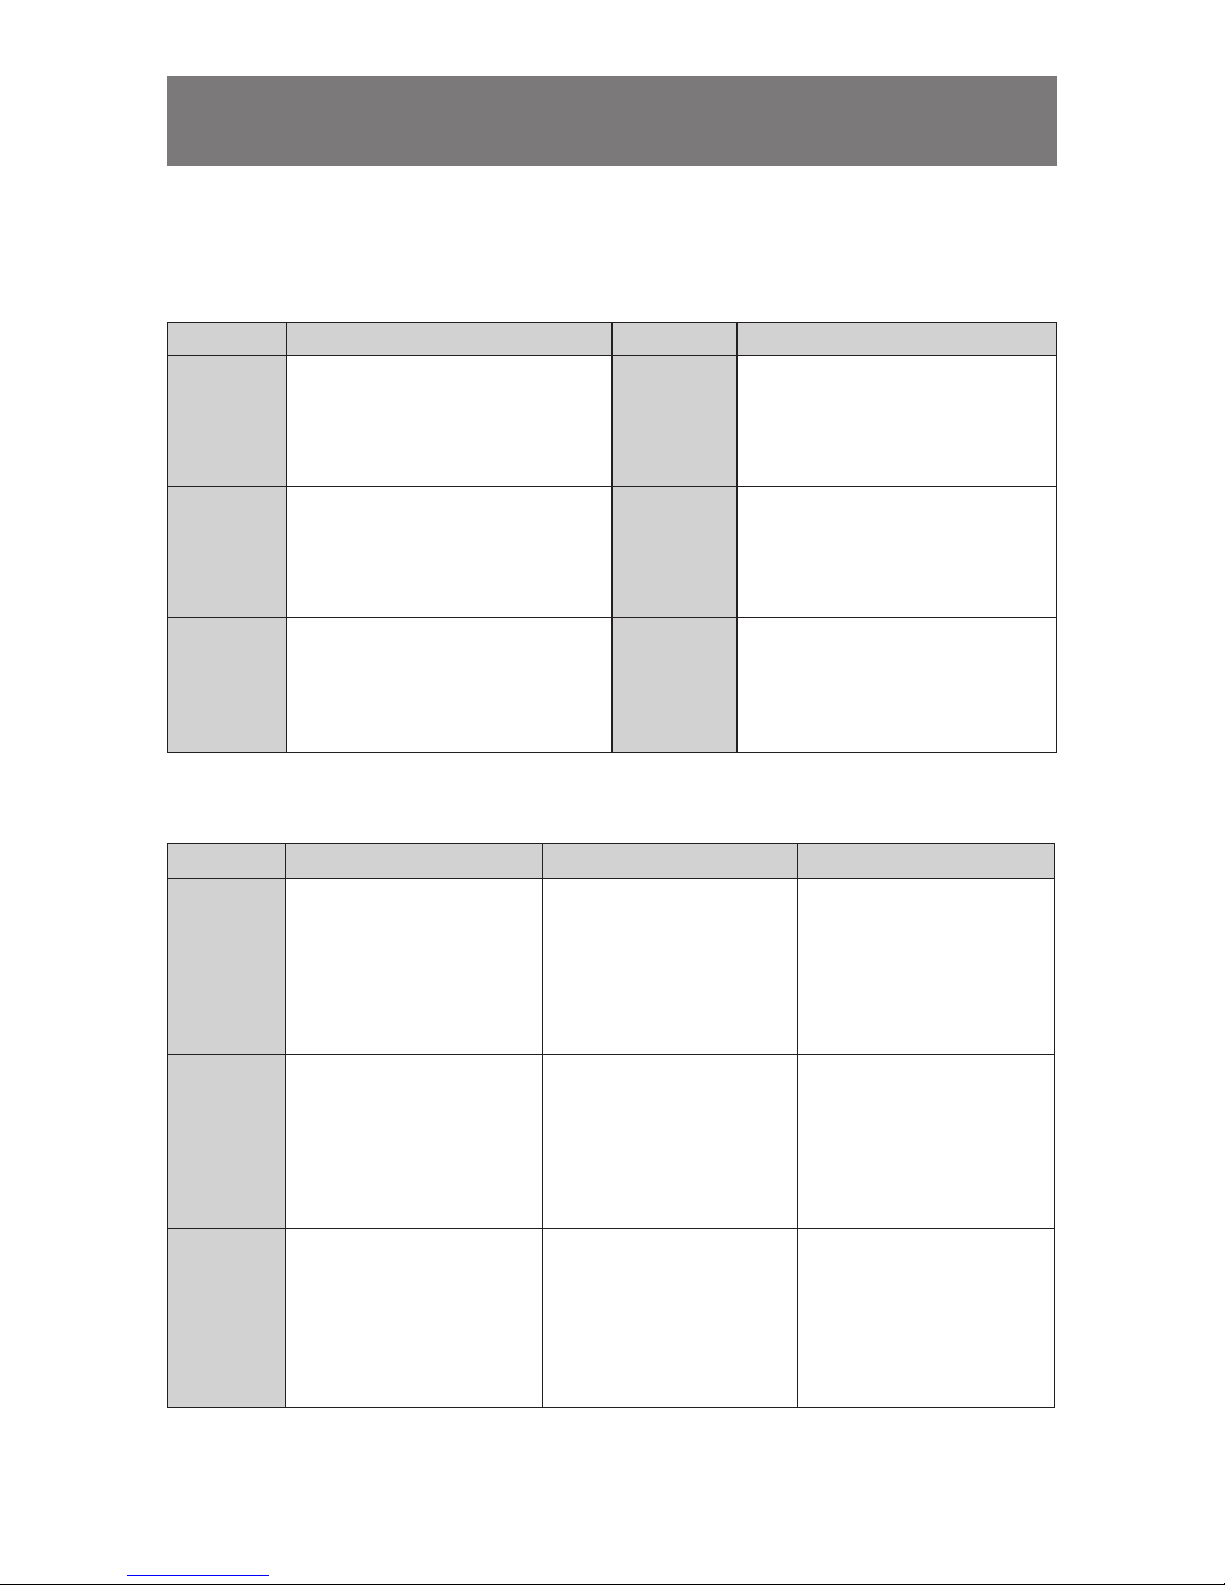
Power Management
This system saves energy by switching your monitor into a low-power mode when it has not been
used for a certain period of time. Power Management system operates with a VESA DPMS
compliant video card installed in your computer. You use a software utility installed on your
computer to set up this feature.
Power Management Modes
State Normal Operation DPMS Standby DPMS Suspend DPMS Off
Horizontal Sync Active Inactive Active Inactive
Vertical Sync Active Active Inactive Inactive
Video Active Blanked Blanked Blanked
Power Indicator
LED OFF
Blue Flashing
(1 sec. interval)
Blue Flashing
(1 sec. interval)
Blue Flashing
(1 sec. interval)
Power
Consumption
45W Less than 7W Less than 7W Less than 7W
This monitor is EPA ENERGY STAR® compliant and NUTEK compliant when used with a computer
equipped with VESA DPMS functionality.
For energy conservation, turn your monitor OFF when you are not using it or when leaving it
unattended for long periods.
NOTE
This monitor automatically returns to normal operation when horizontal and vertical sync return.
This occurs when you move the computer’s mouse or press a key on the keyboard.
Page 17
16
Appendix
Pin Assignments
DVI-D Connector
Pin Signal Assignment Pin Signal Assignment
1 T.M.D.S Data 2– 13 No Connection
2 T.M.D.S Data 2+ 14 5V Power
3 T.M.D.S Data 2 Shield 15 Ground (for 5V)
4
No Connection
16 Hot Plug Detect
5
No Connection 17 T.M.D.S Data 0–
6
DDC Clock 18 T.M.D.S Data 0+
7
DDC Data 19 T.M.D.S Data 0 Shield
8
No Connection 20 No Connection
9
T.M.D.S Data 1– 21 No Connection
10
T.M.D.S Data 1+ 22 T.M.D.S Clock Shield
11
T.M.D.S Data 1 Shield 23 T.M.D.S Clock +
12
No Connection 24 T.M.D.S Clock –
15 pin D-sub Connector
Pin Separate H/V Composite H/V Sync-on-green
1 Red Red Red
2 Green Green Green + H/V Sync
3 Blue Blue Blue
4 GND GND GND
5
GND (DDC Return) GND (DDC Return) GND (DDC Return)
6 GND-Red GND-Red GND-Red
7 GND-Green GND-Green GND-Green
8 GND-Blue GND-Blue GND-Blue
9 No Connection No Connection No Used
10 GND-Sync/Self Test GND-Sync/Self Test GND-Sync/Self Test
11 GND GND GND
12
DDC_SDA DDC _SDA DDC _SDA
13
H_Sync H/V Sync Not used
14
V_Sync Not used Not used
15
DDC_SCL DDC _SCL DDC _SCL
Page 18

17
Appendix
Troubleshooting
No picture
• Make sure that the power cord is completely connected. (See page 8.)
• Make sure that the LCD monitor and computer power switch are on.
• Check the signal cable connector for bent or pushed-in pins.
The display image is too light or too dark.
• Adjust the Brightness. (See page 11.)
Screen is blank and power indicator light is steady Blue or blinks every
1seconds.
• Make sure that the signal cable is completely connected to the display card or computer.
• Make sure that the display sources or computer are turned on. (See page 8.)
• The monitor is in the power management system.
• Press any key on the keyboard or move the computer’s mouse.
Page 19

18
Memo
Page 20

19
Memo
Page 21

20
Memo
Page 22

http://www.widecorp.com
WIDE Corporation
456, Gomae-dong, Giheung-gu, Yongin-si, Gyeonggi-do, 446-901, Republic of Korea
TEL : +82-31-218-1600 FAX : +82-31-274-7400
WIDE USA Corporation
8 Hammond #114 Irvine,CA 92618, USA
TEL : +1-949-305-9933 FAX : +1-949-305-5452
WIDE EU Corporation
Hullenbergweg 413, 1101 CS Amsterdam Zuidoost, The Netherlands
TEL : +31-20-311-9797 FAX : +31-20-311-9790
WIDE Japan Corporation
3-1-4 Plustaria Bldg 2F, Shin-Yokohama, Kouhoku-ku, Yokohama, Kanagwa 222-8505, Japan
TEL : +81-45-473-7398 FAX : +81-45-473-7330
 Loading...