

Page 1

PALM DETAIL SANDER
160W
PPS160G1
223742
Page 2
CONTENTS
GENERAL POWER TOOL SAFETY WARNINGS 3
COMPONENT LIST
ACCESSORIES
SYMBOLS
TECHNICAL DATA
NOISE INFORMATION
OPERATING INSTRUCTIONS
WORKING HINTS FOR YOUR SANDER
MAINTENANCE
TROUBLESHOOTING
ENVIRONMENTAL PROTECTION
5
6
6
6
7
8
10
10
11
11
DECLARATION OF CONFORMITY
13
2
Page 3

ORIGINAL INSTRUCTION
GENERAL POWER TOOL SAFETY WARNINGS
WARNING! Read all safety warnings,
instructions, illustrations and specifications
provided with this power tool. Failure to follow all
instructions listed below may result in electric shock, re
and/or serious injury.
SAVE ALL WARNINGS AND INSTRUCTIONS FOR
FUTURE REFERENCE.
The term “power tool” in the warnings refers to your
mains-operated (corded) power tool or battery-operated
(cordless) power tool.
1. WORK AREA SAFETY
a) Keep work area clean and well lit. Cluttered or
dark areas invite accidents.
b) Do not operate power tools in explosive
atmospheres, such as in the presence of
flammable liquids, gases or dust. Power tools
create sparks which may ignite the dust or fumes.
c) Keep children and bystanders away while
operating a power tool. Distractions can cause you
to lose control.
2. ELECTRICAL SAFETY
a) Power tool plugs must match the outlet. Never
modify the plug in any way. Do not use any
adapter plugs with earthed (grounded) power
tools. Unmodied plugs and matching outlets will
reduce risk of electric shock.
b) Avoid body contact with earthed or grounded
surfaces, such as pipes, radiators, ranges and
refrigerators. There is an increased risk of electric
shock if your body is earthed or grounded.
c) Do not expose power tools to rain or wet
conditions. Water entering a power tool will increase
the risk of electric shock.
d) Do not abuse the cord. Never use the cord for
carrying, pulling or unplugging the power tool.
Keep cord away from heat, oil, sharp edges or
moving parts. Damaged or entangled cords increase
the risk of electric shock.
e) When operating a power tool outdoors, use an
extension cord suitable for outdoor use. Use of a
cord suitable for outdoor use reduces the risk of electric
shock.
f) If operating a power tool in a damp location is
unavoidable, use a residual current device (RCD)
protected supply. Use of an RCD reduces the risk of
electric shock.
3. PERSONAL SAFETY
a) Stay alert, watch what you are doing and use
common sense when operating a power tool.
Do not use a power tool while you are tired
or under the influence of drugs, alcohol or
medication. A moment of inattention while operating
power tools may result in serious personal injury.
b) Use personal protective equipment. Always
wear eye protection. Protective equipment such as
dust mask, non-skid safety shoes, hard hat, or hearing
protection used for appropriate conditions will reduce
personal injuries.
c) Prevent unintentional starting. Ensure the
switch is in the off-position before connecting
to power source and/or battery pack, picking up
or carrying the tool. Carrying power tools with your
nger on the switch or energising power tools that have
the switch on invites accidents.
d) Remove any adjusting key or wrench before
turning the power tool on. A wrench or a key left
attached to a rotating part of the power tool may result
in personal injury.
e) Do not overreach. Keep proper footing and
balance at all times. This enables better control of
the power tool in unexpected situations.
f) Dress properly. Do not wear loose clothing or
jewellery. Keep your hair and clothing away
from moving parts. Loose clothes, jewellery or long
hair can be caught in moving parts.
g) If devices are provided for the connection of
dust extraction and collection facilities, ensure
these are connected and properly used. Use of
dust collection can reduce dust-related hazards.
h) Do not let familiarity gained from frequent use
of tools allow you to become complacent and
ignore tool safety principles. A careless action can
cause severe injury within a fraction of a second.
4. POWER TOOL USE AND CARE
a) Do not force the power tool. Use the correct
power tool for your application. The correct power
tool will do the job better and safer at the rate for which
it was designed.
b) Do not use the power tool if the switch does
not turn it on and off. Any power tool that cannot
be controlled with the switch is dangerous and must be
repaired.
c) Disconnect the plug from the power source and/
3
Page 4

GENERAL POWER TOOL SAFETY WARNINGS
or remove the battery pack, if detachable, from
the power tool before making any adjustments,
changing accessories, or storing power tools.
Such preventive safety measures reduce the risk of
starting the power tool accidentally.
d) Store idle power tools out of the reach of
children and do not allow persons unfamiliar
with the power tool or these instructions to
operate the power tool. Power tools are dangerous
in the hands of untrained users.
e) Maintain power tools and accessories. Check
for misalignment or binding of moving parts,
breakage of parts and any other condition
that may affect the power tool’s operation. If
damaged, have the power tool repaired before
use. Many accidents are caused by poorly maintained
power tools.
f) Keep cutting tools sharp and clean. Properly
maintained cutting tools with sharp cutting edges are
less likely to bind and are easier to control.
g) Use the power tool, accessories and tool bits
etc. in accordance with these instructions,
taking into account the working conditions and
the work to be performed. Use of the power tool for
operations different from those intended could result in
a hazardous situation.
h) Keep handles and grasping surfaces dry, clean
and free from oil and grease. Slippery handles and
grasping surfaces do not allow for safe handling and
control of the tool in unexpected situations.
5. SERVICE
a) Have your power tool serviced by a qualied
repair person using only identical replacement
parts. This will ensure that the safety of the power tool
is maintained.
4
Page 5
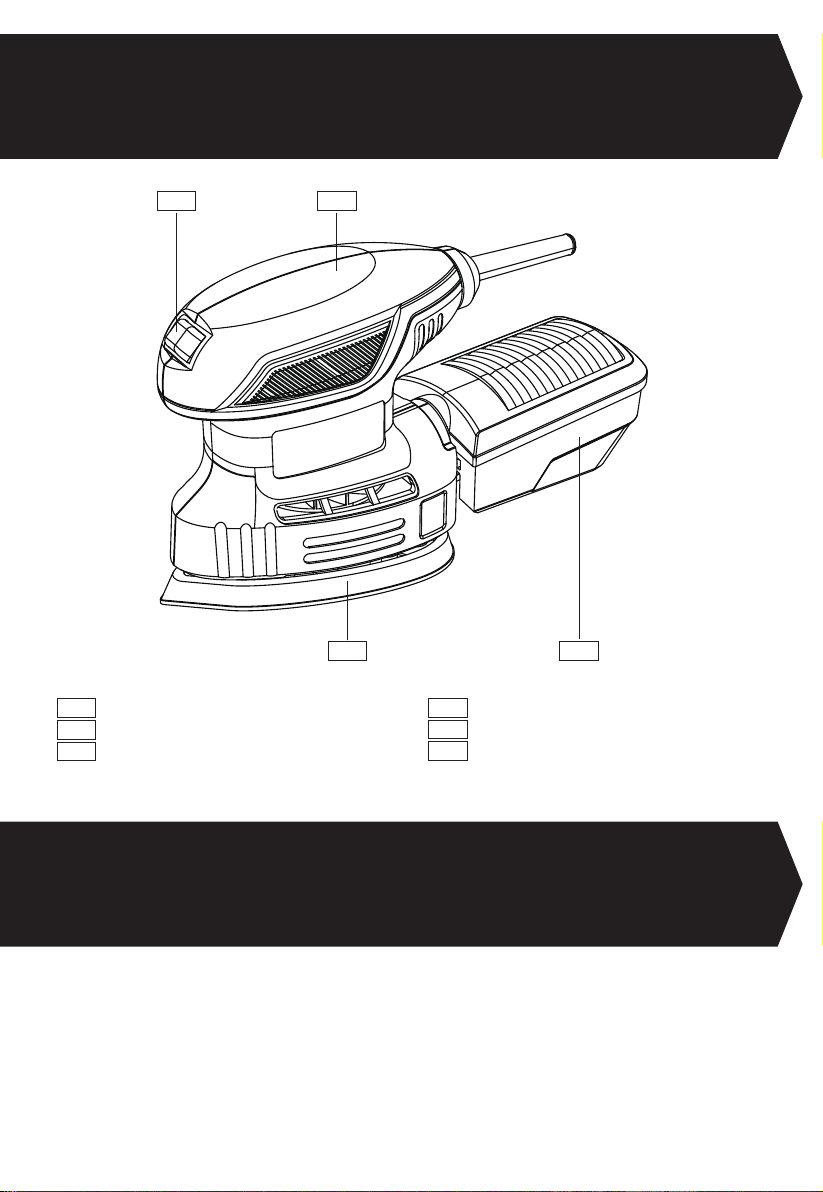
COMPONENT LIST
1
On/off switch
2
Hand grip area
Dust box
3
1
2
34
4
Base plate
5
Sanding paper (See Fig. A)
Dust extraction outlet (See Fig. B)
6
ACCESSORIES
Hook & loop sanding paper (60 grit) 1
Dust box 1
We recommend that you purchase your accessories from the same store that sold you the tool. Refer to the accessory
packaging for further details. Store personnel can assist you and offer advice.
5
Page 6
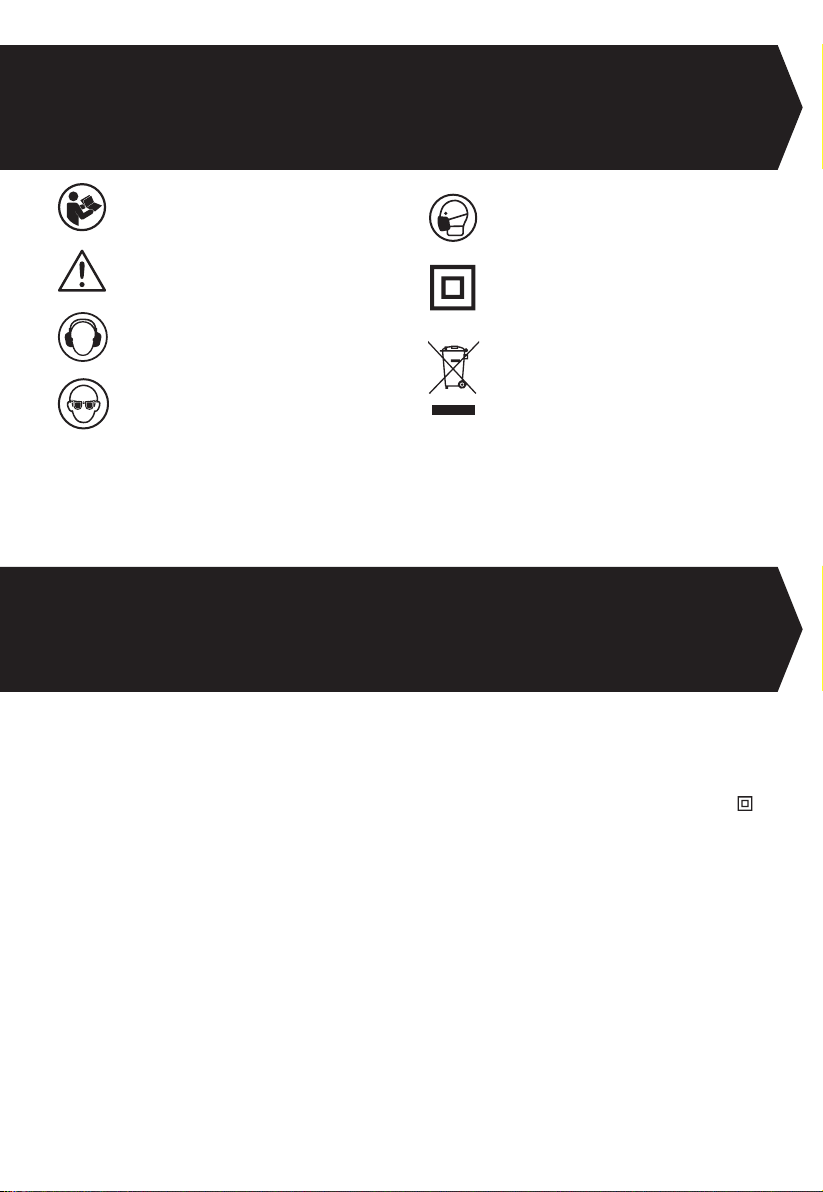
SYMBOLS
To reduce the risk of injury, read all of this
instruction manual
Warning
Wear dust mask
Double insulated
Wear ear protection
Wear eye protection
TECHNICAL DATA
Voltage
Power input
No load speed
Base size
Orbital diameter
Protection class
Machine weight
Waste electrical products must not be
disposed of with household waste. Please
recycle where facilities exist. Check with
your local authorities or retailer for recycling
advice.
230-240V~50Hz
160W
14000/min
140x140x80mm
1.6mm
/II
1.0kg
6
Page 7
NOISE INFORMATION
A weighted sound pressure LpA: 75 dB(A)
A weighted sound power LwA: 86 dB(A)
K
& KwA 3.0 dB(A)
pA
Wear ear protection.
VIBRATION INFORMATION
Vibration total values (triax vector sum) determined according to EN 62841:
a
= 5.22 m/s²
Vibration emission value
The declared vibration total value and the declared noise emission value have been measured in accordance with a
standard test method and may be used for comparing one tool with another.
The declared vibration total value and the declared noise emission value may also be used in a preliminary assessment
of exposure.
WARNING! The vibration and noise emissions during actual use of the power tool can differ from the declared
value depending on the ways in which the tool is used especially what kind of workpiece is processed dependant
on the following examples and other variations on how the tool is used:
How the tool is used and the materials being cut or drilled.
The tool being in good condition and well maintained.
The use of the correct accessory for the tool and ensuring it is sharp and in good condition.
The tightness of the grip on the handles and if any anti vibration and noise accessories are used.
And the tool is being used as intended by its design and these instructions.
h
Uncertainty K = 1.5 m/s²
This tool may cause hand-arm vibration syndrome if its use is not adequately managed.
WARNING! To be accurate, an estimation of exposure level in the actual conditions of use should also take
account of all parts of the operating cycle such as the times when the tool is switched off and when it is running
idle but not actually doing the job. This may signicantly reduce the exposure level over the total working period, helping
to minimize your vibration exposure risk.
Always use sharp chisels, drills and blades.
Maintain this tool in accordance with these instructions and keep well lubricated (where appropriate).
If the tool is to be used regularly then invest in anti vibration and noise accessories.
Plan your work schedule to spread any high vibration tool use across a number of days.
7
Page 8
OPERATING INSTRUCTIONS
NOTE: Before using the tool, read the instruction book carefully.
Intended Use
This tool is intended for dry sanding of wood, plastic, ller and coated surfaces.
ASSEMBLY
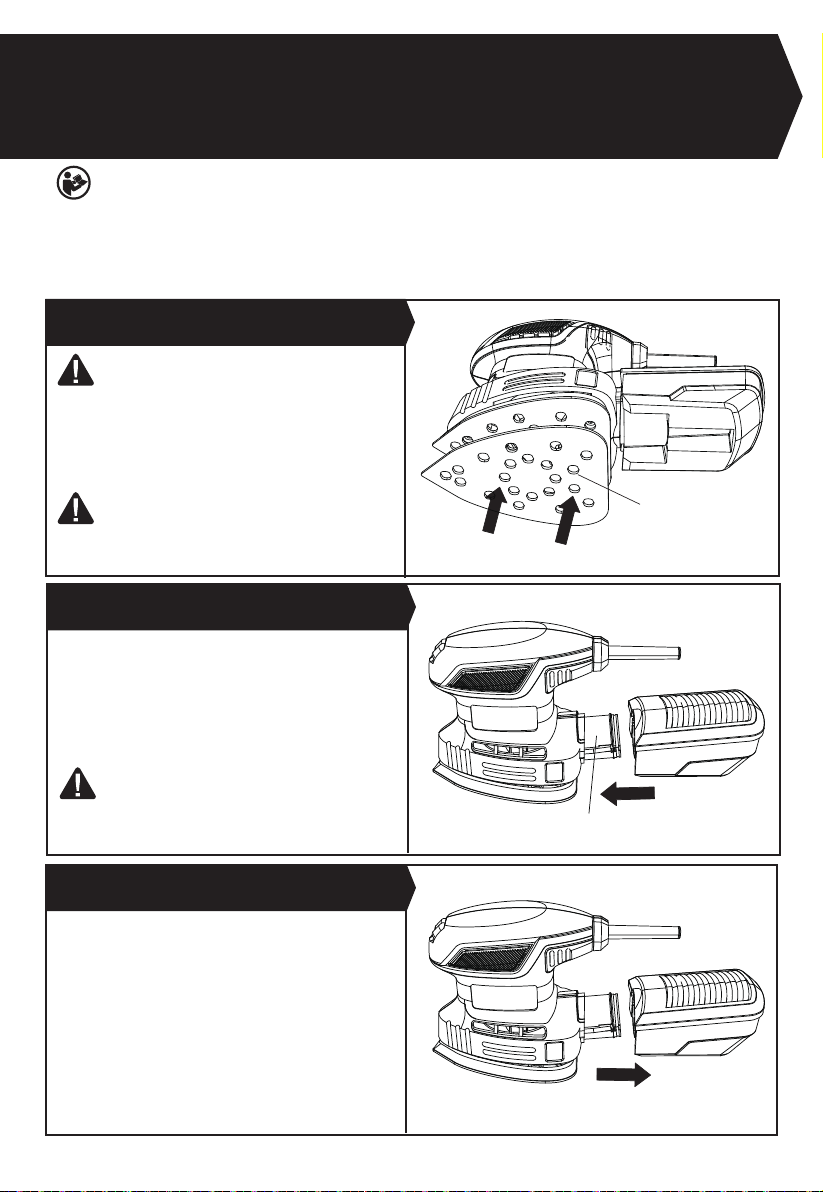
1. FITTING THE SANDING PAPER (SEE FIG. A)
WARNING: Always remove the plug from
the mains socket before carrying out any
maintenance or adjustment.
Remove any dust or dirt from the sanding plate, t the
sanding paper (5) directly onto the base. Make sure
the paper is central to the base,with the holes in the
sanding bass and sanding paper aligned.
WARNING: Never use your sander without a
sanding paper applied.
Fig. A
2. ATTACHING THE DUST BOX (SEE FIG. B)
Your sander is equipped with a dust box, which is
designed for dust collection task. Insert the dust box into
the rear dust extraction outlet (6) until it is secure. Pull
the dust box to make sure it is tightened securely on the
dust extraction outlet.
To remove, pull off the dust box out directly.
CAUTION: To prevent the possibility of sanding
dust or foreign body being thrown into your
face or eyes, never attempt to use your sander
without the dust box properly installed.
Fig. B
5
6
3. REMOVE AND EMPTY THE DUST BOX (SEE FIG. C)
For more efcient operation, empty the dust box after
every 5-10 minutes of operation. This will permit the air to
ow through the dust bag more effectively.
Pull the dust box out from the dust outlet port of the
sander. Shake out the dust. It is recommended to clean
the lter regularly for better performance.
Fig. C
8
Page 9
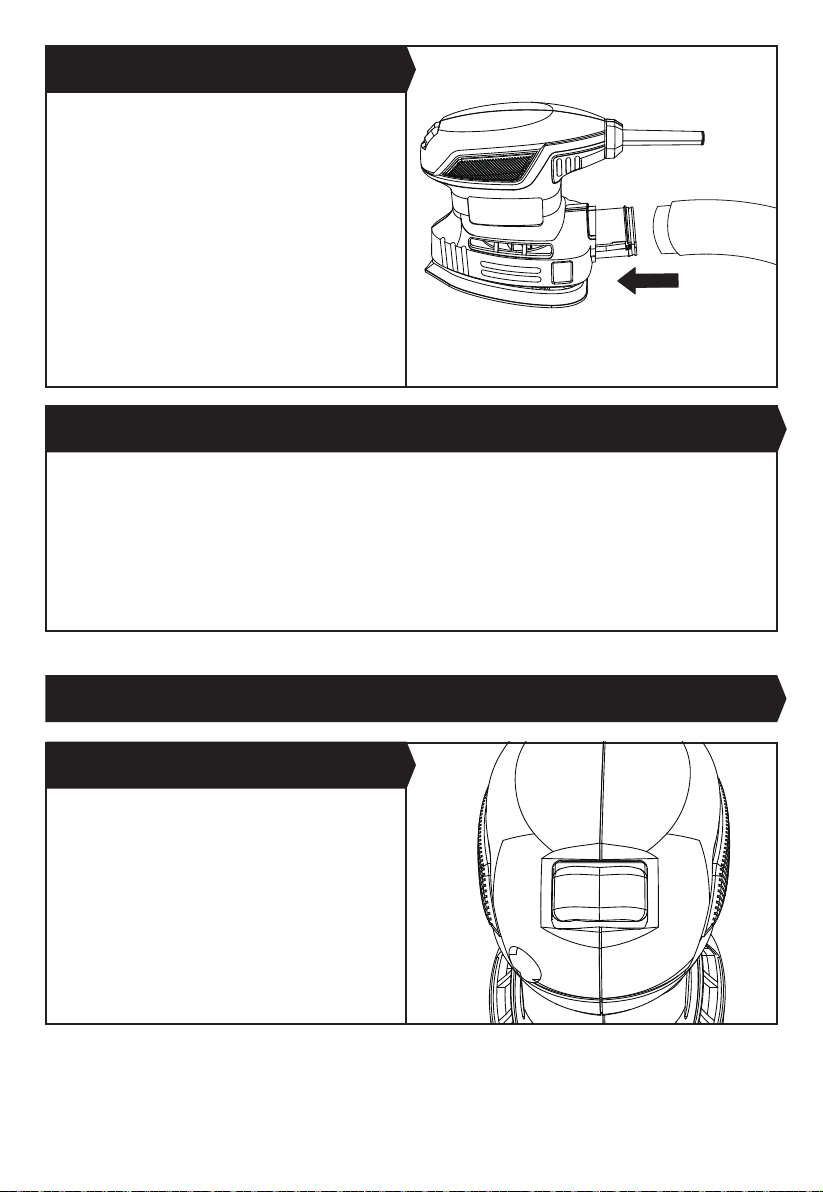
4. ATTACHING SANDER TO VACUUM (SEE FIG. D)
Your sander is equipped with a 35mm dust extraction
outlet, which is designed for connecting the hose of a
vacuum cleaner. If the vacuum hose is 35mm, insert
the hose directly into the rear dust extraction outlet of
sander.
While using, rst please turn on the vacuum cleaner, and
then turn on the sander. If you stop sanding, rst turn off
the sander, and then turn off your vacuum cleaner.
NOTE: Please pull the hose to make sure it is tightened
securely on the dust extraction outlet.
NOTE: Use of vacuum extraction does not negate the
need to wear personal protective equipment, especially
respiratory protective equipment.
5. SELECT THE RIGHT SAND PAPER
Selecting the correct grit of sandpaper is an extremely important decision that will allow you to achieve the best quality
sanding nish.
Coarse grit will remove the most material and ner grit will give you the best nish in all sanding operations. The
condition of the surface to be sanded will determine which grit will do the job.
If the surface is rough:
Start with coarse grit (sold separately) and sand until the surface is uniform. Then use medium to remove any scratches
left by the coarse grit. Then use ner grit (sold separately) for nishing the surface.
NOTE: Always continue sanding with each grit until the surface is uniform.
Fig. D
OPERATION
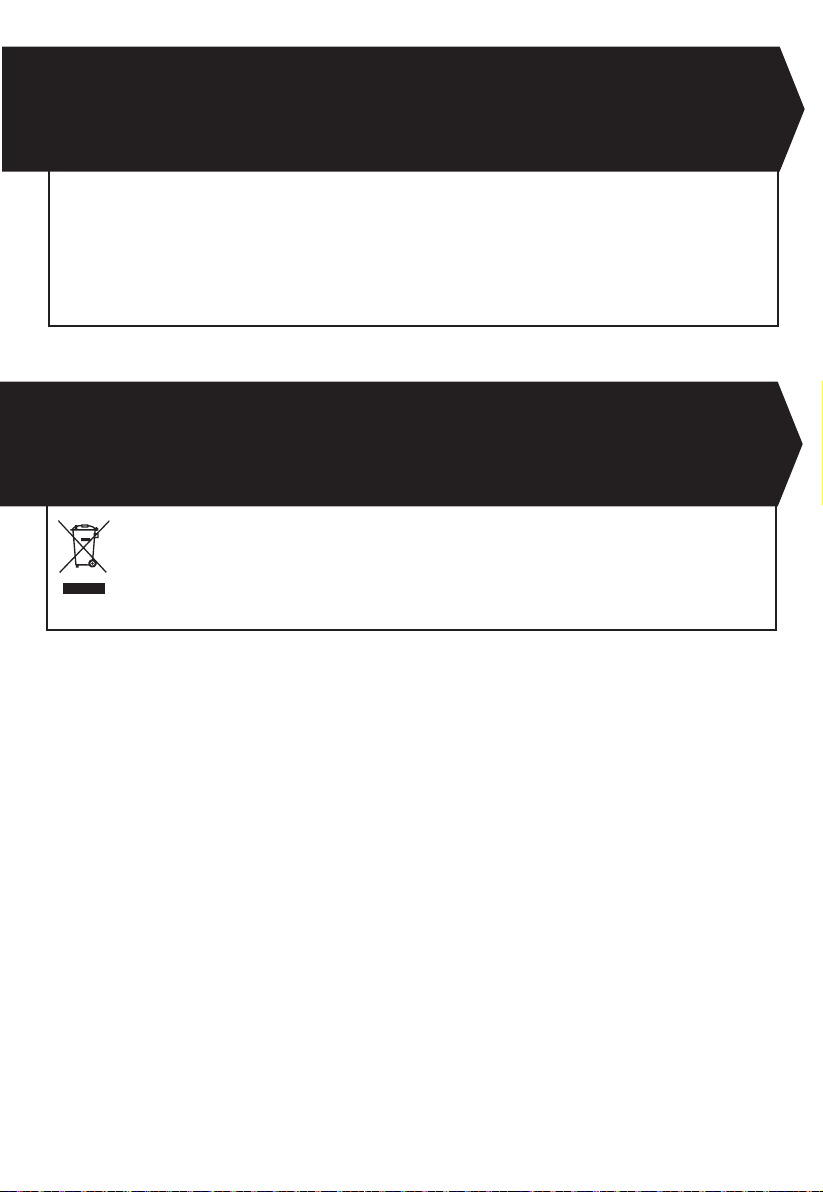
1. ON/OFF SWITCH (SEE FIG. E)
Push down the ON/OFF switch at the position “I” to
switch the product on.
Push down the ON/OFF switch at the position “O” to switch
the product off.
9
Fig. E
I
O
Page 10

2. USING THE SANDER
The workpiece to be sanded must be secured. If it is small or it may move during sanding, it must be held in a vice or
suitably clamped.
Be sure to hold the sander rmly whilst it is on and apply it gently to the work, it may “kick” on rst contact. Hold the
sander so that it is at on the work and move slowly, preferably with a smooth, circular motion. Regularly check the
condition of the sanding paper and replace when worn for best results.
WORKING HINTS FOR YOUR SANDER
1. If your power tool becomes too hot, especially when used at low speed, set the speed to maximum and run it with no
load for 2-3 minutes to cool the motor. Avoid prolonged usage at very low speeds. Always use sanding paper that is
suitable for the material you want to sand.
2. Always ensure the work-piece is rmly held or clamped to prevent movement.
3. Any movement of the material may affect the quality of the sanding nish.
4. Start your sander before sanding and turn it off only after you stop sanding. For the best results, sand wood in the
direction of the grain.
5. Do not start sanding without having the sanding paper tted.
6. Do not allow the sanding paper to wear away it will damage the base-plate. The guarantee does not cover base-plate
wear and tear.
7. Use coarse grit paper to sand rough surfaces, medium grit for smooth surfaces and ne grit for the nal surfaces. If
necessary, rst make a test run on scrap material.
8. Use only good quality sanding paper.
9. The sanding paper controls the sanding efciency, not the amount of force you apply to the tool. Excessive force
will reduce the sanding efciency and cause motor overload. Replacing the sanding paper regularly will maintain
optimum sanding efciency.
MAINTENANCE
Remove the plug from the socket before carrying out any adjustment, servicing or maintenance.
Your tool requires no additional lubrication or maintenance.
There are no user serviceable parts in your power tool. Never use water or chemical cleaners to clean your power tool.
Wipe clean with a dry cloth. Always store your power tool in a dry place. Keep the motor ventilation slots clean. Keep all
working controls free of dust. Occasionally you may see sparks through the ventilation slots. This is normal and will not
damage your power tool.
If the supply cord is damaged, it must be replaced by the manufacturer, its service agent or similarly qualied persons in
order to avoid a hazard.
10
Page 11
TROUBLESHOOTING
1. If your sander will not operate, check the power at the mains plug.
2. If the sander does not abrade the surface, check the sandpaper. If the sandpaper is worn, replace and try again.
The paper must be kept in a dry place, if it is allowed to become damp, the abrasive particles will lose their
adhesion to the backing paper and will not abrade.
3. If the sander dose not move smoothly, The sanding paper may be loose, damaged or wrinkled. Replace and try
again.
4. If a fault can not be rectied return the sander to an authorized dealer for repair.
ENVIRONMENTAL PROTECTION
Waste electrical products must not be disposed of with household waste. Please recycle where facilities exist.
Check with your local authorities or retailer for recycling advice.
11
Page 12
PLUG REPLACEMENT (ONLY FOR REWIRABLE PLUG OF UK &
IRELAND)
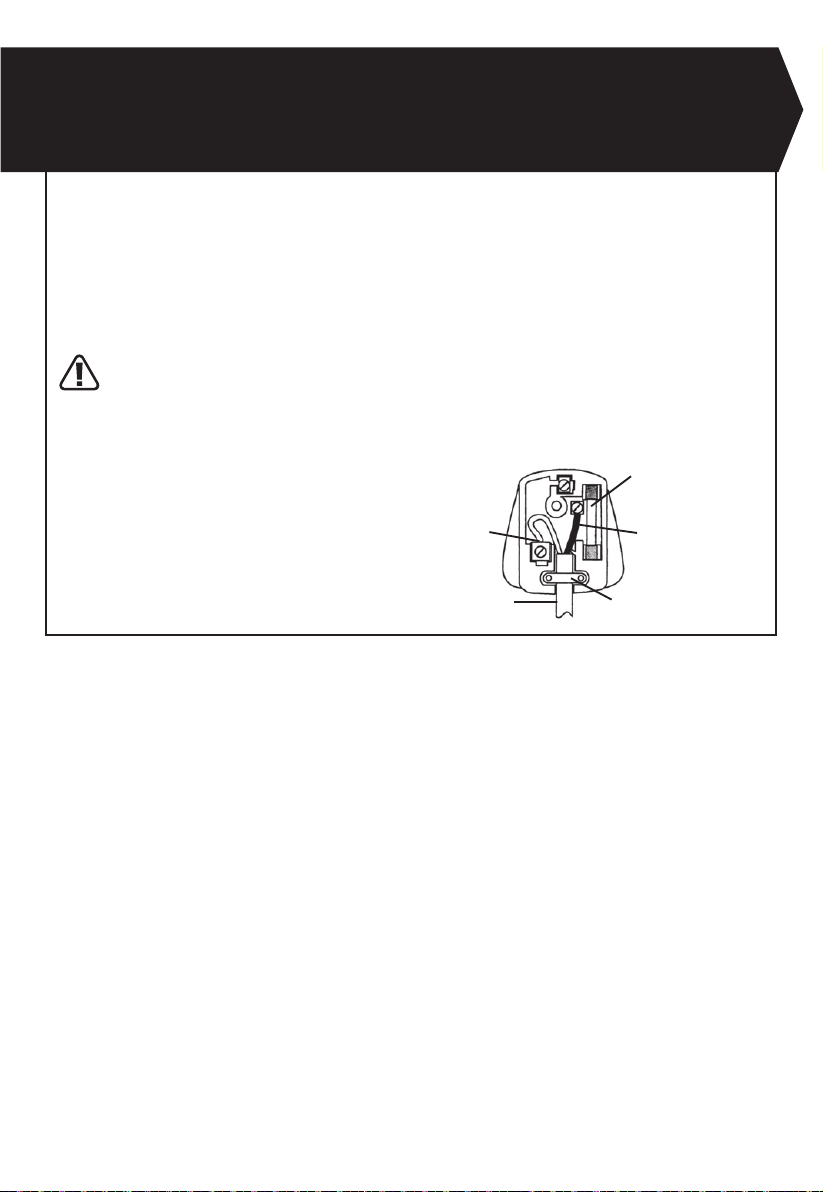
If you need to replace the tted plug then follow the instructions below.
IMPORTANT
The wires in the mains lead are colored in accordance with the following code:
Blue = Neutral
Brown = Live
As the colors of the wires in the mains lead of this appliance may not correspond with the colored markings
identifying the terminals in your plug, proceed as follows. The wire which is colored blue must be connected to
the terminal which is marked with N. The wire which is colored brown must be connected to the terminal which is
marked with L.
WARNING:
Never connect live or neutral wires to the earth terminal of the plug. Only t an approved 13A BS1363/A plug
and the correct rated fuse.
Note: If a moulded plug is tted and has to be removed take great care in disposing of the plug and severed cable, it
must be destroyed to prevent engaging into a socket.
Connect
Blue to N
(neutral)
13 Amp fuse approved
to BS1362
Brown L(live)
Outer sleeve
rmly clamped
12
Cable grip
Page 13
DECLARATION OF CONFORMITY
We,
Wickes Building Supplies Limited
Declare that this product: PALM DETAIL SANDER
Description and SKU code: 223742
Complies with the following Directives and Regulations:
2006/42/EC, Machinery Directive
2014/30/EU, Electromagnetic Compatibility Directive
2011/65/EU & (EU)2015/863 (RoHS), Restriction of Hazardous Substances Directive
and conforms to the following standards:
Standards specic to this product:
EN 62841-1
EN 62841-2-4
EN 55014-1
EN 55014-2
EN 61000-3-2
EN 61000-3-3
28th January, 2021
Philip Ansell
Category Technical Manager
Wickes
Vision House
19 Colonial Way
Watford
WD24 4JL”
13
Page 14

14
Page 15

15
Page 16

Customer Helpline 0345 2005409
 Loading...