

Page 1

INSTRUCTION MANUAL
precision knife sharpeners
MODEL
WE320
Page 2

WWW . W ICKEDEDGEUS A.C O M
YOU ARE MOMENTS AWAY
FROM USING THE FINEST
KNIFE SHARPENER IN THE
WORLD. MADE OF TOP QUALITY
MATERIALS AND STATE OF THE
ART MANUFACTURING, THE
WICKED EDGE PRECISION
KNIFE SHARPENER WILL CHANGE
THE WAY YOU THINK ABOUT
SHARPENING KNIVES. IT IS THE
CHOICE OF PROFESSIONALS.
YOU ARE MOMENTS AWAY
FROM USING THE FINEST
KNIFE SHARPENER IN THE
WORLD. MADE OF TOP QUALITY
MATERIALS AND STATE OF THE
ART MANUFACTURING, THE
WICKED EDGE PRECISION
KNIFE SHARPENER WILL CHANGE
THE WAY YOU THINK ABOUT
SHARPENING KNIVES. IT IS THE
CHOICE OF PROFESSIONALS.
precision knife sharpeners
Page 3

CONGRATULATIONS!
Hi, I’m Clay Allison, developer of the Wicked Edge Precision Sharpener, and I want to thank you for your purchase
and welcome you to the Wicked Edge community. I know you’ll enjoy what this ne machine can do for your knives
and I sincerely hope you, your kids and grandkids get many years of great results and enjoyment from it.
A lot of care has gone into the design and manufacturing of our sharpeners and we’ve been helped immensely by
feedback from within our community so that the machine is constantly evolving and getting better. Our team here
at Wicked Edge are entirely dedicated to ensuring the satisfaction of each and every customer. If there is something
you need, please let us know.
You’ll nd that our website is a great resource with a thriving forum, a burgeoning Wiki and a quickly growing
database of knives and their Wicked Edge settings. The forum in particular is lled with thousands of passionate
sharpeners that know all kinds of great tips and tricks for the Wicked Edge. You’ll nd the culture is very open and
welcoming, and people are sharing information and learning from each other constantly. I hope you’ll log on and
create an account so you can participate in the lively discussions happening daily. There are a large, and increasing,
number of videos under the Demo section where you can see the sharpener in action and learn about various,
sharpening specic, skills. Our tech support crew is available by phone and email and is very enthusiastic about
helping you get the most from your Wicked Edge.
wickededgeusa.com • congratulations • 03
Page 4

A FEW POINTERS TO GET YOU STARTED
1. Choosing your angle - If you’re new to sharpening, it’s probably best to match the angles already ground onto
your knife. You can easily nd what those are by coloring in the bevel with a marker and observing how much
marker comes o when you’re using the stones. Please see page 12 for detailed instructions on discovering your
knife’s angle. Located in the website’s Instructions section, you’ll nd a complete tutorial on using a marker to nd
your angle.
2. Drawing and detecting a burr - In order for a knife to be truly sharp, both bevels’ planes need to intersect at a
ne point or apex. To verify that the bevels meet, it’s important to draw a burr from each side of the knife along the
entire length of the blade. You should do this when you’re rst getting started with a knife while using the coarser
grits. Please see page 18 for detailed instructions for drawing and detecting a burr. Also in the website’s Instruc-
tions section is a complete tutorial on drawing and detecting a burr.
3. Letting your stones break in - Your new diamond plates will be very aggressive at rst and will need to have a
lot of the extra, loose diamonds knocked o. The best way to do this is to work on a few inexpensive knives. As you
perfect your technique, you’ll also break in your stones and your results will continue to get better and better. I
can’t really overstate the necessity of letting your stones break in. The dierence in edge quality you’ll achieve as
your stones hit their stride is signicant.
04 • congratulations • wickededgeusa.com
Page 5

A FEW POINTERS TO GET YOU STARTED
4. Pressure - Don’t use too much! For most applications, you’ll want to use only the weight of the stones them-
selves against the blade. There are exceptions, like when you want to remove a lot of metal and change the angles
of the blade, but for the most part, a light touch is your friend.
5. Safety - You’re knives will get very sharp with the Wicked Edge and extra care needs to be taken to prevent cuts.
Don’t leave a knife clamped in the machine when you’re not actively using it, and don’t reach across the machine
when a knife is mounted. Always pay attention to what you’re doing when operating the sharpener and don’t let
yourself become distracted.
Thank you again for choosing Wicked Edge and please let me know if there is ever anything I can do for you.
Sincerely,
Clay Allison
wickededgeusa.com • congratulations • 05
Page 6

TABLE OF CONTENTS
Anatomy of a Knife Pg. 7
In the Box - Numbered Parts List Pg. 8
Getting Started - Setting up your Generation 3 Pro Sharpener Pg. 9
Mounting Your Knife - Getting familiar with your new sharpener Pg. 10, 11
Adjusting the Vise Tension Pg. 12, 13
Setting the Angle - Matching the existing angle or choosing your own Pg. 14, 15
Making Micro-Angle Adjustments - How to use the sharpener’s micro-angle adjustment feature Pg. 16, 17
Correct Positioning - Knife placement and nding the “sweet spot” Pg. 18, 19
Recording Your Settings - Three steps necessary for angle repeatability Pg. 20
Basic Sharpening - Sharpening your knife for the rst time with your Wicked Edge Sharpener Pg. 21
Creating and Detecting a Burr - Critical step for success Pg. 22
Progressing Through Your Stones / Removing Your Knife Pg. 23
Touching Up Your Knife - General knife maintenance Pg. 24
Knife Sharpening Tables - Track your knives for fast touch-ups Pg. 25, 26
Terms of Service Pg. 27
06 • table of contents • wickededgeusa.com
Page 7
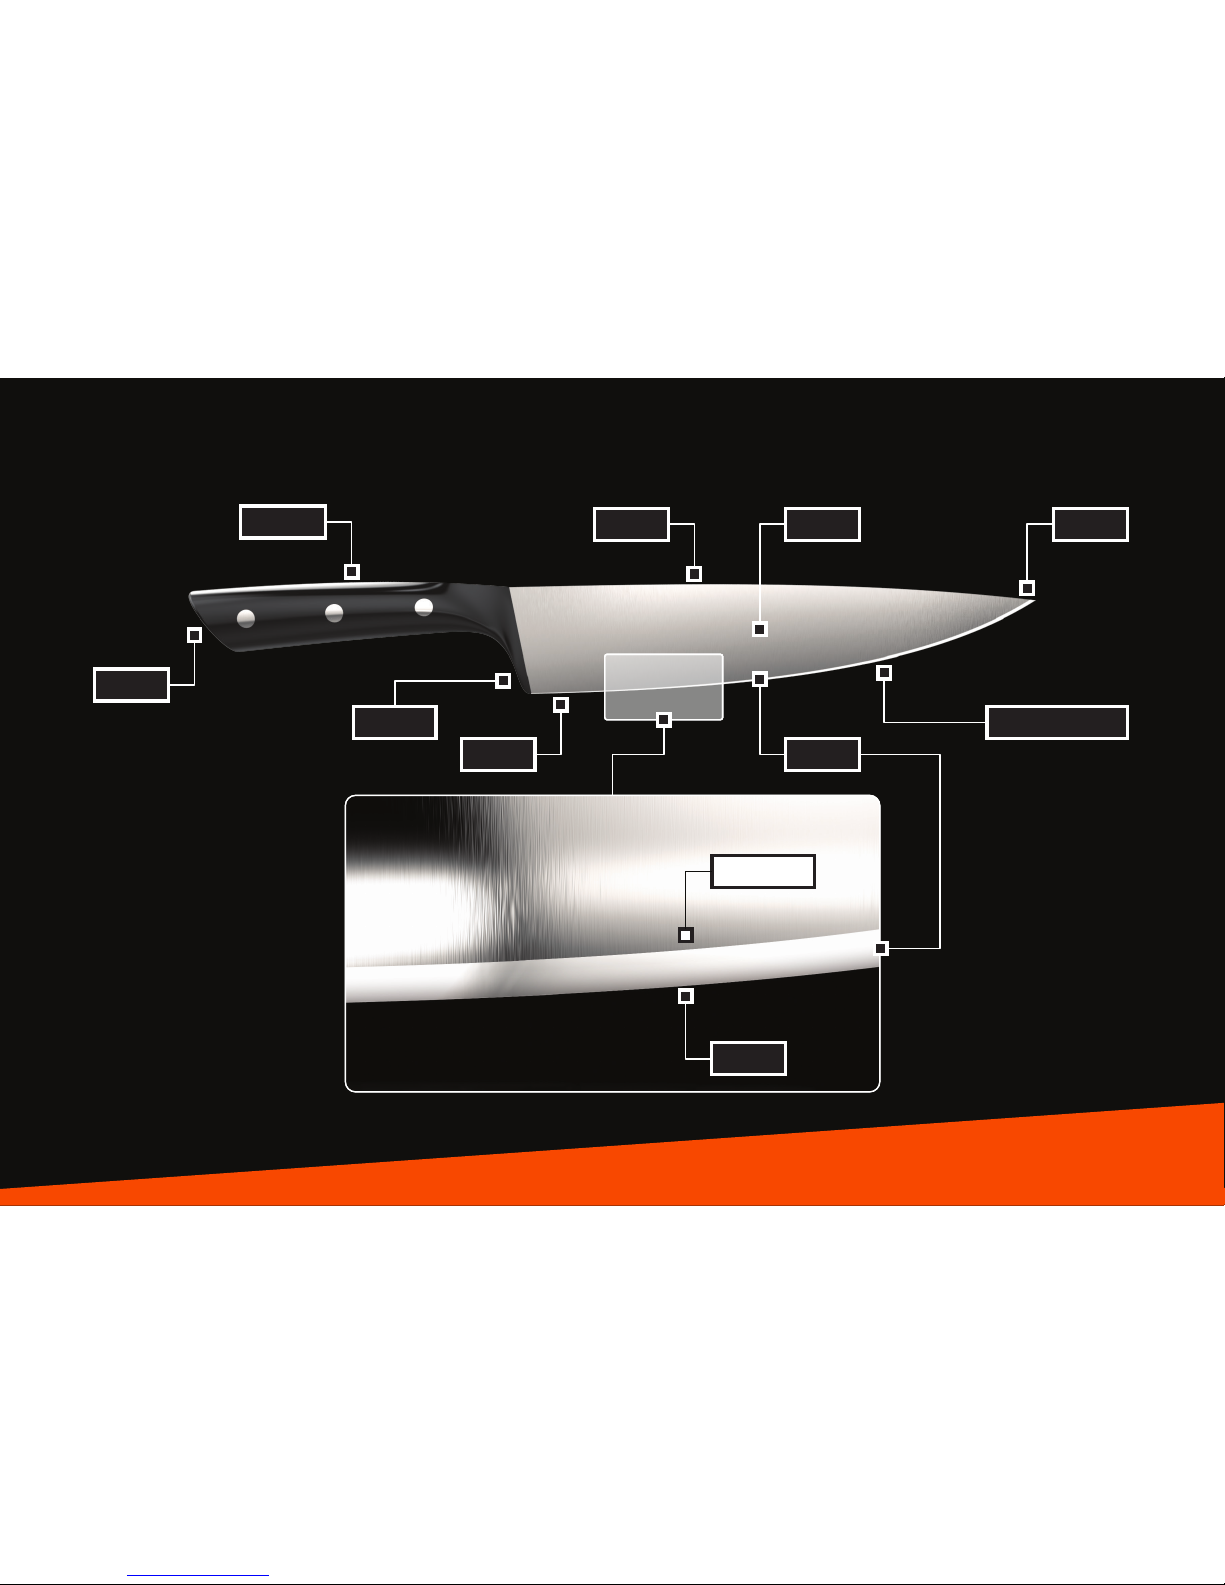
ANATOMY OF A KNIFE
wickededgeusa.com • anatomy of a knife • 07
Bevel Detail
Tip
Cutting Edge
Handle
Butt
Bolster
Heel Bevel
Edge
Spine Blade
Shoulder
Page 8
08 • in the box • wickededgeusa.com
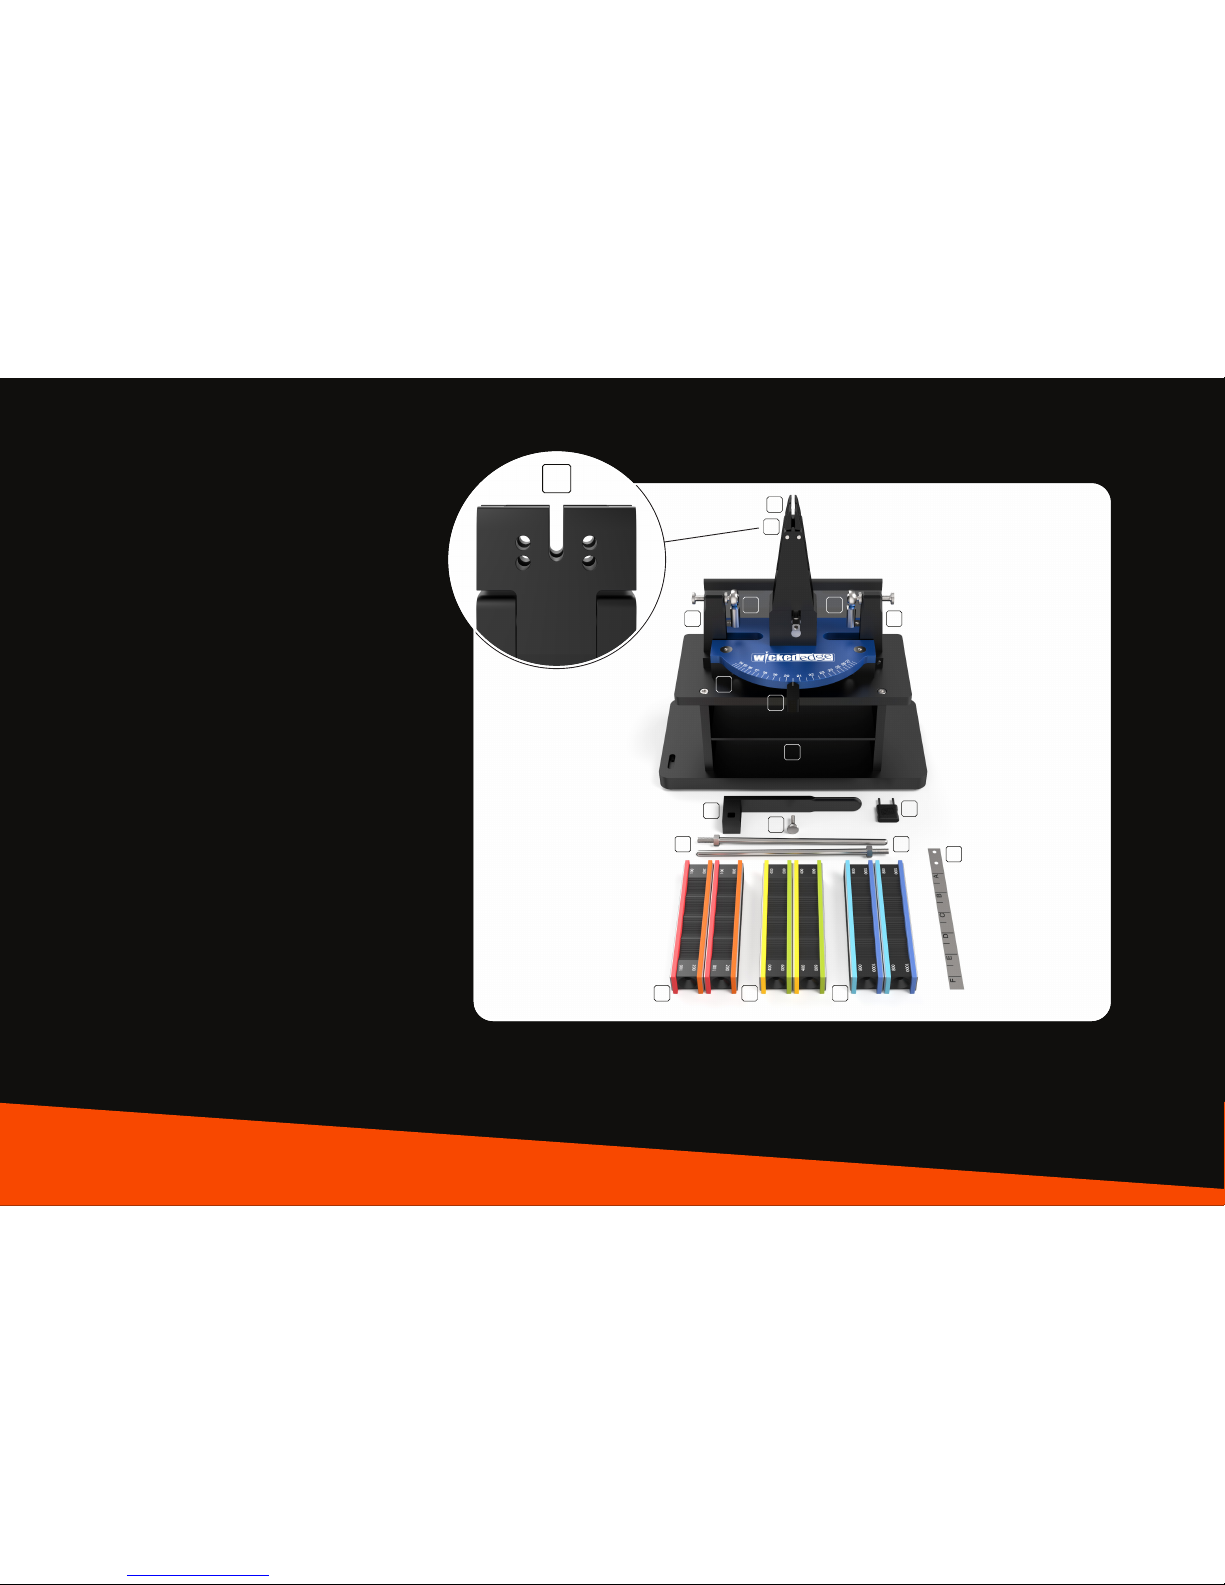
IN THE BOX
Please check to ensure you have all of the
components of your sharpener. You
should have each of the items listed here
in the quantity shown in parentheses.
1. Vise
2. Two Depth Settings for Repeatable Mounting
(Figure 1-1)
3. Depth Key
4. Vise Lever / Vise Lever Block
5. Thumb Screw for Vise Lever
6. Guide Rod (2)
7. Numbered Angle Settings
8. Angle Lever
9. Shelves for Sharpening Stones
10. Alignment Guide
11. Guide Rod Post
12. Ball-Joint Rod End
13. Coarse 100 Grit / Medium Coarse 200 Grit
Diamond Stones Pack
14. Medium 400 Grit / Fine 600 Grit Diamond
Stones Pack
15. Extra Fine 800 Grit / Ultra Fine 1000 Grit
Diamond Stones Pack
1
2
11 11
6 6
4
5
3
10
1514
13
12 12
7
8
9
Fig. 1
Fig. 1-1
2
Page 9
wickededgeusa.com • getting started • 09
GETTING STARTED
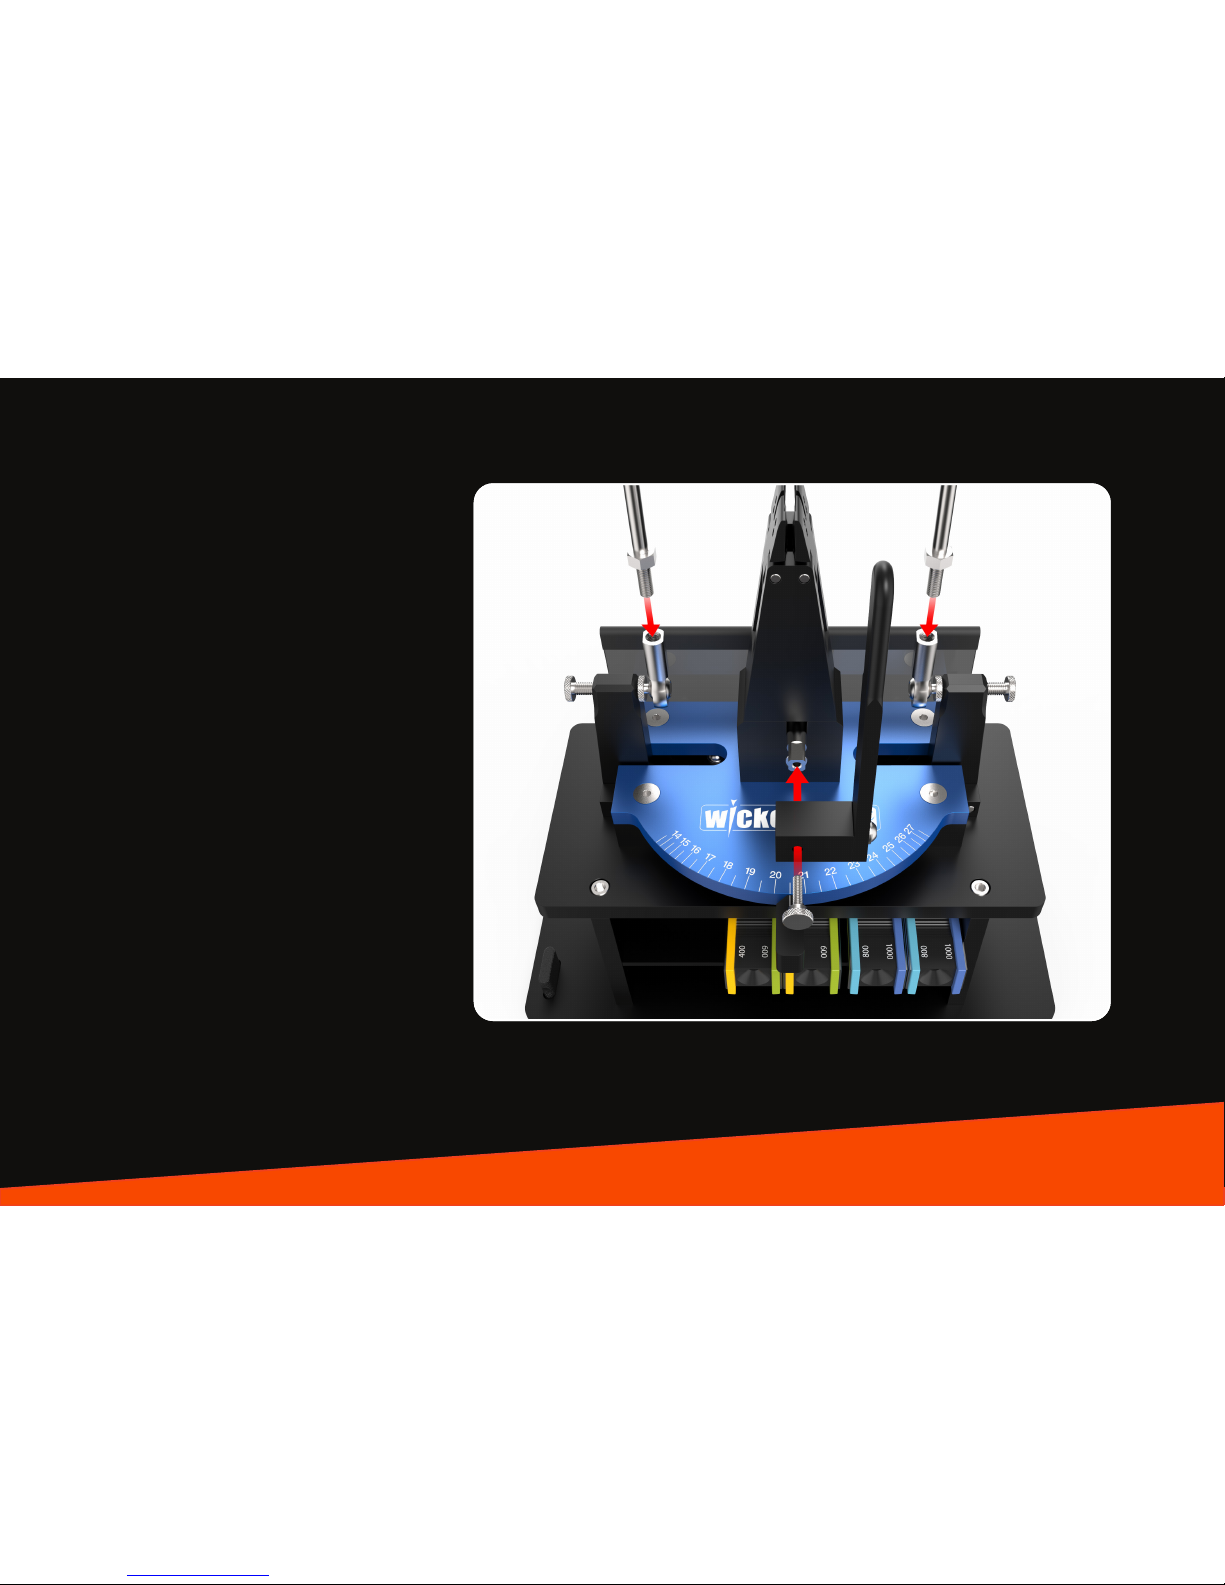
Step 1: Attach your Guide Rods to the
Ball-Joints by threading them into the rod
ends as shown in Figure 2.
Step 2: Attach the #4 Vise Lever to the
sharpener by sliding the square hole on
the Vise Lever Block onto the square Cam
Shaft, which is located toward the bottom
of the #1 Vise, as shown in Figure 2. When
attached, the lever should be to the right
of the #1 Vise. Use the #5 Thumb Screw to
secure the Vise Lever onto the Sharpener.
Step 3: Place your sharpening stones
onto the #9 Shelves for easy access while
sharpening.
Fig. 2
Page 10
10 • mounting your knife • wickededgeusa.com
MOUNTING YOUR KNIFE
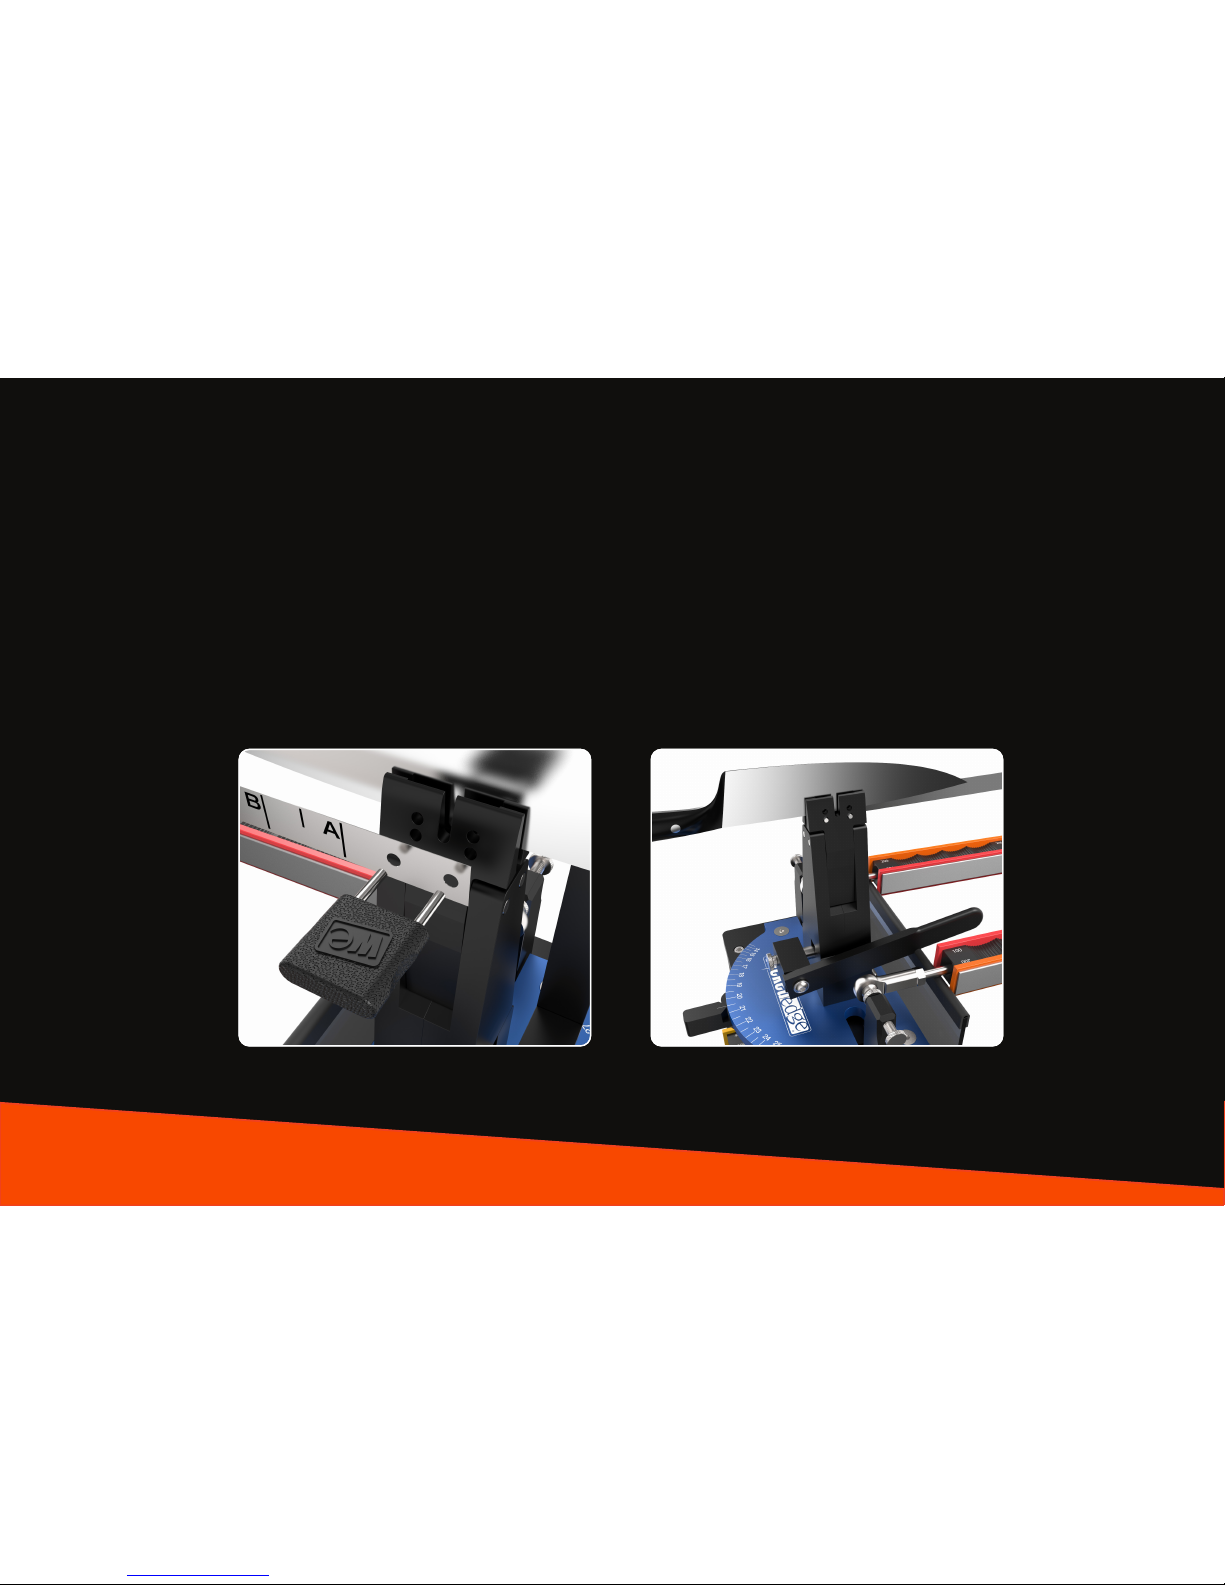
Attach the #10 Alignment Guide to the #3 Depth Key and insert the two prongs of the Depth Key into one of the two #2 Depth Settings located at
the top of the Vise, as shown in Figure 3. (If you are sharpening a larger knife, use the bottom settings. If you are sharpening a smaller knife, use the
top settings.)
Holding the knife so the tip is facing directly away from you and the edge is facing upward, mount the knife so it is approximately centered in the
Vise. The spine of the knife should make contact with both prongs of the Depth Key as shown in Figure 4. If your knife does not have a at spine,
place it in the Vise so the tip and heal of the knife are level.
Fig. 3 Fig. 4
Page 11
wickededgeusa.com • mounting your knife • 11
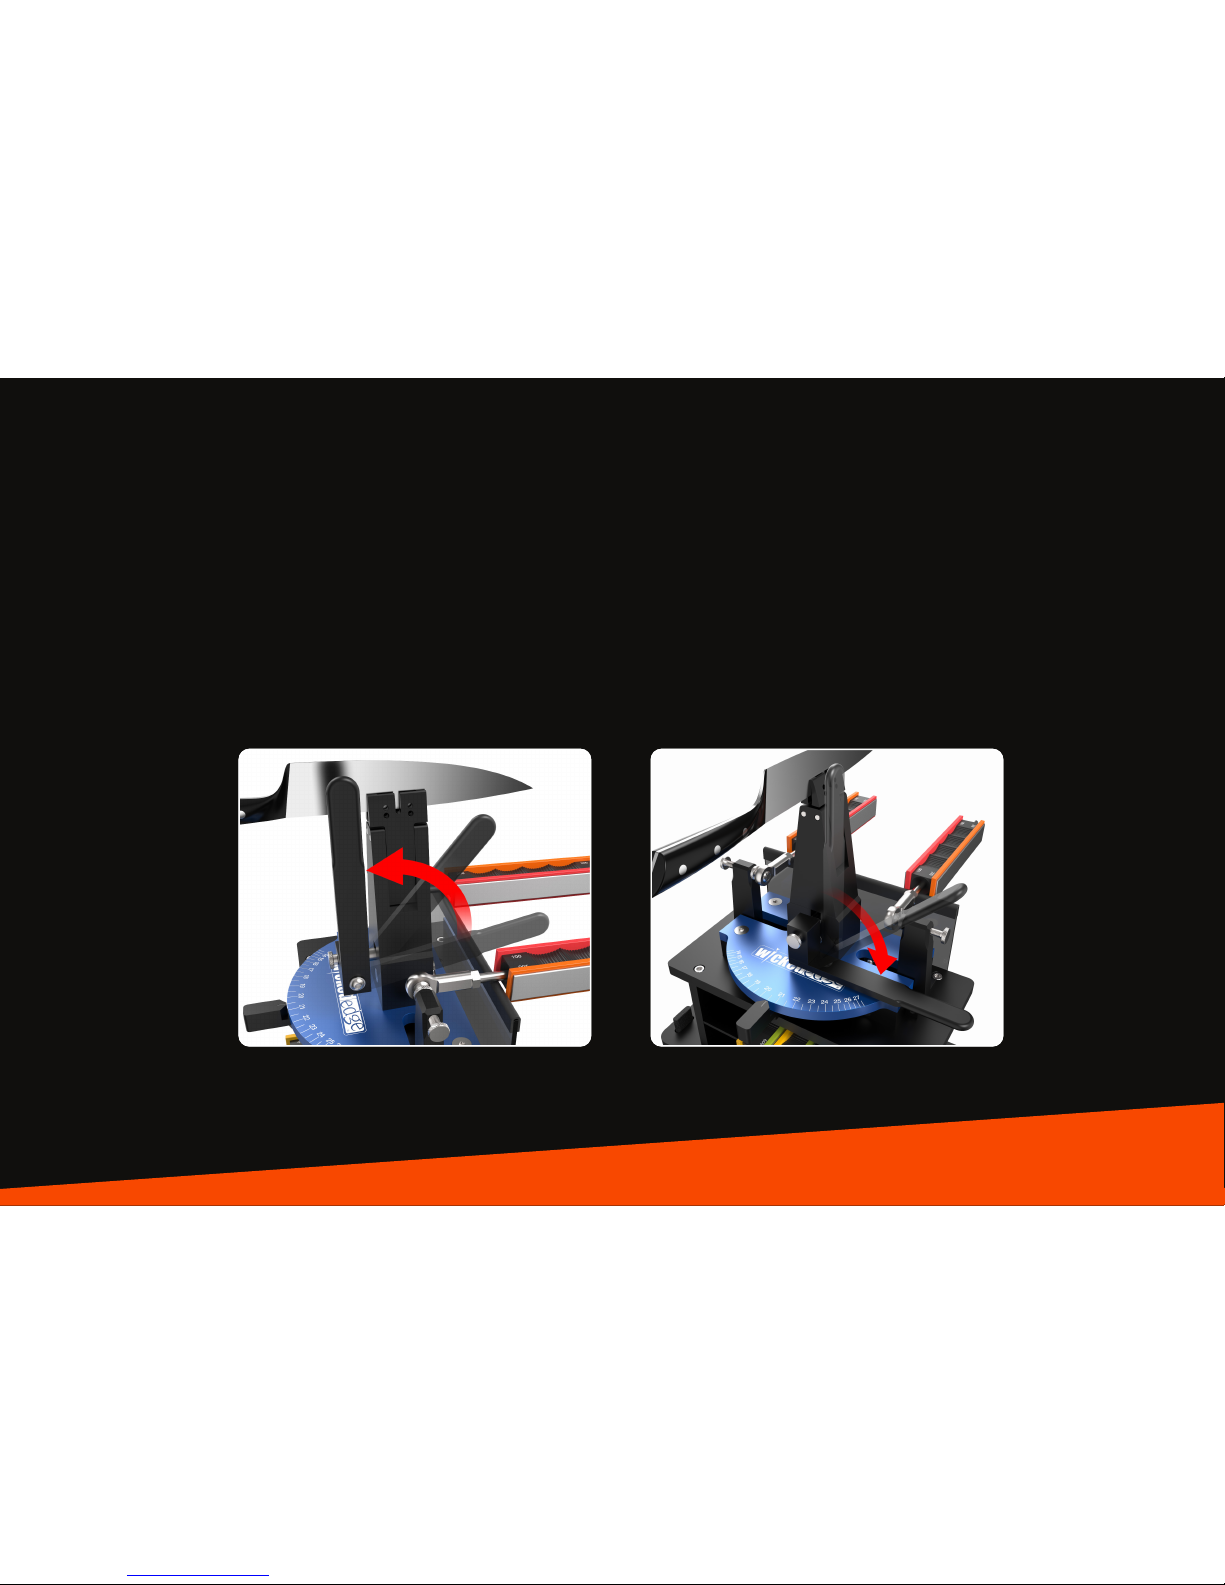
Fig. 5 Fig. 6
MOUNTING YOUR KNIFE
While rmly holding the knife with one hand, lift the Vise Lever up from its resting position. The Vise Lever should be now be vertical, parallel to
the vise, as shown in Figure 5.
Push the Vise Lever all the the way down to the right side of the sharpener, as shown in Figure 6.
Page 12
Page 10
12 • adjusting the tension • wickededgeusa.com
ADJUSTING THE
TENSION OF THE
SHARPENER’S VISE
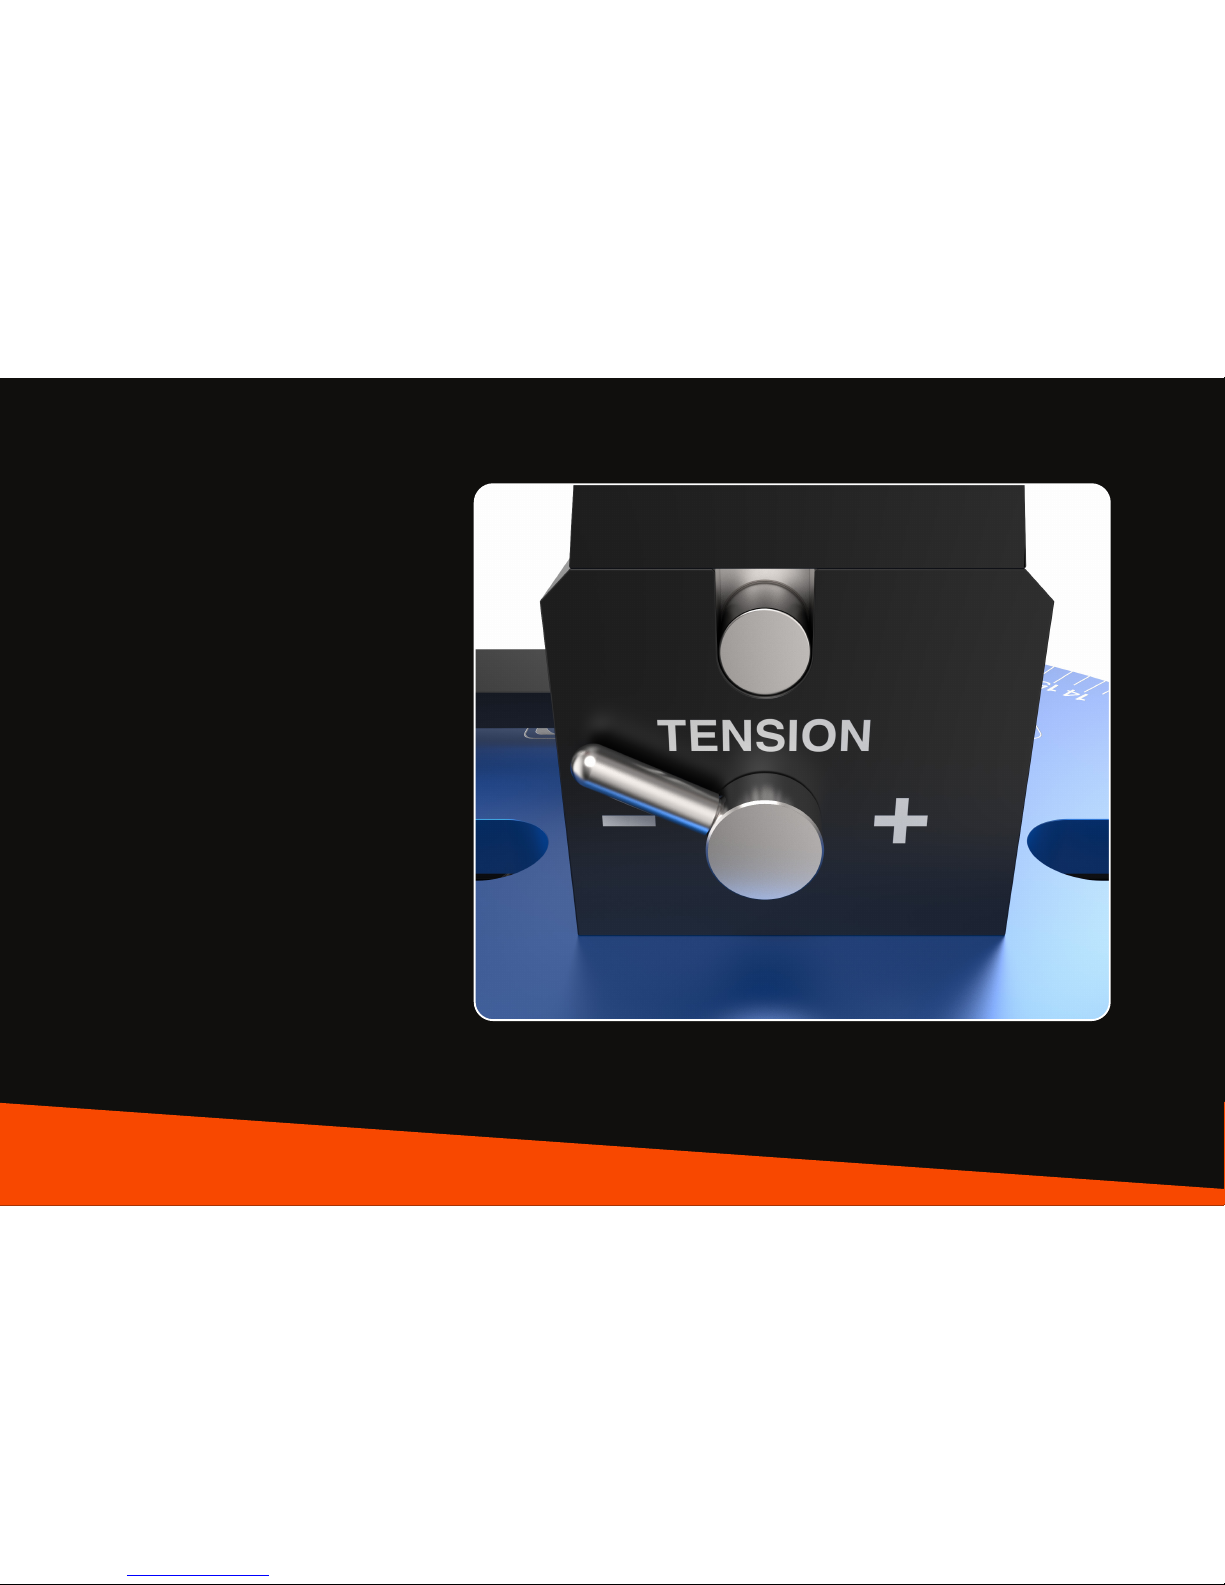
Use the Tension Lever located on the back side
of your Vise to adjust the clamping tension, as
shown in Figure 7. If the back side of the
sharpener is facing toward you, the Tension
Lever should be turned all the way to the left.
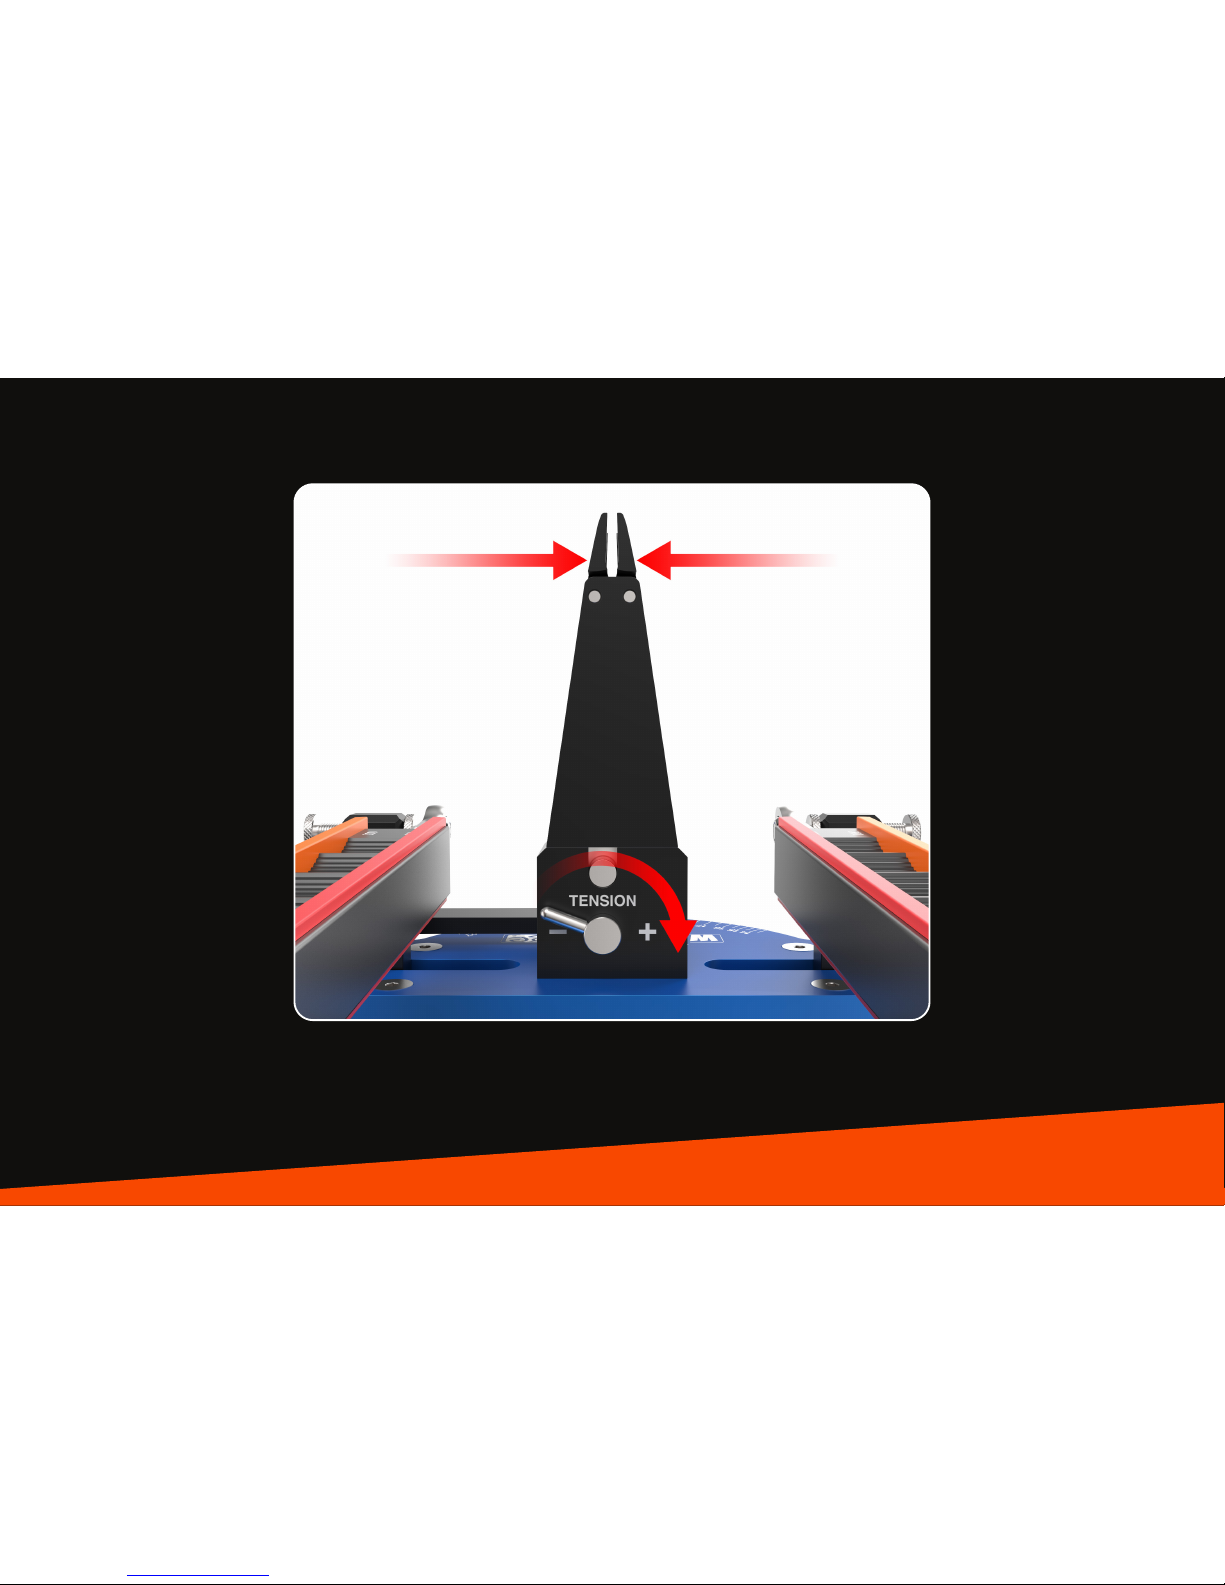
Try clamping the knife with the Tension Lever
in this position. If the knife can wiggle in the
Vise, readjust the Tension Lever by moving it
clockwise, then try clamping the knife again.
IMPORTANT: MAKE SURE TO RESET THE
TENSION LEVER TO THE LEFT AFTER EVERY
SHARPENING SESSION. IF THE TENSION IS TOO
TIGHT THE JAWS WILL BEND WHEN A KNIFE IS
CLAMPED.
Fig. 7
Page 13
wickededgeusa.com • adjusting the tension • 13
Fig. 8
Page 14
Edge
Shoulder
1.
3
Angle is too narrow, move
lever to next highest setting.
Edge
Shoulder
4
Shoulder
Marker Ink on Edge
1
Edge
Edge
Marker
Shoulder
2
Blade Detail - (Not to Scale)
Fine Stone
14 • setting the angle • wickededgeusa.com
SETTING THE ANGLE
There are three ways to nd your angle.
1. Consult the manufacturer’s documentation
2. Use a laser goniometer available from CATRA at
www.catra.org
3. Use a marker to color in the bevel and observe how the
stones remove the marker (recommended)
You may also refer to the Knife Database located on our
website to see if someone with a similar knife has recorded
their settings.
This is the procedure for using a marker to nd your
angle:
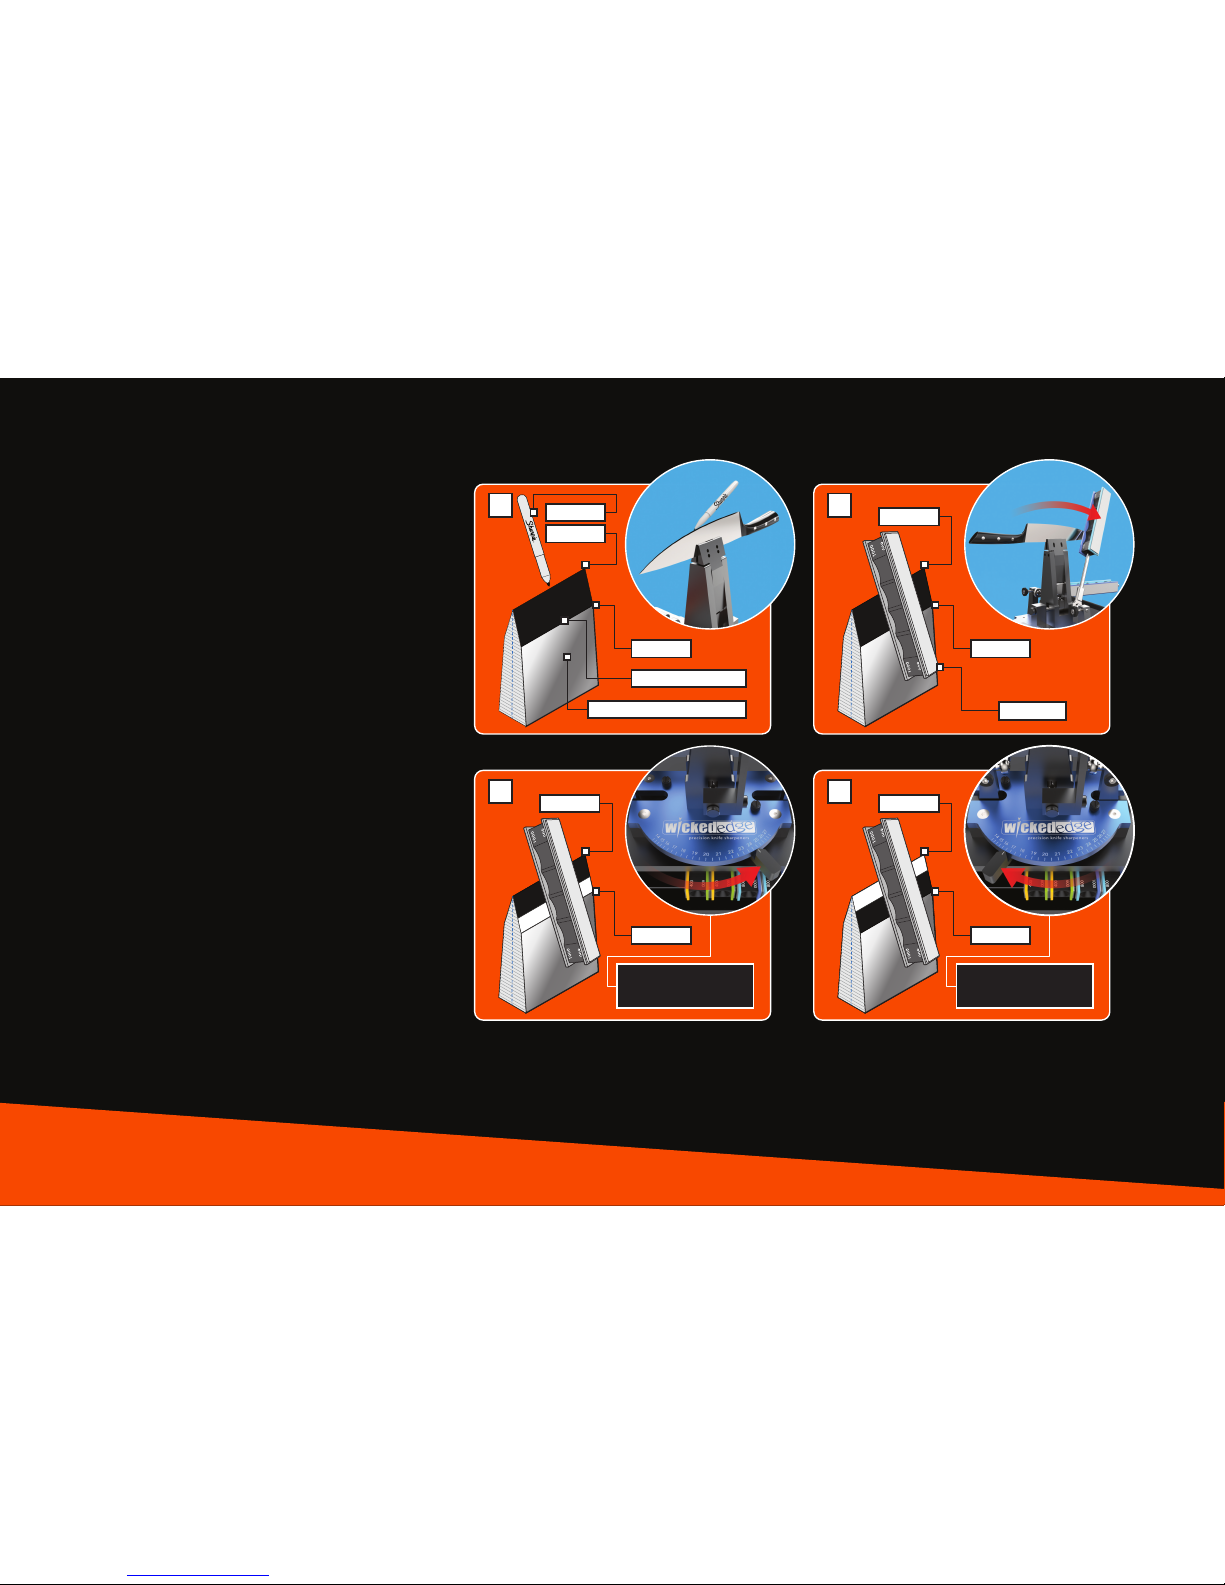
Color in your bevel as shown in Figure 9-1.
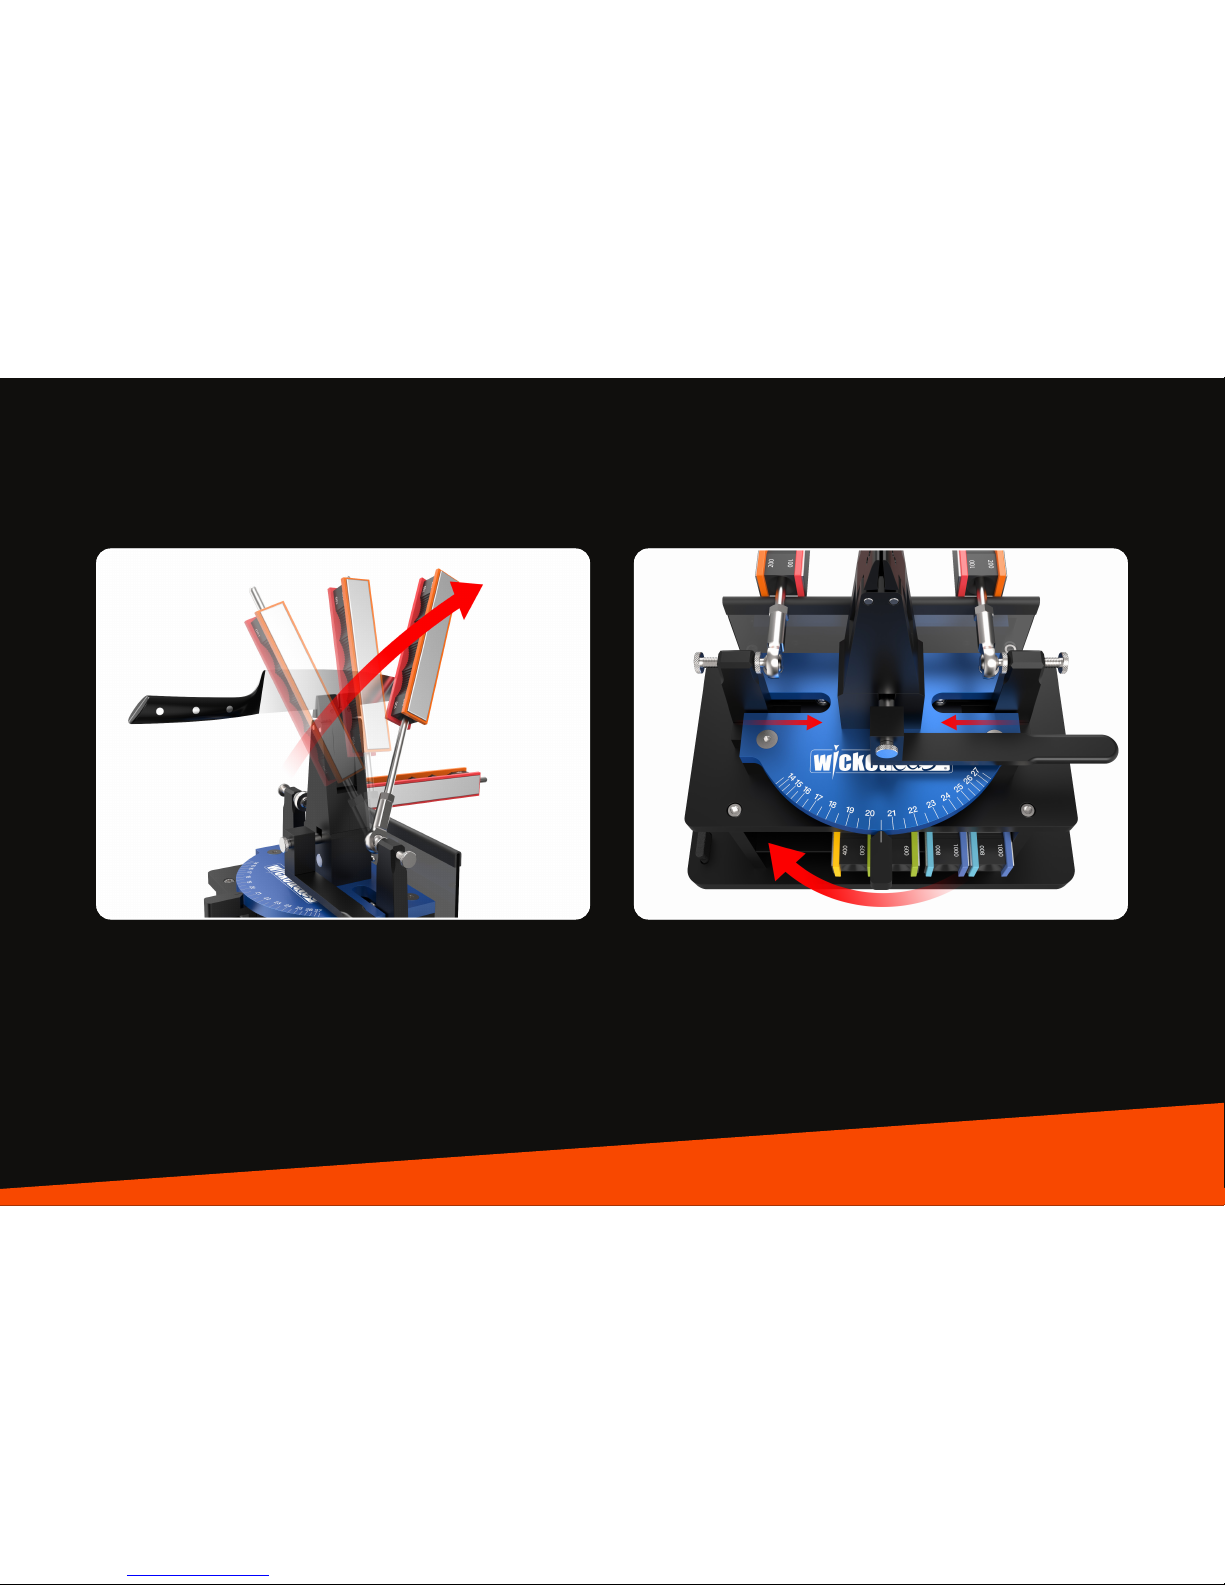
Set a ne stone on the Guide Rod and lay it up against the
bevel of the knife. Move the Angle Lever until the stone
appears to lay at against the bevel. Make a pass or two
with the stone, as shown in Figure 10 on the next page, and
observe where the marker is removed. If the marker is
removed from the bottom of the bevel, as shown in Figure
9-3, Angle is too narrow, move the Angle Lever to the next
highest angle, as shown on Figure 12 on the next page. If
the marker is removed at the top of the bevel, as shown in
Figure 9-4, Angle is too wide, move lever to the next lowest
angle setting. When you nd the angle that allows the
stone to remove the marker from the entire bevel with one
pass, that is the angle of your edge.
Fig. 9-1 Fig. 9-2
Fig. 9-3 Fig. 9-4
Angle is too wide, move
lever to next lowest setting.
Page 15
wickededgeusa.com • setting the angle • 15
Fig. 10 Fig. 11
Page 16

16 • micro-angle adjustments • wickededgeusa.com
MAKING MICRO-
ANGLE ADJUSTMENTS
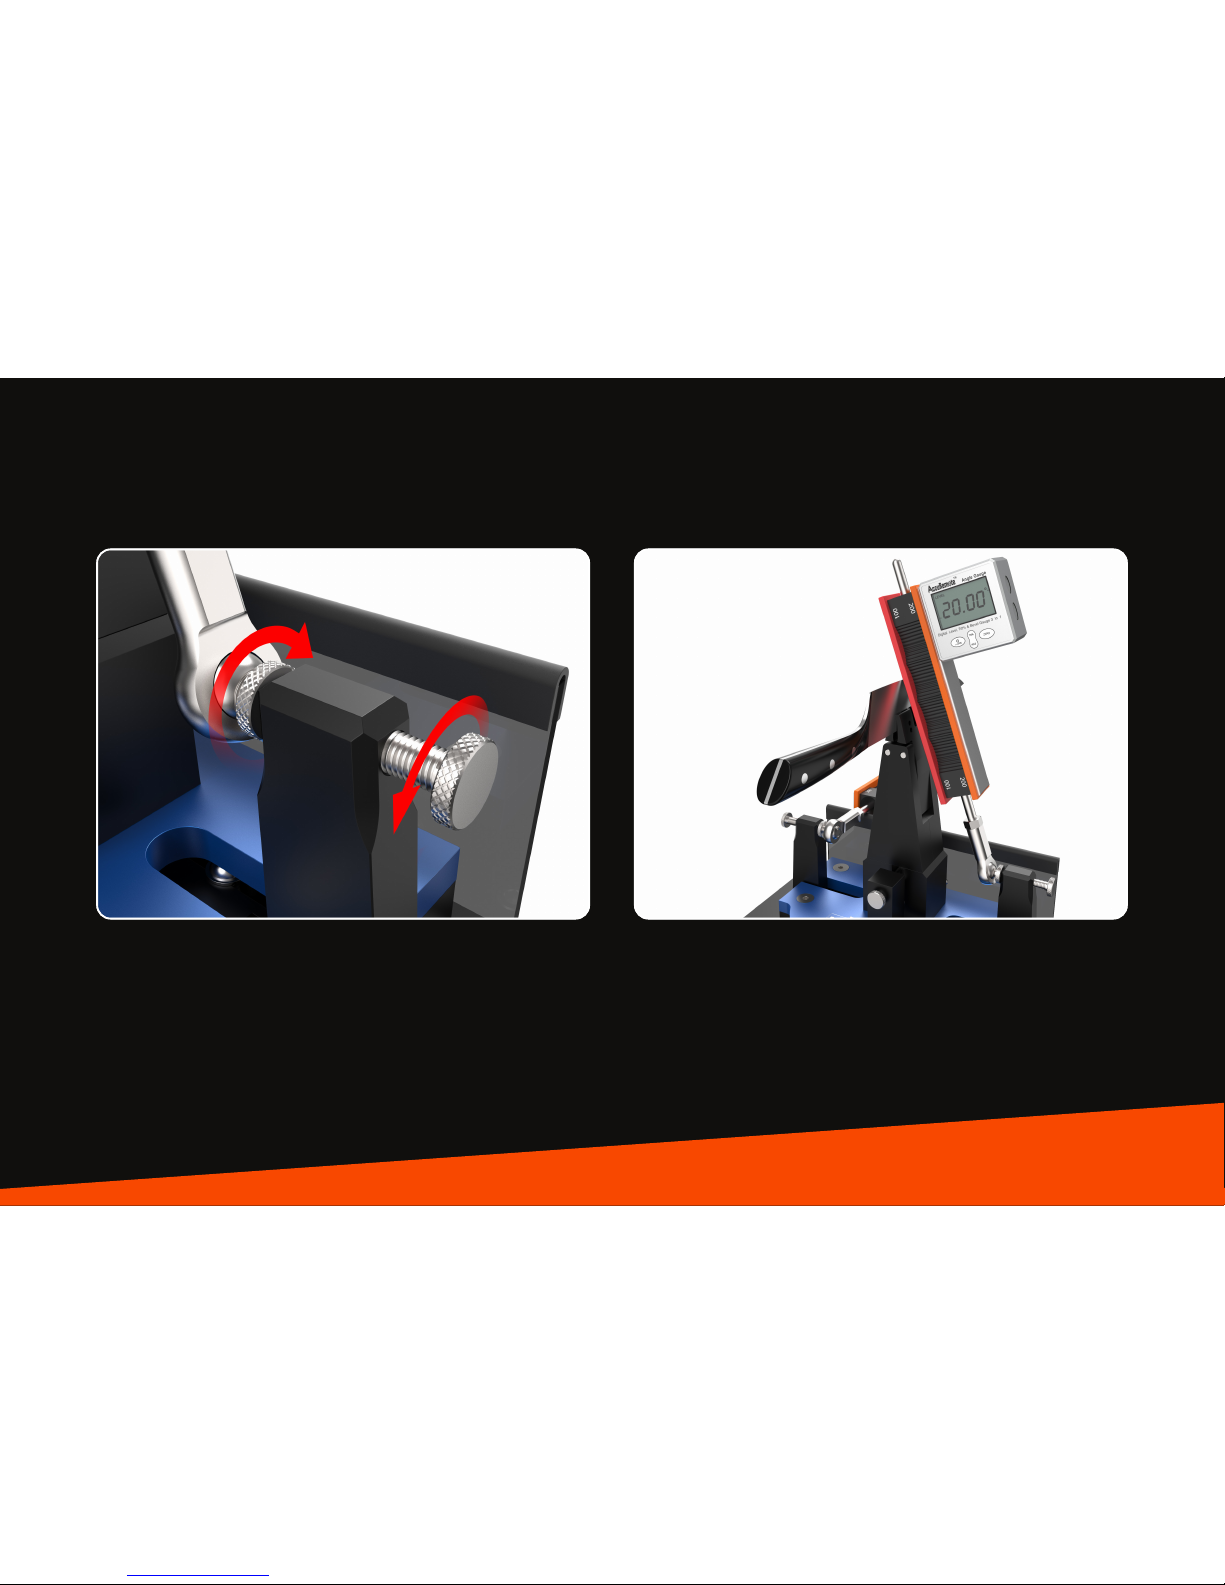
Step 1: Loosen the Jam-Bolt on the outside of the Guide Rod Post to free the threads which are attached to the Ball Joint as shown in Figure 12 on
the next page.
Step 2: Turn the thumb wheel to move the ball-joint closer to or farther from the Vise as shown in Figure 12 on the next page. Use a Digital Angle
Gauge to view the sharpening angle as you make adjustments, as shown in Figure 13 on the next page.
Step 3: Tighten the Jam-Bolt to secure the sharpening angle.
Page 17
wickededgeusa.com • micro-angle adjustments • 17
Fig. 12 Fig. 13
Page 18

18 • correct positioning • wickededgeusa.com
CORRECT POSITIONING
The curvature of a knife is an important factor to consider when sharpening because it can eect the sharpening geometry, so it is important to
position the knife correctly in the clamp. Doing so will let you keep your bevels even, from the heal of the knife to the tip.
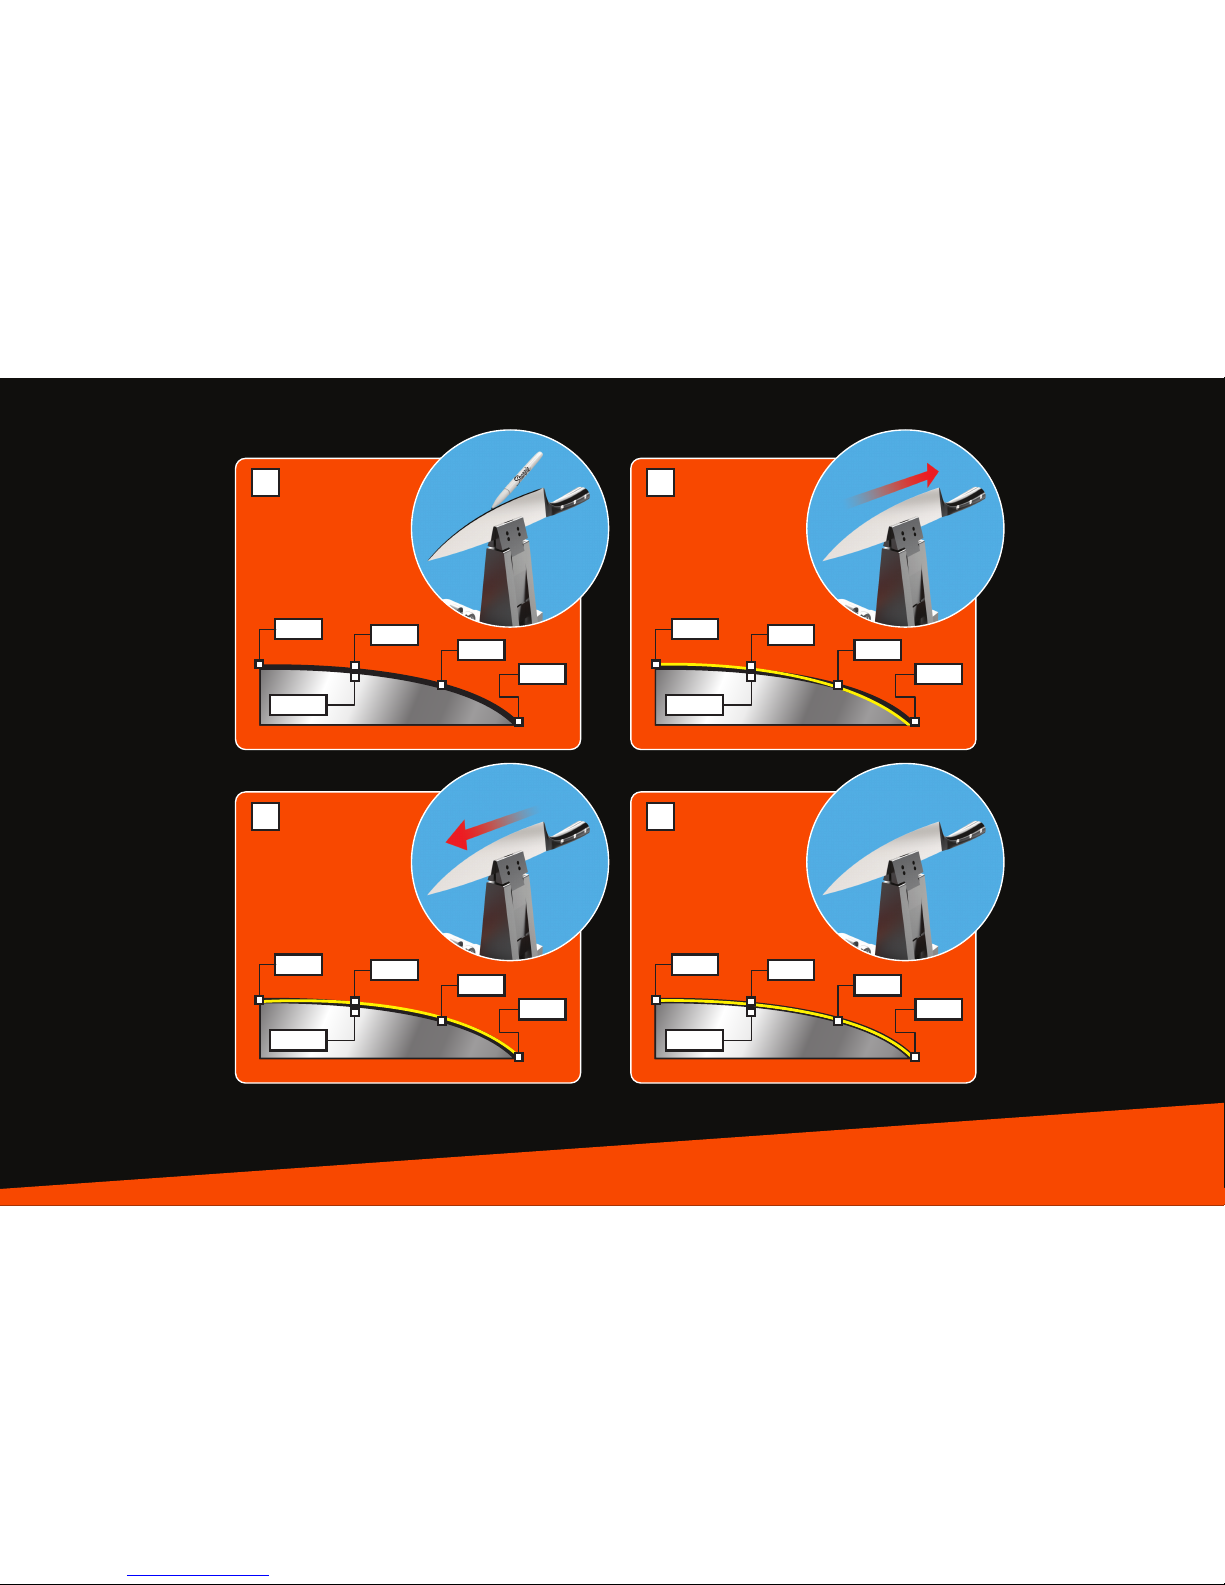
The easiest way to to nd the optimal front-to-back positioning for a given knife is to, again, use a marker. Color in the entire bevel, on both sides.
Then, lightly swipe a ne stone down the entire length of the blade to see where the marker is removed. Look closely to see how the stone eects
the coloring on the edge. If the stone is removing the marker from the edge along the straight portion but dipping down into the shoulder
toward the tip, as shown in Figure 14-2 on the next page, reposition the knife with the tip closer to the clamp. If the opposite happens – that the
stone removes the marker at the shoulder of the bevel along the straight portion and then moves to the edge along the curve, as shown in
Figure 14-3 on the next page, then the knife should be repositioned with the tip further from the Vise. Once you nd the position where the
marker is removed evenly from the entire bevel, as shown in Figure 14-4 on the next page, you have found the optimum positioning for your knife.
Any time you reposition your knife, it is important to re-insert the Depth Key and Alignment Guide and re-record your settings.
Page 19
wickededgeusa.com • correct positioning • 19
Bevel is colored in
from Shoulder to
Edge with marker.
Marker is removed at
Edge at the Heel and
on the Shoulder at the
Tip - Knife is too far
forward: reposition with
tip closer to clamp.
Marker is removed at
Shoulder at the Heel
and on the Edge at
the Tip - Knife is too far
back: reposition with tip
further from clamp.
Marker is removed
parallel to the Edge
and Shoulder along
the length of the
Blade - Knife is
correctly positioned.
Heel
1.
3 4
1
2
Edge
Belly
Tip
Shoulder
Heel
Edge
Belly
Tip
Shoulder
Heel
Edge
Belly
Tip
Shoulder
Heel
Edge
Belly
Tip
Shoulder
Fig. 14-1
Fig. 14-3
Fig. 14-2
Fig. 14-4
Page 20
20 • recording your settings • wickededgeusa.com
RECORDING
YOUR SETTINGS
Recording your angle, depth, and alignment settings
is a crucial step for success. If your settings are
recorded correctly you will be able to touch up your
knives in less than a minute and remove virtually no
metal.
Step 1: Using the knife sharpening tables located at
the back of this manual, record the make and model
of your knife
Step 2: Record your angle settings. If you did not
use an optional Digital Angle Gauge, record the
degree marking from the blue plate on your
sharpener. If you used a Digital Angle Gauge,
record what it reads when it is leaned against
your knife.
Step 3: Record that you used either the top
or bottom depth setting.
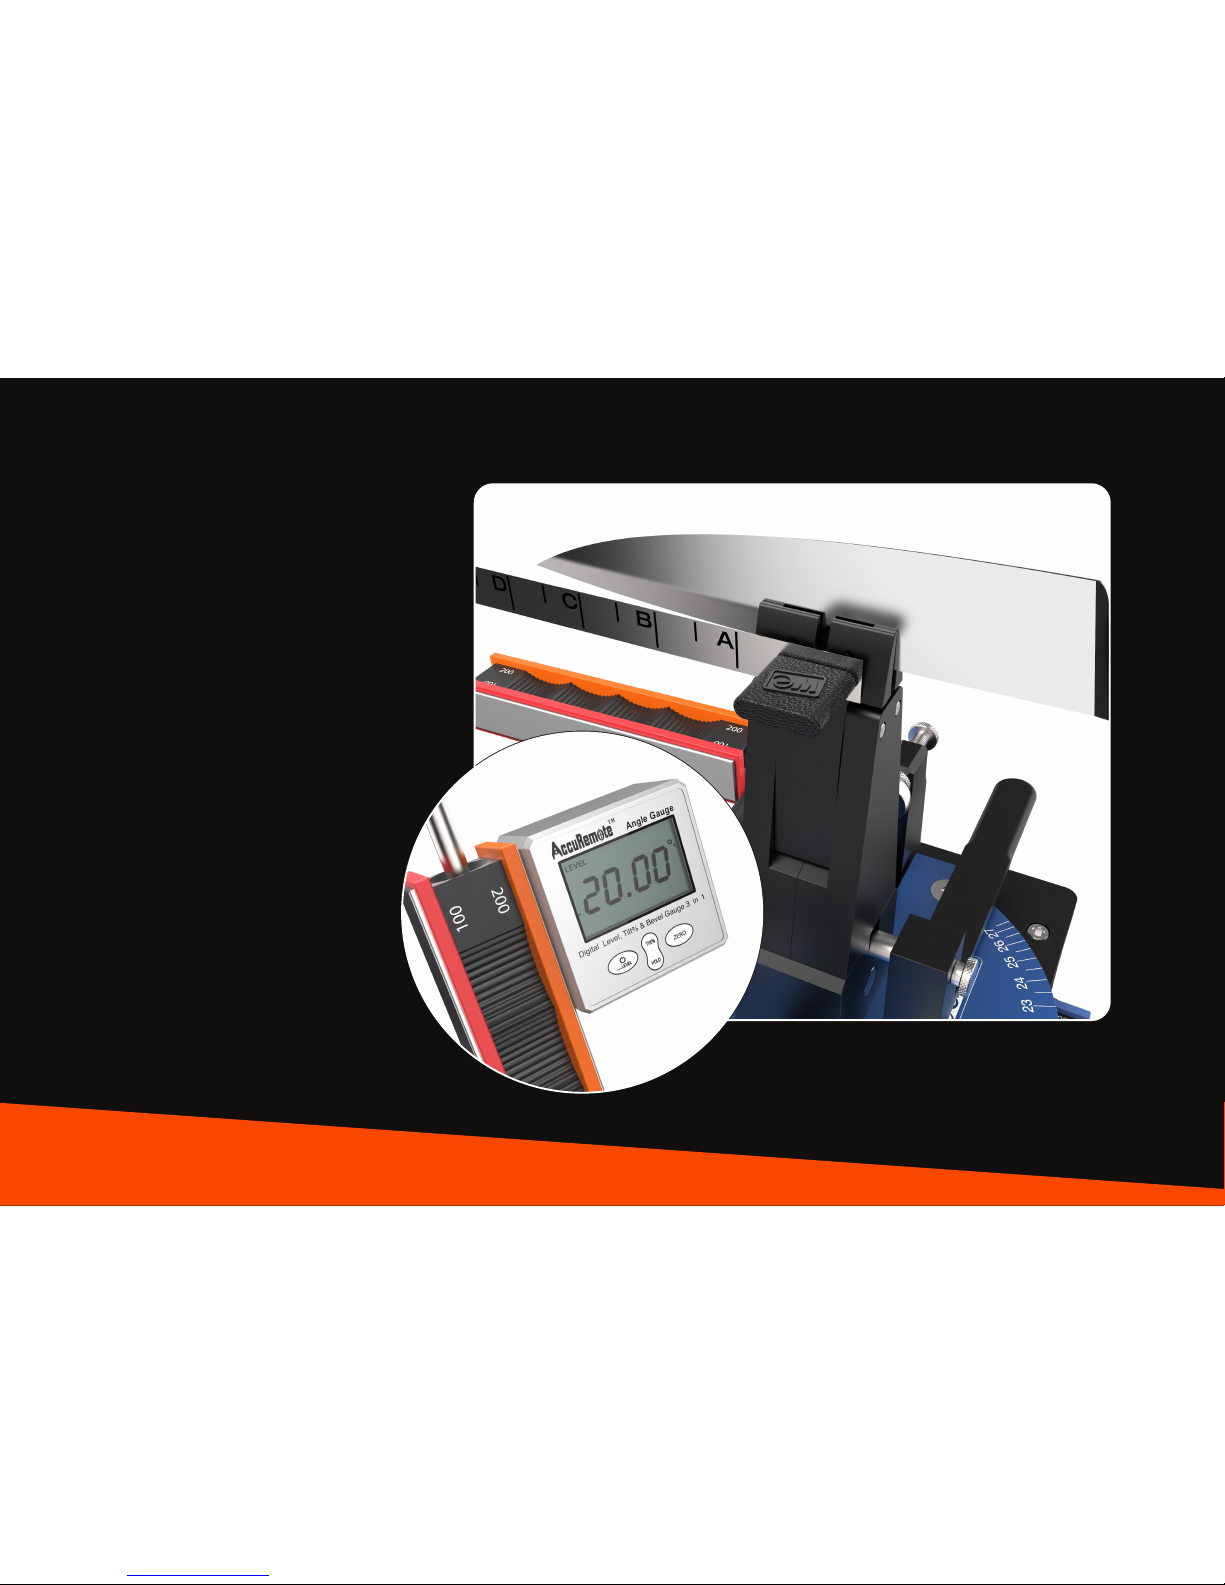
Step 4: Measure your knife's alignment using
your Alignment Guide and record where the
tip of the knife is aligned. Figure 15 shows the
tip of the knife is aligned with the C.5 mark on
the alignment guide. If this was your knife you
would simply write C.5 in the sharpening table's
alignment column.
Fig. 15
Fig. 15-1
Page 21
wickededgeusa.com • basic sharpening • 21
BASIC SHARPENING
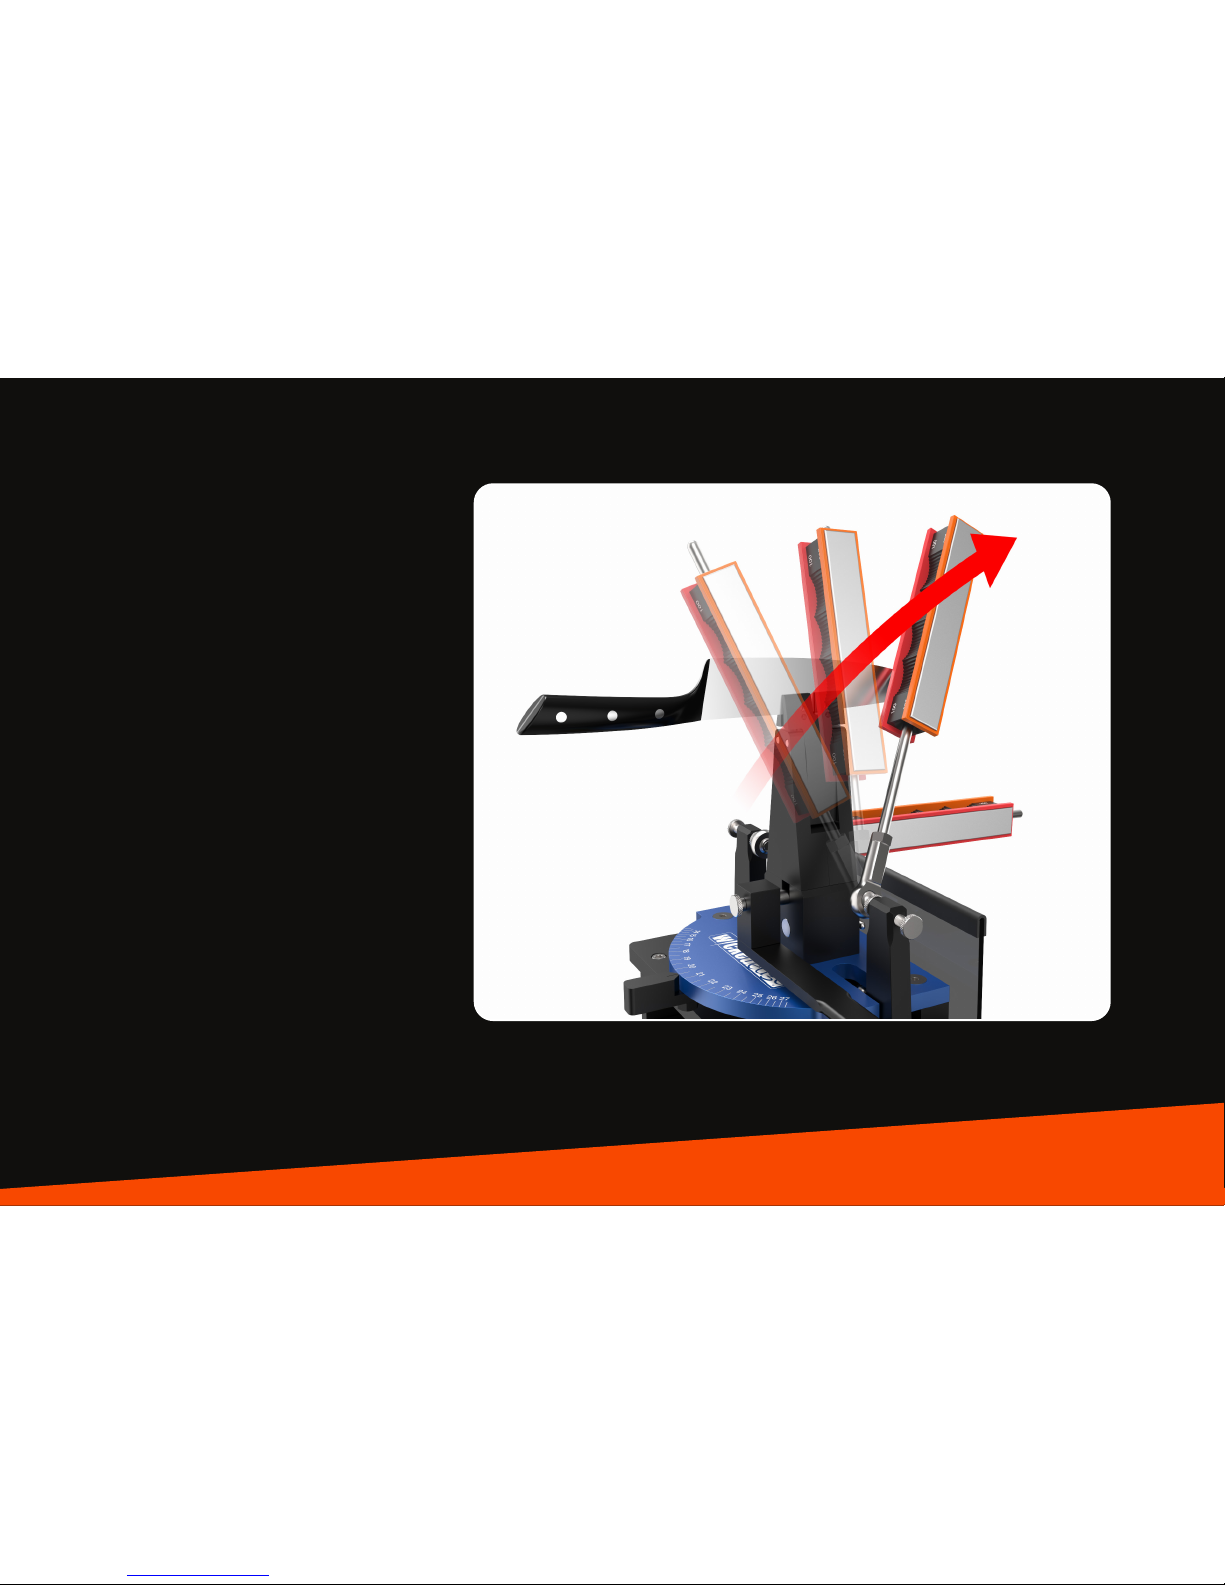
If this is the rst time your knife has been
sharpened with a Wicked Edge Sharpener, or if
you are changing the angle of the knife's edge,
you will need to use the coarse stones to
re-prole the edge. Again, mark the entire
bevel of the knife, on both sides, with a marker.
Slide the 100/200 Grit Diamond Stones
Handles onto the Guide Rods. Grasp the
handles with your ngers on the indentations,
being careful to keep your nger tips behind
the guards that the stones are mounted to.
Place the top of the Red – 100 Grit Coarse
Stone at against the heal of the knife. Slide
the stone up and away from you, along the
entire bevel of the knife. The stroke is done
when the bottom of the stone reaches the tip
of the knife. Use alternating side-to-side
strokes so both sides of the knife are sharpened at the same time. Sharpen until the
marker is completely removed from the bevels.
Fig. 16
Page 22
22 • creating and detecting a burr • wickededgeusa.com
CREATING AND
DETECTING A BURR
When you’re rst sharpening a blade, successfully drawing a burr from
each side of the knife is the most important step. It is very dicult to
know for certain without the presence of a burr if the bevels on each
side of the blade actually extend to the edge. If the bevels do not
extend all the way to the edge, the edge of the knife will be blunt and
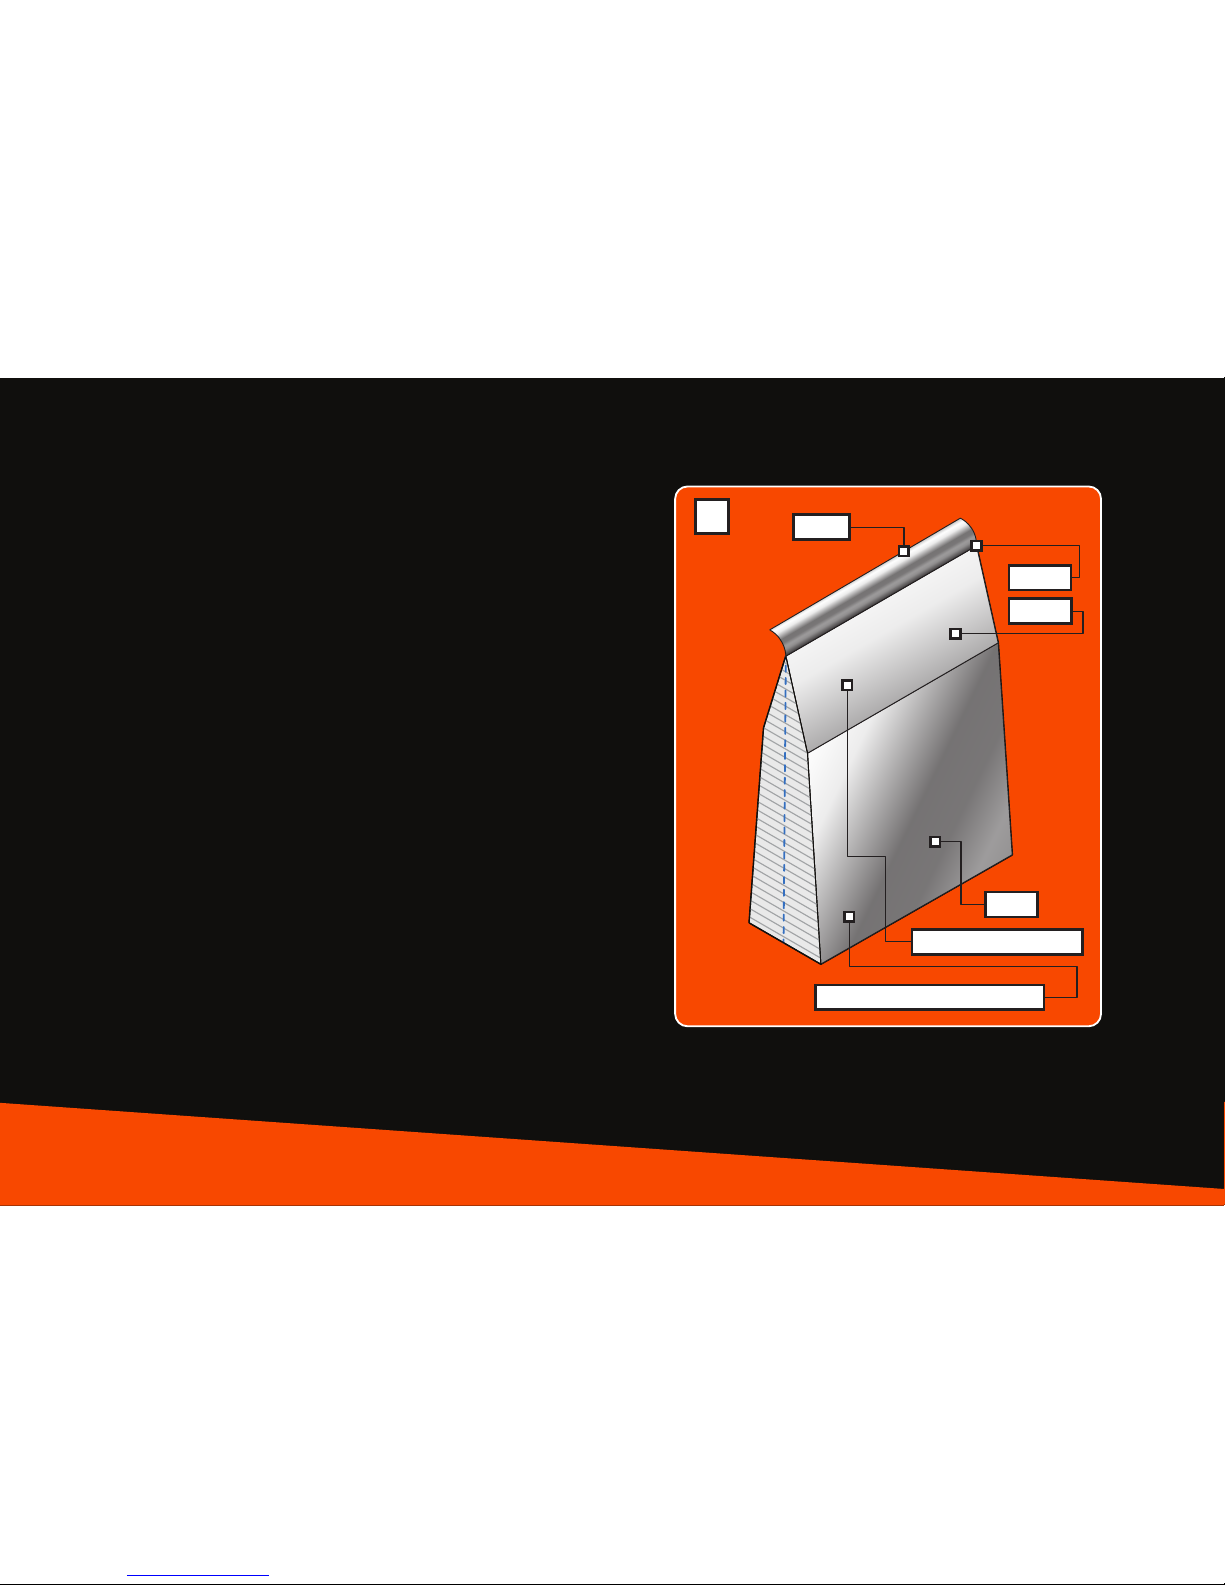
the knife will not be sharp. A burr, also called a wire edge, is created as
a result of sharpening metal. The burr forms on the edge of a knife
where the planes of bevels intersect. The diagram to the right shows
the burr projecting from the edge of the knife:
Once all the marker has been removed from the bevel, try to create a
burr on one side of the knife by sharpening the opposite side only. Do
approximately 10 strokes on one side of your knife only and then check
the opposite side for a burr. You can do this by very carefully feeling
the side of the blade by rubbing your ngernail or a cotton ball up the
opposite side of the knife, from the spine toward the edge. If you feel it
snag on the edge, the burr has been properly formed. Make sure the
burr exists throughout the entire length of the knife. Dierent areas of
the knife may require more strokes to successfully form a burr. Do as
many strokes as necessary to detect a burr along the entire edge. Once
you’ve successfully created and detected a burr on one side of the
knife, repeat the procedure for the other side.
1.1
Face
Blade Detail - (Not to Scale)
Edge
Bevel
Burr
Side Just Sharpened
Fig. 17
Page 23
wickededgeusa.com • removing your knife • 23
Fig. 18
Fig. 19
PROGRESSING THROUGH
YOUR STONES
Once you’ve successfully created and detected a burr from both
sides of the blade, sharpen your knife using alternating side-to-side
strokes. Progress through your abrasives until you achieve the level
of polish desired. Note that your stones will need time to break in.
We recommend sharpening your inexpensive knives rst to let your
stones break in. As you spend time using your Wicked Edge
Sharpener your technique will become more uid, your stones will
break in, and your results will improve with every knife.
REMOVING
YOUR KNIFE
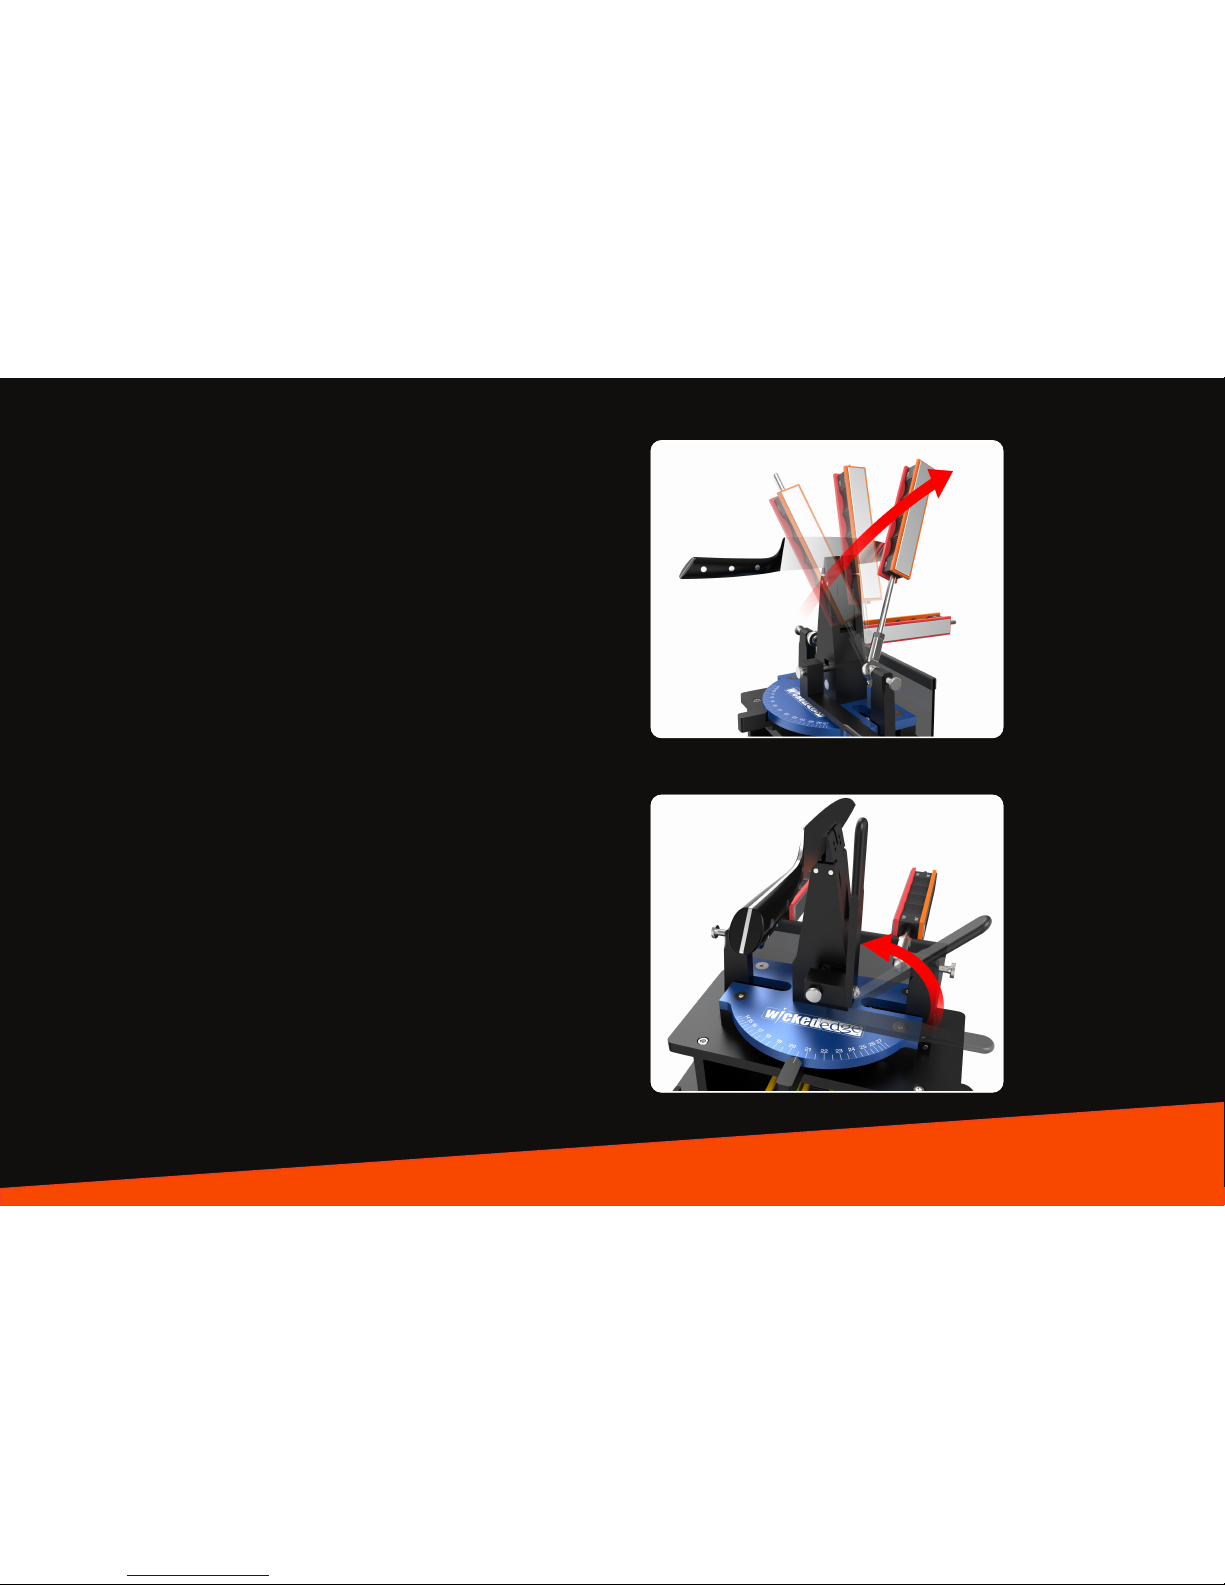
Be careful! Your knife is extremely sharp. FIRMLY hold the handle of
the knife with one hand and use your other hand to move the Vise
Jaw Clamping Lever to its up position to release the knife, as shown
in Figure 19.
Page 24

24 • touching up your knife • wickededgeusa.com
TOUCHING UP YOUR KNIFE
When your knife starts to become dull, it's time for a touch-up. The amount of time between touch-ups can vary, depending on the steel, angle,
and usage. To bring your edge back to incredible sharpness we recommend starting your grit progression with your nest diamond stone. Simply
reference your recorded settings for that particular knife. Mount your knife so the depth, alignment, and angle settings are identical to that which
you set during that knife's previous sharpening session. Once everything is set, draw a burr from one side. Then sharpen the opposite side and
push the burr to the other direction. Once you have found the burr on both sides, do approximately 20 strokes with your diamond stones on each
side of the knife. If you have purchased any additional ne stones or strops, progress through them until you reach a level of sharpness and polish
that you are happy with.
If you have any questions please feel free to email or call us.
Here's our contact info:
Email: [email protected]
Toll Free:
(877) 616-9911
Hours: 9:00 A.M. To 5:00 P.M. Mountain Time
Page 25

wickededgeusa.com • knife sharpening table • 25
WICKED EDGE® KNIFE SHARPENING TABLE
Brand Model Angle Mark Depth
Sample 10xx 22 C 0.5 Top
Brand Model Angle Mark Depth
Page 26

26 • knife sharpening table • wickededgeusa.com
WICKED EDGE® KNIFE SHARPENING TABLE
Brand Model Angle Mark Depth Brand Model Angle Mark Depth
Page 27

WICKED EDGE® KNIFE SHARPENER WARRANTY
STOP!! BEFORE USING THIS PRODUCT YOU MUST READ THE FOLLOWING PRODUCT WARRANTY, DISCLAIMERS AND WARNINGS!
Wicked Edge® (a division of HollowPoint, LLC) oers a Limited Lifetime Warranty to the purchaser of the knife sharpener, for defects in materials
and workmanship. The knife sharpener is not made for, designed for, nor intended to be, used for any purpose other than as specied in the
Instructions. Any use of the knife sharpener, for any activity whatsoever, other than that for which the knife sharpener was intended, is done at the
purchaser’s own risk. The knife sharpener is to be used only with knives in good condition that are not damaged or otherwise faulty. It is the
purchaser’s sole responsibility to read the Instructions thoroughly. Extreme care must be used when installing, mounting and using the knife
sharpener to avoid serious accident, injury, or death. Wicked Edge® will not be responsible for damage to the knife sharpener while being
mounted. By purchasing the knife sharpener, the purchaser agrees and acknowledges that the knife sharpener is an inherently dangerous tool
that can cause injury, even in the course of ordinary use, and even if used for the purpose for which the knife sharpener was intended. Therefore,
the purchaser agrees and acknowledges that Wicked Edge® cannot be responsible or liable in any way for injury, accident, bodily harm (including
death) or other such trauma that may arise out of the purchaser’s use or misuse of the knife sharpener, whether used in the course of sharpening
knives or otherwise, regardless of whether such use was for the purpose for which the knife sharpener was intended.
THE PURCHASER HEREBY EXPRESSLY RELEASES WICKED EDGE®, ITS EMPLOYEES, AGENTS, OFFICERS, DIRECTORS AND MEMBERS, FOR ANY AND
ALL LIABILITY, INCLUDING DAMAGES, INJURY, ACCIDENT, BODILY HARM (INCLUDING DEATH) OR OTHER SUCH TRAUMA, THAT MAY RESULT FROM
PURCHASER’S USE OR MISUSE OF THE KNIFE SHARPENER, OR USE OR MISUSE OF KNIVES IN CONNECTION WITH THE KNIFE SHARPENER.
Wicked Edge’s® obligation under this warranty is limited to the replacement of the knife sharpener only. All costs related to the removal, installation or re-installation of the knife sharpener, freight charges, incidental or consequential damages, are expressly excluded from this warranty. This
warranty is expressly in lieu of all other warranties, expressed or implied. This warranty SHALL NOT apply to any knife sharpener that has been
subject to accident, negligence, alteration, abuse or misuse as determined at the sole discretion of Wicked Edge.®
wickededgeusa.com • warranty • 27
Page 28

pre cision k nife sharpener s
WWW . W ICKEDEDGEUS A.C O M
Wicked Edge®
1591 Pacheco Street, Bldg 2
Santa Fe, NM 87505 USA
(877) 616-9911
©2017 Wicked Edge® All Rights Reserved.
 Loading...