

Page 1
User Manual
Z-Wave Controller for wibutler pro - Alfred
Document Revision 1.02
Page 2

1
Z-Wave Controller Manual for wibutler pro – Alfred
Content
Introduction .................................................................................................. 2
General Usage ............................................................................................... 3
Installation Guide ...................................................................................... 3
Connecting to a wibutler and First Orientation ......................................... 3
Network Management .................................................................................. 6
Add Device to Network ............................................................................. 6
Remove Device from Network .................................................................. 6
Reset Network Controller .......................................................................... 7
Send Node Information Frame .................................................................. 7
Network Replication .................................................................................. 7
Controller Learning .................................................................................... 8
Device Management ..................................................................................... 9
Remove Failing Device ............................................................................... 9
Replace Failing Device ............................................................................... 9
Basic Device Operation .............................................................................. 9
Page 3

2
Z-Wave Controller Manual for wibutler pro – Alfred
Introduction
The wibutler pro is a multi-radio server for home automation. One of the
support radio standards relevant for the modern smart home is Z-Wave. Your
entire smart home can be configured and controlled by our user-friendly
mobile app.
The wibutler pro can be included and operated in any Z-Wave network with
other Z-Wave certified devices from other manufacturers and/or other
applications. All non-battery operated nodes within the network will act as
repeaters regardless of vendor to increase reliability of the network. In
addition it supports secured communication between security enabled
products.
This user manual covers only the general usage and Z-Wave specific topics.
Please have a look at our quick start guide, the general user manual and our
online community at www.wibutler.com to get more information about the
wibutler pro.
Page 4
3
Z-Wave Controller Manual for wibutler pro – Alfred
General Usage
Installation Guide
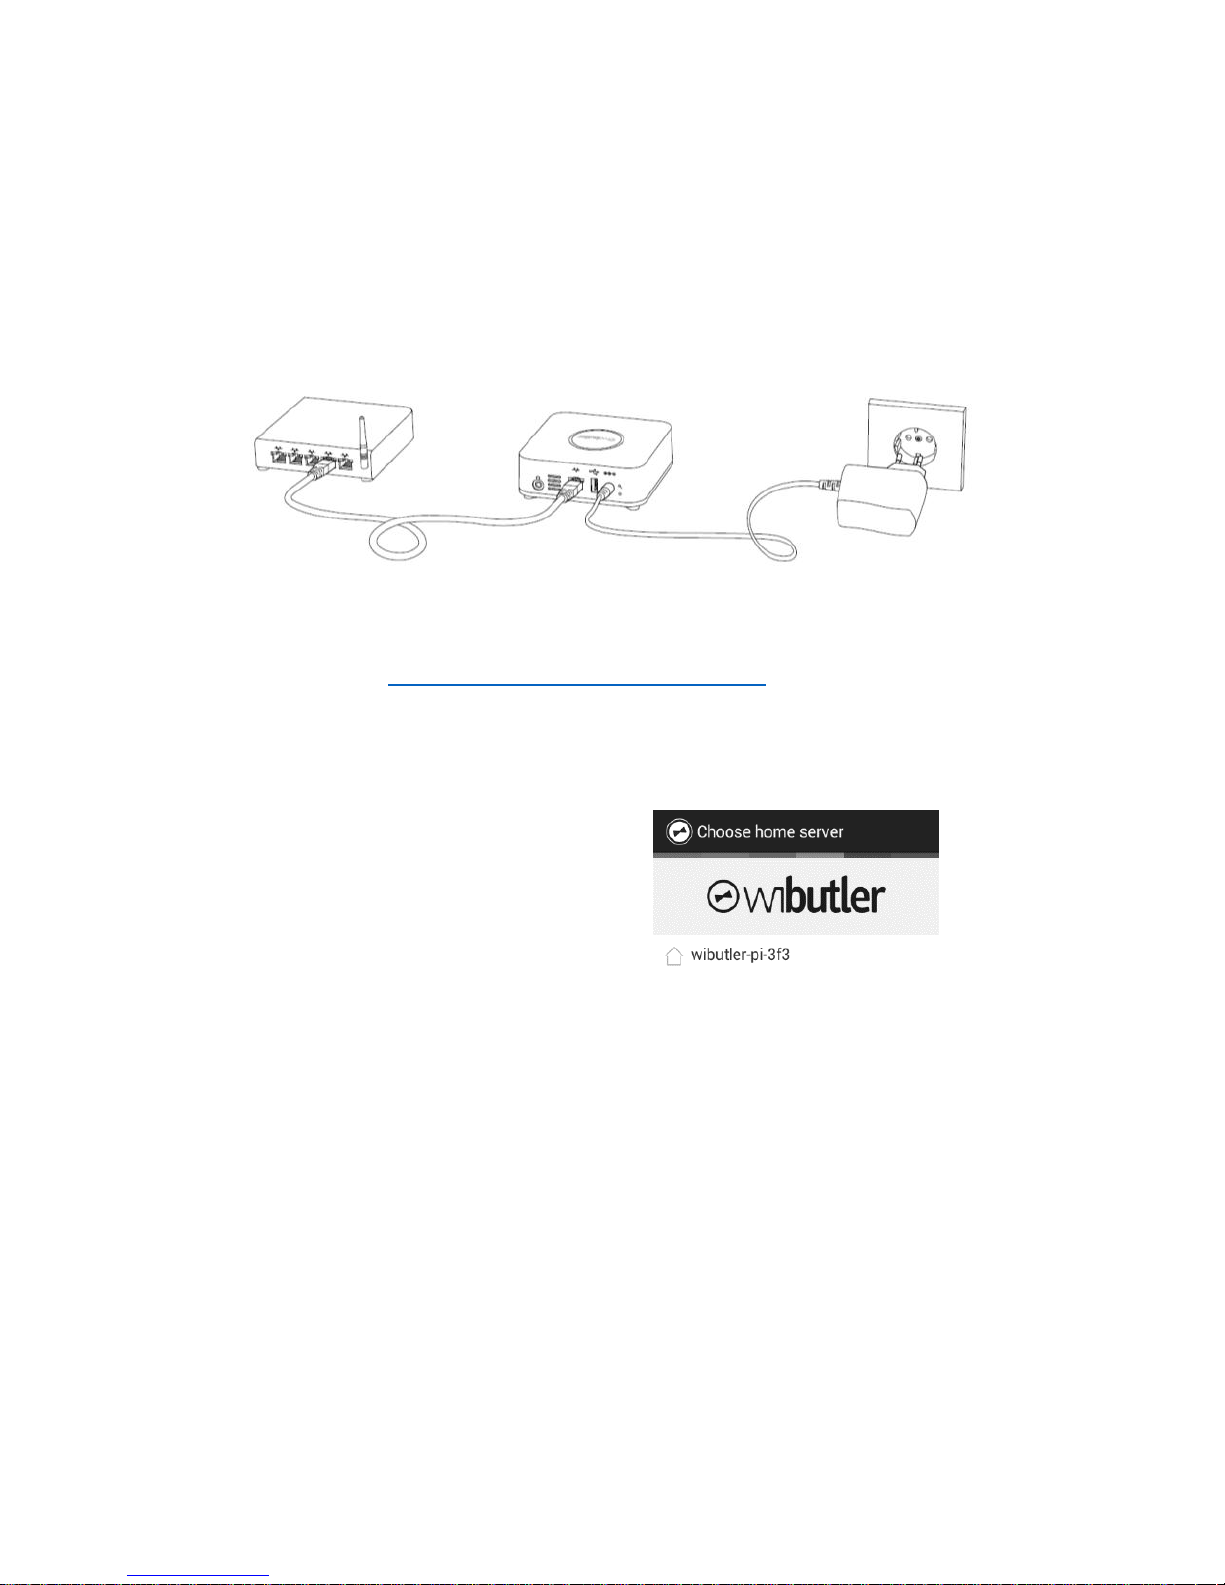
To setup your wibutler, connect it to the power line and your WLAN router
as shown in the picture below.
We provide an Android App and iOS App which are both available in the
official App stores by google and Apple. Links to the Apps are available on
our website at https://www.wibutler.com/downloads
Connecting to a wibutler and First Orientation
Start the mobile app and
select your wibutler
from the wibutler list.
Most likely you will see
only a signle device. If no
device is listed, make
sure that the mobile
device is in the same
network as the wibutler
and the router it’s
connected to.
Page 5
4
Z-Wave Controller Manual for wibutler pro – Alfred
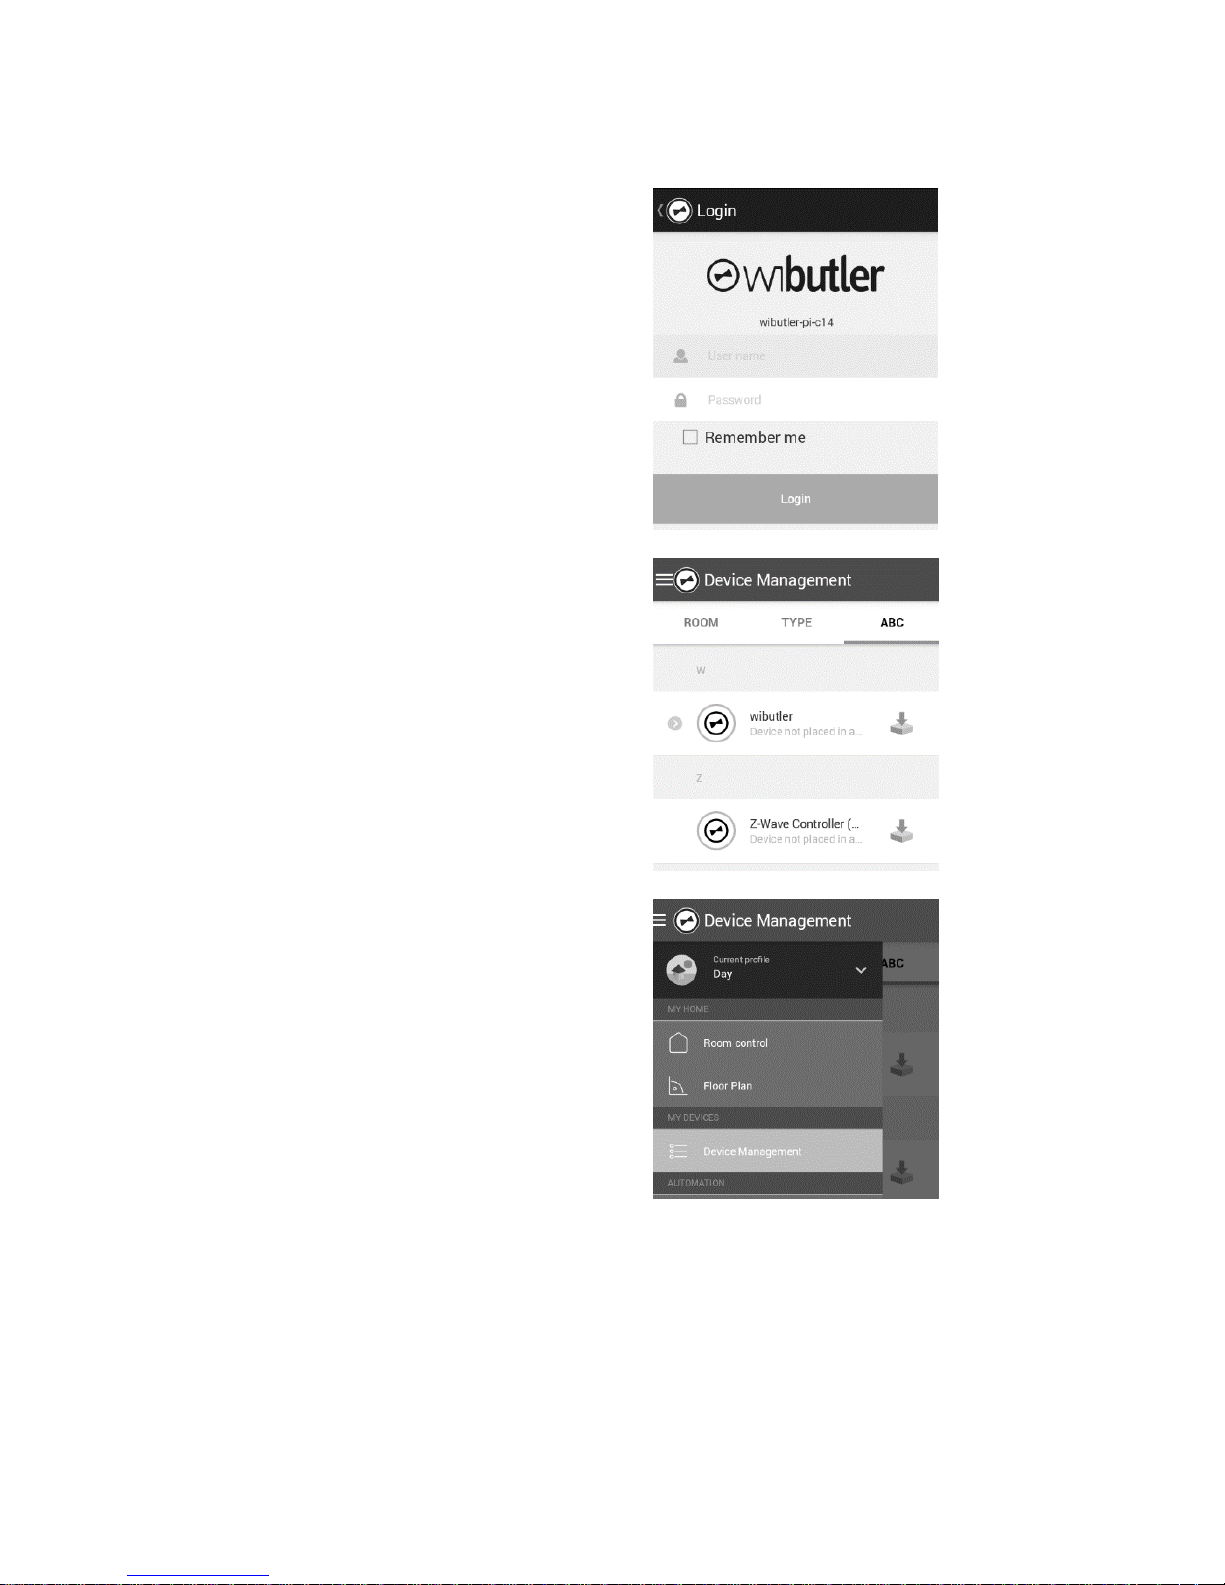
Enter your username
and password to login to
the selected wibutler
device.
After Login, the device
manager is shown. If no
device has been added
to the wibutler, the
wibutler itself and the ZWave Controller are
present.
You can always go back
to the Device Manager
by tapping on the top
left corner until the side
scrole menu opens up
(see picture on the right)
and select “Device
Manager” under “My
Devices”.
Page 6
5
Z-Wave Controller Manual for wibutler pro – Alfred
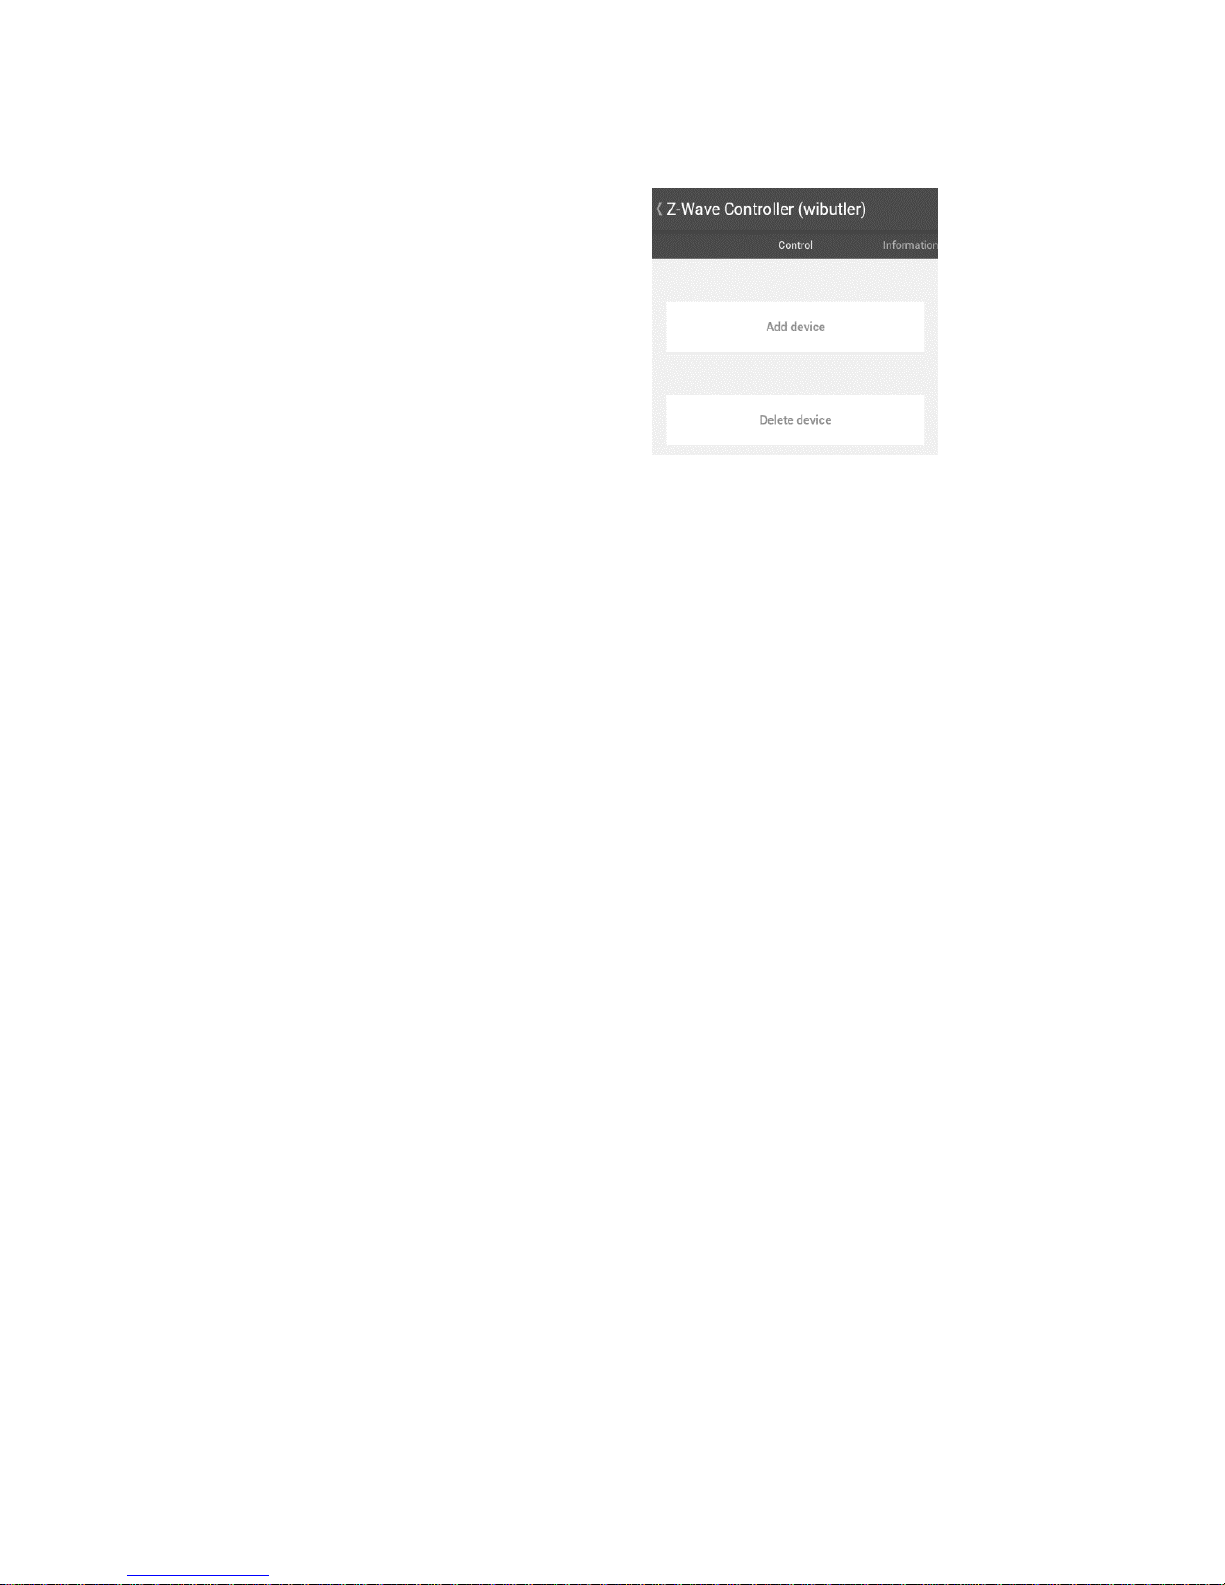
If you tab on a device, a
device specific interface
is shown (see Z-Wave
Controller on the right
picture). By wiping with
your finger from the left
to the right or vice versa,
you can switch between
different pages like
“Control” or
“Information”
Page 7

6
Z-Wave Controller Manual for wibutler pro – Alfred
Network Management
All network specific functions are accessible from our mobile app by a special
device called “Z-Wave Controller” in the wibutler device list. You can get to
the controller device by connecting to your wibutler home server, tapping on
the top left corner of the screen and then select [Device Management] -> [ZWave Controller].
Add Device to Network
If you want to add a Z-Wave device to your network, open the Z-Wave
Controller device and select the menu entry “Add Device” on the “Control
Page”. Now the Z-Wave network is in inclusion mode. Please refer to the user
manual of the device you are including to perform the correct action on the
device. Once the inclusion process is completed, the controller menu is
shown again. When you go back to the device management view, you see
the new device in the wibutler device list after 20 sec.
You can stop the inclusion mode by pressing the button “Stop InclusionMode”. If no device is included within 60 seconds the controller stops the
inclusion mode automatically.
If the inclusion keeps failing, the device is most likely associated with another
Z-Wave network. Please remove the network association as descript in
section “Remove Device from Network”.
Remove Device from Network
If you want to remove a Z-Wave device from either your Z-Wave network or
remove the network association of a Z-Wave device, open the Z-Wave
Controller device and select the menu entry “Remove Device” on the
“Control Page”. Now the Z-Wave network is in exclusion mode. Please refer
to the user manual of the device you are excluding to perform the correct
action on the device. Once the exclusion process is completed, the controller
menu is shown again. If the device was part of your network it is completely
removed from the wibutler home automation network. This includes
associations with automation rules and room placements.
You can stop the exclusion mode by pressing the button “Stop ExclusionMode”. If no device is excluded within 60 seconds the controller stops the
inclusion mode automatically.
Page 8

7
Z-Wave Controller Manual for wibutler pro – Alfred
Reset Network Controller
If you want to reset your complete Z-Wave Controller, open the Z-Wave
Controller device and select the menu entry “Reset Controller”. Since a reset
removes all Z-Wave devices from the wibutler home automation network,
you have to confirm the controller reset on the next menu screen. Be aware
that if your wibutler is the only Z-Wave controller in your network you might
not be able access your devices without building a new Z-Wave network.
Send Node Information Frame
If you want to send a node information frame (NIF), open the Z-Wave
Controller device and select the menu entry “Send NIF”. The controller will
send an unsolicited broadcast message.
Network Replication
The controller can include other controllers. During this process the wibutler
will share its network information. The process is called network replication.
The other controller can be included as an additional inclusion controller.
Therefore put the wibutler in inclusion mode (see Add Device to Network).
Alternatively a controller change can be initiated. Here, the wibutler hands
its primary controller role over to the new controller, which becomes a
member of the existing Z-Wave network previously initiated by the wibutler.
If you want to initiate a controller shift, open the Z-Wave Controller device
and select the menu entry “Change Controller” on the “Control Page”. Now
the Z-Wave network is in the controller change mode. Please refer to the
user manual of the controller you are about to include to perform the correct
action to put the controller into learn mode. Now the controller change is
done automatically. Exchanging the data may take some time.
You can stop the controller change mode by pressing the button “Stop
Change-Mode”. If no controller entered the learn mode within 30 seconds
the controller stops the change mode automatically.
If the change was not performed make sure, that both controller are in reach
and you followed the instructions of the other controller accordingly.
Remarks
Page 9

8
Z-Wave Controller Manual for wibutler pro – Alfred
If you added devices with an inclusion controller to your network,
you may have to manual update die wibutler devices list.
Therefore, open the Z-Wave Controller device and select the menu
entry “Update Device List” on the “Control Page”.
If the inclusion or secondary controller is not automatically
updated after the wibutler added a new device to the network, you
can re-included the other controller without excluding it from the
network before. Now the device information are synchronized
again.
Controller Learning
With controller learning you can include the wibutler pro into an existing ZWave network. It takes the network ID and all available devices from the
other controller which includes to wibutler into its network. The controller
role of the wibutler depends on the way it is included by the other network
controller. It can be either work as a secondary or inclusion controller or it
can become the primary controller of the Z-Wave network.
If you want to start the learn mode, open the Z-Wave Controller device and
select the menu entry “Learn Mode” on the “Control Page”. Now the Z-Wave
network is in learn mode. Please refer to the user manual of the other
controller to either include the wibutler as another controller or to perform
a controller change. Once the wibutler controller receives the expected data
from the other controller, the controller returns to its normal operation
mode.
Page 10

9
Z-Wave Controller Manual for wibutler pro – Alfred
Device Management
The Z-Wave functions described in this section are device specific and are
accessible from the device representation in the mobile app. You can get to
any device by connecting to your wibutler home server, tapping on the top
left corner of the screen and then select [Device Management].
Remove Failing Device
The wibutler Z-Wave controller marks a devices as failed when the device is
not acknowledging any commands. Without any communication, it is not
possible to remove the devices with the controllers exclude mode.
The “Control Page” of a failing device changes and offers the option “Remove
Failing Device”. When choosing this option, the controller tries to reach the
device and if it still fails it is removed from the wibutler home automation
network.
If the controller can reach the device the “Control Page” shows the default
elements of this device
Replace Failing Device
The wibutler Z-Wave controller marks a devices as failed when the device is
not acknowledging any commands. Without any communication, it is not
possible to remove the devices with the controllers exclude mode.
The “Control Page” of a failing device changes and offers the option “Replace
Failing Device”. When choosing this option, the controller tries to reach the
device and if it still fails, it is ready to including another device. Please refer
to the user manual of the device you are about to include to perform the
correct action on the device.
Remark: Only replace a failing device with the same product type. In this case
all the configuration remain. If you want to replace the device with another
product, we highly recommend to first remove the failing device and then
include the new device as descript in the section “Add Device to Network”
Basic Device Operation
If the device type of an included device is unknown to the wibutler, a minimal
operation is guaranteed by the use of basic commands. Z-Wave allows to
send a basic get and basic set command.
Page 11

10
Z-Wave Controller Manual for wibutler pro – Alfred
The basic get command allows to read back a devices specific value in the
range of 0x00 to 0xFF. The meaning of this value must be given in the device’s
user manual. To execute the basic get operation, open the device
representation in the mobile App and press the button “Basic GET”.
The basic set operation allows to write a value in the range of 0x00 to 0xFF.
The meaning of this value must be given in the device’s user manual. To
execute a basic set operation, open the device representation in the mobile
App and move the slider to the value you want to write. Once you release
the slider, the value is written.
When receiving a basic GET command, the wibutler reports the value of the
latest basic SET command or zero as default value.
 Loading...