

Page 1
C500AP & C500APT
AIRPOT COFFEE BREWER
Service Manual
Throughout this service manual, whenever the airpot brewer model C500AP is mentioned,
this information is typical to both the C500AP and C500APT. All parts are common except
where noted.
Table of Contents
-
Unpacking . . . . . . . . . .
Shipping List . . . . . . . . .
Rough-in Drawing . . . .
Start up . . . . . . . . . . . . .
Coffee Brewing . . . . .
Care & Maintenance
Troubleshooting . . . . . .
Wiring Diagram . . . . . .
Illustrated Parts List . . .
Warranty . . . . . . . . .
Carton Contents
Qty Item
Brewer, C500AP
1
Brew Cone, S/S
1
Fitting, Flare Elbow
1
25
Paper Filters
Service Manual
1
1
1
1
2
2
3
3
5
7
Back
Cover
Wilbur Curtis Co., Inc.
6913 West Acco Street, Montebello, CA 90640-5403 U.S.A.
Tel: (323) 837-2300 Fax: (323) 837-2401
®
C
®
Page 2
C500AP Airpot Coffee Brewer
3
3
3
3
3
3
3
3
3
3
3
3
3
3
UNPACKING
All products manufactured by the Wilbur Curtis Company are thoroughly inspected at the factory and
are warranted to be free of all defects and faulty workmanship. The C500AP unit is packaged for
maximum protection for shipping. Make sure the shipping carton is not damaged or punctured. Unpack the carton carefully , inspecting the contents for any damage that may have occurred in transit.
Report any damage immediately to the freight company .
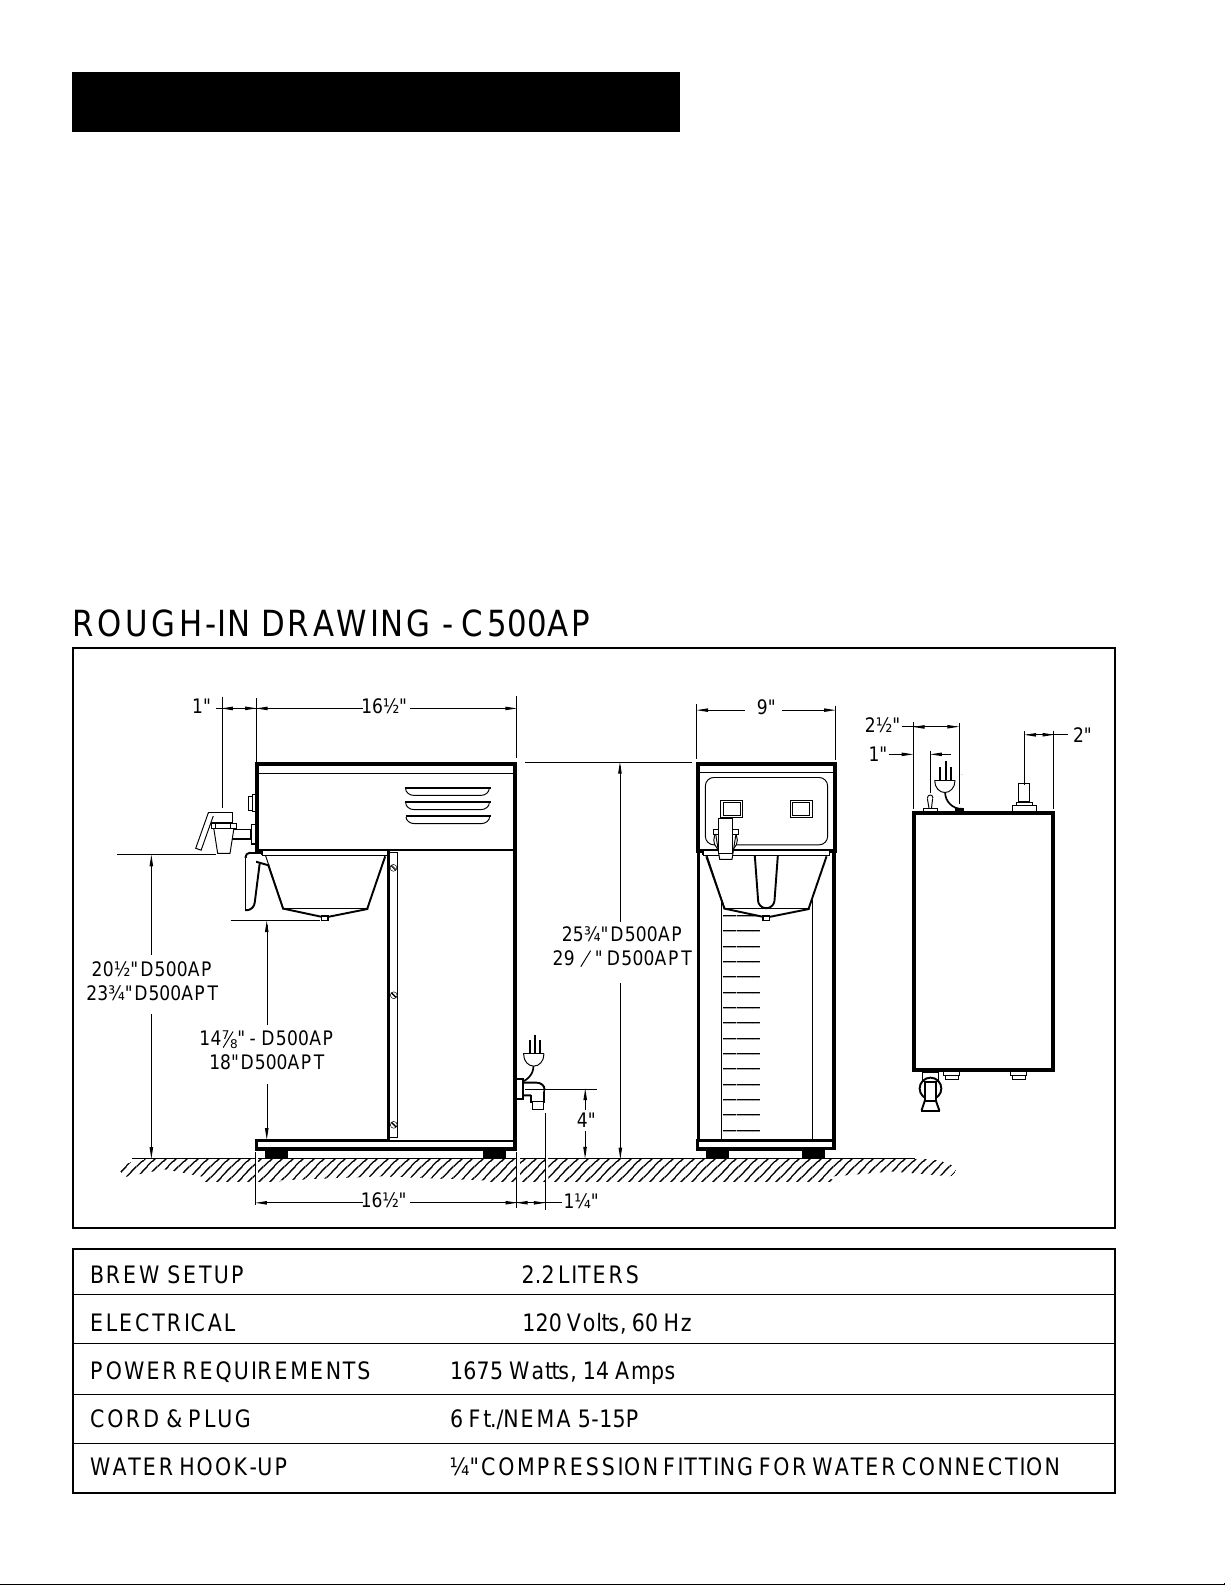
ROUGH-IN DRAWING - C500AP
16½"1"
25¾" D500AP
1
29 " D500APT
20½" D500AP
8
23¾" D500APT
7
14 " - D500AP
8
18" D500APT
4"
16½"
1¼"
BREW SETUP 2.2 LITERS
9"
2½"
2"
1"
2
2
2
2
2
2
2
2
2
2
2
2
2
2
ELECTRICAL 120 Volts, 60 Hz
POWER REQUIREMENTS 1675 Watts, 14 Amps
CORD & PLUG 6 Ft./NEMA 5-15P
WATER HOOK-UP ¼" COMPRESSION FITTING FOR WATER CONNECTION
[ 1 ]
Page 3
C500AP Airpot Coffee Brewer
START-UP
1. Remove top cover of brewer. Remove lid from heating tank. Hand fill tank until water level is
approxmately two inches below probe tip.
2. Connect the water line to the brewer using ¼" copper tubing with ¼" female flare fitting.
3. Turn on water.
4. With top cover removed, locate the thermostat (see illustration, page 8, #37), turn the thermostat shaft
clockwise until it stops. The BREW READY indicator light will go off when the thermostat is on.
5. Plug unit into power supply outlet and flip power switch (behind unit) to ON position. Turn ON/OFF
switch to ON position. Water should flow into heating tank. Check to see that the water stops flowing
when it reaches the probe tip. When this is verified, replace the tank lid and top cover of machine.
6. The warm-up time for the water in the tank to reach brewing temperature is from 15 to 20 minutes. The
BREW READY indicator light will come on when the water is hot enough to start brewing.
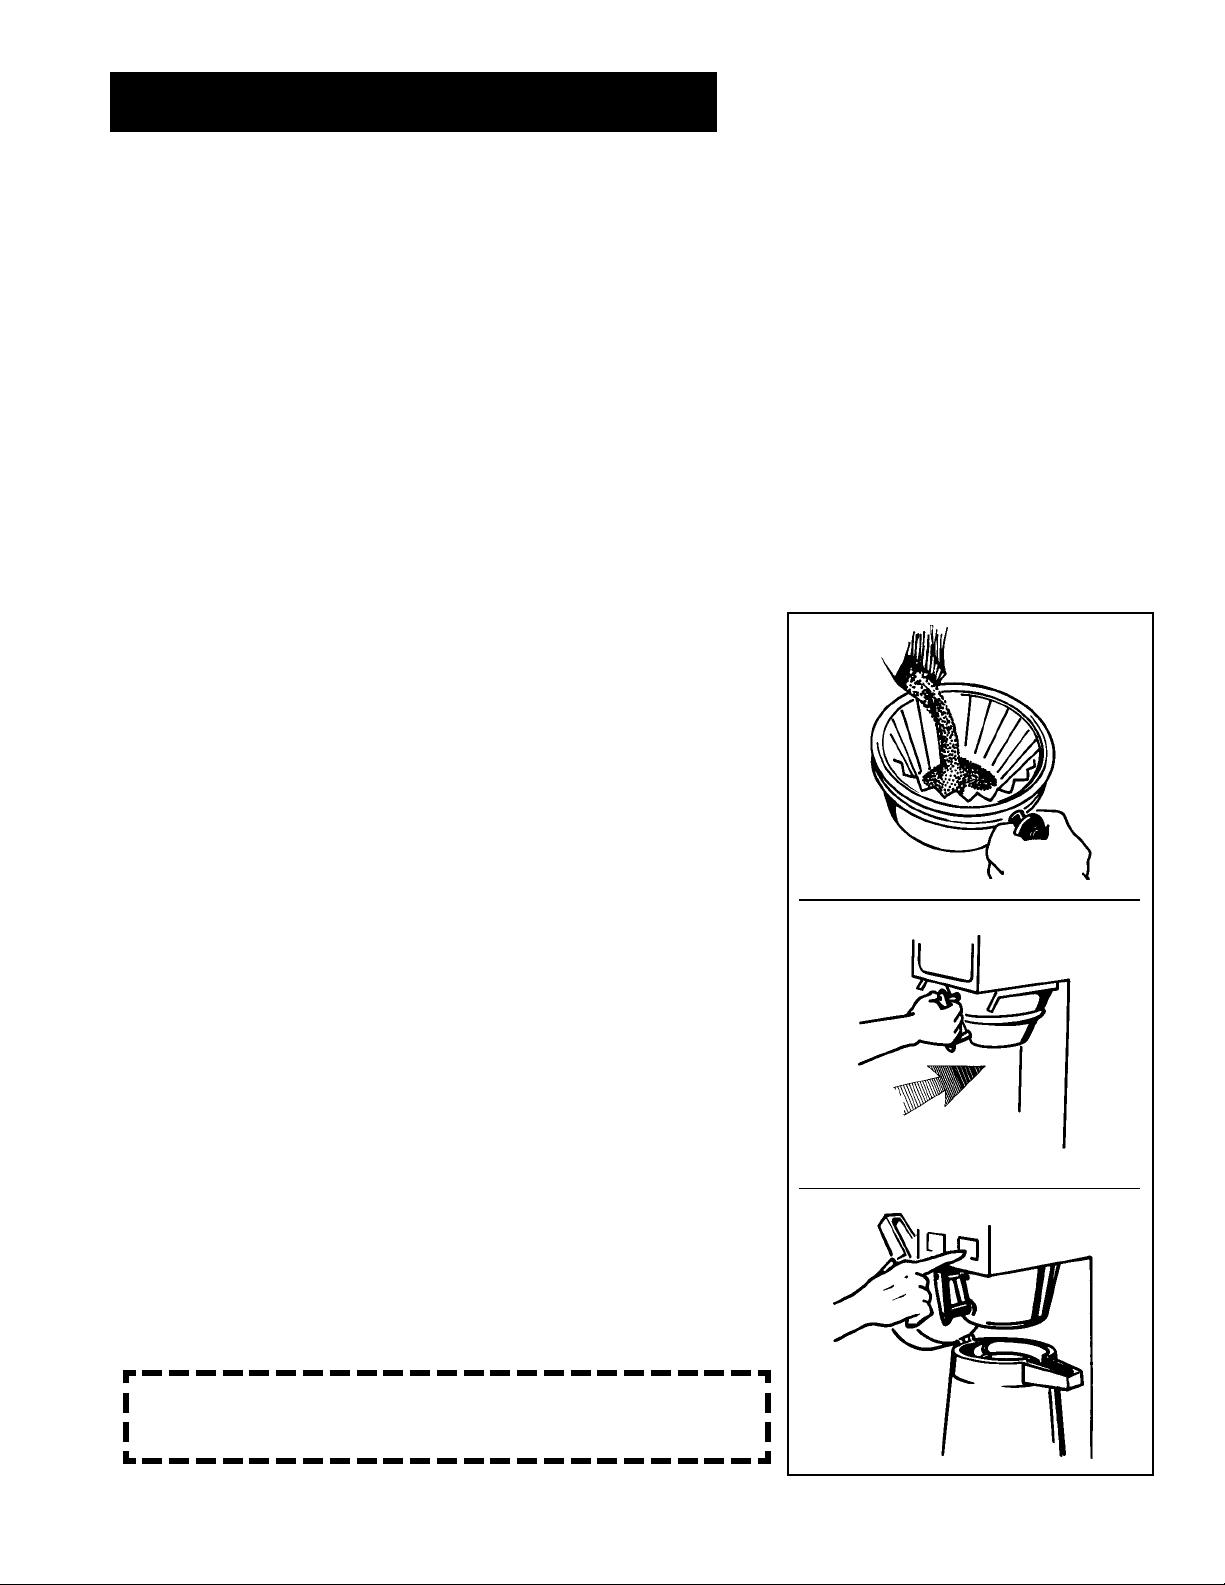
COFFEE BREWING
1
2
3
Pour ground coffee into the filter and brew
cone.
Slide the brew cone onto the guide rails as far
in as it will go.
Place an empty, open airpot on the deck beneath the brew cone. Push the BREW SWITCH
to start. Hot coffee will start to flow from the
brew cone.
CAUTION HOT LIQUID. BREW INTO AN EMPTY AIRPOT ONLY.
!
DO NOT REMOVE BREW CONE UNTIL IT HAS COMPLETELY
DRAINED.
[ 2 ]
Page 4

C500AP Airpot Coffee Brewer
CARE AND MAINTENANCE OF C500AP
Preventive maintenance is essential in keeping your Curtis coffee brewer performing at it's peak. Regular
cleaning will pay off with an appealing, high performance coffee brewing machine.
Preventive Maintenance
1. Remove the sprayhead from brewer and clean it once a week; more often in heavy lime areas.
2. The inside of the heating tank may, occasionally, require removing of lime build-up. The
frequency is determined by local water conditions.
WARNING - When cleaning the unit, do not use cleansers, bleach liquids, powders or any other
substance containing chlorine. These products will promote corrosion and will pit the stainless steel.
USE OF THESE PRODUCTS WILL VOID YOUR WARRANTY.
Daily Cleaning
Using a daily routine of cleaning the external parts of the C500AP should maintain it's new appearance and
insure that the flavor of the coffee is always good.
1. Wipe off any spills, dust or debris from exterior surfaces.
2. Rinse out the brew cone.
3. Clean sprayhead and dome using a non-toxic cleaner and a damp cloth.
4. Clean the brew cone slide rails with a brush or damp cloth. Dry thoroughly.
Stainless Steel Polish can be used to clean the outside surfaces of the C500AP coffee brewer. This is to
prevent scratching of the stainless steel surfaces.
TROUBLE SHOOTING:
PROBLEM: WATER DOES NOT FLOW INTO HEATING TANK.
POSSIBLE CAUSE
1. Water line turned off
or water filter needs
changing
2. Water inlet valve coil
burned out
Make sure the brewer is receiving enough water pressure. Open the
water line and verify water flow.
Turn the power off. Disconnect wires from water inlet coil terminals and
connect a power cord to the terminals. Plug cord into a 120V outlet and
verify if water flows when plugged in and stops when power is disconnected. If valve fails this test, replace valve or coil.
SOLUTION
3. Grounded probe
When the water level gets below the probe tip, water should automatically refill the tank. If not, pull wire off the probe terminal. Water should
now start flowing into the tank. If not, check the water level control board
(see step 4) or inlet valve (step 5).
[ 3 ]
Page 5

C500 A P Air Pot Coffee Brewer
TROUBLE SHOOTING CONTINUED:
POSSIBLE CAUSE
4. Defective or burned out
water level control
board
PROBLEM: WATER HEATING TANK OVERFLOWING.
POSSIBLE CAUSE
5. Defective water inlet
valve
6. Probe limed up
Pull wire out of probe terminal. With a Volt meter, check voltage at the
water inlet coil terminals. This should read 110-120 volts. If no voltage is
present, check Liquid Level Control board. Make sure the L.L.C. board is
energized on terminals 2 & 3. The L.L.C. board is grounded to the chassis of the machine by contacting the board to the mounting bracket. Make
sure board is grounded here. Check for loose connections at terminals.
When the water level control board fails to energize the water inlet valve,
the board should be replaced
Turn power off and observe water level. If water continues to flow in,
valve is leaking; clean or replace valve.
Pull wire off from probe terminal. Touch the body of the heating tank
with the end of this wire. If water stops, try cleaning the probe. Probe
may have to be replaced.
SOLUTION
SOLUTION
7. Non-grounded or loose
terminal connections at
liquid level control
board
PROBLEM: WATER IN TANK DOES NOT GET HOT OR WATER TEMPERATURE TOO LOW
POSSIBLE CAUSE
8. Thermostat turned OFF
9. Defective thermostat
10. Burned out heating
element
PROBLEM: WATER NOT FLOWING FROM SPRAYHEAD.
POSSIBLE CAUSE
11. Water level is too low
in heating tank
Liquid level control board must be securely grounded. Check for loose
connections at the terminals. Check for voltage at the inlet valve terminals. If there is voltage present at the inlet valve terminals, replace the
L.L.C. board.
SOLUTION
Check thermostat to make sure it is in the ON position.
Replace thermostat.
Check element for continuity and/or check with clamp ammeter. This
should show a reading of approximately 15 amps. If no power is going
through element, replace it.
SOLUTION
Check water level in tank. If water is not flowing into the tank, review
steps 1 thru 4, on previous page.
12. Defective brew switch
With the power off, check the continuity between terminal 4B & 5B.
When the switch is pressed, there should be solid continuity between
these two terminals. If not, replace the switch.
[ 4 ]
Page 6

C500 A P Air Pot Coffee Brewer
TROUBLE SHOOTING CONTINUED:
POSSIBLE CAUSE
13. Defective brew timer
(WC-604)
14. Defective dump valve
or coil
WIRING DIAGRAM
SOLUTION
Make sure the timer is receiving 110 to 120 volts at terminals B and A.
Measure the voltage across terminals 6 and A on the timer when it has
been activated. There should be 110 to 120V going to the dump valve. If
not, then the timer is faulty. Replace timer.
If the timer is functioning properly (step 13); next check the dump valve.
Measure voltage across the two terminals of the valve coil. You should
read 110 to 120 volts. Check also for clogging or lime deposits. Clean
lime or clog if present. Replace valve or coil.
[ 5 ]
COMMON STUD
CHASIS GROUND
Page 7

WIRING DIAGRAM
[ 6 ]
Page 8

C500 A P Airpot Coffee Brewer
ILLUSTRATED PARTS, MAIN VIEW
[ 7 ]
Page 9

C500 A P Airpot Coffee Brewer
ILLUSTRATED PARTS, DETAIL BUBBLES
19
B
59
60
59
18
☯ 8 ]
D
Page 10

C500 A P Air Pot Coffee Brewer
PARTS LIST
INDEX
NUMBER
1
2
5
6
7
8
9
10
11
12
13
14
15
16
17
18
19
20
21
22
23
24
25
27
29
30
31
32
33
34
35
36
37
41
42
43
44
45
46
48
49
50
51
PART
NUMBER
WC-3317
WC-3323
WC-3963
WC-3621
WC-1809
WC-1806
WC- 114R
WC- 122
WC-6317
WC- 202
WC- 608
WC-4380
WC-4329
WC-4525
WC-2977
WC-5310
WC- 817
WC-4213
WC-6221
WC-2936
WC-6217
WC-3502
WC- 102
WC- 826L
WC-4436
WC-1200
WC-1408
WC-2401
WC-4616
WC-6215
WC- 604
WC-5450
WC- 515R
WC-54052
WC-5851
WC-43062
WC-4543
WC-4211
WC-4212
WC-29010
WC-29009
WC-5502
WC-2938
DESCRIPTION
WIRE BREW BASKET FOR WC-3323
BREW CONE COMPLETE, STAINLESS STEEL, 7 1/8"
LABEL, CAUTION
UNIVERSAL BREW CONE
HOT WATER FAUCET
FAUCET SEAT CUP, SILICONE
ON/OFF SWITCH
BREW SWITCH
SWITCH PANEL
BREW READY LIGHT
LIQUID LEVEL CONTROL BOARD, 120V.
SHOCK GUARD, FISH PAPER
#8 EXTERNAL LOCK WASHER
SCREW, 8-32x¼ PHILLIPS TRUSS HD SS
FITTING, SPRAYHEAD
TUBING, SILICONE, 5/16" I.D
DUMP VALVE
LOCK NUT, 5/8"
SCREEN, DRIP TRAY
SPRAYHEAD, RED
COVER, CENTER WRAP
BUMPER LEG, 8-32 STUD
TOGGLE SWITCH
VALVE, INLET 1 GPM 120V 10W
SCREW, 4x3/8 PHIL PAN HEAD
POWER CORD
CORD GRIP
FLARE ELBOW 1/4 x 3/8
SCREW, 1/4-20x½ PHILLIPS PAN HEAD STAINLESS STEEL
TIMER COVER
TIMER
COVER, TOP
THERMOSTAT
HEATING TANK COMPLETE, LESS HEATING ELEMENTS
COVER, TANK W/ NOTCHES
GASKET, TANK LID
SCREW, 8-32x 1" SLOTTED HEX SS 18-8 WASHER HEAD
NUT, 3/8" JAM
NUT, 5/8" JAM
FITTING, BARBED OVERFLOW
FITTING, BARBED INLET
PROBE, WATER LEVEL
FITTING, 1/8" HEX FOR WATER LEVEL PROBE
[ 9 ]
Page 11

C500 A P Air Pot Coffee Brewer
PARTS LIST, CONTINUED...
INDEX
NUMBER
52
53
54
55
56
57
59
60
63
PART
NUMBER
WC-4394
WC-4306
WC- 904-04
WC-5409
WC-43058
WC-3685
WC-3765L
WC- 829
WC-3763
DESCRIPTION
SHOCK GUARD FOR HEATING ELEMENT
WASHER, 9/16" I.D. TEFLON
ELEMENT, HEATING 1.6KW 120V W/ JAM NUT & SILICONE WASHERS
CLIP, THERMOSTAT CAPILLARY
PLUG, TANK DRAIN PP RED
INSULATION, WRAP C500AP
KIT, INLET VALVE REPAIR USE ON WC-825/WC-826/WC-826L/WC-847
WASHER, FLOW
KIT, DUMP VALVE FOR WC866, WC889, WC816, WC817 & WC818
Wilbur
Co., Inc.
Wilbur Curtis Co., Inc.
6913 West Acco Street, Montebello, CA 90640-5403 U.S.A.
Tel: (323) 837-2300 Fax: (323) 837-2401
[ 10 ]
Page 12

Product Warranty Information
The Wilbur Curtis Company certifies that its products are free from defects in material and workmanship under normal use. The following limited
warranties and conditions apply:
3 Years, Parts and Labor , from Original Date of Purchase on digital control boards.
2 Years, Parts, from Original Date of Purchase on all other electrical components, fittings and tubing.
1 Year , Labor , from Original Date of Purchase on all electrical components, fittings and tubing.
Additionally , the Wilbur Curtis Company warrants its Grinding Burrs for Forty (40) months from date of purchase or 40,000 pounds of coffee, whichever
comes first. Stainless Steel components are warranted for two (2) years from date of purchase against leaking or pitting and replacement parts are
warranted for ninety (90) days from date of purchase or for the remainder of the limited warranty period of the equipment in which the component is
installed.
All in-warranty service calls must have prior authorization. For Authorization, call the T echnical Support Department at 1-800-995-0417. Ef fective date
of this policy is April 1, 2003.
Additional conditions may apply. Go to www.wilburcurtis.com to view the full product warranty information.
CONDITIONS & EXCEPTIONS
The warranty covers original equipment at time of purchase only. The Wilbur Curtis Company , Inc., assumes no responsibility for substitute replacement
parts installed on Curtis equipment that have not been purchased from the
Wilbur Curtis Company, Inc. The Wilbur Curtis Company will not accept any responsibility if the following conditions are not met. The warranty does not
cover and is void under the following circumstances:
1) Improper operation of equipment: The equipment must be used for its designed and intended purpose and function.
2) Improper installation of equipment: This equipment must be installed by a professional technician and must comply with all local electrical,
mechanical and plumbing codes.
3) Improper voltage: Equipment must be installed at the voltage stated on the serial plate supplied with this equipment.
4) Improper water supply: This includes, but is not limited to, excessive or low water pressure, and inadequate or fluctuating water flow rate.
5) Adjustments and cleaning: The resetting of safety thermostats and circuit breakers, programming and temperature adjustments are the
responsibility of the equipment owner. The owner is responsible for proper cleaning and regular maintenance of this equipment.
6) Damaged in transit: Equipment damaged in transit is the responsibility of the freight company and a claim should be made with the carrier.
7) Abuse or neglect (including failure to periodically clean or remove lime accumulations): Manufacturer is not responsible for variation in
equipment operation due to excessive lime or local water conditions. The equipment must be maintained according to the manufacturer’s
recommendations.
8) Replacement of items subject to normal use and wear: This shall include, but is not limited to, light bulbs, shear disks, “0” rings, gaskets,
silicone tube, canister assemblies, whipper chambers and plates, mixing bowls, agitation assemblies and whipper propellers.
9) Repairs and/or Replacements are subject to our decision that the workmanship or parts were faulty and the defects showed up under normal
use. All labor shall be performed during regular working hours. Overtime charges are the responsibility of the owner . Charges incurred by delays,
waiting time, or operating restrictions that hinder the service technician’s ability to perform service is the responsibility of the owner of the
equipment. This includes institutional and correctional facilities. The Wilbur Curtis Company will allow up to 100 miles, round trip, per in-warranty
service call.
RETURN MERCHANDISE AUTHORIZA TION: All claims under this warranty must be submitted to the Wilbur Curtis Company Technical Support
Department prior to performing any repair work or return of this equipment to the factory . All returned equipment must be rep ackaged properly in
the original carton. No units will be accepted if they are damaged in transit due to improper packaging. NO UNITS OR PARTS WILL BE AC-
CEPTED WITHOUT A RETURN MERCHANDISE AUTHORIZATION (RMA). RMA NUMBER MUST BE MARKED ON THE CARTON OR
SHIPPING LABEL. All in-warranty service calls must be performed by an authorized service agent. Call the Wilbur Curtis T echnical Support
Department to find an agent near you.
Printed in U.S.A. 8/06 F-1994
Wilbur Curtis Co., Inc.
6913 West Acco Street, Montebello, CA 90640-5403 U.S.A.
Tel: (323) 837-2300 Fax: (323) 837-2401
www.wilburcurtis.com
 Loading...