

Wibre 4.0202 Installation Manual

INSTALLATION · MANUAL
500–700 mm
120
183
120
218
183
180
125
161
84 2
4.0199.04.00
4.0199.01.00
4.0199.02.00
4.0199.03.00
170
210
206
183
180
1. Anwendung
Schwimmbad-Scheinwerfer zur Beleuchtung und Akzentuierung
in Schwimmbädern, Whirlpools oder Wasserspielen. Empfohlene
Beckengröße (ca. 8 x 5 m) oder nach Absprache.
Der Scheinwerfer ist für einen Einsatz bis 5,0 m Wassertiefe
geeignet. Die Konstruktion ist komplett aus V4A-Edelstahl 1.4571
gefertigt und zusätzlich epoliert. Die Verwendung des Scheinwerfers
in chloriertem Schwimmbadwasser und in Meerwasser ist möglich.
Scheinwerfer ist vor Einfrieren zu schützen, das Wasser muss frei von
Metall angreifenden Bestandteilen sein.
Einbaugehäuse ist zur Installation erforderlich und ist je nach
Einbauart auszuwählen, Zubehörteile (z.B. Betriebsgeräte) sind
optional lieferbar.
Achtung! Betrieb nur Unterwasser.
Angeschlossene Spezialkabel sind nicht zu entfernen oder zu kürzen,
längere Kabellängen >5 m lieferbar. Von jeglichen Kabelverbindungen im Einbaugehäuse bzw. im Kabelrohr wird abgeraten.
Für die gesamte lichttechnische Anlage wird eine Überspannungsschutzeinheit und die Verwendung eines Trenntrafos zur sicheren
elektrischen Trennung (Schutztrennung) empfohlen. Beim Montage
sollte auf ausreichend ESD-Schutz geachtet werden.
Sonderkonstruktionen-/anwendungen auf Anfrage.
2. Technische Daten/Konstruktion
· Schutzart IP68 – Wassertiefe bis 5 m
· Komplett aus V4A-Edelstahl 1.4571, epoliert
· runde Aufsatzblende aus V4A-Edelstahl, Höhe 2 mm
· POW-LED kaltweiß, warmweiß, neutralweiß
· POW-LED royalblau
· Multichip POW-LED RGB-W
· Betriebsart: Konstantstrom
· temperaturüberwacht (onboard)
· Überspannungsschutz
· rotationssymmetrische breitstrahlende Lichtverteilung
· Kabeldruckverschraubung, V4A Edelstahl
· Konstantstromnetzteil/RGB-W-Controller separat bestellen
· Lieferung inklusive Leuchtmittel und 3 m Unterwasserkabel
· Einbaugehäuse entsprechend Einbausituation separat bestellen
1. Application
Swimming pool spotlight for illumination and accented lighting in
swimming pools, whirlpools or fountains. Recommended pool size
(approx. 8 x 5 m) or as determined in consultation with us.
The spotlight is suitable for use in water up to 5.0 m deep. It is made
entirely of V4A stainless steel 1.4571 and is also electropolished.
The spotlight can be used in chlorinated swimming pool water and
in salt water.
The spotlight must be protected from freezing, and the water must
be free of metal-corroding components.
An installation housing is required for installation and must be
selected for the type of installation.
Accessories (e.g. operating devices) can be supplied optionally.
Attention! Operation only underwater.
Connected special cables must not be removed or shortened, longer
cable lengths >5 m are available. Cable connections in the installation housing or conduit are not re com mended.
For the entire lighting system, a surge protection unit and use of an
insulating transformer for safe electrical disconnection (electrical
separation) are recommended. Adequate ESD protection must be
ensured during fitting.
Special designs/applications on request.
2. Technical Details/Construction
· Protection class IP68 – up to 5m water depth
· Entirely made of stainless steel 316Ti 1.4571, epolished
· Round attachment cover, made of stainless steel 316Ti, height 2 mm
· POW-LED cold white, warm white, neutral white
· POW-LED royal blue
· Multichip POW-LED RGB-W
· operating mode: constant current
· temperature controlled (onboard)
· surge protection
· rotationally symmetric wide light distribution
· Cable pressure sleeve, stainless steel 316Ti
· Constant-current power source/RGB-W-controller external
· Supplied with lamp and 3 m of underwater cable
· Please order housing separately
1. Application
Projecteur de piscine destiné à l‘éclairage et la mise en scène dans
des piscines, des jacuzzis ou des animations aquatiques. Taille de
bassin recommandée (env. 8 x 5 m) ou selon accord.
Le projecteur convient pour une installation jusqu‘à une profondeur
de 5 m. Construction entièrement réalisée en acier inoxydable
électropoli V4A 1.4571. Le projecteur peut être utilisé dans une eau
de piscine chlorée et dans l‘eau de mer.
Protéger le projecteur contre le gel, l‘eau doit être exempte
d‘éléments agressifs contre les métaux.
Le boîtier d‘encastrement est nécessaire pour l‘installation et doit
être sélectionné en fonction du type de montage. Les accessoires (p.
ex. blocs d‘alimentation) sont disponibles en option.
Attention: Fonctionnement immergé uniquement.
Les câbles spiralés raccordés ne doivent pas être retirés ou raccourcis,
longueurs de câbles > 5 m disponibles. Toutes les connexions de câbles
dans le boîtier d‘encastrement ou la gaine de câbles sont déconseillées.
Il est recommandé d‘utiliser, pour l‘ensemble de l‘installation technique
d‘éclairage, une unité de surtension et un transformateur d‘isolement
pour l‘isolation électrique sûre (isolation de protection). Lors du montage, veiller à garantir une protection suffisante contre les décharges
électrostatiques. Constructions / applications spéciales sur demande.
2. Caractéristiques techniques/Construction
· Indice de protection IP68 – jusqu‘à une profondeur de 5 m
· Complet en acier inoxydable 316Ti 1.4571, e-polir
· enjoliveur rond en acier inoxydable 316Ti, hauteur 2 mm
· POW-LED blanc froid, blanc chaud, blanc neutre
· POW-LED royal bleu
· Multichip POW-LED RVB-B
· mode d‘opération: courant constant
· control de température par (onboard)
· limiteur de tension
· Diffusion de la lumière à symétrie large de rotation
· Serre-câble à vis, acier inoxydable 316Ti
· Bloc d‘alimentation en courant continu/Contrôlleur RVB-B externe
· Ampoule et câbles immergeables de 3 m inclus dans la livraison
· Boîtier d’encastrement à commander séparément!
WIBRE Elektrogeräte Edmund Breuninger GmbH & Co. KG · Liebigstrasse 9 · 74211 Leingarten/Germany
Telefon: +49 (0) 7131 9053-0 · Telefax: +49 (0) 7131 9053-19 · E-Mail: info@wibre.de
1/4
4.0202
Einbau-Scheinwerfer
Recessed-Spotlight
Projecteur encastré
IP68
STAINLESS
STEEL V4A
1.4571
316Ti
ELECTRO
POLISHED
POW-LED
INCL.
3.000 K
4.500 K
6.000 K
BLUE
RGB-W
DALI
1-10 V
OPTIONAL
DIMM
CABLE
INCL.
max 5m
CONSTANT
CURRENT
KONSTANT
STROM
INSTALLATION · MANUAL
3. Installation/Montage
Zur Installation sind die nationalen Sicherheitsvorschriften zu
beachten. Es wird keine Haftung für unsachgemäßen Einsatz oder
Montage übernommen. Bei nachträglichen Änderungen an den
Leuchten wird keine Haftung übernommen.
Montage des Scheinwerfers in Verbindung mit entsprechendem
Einbaugehäuse aus V4A-Edelstahl EPOL mit 1,5 m Kabelschutzrohr
für den Wand- und Bodeneinbau in Betonbecken mit Fliesenauskleidung (max. 30 mm Fliesen-/Mörtelaufbau oder nach Anfrage),
Edelstahlbecken zum Einschweissen, Becken mit eingelegter Folie
(Druckflansch) und Becken mit Klebe-/Folienanstrich (Klebeflansch)
möglich.
Montage in Betonbecken
Einbaugehäuse mit den 3 beiliegenden V4A-Halteklammern und
Edelstahlnägeln an vorderen Verschalung (Wasserseite) nach
Markierung ausrichten und fixieren. Gegebenenfalls äußeren Bund
z.B. mit Silikon abdichten um das Eindringen von Schmutz ins Innere
des Einbaugehäuses zu vermeiden. Kunststoffabschlussstück an
der hinteren Verschalung fixieren. Einbaugehäuse, Kabelschutzrohr
mit Schellen und Kunststoffabschlussstück auf festen Halt prüfen.
3.1/3.2
Nach dem Betonieren und Entfernen der Verschalung Mörtel und
Fliesen bis max. zum Innendurchmesser (ø 180 mm) des Einbaugehäuses auftragen. Maximaler Mörtel- und Fliesenaufbau 30 mm.
Bei höherem Fliesen/-Mörtelaufbau längere Schrauben verwenden
(auf Anfrage). 3.3
Montage in Edelstahlbecken
Positionierung der Leuchten festlegen und Öffnungen von ø 180 mm
in Schwimmbeckenwand entsprechend ausschneiden. Einbaugehäuse nach Markierung ausrichten und fixieren. Kunststoffabschlussstück am Ende des Kabelschutzrohres fixieren. Einbaugehäuse,
Kabelschutzrohr mit Schellen und Kunststoffabschlussstück auf
festen Halt prüfen.
Gehäuse mit der Schwimmbadwand IP68-dichtschweißen und
Schweißnaht nachträglich passivieren. 3.4
Montage in Becken mit Klebe-/Folienanstrich
Einbaugehäuse mit Klebeflansch mit den 3 beiliegenden V4AHalteklammern und Edelstahlnägeln an der vorderen Verschalung
(Wasserseite) nach Markierung ausrichten und fixieren. Gegebenenfalls äußeren Bund z.B. mit Silikon abdichten um das Eindringen von
Schmutz ins Innere des Einbaugehäuses zu vermeiden. Kunststoffabschlussstück an der hinteren Verschalung fixieren. 3.1
Einbaugehäuse, Kabelschutzrohr mit Schellen und Kunststoffabschlussstück auf festen Halt prüfen.
3. Installation/Mounting
When installing, observe the national safety regulations. We are
not liable for any improper use or installation. No liability will be
accepted in case of subsequent modification to the lights.
Installation of the spotlight in combination with the corresponding
Installation housing made of V4A stainless steel EPOL with 1.5 m
cable protection tube for wall and floor installation in concrete
pools with tile covering (max. 30 mm tile/mortar thickness, or
after consultation with us), for welding into stainless steel pools, in
pools with fitted foil (pressure flange) and pools with adhesive/foil
coatings (adhesive flange).
Installation in concrete pools
Align installation housing on the marking and fasten it to the front
cover (water-side) using the 3 accompanying V4A retaining clips
and stainless steel nails. If necessary, seal the outside connection
with silicone, for example, to keep dirt from penetrating inside the
installation housing. Fasten plastic end piece to the rear cover. Check
installation housing, cable protection tube with clamps and plastic
end piece for firm hold. 3.1/3.2
After cementing in the installation housing and removing the
cover, apply mortar and tiles to no more than the inside diameter
(D180mm) of the installation housing. Maximum mortar and tile
thickness 30mm. In case of greater tile/mortar thickness, use longer
screws (on request) 3.3.
Installation in stainless steel pools
Determine positioning of the lights and cut out openings of
ø 180 mm in the swimming pool wall accordingly. Align and fasten
installation housing on the marking. Fasten plastic end piece at the
end of the cable protection tube. Check installation housing, cable
protection tube with clamps and plastic end piece for firm hold.
Weld housing to the swimming pool wall IP68-tight and then
passivate the welding seam. 3.4
Installation in pools with adhesive/foil coating
Align installation housing with adhesive flange on the marking and
fasten it to the front cover (water-side) using the 3 accompanying
V4A retaining clips and stainless steel nails. If necessary, seal the
outside connection with silicone, for example, to keep dirt from
penetrating inside the installation housing. Fasten plastic end piece
to the rear cover. 3.1
Check installation housing, cable protection tube with clamps and
plastic end piece for firm hold.
3. Installation/Montage
Respecter les prescriptions nationales applicables en matière de
sécurité. Nous déclinons toute responsabilité pour l’utilisation ou
le montage non conforme. De même, nous réfutons toute responsabilité pour les modifications réalisées sur les luminaires.
Possibilité de montage du projecteur en association avec le boîtier
d‘encastrement correspondant en acier inoxydable électropoli V4A
avec gaine de protection pour câble de 1,5 m pour le montage
dans la paroi ou le sol des bassins en béton carrelé (hauteur max.
carreaux/mortier 30 mm ou sur demande), des bassins en acier inoxydable (à souder), des bassins avec revêtement intérieur (flasque de
pression) et des bassins à revêtement collé/liner (flasque de collage).
Montage dans les bassins en béton
Positionner et fixer le boîtier d‘encastrement à l‘aide des 3 agrafes de
fixation V4A et des clous en acier inoxydable fournis sur le coffrage
avant (côté eau) selon le marquage indiqué. Le cas échéant, étanchéifier l‘embase extérieure, par exemple avec du silicone afin d‘éviter que
des salissures n‘entrent dans le boîtier d‘encastrement. Fixer l‘embout
d‘extrémité en plastique au coffrage postérieur. Vérifier la bonne
fixation du boîtier d‘encastrement, de la gaine de protection du câble
avec colliers et de l‘embout d‘extrémité en plastique. 3.1/3.2
Après avoir bétonné le bassin puis retiré le coffrage, appliquer
le mortier et poser les carreaux au maximum jusqu‘au diamètre
intérieur (ø 180 mm) du boîtier d‘encastrement. Hauteur maximale
mortier et carreau 30 mm. En cas de hauteur mortier/carreaux
supérieure, utiliser des vis plus longues (sur demande). 3.3
Montage dans les bassins en acier inoxydable
Déterminer la position des projecteurs et découper une ouverture
correspondante d‘un diamètre de 180 mm dans la paroi du bassin.
Positionner et fixer le boîtier d‘encastrement selon le marquage
indiqué. Fixer l‘embout d‘extrémité en plastique à l‘extrémité de la
gaine de protection du câble. Vérifier la bonne fixation du boîtier
d‘encastrement, de la gaine de protection du câble avec colliers et
de l‘embout d‘extrémité en plastique. Souder le boîtier sur la paroi
du bassin de manière à assurer l‘étanchéité et à atteindre l‘indice de
protection IP68; puis, passiver le cordon de soudure. 3.4
Montage dans les bassins
avec revêtement collé/liner
Positionner et fixer le boîtier d‘encastrement avec le flasque de collage
à l‘aide des 3 agrafes de fixation V4A et des clous en acier inoxydable
fournis sur le coffrage avant (côté eau) selon le marquage indiqué. Le cas
échéant, étanchéifier l‘embase extérieure, par exemple avec du silicone
afin d‘éviter que des salissures n‘entrent dans le boîtier d‘encastrement.
Fixer l‘embout d‘extrémité en plastique au coffrage postérieur. 3.1
Vérifier la bonne fixation du boîtier d‘encastrement, de la gaine
2/4
WIBRE Elektrogeräte Edmund Breuninger GmbH & Co. KG · Liebigstrasse 9 · 74211 Leingarten/Germany
Telefon: +49 (0) 7131 9053-0 · Telefax: +49 (0) 7131 9053-19 · E-Mail: info@wibre.de
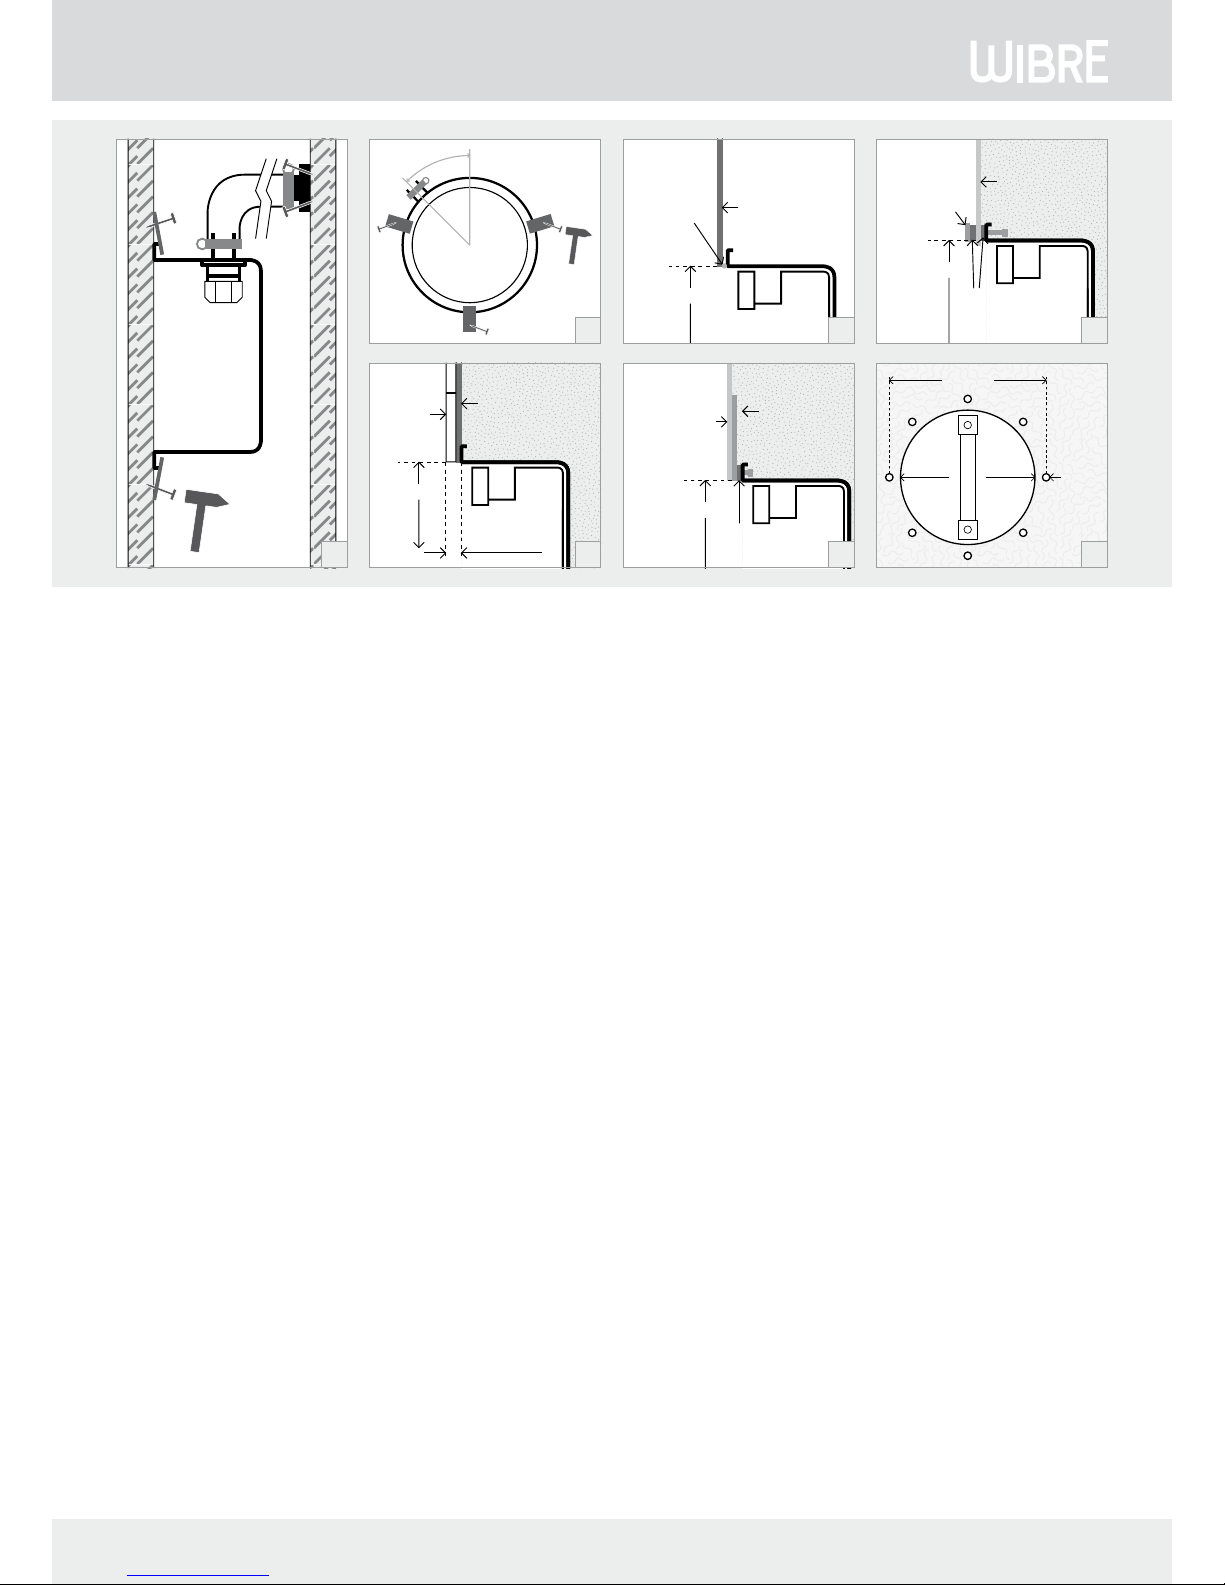
45°
ø 180 mm
Edelstahlwand
stainless steel wall
mur en acier
IP68
dichtgeschweißt
IP68 welded
IP68 oudé
max 30 mm
Mörtel
mortar
mortier
Fliesen
tiles
carreaux
ø 180 mm
Beton
concrete
béton
Beton
concrete
béton
Klebe-/
Folienanstrich
adhesive/
foil coating
revêtement collé/
liner
Klebeflansch
adhesive flange
flasque de collage
ø 180 mm
Dichtung
Seal
Joint
Beton
concrete
béton
Dichtung
Seal
Joint
eingelegte Folie
fitted foil
revêtement
intérieur
Druckflansch
pressure flange
flasque de
pression
ø 180 mm
TK 199 mm
180 mm D 5 mm
Folie
foil
liner
3.1
3.2
3.3 3.5
3.4 3.6
3.7
 Loading...