

Page 1
SNO 3 IN 1 ICE MAKER, CRUSHER
& WATER DISPENSER
MODEL: ICE-100S
Page 2

Introduction
Thank you for purchasing this SNO 3 IN 1 ICE MAKER, CRUSHER
AND WATER DISPENSER by Whynter. To ensure that you enjoy
years of trouble-free operation, please read and follow the instructions
contained in this manual. Please retain these instructions for future
reference.
Features
- Makes ice cubes, crushed ice and cold water.
- Easy installation, with water supplied in one of the 3 ways listed
below:
• Connects directly to the domestic water supply (plumbing
required)
• Manual fill - 2 litre water reservoir with level indicator
• Commercial water bott le 3 or 5 gallons
- Delivers ice cold water constantly at 38°F.
- Supplies ice cubes in 10 minutes.
- Produce up to 26 lbs of ice per 24 hours.
- 750g or 185 cube continuous capacity.
- Built-in temperature compensation control system to ensure
consistently sized, clear ice cubes.
- Patented crushed ice production method that reduces ice cubes to ice
flakes.
- Simple 5 button operation.
- Self-clean function.
Unpacking your unit
IMPORTANT – this unit is heavy (53lbs) – to prevent injury, please
seek assistance when removing from packaging.
When removing your ice maker from the box, please lift using side slots
but not the top cover or front plate.
Do not place the unit upside down as this could cause the malfunction
of the compres sor or refrig e rating syst em .
Ensure the surface on which you wish to place the unit is flat, stable
and capable of holding the weight of the unit.
Ensure the unit is placed with at least 15cm / 6 inches clearance at
back and sides to allow adequate ventilation.
Do not place the ice maker in direct sunlight or near a source of direct
heat.
The appliance operates at its optimum performance in a normal room
temperature of 68ºF / 20ºC.
Important safety notes
Only use an earthed 110V AC 60Hz mains power supply.
Children must be supervised when using the ice maker.
Do not place anything on the top of the unit.
Switch off the unit and unplug the unit before moving the ice maker.
Use the self clean function at least once a month.
Turn off the unit when the unit is not used for long time.
Page 3
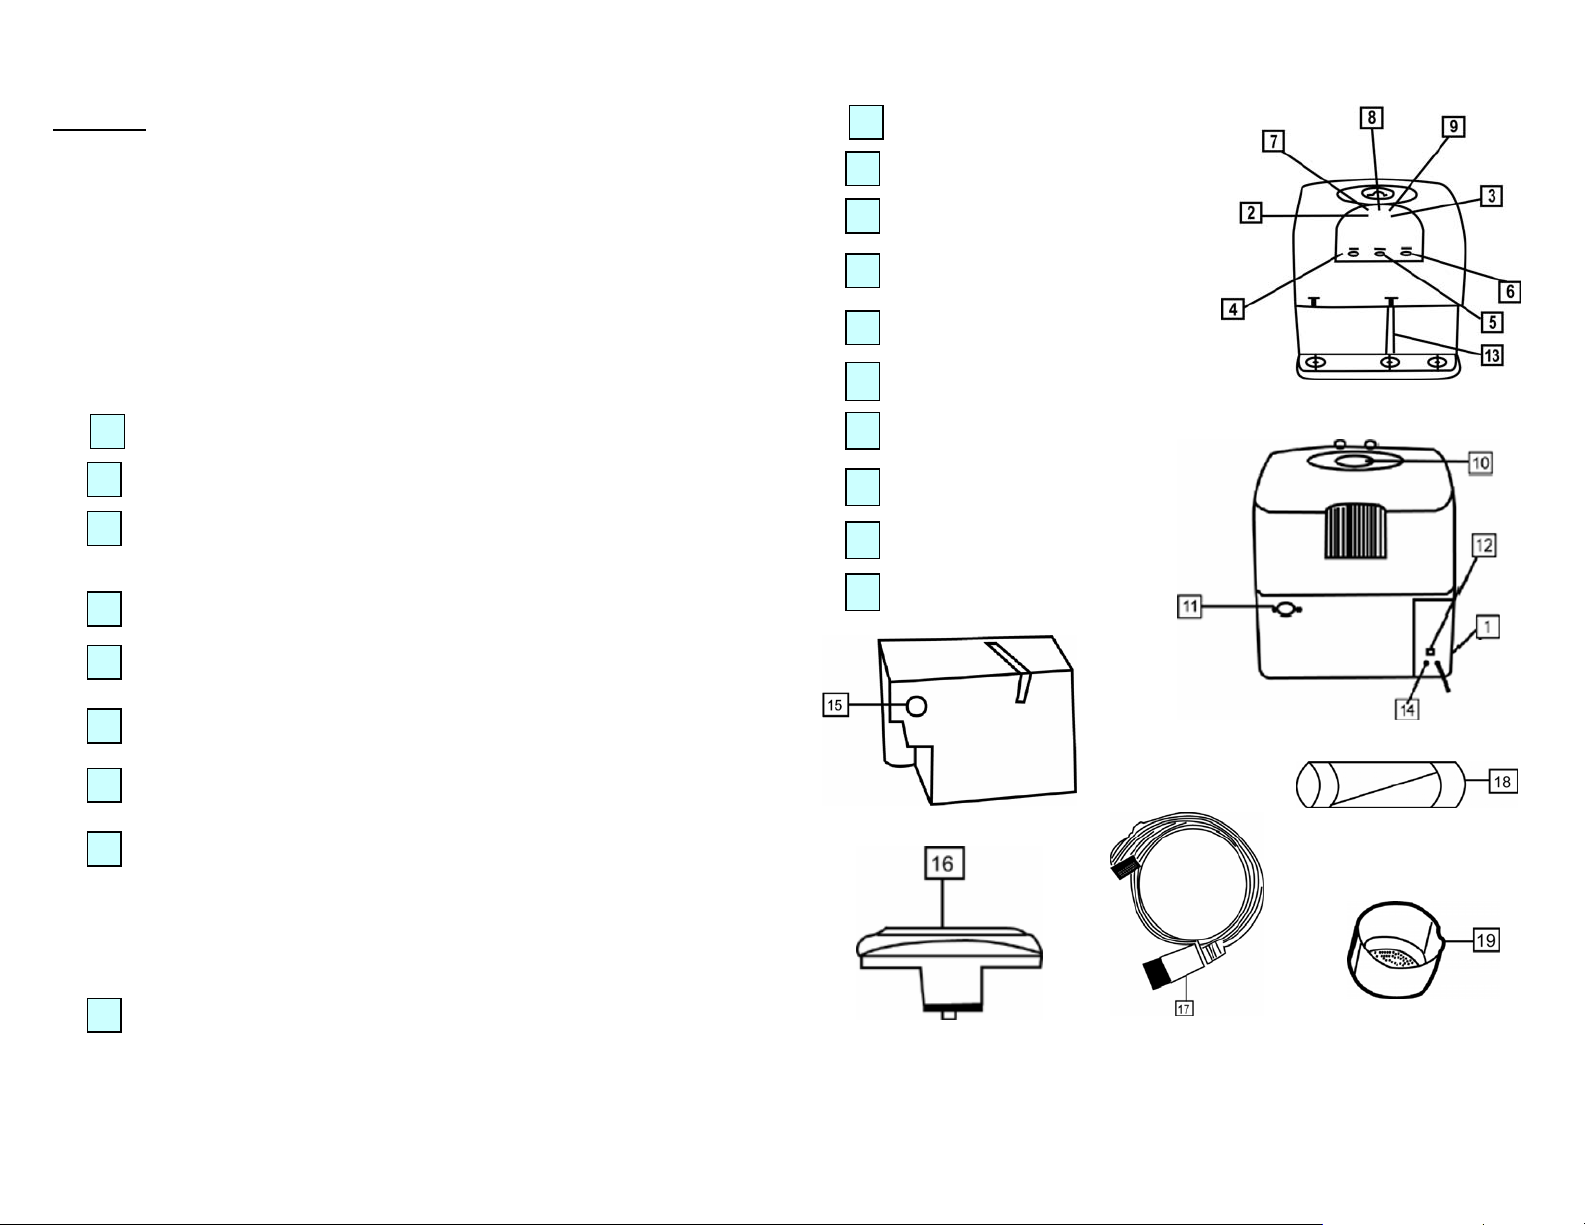
Controls
Please refer to the diagrams below and familiarise yourself with the
operating buttons.
[ON/OFF] Power switch
1
2
[START] Starts ice/iced water production
3
[STOP] Stops the ice/iced water production
4
[ICE CUBES] Dispenses Ice Cubes
5
[CURUSHED ICE] Dispenses Crushed Ice
[ICED WATER] Dispenses Iced Water
6
7
[CLEAN] light GREEN – Self cleaning indicator
[POWER] light
8
RED = Unit on standby
GREEN = ice making in process
ORANGE = Ice bin full
RED (flashing) = Unit on standby due to low water level.
9
[WARNING] light ORANGE (flashing) = low water level
Manual water fill compartment
10
11
Water line connector
12
[CLEAN] Self clean button
13
Water level indicator
Fuse holder
14
Drain plug
15
16
Water bottle adaptor
Water hose
17
Replacement fuse
18
Filter
19
Page 4

Installation Instructions
1) As with all refrigeration equipment, this appliance should be settled
for at least five hours prior to switching on the appliance.
2) The power supply must be an earthed 110V AC 60Hz mains supply.
1) Choose your required water supply method:
a. Water line supply - Use the provided water hose (17) to connect to
your household water supply (Fig. 1). If assistance is required,
please contact a certified plumber. Connect the water hose
connector to a water faucet. Place the other end of the water hose
into the water line connector (11) (Fig. 2) at the back of the unit.
To disconnect the water hose connector from the water spigot, first
make sure the water line is turned off, then simply pull back the
release washer of the connector and pull apart (Fig. 3). To release
the water line from the unit, simply unscrew the water hose on
water line plug and pull the hose out (Fig. 4)
b. Manual water filling – You can use tap water or purified water.
Remove the manual wat er fill compartment cover and place the
filter net (19) in the compartment, pour water into the
compartment until the compartment is full. Please ensure that
you do not overfill or allow the water level to drop below the
minimum level.
c. Commercial water bottle - Place a 3 or 5 gallon water bottle on
the top of the unit using the water bottle adapter. We do not
recommend using a water bottle with cap. To install the bottle
supporter, insert it to the manual fill compartment (10 with the
arrow pointing to the front of the unit. Turn the adapter clock wise
slightly until the tabs on the inside of the compartment match up
with the grooves on the protruding tube at the bottom of the
adapter. Push down and then turn counter-clockwise to lock the
adapter in place. Then sit the water bottle upside down to the
bottle supporter.
IMPORTANT – DO NOT turn on the unit before installing
the water bottle.
Page 5

2) Using the ON/OFF switch (1) at the side of the unit, switch the
power ON. The POWER light (8) on the top of the unit will illuminate
red.
3) Press the START button (2) at the top of the unit. The water level
will be automatically checked and, if correctly filled, the red light will
turn green. If the water level is still incorrect after 50 seconds, the
LOW WATER light (9) will flash in orange and the POWER light (8)
will flash in red. The unit will then switch to standby mode until the
reservoir is filled in 18 minutes. Once you have correctly filled the
reservoir, the unit will restart automatically. If the water level is still
not filled for more than 18 minutes, the unit will stop. Press STRAT
button to turn on the unit.
4) Press the STOP button (3) at any time, the unit will stop and the
POWER light will turn to red. Please note that it will take
approximately three minutes for the unit to reset itself.
5) Ice and cold water will be ready for dispensing in approx. 6-10
minutes.
6) When the ice cube storage compartment is full, the POWER light (8)
will turn orange and the unit will switch to stand-by mode. If the ice is
taken out or melted, the unit will restart automatically and the
POWER light (8) will turn green.
7) If the water level is lower than the minimum line, the POWER light
(8) will flash in red and the unit will switch into stand-by mode until
water level restored.
8) To dispense ice cubes, crushed ice or iced water, just press the
relevant button - (4), (5) or (6). Place a cup, glass, etc, under the
delivery outlet required.
Note: The ICE CUBE (4) and CRUSHED ICE (5) buttons cannot be
used simultaneously.
Care, cleaning & mai ntenance
Cleaning the Unit
To maintain hygiene, it is important that the SELF CLEAN function is
used on a regular basis.
Note: The START (2) and CLEAN (12) buttons cannot be pressed
simultaneously.
1) Ensure the unit is switched on.
2) If the unit has not been used for a while, drain the unit using the
following steps:
• Press the ICE CUBES, CRUSHED ICE and ICED WATER
buttons individually, until corresponding tanks are empty.
• Remove the Drain Plug (14) at the bottom of the unit to
empty the water tank.
3) Add a solution of one part vinegar to ten parts water into the manual
water fill compartment (10) at the top of the unit. Ensure water level
is above the minimum otherwise the unit will not self clean.
4) At the back of the unit, press the CLEAN button (12). The unit will
automatically enter into Self Clean mode and the green CLEAN light
(7) will be illuminated.
5) Press the STOP button (3) after 15 minutes to end the Self Clean
cycle.
6) Once the Self Clean cycle is complete, drain the water from the unit
as described in step 2 above.
7) Flush the unit at least three times to remove the cleaning mixture.
To do this, repeat step 1 to 6 above using water only. When in step
2, just press the ICED WATER button (6) only.
8) Refill the reservoir to resume the ice making function.
Page 6

Maintenance
1) Do not use any commercial chemical cleaning agent, acidic
agent, naphtha decontamination powders, etc to clean the
machine. Our recommended cleaning agent is vinegar and
water solution.
2) Cleaning agent must be added through the manual fill compartment
(10) only.
3) Do not allow water to be in the reservoir for more than a few days.
The water reservoir should be drained and the SELF CLEAN function
should be used.
4) To prevent injury, please do NOT touch the ICE or WATER outlets
while the machine is switched ON.
5) If any part of this machine fails or is damaged, please contact our
service department.
Troubleshooting
TROUBLE REASON WHAT TO DO
1. Plug into mains power
There is no POWER light
on
Power light on but the
compressor is not working
(buzzing noise only)
Orange flashing light
(no/low water) is on
Water has poor taste or
odour
Particles floating in water
Compressor is working but
not dispensing ice or
water
Unit does not take in water
Unit does not take in water
from a water bottle
1. No power
2. Fuse blown
Incorrect voltage
Low water level or
no water in r eservoir.
Unit needs to be
sanitized.
Water has high mineral
content.
1. Low water level
2. Mineral deposits
clogging tanks.
1. Unit is not switched on.
2. The water level
indicator (red ball) is not
moving.
3. Water tank is about
half full
3. Fuse blow n
1. Bottle supporter is not
installed properly
supply.
2. Replace fuse; unscrew
fuse holder (part 14) and
replace fuse
Voltage must be 110v AC
60HZ earthed mains supply
Fill water manually/ Change
water bottle or turn on water
line
See cleaning section
Use water with less
hardness.
1. Fill water
2. Clean the unit
1. Turn on the unit using
the On/Off switch and
press the Start button. Hold
a glass of water about 5
inches above f i l l
compartment and pour
water into unit.
2. Make sure that the red
ball is floating
3. The unit s tops taking in
water when the water tank
is about half full.
4. Replace fuse; unscrew
fuse holder (part 14) and
replace fuse
1. Maker sure the bottle
supporter is properly
installed with the arrow
Page 7

Unit does not take in water
from a water line.
Unit makes loud noise,
Unit makes cloudy ice
cubes.
The orange light is on (ice
bin full indicator) and ice
was removed from the unit
but the unit does not
restart .
2. Unit needs to be
restarted.
3. Insufficient water
pressure.
4. Bottle has a cap or
seal.
Water pressure is too
high or low.
The ice maker makes the
loud noise when it is able
to sense wat er in the fill
compartment but not able
to draw the water into the
water tank. The loud
noise is not an indication
of any problem of the unit.
Due to fast freezing, ice
cubes may appear
"cloudy". This is trapped
air in the water and does
not affect the taste or
quality of the ice.
Small piec es of ice may
stick to the ice cube bin
sensor.
facing front and center.
2. Turn off the unit for a
minute and turn back on
then push Start button.
3. Take off the bottle and
manual fill the unit with
water.
4. Remove cap or seal then
reposition bottle back on to
bottle suppor t er . Tu r n on
Power and push Start
button.
Reduce or increase the
water press ur e.
Add more water to the unit
or adjust th e water bottle.
Wait about 10 – 20 minutes
and the unit should resume
the ice making process and
the light will turn from
orange to green.
Technical Specifications
• Voltage: 110V
• Maximum Power: 230W
• Ice Storage: 750g
• Ice making ability: 26 Kg/24h
• Water tank capacity: 2 liter
• Iced water tank capacity: 0.8 liter
• Refrigerant Gas: R134a/80g
• Ice shape: Bullet shape
• Dimensions: 16” × 16” x 16.3” (L×W×H)
• N.W./G.W.: 53 / 57 lb
• Approvals : ETL
Page 8

ONE YEAR LIMITED WARRANTY
This WHYNTER SNO 3 in 1 ice maker is warranted, to the original owner
within the 48 continental states, for one year from the date of purchase
against defects in material and workmanship under normal use and service.
Should your SNO 3 in 1 ice maker prove defective within one year from the
date of purchase, return the defective part or unit, freight prepaid (with two
months of purchase; after two months to one year, customer will be
responsible for freight cost to Whynter’s service department), along with an
explanation of the problem. Please package the ice maker carefully in its
original packaging material to avoid damage in transit. Please retain original
box and packaging material. Under this warranty, Whynter will repair or
replace any parts found defective. This warranty is not transferable. After the
expiration of the warranty, the cost of labor and parts will be the responsibility
of the original owner of the unit.
THIS WARRANTY DOES NOT COVER:
- Acts of God, such as fire, flood, hurricanes, earthquakes and tornadoes.
- Damage, accidental or other wise, to the ice maker while in the possession
of a consumer not caused by a defect in material or workmanship;
- Damage caused by consumer misuse, tampering, or failure to follow the care
and special handling provisions in the instructions.
- Damage to the finish of the case, or other appearance parts caused by wear.
1) Filter.
2) Damage caused by repairs or alterations of the ice maker by anyone
other than authorized by the manufacturer.
3) Freight and Insurance cost for the warranty service.
To obtain service or information, contact
Whynter Innovations Group via Email at
service@whynter.com
or call 866-WHYNTER.
 Loading...