

Whole House 2.0 Quick Start Manual
We Go The Distance ®
FM TRANSMITTER
2.0
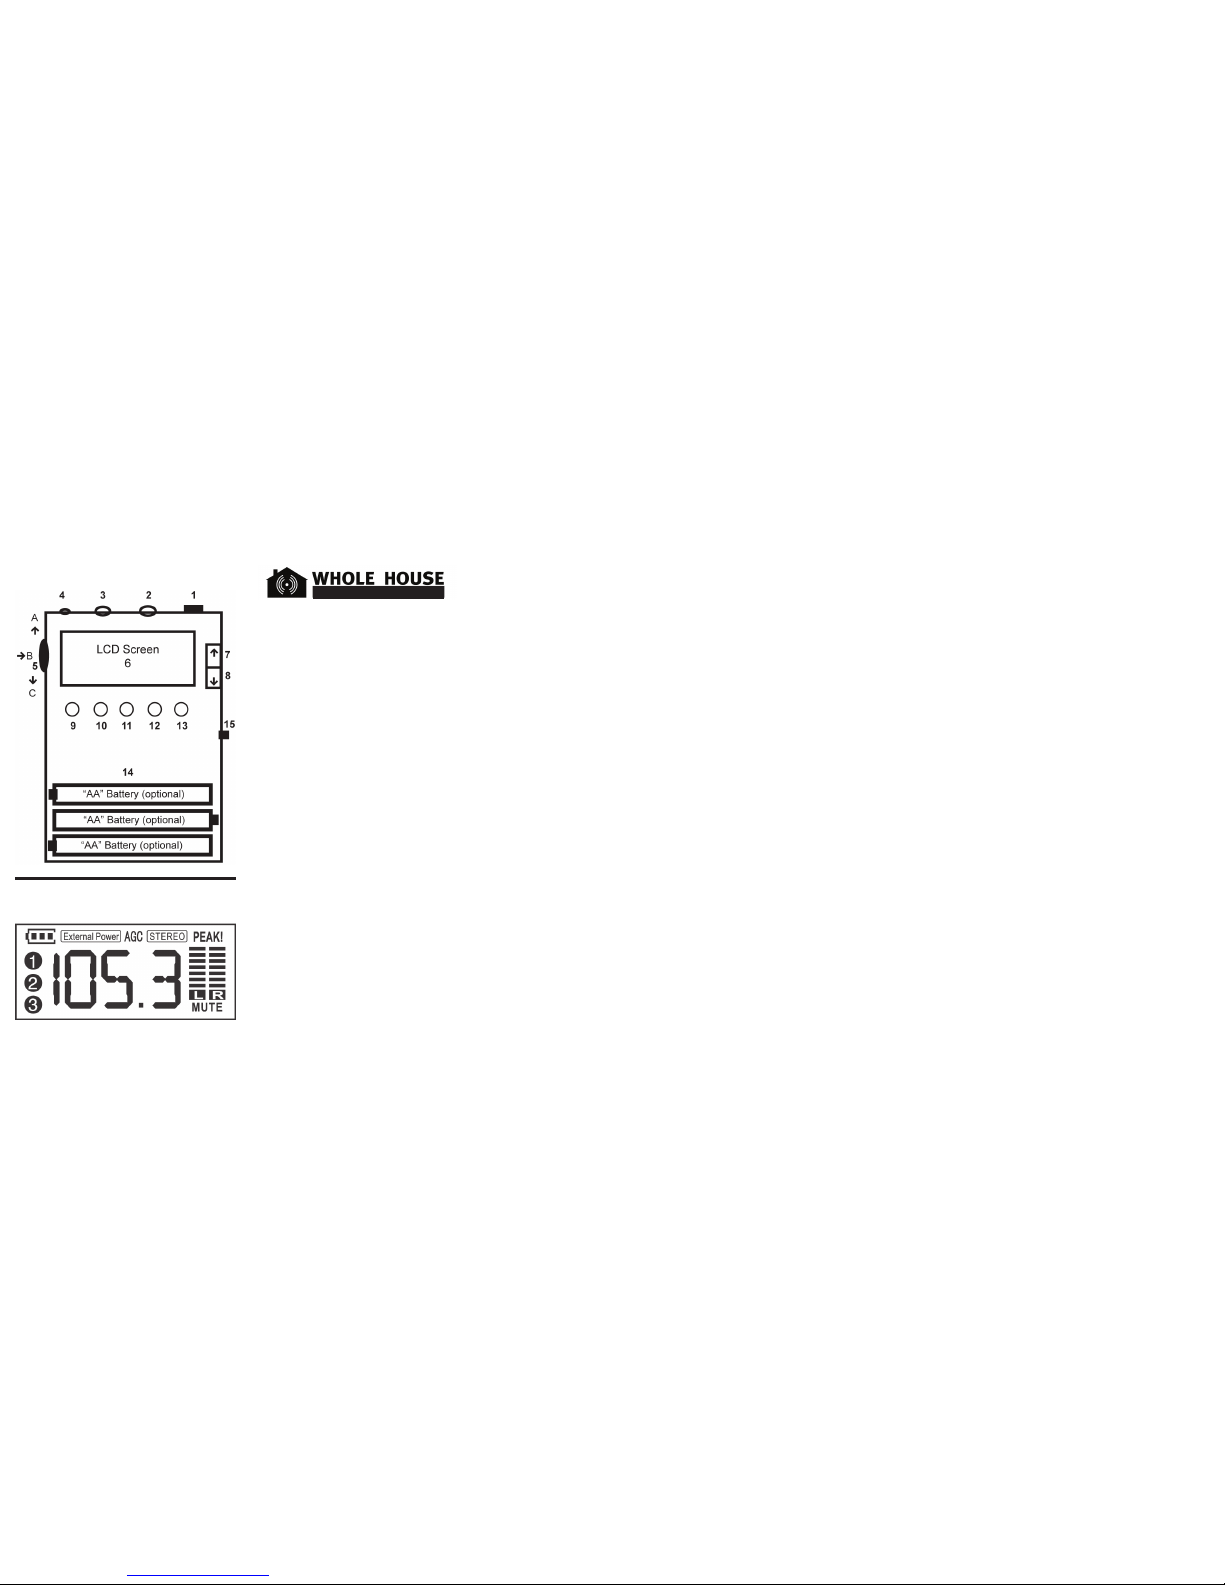
Transmitter Controls
1. Power On / Off
2. Line In / Audio In Jack
3. Microphone In Jack
(Note: Mic will be cut off when audio
cable is plugged in)
4. Antenna Wire
5. Multifunction Volume Control
A= Increase, B= Mute, C= Decrease
6. LCD Screen
Backlight goes off after 3 seconds
7. Tune Transmit Frequency UP
8. Tune Transmit Frequency
DOWN
9. Stereo/Mono Selection
10-12. Preset Transmit
Frequencies
13. AGC On/Off
14. 3 AA Batteries for optional
power
15. 5V DC External Power
Jack
All LCD Displays (6)
u
Power: The transmitter
can be powered by 110/220V
AC Wall Adapter, 12V DC Car
Adapter, Computer USB Port or 3
“AA” batteries.
When using the 110/220V or
12V power adapter, rst plug the
external Power USB Cable into
the adapter and then the other
end into the 5V DC Power Jack
located on the transmitter (15).
The LCD Screen (6) will indicate if
you are powering from batteries or
an external source.
v
Audio Source: Connect
any audio source you want
to transmit by using the Audio
Cable with 3.5mm stereo plugs
(For TV’s, DVD Players, etc. you
will need to also use the included
RCA jack cable). Plug one end
into the audio source and the
other end into the transmitter’s
Line in/Audio In Jack (2).
Adjust the volume on the audio
source to about ½ of full volume.
w
Turn The Transmitter
On by pushing in the Power
Switch (1). The LCD Screen (6)
will light up for 3 seconds.
x
Tuning: Tune the
transmitter to any unused FM
Station between 88.1 and 107.9
FM by using the Tune Buttons
(7 & 8). The FM Frequency you
tune to will be indicated on the
LCD Screen (6).
Only tune to an unused station.
You can listen on any FM receiver
and select a station with static and
or a weak signal which indicates it
is an unused station.
y
Adjust Volume: To adjust
the volume going into the
transmitter use the Multifunction
Volume Control (5). You can
also mute the volume with
(5). Pushing the button up will
increase the volume, pushing
down will decrease the volume
pushing in will mute the volume.
LCD Screen (6) will indicate
the volume level selected and
will indicate if MUTE has been
selected.
Additional Features
Stereo / Mono: You can
select transmitting in stereo or
mono with button (9). Mono is
the best way to transmit when
using a microphone (3) for the
audio source. LCD Screen (6)
will indicate when STEREO has
been selected. If Stereo is not
indicated you are transmitting in
MONO. (NOTE: Mic will be cut off
when audio cable is plugged in).
Preset Transmit Frequencies:
You can select 3 preset
frequencies with buttons 10-12.
Tune to the frequency you want
with the Tune buttons 7&8. Hold
down 10,11 or 12 until the preset
button number is indicated in the
LCD Screen (6). This indicates
that the frequency has been
Transmitter Quick
Start Guide

stored. To change the settings
for any stored frequency simply
repeat this step.
To Tune To A Preset
Frequency press button 10, 11
or 12. The transmitter will tune to
that saved frequency and indicate
it on the LCD Screen (6).
AGC: Automatic Gain Control
(13) will help level out an audio
source that is changing in volume,
When AGC is selected it will be
indicated on the LCD Screen (6).
Helpful Tips
• Transmitter Location: Since
your goal is to broadcast throughout
your whole house or ofce it is
best to place the transmitter in a
room closest to the center of the
building.
• Broadcast Distance: is affected
by types of building material,
terrain and environment.
• The HIGHER you can place
the transmitter the farther you
will broadcast. For this reason
we suggest you do not set it up in
the basement but if possible, place
the transmitter in a top oor center
room.
• Computer Users: If you are
using a computer to supply audio
or power, keep the transmitter
as far from the computer as
possible. Computers produce
radio interference.
• Audio In: For best results make
sure the audio volume going
into the transmitter is as loud as
possible without distortion. While
listening to the audio on a radio
receiving from the transmitter turn
up the volume until the sound
begins to be distorted and then
turn the volume down a little bit.
• Microphone:
You may purchase a mic from
WholeHouseFMTransmitter.com.
(NOTE: Mic will be cut off when audio cable
is plugged in)
.
• Attention Satellite Radio Users:
If your satellite receiver has a built
in FM transmitter, you must be sure
to turn it OFF so it will not produce
interference with the Whole House
FM Transmitter.
• Power Adapters: Only the
power adapters provided are to
be used with the transmitter. Any
other power adapter may damage
the transmitter. Do not use the
power adapters outdoors or in wet
conditions.
• Antenna: The single wire
antenna (4) should not be used
to hang or lift the transmitter. The
antenna should be fully extended
and positioned in a vertical position
for best results. The higher and
longer an antenna is the better the
transmission will be.
Have Questions Or Need
Assistance?
Call Us at
(888) 674-6226
(M-F 8-5 pm ET)
or Go Online at:
Help.WholeHouseFMTransmitter.com
The Whole House Stereo
FM Transmitter 2.0 Includes:
• FM Transmitter
• 110/220V AC Power Adapter
• 12V DC Mobile Power Adapter
• USB to DC Power Cable
• 1/8” (3.5mm) Stereo Audio Cable
• RCA Jack Stereo Audio Cable
• Stereo “Y” Cable
• Quick Start Guide
Made in China v01-01-10
For Home, Ofce and Vehicle Use
© 2010 TAW~Global, LLC All rights reserved
Quick Start Guide
We Go The Distance ®
FM TRANSMITTER
2.0
Warranty Information
The Whole House FM Transmitter
2.0 has a full 90 day warranty on
any defective parts or labor. For
complete warranty details please
visit our website at:
Warranty.WholeHouseFMTransmitter.com
or call our ofce at: 888-674-6226
XOAWH-FMT
IC:8728A
 Loading...