

Whittemore Enterprises EAGLE TWO PLUS Instructions/service Manual

EAGLE TWO PLUS
INSTRUCTION & SERVICE MANUAL
USER GUIDE | EAGLE TWO+
1
0120
Versi on : 3. 3
This document is a user guide for EAGLE TWO+Electrosurgical unit. Guide is intended to be referred
by qualified & trained physician and surgeon. This instrument is electrically hazardous, user operating
this generator / consulted technician for servicing should read this user manual thoroughly.
Please Note Manufacturer has every right to change specifications and/or functions of this equipment
without any prior notice or announcement.
Words referring to EAGLE TWO+ESU in this document are: Generator, ESU, and Machine
Use for: This document is drafted by taking EAGLE TWO+ ESU into account only, which is a
product of Whittemore Enterprises Inc.
Registered Trademarks: EAGLE TWO+®, Turoseal®, VesSeal
Manufactured By:
Whittemore Enterprises Inc.
11149 Arrow Route,
Rancho Cucamonga Ca 91730
Contact us: Tel: 800-999-2452
For further Information:
Email: sales@wemed1.com
®
Document: Version: 3.3
Month & Year: February 2018
USER GUIDE | EAGLE TWO+
2
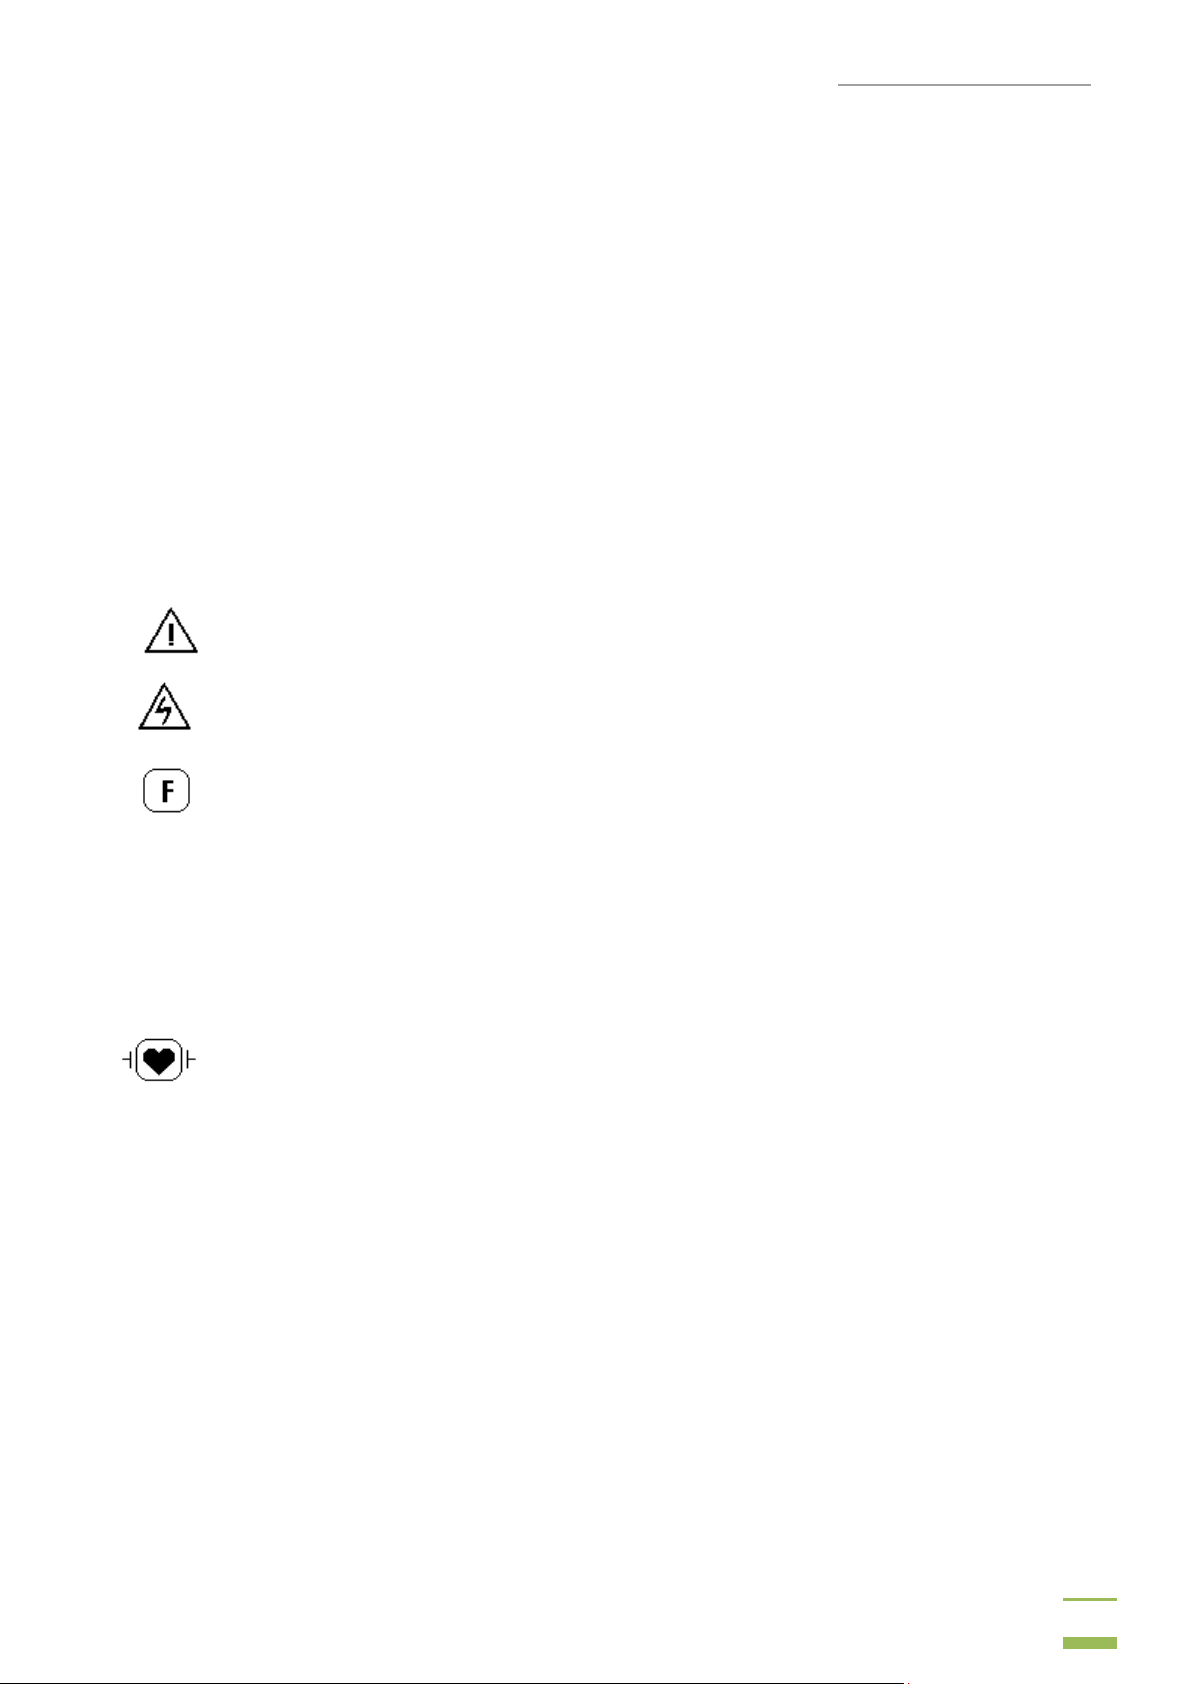
Symbol
Meaning
General warning sign
Explains the possible damage which may occur to the machine OR minor
injuries to person.
Electrical Hazard
Explains the possible risk associated with personal injury or death.
Prohibition Sign
Explains actions by which the possible damage which may occur to
instruments associated with machine and/or others so, should be prohibited.
Versi on : 3. 3
Conventions and Symbols used in this document
Pushing Prohibition
Sitting Prohibition
Stepping Prohibition
General mandatory action to be taken by user
Refer Manual or Booklet

USER GUIDE | EAGLE TWO+
3
Versi on : 3. 3
INDEX
1. Introduction
A . General Features
B. Modes of Electrosurgery
i . Monopolar Electrosurgery
ii. Bipolar Electrosurgery
iii. Vessel Sealing System i v.
Saline Plasma Bipolar Resection
C. Derivatives of EAGLE TWO+
2. Safety Instructions
3. Controls, Indicators & Output Sockets
A . Front Panel
B. R ear Panel
C. Main screen
D. How to select power and mode
E. How to select power using handswitching pencil
F. Programming the generator
4. Technical Specifications
A . General Specifications
B. Available power settings
C. Output Characteristics
D. Output frequencies
E. Area of application
F. Output Power vs. Load Graphs
5. Before Surgery
A . Preparing the generator
B. Setting the generator
C. Pr ogramming the generator
D. Patient Return Electrode Monitoring (PREM)
E. Surgery Modes and Accessory Connections
6. During Surgery
A . Preparing the Patient Return Electrode.
B. Modes & power settings
C. Helpful hints to avoid hemostat burns
D. Settings for surgeries
E. Alarm conditions
7. After Surgery
A . Preparing the generator for reuse
B. Cleaning the generator
C. Storing the generator
8. Operating Principle
A . General Description
B. Block Diagram & Description
9. Testing Procedure
10. Calibration Procedure
11. Care, Storage and Disposal
12. Troubleshooting
13. Warranty
14. Disclaimer

USER GUIDE | EAGLE TWO+
4
Versi on : 3. 3
CHAPTER 1
Introduction
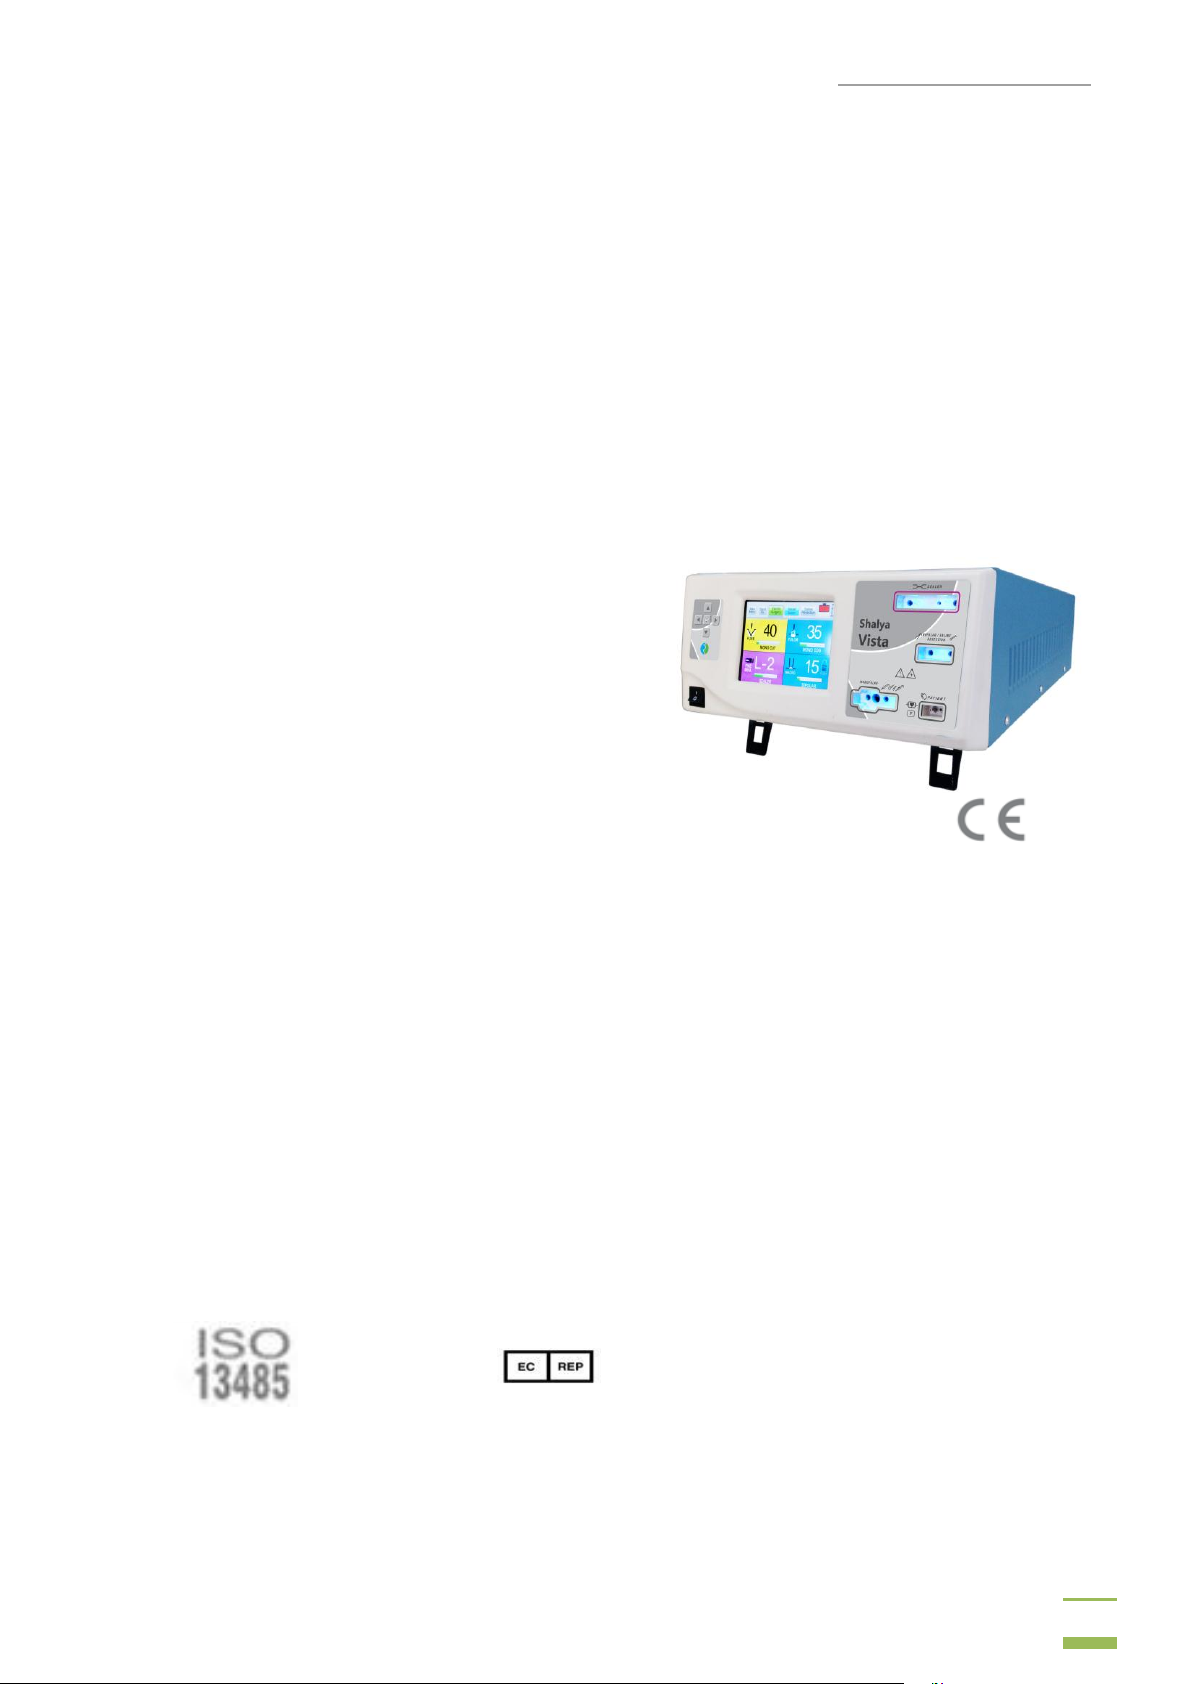
EAGLE TWO+Electrosurgical Generator – the product of Whittemore Enterprises Inc. provides
necessary High Frequency electrical power for different types of surgical needs in
advance Medical Technologies. Vessel Sealing, Saline Resection with conventional Monopolar and
Bipolar Electrosurgical applications with multiple options of effects with following features:
A. GENERAL FEATURES
Combo Electrosurgical Unit with following features:
Touch Screen LCD Interface: 5.7” Resistive Touch Screen f o r user-friendly interface
with on-screen modes description facilitating surgeon to choose the best-suitable mode for
the surgical applications.
COMBO Generator Technology: Vessel Sealing System, Saline Plasma Bipolar
Resection, High Performance ESU (Diathermy) in Single Unit.
Smart Unit: Surgical Monitoring and Automatic & Instant Response Technology ESU for
consistent cutting & coagulation through all types of tissue.
6SENSE Technology: Advance Microprocessor controlled Digital tissue impedance
feedback system with sense the change in Voltage, Current, Power, Tissue Density, Return
Electrode Contact quality & leakage RF current.
Fully Microprocessor controlled: To achieve high degree of clinical precision.
SECTION 1: Electrosurgery Section:
PREM Safety (Patient return electrode monitoring) – PREM – is ultimate Safety for
return electrode site burns.
Surgical Assistant: 999 Customizable User Programs. Recall function for fast
preprogrammed case settings.
Bipolar/BiCoag Alarm: Provides Audio feedback alarm after completion of Bipolar
Coagulation. This reduces charring & sticking of tissue to forceps & avoids over burning of
tissue. User can chose Auto BiCoag or BiCoag Alarm as per convenience.
Bipolar Cut: Macro mode can be effectively used for bipolar cutting with hooks & other
cutting devices in laparoscopic surgery.
ARGON Beam Coagulator upgradeable.
Smart ENDOCUT Mode: Pulse current for papillotomy & polypectomy Applications as
option
Hydro Cut/ Coag: - Helps effective cutting & Co-agulation under fluids/water.
SECTION 2: Vessel Sealing System:
Vesseal Technology is recent innovation in field of advance feedback controlled Electro
surgical Technology. System senses the tissue hold in instrument & appropriate amount of
energy is delivered by continually sensing the tissue density to form the permanent seal.
Cool Seal technology to seal the tissue vessel by applying calibrated pressure with RF
energy. The Collagen & Elastin within the tissue in vessel walls melts & restructure to
form a seal. The seal tissue appears translucent in nature & having plastic resistance
property.
Auto Stops the energy delivery with audio indication at completion of sealing.
Tissue ReHold alarm is given if improper grasping of tissue.

USER GUIDE | EAGLE TWO+
5
Versi on : 3. 3
Bipolar Cut & Coag with independent Display setting with independent foot-switches.
Sealing Program auto-select is available as per the selected accessory.
SECTION 3: Saline Plasma Bipolar Resection
Electrode Disconnection / Non Saline activation Alarm.
Regular loops can be used for saline work, hence reduces working cost.
Regular Working Element can be used for bipolar work.
B. MODES OF ELECTROSURGERY
1. Monopolar Electrosurgery:
In Monopolar electrosurgery, single pole, active electrode is in the surgical site. An electric current
from generator is delivered to the surgical site through active electrode & returned back to generator
via patient return electrode. Monopolar electrosurgery is used for most of the general surgical
procedures. Patient return electrode is used in these applications as return path for RF current.
Monopolar Cut Modes: There are SEVEN Cut modes-
Low Cut - It is used for a cut with no sparking, useful for precise and clean cutting for thin
tissue.
Pure - This is the default Monopolar cut mode i t may be used for precise cut with no
hemostasis.
Blend 1-It is used where slower cutting & moderate hemostasis is desired.
Blend 2-It is used where slower cutting & extra hemostasis is desired.
Endo-1 Cut - It is used for a cut with pauses & moderate pulse interval control.
Endo-2 Cut - It is used for a cut with pauses & large pulse interval control.
Hydro Cut – It is used for efficient cutting under bodily fluids/water.
Monopolar Coag Modes: There are SEVEN Coag modes-
Soft – Soft coagulation with deep tissue necrosis.
Swift - Low voltage non-contact coagulation
Desiccate – Coagulation for soft and delicate tissues.
Fulgurate – This mode is suitable for long remote/non-contact coagulation with moderate
sparking in variety of application. This mode can be selected separately as and when required.
Spray – This mode is suitable for long remote/non-contact coagulation with moderate
coverage.
Hi-Spray – Non-touch long distance coagulation with larger coverage area.
Hydro-Coag – It is used for efficient coagulation under bodily fluids/water.
2. Bipolar Electrosurgery:
In Bipolar electrosurgery, both the active & return electrodes are in surgical site. Patient return
electrode is not required as bipolar instrument contains an active electrode & return electrode.
An electric current flows from active electrode to the return electrode through tissue grasped by the
instrument. This technique is mostly used in delicate surgeries, cosmetic surgeries & neurosurgeries.
Bipolar Modes: Bipolar Electrosurgery contains FIVE types of modes-
Micro – The voltage is kept low to avoid sparking. It is selected for fine bipolar tissue
desiccation.
Standard – Standard bipolar coagulation for all type of tissue with moderate hemostatis.
Force – Bipolar coagulation for thicker & high impedance tissue.

USER GUIDE | EAGLE TWO+
6
Versi on : 3. 3
Macro – Voltage in this mode is higher than other bipolar modes.
Bicut – Comparatively low voltage Precious & clean bipolar cutting.
3. Vessel Sealing System:
In Vessel Sealing System, both the active & return electrodes are in surgical site as in bipolar. Patient
return electrode is not required as Vessel Sealing instrument contains an active electrode & return
electrode. Tissue vessel is sealed by applying calibrated pressure with RF energy through tissue
grasped by the instrument. The Collagen & Elastin within the tissue in vessel walls melts & restructure
to form a seal. The seal tissue appears translucent in nature & having plastic resistance property. This
advance technique is mostly used in surgeries where larger blood vessel tissue to cut.
Sealer:
Two sealer modes:
Fine Seal – Effective for delicate and thin tissue vessel sealing. (Sealing Instrument diameter
less than 5mm)
Rapid Seal – Effective for standard vessel sealing and fusion. (Instrument diameter between
5mm-10mm)
4. Saline Plasma Bipolar Resection:
In Saline Plasma Bipolar electrosurgery, both the active & return electrodes are in surgical site as in
bipolar. Patient return electrode is not required as Saline plasma bipolar instrument contains an active
electrode & return electrode.
The generator produces a high initial voltage spike that establishes spark in a gap between the bipolar
electrodes under saline. When the activated bipolar electrode is not in contact with the tissue, the
electrolyte solution in the bladder dissipates it. When the loop is sufficiently close to tissue, the high
bipolar voltage spike arc between the electrodes converts the conductive sodium chloride solution into
a non-equilibrium vapor layer or „plasma‟ containing energy-charged sodium particles. Once formed,
this plasma can be maintained at lower voltages.
With tissue contact, there is disintegration of tissue via molecular dissociation as the current flows to
the nearby return electrode. Energetic species of the charged ions from the plasma result in disruption
of carbon–carbon and carbon–nitrogen bonds. There is also electron impact dissociation of water
molecules into excited fragments of H+ and OH- ions. Bottom line is rupture of cell membranes which
translates into visible cutting.
Saline Resection:
Bipolar Saline Cut:
Saline Cut 1 – Low intensity saline plasma cut for delicate tissues.
Saline Cut 2 – Medium intensity saline plasma cut for delicate tissue.
Saline Cut 3 – Saline plasma cut for Resection / vaporization.
Bipolar Saline Coag:
Saline Soft Coag – Low intensity saline plasma Coag for delicate tissues.
Saline Standard Coag – Medium intensit y plasma coag for optimum coagulation.
Saline Force Coag – Saline plasma coag for Resection / vaporization.

USER GUIDE | EAGLE TWO+
7
Sr.
No.
Derivatives
Vessel
Sealer
Saline
Electrosurgery
(+)
(Monopolar 1 &
Monopolar 2)
RF Scalpel
√
√
√
Versi on : 3. 3
C. DERIVATIVES OF EAGLE TWO+
EAGLE TWO+unit comes with a number of options (derivatives) to choose from which have
been listed below.
1. EAGLE TWO+VSE
2. EAGLE TWO+VSE (+)
3. EAGLE TWO+SE
4. EAGLE TWO+SE (+)
5. EAGLE TWO+VS
6. EAGLE TWO+V
7. EAGLE TWO+S
8. EAGLE TWO+E
9. EAGLE TWO+E (+)
√ √ √
√ √ √
√ √
√ √
√ √
√
√
√
√
USER GUIDE | EAGLE TWO+
8
Versi on : 3. 3
CHAPTER 2
Safety Instructions
Read all the warnings, cautions provided with this generator before using.
Hazardous Electrical Output: This instrument is to be used only by trained, licensed
physician/surgeon.
If the patient has an internal pacemaker and internal cardiac defibrillator or any kind of
orthopedic implant, consult the pacemaker, defibrillator & orthopedic implant
manufacturer for instructions before performing an electrosurgical procedure. Maintain
adequate distance between these implants and active electrode of the generator.
General Warnings and Caution
Warnings-
This generator should be used by qualified medical person only.
Do not connect wet accessories to the generator.
Use generator only if the self-test has been completed.
Never turn the activation tone down to an inaudible level in any case.
In any case, patient should not touch any metal parts that are connected to
earth/floor/ground. Take excessive precaution use antistatic pads.
Do not lean on the patient, while buzzing the hemostat, accidental and unintended burn
injury may occur.
To reduce the risk of an inadvertent burn at the electrode site due to monitoring equipment
place the electrode and / or probe as far away as possible from the electrosurgical site.
Cautions:
Read all the Warnings & cautions before using this generator.
Use hand switches, footswitches provided by Whittemore Enterprises Inc. only.
In case of any doubt or query contact Whittemore Enterprises Inc.
Avoid use of needle like monitoring equipment on patient wherever possible.
Electrode & Instruments:
Warnings-
Always ensure that instrument & electrode is properly cleaned
and dried before attaching to the generator.
Keep the cables of electrodes as distant as possible from patient
other wires.
Do not activate the generator, before touching the active electrode to the tissues, electrical
arcs may be created.
or
USER GUIDE | EAGLE TWO+
9
Versi on : 3. 3
Do not activate the generator in an open circuit condition. Do not short Active electrode
with return electrode.
Do not activate electrodes while in contact with other instrument, an unintended tissue
injury may occur.
Do not wrap instrument cables around and/or bring in contact with any metal object as
electromagnetic induction may produce hazardous electric current.
Never use any instrument above maximum power, voltage ratings as specified by the
manufacturer.
Never use broken or damaged instruments or cords it may turn out harmful for patient and/
or surgeon.
Cautions:
Always use the appropriate instrument for the surgery.
Always ensure your electrodes are properly cleaned & in good working
condition.
Monopolar
Warnings-
Do not connect more than one instrument at a time into a given socket.
Using PREM electrode plates other than Whittemore Enterprises Inc. may malfunction
generator and will turn out to be hazardous for patient.
Always ensure proper connection of PREM electrode with the patient‟s skin; do not apply
any solution which dehydrates the skin of a patient where PREM is to be connected.
To avoid the electrosurgical burns beneath the patient return electrode, it is necessary to
follow all directions on the product package for proper return electrode placement & use.
Place Patient Return Electrode as close as possible to the surgical site.
Cautions:
Use Patient Return Electrode for Monopolar modes only.
Using a patient return electrode without the PREM Safety feature, will not activate the
PREM Contact Quality Monitoring System.
Hemostat Buzzing:-
Warnings-
It‟s not recommended to use hemostat buzzing method.
If using hemostat buzzing, firmly grip as larger area of hemostat as possible.
Touch active electrode on the area of hemostat, which is closer to the patient.
Avoid leaning on the patient.
Avoid using coagulation wherever possible, use cut instead.
Use the as low power setting as possible for this method.
Unintended burns may occur even after wearing the gloves due to higher current densities
which may penetrate gloves causing current leakage resulting in shocks and burns to the
surgeon.
USER GUIDE | EAGLE TWO+
10
Versi on : 3. 3
Bipolar
Cautions:
Bipolar accessories must be connected to the bipolar socket only.
Bipolar mode should be utilized whenever possible.
Vessel Sealing
Warnings-
Make use of appropriate footswitch for vessel sealing operation; perform manual
settings when using single paddle footswitch.
Use appropriate power; apply adequate pressure on tissue before activating sealer.
Completion alarm indicates the proper sealing of tissue, do not release the instrument before
completion alarm sounds.
Do not perform sealing operation in the vicinity of conductive fluids as it may cause
unintended injuries to the area in vicinity of conducting fluids.
In laparoscopic operations ensure that the direct contact with the desired tissue is
established; do not activate power before proper contact as it may lead to unintended burns.
Do not apply sealing electrode on wounded vessels as it may damage it further.
Proper inspection of the vessel instrument is necessary before use. If any kind of insulation
failure or damages of instrument or improper assembly of instrument occurs, do not use it
on the patient as this could be dangerous for Operator and the Patient.
Vessel sealing devices will not work in blood reach environment; get the tissue clean before
sealing.
Do not activate the blade without completion of sealing cycle as this may cut the live
arteries resulting to blood loss during surgery.
Cautions:
Use vessel sealing accessories provided by Whittemore Enterprises Inc. only. Making use
of other instrument may not deliver optimized power or desired effects for the operation.
Do not use saline solutions for cleaning bipolar Vessel Sealing instruments, this may reduce
working life of accessories.
Do not use vessel sealer with the tissue washed with Normal Saline (NS). Do not give saline
wash till vessel sealing procedure complete. Use sterile water in case of requirement.
Do not reuse single time use instruments.
Do not use ultrasonic cleaners at high amplitudes. Product damage may otherwise result.
Saline Resection
Warnings-
Use continuous irrigation for better results.
Do not use nonstandard saline solution.
Use minimum possible power setting to avoid operator nerve reflection.
Do not activate the generator without firmly engaging the loop with the tissue.
Do not use nonconductive irrigation liquid, it may lead to alternate site injuries.
USER GUIDE | EAGLE TWO+
11
Versi on : 3. 3
Electrical Connections & Power:
Warnings-
Make use of a dry cheesecloth between patient and ground body.
Inspect electrode connections and contacts frequently.
Check all the power settings & each and every connection to the generator
before using the device on patient.
Check if the earthing of power source in surgical room is proper. Make sure equipment
chassis or cabinets are grounded. Never cut off or reverse the ground connection on a plug.
Please check if power from the main line (AC) is within the specified range as required for
proper functioning of the generator. Inappropriate voltage from the mains plug (AC Line)
may damage the device and/or may turn out to be hazardous to patient and/or surgeon.
Always use lowest output setting for desired surgical effect. If proper setting is unknown,
set the generator at a very low setting & increase the power continuously until the desired
effect is achieved.
Take faults of the circuitry into consideration any time the surgeon continues to request a
higher power. Check all the problematic extents such as: patient electrode, active electrode
or ESU as excessive power may damage and/or burn the tissue.
Simultaneously activating irrigation & electrosurgical current may result in increased arcing
at electrode tip, burns to unintended tissues, shocks & burns to the surgical site.
Cautions:
Never use power plug adaptors.
Avoid the use of “extension cord” for the mains power supply.
Do n o t plug i n or unplug power cord when mains sw it c h & / o r generator‟s
switch is in the ON state.
Never defeat the purpose of a fuse or circuit breaker. Never install a fuse of
higher amperage rating than specified.
Keep the active electrode clean. Dirty electrode causes the reduction of output power.
The ESU's electrical cord should be adequate in length & flexibility, to reach the electrical
outlet without stress or the use of an extension cord.
Replace defective cords and plugs. Inspect cabling for defects such as frayed wiring, loose
connections, or cracked insulation.
Check all accessories and connections to the electrosurgical generator before using.
Improper connection may result in arcs, sparks.
Accessories Related:
Warnings-
Inspect ESU unit prior to use. Remove accessories which are
damaged and/or not working properly.
Do not wrap the accessory leads around the metal objects. This may
induce currents that are dangerous to the patient.
Do not try to increase or reduce length of cables. Excessive or improper current may
unintentionally damage the tissue or skin.
USER GUIDE | EAGLE TWO+
12
Versi on : 3. 3
Cautions:
Place Foot paddles on flat, dry & clean surfaces.
Do not reuse or re-sterilize accessories labeled “disposable or single use only”.
Check all accessories before using, especially if they are endoscopic accessories.
Radio Frequency Burns:
Warnings-
Keep the monitoring equipment electrode as distant as possible
from electrosurgical site, to reduce the risk of inadvertent
electrosurgical burn.
Avoid skin-to-skin contact points such as fingers touching leg use dry cloth between
contacts.
Do not activate the electrodes for extended period of time (more than 1 minute) it leads to
excessive heating of the electrode and may burn the tissue.
Generator Placement & Environment:
Warnings-
Never place containers of liquid on diathermy unit.
Never use electrosurgical unit in presence of flammable anesthetic
In presence of excessive Oxygen & Nitrogen gases, extra measures must be taken to reduce
Cautions:
Do not place the generator on the top of any electrical equipment.
Always keep as much distance as possible between monitoring
Do not disconnect the generator from main line (AC) immediately after turning off keep it
If generator is relocated from cold to warm room, keep generator ON at least for half an
Other:
Warnings-
Check if activation, safety, warning audio & visual alarms are working properly. If
Always perform cleaning operation of the generator after surgery; disconnect all the
In case if a patient is moved from one place to another recheck all the connections, as the
During procedures in small surgical field, accidental and unintended burn injury may occur.
gases.
the concentration of these gases.
equipment, video equipment and electrosurgical generator.
connected to the main line for at least for a minute.
hour to let generator to acclimate to the room temperature.
found problematic; restart the generator, check it again after restarting. If problem still
exists do not use the generator as it may result in erratic functioning which may lead to
hazards. Contact Whittemore Enterprises Inc. service department.
electrical connections and accessories before cleaning the generator.
proper contact of electrode cable with the generator is necessary.

USER GUIDE | EAGLE TWO+
13
Versi on : 3. 3
Shave off body hairs coming in contact with surgical site whenever necessary.
Cautions:
Avoid the use of hybrid tracers that include both metal & plastic components.
Always maintain proper ventilation in the surgical room, as surgical smoke
generated during surgery is harmful to health.
Always keep as much distance as possible between monitoring equipment,
video equipment and electrosurgical generator.
Do not disconnect the generator from main line (AC) immediately after turning off keep it
connected to the main line for at least for a minute.
If generator is relocated from cold to warm room, keep generator ON at least for half an
hour to let generator to acclimate to the room temperature.
USER GUIDE | EAGLE TWO+
14
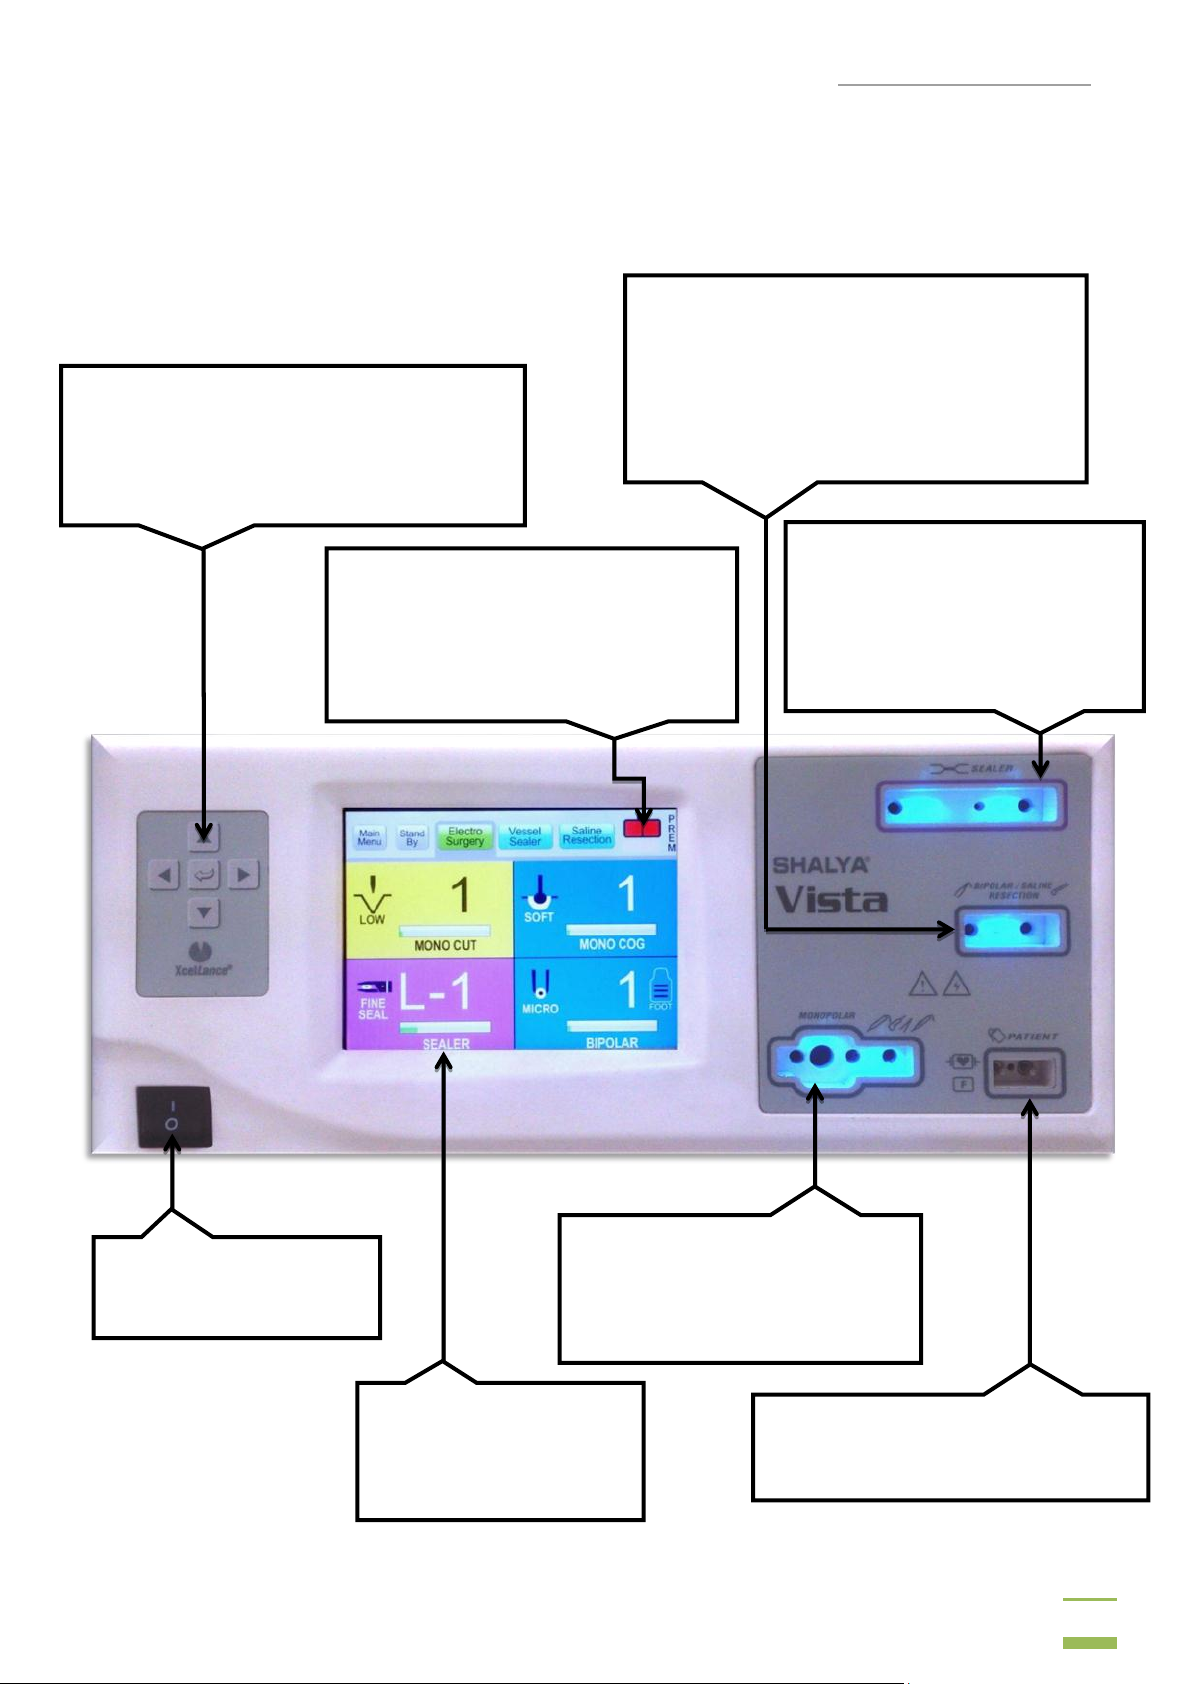
Power ON/OFF switch:
To turn the generator ON/
OFF.
Monopolar Electrode Socket:
This accepts Single pin
footswitching or 3-pins Hand
switching Electrode cable.
Patient Return Electrode Socket:
This accepts PREM/ Non-PREM
electrode sockets.
Keypad:
This is adjunct to LCD touchscreen input.
Arrow keys: to select modes on the menu &
to increase and/or decrease the power.
Enter key: to confirm any mode and setting.
PREM Contact/Contact indicator:
It indicates the contact adequacy using
process bars (Green) or gives audiovisual alarm (flashes (Red)) when
contact with the patient is inadequate.
Sealer Electrode Socket:
Accepts standard two pins 4mm
sealer interface cable & hand
switching cable for sealer.
Open & Lapro sealing cables can
be connected.
Saline Resection/Bipolar Socket:
Accepts standard 4mm Bipolar/Saline
Resection interface cables. Active HF cord
in one hole & return HF cord from lure lock
adapter in other hole or standard two pin
bipolar resectoscope cable in Saline
Resection mode.
Touch Screen LCD:
Touch screen LCD for
user friendly interface.
Versi on : 3. 3
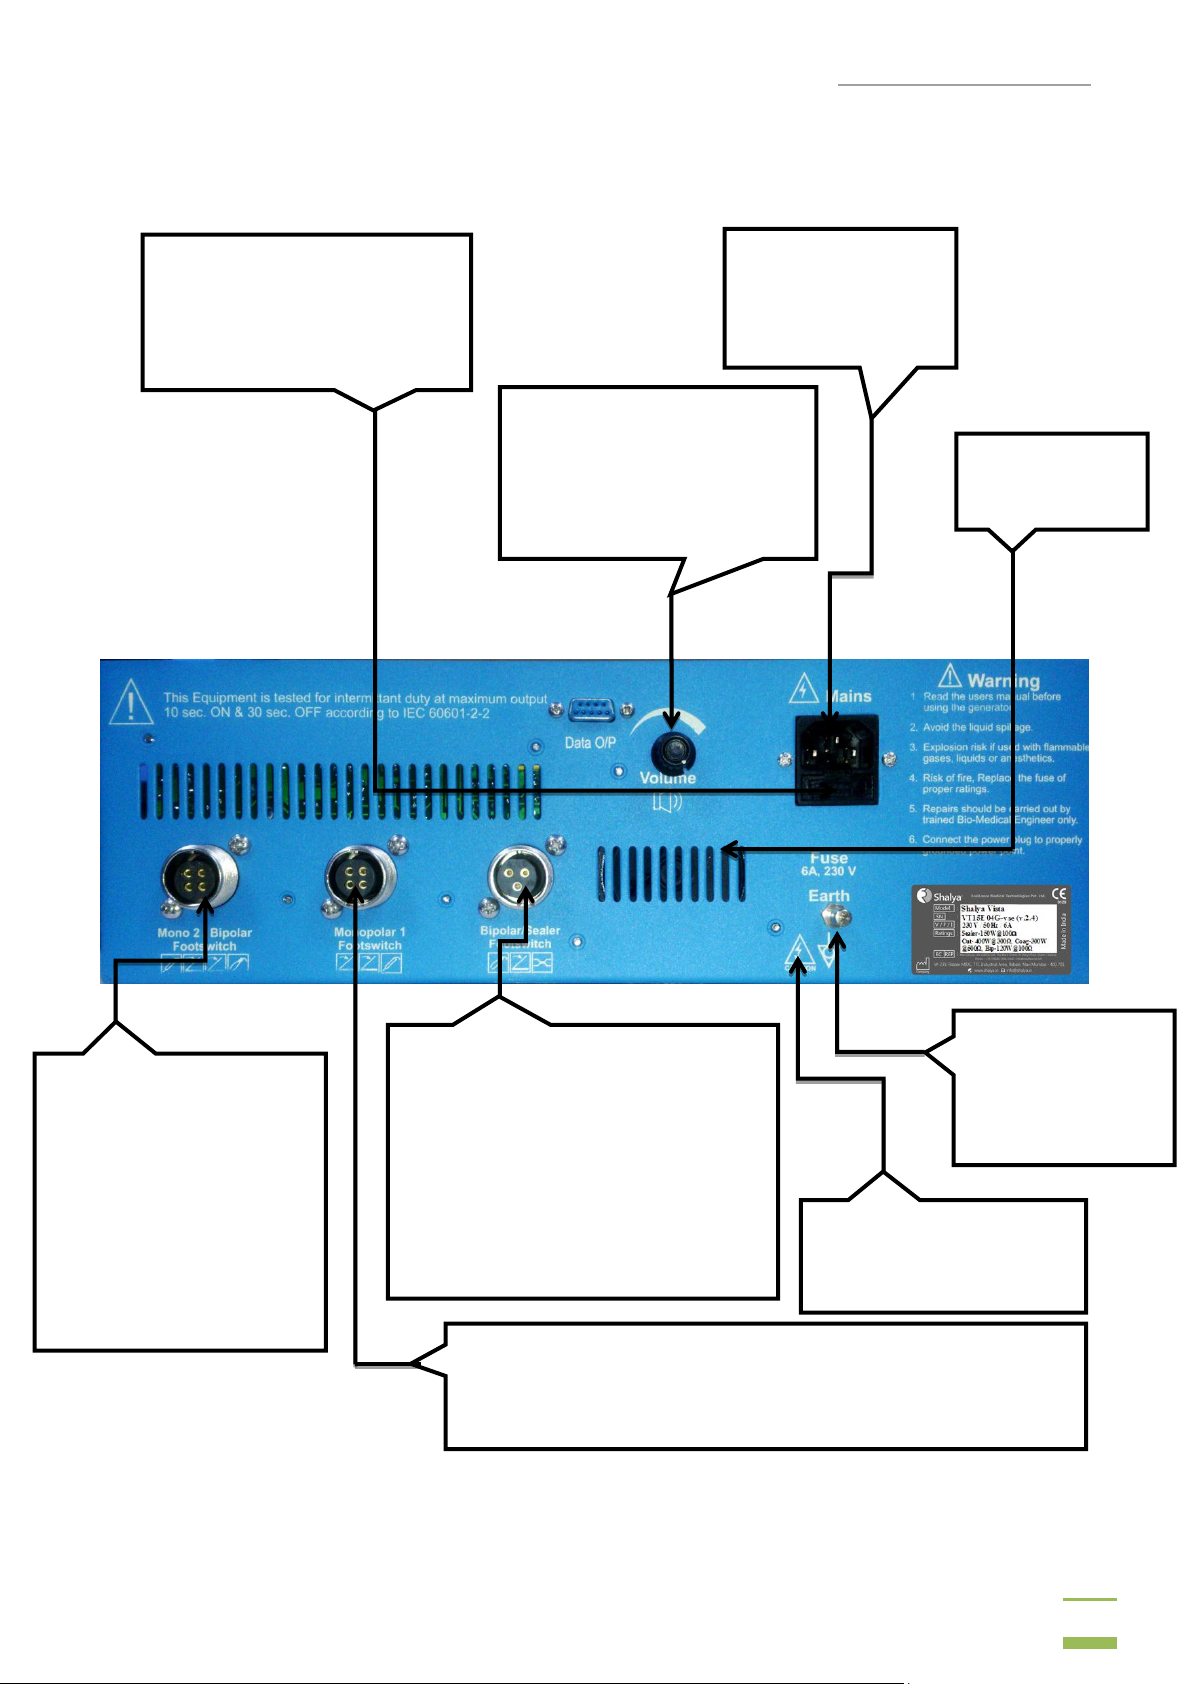
CHAPTER 3
Controls, Indicators & Output Sockets
A. Front Panel
USER GUIDE | EAGLE TWO+
15
B. Rear Panel
Volume Control:
For adjusting volume of
activation tones
Please Note: Alarm
Volumes are not adjustable
Bipolar/Sealer Footswitch:
It is a single paddle footswitch
Electro Surgery mode: Activates
Sealer/Bipolar depending on the
modes selected on the main screen.
Sealer mode: It will activate sealer
m o d e s .
Please Note: Saline Resection will
not work with this input.
Power Socket: To
supply AC (230V /
50Hz) or (110V/60
Hz) power to ESU
Grounding Lug:
To reduce noise in
other equipments.
Connect it to the
earthing receptacle.
Monopolar Footswitch:
Electro surgery Mode: Activates Cut/ Co-agulation modes.
Two input paddles: One for Cut(Yellow) another (Blue)
Monopolar 2/ Bipolar
Footswitch:
ES mode :Sealer &
Bipolar
Vesseal Sealer Mode:
Bipolar cut/ Bipolar
Coagulation
Saline Resection:
Saline cut/Saline coag
Fuse Socket: Fuse Rating
(230V, 6A) or (110V, 10A)
Please Note: In case of fuse
malfunction replace fuse with
the same rating
Speaker:
Alarm speaker
aperture
Electric Shock Hazards:
Due to mains supply &
Ground path
Versi on : 3. 3
Note: This manual is common for both 110V/230V mains power supply.
For technical specification, refer Chap 4: Technical Specification; Section: Input Power.
USER GUIDE | EAGLE TWO+
16
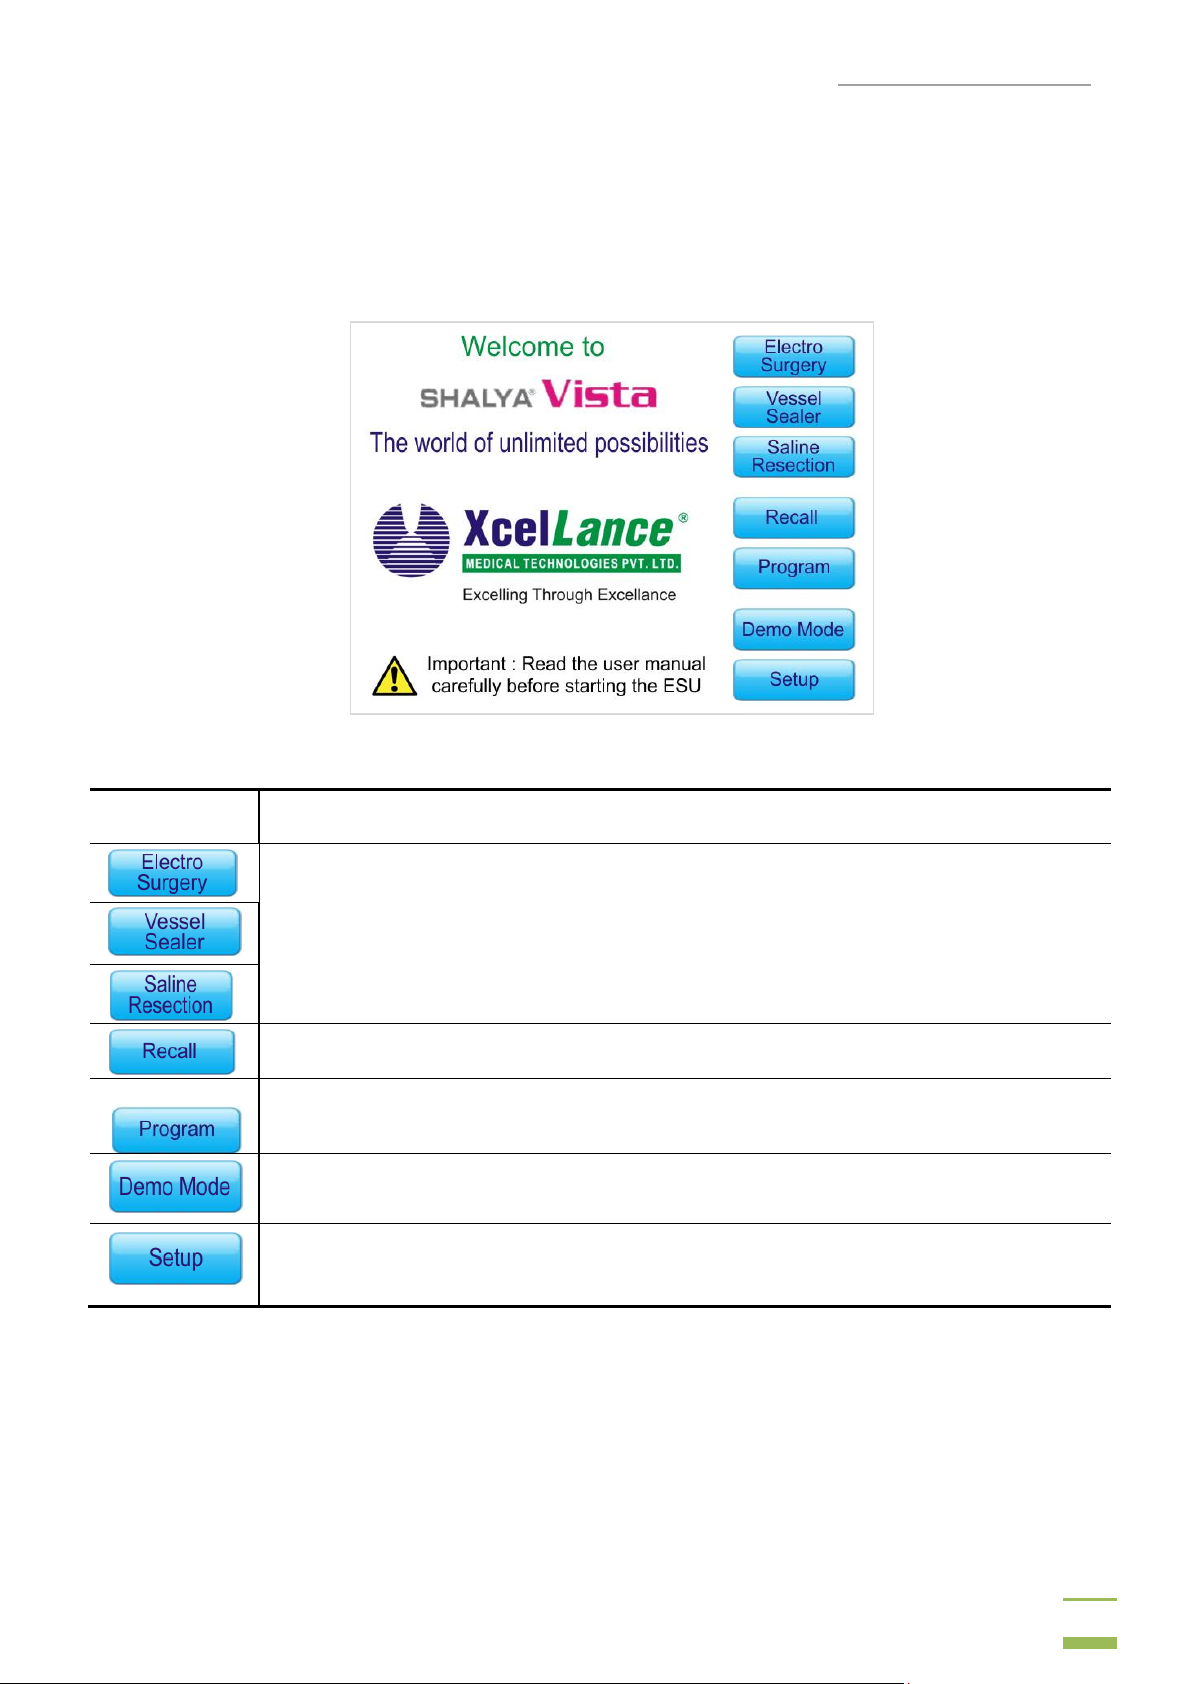
Symbols
Description
Every symbol on the left side forms an individual touch button.
Touching on any of the touch button will open up the corresponding menu
screen.
Recall function calls up the recently used settings.
Program function can be used to store frequently used settings, facilitating
user to store up to approx. 50+ user programs.
Demonstration mode.
Setup Function facilitates user to change system settings.
Versi on : 3. 3
C. Main Screen
Screen1 is the main menu screen appears once EAGLE TWO+has turned ON/ restarted. Touch
interface and easily accessible menu makes it very user friendly. Details of symbols on the screen are
given below.
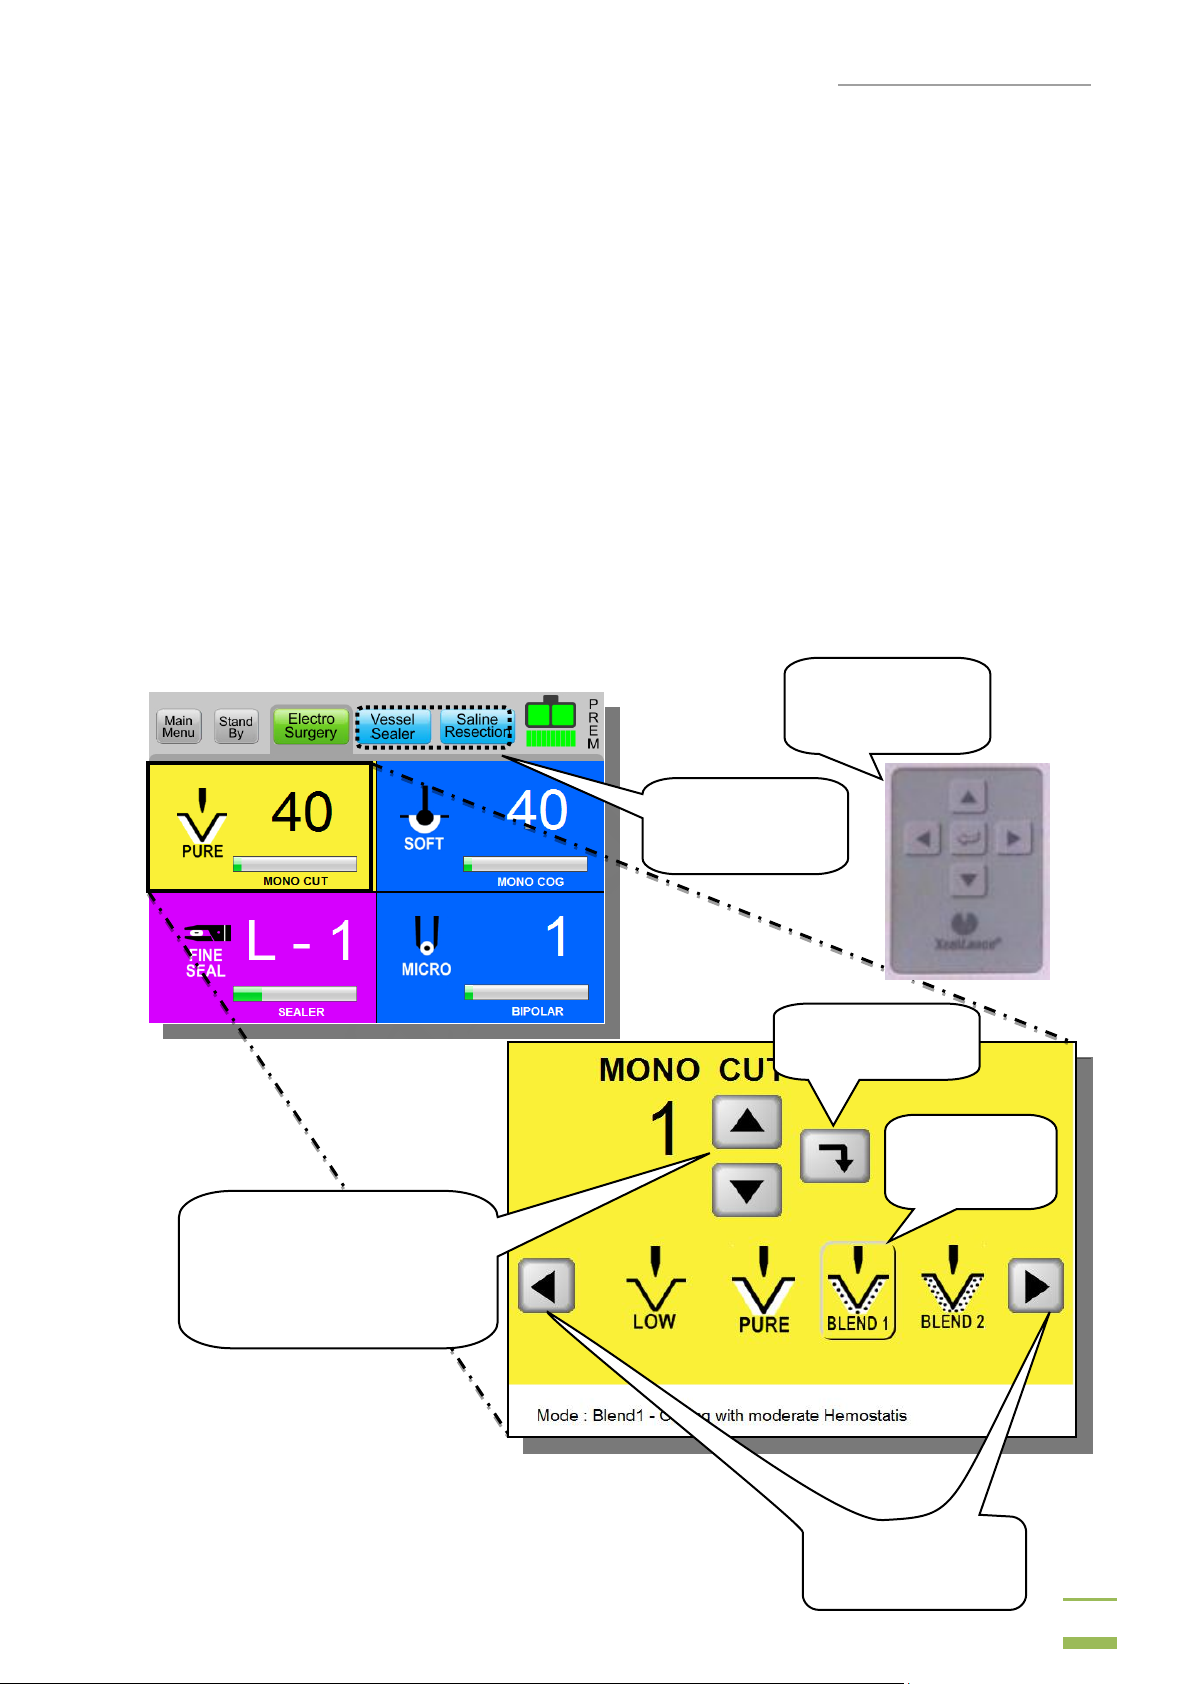
SCREEN 1
Please Note: Details of the modes above are explained below.
USER GUIDE | EAGLE TWO+
17
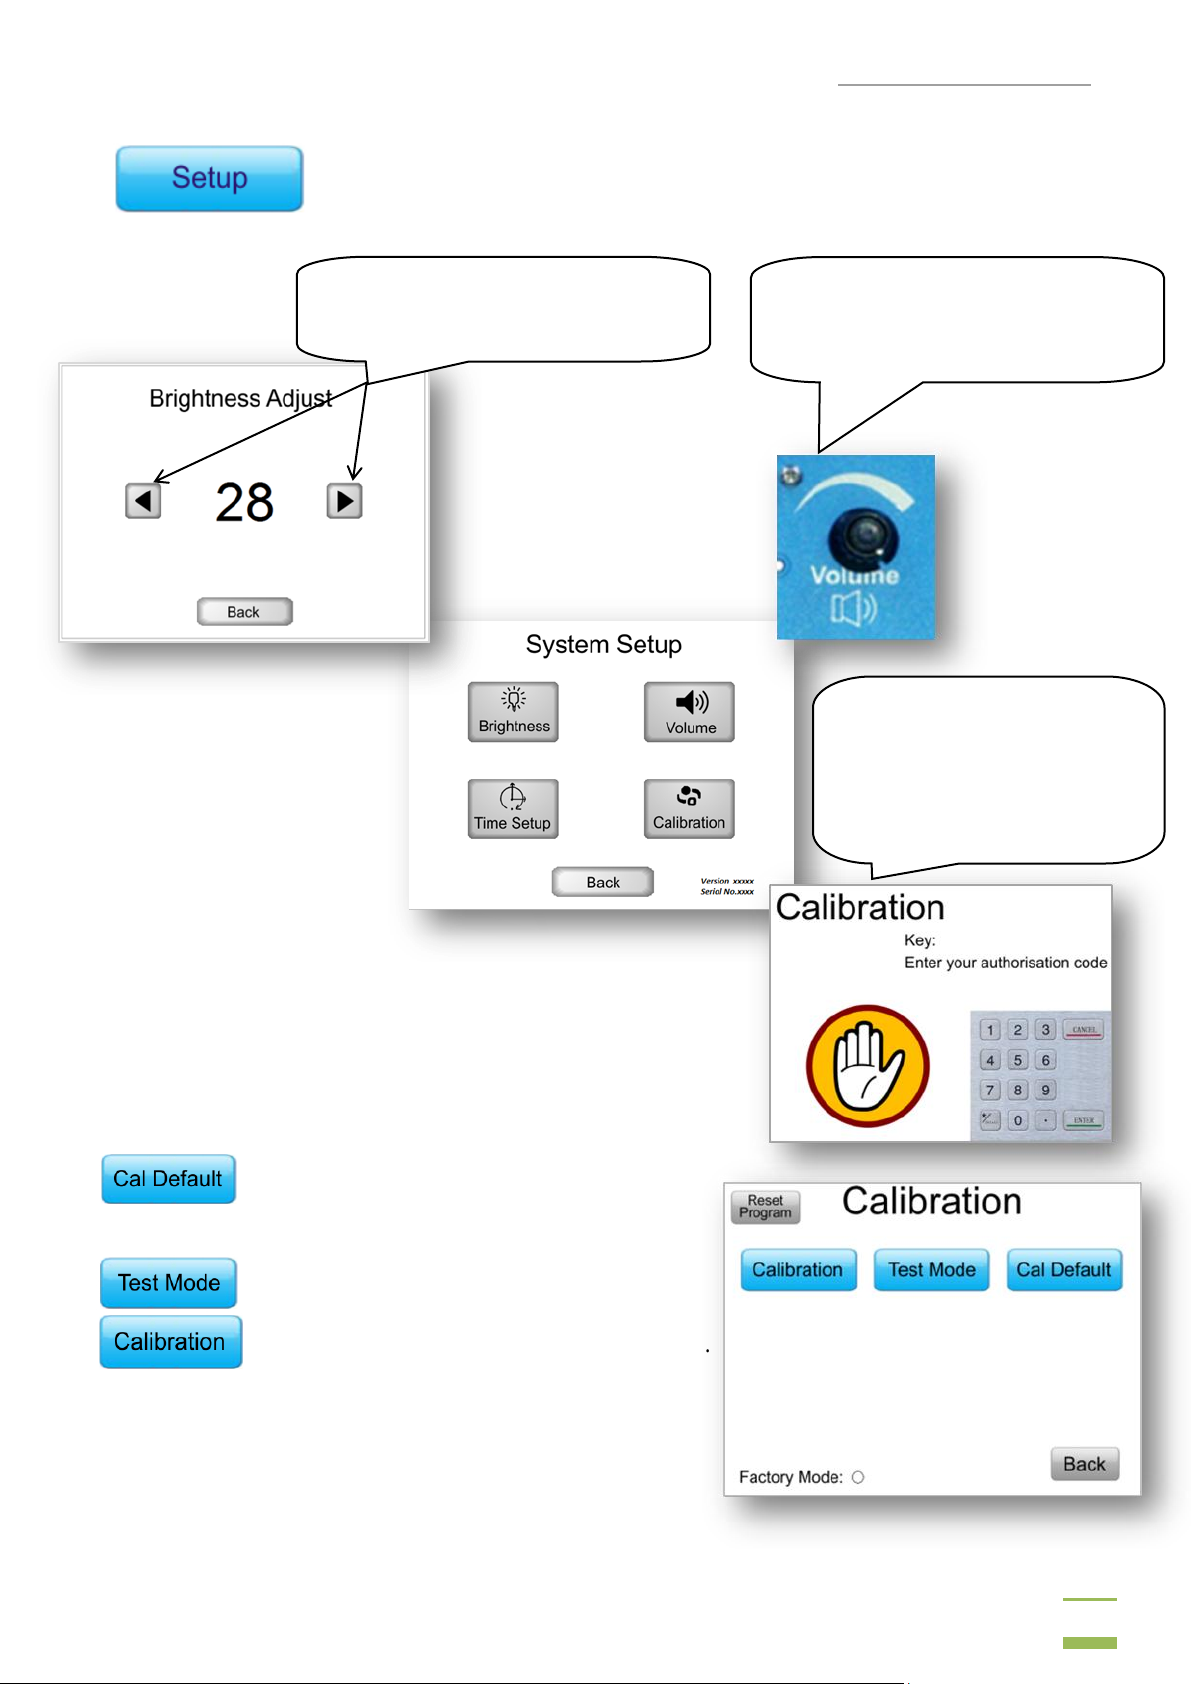
Warning: To be accessed only
by trained professional.
Please contact the
manufacturer to obtain the
Authorization code.
System Volume can be adjusted
by turning volume control pot on
the back panel of machine
Touch buttons to increase and/or
decrease the brightness.
Versi on : 3. 3
To load the default Calibration Counts.
Test mode shows the functionality of
Input/output interfaces.
It is used to calibrate machine‟s sensors.
Calibration mode is explained in later chapters.
USER GUIDE | EAGLE TWO+
18
SCREEN 1
SCREEN 2
Up/down keys to increase
&
decrease the power
respectively.
Enter Key
Touch to
Select
Versi on : 3. 3
D. How to select Power & Mode?
STEP 1:- Enter the desired surgical mode (Electro-surgery, Vessel Seal, and Saline Resection).
STEP2:- Select desired procedural mode just by touching relevant icon or by using Front panel
Keyboard. There are four modes under Electrosurgery namely Monopolar Cut, Monopolar Coagulation, Sealer and Bipolar.
STEP3:- Enter the desired mode just by touching its icon as shown in SCREEN 1 & 2. Select sub-
modes using Touch Select ive Icons (SCREEN2).
STEP4:- Once desired sub-mode (procedure) is selected, increase/decrease the power using on-screen
or front panel keypad‟s up/down arrow keys to.
STEP5:- Now once power is selected for the desired sub-mode (procedure) press Enter Key (Onscreen or Keypad). Pressing appropriate foot paddle or Handswitch will make power available on
relevant port. Follow the same procedure to select modes in different surgical modes viz. (Vesseal
Sealer & Saline Resection).
Other Surgical
Modes
Front Panel
Keypad
Horizontal
Scroll Keys
USER GUIDE | EAGLE TWO+
19
Coag Switch
Cut Switch
Versi on : 3. 3
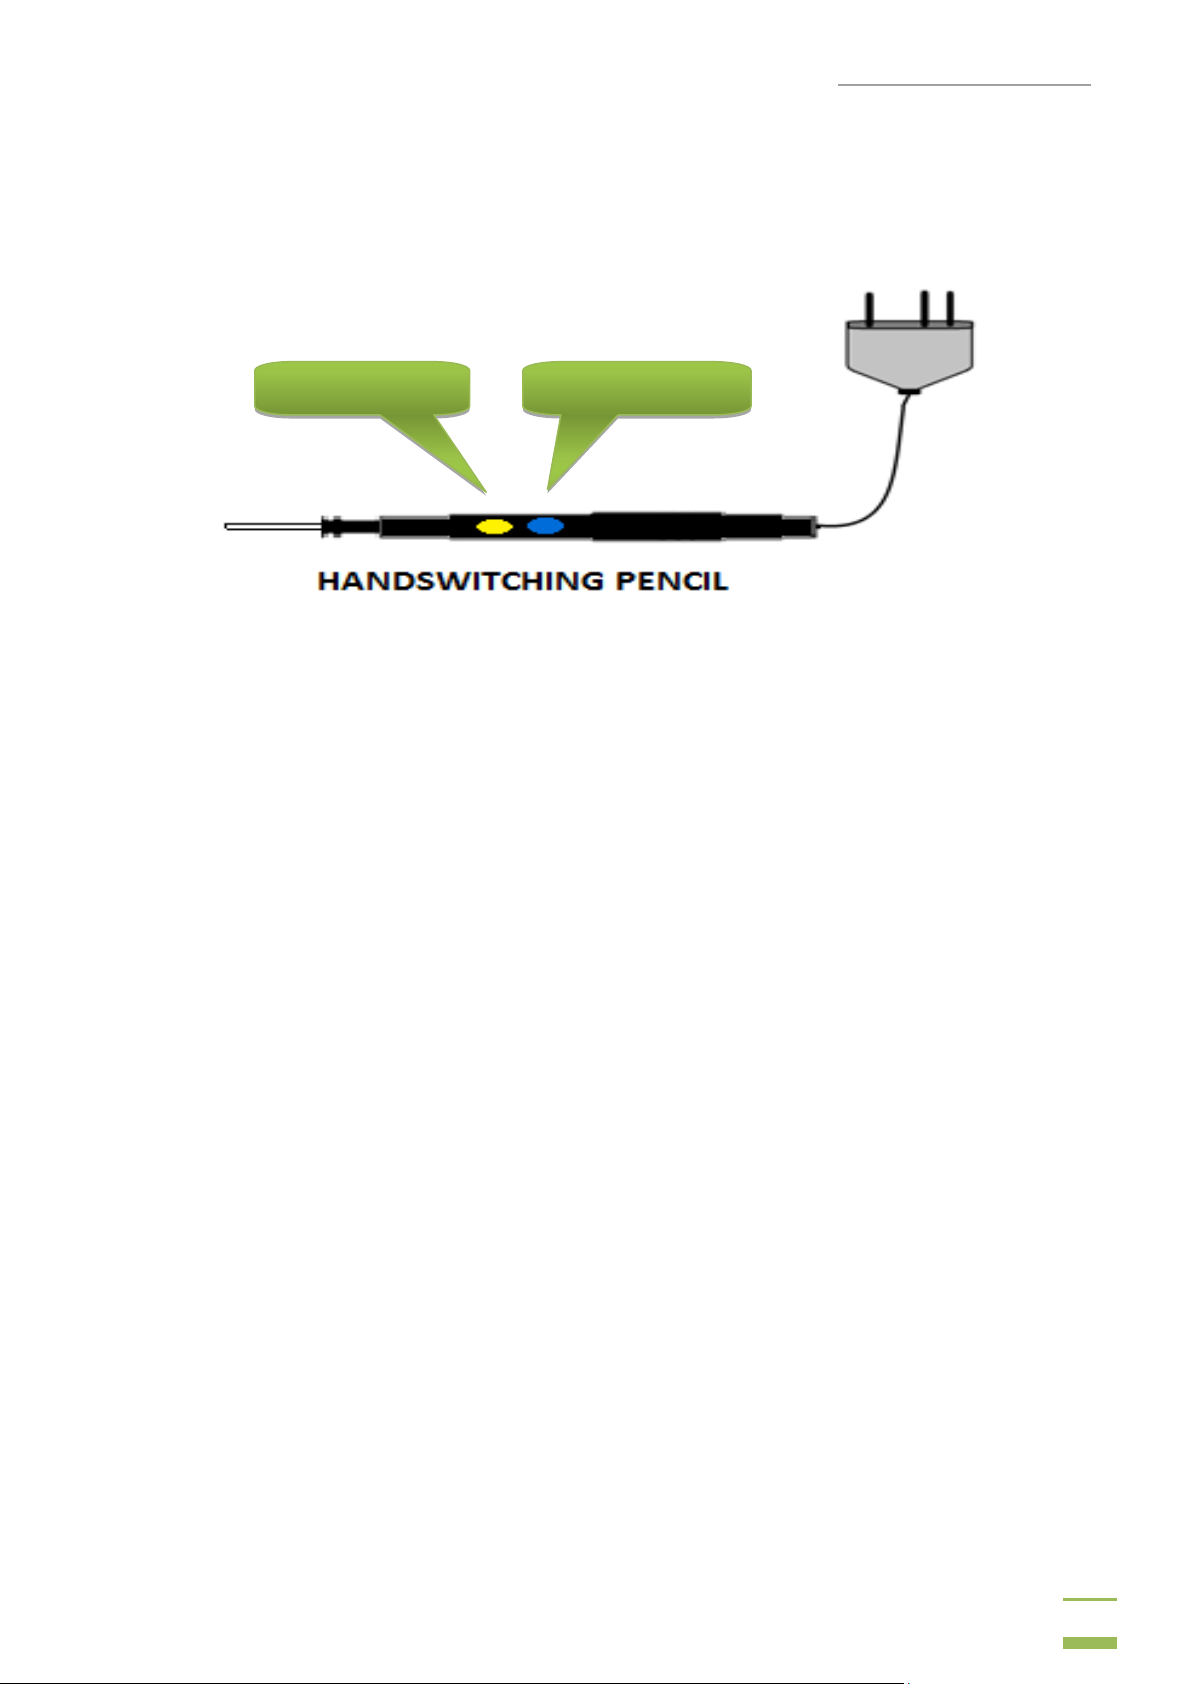
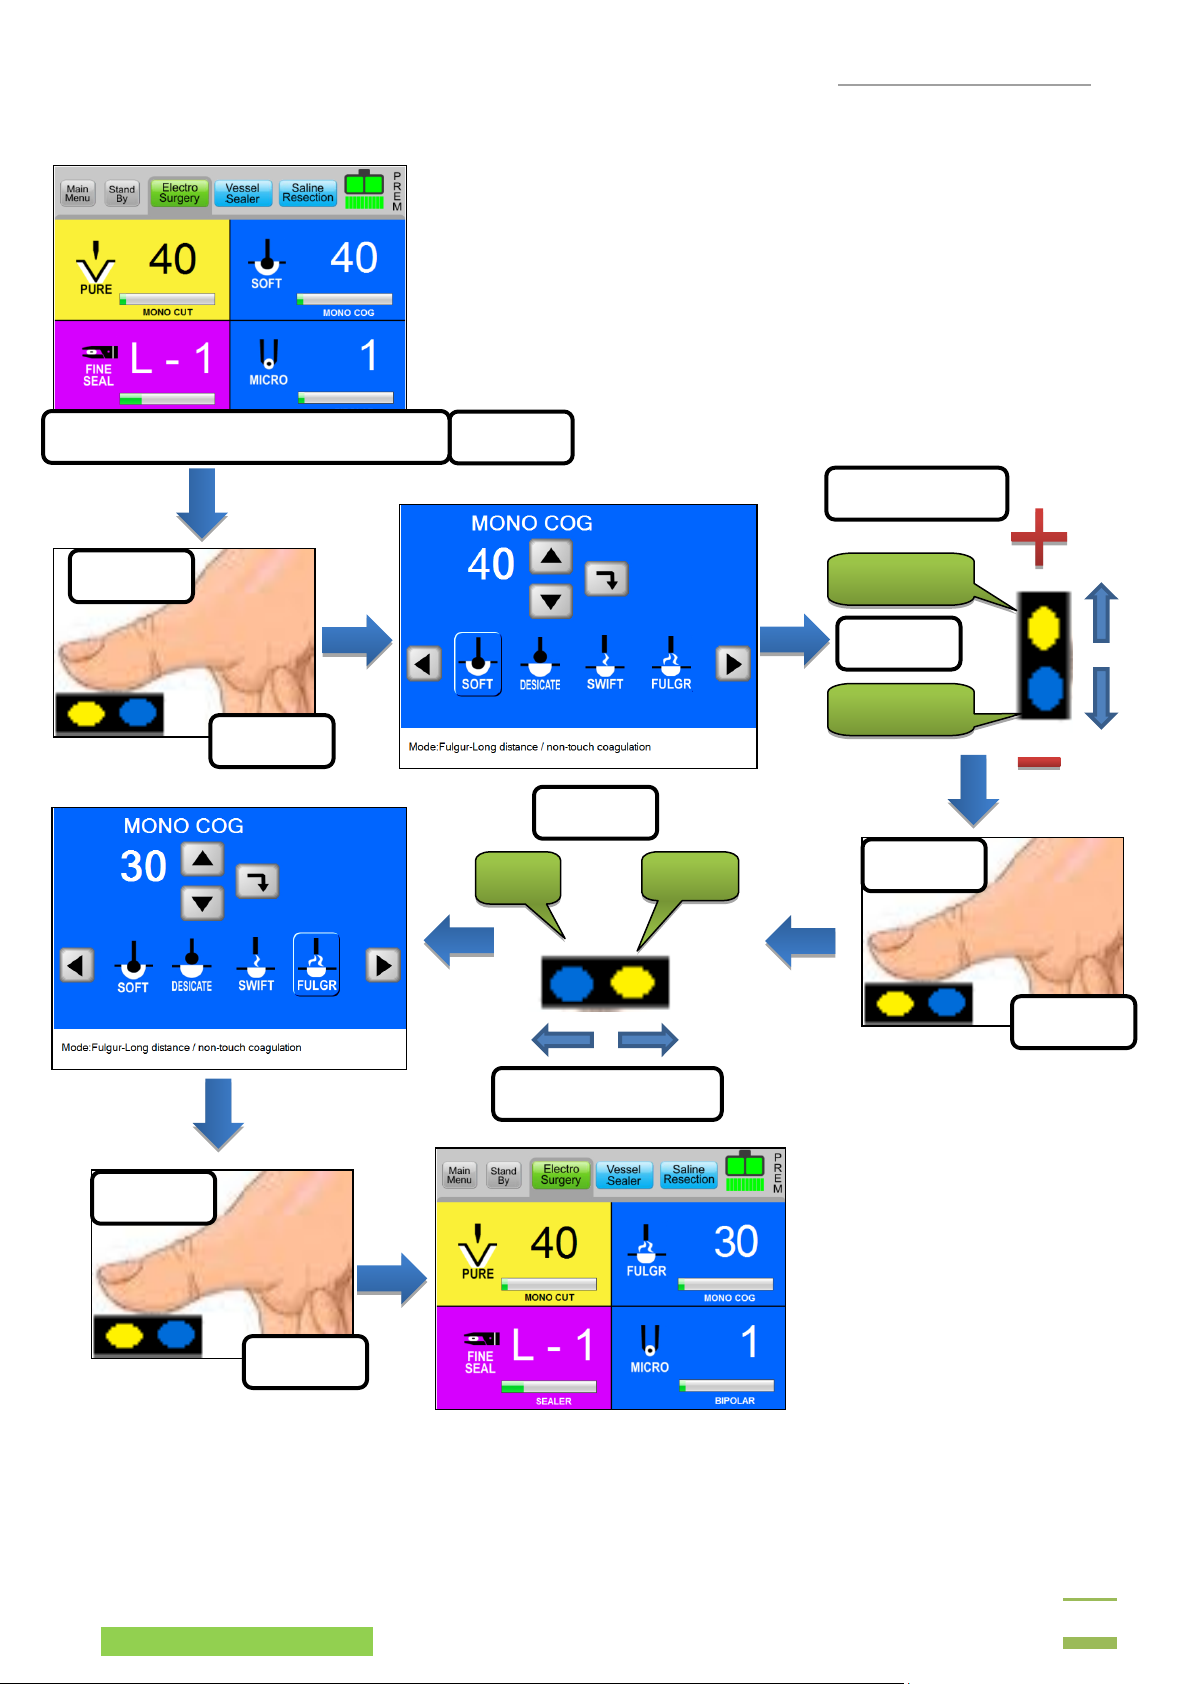
E. How To Select Power Using Handswitching Pencil?(OPTIONAL)
EAGLE TWO+provides remote control using handswitching electrodes. This facilitates quick
remote access to manipulation of settings for very recently activated mode, during surgery.
During normal Monopolar operation, Handswitching electrode (Pencil) can be used for Monopolar
Cut and Monopolar Coagulation operations. Pressing yellow button will activate Monopolar cut output
and pressing blue button will activate coagulation output.
USER GUIDE | EAGLE TWO+
20
STEP 1
STEP 2
STEP 3
STEP 4
STEP 5
STEP 6
Press Coag switch on the electrode.
ENTER
ENTER
ENTER
SELECT MODE
SET POWER
Versi on : 3. 3
L e t ‟ s assume i f recently activated m o d e was Monopolar Cut
Pure at power setting of 40Watts.
Now if surgeon wants to change it to new mode: Monopolar
Coag Fulgar at power settings of 30Watts.
FOR ENTER: Press Cut and Coag buttons simultaneously.
Increase
Left
Decrease
Right
Whittemore Enterprises Inc.
USER GUIDE | EAGLE TWO+
21
Step 1
Step 3
User can set
powers of
multiple surgical
m o d e s .
SCREEN3
SCREEN2
Touching any of the text boxes will open
up user friendly QWERTY on-screen
keyboard.
PROGRAM 1 DR.XYZ
Step 2
Versi on : 3. 3
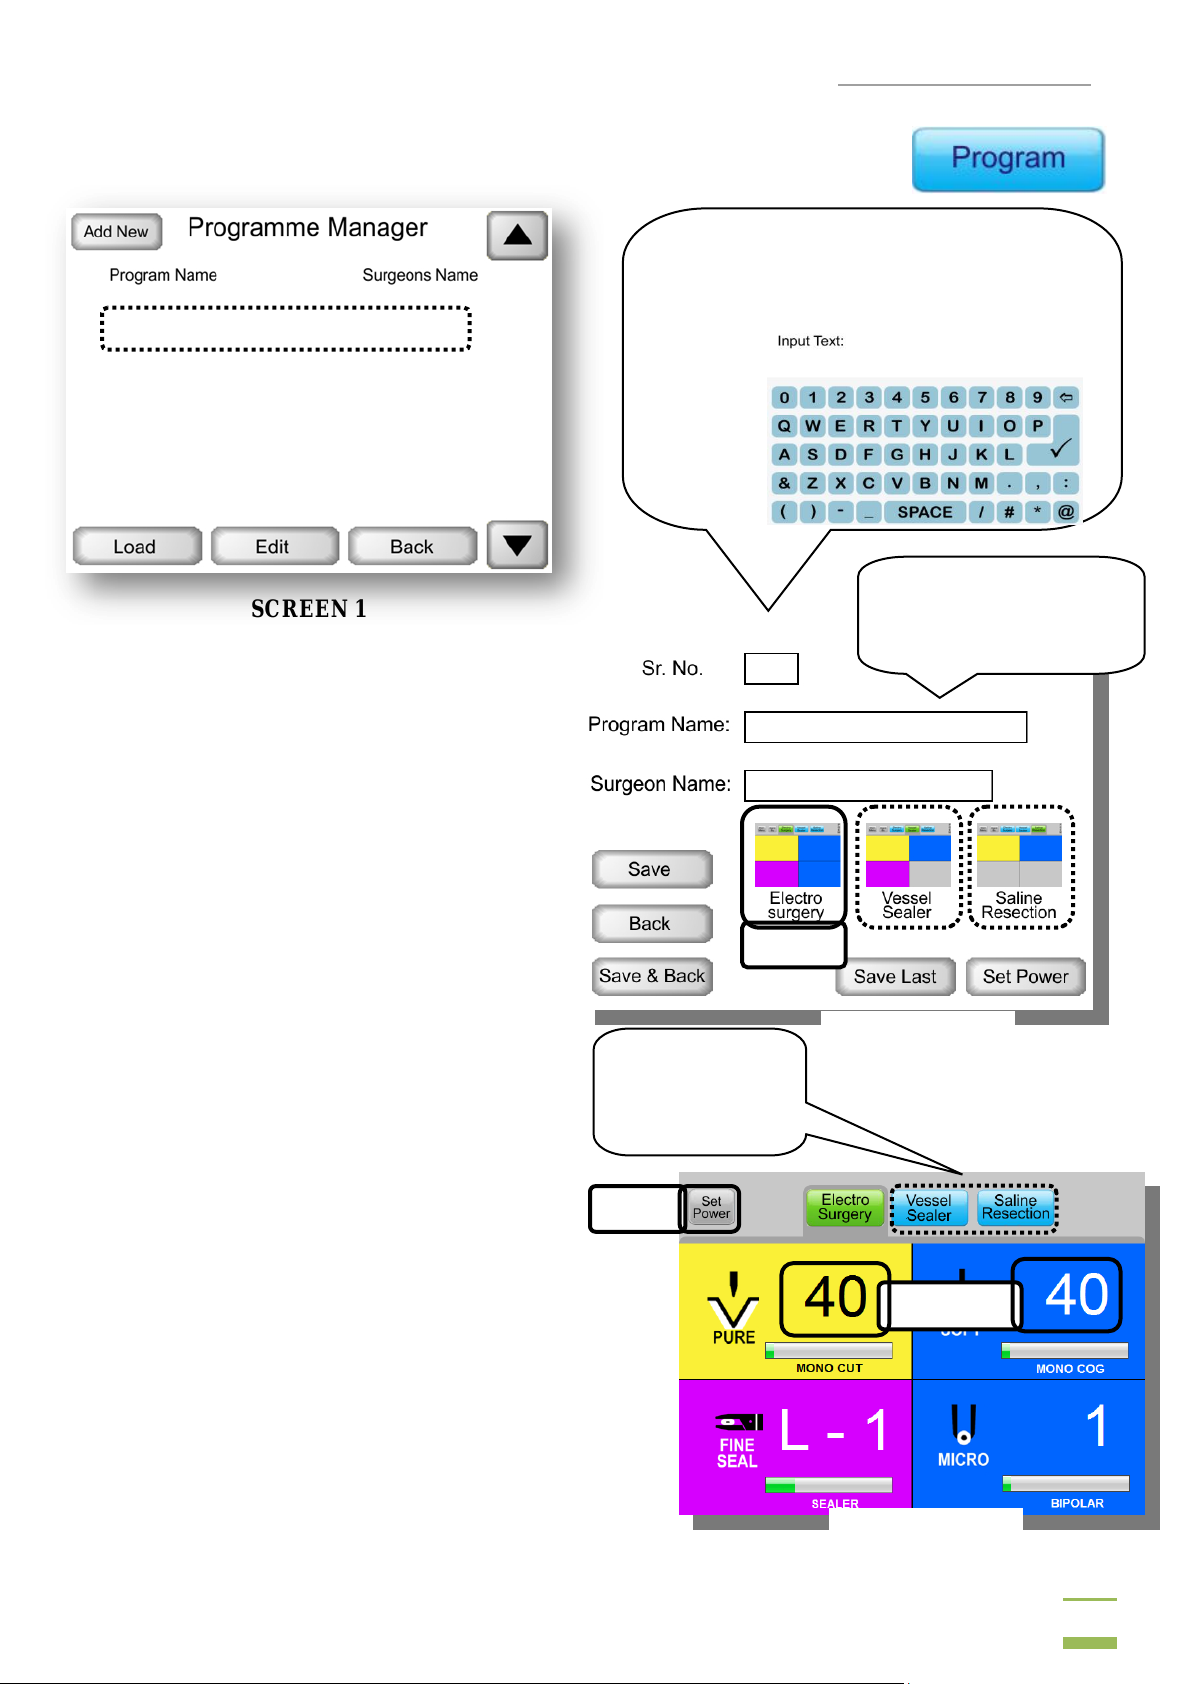
F. Programming The Generator
SCREEN 1
Program function gives facility to edit,
load & store custom user programs.
User can load any program just by
touching on its name and by pressing
„Load‟ button.
Use up/down arrow keys to scroll
through programs.
New Program can be added by touching
„Add New‟ tab on the screen. After
pressing, screen 2 will be displayed on
the screen.
To add new program follow the steps
below.
Follow the same procedure for editing
preset programs. Select program and
press „Edit‟.
STEP1:- Enter Program name, surgeon name.
Choose desired surgical mode from
Electrosurgery, Vesseal Sealer or Saline
Resection & Press Set Power tab (see
SCREEN2).
STEP2:- Now, Enter desired mode & set
appropriate power. User can set power for
mult iple surgical procedures & surgical modes
as shown in the SCREEN3.
STEP3:-Once the power and procedures &
modes are selected press „Set Power‟ tab
(SCREEN3).
STEP4:-Once done press „ S a v e & Back‟.
(SCREEN2).
Note: “How to select power?” refer the guide.
Enter name of
surgical-procedure for
which setting is to be
stored.

USER GUIDE | EAGLE TWO+
22
Versi on : 3. 3
Stand By
Pressing will disable any inputs to and outputs from the generator. Generator will not
respond to any sort of activation in standby mode.
User can exit standby mode anytime by pressing ; entering and exiting the mode will
not affect any user settings.
USER GUIDE | EAGLE TWO+
23
ATTENTION Refer accompanying documents
SHOCK To reduce the risk of electric shock: Do not remove the cover.
For servicing consult qualified service personnel.
Maximum allowable leakage current limit is as per established standard; EAGLE TWO
+provides a high degree of protection against electric shock. Instrument can be used for
cardiac procedures due to type CF isolated (floating) output.
Versi on : 3. 3
CHAPTER 4
Technical Specifications
A. GENERAL SPECIFICATIONS
General Output Configuration: Isolated output with cardiac defibrillator protection.
Duty Cycle of Operation: At maximum rated load conditions, pure cut-400 watt setting at 300 Ω s,
The system is suitable for activation time of 10 seconds ON, 30 seconds OFF for one hour.
Cooling: Forced: By temperature controlled fan airflow towards bottom.
Natural by Convection: By side and rear panel vents.
Display: 5.7” 480x320 LCD-Touch Screen Display
Standards and IEC Classifications
FLOATING The generator output is floating (isolated) with respect to ground.
DANGER Explosion risk if used with flammable anesthetics.
Class I Equipment (IEC 60601-1)
Accessible conductive parts are connected to the protective earth conductor the way which they can‟t
become live in the event of a basic insulation failure.
Type CF Equipment (IEC 60601-1)
Drip Proof (IEC 60601-2-2)
The EAGLE TWO+enclosure is so constructed that liquid spillage in normal use does not wet electrical
insulation or other components which, when wet, are likely to affect adversely to the safety of the
generator.
IP Class Specification
IP Class of this equipment is rated at IP20 as per IEC Standard 60529.
Electromagnetic Interference (IEC 60601-1-2)
When proper mains are connected, generator operates without interference. The generator minimizes
electromagnetic interference to video equipment used in the operating room.

USER GUIDE | EAGLE TWO+
24
Versi on : 3. 3
Caution Do not stack equipment upon EAGLE TWO+or place the generator on top of other
electrical equipment. This configuration does not allow proper cooling. Caution Do not place any
chemical or solution in operating room, may spoil safety of electronic circuit by liquid spillage.
Electromagnetic compatibility (IEC 60601-1-2)
The Shalya fulfills the specifications regarding electromagnetic compatibility.
Voltage Transients (Emergency Generator Mains Transfer)
The EAGLE TWO+operates in a safe manner when the transfer is made between line AC and an
emergency generator voltage source.
Defibrillator Proof
The EAGLE TWO+meets specifications for “defibrillator proof” design.
Dimensions and Weight
Length: 42.5 cm
Width: 35.5 cm
Height: 15.5 cm
Weight: < 7.5 kg
Transport and Storage
Temperature range: - 40° to 70°C
Relative humidity: 10% to 100%, condensing.
Operating Parameters
Temperature range: 10°C to 40°C
Relative humidity: 30% to 75%, noncondensing.
Warm-up time
Allow one hour for the generator to reach room temperature before use, if transported or stored
at temperature outside the operating temperature range.
Internal Memory
EEPROM store all the user data & settings.
Audio Volume
Activation Tone: Volume (adjustable): 40 to 65 dB
Frequency: Bipolar/Sealer: 455Hz
Cut: 580Hz
Coag: 865Hz
Alarm Tone: Volume (not adjustable): 65 dB
Frequency: 865Hz
Pulse: Two 800msec.coag tone separated by 800msec.of silence
PREM Contact Quality Monitor
o Measurement frequency: 80 kHz 10 kHz
o Measurement current: <10µA
o Acceptable Resistance Range upto 40%

USER GUIDE | EAGLE TWO+
25
Mains nominal voltage:
230 V
110 V
Mains current (maximum):
Maximum VA at nominal line voltage:
6A
10A
Versi on : 3. 3
o Dual Area PREM return electrode: 5 to 135 Ω s
o Single Area Patient return electrode: 0 to 10 Ω s
Low Frequency (50 - 60 Hz) Leakage Current:
o Source current, patient leads, all outputs:
o Normal polarity, intact ground: <10µA
o Normal polarity, ground open: <50 µA
o Reverse polarity, ground open: <50µA
o Enclosure source current, ground open: <300µA
High Frequency (RF) Leakage Current
o Monopolar (RF) leakage current: < 150 mA RMS
o Bipolar RF leakage current: < 60 mA RMS
Input Power
Input mains voltage, full regulation range: 210-260 Vac 104-132 Vac
Input mains voltage, operating range: 180-260 Vac 85-135Vac
Idle: 0.2 A Idle: 0.4 A
Cut: 3.5 A Cut: 6 A
Bipolar: 1.4 A Bipolar :3.2 A
Coag: 1.9 A Coag: 5A
Idle: 60 VA Idle: 60 VA
Cut:920 VA Cut:810 VA
Bipolar: 390 VA Bipolar: 432 VA
Coag: 520 VA Coag: 675 VA
Mains line frequency range (nominal): 50 to 60 Hz 50 to 60 Hz
Fusing:
B. AVAILABLE POWER SETTINGS (in Watts)
Bipolar (All modes):
1 to 40 by step of 1, 40 to 70 by step of 5 ,100 to 120 by step of 10
Monopolar Cut: Pure / Endo-1/Endo-2/Hydro
1 to 40 by step of 1, 40 to 100 by step of 5, 100 to 400 by step of 10.
Monopolar Cut: Low
1 to 40 by step of 1, 40 to 100 by step of 5, 100 to 300 by step of 10.
Monopolar Cut: Blend 1
1 to 40 by step of 1, 40 to 100 by step of 5, 100 to 250 by step of 10.
Monopolar Cut: Blend 2
1 to 40 by step of 1, 40 to 100 by step of 5, 100 to 200 by step of 10.
Monopolar Coag: Soft
1 to 40 by step of 1, 40 to 100 by step of 5, 100 to 300 by step of 10.
Monopolar Coag: Desiccate
1 to 40 by step of 1, 40 to 100 by step of 5, 100 to 200 by step of 10.

USER GUIDE | EAGLE TWO+
26
1300
1700
2000
2300
1700
1700
1700
300 Ω
300 Ω
300 Ω
300 Ω
300 Ω
300 Ω
300 Ω
300
400
250
200
400
400
400
1.5
1.5
2
2.6
1.5
1.5
1.5
1300
4000
4500
4900
5200
6000
4900
300 Ω
500 Ω
500 Ω
500 Ω
500 Ω
500 Ω
500 Ω
300
200
120
120
120
70
120
1.5
5.0
6.2
7.0
8.0
10.0
7.0
Micro
Standard
Fo r c e
380
560
700
100 Ω
100 Ω
100 Ω
120
120
120
1.5
1.5
1.5
Bipolar Cut
Mode
Open Circuit
P-P Voltage
(in Volts)
Rated Load
(max)
Power (max)
(in Watts)
Crest Factor -
(Load)
Versi on : 3. 3
Monopolar Coag: Swift/Fulgar/Spray/Hydro
1 to 40 by step of 1, 40 to 100 by step of 5, 100 to 120 by step of 10.
Monopolar Coag: Hi-Spray
1 to 40 by step of 1, 40 to 70 by step of
Sealer:
Vesseal Sealer: Fine /Rapid
L1-80W
L2-100W
L3-120W
L4-135W
L5-150W
Saline Resection: Cut I/ Cut II/ Cut III
1 to 40 by step of 1, 40 to 100 by step of 5, 100 to 300 by step of 10.
Saline Resection: Soft/Standard/Force
1 to 40 by step of 1, 40 to 100 by step of 5, 100 to 200 by step of 10.
C. OUTPUT CHARACTERISTICS
Maximum Output for Bipolar and Monopolar Modes
Power readouts agree with actual power into rated load to within 20%or 10watts, whichever is greater.
Monopolar Cut Load-300 Ω
Low
Pure
Blend 1
Blend 2
Endo 1
Endo 2
Hydro
Monopolar Coag Load-500 Ω
Soft
Desiccate
Swift
Fulgurate
Spray
Hi-Spray
Hydro
Bipolar Coag Load-100 Ω

USER GUIDE | EAGLE TWO+
27
Macro
120
1.5
Bicut
120
1.5
Micro Seal
Standard Seal
560
560
100 Ω
100 Ω
150
150
1.5
1.5
Load-100 Ω
900
1020
1160
100 Ω
100 Ω
100 Ω
300
300
300
1.5
1.5
1.5
430
500
580
100 Ω
100 Ω
100 Ω
200
200
200
1.5
1.5
1.5
Bipolar
Micro
Standard
Fo r c e
Macro
Bicut
440 kHz sinusoidal
440 kHz sinusoidal
440 kHz sinusoidal
440 kHz sinusoidal
440 kHz sinusoidal
Monopolar Cut
Low
Pure Cut
Blend-1
Blend-2
Endo-1
Endo-2
Hydro Cut
Soft
Desiccate
Swift
Fulgurate
Spray
Hi-Spray
Hydro Coag
390 kHz Sinusoidal wave.
460 kHz damped sinusoid recurring at 62kHz.
460 kHz damped sinusoid recurring at 42kHz.
460 kHz damped sinusoid recurring at 34kHz.
460 kHz damped sinusoid recurring at 24kHz.
460 kHz damped sinusoid recurring at 13kHz.
460 kHz damped sinusoid recurring at 34kHz.
Versi on : 3. 3
700 100 Ω
700 100 Ω
Sealer Load-10 Ω
Saline Resection
Saline Cut
CutI
CutII
CutIII
Saline Coag
Soft
Standard
Fo r c e
*Crest facture measured at load mentioned above at half power condition.
*Crest factor is an indication of a waveform‟s ability to coagulate bleeders without a cutting effect.
Maximum Output for Ultrasonic Electrosurgery Module (UEM)
Precise Cut and Desiccate Coag are the only Mono. Modes available to a connected UEM hand piece.
D. OUTPUT FREQUENCIES
6SENSE Technology, an automatic adjustment, is applied to all bipolar modes and all cut modes. It is
not applied to the Coag modes because of their non-contact capabilities.
390 kHz sinusoid. Maximum voltage is limited to a lower value.
390 kHz sinusoid.
390 kHz bursts of sinusoid, recurring at 29 kHz intervals. 50% duty cycle
390 kHz bursts of sinusoid, recurring at 29 kHz intervals. 50% duty cycle
390 kHz sinusoid. Pulse interval controlled depends on tissue feedback
390 kHz sinusoidal. Pulse interval time slightly greater than Endo-1
390 kHz sinusoidal
Monopolar Coag

USER GUIDE | EAGLE TWO+
28
Sealer
Fine Seal
Rapid Seal
Saline Cut I
Saline Cut II
Saline Cut II
440 kHz sinusoidal
440 kHz sinusoidal
440 kHz sinusoidal
Versi on : 3. 3
440 kHz sinusoidal
440 kHz sinusoidal
Saline Resection
390 kHz sinusoidal
390 kHz sinusoidal
390 kHz sinusoidal
Saline Soft Coag
Saline Standard Coag
Saline Force Coag
E. AREA OF APPLICATION
Applications of ESU / Diathermy Section:
o Gynecology
o Urology (Resection)
o Laparoscopic Surgeries.
o Endoscopy (ERCP)
o Oncosurgery
o Heart & Chest surgery, CABG
o Neurosurgery, Spine
o Arthroscopy
o All other general surgical procedures.
Applications of Vessel Sealing System Section:
o Lap-Assisted Vaginal Hysterectomy (LAVH)
o Vaginal Hysterectomy
o Gastrectomy
o Gastric Bypass
o Appendectomy
o Colectomy
o Nephrectomy
o Nissen Fundoplication
o Colon Resection
o Cystectomy
o Radical Hysterectomy
o Liver Resection
o Adenalectomy
o Splenectomy
o Salpingo-oophorectomy
o Radical Prostatectomy
o Abdominal Hysterectomy
o Hemorhoidectomy
Applications of Saline Plasma Bipolar Resection Section:
o Urology- Bipolar Saline Resection
o Gynecology- Bipolar Saline TCRE
o Arthroscopy
USER GUIDE | EAGLE TWO+
29
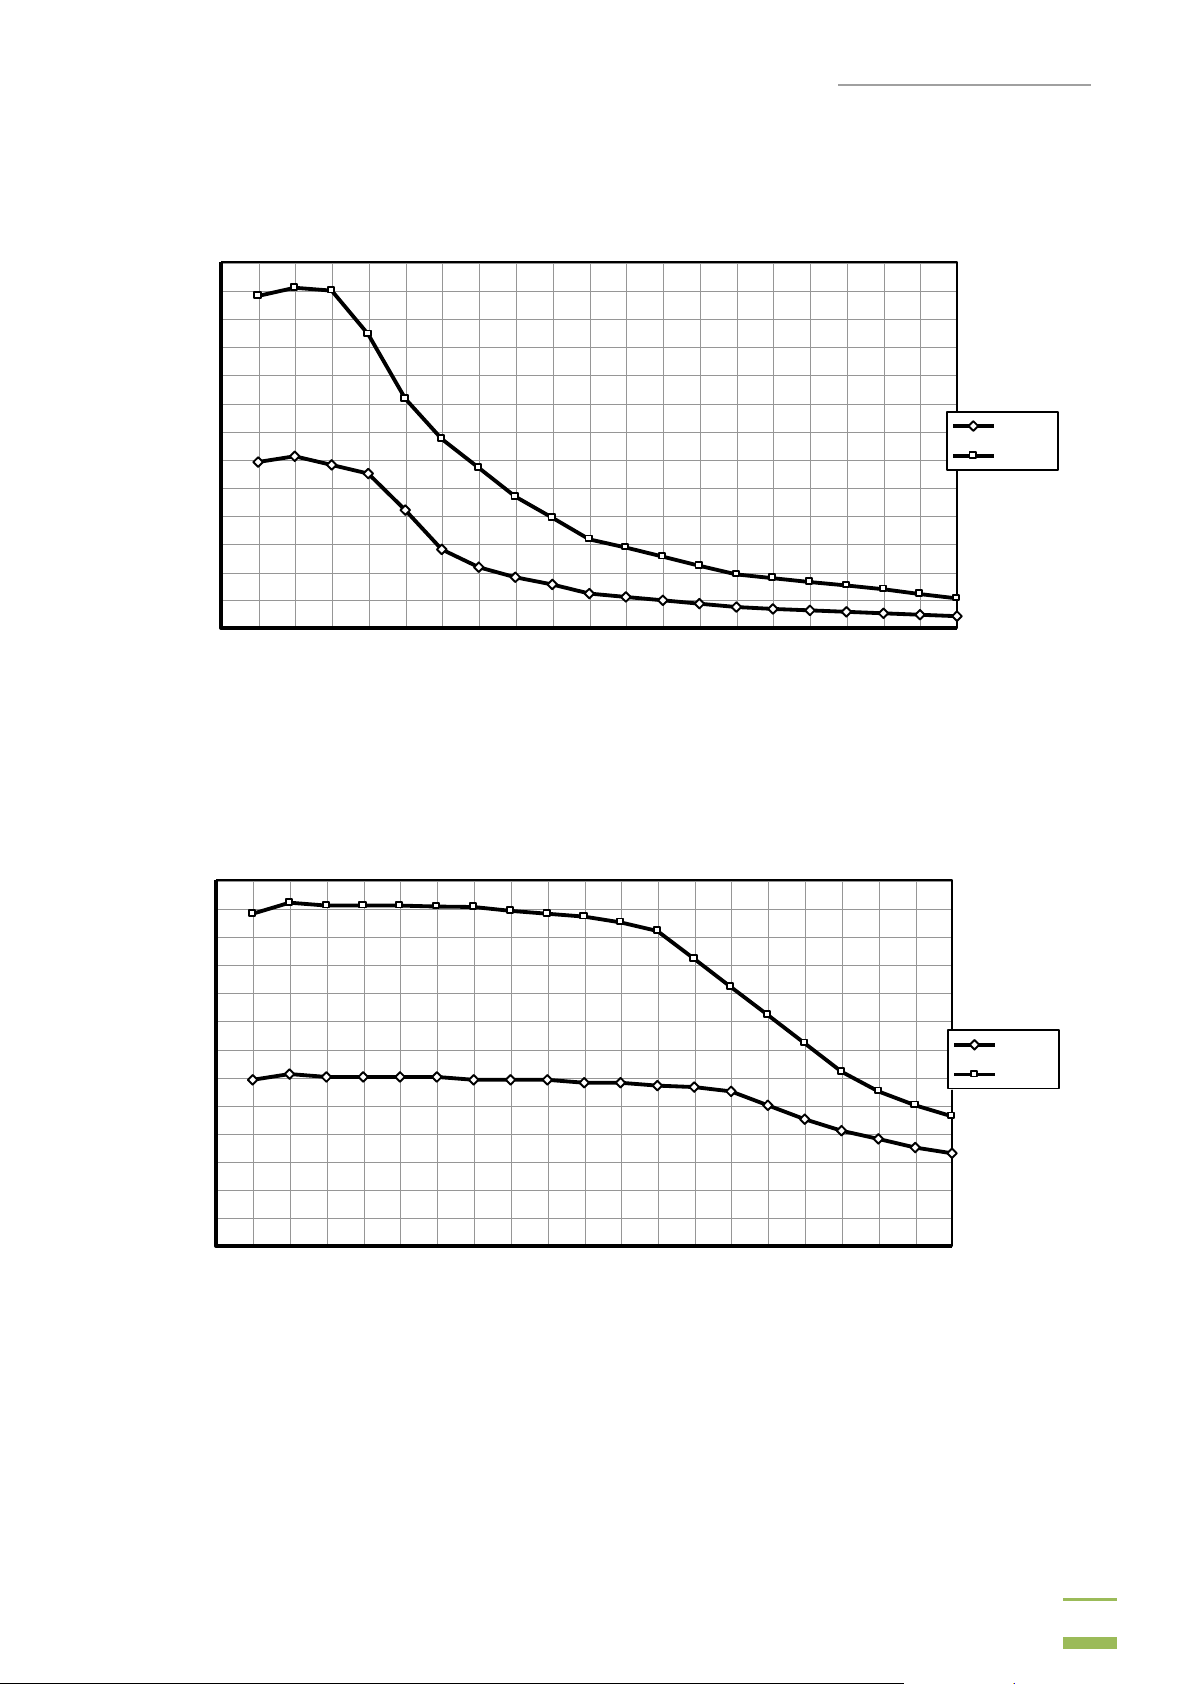
Bip ola r M icro M o d e
0
10
20
30
40
50
60
70
80
90
100
110
120
130
0
50
100
150
200
250
300
350
400
450
500
550
600
650
700
750
800
850
900
950
1000
Lo a d R e sis tance ( o h m s )
O u tp ut P o w e r ( w a tts )
60W
120W
Bip ola r M a cro M ode
0
10
20
30
40
50
60
70
80
90
100
110
120
130
0
50
100
150
200
250
300
350
400
450
500
550
600
650
700
750
800
850
900
950
1000
Lo a d R e sis tance ( o h m s )
O u tp ut P o w e r ( w atts )
60W
120W
Versi on : 3. 3
F. OUTPUT POWER VS. LOAD GRAPHS
 Loading...