

White-Westinghouse WWTR1802KW5, WWTR1802KW4, WWTR1802KW3, WWTR1802KW2, WWTR1802KW1 Owner’s Manual
...Page 1
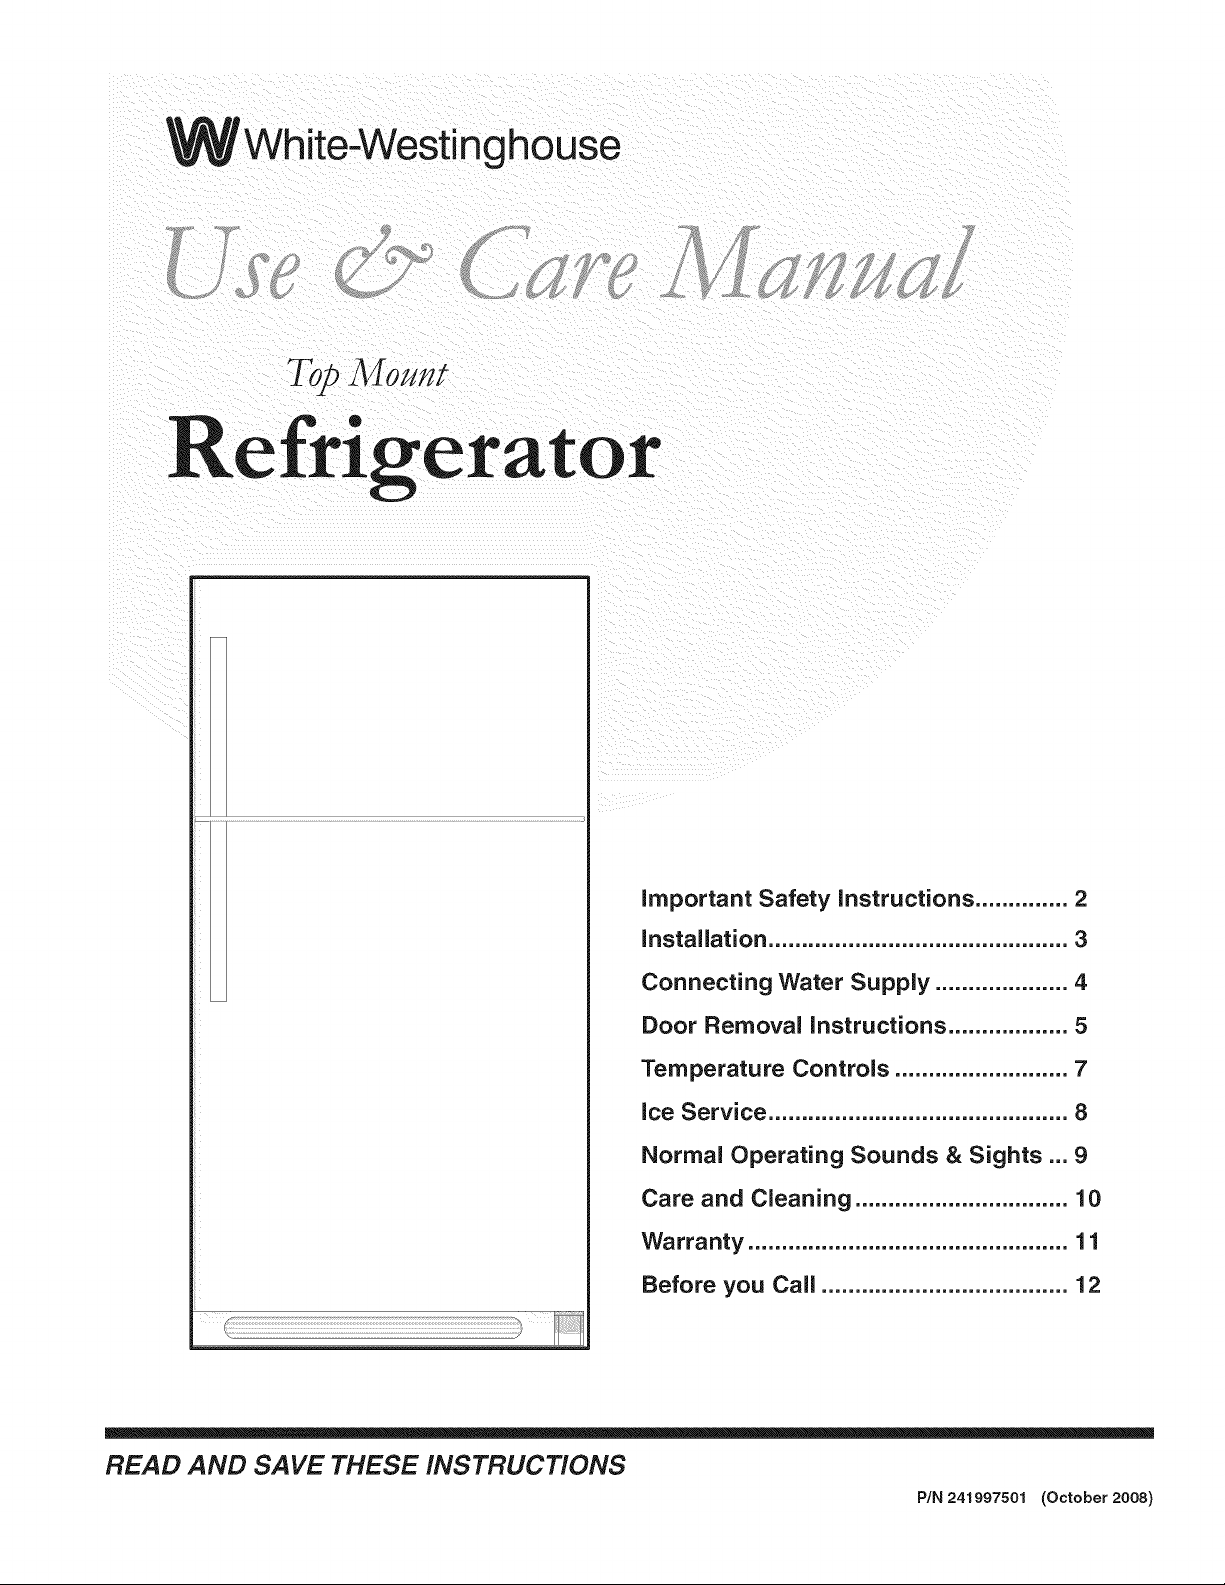
jWhite-Westinghouse
Top Mo#Ht
READ AND SAVE THESE INSTRUCTIONS
important Safety instructions .............. 2
installation ............................................. 3
Connecting Water Supply .................... 4
Door Removal instructions .................. 5
Temperature Controls .......................... 7
ice Service ............................................. 8
Normal Operating Sounds & Sights ... 9
Care and Cleaning ................................ 10
Warranty ................................................ 11
Before you Call ..................................... 12
PIN 241997501 (October 2008)
Page 2

IMPORTANT SAFETY INSTRUCTIONS
Safety Precautions
Do not attempt to install or operate your unit until you have read
the safety precautions in this manual. Safety items throughout
this manual are labeled with a Danger, Warning or Caution
based on the risk type.
Definitions
iS
po_eThis safety symbol Is to you to
ntlal personal injury hazards Obey all safety messages that
follow this symbol to avoid possible injury or death.
DANGER indicates an imminently hazardous situation
which, if not avoided, will result in death or serious injury.
the alert It used alert
DANGER
WARNING
WARNING indicates a potentially hazardous situation
which, if not avoided, could result in death or serious
injury.
CAUTION
CAUTION indicates a potentially hazardous situation
which, if not avoided, may result in minor or moderate
injury.
IMPORTANT
indicated installat=on,operation or maintenance information
which is important but not hazard-related.
_J WARNING
Please read all instructions before using this refrigerator.
FOR YOUR SAFETY
• Do not store or use gasoline, or other flammable liquids
in the vicinity of this or any other appliance. Read product
labels for warnings regarding flammability and other
hazards.
• Do not operate the refrigerator in the presense of explosive
fumes.
• Avoid contact with any moving parts of automatic ice
maker.
• Remove all staples from the carton. Staples can cause
severe cuts, and also destroy finishes if they come in
contact with other appliances or furniture.
CHILD SAFETY
Destroy or recycle the carton, plastic bags, and any exterior
wrapping material tmmedtately after the refrigerator is
unpacked. Chddren should NEVER use these items to play.
Cartons covered wtth rugs, bedspreads, plasttc sheets or
stretch wrap may become atrttght chambers, and can qutckly
cause suffocatton.
_J WARNING
These Guidelines Must Be Followed To Ensure That
Safety Mechanisms in This Refrigerator Will Operate
Properly.
ELECTRICAL INFORMATION
, The refngerator must be plugged Into Its own
dedicated 115 Volt, 60 Hz., 15 Amp, AC only electrical
outlet. The power cord of the apphance is equipped wtth
a three-prong grounding plug for your protectton against
electncal shock hazards. It must be plugged directly Into a
properly grounded three prong receptacle. The receptacle
must be installed in accordance wtth local codes and
ordinances. Consult a quahfled electrlctan. Avotd
connecttng refngerator to a Ground Fault Interrupter (GFI)
ctrcult. Do not use an extenston cord or adapter plug.
- If the power cord is damaged, it should be replaced by an
authonzed service technlctan to prevent any risk.
- Never unplug the refrigerator by pulhng on the power
cord. Always grtp the plug firmly, and pull stratght out
from the receptacle to prevent damaging the power cord.
- Unplug the refrigerator before cleantng and before
replactng a hght bulb to avotd electrical shock.
- Performance may be affected if the voltage varies by
10% or more. Operating the refrigerator wtth insuffictent
power can damage the compressor. Such damage is
not covered under your warranty.
• Do not plug the unit into an electrtcal outlet controlled by a
wall swttch or pull cord to prevent the refrigerator from
betng turned off acctdentally.
PROPER DISPOSAL OF YOUR REFRIGERATOR OR
FREEZER
Risk of child entrapment
Chdd entrapment and suffocatton
are not problems of the
past. Junked or abondoned
refrigerators or freezers are sttll
dangerous - even if they wtll stt
for "JUSt a few days." If you are
getttng rid of your old refrigerator
or freezer, please follow the
tnstructtonsbelow to help prevent
acctdents.
Before you throw away your old refrigerator/freezer:
• Remove doors.
• Leave shelves in place so children may not eastly chmb
tnstde.
• Have refrigerant removed by a quahfled service
techn_ctan.
2
Page 3
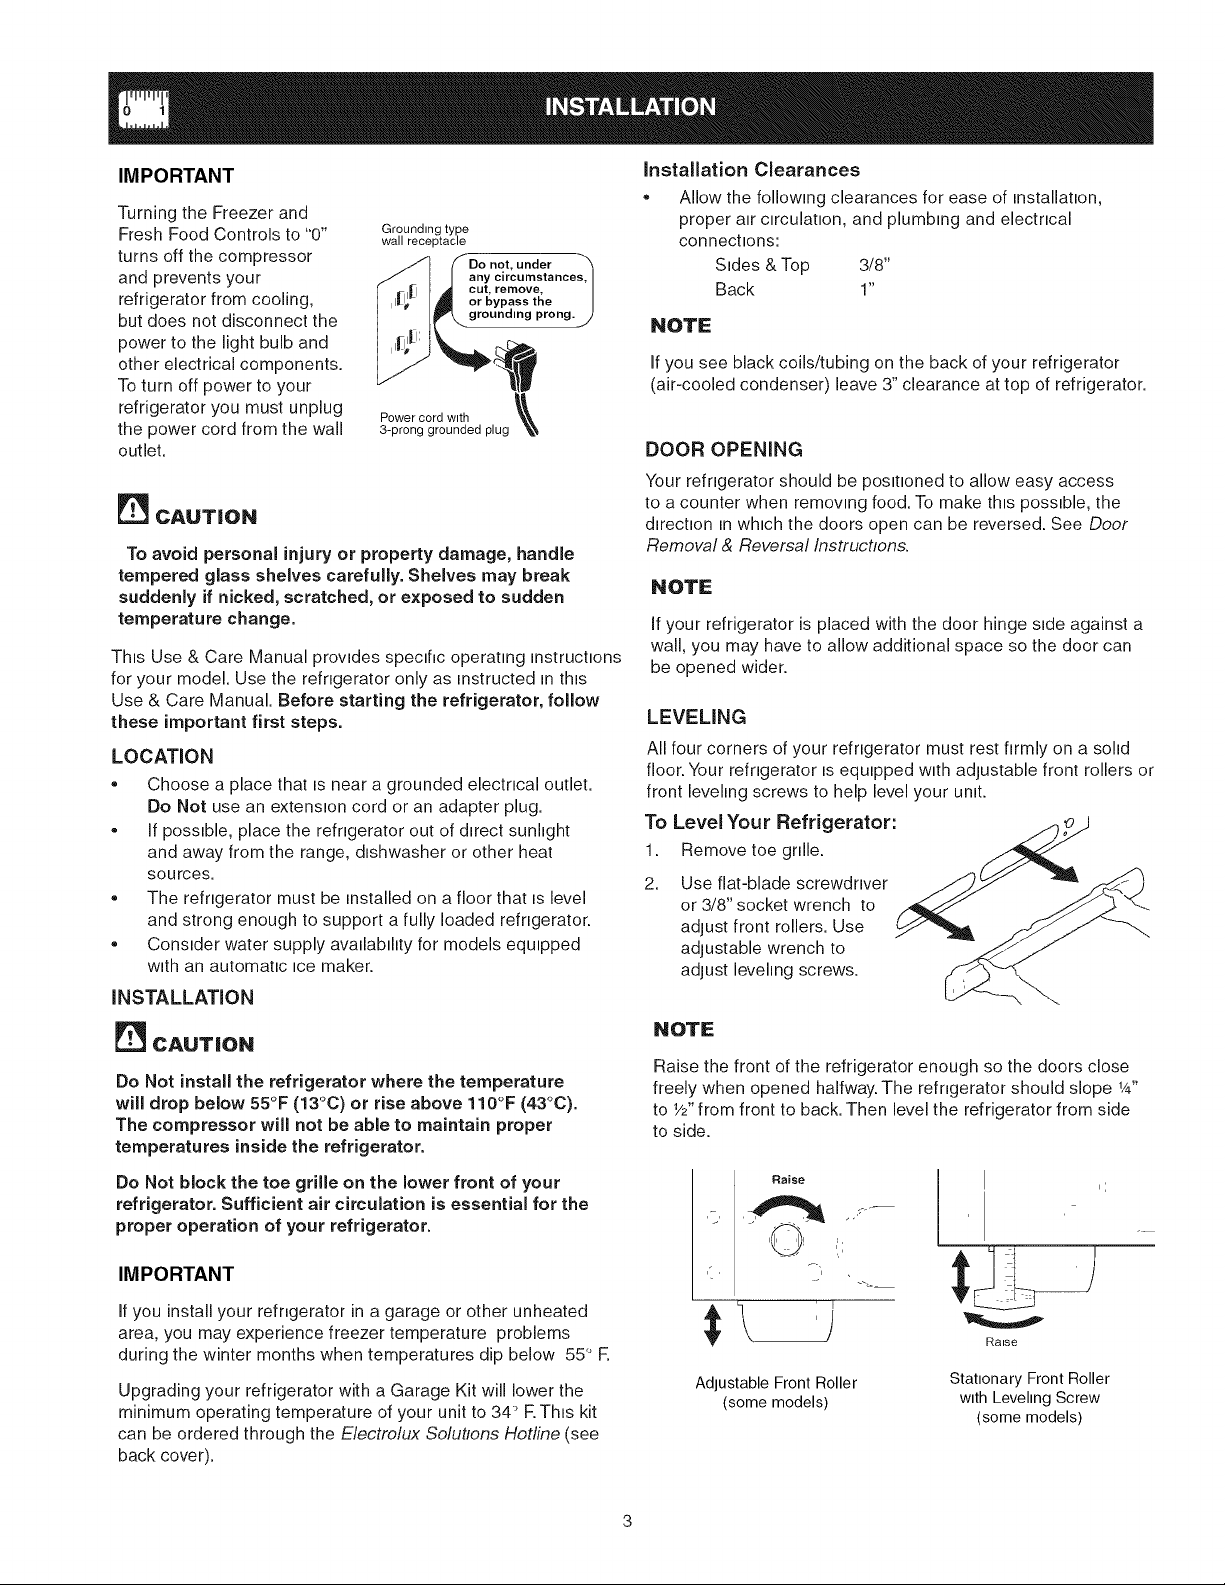
IMPORTANT
Turning the Freezer and
Fresh Food Controls to "0"
turns off the compressor
and prevents your
refrigerator from cooling,
but does not disconnect the
power to the light bulb and
other electrical components.
To turn off power to your
refrigerator you must unplug
the power cord from the wall
outlet.
Grounding type
wall receptacle
Do not, under -'_
any circumstances, I
cut, remove, I
or bypass the |
_. grounding prong, j
Power cord with
3-prong grounded plug
[_J CAUT|ON
To avoid personal injury or property damage, handle
tempered glass shelves carefully. Shelves may break
suddenly if nicked, scratched, or exposed to sudden
temperature change.
This Use & Care Manual provides specific operating instructions
for your model. Use the refrigerator only as instructed inthis
Use & Care Manual. Before starting the refrigerator, follow
these important first steps.
LOCATION
= Choose a place that is near a grounded electrical outlet.
Do Not use an extension cord or an adapter plug.
• If possible, place the refrigerator out of direct sunlight
and away from the range, dishwasher or other heat
sources,
• The refrigerator must be installed on a floor that is level
and strong enough to support a fully loaded refrigerator.
• Consider water supply availability for models equipped
w_th an automatic _cemaker.
INSTALLATION
_J CAUT|ON
Do Not install the refrigerator where the temperature
will drop below 55°F (13°C) or rise above 110°F (43°C).
The compressor will not be able to maintain proper
temperatures inside the refrigerator.
Do Not block the toe grille on the lower front of your
refrigerator. Sufficient air circulation is essential for the
proper operation of your refrigerator.
IMPORTANT
installation Clearances
,, Allow the following clearances for ease of installation,
proper air circulation, and plumbing and electrical
connections:
Sides & Top 3/8"
Back 1"
NOTE
If you see black coils!tubing on the back of your refrigerator
(air-cooled condenser) leave 3" clearance at top of refrigerator.
DOOR OPENING
Your refrigerator should be positioned to allow easy access
to a counter when removing food. To make this possible, the
d,rectlon in which the doors open can be reversed. See Door
Removal & Reversal InstrLlctlons.
NOTE
if your refrigerator is placed with the door hinge side against a
wall, you may have to allow additional space so the door can
be opened wider.
LEVELING
All four corners of your refrigerator must rest firmly on a solid
floor. Your refrigerator is equipped with adjustable front rollers or
front leveling screws to help level your un,t.
To Level Your Refrigerator:
1. Remove toe grille.
2. Use fiat-blade screwdriver
or 3/8" socket wrench to
adjust front rollers. Use
adjustable wrench to
adjust leveling screws.
NOTE
Raise the front of the refrigerator enough so the doors close
freely when opened halfway, The refngerator should slope W'
to Y2"from front to back, Then level the refrigerator from side
to side,
Raise
l
r.
"l
if you install your refrigerator in a garage or other unheated
area, you may experience freezer temperature problems
during the winter months when temperatures dip below 55 ° R
Upgrading your refrigerator with a Garage Kit will lower the
minimum operating temperature of your unit to 34" R This kit
can be ordered through the Electrolux Solutions Hotline (see
back cover).
Adlustable Front Roller
(some models)
Raise
Stationary Front Roller
with Leveling Screw
(some models)
Page 4
_ WARNING
To avoid electric shock, which can cause death or severe
personal injury, disconnect the refrigerator from electrical
power before connecting a water supply line to the
refrigerator.
_ CAUTION
To Avoid Property Damage:
• Copper tubing is recommended for the water supply
line=Water supply tubing made of %" plastic is not
recommended since it greatly increases the potential
for water leaks. Manufacturer will not be responsible
for any damage if plastic tubing is used for supply
line.
= DO NOT install water supply tubing in areas where
temperatures fall below freezing.
• Chemicals from a malfunctioning softener can
damage the ice maker. If the ice maker is connected
to soft water, ensure that the softener is maintained
and working properly.
IMPORTANT
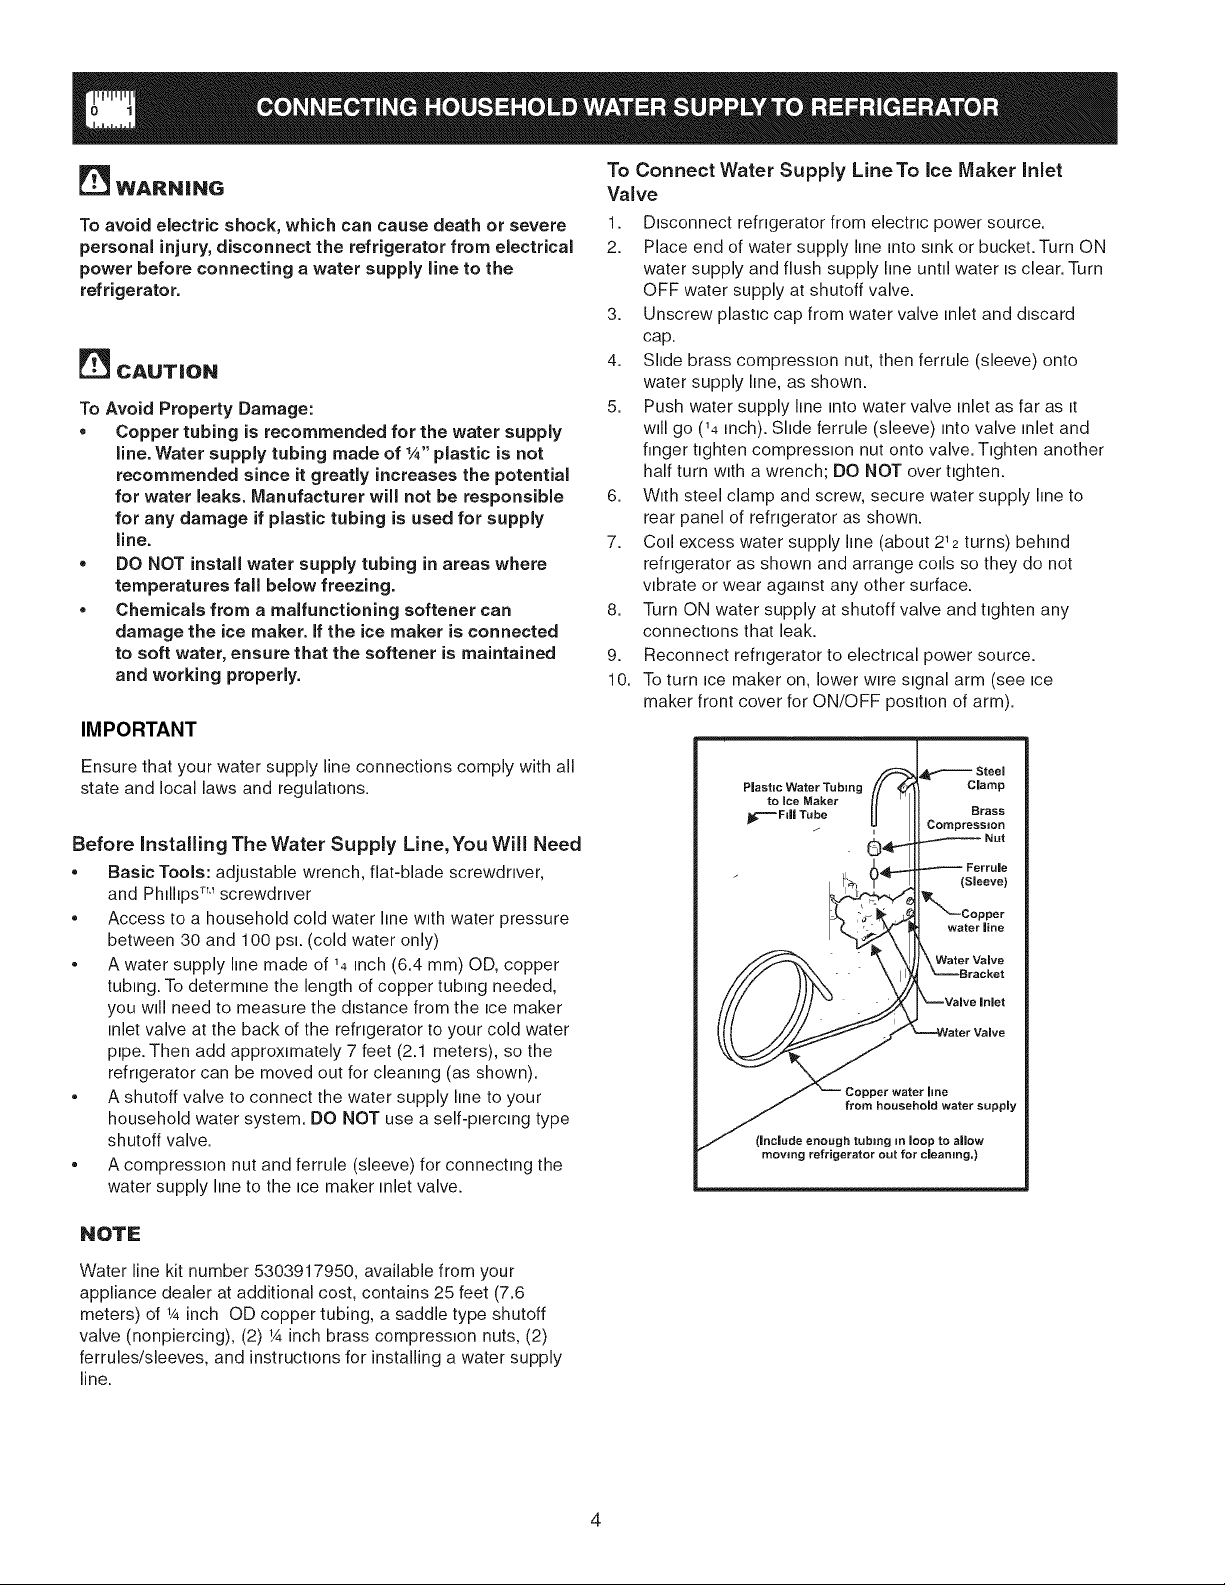
To Connect Water Supply LineTo ice Maker inlet
Valve
1. Disconnect refrigerator from electric power source.
2. Place end of water supply line into sink or bucket. Turn ON
water supply and flush supply line until water is clear. Turn
OFF water supply at shutoff valve.
3. Unscrew plastic cap from water valve inlet and discard
cap.
4. Slide brass compression nut, then ferrule (sleeve) onto
water supply line, as shown.
5. Push water supply line into water valve inlet as far as it
will go (14 inch). Shde ferrule (sleeve) Into valve inlet and
finger tighten compression nut onto valve. Tighten another
half turn with a wrench; DO NOT over tighten.
6. With steel clamp and screw, secure water supply line to
rear panel of refrigerator as shown.
7. Coil excess water supply line (about 212turns) behind
refrigerator as shown and arrange coils so they do not
vibrate or wear against any other surface.
8. Turn ON water supply at shutoff valve and tighten any
connections that leak.
9. Reconnect refrigerator to electrical power source.
10. To turn ice maker on, lower wire signal arm (see ice
maker front cover for ON/OFF posihon of arm).
Ensure that your water supply line connections comply with all
state and local laws and regulations.
Before Installing The Water Supply Line, You Will Need
• Basic Tools: adjustable wrench, fiat-blade screwdriver,
and Phillips TM screwdriver
• Access to a household cold water line with water pressure
between 30 and 100 psi. (cold water only)
• A water supply line made of 14inch (6.4 ram) OD, copper
tubing. To determine the length of copper tubing needed,
you will need to measure the distance from the ice maker
inlet valve at the back of the refrigerator to your cold water
pipe. Then add approximately 7 feet (2.1 meters), so the
refrigerator can be moved out for cleaning (as shown).
• A shutoff valve to connect the water supply line to your
household water system. DO NOT use a self-piercing type
shutoff valve.
• A compression nut and ferrule (sleeve) for connechng the
water supply hne to the ice maker Inlet valve.
NOTE
Water line kit number 5303917950, available from your
appliance dealer at additional cost, contains 25 feet (7.6
meters) of 1/4inch OD copper tubing, a saddle type shutoff
valve (nonpiercing), (2) !/4inch brass compression nuts, (2)
ferrules!sleeves, and instruchons for installing a water supply
line.
Plastic Water Tubing
to lee Maker
Jk_====F=fl Tube
" Water Valve
- _=-==_Bracket
" _' ,-Water Valve
/ _ Copper water line
/ (Include enough tubing in loop to allow
moving refrigerator out for cleanung,)
from household water supply
Compression
_'--Copper
water line
=Valve Inlet
Steel
Clamp
Braes
(Sleeve)
4
Page 5

'\\
\
,%'rencr', I
DOOR REMOVAL AND REVERSAL INSTRUCTIONS:
I
\,
Phers L
\
_"_" Top H=nge
""_'-"-_-_ Cover
11
Door Stop
H,nge Hole
//Plug
Door Stop
Screw
Top Hinge
,Ira :/ Hinge
/ Pm
_'//Center
Washer
_// Hinge
_Pin
_ ottom
Screws
Door
Washer
Screws
Hole
Plugs
J
Door
Hinge
Toe Grille
NOTE
The direct=on in which your refrigerator doors open (door swing) can be
reversed, from left to right or right to left, by moving the door hinges from one
side to the other. Reversing the door swing should be performed by a qualified
person.
IMPORTANT
Before you beg_n, turn the refrigerator temperature control to "0" and remove
the electrical power cord from the wall outlet. Remove any food from door
shelves.
1. Remove toe grille.
2. Remove top hinge cover. Trace around the htnge with a soft lead pencil.
This makes remstallation easier. Remove top hinge and lift door off center
hinge pin. Set door aside.
3. Unscrew center hinge pin using adjustable wrench and save for
reassembly. Ensure plastic washer stays on hinge pin.
4. Lift refrigerator door off of bottom hinge and set aside.
5. Remove center hinge and shtm by removing inside screw and
loosening two outside screws enough to allow hinge and shim to slide out.
Ttghten screws.
6. Loosen two outside screws on opposite side of refrigerator, remove tnside
screw and install center htnge.
7. Remove two screws on bottom hinge with 3/8" socket wrench.
8. Install bottom hinge on opposite side with the two screws removed from
step 7.
9. Unscrew bottom hinge pin usmg adjustable wrench. Move hinge pin to
other hole tn hinge and tighten with adjustable wrench.
10. Reverse door handles (see mstructions on next page).
11. Move freezer and refrtgerator door stops to opposite side. Before starting
screws, use an awl to puncture the foam.
12. Posttton refrigerator door onto bottom hmge ptn and screw center hinge pm
through center hinge tnto top of door. Close refrigerator door to help ahgn
hinge hole.
13. Ttghten center hinge pin with adjustable wrench.
14. Remove cabinet and hmge hole plugs and move to opposite side.
15. Lower freezer door onto center hinge pin.
16. Close freezer door. Have an assistant lift up on opposite side of door while
tightening screws to tnstall top hinge.
17. Flip toe grille and retnstall.
18. Plug in electrical power cord and turn refrigerator temperature control to
center position. Adjust setting as necessary.
Page 6

TO REMOVE FREEZER HANDLE:
(Handles may be easier to reverse while doors are off.)
1. Remove two screws attaching handle to bottom of freezer
door.
2. Swing bottom of handle away from the door and slide
handle straight up and off of dovetail button.
3. Remove screw and dovetail button and install on other
side, using the same holes as nameplate.
4. Self-Adhesive Nameplate Models: Use putty knife to
gently peel off nameplate from door and reapply over old
handle holes.
TO ATTACH FREEZER HANDLE:
1. Start with handle offset away from door. Place top of handle
over dovetail button, swing handle into an upright position
and pull downward, locking it into place.
2. Secure bottom of handle with two screws removed earlier.
Self Adheswe
Nameplate Nameplate
TO REMOVE REFRIGERATOR HANDLE:
(Handles may be easier to reverse while doors are off.)
1. Remove two screws attaching handle to top of refrigerator
door.
2. Swing top of handle away from door and slide handle
down and off of dovetail button.
3. Remove screw and dovetail button and install on other side,
moving hole plugs from corresponding holes to opposite
side.
TO ATTACH REFRIGERATOR HANDLE:
1. Start with handle offset away from door. Place bottom of
handle over dovetail button, swing handle into an upright
position and pull upward, locking it into place.
2. Secure top of handle with screws.
Lock Handle
DovetaiJ
Screw------_A Dovetail Button
6
Page 7

COOLDOWNPERIOD
To ensure safe food storage, allow the refrigerator to operate
with the doors closed for at least 8 to 12 hours before loading it
with food,
REFRIGERATOR & FREEZER CONTROLS
NOTE
When making changes to the temperature controls, wait 24
hours for the temperature to stabilize before making additional
changes.
NOTE
When first turning refrigerator on, move refrigerator and
freezer controls to Normal, This is the recommended initial
setting, After 24 hours, adjust the controls as needed,
.... i
OR
Freezer Control (some models)
// ,,.. .""
/ "
£old O' /0 (older
_,f )"
', /
TEMPERATURE ADJUSTMENT
• Adjust temperature gradually: move the knob in small
increments, allowing the temperature to stabilize.
- For colder temperatures, turn the knob towards Colder.
- For warmer temperatures, turn the knob towards Cold.
Turning the refrigerator control will change temperatures in both
compartments. For example, if the refrigerator control is turned
to a colder setting, the freezer control may have to be adjusted
to a warmer setting. Turning the freezer control will change only
the freezer temperature.
To maintain temperatures, a fan c_rculates a_rm the refrigerator
and freezer compartments. For good circulation, do not block
cold air vents with food items.
* IMPORTANT
Turning the refrigerator temperature control to "0" turns off
the compressor and prevents the refrigerator from cooling,
but does not disconnect the power to the light bulb and other
electrical components, To turn off power to your refrigerator,
you must unplug the power cord from the wall outlet,
o,, ,,%o, o,,, ,,o
t O', "
", e
OR
OR
i I' (
\ j
Refrigerator & Freezer Control (some models)
,, f"
', /
,,,,,"
J
j'
Refrigerator Control
(some models)
TEMPERATURE ADJUSTMENT GUIDE
If Refrigerator compartment Is Too Warm Turn Refrigerator Control Slightly Towards Colder.
If Refrigerator compartment Is Too Cold Turn Refrigerator Control Slightly Towards Cold.
If Freezer compartment Is Too Warm Turn Freezer Control Slightly Towards Colder.
If Freezer compartment Is Too Cold Turn Freezer Control Slightly Towards Cold.
* To Turn Refrigerator Off Turn Refrigerator Control To 0.
Page 8

Ifyourrefrigeratorhasanautomaticicemaker,itwillprovidea
sufficientsupplyoficefornormaluse.Duringtheinitialstartup
ofyourrefrigerator,noicewillbeproducedduringthefirst24
hoursofoperation.Airinnewplumbinglinesmaycausetheice
makertocycletwoorthreetimesbeforemakingafulltrayof
ice.Withnousage,itwilltakeapproximatelyonetotwodaysto
filltheicecontainer.
Newplumbingconnectionsmaycausethefirstproductionofice
cubestobediscoloredorhaveanoddflavor.Discardicemade
duringthefirst24hours.
NOTE
NOTE: Automatic ice makers are also optional accessories
that may be installed in most models at any time. Call your
local dealer for information.
IMPORTANT
Your ice maker is shipped from the factory with the wire signal
arm in the ON position. To ensure proper function of your ice
maker, hook up water supply immediately or turn ice maker
OFF by lifting the wire signal arm until it clicks and locks in
the UP posntion, if the ice maker is not turned off and the
water supply is not connected, the water valve will make
a loud chattering noise.
ICE PRODUCTION: WHAT TO EXPECT
The ice maker will produce 2.5 to 3 pounds of ice every 24
hours depending on usage conditions. Ice Is produced at a rate
of 8 cubes every 80 to 160 minutes.
TURNING YOUR ICE MAKER ON
After the plumbing connections have been completed, the water
supply valve must be opened. Place the ice container under the
ice maker, pushing it as far back as possible. Lower the wire
signal arm to its "down" or ON position.
TURNING YOUR ICE MAKER OFF
To stop the ice maker, lift the
wire signal arm untd it chcks
and locks in the "up" or OFF
position. The Ice maker also
turns off automatically when
the ice container Is full. If your
model has an adjustable freezer
shelf, place the shelf In the lower
position, so that the wire signal
arm will hit the ice when the
container is full.
Wire
Signal Arm
ON
_ CAUTION
Chemicals from a malfunctioning softener can damage
the ice maker, ff the ice maker is connected to soft water,
ensure that the softener is maintained and working
properly.
_ CAUTION
DO NOT place the ice container in your dishwasher.
8
Page 9

UNDERSTANDINGTHESOUNDSYOU MAY HEAR
Your new high-efficiency refrigerator may make unfamiliar
sounds. These are all normal sounds and soon will become
familiar to you. They also indicate your refrigerator is operating
as designed. Hard surfaces, such as vinyl or wood floors, walls,
and kitchen cabinets may make sounds more noticeable. Listed
below are descriptions of some of the most common sounds
you may hear, and what is causing them.
NOTE
Rigid foam insulation is very energy efficient, but is not a
sound insulator.
O
E. Cold Control/Defrost Timer or Auto Defrost Control
These parts can produce a snapping or chcklng sound
when turning the refrigerator on and off. The timer also
produces sounds stmllar to an electric clock.
F. Compressor
Modern, high-efficiency compressors operate much
faster than older models. The compressor may have a
hgh-pttched hum or pulsating sound.
G. Water Valve
Ifyour refrigerator is equipped wtth an automatic ice
maker, you will hear a buzzing sound as the water valve
opens to fill the ,ce maker during each cycle.
H. Drain Pan (Nonremovable)
You may hear water running into the drain pan during
the defrost cycle. The drain pan will be located on top
of the compressor for air-cooled condensers (black cotls
on back of refrigerator).
I. Condenser Coils
S
,,J
A. Evaporator
The flow of refrigerant through the evaporator may
create a boiling or gurgling sound.
B. Evaporator Fan
You may hear air being forced through the refrigerator
by the evaporator fan.
C. Defrost Heater
During defrost cycles, water dripping onto the defrost
heater may cause a hissing or sizzling sound. After
defrosting, a popping sound may occur.
IMPORTANT
REPLACING THE FREEZER LIGHT BULB (SOME
MODELS)
_J CAUTION
Avoid cuts when replacing Jight bulbs, wear gloves.
1. Unplug refrtgerator.
2. Wear gloves as protection against posstble broken glass.
3. Unsnap light shield as shown.
4. Unscrew and replace old bulb wtth an appliance bulb of
the same wattage.
5. Replace light shield.
6. Remember to plug the refrigerator back ,n.
NEVER CLEAN CONDENSER (SOME MODELS)
Ifyour refrigerator is equtpped with a Never Clean condenser,
there's no need to clean the condenser under normal operating
conditions. If the refrigerator isoperated under particularly
dusty or greasy condttlons, or if there is stgnlflcant pet traffic
in your home, it may be necessary to periodically clean the
condenser for maximum efficiency.
Defrost
Water
During the automatic defrost cycle, you may notice a red glow
in the vents on the back wall of your freezer compartment.
This is normal during the defrost cycle.
D. Automatic Ice Maker
If your refrigerator isequipped with an automatic ice
maker, you wtll hear ,ce cubes falling ,ntothe ,ce bin.
J
Page 10

Keepyourrefrigeratorandfreezercleantopreventodorbuild-up.Wipeupanyspillsimmediatelyandcleanbothsectionsatleast
twiceayear.Neveruseanytypeofscouringpads,brushes,abrasivecleanersorstrongalkalinesolutionsonanysurface.Donot
washanyremovablepartsin a dishwasher. Always unplug the electrical power cord from the wall outlet before cleaning.
CAUTION
o
When moving the refrigerator, pull straight out. Do not shift the refrigerator from side to side as this may tear or
gouge the floor covering. If the refrigerator has an automatic ice maker, be careful not to move the refrigerator
beyond the plumbing connections.
o
Damp objects stick to cold metal surfaces. Do not touch refrigerated surfaces with wet or damp hands.
o
Never use CHLORIDE to clean stainless steel.
NOTE
,, Do not use abrasive cleaners such as window sprays, scouring cleansers, flammable liquids, cleaning waxes, concentratred
detergents, bleaches or cleansers containing petroleum products or plashc parts, interior doors, gaskets or cabinet liners, Do
not use paper towels, scouring pads, or other abrasive cleaning materials.
,, Turning the refrigerator temperature control to "0" turns off the compressor, but does not disconnect electrical power to the
light bulb or other electrical components. To turn off power to your refrigerator, you must unplug the power cord from the
wall outlet.
• Do not use razor blades or other sharp instruments which can scratch the appliance surface when removing adhesive
labels. Any glue left from tape or labels can be removed with a mixture of warm water and mild detergent, or, touch the glue
residue with the sticky side of tape you have already removed. Do not remove the serial plate.
Care & Cleaning Chart
Part
Interior/Door •
Liner
Door Gaskets •
Drawers/Bins •
Glass Shelves •
Toe Grille
Exterior and •
Handles
Exterior and •
Handles
(Stainless
Steel Models
Only)
Exterior
(Easy Care •
Stainless
Steel Models)
What To Use Tips and Precautions
Soap and water Use 2 tablespoons of baking soda in 1 quart of warm water. Be sure to wring ex=
Baking soda and cess water out of sponge or cloth before cleaning around controls, light bulb
water or any electrical part.
Soap and water Wipe gaskets with a clean soft cloth.
Soap and water Do not wash any removable ,tems (bins, drawers, etc.) in d,shwasher.
Soap and water Allow glass to warm to room temperature before ,mmersmg ,n warm water.
e
Glass cleaner
e
Mild liquid sprays
Soap and water Vacuum dust from front of toe grille. Vacuum backside and wipe with sudsy cloth or
e
Mild liquid sprays sponge. Rinse and dry.
e
Vacuum attachment
Soap and water Do not use commercial household cleaners, ammonia, or alcohol to clean handles.
Non Abrasive Glass Use a soft cloth to clean smooth handles. DO NOT use a dry cloth to clean
Cleaner smooth doors.
Soap and water
Stainless Steel
Cleaners
CAUTION: Never use CHLORIDE to clean stainless steel.
Clean stainless steel front and handles with soapy water and a dishcloth. Rinse
with clean water and a soft cloth. Use a non-abrasive stainless steel cleaner. These
cleaners can be purchased at most home improvement or major department stores.
Always follow manufacturer's instructions.
NOTE: Always clean, wipe and dry with the grain to prevent cross-grain
scratching. Wash the rest of the cabinet with warm water and mild hquld detergent.
Rinse well, and wipe dry with a clean soft cloth.
Soap and water
Mild I,quld sprays
CAUTION: DO NOT use abrasive or stainless steel cleaners on Easy Care
Stainless Steel Models. It will remove the protective finish.
Use warm soapy water to clean Easy Care surfaces. Mild hquld sprays may be used
on stubborn spots.
10
Page 11

Your appliance is covered by a 90 day limited warranty. For 90 days from your original date of purchase, Electrolux will pay
costs, except as set forth below, associated with replacing any parts of this appliance that prove to be defective in materials or
workmanship when such appliance is installed, used, and maintained in accordance with the provided instructions.
Exclusions This warranty does not cover the following:
1. Products with original serial numbers that have been removed, altered or cannot be readily determined.
2. Product that has been transferred from its original owner to another party or removed outside the USA or Canada.
3. Rust on the interior or exterior of the unit.
4. Products purchased "as-is" are not covered by this warranty.
5. Food loss due to any refrigerator or freezer failures.
6. Products used in a commercial setting.
7. Service calls which do not involve malfunction or defects in materials or workmanship, or for appliances not in ordinary
household use or used other than in accordance with the provided instructions.
8. Service calls to correct the installation of your appliance or to instruct you how to use your appliance.
9. Expenses for making the appliance accessible for servicing, such as removal of trim, cupboards, shelves,etc.,which are
not a part of the appliance when it is shipped from the factory.
10. Service calls to repair or replace appliance light bulbs, air filters, water filters, other consumables, or knobs, handles, or
other cosmetic parts.
11. Surcharges including, but not limited to, any after hour, weekend, or holiday service calls, tolls, ferry trip charges, or
mileage expense for service calls to remote areas, including the state of Alaska.
12. Damages to the finish of appliance or home incurred during installation, including but not limited to floors, cabinets, walls,
etc.
13. Damages caused by: services performed by unauthorized service companies; use of parts other than genuine Electrolux
parts or parts obtained from persons other than authorized service companies; or external causes such as abuse, misuse,
inadequate power supply, accidents, fires, or acts of God.
DISCLAIMER OF IMPLIED WARRANTIES; LIMITATION OF REMEDIES
CUSTOMER'S SOLE AND EXCLUSIVE REMEDY UNDER THIS LIMITED WARRANTY SHALL BE PRODUCT REPAIR AS
PROVIDED HEREIN. CLAIMS BASED ON IMPLIED WARRANTIES, INCLUDING WARRANTIES OF MERCHANTABILITY OR
FITNESS FOR A PARTICULAR PURPOSE, ARE LIMITED TO THE DURATION OF THE EXPRESS LIMITED WARRANTY
STATED ABOVE. ELECTROLUX SHALL NOT BE LIABLE FOR CONSEQUENTIAL OR INCIDENTAL DAMAGES SUCH AS
PROPERTY DAMAGE AND INCIDENTAL EXPENSES RESULTING FROM ANY BREACH OF THIS WRITTEN LIMITED
WARRANTY OR ANY IMPLIED WARRANTY. SOME STATES AND PROVINCES DO NOT ALLOW THE EXCLUSION OR
LIMITATION OF INCIDENTAL OR CONSEQUENTIAL DAMAGES, OR LIMITATIONS ON THE DURATION OF IMPLIED
WARRANTIES, SO THESE LIMITATIONS OR EXCLUSIONS MAY NOT APPLY TO YOU. THIS WRITTEN WARRANTY GIVES
YOU SPECIFIC LEGAL RIGHTS. YOU MAY ALSO HAVE OTHER RIGHTS THAT VARY FROM STATE TO STATE.
If You Need
Service
Keep your receipt, delivery slip, or some other appropriate payment record to establish the warranty period
should service be required. Ifservice is performed, it is in your best interest to obtain and keep all receipts.
Service under this warranty must be obtained by contacting Electrolux at the addresses or phone
numbers below.
This warranty only applies in the USA and Canada. In the USA, your appliance is warranted by Electrolux Major Appliances
North America, a division of Electrolux Home Products, Inc. In Canada, your appliance is warranted by Electrolux Canada Corp.
Electrolux authorizes no person to change or add to any obligations under this warranty. Obligations for service and parts under
this warranty must be performed by Electrolux or an authorized service company. Product features or specifications as described
or illustrated are subject to change without notice.
USA
1.866.31 2.21 17
Electrolux Major Appliances
North America
RO. Box 212378
Augusta, GA 30907
1.800.668.4606
Electrolux Canada Corp.
5855 Terry Fox Way
Mississauga, Ontario, Canada
Canada
L5V 3E4
11
Page 12

1-800-944-9044 (United States) Visit our web site at
1-800-668-4606 (Canada) www.frigidaire.com.
Common Before calling for service, review this list. it may save you time and
Occurrences defective workmanship or materials in this appliance.
Refrigerator does not run.
Freezer temperature too cold.
Refrigerator temperature is
satisfactory.
Refrigerator temperature too cold.
Freezer temperature is
satisfactory.
* Refrigerator is noisy or vibrates.
Odors in refrigerator.
Cabinet light not working.
expense. This list includes common occurrences that are not the result of
+ Ensure ptug is tightly pushed into etectricat outlet.
® Check/reptace fuse with a 15 amp time-detay fuse. Reset circuit
breaker.
® The temperature control isturned to "O".
® Refrigerator may be in defrost cycle. Wait 20 minutes and check again.
® Set freezer controt to a warmer setting untit freezer temperature is
satisfactory. Altow 24 hours for the temperature to stabitize.
Set refrigerator controt to a warmer setting. Arrow 24 hours for
temperature to stabitize. Then check freezer temperatures and adjust
as needed.
® The cabinet is not level.
+ Floor is weak.
® Interior needs to be cleaned.
® Foods that produce odors should be covered or wrapped.
+ Replace light bulb.
® Ensure plug is tightly pushed into electrical outlet.
® Light switch may be stuck. Push in light switch, located on the
refrigerator control box, to release.
Automatic ice maker not working.
(some models)
+ Ensure the Wire Signal Arm is not in UP position.
® Ice maker should produce 4 to 5 pounds of ice in a 24 hour period.
® Water supply is turned off.
® Water pressure is too low.
® The freezer is not cold enough.
12
 Loading...