

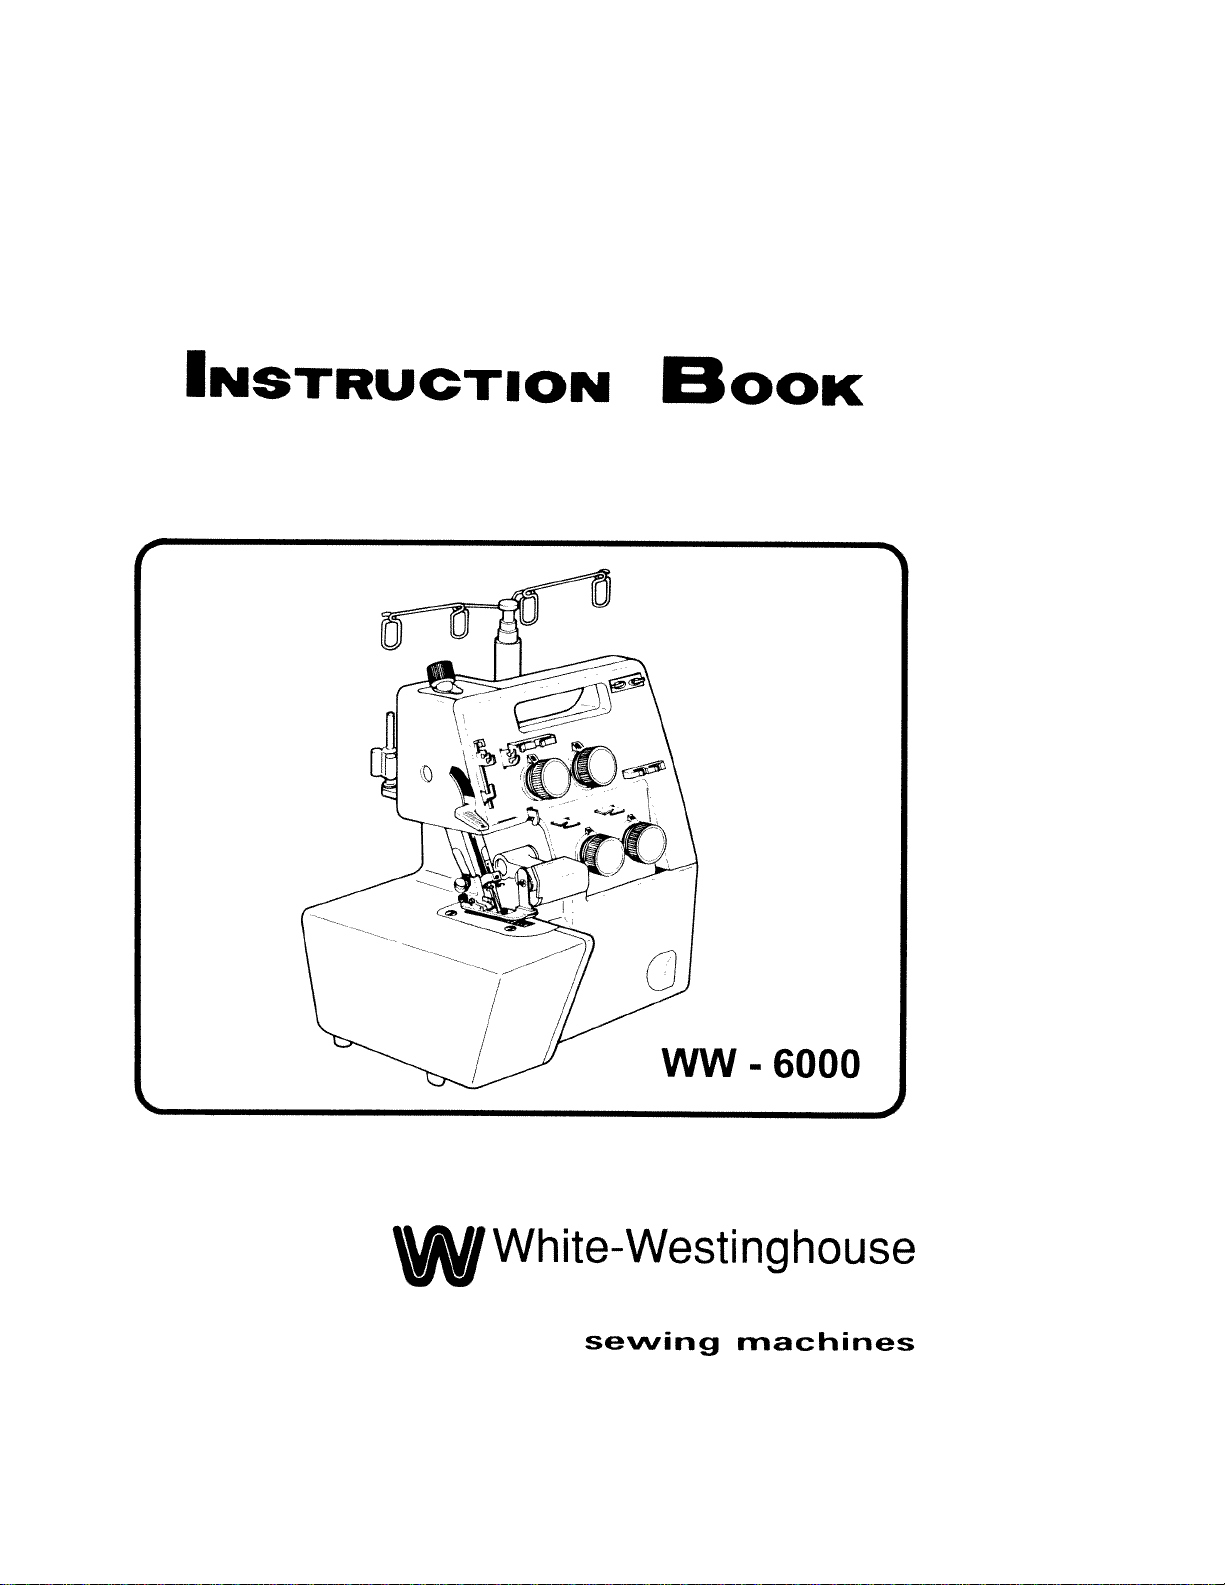
Page 1
z
1
0
-I
0
CD
I
I
a,
0
0
0
CD
0
C,
C
Cl)
CD
CD
0
Page 2
To
reduce
has
a
other).
one
way.
reverse
qualified
not
change
POLARIZED
the
polarized
This
the
if
plug
the
plug.
electrician
the
risk
plug
plug
plug
of
will
If
to
PLUG
electric
(one
fit
does
still
it
install
in
in
not
any
CAUTION
shock,
blade
a
polarized
fit
does
the
way.
is
wider
fully
not
proper
this
in
fit,
appliance
than
outlet
the
outlet,
contact
outlet.
the
only
a
Do
Record
and
Model
The
Serial
The
Model
Serial
Model
Retain
OVERLOCK
in
space
No.ofthis
No.
is
No.islocated
No.
No.
WW-6000
these
numbers
SEWING
provided
appliance.
located
for
below
Rear
Rear
future
MACHINE
the
Serial
of
arm.
of
arm.
reference.
No.
Page 3
IMPORTANT
SAFETY
INSTRUCTIONS
When using an electrical
followed,
including
Read
the
instructions
all
appliance).
DANGER
An
appliance
appliance
from
WARN
electric
1.
Do
not
is
used
by
2.
Use
this
attachments
Never
Never
and
Never
Do
not
not
Do
administered.
To
disconnect,
not
Do
operate
operate
droporinsert
3.
properly,ifit
appliancetothe
electrical
4.
ingsofthe
dust,
5.
6.
7.
being
8.
outlet.
9.
should
shock,
allow
or
appliance
or
sewing
loose
use
operate
unplugbypullingoncord.Tounplug,
—
never
electric
the
ING
tobeusedasa
near
children.
recommended
this
has been
nearest
mechanical
appliance
the
machine and
cloth.
outdoors.
where
turn
appliance, basic
following:
—To
reduce
be
left
outlet
immediately
——To
or
only
applianceifit
dropped
authorized
adjustment.
any
aerosol
all
reduce
injury
toy.
for
its
intended
the
by
with
object
(spray)
controlstothe
the
unattended
after using
the
to
persons:
Close
attentionisnecessary
useasdescribedinthis
manufacturer
hasadamaged
or
damaged,
dealerorservice
any
foot
into
openings
air
controller
opening.
any
products
off
(“0”)
safety
precautions
before
risk
of
when
plugged
risk
contained
as
cord
or
dropped
center
blocked,
free
from
are
being
position,
grasp
the
using
electric
in.
and
before
burns,
of
in
or
plug,
into
for
Keep
the
accumulation
usedorwhere
then
plug, not
should
shock:
Always
unplug
cleaning.
fire,
when this
manual.
this
manual.
ifitis
not
water.
Return
examination,
ventilation
remove
the
cord.
always
(this
appliance
Use
working
repair,
open
of
oxygen
plug
from
be
this
only
the
lint,
is
DANGER
1.
2.
3.
Always
Do
Do
Do
unplug
not
reach
not
placeorstore
not
place
before
relamping.
foranappliance
appliance
or
drop
in
into
water
Replace
that
where
or
has
other
bulb
fallen
it
can
liquid.
with
into
fall
same
water.
or
be
type
Unplug
pulled
rated15watts.
immediately.
into
a
tub
or sink.
Page 4

WARNING
1
Keep
lingers
machine
2.
Always
3.
Do
4.
Do
break.
Switch
5.
area,
presser
6.
Always
lubricating,
instruction
7.
Never
maybeblocked.
needle.
use
not
use
not
pullorpush
the
such
foot,
unplug
operate
the
bent
sewing
as
etc.
or
manual.
away
proper
needles.
threading
sewing
when
onasoft
from
all
needle
fabric
machine
machine
making
moving
while
off
needle,
any
surface
plate.
(“0”)
other
parts.
The
stitching.
when
changing
from
the
user
such
Special
wrong
as
a
care
plate
It
may
making
needle,
electrical
servicing
bed
is
can
deflect
any
threading
outlet
adjustments
or
couch
required
cause
the
the
needle
adjustments
bobbin,
when
where
around
needle
causing
in
or
removing
mentioned
air
the
the
sewing
to
break.
the
needle
changing
covers,
openings
it
to
in
the
SAVE
THESE
INSTRUCTIONS
Page 5
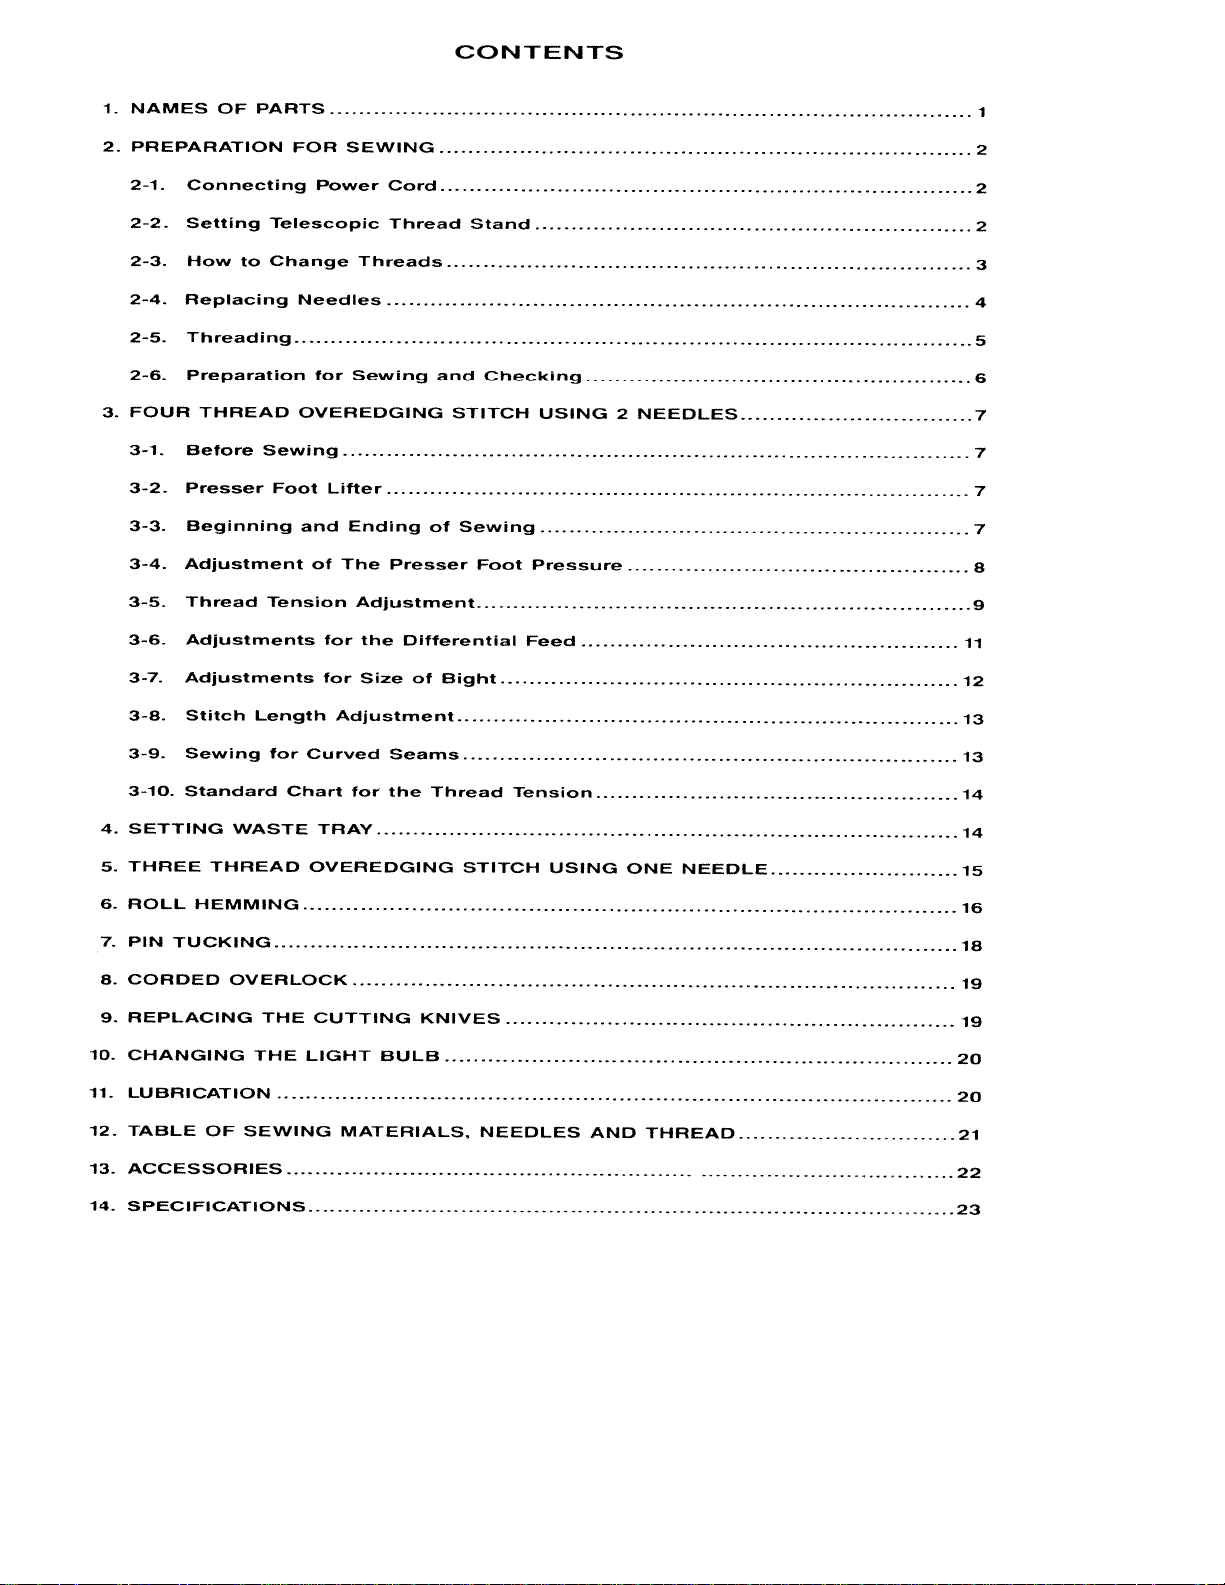
CONTENTS
NAMES
1.
2.
PREPARATION
2-1.
2-2.
2-3.
2-4.
2-5.
2-6.
FOUR
3.
3-1.
3-2.
3-3.
3-4.
3-5.
3-6.
3-7.
OF
Connecting
Setting
How
Replacing
Threading
Preparation
THREAD
Before
Presser
Beginning
Adjustment
Thread
Adjustments
Adjustments
PARTS
FOR
.
SEWING
Power
Telescopic Thread
Change
to
Needles
for
Sewing
OVEREDGING
Sewing
Lifter
Foot
and
Ending
of
The
Tension
for
for
Cord
Threads
Presser
Adjustment
the
Differential
Size
1
2
2
Stand
2
3
4
5
Checking
and
STITCH
USING
2
NEEDLES
6
7
7
7
of
Sewing
Foot
Pressure
7
8
9
Feed
of
Bight
11
12
3-8.
3-9.
3-10.
4.
SETTING
THREE
5.
6.
ROLL
PIN
7,
CORDED
8.
REPLACING
9.
10.
CHANGING
11.
LUBRICATION
TABLE
12.
ACCESSORIES
13.
14.
SPECIFICATIONS
Stitch
Sewing
Standard
THREAD
HEMMING
TUCKING
OF
Length
for
Chart
WASTE
OVERLOCK
THE
THE
SEWING
Adjustment
Curved
for
TRAY
OVEREDGING
CUTTING
LIGHT
BULB
MATERIALS,
Seams
the
Thread
KNIVES
STITCH
NEEDLES
Tension
USING
AND
ONE
THREAD
NEEDLE
13
13
14
14
15
16
18
19
19
20
20
21
22
23
Page 6
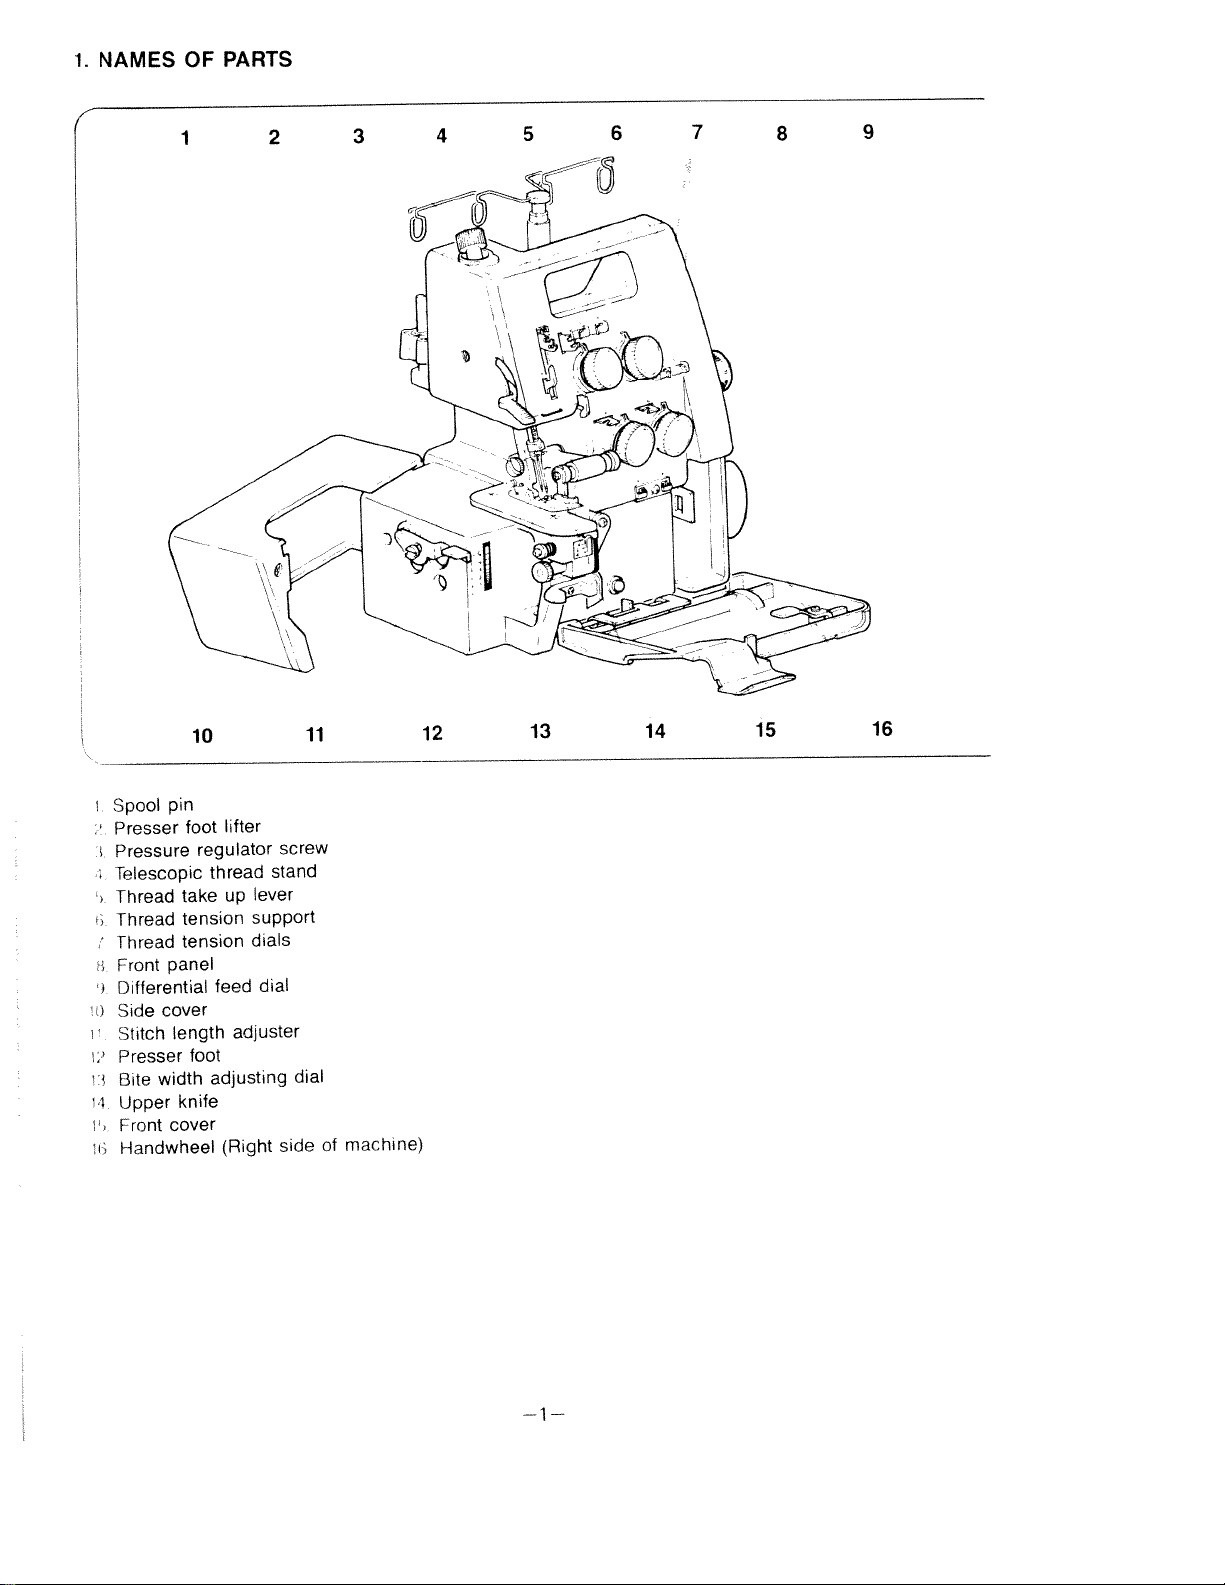
1.
NAMES
OF
PARTS
1
2
3
4
5
I
6
-
7
—
8
9
I
Spool
Presser
Pressure
Telescopic
Thread
fhread
Thread
Front
Differential
Side
0
1
Stitch
Presser
2
Bite
Upper
Front
Handwheel
i
pin
foot
take
tension
tension
panel
cover
length
width
knife
cover
10
lifter
regulator
thread
up
feed
adjuster
foot
adjusting
(Right
screw
stand
lever
support
dials
dial
side
dial
11
of
machine)
12
13 14
15
16
Page 7
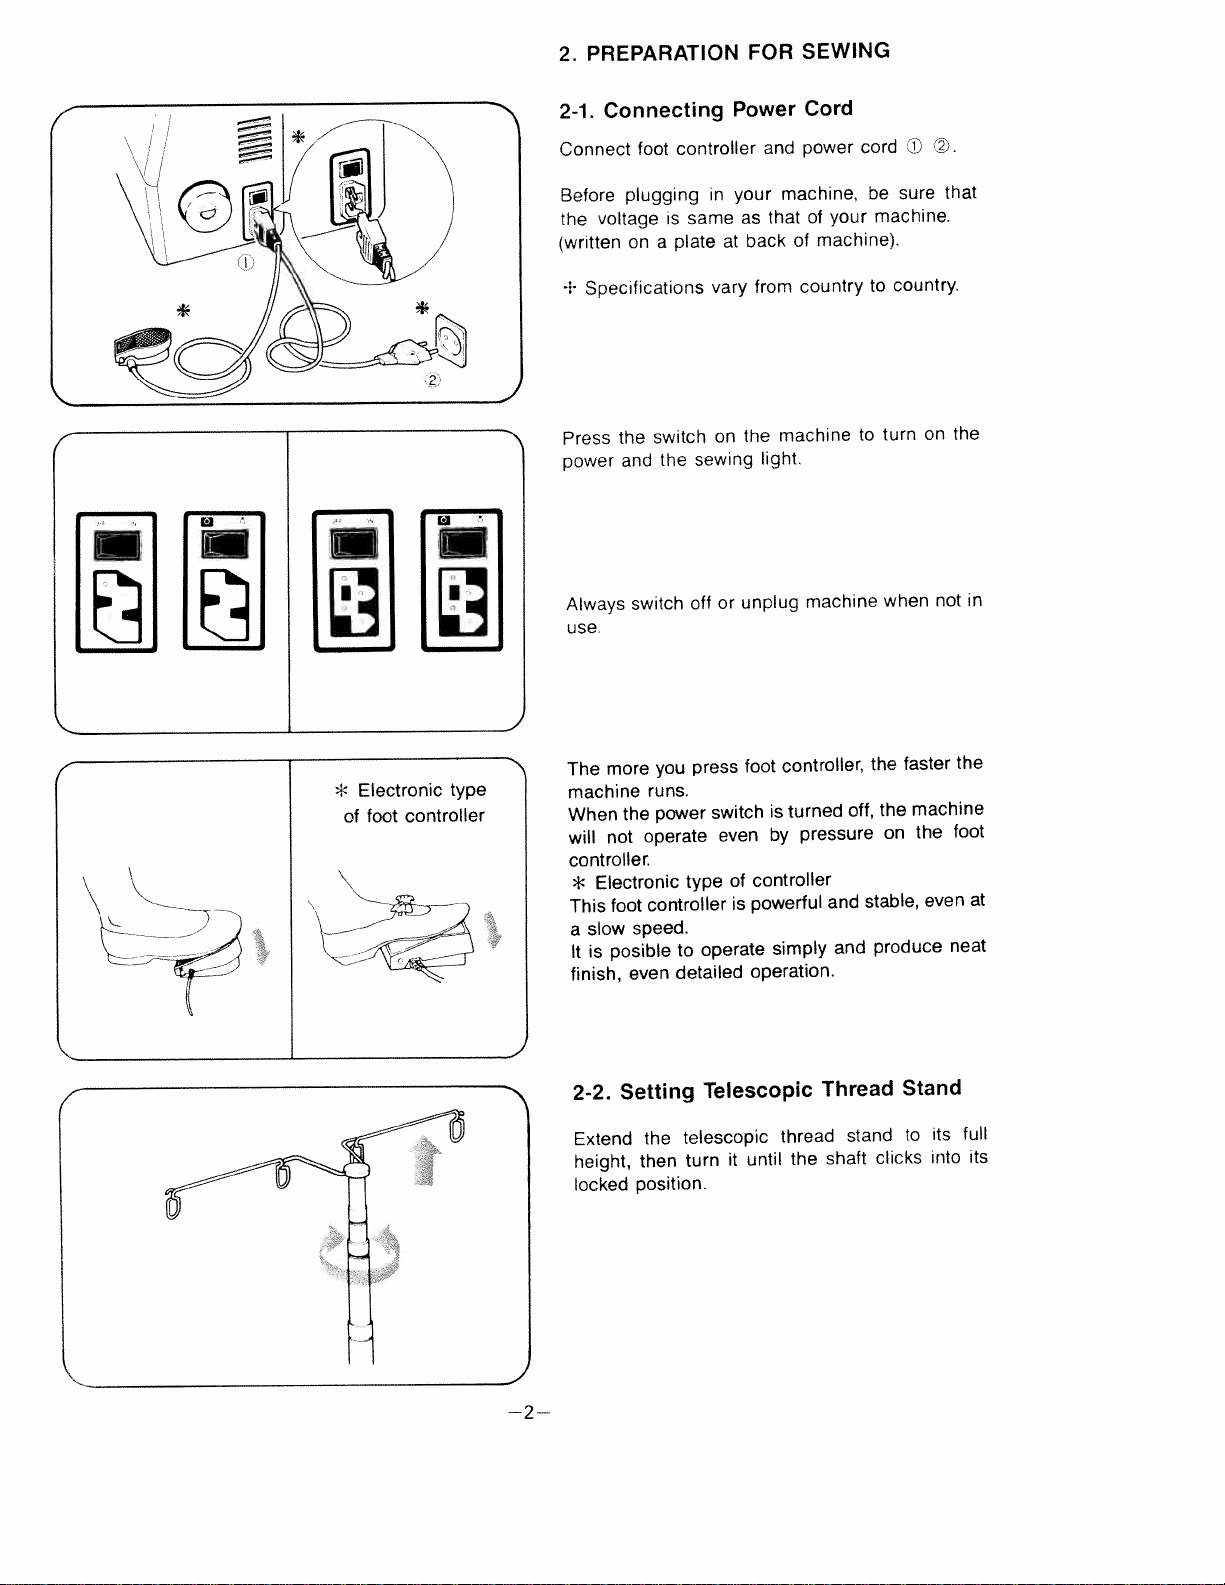
PREPARATION
2.
FOR
SEWING
Connecting
2-1.
Connect
Before
the
(written
plugging
voltage
+
Specifications
the
Press
and
power
Always
use.
foot
on
a
switch
switch
controller
same
is
plate
sewing
the
off
in
at
vary
on
or
Power
and
your
that
as
back
from
the
light.
unplug
Cord
power
machine,
of
machine).
of
country
machine
machine
your
cord
be
machine.
country.
to
turn
to
when
t
sure
on
.
not
that
the
in
A
the
faster
off,
and
and
Thread
stand
shaft
the
the
on
stable,
produce
clicks
machine
the
even
Stand
its
to
into
foot
at
neat
full
its
controller,
foot
press
you
more
The
Electronic
*
foot
of
7-
type
controller
A
machine
When
will
controller.
*
This
slow
a
It
finish,
2-2.
Extend
height,
locked
the
operate
not
Electronic
foot
speed.
posible
is
even
Setting
the
then
position.
runs.
power
type
controller
operate
to
detailed
Telescopic
telescopic
turn
switch
even
of
is
it
turned
is
pressure
by
controller
powerful
simply
operation.
thread
the
until
—2—
Page 8

2-3.
I
he
wng
1)
behnd
iww
f
How
machine
Cut
thread
he
original
is
the
the
to
an
easy
thread
telescopic
on
Change
supplied
is
waytochange
in
spindle
the
thread.
Threads
with
use
thread
near
and
thread
them:
the
stand).
tie
it
but
cone
Place
to
the
the
fol
spool
the
end
Tie
threads
Cut
thread
toot.
H
‘wd
ed
Lower
Set
s
through
the
presser
When
to
avoid
and
wake
the
tensions
thread
changing
knot
caught
the
presser
smoothly,
knot
foot.
before
bending
above
foot
to
0sothat
comes
the
reaches
it
in
the
threading
draw
needle
the
lifter
to
the
out
to
thread,
the
needle
needle’s
easier,
lift
up
thread
looper
the
about
eyeofthe
as
eye.
use
the
knot
10
cm
cut
knot
the
tweezers.
press-
can
thread
past
the
off
nee
I-
N
is
—3—
Needle
eye
.1
Page 9
I
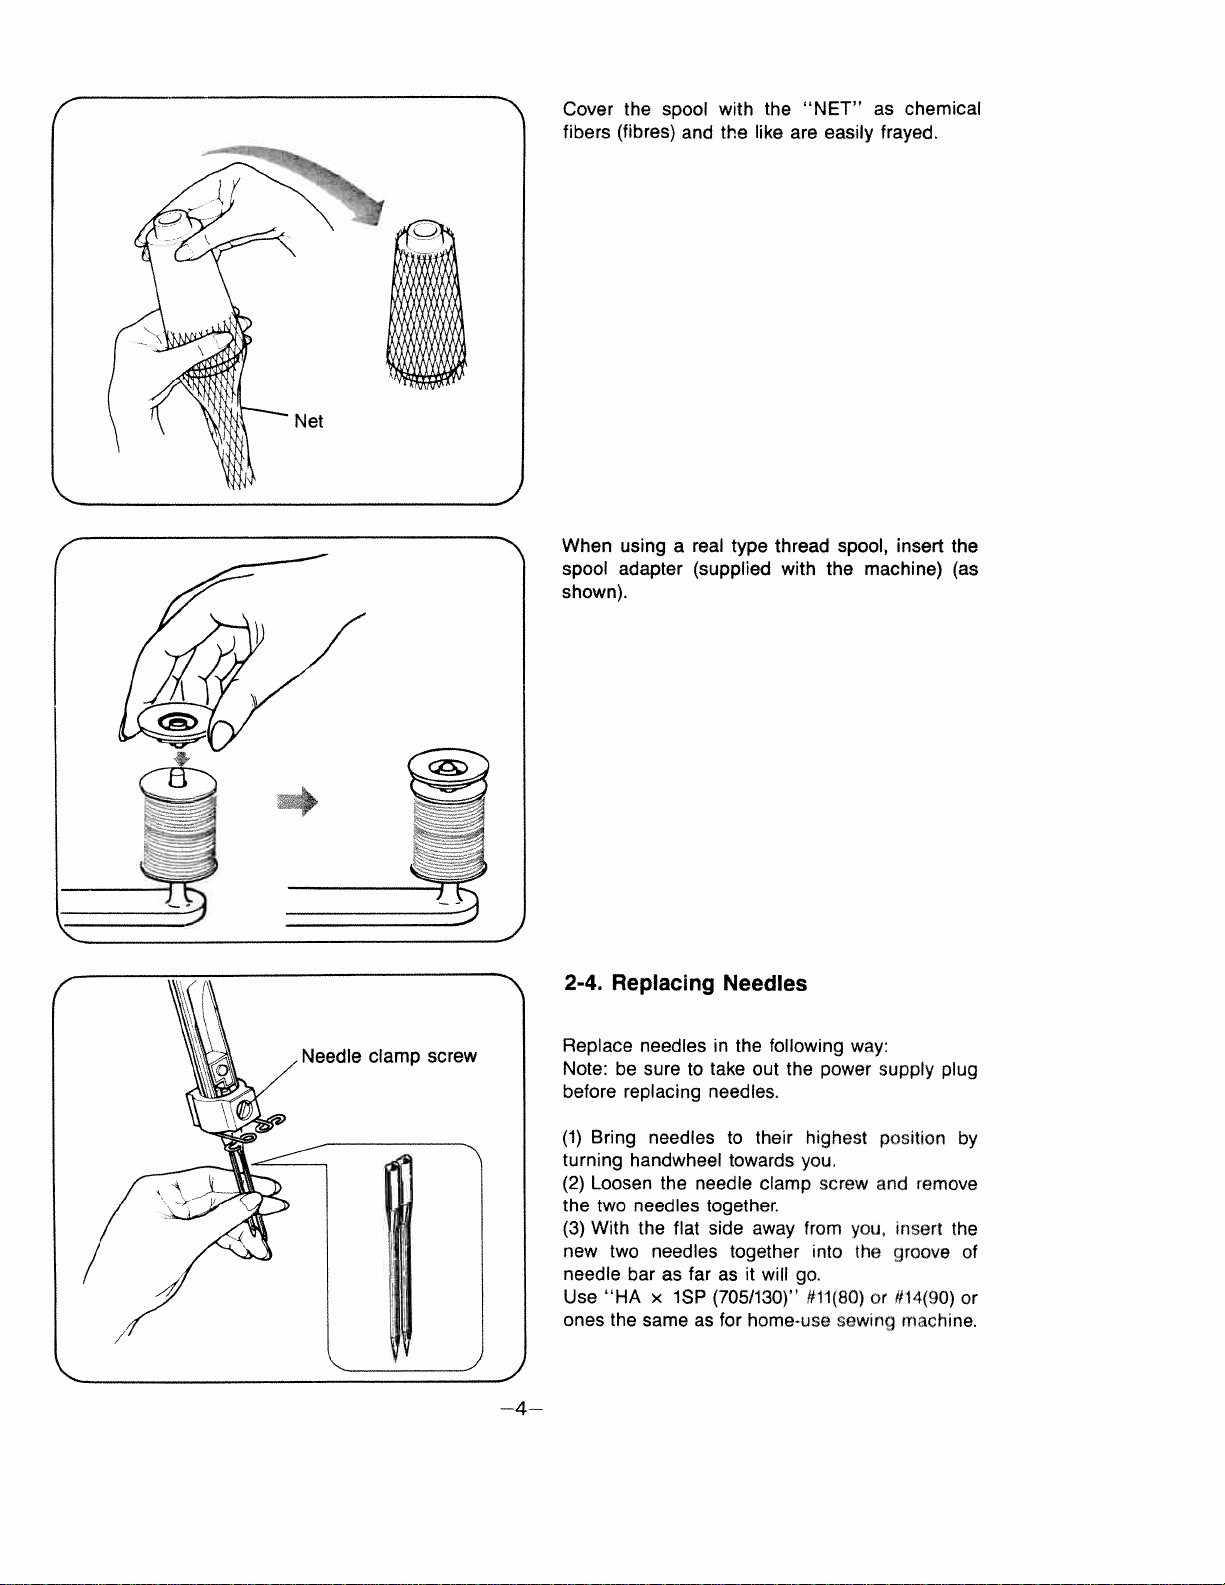
Cover
fibers
When
spool
shown).
the
spool
(fibres)
usingareal
adapter
and
(supplied
with
the
type
the
like
“NET”
are
thread
with
easily
spool,
the
chemical
as
frayed.
insert
the
machine) (as
—4—
2-4.
Replace
Note:
before
(1)
Bring
turning
(2)
Loosen
the
two
With
(3)
new
needle
Use
“HAxiSP
ones
Replacing
needles
be
sure
to
replacing
needles
handwheel
the
needle
needles
the
flat
two
needles
barasfarasit
the
same
as
Needles
in
the
following
take
out
needles.
to
their
towards
clamp screw
together.
side
away
together
will
(705/130)”
for
home-use
way:
the
power
supply
highest
you.
from
nto
go.
#11(80)or414(90)
and
you,
the
sewing
position
Insert
groove
plug
by
remove
the
of
or
machine.
Page 10

Threading
2-5.
threading
When
threading
sequence:
Lower
First:
Second:
Finally:
must
Upper
Needle
be
looper
looper
threading
the
carried
machine
threading
threading
out
(C.
from
in
(A)
D)
the
the
(B)
beginning,
following
Lower
(1)
Push
towards
and
pass
then,
and
tension
Pass
Bring
turning
thread
rhen,
turning
by
front
the
you,Take
it,
in
dial
thread
the
the
handwheel
through
move
looper
through
order
6
lower
the
the
threading
cover
to
thread
the
guide
through
A)
(Fig.
through
looper
towards
tower
lower
handwheel
the
guides
guides
to
looper
looper
(A)
right,
drawn
of
2
far
the
you,
thread
slightly
towards
and
the
3
7
from
4
left
and
you.
fold
the
thread
and
5
8
9
position
pass
guide
to
it
and
the
(Fig.
down
spool
stand
thread
I
by
the
right
B)
the
1
’ss
as
rhen
weezzrs.
spare
thread
shown.
thread
Cut
thread.
through
(Fig.
the
the
C)
hole
thread
(Fig.
lower
of
D)
lower
leaving
looper
looper
about
thread
10
3
cm
guide
using
(4)
—5—
Fig.
Fig.
C
D
Page 11

(2)
Upper
looper
threading
(B)
I
pass
A).
position
it,
then,
j,using
10cm
Fig.
lowest
its
of
toward
spool
stand
upper
leaving
E).
to
you.
and
and
(Fig.
looper
about
(C)
looper
upper
the
Bring
•
Cut
Right
handwheel
thread
the
of
®
guides
hole
the
the
thread
front
the
needle
from
thread
©
thread
(Fig.
cover.
threading
turning
Draw
•
guide
through
Thread
•
ers.
spare
Close
•
E
(3)
I
the
A
it
side
grasp
in
(Fig.
about
push
the
from
)—
with
the
direction
F)
eye
in
screw
hand
thread
thread
thread
(Fig.
threading,
from
turn
right
A)
and
1€
hand.
drawn
guide
needle’s
leaving
For
ease
•
7-
Fig.
F
B
holder
left
your
holderCand
with
your
Take
through
the
right-hand
back.
the
Cut
thread.
the
•
the
spool,
),
(
10cm
upper
forefinger
right
of
and
then
from
(4”)
end
thread
through
order,
in
tweez
(4”)
knife
of
arrow
pass
front
spare
of
by
of
of
the
B
it
to
to
As
be
t
L
the
taken
upper
when
knife
moving
is
sharpened,
this
part.
care
should
Left
(4)
•
Take
through
the
left-hand
(Fig
A,
2-6.
Checking.
Check
•
•
Confirm
lower
slowly
there
knives.
Turn
•
hand
stitch
If
the
the
of
threaded
needle
thread
the
guides
thread
needle’s
F).
Preparation
no
that
that
the
correctly
knife
towards
any
handwheel
check
of
doesn’t
needle
incorrectly.
fabric
is
the
to
finger
thread
threading
drawn
(
eye
for
thread
upper
If
you.
or
towards
the
that
needle
the
wind
plate,
(D)
from
—),
r)
Sewing
slips
knife
turning
by
itisnot
waste
thread
around
check
and
spool,
and
6
8,
front
from
and
offorsnaps.
against
moves
the
handwheel
Correct,
thread
with
you
around
winds
plate.
the
stitch
any
it
threads
pass
thread
back
to
check
between
your
finger
it
the
if
right
the
are
—6—
Page 12

FOUR
3.
STITCH
Before
3-1.
THREAD
USING
Sewing
OVEREDGING
2
NEEDLES
I-
threading
After
ire
not
draw
out
presser
oy
windonto
3-2.
For
lower
When
frontofthe
I
place
raise
hand
or
foot,
Presser
setting
the
beginning
thick
the
the
the
wound
the
two
the
average
presser
presser
material
presser
completed,
is
around
four
turn
and
three
or
needle
Foot
to
material,
threads
the
times
plate.
Lifter
material,
foot
lifter.
sew,
foot
lower
under the
lifter.
foot
and
stitch
the
under and
handwheel
to
thereisno
push
it
willbefed
and
the
when
finger,
towards
make the
the
material
presser
presser
threads
the
gently
behind the
you
thread
need
just
through.
lifter,
foot
then
foot,
J
7-
to
in
1
3.
‘1)
Beginning
iist
slightly
thind
Beginning
your
put
until
presser
the
to
left
the
and
sew
hand
tipofthe
foot.
Ending
on
the
fabric
of
Sewing
material
comes
push
to
exactly
/
L
—7—
Page 13

(2)
4
Ending
Make
chain-stitches
prevent
the
Draw
the
chain-stitches.
Then
ser
+
next
left
foot.
Do
bend
the
cut
not
the
sewing.
finished
as
the
pull
and
of
sewing
thread
the
This
thread
break.
from
fabric
machine
is
it
out
at
untying
called
2
—5cm
roughly
the
gently
is
operating
end
chain-stitch
(1-2”)
the
of
and
to
backwards
from
as
the
sewing
prepare
and
sewing.
the
needle
and
make
pres
to
for
to
-
will
)
—8—
3-4.
Adjustment
Pressure
The
presser
materials
Adjustment
very
thin
or
Accordingly,
sure
and
thicker
Increase
tightening
the
of
is
the
medium
very
sew
of
foot
pressure
necessary
thick
thinner
materials
pressure
adjustment
the
(standard)
only
materials.
materials
with
the
of
screw.
Presser
is
pre-adjusted
thickness.
when
with
more
presser
Foot
you
work
less
pressure.
foot
for
on
pres
by
Page 14
3-5.
Thread
Tension
Adjustment
7-
balance
the
Set
Balance
the
When
material,
of
top
clockwise.
the
When
underside,
loosen
Correct
(1)
Lower
•
well
be
er
threads
fabric.)
the
•
Needle
of
the
lower
(or
upper
tighten
tension
tension.
looper
balanced
thread
of
Loopwer
loosen
tighten
dial
thread
should
tension
the
thread:
looper
should
thread
tension
tension
looper
thread
tension
counter-clockwise.)
4
and
same
with
make
not
as
dial
dial
upper
tension.
crosses
slacken,
be
weak
pulled
is
dial
4
pulled
is
clockwise.
3
thread
at
possible.
as
to
counter
3
clockwise.)
to
should
loop
(Both
edge
the
pulled.
or
the
2
the
(or
of
Unbalanced
(2)
round
Tighten
(Dial
looper
and
the
or
3
)
(Dial-
over
thread
loosen
4
the
).
upper
tension
the
back:
thread
looper
of
thread
the
tension
upper
of
the
wraps
looper
lower
--9
looper
Upper
Left-hand
Right-hand
Right
thread
needle
r
side
thread
Tighten
4
Loosen
Page 15

Wrong
Upper
side
Right
looper
side
thread
Lower
Looper
Thread
2
L9Qsen
I..Jribalanced
(3)
round
Tighten
upper
and
the
looper
over
thread
(Dial
lower
the
tension
;he
looper
face
thread
of
tlread
the
tension
lower
wraps
looper
of
the
Left
Right-hand
,-
thread
Lower
Upper
Right
hand
Wrong
ioo4
hand
needle
needle
Right
looper
needle
side
thread
thread
side
thread
.•:.
thread
Tigen
loose:
Unbalanced
(4)
left
needle
thread
too
Tighten
Tighten
(Dial
and
4)
the
)
or
thread
loosen
tension
both
of
looper
the
thread
left
(Dial
3
needle
i’
en
Loosen
Lower
Upper
Left-hand
\
Wrong
looper
looper
needle
thread
Right
thread
side
side
thread
too
right
loose:
needle
needle
thread
right
tension
Unbalanced
Right-hand
,-
needle
“
thread
(5)
Tighten
(Dial
the
2
thread
of
the
Ti9ten
—10—
Page 16

3-6.
Adjustments
Differential
Differential
ching
or
condensing
two
independent
behind
different
The
finish
condensable
*
function
of
“N”
the
overedging
indicates
feeding
ratio.
feed
needles,
has
fabrics.
Feed
performs
the
can
the
for
the
For
edge
dogs,
be
eeffect
stretchable
neutral
The
the
of
one
adjusted
of
position.
function
the
fabric,
in
front
producing
and
of
stret
since
and
one
feed
to
at
neat
a
H
Indicator
Differential
OoL
Refer
Unstretchable
uncondensable
materials
Condensable
materials
the
to
Stretchable
materials
-..
below
and
chart
Jersey
Medium
woven
fabrics
Georgette
and
Fabric
Knit
test
stitch
.
—
..
performance
Differential
ratio
..:.:...
::.:
s
..
on
scrap
a
.
feed
.
is
set
,,
N
.
i
J
.
of
material
Differential
feed
N-2
N
0.7-N
you
ratio
are
-I
going
N
to
use.
Result
adjustment
of
>
—11—
Page 17

Adjustments
3-7.
for
Size
of
Bight.
the
(0.17”)
bight
the
direction
kind
the
bight
(0.16”)
of
size.
bight
direc
size,
of
bight
according
is
4.5mm
size
to
cover
width
width
bigger number)
adjusting
adjust
narrower
is
adjusting
number)
dial
to
the
than
dialtothe
than
the
to
6.0mm
to
material.
The
standard
Open
If
the
turn
lithe
the
arrow.
the sizeofthe
(0.23”)
bight
side
the
cutting
the
bite
(To
width
a
smaller
widthiswider
cutting
bite
• Adjust
•
*
f
4t
•
(1)
size,
tionofarrow.
(2)
turn
the
4.2mm
from
II
1
o
the
right
The
between
material
figure
left
the
4.5mm.
shows
needle
that
and
the
the
size
edge
of
of
bite
the
\
—1
2—
Page 18

How
3-8.
machine
The
regular
for
adjust
hemming)
adjustment
For
±
from
2.5mm
the
to
normal
25mm
Adjust
to
is
seaming
stitch
5mm
lever.
used
is
Stitch
pre-set
and
length
one-touch
by
overedging
5mm.
to
only
2.5mm
to
a
overedging.
1mm
from
set
stitch
A
rolled
for
Length
stitch
(Narrow
of
the
stitch
the
length
hemming.
You
stitch
less
length
may
rolled
length
length
than
Sewing
3-9.
neat
For
a
For
inside
trimming
the
of
front
fabric
the
apply
your
with
For
outside
directions
the
fabric
applying
hand,
the
in
shown.
pressure
Seams
curved
of
fabric
at
opposite
under
the
in
seams:
gently
the
pressure
same
direction
the
opposite
with
right
to
time,
for
Curved
finish
clean
and
line
presser
your
pressure
hand
the
above.
guide
of
left
as
apply
the
foot,
curves,
the
with
little
a
right
curves,
of
—13--
Page 19

PATTE
STITCH
STITCH
THREAD
TENSION
RI’
ES
LENGTH
NEEDLE
THREAD
UPPER
LOOPER
THREAD
OVEREDGING
2.5-5mm
2-4
1-4
ROLL
HEMMING
1-15mm
1-4
1-4
ROL
FINE
HEMMING
1-15mm
1-4
2-4
31O.
The
should
in
as
Since
strength
adjust
to
Thread
fabric
The
‘N’.
Standard
Tension
tension
different
be
chart
the
figures
the
threads
of
the
tensions
the
and
differential
P.11).
(See
for
thread
thread.
Chart
each
according
the
on
in
will
feed
the
of
right.
the
tension,
tension
differ
ratio
the
for
thread
the
to
chart
may
it
litte.
a
according
normally
is
Thread
pattern
are
be
tension
for
necessary
the
to
dials
stitches
average
kind
of
LOWER
LOOPER
THREAD
-
a
—f
2-4
(_
-
5-8
2-4
tray
of
TRAY
a
the
in
the
the
of
machine
direction
waste
waste
as
tray
to
tray
illustrated.
arrow.
of
direc
the
in
the
the
the
arrow.
right
the
of
waste
left
WASTE
guide
overlock
end
SETTING
4.
(1)lnsert
leg
right
the
Turn
/
(2)Push
of
tion
—14--
Page 20

5.
THREE
STITCH
Though
stitch
stitch
operated
(1)
By
THREAD
USING
machine
this
overedging
overedging
just
by
removing
ONE
is
using
using
removing
right
the
OVEREDGING
NEEDLE
made
2
1
mainly
needles,
needle
needle.
1
needle.
for
three-thread
can
be
4
thread
easily
Three-thread
as
wide
as
the
is
differential
P.11)
By
right
he
the
differential
he
P11)
can
normally
removing
right
normally
is
needles
Use
width
The
(See
(2)
ise
.adth
See.
overedging
a
be
thread
left
needle
4-thread
achieved.
4,5
feed
the
sews
thread
2.5
feed
stitch
overedgihg
tension.
mm.
is
ratio
needle.
left
with
tension.
mm.
is
ratio
using
(Dial
normally
narrow
a
(Dial
normally
1
stitch
:1)).
2
needle
the
N”.
width
The
)
N’.
using
bite.
for
2
bite
bite
—1
5-
Page 21

Roll
The
The
looper
Fin
The
lower
Hemming
fabric
thread
thread.
Roll
fabric
looper
is
rol
tension
Hemming
is
rolled
thread.
led
I
by
and
22
and
adjusting.
is
overlocked
‘3
S
overlocked
z
with
t,
with
upper
2
upper
and
ROLL
6.
Roll
hemming
overlocking.
ideal
for
HEMMING
is
achieved
the
use
with
2
thin
types
materials.
by
as
rolling
the
illustrated
fabric
on
left
and
is
(1)
Remove
(1)
right
needle)
Change
(2)
roll
for
For
marked
foot
sewing).
hemming.
roll
“A”
hemming
B”
and
CHANGING
PLATE
L)
Raise
the
Set
©
the
ing
Lower
©
r
Loosen
direction
Loosen
©
with
the
the
the
and
the
PRESSER
the
up
needle
hand
presser
the
the
of
screw
the
larger
left
presser
the
needle
upper
wheel
presser
arrow
needle.
sewing,
needle
to
the
foot
and
screw
foot
plate
plate
FOOT
knife,
highest
toward
lifter
foot
remove
and
driver
(Sew
and
use
“A”
(See
thumb
the
the
“B”.
AND
position
you
the
iii
iret
only
needle
presser
(The
are
NEEDLE
Pb)
rew
pi
hit
it
rO
for
with
presser
normal
by
ii
IS
the
plate
foot
turn
the
loot
1,
to
rn
—16—
Page 22

)
.
®
the
Set
tigl2ten
the
Set
presser
the
arrow.
of
Put
the
needle
the
presser
upper
screw
foot
plate
foot
thumb
knife
a
for
and
roll
back
for
b
hemming
screw
where
roll
on
hemming
it.
and
in
the
it
was.
and
tighten
direction
STANDARD
WIDTH
BITE
STITCH
DIFFERENTIAL
RATIO
NEEDLE
The
UPPER
THREAD
figures
THREAD
TENSION
+
different
threads.
the
roll
For
+
left
the
illustrated.
right
side
CHART
LENGTH
LOWER
THREAD
according
hem
side
(For
(dotted
FEED
THREAD
LOOPER
LOOPER
in
the
(See
sewing,
(solid
normal
FOR
above
to
P.20
line)
line)
ROLL
the
and
pass
of
HEMMING
ROLL
HEMMING
mm
-
6
5
1.5mm
1
N
4
1
-
1-4
5-8
chart
of
kind
P11)
needle
the
thread
of
sewing,
thread
1
may
the
guide
pass
guide
ROLL
FINE
HEMMING
6
mm
-
5
15mm
1
-
N
4
1
-
2-4
2-4
a
be
fabric
thread
a
it
to
a
little
and
as
the
I-
(3)
(4)
.1
to
At
(3)
of
the
For
towards
neater
the
thread
roll
stitches.
begining
hem
rear
the
chain.
sewing,
of
of
the
sewing,
pull
machine,
gently
the
pull
material
and
the
you’ll
end
gently
get
—17—
Page 23

7.
PIN
TUCKING
tucking
Pin
fabric
tucking
Pin
clothing
Use
*
plate
Remove
(1)
width.
Raise
(2)
Lower
+
The
(3)
overedging.
The
±
tucking
The
±
is
raising
by
is
a
and
presser
the
“A”.
the
(Sew
upper
the
the
tension
fabric
in
differential
overlocked
the
suited
lady’s
or
left
only
presser
set
is
(See
ironed
is
advance.
feed
upper
to
blouse.
foot
right
with
knife.
foot
the
P14)
so
knife.
the
marked
needle
the
(See
lifter.
same
along
ratio
avoid
design
one
P6)
the
normally
is
cutting
of
and
“A”
your
to
needle.)
the
as
line
child’s
a
needle
required
one
the
of
“N”.
the
for
pin
(4)
±
(5)
Place
hem
plate
Raise
Make
The
sewing
fabric
the
in
edge
start
and
the
up
chain-stitch
hem
edge
finished.
is
under
with
line
sew.
to
presser
ironed
is
with
the
the
presser
side
of
foot
the
the
needle
lifter.
sewing.
the
of
end
the
at
your
when
de
to
one
—18—
Page 24

8.
CORDED
OVERLOCK
Corded
when
fabrics.
There
(1)
the
(2)
of
9.
The
special
be
fabric
tion.
Before
supply
Move
toward
overlock
joining
are
Place
the
right
Sewanarrow
overlocked
the
REPLACING
upper
long-lasting
replaced.
even
replace
replacing
plug
the
you.
can
elastic
waysofcorded
two
slightly
needle,
knife
However,
though
them
is
take
front
cover
usedtostrengthen
be
materials
wide
cord
and
sew
positioning
cord,
stitch.
THE
CUTTING
and
lower
steel
and
when
they
are
in
the
following
the
knife,
out.
to
the
on.
knife
they
set
be
such
overlock.
(about
are
will
seldom
in
sure
right,
as
3mm)
itonthe
KNIVES.
made
do
not
the
right
way:
the
then
stitches
knitted
under
edge
of
have
cut
posi
power
open
the
a
to
it
Lower
knife
clamp
screw
plate
(1)
Replacing
Loosen
the
knife
knife
with
(2)
Replacing
Move
the
turning
Loosen
upper
knife.
Check
positioned
biting
Tighten
if
position
the
lower
for
a
the
upper
the
handwheel
the
upper
Change
the
downwords
the
upper
the
new
top
the
biting
of
lower
knife
one.
of
upper
knife
knife
position
lower
knife
clamp
the
to
towards
the
0.5
knife.
knife:
Align
needle
knife:
its
screw,
knife
screw.
screw
the
lowest
while
for
A
of
1.0
top
plate.
you.
a
from
and
of
position
holding
new
upper
the
change
the
one.
knife
top
lower
by
the
is
of
—19—
Page 25

10.
CHANGING
When
the
is
switched
(1)
Take
Out
(2)
Remove
(3)
Change
(4)
Replace
11.
WBRICATION
light
on:
the
the
the
the
does
power
lamp
light
lamp
THE
not
cover.
bulb.
cover.
LIGHT
come
supply
on
plug.
BULB
even
though
it
I
Lubration
since
oil
two
important
the
impregnated
drops
of
CLEANING
First
disconnect
removing
1.
Open
front
2.
Using
the
and
lint
STORAGE
1.
When
disconnect
removing
2.
Using
the
your
machine
3.
Store
away
SERVICING
Any
questions
is
to
be
addressed
was
purchased.
is
plug
that
the
not
sintered
oil
will
from
cover
brush
has
machine
t
plug
vrnyt
from
regarding
necessary
parts
increase
machine
the
and
provided,
accumulated
from
from
the
cover
when
bright
to
tha.
are
metal.
from
electric
side
is
not
the
electric
provided
you
and
service
tore
for
made
all
However,
durability.
power
outlet.
cover.
remove
in
power
hnish
your
damp
and
where
this
machine
ofaspecial
supply
Page
(See
all
the
use,
please
supply
ontlot,
pk
ase
sewing.
places,
or
operation
th:I.
machine
one
dust
cover
or
by
3)
by
Page 26
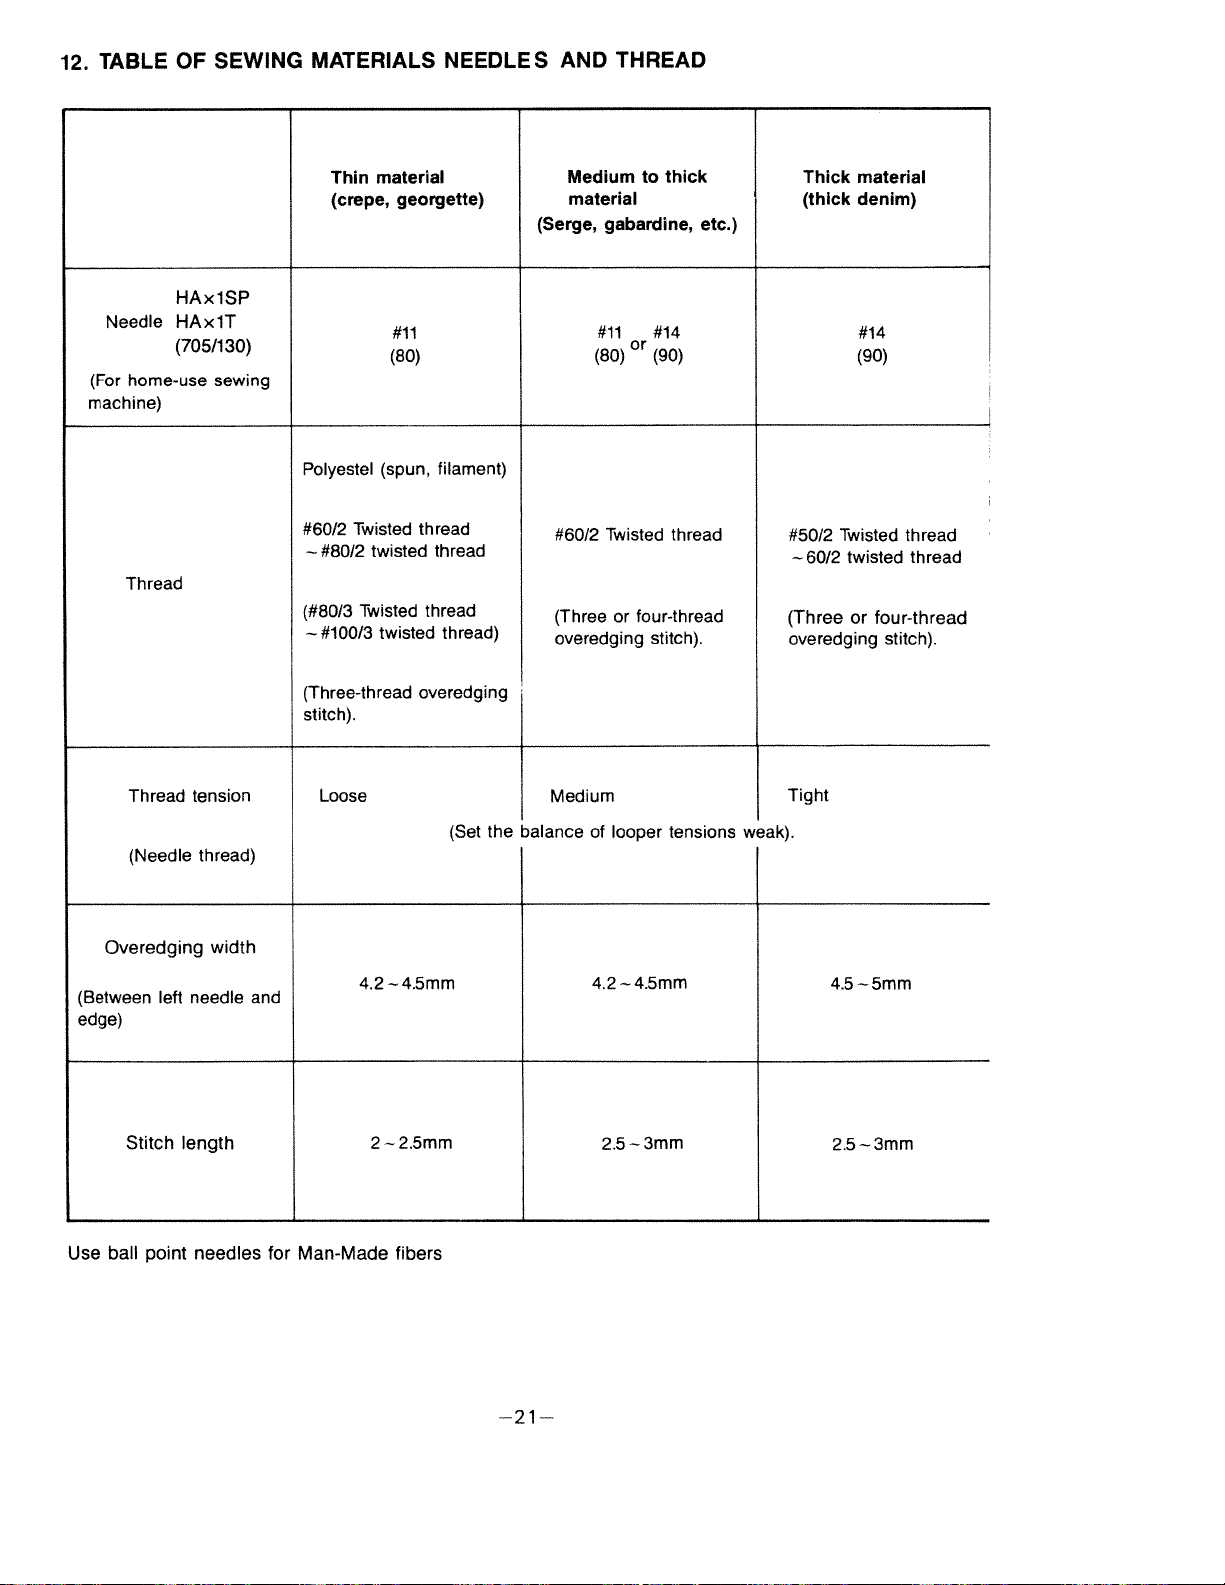
12.
TABLE
OF
SEWING
MATERIALS
NEEDLES
AND
THREAD
Needle
(For
home-use
machine)
Thread
HAx1SP
HAx1T
(705/1
sewing
30)
material
Thin
(crepe,
Polyestel
#60/2
—
#80/2
(#80/3
—#100/3
(Three-thread
stitch).
(spun,
Twisted
twisted
Twisted
twisted
georgette)
#11
(80)
filament)
thread
thread
thread
overedging
thread>
Mediumtothick
material
(Serge,
gabardine,
#14
#11
or
(90)
(80)
Twisted
#60/2
(Threeorfour-thread
overedging
stitch).
etc.)
thread
Thick
(thick
#50/2
Twisted
twisted
—
60/2
(Three
overedging
or
material
denim)
#14
(90)
thread
thread
four-thread
stitch).
Overedging
(Between
edge)
ball
Use
Thread
(Needle
left
Stitch
point
tension
thread)
width
needle
length
needles
and
for
Loose
4.2—4.5mm
Man-Made
2—2.Smm
fibers
(Set
the
Medium
balance
of
looper
4.2—4.5mm
2.5—3mm
tensions
Tight
weak).
4.5—5mm
2.5—3mm
—21—
Page 27

13.
ACCESSORIES
Needle
Screw
Needles
HAx1
HAx1
705/130
plate
drivers
SP
T
for
rolled
hemming
-
#11.2
(80)
#14..
(90)
Presser
rolled
Tweezers
Spool
.3
foot
hemming
Adapter
for
Cleaning
Accessor
Lower
brush
knife
Net
n
Oiler
Vinyl
Waste
cover
tray
—22
Page 28

SPECIFICATIONS
14.
Number
Number
Needles
between
Width
Overedge
of
Size
length
Stitch
of
of
bight
threads
needles
width
two
needles
Standard
Standard
2mm
(Range
1
—5mm
threads)
(3
(1
needle)
4
Threads
2
Needles
HAx1SPorHAx1T
4.5mm
(705/130)
4.2
-.6mm)
#11
(80)
Differential
Maximum
Machine
Weight
ratio
feed
sewing
dimensions
speed
Width
Depth
Height
300mm
220mm
290mm
1:0.7—2
1500
RPM
330mm)
(Max.
220mm)
(Max.
330mm—570mm)
(Max.
8.1
kg
—23—
Page 29

 Loading...