

Page 1

Use & Care Guide
Gas & Electric Dryer
Manual de Uso y Cuido
Secheuse a Gaz ou Electnque
Guide de L'Utilisateur
Secadora a Gas y EI6ctdca
www.frigidaire.com P/N 1S710S 100 (0806)
Page 2

Table of Contents
Product registration ...................................................................................................................................... 2
Important Safety Instructions ............................................................................................................................ 2-4
Drying Procedures................................................................................................................................................ 4
Features................................................................................................................................................................. 5
Care and Cleaning ............................................................................................................................................. 5-6
Common Drying Problems.................................................................................................................................. 6
Avoid Service Checklist ........................................................................................................................................ 7
Warranty ................................................................................................................................................................ 8
Framcais ........................................................................................................................................................... 9-15
Espahol ........................................................................................................................................................... 16-22
Product Record
The symbol _.., on the product or on its packaging indicates that this product may not be treated as household waste. Instead
it shall be handed over to the applicable collection point for the recycling of electrical and electronic equipment. By ensuring this
product isdisposed of correctly, you will help prevent potential negative consequences for the environment and human health,
which could otherwise be caused by inappropriate waste handling of this product. For more detailed information about recycling
of this product, please contact your local city office, your household waste disposal serviceor the shop where you purchased the
product.
Read and Save These Instructions
This Useand CareGuide providesgeneral operating instructions
for your dryer. It also contains information about features for
several other models. Your dryer may not have every feature
included.
Usethe dryer only asinstructed inthis Use&Care Guide and the
Operating Instructions included with your dryer.
Record Your Model and Serial Numbers
The model and serial numbers of your dryer are found on the
dryer serial plate located of the left side of the door opening.
Record and retain these numbers.
Noter los num_ros de mod_le et de s_rie
Model
Number
Note: The instructions appearing in this Owner's Guide arenot
meant to cover everypossible condition and situation that may
occur. Common sense and caution must be practiced when
installing, operating and maintaining any appliance.
Serial
Number
Purchase
Date
Important Safety Instructions
Your safety and the safety of others is very important.
We have provided many important safety messagesinthe Useand Care Guide, Operating Instructions, Installation Instructions
and on your appliance. Always read and obey all safety messages.
P_ This isthe safety alert symbol. This symbol alerts you to hazards that can kill or hurt you or others. All safety messages will
be preceded by the safety alert symbol and the word "DANGER" or "WARNING ". These words mean:
You will bekilled or seriously injured if you don't follow instructions.
You can be killed or seriously injured if you don't follow instructions.
AII safety messages will identify the hazard, tell you how to reduce the chance of injury, and tell you what can happen
if the instructions are not followed.
Foryour safety, the information inthis manual must be followed to minimize the risk of fire or explosion or to
prevent property damage, personal injury or lossof life.
Do not store or use gasoline or other flammable vapors and liquids in the vicinity of this or any other appliance.
WHAT TO DO IF YOU SMELL GAS:
• Do not try to light any appliance.
Do not touch any electrical switch; do not useany phone inyour building.
Clear the room, building or area of all occupants.
Immediately call your gas supplier from aneighbor's phone. Follow the gas supplier's instructions.
If you cannot reach your gas supplier, call the fire department.
Installation and service must be performed by aqualified installer, service agency or the gas supplier.
Page 3

14-30R
FUSED 30 AMP
120/240 V OR
120/208 V WALL
RECEPTACLE
ELECTR/C DRYERS:
DRYER
CORRECT
Use this way ONLY
DRYER
SER VI CE
CORD
Grounding type
wallrece
Power supply cord with 3-prong
CORRECT Use this way ONL Y
GAS DRYERS:
Do not under any
circumstances cut,
remove orbypass the
grounding prong
from this plug
grounding plug
Important Safety Instructions Con 't
_Avoid fire hazard or electrical shock. Do not use
an adaptor plug or extension cord or remove grounding prong
from electrical power cord. Failure to follow this warning can
cause serious injury, fire or death.
Note: The instructions appearing in this Useand Care Guide are
not meant to cover every possible condition and situation that
may occur. Common senseand caution must be practiced when
installing, operating and maintaining any appliance.
You can be killed or seriously injured if you
don't follow these Important Safety Instructions:
• To reduce the risk of fire, electrical shock, or injury to persons
when using this dryer, comply with the basic warnings listed
below.
• Failureto comply with these warnings could result in serious
personal injuries.
Prevent Fire
• Do not dry items that havebeen previously cleaned in, soaked
in, or spotted with gasoline, cleaning solvents, kerosene, waxes,
etc. Do not store these items on or near the dryer. These
substances give off vapors that could ignite or explode.
• Do not place items exposed to cooking oilsin your dryer. Items
contaminated with cooking oils may contribute to achemical
reaction that could cause a load to catch fire.
• Do not dry articles containing rubber, plastic or similar
materials such as bras, galoshes, bath mats, rugs, bibs, baby
pants, plastic bags and pillows that may melt or burn. Some
rubber materials, when heated, can under certain circumstances
produce fire byspontaneous combustion.
• Clean the lint screenbefore or after each load. The interior of
the dryer, lint screen housing and exhaust duct should be
cleaned approximately every 18 months by qualified service
personnel. An excessiveamount of lint build-up in these areas
could result in inefficient drying and possible fire. SeeCare and
Cleaning.
• Do not operate the dryer if the lintscreen isblocked, damaged
or missing. Firehazard, overheating and damage to fabrics can
occur. If your dryer has a drying rack, always replace the lint
screen when finished using the drying rack.
SAVE THESE INSTRUCTIONS
• -Risk of Fire- A clothes dryer produces combustible lint. The
dryer must be connected to an exhaust outdoors. Regularly
inspect the outdoor exhaust opening and remove any
accumulation of lint around the outdoor exhaust opening and
in the surrounding area.
• Donot obstruct theflow of ventilating air. Do not stackor place
laundry or throw rugs against the front or back of the dryer.
Do not spray any type of aerosol into, on or near dryer at any
time.
Do not use fabric softeners or products to eliminate static
unlessrecommended bythe manufacturer of the fabric softener
or product.
• Failure to comply with these warnings could result in fire,
explosion, serious bodily injury and/or damage to the rubber or
plastic parts of the dryer.
Protect Children
Do not allow children to play on or in the dryer. Close
supervision of children isnecessarywhen the dryer isused near
children. As children grow, teach them the proper, safe use of
all appliances.
• Destroy the carton, plastic bag and other packing materials
after the dryer is unpacked. Children might usethem for play.
Cartons covered with rugs, bedspreads or plastic sheets can
become airtight chambers.
• Keep laundry products out of children's reach. To prevent
personal injury, observe all warnings on product labels.
• Before the dryer is removed from serviceor discarded, remove
the dryer door to prevent accidental entrapment.
• Failure to comply with these warnings could result in serious
personal injuries.
Prevent Injury
• Toprevent shock hazard and assurestability during operation,
the dryer must be installed and electrically grounded by a
qualified servicepersonin accordancewith localcodes.Installation
instructions are packed inthe dryer for the installer's reference.
Refer to INSTALLATIONINSTRUCTIONSfor detailed grounding
procedures. If the dryer is moved to a new location, have it
checked and reinstalled by a qualified service person.
3 Printed in U.S.A.
Page 4

Important Safety Instructions Con 't
• To prevent personal injury or damage to the dryer, the
electrical power cord of a gas dryer must be plugged into a
properly grounded and polarized 3-prong outlet. The third
grounding prong must never be removed. Never ground
the dryer to agas pipe. Do not use an extension cord or
an adaptor plug.
ALWAYS disconnect the dryer from the electrical supply
before attempting any service or cleaning. Failure to do so can
result in electrical shock or injury.
Do not use any type spray cleanser when cleaning dryer
interior. Hazardous fumes or electrical shock could occur.
To prevent injury, do not reach into the dryer if the drum is
moving. Wait until the dryer has stopped completely before
reaching into the drum.
1, Prepare items for drying.
\,
Follow fabric care label instructions.
Dry items of similar fabric, weight and construction in the same load.
Separate dark items from light-colored items. Separate items that shed lint
from those that attract lint. If an item sheds lint, turn it inside out.
Besure buckles, buttons and trim are heatproof and won't damagethe drum
finish. Closezippers, fasten hooks and Velcro®-Iike fasteners. Tiestrings and
> d_ %:[Z_7*
sashesto prevent snagging and tangling.
If possible, turn pockets inside out for even drying.
_;gt
Check for stainswhich may not have been removed in washing. Dryer heat
may permanently set some stains. Repeat stain removal process before
drying.
Placesmall items in a mesh bag to prevent tangling and for easy removal.
2. Check that lint screen is dean and in place.
Place small items in a mesh bag.
3. Load the dryer.
The average load will fill the drum 1/3to 1/2full. Items need room totumble
freely for even drying and lesswrinkling. Do not overload dryer.
When drying large items, dry only 2 or 3 at atime. Fillout the load with small
and medium sized items.
Fordelicate or very small loads, add 2 lint-free towels for better drying, less
wrinkling, and to prevent grease stains caused by fabric softener sheets.
Do not overdryitems. Overdrying cancausewrinkling, shrinkage, harshness,
and a build-up of static electricity, which can produce more lint.
If desired, add a dryer fabric softener sheet.
4, Close the dryer door and set dryer controls (some models).
SeeOperating Instructions card for your specific model controls.
5. Turn cycle selector clockwise to the desired setting.
6. Start the dryer.
PushStart Button for 2secondsorturn the STARTknob clockwisetoON, hold
for 1-2 seconds and release.
Fill dryer drum 1/3 to 1/2 full.
To add or remove itemswhen the dryer is running, open the door. The dryer
will always stop when the door is opened. Allow the drum to come to a
complete stop before reaching inside.
To restart dryer, close the door then push the Start Button for 2 seconds or
turn the STARTknob clockwise to ON, hold for 1-2 seconds and release.
The dryer will not start if the cycle selector isin the OFFposition.
7. When the cycle ends, remove items immediately and hang or fold. Ifload
is removed before the cycle ends, turn cycle selector to OFF.
To prevent injury and damage to the dryer:
- All repairs and servicing must be performed by an
authorized servicer unless specifically recommended in
this Owner's Guide. Useonly authorized factory parts.
- Do nottamper with controls.
- Do not install or store the dryer where itwill beexposed to
the weather.
A thermal limiter switch automatically turns off the motor in
the unlikely event of an overheated situation (electric dryers
only). A service technician must replace the thermal limiter
switch after correcting the fault.
Failureto comply with these warnings could result inserious
personal injuries.
4
Page 5
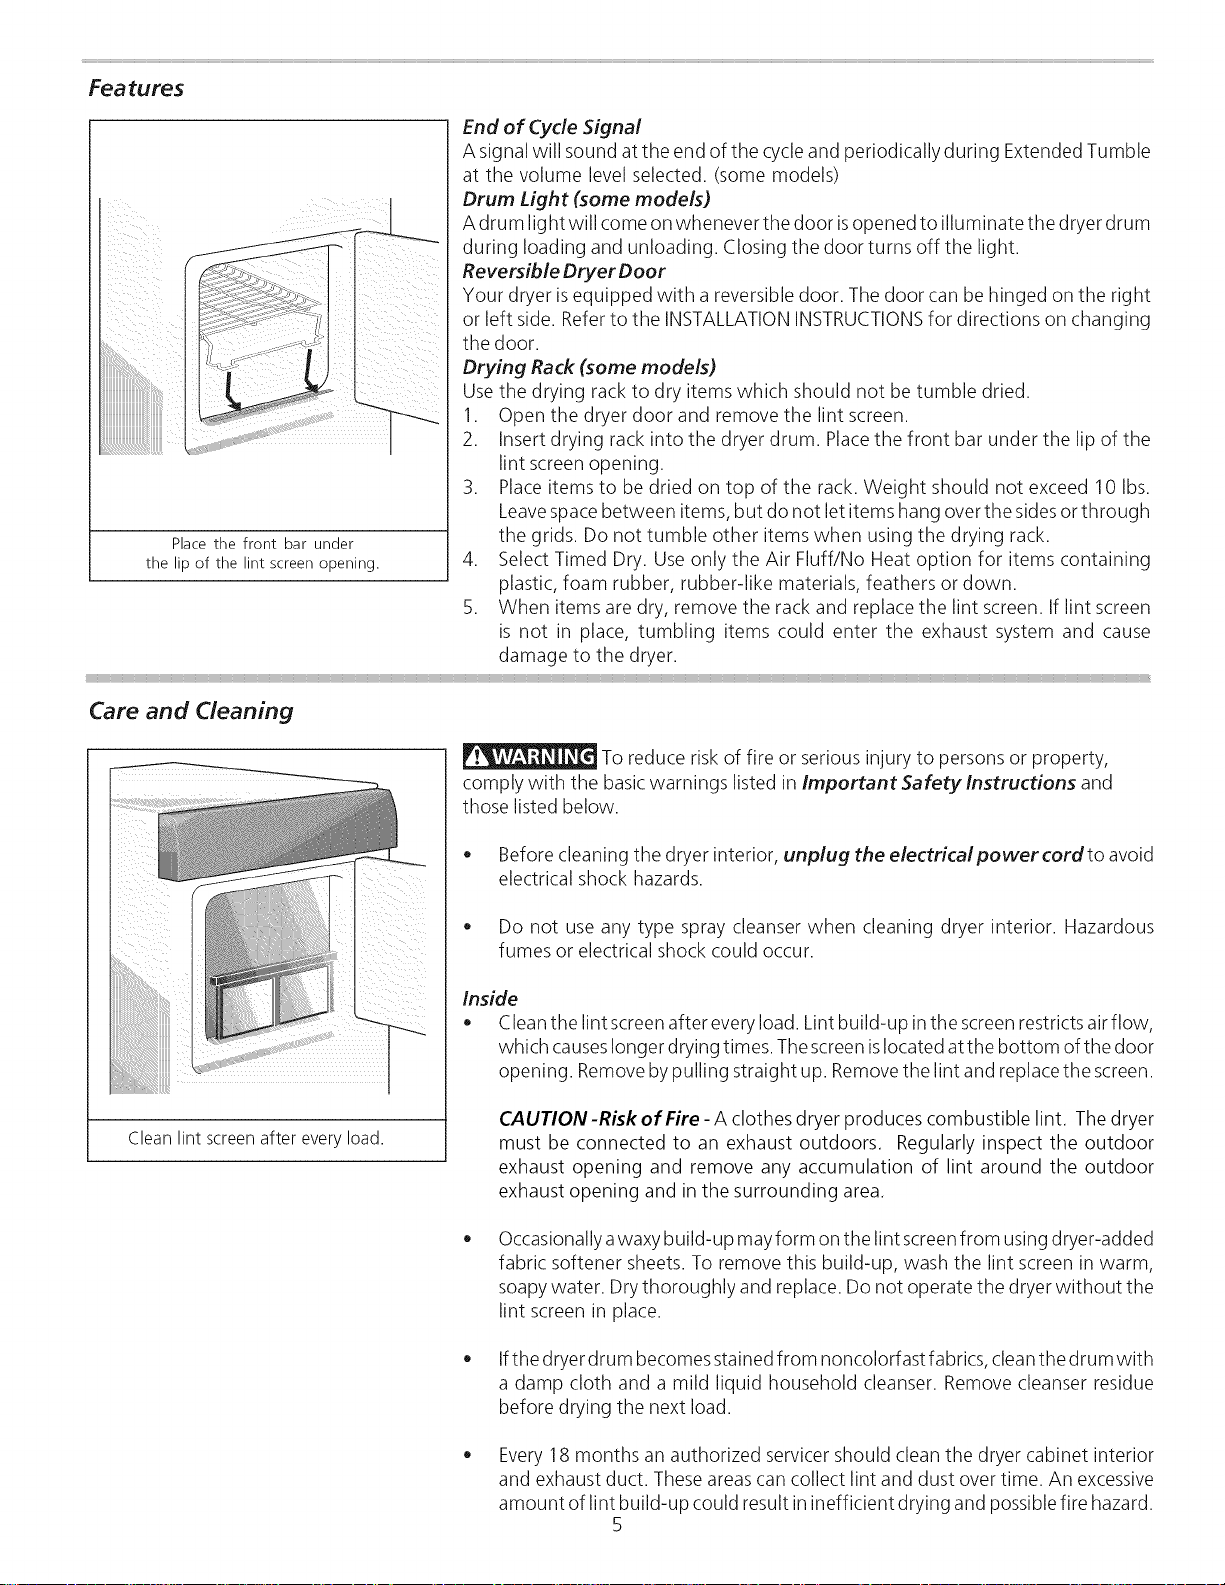
Features
End of Cycle Signal
A signal will sound at the end of the cycleand periodically during Extended Tumble
at the volume level selected. (some models)
Drum Light (some models)
A drum light will come onwhenever the door isopened to illuminate the dryer drum
during loading and unloading. Closing the door turns off the light.
Reversible Dryer Door
Your dryer is equipped with a reversible door. The door can be hinged on the right
or left side. Referto the INSTALLATIONINSTRUCTIONSfor directions on changing
the door.
Drying Rack (some models)
Use the drying rack to dry items which should not betumble dried.
1. Open the dryer door and remove the lint screen.
2. Insert drying rack into the dryer drum. Placethe front bar under the lip of the
lint screen opening.
3. Place items to be dried on top of the rack. Weight should not exceed 10 Ibs.
Leavespacebetween items, but do not let items hang over the sidesor through
Place the front bar under the grids. Do not tumble other items when using the drying rack.
the lip of the lint screenopening. 4. Select Timed Dry. Use only the Air Fluff/No Heat option for items containing
plastic, foam rubber, rubber-like materials, feathers or down.
5. When items are dry, remove the rack and replace the lint screen. If lint screen
is not in place, tumbling items could enter the exhaust system and cause
damage to the dryer.
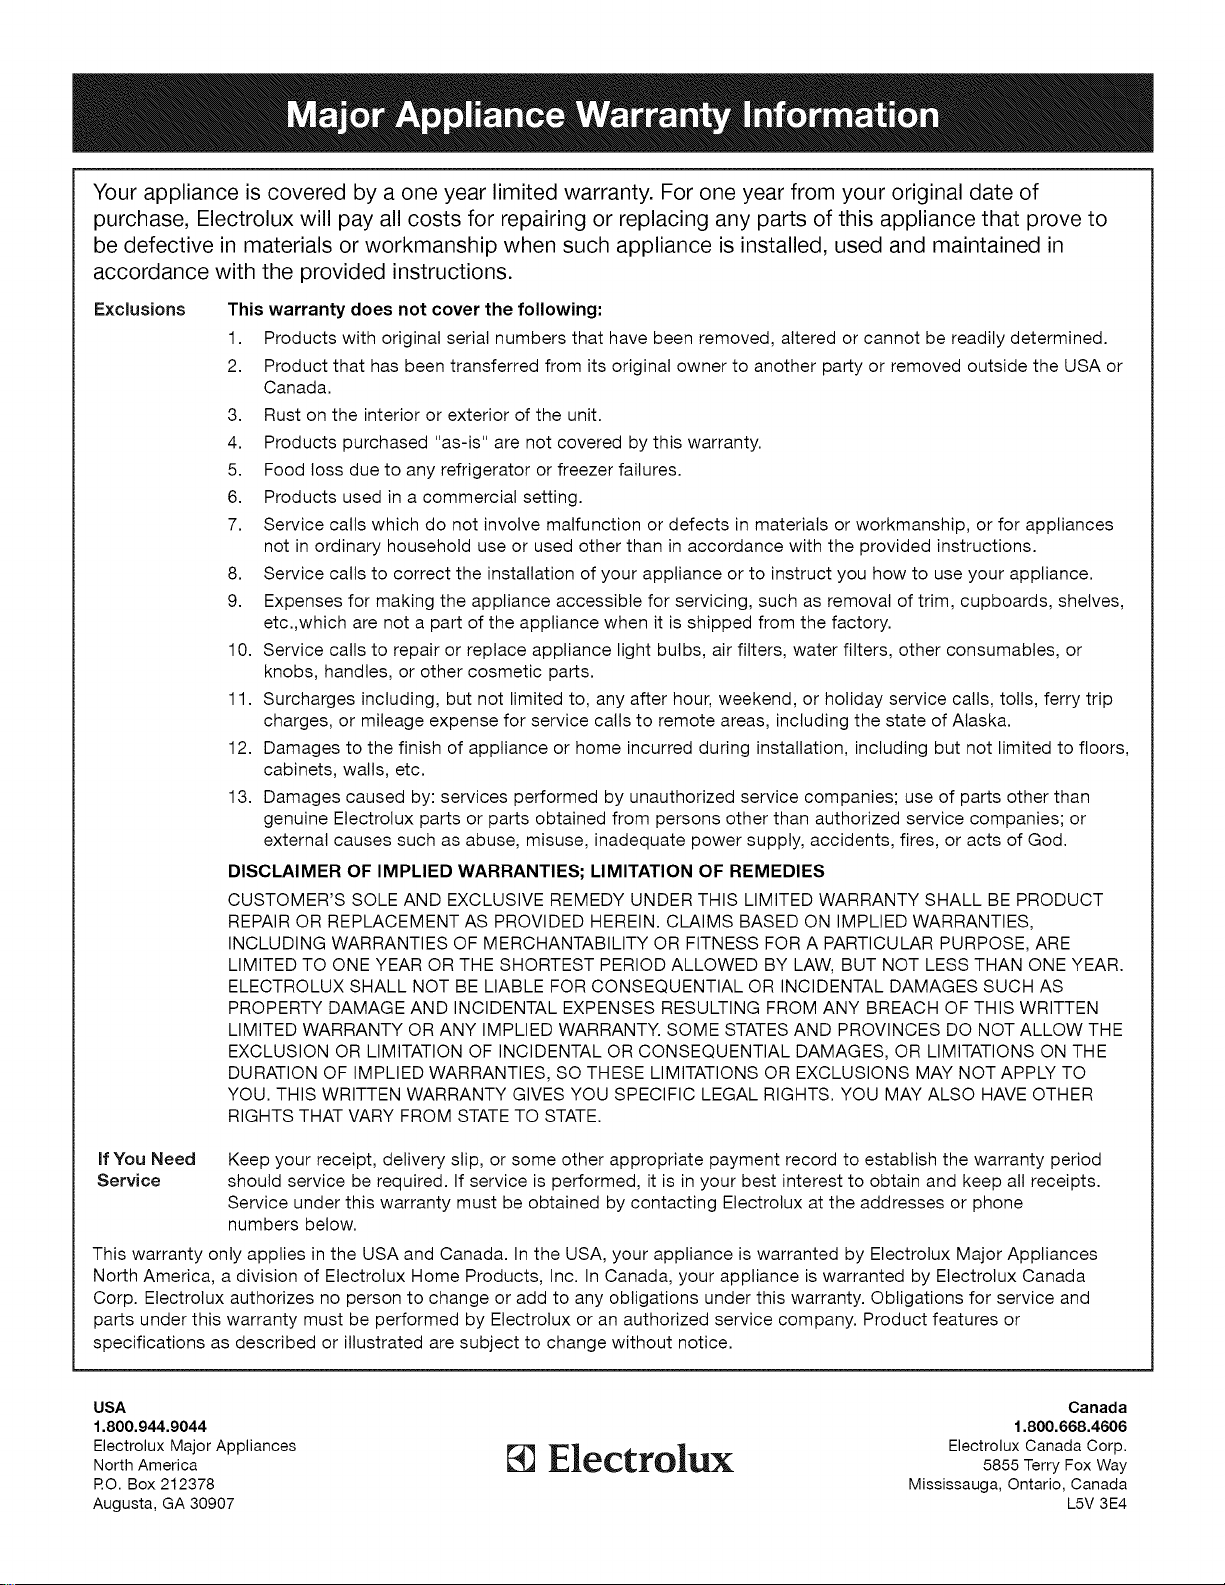
Care and Cleaning
Clean lint screen after every load.
To reduce risk of fire or serious injury to persons or property,
comply with the basic warnings listed in ImportantSafetylnstructions and
those listed below.
• Before cleaning the dryer interior, unplug the electrical power cord to avoid
electrical shock hazards.
Do not use any type spray cleanser when cleaning dryer interior. Hazardous
fumes or electrical shock could occur.
Inside
Clean the lint screenafter every load. Lint build-up inthe screenrestricts air flow,
which causeslonger drying times. Thescreen islocated atthe bottom of the door
opening. Remove by pulling straight up. Removethe lint and replace the screen.
CAUTlON-Risk of Fire -A clothes dryer produces combustible lint. The dryer
must be connected to an exhaust outdoors. Regularly inspect the outdoor
exhaust opening and remove any accumulation of lint around the outdoor
exhaust opening and in the surrounding area.
Occasionally awaxy build-up may form on the lint screenfrom using dryer-added
fabric softener sheets. To remove this build-up, wash the lint screen in warm,
soapy water. Drythoroughly and replace. Do not operate the dryer without the
lint screen in place.
Ifthe dryer drum becomes stained from noncolorfast fabrics, clean the drum with
a damp cloth and a mild liquid household cleanser. Remove cleanser residue
before drying the next load.
Every 18 months an authorized servicer should clean the dryer cabinet interior
and exhaust duct. These areas can collect lint and dust over time. An excessive
amount of lint build-up could result in inefficient drying and possible fire hazard.
5
Page 6

Care and Cleaning con 't
Outside
• Clean the cabinet with mild soap and water. Never use harsh, gritty er
abrasive cleansers.
if the cabinet becomes stained, clean with diluted chlorine bleach [1/2 cup
(120 ml) in 1quart (.95 liter) water]. Rinseseveral times with clear water.
Removeglue residue from tape or labelswith a mixture of warm water and mild
detergent. Or, touch residue with the sticky side of the tape or label.
When cleaning chrome parts useWindex with ammonia or any of the cleaning
items mentioned for cleaning the cabinet.
\
Before meving the dryer, placeastrip of cardboard or thin fiberboard under
the front leveling legs to prevent damage to floor.
Do not store or place laundry products on
top of dryer at any time. They can damage
the finish or controls.
Common Drying Problems
Many drying problems involve poor cleaning results, poor soil and stain removal, residues of lint and scum, and fabric
damage. Forsatisfactory drying results, follow these suggestions provided by The Soap and Detergent Association.
PROBLEM
Greasy, oily
stains
Lint
POSSIBLECAUSES
o Fabricsoftener sheet.
Overloading.
Overdrying causes static
electricity.
Lint screen not clean
when cycle began.
Lint is attached to "pills."
SOLUTIONS PREVENTIVE MEASURES
Rub fabric softener stains with bar
soap. Rinse and rewash.
Reduce load size and rewash using
liquid fabric softener in the final rinse.
Or, add afabric softener sheet and
tumble without heat.
Use lint brush or roller to remove lint.
Add a few bath towels to small loads for
proper tumbling.
Some "silk-like" fabrics should be air dried.
Use proper drying temperature.
Place fabric softener sheet on top of load
before starting the dryer.
Do not overload dryer.
Use fabric softener in washer or dryer to
reduce static electricity.
Remove items when they are slightly damp
to avoid overdrying.
Check that lint screen isclean and in place.
Pilling
(Fibers break
off, ball up and
cling to fabric.)
Shrinking Overdrying.
Wrinkling Overloading.
Pilling is normal with
synthetic and permanent
press fabrics. This is due
to abrasion from normal
wear.
Leaving items in dryer
after cycle ends.
Use a lint brush or shaver to remove
pills.
Irreversible condition. Follow fabric care label directions.
Reduce load size and tumble at
medium or low heat for 5-10 minutes.
Remove items immediately. Hang or
fold.
Use fabric softener to lubricate fibers.
When ironing, use spray starch or fabric
finish on collars and cuffs.
Turn items inside out to reduce abrasion.
If shrinking is a concern, check load often.
Remove items while slightly damp and
hang or lay flat to complete drying.
Block knits into shape.
Do not overload dryer.
Remove items as soon as cycle ends.
Page 7

Avoid Service Before calling for service, review this list. It may save both time and expense. The list includes
Checklist common occurrences that are not the result of defective workmanship or materials in this dryer.
0 CCURRENCE POSSIBLE CA USE SOLUTION
Dryer does not start. Electrical power cord is not securely Make sure the plug fits tightly in wall outlet.
plugged in or plug may be loose.
House fuse blown or circuit breaker Reset circuit breaker or replace fuse.
tripped.
Thermal limiter tripped. Call authorized service person for replacement.
Dryerrunsbutwon'theat. There are 2 house fuses in the dryer Replace fuse.
circuit. If l of the 2 fuses is blown, the
drum may turn but the heater will not
operate.
Gas supply valve is not open (gas Check to make sure supply valve is open. See
models). INSTALLATION INSTRUCTIONS for procedure.
Dryer does not have anough air supply See INSTALLATION INSTRUCTIONS.
to support the burner flame (gas models).
LP gas supply tank is empty or there has Refill or replace tank.
been a utility interruption of natural gas
(gas models). Dryer should heat when utility service is restored.
Make sure electrical line is not overloaded and the
dryer is on a separate circuit.
Drying cycle takes too long, Lint screen is clogged with lint. Make sure all lint has been removed from the dryer lint
outsideofthedryerfeelstoo screen before starting each cycle.
hot or smells hot.
Exhaust duct requirements have not
been met.
Electric dryer is connected to a 208 volt Drying time will be 20% longer than drying on a 240
circuit, volt circuit.
Drying procedures have not been SeeDrying Procedures.
followed.
Outside exhaust hood or exhaust duct Clean out any obstruction.
may be clogged or restricted.
High humidity. Use a dehumidifier near the dryer.
Excessive wrinkling. Dryer is overloaded. Do not overload. See Drying Procedures.
Items left in dryer too long. Remove items as soon as cycle ends.
Insufficient sorting of items. SeeDrying Procedures.
Drying temperature too high. Follow fabric care label instructions.
Scratching or chipping of the
drum finish.
Foreign objects such as coins, pins, clips
or buttons are inside the dryer.
Permanently attached items such as belt
buckles, zippers and fasteners may be
hitting the inside of the drum.
Exhaust duct must be at least 4 inches in diameter and
made of rigid or flexible metal.
When in place, the duct must have no more than two
90° bends and must not exceed length listed in
INSTALLATION INSTRUCTIONS.
Always remove foreign objects from pockets before
laundering. Remove objects from drum and restart
dryer.
It may be necessary to baste a scrap of material
securely around ornaments before drying to prevent
scratching and damage to the dryer.
Drum damage caused by foreign objects or permanently
attached items is not covered by the warranty.
Page 8
Your appliance is covered by a one year limited warranty. For one year from your original date of
purchase, Electrolux will pay all costs for repairing or replacing any parts of this appliance that prove to
be defective in materials or workmanship when such appliance is installed, used and maintained in
accordance with the provided instructions.
Exclusions
This warranty does not cover the following:
1. Products with original serial numbers that have been removed, altered or cannot be readily determined.
2. Product that has been transferred from its original owner to another party or removed outside the USA or
Canada.
3. Rust on the interior or exterior of the unit.
4. Products purchased "as-is" are not covered by this warranty.
5. Food toss due to any refrigerator or freezer failures.
6. Products used in a commercial setting.
7. Service calls which do not involve malfunction or defects in materials or workmanship, or for appliances
not in ordinary household use or used other than in accordance with the provided instructions.
8. Service calls to correct the installation of your appliance or to instruct you how to use your appliance.
9. Expenses for making the appliance accessible for servicing, such as removal of trim, cupboards, shelves,
etc.,which are not a part of the appliance when it is shipped from the factory.
10. Service calls to repair or replace appliance light bulbs, air filters, water filters, other consumables, or
knobs, handles, or other cosmetic parts.
11. Surcharges including, but not limited to, any after hour, weekend, or holiday service calls, tolls, ferry trip
charges, or mileage expense for service calls to remote areas, including the state of Alaska.
12. Damages to the finish of appliance or home incurred during installation, including but not limited to floors,
cabinets, walls, etc.
13. Damages caused by: services performed by unauthorized service companies; use of parts other than
genuine Etectrolux parts or parts obtained from persons other than authorized service companies; or
external causes such as abuse, misuse, inadequate power supply, accidents, fires, or acts of God.
DISCLAIMER OF IMPLIED WARRANTIES; LIMITATION OF REMEDIES
CUSTOMER'S SOLE AND EXCLUSIVE REMEDY UNDER THIS LIMITED WARRANTY SHALL BE PRODUCT
REPAIR OR REPLACEMENT AS PROVIDED HEREIN. CLAIMS BASED ON IMPLIED WARRANTIES,
INCLUDING WARRANTIES OF MERCHANTABILITY OR FITNESS FOR A PARTICULAR PURPOSE, ARE
LIMITED TO ONE YEAR OR THE SHORTEST PERIOD ALLOWED BY LAW, BUT NOT LESS THAN ONE YEAR.
ELECTROLUX SHALL NOT BE LIABLE FOR CONSEQUENTIAL OR INCIDENTAL DAMAGES SUCH AS
PROPERTY DAMAGE AND INCIDENTAL EXPENSES RESULTING FROM ANY BREACH OF THIS WRITTEN
LIMITED WARRANTY OR ANY IMPLIED WARRANTY. SOME STATES AND PROVINCES DO NOT ALLOW THE
EXCLUSION OR LIMITATION OF INCIDENTAL OR CONSEQUENTIAL DAMAGES, OR LIMITATIONS ON THE
DURATION OF IMPLIED WARRANTIES, SO THESE LIMITATIONS OR EXCLUSIONS MAY NOT APPLY TO
YOU. THIS WRITTEN WARRANTY GIVES YOU SPECIFIC LEGAL RIGHTS. YOU MAY ALSO HAVE OTHER
RIGHTS THAT VARY FROM STATE TO STATE.
If You Need
Service
This warranty only applies in the USA and Canada. In the USA, your appliance is warranted by Electrolux Major Appliances
North America, a division of Etectrolux Home Products, Inc. In Canada, your appliance is warranted by Electrolux Canada
Corp. Etectrolux authorizes no person to change or add to any obligations under this warranty. Obligations for service and
parts under this warranty must be performed by Electrolux or an authorized service company. Product features or
specifications as described or illustrated are subject to change without notice.
USA
1.800.944.9044
Electrolux Major Appliances
North America
RO. Box 212378
Augusta, GA 30907
Keep your receipt, delivery slip, or some other appropriate payment record to establish the warranty period
should service be required. If service is performed, it is in your best interest to obtain and keep all receipts.
Service under this warranty must be obtained by contacting Etectrolux at the addresses or phone
numbers below.
Canada
1.800.668.4606
Electrolux
Electrolux Canada Corp.
5855 Terry Fox Way
Mississauga, Ontario, Canada
L5V 3E4
Page 9

Table des matieres
Enregisttrement du produit ............................................................................................................................................ 9
Consignes de s_curit_ importantes ............................................................................................................................. 9-11
Directives de s_chage ............................................................................................................................................ 11-12
Caract_ristiques .................................................................................................................................................... 12
Entretien et nettoyage ............................................................................................................................................ 12-13
Probl_mes de s_chage courants .......................................................................................................................................... 13
Guide de d_pannage .......................................................................................................................................................... 14
Garantie ................................................................................................................................................................... 15
Enregistrement du produit
Le symbole _4_., sur le produit ou son emballage indique que ce produit ne pout _tre trait_ comme d_chet m_nager. II dolt _tre
remis au point decollecte d_di_ _cot effet (collecte et recyclage du materiel _lectrique et _lectronique). En proc_dant _ la mise
la casser_glementaire de I'appareil, nous pr_servons I'environnement et notre s_curit_, s'assurant ainsi que le d_chets seront
trait_s dans des conditions appropri_es. Pour obtenir plus de d_tails sur le recyclage de ce produit, veuillez prendre contact avec
los services de votre commune ou le magasin o0 vous avez effectu_ I'achat.
Lifece manuel en entier avant de seservir de cot appareil.
Ce manuel renferme de pr_cieuses informations sur, le
fonctionnement, I'entretien, leservice apr_s-vente.
Le conserver en lieu s0r.
Le present Guide de I'utilisateur d_crit le mode d'emploi
g_n_ral de la s_cheuse. II contient _galement des
renseignements sur loscaract_ristiques de divers autres
modules. Los caract_ristiques d_crites ici peuvent ne pas
s'appliquer _toutes loss_cheuses.
N'utiliser la s_cheuse que conform_ment au guide de
I'utilisateur et _ la Notice de fonctionnement qui
I'accompagnent.
Remarque : Losdirectives qui figurent dans le Guide de
I'utilisateur ne sauraient couvrir toutes loscirconstances et
lossituations possibles.IIfaut doncfaire preuvedejugement
et de prudence pendant I'installation, I'utilisation et
I'entretien detout appareil _lectrom_nager.
Lire et conserver ces instructions
Noter les numeros de modele et de serie
Losnum_ros de module et de s_rie de la s_cheuse setrouvent sur la
plaque signal_tique _ilagauche de I'ouverture de la porte. Noter et
conserver cosnum_ros.
N°de
mod#le
N°de
s_rie
Date de
i'achat
Consignes de securite importantes
La s_curit_ de I'utilisateur et celle des autres sont tr_s importantes.
Leguide de I'utilisateur, losconsignes d'utilisation et losdirectives d'installation contiennent de nombreuses consignes de s_curit_
importantes. Toujours life et respecter toutes losconsignes de s_curit_.
Voici le symbole de mise en garde. Ce symbole met en garde contre los risques pouvant entratner le d_c_s ou des
blessures _ sol ou aux autres. Tous los messagesrelatifs _ la s_curit_ sont precedes du symbole de mise en garde et
du terme <<DANGER >>ou <<AVERTISSEMENT>>.Cos termes signifient
L'utilisateur tu_ bless_ s'il suit directives.
Tousles messages relatifs b la s_curit_ indiquent le risque, comment r_duire le risque de blessure et ce qui peut
survenir si on ne suit pas les directives.
d'explosion, dedommages materiels, de blessureset de mort.
- Ne pas entreposer ni utiliser d'essence ou d'autres vapeurs ou liquides inflammables _ proximit_ de cette s_cheuse ou de tout
autre appareil _lectrom_nager.
QUE FAIRE S'IL YA UNE ODEUR DE GAZ
• N'allumer aucun appareil _lectrique.
Netoucher aucun commutateur _lectrique; ne pas utiliser let_l_phone dans I'immeuble.
Fairesortir tous losoccupants de la piece, de I'immeuble ou de la zone avoisinante.
Appeler la compagnie de gaz imm_diatement en utilisant let_l_phone d'un voisin. Suivre losinstructions dela compagnie de
gaz.
S'il est impossible de joindre la compagnie degaz, appeler los pompiers.
L'installationetlosr_parationsdoivent_treeffectu_espar un installateur ou un technicien qualifi_ ou par la compagnie de gaz.
sera ou gravement ne pas cos
L'utilisateur _tre tu_ ou bless_ s'il ne suit ces directives.
Pourvotre s_curit_,suivrelosdirectivesdonn_esdanslepresentguide pour minimiserlosrisquesd'incendie,
peut gravement
pas
Page 10

SECHEUSESELECTRIOUES
14-30R
PRISEMURALE
PROTE:GE:EPAR
FUSIBLE 30 A
120/240 V OU
120/208 V
SECHEUSE
CORDON D'ALIMENTATION DE LA SECHEUSE
Prise murale
mise b/a
terre
SECHEUSESA UGAZ
line faut en aucun cas
couper, retirer ou
ignorer la broche de
terre de cette fiche.
CORRECT
Utiliser SEULEMENT de cette fa_on
onsignes de securite importantes
On 't)
Lire routes/es directives avant d'utiliser /a s_cheuse.
pr_venir les risques d'incendie ou
de chocs _lectriques, ne pas utiliser de fiche adaptatrice ni de
rallonge ni retirer la broche de terre du cordon d'alimentation
_lectrique. Lenon-respecte decette consigne pourrait entratner
des blessures graves, un incendie ou la mort.
_Pour r_duire le risque defeu, de choc
_lectrique, de blessure graves ou de dommages materiels,
respectez les avertissements de base _num_r_s dans les
Instructions de s_curit_ importantes et ceux _num_r_s ci-
dessous:
• Lenon-respecte deces mises en garde pourrait entratner des
blessuresgraves.
Pr_vention des incendies
Ne pas s_cher dans cet appareil des articles qui ont _t_ au
pr_alable laves ou tremp_s dans de I'essence, du solvant
nettoyant, du k_ros_ne, de la cire, etc. nidesarticles qui sont
souill_s de ces produits. Ne pasranger de tels articles sur la
s_cheuseni_proximit_ de celle-ci. Lesproduits d_critsci-dessus
d_gagent des vapeurs qui peuvent s'enflammer ou exploser.
Nepasplacer dans la s_cheusedesarticles qui ont _t_ exposes
de I'huile de decuisson. Lesarticles souill_sd'huile de cuisson
peuvent entratner une r_action chimique pouvant provoquer
I'inflammation de la charge.
Nefakes pass_cher d'articles contenant du caoutchouc, du
plastique ou des articles comme des soutiens-gorges,
descentes de bains, carpettes, bavettes, calecons de b_b_,
sacsdeplastique et oreillerspouvant fondre ou br01er.Plusieurs
mat_riaux en caoutchouc, sousI'effet de lachaleur, peuvent
dans certaines circonstances produire un incendie par
combustion spontan_e.
Nettoyer le filtre _ charpie avant ou apr_s chaque s_chage.
L'int_rieur delas_cheuse, leIogement du filtre _ charpie et la
conduite d'_vacuation d'air doivent _tre nettoy_s environ tous
les 18 mois par un technicien qualifi_. Un d_p6t excessif de
charpie dans ceszones pourrait ralentir les_chageetentratner
des risques d'incendie. Sereporter _la section Entretien et
nettoyage.
Ne pas utiliser la s_cheuse si le filtre _ charpie est engorg_,
endommag_ ou manquant. Cela pr_senterait des risques
d'incendie, de surchauffes ou de dommages pour les tissus.
Si la s_cheuse est pourvue d'une grille de s_chage, replacer
le filtre _ charpie apr_s chaque utilisation de cette grille.
Cordon d"alimenta tion avec fiche
3 broches mise a la terre
CORRECTUtiliser SEULEMENT de cette fa_on
CONSERVER CES DIRECTIVES
• - Risque d'incendie - Une s#cheuse _ linge produit de la
charpie combustible. Las#cheusedolt #tre connect#e _ une
bouche d'#vacuation vers I'ext#rieur du b_timent ou de
I'immeuble. Vous devez inspecter r#guli@rement I'#vent
ext#rieur et enlever toute accumulation de charpie autour de
I'#vent et dans la cavit# du conduit d'#vacuation.
• Ne pas obstruer la circulation d'air. Ne pasempiler ni placer
des v#tements ou des tapis sur I'avant ou I'arri@re de la
s_cheuse.
• Nevaporiser en aucun temps des produits en a#rosol dans ou
sur la s#cheuse ou _ proximit# de celle-ci.
• Ne pas utiliser d'assouplissant ou autre produit #liminant
l'#lectricit# statique _ moins que cene soit recommand# par
le fabricant de l'assouplisseur ou du produit en question.
• Lenon-respecte de cesmises en garde pourrait entra?ner un
incendie, uneexplosion, desblessuresgravesoudesdommages
aux pi_ces en caoutchouc ou en plastique de la s#cheuse.
Protection des enfants
Ne pas permettre aux enfants de jouer sur ]a s_cheuse ni
I'int#rieur de celle-ci. Lorsque la s#cheuse est utilis#e
proximit# d'enfants, il est recommand# de les surveiller
attentivement. D@sque les enfants sont assez grands, leur
enseigner I'utilisation correcte et s#curitaire de tousles
appareils #lectrom#nagers.
• D#truire la bo?te, le sacen plastique et lesautres mat#riaux
d'emballage qui enveloppent la s#cheuse. Les enfants
risqueraient de s'en servircommejouet. Lescartons recouverts
d'un tapis, d'un couvre-lit ou d'une feuille de plastique peuvent
former une chambre _tanche.
• Garder lesproduits _ lessivehors de port#e des enfants. Pour
pr_venir lesblessures,respectertoutes lesconsignesdes_curit_
qui figurent surI'#tiquette de cesproduits.
• Avant de mettre la s#cheuse horsd'usage ou de lajeter, retirer
la porte pour #viter que quelqu'un ne s'emprisonne
accidentellement dans I'appareil.
• Lenon-respecte de ces misesen garde pourrait entrainer des
blessuresgraves.
Pr_ vention desblessures
• Pour pr_venir ]es risques de chocs _lectriques et assurer ]a
stabilit# de I'appareil pendant lefonctionnement, la s#cheuse
dolt #tre install#e et mise _laterre par un technicien qualifi#
conform#ment aux codes Iocaux. Lanotice d'installation qui
accompagne la s#cheuse est destin#e _ I'installateur. Se
reporter _ laNOTICED'INSTALLATIONpour obtenir la marche
suivre pour lamise_laterre. Silas#cheusedolt #tre d#plac#e,
la faire v#rifier et r#installer par un technicien qualifi#.
10
ImprimeauxEtats-Unis
Page 11

Consignes de securite importantes (suite) • Pour pr_venir les blessures, ne pas insurer la main dans la
• Pour pr_venir los blessures et _viter d'endommager la s_cheusependantqueletambourestenmouvement.Attendre
s_cheuse,lecordon d'alimentation _lectrique de s_cheuseau
gaz dolt _tre branch_ dans une prise _ 3 trous correctement
mise _ la terre et polaris_e. La troisi_me broche de mise b
la terre ne dolt en aucun cas _tre retiree. Nejamais relier
la s_cheuse bun tuyau de gaz pour la mettre a la terre.
Ne pas utiliser de rallonge ni de fiche adaptatrice.
TOUJOURS couper I'alimentation _lectrique avant detenter
de r_parer ou de nettoyer las_cheuse.
Lenon-respecte de cette miseen garde pourrait entratner des
chocs_lectriques ou desblessures.
N'utiliser enaucun temps des produits de nettoyage ena_rosol
pour nettoyer I'int_rieur de las_cheuse.
Cos produits peuvent d_gager des vapeurs dangereuses ou
causer une _lectrocution.
que las_cheuse soit compl_tement arr_t_e avant d'ins_rer la
main dans letambour.
Pourpr_venir lesblessuresetnepas endommager las_cheuse :
- Les r_parations et I'entretien doivent _tre effectu_s
uniquement par un r_parateur autoris_ _ moins
d'indications contraires dansle present Guide de I'utilisateur.
N'utiliser que des pi_ces recommand_es par le fabricant.
- Nepas modifier loscommandos.
- Ne pas installer ni entreposer las_cheuse dans un endroit o0
elleseraitexpos_eauxconditions atmosph_riques ext_rieures.
Un thermorupteur arr_te automatiquement le moteur de la
s_cheuse (s_cheuses_lectriques seulement) dans lecas peu
probable o0 elle surchaufferait. Un technicien dolt r_gler le
probl_me, puis remplacer lethermorupteur.
Lenon-respecte de ces misesen garde pourrait entratner des
blessuresgraves.
Directives de sechage
Respecter losdirectives qui suivent avant de placer lesv_tements dans la s_cheuse.
Lifelanotice de d'utilisation pour connattre lefonctionnement devotre module.
Toujours life et suivre I'_tiquette d'entretien de chaque article ainsi que
I'_tiquette des produits b lessive.
_Pour r_duire lesrisques d'incendie, de chocs _lectriques et
de blessures,life losConsignes des_curit_ importantes avant d'utiliser las_cheuse.
1. Pr_parer les v_tements b s_cher.
Respecter les directives de
I'_tiquette d'entretien.
S_cher ensemble les articles detissu, de poids et de fabrication semblables.
S_parer losarticles de couleur fonc_e desarticlesdecouleur p_le.S_parer losarticles
qui produisent de la charpie de ceuxqui I'attirent. Tourner _ I'envers losarticles qui
produisent dela charpie.
S'assurer que los boucles, los boutons et los garnitures r_sistent _ la chaleur et
qu'ils n'endommageront paslerev_tement dutambour. Fermerlosfermetures _clair,
attacher los agrafes et former losattaches de type Velcro®. Attacher loscordons et
losceintures entissu pour losprot_ger des accrocs et losemp_cher de s'emm_ler.
Danslamesuredu possible, retourner lespoches pour obtenir un s_chageuniforme.
V_rifier s'il reste des taches qui n'ont pas _t_ enlev_es au lavage. Lachaleur de la
Placer les petits articles
dans une poche en filet.
s_cheuse pout fixer certaines taches de facon permanente. Reprendre losmesures
de d_tachage avant de s_cher cos articles.
Placerlos petits articles dans une poche en filet pour losemp_cher de s'emm_ler
et faciliter leur manipulation.
2. S'assurer que le filtre b charpie est propre et en place.
3. Placer les v_tements dans la s_cheuse.
Une charge moyenne devrait remplir le tambour au tiers ou _ lamoiti_. Lesarticles
ont besoin d'espacepour basculerlibrement, sansquoi ilsnes_chent pasuniform_ment
et ils sefroissent plus qu'_ la normale. Ne pas surchargerla s_cheuse.
Nes_cher que 2 ou3 gros articles _lafois. Ajouter de petits et moyens articles pour
completer la charge.
Dans lecasdesarticles fragiles ou tr_s petits, ajouter deux serviettes ne produisant
pasde charpie, afin d'assurer un s_chage plus uniforme, de r_duire lefroissement et
d'_viter lostaches de graisse caus_espar I'assouplissant en feuille.
Ne pas s_cher trop Iongtemps. Un s_chage excessif peut froisser ou r_tr_cir los
v_tements, losrendre rugueux ou produire de I'_lectricit_ statique, et donc davantage
de charpie.
Au besoin, ajouter un assouplissant en feuille.
4. Former la porte de la s_cheuse et r_gler los commandos de la s_cheuse
Remplir letambour de la
s_cheuse au tiers ou _ la demie.
(certains mod_les).
Sereporter _ laNotice de fonctionnement pour conna_tre lescommandes
propresachaque module.
5. Placer le s_lecteur de cycle b la position d_sir_e.
6. D_marrerla s_cheuse.
Appuyer sur le bouton START(D_part) pendant 2 secondes.
Pourajouter ou rotifer desarticles pendant lefonctionnement delas_cheuse,ouvrir
la porte.
11
Page 12

Directives de sechage (suite)
Las_cheuses'arr_tetoujourslorsquelaporteestouverte.Attendre • La s_cheuse nese met pas en marche sile s_lecteur est _ la
que le tambour s'arr#te compl_tement avant d'ins#rer la main position OFF(ARRCT).
dans la s_cheuse. 7.A la fin du cycle, retirer imm_diatement les v_tements et
• Pourred6marrer las6cheuse,former la porte puis appuyer sur lessuspendre eulesplier. Silesv6tements sont retir6savant la
le bouton START(D6part) pendant 2 secondes, fin du cycle,tourner les61ecteurde cyclealaposition Off (ARRCT).
Caracteristiques A vertisseur de fin de cycle
Un avertisseur de fin de cycle sonne a la fin du cycle et de fat on p_riodique sila
fonction Extended Tumble est s61ectionn6e.
_'clairage du tambour (certains mod_les)
Lorsque la porte est ouverte, une lampe s'allume, afin d'_clairer letambour pendant
le chargement et le d6chargement. Cette lampe s'6teint Iorsque la porte est
referm6e.
Porte r_versible
La s_cheuse est pourvue d'une porte r_versible. Les charni_res de cette porte
peuvent _tre install_es b droite ou b gauche de la porte. Sereporter b la NOTICE
D'INSTALLATION pour plus de d_tails.
Grille de s_chage
Utiliser la grille des_chage pour lesarticles qui nepeuvent _tre s_ch_spar culbutage.
1, Ouvrir la porte de la s_cheuse et enlever le filtre b charpie.
2, InsUrer la grille de s_chage dons le tambour de la s_cheuse. Placer la barre
frontale sous lerebord de I'ouverture du filtre b charpie.
3, Placer losarticles b s_cher sur ledessusdelagrille. Leur poids ne dolt pasd_passer
10 Ib (4,5 kg). Laisserde I'espace entre losarticles et ne pas los laisser pendre sur
Placer la barre frontale sous le rebord
de I'ouverture du filtre _ charpie.
los c6t_s ou au travers des grilles. Ne pas s_cher par culbutage d'autres articles
pendant que la grille de s_chage est utilis_e.
4, S_lectionner le cycle Timed Dry (s_chage minute). N'utiliser que I'option Air Fluff/
No Heat (sanschaleur) pour losarticles contenant des plumes, du duvet, du plastique,
du caoutchouc mousse ou des mat_riaux caoutchouteux.
5, Lorsque los articles sont secs,enlever la grille et r_installer lefiltre _ charpie. Si
ce dernier n'est pasen place, les articles a s_cher pourraient p_n_trer dans le
syst_me d'_vacuation et endommager la s_cheuse.
Entretien et nettoyage _ Afin de r_duire lesrisquesd'incendie, de blessuresgraves
ou de dommages materiels, respecter losconsignes _l_mentaires d_crites _ lasection
Consignes de s_curit_ importantes ainsi que lesdirectives qui suivent.
Avant de laverl'int_rieur de las_cheuse,d_brancherlecordon d'alimentation
_lectrique afin de pr_venir lesrisquesde chocs _lectriques.
N'utiliser jamais de produits produit de nettoyage en a_rosol pour nettoyer
I'int_rieur de la s_cheuse.Cosproduits peuvent d_gager desvapeursdangereuses
ou causer des chocs_lectriques.
Int_rieur
Nettoyer lefiltre _charpie de las_cheuseapr_schaque s_chage.L' accumulations
de charpie dans le filtre restreint lacirculation de I'air et ralentit le s_chage. Le
filtre est situ_ dansle hasde I'ouverture de laporte. Rotiferlefiltre enle soulevant
bien droit. Rotifer lacharpie et remettre lefiltre en place.
ATTENTION-Risque d'incendie- Une s_cheuse_ lingo produit dela charpie
combustible. Las_cheuse dolt _tre connect_e _ une bouche d'_vacuation vers
I'ext_rieur du bZiment ou de I'immeuble. Vous devez inspector r_guli_rement
I'_vent ext_rieur et enlever toute accumulation decharpie autour de I'_vent et
dans lacavit_ du conduit d'_vacuation.
Detemps _ autre, un d_p6t de cite pout seformer surle filtre _charpie Iorsqu'on
Nettoyer le filtre _ charpie
apr_s chaque brassie.
utilise un assouplissant de tissu en feuille dans la s_cheuse. Pour supprimer ce
d_p6t, laver le filtre _ charpie dans de I'eau tilde savonneuse. S_cher_ fond et
replacer le filtre. Ne pas utiliser la s_cheuse sans le filtre _ charpie.
Si le tambour est tach_ par des%tements qui ont d_teint, le nettoyer _ I'aide
d'un chiffon humide et d'un d_tergent liquide doux d'usage domestique. Essuyer
toute trace de d_tergent avant de r_utiliser la s_cheuse.
L'int_rieur de la carrosserie de la s_cheuse ainsi que le conduit d'_vacuation
doivent _tre nettoy_s tousles 18 mois par un technicien autoris_. Avec letemps,
il pout s'accumuler de la poussi_re et de la charpie _ cos endroits. Une
accumulation excessivede charpie pourrait r_duire I'efficacit_ de la s_cheuse et
causer un incendie.
12
Page 13

Entretien et nettoyage (suite)
Ext#rieur
• Nettoyer lacarrosseriede la s_cheuse_ I'eau etau savon doux. Nejamais
utiliser de d#tergent fort, granuleux ou abrasif.
Lestaches surla carrosserie doivent _tre lav@s _ I'aide d'un m_lange de
javellisant et d'eau (120 ml [1/2 tasse] dejavellisant dilu_s dans 0,951 [1
pinte] d'eau). Rincer plusieurs fois _ I'eau claire.
Retirerlesr_sidusdecolle provenantde rubans adh_sifs oud' _tiquettes
I'aided'un m_lange d'eau tilde et ded_tergent doux. Ou encore, d_coller
ces r_sidus en yappuyant le c6t_ collant du ruban ou de I'_tiquette.
Pournettoyer lespi_cesde chrome utilisez Windex avecammoniaque ou
quelq'un desarticles mentionn_s pour nettoyer lecabinet.
\
Avantde d#placerlas#cheuse, placerune bande de carton ou unmince
panneau de fibres sous les pieds niveleurs avant afin d'_viter
Ne ranger, ni poser en aucun temps des produits a lessive,
tels que du d_tergent, de I'assouplissant et du javellisant,
sur le dessus de la s_cheuse. Ces produits peuvent
endommager le fini ou les commandes de la s6cheuse.
d'endommager le plancher.
Problemes de sechage courants
Bon nombre de probl_mes de s_chage sont li_s _un lavage insuffisant, au traitement inad_quat de la salet_ et des taches, _ un d@6t
de charpie ou de mousse ou encore _ des tissus endommag_s. Pour des r_sultats satisfaisants, suivre les recommandations de The
Soap and Detergent Association (association des fabricants de savons et de d_tergents).
PROBL_'MES
Tachesde
CAUSESPOSSIBLES
o Assouplissantenfeuille.
graisse ou
d'huile
Charpie
Boulochage
(desfibres se
detachent et
forment de
petites boules
[bouloches]qui
adherent au tissu)
Retrecissement _ %chageexcessif.
Froissement
%cheusesurcharg@.
Lesechageexcessifproduit
de I'_lectricitestatique.
Filtrea charpienon nettoy_
aud_but du cycle.
Lacharpies'attacheaux
bouloches.
Le boulochage est cause
par I'abrasion qui
accompagne I'usure
normale des tissus
synthetiques et sans
repassage.
Charge trop volumineuse.
Articles laissesdansla
secheuseapresla fin du
cycle.
SOLUTIONS
Frotterlestachesd'assouplissantavec
unpaindesavon.Rinceret laverde
nouveau.
Laver de nouveau en reduisant le
volume de la brass@ et en utilisant
un assouplissant liquide au rinqage
final.
Ou encore, ajouterde I'assouplissant
en feuilleet secherpar culbutage sans
chaleur.
Retirerlacharpiea I'aided'une brosse
ou d'un rouleaua charpie.
Utiliserune brosseou un rasoir
charpie pour retirer lesbouloches.
,, Problemeirr@ersible.
Reduirele volume de la charge et
secheraune temperature moyenne ou
bassependant 5 a 10 minutes.
Retirerimmediatement lesarticlesde la
secheuse.Suspendreou plier.
MESURES PREVENTIVES
Ajouter quelques serviettes aux petites charges,
afin de faciliter le culbutage.
Certainstissussoyeuxdoivent_tre seches_I'air
ambiant.
Utiliserlatemperature de sechagerecommand@.
PlacerI'assouplissantsurledessusde lacharge
avantded_marrerlasecheuse.
Nepassurchargerlasecheuse.
Utiliserun assouplissantdanslalaveuseou la
secheusepour reduire I'electricitestatique.
Retirer les articles de la secheuse Iorsqu'ils sont
encore leg_rement humides, afin d'_viter le
sursechage.
S'assurerquelefiltre _ charpieestpropre et en place.
Utiliser un assouplissant pour lubrifier les fibres
Au repassage, utiliser de I'amidon en a_rosol ou
un produit rehaussant I'apparence du tissu sur
les cols et lespoignets.
Retourner les articles afin de r_duire leur usure.
Suivre les directives de I'_tiquette d'entretien de
chaque article.
Si I'on craint le retrecissement des v&tements,
verifier souvent cesderniers pendant le sechage
Retirer les articles de la secheuse Iorsqu'ils sont
encore leg_rement humides et les suspendre ou
les secher a plat.
Redonner la forme aux tricots.
Ne pas surcharger la secheuse.
Retirer les articles de la secheuse d_s que le cycle
est termine.
Page 14

Avan t de faire appel aux services d'un technicien, consulter le guide qui suit. Cela peut epargner
Guide de depannage temps et argent. Ceguide porte sur des problemes courants qui ne sent pas causes par un defaut
de materiau ou de fabrication.
PROBLEME CA USE POSSIBLE SOLUTION
Lasecheusenedemarrepas. Lecordon d'alimentation _lectrique n'est pas S'assurer que la fiche est bien entree dans la prise murale.
Lasecheusefonctionnemais Le circuit de la secheuse comporte deux Remplacer le fusible.
nesechepas, fusibles. Lorsqu'un des deux fusibles est
Le sechage se fair tres Lefiltre a charpie est engorge. S'assurerquetoutela charpiea _te retir_edu filtreavantde
lentement, I'exterieur de la d_marrer chaque cycle.
secheuse est chaud ou une
odeur suggere que la Les exigences relatives a I'installation du Leconduited'_vacuationdoitmesureraumoins4pode
secheusesurchauffe, conduit d'_vacuation n'ont pas_t_satisfaites. diametre et _tre faite de metal rigide ou souple.
branchedefa_onsecuritaireoulafiche estlache.
Lefusible estbrQleouledisjoncteurest Remplacerlefusibleou reenclencherledisjoncteur.
d_clenche. S'assurer que le circuit electrique n'est passurcharge et que
la secheuse dispose de son propre circuit.
Lethermorupteurestd_clenche. Faire appel a un technicien, afin de remplacer le
thermorupteur.
brOle, I'_lement de chauffage ne peut
fonctionner m_me si le tambour tourne.
La vanne d'alimentation en gaz n'est pas S'assurerque lavanne d'alimentation estouvert. Sereporter a la
ouvert (modUles au gaz). NOTICED'INSTALLATIONpour lamarche_suivre_cet egard.
L'arrivee d'air de la secheuse est insuffisante Se reporter a la NOTICE D'INSTALLATION.
pour alimenter laflamme du brOleur(modUles
au gaz).
Labouteille de propane estvide ou leservice Remplir ou remplacer labouteille.
d'alimentation en gaz naturel a _te La secheuse devrait fonctionner une fois le service
interrompu (modUles au gaz). d'alimentation en gaz r_tabli.
Froissemen t excessif
Rayage ou ecai#age du fini
du tambour
Une fois installee, le conduite ne dolt pas comporter plus de
deux coudes _ 90° ni exceder la Iongueur indiqu_e dans la
NOTICE D'I NSTALLATION.
La secheuse electrique est branchee sur un Le temps de sechage est augmente de 20 pour cent par
circuit de 208 volts, rapport a un circuit de 240 volts
Lesdirectives de sechage n'ont paset_ suivies. SereporteralasectionDirectivesdesechage.
Leconduit d'_vacuation ou la bouche Retirer toute obstruction.
d'_vacuation exterieureestengorg_ ou obstru_.
Humidite _levee. Utiliser un d_shumidificateur pros de la secheuse.
Lasecheuse est surchargee. Ne pas surcharger la secheuse. Se reporter a la section
Lesarticles sont testes trop Iongtemps dans Retirer les articles de la secheuse d_s la fin du cycle.
la secheuse.
Tri insuffisant des articles. Sereporter a la section Directives de sechage.
Temperature de sechage trop _levee. Respecter les directives de I'_tiquette d'entretien dechaque
Des objets comme des pieces de monnaie,
des epingles, des pinces ou des boutons se
trouvent dans la secheuse.
Directives de sechage.
article.
Toujours vider les poches des v6tements avant de les laver.
Retirer cesobjets du tambour puis red_marrer la secheuse.
Des objets fixes en permanence aux
v6tements, comme des boucles de ceinture,
desfermetures eclair ou des agrafes peuvent
percuter I'interieur du tambour.
14
II pourrait s'averer necessaire de faufiler une piece de tissu
autour des ornements avant de secher les v_tements.
Los dommages causes au tambour par des corps
etrangers ou des objets fixes en permanence aux
v@tements ne sont pas couverts par la garantie.
Page 15

Votre appareil est couvert par une garantie limit_e d'un an. Pendant un an a partir de la date d'achat originale,
Electrolux assumera les coots des r_parations ou du remplacement des pi_ces de cet appareil qui pr_sente un
d_faut de fabrication ou de mat_riau, si cet appareil est installS, utilis_ et entretenu selon les instructions fournies
avec celui-ci.
Exclusions
Si VOUS avez
besoin d'une
r_paration
Cette garantie n'est valide qu'aux Etats-Unis et au Canada. Aux Etats-Unis, votre appareil est garanti par Electrolux Major Appliances
North America, une division de Electrolux Home Products, Inc. Au Canada, votre appareil est garanti par Electrolux Canada Corp.
Personne n'est autorise b.modifier ou b. ajouter aux obligations contenues dans cette garantie. Les obligations de cette garantie
concernant la reparation et les pieces doivent etre remplies par Electrolux ou par une compagnie de reparation autorisee. Les
caracteristiques et specifications decrites ou illustrees peuvent etre modifiees sans preavis.
Cette garantie ne couvre pas ce qui suit :
1. Les produits dont le numero de serie original a ete enleve, modifie ou qui n'est pas facilement determinable.
2. Les produits qui ont ete transferes de leur proprietaire inital b. une autre partie ou qui ne sont plus aux Etats-Unis ou
au Canada.
3. La rouille b.I'interieur ou b. I'exterieur de I'appareil.
4. Les produits vendus ,, tels quels ,_ne sont pas couverts par cette garantie.
5. Les aliments perdus en raison de pannes du refrigerateur ou du congelateur.
6. Les produits utilises dans les etablissements commerciaux.
7. Les appels de service qui ne concernent pas un malfonctionnement, un defaut de fabrication ou un vice de materiau
ou pour les appareils qui ne font pas I'objet d'un usage domestique ou qui ne sont pas utilises conformement aux
instructions fournies.
8. Les appels de service pour verifier I'installation de votre appareil ou pour obtenir des instructions sur la fagon
d'utiliser votre appareil.
9. Les frais qui rendent I'appareil accessible pour une reparation, par exemple enlever des garnitures, les armoires, les
etageres, etc. qui ne faisaient pas partie de I'appareil Iorsqu'il a quitte I'usine.
10. Les appels de service au sujet de la reparation ou du remplacement des ampoules, des filtres b.air, des filtres b.eau,
d'autre materiel ou des boutons, poignees ou autres pieces esthetiques.
11. Les frais supplementaires, y compris, sans s'y limiter, les appels de service apres les heures normales de bureau,
le week-end ou les jours feries, les droits et peages, les frais de convoyage ou les frais de deplacement pour les
appels de service dans des endroits isoles, notamment I'E_tat de I'Alaska.
12. Les dommages causes au fini de I'appareil ou b. la maison pendant I'installation, y compris, sans s'y limiter, aux
planchers, aux armoires, aux murs, etc.
13. Les dommages causes par : des reparations faites par des techniciens non autorises; I'utilisation de pieces autres
que les pieces Electrolux d'origine qui n'ont pas ete obtenues par I'entremise d'un reparateur autorise; ou les
causes etrangeres comme I'abus, I'alimentation electrique inadequate ou les cas de force majeure.
AVIS DE NON-RESPONSABILITI_ SUR LES GARANTIES IMPLICITES; LIMITATIONS DES RECOURS
L'UNIQUE RECOURS DU CLIENT EN VERTU DE CE-i-i-E GARANTIE LIMITEE EST LA RI_PARATION OU LE
REMPLACEMENT DU PRODUIT COMME D#CRIT PRE_CI_DEMMENT. LES DEMANDES BAS#ES SUR DES
GARANTIES IMPLICITES, Y COMPRIS LES GARANTIES IMPLICITES DE QUALITE MARCHANDE ET D'ADAPTATION A
UN USAGE PARTICULIER SONT LIMITEES A AU MOINS UN AN OU A LA PERIODE LA PLUS COURTE PERMISE PAR LA
LOI. ELECTROLUX NE SERA PAS TENUE RESPONSABLE DES DOMMAGES DIRECTS OU INDIRECTS NI DES
DOMMAGES MATERIELS ET DES D#PENSES IMPRt_VUES RI_SULTANT D'UNE VIOLATION DE CE-i-i-E GARANTIE
ECRITE OU DE TOUTE AUTRE GARANTIE IMPLICITE. CERTAINS ETATS ET CERTAINES PROVINCES NE PERME-i-i-ENT
PAS DE RESTRICTION OU D'EXEMPTION SUR LES DOMMAGES DIRECTS OU INDIRECTS OU DE RESTRICTION SUR
LES GARANTIES IMPLICITES. DANS CE CAS, CES RESTRICTIONS OU EXEMPTIONS POURRAIENT NE PAS E_TRE
APPLICABLES. CE-i-i-E GARANTIE ECRITE VOUS PROCURE DES DROITS LE_GAUXSPECIFIQUES. IL SE PEUT QUE
VOUS AYEZ D'AUTRES DROITS QUI VARIENT SELON L'I_TAT OU LA PROVINCE.
Conservez votre regu, votre bon de livraison ou une autre preuve valide de paiement pour etablir la periode de la garantie
dans le cas ou vous devriez faire appel aux services d'un technicien autorise. Si une reparation doit etre effectuee,
veuillez obtenir et conserver tousles regus.
Le service auquel vous avez recours en vertu de cette garantie doit etre obtenu en communiquant avec Electrolux b.
I'adresse ou aux numeros de telephone indiques ci-dessous.
I_TATS-UNIS
1.800.944.9044
Electrolux Major Appliances
North America
Case postale 212378
Augusta, GA 30907, ETATS-UNIS
Electrolux
1.800.668.4606
Canada
Electrolux Canada Corp.
5855 Terry Fox Way
Mississauga, Ontario, Canada
L5V 3E4
Page 16

Tabla de Materias
Instrucciones Importantes de Seguridad ........................................................................................................................ 16-17
Procedimientos para el secado .................................................................................................................................... 18-19
Caracteristicas ........................................................................................................................................................... 19
Cuidado y Limpieza .................................................................................................................................................. 19-20
Problemas Comunes del Secado..................................................................................................................................... 20
Evitar Ilamadas de servicio............................................................................................................................................. 21
Guarantia ............................................................................................................................................................... 22
ANOTE de PRODUCTO
Elsimbolo en el producto o en su embalaje indica que este producto no sepuede tratar como desperdicios normales del hogar.
Esteproducto se debe entregar al punto de recolecci6n de equipos el_ctricos y electr6nicos para reciclaje. AI asegurarse de que este
producto sedeseche correctamente, usted ayudar_i a evitar posibles consecuencias negativas para el ambiente y la salud p0blica, Io
cual podria ocurrir sieste producto no se manipula de forma adecuada. Paraobtener informaci6n m_isdetallada sobre el reciclaje de
este producto, p6ngase en contacto con la administraci6n de su ciudad, con su servicio de desechos del hogar o con la tienda donde
compr6 el producto.
Este Manual del Usuario le proporciona instrucciones de
funcionamiento generales para su secadora. Adem_qscontiene
informaci6n sobre lascaracteristicas para varios otros modelos.
Susecadorapueden notener todas lascaracteristicas descritas en
este manual.
Use la lavadora y secadora solamente como se indica en este
Manual y en las tarjetas de Instrucdones de Funcionamiento
que se incluyen con la secadora.
Nora: Lasinstrucciones que aparecen en este Manual de Uso y
Mantenimiento no pretenden cubrir todas lascondiciones y
situaciones posibles que pueden ocurrir. Debetenerse sentido
com0n ycuidado alinstalar, operar y mantener cualquier
electrodom_stico.
Le agradecemos que haya seleccionado esta SECADORA.
En este manual del usuario encontrar_i las
intruccionesapropiadas para u funcionamiento y cuidado.
Anote su N(lmero de Modelo y de Serie
Anote a continuaciOn el n0mero de modelo y de serie que se
encuentran en la placade seriesituada en el interior de la puerta
de la secadora. Conserve estos n0meros para referencia futura.
N(lmero
de Me delo:
NOmero
de Serie:
Fecha
de compra:
Su seguridad y la seguridad de terceros son muy importantes.
Hemos proporcionado muchos mensajes importantes para la seguridad en las Instrucciones de Operaci6n del Manual de Uso y
Mantenimiento, lasInstrucciones de Instalaci6n yen el mismo aparato. Siempre leay obedezca todos losmensajes para seguridad.
_Este simbolo significa alerta. Estesimbolo Io alerta acercade peligros que pueden matar o lesionar, tanto a usted como aotras
personas. Todos los mensajes de seguridad set,in precedidos pot el simbolo de alerta para suseguridad y la palabra "DANGER" o
"WARNING" (PELIGROO ADVERTENCIA). Estaspalabras significan:
DANGER(PELIGRO)Usted motifs1o resultar_iseriamente lesionado sino sigue lasinstrucciones siguientes.
WARNING (ADVERTENCIA)Usted puede motif o resultar seriamente lesionado si no sigue las instrucciones
siguientes.
Todos los mensajes deseguridad iden tificar_n el peligro, le dir_n a usted c6mo reducir la posibilidad de lesi6n y tambi_n
qu_ puede suceder si no se siguen las instrucdones.
Para su seguridad, siga las instrucciones contenidas en este manual a fin de reducir a un minimo los riesgos
de incendio o explosi6n o para evitar dahos materiales, lesiones personales o la muerte.
No almacene ni utilice gasolina u otros vapores y liquidos inflamables en la proximidad de _ste o de cualquier otto artefacto
el_ctrico.
QUE DEBE HACER S! PERCIBEOLOR A GAS:
• No trate de encender ning0n artefacto el_ctrico.
No toque ning0n interruptor el_ctrico; no use ning0n tel_fono en su edificio.
Haga salir a todos los ocupantes de la habitaci6n, del edificio y del lugar.
Llame a su proveedor de gas desde el tel_fono de un vecino. Siga lasinstrucciones del proveedor de gas.
Si no Iogra comunicarse con su proveedor de gas, Ilame al departamento de bomberos.
Lainstalaci6n yel servicio de mantenimiento debe realizarlos un instalador calificado, laagencia de servicios o el proveedor de gas.
16
Page 17

SECADORAS ELtCTRICAS"
©
14-30R
RECEPTACULO
MURAL CON FUSIBLES
DE 30 AMP
120/240 VOLTIOS
O 120/208 VOLTIQS
MANERA CORRECTA
Usese asi SOLAMENTE
SECADORA
CORDON
ELECTRICODELA
SECADORA
Recept_culo
mural con
toma de
Cable de alimentadbn elO_:tricacon
enchufe de toma de tierra con 3 clavijas
SECADORAS A 6AS:
No corte, saque ni cortocircuite bajo
nin-guna circunstancia la clavija de
toma de tierra de este enchufe.
MANERA CORRECTA
Useseasi SOLAMENTE
lnstrucciones importantes para la seguridad
Lea todas las instrucciones antes de utilizar esta
secadora.
Evite los riesgos de incendio o lasdescargas
elOctricas.Nouseun adaptador o un cable deextension ni saque la
clavija de toma de tierra del cable el_ctrico. El no seguir esta
advertencia puede causar lesiones graves, incendio o lamuerte.
Usted puede morir oresultar seriamente
lesionado sino sigue/as instrucciones siguientes. Para reducir
el riesgo de incendio, descargasel_ctricas olesiones alas personas
durante el usodeestasecadora,cumpla con lasadvertenciasbasicas
que seenumeran acontinuaci0n.
Elincumplimiento de estas advertencias puede causar lesiones
personales graves.
Evite el incendio
• No seque ninguna prenda que haya sido limpiada, remojada o
manchada previamente con gasolina, solventes de limpieza,
keroseno, ceras, etc. No guarde estosproductos sobre ni cerca de
la secadora. Estas substancias emiten vapores que pueden
encenderse o explotar.
• Nocoloque ensusecadora ninguna prenda que hayasido expuesta
alosaceitesdecocina. Elaceitede cocinacontenido enestasprendas
puede crear una reacci6n quimica que puede causar alas prendas
de encenderse.
• No seque articulos que contengan goma, pBstico ni materiales
similarescomo sostenes,botasimpermeables, alfombras parabaho,
alfombras, baberos, calzoncillos de beb@, bolsas plasticas y
almohadas que puedan derretirse oquemarse. Algunos materiales
de goma cuando secalientan pueden, en algunas circunstancias,
producir fuego pot combusti6n espontanea.
• Limpie la rejilla para pelusasantes o despu@sde cada carga de
ropa. El interior de la secadora, el recipiente que alberga la rejilla
para pelusas y el conducto de salida deben set limpiados
aproximadamente cada 18 meses pot un t@cnico de servicio
capacitado. Una cantidad excesivade pelusasenestas _ireaspuede
causar un secado deficiente y un posible incendio. Vea Cuidadoy
Iimpieza.
• No ponga la secadora en funcionamiento silarejilla para pelusas
establoqueada, dahada osi noestacolocada. Puedeocurrir unriesgo
de incendio, un sobrecalentamiento o dahos alas prendas. Si su
secadora tiene un estante para secado, vuelva siempre acolocar la
rejilla para pelusas cuando termine deusar el estante para secado.
-Riesgo de Incendio- Lasecadora de ropa
produce pelusa combustible. La secadora debe conectarse a un
conducto extemo. Inspeccione regularmente el conducto externo
yretire lapelusa acumulada alrededor de laabertura del conducto
externo yen el _ireacircundante.
Impreso en los EE.UU.
• No obstruya el paso del aire de ventilaciOn. No apile ni coloque
ropa o alfombras contra laparte delantera otrasera de la secadora.
• No rocieningOntipo deaerosoldentro, sobreocercadelasecadora
en ningOn momento.
• Nousesuavizantesniproductosparaeliminar laelectricidadestatica
a menos que Io recomiende el fabricante del suavizante o del
producto.
• El incumplimiento de estas advertencias puede traer como
consecuencia un incendio, una explosion, lesionescorporales graves
y/o dahos a laspiezasde caucho o de pkistico de lasecadora.
Proteja a los nihos
• No permita que los nihos jueguen encima de o dentro de la
secadora. Debe vigilar de cercaalos nihos cuando la secadora est_
siendo usada en presencia de nihos. Cuando estos crezcan,
ens_heles el usocorrecto yseguro de todos los electrodom_sticos.
• Deseche la caja de carton, la bolsa de pl_istico y los dem_is
materiales de envio una vez que haya desembalado la secadora.
Los nihos podrian usarlos para jugar. Lascajas de carton tapadas
con alfombras, colchas u hojas de pkistico pueden convertirse en
c_imarasherm_ticas.
• Mantenga todos losproductos de lavado fuera del alcance de los
nihos. Paraevitar laslesionespersonales,sigatodas lasadvertencias
de lasetiquetas delosproductos.
• Antes de retirar la secadora de servicio o desecharla, saque la
puerta de la secadora para evitar que alguien quede atrapado.
• Elincumplimiento de estas advertencias puede causar lesiones
personales graves.
Evite lesiones
• Para evitar el riesgo de descargas el_ctricas y garantizar la
estabilidad durante elfuncionamiento, lasecadoradebe setinstalada
y conectada a una toma de tierra pot un t_cnico de servicio
capacitado de conformidad con loscOdigos el_ctricos locales. Se
incluyen instrucciones para la instalaciOn con la secadora para
referencia del instalador. Vea las INSTRUCCIONES PARA LA
INSTALACIONpara losprocedimientos detallados sobre la conexiOn
a la toma de tierra. Sisemueve la secadora a otra ubicaciOn, haga
que un t_cnico deservicio capacitado examine yvuelvaa instalar la
secadora.
• Paraevitar lesiones personales o da_os a la secadora, el cable
el_ctrico de la secadora a gas debe estar enchufado en un
tomacorrientes de 3 clavijas, polarizado y con toma de tierra
adecuada. No debe sacarse nunca la davija de tierra. No
conecte nunca la toma de tierra a una tuberia de gas. No use
un cable de extensi6n ni un adaptador.
17
GUARDE ESTAS INSTRUCCIONES
Page 18

Instrucciones importantes para la seguridad
• Descenecte SIEMPRE la secadora del tomacorrientes antes de
tratar de hacer cualquier mantenimiento olimpieza. Sino Io hace,
pueden ocurrir descargas el_ctricas o lesiones.
• No usening0n limpiador en vaporizador cuando limpie el interior
de lasecadora.Puedendesprendersevaporespeligrososo producirse
descargasel_ctricas.
Paraevitar lesiones, no meta la mano en la secadora mientras el
tambor est_ en movimiento. Deje que el tambor se detenga
completamente antes de meter la mano.
• Paraevitar lesiones personales graves y dahos a la secadora:
Tedas las reparadones y el servido deben ser Ilevados a
cabo por un t_cnico autorizado
Procedimientos para el secado
Siga lospasos que seindican a continuaciOn para preparar lacarga de ropa para
el secado.
• Lealatarjeta de Instruccionespara elFuncionamiente para utilizar su modelo
especifico.
\ i
\,j ,
Sigalasinstruccionesdela
etiquetadela prenda.
Coloque las prendas peque_as
en un saco de malla.
Llene el tambor de la secadora
de un tercio a la mitad.
Lea y siga siempre las etiquetas para el cuidado y secado de sus prendas.
lesiones personales, lea las Instrucdones Importantes para la Seguridad en
antes de poner la secadora en march&
1, Prepare la ropa para el secado.
Seque lasprendas de tejidos, pesos y confecciones similares en la misma
carga.
• Separe las prendas oscuras de las prendas claras. Separe las prendas que
sueltan pelusa de las que atraen pelusa. Si una prenda suelta pelusa,
col0quela al rev_s.
• Aseg0rese de que las hebillas, los botones y los adornos sean resistentes
al calory no dahen el acabado del tambor. Cierre las cremalleras, los
ganchos yloscierres detipo Velcro_LAnude loslazosylascintas para evitar
que seenganchen y seenreden.
• Si esposible, saque los bolsillos para que se sequen tambi_n.
• Examine lasprendas paravet si haymanchas que no fueron eliminadas con
el lavado. Elcalor dela secadora puede asentar permanentemente algunas
manchas. Repita el proceso de eliminaci6n de manchas antes del secado.
• Coloque las prendas pequeNas en un saco de malla para evitar que se
enreden y para sacarlas con m_isfacilidad.
2. Compruebe que la rejilla para pelusas est_ limpia y colocada en su lugar.
3. Llene la secadora.
• La carga promedio Ilenar_iel tambor a un tercio o la mitad. Lasprendas
necesitan espacio para moverse libremente para obtener un secado
uniforme y menos arrugas. No sobrecargue la secadora.
• Cuando seque prendas grandes, seque s61o2 6 3 a la vez. Complete la
carga con prendas pequehas y medianas.
• Para cargas delicadas o muy pequehas, a_ada 2 toallas sin pelusaspara
obtener un mejor secado, menos arrugas ypara evitar lasmanchas de grasa
causadas pot las hojas de suavizante.
• No sequela ropa excesivamente. Elsecado excesivo puede causararrugas,
encogimiento, aspereza y una acumulaci6n de electricidad est_itica que
puede producir m_ispelusas.
• Si Io desea, ahada una hoja de suavizante.
4. Cierre la puerta de la secadora y coloque los controles de la secadora
(algunos modelos).
Vea latarjeta de Instrucdones para el fundonamiento para los controles
especificos de su modelo.
5. Gire la perilla de! programador hasta la posicion deseada.
6. Ponga la secadora en marcha.
Pulseel Bot6n de Iniciar (Start) para 2 segundos o gire laperilla de INICIAR
en el sentido de lassaetasdel reloj hasta laposici6n PRENDIDO,mantenga
para 1-2 segundos y desenganche.
Para a_adir o retirar ropas cuando la secadora est_ien funcionamiento,
abra la puerta.
amenosque serecomiende Iocontrario en este Manual delUsuario.
Use solamente piezas de repuesto autorizadas pot la f_ibrica.
- No modifique los controles.
- No instale niguarde la secadora en un lugar a laintemperie.
• Undisyuntor de seguridad apaga el motor autom_iticamente en
el caso poco probable de que ocurra un sobrecalentamiento
(secadoras el_ctricas solamente). Un t_cnico de servicio deber_i
cambiar el disyuntor de seguridad despu_s de haber corregido la
falla.
• Elincumplimiento de estas advertencias puede causar lesiones
personales graves.
Para reducir el riesgo de incendio, descargas el_ctricas o
18
Page 19

Procedimientos para el secado
La secadora se parar_i siempre cuando la puerta est,1abierta.
Permite al tambor de pararse completamente antes de
meter la mano en la secadora.
• Paravolver a poner la secadora en funcionamiento, cierre
la puerta y entonces empuje el bot6n de Prendido para 2
segundos o gire la perilla de INICIARen el sentido de las
saetas del reloj hasta PRENDIDO, mantenga para 1-2
segundos y desenganche.
o
Lasecadorano podria ponerse en funcionamiento siel selector
de ciclo est,1en la posici6n de APAGADO.
7.
Cuando se termine el ddo, saque las prendas inmediata-
mente y cu_lguelas o d6blelas. Sisaca la carga antes de
que termine el ciclo, gire la perilla del programador hasta la
posici6n de apagado (OFF).
Caracteristicas
Ubique la barra del frente debajo
del labio de apertura del filtro de pelusa.
Control de la Sehal de Cido (algunos modelos)
Una seflal sonars1en el extemo del ciclo y durante la Extended Tumble en el nivel del
volumen seleccionado.
Luz del Tambor (algunos modelos)
Una luz se prender_i cada vez que la tapa de la secadora sea abierta, para iluminar el
tambor durante las operaciones de carga y descarga. Cerrando la puerta se apagar_i la
luz.
Puerta Reversible
Susecadora est,1equipada con una puerta reversible. Lasbisagras pueden colocarse ala
derecha o a la izquierda. Vea las INSTRUCCIONESPARA LA INSTALACION para saber
c6mo cambiar lapuerta.
Parrilla de Secado (algunos modelos)
Use la parrilla de secado para prendas que no deban ser volteadas.
1. Abra la tapa de la secadora y remueva el filtro de pelusa.
2. Inserte la parrilla de secadoen el tambor de secado. Ubique labarra del frente debajo
del labio de apertura del filtro de pelusa.
3. Coloque lasprendas que van a sersecadas sobre la parrilla. El peso no debe exceder
las101bs.Dejeespacio entre lasprendas, pero no deje lasprendas colgar aloscostados
de la parrilla o entre los agujeros de la malla. No voltee otras prendas cuando este
siendo usada la parrilla de secado.
4. Seleccione un ciclo de secado regulado que mejor seadapte alas prendas por secar.
Seleccione solamente temperatura aire sincalor paraarticulos que contengan pkistico,
espuma de goma, materiales parecidos a lagoma, plumas o plum6n.
5. Cuando los articulos est@nsecos, remueva la parrilla de secado y vuelva a colocar el
filtro atrapa pelusa. Sielfiltro atrapa pelusa no est,1ensu lugar, losarticulos que est@n
siendo volteados pueden entrar en el sistema de escapede aire y daflar la secadora.
Cuidado y limpieza
Limpie la rejilla para pelusas despu@sde cada carga.
Para reducir el riesgo de incendio o lesiones graves a personas o
materiales, cumpla con las advertencias b_isicas enumeradas en las Instrucciones
importantes para la seguridad y lasque seenumeran acontinuaci6n.
Antes de limpiar elinterior de lasecadora, desconecte elcable el_ctrico paraevitar
riesgos de descargas el@ctricas.
No use ning0n limpiador en vaporizador cuando limpie el interior de la secadora.
Pueden desprenderse vapores peligrosos o producirse descargas el@ctricas.
Interior
* Limpie la rejilla para pelusas despu_s de cada carga. Laacumulaci6n de pelusas en
la rejilla limita el pasode aire, Io que haceque lostiempos de secado sean m_islargos.
Larejilla seencuentra en la parte inferior de laabertura de la puerta. S_iquelajalando
hacia arriba. Saque las pelusas y vuelva a colocar la rejilla.
PRECAUCION - Riesgo de Incendio - La secadora de ropa produce pelusa
combustible. La secadora debe conectarse a un conducto externo. Inspeccione
regularmente el conducto extemo y retire la pelusa acumulada alrededor de la
abertura del conducto extemo y en el _ireacircundante.
De vez en cuando puede formarse una acumulaci0n de cera sobre la rejilla causada
por el usode hojas de suavizante en lasecadora. Paraeliminar estaacumulaci6n, lave
la rejilla para pelusas en agua jabonosa y caliente. S_quela bien y vuelva a colocarla
en su lugar. No ponga lasecadora en marcha sin la rejilla para pelusas en su lugar.
Sieltambor de la secadora tiene manchas de ropa de colores, limpielo con un patio
h0medo y unlimpiahogar liquido suave.Limpie el residuo de limpiador antes de secar
la siguiente carga.
Cada 18 moses un t_cnico de servicio autorizado debe limpiar el interior de la
envoltura de la secadorayelconducto de salida. Estas_ireaspueden acumular pelusas
y polvo con el tiempo. Una cantidad excesiva de pelusas puede causar un secado
deficiente y un posible riesgo de incendio.
19
Page 20

Cuidado y limpieza
DETERGENTE
BLANQUEADOR
Exterior
,, Limpie la envoltura con un jabOn suave y agua. No use nunca fimpiadores
#speros, granulados o abrasivos.
• Si la envoltura sernancha, limpie con lejiadiluida [1/2taza (120 mL) en 1 cuarto
de galOn (0,95 L) de agua]. Enjuague varias veces con agua limpia.
Elimine el residuo de pegamento de la cinta o las etiquetas con una mezcla de
agua caliente ydetergente suave. O bien, toque el residuo con ellado pegajoso
de la cinta o etiqueta.
Paralimpiar laspiezas de cromo utilice Windex con amoniaco o cualquiera de
los articulos de limpieza mencionados para limpiar el gabinete.
\
No guarde ni coloque los productos de lavado
encima de la secadora en ningOn momento.
Pueden dahar el acabado o los controles.
• Antes de moverla secadora, coloque una tira de carton o I_iminadelgada de
fibra debajo de las patas delanteras niveladoras para evitar dahar el piso.
Problemas comunes de! secado
Muchos de los problemas del secado involucran resultados pobres de lavado, manchas y suciedad mal quitada, residuos de
peluda y escoria y articulos dahados. Para resultados de secado satisfactorios, observe estas sugestiones proporcionadas por la
AsociaciOn de JabOn y Detergente.
PROBLEMA
Manchas
aceitosas o
grasientas
Pelusa
CAUSAS POSIBLES
,Papel suavizante de telas.
,Demasiada carga.
,Secar m_isde Io necesario
produce carga
electrost_itica.
,El filtro atrapa pelusa no
est,1limpio al iniciar el ciclo.
,La pelusa est,1 unida a
"motas".
SOLUCIONES
, Frote las manchas de suavizante
con una barra de jabSn. Enjuague y
vuelva a lavar.
,Reduzca la carga y vuelva a lavar
usando suavizante liquido en el
01timo enjuague.
,O agregue una hoja de papel
suavizante y voltee sin usar calor.
,Use un cepillo o rodillo removedor
de pelusa para remover la misma.
MEDIDAS PREVENTIVAS
,Agregue alguna toalla de ba_o para cargas
peque_as, para producir un volteo apropiado.
,Algunas prendas "imitaciSn seda" deben ser
secadas al aire.
,Use la temperatura de secado apropiada.
,Coloque la hoja de papel suavizante sobre la
carga antes de comenzar el secado.
,No sobrecargue la secadora.
,Use suavizante en el lavado o en el secado para
reducir la carga electrost_itica.
,Remueva las prendas de la secadora cuando
todav[a est_in ligeramente h0medas, para evitar
el sobre secado.
,Controle que el filtro atrapa pelusa este limpio y
en su lugar.
Apilamiento ,El apilamiento es normal en
(rotura de fibras, telas con contenido de
formaciSn de fibras sinteticas y planchado
pelotas peque_as permanente. Esto es
yadherenciasala producido porla abrasiSn
tela) debido al uso normal de la
prenda.
Encogido
Arrugas ,Cargas muy grandes.
,Demasiado secado. ,Esta condiciSn es irreversible.
,Dejar las prendas en la
secadora luego de haber
terminado en ciclo.
,Use un cepillo o afeitadora para
pelusa para remover esta
formaciSn.
,Reduzca el tama_o de lacarga yvoltee
a temperatura media por 5 a 10
minutos.
,Remueva las prendas
inmediatamente y cuelgue o doble.
20
, Use suavizante para lubricar las fibras.
,Durante el planchado rode almidSn o
acondicionador de telas, en cuellos y pu_os.
,De vuelta las prendas para reducir la abrasiSn.
,Observe las indicaciones para el cuidado en las
etiquetas de cada prenda.
,Si el encogido es una preocupaciSn, controle el
secado a menudo.
,Remueva las prendas estando ligeramente
h0medas.
,Extienda las prendas tejidas a la forma original.
,ColSquelas acostadas para completar el secado.
,No sobrecargue la secadora.
,Remueva las prendas tan pronto como el ciclo
termine.
Page 21

Evitar#amadas de servicio
Antes de Ilamar para obtener servicio, examine esta lista. Puede ahorrarle tiempo y dinero. Esta lista incluye los problemas comunes
que no son el resultado de una fabricaciOn o materiales defectuosos de esta secadora.
PROBLEMA CAUSA POSIBLE SOLUCION
La secadora no se pone El cable el_ctrico no est,1bien enchufado o el Aseg0rese de que el enchufe est6 bien encajado en el
en marcha enchufe puede estar flojo, tomacorrientes de la pared.
El fusible de la casa se ha fundido o el disyuntor Prenda el disyuntor o cambie el fusible.
se ha disparado.
Aseg0rese de que la linea el_ctrica no est_ sobrecargada y de
que la secadora est_ en un circuito separado.
El disyuntor de seguridad para la temperatura Llame al t6cnico autorizado de servicio para que Io cambie.
se ha disparado.
La secadora se pone en Hay 2 fusibles dom_sticos en el circuito de la Cambie el fusible.
marcha pero no calienta, secadora. Si 1 de los 2 fusibles se ha fundido, el
tambor puede girar pero el calentador no
funciona.
La wilvula de entrada de gas no est,1 abierta Compruebe que la wilvula de entrada est_ abierta. Vea los
(modelos de gas). INSTRUCCIONES PARA LA INSTALACION para saber c6mo
hacerlo.
La secadora no tiene una cantidad suficiente Vea los INSTRUCCIONES PARA LA INSTALACION.
de aire de entrada para el quemador de la llama
(modelos de gas).
La bombona de gas est,1vacia o ha habido un Llene o cambie la bombona.
corte en el uministro de gas natural (modelos
de gas).
La secadora deber_i secar cuando regrese el suministro de gas.
El ciclo de secado es La rejilla para pelusas est,1 obstruida con Aseg0rese de haber quitado los pelusas de la rejilla para pelusas
demasiado lento, el exterior pelusas, de la secadora antes de comenzar cada ciclo.
de la secadora est_
demasiado caliente o huele No se han cumplido los requisitos para el Elconducto de salida debe tener como minimo 10 cm (4
caliente, conducto de salida, pulgadas) de di_imetro y debe estar hecho de metal rigido o
La secadora el_ctrica est.1 conectada a un El tiempo de secado ser_i un 20% m_is largo que el secado hecho
circuito de 208 voltios, con un circuito de 240 voltios.
No se han seguido las procedimientos de Vea los Procedimientos para elsecado.
secado.
La campana de salida exterior o el conducto de Limpie la obstruccibn.
salida pueden estar taponados o semi
obstruidos.
Mucha humedad. Use un deshumidificador cerca de la secadora.
Arrugas excesivas. La secadora est,1 sobrecalentada. No la sobrecargue. Vea los Procedimientos para el secado.
Los prendas se han dejado demasiado tiempo Saque los prendas tan pronto como termine el ciclo.
en la secadora.
Distribucibn insuficiente de los prendas. Vea los Procedimientos para el secado.
Temperatura de secado demasiado alto. Siga los instrucciones de la etiqueta de la prenda.
Arafiazos o descascarillado
del acabado del tambor.
Objetos extrahos como monedas, alfileres,
pinzas o botones dentro de la secadora.
Accesorios permanentes como hebillas de
cinturones, cremalleras y cierres pueden estar
golpeando el interior del tambor.
flexible.
Una vez colocado, el conducto de salida no debe tener m_isde
dos dobleces de 90° y no debe sobrepasar la Iongitud indicada en
las INSTRUCCIONES PARA LA INSTALACION.
Saque siempre los objetos extrahos de los bolsillos antes de lavar la
prenda. Saque los objetos del tambor y ponga la secadora en
marcha de nuevo.
Puede ser necesario envolver bien un pedazo sobrante de tela
alrededor de los adornos antes del secado para evitar los
arahazos y dahos a la secadora.
21
Los dodos al tambor causados pot objetos extra_os o
accesorios permanentes no est&n cubiertos por la garantia.
Page 22

Suelectrodom_sticoestacubiertoporunagarantfalimitadadeuna_o.Duranteuna_oapartirdelafechaoriginal
decompra,Electroluxcubriratodosloscostosdereparaci6noreemplazodecualquierpiezade_ste
electrodom_sticoqueseencuentrendefectuosasenmaterialesomanodeobracuandoelelectrodom_sticose
instala,utilizaymantienedeacuerdoconlasinstruccionesproporcionadas.
Exclusiones
Si tiene que
solicitar
servicio
t_cnico
Esta garantia solo se aplica en los Estados Unidos y Canadb.. En los EE.UU., su electrodomestico estb. garantizado por Electrolux Major
Appliances North America, una division de Electrolux Home Products, Inc. En Canadb., su electrodomestico estb. garantizado pot
Electrolux Canada Corp. Electrolux no autoriza a ninguna persona a cambiar o agregar ninguna obligacion bajo esta garantia. Nuestras
obligaciones de reparacion y piezas bajo esta garantia deben ser realizadas por Electrolux o compa_ia de servicio autorizado. Las
especificaciones o caracteristicas del producto segOn se describen o ilustran estb.n sujetas a cambio sin previo aviso.
EE. UU.
1.800.944.9044
Electrolux Major Appliances
North America
P.O. Box 212378
Augusta, GA 30907
Esta garantia no cubre Io siguiente:
1. Productos a los que se les quitaron o alteraron los n[3meros de serie originales o que no pueden determinarse con
facilidad.
2. Productos que hayan sido transferidos del due_o original a un tercero o que no se encuentren en los EE.UU. o en
Canadb..
3. 0xido en el interior o exterior de la unidad.
4. Los productos comprados "previamente usados o productos de muestra" no estb.n cubiertos pot esta garantia.
5. Perdida de alimentos por fallas del refrigerador o congelador.
6. Productos utilizados para fines comerciales.
7. Las Ilamadas de servicio que no involucren el funcionamiento defectuoso ni los defectos de materiales o de mano de
obra, o para electrodomesticos que no sean utilizados para uso normal del hogar o de acuerdo con las instrucciones
proporcionadas.
8. Llamadas de servicio para corregir errores de instalacion del electrodomestico o para instruirlo sobre el uso del
mismo.
9. Gastos para facilitar el acceso al electrodomestico para el servicio, tales como la remocion de molduras, armarios,
estantes, etc. que no eran parte del electrodomestico cuando se envio de la fb.brica.
10. Llamadas de servicio para reparar o reemplazar bombillas, filtros de aire, filtros de agua, otros consumibles, perillas,
manijas u otras piezas decorativas.
11. Costos adicionales que incluyen, sin limitarse, cualquier Ilamada de servicio fuera de las horas de oficina, durante los
fines de semana o dias feriados, peajes, pasajes de transporte o millaje/kilometraje para Ilamadas de servicio en
b.reas remotas, incluyendo el estado de Alaska.
12. Da_os al acabado del electrodomestico o al hogar que hayan ocurrido durante la instalacion, incluyendo, sin
limitarse, los armarios, paredes, etc.
13. Da_6s causados por: servicio realizado por compa_ias de servicio no autorizadas, el uso de piezas que no sean
piezas genuinas Electrolux o piezas obtenidas de personas que no pertenezcan a compa_ias de servicio autorizado,
o causas externas como abuso, mal uso, suministro electrico inadecuado, accidentes, incendios, hechos fortuitos or
desastres naturales.
RENUNCIA DE RESPONSABILIDAD DE GARANT[AS IMPL[CITAS; LIMITACION DE ACCIONES LEGALES
LA 0NICA Y EXCLUSlVA OPCION DEL CLIENTE BAJO ESTA GARANTfA LIMITADA ES LA REPARACION O
REEMPLAZO DEL PRODUCTO SEGON SE INDICA. LOS RECLAMOS BASADOS EN GARANTiAS IMPLiCITAS,
INCLUYENDO LAS GARANTiAS DE COMERCIALIZACION O APTITUD DEL PRODUCTO PARA UN PROPOSlTO
ESPECiFICO, ESTAN LIMITADOS A UN ANO O AL PERiODO MiNIMO PERMITIDO POR LEY, PERO NUNCA MENOS DE
UN ANO. ELECTROLUX NO SERA RESPONSABLE POR DANOS CONSECUENTES O INCIDENTALES COMO POR
EJEMPLO DANOS A LA PROPIEDAD Y GASTOS INCIDENTALES OCASlONADOS POR EL INCUMPLIMIENTO DE ESTA
GARANTiA ESCRITA O DE CUALQUIER GARANTiA IMPLiCITA. ALGUNOS ESTADOS Y PROVlNCIAS NO PERMITEN LA
EXCLUSION O LIMITACION DE DANOS INCIDENTALES O CONSECUENTES O LIMITACIONES EN LA DURACION DE
LAS GARANTiAS IMPLiCITAS, DE MANERA QUE PUEDE QUE ESTAS LIMITACIONES O EXCLUSlONES NO SE
APLIQUEN EN SU CASO. ESTA GARANTiA ESCRITA LE OTORGA DERECHOS LEGALES ESPECiFICOS. ESO
POSlBLE QUE TAMBIt_N TENGA OTROS DERECHOS QUE VARiAN DE UN ESTADO A OTRO.
Guarde su recibo, el comprobante de entrega o cualquier otro registro de pago adecuado para establecer el periodo de
la garantia si Ilegara a requerir servicio.
Si se realiza la reparacion, le conviene obtener y conservar todos los recibos.
El servicio realizado bajo esta garantia debe ser obtenido a traves de Electrolux utilizando las direcciones o nOmeros que
se indican abajo.
Canada
L5V 3E4
Electrolux
1.800.668.4606
Electrolux Canada Corp.
5855 Terry Fox Way
Mississauga, Ontario, Canada
Page 23

Notes
Page 24

3 Ways To Contact Us!
i3 formas de contactar nos!
3 fagons de nous contacted
USA, EE.UU., €:.-U.,
1-800-944-9044
CANADA, CANADA
1-800-265-8352
(English)(Fran£_ais)
Or, O, Ou
USA, EE.UU., E_.-U.
Electrolux Major Appliances North America,
a division of Electrolux Home Products, Inc.
RO. Box 212378
Augusta, GA 30917 ....
Or, O, Ou
Visit Frigidaire's Web Site at:
Visite la pagina de Frigidaire en Internet:
Visitez le site lnternet de Frigidaire au:
http://www/frig idaire.corn
© 2005 Electrolux Major Appliances North America
a division of Electrolux Home Products, nc.
CANADA, CANADA
Electrolux Major Appliances North America,
a division of Electrolux Home Products, Inc.
5855 Terry Fox Way
Mississauga, Ontario, Canada
L5R 4C2
E_ The Electrolux Group. The world's No. 1 choice.
The Electrolux Group is the world's largest producer of powered appliances for kitchen, cleaning and outdoor use combined. More than 55 million
Electrolux Group products (such as refrigerators, cookers, washing machines, vacuum cleaners, chain saws and lawn mowers) are sold each year
to a value of approximately USD 14 billion in more than 150 countries around the world.
PRINTED IN USA
 Loading...