

White-Westinghouse WFG16DRPRA, WFG19DRWRA, WFG16CRPRA, WFG16CRWRA, WFG16DRWRA User Manual
...Page 1

WFG16DRPRA
WFG16DRWRA
WFG16CRPRA
WFG16CRWRA
WFG19DRWRA
WFG19CRWRA
www.white-westinghouse-intl.com
Page 2
Page 3
Page 4
Page 5

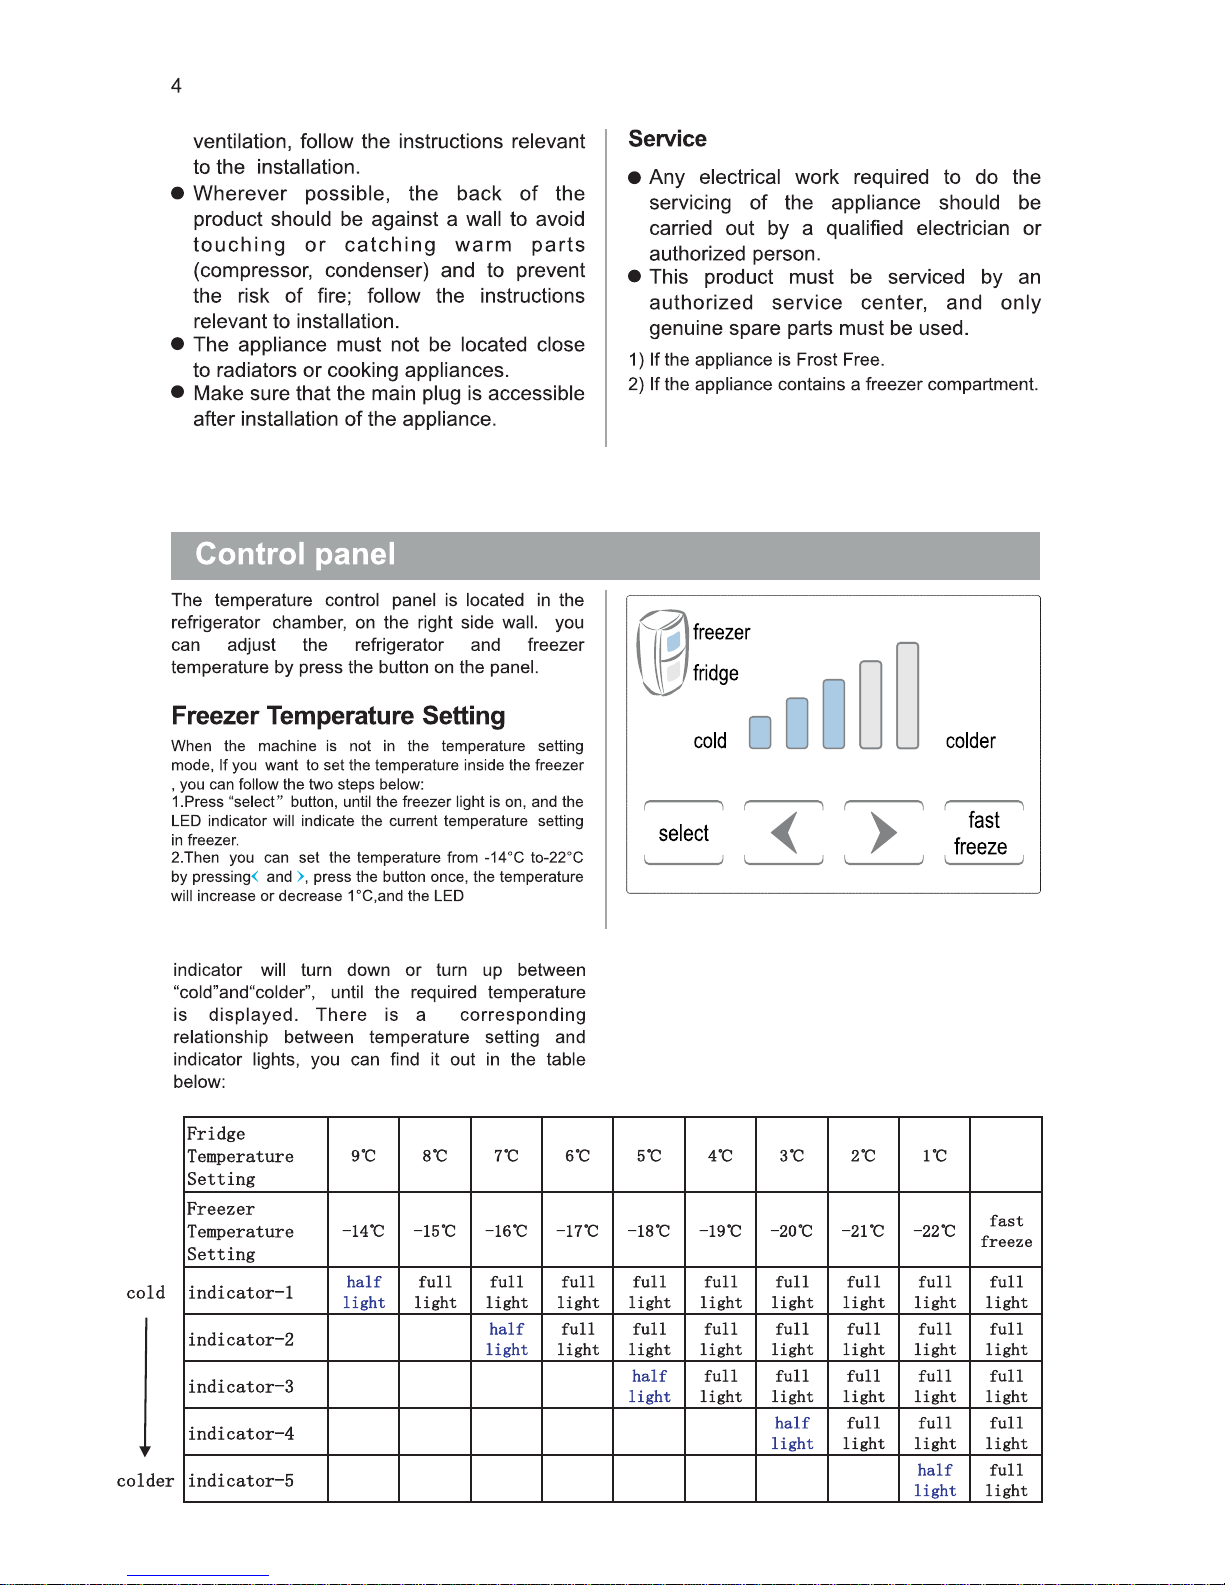
Fast Freeze
If you need the temperature inside the freezer
to drop rapidly, press the FAST FREEZE button,
all the LED indicator are full light, the freezer
compartment will operate in FAST FREEZE mode
for 24 hours, and the setting temperature is -23
If you change the temperature setting, the fridge
will exit FAST FREEZE mode.
°C.
ATTENTION: Normally we advise you setting the
temperature on “Mid”position.A colder setting on the
temperature regulator means more energy will be
consumed. In FAST FREEZE mode the compressor
will run continuously or even non-stop!
FRIDGE TEMPERATURE
When the machine is not in the temperature
setting mode, If you want to set the temperature
inside the fridge , you can follow the two steps
below:
1. Press “select” button, until the fridge light is on,
and the LED indicator will indicate the current
temperature setting in fridge.
2. Then you can set the temperature from 1 to
9 by pressing and , press the button once, the
temperature will increase or decrease 1 ,and
the LED indicator will turn down or turn up
between “cold”and “colder”, until the required
temperature is displayed. There is a
corresponding relationship between temperature
setting and indicator lights, you can find it out in
the same table upper.
°C
°C
°C
1. Remove the light cover .
2. Use the cross screw driver to take the
screw out.
3. Pull out the joint cable, and take down
the old LED light.
4. Replace with a new LED light that is
same to the origin, screw the screw in.
Unplug the mains plug.
Press the bulb in the center with finger.
Warning! If the LED light bulb is
damaged, DO NOT CHANG IT BY
THE USER!
Before changing the light bulb, switch off
the appliance and unplug it, or pull the
fuse or the circuit breaker.
To switch off the appliance.
Changing the light bulb carry out by
inexperienced persons may cause injury or
serious malfunctioning.it must be replaced
by a qualified persons in order to avoid a
hazard. Contact your local Service Force
Center for help.
Changing the light bulb
Before changing the light bulb, either the
refrigerator or disconnect the electricity
leading into the refrigerator at the main
power supply. Failure to do so could result in
electrical shock or personal injury.
The freezer compartment consist of 2
sections. One is the 4-star section and the
other one is the 2-star section.
The temperature for 2-star section is
always below -12°C, where the
temperature for 4-star section is
always below -18°C.
5
Page 6
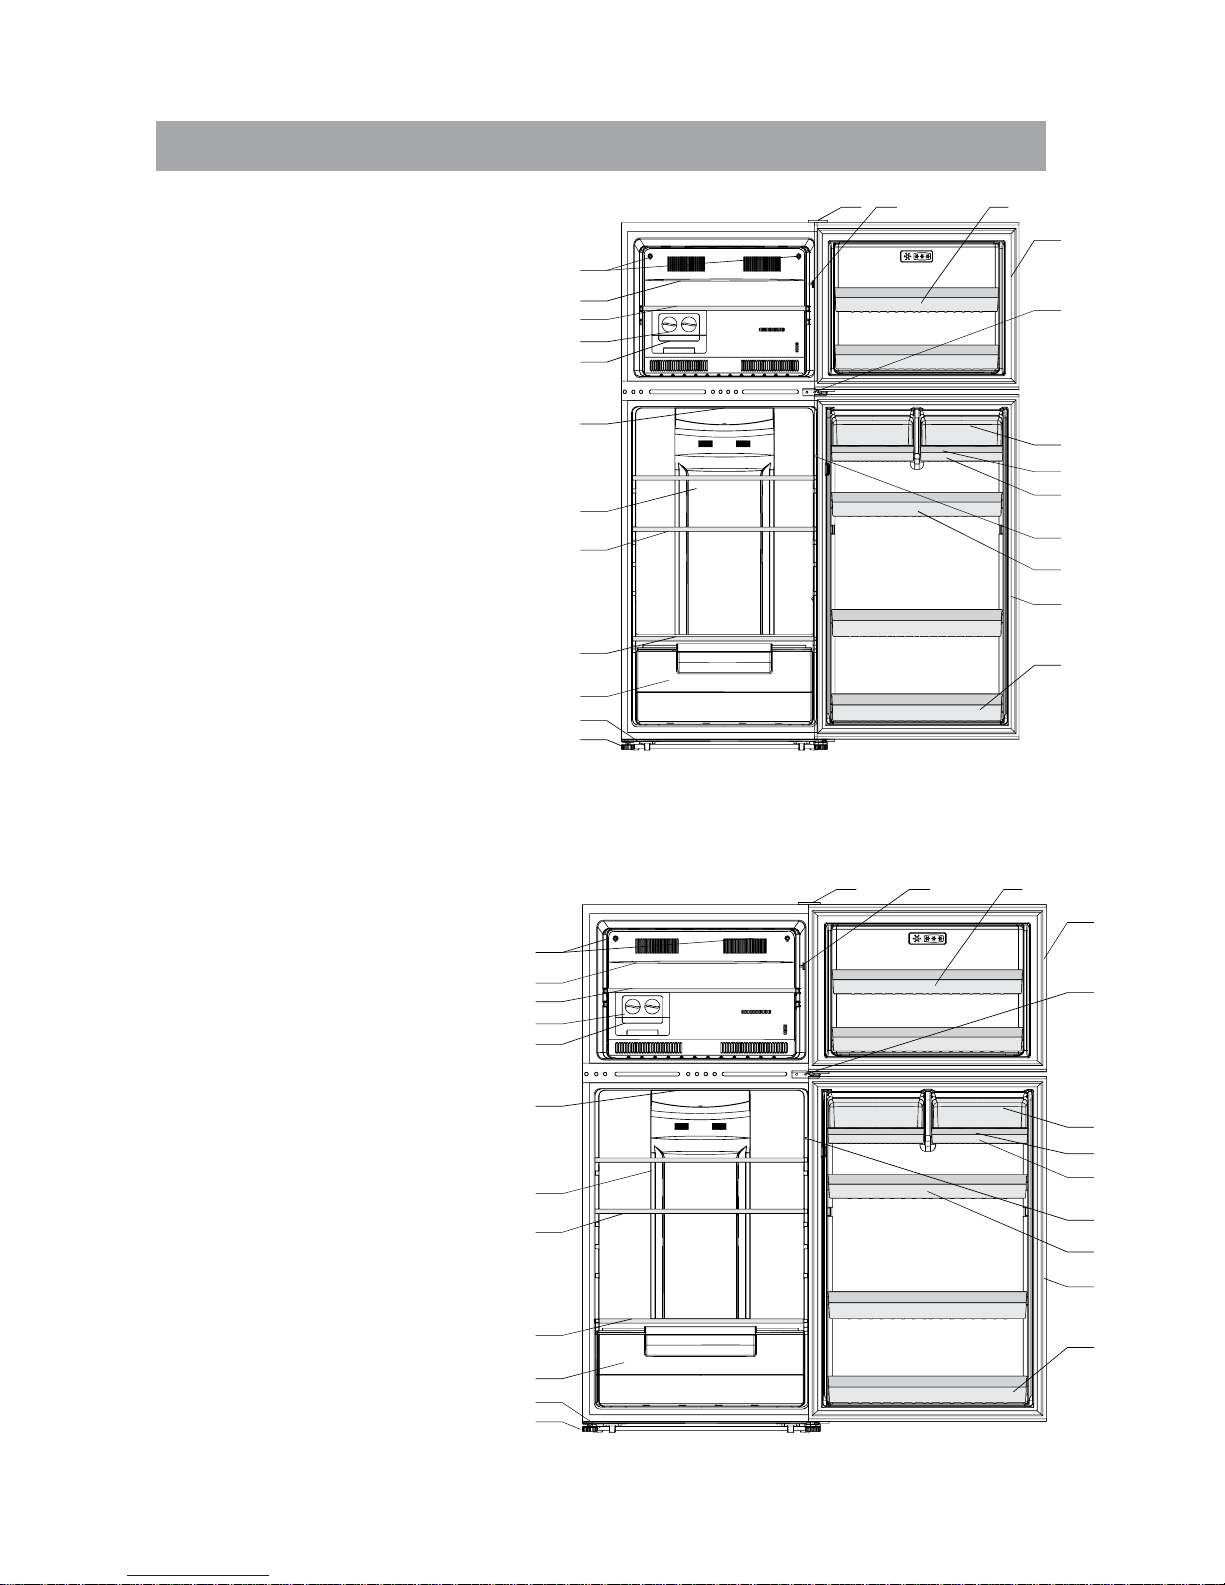
Description of the appliance
6
Note: Due to unceasing modification of our products your refrigerator may be slightly different
from this Instruction Manual, but its functions and using methods remain the same.
REFRIGERATOR
FREEZER
View of the appliance
Note: Due to unceasing modification of our products your refrigerator may be slightly different
from this Instruction Manual, but its functions and using methods remain the same.
(WFG16DR)
1
2
3
4
5
6
7
8
9
10
11
12
13
17
1415 16
18
19
20
21
22
24
25
23
1
2
3
4
5
6
7
8
9
10
11
12
13
17
14 15 16
18
19
20
21
22
24
25
23
REFRIGERATOR
FREEZER
1. Screw hole cover
2. Wind channel part in freezer chamber
3. Shelf part
4. Ice tray part
5. Ice box
6. Light cover
7. LED light (inside)
8. Wind channel part in refrigerator chamber
9. Shelf part
10. shelves assembly
11. Crisper box part
12. Roll wheel
13. Adjustable bottom feet part
14. Upper hinge cover
15. Door switch
16. Freezer door rack
17. Gasket part
18. Middle hinge part
19. Shelf cover
20. Egg tray
21. Small shelf
22. Door switch
23. Refrigerator door rack(middle)
24. Gasket part
25. Refrigerator door rack(lower)
View of the appliance
1. Screw hole cover
2. Wind channel part in freezer chamber
3. Shelf part
4. Ice tray part
5. Ice box
6. Light cover
7. LED light (inside)
8. Wind channel part in refrigerator chamber
9. Shelf part
10. shelves assembly
11. Crisper box part
12. Roll wheel
13. Adjustable bottom feet part
14. Upper hinge cover
15. Door switch
16. Freezer door rack
17. Gasket part
18. Middle hinge part
19. Shelf cover
20. Egg tray
21. Small shelf
22. Door switch
23. Refrigerator door rack(middle)
24. Gasket part
25. Refrigerator door rack(lower)
( )WFG19DR
Page 7
3. Insert expansion bolts in the hole and
remove nuts, shrapnel and washers.
4.Install it by following schematic diagram,
then tighten the nut.
Warning! Before installing, read the
instructions carefully for your safety
and the correct operation of the appliance.
Position the appliance away from sources
of heat such as stoves, radiators, direct
sunlight, etc.
Maximum performance and safety are
guaranteed by maintaining the correct
indoor temperature for the class of unit
concerned, as specified on the rating
plate.
Before using the appliance for the first
time, wash the interior and all internal
accessories with lukewarm water and
some neutral soap so as to remove the
typical smell of a brand new product, then
dry thoroughly.
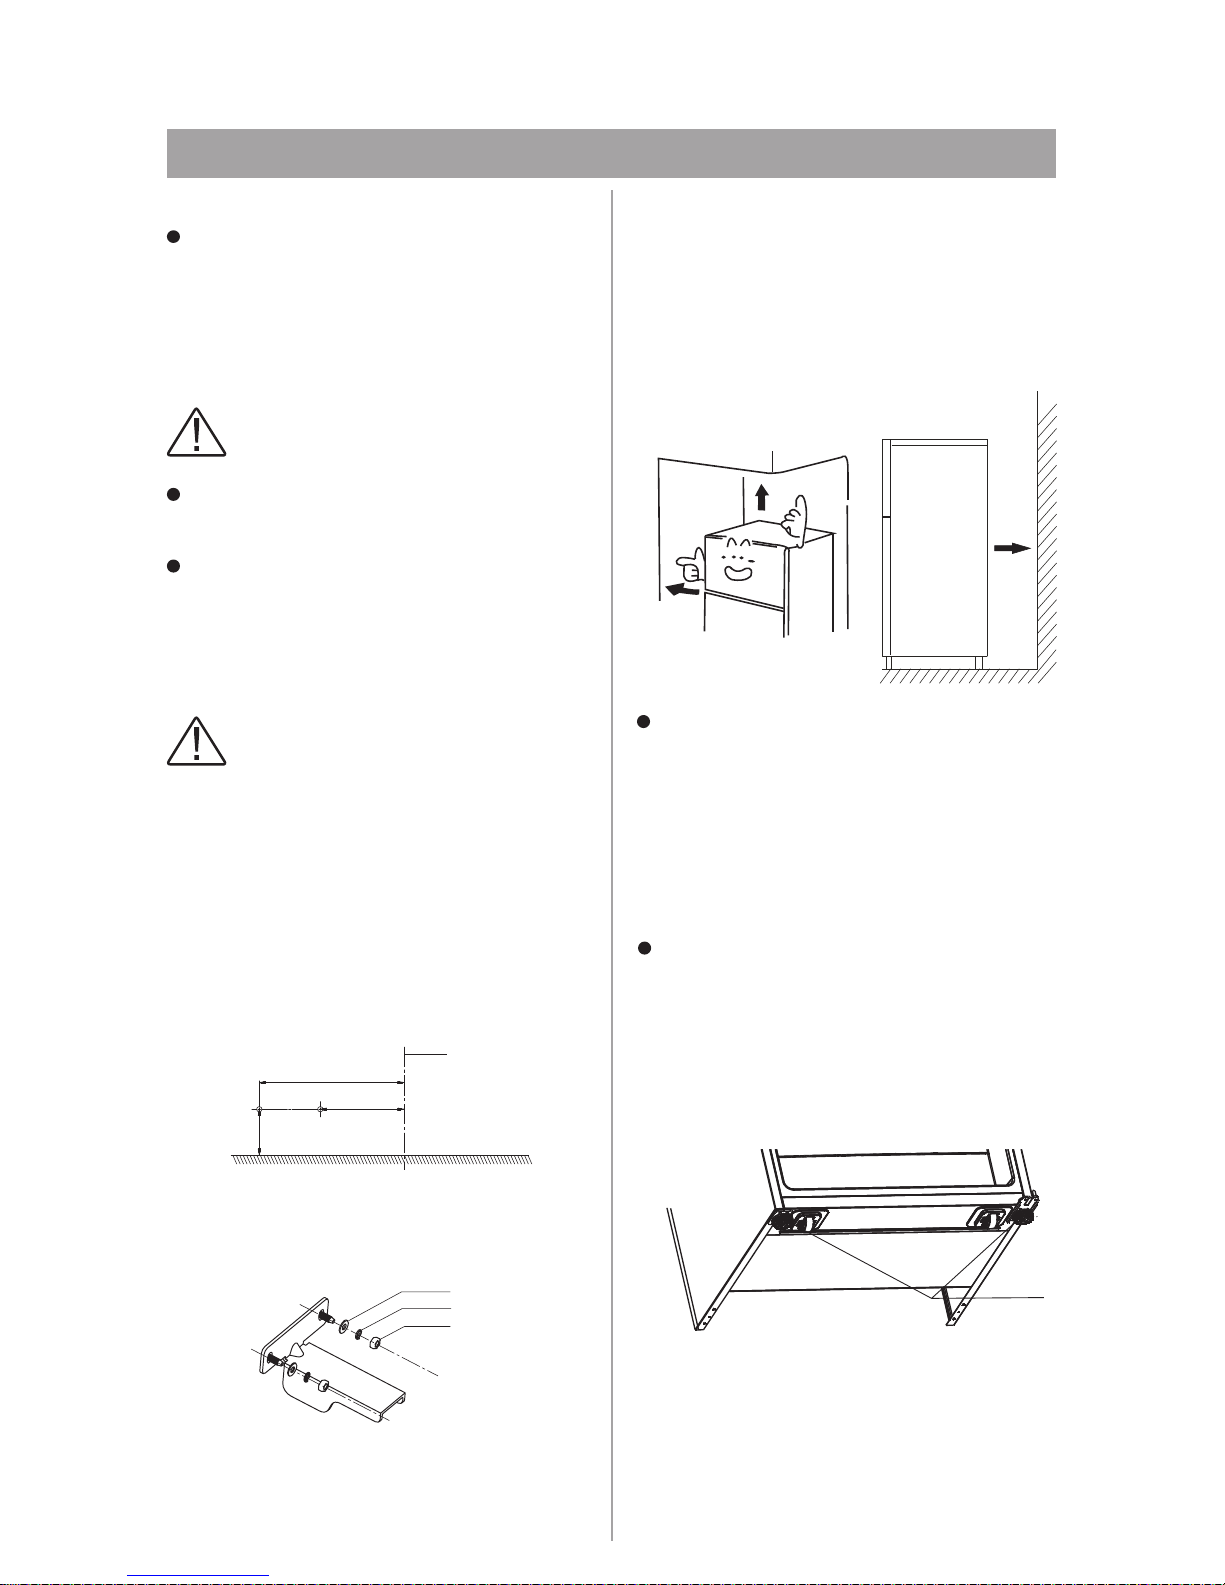
Leveling
the floor. You can also adjust the level by
the appropriate level
the front (use your fingers or a suitable
spanner).
unscrewing adjustment
in
The appliance should be level in order to
eliminate vibration. To make the appliance
level, it should be upright and both
adjusters should be with in stable contact
First use and installation
Cleaning before use
Installation Positioning
7
adjustable
bottom feet
part
Warning! The appliance must be
fastened to the wall for safety reason.
Take the bag located supplied with the
app liance. It c onta ins t he f oll owin g
accessories:
1 fixed board
2 Expansion bolts
Proceed as follows to carry out the fastening:
1.Find the appliance's position center.
2.Measure 60mm from the floor. Drill two
holes with diameter of 8mm, depth of
40mm.One hole is 110mm from centerline,
another one is 190mm from centerline.
Fastening to the wall
5.Push the appliance to the wall.
Important! It is necessary to have good
ventilation around the refrigerator to allow for
the dissipation of heat, high efficiency,
19cm
11cm
6cm
centerline
washer
shrapnel
nut
Appliances must not be exposed to rain.
Sufficient air must be allowed to circulate
in the lower rear section of the appliance,
as poor air circulation can affect performance. Built-in appliances should be
positioned away from heat sources such
as heaters and direct sunlight.
75mm
100mm
100mm
and low power consumption.
sufficiently cleared
refrigerator
refrigerator
sides, a
height
For this
reason, space should
be available around the . It is
advisable for there to be 75mm separating
the back of the to the wall at
least 100mm of space on its two
of over 100mm from its top and a
clear space in front to allow the doors to
open 160°.
Electrical connection
Caution! Any electrical work required to
install this appliance should be carried out by
a qualified or person.authorized
Warning!This appliance must be grounded.
The manufacturer declines any liability should
these safety measures not be observed.
Page 8
Daily use
Accessories 1)
Movable shelves/trays
Various glass, plastic storage shelves or
wire trays are included with your appliance.
The walls of the refrigerator are equipped
with a series of runners so that the
shelves can be positioned as desired.
Positioning the door shelves
To permit storage of food packages of
various sizes, the middle door shelves can
be placed at different heights.
Freezer food compartment 2)
For freezing fresh food and storing frozen
and deep-frozen food for a long time.
Vegetable Drawer
For storing fruit and vegetables.
Refrigerator compartment
For storing the food which needs not
being frozen and different part suitable for
different kind of food.
Thawing food 2)
In the refrigerator compartment.
At room temperature.
In a microwave oven.
In a conventional or fan oven.
Food once thawed should be re-frozen
only in exceptional cases.
1) If the appliance contains related accessories
and functions.
2) If the appliance contains a freezer compartment.
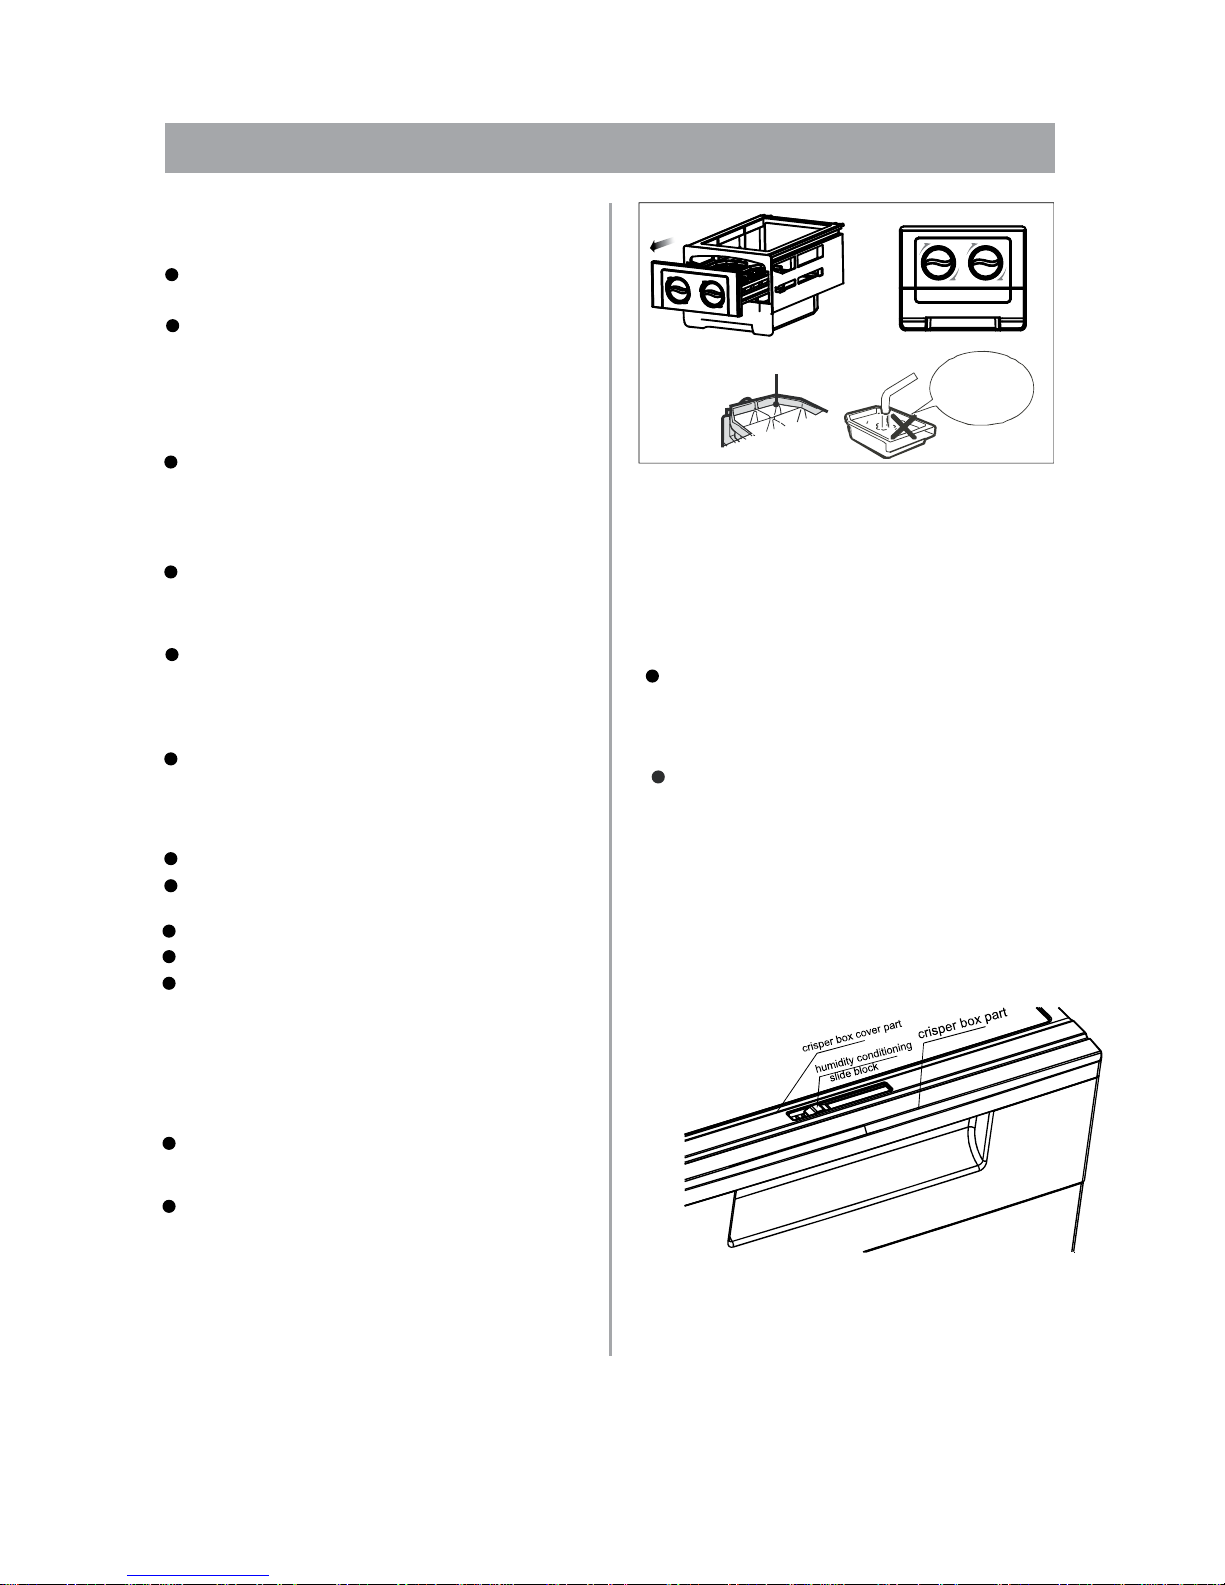
Ice-cube tray
For making ice and storing ice-cubes.
IceMaker:Twist ice
Takeouttheicemakingtray .
Fillthewaterinlevelofline.
Placetheicemakingtrayinitsoriginalposition.
Whenicecubesareformed, clockwisetwistthe
knobtodropofficecubesintotheicebox.
8
Iceboxisinadvisabletobeusedtomakeice,
otherwiseitmaycrack.
Ifittakesalongtimetomakeice, pleasedonot
holdtheicetraydirectlytoavoidtheicetray
stickingandhurtingyourhands.
Notice:
Iceboxis
inadvisable
tomakeice
waterlevel
Humidity Conditioning
Deferent vegetable and fruits need deferent
humidity, you can condition humidity in the
crisper box.
Adjust the humidity conditioning slide block
The humidity conditioning slide block is on the
crisper box cover part.
Slide the block right or left, the size of the exit
from which the air escape out will become
larger or smaller.
Larger size of the exit means lower humidity in
the crisper box. smaller size of the exit means
higher humidity in the crisper box.
Page 9
Page 10

Page 11

Page 12

Page 13

(WFG16DR)
(SASO)
(WFG19DR)
Page 14

(WFG16DR)
(UAE)
(WFG19DR)
Page 15

(SASO)
(W)
(WFG19DR) (WFG16DR)
Page 16

(W)
(UAE)
(WFG19DR) (WFG16DR)
Page 17

Page 18

Page 19

Page 20

Page 21

(
(
(
(
Page 22

Page 23

(WFG16DR)
(WFG19DR)
Page 24

Page 25

select
LED
LED
- - - - - - - - -
Page 26

Page 27

..............................
............................................
..........................................
.............................
.......................................
..............................
.....................................
..........................................
...........................
Page 28

WFG16DRPRA
WFG16DRWRA
WFG16CRPRA
WFG16CRWRA
WFG19DRWRA
WFG19CRWRA
www.white-westinghouse-intl.com
 Loading...