

Page 1
MXSPORT
Waterproof
Metal Detector
White’s Electronics, Inc.
1011 Pleasant Valley Rd
Sweet Home, OR 97386
www.WhitesElectronics.com
All rights reserved ©White’s Electronics, Inc.
User’s Guide
Page 2
Specifications
MXSport
Weight
Backlight Yes
Assembled Length
Minimum
Assembled Length
Maximum
Headphone Jack 1/4" Adapter Included
Arm Rest Strap Included
Number of Frequencies 1
Mft. Warranty 2 Year
Instruction Manual
Searchcoil Shape Round
Searchcoil Type DD
Interchangeable
Searchcoil
Submersible Searchcoil Yes
Optional Searchcoil Available
Number of Search Modes 7
Coins & Jewelry
Relics
Pinpoint
Discrimination Adjustable
Sensitivity Adjustable
Ground Balancing
(Automatic)
Target Identification Yes
Number of Target ID
Segments
Depth Indication Ye s
Volume Adjustable
Low Battery Warning Yes
MX Sport Specifications
Contents
Type of Detector All-Purpose
Waterproof Yes
Adjustable Shaft Yes
Rechargeable System Not Included
Batteries AA x 8
Arm Rest Adjustable
Control Box Mount Standard
Frequencies 13.8kHz
Searchcoil Size 10"
Searchcoil Build Open
Waterproof Searchcoil Yes
Display Type LCD
All Search Modes
Technology VLF Single Frequency
Threshold Yes
Ground Balancing (Fixed) Yes
Programmable Target ID Yes
Pinpoint Mode Ye s
4 lbs.
41"
50"
Yes
Yes
All Metal
Beach
Prospecting
Hi- Trash
Yes
20
Specifications ..............................................................................................................................2
Assembly ......................................................................................................................................... 4
Batteries ......................................................................................................................................... 5
Getting Started ............................................................................................................................6
Quick Reference Tables
Search Mode .................................................................................................................. 7
Options Keypad ...............................................................................................................8
Options ...............................................................................................................................9
Search Programs ......................................................................................................11
Features
Display & Controls
Power ...............................................................................................................................14
Track ................................................................................................................................14
Sensitivity ........................................................................................................................16
Programs .......................................................................................................................16
Reset ................................................................................................................................18
Discrimination ............................................................................................................. 18
Volume ............................................................................................................................20
Threshold .......................................................................................................................20
Tone ID ............................................................................................................................21
Depth Units ...................................................................................................................22
Backlight .........................................................................................................................22
Frequency Offset 22
Salt Track .......................................................................................................................23
All Metal Features
SAT (Self-adjusting Thresold) ................................................................................24
VCO (Voltage Controlled Oscillator) ...................................................................25
Preparation for Water Hunting ........................................................................................26
Proper Care ................................................................................................................................27
Searching .....................................................................................................................................26
Digging ...........................................................................................................................................26
Accessories ................................................................................................................................27
Service ..........................................................................................................................................29
Warranty .....................................................................................................................................29
Audio Tones Yes
Number of Audio Tones 22
Battery Life 20+ Hours
3
Page 3
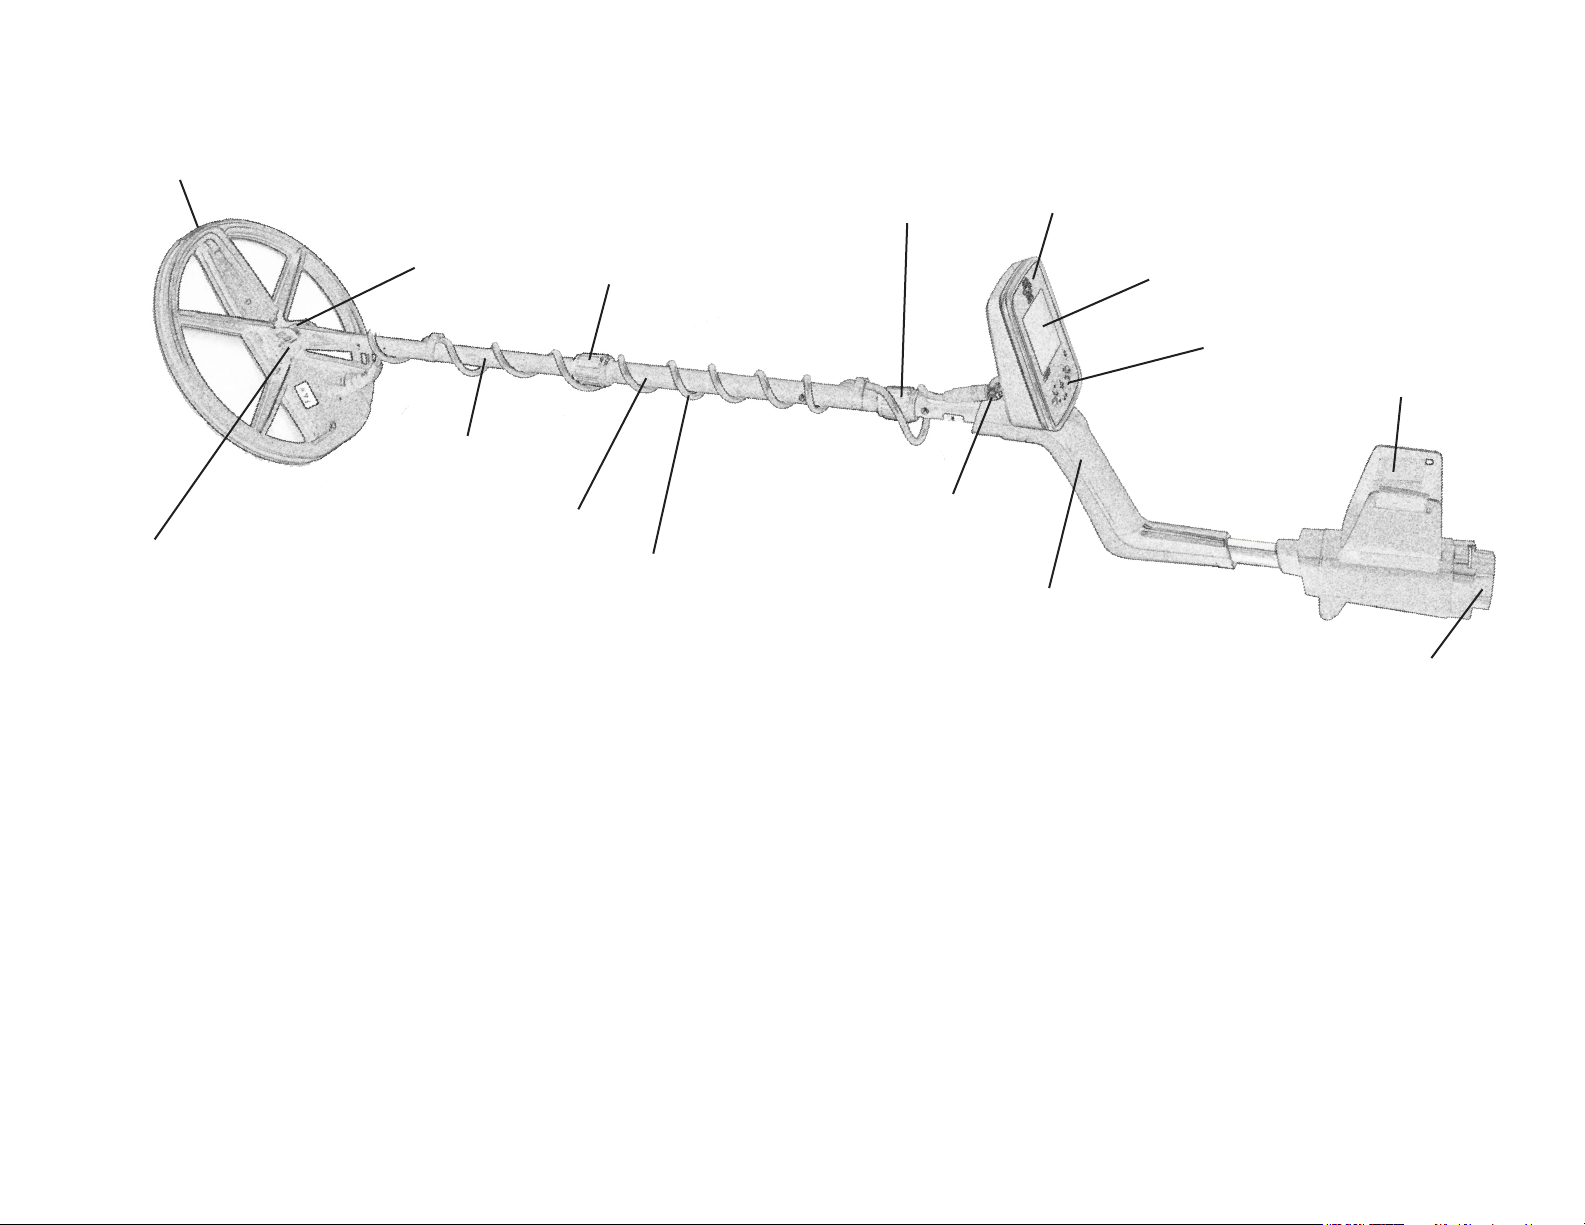
Assembly
Search Coil
Non-metallic
Washers
Fiber Rod
Camlock
Camlock
Control Pod
Display
Control Buttons
Velcro Amrstrap
Center Rod
Fiber Bolt &
Thumbnut
1. Remove all parts from the shipping carton and check assembly diagram to ensure
all parts are present.
2. Install black rubber washers on fiber lower rod; attach search coil to lower fiber
rod. Use only the nonmetallic washers, fiber bolt, and fiber thumbnut provided to
secure search coil loop to the lower fiber rod.
3. Insert lower fiber rod into center rod so that the spring buttons line up with one of
the length-adjustment holes in the center rod. Turn the camlock to eliminate any
slack.
4. Insert the center extension rod into the hand-grip section. Turn the camlock to
eliminate any slack.
5. Wind the search coil cable around the rods, first revolution over the top of the
rod, all the way to the display pod. Plug the cable into the connector on the back
of the display. When looking at the back of the display, it is the connector on the
right. Tighten the retainer ring securely.
6. Thread the velcro armcup through the slots on the armcup. With your arm in
position, fold the strap over onto the velcro so that the strap is loose enough to to
pull your arm in and out of the armcup.
Search Coil
Cable
Search Coil
Connector
Handgrip
Battery Holder
with Cap
7. Grip the detector and sweep the search coil over the floor. If the fit feels uncomfortable, adjust the position of the lower fiber rod. The ideal position allows you
to stand up straight and sweep the search coil over the ground without stooping
over.
8. Install eight “AA” batteries in the battery holder carefully noting the + & - positions
marked inside the battery holder. Insert the battery pack, lining up the contacts.
Tighten the battery seal.
Tips on Batteries
• The MX-Sport operates for up to 40 hours (without backlight) using eight quality
“AA” batteries.
• High-quality “AA” alkaline batteries are recommended. Rechargeable NiCad, Nickel
Metal Hydride, or other similar “AA” substitutions work well. Batteries near or
above 2 volts per cell and higher are not recommended.
• Battery life will change with battery type, operating temperature, and backlight
use. Lowering the volume of the built in speaker or using headphones extends
battery life.
4
5
Page 4

Getting Started with MX Sport
1. Press the power ON button. Upon initial power up, the detector defaults to the Coin and Jewelry program.
2. Sweep the search coil from side to side, keeping it level and
close to the ground. Overlap each search pass by at least
50%.
3. Once a target is detected, indicated by a consistent beep,
sweep several passes over the target center and note the
display identification and target depth.
4. If the target indicates dig worthy, press and hold the Pinpoint
button(√/X).Iftapped,thepinpointbuttonwilllockinthePinpoint mode. After pinpointing remember to tap the pinpoint
button once more to return to Search mode.
5. When using MX Sport’s DD search coil, the pinpoint spot is
an imaginary line through the center of the search coil. It is
important to determine where this detection line begins and
ends on the coil. When using an optional concentric search
coil, the pinpoint spot is in the center of the search coil
6. Sweep the target area slowly in an “x” pattern. The strongest
beep and shallowest depth indicates target center.
7. Practice with a visible object above ground, moving back and
forth over the target.
8. Use care in digging properly for the terrain. Fill in all holes
and discard any trash found in the proper receptacle. By not
leaving trash and unsightly holes behind you, open areas will
continue to be available for you and others to metal detect.
Power Button: The power button turns on the MX Sport. Tapping
the power button while the detector is on will turn on the backlight. Holding the power button while on will turn the MX Sport off.
Search Mode
The MX Sport enters Search mode when turned on. In Search
mode, the buttons on the keypad perform the following functions:
Controls
The MX Sport operates in either Search or Options mode. The
detector will continue to provide audio feedback when in Options
mode, but the display will be used to show options rather than
target information.
6
7
Page 5
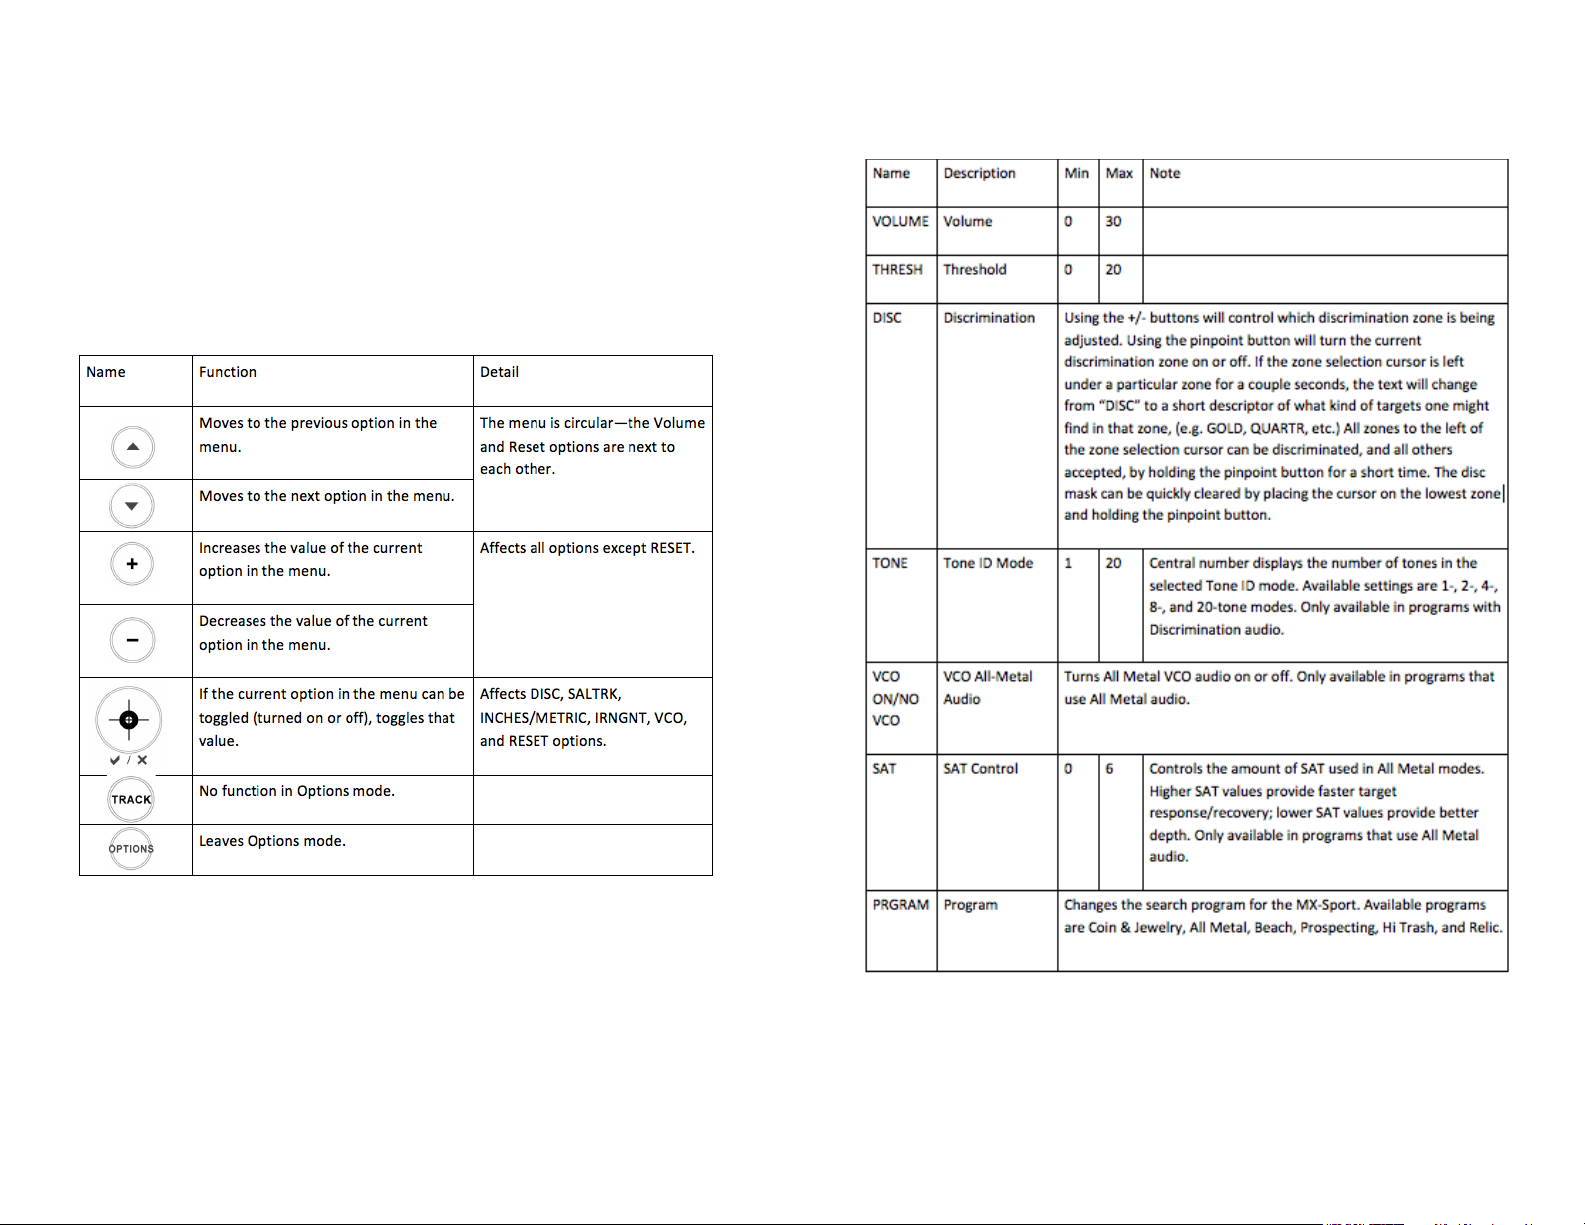
Options Keypad Functions
Options
When the user presses the Options button while in Search mode,
the MX Sport enters Options mode. As mentioned above, Options
mode will only affect the display. The MX Sport will still provide audio feedback from the target system. The MX Sport will automatically leave Options mode approximately 10-15 seconds after the
last time any button is pressed on the keypad. When in Options
mode, the buttons on the keypad perform the following functions:
The following is a list of options available in the MX Sport.
8
9
Page 6

Options, cont.
Search Programs
Search Programs are implemented as a method for quickly changing
multiple options at the same time. Some of these options are also available in the menu (ex. Discrimination), and some are not (ex. the type of
audio being used). The factory default settings for each program are
intended for general use.
Adjustments made to options in the menu are saved each time the
user changes programs and each time the MX Sport is turned off. Performing a factory reset as detailed following will return all Programs to
their factory default settings.
10
11
Page 7

Features (Detailed)
continuous background hum. In all search modes, the up & down
arrows control the Threshold. The lowest setting of 0 is Silent
Search. Use of a threshold provides more information regarding what the metal detector sees. Rejected targets or ground
peculiarities often cause the threshold to fade to silent. Changing
the search orientation can correct this anomaly. Searching in
silence (no threshold) has the advantage of better focus on the
desired target responses. Unlike older metal detectors, there is
no difference in detection depth using either threshold or silent
search. However, those who search with a threshold tend to
find more artifacts as the threshold alerts the user to spots that
have something unusual about them—perhaps two targets near
each other—and thus more attention is paid checking for possible worthwhile targets.
Options- Pressing the Options button, the up and down arrows
are used to select the specific option to adjust. The + & - buttons
make adjustments to the selected option.
Navigation
During normal searching there are two live controls that add
convenience for the two most common adjustments; Sensitivity
and Threshold.
SENSITIVITY: During searching (in all search modes) pressing
the + & - buttons adjusts the sensitivity, or responsiveness, of
the MX Sport. If the sensitivity is set too high, excessive noise will
make it difficult to locate targets due to the noise from either
the ground or external electric interference. Too-high sensitivity is noted by false signals. Lowering the sensitivity will improve
performance. Increase sensitivity for increased depth when the
ground and external conditions allow. Note: Few areas will allow
maximum sensitivity.
THRESHOLD: The MX Sport can be efficiently used with or
without a threshold hum. Threshold can be defined as a steady
12
Summary:
Press Option button and use arrows to view all the options; press
+ & - to adjust a specific option. Go to the next option or exit to
search. Exit from Options is automatic after 10–15 seconds.
Simply press Option again if you desire further adjustment.
Detection (Search mode) will continue while in the Options mode.
Once options have been adjusted, pressing Option button again
will exit options.
Options will be slightly different depending on the search program. For example All Metal, Prospecting, and Relic have the
features that are specific to All Metal-type programs. Features
such as Self-Adjusting Threshold (SAT) and Voltage Controlled
Oscillation (VCO) only appear when one of the All Metal modes
are in use. These features have no influence over the Discrimination programs and they will not appear as options.
13
Page 8

Display & Controls
POWER
A quick press of the button turns the MX Sport ON. Another
quick press of the power button toggles the backlight on and off.
PressingandholdingON/OFFforasecondturnstheMXSport
OFF.
Options: Activates option selections. Up & down arrows select
among available options. Pressing + or - adjusts that specific option. Select another option by pressing again or exit by waiting for
the option to time out automatically (10–15 seconds).
√/X:AccessPinpointmode.Alsousedforsomemenusequences.
In Search mode, + and - adjust Sensitivity; in Options they select
the level of adjustment.
TRACK
The MX Sport automatically self-adjusts to the ground mineralization currently being searched and tracks to changes in mineralization. Ground compensation and tracking to ground mineral
changes is fully automatic. Automatic ground tracking improves
performanceovertypical/normalgroundwheregroundmineral
changes are naturally occurring and gradual.
Spotty high ground minerals (naturally occurring or not), mixed
with lower mineralization, can cause errors in ground tracking
and result in instability and difficulties (as if the sensitivity was set
too high for the area). If stability does not return at reasonably
reduced sensitivity settings, spotty high mineralization is likely the
cause. To search these difficult areas, locking the ground balance
at a fixed level more often than not resolves or reduces
instability.
• Option #1: In 80% of situations, tracking can be loced as
soon as the detector is turned on. This will result in improved
performance in difficult spotty areas. Locking the Tracking
prior to searching locks the ground balance at the ferrite
(high iron) level.
• Option #2: In 20% of situations, a natural or man-made spot-
ty mineralization may still cause difficulties at the initial ferrite, locked-ground rejection level. In these areas, find a highly
mineralized spot that is representative of all the spots in the
area, sweep the search coil 6–12 times (or until it doesn’t
respond) and press the TRACK button. In this case, the user
is locking the ground rejection level at the high mineral spot
so that all similar spots can be ignored (no response).
If the minerals within these spots exceeds typical ground mineral
levels, and are seen as metal ore, they can not be reduced by
ground tracking. Reducing the sensitivity of the detector, or using
the discrimination mask, is necessary to reduce metal responses. In some regions, hot rocks (iron rich stones) can exceed the
metal content of a mineral and thus exceed the range of any
metal detector’s ground rejection. Any metal (gold silver, copper,
nickel, aluminum etc) can be found in metal ore (rock) form, as
well. Again, Discrimination and Sensitivity adjustments are the
only way to deal with these responses.
The MX Sport captures ground mineral information in real time.
Turning off the Power and turning back on will automatically unlock a locked ground balance level. This is necessary to capture
new ground information. Switching in and out of the Beach mode
(a different ground rejection range) will also unlock a locked
groundbalance.WhenpoweringON/OFForswitchinginorout
of the Beach mode, remember to re-lock the ground tracking if
that is required for the area.
Pressing the TRACK button can lock tracking. However, the level
the ground balance is set to when locked is critical for stable operation. Holding the Track button puts the detector into Ground
Grab mode, where the number displayed is the relative ground
phase, and the depth meter shows ground strength.
14
SENSITIVITY
Used to increase or decrease responsiveness to targets, ground,
and external electrical noise. Maximum depth will be achieved by
using the highest setting possible for the area. Settings 1–10
are available. Increasing sensitivity to 10 activates the Audio
15
Page 9

Display & Controls, cont.
Boost feature, which amplifies the audio responses of small
signals. Audio Boost is intended to achieve maximum precision
on weak signals, and is not well-suited for general searching.Reduced sensitivity is often needed to search bad ground conditions
or high electrical activity areas.
When the ground is highly mineralized (typically high iron), reduced sensitivity often increases detection depth. Finding the
level that provides for smooth, stable operation and easy target
identification is important to maximize performance. Few areas
will allow maximum sensitivity settings.
1. During normal searching, press the + button to increase
sensitivity; press the - button to decrease sensitivity. The MX
Sport provides quick and convenient up or down sensitivity
during use without accessing Options. The current sensitivity setting shows briefly where the VDI number normally is
displayed.
2. Sensitivity adjustment is not featured in Options, but only with
the + or - buttons when not in the Options mode.
PROGRAMS
A program is a complete selection of options for specific or targeted metal detecting.
To select a Program:
1. Press Options and use the up & down arrows to select Program.
2. Press + & - to select the highlighted program.
3. Press Options again to return to normal searching or wait for
it to time out (10–15 seconds).
Coin & Jewelry: This is the primary search program used for
general-purpose searching. When searching typical soil for coins,
jewelry, or any other precious metals, and trash metal rejection
is needed, Coin & Jewelry discriminates against (rejects) ferrous
(iron) objects and light foil. Discrimination can be customized in
the Coin & Jewelry mode; see Discrimination.
Beach: The Beach program has features built in to ignore conductive wet or salty soils. Use Beach anytime you are searching
a salt-water beach. And because many fertilizers are conductive when wet, heavily fertilized farm fields may also require the
Beach mode when they are wet. The Salt Track feature can be
added to any program using the Options feature. One may need
to add the Salt feature to the Relic mode in highly fertilized wet
fields,and/ortotheProspectingprogramwhensearchingdesert alkali (salt) areas.
All Metal: Use the All Metal program to detect all metal types,
includingiron/steel.Findingpropertymarkers,clearingnails
from a driveway, locating lost tools, relic-hunting when iron is of
interest are examples of when All Metal would be used. All Metal
is a superior search program compared to locking in the Pinpoint mode, which has electronic aids to help pinpoint that are
not ideal for general searching. All Metal does have optional VCO
audio so target size and strength influences the audio.
Relic: Optimized for searching encampments and abandoned
homesteads. Very little trash metal rejection.
High Trash: Some areas (especially public areas) have high
concentrations of trash. To productively search high trash areas
requires a higher degree of Discrimination (trash rejection). If
trash becomes an issue using one of the other programs, try
High Trash.
Prospecting: For gold nugget searching. Also great for prospecting for other types of naturally occurring metals: copper, silver,
nickel, etc.
Pinpoint: Once the choice has been made to dig, press the
Threshold can be defined as a steady continuous background
hum.√/XbuttonaccessesthePinpointmode.Pinpointisdifferent compared to an All Metal mode in that special features are
activated to aid in target centering. Pinpoint can be toggled in the
hunting mode with a quick press. Alternately, the button can be
held to keep the detector in pinpoint until the button is released.
Pinpoint mode is not recommended for general searching.
16
17
Page 10

RESET
1. Restore to Factory Settings:
2. Press Option, use the up and down arrows to select RESET.
3. Press and hold Pinpoint button.
4. All options return to factory settings.
Discrimination
Each of the MX Sport programs begins with Discrimination settings pre-selected for most hunting.
The MX Sport has the ability to accept or reject
metaltypesbasedontheirconductivityand/or
electricalphase.Targetconductivity/phaseis
indicated on the display VDI scale (Visual Discrimination Indication) with a VDI reference number.
By learning what targets consistently indicate
specific VDI numbers, you can be sure to accept
or reject the different target VDI ranges that
interest you.
Many types of targets share similar VDI number
ranges.Forexamplegoldjewelryofvariedsizes/
types shares the same VDI number range as
aluminumofvariedsizes/types.Deeperdepths
suggest the target being heavier gold; shallow
depth indications suggest the target being lighter-weight aluminum. However, due to the wide
variety of gold alloys and sizes, to find all the gold
jewelry, digging lead, pull tabs, and screw caps is
to be expected.
Trash metals (iron) often produce some beep,
different from an accepted good target. In most
cases, iron will produce a broken or inconsistent
tone whereas an accepted good target produces
a more consistent beep.
The display can help, but an inconsistent tone is most likely a
rejected target. If you have trouble recognizing these inconsistent beeps and displays, find the sweep speed that enhances the
rejection sound to the point you can recognize it when compared
to the sound of a good target. Accuracy is greatly increased
sweepingthecenterofthetarget.Pinpoint(press√/Xand“x”
thearea,returntoDiscrimination(press√/Xagain),thenpass
the search coil over target center and note the sound and display
indication.
When a metal target doesn’t indicate as expected, peculiarities
within that metal’s alloy mix (metal types) are usually to blame.
As alloyed steel bottle caps age, the iron deteriorates and the
better (non-iron) alloys remain and become prominent (e.g., very
old bottle caps are likely to indicate as quarters). The longer they
areintheground,themoretheirondissolvesandthestronger/
better the non-iron looks to a metal detector. Soil conditions,
corrosion factors, depth, and other variables can skew the audio
and display indications and, thus, Discrimination settings. Used
properly, however, Discrimination will more than double your time
spent digging valued targets. The point is to reject the most common trash and accept the most common good targets. The MX
Sport has 20 rejection ranges. Discrimination comes already set
up for the Program you have selected.
To Customize Discrimination:
It is sometimes necessary to customize discrimination for tar-
getsyouwanttoaccept/reject.Ironwilllikelyjumpalloverthe
scale inconsistently. You can only reject the first range for iron.
For other targets that indicate consistently in a range, identify
and then reject that range.
1. Press Options and use up & down arrows to select Discrimination.
2. Use the + or - buttons to select the desired range you want
to change, indicated by the flashing curser. Press pinpoint
button to toggle between accepting or rejecting that range.
The pinpoint button changes that range from reject (solid
indicator bar) to accept (blank indicator bar) or from accept
(blank indicator bar) to reject (solid indicator bar).
3. Press Options to exit, or wait 10–15 seconds for the Options
mode to automatically time out.
18
19
Page 11

Disc Tips: In the DISC menu option, if the zone selection cursor
is left under a particular zone for a couple seconds, the text will
change from DISC to a short descriptor of what kind of targets
one might find in that zone, (e.g. GOLD, QUARTR, etc.)
In the DISC menu option, all zones to the left of the zone selection
cursor can be discriminated, and all others accepted, by holding
the pinpoint button for a short time. The disc mask can be quickly
cleared by placing the cursor on the lowest zone, and holding the
pinpoint button.
Volume
Volume adjusts how loudly a metal target beeps. The MX Sport
provides adequate volume levels for individuals with good hearing.
Those with impaired hearing should use headphones.
To Adjust Volume:
1. Press Options and use the up & down arrows to select Volume.
2. Press + & - buttons to select the desired volume level.
3. Press Options to exit, or wait 10–15 seconds for the options
mode to automatically time out.
Threshold
The MX Sport can be used in silent search (no sound until a
target is detected), or with a Threshold (steady continuous background hum) with virtually no difference in maximum detection
depths. However, searching with a continuous threshold has the
advantage of providing more information regarding what the detector is seeing. The threshold fading to silence indicates either
a rejected target, or a ground anomaly. By focusing more closely
around that spot, often a good target can be found near trash.
To Adjust Threshold:
During searching simply press up and down arrows next to the
Options button to adjust threshold.
Optionally while in the menu:
1. Press Options and use the up & down arrows to select
Threshold.
2. Press + & - buttons to adjust threshold. Threshold level
should be as quiet as possible while still hearing a hum.
3. Press Options to exit, or wait 10–15 seconds for the Options
mode to automatically time out.
Tone Identification or Tone ID
The pitch or audio frequency produced by each target’s display
identification range can be highlighted with differently pitched
sounds, called Tone Identification or Tone ID.
A specific audio pitch reference for each range provides quick audio ID based on the pitch of the beep it produces during searching- without looking at the display.
When Tone Identification is in single tone, all accepted metal
types produce the same audio pitch during searching. If the
Discrimination is set to reject a specific target range, that range
may not produce a beep of any pitch. Rejected targets often do
not produce any tone (silence).
To Adjust Tone Identification:
1. Press Options and use up & down arrows to select Tone ID.
2. Press + & - to select the type of Tone Identification desired.
3. Press Options to exit or wait 10–15 seconds for the options
mode to automatically time out.
Tone ID Settings
1-Tone: All targets produce the same pitch beep (no tone ID).
2-Tone ID: Iron targets produce a low-pitched beep; all other
targets produce a higher pitched beep.
4-Tone ID:
• Iron (lowest)
• Foil & Pull Tabs
• Nickels
• Coins (highest pitch)
20
21
Page 12

8-Tone ID:
• Large Iron (lowest)
• Small Iron
• Foil/SmallGold
• Nickels
• Pulltab
• Screwcap
• Zinc/IndianHeadPenny
• Dime – Dollar (highest pitch)
20-Tone ID:
Each of the 20 Display ID segments (discrimination zones)
produce their own uniquely-pitched beep, starting with iron (the
lowest pitch) to Silver Dollars (highest pitched).
Depth Units
The MX Sport can report target depth in inches or metric.
1. PressOptionsanduseUp&DownarrowstoselectINCHES/
METRIC
2. Press + & - to select the units of measure desired.
3. Press Options to exit or wait 10–15 seconds to automatically
time out.
Backlight
The MX Sport has a backlit display option for use in low-light
conditions. Backlight use will reduce battery life (slightly, 10% to
20%) but may be necessary in some conditions. During use, tap
the Power button momentarily to select Backlight.
Alternately, press Option, use the up & down arrows to select
LIGHT, then use the + & - buttons to select the desired intensity
of the backlight. Press Options again to exit, or wait 10–15 seconds to automatically time out.
Frequency Offset
When two or more metal detectors of the same frequency are
used near each other, interference (cross talk) among them
is likely to occur. By slightly changing the frequency of the MX
22
Sport, such interference can be eliminated both for the MX Sport
and for the other detectors being operated nearby. Interference
from another metal detector is typically obvious chatter, similar
to having your sensitivity set too high for the area, only often with
a more regular pattern of sound.
When it appears another metal detector is causing interference:
Press Options and use the up & down arrows to select Frequency. Use + & - to select among the five available frequencies. Frequency shifting on the MX Sport is slight—not enough to result
in any measurable differences in sensitivity—just enough to avoid
interference from another metal detector nearby.
Salt Track
The MX Sport is a single frequency (VLF) metal detector. More
expensive multi-frequency and pulse-induction metal detectors
do have some advantage in wet conductive (salt) grounds. However, the MX Sport provides for excellent results in these wet
conductive salt conditions. The MX Sport Beach program has a
revised ground balance range to accommodate use in wet salt
sand because salt (when wet) is conductive like a metal target is
conductive.
Other situations where a person may need the expanded salt
ground balance range added to a program other than Beach
include Relic or Prospecting programs Thus, the salt option is
available in the Options mode and can be added or subtracted
from any program.
Relic hunting is often conducted in farm fields. These farm fields,
when wet and heavily fertilized, produce conductive conditions
similar to wet conductive salt. Add the Salt Track feature to the
Relic program when searching heavily fertilized wet farm fields.
In desert regions alkali (salt) patches are often found in good
nugget shooting areas. By adding the Salt Track feature to the
Prospecting program, these alkali areas can be searched effectively for nuggets even when wet.
23
Page 13

To add the Salt Track feature to any program:
1. Press Options and use the up & down arrows to select Salt
Track.
2. Use the + & - buttons to select either 1 for salt ground balance range or 0 for normal ground balance range.
Often soft sand will gather more saltwater compared to the surrounding sand. Because these spots have a sharp increase in
conductivity, the MX Sport will likely beep regardless of whether
metal is present. If a reasonable beep is produced that doesn’t
pinpoint sharply like a typical metal object (pinpoints as a large
area with a lower than normal volume beep), it is likely a salt
pocket; ignore and continue searching.
Additionally, when searching at the wave line, one may hear the
incoming and outgoing waves respond to some degree. It is best
to search fully in the water or fully on the beach. In most cases
natural sluicing (wave action gathering all heavy metals in one
streak or patch) occurs either in the water or on the beach. In
other words, natural sluicing often leaves targets behind the
waves (on the beach), or takes it out into the water. With a tide
guide and patience, you can search 100% of the beach.
You may want to turn Salt OFF (0 in the Beach mode) when
searching fresh water beaches (no salt). The extended ground
balance range provided by the salt feature is not recommended
when searching areas that do not have wet salt (conductive
ground conditions). Only when conductive ground conditions are
present will the salt feature improve performance.
ALL METAL PROGRAM-ONLY FEATURES
SAT (Self-Adjusting Threshold)
SAT only influences the All Metal, Relic, and Prospecting programs and only appears in Options when one of these programs
is activated.
SAT makes the All Metal programs require motion to detect
metals. Stopping over any metal for any significant length of time
24
will reset the audio to natural, and that metal target will stop responding. Again, when using SAT, search coil sweep is required.
When searching in an All Metal program, searching with a
threshold hum is mandatory for maximum detection depth. In
an All Metal mode (without SAT) the threshold hum will fade or
increase with time as well as any slight change in the ground.
Although these slight changes in conditions can be heard in
the changing threshold hum, they are not significant enough
to dictate any operator change in settings. SAT automatically
maintains the threshold hum over time and irregular conditions
by resetting the threshold at regular (timed) intervals. These
timed intervals can be sped up or slowed to match how quickly
the ground conditions are changing and how quickly you want to
sweep the search coil.
To adjust SAT when All Metal, Relic, or Prospecting programs
are in use:
Press Options and use the arrows to select SAT. Use the + & - to
select levels 0 = no SAT to 6 = Hyper SAT. Use the SAT speed
nearest “0” that maintains a steady continuous threshold hum.
Quicker SAT speed settings, near to 6 (Hyper SAT), require
quicker search coil sweep speeds due to the fact that fast SAT
can tune out metal target responses if swept too slowly.
Select the slowest (lowest number) SAT speed that maintains
a steady threshold and no faster. Match the speed the search
coil is swept to the SAT speed. Practice with a target above the
ground to assure the search coil is being swept briskly enough to
respond to targets.
VCO (Voltage Controlled Oscillator)
VCO only influences the All Metal, Relic, Prospecting, and Pinpoint
programs, thus only appears in Options when one of these programs is activated. For the Pinpoint mode, lock in Pinpoint, then
press options and select VCO.
VCO provides an increase in the pitch of the beep as the search
coil nears a metal target. As the search coil moves away from
a metal target the pitch of the beep decreases. In this way the
center of the metal target is obviously the highest-pitched beep.
25
Page 14

Preparation for Water Hunting
The MX Sport is waterproof to a depth of 10 feet with
proper preparation. Before submerging the detector,
doublecheck the following.
1. The loop cable should be firmly tightened.
2. The headphone cable, headphone adapter, or headphone connect cap should be firmly tightened.
3. The battery compartment cap should be firmly
tightened. The hash marks on the battery cap and
the battery compartment will line up when the seal is
properly tightened.
Proper Care
As tough as your White’s metal detector is, it is a sophisticated electronic device
that requires reasonable common sense care similar to all electronic devices.
• Store in a warm, dry area with batteries removed
• Avoid harsh impacts
• Donotstoreinyourcar’strunkduringwinterand/orsummerextremes
• Do not store in direct sunlight
Searching
Sweep the search coil smoothly and evenly from side to side, as if mopping a floor,
about 2 seconds per pass, overlapping each pass 50%. Keep the search coil as
near to the ground as possible, throughout every sweep. By placing junk and good
targets on top of the ground and sweeping the search coil past them, you can
see the ideal sweep speed that enhances target detection and identification. If the
search coil is swept too slowly, detection doesn’t happen or discrimination isn’t
clearly recognizable. With the correct sweep speed, both detection and discrimination accuracy are optimized.
Fundamental to detecting success is choosing great places to use your MX Sport.
These can be researched by word of mouth, at the library, in the newspaper, in
books, or on the Internet. The longer an area has seen use, and the more activities
and people who may have used it, the more interesting the targets.
Remember that you must have permission from the property owner to search private property unless it is your own. Many publicly owned lands are open to metal
detecting. However, some have permit systems and digging tool restrictions.
Always check with your local parks department for necessary forms, permission,
and/orlimitations.
• In grass or turf, a trowel or knife-like tool works best. It can be combined with
the hinged door digging method where the turf is cut on three sides and the
flap turned over. By leaving the hinged part of the turf attached, the flap is
less likely to get displaced by a lawn mower.
• When digging additional dirt from a hole, place it on a drop cloth. Once digging
is completed, you can quickly dump the dirt back in the hole with little spread-
ing or effort.
In all cases care must be taken to minimize damage caused by digging. Practice in
your own yard first. With a little practice and the correct tool, it should be difficult
to tell where you have dug. Not only does this aid you in getting permission to hunt,
it also places all metal detector users in a favorable light. In addition:
• Remove all trash you encounter and discard in the proper receptacle.
• Aid law enforcement whenever possible.
Accessories
• Headphones: Greatly increase the ability to hear the MX-Sport in high noise
environments, increase battery life, and provide for increased privacy. Any
stereo headphone between 8 and 150 ohms will work. A cable adapter is
available so that the MX Sport will accept any ¼-inch headphone. Optional
waterproof Sport headphones plug directly into the MX-Sport
• Carry Cases: White’s offers backpacks and gun-style cases to fit the MX
Sport. These padded cases offer convenience for storage and protection for
travel.
• Search Coils: The standard search coil is the best for all-around use. While
larger search coils detect deeper, they are less sensitive to small targets and
are harder to pinpoint. Smaller search coils pinpoint and detect small metals
better, and detect good targets in high-trash public areas better than larger
search coils, but do not detect as deep.
• Digging Tools: It is important to have appropriate digging tools for the areas
you search. Care must always be used to leave the area as you found it or
better.
FCC Compliance
Per FCC 15.19(a)(3) and (a)(4) This device complies with part 15 of the FCC
Rules. Operation is subject to the following conditions:
1. This device may not cause harmful interference.
2. This device must accept any interference received, including interference that
may cause undesired operation.
Per FCC 15.21, the user that makes changes or modifications not expressly approved by the party responsible for compliance could void the user’s authority to
operate the equipment.
Digging
Different terrains require different types of digging tools and digging techniques.
• For sandy beaches any simple strainer type scoop works fast and easily to
recover targets.
26
Product Note
This product uses the FreeRTOS.org real time kernel. The FreeRTOS.org source
code can be obtained by visiting www.FreeRTOS.org
27
Page 15

Service
In the unlikely event that you have trouble with your White’s metal
detector that your retailer can not satisfactory help you with,
White’s has warranty service centers in the USA, and most regions outside the USA.
For our service centers nearest you, please see our website:
www.whiteselectronics.com
Warranty
If within two years (24 months) from the original date of purchase, your
White’s detector fails due to defects in either materials or workmanship,
White’s will repair or replace, at its option, all necessary parts without charge
for parts or labor.
Simply return the complete detector to the Dealer where you purchased it or
to your nearest Authorized Service Center. The unit must be accompanied by a
detailed explanation of the symptoms of the failure. You must provide proof of
the date of purchase before the unit is serviced under warranty.
This is a transferable manufacturer warranty that covers the metal detector
for two years from the original date of purchase, regardless of the current
owner.
Items excluded from the warranty are non-rechargeable batteries, accessories that are not standard equipment, shipping and handling costs outside the
continental USA, special delivery costs (Air Freight, Next Day Air, 2nd Day Air,
packaging service, etc.) and all shipping and handling costs inside the continental USA 90 days after purchase.
White’s registers your purchase only if the Sales Registration Card is filled
out and returned to the factory address soon after original purchase for the
purpose of keeping you up to date regarding your metal detector and White’s
ongoing product development.
This warranty does not cover damage caused by accident, misuse, neglect,
alterations, modifications, unauthorized service, or prolonged exposure to
corrosive compounds including salt. Duration of any implied warranty (e.g.,
merchantability and fitness for a particular purpose) shall not be longer than
the stated warranty. Neither the manufacturer nor the retailer shall be liable
for any incidental or consequential damages.
Some states do not allow limitations on the length of implied warranties or the
exclusion of incidental or consequential damages. Therefore, the above limitations may not apply to you. In addition, the stated warranty provides specific
28
 Loading...