

Page 1

BeachHunter 300 Table of Contents
BeachHunter 300
Table of Contents
Assembly................................................................................................2
Assembly Instructions .....................................................................................................................................3
Proper Care .....................................................................................................................................................3
Batteries .................................................................................................4
Standard Battery Holder ................................................................................................................................. 4
Using the Standard Battery Holder ................................................................................................................. 4
Quick Start ............................................................................................. 5
Quick Start Instructions ..................................................................................................................................5
Controls .................................................................................................6
Threshold ........................................................................................................................................................6
Sensitivity ....................................................................................................................................................... 6
Tips on Ground "Balancing" ...........................................................................................................................
Ground ............................................................................................................................................................7
Toggle Switch .................................................................................................................................................
7
8
L.E.D. Display ......................................................................................9
What the lights mean ...................................................................................................................................... 9
Red .................................................................................................................................................................. 9
Yellow .............................................................................................................................................................
Green ............................................................................................................................................................... 9
Searching ..............................................................................................10
Operator Techniques ..................................................................................................................................... 10
When you get a Beep! ................................................................................................................................... 10
Responsible Detecting .................................................................................................................................. 11
Owner Information ...............................................................................12
Service .......................................................................................................................................................... 12
Warranty .......................................................................................................................................................
Warranty Transfer ........................................................................................................................................
Warranty UK ................................................................................................................................................
Warranty Transfer UK ..................................................................................................................................
13
14
15
16
9
1
Page 2

Ch1 BeachHunter 300 Assembly
Assembly
WASHERS
LOOP
BETWEEN
EACH LOOP
EAR & CLEVIS
CABLE RETAINERS
CAMLOCKS
CLEVIS
LOWER
HEADPHONE
CENTER ROD
SECTION
LOOP CABLE
LED TARGET INDICATORS
CONTROL BOX
“S” ROD
ELBOW
CUP
STRAP
ELBOW CUP
FOAM PADS
INSIDE ELBOW
CUP
BATTERY
COMPARTMENT
LATCH
2
Page 3

Assembly Instructions
1. Remove all parts from shipping carton and
check the assembly page to make sure all parts are
present. Remove control box from the “S” rod by
compressing both the spring clip buttons on one
side of the rod and pivoting the control box off.
For superior water proofing, the Loop, Head
phone, and their cables are hard wired (not removable) from the control box, headphone and loop.
The waterproof fitting and strain reliefs on the
cables are torqued to a specific ideal setting and
should not be loosened or tightened. Extra care/effort must be taken in assembly regarding winding
the cable around the rod.
2. Unlock “S” rod camlock and insert the reduced
end of the center rod into curved “S” rod so that
stainless steel spring clip buttons line up and lock
into the holes in the curved “S” rod. Turn cam
lock to secure.
3. Fit the rubber washers between clevis/lower
rod and searchcoil ears. Use only non-metallic
washers, fiber bolt, and thumbnut, to secure loop
to clevis/lower rod. Then insert into center rod so
that stainless steel spring buttons line up and lock
into one of the adjustment holes in the center rod.
Turn Camlock to secure.
4. Unravel cable and wind the cable around the
clevis and rod assembly, first revolution
OVER the top of the rod with some slack before
applying the cable retainer. This is done so that
the search coil can be paddled backwards toward
the rod without putting a strain on the cable. Wind
cable firmly all the way to the curve in the “S”
rod. Then attach control box to the rod by compressing the two spring clips on the rod aligning
and inserting control box lid bracket. To secure
cable, wrap velcro cable retainers around rod and
cable, one near the search-coil and one near the
padded handle on the “S” rod.
5. Grip the instrument by the handle, with your
arm in the elbow cup with strap secure, and sweep
the coil over the floor. If the instrument fit feels
uncomfortable, adjust the elbow cup by removing
and repositioning the bolt/thumbnut and installing in one of the optional positions. If necessary,
readjust clevis/lower rod length with the spring
clip buttons so that the searchcoil can be held near
-
-
should be
Ch1 BeachHunter 300 Assembly
the floor without requiring stooping over.
6. Adjust the elbow cup strap so that it is loose
enough for you to slide your arm in and out without
loosening each time you want to set the detector
down. Peel and stick elbow cup foam pads on the
inside of the elbow cup, one on each side.
7. Install batteries as described in the next section.
8. This model can be mounted on two different po-
sitions on the rod, forward or aft. Or the control box
may be left off the rod for hip mounting using the
provided pouch and any belt (two inch preferable).
9. It should be noted at this point that the detector
may not work as expected indoors due to the high
degree of metals ( nails, pipes, etc.) used in modern
construction and the presence of electrical interference. It is best to tune and practice out-of-doors to
ensure stable, predictable results.
Proper Care
1. Cleaning - The BeachHunter 300 is waterproof
and can be cleaned with water & mild soap.
2. Battery Door -
clean and free of sand. Do not lubricate.
3. Weather -
conditions of a car trunk during winter and/or
summer extremes. Protect your detector from
direct sunlight during storage.
4. Water - Saltwater is very corrosive! After your
detector has been exposed to salt, rinse it with
fresh water. Wipe down the control box with a
damp cotton cloth. Do not allow water inside the
battery compartment or control box.
5. Storage - When not in use, make sure the
THRESHOLD knob is turned fully counterclock
wise, to the OFF. If you plan on storing your de
tector for long (several weeks), remove the battery
holder from the instrument and remove the battery
cells from the holder. Store the instrument indoors,
in an area where it will be protected from abuse.
6. Additional Precautions - Avoid dropping
your detector while attempting to set it down to
dig. Avoid using your detector for leverage when
standing up from a dig. Do not modify your instrument during its warranty period.
Keep the rubber battery door
Do not expose your detector to the
-
3
Page 4
Ch2 BeachHunter 300 Batteries
CAUTION
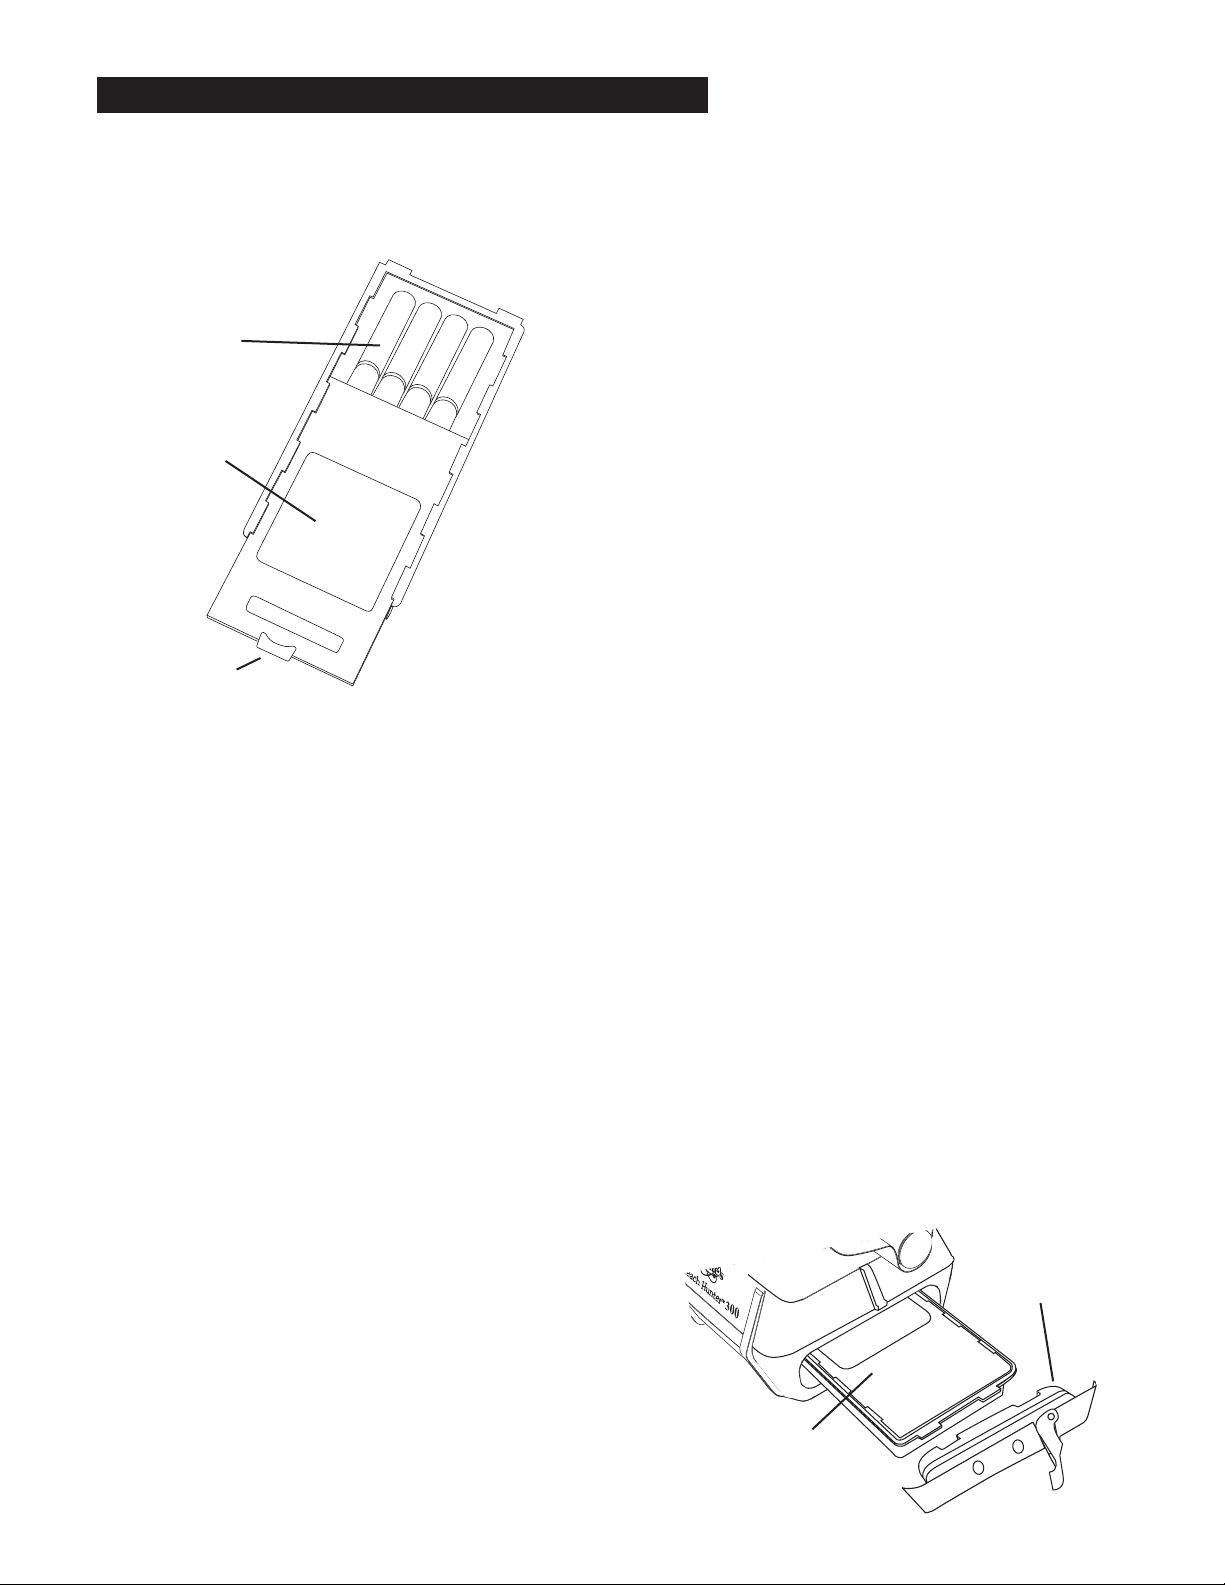
Battery Holder #802-7150
LIFT
T
AB
AND PULL
Batteries
“AA” BATTERIES
DECAL
FACING UP
Using the
Standard Battery Holder
1. Slide open the battery holder lid (decal side of
battery holder) by applying gentle upward
pressure on the tab of the door so that it unlocks.
Slide the door away from the battery box
exposing the cell positions.
2. Remove any old cells from the holder. Note the
(+) and (-) positions of each cell and the (+)
and (-) for each position marked inside the cell
tray. Install new “AA” cells noting carefully the
correct (+) and (-) positions.
BATTERY
DOOR TAB
Standard Battery Holder
1. The standard battery holder holds eight “AA”
cell batteries. Alkalines are recommended for use
with this model. During normal searching conditions you can expect about 40 hours of hunting
time from one set of eight alkalines.
2. Non-alkalines can be used in this holder. When
non-alkalines or rechargeable “AA” cells are used,
detecting time (before replacement/recharge) will
be reduced to about 30 hours.
3. Once the batteries become weak, the blue/green
light fails to light when the SENSITIVITY control
is turned to BATT CHK The beep over metal targets will be reduced in volume when low batteries
are used. Shortly thereafter, the instrument will no
longer respond to metals.
4. The battery compartment opens by disengaging
the latch, disengaging the two hooks on each side
and removing the large rubber door. Tilt the instrument to slide the battery pack from the control box.
If the cells are installed incorrectly, the detector
may require service by an Authorized
Service Center.
3. Slide the door closed so that it snaps securely.
4. Insert the battery holder into the detector so that
the decal is facing up, with the battery holder door
tab and metal contact points facing toward the
inside of the battery compartment.
Make sure the large rubber battery compartment
door is dry and free of sand/debris, insert it into
place (only fits one way). Secure the two hooks on
each side of the case. Then engage the latch.
An optional rechargeable system incorporating the
latest in state of the art non-memory characteristics
is available for the BeachHunter 300 Whiteʼs nicad
#802-5211, and charger #509-0022 are recommended.
RUBBER BATTERY
COMPARTMENT
DOOR
BATTERY
HOLDER WITH
DECAL FACING UP
4
Page 5
Quick Start
6
4
1
2
3
Ch3 BeachHunter 300 Quick Start
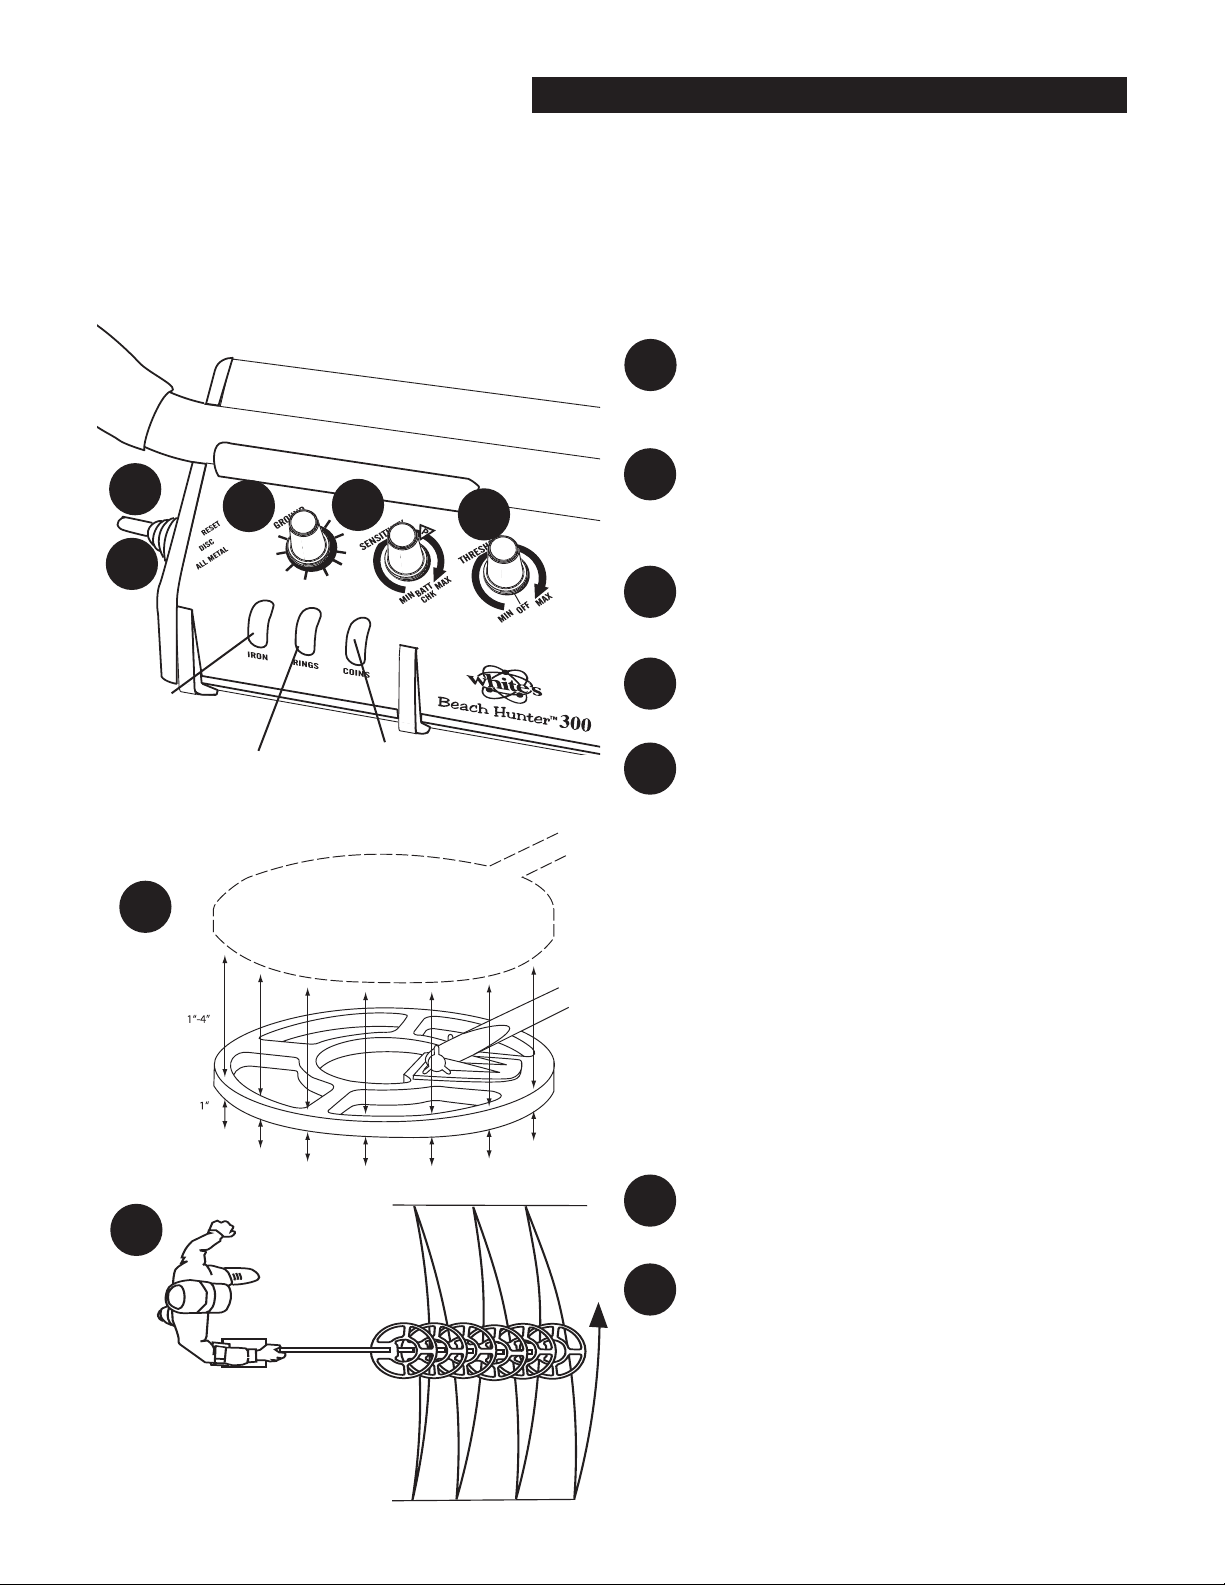
Quick Start
Instructions
Once fully assembled, and the batteries
1
installed, rotate the ON/OFF THRESHOLD
knob until a slight hum is heard.
Turn the SENSITIVITY knob to BATT CHK
2
position and assure blue/green light is visible, then set the SENSITIVITY knob to “P”
(Preset).
3
Set the GROUND control to center
(1/2 rotation from either end stop).
RED LIGHT
IRON
YELLOW LIGHT
JEWELRY
5
7
BLUE/GREEN LIGHT
COINS
BATTERY CHECK
4
Set the toggle to the left, ALL METAL posi
tion.
5
Lower the search coil (loop) to search height
(approx 1" above the ground.) Pump the
search coil slowly up and down (from 1" to
4") and notice the change in volume of the
background hum.
If the hum INCREASES on the downstroke,
turn the Ground control knob to the LEFT. If
the hum DECREASES on the downstroke,
turn the Ground control knob to the RIGHT.
When you hear no change in the hum when
pumping the searchcoil, the BeachHunter 300
is “GROUND BALANCED” for the area you
are searching.
6
Set the toggle to center, DISC position.
-
Start making wide overlapping sweeps 1"
7
above the ground. Listen for the low (iron/
trash), medium (gold jewelry, nickel, aluminum) and high (silver and copper coin) beeps
and watch the corresponding L.E.D. lights tell
you what treasure lies beneath your feet!
5
Page 6

Ch4 BeachHunter 300 Controls
Controls
PRESET
POSITION
Threshold
The THRESHOLD knob turns the instrument
ON/OFF and adjusts the steady background hum or
“threshold” that should be heard continually during
use. The ideal setting is the softest you can hear.
If threshold is not desired, turn the THRESHOLD
control just slightly counterclockwise to silence.
Although some performance may be compromised,
respectable results can still be achieved.
Turn the Threshold fully counterclockwise OFF
when not using the BeachHunter 300 (For prolonged periods of storage of two weeks or more,
remove the battery holder from the instrument.)
Sensitivity
The SENSITIVITY control adjusts the responsiveness to metal targets as well as the amount of interference from external electrical sources and ground
peculiarities. It also functions as a battery check by
turning the knob fully counterclockwise to activate
the blue/green LED “coins” indicator light.
In most conditions the “P” (Preset) position is ideal.
If interference becomes apparent (false signals
or instability), reduce the SENSITIVITY control
(counterclockwise) until smooth, stable operation is
restored.
If smooth, stable operation is noted at “P” (Preset),
increasing the SENSITIVITY control (clockwise)
may increase detection depth so long as stable predictable results can be achieved.
The SENSITIVITY control will also dictate the
sensitivity of the I.D. display. If set too high for the
conditions the display may become unreliable. We
advise reducing the sensitivity control by turning it
slightly counterclockwise to restore accuracy.
6
Page 7

Ch4 BeachHunter 300 Controls
Ground
The Ground control adjusts the level of rejection
against ground mineralization. When set properly
the detector will ignore most common ground including salt. Fine tuning the GROUND control for
the area will improve performance particularly
when the All Metal mode is used.
To fine tune the GROUND control first go to the
area you wish to search.
Place the loop on the ground (search height).
TOGGLE IN
ALL METAL
POSITION
Tips on Ground “Balancing”
Think of the GROUND control as a volume
level for the ground. With the loop approaching the ground, if the “hum” gets louder, turn
the control down. If it gets softer, turn the
control up. The goal is to find the ground setting that allows little or no change in threshold
“hum” as the loop is lowered and lifted from
search level. If a steady “hum” is difficult to
accomplish, slightly reduce the SENSITIVITY control (turn counterclockwise) and try
again.
Turn the THRESHOLD control clockwise until a
slight hum (threshold of sound) can be heard.
Place the TOGGLE in the All Metal position.
Pump (lift and lower) the loop from the ground raising about four inches and lowering to search height
while listen to the threshold. The threshold will
either stay the same (desired), increase in volume,
or decrease in volume.
Pay attention to the change in sound only as the
loop approaches the ground.
If the threshold sound decreases as the loop approaches the ground, start turning the GROUND
control “clockwise” or “up” slowly while continuing to pump the loop over the ground.
If the threshold hum increases in volume as the
loop approaches the ground, start slowly turning the
GROUND control “counterclockwise” or “down”
while continuing to pump the loop over the ground.
Once completed, switch the toggle switch to the
DISC setting if trash rejection is desired
7
Page 8

Ch4 BeachHunter 300 Controls
Toggle Switch
The TOGGLE selects between the two operating
modes DISC and ALL METAL.
ALL METAL
This position responds to all types of metals with
the same tone “beep”.
All Metal may detect deeper in some areas when
compared to the DISC mode.
Pinpointing is best completed in the All Metal
mode. Although some slight motion of the loop is
required for continued detection, the degree of motion is very minimal.
The LED display will still indicate target category
regardless of the TOGGLE position.
Setting of the GROUND control is recommended
in the All Metal mode.
DISC
is the most common operating mode and will provide one of three distinctive tones depending upon
the metal type.
Low tone (broken or inconsistent) indicates iron or
steel.
Medium tone indicates jewelry/nickel. Lead and
medium size aluminum also indicate in this medium tone category. An operator must dig lead and
medium aluminum in order to successfully recover
jewelry.
High tone indicates copper/silver coin range. Large
aluminum (pop cans) may also indicate in this high
tone range.
RESET
This position resets or clears the LED display lights
and while being held in RESET switches from
DISC to All Metal.
It is not necessary to reset the LED display during
normal searching. Each new target will automatically reset the LED and provide a new indication.
An operator may want to reset the LED display and
sweep a particular target a second time during testing or experimentation.
Primarily, the RESET is used to momentarily ac
cess the All Metal mode for quick pinpointing.
Once released, the TOGGLE will automatically
return to the DISC position.
-
8
Page 9

Ch5 BeachHunter 300 LED Display
L.E.D. Display
What the lights mean
The high intensity L.E.D. display indicates the
possible category or type of metal currently being
detected.
It is normal for the display to show and hold a
random indication during use, as well as indicating
RED
IRON/STEEL
YELLOW
JEWELRY/
NICKEL
GREEN
COPPER/SILVER/
LARGE BRASS/
ALUMINUM
targets while searching in the All Metal mode. The
L.E.D. display will reset with the TOGGLE pushed
to the Reset position and released but it is not necessary. The L.E.D. display automatically produces
a new indication each time a new target passes near
the loop. Consult the display indication only when
it is accompanied by a smooth repeatable audio
sound.
During heavy interference, if the SENSITIVITY
control is set too high for the conditions, display
accuracy may be reduced. If errors are excessive,
reduce the SENSITIVITY control by turning it
slightly counter clockwise.
Red
This L.E.D. indicates the metal is likely iron or steel
such as nails, steel bottle caps or iron relics. Dig
only if iron/steel is of interest.
Yellow
This L.E.D. indicates the mid range where jewelry
and nickel most often falls. Unfortunately
aluminum and lead also fall into this category. To
successfully find jewelry one must dig nickels,
small to medium aluminum and lead.
Green
This L.E.D. indicates the high end of the scale
where copper and silver coins typically indicate.
Large brass, large aluminum, and other large nonferrous (not of iron) metals may also indicate in this
area.
9
Page 10

Ch6 BeachHunter 300 Searching
Searching
Operator Techniques
To get experience with the sound of metal objects in
the ground, place a large nail, and/or a steel bottle
cap (not aluminum), a silver coin, and an item of
jewelry (mans gold ring preferred) on the ground.
Sweep the loop over these metals at a rate of three
to four seconds per pass. Note on the iron/steel the
inconsistency in the beep, and that it is a lower tone
and/or has a flutter to the sound. Note that typically
jewelry produces a medium tone beep and that it
provides a more consistent smooth sounding beep.
Note that the coin produces an even higher tone
beep and is also more consistent. An operator will
soon learn to ignore the lower tone flutter sounds
trash produces and listen for the smooth consistent
medium and higher tone beep that coins and other
valuable metals produce.
Once a smooth consistent medium to high tone
beep has been located, sweep the loop directly over
the center of the target several times and read the
possible I.D. on the L.E.D. display. Like the audio
discriminator, the display will tend to fluctuate on
trash, and read more consistent on valuable metals.
This is why we recommend relying on the audio
beep as the primary indication, and then check the
Display I.D.
The display will produce and hold indications as the
loop passes over ground, trash, and other metals.
Ignore the display until a consistent medium to high
tone beep has been located.
The more consistent the display, the more likely the
indication is correct. Trash metals tend to indicate
inconsistently.
Caution: two different types of metals lying near
each other in the ground may produce multiple
display indications that may appear to mimic trash.
Use the pinpoint “x” ing method to isolate the targets.
10
When you get a Beep!
Pinpoint exactly where to dig by placing the TOGGLE in the All Metal position and “X-ing” the loop
slowly over the area “eyeballing” the center. The
detector will “beep” as the physical center as the
loop passes the center of the target.
As the loop nears the center of the target the sound
will increase in both tone and volume. The loudest
and highest tone beep indicates target center
(V.C.O.-Voltage Controlled Oscillator).
Note that some very slight loop movement is required. It is a good idea to place coins on the
ground and practice pinpointing. It takes some time
to develop pinpointing skills. Return the TOGGLE
to the DISC position prior to general searching.
For fast pinpointing the TOGGLEʼs Reset position
can be used. When pressed and held in Reset, the
All Metal mode is temporarily accessed for pinpointing. Once released the TOGGLE will automatically return to DISC for searching.
If the desire is to detect iron/steel such as tools,
relics or property stakes, place the TOGGLE in All
Metal and leave it there during searching. Common
metals will respond with the same tone beep.
The L.E.D. display will continue to indicate I.D.
regardless of the toggle position.
Proper setting of the GROUND control is more
critical when searching in All Metal.
If searching near other metal detectors, rarely cross
talk or interference will result. However, if you
note some static chatter, simply increase the dis
tance between you and the other metal detector.
-
Page 11

PINPOINTING BY
"X"ING THE LOOP
Ch6 BeachHunter 300 Searching
Responsible Detecting
Care must be taken to use the appropriate digging
tool for the terrain, and not to leave unsightly excavations or holes on other peoples property.
There are hundreds of digging tools designed to
minimize the impact removal of small items has
on the grass and vegetation. Tools can also avoid
damaging the items found.
Note: For searching in extreme conditions, improved performance (increased depth) may result by
reducing the SENSITIVITY setting.
Because the loop must be moving in order
to accurately respond, the sweep of the loop is
critical to performance. Sweep the loop close to
the ground. Keep it close throughout the sweep.
Overlap each pass by at least 50%.
Sand scoops are all that is needed in some areas, in
others a hand gardening spade. Challenging ground
conditions may require more sophisticated tools.
Check with your Dealer regarding an appropriate
tool for your area.
The beach replenishes itself with each season and
with each shift in the sand. The more traffic (people) and the longer (older) the traffic, the better the
odds of lost valuables.
You may want to start with your own yard. Valu
ables can be found anywhere people have
congregated, gathered, lived, sat, walked, played,
camped, picnicked, traveled or fought.
Any area inhabited before 1965, is likely to have
the older styles of collectable coins.
You must have permission to search both private
and public property from the owner or person in
charge of managing the property. In most cases,
you can locate the owner, or available permit sys
tem, through City Hall or the County Seat.
-
-
Productive areas or areas that have potential, should
be searched from at least two different directions, at
ninety degree angles from each other.
If the area is City owned contact the Parks and
Recreations Department. If it is a State or Federal
Park contact the superintendent or grounds keeper.
Known and marked historical sites, parks, and monuments, typically are off limits to metal detecting.
11
Page 12

Ch7 BeachHunter 300 Information
Information
Service
Whiteʼs reputation has been built on quality products backed by quality service. Our Factory Authorized
Service Centers are factory trained and equipped. They offer the same quality service as the factory. Ser
vice before and after the sale is the cornerstone of our customer relations.
-
Whiteʼs Authorized USA Service Centers:
Centerville Electronics
10063 Wellington Rd.
Manassas, Virginia 20110
Toll Free 1-888-645-0202
Fax: 1-703-222-8625
E-Mail: centelec@vwx.com
Electronic Exploration
575 West Harrison
Lombard, Illinois 60148
Toll Free: 1-800-392-3223
Fax: 1-630-620-1005
E-Mail: tony@ee-il.com
Whiteʼs Electronics, Inc.
1011 Pleasant Valley Road
Sweet Home, Oregon 97386
Telephone: 1-541-367-6121
Fax: 1-541-367-6629
E-Mail: nbaker@whiteselectronics.com
Before shipping detectors for service:
A. Contact your Dealer. There may be a quick,
simple fix or explanation that will prevent
having to send the detector in for service.
B.
Double check the obvious, such as batteries,
and try the detector in another area to be sure
there is not interference.
C. Be sure to send all necessary parts with your
detector, such as search-coil, batteries and
holders, as these items can result in symptoms.
D. Always include a letter of explanation about
your concerns, even if you have talked to the
Service Center by telephone.
E. Take care in packaging instruments for
shipping and always insure your package.
12
Page 13

Warranty
If within two years (24 months) from the original
date of purchase, your White's detector fails due to
defects in either material or workmanship, White's
will repair or replace at its option, all necessary
parts without charge for parts or labor.
Simply return the complete detector to the Dealer
where you purchased it, or to your nearest Authorized Service Center. The unit must be accompanied
by a detailed explanation of the symptoms of the
failure. You must provide proof of date-of-purchase
before the unit is serviced.
This is a transferable manufacturer warranty, which
covers the instrument two years from the original
purchase date, regardless of the owner.
Items excluded from the warranty are non-rechargeable batteries, accessories that are not standard equipment, shipping / handling costs outside
the continental USA, Special Delivery costs (Air
Freight, Next Day, 2nd Day, Packaging Services,
etc.) and all shipping / handling costs inside the
continental USA 90 days after purchase.
White's registers your purchase only if the Sales
Registration Card is filled out and returned to the
factory address by your dealer, soon after original
purchase for the purpose of recording this information, and keeping you up-to-date regarding White's
ongoing research & development.
The warranty does not cover damage caused by accident, misuse, neglect, alterations, modifications,
unauthorized service, or prolonged exposure to corrosive compounds, including salt.
Ch7 BeachHunter 300 Information
Duration of any implied warranty (e.g., merchantability and fitness for a particular purpose) shall
not be longer than the stated warranty. Neither the
manufacturer or the retailer shall be liable for any
incidental or consequential damages. Some states
however, do not allow the limitation on the length
of implied warranties, or the exclusion of incidental or consequential damages. Therefore, the above
limitations may not apply to you.
In addition, the stated warranty gives you specific
legal rights, and you may have other rights which
vary from state-to-state.
The foregoing is the only warranty provided by
White's as the manufacturer of your metal detector. Any “extended warranty” period beyond two
years, which may be provided by a Dealer or other
third party on your detector, may be without White's
authority involvement and consent, and might not
be honored by Whiteʼs Electronics, Inc.
13
Page 14

Ch7 BeachHunter 300 Information
Warranty Transfer
If for any reason you should sell your BeachHunter 300 prior to the date the warranty expires, the remaining warranty is transferable.
Simply fill out the following information, seal it in a stamped envelope, and send it to
White's Electronics, 1011 Pleasant Valley Road, Sweet Home, Oregon 97386. The
remaining warranty period will then be available to the new owner.
The Warranty Statement applies to both the original owner as well as the second owner.
"
Original Owner:
Name: __________________________________________________________
Address (Which appears on the original warranty card):
________________________________________________________________
________________________________________________________________
Instrument Serial Number: __________________________________________
Original Purchase Date:_____________________________________________
New Owner:
Name: __________________________________________________________
Address: ________________________________________________________
________________________________________________________________
________________________________________________________________
Comments: ______________________________________________________
________________________________________________________________
________________________________________________________________
________________________________________________________________
________________________________________________________________
WARRANTY TRANSFER
®
14
Page 15

Ch7 BeachHunter 300 Information UK
WHITE'S ELECTRONICS (UK) Ltd.
After Sales Service
LIMITED WARRANTY STATEMENT
The serial number which is unique to your unit is on a white label inside the battery compartment.
Please quote this number on any correspondence regarding your detector.
White's Electronics has always been concerned with the absolute quality of their mineral/metal detectors. Service after the sales is
of extreme importance to us and we always do our utmost to ensure that customers are satisfied with our units. If your unit should
require servicing or repair, simply return it to us at the factory in Inverness and we shall carry out the necessary work for you.
Any work carried out by unauthorized persons will automatically nullify the warranty.
If within two years (24 months) from the original date of purchase, your White's detector fails due to de
fects in either material or workmanship, White's Electronics (UK) Ltd. will repair or replace at its option,
all necessary parts without charge for parts or labor.
Simply return the detector to our factory in Inverness, Scotland, giving details of the faults.
Items excluded from the warranty are non-rechargeable batteries and other accessories.
The warranty is not valid unless the Warranty Registration Card is returned to the factory address within
10 days of the original purchase for the purpose of recording that date, which is the actual commencement
date of the warranty.
This warranty does not cover damage to the detector caused by accident, misuse, neglect, alterations,
modifications or unauthorized service.
Duration of any implied warranties (e.g., merchantability and fitness for a particular purpose) shall not be
longer than the stated warranty.
Neither the manufacturer nor the retailer shall be liable for any incidental or consequential damages resulting from defects or failures of the instrument to perform.
This warranty does not affect your statutory legal rights.
-
Whiteʼs Electronics (UK) Ltd
35 Harbour Road ~ Inverness ~ Scotland ~ IV1 1UA
Telephone: (01463) 223456 Fax: (01463) 224048
Email: sales@whelects.demon.co.uk.
Web site: www.whites.co.uk
15
Page 16

Ch7 BeachHunter 300 Information UK
Warranty Transfer
If for any reason you should sell your White's detector prior to the date the warranty expires, the remaining warranty may be transferable.
Simply fill out the following information, and send it to White's Electronics, (UK) Ltd.,
35 Harbour Road, Inverness, Scotland, IV1 1UA. Whiteʼs will then advise you what, if
any Warranty is available.
The Warranty Statement must be completed with Serial number and information on previ
ous and new owners.
"
Original Owner:
Name: __________________________________________________________
Address (as on original warranty card):
________________________________________________________________
________________________________________________________________
Serial Number:____________________________________________________
New Owner:
Name: __________________________________________________________
Address: ________________________________________________________
________________________________________________________________
________________________________________________________________
Tel: ____________________ Email:_______________________________
-
WARRANTY TRANSFER
®
©White's Electronics, Inc.
P/N 621-0506-1 Printed in USA Rev. 5 /2008
16
 Loading...