

Page 1

WK 270-1703A
WK 310-1703A
FRIDGE/FREEZER
Instruction manual
Page 2
2
IMPORTANT NOTE
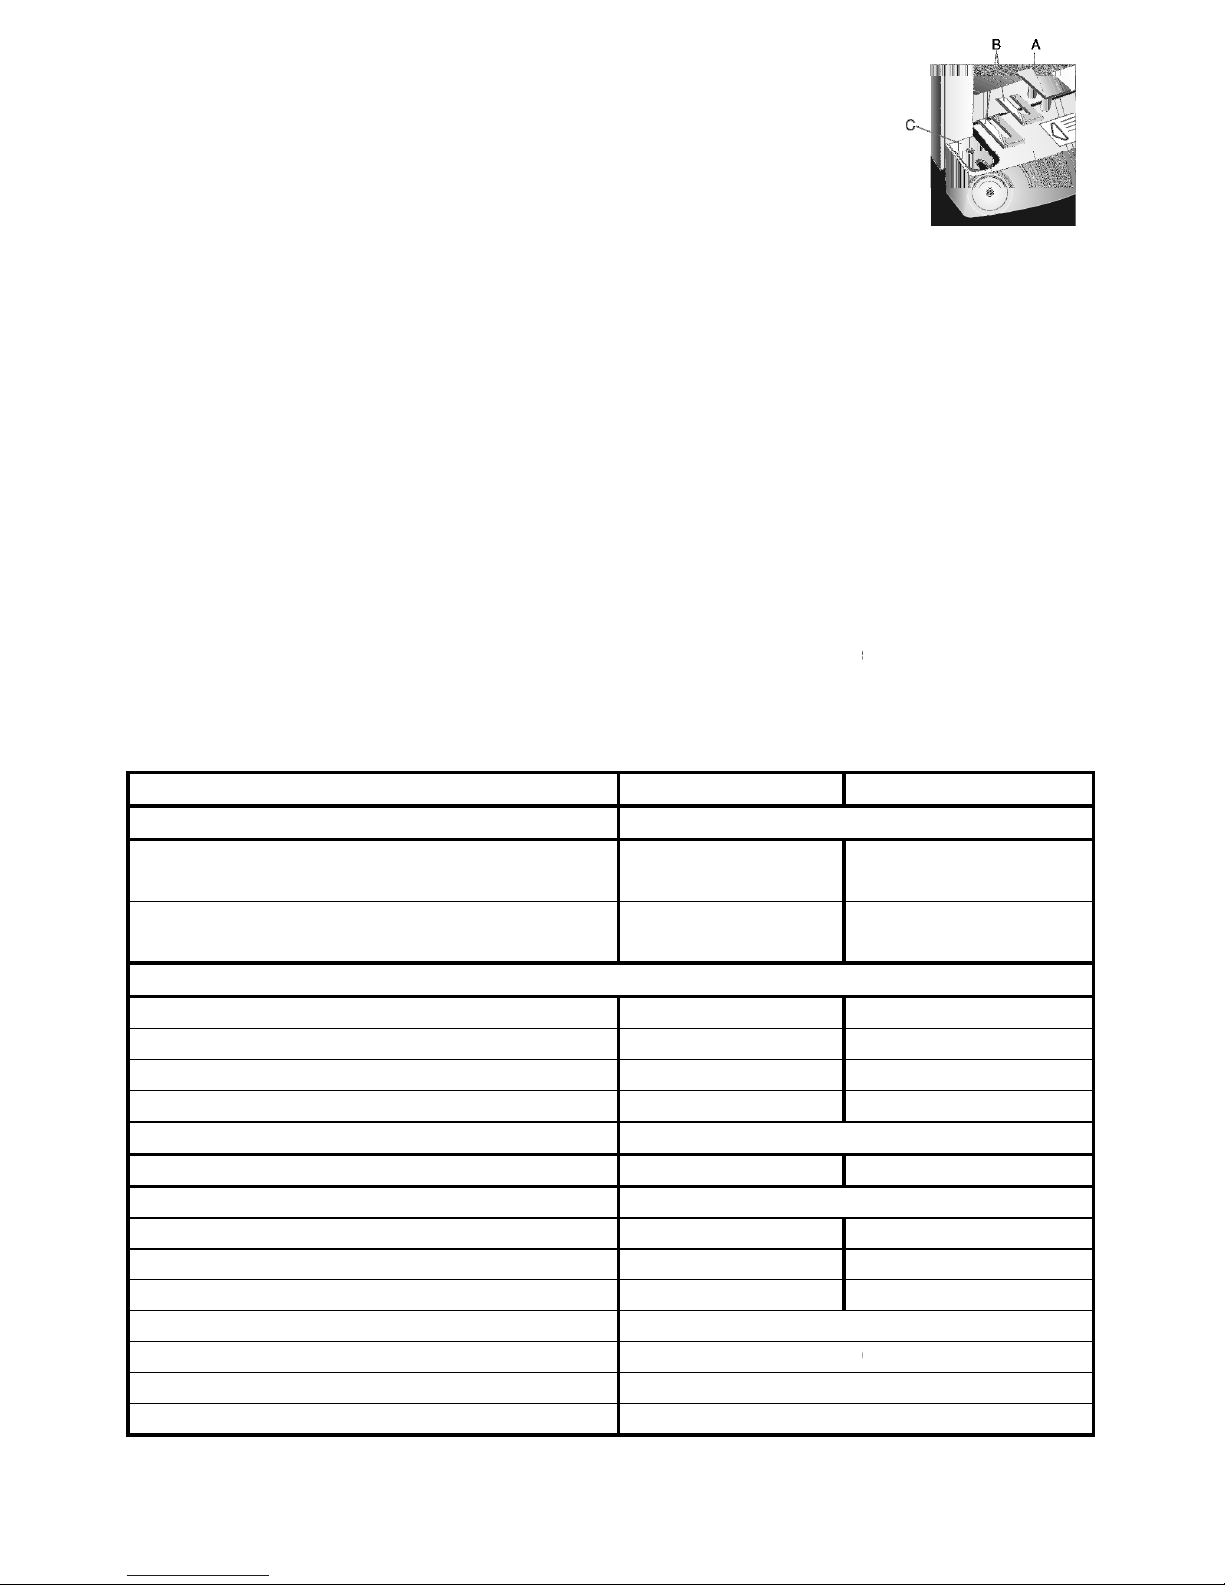
REMOVAL OF TRANSIT PACKAGING
BEFORE USING FOR THE FIRST TIME,REMOVE BLANKING PLUG "A
TAKE OFF ALL PACKING PIECES ''B'', AND THEN REPLACE IN HOLE ''C''
GENERAL INFORMATION
These fridge-freezer models are compressor based "double - door"
appliances
term storage of chilled products in the refrigerating chamber
as well as for prolonged
frozen products and the production of ice in the freezing chamber.
These class “N" appliances are intended to be used under
domestic
temperature of +16 to +32 °C and air moisture not higher than 70% the
manu
trouble-free operation. These appliances meet all up-to-
date requirements for
products and electrical devices.
The appliances are environmentally friendly, they do not
contain ozone layer de
The appliance uses refrigerant R600a.
All preventive maintenance operations and repairs should be carried out by an expert in this kind
of equipment.
! CAREFULLY READ THE INSTRUCTION MANUAL. If instructions are not fol
risk of injury, damage to the appliance, and loss of the right to free warranty service.
recommend to keep the Instruction manual the whole time you have the appliance.
NOMINAL TECHNICAL DATA
Model
WK
270
-
1703A
Name of appl
iance
Fridge/freezer
Energy efficiency class
in accordance with
directive 94/2 EC
A
Energy consumption:
kWh/24 h
kWh/per year
0,79
288
Actual consu
mption will depend on how the appliance is used and
Total gross volume, L
261
Fresh food volume , L
170
Freezing chamber gross volume, L
83
Frozen food volume , L
61
Powercut safe,
h
17
Freezing capacity, kg/24h
5
Temperature in deep freezer compartment, °C
minus 18
Overall dimensions ,mm
1450x600x600
Storage shelves area, dm
2
105
Weight, kg
51
Voltage used,
V / Frequency, Hz
220-2
40
Rated input, W
140
Current, A
1,0
Insulation foaming
C5H
",
designed for short-
storage of
conditions. At ambient
facturer guarantees its
household refrigeration
pleting materials.
lowed, there is a
We
WK 310
-
1703A
A
0,89
324
where it is located.
309
193
114
92
12
1730x600x600
140
55
/50
10
Page 3

3
SAFETY REQUIREMENTS
• Prior to connecting the fridge freezer to the mains, make sure that the power cord is not damaged.
• The plug of refrigerator should be connected to a properly fixed, stationary socket.
• The socket must have a reliable earth connection.
• This fridge freezer is supplied with a special supply cord. It should only be exchanged for an
identical special supply cord and this replacement should only be carried out by the manufacturer or
the manufacturer’s appointed agent.
• Maintain your appliance carefully. Don’t allow the hole in the gutter for water running out to block,
because water inside the cabinet and on door seals may cause corrosion, seals pulling out and other
defects.
• Clean parts located at the refrigerator rear wall from dust accumulated there with a dry brush or a
vacuum-cleaner at least once a year.
• Protect plastic surfaces of the food storage compartment from any fat, oils, sauces because they
can cause damage to the compartment. In case of unintended spill immediately clean the surface
with dish washing liquid.
• Do not place vessels containing liquid on top of the fridge freezer as these could spill onto electrical
components. Do not place heating appliances (electric stoves, irons, grills and others) on the top
cover of the fridge freezer.
In case of scrapping the appliance national requirements must be considered with reference to the
recycling of the refrigerant and insulation gas. Contact your local authority before scrapping.
WARNING!
• Keep ventilation openings in the appliance enclosure or in the built in structure, clear
of obstruction.
• Do not use mechanical devices or other means to accelerate the defrosting process.
• Do not damage the refrigerant circuit.
• Do not use electrical appliances inside the food storage compartments of the appliance.
• Do not leave running (connected to the mains) with opened (or incompletely closed)
door longer than it is needed for taking out or putting in foodstuffs.
• AFTER SWITCHING THE APPLIANCE OFF (WHILE CLEANING, MOVING TO ANOTHER
PLACE AND SO ON), IT CAN BE SWITCHED ON AGAIN ONLY AFTER 15 MINUTES.
• While defrosting or cleaning the fridge-freezer do not forget to disconnect it from the mains.
• Do not store glass bottles containing liquids capable of freezing and also carbonated bottled
beverages in capped bottles or cans in the freezing chambers as they may explode.
• It is not advisable to use food stuffs in a cold state straight from the freezing chamber.
Information:
- leave the doors of refrigerator open if it is switched off for a long time;
-if selling or transferring this freezer inform the new user, that it contains insulation - cyclopentane
and refrigerant R600a.
Page 4

4
REFRIGERATOR DESIGN
! Before studying the text described below, pay attention to the figures.
WARNING!
THE APPLIANCE ACCESSORIES LISTED BELOW MAY DIFFER FROM THE ACCESSORIES
OF THE APPLIANCE YOU HAVE BOUGHT IN QUANTITY AND IN DESIGN.
This description is adapted
for entire group of two–compartment refrigerator-freezer combinations.
The refrigerator is fitted with two chambers - ”freezing chamber A”
and
chamber B” .
The freezer chamber is fitted with "freezing" area that is marked.
1-2 Interior li
ghting lamp, interior lighting lamp cover
13
Fast-freeze section
3 Thermostat
- temperature regulator
14
Frozen products section(s)
4 Thermostat position indicator
15
Thaw water channel
5 Electric supply indicator (green light)
19
Door trays
6 Adjustable height shelves
20
Egg tray
9 Thaw water channel cleaner (red colour)
25 Condenser
10 Shelf (glass)
26 Thaw water drip tray
12 Fruit and vegetable boxes
27
Compressor
"fresh food storage
Page 5

5
CHANGING THE OPENING DIRECTION OF THE DOORS
It is recommended that changing the opening direction of the doors should be done with a helper.
You will need two spanners No. 8 and No. 10 and a Philips head screwdriver.
! When changing the opening direction of the doors, YOU CAN NOT lay the refrigerator horizontally.
Do the actions below in the order they are listed:
WARNING! Turn off the
appliance and pull the plug
out of the electricity supply
socket
.
1. remove the bottom cover 15;
2. unscrew two screws 12 and
remove the bottom bracket 13
together with the washers 11 on
the axle and the spacer 10;
3. remove the bottom door 9;
4. unscrew the fixing screws 7 of
the middle bracket 6;
5. remove the middle bracket 6
together with washers on the axle
and the spacer 5;
6. remove the top door 4;
7. unscrew the axle 2 together
with the nut 1 and the washers 3
from the upper bracket and screw
all this set on the left side of the
door;
8. displace the plug 21 the upper
door and the plug 19 from the
bottom door on the right side;
9. take out the pins 20 from the
cabinet in the zone of the cross
element and displace the to the
right side;
10. hang the upper door on the
axle 2;
11. prior to screwing the middle
bracket 6 with washers and
spacers on the left side of the
cabinet, insert the bracket axle
into the upper door;
12. hang the bottom door on the
middle bracket axle;
13. prior to unscrewing the
bracket 16 and exchanging it with
the bottom bracket 13 (together with the set of washers and spacers), insert the bracket axle
into the bottom door. The brackets 14 which are under the brackets 13 and 16 remain in their
places;
14. unscrew fixing screws 17 from doors, remove handles 18 and screw it on the eight side of the
door therefore taken out plugs. Cover the holes in which the handle was screwed with taken out
plugs. Put on the bottom cover 15.
Page 6

6
PREPARATION FOR USE
The transportation board is made from expanded polystyrene. Remove the adhesive tapes from
sides, lift the refrigerator up and take out the board.
When positioning the appliance in chosen location, it will move more easily into position if you lift the
front a little and incline it backward, allowing it to roll on its casters.
Strip sticky tape off and open the doors. Remove the red transportation holders from the shelves.
◄ If your appliance is supplied complete with
glass shelves, pull a shelf in the direction 1 and
remove each red transportation holder in the
direction 2.
Take two supports 1 from the pack and insert
them into the guides 2 in the back part of the
table top. ►
Adjusting the feet, mount the refrigerator with a slight backwards incline to provide a self closing door
effect. It is very important that all the feet are uniformly touching the floor.
LOCATION
• The fridge freezer should be placed in a dry, well ventilated room.
• The fridge freezer must be kept from exposure to direct sun rays.
• It is not advisable to locate it near the heat sources (boilers, radiators and so
on). If it is not possible to select another place, use an insulating panel.
• The appliance must not touch heating, gas or other pipes or heating
devices.
Overall space required in use of the refigerator. ►
If the appliance is placed in a corner, a gap of at least 1 cm must be left between
the appliance body and the wall so that the freezer compartment door can be
opened enough to pull out the frozen product drawer.
VENTILATION
IMPORTANT! Keep ventilation openings in the appliance enclosure or in
the built - in structure, clear of obstruction.
◄ Do not cover the ventilation holes at the top of the appliances– it must be a
good air circulation around the appliance. There should be a gap of at least 10
cm between the top of the appliance body and any furniture that may be above
it. If this requirement is not followed, the appliance consumes more electrical
energy and its compressor may overheat.
If doors of the appliance close badly, it is necessary to change the door gasket.
If the door does not close correctly, the temperature in the appliance rises and
energy consumption increases.
Page 7

7
CONTROLS AND WARNING LIGHTS (Fig. 1)
The fridge-freezer is switched on by connecting it to the mains. By disconnecting it, the appliance
is switched off.
Important Note: After switching the thermostat off only the compressor is switched off.
The temperature in the refrigerating chamber is adjusted by the temperature control knob 3.
The temperature controller is switched off when the knob shows a "0" mark in the temperature
control scale window. If the temperature control knob is turned clockwise, the temperature in the
chamber reduces.
The temperature of the refrigerator chamber is set by turning the thermostat wheel 4 which is
connected to a thermostat. Temperature is indicated in the thermostat window 3 of the top cover
panel and on the wheel – below the top cover.
The thermostat is switched off when the thermostat knob and the wheel are turned to the position
“O”. Turning the thermostat wheel clockwise temperature of the refrigerator chamber decreases.
A green illuminating lamp 5 indicates that the refrigerator is connected to the mains.
CHANGING THE INTERIOR LIGHT BULB
When changing the interior light bulb, do the actions below in the order
they are listed:
1. disconnect the refrigerator from the mains;
2. press the dome light cover clip to the right and pull it downwards to
remove the cover;
3. replace the lamp: lamp type - 15 W, lamp holder - E 14;
4. reverse removal to replace the cover;
5. reconnect the refrigerator to the mains.
FREEZING AND STORAGE OF THE FOOD STUFFS (Fig.1)
Temperature in the freezing and fresh food storage chambers depends on the ambient temperature,
position of the temperature control knob and the number of fresh food products stored therein.
• DO NOT EXCEED THE INDICATED MAXIMUM AMOUNT OF FOOD FOR FREEZING:
FOR MODELS WK 270 IT IS 5 KG PER 24 HOURS,
FOR MODELS WK 310 IT IS 12 KG PER 24 HOURS.
Initially set the temperature controller knob to position “3”. If this causes excessive cooling of the
foods in the chamber – adjust the setting to between “1” & “3” and if the cooling is insufficient, adjust
the setting to between “3” & “5”.
! IF THE ROOM IS COOL, THE APPLIANCE COOLS LESS. THE TEMPERATURE IN THE APPLIANCE MAY
THEREFORE RISE. Use the thermostat wheel to set a lower temperature.
Fresh foodstuffs prepared for freezing should be placed in one or two layers in the fast-freeze
section (fig. 1). The thermostat knob should be set to 5. After 24 hours, the frozen food products
should be replaces from the fast-freeze section to the storage section drawer(s). When the products
are frozen, the thermostat wheel should be set at its earlier position.
◄ Leave a gap of not less than 3 cm between the foodstuffs being frozen
and the upper partition.
• Do not place unwrapped foodstuffs in the freezer sections.
• Fresh food for freezing should not touch already frozen foodstuffs.
• Do not freeze foodstuffs that are warmer than the room temperature.
• Do not freeze liquid foodstuffs in glass vessels or bottles. Do not freeze
carbonated beverages.
Page 8

8
• Strictly observe the frozen food product validity dates indicated by the manufacturer on the product
packaging.
• WE RECOMMEND THAT FROZEN FISH AND SAUSAGE SHOULD BE STORED IN THE FREEZER
COMPARTMENT NOT LONGER THAN 6 MONTHS; CHEESE, POULTRY, PORK, LAMB – NOT MORE
THAN 8 MONTHS; BEEF, FRUIT AND VEGETABLES – NOT LONGER THAN 12 MONTHS.
PRACTICAL TIPS AND OBSERVATIONS
• Do not keep bananas in the refrigerator – these fruits are sensitive to cold.
• Do not keep prepared food and ready-to-cook (“heat and eat”) food in the same container.
• Store in an airtight container in the appliance any foodstuffs that have a strong odour (e.g. fresh
fish, pâté de foie gras goose liver pâté, and cheese).
• Frozen foodstuffs should be thawed in the refrigerator compartment. Food that thaws slowly retains
better flavour properties and spread cold will help to maintain the set temperature in the
refrigeration compartment. Do not consume ice made in the freezer chamber straight away.
• Products will freeze more quickly if they are divided up and packed in small portions.
ICE MAKING
Ice-cubes are prepared in a tray 16 (fig .1) for making ice-cubes. Fill each space in the ice cube tray
¾ full of drinking water. Place the ice-cube tray in the fast-freeze section. When you want to remove
the ice-cubes from the ice-cube tray, leave it for 5 min at room temperature and then shake the cubes
into the special dish for them.
REFRIGERATOR DEFROSTING
The freezer compartment should be thawed not less than twice a year or when a layer of ice thicker
than 5 mm forms in it. Do the actions below in the order they are listed:
WARNING! Turn the appliance off and pull the plug out of the electrical socket.
• Remove foodstuffs from freezer compartment. The frozen foodstuffs will not warm up too much
while you are thawing the freezer compartment if you cover them with a thick cloth and keep them
in a cool place.
◄ Remove bottom cover. Place a dish under the thaw water
channels.
• Leave door of freezer compartment open.
• When the ice melts, clean and wipe dry the surfaces and fixtures of
the freezer compartment.
• Close the freezer compartment door. Plug in and turn on the
appliance
After defrosting, wash the refrigerator with hot water or with suds or soda solution, WIPE DRY AND
AIR IT.
• Clean the channel gutter with the help of the cleaner 9 (Fig.1);
• Do not clean with liquids containing alcohol;
• Refrigerators produced from a stainless steel should be cleaned only with cleansers for those
surfaces
Remarks on the appliance operating noise
As the appliance operates and goes through the freezing cycle, various noises will be emitted. This is
normal and is not a sign of any malfunction.
• As the refrigerant circulates around the refrigeration system, it causes sounds like murmuring,
bubbling, or rustling.
• Louder sounds like popping or clicking may be heard for a short time as the refrigerator’s
compressor switches on.
Page 9

9
If problems occur use the troubleshooting chart below:
Note. If your fridge freezer is not working and it is not
possible to repair
troubleshooting charts, switch it off, open the appliance doors and call
a service agent
FAILURE REMOVAL BY THE USER
Trouble Way of remedy
Fridge
-
freezer
is
connected
but
the
green lamp does not light up.
No voltage in the mains or no contact betw
and socket. Check
plug fuse, try in an alternative socket
An unusual noise arises during
operation of the refrigerator.
Check if the appliance is pla
ced correctly, as follows:
Stands level on a smooth and
firm
any vibrating devices or furniture next to it.
While opening the door the gasket
comes off.
Insert the gasket into
position by
pressing the inner part
of the gasket. If the gasket
has been contaminated
oily liquids, it is necessary to clean the gasket and the
groove in the door with dish washing agent and wip
dry before re-fitting.
Water at the bottom of the fresh food
storage chamber.
Defrost water disposal
system is clogged.
channel in the gutter
with the help of
High temperature in the appliance.
A lot of warm foodstuffs l
oaded; doors have been
opened or a long time or too often.
Surface of the appliance dews.
High r
elative humidity (over 70 %).
The refrigerator must only be carried in the upright position.
Secure the refrigerator during transit in order to avoid damage.
When requesting a repair to your
appliance, always quote the
information given on the label
shown below.
The symbol on the product or on its packaging indicates that
this product may not be treated
as household waste. Instead it shall
be handed over to the applicable collection point for the rec
of electrical and electronic equipment. By ensuring this product is
disposed of correctly, you will help
prevent potential negative
consequences for the environment and human health, which could
otherwise be caused by inappropriate waste handling of this
product. For more detailed information
about recycling of this product, please contact your local authority
office, your household
disposal service or the shop where you purchased the product.
it by means of these
.
een the plug
.
base; doesn’t touch
with
e it
Clean
the
the cleaner 9.
ycling
waste
 Loading...