

Page 1

Integrated Fridge Freezer
FF250IHE
Instruction Manual
Page 2

Important: Please read these instructions thoroughly before using your
appliance. Keep them in a safe place for future reference.
SAFETY INFORMATION
x This integrated fridge freezer is intended for normal household use.
x The appliance is designed for indoor use only.
x Wait at least 2 hours before first powering up the appliance to allow the
cooling system to settle after transportation.
x Do not allow children to play with the appliance to avoid the risk of
entrapment and suffocation.
x Do not use mechanical, electrical or chemical methods to speed up the
defrost process.
x Do not store liquids in glass containers in the freezer as these may shatter.
x Do not store flammable materials such as alcohol, gasoline, LP gas or
glue, etc, in the freezer.
x This appliance
flammable.
x If the refrigeration circuit should become damaged, avoid naked flames
and sources of ignition. Thoroughly ventilate the room in which the
appliance is situated.
x If the supply cord is damaged, it must be replaced by the manufacturer, its
service agent or suitably qualified person, in order to avoid a hazard.
x Any electrical work required to install the appliance should be carried out
by a qualified person.
This appliance can be used by children aged from 8 years
x
contains the refrigerant isobutene (R600a) which is
and above and persons with reduced physical, sensory or
mental capabilities or lack of experience and knowledge if
they have been given supervision or instruction
concerning use of the appliance in a safe way and
understand the hazards involved. Children shall not play
with the appliance. Cleaning and user maintenance shall
not be made by children without supervision.
x Do not position the appliance near a heat source or in direct sunlight.
x Ensure that sufficient space is left around the appliance to provide
adequate ventilation.
x Do not use single/multiple adapters or extension cables.
x This appliance is designed to be built-in.
1
Page 3
x Warning! The light bulb supplied with this appliance is a “special use bulb”
which is usable only with this appliance. It must not be used for domestic
lighting.
x Warning! Do not touch the light bulb, if it has been on for a long period, as
it will be hot.
x It is recommended that 2 people unpack and install the appliance.
x The appliance must be installed in a kitchen cabinet which is strong
enough to support the freezer when it is fully loaded.
x Do not install the appliance in a moist or wet environment.
x This appliance is suitable for use in an ambient temperature of 10 to 38°C.
WARNING: This appliance must be earthed.
x Any electrical work that is required to install the appliance must be carried
out by a qualified electrician.
x The fridge freezer should be powered from a 220-240V 50Hz supply.
x It is recommended that the socket is still accessible after the appliance has
been installed.
PRIOR TO INSTALLATION
x Remove all packaging from inside the appliance.
x Thoroughly clean the inside of the appliance.
x Ensure that the size of the kitchen cabinet and ventilation areas are large
enough.
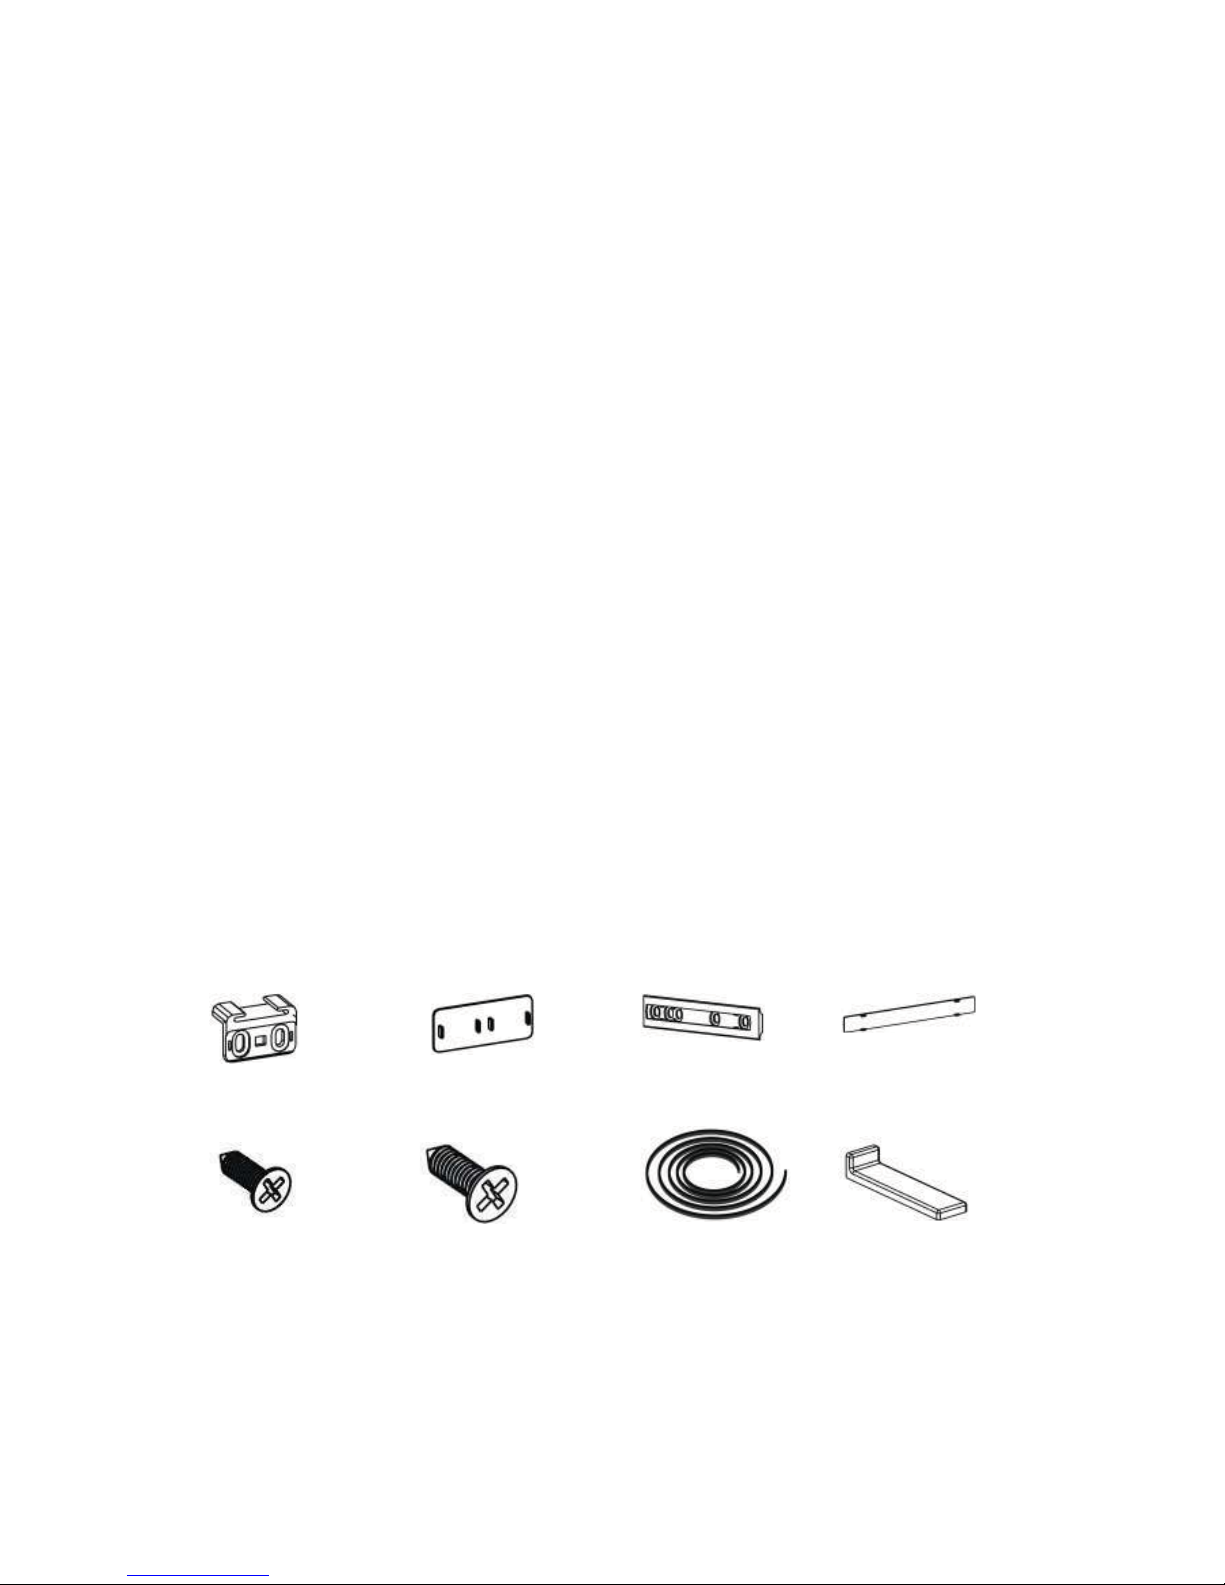
INSTALLATION KIT
Guide x 4 Guide Cover x 4 Slider x 4 Slider Cover x 4
Short Screw x 27 Long Screw x 2 Rubber Seal x 1 Middle Bracket
Cover x 2
2
Page 4

REVERSING THE DOOR OPENING
The appliance is delivered with the doors opening from the left hand side. To
change the opening direction, please follow these instructions.
Note: Ensure that the appliance is unplugged and empty before reversing the
doors.
1. Unscrew the top hinge and then lift off
the upper door and place it on a padded
surface to avoid scratching it.
Note: It is recommended that an 8mm
spanner is used to remove the screws that
fix the top hinge and middle brackets.
2. Unscrew the middle hinge and bracket
on the right hand side and then lift off
the lower door and place it on a padded
surface to avoid scratching.
Unscrew the middle bracket from the left
hand side of the cabinet.
3
Page 5
3. Remove the bottom hinge pin from the
right hand side and transfer it to the left.
4. Re-position the lower door onto the
bottom hinge pin and locate the middle
hinge pin into the top of the lower door.
5. Re-fit the middle hinge and bracket.
Ensure that the door is aligned
horizontally and vertically so that the
seals are closed on all sides, before
finally tightening the screws.
Re-fit the middle bracket to the right
hand side of the cabinet.
6. Remove the top hinge pin from the top hinge. Turn the hinge over and
re-fit the hinge pin.
7. Re-fit the upper door and the upper
hinge. Ensure that the door is aligned
horizontally and vertically so that the
seals are closed on all sides, before
finally tightening the upper hinge screws.
4
Page 6

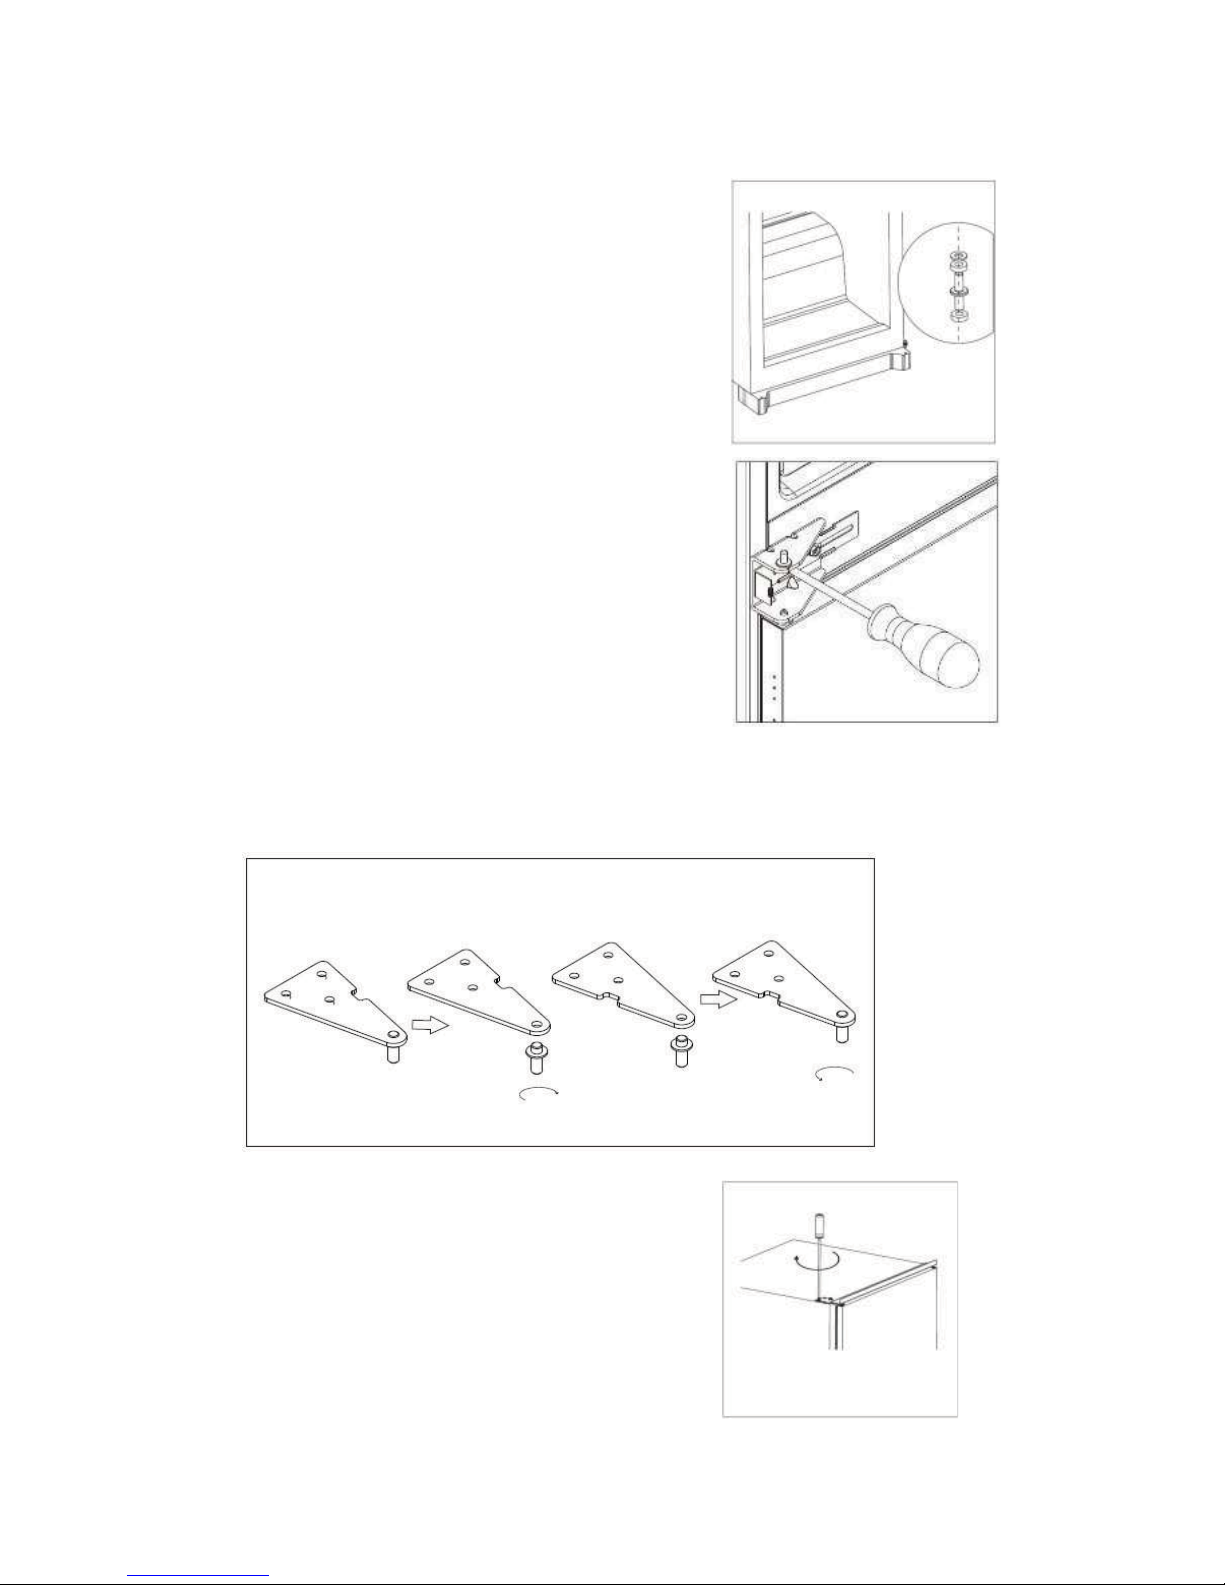
INSTALLATION
1. Slowly and carefully slide the appliance
into the kitchen cabinet. Ensure that the
opening side is as close to the cabinet
wall as possible.
2. Screw a guide to the side of the
appliance door, using 2 short screws.
Insert a slider into the guide then fully
open and close the appliance and
cabinet doors together to check that the
cabinet door opens smoothly and can
be fully closed.
3. Open the appliance and wooden doors
together and mark the position of the
slider (approx. 2cm in from the edge of
the cabinet door), such that the slider
engages with the guide when the door is
opened and closed. Take the slider out
of the guide and fix the slider to the
cabinet door with 2 short screws. Fix the
slider cover onto the slider.
4. Unscrew the guide from the appliance
door.
5. Repeat steps 2 to 4 to fix the other 3
sliders and covers to the cabinet doors.
6. Fit the 4 guides onto the sliders and
then fix then to sides of the appliance
doors. Fit the guide covers onto the
guides.
5
Page 7

7. Double check that the doors can close
and open smoothly and that the
appliance is sealed well. If not, slightly
adjust the unit. Fix the bottom bracket to
the kitchen cabinet with 2 long screws.
8. Fix the top bracket to the kitchen
cabinet with short screws.
9. Insert the rubber seal into the gap
between the appliance and the kitchen
cabinet, on the door opening side.
10. Fix the middle brackets to the kitchen
cabinet, on both sides. Fit the middle
bracket covers to the middle brackets.
6
Page 8

OPERATION
BEFORE USING YOUR FRIDGE FREEZER
1. Ensure that the appliance has been installed as recommended and that it
is level.
2. Clean the inside of the fridge and freezer compartments (see ‘Care and
Maintenance’)
3. Ensure that the appliance has been left for a minimum of 2 hours before
switching on the power, to allow the refrigeration system to stabilise.
4. Insert the plug into a socket and switch on the supply.
5. Run the appliance for 2 – 3 hours to allow the compartment to get down to
temperature, before placing food in the freezer compartment.
Caution: When the compressor first starts up it may produce some
background noise. This is normal and will reduce as the cooling system
operates.
CONTROL PANEL
Buttons
B1 – Press to adjust the temperature of the fridge compartment,
scrolling through 2, 3, 4, 6 and 8°C
B2 – Press to select the operation mode; Smart, Super or user’s setting.
Indicators
L1 – Shows the set temperature of the fridge compartment.
L2 – Shows that Smart mode has been selected.
L3 – Shows that Super mode has been selected.
7
Page 9

Temperature Setting
1. Press the Mode button to select the user’s setting (Smart and Super
indicators off)
2. Press the Adjust button to select the set temperature for the fridge. The
temperature of the freezer compartment is automatically controlled at
around -18°C.
Smart Mode
Press the Mode button to select Smart mode. In Smart mode the appliance
runs automatically according to the ambient temperature around the
appliance.
Super Mode
Press the Mode button to select Super mode. In Super mode the appliance
runs so that the freezer compartment is the coldest. After 54 hours the
original fridge temperature setting will automatically be restored.
Turn off the Appliance
Press and hold the Adjust button for 5 seconds to turn the appliance off.
Press the button again to turn the appliance on.
Door Open Alarm
The alarm will sound if the fridge door is left open for 90 seconds and will
continue until the door is closed.
FRIDGE COMPARTMENT
Movable Shelves
The walls of the fridge compartment are
equipped with a series of runners so that
the glass shelves can be positioned as
desired.
Door Balconies
To allow the storage of food packages of
various sizes, the door balconies can be
removed. To remove the door balcony
gently push the balcony upwards until it
becomes free.
8
Page 10

Daily Use
x Do not put hot food into the fridge.
x Do not place food products directly against the rear wall.
x Do not pack food close together as this prevents air circulating.
x Do not set the fridge temperature lower than necessary.
x Cover or wrap up the food, particularly if it has a strong flavour.
x Meat should be stored in sealed plastic bags and placed on the glass shelf
above the vegetable drawer.
x Cooked food and cold dishes should be covered and stored on any shelf.
x Vegetables should be cleaned and stored in one of the drawers.
x Butter and cheese should be stored in sealed containers or wrapped in
aluminium foil or polythene bags to exclude as much air as possible.
x Milk bottles should have a cap and be stored in the door balconies.
x Bananas, potatoes, onions and garlic must not be kept in the fridge unless
in a fully sealed container.
FREEZER COMPARTMENT
Daily Use
x The freezer compartment is suitable for freezing fresh food and for storing
frozen food.
x The maximum amount of fresh food that can be frozen in 24 hours is 3kg.
x Do not place carbonated or fizzy drinks in the freezer compartment as the
pressure in the container may cause it to explode.
x Ice lollies can cause frost burns if consumed straight from the freezer.
x Store pre-frozen food as soon as possible after purchasing.
x Ensure that the freezer door is always securely closed and only opened for
as short a time as possible.
x It is recommended that dates are put on the food packages so that the
storage time can be monitored.
x Ice cubes can be made in the ice tray provided.
x Ensure that pre-frozen food is still frozen when it is stored in the freezer.
x Cooked food should be allowed to cool to room temperature before placing
in the freezer.
x Food should be stored in freezer bags or freezer proof containers.
x Distribute fresh food evenly in the compartment so that air can circulate.
x Do not re-freeze food that has thawed out, unless you cook it again to kill
off harmful bacteria.
x Reseal packs properly after removing items. This will help prevent the
items from drying out and frost building up on any remaining food.
x Ensure that the seal is kept clean and that a good seal forms when the
door is closed.
9
Page 11

TECHNICAL SPECIFICATIONS
FF250IHE
Energy efficiency class A+
Annual energy consumption (kWh/ annum) 263
Storage Volume (fridge) (litres) 181
Storage volume (4* freezer) (litres) 63
Freezing capacity (kg/24h) 3
Climate class SN, N, ST
Airborne acoustical noise emissions (dB (A)) 4
Installation Built-in
CARE & MAINTENANCE
Warning: Always unplug the appliance before cleaning or defrosting the
freezer.
For hygienic reasons the appliance interior, including the interior accessories,
should be cleaned regularly.
Cleaning Your Fridge Freezer
x Note: Ethereal oils and organic solvents can attack plastic parts. e.g.
lemon juice or the juice from orange peel, butyric acid or cleansers that
contain acetic acid. Do not allow such substances to come into contact
with the appliance parts.
x Do not use any abrasive cleaners.
x Wash the inside compartments and accessories with warm water and a
mild detergent solution.
x The outside of the appliance can be cleaned with a damp cloth containing
mild detergent and warm water.
x Thoroughly dry the interior and exterior of the appliance.
x Ensure that the rubber seals on the doors are
cleaned regularly, so that a good seal is
maintained and the appliance runs efficiently.
x To avoid defrost water overflowing into the
fridge, periodically clean the drain hole at the
back of the fridge compartment. Use a pipe
cleaner to clean the hole as indicated below.
10
Page 12

Replacing the Lamp
WARNING: Turn off the supply and unplug the appliance before replacing the
lamp.
1. Turn off the mains supply and unplug
the appliance.
2. Remove the screw from the lamp cover.
3. Remove the lamp cover.
4. Unscrew the lamp.
5. Fit the new lamp (Max 15W)
6. Refit the lamp cover and screw.
7. Plug in the appliance and switch on the
mains supply. Select the required mode
or temperature setting.
Defrosting Your Freezer
Over time frost will build inside the freezer compartment. At least once a year
the freezer will need to be defrosted to ensure that the freezer is working
efficiently.
Defrosting is better to be done when the stock of frozen food is low.
WARNING: Turn off the supply and unplug the appliance before defrosting
the freezer.
x Remove all frozen food from the freezer compartment and place it in a
cooler. Wrapping the food in newspaper will help to keep it frozen.
x Switch off the mains and unplug the appliance.
x Place a container under appliance to collect the defrost water.
x Carefully remove the ice layer with an ice scraper. Do not use sharp metal
tools.
x Leave the door open to allow the ice to thaw.
x Warm (not boiling) water can be poured onto the ice to speed up the
defrosting process.
x Once all the water has drained out, clean and thoroughly dry the freezer
compartment.
x Plug in the appliance and switch on the mains supply.
x Run the freezer for at least an hour before returning the frozen food to the
compartment.
11
Page 13

Power Failure
x If the mains power should go off, avoid opening the doors so that the
interior remains as cool as possible.
x The food inside the freezer should remain frozen as long as the power is
off for less than 24 hours.
x If the power is due to be off for more than 24 hours then the frozen food
should be quickly moved to another freezer.
CUSTOMER SERVICE
If you have a problem with your appliance please check the troubleshooting
guide below, before calling for a Service Engineer.
Please ensure that you have the model number and your serial number to
hand when you make the call.
For UK and Southern Ireland call:
Either 0800 988 1323 or 03448 797422
however calls from mobiles may be
charged at your network provider’s rates)
For Northern Ireland call:
028 90365222
Mobile and other providers’ charges may vary).
Please note: If the fault is caused by customer misuse or is due to faulty
installation, you will be charged for the call-out.
(Calls are FREE from landlines, (Calls charged at basic rate)
(Service Network 2000)
(Daytime calls cost up to 17p plus 10p per minute from BT lines Monday-Friday.
12
Page 14

TROUBLESHOOTING GUIDE
In the unlikely even of a problem with your fridge freezer, please consult the
guide below before calling a Service Engineer.
PROBLEM POSSIBLE CAUSE
Appliance not plugged in or mains not
switched on.
Appliance does not operate
Food is too warm
Noisy appliance
Water on the floor
The fuse or circuit breaker has operated.
Appliance is turned off. Press ‘Adjust’ button
for 5 seconds to turn appliance on.
Temperature is set too high.
The door has been frequently opened.
The rubber seal is not sealing properly.
A large amount of fresh food has recently
been added.
Vibrations caused by objects touching the
appliance.
Vibrations caused by the appliance not
being stable or level.
Popping, cracking or gurgling sounds from
the refrigeration circuit are normal.
Drain hole in the fridge compartment is
blocked.
13
Page 15

DISPOSAL INFORMATION
This appliance is marked according to the European Directive
2012/19/EU on Waste Electrical and Electronic Equipment (WEEE).
At end of life this product should be recycled and not disposed in
household waste. Contact your retailer, council or local authority for
further information.
Old refrigeration appliances are likely to contain CFC gases which are
harmful to the environment. Please ensure that you dispose of old appliances
responsibly.
14
Page 16

Supplied by Crosslee plc, Halifax, West Yorkshire, HX3 8DE
CKWK-G01-B
 Loading...