

Page 1
DW1260WA
DW1260SA
Page 2
Fordetailedoperating methodread the correspondingcontent on the instructionmanual.
Switch on the appliance Press the On/Off button to switch on the appliance, Open the door.
Witheachwashcycle.
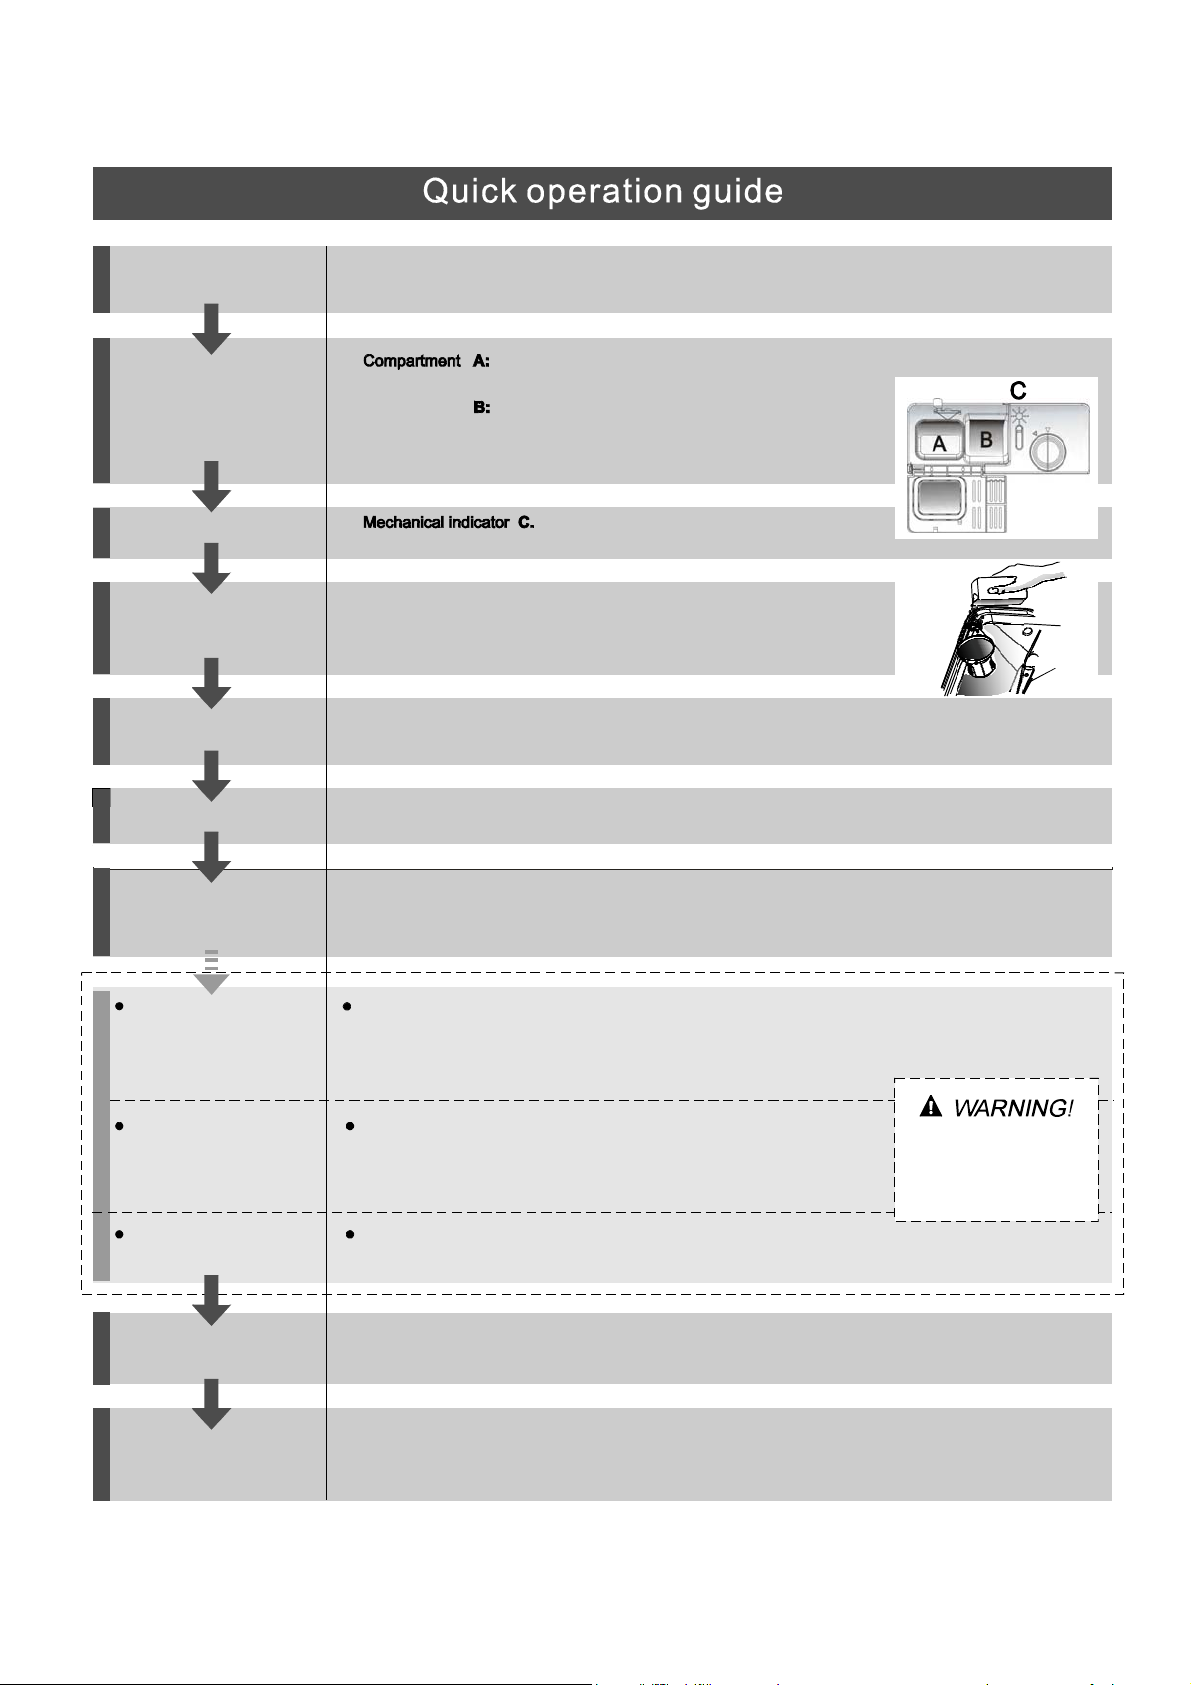
Fill the detergent dispenser
Compartment
For programmes with pre-wash only.
(Follow the user instructions!)
Check the rinse aid level
Checkthe regeneratio n
salt level
Load the baskets
Select a p rogramme
Running the dishwasher
Changing theprogramme
Electric indicator oncontrol panel (if provided).
(On models with water softener system only.)
Electric indicator on control panel (if provided).
If there is no salt warning light in the control panel
(for some models), you can estimate when to fill the salt into
the softener by the number of cycles the dishwasher has run.
Scrapeoff any large amountof leftover food. Softenremnantsof burnt food in pans,
thenl oad the baskets.Refer to the dishwasherloading instructions.
Press the Programme button until the selected programme lights up.
( See the section entitled Operationg instruction )“”
Close the door, turn on the water tap and press the Start/reset button. The machine will start working
after about 10 seconds.
1.A runningcycle can o nly be modified if it has been runningfor a short time.Otherwise the detergent
may have already been released and the water already drained. If this is the case, the detergent
dispenser must be refilled.
2. Press the Start/Reset button for more than 3 seconds to cancel the running programme.
3. Select a new programme.
4. Restart the dishwasher.
Add forgottendishes in the
dishwasher.
If the appliance is switched
off during a wash cycle.
Switch off the appliance
Turn off the water tap,
unload the baskets
1.Open the door a little to stop the dishwasher.
2.After the spray arms stop working, you can open the door completely.
3.Add the forgotten dishes.
4.Close the door, the dishwasher will start running again after 10 seconds.
If the appliance is switched off during a wash cycle, when switched
on again, please re-select the washing cycle and operate the dishwasher
according to the original Power-on state ).
When the working cycle has finished, the buzzer of the
dishwasher will sound 8 times, then stop.
Turn off the appliance using the ON/OFF button.
Warning: wait a few minutes (about 15 minutes) before unloading the dishwasher to avoid handling
the dishes and utensils while they are still hot and more susceptible to break.
They will also dry better.Unload the appliance, starting from the lowerb asket.
Open t he do or car efully.
Hotsteam m ay escape
when the dooris opened!
Page 3
Dear Custom e r,
Pleasecarefully read thismanualbeforeusingthe
dishwasher, it willhelpyou t o use andmaintainthe
dishw ash er properly.
Keepit to refer to it at a later date.
Passit on toany subsequentownerof the appliance.
This ma nual c on tain s sec t ion s on safety Instruction s ,
Operating Instructions, Installation Instructions and
Troubles hooting Tips , etc .
To re view the section on t roublesho oting Tip s
will helpyouto solvesomecommon problems
byyourself .
Ifyou can not solve the pro blems b y yourself ,
please ask fo r the helpof professiona l technicians.
ControlPanel.... ...............................................3
Dishw as h er Fe at ure s... ... .. ....... . ... .. .. . ... . ... .. . .. ... 3
A Water Soften er............ ... ...... ....... ...... ..... ..4、 ..
B L oa din g the S a lt in to t he S oftener....... ... .. . .. .. 5、
C FilltheRinseAidDispenser.........................5、
D FunctionofDetergent. ................................6
、
Attentio n before or after loadi ng the Dishwas her
Baskets. ...................................................... ...9
Loadingthe upper ...............................10Basket
Loading the Lower ...............................10Basket
CutleryBasket..............................................11
Ther ecommend ed method loadi ng b ig
dishwar e...... .............................................. ...12
WashCycle Table...........................................13
Turning ontheAppliance................................14
Changethe Programme...... ........ ................14....
At the Ene of the Wash Cycle...........................14
FilteringSystem...... .......... ......... ....................15
Caring for the Dishwasher..................... .........16.
The man ufacturer, fol lowing a p olicy of c onst ant
development andu pdating of the product, may
make m odifications witho ut gi ving prior notice.
Positioning theAppliance................... ..........17..
About P ower C onne c ti on..... .. .... .. ... .... .... ...... .1 7.
Water C o nnec ti on.... ... .... .. . ... ..... . .. .... ... .. .......18.
Startof dishwasher................................ ......19..
Beforec allingf or service........................... .....20.
Errorc odes.................................... ..............21.
Technicalinformation.............................. .....22..
Page 4
When using your dishwasher, fo l l ow t he p r ecaut i ons li s t ed b el ow:
This appliance must be grounded. In the event of a
malfunction or breakdown, grounding will reduce
the risk of anelectric shock by providing a path of
least resistance of electric current. This appliance
is equipped with a cord having an equipmentgrounding conductor and a grounding plug.
The plug must be plugged into an appropriate outlet
that is installed and grounded in accordance with
all local codes and ordinances.
Donotabuse,siton,orstandonthedoorordish
rack of the dishwasher.
Do not touch the heating element during or
immediately after use.
(This instruction is only applicable to machines
with a visual heating element.)
Do not operate your dishwasher unless all
enclosure panels are properly in place. Open
the door very carefully if the dishwasher is
operating, there is a risk of water squirting out.
Do not place any heavy objects the
door when it is open. The appliance could tip
forward.
When l oading items to be w ashed:
1) L ocate sharp items sothat they are not li kely
to damage t he door seal;
2 Warning: Kni ves and other u tensils with
)
sharp points must be loade d i n t he basket
with their points do wn or place d i n a
horizontalposition.
When using y our dishwasher, yo u s hould
pr ev ent p lastic items f rom c omin g i n to contac t
with the h eating element.( This instructi on is only
applicable to machines with a visual heating
element. )
Check that th e deterg ent c omparm ent i s empty
after c ompletio n o f the wash cycle.
Do not wash plastic items unless they are marked
dishwasher safe or the equivalent. For plastic items
n
ot so marked, check the manufacturer's
recommendations.
Use o nly detergent and rinse additives
design ed for an autom atic dis hwa sher.
Never us e soap, l aundry detergent , or hand
washing detergent in your dishwasher. Ke ep
these produ cts out of t h e reac h of chi ldren.
on or standon
Improper connection of the equipment-grounding
conductor can result in the risk of an electric shock.
Check witha qualified electrician or service
representative if you are in doubt whether the
appliance is properly grounded. Do not modify the
plug provided with the appliance; If it does not fit
the outlet. Have a proper outlet installed by a
qualified electrician.
Keep children away from detergent and rinse aid, keep
child away from the open door of the dishwasher,
ren
there could still be some detergent left inside.
This appliance is not intended for use by persons
(including children with reduced physical, sensory or
mental capabilities, or lack of experience and
knowledge ,unless they have been given supervision
or instruction concerning use of the appliance by a
person responsible for their safety.
Children should be supervised to ensure that they do
not play with the appliance.
Dishwasher detergents are strongly alkaline, they
can be extremel y da ngerous if swallowed. Avoid
contact with skin and eyes and keep ch ildren away
from the dish washer when the door is ope n.
The d oor should not be left open,
since this coul d increase t he risk of tripping.
Ifthe s upply cordi sdamaged, it mustbereplaced
bythemanufactureroritsserviceagentora
similar ly quali fied pers on in orde r to avoid a
hazard .
Remove the door to the washing compartment when
removing an old dishwasher from service or discarding it.
Pleased ispose of pack ing materials properly.
Use the dishwasher only for its intended function.
During i nstallatio n, t he power supply m ust not
be exce ssive ly or dange rously bent or f lattened.
Do not tamper with controls.
The a pplianc e is to be connected to the water
mains u sing new hose set s and that old ho se-sets
should no t be re used.
The maxi mum number of place setting s to be
washed i s 12.
The maxi mum permissible inlet water pressure is
1Mpa.
The mi nimum permissibl e i nlet water pressure is
0.04Mpa.
)
Page 5
Dispose of the d ishwasher packaging material corre ctly.
All pa ckaging material s can be recy cled.
Plastic parts are m arked with the s tandard internati onal abbreviation s:
PE for polyethylene, e.g. sheet wrapping material
PS forpolystyrene,e.g.paddingmaterial
POM polyoxymethylene, e.g. plastic clips
PP polypropylene , e.g. Salt filler
ABS Acrylonitri le B utad iene Styrene, e.g. Control Panel .
Packagingmaterialcould be dangerous for children!
For di sposi ng ofpa ckage a nd thea ppliance ple ase go to a recycling centre. Therefore cut
offthe power s upplycableandmakethedoor closing deviceunusable.
Cardboardpackagingismanufactured fromrecycled paper and should be disposedinthe
waste paper c ollect ion for r ecycling .
By ensuring t his product is disposed of correctly,you will help pre vent potential negati ve
consequences for the environment and human health, w hich could otherwise be caused
byinappropriate wastehandlingofthisproduct.
For m ore detailed informat ion a bout rec ycling of this pro duct , ple ase contact your local
city of fice and your hou sehold waste disposal service.
DISPOSAL: Do no t dispose this pr oduct as unsorted municipal waste. Collection of such
waste sep ara tely for spec ial t reatment is necessary.
Page 6
To g etthe best performancefrom yourdi shwasher, r ead alloperatinginstructions
beforeusing it fo rthe firsttime.
78
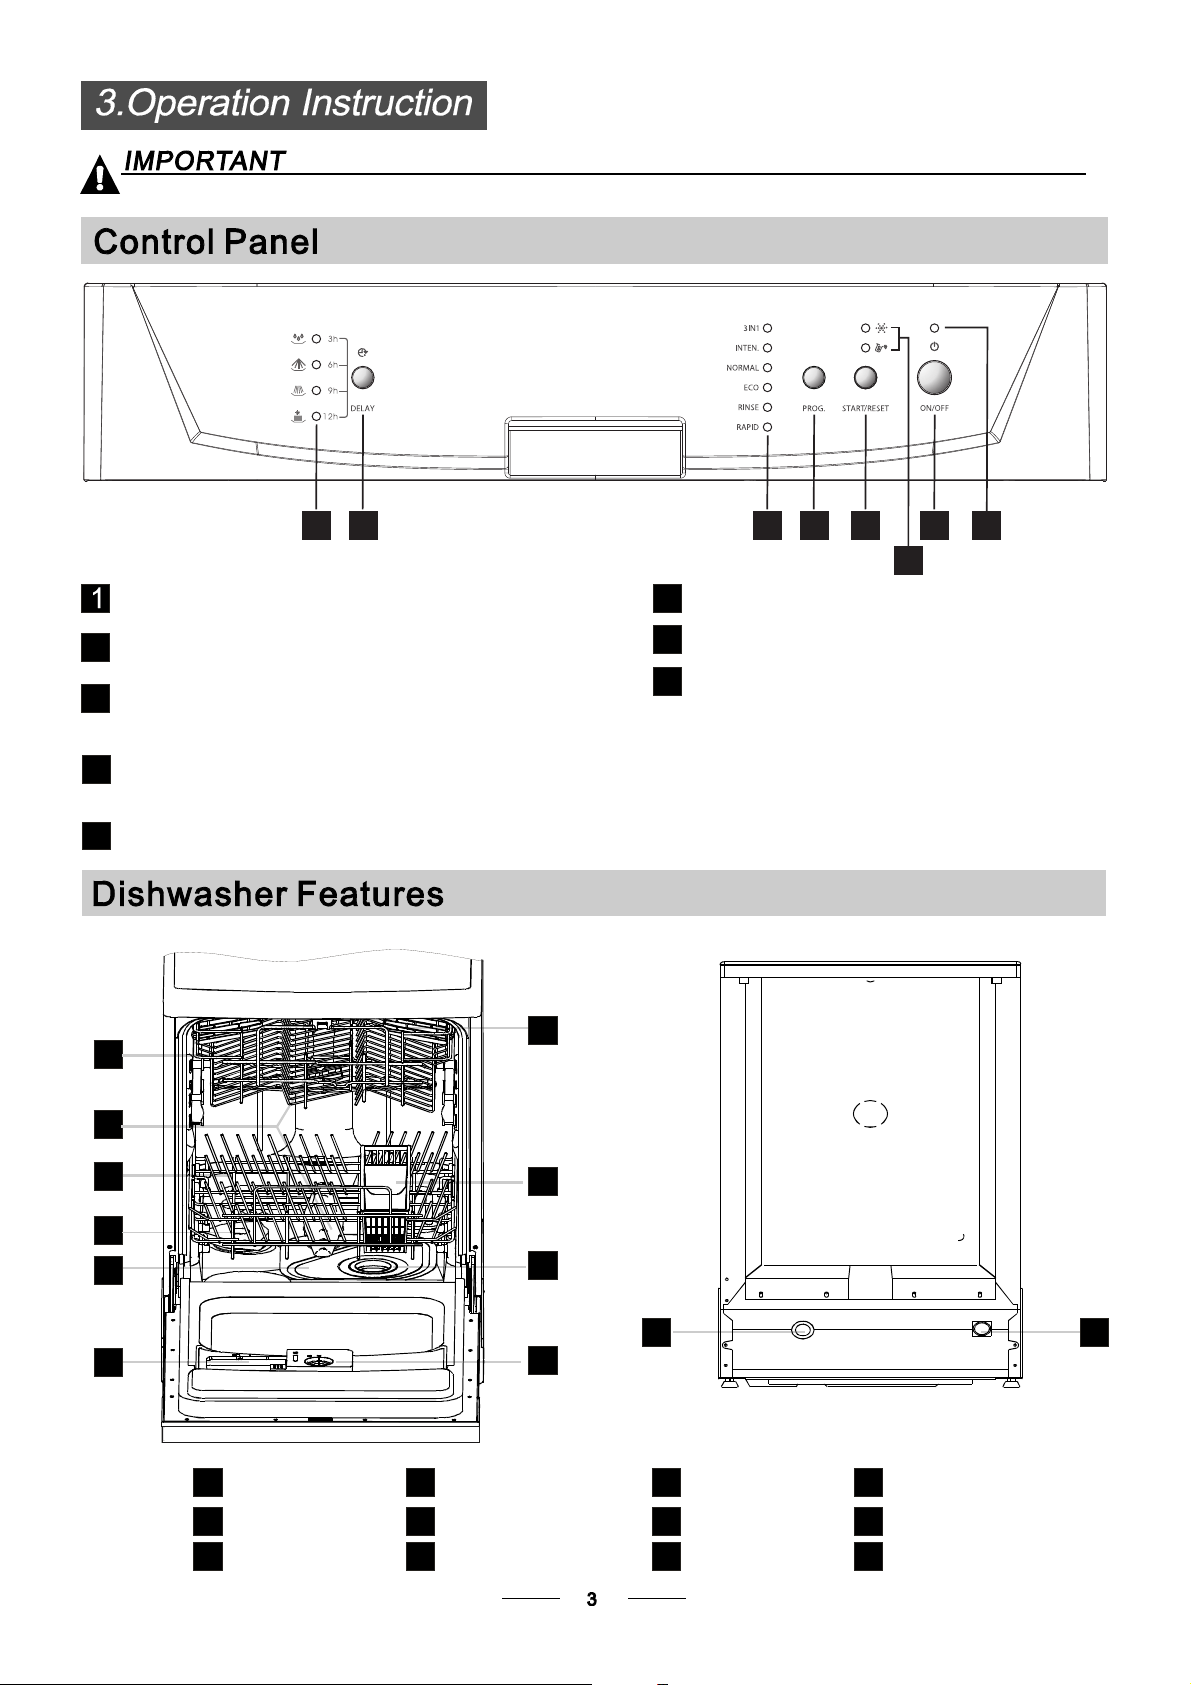
Power indicator light: To show t he p ower supply.
Power switch: To t urn on/off t he power supply.
2
Salt a nd rinse aid warni ng lights: To sh ow
3
whenthesaltcontaineror dispenserneedto be
refilled.
Start /Reset button: To start the selected
4
was hing program or re se t the w a s hing program
when the machine isw orking.
WashingProgr am Selector: To select one o f
5
the six wa s hi n g pro gr a ms.
Front view
1
5
6
4
1
2
3
Program indic ator lights: Toshow the washing
6
program.
Delay Button : ToP ress the bu tton to de lay.
7
Dela y time/Washi n g Phas e s ind icator li ght:
8
When youdelay time(3, 6, 9, or 12hours), the
indicatorslightwillbe onto showoneofthe
delay time. Wh en the machine is wo rking, the
indicators will be on toshowoneof the washing
phases of cycle.
Back View
7
2
3
4
5
6
on
Off
Upper Basket
1
Spra yArm s
2
Lower Basket
3
8
9
10
Salt Container
4
MainFilter
5
Detergent Dispenser
6
11 12
Cup Shelf
7
Cutlery Basket
8
Coarse Filter
9
RinseA idDispenser
10
Drain pipe connector
11
Inlet pipe c onne ctor
12
Page 7
Before u sing y our dishwasher for the first time:
A. Set the wate r sof tener
B. Pour 1 2 litre of waterinside thesaltcontainer andthenfill withdishwashersalt
/
C. Filltherinseaiddispenser
D. Fill in deter gent
The wat er so ftener must be set m anually, usin g th e w ater hard ness di al.
The wat er so ftener is designed to r emove minerals and salts f rom the w ater, wh ich w ould have
a detrim ental o r adverse effect on the ope ration of the app liance. T he h igher the
content ofthese minerals and salts, the harder your wat er is. T he s oftener should be
adjusted acco rding to the ha rdness of t he water in you r area. Your loca l WaterAuthority
can advise y ouon the hardness o fthe waterinyourarea.
Adjusting SaltConsumpti on
The dishwas her is de signed to allow for adjustment in the am ount of salt consumed based on t he hardness of
the waterused. This is intended to optimise andcustomise the levelo f saltconsumption.
Pleas e follo w the steps bel ow for a djus tmen t in salt cons ump tion .
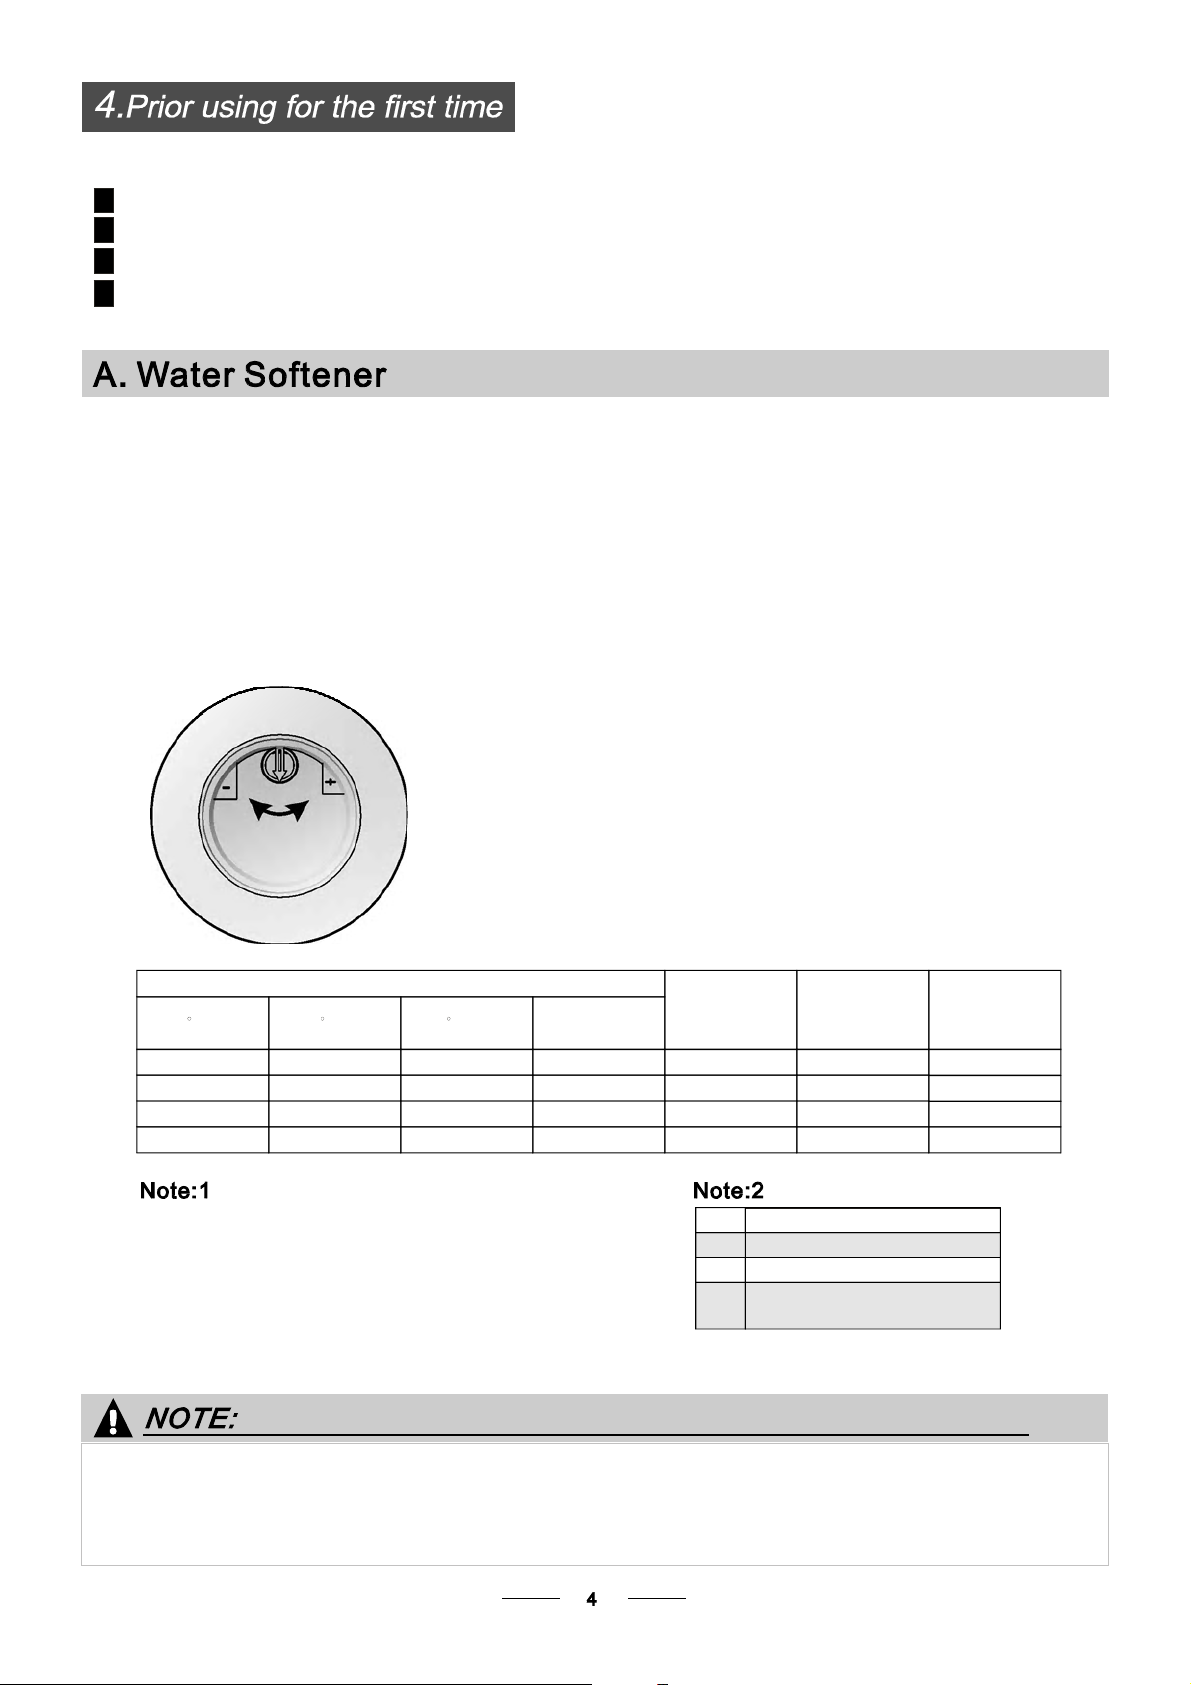
1. Unscrewthecapfrom the salt container.
2. There i s ari ng o n the container with ana rrow on i t (see figure
onthe side),ifnecessary,rotate the ring in the anticlockwise
direction from the "-" Setting toward the " +" sign, basedon the
hardness o f the w ater being used.
It is recomm ended t hat adju stments should be made in
accord ance wit h the followin g sch eme:
WATER HARDNESS
dH
45~60 80~107 56~75 8~11
dH=1.25 C larke=1.78fH=0.178mmol/l
1
DH: German degree
°
fH: Frenchdegree
°
Clark: Britishdegree
°
fH
0~140~8 0~1.4
14~398~22 1.4~3.9 - 20 50
39~8022~45 3.9~8 Mid 40 25
°°°
Clarke
0~10
10~28
28~56
mmol/l
Selector Position
/
+
""/
No sa lt n eed added
"-"
Settingtowardthe"-"sign
"+"
Settingtowardthe"+"sign
Settingtowardbetween
"Mid"
the "-" sign and "+" sign
Salt consumption
(gram/cycle)
0
60 16
Auto nomy
(cycles/1kgs)
/
Contact your l ocal water board f or information on the hardness of your water suppl y.
If your model doe sn ot have a nywater so ftener,you may s kip this section.
WATER SOFTENER
Thehar dness ofthe wa ter v aries f rom place to place. I f hard wa ter is us ed in the dis hwasher,deposits will
form on the dishes and utensils.
Theapplian ce i s equipped with a sp ecial softener that uses asalt container specific ally designed to elimi nate
lime and minera ls from the wate r.
Page 8
Always u se the salt i ntende d f or use w ith dishwasher.
The sa lt c ont ainer is located beneath the lower basket and should be f illed as explained
inthe foll owing:
Attention!
Only use salt specifi cally designed for t he use i n di shwashers! Every other type of
salt no t specifically designed for the u se in ad ishwasher, espe cially table salt, will
damage the w ater softener.In case of d ama ges caused by t he use o f unsuitable
salt t he manufacturer does not g ive any warranty nor is liable for a ny damages caused.
Only f ill wi th salt just b efore starting one of theco mplete washing p ro grams.
This will p revent any g rains of salt or sa lty water,whi ch may have b een spilled,
remaining on the bottom of the machine for any period of ti me, which may cause
corros ion.
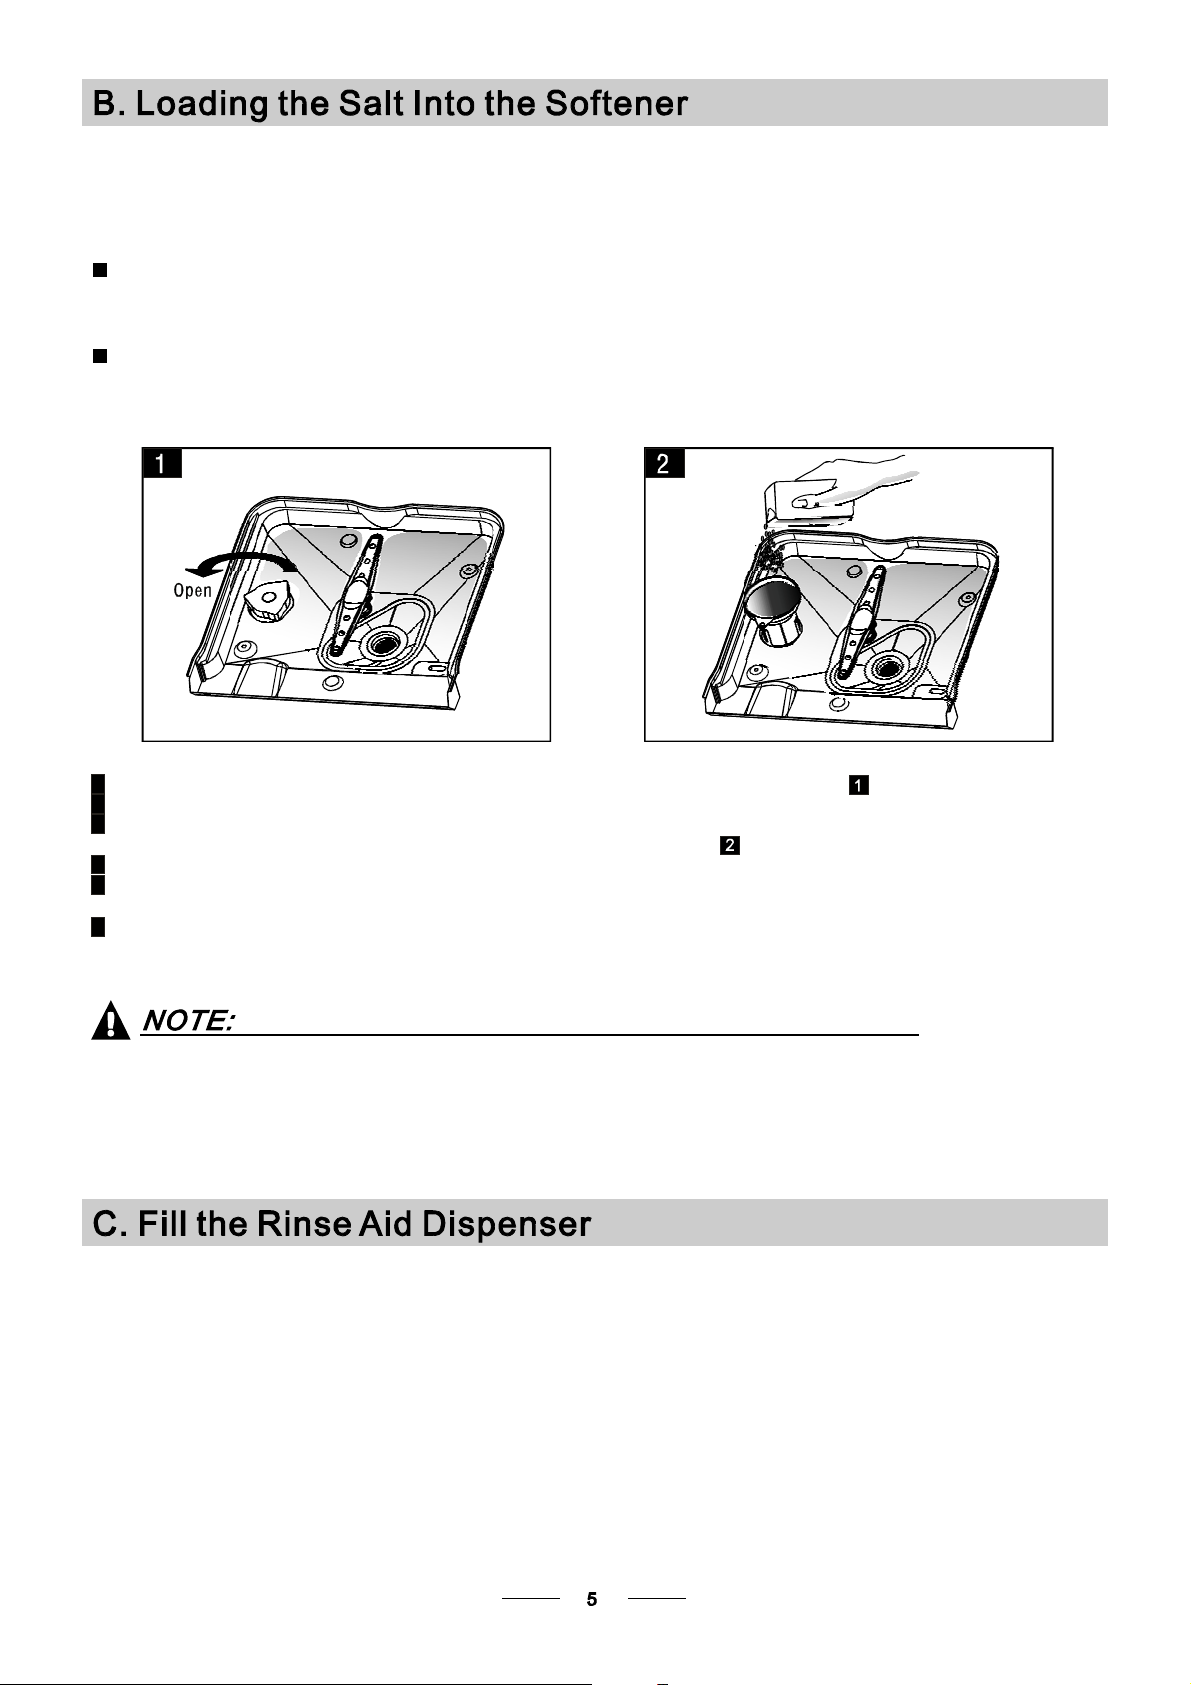
A Remove the lowerbasket andthenunscrew andremove the cap fromthesalt container.
B Before thefirstwash, fill1lt.of water in the salt container of your machine.
C Place the end of the fun nel (supp lied) into the hole and introduce about 1kg of salt .
normal for a small amoun t of wate r t o c ome out of th e salt con tai ner.Itis
D Afte r f illi ng the c ontain er , screw the c ap tightly back clo ckwise.
E Usually, the salt warni ng light will stop being il luminat ed within 2-6 days afte r th e s alt cont ainer has been filled wit h
salt.
F Immediat ely a ft er f illin g the salt into the salt c ont ainer, a washing progr am should be started
soak orrapid ).
bysalty water. This isout of warranty.
program Otherwise the filter system , pump or ot her importan t parts of the machine may be d amaged
1.The salt container must only be refilled when the salt wa rning light in t he control panel comes on.
Depending on how wel l the s alt dissolve s, t he s alt warning light may still be on eventhough the
salt cont ainer is filled.
If ther e i s n o salt warning light i n the con trol panel (for so me Models),you can estimate when to f ill
the s alt i nto the softener by the cycles that the dishwashe r has run.
2. If ther e a re spills of the salt , a soak or a rap id program s hould be run to remove the excessive salt.
(Wesu ggest to use t he
RinseAi dDispe nser
The r inse aid i s rel ea se d d uri ng t he fi nal rinse to preve nt water fro m forming d roplet s on y o ur dishe s, which can
leave spots and streaks. It also improves dry ing by allowing water to r oll offt he dishes. Yourdishwasher is
designed touseliquidrinseaids. The rinse aiddispenser islocatedinside thedoor next to the detergent dispenser.
To fill the dispen ser, op en th e cap and pour the rinse ai d into the dispe nse r until the le vel indi cator turn s com pletel y
black. The volume of t he rinse a id c ontain er is about 110ml.
Function of RinseAid
Rinse ai d is automaticall y added during the last rinse, ensur ing thorough rin sing, and spot and streak free drying.
Attention!
Only usebrandedrinseaid for dishwasher. Neverfill the rinseaiddispenserwithanyother substances
(e.g. Dishwasher cleani ng agent, liqu id deterge nt). Th is would damage the app liance.
Page 9

Whento Refill the RinseAidDispenser
Ifth ere i s no ri nse-aid warning light in the c ontrol panel, you can estimate the am ount from the col our
ofthe optical level indicat or C loca ted next to the cap. When the rinse-aid c onta iner isfu ll, the whole
indicator will bedark .As the r inse-aid dimini shes, the si ze of the dark dot decreases. You should never let
the r inse aid l ev el fa ll 1 / 4 full.
Asthe rinse aid d imin ishes, the size o f the black do t
onthe rinseaidlevelindicatorchanges,as illustrated b elow.
Full
3/4full
1/2full
1/ 4 full - Shouldrefill to eliminate spotting
Empty
""
To open the di spenser, turn the cap to the "op en" (le ft) arrow an d lift it out.
1
Pour the rinse ai d into the dispe nser, being caref ul not to over fill .
2
Replace the cap by inserti ng it aligned with " open" arrow and turnin g i t to t he cl osed (right) arrow.
3
Cl ean up a n y rins e aid spil l ed whil e during f illing with an abso r bent cloth to a v oid excessiv e f oami n g
during the next wa sh.
Don't f orget to replace t he cap before you close dis hwa sher d oor.
Adjusti ng RinseA id Di spenser
The r inse aid dispenser has six or four s ettings. Al ways star t with t he d ispens er
set o n "4". If spot s and p oor drying are a problem, increa se the amo unt of r inse
aid d ispensed by removing the dispenser li d an d rotating the d ial to "5". If t he
dishes s till are not d rying prope rly o r are show spots, adjust t he dial to the n ext
higher lever until your dishes a re spot-free. The recommend ed setting is "4".
(Factoryvalueis "4".)
Increasethedose if there aredropsof water o rlime spotsonthedishes afterwashing.
Reduce it if th erea restickywhitis h stainson yourdisheso ra bluish film on glassware or
knifeblades.
Detergents with its chemic al ingredients ar e ne cessary to remove dirt, crus h dirt an d transport it out of the di shw asher.
Mostof the commercial qualitydetergentsare suitable for this p urpose.
Deterg ents
The re are 3 sorts of d etergen t s
1.Withphosphate andwithchlorine
2.Withphosphate and wi thout chlorine
3.Withoutphosphate and without chlorine
Page 10

Normally ne w pulverised detergent is without phosphate. Thus the water soften er function of
phosphate is not gi ven. In thi s cas e we rec om men d t o fill salt i n the sa lt contai n er ev en whe n
the hard ness o f water is o nly 6 dH. If dete rgents w itho ut phosp hate are used in the case of hard wat er
often wh ite s pots appear on d ishes and glasses. In this cas e please add mo re detergent to reach
better resul ts. D eter gents without chlori n e do only ble ach a litt le. S tr o ng an d colou red spo ts will not
beremo ved completely.In t hi s ca se please choose a p rogram with a hi gher temperature .
°
Concentr ated Detergent
Based on theirchemicalcomposition,detergents can be splitintwobasictypes:
conventional, alkaline detergents w ith caustic components
lo w alkaline c oncentr ated deterge nts w ith n at ural enzy mes
The use of normal washingprogra ms in combinationwith concentrateddetergents
reduces pollution a nd is good for your dish es; these wash p rog rams ar e specifically mat ched
toth e dirt- diss olving properti es of the enzyme s of the conc ent rated de terg ent. For this reason
“”
normal washprogramsin whichconcentrated detergentsareused can achieve thesame
resultsthat c an o therwiseonly be achievedusing intensive programs.
“”
“”
DetergentTablets
Detergent tablets of different brands dissolve atdifferentspeeds. Fort his reasonsome
detergent ta blets cannot dissolve and develop their fu ll cleaning power during s hort
programs. T herefore please use long programs when u sin g de tergent tablet s, t o
ens ure the com plet e rem oval of deterg e n t res iduals.
Detergent Dispenser
The dispens er m ust be refilled be fore the start of e ach wash cy cle f ollowing the instructions
provided in the wash cycle table . Yourdis hwasher uses le ss de tergent and rinse aid than
Conventional dishwa sher.Generally,only onetablespoon ofdetergent isneeded for
anormal wash load.More heavily soiled itemsneed moredetergent. Always addthe
detergen t just be fore star ting the dishwasher, otherwis e it coul d g e t damp and will n ot
dissolve pr oper l y.
AmountofDetergent toUse
If th e l id is close d: press release button.T he l id will spring open.
Always a dd the dete rgent just b efore starting each w ash cycle.
Only usebranded detergentaidf ordishwasher.
Dishwasher detergent is corrosive! Take c are to keepi t out of reach of c hildren.
Proper U se of De tergent
Use o nly detergent specificall ym ade for t he use in dis hwashers . K eep your detergent f resh and dry.
Don't put powdereddetergent intothedispenser untilyou'rereadytowash dishes.
Page 11

Fillin Detergent
Fillthe detergent disp enser w ith detergen t.
The m arking in d ica tes the dos i ng levels , a s
illus t ra ted o n t he r igh t:
The p lace o f main w ash cycle dete rgent placed.
A
The p lace o f pre-wash c ycle detergent placed.
B
Pleaseo bserve the m anufactur ers dosing and storage
Recommendations as stated on thedetergent packaging.
Closethe lid and pressuntil i t locksin place.
If th e d i shes are h eavi ly so il ed, place an additional
detergent dosein the pre-wash detergent chamber.Th is d etergen t will take effect during the pre-wash phase.
Youfi nd i nformatio n about the a mount of detergent for th e si ngle program me ont he last page.
Please a ware, tha t according t o the levelsoi ling and the spec ific hardness of water difference s a re po ssible.
Please observe the manufacturer's recommendations onthedetergent packaging.
Page 12

Considerbuying utensils which areidentified as dishwasher-proof.
Use a milddetergent thatis describedas 'kindto dishes'. If necessary, seekfurther
information from the detergentmanufacturers.
Forparticular items, select aprogramwithaslowa temperature as possible.
To prev ent dama ge, do not tak e glass and cutl ery out of the dis hwas he r immediat el y
after the prog ramm e has ende d.
Are notsu itable
Cutlery with w ooden,hornchina or
mother-of-pearl han dles
Plastic items that are n ot heat resistant
Older cutlery with glued partst hat are not
temperature resistant
Bonded c utlery item s or dish es
Pewter or coop er items
Crystal gl ass
Steel items su bject to rusting
Wooden pl atters
Items made from synthetic fibres
(For b est performance of t he dishwasher, fol low t he se load ing guidelines.
Features and ap pearance of baskets and cut ler yba skets m ay vary from your mod el.)
Scrape off any larg e amount s of le ftover food. Soften remnants of burnt food in pans.
It i s not necess ary to r inse the dishes under running water.
Place objects in t he dishwasher in following way:
1.Itemssuch as cups, glasses, pots /pans, e tc. are fa ced downwards.
2.Curveditems, or ones with reces ses, should be loade d aslant so th at water can run off.
3.Allutensils are stacked securely and can not ti p ov er.
4.Allutensils are placed in t he way t hat the spray ar ms can r otate freely during washing.
Ve ry sm all items s hould not be w ashed in the dishwasher as they could easily fall out o f the basket.
Are o flimitedsuitability
Some ty pes of g lasses can become
dull afte r a larg e number of w ashes
Silver and alumi num par ts have a
tendencytodiscolourduring washing
Glazed patterns may fadeifmachine
washed frequently
Load h ollow i tems such as cups, gl asses, pans etc. With t he opening facing downwards s o that
wat e r can n o t c o lle c t i n t he contai ner or a dee p b a se.
Dishes anditems of cutlerymust not lie inside one another, orcover each other.
To avoid d a mage to glasses, they m ust not touch.
Load large items w hich are most difficult toclea n in to the lower basket.
The u pper basket is de signed to hold m ore delicate and lighter d ishwa re suc h as gl asses, coffee
andtea cups
Long bladed knives stored in a n upright position are a p otential hazard !
Long and/or sharp items o f cutlery such as carving knives must be positi oned
horizon tally in the upper b asket.
Please do not overload your dishwashe r. Thisis important for good results and for
reasonab le consumption of energy.
To prevent water dripping from the upper ba sket into the lower basket, w e recommend that you
empty the lower ba sket first and the n the upper ba sk et.
Page 13

The upperbasketisdesignedtoholdmore delicate andlighter dishwaresuchas glasses,coffee
and tea c ups and sau c ers, as wel l a s plates , s mall bow ls and s hallow pans (a s long as th e y are
not toodirty).
Position the di shes and co ok ware so th at they wil l not g et moved by t h e spray of water.
4
3
1
5
1
4
1
7
1
6
2
1
1
4
Wesuggest that you place large i tems and the most difficult to clean ite ms are to be placed into the l ower basket:
such as pots, pans, l id s, s erving di shes a nd b owls , as sho wn in the figure below.
It is prefer able to pla ce s ervin g dishes and lids on the s ide of the racks in or der to a void blocking the rotation of th e
topspray arm.
Please be remind ed th at :
Pots, serving b owls, etc, m ust always b e placed top d own.
Deep pots s hould be s lanted to allow water t o fl ow out.
The B ottom Basket features folding spikes so that la rger or m ore pots and pans ca n be loaded .
Cups
1
Small serving bowl
2
La rge se r ving bow l
3
Glasses
4
Saucers
5
Dish
6
Dessert dishes
7
7
77
8
99
Dessert dishe s
7
Oval platte r
8
Dinner plat es
9
Soup plates
10
Silverware basket
11
1010
Page 14

Page 15

Adju sting the Upper Basket
The height of the upper b asket can be ad justed in order t o create m ore space for l arge utensils
both for the upper/lowe r basket. The heigh t of the upper b asket can be adjusted by placing the
wheels on different height of the r ails. Long items, se rving cutlery, salad servers and knives
should be placed on the shelf so that they do not o bstruct the r otati on o f th e s pr ay a rms.
The she lf can be folded back or be removed when not required for use.
Foldin g Spikes of Low er Basket
For better stacking of pots an d pa ns,
the spikes can be f olded down as
show in the p ict u re ri gh t.
Cutlery s hould be placed in the cutlery basket with the handles at the bo ttom. If the r ack has side bas kets, the
spoons shoul d be loaded sep arately i nto the appropriate slots , espe cially long utensils should be placed in the
horizontal p osition at the front of t he uppe r basket as s hown in thepictu re.
32
2
4
525
5
4
555
2
4
1
1
3
4
1
2
4
1
1
2
4
1
3
8
3
Forpersonal safety and a topqualitycleaning,placethe silverwarein thebasket
making surethat:
They d o not nes t together.
Silverware is placed with the handles-down.
But pl ace knives a nd other potentially dangerous utensi ls are pla ced handles-up.
33
2
33
3
2
1
4
1
2
1
4
3
1
4
2
1
1
2
4
555
555
632367
Fo rk s
1
So u p spoo ns
2
Desser t sp o ons
3
Tea spoons
4
4
4
Do not let any item extend
throug h bottom .
Knive s
5
Serving sp oo ns
6
Gravyladles
7
Serving f orks
8
Page 16

()
Means:need tofill rinseinto the Rinse-AidDispenser.
3in1
Intensive
Normal
Eco.
(*EN 50242)
Rinse
For normally s oiled loads,
such as , plates,glasses
pots
andlightly soiledpans.
standarddaily cycle.
For the heaviestsoiled
loads,suchas pots, pans,
casseroledishes and dishes
that havebeen sitting with
dried food on them for a
while.
For normally soiledloads,
suchas pots plates
、、
glassesand lightly
soiledpans.
Stan da r d dail y c ycl e f or
no rmally so iled loads,
suchas pots plates
、、
glas se s .
For dishes thatneed to be
rinsed and driedonly.
Pre-wash 50
wash 50
rinse 70
drying
Pre-wash(50 )
(℃)
(℃)
(℃)
℃
Pre-wash
Wash (6 5 )
℃
Rinse
Rinse
Rinse(55 )
℃
Drying
Pre-wash(50 )
Wash (5 0 )
℃
℃
Rinse
Rinse(65 )
℃
Drying
Pre-wash
Wash (5 0 )
Rinse
℃
(65 )
℃
Drying
Wash(40 )
Rinse(70 )
℃
℃
Drying
3in 1
5/25g
(or )3i n1
5/25g
(or )3i n1
5/25g
(or )3i n1
150
130
160
155
80
1.15
1.5
1.3
1.13
1.0
12.3
23.1
15.9
16.5
8.6
Rapid
Ashorterwash forlightly
soiled loads that do not
need drying.
Wash (4 0 )
℃
Rinse
Rinse(45 )
℃
20g.
30
*EN 50242 :This programme is the test cycl e. The inf ormation for comparability test
in acco rdance with E N 50242, as fol lows:
Capacity: 12 setti ng
Position U pper basket: upper wheels onrai ls
Rinse aid setti ng: 6
Startin g a cycl e wash
Draw out the lowe r an d upper basket, l oad the d ishes and push them back.
It i s c ommended to load the lower basket fi rst, then the upper on e (see t he sectio n entitled
Loadingthe Dishwasher ).
“”
Pour in th e d eterg ent (see the sectionentit led Salt, Detergent and RinseAid ).
“”
Insert the pl ug into the socket . The power supp ly i s 220-240 VAC/ 50 Hz, the spec ification
of the so cket is 1 0A 250VAC . Make sure that the w ater supply is turned on to full pressure.
Close the do or, pr ess the ON/OFF button,and the ON/OFF light will turn on.
Press the pro gram button , the wash pr ogram will b e ch ange d as follows direction:
3in1->Intensive->Normal->Eco->Rinse->Rapid;
If a p rog ram isse lected, t he r esponse ligh t will light. Then press the Star t/Reset button, the
dishwasher begin sto start.
0.5
12.2
Page 17

When you press the Start/Resetbuttontopause during washing,theprogramlightwill
stopblinking and the dishwasherwillmooing everyminute unlessyou pressthe
Star t/ R e set but t on to sta r t.
Premise:
Acycle that is under way can only be m odified if it ha s only been r unning fora short time. Ot herwis e, the
1
detergent may have already be en re leased, and the appliance may have alre ady drained the wash water.
If t his is the case , the detergent dispenser mu st be refil led (see the sectio n entitled " Loading the
Detergent " ).
Press the st art/rese t button , the mach ine will be in standb y state, then you can
2
change the program to the desi red cycle setting (see the section en tit led " Starting a wash cy cle. . .").
The pr ogram lights show the state of t he dishwash er:
3
a) Allp rogramlights off--------------------- -----------------------stand by
b) Oneof the programlights on--------------------------------------pause
c) Oneof the programlights blinking----------------------- ------------run
c) Someof the up three p rogramlights bl inkingfleetly------------error
more t han 3 second s
Ifyou open thedoor ,t he machinewill pause. T he programlightw ill
duringa washcycle
stopblinkingand the buzzerwill mooingevery minuteunless youclose the door .After
you close t he d oor ,t he mac hine wil l ke ep on wor kin g afte r 10 sec onds.
Aforgotten dish can be added any time before the detergent cup opens.
Press the start/reset button
1
Open the door a little to stop the washing.
2
After the spray arms stop working,you can open the door
3
completely.
When the wor king cy cle has finis hed, the bu zzer of the dishwasher will s ound f or 8 sec o n d s, then st op. Turn off
the appliance using the O N/OFF button, shut off th e wa ter supp ly and open the door of th e dishwashe r.
Wait for a f ew minutes before unloadin g th e di shwashe r t o a voi d ha ndling the dishes and ute nsils while they
are still h ot a nd more susceptible to breakage. They w ill also d ry better.
Add forgotten dishes.
4
Close the door
5
Press the start/reset button, the dishwasher will run
6
after 10 seconds.
SwitchOffthe Dishwasher
The p rogram light is on but is not blinking, only in th is case the program me has e nded.
1.Switchoff the di shwasher by pressing the ON/OFF button.
2.Turn offthewater tap!
Openthedoorcarefully.
Hot di shes are sensitive to kn ocks. The dishes should theref ore b e allowed to cool down around 15 minutes
beforeremovingfrom the appliance.
Open t he d ishwas her's door,leave it ajar and w ait a f ew minutes before removing the dishes. In this way they
will be cooler and the drying will b e improved.
Unloading thedishwasher
Itis normal that the dishwasher is wet in side.
Empty the low er basket f irst and then t he upper o ne. T his will avoid water dripping from the upper Bas ket onto
the dishes in the lower one.
It is dangerous to ope n the door when w as hi ng , bec aus e the hot wate r may scald you.
Page 18

The filter prevents l ar ger remnants of food or other objects from getting inside the pum.
Theresiduesmayblock thefilter, inthiscasetheymustbe removed.
The fi lter syst em c onsists of a coar se f ilter,a flat (M ain f ilter)
An d a mic ro fil t e r( F i ne f i lter).
1
2
3
2
1
3
Main filter
Foodand soilparticlestrappedinthisfilterare pulverizedby a
special jet onthe lower spray arm and w ashed down to d rain.
Coarse filter
Larger items, such as pie c es of bones or gla ss, tha t could block
thedrain aretrapped in the coarsefilter. To remove theitems
caught by the filter,gently squeeze the tap o n th e t op of this
filter and liftout.
Fine filter
This filterholdssoiland foodresiduesin thesump areaa nd
preventsitfrombeingredepositonthedishes during washcycle.
Filterassembly
Thefilter efficiently
For b est performance and results, the filte r mu st b e cleaned regular ly. t his reason, it is a goo d ide a t o
remove the la rger food particl es tr apped in the f ilter after each wash cy cle by rin sing the semicirc ular filter an d
cup u nder runnin gwa ter.To remove the fil ter device, pull the c up handle in t he upward d irect ion.
removes f ood particle s fro m t he wash w ater, all owing it to be recycle ddu ring the cycle.
For
Th e dishwasher must n e ver b e u sed wi t hout t he fi lters.
Improper replace ment of thefilter may reduce the performance level of the appliance
anddamagedishes and utensils.
2
3
1
Step 1 Turn the filter in ant i-clockwise direction,
:
then li ft it u p.
Step 2 l ift the Main filte r up:
Step3 lifttheFinefilterup:
When following this procedure from step1 to step 3, the filter system will be removed;
when following it fromStep 3 to Step 1, the filter system will be installed.
Page 19

Remarks:
- Inspec t the filters for blo cking a fter every time t he dishwasher has been used.
- By unscrew ing the c oarse filter, you can remove the filter system. Remove a ny f oo d re mnants and
clean the filters under running water.
Theentirefilter assemblyshouldbe cleanedoncea week.
Cleaning theFilter
To clean the c o a rse filt er and the fi n e fil ter, use aclea ning brush. R e as semble t he f ilter p ar t s as s hown in the f igur es
on th e last page and r eins ert the enti re assem bly in the dis hwa sher, positio ning it in it s s eat and pres sing downwar ds.
Whencleaning the filters,don't knockon them.Otherwise,the filterscould be
contortedand theperformanceof the dishwasher could bedecreased.
The cont rol panel can be cleaned by using a l ightly dampened cloth.
After cle aning, make sure to dry it thoroughly.
For t he ext eri or, u s e ag ood a pp liance poli s h wax.
Neveruse sharp objects, scouring pads or h arsh cleaners on a ny part of the dis hwasher.
Cleaning The Door
To clean thee dge around the door, you sho uld use o nly a soft wa rm, damp cl oth.
To avoid penetration o f water into the d oor l ock and electrical components, do not
usea spray cleaner of any k ind.
Never u se a spr ay c leaner to cl ean the door panel asit may damage the door lock
and electricalcomponents.
Abrasive ag ents o r some paper towels s hould not b e u sed because of theris k o f
scra tch ing or l eavi ng s pots on th e s t ainless stee l surf a ce.
Protec tA gainst Freezi ng
please take frost protection measures on t he dishwasher in winter.Every fter washing c ycles,
please operate as follows
1.Cut offtheelectrical powertothedishwasher.
2.Turnoff th e w ater supply and disconnect the water inlet pipe from the water valve.
3.Drainthewaterfrom the inletpipeandwater valve.(Use apantocatchthewater)
4.Reconnect t he water i nlet pipe to the wa ter valve.
5.Remove the filter at the bottom o f the t ub and use a sponge to soak up wate r in the sump.
:
If your dishwasher cannot work because of t he ice,
timea
please c ontact professi onal service pe rsons.
Cleani ng the Sp rayArms
It is necessar y to cl ean the sp ray arms regularly for hard water ch emicals will clog the spray ar m jets an d b earings.
Remove the upp er spray arm
Toremove theuppersprayarm, screwoffthenutclockwisethenremovethearm.
UNSCREW
PULLOUT
upper
lower
Removethelowerspray arm
To remove the l ower spray arm, pull out .the spray ar m upward
Was h the arms
Washthe arms in soa py a nd warm w at er and u sea soft brush to clea n t he jets.
Replace them after r insing them thoroughl y.
Page 20

AfterEveryWash
After every wash, turn offthe water supply to the
appliance and leave t he door slightly open soth at
moisture and odours are n ot trapped inside.
Removethe Plug
Before cleaning or p erforming mainten ance, always
remove th e p lug from t he socket.
No Solvent s orA bras ive Cleani ng
To clean the exterior and rubberpartsof the dishwasher,
donotusesolventsor abrasivecleaning products.
Only use acloth with warm soapy wate r.
Torem ov e spots o r s t ains from the surface of the
interior, use a clothda mpened withwater a na little
vinegar,or a c leaning product made specifically for
dishwashers.
Position the appliance in the d esired location. The back should rest ag ainst the wall behind it, and the sides,
along the adjacent cabinets o r walls. T he dishwasher is equipped with water supply and d rain hoses that can
be pos itioned either to the right or the left sides to facilitate prop er in stallatio n.
Whennot in Use foraLongTime
It isrecommend that yourun a was h cycle with the
dishwasher e mpty and the n r emove the plug f rom the
socket, t urn offthe water supply and leave the door of
the appliance slightly ope n. This will h elp the door
seals to lastlonger andprevent odoursfromforming
withinthe appliance.
Moving the Ap plia nce
If th e appliance must be move d, t ry to keep i t in the
verticalposition.Ifabsolutelynecessary, it can be
positioned on its back .
Seals
Oneofthefactorsthatcauseodourstoforminthe
dishwasher is foo d th at remains t r apped in theseals.
Periodic cleaning with a d amp sponge will prevent this
fro m occurri ng.
Once the appl iance is positioned for levelling, the height of the dishwashe r
may be altered v ia adjustment of the scre wing level of the fee t. In any case,
the appl iance should not b e incl ined more than 2 .
For personal safety:
DO NOT USE AN EXTENSION CORD OR AN ADAPTER PLUG WITH THIS APPLIANCE.
DONOT, UNDER ANY CIRCUMSTANCES, CUT OR REMOVETHE EARTHING
CONNECTION FROM THE POWER CORD.
Please look at the r ating labe l to know the rat ing voltage and connect t he dishwasher to the appropriate power suppl y.
Use the r equired fuse 10 amp, tim e d elay fuse or c ircui t br eake r rec ommended and provide separate circuit servi ng
only this appliance.
Ensure the v oltage and f requency of the p ower being corresp onds to
those on the ratin g pl ate. Only in sert the plug into an electrica l so cket which i s earthed
properly.If t he electrical socket to which thea ppliance must be c onnected is not
appropriate forthe plug, replace the socket, ratherthanusing a a daptorsorthelike as
theycouldcauseoverheating andburns.
This appliance must be earthed. In the event of a malfunction or breakdown, earthing will reduce the risk of
electric shock by providing a path of least resistance for the electric current. This appliance is equipped with a
cord havingan equipment-earthing conductor and an earthing plug. The plug must be plugged into an
appropriate outlet that is installed and earthed in accordance with all local standards and requirements.
Page 21

Improper connection of the equipment earthing conductor can result in the risk of an
electric shock.
Check with a qualified electrician or service representative if you are in doubt whether the
appliance is properly earthed.
Do not modify the plug provided with the appliance. If the plug does not fit properly to the
outlet, please have a qualified electrician to install a proper outlet.
for personal safety:
DO NOT USE AN EXTENSION CORD OR AN ADAPTER PLUG WITH THIS APPLIANCE.
DO NOT, UNDER ANY CIRCUMSTANCES, CUT OR REMOVE THE
CONNECTION
Connect the c old water supply hose to a thre aded 3/4(inch) connector and make sure
that it isfast ened tightly in place.
If the w ater pipes are n ew or haveno t been use d for an e xtended period of t ime, let the
water run to make sure that the water i s clear.This p recauti on i s needed to avoi d the
risk o f the water inlet t o be bl ocked and damage the a ppliance .
The wa ter supply to the appliance ca n a lso be connected to t he household hot water
line ( such as, c entral sy stem, heating system),as long as it does not exceed a
temperatur e of 60 C. In this case , th e w ash cycle time will be s hortene dby about 15
minutesandthewash efficiency slightly reduced.
The co nnection must be made to the hot water line following the same procedures as
described i nthe sec tionfor theconnectiontothe coldwater li ne.
In or der to avoid th at there i smo re waterstaying in the inlet hose, pleaseclose
theh ydrant after using.(Not applicable to appliances without aqua-stop.)
FROM THE POWER CORD.
EARTHING
Insertth e drain h ose into a d rain pipe witha m inimumdiameterof 4cm, orlet it run into thesink, makingsure to
avoid bendingor crimping it.Usethespecialplasticsupport thatcomes withthe appliance. The topofthehose
must be at a height b etween 40 and 1 00cm .The free end o f the hose mustno t b e immersed in water toav oid the
back f low of i t.
PLEASEHANG UPTHE DRAIN HOSE EITHERWAYOFA, B, C
Close the drain hose hook to the counter
Front
NOTE
A
Drain hosehook
Counter
Thetopofthehose
must be at a height
B
between
40 and 100cm.
The free end o f the
hos e mus t n ot be
immersed in water.
Drain pipe
C
40mm
φ
Note: The drain hose of this appliance must only beconn ected to a dirt y water drain. Wate r mu st n ot be
discharged into a fresh water drain.
“”
“”
Page 22

How to Drain Excess WaterFromHoses
If the sin k is 100 0 hig her from the floor, th e excess water i n h o ses c a nno t be dra ined directly
into thesink. It willbe necessarytodrainexcess waterfrom hoses intoa bowlor suitable
container that is held outside and lower than t he s ink.
Wat er Ou t l e t
Connect the water drain hose. Th e dr ain hose must be correctly fit ted t o avoid water leaks.
Ensure that thew ater drain hose is no t kinked or s quashed .
Extension Hose
Ifyouneeda drain hose extension,makesuretousea similar drain hose.
It must be no longer t han 4 m etres; otherwise the cleaning effect of t he dishwasher could be reduced.
Syphon Connec tion
Thewasteconnection mustbe ata heightofbetween 40cm(minimum)and100cm(maximum)
from the b ottom of th e dis h . T h e w a ter dr ain hose should be fixed b y a h ose clip. Th e free end of
the h ose mu st not be immers ed in wat er.
Thefollowingthingsshould be checked beforestartingthe dishwasher.
1
Thedishwasher is levelandfixed properly
2
The inle t valve is open
3
Thereis a leakageat the connectionsofthe conducts
4
Thewiresaretightlyconnected
5
The power is switched on
6
The inlet and drai n hoses are knotte d
7
Allpackingmaterialsandprintingsshould be taken out from the dishwasher
After installation, please make sure tokeep this manual.
The content of this manualis very helpful to theusers.
Page 23

Fuse blown, or the
circuit breaker acted
Replace fuse or reset circuit breaker. Remove any other
appliance s sharing the same circuit with the dishwasher
Power supply is not
turned on
Error code:E1;
Water pressure is low
Door of dishwasher
not properly closed.
Kink in drain hose
Filter clogged
Kitchen sink clogged
Improper detergent
Spilled rinse-aid
Make sure the dishwasher is turned on and the door is
closed securely.
Make sure the power cord is properlyplugged into the
wall socket.
Check that the water supply is connected properly and
the water is turned on.
Make sure to close the door properly and latch it.
Check drain hose.
Check coarse the filter
(see section titled )" Cleaning The Filter "
Check the kitchen sink to make sure it is draining well.
If the problem is the kitchen sink not draining ,you may
need a plumber rather than a serviceman for dishwashers.
Use only the special dishwasher detergent to avoid
suds. If this occurs, open the dishwasher and let suds
evaporate.Add 1 gallon of cold water to the tub. Close
and latch the dishwasher, then Start the "soak" wash
cycle to drain out the water . Repeat if necessary.
Always wipe up rinse-aid spills immediately.
Detergent with
colourant was used
Hard water minerals
The affected items are
notcorrosion resistant.
A progra mm e was not
run after dishwasher
salt was added.
Traces of salt have
gotten into the wash cycle.
The lid of the softer
is loose
r
Aspayarmis
knocking against
an itemin a basket
Items of crockery
are loose in the
wash cabinet
This may be caused
by on-site installation
or the cross-section of
the piping.
Make sure that the detergent is the one without
colourant.
To clean the interior, use a damp sponge with
dishwasher detergent and wear rubber gloves.
Never use any other cleaner than dishwasher
detergent for the risk of foaming or suds.
Always run the quick wash programme .
without any crockery in the dishwasher and
without selecting the Turbo function (if present),
after adding dishwasher salt.
Check the lip .Ensure the fix is fine.
Interrupt the programme, and rearrange the items
which are obstructing the sp ay arm.r
Interrupt the programme,
and rearrange the items of crockery.
This has no infl uence on the dishwasher function.
if in doubt, contact a su itably qualified plumber.
Page 24

The dishes were not
loaded correctly.
See notes in " Loading the Dishwasher Baskets ".
Theprogramme was
notpowerful enough.
Not enough detergent
wasdispensed.
Items are blocking
the path of sp ay arms.r
The filter combination
inthebaseofwash
cabinet is not clean or
is not correctly fitted.
This may c ause
the sp ay arm jets
r
to get blocked.
Combination of soft
water and toomuch
detergent.
Aluminum utensils
have rubbed against
dishes.
Dishes block
detergent cups.
Improper loading
Too little rinse-aid
Select a more intensive programme.
See" Wash Cycle Table ."
Use more detergent, or change your detergent.
Rearrange the items so that the sp ay can rotate freely.r
Clean and/or fit the filter combination correctly.
Clean the sp ay arm jets. See "Cleaning the Spray
Arms".
Use less detergent if you have soft water and select
a shortest cycle to wash the glassware and to get
them clean.
Use a mild abrasive cleaner to eliminate those marks.
Re-loadin g the dishes properly.
Load the dishwasher as suggested in the direction s.
Increase the amount of rinse-aid/refill the rinse-aid
dispenser.
r
Dishes are removed
too soon
Wrong program
has been selected
Use of cutlery with
a low-quality coating
Do not empty your dishwasher immediately after
washing. Open the door slightly so that the steam can
escape. Begin unloading the dishwasher only once t
he dishes are barely warm to the touch. Empty the low
basket first.This prevents water form dropping off
dishes in the upper basket.
In short program the washing temperature is lower.
This also lowers cleaningperformance. Choose
a program with a long washing time.
Water drainage is more difficult with these items.
Cutlery or dishes of this type are not suitable for
washing in the dishwasher.
When some malfunctions come on, the appliance will display error codes to warn you:
Longer inlet time.
Longer heating time,
but not reaching required temperature
Overflow.
Failure of temperature sensor
Faucets is not opened, or water intake is restricted,
or water pressure is too low.
Malfunction of temperature sensor or of heating
element.
Some element of dishwasher leaks .
Open circuit or break of temperature sensor
Failure of temperature sensor
Short circuit or break of temperature sensor
If overflow occurs, turn off the main water supply before calling a service.
If there is water in the base pan because of an overfill or small leak,
the water should be removed before restarting the dishwasher.
Page 25

Height : 850mm
Width : 600mm
Dept h : 580mm
Waterpressure: 0.04-1.0MPa
Hot w ater connection : max 60 ℃
Power supply: see rating label
Capacity: 12pl ace settings
 Loading...