

Page 1
Whitecroft Lighting Limited
Burlington Street, Ashton-under-Lyne, Lancashire OL7 0AX
Telephone +44 (0)870 5 087 087 Facsimile: +44 (0)870 5 084 210
Registered No. 3848973 England Registered Office: As above
Sirocco Park & Sirocco Flood
Installation Leaflet
SEPTEMBER 2017 - Rev C
General Maintenance
The luminaire can be opened via 4 off hex-socket screws from above. Ensure that the
support/stay is engaged when working on this luminaire to prevent injury.
PK/LEAF/SIROCP
Please note: All images shown are for illustration
purposes and should be used as a reference guide only.
GENERAL INFORMATION
1. A qualified electrician, in accordance with IEE wiring regulations, should carry out
connection to mains wiring.
2. Ensure that the rated voltage and frequency requirements are compatible with the
available mains supply.
3. Cleaning of reflectors and lenses should be carried out using clean, soft and lint
free cloths and anti-static cleaning fluid.
4. Do not carry out high voltage insulation test, i.e. 500/1000v this may damage
internal components.
5. For non-encapsulated products, for instance modules where the components can
be touched, electro static discharge can damage sensitive components on the
Printed Circuit Board (PCB) or LED. For this reason ESD precautions must be
taken wherever these modules are handled or built in into the Luminaire.
6. When servicing luminaries on site, grounding of the service field engineer should
be considered.
7. We recommend use of a high temperature copper paste on all screws that need to
be accessed during maintenance process, this will prolong the life of the fixings
and reduce the force required to remove the screws.
8. Some luminaires installed in outdoor environments may experience a build-up of
internal condensation. This is due to a difference in temperature between inside
and outside the luminaire which is quite common and acceptable under
BSEN60598.
Page 2
Luminaire
Height
mm
Width
mm
Length
mm
Weight Kg
Sirocco Park
156
280
530
8.8
Sirocco Flood
156
360
650
12.8 max
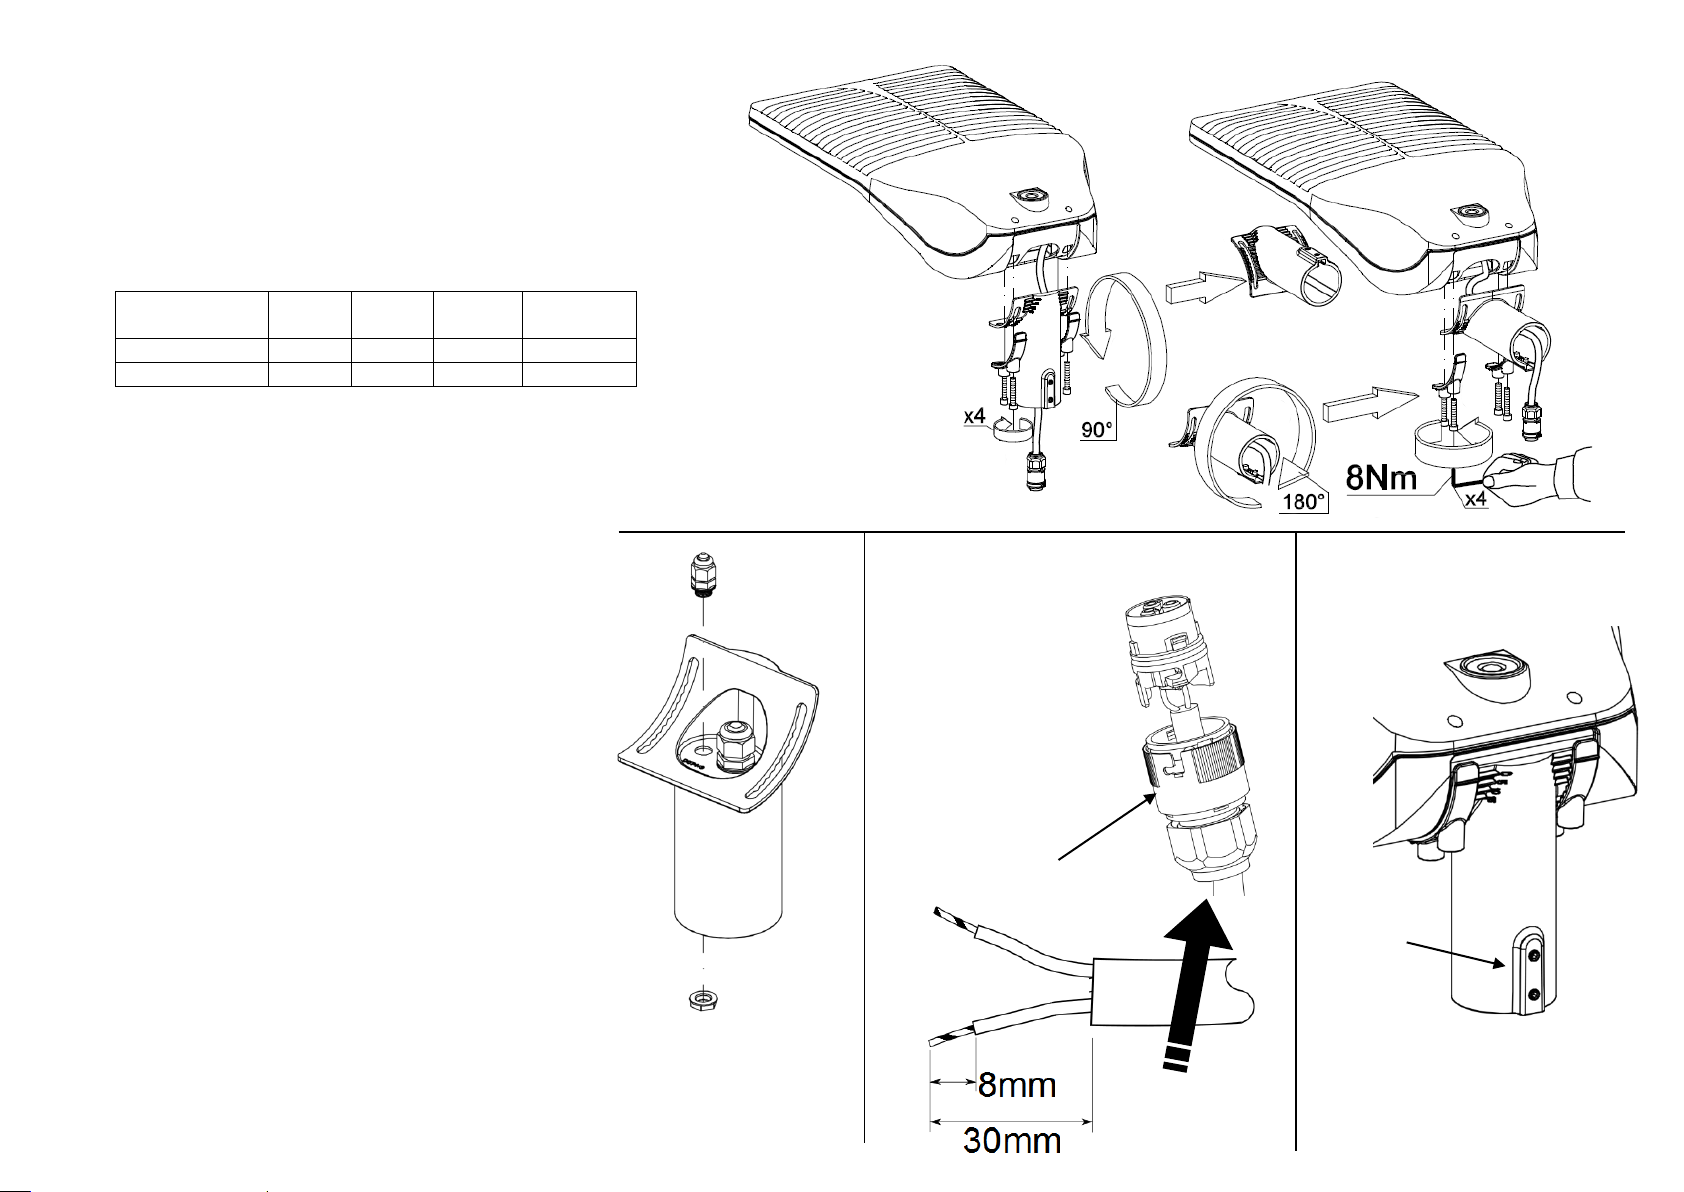
Fig 3. Fit Supply Plug.
1. Prepare the supply
flex.
2. Pass the flex
through plug body.
3. Make electrical
connections.
4. Close plug – press
fit together.
5. Tighten the glandnut to seal the plug
body.
SPECIFICATION
INSTALLATION SEQUENCE
In order to fit this luminaire, the correct sequence of
assembly must be observed. During installation make sure
the power supply is completely isolated from the mains.
Refer to general information overleaf before installation.
1. Carefully unpack the luminaire and locate the plug
kit and gland kit.
2. Prepare the body for installation in the correct
orientation – on a vertical post or horizontal bracket.
Remove and re-fit the mounting socket if necessary.
(fig 1) If additional electrical feeds are required for
Dali control, fit the supplied gland into the body
mounting socket at this stage. (fig 2)
3. Fit the IP66 plug supplied to the incoming supply
flex. (fig 3) Supply flex must be round and Ø912mm.
4. Plug the supply into the flying lead attached to the
luminaire. Ensure that the connectors are locked
together by rotating the locking ring.
5. If Dali feeds are to be used, they must be passed
through the gland into the body. The luminaire can
be opened via 4 off 4mm hex screws from above.
Make Dali connections directly to the labelled
terminal blocks. Close the luminaire ensuring that
the IP seal is free from obstructions.
6. Fit the luminaire onto the mounting post/bracket and
tighten the securing grub-screws to 8Nm. (fig 4)
NB. If a photocell is fitted, the luminaire will not switch on
in daylight. Cover the sensor to simulate darkness to
verify operation.
The Sirocco Park and Sirocco Flood are Exterior Street lighting
luminaires available in a choice of light distributions and power
levels. See www.Whitecroft light.com for full specifications of the
entire range.
Nom. mounting column/bracket diameter: Ø60mm
Max mounting column/bracket diameter: Ø63mm
Body finish: Anthracite
Factory-fitted Photocell switching: On 70 lux/Off 105 lux.
Locking Ring
8Nm max.
Fig 2. Knock-out
or drill if required.
Fig 1. Mounting
Collar Orientation.
Fig 4. Mount Luminaire.
 Loading...