

MF 343
MF 344
Català
MF 449
MF 448
MF 447
MF 62
MF 63
FOURS MULTIFONCTIONS “ LIMA ”
“ LIMA ” MULTIFUNCTION OVEN
HORNO MULTIFUNCTIONES
ﻥﺮﻓ ﺩﺪﻌﺘﻣ ﻝﺎﻤﻌﺘﺳﻻﺍ" ﺎﻤﻴﻟ"
Català
Fig. 1

Français
FOURS MULTIFONCTIONS “ LIMA ”
MF 343 / MF 344 / MF 449 / MF 448 / MF 447 / MF 62 /
MF 63
Cher Client,
Nous vous remercions d’avoir choisi d’acheter un appareil
ménager de marque White and Brown.
Sa technologie, son design et sa fonctionnalité, s’ajoutant
au fait qu’elle répond amplement aux normes de qualité
les plus strictes, vous permettront d’en tirer une longue et
durable satisfaction.
Conseils et mesures de sécurité
- Cet appareil peut être utilisé
par des enfants âgés de 8 ans et
plus, et par des personnes dont les
capacités physiques ou mentales sont
réduites ou des personnes dénuées
d’expérience ou de connaissance, s’ils
ont pu bénéficier d’une surveillance ou
d’instructions préalables concernant
l’utilisation de l’appareil en toute sécurité
et avoir compris les dangers impliqués.
Le nettoyage et la maintenance ne
doivent pas être réalisés par les enfants
sauf s’ils sont âgés de 8 ans et plus et
s’ils sont supervisés par un adulte.
- Cet appareil n’est pas un jouet. Il
convient de surveiller les enfants pour
s’assurer qu’ils ne jouent pas avec.
- Garder l’appareil et le cordon
d’alimentation hors de portée des
enfants de moins de 8 ans.
- La température des surfaces
accessibles et de la porte de l’appareil
peut être élevée lorsque l’appareil
Description
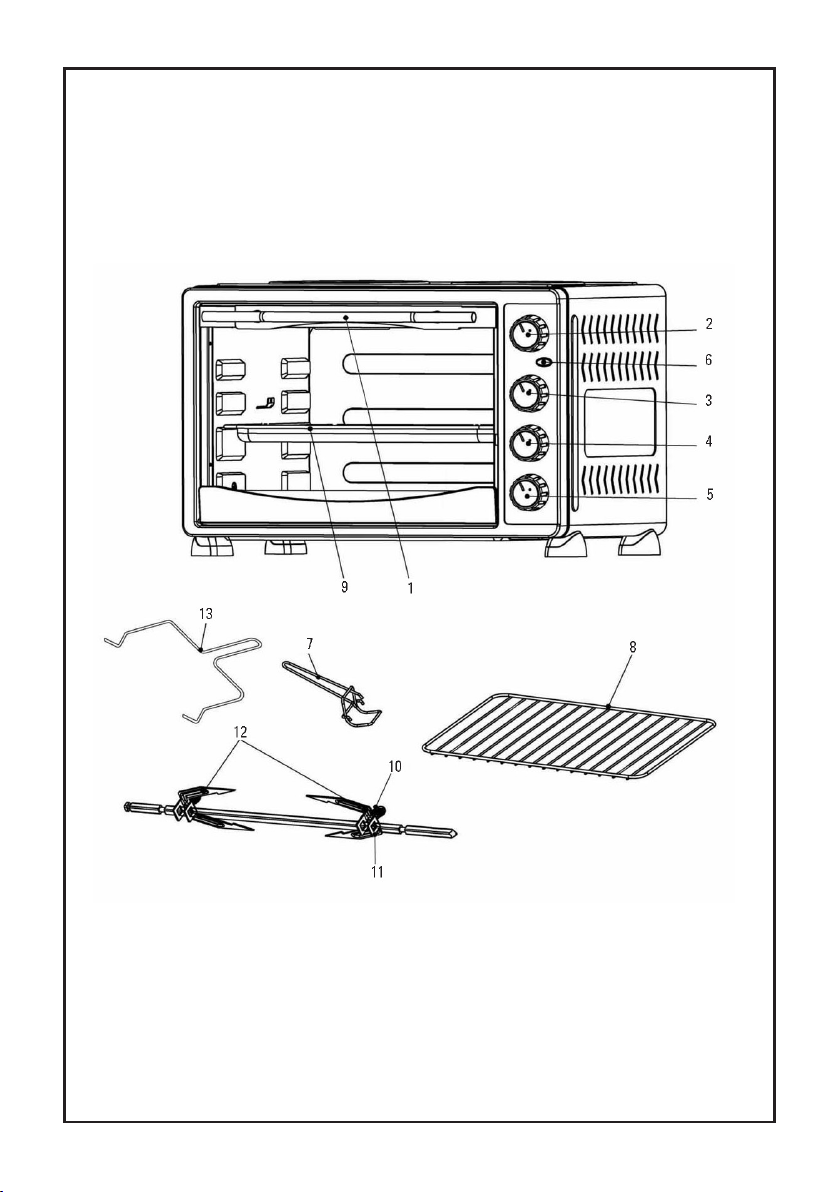
1- Poignée
2- Bouton sélecteur chaleur
tournante - rôtissoire
3- Bouton thermostat
réglable jusqu’à 230 °C
4- Bouton sélecteur mode
de cuisson
5- Minuteur
6- Indicateur lumineux
de fonctionnement
- Lire attentivement cette notice avant de mettre l’appareil
en marche, et la conserver pour la consulter ultérieurement. La non-observation et application de ces instructions peuvent entraîner un accident et annuler la garantie.
- Nettoyer toutes les parties du produit en contact avec
les aliments comme indiqué dans la partie nettoyage de
cette notice.
7- Poignée pour grille
ou lèchefrite
8- Grille
9- Lèchefrite
10- Vis
11- Vis papillon
12- Broche
13- Poignée
de tournebroche
est en fonctionnement. Prendre les
précautions nécessaires afin d’éviter
tout risque de brûlures.
- Ne jamais modifier la prise de
courant, ne pas utiliser d’adaptateur ni
de programmateur. L’appareil n’est pas
destiné à être mis en fonctionnement
au moyen d’une minuterie extérieure
ou par un système de commande à
distance séparé.
- Ne jamais utiliser l’appareil s’il est
tombé, s’il a des signes visibles de
dommages, si le cordon d’alimentation
ou la prise sont endommagés. Ils
doivent être remplacés par une
personne qualifiée, adressez-vous au
revendeur ou à notre service aprèsvente.
- Ne jamais réparer l’appareil vousmême, cela implique des risques et
vous perdriez le bénéfice de la garantie.
Comme tout appareil électrique il doit
être réparé par une personne qualifiée.

- Avant de raccorder l’appareil au secteur, s’assurer que
le voltage indiqué sur la plaque signalétique correspond
à celui du secteur. Si ce n’est pas le cas ne branchez pas
l’appareil et adressez-vous à votre revendeur.
- Il convient que l’appareil soit alimenté par l’intermédiaire
d’un dispositif à courant différentiel résiduel (DDR)
ayant un courant assigné de fonctionnement résiduel
n’excédant pas 30 mA.
- L’appareil doit être branché sur une prise de courant
reliée à la terre supportant un minimum de 16 ampères
(pour les appareils de classe I).
- Ne jamais enrouler le cordon d’alimentation autour de
l’appareil.
- Ne jamais plier le cordon d’alimentation et ne jamais
tenter de le remplacer vous-même. Adressez-vous à
votre revendeur ou à notre service après-vente.
- Ne jamais placer le cordon d’alimentation en contact
avec les parties chaudes de l’appareil.
- Ne jamais toucher l’appareil ni la prise de courant avec
les mains ou les pieds humides, ni les pieds nus.
- Ne jamais toucher l’appareil si le cordon d’alimentation
ou la prise de courant sont endommagés.
- Ne pas utiliser l’appareil s’il est tombé sur le sol, s’il a
des signes visibles de dommages ou de fuites.
- Utiliser l’appareil dans un endroit bien ventilé. Les
endroits encombrés et sombres sont propices aux
accidents.
- Ne pas placer l’appareil sur des surfaces chaudes
telles que des plaques de cuisson, des brûleurs à gaz,
appareils similaires.
- Ne pas placer l’appareil sous les rayons directs du
soleil.
- Ne pas utiliser d’aérosols lorsque l’appareil est en
fonctionnement.
- Éloigner les enfants de l’appareil lorsqu’il est en
fonctionnement et ne les laisser pas toucher l’appareil
même éteint, les surfaces chaudes peuvent causer des
brûlures.
- L’appareil ne doit pas être placé sous une prise
électrique.
- L’appareil doit être placé sur une surface horizontale,
plane et stable, pouvant supporter son poids et la chaleur
dégagée par l’appareil. Conserver un espace libre autour
de l’appareil.
- Ne jamais utiliser l’appareil a proximité de matières
inammables telles que rideaux, voilages, revêtements
muraux, meubles, etc.
- AVERTISSEMENT : an d’éviter une surchauffe et un
risque d’accident, ne jamais couvrir l’appareil lorsqu’il
est branché.
- Ne pas utiliser l’appareil à proximité d’une piscine ou de
tout point d’eau, ni dans les pièces humides telles que
les salles de bains.
- Ne pas exposer l’appareil aux intempéries, à la pluie
ou à un environnement humide. L’eau qui entre dans
l’appareil augmente le risque de choc électrique et
d’accident.
- Ne jamais plonger l’appareil dans l’eau ou tout autre
liquide.
- Ne pas utiliser l’appareil à l’extérieur, cet appareil doit
être utilisé dans un endroit sec.
- Ne pas toucher les parties mobiles de l’appareil pendant
son utilisation.
- Tenir l’appareil à l’écart de toutes sources de chaleur.
- Ne pas stocker l’appareil à l’extérieur.
- Ne pas toucher les parties chaudes et les parties
métalliques de l’appareil pendant son utilisation an
d’éviter tout risque de brûlures.
Recommandations :
- Dérouler entièrement le cordon d’alimentation avant
toutes utilisations.
- Ne pas utiliser l’appareil si ses accessoires ne sont pas
correctement installés ou ne fonctionnent pas. S’ils sont
défectueux les remplacer.
- Ne pas utiliser l’appareil si son dispositif marche/arrêt
ne fonctionne pas.
- Ne pas déplacer l’appareil pendant son utilisation,
attendre le complet refroidissement avant de le manipuler.
- Ne pas retourner l’appareil pendant son utilisation ou
lorsqu’il est branché au secteur.
- Ne pas dépasser les capacités de l’appareil.
- Ne pas faire amber les aliments sur ou dans l’appareil
ni à proximité.
- Débrancher l’appareil du secteur après utilisation et
attendre son complet refroidissement avant de le déplacer,
de le nettoyer, de remplacer un élément ou de le ranger.
- Cet appareil est destiné à un usage domestique
uniquement et non industriel ou professionnel.
- Garder l’appareil rangé dans un endroit sec et ventilé,
sans poussières et éloigné des rayons solaires. Ne pas
stocker l’appareil en position verticale.
- Ne jamais laisser l’appareil sans surveillance en cours
d’utilisation an d’éviter tout risque d’accident. Tenir les
enfants éloignés de l’appareil même éteint.
- Ne jamais stocker l’appareil dans une pièce dont la
température ambiante est inférieure à 2 °C.
- S’assurer qu’aucun objet ou poussières n’obstruent les
grilles de ventilation de l’appareil.
- Effectuer des vérications périodiques de l’étanchéité
de la porte.
- Ne jamais placer de plat, couvert ou autres ustensiles
plastiques dans le four en cours de fonctionnement.
- Garder l’intérieur du four propre an d’éviter
la carbonisation des restes de nourriture ce qui
endommagerait l’appareil.
- Ne pas utiliser l’intérieur du four à des ns de stockage.
- Prendre les précautions nécessaires lors de la mani-
pulation de récipients qui ont chauffé dans l’appareil an
d’éviter tout risque de brûlures.
- Utiliser uniquement des ustensiles appropriés pour les
fours et adaptés aux fortes températures
- Ne pas faire chauffer des œufs dans leurs coquilles
ou des œufs durs entiers, ils peuvent exploser, même
après cuisson.
- Ne pas placer d’ustensiles ou plats lourds sur la porte
du four ouverte.
- ATTENTION si la porte du four est endommagée ne
pas l’utiliser et faites-la réparer par un technicien agréé.
- Ne pas utiliser l’appareil pour sécher des animaux
domestiques ni des textiles.
- Ne pas utiliser l’appareil si la porte est ssurée ou cassée.
Français
- Veiller à ce que l’appareil soit éteint et débranché
lorsque vous quittez votre domicile.
- Mettre le thermostat sur la position Min. ne signie pas
que l’appareil est arrêté.
- Ne jamais utiliser d’autres accessoires que ceux
livrés et recommandés par le fabricant. Ceci peut être
dangereux et risque d’endommager l’appareil.
- Ne jamais utiliser le cordon d’alimentation pour lever,
transporter ou débrancher l’appareil.
- Ne jamais lever ou transporter l’appareil quand il est
chaud. Attendre le complet refroidissement avant de
manipuler l’appareil.
- Attention : il peut y avoir un risque d’accident si le
nettoyage de l’appareil n’est pas réalisé conformément
aux instructions de cette notice.
- Si pour une raison quelconque l’appareil devait
prendre feu, débranchez-le du secteur, évitez tout
courant d’air qui risquerait d’attiser le feu, étouffez
les ammes à l’aide d’un couvercle ou autres (qui ne
soient pas inammables) mais JAMAIS avec de l’eau.
- Toute utilisation inappropriée ou non conformes
aux instructions de ce manuel annule la garantie et
la responsabilité du fabricant.
Recommandations spéciques :
- Avant d’utiliser l’appareil, le placer dans un endroit
dégagé, de façon à ce que l’air puisse circuler tout
autour, notamment au dessus. Laisser un espace libre de
10 cm tout autour du four, et de 30 cm au-dessus. Veiller
à ce qu’aucun objet ne soit posé dessus.
- Ne jamais toucher les surfaces chaudes de l’appareil
an d’éviter les brûlures. Éviter en particulier les parties
métalliques et la porte qui deviennent très chaudes
pendant l’utilisation. Prendre garde pendant l’ouverture
et la fermeture de la porte.
- Prendre toutes les précautions nécessaires pour sortir
les accessoires du four lorsqu’ils sont chauds. Il est
recommandé d’utiliser la poignée fournie pour sortir
la grille ou le lèchefrite, et la poignée spéciale pour le
tournebroche.
- Lorsque l’appareil est chaud, éviter toute projection de
liquide sur la porte vitrée, qui risquerait de l’endommager.
- Débrancher l‘appareil lorsqu’il n’est pas en
fonctionnement ou pour le nettoyer. Toujours veiller à
ce que la minuterie et le bouton du thermostat soient en
position « arrêt » avant de le débrancher.
- Ne placer aucun accessoire directement sur la plaque
de sole.
- Ne jamais placer de papier, carton, plastique ou matière
similaire dans le four.
- Ne jamais tapisser quelque partie que ce soit du four
avec du papier aluminium. Ceci pourrait provoquer une
surchauffe et endommager l’appareil.
Mode d’emploi
Pour le bon fonctionnement de votre appareil
Avant la 1re utilisation, retirer tous les emballages et
lms de protection de l’appareil. nettoyer toutes les
pièces avec un chiffon humide.
Note : A la première mise en marche de l’appareil, une
légère fumée peut se produire. Celle-ci est due aux produits
employés pour la protection des résistances. Cette réaction
est parfaitement normale et n’est pas dangereuse.
Lors de la première utilisation, faire fonctionner le four à
vide pendant 10 minutes à 200 °C an de faire brûler la
graisse de protection et d’éliminer les fumées et odeurs
qui se dégagent normalement d’un appareil neuf. Aérer
la pièce pendant cette opération. Laisser refroidir et
nettoyer le four, la grille et le lèchefrite.
- Brancher l’appareil sur le secteur.
- Régler le thermostat sur la température désirée.
- Placer le sélecteur de mode de cuisson sur la fonction
souhaitée selon les aliments à cuire.
- Laisser le four préchauffer en enclenchant la minuterie.
- L’appareil se met en marche dès que la minuterie est
enclenchée. Le témoin lumineux de fonctionnement s’allume.
- Lorsque le four est chaud, placer les aliments à cuire
avec les accessoires appropriés.
- Refermer la porte du four.
- Sélectionner le temps de cuisson souhaité en tournant
le sélecteur de la minuterie.
- Lorsque le temps sélectionné est écoulé, le four s’arrête
automatiquement. Pour arrêter l’appareil manuellement
en cours de cuisson, tourner la minuterie sur 0.
- Toujours utiliser la poignée pour sortir le plat ou la grille
du four lorsqu’il est chaud.
- Éteindre toutes les commandes de l’appareil.
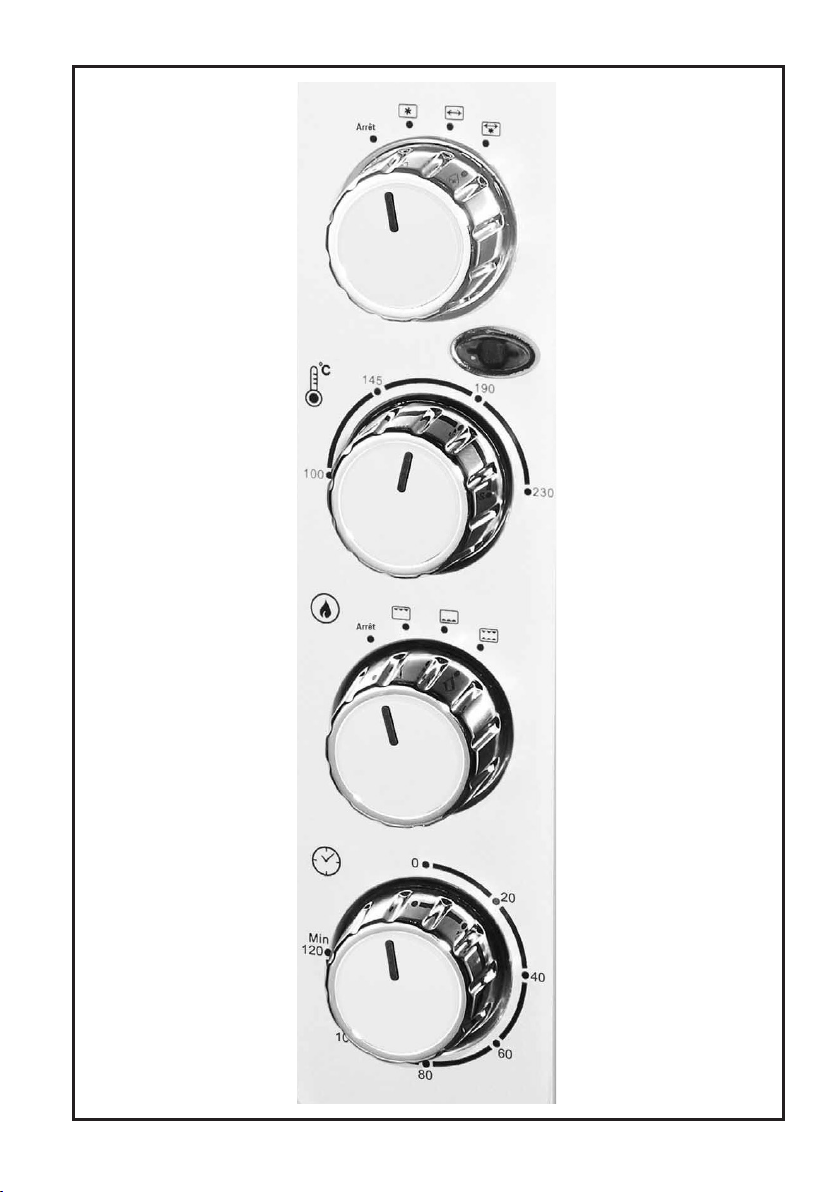
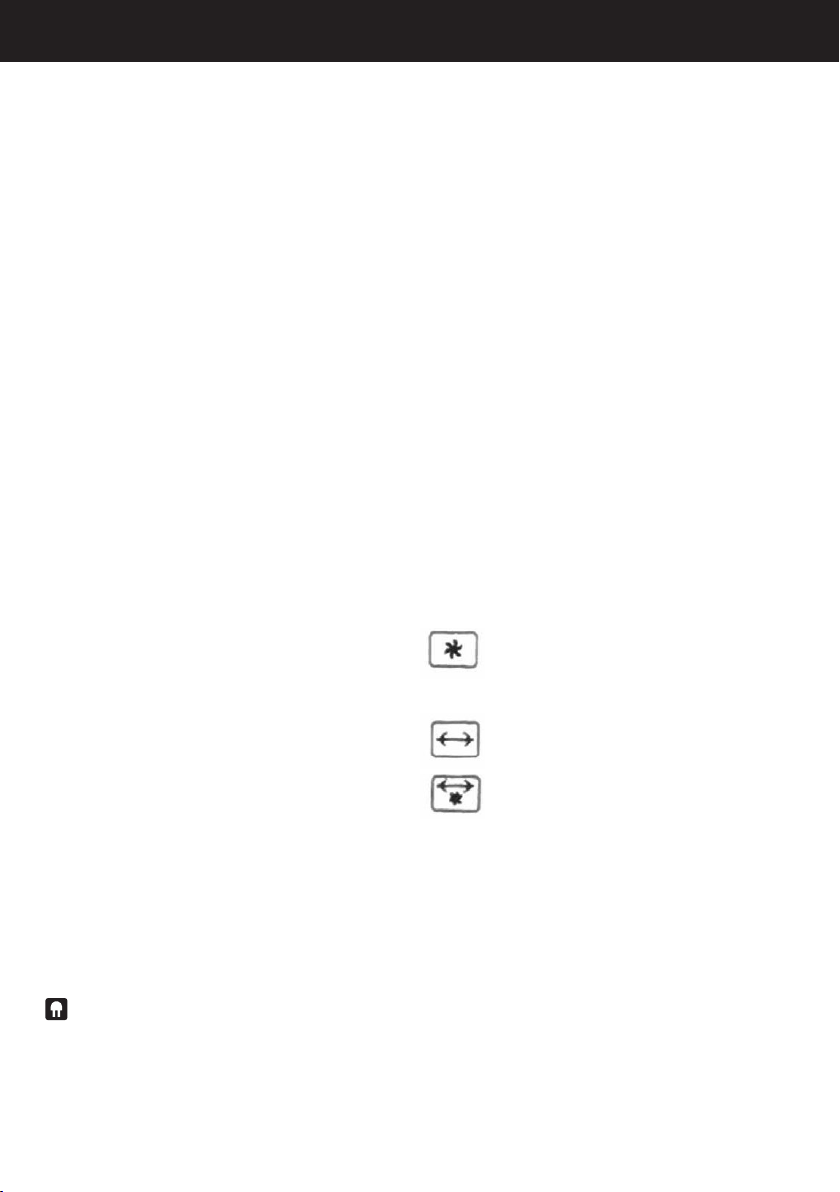
Bouton sélecteur rotisserie-chaleur tournante (Fig. 1)
ARRÊT : Position Arrêt
Chaleur tournante : le ventilateur projette la
chaleur de la résistance dans l’ensemble du
four pour cuire de façon homogène vos plats
ou bien pour cuire deux plats différents sans
mélanger les saveurs.
Rôtissoire : pour faire rôtir vos viandes. Placer
le lèchefrite en dessous du tournebroche pour
récupérer le jus de cuisson
Rôtissoire + chaleur tournante.
INDICATEUR LUMINEUX DE FONCTIONNEMENT (Fig. 1)
Il s’allume dès que le minuteur est activé. Le four est en
fonctionnement.
BOUTON THERMOSTAT FOUR (Fig. 1)
Il permet de régler la température de 100 °C à 230°C.
Vous pouvez modier la température à tout moment de
la cuisson.
Température Thermostat
Four très doux 100° - 110° 3 - 4
Four doux 110°- 150° 4 - 5
Four moyen 150°- 200° 5 - 6
Four chaud 220° 7
Four très chaud 230° 8
BOUTON MODES DE CUISSON (Fig. 1)
ARRÊT : Position arrêt
La résistance du haut se met en marche. Elle
vous permet de gratiner ou griller vos plats.
La résistance du bas se met en marche. Elle
vous permet de cuire vos plats par le dessous
ou de terminer la cuisson d’un plat qui a déjà
trop doré sur le dessus.
Voûte + sole : convection : les deux résistances
se mettent en marche simultanément.
Cela permet de cuire vos plats de façon
uniforme : pâtisseries, légumes, plats
cuisinés… Il est recommandé de placer la
grille au centre ou sur le gradin inférieur.
BOUTON MINUTEUR (Fig. 1)
Il vous permet de régler votre cuisson de 0 à 120 min.
Dès que vous activez le minuteur, le témoin lumineux
s’allume et le four est en fonctionnement. Lorsque
le temps programmé est écoulé, le four s’arrête
automatiquement.
Pour interrompre la cuisson à tout moment, ramenez le
minuteur à 0.
UTILISATION DU TOURNEBROCHE
Par exemple pour un poulet :
- Ne pas faire préchauffer le four.
- Insérer la 1re vis papillon dans la broche et la xer à
l’aide de la vis. Embrocher le poulet bien au centre du
tournebroche, insérer la 2e vis papillon et la xer à l’aide
de la vis.
- Installer le lèchefrite en position basse.
- Positionner le tournebroche en rentrant la broche sur
la droite, puis la faire coulisser pour l’enclencher sur son
support à gauche.
- Démarrer la rotation du tournebroche en sélectionnant
le mode et la durée de cuisson souhaitée.
- Régler le thermostat sur la température désirée
(température conseillée pour un poulet rôti : 210 °C).
Si une fumée excessive se produit pendant la cuisson,
réduire la température.
- Lorsque la cuisson est terminée, remettre le thermostat
et la minuterie en position 0.
- Sortir le tournebroche à l’aide de la poignée spéciale en
prenant toutes précautions utiles pour éviter les brûlures :
positionner la poignée dans les encoches. Soulever
légèrement, coulisser vers la droite pour débloquer le
tournebroche, puis sortir complètement la broche.
CHALEUR TOURNANTE
Votre four est équipé d’un ventilateur interne. Cette
fonction, appelée chaleur tournante, permet une meilleure
répartition de la chaleur dans le four.
Il est recommandé de l’utiliser pour :
- cuire et réchauffer en même temps deux plats différents
sans mélanger les saveurs
- obtenir une cuisson plus homogène, croustillante et
moelleuse
- cuire les aliments plus rapidement.
Pour utiliser la chaleur tournante :
- Allumer la chaleur tournante à l’aide du sélecteur
chaleur tournante, position .
- Pour arrêter la fonction chaleur tournante à tout
moment, tourner le sélecteur sur la position OFF.
QUELQUES CONSEILS POUR OBTENIR LES
MEILLEURS RÉSULTATS AVEC LE FOUR
- Ne pas surcharger le four.
- Dans la mesure du possible, bien placer les aliments au
centre de l’appareil.
- Ne pas ouvrir la porte trop fréquemment pendant la
cuisson pour éviter les déperditions de chaleur.
- Bien surveiller la cuisson lorsque vous testez de
nouvelles recettes.
QUELQUES CONSEILS POUR CUISINER VOS
VIANDES
Un léger dégagement de fumée fait partie du processus
qui permet de rôtir un aliment. Cependant, on peut
réduire les émissions de fumées en suivant les quelques
conseils suivants :
- Ne pas couvrir la grille avec du papier aluminium. Ceci
provoque fumées et éclaboussures en empêchant les
graisses de s’écouler. Cela nuit également à la bonne
circulation de l’air dans le four et peut l’endommager.
- Placer un récipient rempli d’eau dans le four. Ceci
permet de réduire les émissions de fumées.
- Pour de meilleurs résultats, décongeler la viande avant
de la faire cuire.
- Si la viande est très grasse, la débarrasser de ses
excédants en la coupant si nécessaire.
- Si des éclaboussures de graisse se produisent pendant
la cuisson, réduire la température à l’aide du thermostat.
- An d’éviter l’accumulation des graisses qui provoque
irrémédiablement de désagréables fumées, veiller à
nettoyer le four après chaque utilisation. Utiliser une
éponge non abrasive et de l’eau chaude.

Français
Nettoyage
Ce four est équipé de parois intérieures autonettoyantes,
à partir de 200 °C lors de la cuisson les graisses sont
détruites.
- Par précaution il est conseillé tout de même, d’utiliser
une éponge humide.
- Cet appareil a été conçu pour vous apporter un
maximum de sécurité. Cependant, il est important de
le maintenir parfaitement propre, débarrassé de toute
graisse ou particules de nourriture.
Attention : les micro-pores des parois intérieures sont
sensibles au sucre.
Spécications techniques
MF 343 MF 344 MF 449 MF 448 MF 447 MF 62 MF63
Puissances (W)
Capacité (L)
Classe
Température de
fonctionnement
Dimension
Produit (LHP)
Poids Produit
1500 1500 2000 2000 2000 2200 2200
34 34 45 45 45 55 55
I I I I I I I
230 °C
Max.
51,2 x 32,2
x 39,3 cm
230 °C
Max.
51,2 x 32,2
x 39,3 cm
230 °C
Max.
53,6 x 35,6
x 40 cm
6,6 kg 6,6 kg 9,09 kg 9,09 kg 9,09 kg 9,7 kg 9,7 kg
- Toujours débrancher l’appareil et le laisser refroidir
avant de le nettoyer.
- Retirer la grille et les accessoires.
- Pour nettoyer la vitre, utiliser un produit spécial vitrages
ou un chiffon humide. Sécher à l’aide d’un chiffon.
- Pour nettoyer les parois extérieures, utiliser un chiffon
humide. En cas de tâche résistante, employer une
solution non abrasive ou du produit de nettoyage pour
vitres. Rincer et essuyer avec un chiffon sec. Ne jamais
employer de tampons métalliques qui pourraient abîmer
la surface du four.
- Les accessoires peuvent se nettoyer de façon classique
comme tous les ustensiles de cuisine.
230 °C
Max.
53,6 x 35,6
x 40 cm
230 °C
Max.
53,6 x 35,6
x 40 cm
230 °C
Max.
57,3 x 36,1
x 47,2 cm
230 °C
Max.
57,3 x 36,1
x 47,2 cm
Écologie et recyclage du produit
Au terme de sa durée de vie, ce produit ne doit
pas être éliminé avec les ordures ménagères
mais doit être remis à un point de collecte
destiné au recyclage des appareils électriques
et électroniques. Le symbole gurant sur le
produit, la notice d’utilisation ou l’emballage vous indique
cela. Les matériaux sont recyclables conformément à leur
marquage.
Vous apporterez une large contribution à la protection de
l’environnement par le biais du recyclage, de la réutilisation matérielle ou par les autres formes de réutilisation des
appareils usagés. Veuillez vous adresser à votre municipalité pour connaître la déchetterie compétente.
Cet appareil est conforme à la directive 2006/95/ EC sur
la basse tension, la directive 2004/108/ EC sur la compatibilité électromagnétique et la directive 2011/65/ EC
sur les restrictions de l’utilisation de certaines substances
dangereuses dans les équipements électriques et électroniques.

“LIMA” MULTIFUNCTION OVEN
MF 343 / MF 344 / MF 449 / MF 448 / MF 447 / MF 62
/ MF 63
Dear customer,
Many thanks for choosing to purchase a White and Brown
brand product.
Thanks to its technology, design and operation and the
fact that it exceeds the strictest quality standards, a fully
satisfactory use and long product life can be assured.
Description
1- Handle
2- Fan oven - grill selector
knob
3- Temperature knob up to
230ºC
4- Cooking mode selector
knob
5- Timer
6- Oven on light
7- Grill or frying pan
handle
8- Grill
9- Frying pan
10- Bolt
11- Buttery screw
12- Spike
13- Spit handle
- Read this instruction manual carefully before starting
the appliance and store it for future reference. Failure to
observe and comply with these instructions may lead to
an accident.
- Clean all the parts of the product that will be in contact
with food, as indicated in the cleaning section, before use.
Tips and safety measures
- This appliance can be used by people
unused to its handling, disabled people
or children aged from 8 years and above
if they have been given supervision
or instruction concerning use of the
appliance in a safe way and understand
the hazards involved. Cleaning and
maintenance to be performed by the
user must not be carried out by children
under 8 without adult supervision.
- This appliance is not a toy. Children
should be supervised to ensure that
they do not play with the appliance.
- Keep the appliance and its cable out of
reach of children under the age of eight.
- The temperature of the accessible
surfaces and door of the appliance may
be high when the oven is switched on.
Take all necessary precautions to avoid
potential burn risks.
- Never modify the electrical socket, or
use adapters, programmers or electrical
extension cords
- Never use the appliance if it has fallen,
if there are visible signs of damage,
or if the power cable or the socket
is damaged. This appliance must be
repaired by a qualified operator in the
same way as any electronic appliance
- Do not attempt to repair the appliance
yourself, as this could be dangerous
and this may void the manufacturer’s
warranty. This appliance must be
repaired by a qualified operator in the
same way as any electronic appliance

English
- Prior to connecting the appliance to the mains supply,
check that the voltage indicated on the rating plate
corresponds with that of the mains voltage. If not, do not
connect the appliance and contact your dealer
- The appliance should be powered through a residual
current device (RCD) with an assigned residual
operational current no greater than 30 mA
- Connect the appliance to a socket provided with
earthing and that can withstand 16 amps (for class I
appliances).
- Do not wrap the cable around the appliance.
- Never bend the power chord or try to replace it yourself.
Contact your distributor or our aftersales service.
- Never allow the power chord to come into contact with
the hot parts of the appliance.
- Do not touch the appliance or the socket with wet feet or
hands wet, or with bare feet.
- Do not use the appliance if the power cable or socket
are damaged
- Do not use the appliance if it has fallen on the oor, if
there are visible signs of damage or if it has a leak.
- Use the appliance in a well-ventilated place. Accidents
are more likely to happen in poorly-lit places.
- Do not place the appliance on hot surfaces, such as
cooking plates, gas burners, ovens or similar.
- Do not place the appliance in direct sunlight.
- Do not use aerosols while the appliance is switched on.
- Keep children away from the appliance while it is in use
and do not allow them to touch it even when switched off,
as hot surfaces can cause burns.
- Do not place the appliance underneath a plug
- Place the appliance on a at, stable surface capable of
withstanding its weight and the heat given off. Leave a
free space all around the appliance.
- Do not use the appliance near combustible materials
such as curtains, drapes, wall hangings, furniture, etc.
- WARNING: in order to avoid overheating and a possible
risk of an accident, do not cover the appliance when
connected
- Do not use the appliance in the vicinity of a pool or any
water point, or in wet rooms such as bathrooms
- Do not expose the appliance to high temperatures or
leave outdoors, in the rain or in wet environments. Any
water that enters the appliance will increase the risk of
electric shock
- Do not submerge the appliance in water or any other
liquid, or place it under a running tap.
- Do not use the appliance outdoors as it must always be
used in a dry place.
- Do not touch any of the appliance’s moving parts while
it is operating.
- Keep the appliance away from heat sources and sharp
edges.
- Do not store the appliance outdoors
- Do not touch the heated or metal parts of the appliance
while it is in use as this may cause burns.
Recommendations :
- Fully unroll the appliance’s power cable before each
use.
- Do not use the appliance if its accessories are not
correctly t or are not working correctly. Replace these
if they are faulty.
- Do not use the appliance if the on/off button is not
working.
- Do not move the appliance during use, wait for it to cool
down completely before moving it.
- Do not turn the appliance round while it is in use or
plugged in.
- Do not exceed the appliance’s capacity.
- Do not cook ambé food on top of, inside or close to
the appliance.
- Unplug the appliance after use and wait for it to cool
down completely before moving, cleaning or putting it
away or changing any of its components.
- This appliance is for household use only, not professional
or industrial use.
- Keep the appliance in a dry, well-ventilated place, free
of dust and protected from direct sunlight. Do not store
the appliance vertically.
- In order to avoid possible risk of accidents, never leave
the appliance running without supervision. Keep children
away from the appliance even when it is switched off.
- Do not store the appliance on areas where the
temperature could be lower than 2ºC.
- Make sure that dust, dirt or other foreign objects do not
block the fan grill on the appliance.
- Periodically check that the door is sealing correctly.
- Never place plastic plates, cutlery or other utensils
inside the oven while it is in use.
- Keep the inside of the oven clean in order to avoid
the charring of food remains which could damage the
appliance.
- Do not store objects inside the oven.
- Take the necessary precautions when handling dishes
that have been heated in the appliance to avoid potential
burn risks.
- Only use utensils that are suitable for ovens and which
can withstand high temperatures.
- Do not heat eggs inside their shells or whole boiled eggs
as they may explode, even after cooking.
- Do not lean heavy utensils or plates against the open
door of the oven.
- WARNING: if the oven door is damaged do not use the
appliance. Please contact the technical service to get it
repaired.
- Do not use the appliance to dry pets or clothing.
- Do not use the appliance if the door is cracked or
broken.
- Check that the appliance is switched off and unplugged
when leaving the house.
- Turn the thermostat control to the minimum (MIN)
setting. This does not mean that the appliance is switched
off permanently.
- Only use the accessories provided and recommended
by the manufacturer as the use of other accessories may
be dangerous and may damage the appliance.
- Never use the electric wire to lift up, carry or unplug
the appliance.
- Do not lift or transport the appliance while it is hot.
Wait for the appliance to cool down completely before
moving it.

- WARNING: Always follow the instructions in this manual
to clean the appliance as not doing so may lead to
accidents occurring.
- If for any reason the appliance is on re, immediately
disconnect it from the mains, ensure there is no
presence of air currents that could stoke the re and
put out the ames with the help of a lid, or other nonammable items, NEVER using water.
- Any misuse or failure to follow the instructions for
use renders the guarantee and the manufacturer’s
liability null and void.
Specic recommendations:
- Before using the appliance, place it in a clear space,
so air can circulate around it, especially above the
appliance. Leave a space of 10cm around the oven and
30cm below. Check that there is no object underneath it.
- In order to avoid possible burns, do not touch the hot
surfaces of the appliance. Overall, avoid touching the
metal parts of the appliance and the door, which can get
very hot when the appliance is in use.
- Take the necessary precautions when opening and
closing the door.
- Take the necessary precautions in removing the oven’s
accessories when these are hot. We recommend using
the handle provided to remove the grill and frying pan and
the special handle provided to remove the spit.
- Avoid the glass door getting splashed while the
appliance is hot as this may damage it.
- Unplug the appliance when not in use and before
carrying out any cleaning. Always check that the timer
and the thermostat dial are in the «stop» position before
plugging the appliance in again.
- Do not place any accessory directly on the bottom plate
of the oven.
- Do not place any objects made of paper, cardboard,
plastic or similar materials inside the oven.
- Never cover any part of the oven in aluminium foil as
this may cause overheating and damage the appliance.
Instructions for use
For proper functioning of appliance
Before using the product for the rst time, remove
all packaging and protective elements from the
appliance and clean all the parts with a wet cloth.
Warning: The appliance may give off a small amount of
smoke the rst time you use it. This is due to the products
used to protect the elements. This is perfectly normal and
completely harmless.
Before using the oven for the rst time, run it for 10 minutes
at 200ºC to burn off the protective grease and eliminate
the smoke and odours given off by the appliance when it is
new. Ventilate the room during said operation. Let the oven
cool down and clean it together with the grill and frying pan.
- Plug the oven in.
- Set the thermostat to the desired temperature.
- Use the dial to select the cooking mode depending on the
food you wish to cook.
- Preheat the oven by setting the timer.
- The appliance will come on when the timer is set. The oven
on light will light up.
- Once the oven is hot, place the food you wish to cook
inside with the appropriate accessories.
- Close the oven door.
- Select the desired cooking time by turning the timer knob.
- Once the amount of time selected has passed, the oven
will switch off automatically. To stop the appliance manually
during cooking, set the timer knob to 0.
- Always use the handle to remove the dish or grill from the
oven when hot.
Switch off all the appliance’s controls.
Spit-oven selector knob (Fig. 1)
STOP: Stop position
Fan oven: the fan circulates the heat produced
by the element all around the oven to cook
the dishes uniformly or to cook two different
dishes without mixing the avours.
Spit: to roast food. Place the frying pan below
the spit to collect the cooking juices.
Spit and oven
OVEN ON LIGHT (Fig. 1)
This comes on when the timer is set. The oven is on.
OVEN TEMPERATURE KNOB (Fig. 1)
Allows you to adjust the temperature from 100ªC up to
230ºC. The temperature may be modied at any time
during cooking.
Temperature Thermostat
Oven warm 100° - 110° 3 - 4
Oven very warm 110°- 150° 4 - 5
Oven on medium 150°- 200° 5 - 6
Oven hot 220° 7
Oven very hot 230° 8
COOKING MODE SELECTOR KNOB (Fig. 1)
STOP: Stop position
The element at the top heats up. This is to
toast or grill food.
The element at the bottom heats up. This
allows you to cook food from underneath or
nish cooking a dish that is already too cooked
on top.
Top element + bottom plate Fan oven: the two
elements come on at the same time.
This allows you to cook dishes uniformly:
pies, vegetables, cooked dishes, etc. We
recommend placing the grill in the middle or
on the lower level.

English
TIMER KNOB (Fig. 1)
Allows you to set the cooking time for 0 to 120 minutes.
When you set the timer, the light will come on and the
oven will start to heat up. Once the amount of time set
has passed, the oven will switch off automatically.
To stop cooking at any time, turn the timer dial back to 0.
USING THE SPIT
e.g., to roast a chicken:
- Do not preheat the oven.
- Position the rst buttery bolt on the skewer and x it
in place using a screwdriver. Stick the spit through the
middle of the chicken then position the second buttery
screw on the spit and x it in place using a screwdriver.
- Place the frying pan below.
- Insert the spit by inserting the right end rst then sliding
it in to insert the left end.
- Start the spit turning by selecting the desired cooking
mode and cooking time.
- Set the thermostat to the desired temperature
(recommended temperature for a roast chicken: 210°C).
If the appliance gives off excessive smoke during cooking,
lower the temperature.
- When cooking is nished, turn the thermostat and the
timer back to 0.
- Remove the spit using the special handle, taking the
necessary precautions to avoid possible burns: position
the handle in the grooves. Gently lift the spit, sliding it
to the right to release it and then take the skewer out
completely.
FAN OVEN:
This oven is equipped with an internal fan. This function,
called convection cooking, allows the heat to be better
distributed inside the oven.
We recommend using this function for:
- cooking and reheating two different dishes at the same
time without mixing the avours.
- cooking food more uniformly and make food more
crunchy and uffy.
- cooking food more quickly
To use the fan:
- Turn the fan on by setting the mode dial to the correct
position
- To stop the fan function at any time, position the knob
in the OFF position.
RECOMMENDATIONS TO OBTAIN OPTIMUM
RESULTS FROM THE OVEN.
- Do not overload the oven.
- Place food in the middle of the appliance insofar as this
is possible.
- Open the door as little as possible during cooking to
avoid loss of heat.
- Supervise cooking when trying new recipes.
RECOMMENDATIONS FOR COOKING
During the food cooking process it is normal for a small
amount of smoke to be produced. However, these
smoke emissions can be reduced by following these
recommendations:
- Do not cover the grill with foil as this causes smoke and
splashing, preventing grease from draining off. It also
prevents the correct circulation of air inside the oven,
which may damage the appliance.
- Place a dish full of water in the oven. This can reduce
smoke emissions.
- For the best results, defrost meat before cooking it.
- If the meat is very fatty, cut the excess fat off if
necessary.
- If the fat starts to splatter during cooking, lower the
temperature of the thermostat.
- In order to avoid an accumulation of fat that will
inevitably cause unpleasant smoke to be given off, try
to clean the oven after every use. To do this use a nonabrasive sponge with hot water.

Cleaning
This oven is equipped with self-cleaning internal walls:
from a cooking temperature of 200ºC upwards, fat is
eliminated.
- As a precaution, we recommend using a wet sponge.
- This appliance has been designed to work in maximum
safety. However, it’s important to keep it clean and free
of grease and particles of dirt.
Warning: the micropores of the internal walls are
sensitive to sugar.
- Always unplug the appliance and leave it to cool down
before performing any cleaning.
Technical specications
MF 343 MF 344 MF 449 MF 448 MF 447 MF 62 MF63
Power (W)
Capacity (L)
Class
Operating
temperature
Product Size
(LHD)
Product Weight
1500 1500 2000 2000 2000 2200 2200
34 34 45 45 45 55 55
I I I I I I I
230 °C
Max.
51,2 x 32,2
x 39,3 cm
230 °C
Max.
51,2 x 32,2
x 39,3 cm
230 °C
Max.
53,6 x 35,6
x 40 cm
6,6 kg 6,6 kg 9,09 kg 9,09 kg 9,09 kg 9,7 kg 9,7 kg
- Remove the grill and accessories.
- To clean the glass, use a special product for glass or a
wet cloth. Dry with a cloth.
- Use a wet cloth to clean the outside. For more resistant
stains, use a non-abrasive solution or glass cleaning
products. Rinse and then dry with a cloth. Never use
metal scourers as these may damage the surface of the
oven.
- The accessories may be cleaned normally in the same
way as any other kitchen utensil.
230 °C
Max.
53,6 x 35,6
x 40 cm
230 °C
Max.
53,6 x 35,6
x 40 cm
230 °C
Max.
57,3 x 36,1
x 47,2 cm
230 °C
Max.
57,3 x 36,1
x 47,2 cm
Ecology and recyclability of the product
Once the product’s working life has ended, take
it to an authorised waste agent for the selective
collection of Waste from Electric and Electronic
Equipment as indicated in the symbol appea-
ring on the product, the instruction manual or
the packaging. The materials from which the product is
composed are recyclable depending on their respective
markings.
In this way, it greatly contributes to the protection of the
environment through recycling, material reuse or through
other means of reuse of used appliances. Check with your
town hall to nd out the corresponding container for each
type of product.
This appliance complies with Directive 2006/95/EC on
Low Voltage, Directive 2004/108/EC on Electromagnetic
Compatibility, Directive 2011/65/EC on the restrictions of
the use of certain hazardous substances in electrical and
electronic equipment.

Español
HORNOS MULTIFUNCIONES “LIMA”
MF 343 / MF 344 / MF 449 / MF 448 / MF 447 / MF 62 /
MF 63
Distinguido cliente,
Le agradecemos que se haya decidido por la compra de
un producto de la marca White and Brown.
Su tecnología, diseño y funcionalidad, junto con el
hecho de superar las más estrictas normas de calidad
le comportarán total satisfacción durante mucho tiempo. - Leer atentamente este manual de instrucciones antes de
Descripción
1- Asa
2- Botón selector
convección - asador
3- Botón termostato
regulable hasta 230 °C
4- Botón selector modo de
cocción
5- Minutero
6- Indicador luminoso de
funcionamiento
poner en marcha el aparato y conservarlo para futuras consultas. La no observación y aplicación de las presentes instrucciones pueden comportar como resultado un accidente.
- Antes del primer uso, limpiar todas las partes del producto que puedan estar en contacto con alimentos, procediendo tal como se indica en el apartado de limpieza.
7- Empuñadura para
parrilla o sartén para
freír
8- Parrilla
9- Sartén para freír
10- Tornillo
11- Tornillo de mariposa
12- Alcayata
13- Empuñadura del
espetón
- La temperatura de las superficies
Consejos y medidas de seguridad
- Este aparato pueden utilizarlo niños
con edad de 8 años y superior y
personas con capacidades físicas,
sensoriales o mentales reducidas o falta
de experiencia y conocimiento, si se les
ha dado la supervisión o formación
apropiadas respecto al uso del aparato
de una manera segura y comprenden
los peligros que implica. La limpieza
y el mantenimiento a realizar por el
usuario no deben realizarlos los niños
menores de 8 años sin la supervisión
de un adulto.
- Este aparato no es un juguete.
Los niños deben estar siempre bajo
vigilancia para evitar que jueguen con
el aparato.
- Guardar el aparato y el cable de
corriente fuera del alcance de los niños
menores de 8 años.
accesibles y de la puerta del aparato
puede ser elevada cuando el aparato
está en funcionamiento. Tomar las
precauciones necesarias para evitar
posibles riesgos de quemaduras.
- Nunca modificar la clavija. No
usar adaptadores de clavija ni
programadores. No usar el aparato
asociado a un temporizador externo u
otro dispositivo de mando a distancia.
- No utilizar nunca el aparato si ha
caído, si hay señales visibles de daños,
o si el cable de alimentación o la toma
están dañados. Debe reemplazarlos
un operario cualificado, contacte con
su distribuidor o con nuestro servicio
posventa.
- No intente reparar el aparato usted
mismo, ya que puede existir peligro
y anularía la garantía del fabricante.
Como cualquier aparato eléctrico, debe
ser reparado por un operario cualificado.

- Antes de conectar el aparato a la corriente, asegurarse
de que el voltaje indicado en la placa de características
coincide con el voltaje de red. Si no es así, no conecte el
aparato y consulte con su distribuidor.
- Se recomienda que el aparato esté alimentado a través
de un dispositivo diferencial de corriente residual (DDR)
cuya corriente asignada de funcionamiento residual no
exceda los 30.
- Conectar el aparato a una base de toma de corriente
provista de toma de tierra y que soporte como mínimo 16
amperios (para los aparatos de la clase I).
- No enrollar el cable eléctrico de conexión alrededor
del aparato.
- No doblar nunca el cable eléctrico de conexión ni
intentar reemplazarlo uno mismo. Contacte con su
distribuidor o con nuestro servicio posventa.
- No dejar nunca el cable de alimentación en contacto
con las partes calientes del aparato.
- No tocar nunca el aparato ni la toma de corriente con
las manos o los pies húmedos, ni con los pies descalzos.
- No utilizar el aparto si el cable de alimentación o la toma
de corriente están dañados.
- No utilizar el aparato si ha caído, si hay señales visibles
de daños, o si existe fuga.
- Usar el aparato en una zona bien ventilada. Las zonas
sombrías son más propensas a sufrir accidentes.
- No situar el aparato sobre supercies calientes como
placas de cocción, quemadores de gas y aparatos similares.
- No dejar el aparato en contacto directo con los rayos
de sol.
- No emplear aerosoles con el aparato en marcha.
- Mantener a los niños alejados del aparato mientras
esté en funcionamiento y no dejar que lo toquen aunque
esté apagado, ya que las supercies calientes pueden
ocasionar quemaduras.
- No situar el aparato bajo un enchufe.
- Situar el aparato sobre una supercie plana y estable
capaz de resistir su peso y el calor que desprende el
aparato. Dejar un espacio libre alrededor del aparato.
- No utilizar el aparato cerca de materiales combustibles,
tales como cortinas, cortinajes, revestimientos murales,
muebles, etc.
- ADVERTENCIA: a n de evitar un sobrecalentamiento
y un posible riesgo de accidente, no cubrir el aparato
cuando esté conectado.
- No utilizar el aparato en las inmediaciones de una
piscina o de cualquier punto de agua, ni en habitaciones
húmedas como cuartos de baño.
- No exponer el aparato a temperaturas extremas ni a la
intemperie, la lluvia o ambientes húmedos. El agua que
entre en el aparato aumentará el riesgo de choque eléctrico.
- No sumergir el aparato en agua u otro líquido, ni ponerlo
bajo el grifo.
- No utilizar el aparato en exteriores, ya que debe usarse
siempre en un lugar seco.
- No tocar las partes móviles del aparato en marcha.
- Mantener el aparato lejos de fuentes de calor.
- No guardar el aparato en el exterior.
- No tocar las partes calefactadas y las partes metálicas
del aparato cuando está en funcionamiento, ya que
puede provocar quemaduras.
Recomendaciones:
- Antes de cada uso, desenrollar completamente el cable
de alimentación del aparato.
- No usar el aparato si sus accesorios no están
debidamente acoplados o no funcionan correctamente.
Reemplazarlos si presentan defectos.
- No utilizar el aparato si su dispositivo de marcha/paro
no funciona.
- No desplazar el aparato durante su uso, esperar que se
enfríe completamente antes de manipularlo.
- No dar la vuelta al aparato mientras está en uso o
conectado a la red.
- No exceder la capacidad del aparato.
- No amear alimentos sobre el aparato, ni dentro o cerca
del mismo.
- Desconectar el aparato después de su uso y esperar que
se enfríe completamente antes de desplazarlo, limpiarlo,
cambiar alguno de sus componentes o guardarlo.
- Este aparato está pensado para un uso doméstico, no
para uso profesional o industrial.
- Guardar el aparato en un lugar seco y bien ventilado,
sin polvo y protegido de los rayos de sol. No guardar el
aparato en posición vertical.
- A n de evitar un posible riesgo de accidente, no dejar
nunca el aparato funcionando sin vigilancia. Mantener
a los niños alejados del aparato aunque esté apagado.
- No guardar el aparato en lugares donde la temperatura
ambiente pueda ser inferior a 2ºC.
- Vericar que las rejas de ventilación del aparato no
queden obstruidas por polvo, suciedad u otros objetos.
- Comprobar periódicamente el perfecto estado de la
junta de estanqueidad de la puerta.
- No introducir nunca platos, cubiertos y otros utensilios
de plástico en el horno mientras esté en funcionamiento.
- Mantener limpio el interior del horno con tal de evitar
la carbonización de los restos de alimentos que podría
dañar el aparato.
- No almacenar objetos en el interior del horno.
- Tomar las precauciones necesarias al manipular
recipientes que han sido calentados en el aparato para
evitar posibles riesgos de quemaduras.
- Utilizar solamente utensilios apropiados para hornos
apropiados soportar altas temperaturas.
- No calentar huevos dentro de sus cáscaras o huevos
duros enteros, ya que pueden explosionar, incluso
después de la cocción.
- No apoyar utensilios o platos pesados sobre la puerta
del horno abierta.
- ATENCIÓN: si la puerta del horno está dañada no
utilizar el aparato y contactar con el servicio técnico para
su reparación.
- No utilizar el aparato para secar mascotas ni prendas
de ropa.
- No utilizar el aparato si la puerta presenta suras o
está rota.
- Comprobar que el aparato esté apagado y desconectado
de la corriente al salir de casa.
- El hecho de situar el mando termostato a la posición de
mínimo (MIN), no garantiza la desconexión permanente
del aparato.
- Utilizar solamente los accesorios suministrados y

Español
recomendados por el fabricante. Ya que podría ser
peligroso y podría dañarse el aparato.
- Nunca usar el cable eléctrico para levantar, transportar
o desenchufar el aparato.
- No levantar o transportar el aparato mientras esté
caliente. Esperar que el aparato se enfríe completamente
antes de manipularlo.
- ATENCIÓN: Seguir siempre las indicaciones de este
manual para limpiar el aparato, ya que en caso contrario
existiría riesgo de accidente.
- Si por cualquier motivo el aparato se incendia,
desconectarlo inmediatamente de la corriente, evitar
la presencia de corrientes aire que puedan atizar el
fuego y apagar las llamas con la ayuda de una tapa
u otros elementos no inamables, pero NUNCA con
agua.
- Toda utilización inadecuada, o en desacuerdo
con las instrucciones de uso, puede comportar
peligro, anulando la garantía y la responsabilidad
del fabricante.
Recomendaciones especícas:
- Antes de utilizar el aparato, situarlo en una zona despejada, para que aire pueda circular alrededor, sobre todo
por encima. Dejar un espacio de 10 cm alrededor del
horno, y 30 cm por debajo. Comprobar que no quede
ningún objeto debajo.
- A n de evitar posibles quemaduras, no tocar nunca las
supercies calientes del aparato. Evitar sobre todo tocar
las partes metálicas del aparato y la puerta, que pueden
estar muy calientes cuando el aparato está en funcionamiento. Prestar especial atención a la hora de abrir y cerrar la puerta.
- Tomar todas las precauciones necesarias para quitar
los accesorios del horno cuando estén calientes. Se recomienda utilizar la empuñadura suministrada para retirar
la parrilla o la sartén para freír, y la empuñadura especial
para el espetón.
- Evitar que se produzcan salpicaduras sobre la puerta
de cristal mientras el aparato está caliente, ya que podría
resultar dañada.
- Desconectar el aparato cuando no lo utilice o antes de
llevar a cabo cualquier operación de limpieza. Comprobar
siempre que el minutero y el botón del termostato estén
en posición de “paro” antes de volver a conectar el aparato.
- No situar ningún accesorio directamente sobre la placa
de crisol.
- No introducir nunca objetos de papel, cartón, plástico o
materiales similares dentro del horno.
- No tapizar nunca ninguna parte del horno con papel de
aluminio. ya que ello podría provocar un sobrecalentamiento y dañar el aparato.
Modo de empleo
Para el buen funcionamiento del aparato
Antes de utilizar el producto por primera vez, retirar
todos los embalajes y protecciones del aparato y
limpiar todas las piezas con un paño húmedo.
Atención: Al poner en marcha el aparato por primera
vez puede desprender un ligero humo. Esto se debe a los
productos empleados para la protección de las resistencias.
Este fenómeno es perfectamente normal e inocuo.
Antes del primer uso, hacer funcionar el horno vacío
durante 10 minutos a 200º C para quemar la grasa
de protección y eliminar los humos y olores que suele
desprender un aparato nuevo. Ventilar la habitación durante
dicha operación. Dejar que el horno se enfríe y limpiarlo
junto con la parrilla y la sartén para freír.
- Conectar el aparato a la corriente.
- Programar el termostato a la temperatura deseada.
- Situar el selector del modo de cocción en la función
deseada en función de los alimentos que desee cocer.
- Precalentar el horno poniendo en marcha el minutero.
- El aparato se pondrá en marcha al encender el minutero.
El indicador luminoso de funcionamiento se encenderá.
- Cuando el horno esté caliente, introducir los alimentos que
desee cocer con los accesorios apropiados.
- Volver a cerrar la puerta del horno.
- Seleccionar el tiempo de cocción deseado girando el
selector del minutero.
- Al agotarse el tiempo seleccionado, el horno se detendrá
automáticamente. Para parar el aparato manualmente
durante la cocción, situar el minutero a 0.
- Utilizar siempre la empuñadura para retirar el plato o la
parrilla del horno cuando esté caliente.
- Apagar todos los comandos del aparato.
Botón selector de asador-convección (Fig. 1)
PARO: Posición paro
Convección: el ventilador proyecta el calor de
la resistencia al conjunto del horno para cocer
de un modo homogéneo los platos o bien
para cocer dos platos diferentes sin mezclar
los sabores.
Asador: para asar las comidas. Situar la
sartén para freír debajo del espetón para
recoger los jugos de cocción.
Asador + convección
INDICADOR LUMINOSO DE FUNCIONAMIENTO (Fig. 1)
Se ilumina al activar el minutero. El horno está en
funcionamiento.
BOTÓN TERMOSTATO HORNO (Fig. 1)
Permite ajustar la temperatura de 100 ºC a 230 ºC. La
temperatura puede modicarse en cualquier momento
durante la cocción.
Température Thermostat
Horno muy templado 100° - 110° 3 - 4
Horno templado 110°- 150° 4 - 5
Horno medio 150°- 200° 5 - 6
Horno caliente 220° 7
Horno muy caliente 230° 8

SELECTOR MODOS DE COCCIÓN (Fig. 1)
PARO: Posición paro
La resistencia de arriba se pone en marcha.
Permite gratinar o asar la comida.
La resistencia de abajo se pone en marcha.
Permite cocer la comida por debajo o
Terminar la cocción de un plato que ya está
demasiado dorado por arriba.
Bóveda + crisol Convección: las dos
resistencias se ponen en marcha al mismo
tiempo.
De este modo se pueden cocer los platos de
manera uniforme: pasteles, legumbres, platos
cocinados… Se recomienda situar la parrilla
en el centro o sobre el escalón inferior.
BOTÓN MINUTERO (Fig. 1)
Permite regular el tiempo de cocción de 0 a 120 minutos.
Al activar el minutero, el testigo luminoso se
encenderá y el horno se pondrá en funcionamiento. Al
agotarse el tiempo programado, el horno se detendrá
automáticamente.
Para interrumpir la cocción en cualquier momento, situar
de nuevo el minutero a 0.
USO DEL ESPETÓN
Por ejemplo para asar un pollo:
- No precalentar el horno.
- Introducir el primer tornillo de mariposa en la brocheta y
jarla con la ayuda de un destornillador. Ensartar el pollo
en el centro del espetón, introducir el segundo tornillo
de mariposa y jarlo con la ayuda de un destornillador.
- Situar la sartén para freír debajo.
- Colocar el espetón introduciendo la brocheta por la
derecha y seguidamente deslizarla para acoplarla a su
soporte izquierdo.
- Iniciar la rotación del espetón seleccionando el modo
y la duración de la cocción deseada.
- Situar el termostato a la temperatura deseada
(temperatura aconsejada para un pollo asado: 210 °C).
Si el aparato desprende un homo excesivo durante la
cocción, bajar la temperatura.
- Al terminar la cocción, volver a situar el termostato y el
minutero a la posición 0.
- Retirar el espetón con la ayuda de la empuñadura
especial tomando las precauciones necesarias para
evitar posibles quemaduras: situar la empuñadura en
las muescas. Levantarla ligeramente, deslizarla hacia la
derecha para desbloquear el espetón y nalmente sacar
completamente la brocheta.
CONVECCIÓN:
Este horno está equipado con un ventilador interno.
Esta función, llamada convección, permite una mejor
repartición del calor dentro del horno.
Se recomienda usar esta función para:
- cocer y recalentar al mismo tiempo dos platos distintos
sin mezclar sus sabores.
- obtener una cocción más homogénea, crujiente y
mullida
- cocer los alimentos más rápidamente
Para utilizar la convección:
- Encender la convección situando el selector de modo
en la posición
- Para detener la función convección en cualquier
momento, situar el selector en la posición OFF.
ALGUNOS CONSEJOS PARA OBTENER UNOS
RESULTADOS ÓPTIMOS CON EL HORNO
- No sobrecargar el horno.
- En la medida de lo posible, situar los alimentos en el
centro del aparato.
- No abrir la puerta con demasiada frecuencia durante la
cocción para evitar pérdidas de calor.
- Controlar bien la cocción al probar nuevas recetas.
ALGUNOS CONSEJOS PARA COCINAR
Durante el proceso de asado de un alimento es normal
que se desprenda un ligero humo. Sin embargo, pueden
reducirse las emisiones de humo siguiendo los siguientes
consejos:
- No cubrir la parrilla con papel de aluminio. ya que ello
provoca humaredas y salpicaduras impidiendo que las
grasas se escurran. También impide la buena circulación
del aire en el interior del horno, lo cual puede dañar el
aparato.
- Situar un recipiente lleno de agua en el horno. Esto
permite reducir las emisiones de humo.
- Para obtener mejores resultados, descongelar la carne
antes de cocerla.
- Si la carne es muy grasa, quitarle el excedente
cortándola si es necesario.
- Si se producen salpicaduras de grasa durante la
cocción, bajar la temperatura del termostato.
- A n de evitar la acumulación de grasas que
provoca irremediablemente la emisión de humaredas
desagradables, procurar limpiar el horno después de
cada uso. Emplear para ello una esponja no abrasiva
y agua caliente.

Español
Limpieza
Este horno está equipado con paredes interiores
autolimpiables: a partir de 200 ºC de cocción las grasas
se destruyen.
- Por precaución, se aconseja utilizar una esponja
húmeda.
- Este aparato ha sido diseñado para funcionar con
la máxima seguridad. Sin embargo, es importante
mantenerlo en perfecto estado de limpieza, libre de
grasas o partículas de suciedad.
Atención: los microporos de la paredes interiores son
sensibles al azúcar.
Especicaciones técnicas
MF 343 MF 344 MF 449 MF 448 MF 447 MF 62 MF63
Potencia (W)
Capacidad (L)
Clase
Temperatura de
funcionamiento
Dimensión
Producto (LHP)
Peso Producto
1500 1500 2000 2000 2000 2200 2200
34 34 45 45 45 55 55
I I I I I I I
230 °C
Max.
51,2 x 32,2
x 39,3 cm
230 °C
Max.
51,2 x 32,2
x 39,3 cm
230 °C
Max.
53,6 x 35,6
x 40 cm
6,6 kg 6,6 kg 9,09 kg 9,09 kg 9,09 kg 9,7 kg 9,7 kg
- Desconectar siempre el aparato de la corriente y dejarlo
enfriar antes de llevar a cabo cualquier operación de
limpieza.
- Retirar la parrilla y los accesorios.
- Para limpiar el cristal, utilizar un producto especial para
cristales o un paño húmedo. Secar con un trapo.
- Para limpiar las paredes exteriores, utilizar un paño
húmedo. Para las manchas resistentes, emplear una
solución no abrasiva o productos de limpieza para
cristales. Enjuagar y secar con un paño seco. No utilizar
nunca fregaderos metálicos, ya que podrían dañar la
supercie del horno.
- Los accesorios pueden limpiarse de manera normal
como todos los utensilios de cocina.
230 °C
Max.
53,6 x 35,6
x 40 cm
230 °C
Max.
53,6 x 35,6
x 40 cm
230 °C
Max.
57,3 x 36,1
x 47,2 cm
230 °C
Max.
57,3 x 36,1
x 47,2 cm
Ecología y reciclabilidad del producto
Al nalizar su vida útil, no eliminar el aparato
con los desechos domésticos, sino llevarlo a un
punto de recogida selectiva para aparatos eléctricos y electrónicos, tal como indica el símbolo
que aparece en el producto, el manual de instrucciones o el embalaje. Los materiales que conforman
el producto son reciclables en función de sus respectivas
marcaciones.
De este modo contribuirá en gran medida a la protección
del medio ambiente a través del reciclaje, la reutilización
material o por otros medios de reutilización de los aparatos usados. Consulte con su ayuntamiento para que le
indique cual es contenedor correspondiente para cada
tipo de producto.
Este aparato cumple con la Directiva 2006/95/EC de Baja
Tensión, con la Directiva 2004/108/EC de Compatibilidad
Electromagnética, la Directiva 2011/65/EC sobre las restricciones de uso de ciertas sustancias peligrosas en los
equipamientos Eléctricos y Electrónicos.

ﺞﺗﻧﻣﻟا ﻊﯾﻧﺻﺗ ةدﺎﻋإ ﺔﯾﻧﺎﻛﻣإو ﺔﺋﯾﺑﻟا
ءﺎﮭﺗﻧا دﻌﺑ تﺎﯾﺎﻔﻧﻟا ﻊﯾﻣﺟ زﻛرﻣ ﻰﻟإ ﮫﻠﻣﺣ بﺟﯾ لﺑ ﺔﯾﻟزﻧﻣﻟا تﻼﺿﻔﻟا ﻊﻣ ﮫﻧﻣ صﻠﺧﺗﻟا نﻋ عﺎﻧﺗﻣﻻا بﺟﯾ زﺎﮭﺟﻟا ﺔﯾﺣﻼﺻ ةدﻣ
ﻰﻠﻋ وأ مادﺧﺗﺳﻻا لﯾﻟد ﻲﻓ دوﺟوﻣﻟا وأ ﺞﺗﻧﻣﻟا ﻰﻠﻋ صﺎﺧﻟا زﻣرﻟا كﺣﺿوﯾ ﺎﻣﻛ ﺔﯾﻧورﺗﻛﻟﻻاو ﺔﯾﺋﺎﺑرﮭﻛﻟا ةزﮭﺟﻷﺎﺑ ﺔﺻﺎﺧﻟا
زﺎﮭﺟﻟا فﻼﻏ . ﻲھ ﺞﺗﻧﻣﻟا ﺎﮭﻧﻣ فﻟﺄﺗﯾ ﻲﺗﻟا داوﻣﻟاﮫﯾﻠﻋ ﺔﺣﺿوﻣﻟا زوﻣرﻟا بﺳﺣ لﻛ رﯾودﺗﻟا ةدﺎﻋﻹ ﺔﻠﺑﺎﻗ داوﻣ.
ةزﮭﺟﻷا مادﺧﺗﺳا وأ لﺎﻣﻌﺗﺳﻻا ةدﺎﻋﻹ ﺔﻠﺑﺎﻘﻟا ﻊطﻘﻟا رﯾودﺗ ةدﺎﻋإ قﯾرط نﻋ ﺔﺋﯾﺑﻟا ﻰﻠﻋ ظﺎﻔﺣﻟا ﻲﻓ ﺔﻘﯾرطﻟا هذﮭﺑ دﻋﺎﺳﺗ فوﺳ
ﺔﻣدﺧﺗﺳﻣﻟا ﺔﯾﺋﺎﺑرﮭﻛﻟا . تﺎﯾﺎﻔﻧﻟا لﯾﻣارﺑ لوﺣ تﺎﻣوﻠﻌﻣ ﻰﻠﻋ لوﺻﺣﻠﻟ كﺑ صﺎﺧﻟا ﺔﯾدﻠﺑﻟا زﻛرﻣ ﻊﺟار عوﻧ لﻛﻟ ﺔﺻﺻﺧﻣﻟا
تﺎﺟﺗﻧﻣﻟا نﻣ .
ﺔﻗﺎطﻟﺎﺑ ﺔﻠﺻﺗﻣﻟا تﺎﺟﺗﻧﻣﻠﻟ ﻲﺟوﻟوﻛﯾﻹا مﯾﻣﺻﺗﻟا.2009/125/EC
ﺔﯾﻧورﺗﻛﻟﻻاو ﺔﯾﺋﺎﺑرﮭﻛﻟا ةزﮭﺟﻷا ﻲﻓ ةرطﺧﻟا داوﻣﻟا ضﻌﺑ لﺎﻣﻌﺗﺳا دودﺣ لوﺣ . نوﻧﺎﻘﻟا كﻟذﻛ و2011/65/ECوﺣ نوﻧﺎﻘﻟاو طورﺷ ل
ﺔﯾﺳﯾطﺎﻧﻐﻣورﮭﻛﻟاو ﺔﻣﺋﻼﻣﻟﺎﺑ صﺎﺧﻟا2004/108/EC نوﻧﺎﻘﻟاو ضﻔﺧﻧﻣﻟا رﺗوﺗﻟﺎﺑ صﺎﺧﻟا 2006/95/EC نوﻧﺎﻘﻠﻟ زﺎﮭﺟﻟا اذھ قﻓاوﯾ

ﺔﻋﺎﻄﺘﺳﻻا) طاﻮﻟﺎﺑ(
34 45 45 45 55 55
I I I I I I
(LHP) ﻢﺠﺣ ﺞﺘﻨﻤﻟا
ةراﺮﺣ ﻞﻤﻌﻟا
ﺔﻌﺴﻟا) ﺮﺘﻠﻟﺎﺑ(
نزو ﺞﺘﻨﻤﻟا
ﺔﺌﻓ
ًً
MF 343
1500
34
230 °C
Max.
51,2 x 32,2
x 39,3 cm
6,6 kg
لﯾﻐﺷﺗ ﺔﯾﻌﺿو ﻰﻠﻋ رزﻟا تﯾﺑﺛﺗﺑ يرارﺣﻟا لﯾﻣﺣﺗﻟا
يرارﺣﻟا لﯾﻣﺣﺗﻟا لﺎﻣﻌﺗﺳﻻ:
فوأ ءﺎﻔطﻹا ﺔﯾﻌﺿو ﻰﻠﻋ رزﻟا تﯾﺑﺛﺗ بﺟﯾ ﺔظﺣﻟ يأ ﻲﻓ يرارﺣﻟا لﯾﻣﺣﺗﻟا فﺎﻘﯾﻹ.
نرﻔﻟا لﺎﻣﻌﺗﺳا ءﺎﻧﺛأ ةزﺎﺗﻣﻣ ﺞﺋﺎﺗﻧ ﻰﻠﻋ لوﺻﺣﻠﻟ ﺢﺋﺎﺻﻧﻟا ضﻌﺑ
ﮫﺗﻗﺎط نﻣ رﺛﻛأ نرﻔﻟا لﯾﻣﺣﺗ مدﻋ.
نرﻔﻟا زﻛرﻣ ﻲﻓ ﺔﯾﺋاذﻐﻟا داوﻣﻟا ﻊﺿو.
ﻛﺗﻣ لﻛﺷﺑ بﺎﺑﻟا ﺢﺗﻓ مدﻋةرارﺣﻟا نادﻘﻓ يدﺎﻔﺗﻟ ﺦﺑطﻟا لﻼﺧ رر.
ةدﯾدﺟ تﺎﻔﺻو رﯾﺿﺣﺗ دﻧﻋ يرود لﻛﺷﺑ مﺎﻌطﻟا رﯾﺿﺣﺗ ﺔﯾﻠﻣﻋ ﺔﺑﻗارﻣ.
ﺦﺑطﻠﻟ ﺢﺋﺎﺻﻧﻟا ضﻌﺑ
ﺔﯾﻟﺎﺗﻟا ﺔﻘﯾرطﻟﺎﺑ رﺎﺧﺑﻟا جورﺧ نﻣ لﻠﻘﻧ نأ نﻛﻣﯾو نرﻔﻟا نﻣ طﯾﺳﺑ نﺎﺧد جرﺧﯾ نأ نﻛﻣﯾ مﺎﻌطﻟا يوﺷ ءﺎﻧﺛأ:
نﺎﺧدﻟا جﺎﺗﻧإ نﻣ لﯾﻠﻘﺗﻟﺎﺑ ﺢﻣﺳﯾ ﺎﻣﻣ نرﻔﻟا لﺧاد ءﺎﻣﻟﺎﺑ ءﻲﻠﻣ ءﺎﻋو ﻊﺿو.
هءاوﺷ لﺑﻗ مﺣﻠﻟا نﻋ دﯾﻣﺟﺗﻟا ﺔﻟازﺈﺑ ﺢﺻﻧﯾ لﺿﻓأ ﺞﺋﺎﺗﻧ ﻰﻠﻋ لوﺻﺣﻠﻟ.
ةرورﺿﻟا لﺎﺣ ﻲﻓ ﮫﻧﻣ ﺔﯾﻣﻛ ﺔﻟازﺈﺑ ﺢﺻﻧﯾ مﺣﻠﻟا.
لﺎﻣﻌﺗﺳا لﻛ دﻌﺑ ﮫﯾﻓ نوھدﻟا ﺎﯾﺎﻘﺑ نﻣ دﯾﺟ لﻛﺷﺑ نرﻔﻟا فﯾظﻧﺗ بﺟﯾ ﺦﺑطﻟا ﺔﯾﻠﻣﻋ ءﺎﻧﺛأ نﺎﺧدﻟا جﺎﺗﻧإ يدﺎﻔﺗﻟ . طﺷﺎﻛ رﯾﻏ ﺞﻧﻔﺳا لﺎﻣﻌﺗﺳا
تﺎﺗﺳوﻣرﺗﻟا ةرارﺣ ضﻔﺧ بﺟﯾ ﺦﺑطﻟا ﺔﯾﻠﻣﻋ لﻼﺧ ذاذرﻟا جﺎﺗﻧإ لﺎﺣ ﻲﻓ.
موﯾﻧﻣﻟﻷا قروﺑ يوﺷﻟا ﺔﻛﺑﺷ ﺔﯾطﻐﺗ مدﻋ . دﻗ ﮫﻧﻷ دﻗ ﺎﻣﻣ نرﻔﻟا لﺧادﺑ ءاوﮭﻟا كرﺣﺗ مدﻋو بﺋاذﻟا نھدﻟا برﺳﺗ مدﻋ بﺑﺳﺑ ذاذرﻟا بﺑﺳﯾ
زﺎﮭﺟﻟا ﻲﻓ ﻻﺎطﻋأ بﺑﺳﯾ
.
ً
ﻰﻠﻋ ادﺋاز مﺣﺷﻟا نﺎﻛ لﺎﺣ ﻲﻓ
ﺔﺑطر ﺞﻧﻔﺳا ﺔﻌطﻗ لﺎﻣﻌﺗﺳﺎﺑ ﺢﺻﻧﯾ.
لﻣﺎﻛ نﺎﻣﺄﺑ لﻣﻌﻠﻟ زﺎﮭﺟﻟا اذھ مﯾﻣﺻﺗ مﺗ . نوھدﻟا نﻣ ﺎﯾﻟﺎﺧو ﺎﻔﯾظﻧ ﮫﯾﻠﻋ ظﺎﻔﺣﻟا يرورﺿﻟا نﻣ كﻟذ نﻣ مﻏرﻟﺎﺑو
ً
ﺔﯾﻧﻘﺗ تﺎﻔﺻاوﻣ
2000
MF 344
1500
ﮫﻔﯾظﻧﺗ لﺑﻗ درﺑﯾ ﮫﻛرﺗو ﺎﻣﺋاد زﺎﮭﺟﻟا لﺻﻓ
.
ﺔﺑطر شﺎﻣﻗ ﺔﻌطﻗ وأ جﺎﺟزﻠﻟ صﺎﺧ قوﺣﺳﻣ لﺎﻣﻌﺗﺳا ﻰﺟرﯾ جﺎﺟزﻟا فﯾظﻧﺗﻟ .شﺎﻣﻗ ﺔﻌطﻗ مادﺧﺗﺳﺎﺑ ﮫﻔﯾﻔﺟﺗ.
شﺎﻣﻗ ﺔﻌطﻗ لﺎﻣﻌﺗﺳا بﺟﯾ ﺔﯾﺟرﺎﺧﻟا ناردﺟﻟا فﯾظﻧﺗﻟﺔﺑطر .جﺎﺟزﻠﻟ فﯾظﻧﺗ داوﻣ وأ رﺷﻘﻣ رﯾﻏ قوﺣﺳﻣ لﺎﻣﻌﺗﺳا بﺟﯾ ﺔﯾوﻘﻟا ﻊﻘﺑﻠﻟ .
ﺔﯾدﺎﻌﻟا ﺦﺑطﻣﻟا تاودأ ﻊﯾﻣﺟﻛ ﻲﻌﯾﺑط لﻛﺷﺑ تاودﻷا فﯾظﻧﺗ نﻛﻣﯾ.
MF 449 MF 448
2000
2000
تاودﻷا ﻲﻗﺎﺑو يوﺷﻟا ﺔﻛﺑﺷ جارﺧإ.
ﺔﻓﺎﺟ شﺎﻣﻗ ﺔﻌطﻗ فﯾﻔﺟﺗﻟاو فطﺷﻟا .نرﻔﻟا ﺔﯾﺣطﺳ فﻠﺗ بﺑﺳﺗ نأ نﻛﻣﯾ ذإ ﺔﯾﻧدﻌﻣ طوﻓ لﺎﻣﻌﺗﺳا مدﻋ.
MF 447
I
230 °C Max. 230 °C Max.
51,2 x 32,2 x
39,3 cm
6,6 kg
53,6 x 35,6 x
40 cm
9,09 kg 9,09 kg
230 °C
Max.
53,6 x 35,6
x 40 cm
230 °C
Max.
53,6 x 35,6
x 40 cm
9,09 kg
57,3 x 36,1
x 47,2 cm
ً
رﺎﺣ ءﺎﻣو.
فﯾظﻧﺗﻟا
خﺎﺳوﻷاو.
MF 62
2200
230 °C
Max.
9,7 kg
ﺟﺗ مﺗفﯾظﻧﺗﻟا ﺔﯾﺗاذ ﺔﯾﻠﺧاد ناردﺟﺑ نرﻔﻟا اذھ زﯾﮭ : دﻌﺑ200ءﺎﻔﺗﺧﻻاو رﺎﮭﺻﻧﻻﺎﺑ موﺣﺷﻟا أدﺑﺗ ﺔﯾرارﺣ ﺔﺟرد .
هﺎﺑﺗﻧا :ﺟﻟا تﺎﻣﺎﺳﻣتﺎﯾرﻛﺳﻟﺎﺑ ﺔﯾﻧﻐﻟا داوﻣﻟﺎﺑ رﺛﺄﺗﺗ ﺔﯾﻠﺧادﻟا نارد.
MF63
2200
230 °C
Max.
57,3 x 36,1
x 47,2 cm
9,7 kg

تﺎﺗﺳوﻣرﺗ
ﻊﯾرﺳ لﻛﺷﺑ ﺔﻣﻌطﻷا رﯾﺿﺣﺗ.
3 - 4
4 - 5
5 - 6
7
8
ةرارﺣ
100° - 110° ادﺟ درﺎﺑ نرﻓ
110°- 150°
150°- 200°
220°
230° ادﺟ نﺧﺎﺳ نرﻓ
ً
نﺧﺎﺳ نرﻓ
ً
ﺦﺑطﻟا ﺔﻘﯾرط رﺎﯾﺗﺧا رز) مﻗر ةروﺻ1(
ﺎﯾﻠﻌﻟا ةرارﺣﻟا لﯾﻐﺷﺗ مﺗﯾ .مﺎﻌطﻟا يوﺷ وأ صﯾﻣﺣﺗﺑ ﺢﻣﺳﺗ.
مﺗﯾﺎﯾﻧدﻟا ةرارﺣﻟا لﯾﻐﺷﺗ .ﻰﻠﻋﻷا نﻣ ﺔﺻﻣﺣﻣ قﺎﺑطأ ﻲﻓ ﺔﯾﻠﻔﺳﻟا ﺔﮭﺟﻟا نﻣ مﺎﻌطﻟا رﯾﺿﺣﺗﺑ ﺢﻣﺳﺗ.
ﺔﺑﻘﻟا +يرارﺣﻟا لﯾﻣﺣﺗﻟا ءﺎﻋوﻟا :تﻗوﻟا سﻔﻧ ﻲﻓ ﺎﯾﻧدﻟاو ﺎﯾﻠﻌﻟا ةرارﺣﻟا لﯾﻐﺷﺗ مﺗﯾ . قﯾرطﻟا هذﮭﺑ نﻛﻣﯾ
سﻧﺎﺟﺗﻣ لﻛﺷﺑ قﺎﺑطﻷا رﯾﺿﺣﺗ :ىوﻠﺣﻟا بﻟاوﻗ ,لوﻘﺑﻟا ,ةرﺿﺣﻣﻟا قﺎﺑطﻷا ... ﺢﺻﻧﯾ ﺔ ﻛ ﺑ ﺷ ﻊ ﺿ و ﺑ
ﺔﯾﻠﻔﺳﻟا ﺔﺟردﻟا ﻰﻠﻋ وأ نرﻔﻟا فﺻﺗﻧﻣ ﻲﻓ يوﺷﻟا.
تﯾﻗوﺗﻟا رز) مﻗر ةروﺻ1(
نﻣ ﺦﺑطﻟا تﻗو طﺑﺿﺑ ﺢﻣﺳﯾ0 ﻰﻟإ 120ﺔﻘﯾﻗد .
لﻣﻌﻟﺎﺑ نرﻔﻟا أدﺑﯾو تﯾﻗوﺗﻟا رز لﯾﻐﺷﺗ دﻧﻋ نرﻔﻟا ءوﺿ لﯾﻐﺷﺗ مﺗﯾ . نرﻔﻟا فﻗوﺗﯾ ﺦﺑطﻠﻟ ددﺣﻣﻟا تﻗوﻟا ءﺎﮭﺗﻧا دﻧﻋ
ﻲﻛﯾﺗﺎﻣوﺗوأ لﻛﺷﺑ . ﻲﻓ ﺦﺑطﻟا فﺎﻘﯾﻹ مﻗر ﻰﻠﻋ تﯾﻗوﺗﻟا رز تﯾﺑﺛﺗ بﺟﯾ ﺔظﺣﻟ ﺔﯾأ0.
كﺑﺷﻣﻟا لﺎﻣﻌﺗﺳا
جﺎﺟدﻟا يوﺷﻟ لﺎﺛﻣ:
نرﻔﻟا نﯾﺧﺳﺗ مدﻋ.
ﻲﻏارﺑ كﻔﻣ ةدﻋﺎﺳﻣﺑ ﮫﺗﯾﺑﺛﺗو ضﺑﻘﻣﻟا ﻲﻓ لوﻷا ﺔﺷارﻔﻟا ﻲﻏرﺑ لﺎﺧدإ . كﺑﺷﻣﻟا زﻛرﻣ ﻲﻓ نرﻔﻟا ﻲﻓ جﺎﺟدﻟا ﻊﺿو
ﻲﻏارﺑ كﻔﻣ ةدﻋﺎﺳﻣﺑ ﮫﺗﯾﺑﺛﺗو ﻲﻧﺎﺛﻟا ﺔﺷارﻔﻟا كﻔﻣ لﺎﺧدإو.
ﻊﻣ كﺑﺷﻣﻟا ﻊﺿورﺎﺳﯾﻟا دﻧﺳﻣﻟا ﻰﻠﻋ ﮫﺗﯾﺑﺛﺗﻟ ﮫﻛﯾرﺣﺗو نﯾﻣﯾﻟا نﻣ ﺦﯾﺳﻟا.
ﺦﺑطﻟا ﺔﻘﯾرط رﺎﯾﺗﺧﺎﺑ كﺑﺷﻣﻟا نارودو ﺦﺑطﻟا ءدﺑ
ﺔﺑوﻠطﻣﻟا ﺦﺑطﻟا ةدﻣ و .
ﺔﺑوﻠطﻣﻟا ةرارﺣﻟا ﻰﻠﻋ يرارﺣﻟا رزﻟا تﯾﺑﺛﺗ) ﻲھ يوﺷﻣﻟا جﺎﺟدﻟا رﯾﺿﺣﺗﻟ ﺎﮭﺑ ﺢﺻﻧﯾ ﻲﺗﻟا ةرارﺣﻟا210
ﺔﯾرارﺣ ﺔﺟرد .(رﻔﻟا نﻣ دﺋاز نﺎﺧد جورﺧ لﺎﺣ ﻲﻓ ﻰﻠﻋ تﯾﻗوﺗﻟا زﺎﮭﺟ تﯾﺑﺛﺗ بﺟﯾ ﺦﺑطﻟا ءﺎﻧﺛأ ن0.
قورﺣﻟ ضرﻌﺗﻟا يدﺎﻔﺗﻟ ﺔﻣزﻼﻟا نﺎﻣﻷا تﺎﻣﯾﻠﻌﺗ ﻊﯾﻣﺟ عﺎﺑﺗﺈﺑو صﺎﺧﻟا ضﺑﻘﻣﻟا ةدﻋﺎﺳﻣﺑ كﺑﺷﻣﻟا ﺔﻟازإ :
كﺑﺷﻣﻟا لﺻﻔﻟ نﯾﻣﯾﻟا ﻰﻟإ ﮫﻛﯾرﺣﺗ مﺛ ءﻲطﺑ لﻛﺷﺑ ﮫﻌﻓرو ﮫﻟ ﺔﺻﺻﺧﻣﻟا تﺎﺣﺗﻔﻟا ﻲﻓ ضﺑﻘﻣﻟا ﻊﺿو
لﻣﺎﻛ لﻛﺷﺑ ﺦﯾﺳﻟا جارﺧإو.
ارﺣﻟا لﯾﻣﺣﺗﻟاير:
ﺔﯾﻠﺧاد ﺔﺣورﻣ ﻰﻠﻋ نرﻔﻟا اذھ يوﺗﺣﯾ .نرﻔﻟا ﻲﻓ سﻧﺎﺟﺗﻣ لﻛﺷﺑ ةرارﺣﻟا ﻊﯾزوﺗ ﻰﻠﻋ دﻋﺎﺳﺗ ﻲﺗﻟا يرارﺣﻟا لﯾﻣﺣﺗﻟﺎﺑ ﺔﯾﻠﻣﻌﻟا هذھ ﻰﻣﺳﺗ.
ﻲﻠﯾ ﺎﻣﻟ ﺔﯾﻠﻣﻌﻟا هذھ لﺎﻣﻌﺗﺳﺎﺑ ﺢﺻﻧﯾ:
ﺔﻣﻌطﻷا طﻠﺧ نود نوﺣﺻ ةدﻋ رﯾﺿﺣﺗو ﺦﺑط.
درﺎﺑ نرﻓ
ﻂﺳﻮﺘﻣ ةراﺮﺤﻟا
ءﺎﻔطإ :ءﺎﻔطﻹا ﺔﯾﻌﺿو

ﺔﯾﻟوؤﺳﻣﻟا.
ﮫﻗوﻓو ﮫﻟوﺣ ءاوﮭﻟا رﻣﯾ ﻲﻛ قﺋاوﻌﻟا نﻣ ﺔﯾﻟﺎﺧ ﺔﻘطﻧﻣ ﻲﻓ ﮫﻌﺿو بﺟﯾ زﺎﮭﺟﻟا لﺎﻣﻌﺗﺳا لﺑﻗ . ﺔﻓﺎﺳﻣ كرﺗ10 و نرﻔﻟا لوﺣ مﺳ 30 م ﺳ
زﺎﮭﺟﻟا ﻲﻓ ةرﺎﺣﻟا ﺢطﺳﻷا سﻣﻟ مدﻋ بﺟﯾ قورﺣﻟ ضرﻌﺗﻟا يدﺎﻔﺗﻟ .ازﺟﻷا سﻣﻟ يدﺎﻔﺗ نﻛﻣﯾ ذإ صﺎﺧ لﻛﺷﺑ ﮫﺑﺎﺑو زﺎﮭﺟﻟا ﻲﻓ ﺔﯾﻧدﻌﻣﻟا ء
نرﻔﻟا نﻣ ةرﺎﺣﻟا تاودﻷا ﺔﻟازإ دﻧﻋ رذﺣﻟا ﻲﺧوﺗ . ﺔﺻﺎﺧ ضﺑﺎﻘﻣو ﻲﻠﻘﻟا ةﻼﻘﻣ وأ يوﺷﻟا تﺎﻛﺑﺷ ﺔﻟازﻹ ﺔﺻﺎﺧ ضﺑﺎﻘﻣ لﺎﻣﻌﺗﺳﺎﺑ ﺢﺻﻧﯾ
.
زﺎﮭﺟﻟا لطﻌﺗو دﺋاز لﻛﺷﺑ ﮫﺗرارﺣ عﺎﻔﺗرا اذھ بﺑﺳﯾ نأ نﻛﻣﯾ ذإ موﯾﻧﻣﻟﻷا قروﺑ نرﻔﻟا نﻣ ءزﺟ يأ ﺔﯾطﻐﺗ مدﻋ.
ً
ﮫﻔﯾظﻧﺗﺑ مﺎﯾﻘﻟا لﺑﻗ وأ ﮫﻟﺎﻣﻌﺗﺳا مدﻋ دﻧﻋ زﺎﮭﺟﻟا لﺻﻓ .دﯾدﺟ نﻣ زﺎﮭﺟﻟا لﺻو لﺑﻗ تﺎﺗﺳوﻣرﺗﻟاو تﯾﻗوﺗﻟا رز ءﺎﻔطإ نﻣ دﻛﺄﺗﻟا.
نرﻔﻟا لﺧاد كﯾﺗﺳﻼﺑﻟا وأ نوﺗرﻛﻟا نﻣ وأ ﺔﯾﻗرو داوﻣ ﻊﺿو مدﻋ.
فﯾﻠﻐﺗﻟا ﻊطﻗ ﻊﯾﻣﺟ ﺔﻟازإ بﺟﯾ ﻰﻟوﻷا ةرﻣﻠﻟ زﺎﮭﺟﻟا لﺎﻣﻌﺗﺳا لﺑﻗﺔﺑطر شﺎﻣﻗ ﺔﻌطﻘﺑ ءازﺟﻷا ﻊﯾﻣﺟ فﯾظﻧﺗو .
ﺔﻣوﺎﻘﻣﻟا ءازﺟأ ﺔﯾﺎﻣﺣﻟ ﺔﻣدﺧﺗﺳﻣﻟا داوﻣﻟا ﺎﯾﺎﻘﺑ بﺑﺳﺑ ةرھﺎظﻟا هذھ ﺞﺗﻧﺗ .ﺔﯾﻌﯾﺑط ةرھﺎظ ﻲھو.
ﺎھرﯾﺿﺣﺗﺑ بﻏرﺗ ﻲﺗﻟا ﺔﯾﺋاذﻐﻟا داوﻣﻟا بﺳﺣ ةرﺎﺗﺧﻣﻟا ﺦﺑطﻟا ﺔﯾﻠﻣﻋ ﻰﻠﻋ رزﻟا تﯾﺑﺛﺗ.
ﺎﺧﺑطﻟ ﺔﻣزﻼﻟا تاودﻷا ﻊﻣ ﮫﯾﻓ نرﻔﻟا ةرارﺣ عﺎﻔﺗرا دﻌﺑ ﺔﯾﺋاذﻐﻟا داوﻣﻟا لﺧدأ.
ددﺣﻣﻟا ﺦﺑطﻟا تﻗو ءﺎﮭﺗﻧا دﻧﻋ ﻲﻛﯾﺗﺎﻣوﺗوأ لﻛﺷﺑ نرﻔﻟا فﻗوﺗﯾ فوﺳ . مﻗرﻟا ﻰﻠﻋ رزﻟا تﺑﺛ ﺦﺑطﻟا ءﺎﻧﺛأ يودﯾ لﻛﺷﺑ نرﻔﻟا فﺎﻘﯾﻹ0.
ةرﺎﺣ نوﻛﺗ ﺎﻣدﻧﻋ يوﺷﻟا ﺔﻛﺑﺷ وأ نﺣﺻﻟا ﺔﻟازﻹ ﺎﻣﺋاد ضﺑﻘﻣﻟا مدﺧﺗﺳا
.
رﺷﺎﺑﻣ لﻛﺷﺑ جﺎﺟزﻟا حوﻟ قوﻓ ةادأ يأ ﻊﺿو مدﻋ.
ةدﻣﻟ نرﻔﻟا لﯾﻐﺷﺗﺑ ﺢﺻﻧﯾ ﻰﻟوﻷا ةرﻣﻠﻟ لﺎﻣﻌﺗﺳﻻا لﺑﻗ10ﻋ قﺋﺎﻗد ﻰﻠ200 ﺢﺋاورﻟاو نﺎﺧدﻟا ﺔﻟازإو ﺔﯾﺎﻣﺣﻟا نھد قرﺣﻟ ﺔﯾوﺋﻣ ﺔﺟرد
ﺔﺑوﻠطﻣﻟا ةرارﺣﻟا رﺎﯾﺗﺧا دﻌﺑ تﺎﺗﺳوﻣرﺗﻟا لﯾﻐﺷﺗ.
تﯾﻗوﺗﻟا زﺎﮭﺟ لﯾﻐﺷﺗ دﻌﺑ زﺎﮭﺟﻟا لﯾﻐﺷﺗ مﺗﯾ فوﺳ .لﯾﻐﺷﺗﻟا ءوﺿ ءﻲﺿﯾ فوﺳو.
زﺎﮭﺟﻟا لﻣﻋ ءﺎﻧﺛأ ادﺟ رﺎﺣ نوﻛﯾ نأ
.بﺎﺑﻟا قﻼﻏإو ﺢﺗﻓ دﻧﻋ صﺎﺧ لﻛﺷﺑ هﺎﺑﺗﻧﻻا.
ﺢﯾﺣﺻ لﻛﺷﺑ زﺎﮭﺟﻟا لﻣﻌﻟ
ةدﯾدﺟﻟا ةزﮭﺟﻷا نﻣ جرﺧﺗ ﻲﺗﻟا.
ﺔﯾﻠﻣﻌﻟا ءﺎﻧﺛأ دﯾﺟ لﻛﺷﺑ ﺔﻓرﻐﻟا ﺔﯾوﮭﺗ .يوﺷﻟا ﺔﻛﺑﺷو ةﻼﻘﻣﻟا ﻊﻣ ﮫﻔﯾظﻧﺗﺑ مﺎﯾﻘﻟا مﺛ درﺑﯾ نرﻔﻟا كرﺗ.
ﻲﺋﺎﺑرﮭﻛﻟا رﺎﯾﺗﻟﺎﺑ زﺎﮭﺟﻟا لﺻو.
يرارﺣ لﯾﻣﺣﺗ : طﻠﺧ نود ةددﻌﺗﻣ قﺎﺑطأ رﯾﺿﺣﺗﻟ وأ سﻧﺎﺟﺗﻣ لﻛﺷﺑ داوﻣﻟا ﺦﺑطﻟ نرﻔﻟا ﻲﻓ ةرارﺣﻟا ﮫﯾﺟوﺗﺑ ﺔﺣورﻣﻟا موﻘﺗ
تﯾﻗوﺗﻟا زﺎﮭﺟ لﯾﻐﺷﺗ دﻧﻋ ءﻲﺿﯾ فوﺳ .لﻣﻌﯾ نرﻔﻟا.
ﺔﺻﺎﺧ تﺎﻣﯾﻠﻌﺗ:
ﮫﺗﺣﺗ .ﮫﺗﺣﺗ داوﻣ دوﺟو مدﻋ نﻣ دﻛﺄﺗﻟا.
ً
كﺑﺎﺷﻣﻠﻟ.
لوﺻو يدﺎﻔﺗبﺎﺑﻟا رﺳﻛ وأ فﻠﺗ ﻲﻓ اذھ بﺑﺳﯾ نأ نﻛﻣﯾ ذإ ارﺎﺣ زﺎﮭﺟﻟا نوﻛﯾ ﺎﻣدﻧﻋ ﻲﺟﺎﺟزﻟا نرﻔﻟا بﺎﺑ ﻰﻟإ ذاذرﻟا
مادﺧﺗﺳﻻا ﺔﻘﯾرط
هﺎﺑﺗﻧا :ﻰﻟوﻷا ةرﻣﻟا ﻲﻓ زﺎﮭﺟﻟا لﯾﻐﺷﺗ دﻧﻋ نﺎﺧدﻟا نﻣ لﯾﻠﻘﻟا جرﺧﯾ نأ نﻛﻣﯾ.
دﯾدﺟ نﻣ نرﻔﻟا بﺎﺑ قﻼﻏإ.
ﻗو رﺎﯾﺗﺧاتﯾﻗوﺗﻟا رز ةرادﺈﺑ بوﻠطﻣﻟا ﺦﺑطﻟا ت.
ً
زﺎﮭﺟﻟا رارزأ ﻊﯾﻣﺟ ءﺎﻔطإ.
رﺎﯾﺗﺧا رزيوﺷﻟا- يرارﺣﻟا لﯾﻣﺣﺗﻟا ) مﻗر ةروﺻ1 (
فﺎﻘﯾإ :فﺎﻘﯾﻹا ﺔﯾﻌﺿو
ﺎﮭﯾﻓ مﻌطﻟا.
يوﺷ :مﺎﻌطﻟا يوﺷﻟ .ﯾﻓ ﻊﻣﺟﺗﺗو ﺦﺑطﻟا لﺋاوﺳ برﺳﺗﺗ ﻲﻛ كﺑﺷﻣﻟا لﻔﺳأ ﻲﻠﻘﻟا ةﻼﻘﻣ ﻊﺿوﺎﮭ.
يوﺷ +يرارﺣ لﯾﻣﺣﺗ
نرﻔﻟا لﻣﻌﻟ ﻲﺋوﺿ رﺷؤﻣ) مﻗر ةروﺻ1(
نرﻔﻟا تﺎﺗﺳوﻣرﺗ رز) مﻗر ةروﺻ1(
نﻣ ةرارﺣﻟا طﺑﺿﺑ ﺢﻣﺳﯾ100 ﻰﻟإ 230ﺔﯾرارﺣ ﺔﺟرد .ﺦﺑطﻟا ءﺎﻧﺛأ ﺔظﺣﻟ يأ ﻲﻓ ةرارﺣﻟا رﯾﯾﻐﺗ نﻛﻣﯾ.
-ﻣﻟا ﻲﻠﺧﯾو نﺎﻣﻷا ﻲﻐﻠﯾو ،رطﺧ ﻰﻟإ يدؤﯾ نأ نﻛﻣﯾ ،لﺎﻣﻌﺗﺳﻻا تﺎﻣﯾﻠﻌﺗﻟ قﺑﺎطﻣ رﯾﻏ وأ ،بﺳﺎﻧﻣ رﯾﻏ لﺎﻣﻌﺗﺳا يأ نﻣ ﻊﻧﺻ

ءازﺟﻷا نﻷ ﺎﺋﻔطﻣ نﺎﻛ وﻟ ﻰﺗﺣ
.
ً
ً
.
ً
.
ﮫظﻔﺣ وأ ﮫﻌطﻗ نﻣ يأ رﯾﯾﻐﺗ وأ ﮫﻔﯾظﻧﺗ وأ ﮫﻛﯾرﺣﺗ لﺑﻗ لﻣﺎﻛ لﻛﺷﺑ درﺑﯾ ﻰﺗﺣ رﺎظﺗﻧﻻاو لﺎﻣﻌﺗﺳﻻا دﻌﺑ زﺎﮭﺟﻟا لﺻﻓ.
ًً
قورﺣﻟ ضرﻌﺗﻟا يدﺎﻔﺗﻟ نرﻔﻟا ﻲﻓ ﺎﮭﻧﯾﺧﺳﺗ مﺗ ﻲﺗﻟا تاودﻷا سﻣﻟ دﻧﻋ ﺔﻣزﻼﻟا ﺔﯾﺎﻗوﻟا تاءارﺟإ ﻊﯾﻣﺟ عﺎﺑﺗإ.
ً
.
ً
ً
مﮭﻟ ﺎﻗورﺣ بﺑﺳﺗ دﻗ ﮫﯾﻓ ﺔﻧﺧﺎﺳﻟا
.
ﮫﺗرارﺣو زﺎﮭﺟﻟا نزو لﻣﺣﺗﻟ تﺑﺎﺛو وﺗﺳﻣ ﺢطﺳ قوﻓ زﺎﮭﺟﻟا ﻊﺿو .زﺎﮭﺟﻟا لوﺣ ﺔﻓﺎﺳﻣ كرﺗ.
ﺢﯾﺣﺻ لﻛﺷﺑ ﺎﮭﻠﻣﻋ مدﻋ وأ دﯾﺟ لﻛﺷﺑ ﮫﺗاودأ بﯾﻛرﺗ مدﻋ لﺎﺣ ﻲﻓ زﺎﮭﺟﻟا لﺎﻣﻌﺗﺳا مدﻋ .و لﺎﺣ ﻲﻓ ﺎھرﯾﯾﻐﺗﺎﮭﯾﻓ لطﻋ دوﺟ.
ﺎﮭﺟﻟا لطﻌﺗو داوﻣﻟا ﺎﯾﺎﻘﺑ قرﺣ يدﺎﻔﺗﻟ ﺎﻔﯾظﻧ ﮫﻟوﺣ ﺎﻣو نرﻔﻟا ﻰﻠﻋ ظﺎﻔﺣﻟا بﺟﯾ
ز.
ﮫﯾﻓ ءﺎﻔطﻹاو لﯾﻐﺷﺗﻟا ةدﺣو لﻣﻋ مدﻋ لﺎﺣ ﻲﻓ زﺎﮭﺟﻟا لﺎﻣﺗﺳا مدﻋ.
ﮫﻠﻣﻋ لﻼﺧ ﺔﺑﻗارﻣ نود زﺎﮭﺟﻟا كرﺗ مدﻋ بﺟﯾ رﺎطﺧﻷاو ثداوﺣﻟا يدﺎﻔﺗﻟ .ﺎﺋﻔطﻣ نﺎﻛ وﻟ ﻰﺗﺣ لﺎﻔطﻷا دﯾ لوﺎﻧﺗﻣ نﻋ ادﯾﻌﺑ ﮫظﻔﺣ
ﮫﻠﻣﻋ ءﺎﻧﺛأ نرﻔﻟا ﻲﻓ ىرﺧأ ﺔﯾﻛﯾﺗﺳﻼﺑ تاودأ وأ قﻋﻼﻣ وأ نوﺣﺻ لﺎﺧدإ مدﻋ.
ﺦﺑطﻟا دﻌﺑ ﻰﺗﺣ رﺟﻔﻧﯾ نأ نﻛﻣﯾ ذإ نرﻔﻟا لﺧاد رﯾﺷﻘﺗ نود ضﯾﺑﻟا نﯾﺧﺳﺗ مدﻋ.
لﻣﺎﻛ لﻛﺷﺑ زﺎﮭﺟﻟا لﺻﻓ ﺎﯾﻧدﻟا ةرارﺣﻟا ﻰﻠﻋ تﺎﺗﺳوﻣرﺗﻟا رز ﻊﺿو نﻣﺿﯾ ﻻ.
.
نﻋ ﺎﮭﯾﻓ ةرارﺣﻟا ﺔﺟرد لﻘﺗ دﻗ نﻛﺎﻣأ ﻲﻓ زﺎﮭﺟﻟا ظﻔﺣ مدﻋ2ﺔﯾوﺋﻣ ﺔﺟرد .
يرود لﻛﺷﺑ لﺻوﻟا ﻊطﻗ فﻠﺗ مدﻋ نﻣ دﻛﺄﺗﻟا.
ً
ﺔﻌﻔﺗرﻣﻟا ةرارﺣﻟاو نرﻔﻠﻟ ﺔﺑﺳﺎﻧﻣ ﺦﺑطﻣ تاودأ لﺎﻣﻌﺗﺳا.
ﺔﯾﻟزﻧﻣﻟا تﺎﻧاوﯾﺣﻟاو بﺎﯾﺛﻟا فﯾﻔﺟﺗﻟ زﺎﮭﺟﻟا لﺎﻣﻌﺗﺳا مدﻋ.
بﺎﺑﻟا ﻲﻓ رﺳﻛ دوﺟو لﺎﺣ ﻲﻓ زﺎﮭﺟﻟا لﺎﻣﻌﺗﺳا مدﻋ .
طﻘﻓ لﻣﻌﻣﻟا ﺎﮭﺑ ﺢﺻﻧﯾ ﻲﺗﻟاو ﺔﻘﻓرﻣﻟا تاودﻷا لﺎﻣﻌﺗﺳا .زﺎﮭﺟﻟا لﯾطﻌﺗو رطﺧﻠﻟ ضرﻌﺗﺗ نأ نﻛﻣﯾ ذإ.
ً
ارﺎﺣ نوﻛﯾ ﺎﻣدﻧﻋ زﺎﮭﺟﻟا لﻘﻧ وأ ﻊﻓر مدﻋ
.ﮫﻟﺎﻣﻌﺗﺳا لﺑﻗ زﺎﮭﺟﻟا درﺑﯾ ﻰﺗﺣ رﺎظﺗﻧﻻا.
ً
ﮫﻠﻣﻋ لﻼﺧ زﺎﮭﺟﻟا كﯾرﺣﺗ مدﻋ .ﮫﻛﯾرﺣﺗ لﺑﻗ لﻣﺎﻛ لﻛﺷﺑ هدﯾرﺑﺗ ﻰﺗﺣ رظﺗﻧﺗ نأ بﺟﯾ.
زﺎﮭﺟﻟا ةردﻗو ﺔﻌﺳ يدﻌﺗ مدﻋ.
و درﺎﺑ نﺎﻛﻣ ﻲﻓ زﺎﮭﺟﻟا ظﻔﺣسﻣﺷﻟا ﺔﻌﺷأو رﺎﺑﻐﻟا نﻣ ﮫﺗﯾﺎﻣﺣو ﺔﯾوﮭﺗﻟا دﯾﺟو فﺎﺟ .يدوﻣﻋ لﻛﺷﺑ زﺎﮭﺟﻟا ظﻔﺣ مدﻋ.
نرﻔﻟا لﺧاد ءﺎﯾﺷأ نﯾزﺧﺗ مدﻋ.
ﮭﺟﻟا ءﺎﻔطإ نﻣ دﻛﺄﺗﻟالزﻧﻣﻟا نﻣ جورﺧﻟا لﺑﻗ رﺎﯾﺗﻟا نﻣ ﮫﻠﺻﻓو زﺎ.
لﺎﻌﺗﺷﻼﻟ ﺔﻠﺑﺎﻗ رﯾﻏ ىرﺧأ ﻊطﻗ يأ وأ ءﺎطﻏ ةدﻋﺎﺳﻣﺑ هءﺎﻔطإ لوﺎﺣو رﺎﻧﻟا .ادﺑأ ﮫﺋﺎﻔطﻹ ءﺎﻣﻟا لﻣﻌﺗﺳﺗ ﻻ
ﺢﺋﺎﺻﻧ:
ا قرﺣ مدﻋﮫﻧﻣ برﻘﻟﺎﺑ ﻻو ﮫﻠﺧادﺑ ﻻو زﺎﮭﺟﻟا قوﻓ ﺔﯾﺋاذﻐﻟا داوﻣﻟ.
ﻊﺿو مدﻋحوﺗﻔﻣﻟا نرﻔﻟا بﺎﺑ ﻰﻠﻋ ﺔﻠﯾﻘﺛ ءﺎﯾﺷأ وأ تاودأ.
هﺎﺑﺗﻧا :لطﻋ دوﺟو لﺎﺣ ﻲﻓﺔﯾﻧﻘﺗﻟا تﺎﻣدﺧﻟا مﺳﻘﺑ لﺎﺻﺗﻻاو زﺎﮭﺟﻟا لﺎﻣﻌﺗﺳا مدﻋ ﻰﺟرﯾ نرﻔﻟا بﺎﺑ ﻲﻓ .
هﺎﺑﺗﻧا :ةرﯾطﺧ ثداوﺣﻟ ضرﻌﺗﺗ نأ نﻛﻣﯾ ﻻإو زﺎﮭﺟﻟا فﯾظﻧﺗﻟ اذھ لﺎﻣﻌﺗﺳﻻا لﯾﻟد ﻲﻓ تﺎﻣوﻠﻌﻣﻟا ﻊﯾﻣﺟ عﺎﺑﺗإ.
-كﺳﻔﻧﺑ ﮫﻟادﺑﺗﺳا وأ ﻲﺋﺎﺑرﮭﻛﻟا كﻠﺳﻟا ﻲﻧﺛ مدﻋ .ﻊﯾﺑﻟا دﻌﺑ ﺎﻣ تﺎﻣدﺧﺑ وأ عزوﻣﻟﺎﺑ لﺎﺻﺗﻻﺎﺑ مﻗ.
-زﺎﮭﺟﻟا ﻲﻓ ﺔﻧﺧﺎﺳﻟا ﺢطﺳﻸﻟ ﻲﺋﺎﺑرﮭﻛﻟا كﻠﺳﻟا ﺔﺳﻣﻼﻣ ﻊﻧﻣا.
-ﻲﺋﺎﺑرﮭﻛﻟا سﺑﺎﻘﻟا وا زﺎﮭﺟﻟا سﻣﻟ مدﻋنﯾﺗﻠﻠﺑﻣ وأ نﯾﺗﯾﻓﺎﺣ نﯾﻠﺟرﺑ وأ نﯾﺗﻠﻠﺑﻣ نﯾدﯾﺑ .
-ﺎﮭﻔﻠﺗ لﺎﺣ ﻲﻓ سﺑﺎﻘﻟا وأ ﻲﺋﺎﺑرﮭﻛﻟا كﻠﺳﻟا وأ زﺎﮭﺟﻟا لﺎﻣﻌﺗﺳا مدﻋ.
-تﺎﺑرﺳﺗ كﺎﻧھ تﻧﺎﻛ اذإ وأ ررﺿ تﺎﻣﻼﻋ روﮭظ دﻧﻋ وأ ضرﻷا ﻰﻠﻋ ﻊﻗو اذإ زﺎﮭﺟﻟا لﻣﻌﺗﺳﺗ ﻻ .
-ﺔﯾوﮭﺗﻟا ةدﯾﺟ ﺔﻘطﻧﻣ ﻲﻓ زﺎﮭﺟﻟا لﺎﻣﻌﺗﺳا .وﺣﻟا ﺔﺑﺳﻧ دﯾزﺗ نأ نﻛﻣﯾلظﻟا قطﺎﻧﻣ ﻲﻓ ثدا.
-ﺔﮭﺑﺎﺷﻣ ةزﮭﺟأ وأ زﺎﻐﻟا ﺦﺑﺎطﻣ وأ نارﻓﻷﺎﻛ ﺔﻧﺧﺎﺳ ﺢطﺳأ ﻰﻠﻋ زﺎﮭﺟﻟا ﻊﺿو مدﻋ.
-ةرﺷﺎﺑﻣﻟا سﻣﺷﻟا ﺔﻌﺷأ تﺣﺗ زﺎﮭﺟﻟا كرﺗ مدﻋ.
-زﺎﮭﺟﻟا لﯾﻐﺷﺗ ءﺎﻧﺛأ خﺎﺧﺑ لﺎﻣﻌﺗﺳا مدﻋ.
- ﮫﺳﻣﻠﺑ مﮭﻟ حﺎﻣﺳﻟا مدﻋو لﺎﻔطﻷا دﯾ لوﺎﻧﺗﻣ نﻋ ادﯾﻌﺑ لﯾﻐﺷﺗﻟا ءﺎﻧﺛأ زﺎﮭﺟﻟا ﻰﻠﻋ ظﻔﺣﻟا
-ﺔﯾﺋﺎﺑرﮭﻛ سﺑاوﻗ تﺣﺗ زﺎﮭﺟﻟا ﻊﺿو مدﻋ.
-رادﺟﻟا ﺔﯾطﻐﺗﻟاو رﺋﺎﺗﺳﻟﺎﻛ لﺎﻌﺗﺷﻼﻟ ﺔﻠﺑﺎﻘﻟا داوﻣﻟا نﻣ برﻘﻟﺎﺑ زﺎﮭﺟﻟا لﺎﻣﻌﺗﺳا مدﻋثﺎﺛﻷاو ﺔﯾ..ﺦﻟإ.
-رﯾذﺣﺗ :ءﺎﺑرﮭﻛﻟﺎﺑ ﮫﻠﺻو دﻧﻋ زﺎﮭﺟﻟا ﺔﯾطﻐﺗ مدﻋ بﺟﯾ ثداوﺣﻟا رطﺧو موزﻠﻟا نﻋ دﺋاز لﻛﺷﺑ زﺎﮭﺟﻟا ةرارﺣ عﺎﻔﺗرا يدﺎﻔﺗﻟ.
-ﻼﺛﻣ تﺎﻣﺎﻣﺣﻟﺎﻛ ﺔﺑطرﻟا فرﻐﻟا ﻲﻓ وأ ءﺎﻣﻟا ﻊﻣﺟﺗ نﻛﺎﻣأ وأ ﺢﺑﺎﺳﻣﻟا نﻣ برﻘﻟﺎﺑ زﺎﮭﺟﻟا لﺎﻣﻌﺗﺳا مدﻋ
-وأ ﺔﯾﻟﺎﻋ ةرارﺣﻟ زﺎﮭﺟﻟا ضﯾرﻌﺗ مدﻋبطرﻟا وﺟﻟا وأ رطﻣﻟﺎﻛ ﺔﺑﻌﺻ ﺔﯾﺧﺎﻧﻣ فورظﻟ .
-روﺑﻧﺻﻟا ءﺎﻣ تﺣﺗ ﮫﻌﺿﺗ ﻻو رﺧآ لﺋﺎﺳ يأ وأ ءﺎﻣﻟا ﻲﻓ زﺎﮭﺟﻟا سطﻐﺗ ﻻ .
-ﺎﻣﺋاد ﺔﻓﺎﺟ نﻛﺎﻣأ ﻲﻓ لﺎﻣﻌﺗﺳا ةرورﺿ بﺑﺳﺑ ﺔﯾﺟرﺎﺧﻟا قطﺎﻧﻣﻟا ﻲﻓ زﺎﮭﺟﻟا لﺎﻣﻌﺗﺳا مدﻋ
-ﮫﻠﯾﻐﺷﺗ دﻧﻋ زﺎﮭﺟﻟا ﻲﻓ ﺔﻛرﺣﺗﻣﻟا ﻊطﻘﻟا سﻣﻠﺗ ﻻ .
-ﻌﺑ زﺎﮭﺟﻟا لﺎﻣﻌﺗﺳاﺔﯾرارﺣﻟا ردﺎﺻﻣﻟا نﻋ ادﯾ
-لزﻧﻣﻟا جرﺎﺧ زﺎﮭﺟﻟا ظﻔﺣ مﻋ.
-قورﺣﻟا بﺑﺳﺗ نأ نﻛﻣﯾ ذإ ﺔﻧﺧﺎﺳﻟا زﺎﮭﺟﻟا ءازﺟأ سﻣﻟ مدﻋ.
-لﺎﻣﻌﺗﺳا لﻛ لﺑﻗ ﻲﺋﺎﺑرﮭﻛﻟا رﺎﯾﺗﻟا لﺑﺎﻛ صﯾﻠﺧﺗ .
-ﻲﺋﺎﺑرﮭﻛﻟا رﺎﯾﺗﻟﺎﺑ ﻻوﺻوﻣ وأ لﺎﻐﺗﺷا ﺔﻟﺎﺣ ﻲﻓ نوﻛﯾ ﺎﻣدﻧﻋ زﺎﮭﺟﻟا بﻠﻘﺗ ﻻ .
-ﻲﻋﺎﻧﺻﻟا وأ ﻲﻓرﺣﻟا لﺎﻣﻌﺗﺳﻼﻟ سﯾﻟو طﻘﻓ ﻲﻟزﻧﻣﻟا لﺎﻣﻌﺗﺳﻼﻟ مﻣﺻﻣ زﺎﮭﺟﻟا اذھ .
-ىرﺧأ ءﺎﯾﺷأ وأ خﺎﺳوﻷا وأ ،رﺎﺑﻐﻟﺎﺑ ةدودﺳﻣ تﺳﯾﻟ ﺔﯾوﮭﺗﻟا ﺔﯾﻛﺑﺷ نأ نﻣ دﻛﺄﺗ .
-ﺟﻟا لﺻﻔﻟ وأ لﻘﻧﻟ وأ ،ﻊﻓرﻟ ﻲﺋﺎﺑرﮭﻛﻟا لﺑﺎﻛﻟا ادﺑأ لﻣﻌﺗﺳﯾ ﻻ ﻲﺋﺎﺑرﮭﻛﻟا رﺎﯾﺗﻟا نﻣ زﺎﮭ.
-ﺎﺑﻣ ﮫﻠﺻﻔﺑ مﻗ بﺎﺑﺳﻷا نﻣ بﺑﺳ يﻷ زﺎﮭﺟﻟا لﺎﻌﺗﺷا لﺎﺣ ﻲﻓ رﺷﻧﺗ دﻗ ﻲﺗﻟا ﮫﻧﻋ ﺔﯾﺋاوﮭﻟا تارﺎﯾﺗﻟا ﻊﻧﻣاو ءﺎﺑرﮭﻛﻟا نﻣ ةرﺷ

ﺔﯿﺑﺮﻌﻟا
نﺮﻓ دﺪﻌﺘﻣ تﻻﺎﻤﻌﺘﺳﻻا" ﺎﻤﯿﻟ"
MF 343 / MF 344 / MF 449 / MF 448 / MF 447 / MF 62 / MF 63
-زﺎﮭﺟﻟا لوﺣ لﺑﺎﻛﻟا فﻟ بﻧﺟﺗ .
نوارﺑ دﻧأ تﯾاو ﺔﻛرﺎﻣ نﻣ ﺞﺗﻧﻣ ءارﺷ كرﺎﯾﺗﺧا كﻟ رﻛﺷﻧ.
زﯾزﻌﻟا ﺎﻧﻧوﺑز
ﻦﻤﻀﯾ اﺬھ ﺞﺘﻨﻤﻟا ﺎﺿر ﻦﺋﺎﺑﺰﻟا ﺮﺒﻋ روﺮﻣ ﺖﻗﻮﻟا ﻼﻀﻓً ﺎﯿﺟﻮﻟﻮﻨﻜﺘﻠﻟ ﺔﻣﺪﺨﺘﺴﻤﻟا ﮫﯿﻓ ﮫﻤﯿﻤﺼﺗو ﮫﺘﯿﻟﺎﻌﻓو ﺔﻓﺎﺿﻹﺎﺑ ﻰﻟإ ﮫﺘﻘﻓاﻮﻣ ﻊﯿﻤﺠﻟ ﺪﻋاﻮﻗ
تﺎﺒﻠﻄﺘﻣو ةدﻮﺠﻟا .
تﺎﻔﺻاوﻣﻟا:
ضﺑﻘﻣ
ﺔﻋرﺳﻟا رﺎﯾﺗﺧا رز–يوﺷ
ﻰﺗﺣ يرارﺣﻟا طﺑﺿﻟا رز230ﺔﯾوﺋﻣ ﺔﺟرد
ﺦﺑطﻟا ﺔﻘﯾرط رﺎﯾﺗﺧا رز
قﺋﺎﻗدﻟا طﺑﺿ زﺎﮭﺟ
لﯾﻐﺷﺗﻟا ءوﺿ
ﻘﻣﻲﻠﻘﻟا ةﻼﻘﻣ وأ يوﺷﻠﻟ ضﺑ
يوﺷ زﺎﮭﺟ
ﻲﻠﻗ نﻼﻘﻣ
ﻲﻏرﺑ
ﺔﺷارﻓ ﻲﻏرﺑ
ﻲﻧﺛﻣ ﻲﻏرﺑ
كﺑﺷﻣﻟا ضﺑﻘﻣ
-لﺑﻘﺗﺳﻣﻟا ﻲﻓ ﺎﮭﺗرﺎﺷﺗﺳﻻ ﺎﮭظﻔﺣو زﺎﮭﺟﻟا لﯾﻐﺷﺗ لﺑﻗ رذﺣﺑ اذھ لﺎﻣﻌﺗﺳﻻا لﯾﻟد تﺎﻣﯾﻠﻌﺗ ةءارﻗ . هﺎﺑﺗﻧﻻا مدﻋ بﺑﺳﯾ نأ نﻛﻣﯾ
ثداوﺣ عوﻗو ﻰﻟإ تﺎﻣﯾﻠﻌﺗﻟا هذھ قﯾﺑطﺗو.
-لوﻷا لﺎﻣﻌﺗﺳﻻا لﺑﻗ ﻲﻓ ﺔﺣﺿوﻣﻟا تﺎﻣﯾﻠﻌﺗﻟا عﺎﺑﺗﺈﺑ كﻟذو ﺔﯾﺋاذﻐﻟا داوﻣﻟا سﻣﻼﺗ دﻗ ﻲﺗﻟا ﺞﺗﻧﻣﻟا ءازﺟأ ﻊﯾﻣﺟ فﯾظﻧﺗ بﺟﯾ
فﯾظﻧﺗﻟا مﺳﻗ.
ًًً
نﺎﻣﻷا تاءارﺟإو ﺢﺋﺎﺻﻧ
رﻣﻌﺑ لﺎﻔطأ لﺑﻗ نﻣ زﺎﮭﺟﻟا اذھ لﺎﻣﻌﺗﺳا نﻛﻣﯾ8 ﺔﻓرﻌﻣو ةرﺑﺧﺑ صﺎﺧﺷأ وأ ﺎﯾﻠﻘﻋ وأ ﺎﯾﺳﺣ وأ ﺎﯾدﺳﺟ نﯾﻗﺎﻌﻣﻟا وأ تاوﻧﺳ
ﻗارﻣﻟا تﺣﺗ ﺔﻠﯾﻠﻗ ﻰﻠﻋ فرﻌﺗﻟا دﻌﺑو ﺔﺣﯾﺣﺻ ﺔﻧﻣآ ﺔﻘﯾرطﺑ زﺎﮭﺟﻟا لﺎﻣﻌﺗﺳا لوﺣ ﺔﻠﺻﻔﻣ تﺎﻣﯾﻠﻌﺗ ﻰﻠﻋ لوﺻﺣﻟا دﻌﺑ وأ ﺔﺑ
زﺎﮭﺟﻟا لﺎﻣﻌﺗﺳا نﻋ مﺟﻧﺗ دﻗ ﻲﺗﻟا رﺎطﺧﻷا . نﺳ تﺣﺗ لﺎﻔطأ لﺑﻗ نﻣ ﺔﻧﺎﯾﺻﻟاو فﯾظﻧﺗﻟا تﺎﯾﻠﻣﻌﺑ مﺎﯾﻘﻟا مدﻋ بﺟﯾ8 تاوﻧﺳ
نﺳﻟا ﻎﻟﺎﺑ صﺧﺷ ﺔﺑﻗارﻣ نودﺑو.
8تاوﻧﺳ .
ً
- ﺔﺑﻌﻠﺑ سﯾﻟ زﺎﮭﺟﻟا اذھ .ﯾ نأ بﺟﯾزﺎﮭﺟﻟﺎﺑ مﮭﺑﻌﻟ يدﺎﻔﺗﻟ ﺔﺑﻗارﻣﻟا تﺣﺗ لﺎﻔطﻷا ﻰﻘﺑ.
- نﺳ تﺣﺗ لﺎﻔطأ دﯾ لوﺎﻧﺗﻣ نﻋ ادﯾﻌﺑ ﻲﺋﺎﺑرﮭﻛﻟا ﮫﻛﻠﺳو زﺎﮭﺟﻟا ظﻔﺣ
زﺎﮭﺟﻟا لﻣﻋ ءﺎﻧﺛأ ﺎﮭﯾﻟإ لوﺻوﻟا وأ ﺎﮭﺗﺳﻣﻼﻣ نﻛﻣﯾ ﻲﺗﻟا ﺢطﺳﻷا ةرارﺣ ﻊﻔﺗرﺗ نأ نﻛﻣﯾ.
قورﺣﻟ ضرﻌﺗﻟا رطﺧ يدﺎﻔﺗﻟ ﺔﻣزﻼﻟا نﺎﻣﻷا تاءارﺟإ ذﺎﺧﺗا.
-ﻋ سﺑﺎﻘﻟا لﯾدﻌﺗ مد .ﺔﺟﻣرﺑ ةزﮭﺟأ ﻻو سﺑﺎﻘﻠﻟ تﻻوﺣﻣ لﺎﻣﻌﺗﺳا مدﻋ . تﯾﻗوﺗ زﺎﮭﺟﺑ ﮫﻠﺻو دﻌﺑ زﺎﮭﺟﻟا لﺎﻣﻌﺗﺳا مدﻋ
دﻌﺑ نﻋ مﻛﺣﺗ زﺎﮭﺟ وأ ﻲﺟرﺎﺧ.
-ﻲﺋﺎﺑرﮭﻛﻟا كﻠﺳﻟا ﻲﻓ رارﺿأ دوﺟو لﺎﺣ ﻲﻓ وأ ﮫﯾﻠﻋ فﻠﺗ ضارﻋأ روﮭظ وأ ﮫطوﻘﺳ لﺎﺣ ﻲﻓ زﺎﮭﺟﻟا لﺎﻣﻌﺗﺳا مدﻋ . بﺟﯾ
ﺑﻗ نﻣ ﺔﻔﻟﺎﺗﻟا ﻊطﻘﻟا لادﺑﺗﺳاﻊﯾﺑﻟا دﻌﺑ ﺎﻣ تﺎﻣدﺧﺑ لﺎﺻﺗﻻا وأ صﺗﺧﻣ لﻣﺎﻋ ل.
-ﻊﻧﺻﻣﻟا نﻣ نﺎﻣﺿﻟا ءﺎﻐﻟإ مﺗﯾ نأو رطﺧﻠﻟ ضرﻌﺗﺗ نأ نﻛﻣﯾ ذإ كﺳﻔﻧﺑ زﺎﮭﺟﻟا ﺢﯾﻠﺻﺗ مدﻋ . يﺄﻛ زﺎﮭﺟﻟا اذھ ﺢﯾﻠﺻﺗ بﺟﯾ
صﺗﺧﻣ لﻣﺎﻋ لﺑﻗ نﻣ رﺧآ ﻲﺋﺎﺑرﮭﻛ زﺎﮭﺟ.
-ا حوﻟ ﻲﻓ ﺔﯾطﻠﻔﻟا ةوﻘﻟا ﺔﻣﺋﻼﻣ نﻣ دﻛﺄﺗ ﻲﺋﺎﺑرﮭﻛﻟا رﺎﯾﺗﻟﺎﺑ زﺎﮭﺟﻟا لﺻو لﺑﻗ ﺔﻛﺑﺷﻟا ﻲﻓ ﺔﯾطﻠﻔﻟا ةوﻘﻟا ﻊﻣ صﺋﺎﺻﺧﻟ
ﺔﯾﺋﺎﺑرﮭﻛﻟا .عزوﻣﻟا ﻊﺟارو زﺎﮭﺟﻟا لﺻو نﻋ ﻊﻧﺗﻣا ﺎﮭﻘﻓاوﺗ مدﻋ لﺎﺣ ﻲﻓ.
- ﮫﯾﻓ ﻲﺑﺳرﺗﻟا لﻣﻌﻟا رﺎﯾﺗ زوﺎﺟﺗﯾ ﻻأو 30ﺔﺟرد .(DDR) لوﺣﻣ زﺎﮭﺟ قﯾرط نﻋ ﻲﺋﺎﺑرﮭﻛﻟا رﺎﯾﺗﻟﺎﺑ زﺎﮭﺟﻟا لﺻوﺑ ﺢﺻﻧﯾ
ﻲﺑﺳرﺗ
-و ﻲﺿرأ لﺻوﺑ دوزﻣ ﻲﺋﺎﺑرﮭﻛ سﺑﺎﻘﺑ زﺎﮭﺟﻟا لﺻوﺑ مﻗ ةوﻘﺑ16 لﻗﻷا ﻰﻠﻋ رﯾﺑﻣأ )ا ﺔﺋﻔﻟا نﻣ ةزﮭﺟﻸﻟ.(

NOTES

NOTES

NOTES

6, rue de l’Industrie
Z.I. des Sablons
89100 Sens - France
 Loading...