

12
Cafetièr
Cafetièree
Cof
Cof
fee Maker
fee Maker
FA 847/848 Kalys
MODE D’EMPLOI
MODE D’EMPLOI
USER MANUAL
USER MANUAL
FA 847 Kalys
FA 848 Kalys
programmable
03/04 - V1

11
Program the timer
• When the appliance is connected, the LCD screen (10)
displays the hour.
• To select the hour :
- press one time on the “PROG” knob (7) ;
- the LCD screen displays “clock” ;
- press on the “HEURE” knob (9) to select the hour and
on the “MIN” knob (8) to select the minutes ;
- press on the “PROG” knob (7) to end this operation.
• To select the timer :
- press two times on the “PROG” knob (7) ;
- the LCD screen displays “timer” ;
- press on the “HEURE” knob (9) to select the hour and
on the “MIN” knob (8) to select the minutes ;
- press on the “PROG” knob (7) to end this operation.
• Press on the M/A knob (6) one time to switch on the
coffee maker on the manual mode, and two times to
switch on the coffee maker on the automatic mode . The
coffee maker will automatically start at the scheduled
time.
Cleaning
• Unplug the appliance before cleaning.
• Do not put the coffee maker into the dishwasher.
• Clean the outside parts with a damp cloth when the
coffee machine is cold.
• The glass jug and filter basket can be cleaned in hot
soapy water. Rinse with clean hot water and dry before
replacing them.
• Never clean the jug with abrasive products or metal
sponges.
• Descale your coffee maker regularly, about every 5
months. Never use ammoniac or any other substance
that might damage your health.
2
CONSIGNES DE SÉCURITÉ
CONSIGNES DE SÉCURITÉ
Dans toute utilisation d’appareils électriques, des
précautions de base sont à respecter. Lire attentivement
cette notice avant la première utilisation de l’appareil.
• Vérifier que le voltage indiqué sur la plaque signalétique
de l’appareil corresponde bien à celui de votre installation
électrique. Si ce n’est pas le cas, adressez-vous au
revendeur et ne branchez pas l’appareil. Toute erreur de
branchement annule la garantie.
• Ne pas laisser l’appareil à la portée des enfants.
• Cet appareil est destiné à un usage domestique. Il doit
être utilisé selon les instructions du manuel. Ne jamais
l’employer pour d’autres usages.
• Ne jamais plonger l’appareil dans l’eau ou tout autre
liquide. Respecter les instructions pour le nettoyage.
• Ne jamais utiliser l’appareil à l’extérieur. Cet appareil doit
être utilisé dans un endroit sec.
• Ne pas utiliser l’appareil avec les mains mouillées ou
humides.
• Ne jamais utiliser l’appareil sur ou près de surfaces
chaudes.
• Ne jamais déplacer ou débrancher l’appareil en tirant
sur le cordon d’alimentation.
• Débrancher l’appareil avant de le nettoyer ou d’effectuer
le remplacement d’un élément.
• Avant de débrancher l’appareil, toujours mettre l’interrupteur sur la position « arrêt ».
• Ne pas introduire d’objets métalliques pointus, ni vos
doigts dans l’appareil.
• Vérifier régulièrement l’état du cordon d’alimentation. Ne
jamais utiliser l’appareil si le cordon d’alimentation, la
prise ou l’appareil sont endommagés.
Le cordon d’alimentation ne doit en aucun cas être en
WHITE & BROWN vous félicite d’avoir choisi ce produit
et vous remercie de votre confiance.
Pour votre confort et votre sécurité, votre article a été vérifié à toutes
les étapes de sa fabrication et a passé avec succès tous nos tests de
qualité. Nos produits sont conçus pour vous plaire tant par leur design
que par leur facilité d’utilisation et dans l’objectif constant de vous
apporter complète satisfaction.
FRANÇAIS
FRANÇAIS

KAL
KAL
YS F
YS F
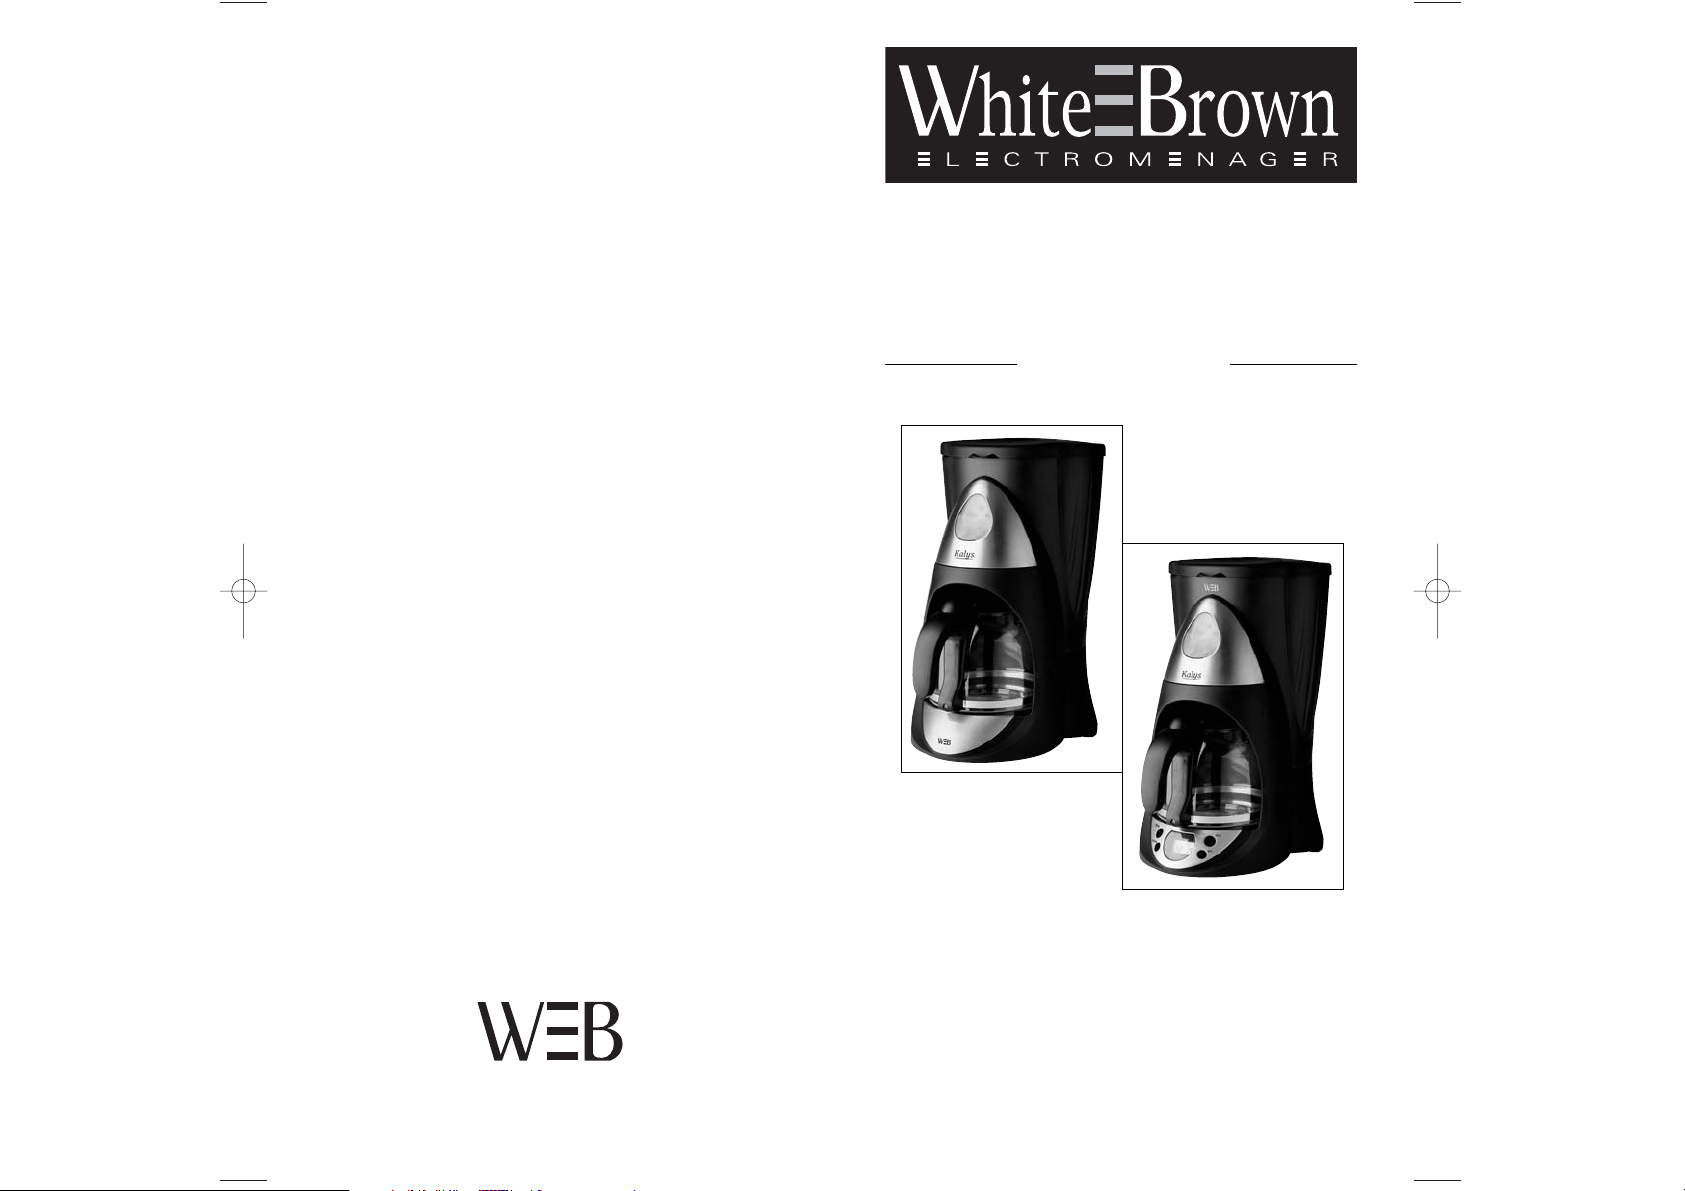
A 848 MODEL WITH TIMER
A 848 MODEL WITH TIMER
Description of the appliance
1. Lid of the water tank and of the filter-holder.
2. Graduated water level.
3. Removable filter holder.
4. Jug.
5. Hotplate.
6. On/Off knob.
7. PROG knob.
8. MIN knob.
9. HEURE (HOUR) knob.
10. LCD screen
Use of the appliance
• Open the lid of the water tank and of the filter-holder (1).
• Pour fresh water into the water tank. The number of
cups can be read on the graduated water level (2).
• Insert the paper filter into the filter holder (3) and add the
desired quantity of ground coffee. Close the lid.
• Place the jug (4) on the hotplate (5).
• Switch on the appliance with the “On/Off” knob (6).
• To obtain the automatic mode, press two times the
“On/Off” knob (6).
• Wait until the brewing process is finished and the filter
has run empty. When the water tank is empty and the jug
is still placed on the hotplate the coffee will be
maintained hot only if the “On/Off” knob is switched on.
• To stop the appliance, press the “On/Off” knob (6) until
all the light indicators are off.
3
contact avec les parties chaudes de l’appareil. Ne pas
enrouler le cordon autour de l’appareil et ne pas le plier.
• Si le cordon chauffe anormalement, contacter un
réparateur agréé.
• Ne jamais réparer l’appareil vous-même. Vous perdriez
le bénéfice de la garantie. Comme tout appareil
électrique, il doit être réparé par une personne qualifiée.
De même, le changement du cordon d’alimentation
représente un réel danger et il est nécessaire de contacter
un réparateur agréé.
Précautions spécifiques
:
• Ne jamais toucher les surfaces chaudes de l’appareil.
• La longueur du cordon de cet appareil a été calculée
pour réduire les risques d’accidents. S’il est trop court,
utiliser une rallonge en veillant à ne pas la laisser pendre
sur la surface de travail et prendre toutes les
précautions utiles pour qu’on ne puisse pas se prendre
les pieds dedans ou la tirer accidentellement.
• Ne faites pas fonctionner votre cafetière sans eau.
• Veiller à toujours utiliser de l’eau potable, froide ou tiède.
• Ne rien mettre d’autre que du café moulu dans le filtre à
café.
• Ne pas utiliser l’appareil si la verseuse est fêlée. La
verseuse doit être utilisée uniquement sur cet appareil.
Manipuler cette verseuse en verre avec beaucoup de
soin car elle est fragile (la verseuse n’est pas garantie).
• Ne jamais placer la verseuse encore chaude sur une
surface mouillée ou froide.
• Ne pas mettre la verseuse vide ou presque vide sur la
plaque chauffante lorsque l’appareil est encore allumé.
• Ne pas oublier que le café atteint une température très
élevée. Servir le café chaud avec précaution pour éviter
tout risque de brûlure.
LE FABRICANT NE SAURAIT ÊTRE TENU POUR RESPONSABLE
DE LA MAUVAISE UTILISATION DE L’APPAREIL.
CONSERVER SOIGNEUSEMENT CE MODE D’EMPLOI.
10
1
2
3
4
5
67
9
810

9
KAL
KAL
YS F
YS F
A 847 MODEL
A 847 MODEL
Description of the appliance
1. Lid of the water tank and of the filter-holder.
2. Graduated water level.
3. Removable filter holder.
4. Jug.
5. Hotplate.
6. On/Off light knob.
7. Light indicator
Use of the appliance
• Open the lid of the water tank and of the filter-holder (1).
• Pour fresh water into the water tank. The number of
cups can be read on the graduated water level (2).
• Insert the paper filter into the removable filter holder (3)
and add the desired quantity of ground coffee. Close the
lid.
• Place the jug (4) on the hotplate (5).
• Switch on the appliance with the On/Off knob (6). The
light indicator switches on (7).
• Wait until the brewing process is finished and the filter
has run empty. When the water tank is empty and the jug
is still placed on the hotplate the coffee will be maintained
hot only if the On/Off knob (6) is switched on.
• To switch off the appliance, set the On/Off knob (6) on
“A” (stop).
4
MODÈLE KAL
MODÈLE KAL
YS F
YS F
A 847
A 847
Description de l’appareil
1. Couvercle du réservoir et du porte-filtre.
2. Réservoir gradué.
3. Porte-filtre amovible.
4. Verseuse.
5. Plaque chauffante.
6. Interrupteur M / A.
7. Témoin lumineux de fonctionnement
Utilisation
• Ouvrir le couvercle du réservoir et du porte-filtre (1).
• Mettre de l’eau potable jusqu’au niveau souhaité dans le
réservoir gradué (2).
• Verser la quantité de café désirée dans un filtre en
papier (4). Positionner l’ensemble dans le porte-filtre
amovible (3). Refermer le couvercle.
• Mettre en place la verseuse (4) sur la plaque chauffante
(5).
• Mettre l’interrupteur lumineux M/A (6) sur la position
« Marche ». Le témoin lumineux (7) s’allume.
• Quand l’opération est terminée, si le réservoir est vide et
que la verseuse est toujours sur la plaque chauffante, le
café restera maintenu au chaud si l’interrupteur reste
sur la position « Marche » .
• Pour arrêter l’appareil, placer l’interrupteur M/A (6) sur
la position « Arrêt ».
1
2
7
4
5
6
3
1
2
7
4
5
6
3

5
MODÈLE
MODÈLE
KAL
KALYSYS
PROGRAMMABLE F
PROGRAMMABLE F
A 848
A 848
Description de l’appareil
1. Couvercle du réservoir et du porte-filtre.
2. Réservoir gradué.
3. Porte-filtre amovible.
4. Verseuse.
5. Plaque chauffante.
6. Touche M / A.
7. Touche PROG
8. Touche MIN
9. Touche HEURE
10. Ecran LCD.
Utilisation
• Ouvrir le couvercle du réservoir et du porte-filtre (1).
• Mettre de l’eau potable jusqu’au niveau souhaité dans le
réservoir gradué (2).
• Verser la quantité de café désirée dans un filtre en
papier. Positionner l’ensemble dans le porte-filtre amovible (3). Refermer le couvercle.
• Mettre en place la verseuse (4) sur la plaque chauffante (5).
• Mettre la touche « M/A » (6) sur la position « Marche ».
• Pour passer en mode automatique, appuyer deux fois sur
la touche « M/A » (6).
• Quand l’opération est terminée, si le réservoir est vide et
que la verseuse est toujours sur la base chauffante, le
café restera maintenu au chaud si la touche « M/A » (6)
reste sur la position « Marche » .
• Pour arrêter l’appareil, appuyer encore sur la touche
« M/A » (6).
8
this case guarantee conditions would cancel. As all
electrical products, a competent electrician must repair it.
Special recommendations :
• Do not touch hot surfaces of the appliance.
• The cord length of this product has been selected to
reduce the possibility of tangling in or tripping over a
longer cord. If more cord length is needed, an extension
cord may be used. Ensure not to let it drape over the
working area or dangle where someone could accidentally pull or trip over it.
• Never use your coffee machine without water in it.
• Only use fresh (potable) and cold (moderate) water.
• Only use ground coffee into the permanent filter.
• Do not use the coffee pot when it shows any signs of
cracks. The jug should always be used with this
appliance. Handle with care, as the glass is very fragile
(it’s not covered by the guarantee in case it is broken).
• Never place the coffee-pot when it is still hot on a wet or
cold surface.
• Never put the empty (or almost empty) coffee pot on the
hotplate when the coffee machine is switched on.
• Do not forget the temperature of the coffee is high.
Handle with care your coffee-pot to avoid any risk of
burns.
THE MANUFACTURER WILL NOT ASSUME ANY
RESPONSABILITY IN CASE OF NON ADHERENCE TO
THESE INSTRUCTIONS.
SAVE THIS USER MANUAL CAREFULLY.
1
2
3
4
5
67
9
810

7
CAUTION
CAUTION
Please read all these instructions carefully before
using this appliance.
• Make sure that the voltage rating on the type plate
corresponds to your main voltage. Any error in connecting
the appliance invalidates the guarantee.
• Never leave the appliance unsupervised when in use.
• Keep out of reach of children.
• Only use this appliance for domestic purposes and in the
way indicated in these instructions. Never use for other
uses.
• Never immerse the product in water or any other liquid
for any reasons. Respect the instructions for cleaning.
• Do not use the appliance outside and always place it in a
dry environment.
• Do not use if you have wet hands.
• Never use the appliance on or near hot surfaces.
• Never pull the cord to unplug or move the appliance.
• Unplug the appliance before cleaning or changing any
parts of the coffee maker.
• Always switch off the coffee maker before unplugging
the appliance.
• Do introduce neither metallic objects, nor fingers inside
the appliance.
• From time to time, check the cord. Never use the cord,
the plug or the appliance when they show any sign of
damage. Make sure the cord never comes into contact
with the hot parts of the appliance. Do not wind the cord
around the appliance and do not bend it.
• If the cord or the plug is getting more and more hot,
contact a qualified electrician.
• Never repair the appliance yourself. All interventions
made by a non-qualified person can be dangerous ; in
6
Programmation :
• Quand l’appareil est branché, l’écran LCD (10) affiche
l’heure.
• Pour régler l’heure :
- appuyer une fois sur la touche « PROG » (7) ;
- l’écran LCD affiche « clock » ;
- appuyer sur la touche « Heure » (9) pour régler l’heure
et sur la touche « MIN » (8) pour régler les minutes ;
- appuyer deux fois sur la touche « PROG » (7) pour
terminer l’opération.
• Pour régler l’heure de programmation :
- appuyer deux fois sur la touche « PROG » (7) ;
- l’écran LCD affiche « timer » ;
- appuyer sur la touche « Heure » (9) pour régler l’heure
et sur la touche « MIN » (8) pour régler les minutes ;
- appuyer une fois sur la touche « PROG » (7) pour
terminer l’opération.
• Appuyer sur la touche « M/A » (6) une fois pour démarrer
la cafetière en mode manuel, et deux fois pour faire
démarrer la cafetière en mode automatique. La cafetière
se mettra en fonctionnement automatiquement à l’heure
sélectionnée.
Nettoyage
:
• Ne pas oublier de débrancher l’appareil avant le nettoyage.
• Ne pas mettre l’appareil ni la verseuse au lave-vaisselle.
• Nettoyer la partie externe avec un chiffon sec et doux
quand la cafetière est froide.
• Les parties amovibles doivent être nettoyées dans de l’eau
chaude savonneuse, bien rincer avant de les replacer.
• Ne pas nettoyer la verseuse avec des produits abrasifs ou
des éponges métalliques.
• Pour détartrer la cafetière, ne pas utiliser d’ammoniaque
ni de substance qui pourrait nuire à votre santé.
Effectuer un détartrage tous les 5 mois environ.
Congratulations for having chosen this WHITE & BROWN product,
and thank you for trusting us. For your comfort and safety,
your appliance has been checked at every step of manufacturing
and has successfully gone through all our tests of quality.
WHITE & BROWN creates original products to please you,
as far as design and easiness to use are concerned
in order to give you complete satisfaction.
ENGLISH
ENGLISH
 Loading...