

24
Cuiseur vapeur
Cuiseur vapeur
Steam cooker
Steam cooker
CV 2204 “Sana Cook”
MODE D’EMPLOI
MODE D’EMPLOI
USER MANUAL
USER MANUAL
10/10
Indications relatives à la protection de l’environnement
Au terme de sa durée de vie, ce produit ne doit pas être éliminé avec les ordures ménagères mais doit
être remis à un point de collecte destiné au recyclage des appareils électriques et électroniques.
Le symbole figurant sur le produit, la notice d’utilisation ou l’emballage vous indique cela.
Les matériaux sont recyclables conformément à leur marquage. Vous apporterez une large contribution
à la protection de l’environnement par le biais du recyclage, de la réutilisation matérielle ou par les
autres formes de réutilisation des appareils usagés. Veuillez vous adresser à votre municipalité pour
connaître la déchetterie compétente.
Instructions on environment protection
Do not dispose of this product in the usual household garbage at the end of its life cycle ; hand it over a
collection point for the recycling of electrical and electronic appliances. The symbol on the product, the
instructions for use or the packing will inform about the methods of disposal.
The materials are recyclable as mentioned in its marking. By recycling or others forms of re-utilization of
old appliances, you are making an important contribution to protect our environment. Please inquire at
the community administration for the authorized disposal location.
notice CV 2204:notice CV 564 28/10/10 15:25 Page 1

MEAT AND POULTRY
• Steaming has the advantage of allowing all the fat to drip away during cooking. Due to the gentle
heat only choose tender lean cuts of meat and trim all fat. Meat suitable for grilling is ideal for
steaming.
• Serve steamed meat and poultry with flavour some sauces or marinade before steaming.
• Thoroughly cook all food before serving. Pierce with a knife or skewer to ocheck that the centre is
cooked and juices run clear.
• Sausages must be completely cooked before steaming.
• Use fresh herbs while steaming to add flavour.
23
CONSIGNES DE SÉCURITÉ
CONSIGNES DE SÉCURITÉ
Dans toute utilisation d’appareils électriques, des précautions de base sont à respecter.
Lire attentivement cette notice avant la première utilisation de l’appareil.
- Vérifier que la tension du réseau correspond bien à celle de l’appareil.
- Cet appareil n’est pas prévu pour être utilisé par des personnes (y compris les enfants) dont les capacités physiques, sensorielles ou mentales sont réduites, ou des personnes dénouées d’expérience ou de
connaissance, sauf si elles ont pu bénéficier, par l’intermédiaire d’une personne responsable de leur
sécurité, d’une surveillance ou d’instruction préalables concernant l’utilisation de l’appareil. Il convient
de surveiller les enfants pour s’assurer qu’ils ne jouent pas avec l’appareil.
- Ne jamais laisser votre appareil sans surveillance lorsqu’il est en fonctionnement.
- Ne pas laisser l’appareil à la portée des enfants ou des personnes irresponsables.
- Ne pas utiliser votre appareil si le cordon d’alimentation ou
l’appareil sont endommagés de quelque façon que ce soit. Si le cordon d’alimentation est endommagé, il doit être remplacé par un technicien agréé.
- Utiliser l’appareil uniquement pour des usages domestiques et conformément aux indications de
ce mode d’emploi.
- Ne jamais plonger l’appareil dans l’eau ou tout autre liquide.
- Ne pas utiliser l’appareil à l’extérieur et l’entreposer dans un endroit sec.
- Ne pas mettre l’appareil dans un four chaud.
- Ne pas utiliser d’accessoires autres que ceux recommandés par le fabricant, ils pourraient
endommager l’appareil.
- Débrancher l’appareil et le laisser refroidir avant de le nettoyer ou de le ranger.
- Ne pas tirer sur le cordon. Veiller à ce qu’on ne puisse pas se prendre les pieds dans le cordon
d’alimentation. Ne pas enrouler le cordon autour de l’appareil et ne pas le plier.
- Le cordon ne doit jamais être en contact avec les surfaces
chaudes de l’appareil.
- Ne pas toucher les surfaces chaudes de l’appareil, la base, les paniers ou le couvercle pendant le
fonctionnement. Attention aux risques de brûlures dues à la vapeur.
2
FRANÇAIS
FRANÇAIS
WHITE & BROWN vous félicite d’avoir choisi ce produit et vous remercie de votre confiance.
Pour votre confort et votre sécurité, votre article a été vérifié à toutes les étapes de sa fabrication
et a passé avec succès tous nos tests de qualité. Nos produits sont conçus pour vous plaire tant
par leur design que par leur facilité d’utilisation et dans l’objectif constant de vous apporter
complète satisfaction.
Food
Beef
Chicken
Lamb
Lamb
Porc
Sausages
(pre-cooked)
Typ e
In slices of
rump, sirloin or
fillet steak
Boneless
breast
Drumsticks
Chops with ou
without bone
Loin cut into
pieces
Tenderloin,
fillet, loin
steaks or loin
chops
Francfort
Knaki
Quantity
250 g
4 pieces
4 pieces
4 chopes
400 g
400 g or
4 pieces
400 g
400 g
Steam
time
12-15 min
15-18 min
22-28 min
15-20 min
8-13 min
17 min
15 min
Special notes
Trim all fat.
Steamed beef has a firm texture.
Remove skin before cooking. Layer for
maximum steam flow.
After steaming, brown skin under grill
if desired
Trim off all fat
Trim off all fat
Trim off all fat
Pierce skins before steaming
notice CV 2204:notice CV 564 28/10/10 15:25 Page 3

RICE, GRAINS
• If you prefer stickier rice, remove the drip tray.
• Use the rice bowl and add the required quantity of liquid together with the rice.
FISH AND SEAFOOD
• Fish is cooked when it is opaque and flakes easily with a fork.
• Frozen fish may be steamed without defrosting it separated before steaming and the cooking time
is extended.
• Add lemon wedges and herbs while steaming to improve flavour.
22
- Pour éviter les brûlures, toujours utiliser des gants ou un torchon pour retirer le couvercle ou soulever les paniers. Soulever le couvercle lentement en le tenant éloigné de vous et laisser la vapeur
s’échapper progressivement. Tenir le couvercle au-dessus de l’appareil pour laisser la condensation s’écouler dans l’appareil. Ne pas toucher l’intérieur de l’appareil en cours de fonctionnement.
- Pour vérifier la cuisson ou remuer, utiliser un ustensile muni d’un long manche.
- Toujours vérifier le montage de l’appareil avant de le mettre en marche.
- Ne jamais réparer l’appareil vous-même. Vous perdriez le bénéfice de la garantie. Comme tout
appareil électrique, il doit être réparé par une personne qualifiée. De même, le changement du
cordon d’alimentation représente un réel danger et il est nécessaire de contacter un réparateur
agréé.
LE FABRICANT NE SAURAIT ÊTRE TENU POUR RESPONSABLE DE
LA MAUVAISE UTILISATION DE L’APPAREIL.
CONSERVER SOIGNEUSEMENT CE MODE D’EMPLOI.
3
Food
Rice
Rice
Rice
pudding
Typ e
White
Brown
Pudding
Rice
Quantity
200 g
300 g
300 g
100 g Rice
+ 30 g caster
sugar
water
level
300 ml
600 ml
600 ml
500 ml warm
milk
Steam
time
25 min
35 min
40 min
75-80 min
Special notes
Serves 2
Serves 4
Serves 4-6
Reset timer after
75 mins and add more water to
Max level if necessary
Food
Fish,
fillets
Fish, thick steaks
Clams
Lobster,
tails
Mussels
Oysters
Scallops
Typ e
Frozen
Fresh
Salmon,
Cod
Tuna
Fresh
Fresh
Fresh
Fresh
Fresh
Quantity
250 g
250 g
250/400 g
250/400 g
400 g
2 queues
400 g
6
400 g
Steam
time
12-15 min
10-12 min
12-15 min
15-20 min
To be checked
22-25 min
12-12 min
16-20 min
10-12 min
Notes
Layer shells for maximum steam flow.
Steaming is done when shells are
completely open
Meat will be opaque. Cook longer
if necessary.
Steaming is done when shells are
completely open.
Steaming is done when shells are
completely open.
Stir halfway through steam time.
Meat opaque and flaky when done.
notice CV 2204:notice CV 564 28/10/10 15:25 Page 5
COOKING TIME TABLE
COOKING TIME TABLE
VEGETABLES
• Cut off thick stems from cauliflowers, broccoli and cabbage.
• Steam leafy, green vegetables for the shortest possible time as they loose colour easily.
• Salt and season vegetables after steaming for best results.
• Frozen vegetables need not be thawed before steaming.
21
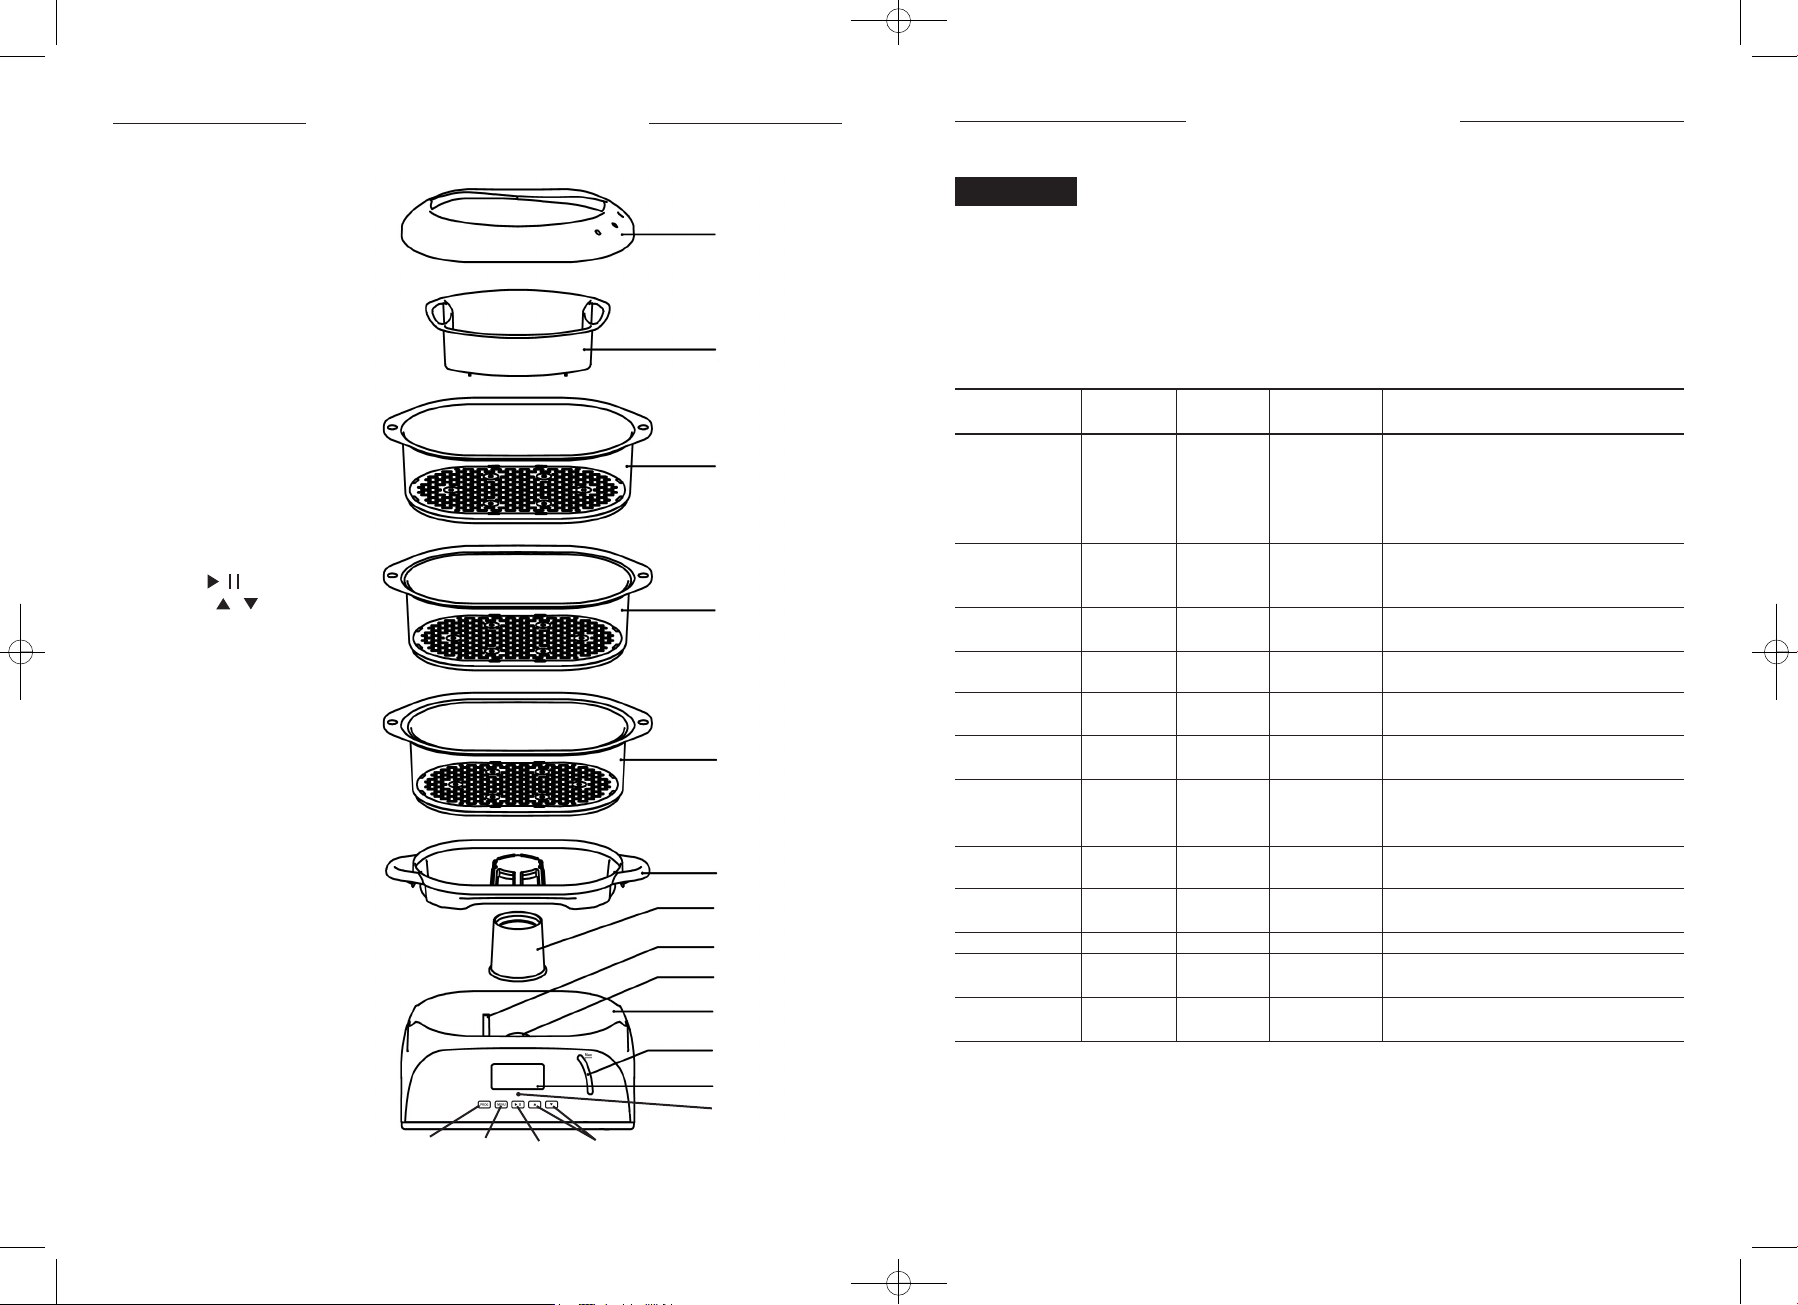
DESCRIPTION DE L’APPAREIL
DESCRIPTION DE L’APPAREIL
1. Couvercle
2. Bol à riz
3. Panier vapeur n°3
4. Panier vapeur n°2
5. Panier vapeur n°1
6. Bac de récupération du jus
7. Concentrateur de vapeur
(amovible)
8. Indicateur du niveau d’eau
intérieur
9. Résistance
10. Réservoir d’eau
11. Indicateur du niveau d’eau
extérieur
12. Ecran LCD
13. Voyant lumineux
14. Touche « PROG »
(programmation)
15. Touche « MENU »
16. Touche « »
17. Touches « »
(sélection)
4
Food
Artichokes
Asparagus
Baby sweet
corn
Beans,
green
Broccoli
Cabbage
Carrots
Cauliflowers
Courgettes
Mushrooms
button
Peas
Small new
potatoes
Spinach
Typ e
Fresh
Fresh
Frozen
Fresh
Fresh
Frozen
Fresh
Frozen
Fresh
sliced
Fresh, sliced
Fresh
florets
Frozen
Fresh,
en slices
Fresh
Frozen
Fresh
Fresh
Frozen
Quantity
3 med.
400 g
400 g
230 g
400 g
400 g
400 g
400 g
400 g
400 g
400 g
400 g
400 g
200 g
400 g
400 g
250 g
400 g
Steam
times
50-55 min
14-16 min
18-20 min
35-40 min
25-30 min
35-40 min
16-20 min
20-23 min
35-40 min
22-25 min
18-20 min
20-23 min
15-20 min
15-20 min
15-18 min
25-30 min
10-12 min
18-20 min
Notes
Lie flat in basket.
Criss cross 2nd layer to allow
steam flow.
Stir halfway through
steam time
Stir halfway through.
steam time
Remove stalk. Stir halfway through
steam time.
Stir halfway through steam time
Stir halfway through steam time
Stir halfway through steam time
Stir halfway through steam time
Stir halfway through steam time
Stir halfway through steam time
Stir halfway through steam time
1
2
3
4
5
6
7
8
9
10
11
12
13
14 15 16 17
notice CV 2204:notice CV 564 28/10/10 15:25 Page 7

INSTALLATION ET UTILISATION DES ACCESSOIRES
INSTALLATION ET UTILISATION DES ACCESSOIRES
- Nettoyer toutes les parties amovibles de l’appareil avec de l’eau savonneuse. Rincer et sécher.
- Placer la base sur un plan de travail stable, à proximité d’une prise de courant.
- Mettez le concentrateur de vapeur (7) autour de la résistance (9), en veillant à ce que le côté le
plus large soit en bas.
- Verser de l’eau froide dans le réservoir (10) jusqu’au niveau maximum « Max » (11).
- Placer le bac de récupération du jus (6) au dessus du réservoir d’eau (10).
- Placer les aliments dans les paniers (3/4/5).
- Superposer les paniers vapeur (3/4/5) sur le bac de récupération du jus (6).
- Positionner le couvercle (1) sur le dernier panier vapeur (3).
- Brancher l’appareil.
- Sélectionner le temps de cuisson (voir « FONCTIONNEMENT DES TOUCHES ET DE L’ECRAN LCD »).
Un bip sonore retentit et le voyant lumineux (13) s’allume.
- Vérifier le niveau d’eau régulièrement grâce à l’indicateur de niveau d’eau extérieur (11). Si
besoin, rajouter de l’eau pendant la cuisson par les ouvertures sur les côtés, au niveau des
poignées du bac de récupération (6).
- Une fois le temps de cuisson écoulé, un bip sonore retentit.
- Il est possible de réchauffer les aliments. Veillez toutefois à ce qu’il reste de l’eau dans le réservoir (10).
- Débrancher l’appareil.
- Retirer le couvercle (1) et les paniers vapeur (3/4/5) de l’appareil en prenant toutes les précautions
utiles pour éviter les brûlures dues à la vapeur.
- Laisser refroidir complètement les éléments avant de les nettoyer.
FONCTIONNEMENT DES TOUCHES ET
FONCTIONNEMENT DES TOUCHES ET
DE L’ECRAN LCD
DE L’ECRAN LCD
- Une fois l’appareil branché, en mode « veille », l’écran LCD indique l’heure et tous les logos
suivants : (pomme)/ (carotte)/ (poisson)/ (riz)/ (volaille)/ (œuf)
Réglage de l’heure
- Appuyer sur la touche « PROG » (14) pendant 2 secondes.
- Lorsque l’heure clignote, appuyer sur les touches “ ” ou “ ” (17) pour régler l’heure.
- Une fois l’heure correcte sélectionnée, appuyer à nouveau sur la touche “PROG” (14) ou attendez
10 secondes. Il revient automatiquement en mode veille.
Pour une cuisson immédiate
- Appuyer sur la touche « MENU » (15) pour sélectionner le type de l’aliment. L’aliment sélectionné
clignote sur l’écran LCD (12) et indique le temps de cuisson recommandé.
- Appuyer sur les touches de sélection « » ou « » (17) pour choisir un autre type d’aliment.
- Appuyer sur la touche «lecture/pause» (16) : le voyant lumineux (13) s’allume et l’écran LCD (12)
indique le symbole de chauffe « », l’aliment sélectionné et le temps de cuisson.
5
CLEANING AND MAINTENANCE
CLEANING AND MAINTENANCE
- Empty the water tank and clean it with a damp cloth.
- All removable parts can be put in the dishwasher.
- Descale the appliance every 8 times.
- Position the turbo ring (7) upside down around the heating element (the largest side on the upper).
- Fill the water tank (10) with cold water up to “MAX” level.
- Fill the inside of the turbo ring with white vinegar to the same level.
- Do not heat up to avoid the descaling odour.
- Leave overnight to descale.
- Rinse out the inside of water tank with warm water several times.
- Stack the baskets one to the other following No.1 (5) into No.2 (4), then together into No.3.
- Put the rice bowl (2) into the steam basket No.1 (5)
- At last place the baskets on the juice collector (6) and put lid (1) over them all.
20
notice CV 2204:notice CV 564 28/10/10 15:25 Page 9

- Press on selector touchs « » and « » (17) to change the cooking time (max 90 mins).
- After the setting time is over, the steam cooker will enter the keeping warm status, symbolized by
the logo « ». Press on the touch « » (16) to cancel the keeping warm status and return to
standby mode. The light indicator (13) is off.
- During cooking, you can press the touch « » (16): the light indicator (13) will flash.
- Press the touch « » (16) to resume.
- Press on touchs « PROG » or « MENU » or do nothing for a period of 2 minutes if you want to
cancel the cooking statusand return to the standby mode. The light indicator (13) is off.
NOTE: When water is insufficient during cooking or keeping warm status, the steam cooker will
automatically stop working and the buzzer will ringing for 10 seconds and return to the standby
mode.
Cooking reservation
- Press the touch « PROG » (14) in the standby mode to enter the reservation setting mode.
The « PROG » logo will flash on the display (12) with the default reservation time also on it.
- Press the « » or « » touchs (17) to set your reservation time (maximum 24 hours).
- Press the « PROG » touch (14) again (12) to show the cooking time « 45 », and a flashing « PROG »
logo. Press the « » and « » touchs (17) to select your cooking time.
- Press on the « PROG » touch (14) to enter the reservation status. The « PROG » logo and the clock
will be shown on the display (12). When it reaches the reservation time, the steam cooker will
begin the reserved cooking.
- Press the « PROG » touch (14) to cancel the reservation status and return to the standby mode.
USING SEVERAL BASKETS
USING SEVERAL BASKETS
- Always place the largest pieces or food with the longest cooking time (including rice) in the lower
basket.
- You may place a different food in the 3 baskets, but as condensation will drip from the upper
baskets be sure the flavours compliment each other.
- If steaming meat or poultry and vegetables, always place the meat or poultry in the lower bowl so
that juices from raw or partially cooked meat cannot drip onto other foods.
- Steaming times for food in the upper trays are usually slightly longer so allow an extra 5-8 minutes.
- If foods with different cooking times are being steamed, start the food with the longest cooking
time in the lower tray. Then when the remaining steaming time reaches that of food with the
shortest cooking time, carefully remove the lid with oven gloves and place other baskets
containing the food to be cooked on top. Cover with the lid and continue steaming.
19
NOTE : la première étape « MENU » peut être ignorée. Appuyer directement sur la touche « » (16) :
le voyant lumineux (13) s’allume et l’écran LCD (12) indique le symbole de chauffe « » et le temps de
cuisson par défaut « 45 » (45 minutes).
- Appuyer sur les touches de sélection « » et « » (17) pour changer le temps de cuisson qui
est au maximum de 90 minutes.
- Une fois le temps de cuisson écoulé, le cuiseur vapeur maintient au chaud les aliments. Ce mode
est indiqué par le logo « l ». Appuyer sur la touche « » (16) pour annuler cette fonction de
maintien au chaud et retourner au mode veille. Le voyant lumineux (13) s’éteint.
- En cours de cuisson, vous pouvez appuyer sur la touche « » (16) : le voyant lumineux (13) clignote.
- Appuyer sur la touche « » (16) pour reprendre la cuisson.
- Appuyer sur la touche « PROG » ou la touche « MENU » ou ne touchez à aucune touche pendant
2 minutes si vous souhaitez arrêter le mode de cuisson en cours et retournez en mode veille. Le
voyant lumineux (13) s’éteint.
NOTE : Lorsque le niveau d’eau est insuffisant pendant la cuisson ou le maintien au chaud des aliments, le cuiseur vapeur s’arrête automatiquement et un bip sonore retentit pendant 10 secondes
avant de retourner en mode veille.
Pour une cuisson avec programmation
- En mode veille, appuyer sur la touche « PROG » (14) pour entrer votre programmation. Le logo
« PROG » clignote sur l’écran LCD (12) indiquant la programmation par défaut.
- Appuyer sur les touches de sélection « » et « » (17) pour sélectionner l’heure de début de
cuisson (maximum 24 heures).
- Appuyer à nouveau sur la touche « PROG » (14). L’écran LCD (12) indique le temps de cuisson « 45 »
minutes par défaut et le logo « PROG » en clignotant. Sélectionner le temps de cuisson désiré en
appuyant sur les touches de sélection « » et « » (17).
- Appuyer une 3
ème
fois sur la touche « PROG » (14) pour valider la programmation. L’écran LCD (12)
affiche « PROG » et l’heure. Le cuiseur vapeur se met automatiquement en marche à l’heure
programmée.
- Appuyer sur la touche « PROG » (14) pour annuler la programmation et revenir en mode veille.
UTILISATION DES TROIS PANIERS VAPEUR
UTILISATION DES TROIS PANIERS VAPEUR
- Toujours placer les plus grosses pièces ou les aliments nécessitant une cuisson plus longue dans
le panier inférieur.
- Il est possible de placer des aliments différents dans les trois paniers. Cependant, la vapeur produit un
effet de mélange de saveurs : il faut donc s’assurer que les goûts des aliments soient compatibles.
- En cas de cuisson de viande ou volaille avec des légumes, toujours placer la viande dans le panier
inférieur afin que le jus ou les graisses ne puissent pas s’écouler sur les autres aliments.
- Le temps de cuisson dans le panier supérieur est généralement plus long que dans les autres paniers,
on peut donc ajouter 5 à 8 minutes au temps indiqué.
- Pour cuire des aliments aux temps de cuisson différents, commencer par placer l’aliment au temps de
cuisson le plus long dans le panier inférieur. Quand le minuteur indique le temps correspondant à la
durée de cuisson des autres aliments, retirer le couvercle avec précaution et placer les autres paniers
vapeur. Replacer le couvercle et terminer la cuisson.
6
notice CV 2204:notice CV 564 28/10/10 15:25 Page 11

NETTOYAGE ET ENTRETIEN DE L’APPAREIL
NETTOYAGE ET ENTRETIEN DE L’APPAREIL
- Vider le réservoir d’eau et l’essuyer avec un chiffon doux.
- Toutes les parties amovibles peuvent aller au lave-vaisselle.
- Détartrer l’appareil régulièrement et au moins toutes les 8 utilisations.
- Mettre le concentrateur de vapeur (7) autour de la résistance (9) (la base la plus large en haut).
- Remplir le réservoir d’eau (10) jusqu’au niveau MAX.
- Remplir l’intérieur du concentrateur de vapeur (7) avec du vinaigre blanc.
- Ne pas mettre l’appareil en marche pour éviter les mauvaises odeurs. Laisser reposer une nuit et
rincer plusieurs fois à l’eau tiède le réservoir d’eau.
- Pour le rangement, insérer les paniers vapeur les uns dans les autres, le n°1 (5) dans le n°2 (4), le
tout dans le n°3.
- Mettre le conteneur à riz (2) dans le panier vapeur n°1 (5)
- Placer le tout sur le bac de récupération (6) et mettre le couvercle (1) par-dessus le tout.
7
INSTALLATION ANG USING OF ACCESSORIES
INSTALLATION ANG USING OF ACCESSORIES
- Wash all the removable parts of the appliance with warm water and washing up liquid.
Rinse and dry.
- Place the base unit on a stable flat surface, near from a plug.
- Put the turbo ring (7) around the heating element (9), with the largest side on the bottom.
- Pour fresh water directly into the water tank (10) up to the maximum level « Max » (11).
- Place the juice collector (6) on the top of the water tank (10).
- Place the food in baskets (3/4/5).
- Superpose baskets (3/4/5) on the top of the juice collector (6).
- Put the lid (1) on the third basket (3).
- Plug the appliance.
- Set time for recommended cooking times (see “TOUCHS AND DISPLAY USING”). The buzzer rings
and the light indicator (13) is on.
- Check the water level regularly by looking the exterior water level indicator (11). If necessary, add
water from the side of juice collector (6) during cooking.
- After the setting time is over, the buzzer rings.
- If there is enough water in the water tank (10), you can reheat food.
- Unplug the appliance.
- Remove the lid (1) and all baskets (3/4/5) from the appliance, taking all precautions because of
burns or scalds risks.
- Let all parts of the appliance cool completely before cleaning.
TOUCHS AND DISPLAY USING
TOUCHS AND DISPLAY USING
- After plugging the appliance in, the display shows the clock and the logo of food (in standby
mode): (apple)/ (carrot)/ (fish)/ (rice)/ (chicken)/ (egg).
Adjusting the clock
- Press the “PROG” touch (14) about 2 seconds.
- When the clock flashes, you can press “ ” or “ ” (17) to adjust the clock.
- When the correct clock is selected, press the “PROG” touch (14) again or wait for 10 seconds.
Cooking immediately
- Press the touch « MENU » (15) to enter the mode of selecting food. The last time selected food will
flash automatically on the display (12) and will show the recommended cooking time.
- Press the touchs « » or « » (17) to select another food.
- Press the touch « » (16): the light indicator (13) is on and the display (12) shows the logo of
« », the selected food and cooking time.
NOTE: the first step « MENU » can be ignored. Press directly on the touch « » (16):
the light indicator (13) is on and the display (12) shows the logo « » and the cooking time “45”
(45 minutes).
18
notice CV 2204:notice CV 564 28/10/10 15:25 Page 13
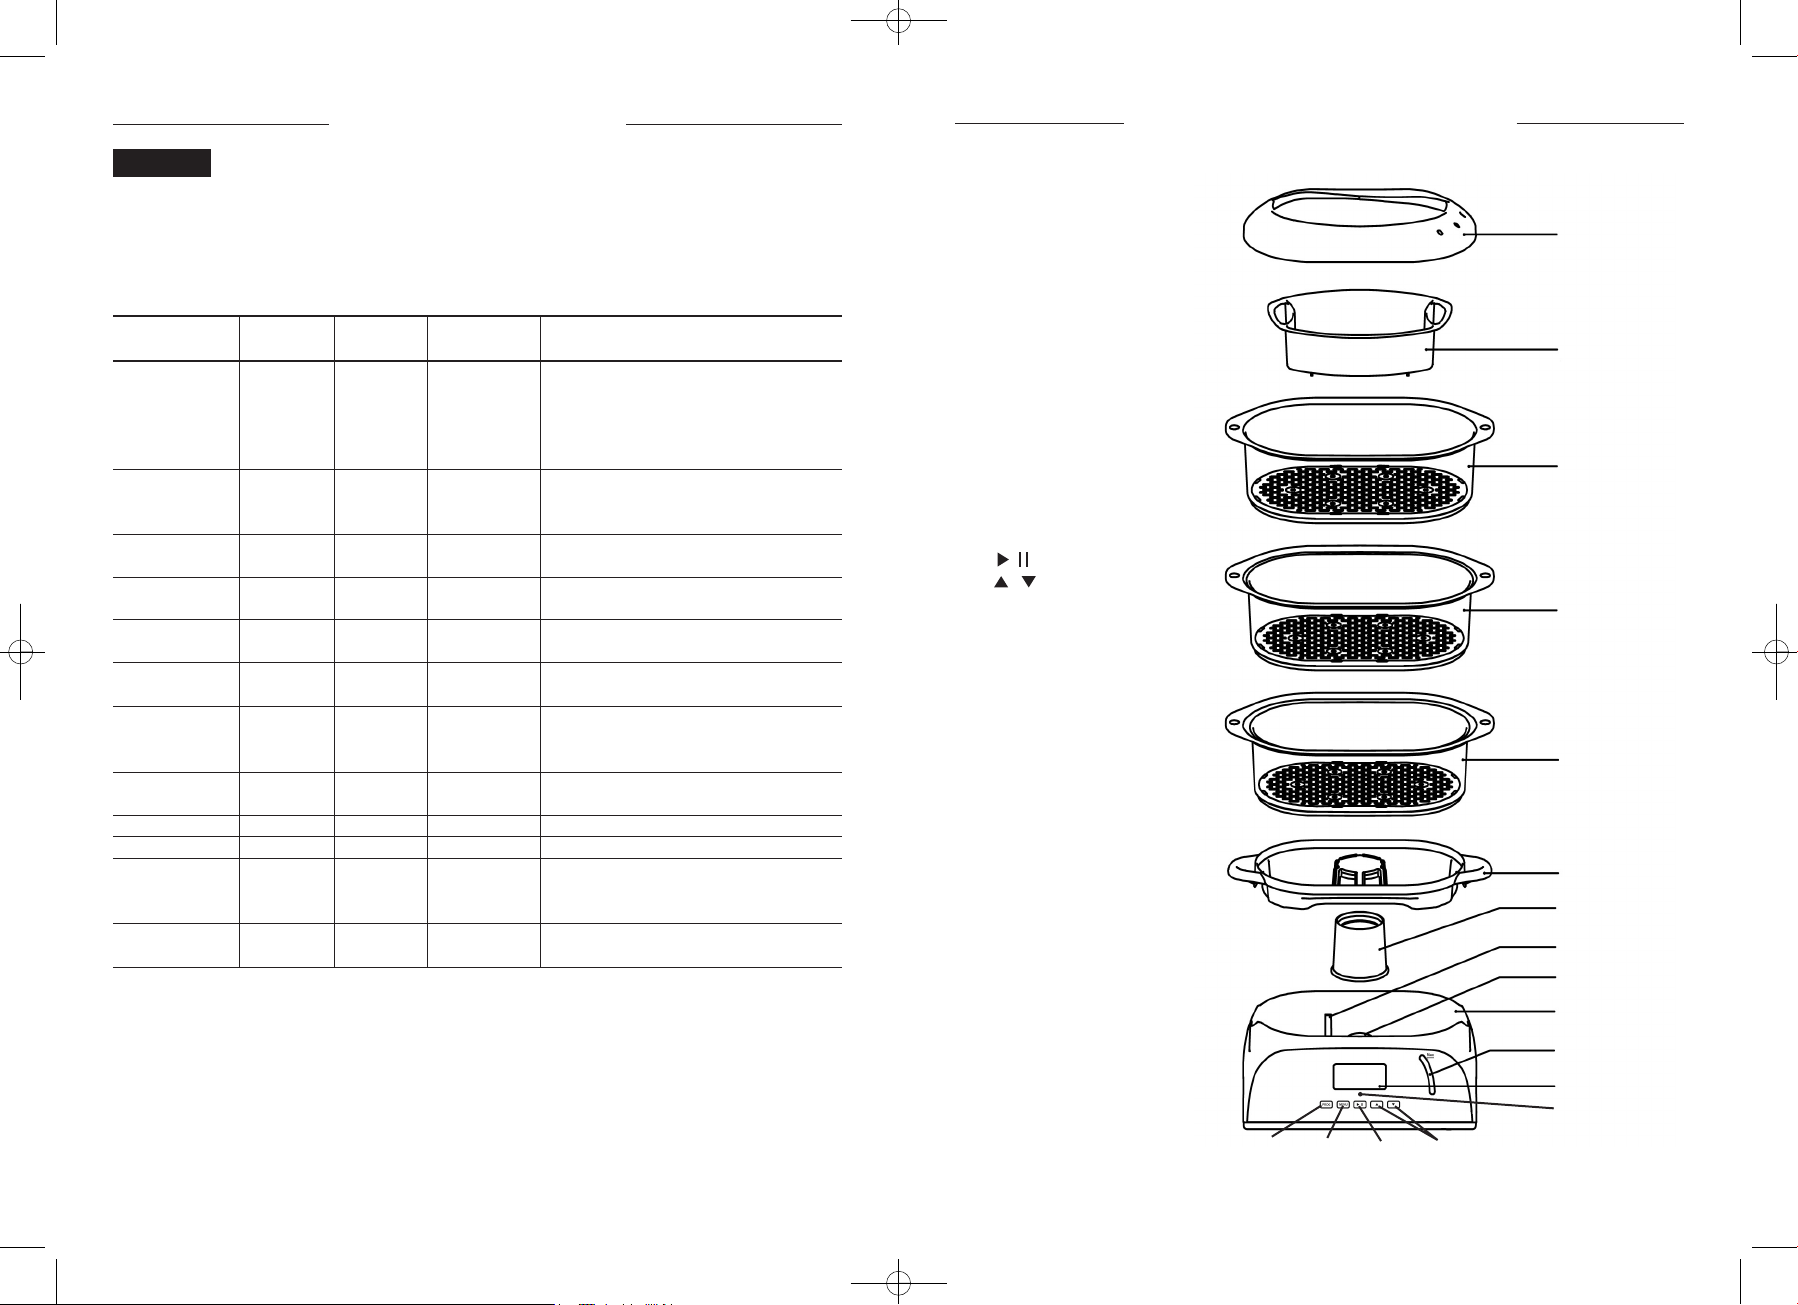
DESCRIPTION OF THE APPLIANCE
DESCRIPTION OF THE APPLIANCE
1. Lid
2. Rice bowl
3. Steam basket No. 3
4. Steam basket No. 2
5. Steam basket No. 1
6. Juice collector
7. (Removable) Turbo ring
8. Inside water level indicator
9. Heating element
10. Water tank
11. Exterior water level indicator
12. Display
13. Light Indicator
14. “PROG” touch (cooking
reservation)
15. MENU touch
16. « » touch
17. « » touchs (selector)
17
TABLEAUX DE CUISSON
TABLEAUX DE CUISSON
LEGUMES
• Couper les légumes en morceaux homogènes.
• Cuire très brièvement les légumes verts à feuilles car ils perdent facilement leur couleur.
• Pour de meilleurs résultats, saler et assaisonner après cuisson.
• Les légumes surgelés ne nécessitent pas de décongélation avant cuisson.
8
Variété
Artichauts
Asperges
Petits épis de
maïs doux
Haricots verts
Bouquet de
brocolis
Choux
Carottes
Chou-fleur
Courgettes
Champignons
Petits pois
Petites
patates
nouvelles
Epinards
Typ e
Frais
Frais
Surgelés
Frais
Frais
Surgelés
Frais
Surgelés
Frais
tranché
Frais, en
rondelles
Frais en
bouquets
Surgelés
Frais, en rondelles
Frais
Surgelés
Frais
Frais
Surgelés
Quantité
3 moyens
400 g
400 g
230 g
400 g
400 g
400 g
400 g
400 g
400 g
400 g
400 g
400 g
200 g
400 g
400 g
250 g
400 g
Temps de
cuisson
50-55 min
14-16 min
18-20 min
35-40 min
25-30 min
35-40 min
16-20 min
20-23 min
35-40 min
22-25 min
18-20 min
20-23 min
15-20 min
15-20 min
15-18 min
25-30 min
10-12 min
18-20 min
Remarques
Allonger dans le panier.
Disposer les couches en croix pour une
bonne diffusion de la vapeur.
Remuer à mi-cuisson.
Remuer à mi-cuisson.
Retirer les tiges.
Remuer à mi-cuisson.
Remuer à mi-cuisson.
Remuer à mi-cuisson
Remuer à mi-cuisson
Remuer à mi-cuisson
Remuer à mi-cuisson
Remuer à mi-cuisson
Remuer à mi-cuisson
1
2
3
4
5
6
7
8
9
10
11
12
13
14 15 16 17
notice CV 2204:notice CV 564 28/10/10 15:25 Page 15

RIZ, CÉRÉALES
• Pour obtenir un riz plus gluant, utiliser l’appareil sans le bac récupérateur d’eau.
• Utiliser le bol à riz et ajouter la quantité de liquide indiquée directement avec le riz.
POISSON ET FRUITS DE MER
• Le poisson est cuit lorsqu’il devient opaque et se détache facilement avec une fourchette.
• Les poissons surgelés peuvent être cuits sans décongélation préalable s’ils sont bien séparés et
en augmentant la durée de cuisson.
• Cuire avec des rondelles de citrons et des herbes pour exalter la saveur.
9
CAUTIONS
CAUTIONS
- Read all these instructions carefully before using this product.
- This appliance is not intended for use by persons (including children) with reduced physical,
sensory or mental capabilities, or lack of experience and knowledge, unless they have been given
supervision or instruction concerning use of the appliance by a person responsible for their safety.
Children should be supervised to ensure that they do not play with the appliance.
- Make sure that the voltage rating on the type plate corresponds to your main voltage.
- Never leave the appliance unsupervised when in use.
- Keep out of children.
- From time to time, check the cord for damages. Never use the appliance if cord or appliance
shows any sign of damage.
- Only use the appliance for domestic purposes and in the way indicated in these instructions.
- Never immerse the product in water or any other liquid for any reasons.
- Do not use outside.
- Never use accessories that are not recommended or supplied by the manufacturer. It could constitute a danger to the user and risk to damage the appliance.
- Do not use accessories that are not recommended by the manufacturer, they could damage your
appliance.
- Unplug the appliance before cleaning or replacement of any pieces. Allow it to cool before ranging
or cleaning.
- From time to time, check the cord. Never use the cord, the plug or the appliance when they show
any sign of damage. Make sure the cord never comes into contact with the hot parts of the appliance.
Do not wind the cord around the appliance and do not bend it.
- Ensure that the power supply cable does not hang down from the work surface as it could be
easily pulled, particularly by small children, thereby causing serious accidents.
- Burns can occur from touching hot parts, hot water, steam or food.
a. Position appliance away from walls and cabinets to prevent damages from steam.
b. To prevent burns, remove lid slowly with the inside of lid pointing away from you and let steam
escape gradually.
c. Use oven gloves or a cloth when removing lid, rice bowl and steam trays.
d. Do not reach over appliance while it is generating steam.
e. When checking food, use a long handle spoon or tongs.
- Always use sufficient water for the steaming time.
- Make sure that the appliance is correctly assembled before using.
- All interventions made by a non-qualified person can be dangerous; in this case guarantee conditions would cancel. As all electrical products, a competent electrician must repair it.
THE MANUFACTURER WILL NOT ASSUME ANY RESPONSIBILITY
IN CASE OF NON ADHERENCE TO THIS RECOMMENDATION.
16
Aliment
Riz
Riz
Gâteau
de riz
Typ e
Blanc
Blanc
Riz rond
Quantité
200 g
300 g
300 g
100 g +
30 g de
sucre
Quantité
d’eau
300 ml
600 ml
600 ml
500 ml de
lait chaud
Temps de
cuisson
25 min
35 min
40 min
75-80 min
Remarques
Pour 2 personnes
Pour 4 personnes
Pour 4 à 6 personnes
Vérifier le niveau
d’eau en cours de
cuisson
Variété
Filets de poisson
Tranches de
poisson
Palourdes
Queues de
homards
Moules
Huître
Coquilles
Saint-Jacques
Typ e
Surgelé
Frais
Saumon,
morue
Thon
Frais
Frais
Frais
Frais
Frais
Quantité
250 g
250 g
250/400 g
250/400 g
400 g
2 queues
400 g
6
400 g
Temps de
cuisson
12-15 min
10-12 min
12-15 min
15-20 min
À surveiller, arrêter
dès que les palourdes
sont ouvertes
22-25 min
12-12 min
16-20 min
10-12 min
Remarques
Bien étaler pour une bonne
répartition de la vapeur.
La chair doit être bien opaque.
Cuire encore si nécessaire.
Arrêter dès que les
moules sont ouvertes.
Arrêter dès que les
huîtres sont ouvertes.
Remuer à mi-cuisson.
La chair doit être bien opaque.
ENGLISH
ENGLISH
Congratulations for having chosen this WHITE & BROWN product, and thank you for trusting us.
For your comfort and safety, your appliance has been checked at every step of manufacturing
and has successfully gone through all our tests of quality. WHITE & BROWN
creates original products to please you, as far as design and easiness to use are concerned
in order to give you complete satisfaction.
notice CV 2204:notice CV 564 28/10/10 15:25 Page 17

C
C
RÈME
RÈMEAUAU
CITRON
CITRON
Pour 4 personnes – Préparation : 20 min – Cuisson : 40 min
- 6 oeufs
- 250 g de sucre
- jus de 2 citrons
- zeste râpé de 1 citron
- 3 dl d’eau
Battez les œufs en omelette.
Chauffez l’eau avec le sucre et le zeste du citron.
Hors du feu, ajoutez le jus de citron.
Versez sur les œufs battus. Mélangez bien. Filtrez.
Versez la crème dans 4 ramequins.
Couvrez avec un film alimentaire.
Placez les ramequins dans le panier vapeur et faites cuire 40 min.
Laissez bien refroidir avant de servir.
I
I
LELEFLOTTANTE
FLOTTANTEAUAU
CARAMEL
CARAMEL
Pour 4 personnes – Préparation : 30 min – Cuisson : 20 min
- 4 œufs
- 300 g de sucre
- 4 dl de lait
- vanille
Versez 100 g de sucre et une cuillerée d’eau dans une casserole. Faites un caramel.
Répartissez-le au fond d’un moule à charlotte. Séparez les blancs des jaunes d’œuf.
Montez les blancs en neige en incorporant progressivement 100 g de sucre.
Versez les blancs montés dans le moule à charlotte et faites cuire 15 min dans le panier vapeur.
Laissez refroidir. Faites chauffer le lait avec 100 g de sucre et la vanille.
Versez le lait en fouettant sur les jaunes.
Remettez l’ensemble dans la casserole et faites chauffer en remuant jusqu’à ce que la crème
épaississe. Attention
, la préparation ne doit pas bouillir. Laissez refroidir.
Démoulez l’île flottante dans un plat de service, versez la crème anglaise autour.
Servez bien froid.
F
F
LAN
LANAUAU
CARAMEL
CARAMEL
Pour 4 personnes – Préparation : 10 min – Cuisson : 10 min
- 4 dl de lait
- 200 g de sucre
- 3 œufs
- vanille
Versez 100 g de sucre et une cuillerée d’eau dans une casserole. Faites un caramel.
Répartissez le caramel au fond de 4 ramequins.
Battez les œufs avec le sucre restant, ajoutez le lait chaud, parfumez avec la vanille.
Versez la crème dans les ramequins, couvrez d’un film alimentaire et faire cuire 10 min
dans le panier vapeur.
Laissez refroidir et démoulez dans une assiette.
15
VIANDES ET VOLAILLES
• La vapeur a l’avantage de permettre aux graisses de s’écouler durant la cuisson. C’est un procédé
particulièrement sain.
• Choisir des morceaux tendres et dégraissés. Les viandes à griller sont en général bien adaptées à
la cuisson à la vapeur.
• Servir les viandes cuites à la vapeur accompagnées de sauces ou les faire mariner avant cuisson.
• Vérifier la cuisson avant de servir. Percer avec un couteau pour vérifier que les morceaux soient
bien cuits jusqu’au cœur. Le jus qui s’écoule doit être clair.
• Les saucisses doivent être parfaitement cuites avant d’être introduites dans le cuiseur-vapeur.
• Utiliser des herbes fraîches pendant la cuisson pour aromatiser la viande.
10
Variété
Bœuf
Poulet
Agneau
Porc
Saucisses
(précuites)
Typ e
Rumsteack,
filet ou aloyau
tranché
Blanc
sans os
Pilons
Côtelettes
avec ou
sans os
Filets,
côtelettes
Francfort
Knaki
Quantité
250 g
4 morceaux
4 morceaux
4 côtelettes
400 g ou
4 morceaux
400 g
400 g
Temps de
cuisson
12-15 min
15-18 min
22-28 min
15-20 min
8-13 min
17 min
15 min
Remarques
Retirer toutes les parties
grasses. Le bœuf cuit à la vapeur a
une texture ferme.
Retirer la peau avant cuisson.
Etaler pour une bonne
répartition de la vapeur.
Après cuisson, faire dorer
au gril si désiré.
Retirer toutes les parties grasses.
Retirer toutes les parties grasses
Percer les saucisses avant cuisson.
notice CV 2204:notice CV 564 28/10/10 15:25 Page 19

QUELQUES RECETTES LÉGÈRES POUR
QUELQUES RECETTES LÉGÈRES POUR
VOTRE CUISEUR VAPEUR
VOTRE CUISEUR VAPEUR
D
D
UOUOPOTAGER
POTAGERÀÀLL
’
’
HUILE
HUILEDD
’
’
ÉPICES
ÉPICES
Pour 4 personnes – Préparation : 1 heure – Cuisson 20 min.
Chauffez le poivre du Séchouan, le cumin et la coriandre 1 min à sec dans une poêle.
Laissez-les bien refroidir et concassez-les.
Remettez les épices dans la poêle, ajoutez les deux huiles et laissez chauffer 10 min à feu très doux.
Ajoutez une cuillère rase de citronnelle émincée et laissez refroidir.
Filtrez cette huile au travers d’une passoire fine.
Versez un litre d’eau dans le réservoir du cuiseur vapeur.
Pelez et taillez les carottes en rondelles et en biais.
Rincez les haricots et effilez-les. Faites cuire les carottes dans le panier pendant 10 min.
Répartissez les haricots vert et poursuivez la cuisson 10 min.
Arrosez les légumes d’huile parfumée, parsemez de basilic ciselé et saupoudrez de fleur de sel.
Dégustez tiède avec un rôti de veau ou des œufs brouillés.
M
M
ILLEFEUILLE
ILLEFEUILLEDEDE
POISSONS
POISSONS
AUX
AUX
HERBES
HERBES
FRAÎCHES
FRAÎCHES
Pour 4 personnes – Préparation : 15 min – Cuisson : 25 min.
Ciselez le cresson, l’oseille, le persil et l’aneth.
Ebouillantez les feuilles de blettes 1 min dans l’eau légèrement salée.
Egouttez-les puis étalez-les sur un torchon.
Versez 1,5 litre d’eau dans le réservoir du cuiseur-vapeur.
Couvrez un pavé de cabillaud d’herbes ciselées, d’un peu de poivre et de 20 g de beurre en dés.
Déposez dessus un pavé de saumon, étendez une couche d’herbes, de poivre et de beurre, et
recouvrez d’un pavé de flétan.
Enrubannez ce millefeuille avec deux feuilles de blette.
Préparez le second millefeuille de la même manière et laissez-le cuire dans le panier pendant 25 min.
Pendant ce temps, ébouillantez les germes de soja 30 secondes dans de l’eau salée.
Egouttez-les. Assaisonnez d’un filet de jus de citron et du reste de beurre en dés.
Coupez chaque millefeuille en deux à la verticale et déposez-les sur des assiettes de service
préalablement chauffées.
Répartissez autour de chaque millefeuille les germes de soja.
Décorez éventuellement de fines herbes et servez.
11
P
P
APILLOTES
APILLOTESDEDE
ROUGETS
ROUGETSAUAU
ROMARIN
ROMARIN
Pour 4 personnes – Préparation : 10 min – Cuisson : 25 min
Epluchez et lavez les pommes de terre en rondelles.
Faites-les cuire 8 min dans une casserole d’eau salée. Egouttez-les.
Pelez et dégermez les gousses d’ail.
Pressez l’ail et mélangez-le avec l’huile d’olive.
Versez 1 litre d’eau dans le cuiseur vapeur.
Coupez les tomates en tranches.
Répartissez les rondelles de pommes de terre sur quatre grands carrés de papier sulfurisé.
Déposez dessus des tranches de tomate puis les filets de rougets.
Badigeonnez les filets de rougets d’huile aillée, salez, poivrez et parsemez de romarin,
puis fermez soigneusement les papillotes sans trop les serrer.
Déposez les papillotes dans la partie supérieure du cuiseur-vapeur et laissez cuire 17 à 22 min.
Servez bien chaud, directement dans la papillote.
E
E
SCALOPES
SCALOPESDEDE
VEAU
VEAUAUAU
BEURRE
BEURRE
PARFUMÉ
PARFUMÉ
Pour 4 personnes – Préparation : 10 min – Cuisson : 30 min
Versez 1,5 litre d’eau dans le cuiseur-vapeur.
Salez et poivrez la noix de veau.
Déposez la dans le panier supérieur du cuiseur-vapeur et faire cuire 30 min environ.
Réservez au chaud.
Préparez le beurre parfumé : pelez, dégermez l’ail et hachez-le finement.
Rincez le citron et prélevez 10 cm d’écorce.
Découpez-la en dés minuscules.
Dans une petite casserole, laissez suer l’ail 30 secondes dans 15 g de beurre bien chaud,
mais sans le laisser colorer.
Ajoutez sur feu très doux les dés d’écorce de citron, le persil et l’estragon finement ciselés, deux
cuillerées de jus de citron et le reste du beurre en dés.
Salez, poivrez puis remuez une minute.
Tranchez la noix de veau en escalopes, disposez-les sur des assiettes préalablement chauffées et
entourez-les de feuilles de cresson et de frisée.
Nappez de beurre parfumé et dégustez.
14
- 400 g de jeunes carottes
- 400 g de haricots verts
- 2 cuill à soupe d’huile d’olive
- 2 cuill à soupe d’huile de tournesol
- 1 bulbe tendre de citronnelle fraîche
- 1/2 cuill à café de cumin
- 10 grains de poivre du
Séchouan
- 10 graines de coriandre
- 8 feuilles de basilic
- fleur de sel
- 2 pavés de saumon (env. 250 g/pièce)
- 2 pavés de flétan (env. 250 g/pièce)
- 2 pavés de cabillaud (env. 250 g/pièce)
- 100 g d’oseille, 1 citron
- 50 g de cresson en sachet
- 4 belle feuille de blettes
- 250 g de germes de soja
- 60 g de beurre demi-sel
- 1/2 bouquet d’aneth
- 1 bouquet de persil plat
- sel, poivre moulu
- 8 filets de rougets barbets
- 600 g de pommes de terre
- 2 tomates
- 2 gousses d’ail
- 2 cuill à soupe d’huile d’olive
- 1/2 citron
- 1 brin de romarin
- sel, poivre
- 600 g de noix de veau
- 100 g de frisée
- 50 g de cresson
- 3 gousses d’ail, 1 citron
- 60 g de beurre
- 1 brin d’estragon
- 1/2 bouquet de persil plat
- sel, poivre
notice CV 2204:notice CV 564 28/10/10 15:25 Page 21

B
B
OUCHÉES
OUCHÉESDEDE
POULET
POULET
MARINÉ
MARINÉ
AUX
AUX
BAIES
BAIESDEDE
GENIÈVRE
GENIÈVRE
Pour 4 personnes – Préparation : 20 min – Marinade : 1 h
– Cuisson : 20 min
Ecrasez à l’aide d’un pilon les baies de genièvre et les clous de girofle.
Répartissez la poudre dans un plat creux.
Ajoutez l’oignon pelé et émincé, le vin blanc, le gin, du sel et du poivre.
Mélangez bien. Coupez les blancs de poulet en morceaux de la taille d’une grosse bouchée.
Mettez-les dans la marinade et mélangez soigneusement.
Laissez mariner une heure dans le réfrigérateur.
Pelez les carottes, rincez les courgettes. Coupez ces légumes en bâtonnets.
Effeuillez le chou et coupez la base des côtes les plus épaisses.
Versez un litre d’eau dans le cuiseur-vapeur.Egouttez les bouchées de poulet.
Couvrez de bâtonnets de légumes et de quelques aiguilles de romarin.
Entourez-les d’une feuille de chou pliée en deux. Liez avec du raphia.
Laissez cuire 15 min à la vapeur dans le panier tapissé du reste de romarin.
Ajoutez les légumes et faites cuire 5 min. Servez ces fines bouchées très chaudes, éventuellement
parsemées de fleur de sel et arrosées d’un beurre blanc.
M
M
ÉDAILLONS
ÉDAILLONSDEDE
LOTTE
LOTTEAUAU
PAPRIKA
PAPRIKA
Pour 4 personnes – Préparation : 20 min – Cuisson : 20 min
Versez 1 litre d’eau dans le cuiseur vapeur.
Dans une sauteuse, faites blondir les oignons pelés et hachés dans cuillerées d’eau chaude.
Versez le vin blanc sec et le cognac dans la sauteuse.
Remuez et ajouter les tomates pelées et coupées, le concentré de tomate et le paprika.
Salez légèrement et poivrez. Couvrez et laissez cuire 10 min en remuant.
Faites cuire les médaillons de lotte dans le panier supérieur du cuiseur-vapeur pendant 10 min.
Ajoutez les courgettes taillées en rondelles dans le deuxième panier et laissez cuire encore 5 min.
Passez la sauce au travers d’une passoire fine pour retirer les graines de tomates.
Mixez-la. Rectifiez l’assaisonnement et relevez de quelques gouttes de Tabasco selon vos goûts.
Disposez les courgettes sur des assiettes de service préalablement chauffées.
Arrosez-les d’un filet d’huile d’olive.
Ajoutez les médaillons de lotte et entourez-les d’un cordon de sauce au paprika.
Décorez de bouquets de mâche et servez.
13
P
P
APILLOTES
APILLOTESDEDE
BAR
BARAUAU
PARFUM
PARFUMDEDE
B
B
AYONNE
AYONNE
Pour 4 personnes – Préparation : 15 min – Cuisson : 25 min
Pelez et tranchez les oignons en minces rondelles.
Faites-les colorer environ 5 min dans une poêle avec 20 g de beurre fondu.
Eliminez les graines du poivron puis taillez-les en longues lanières.
Faites-les revenir dans une poêle avec 15 g de beurre fondu 5 min.
Réservez huit lanières.
Hors du feu, ajoutez le jambon haché, la moitié des oignons, la chapelure et le persil ciselé.
Salez légèrement et poivrez au moulin.
Versez 1 litre d’eau dans le réservoir du cuiseur-vapeur.
Répartissez la farce en dôme sur 4 carrés de papier sulfurisé.
Installez dessus les pavés de bar salés et poivrés, puis parsemez de rondelles d’oignons.
Nouez les lanières de poivrons réservées et déposez-en deux sur chaque pavé.
Parsemez de noisettes de beurre. Fermez les papillotes puis laissez-les cuire pendant 20 min
à la vapeur.
Ouvrez les papillotes, décorez de rondelles de citron et dégustez chaud.
Servez avec des pommes de terre cuites à la vapeur.
R
R
ÂBLES
ÂBLESDEDE
LAPIN
LAPINÀÀLALA
SAUGE
SAUGEETETAUAU
LARD
LARD
FUMÉ
FUMÉ
Pour 4 personnes – Préparation : 15 min – Cuisson : 45 min
Versez 1,5 litre d’eau dans le réservoir du cuiseur-vapeur.
Nettoyez les poireaux et fendez-les en 4.
Coupez les râbles de lapin en deux et badigeonnez chaque morceau de moutarde forte.
Salez un peu et poivrez au moulin.
Enveloppez chaque demi-râble avec deux tranches de lard disposées en croix.
Posez une feuille de sauge sur chaque puis maintenez bien serré avec de la ficelle de cuisine.
Etalez les poireaux dans le panier.
Déposez les ballotins de râble par-dessus puis laissez cuire pendant 40 min environ.
Répartissez les poireaux sur 4 assiettes de service chaudes et posez les râbles dessus.
Servez sans attendre avec des pommes de terre vapeur et accompagnez d’un assortiment
de moutardes.
Cette recette est aussi délicieuse en remplaçant les râbles de lapin par des blancs de
poulet fermier.
12
- 4 pavés de bar
- 1 tranche épaisse de jambon
de Bayonne
- 1 poivron rouge
- 3 oignons, 1 citron
- 50 g de beurre
- 1 cuill à soupe de chapelure
- 10 brins de persil
- sel, poivre du moulin
- 600 g de blancs de poulet
- 3 carottes
- 1 cœur de chou vert
- 2 courgettes
- 1 oignon
- 15 cl de vin blanc sec
- 5 cl de gin
- 1 brin de romarin
- 1 cuill à soupe de baies de genièvre
- 2 clous de girofle
- sel, poivre
- 8 médaillons de lotte
- 4 petits bouquets de mâche
- 600 g de courgettes
- 2 oignons
- 1 petite boîte de tomates pelées
- 5 cl de vin blanc sec
- 2 cuill à soupe de cognac
- 1 cuil à soupe de concentré de tomate
- 1 cuill à café de paprika
- 4 cuill à soupe d’huile d’olive
- Tabasco, sel, poivre
- 2 râbles de lapin
- 8 tranches de lard fumé
- 2 blancs de poireaux
- 2 cuill à café de moutarde forte
- 4 feuilles de sauge fraîche
- sel, poivre du moulin
notice CV 2204:notice CV 564 28/10/10 15:25 Page 23
 Loading...