

Page 1

WHITE
W2500
SUPERLOCK
Toll
Call
www
Free
whtpcpwinn
800-331-3164
INSTRUCTION
rrn
BOOK
Page 2

When
Read
using
all
instructions
an
electrical
1
;iGTANT
before
appliance,
using
basic
this
safety
sewing
SAFETY
precautions
machine.
should
INSTRUCTIONS
always
be
followed,
including
the
following
DNGER—
1.This
2.Always
VVARN
1.
2.
3.Never
4.
5.
6.Do
7.
8.
9.
10.
11.
12.
Do
13.
14.
Switch
changing
15.
Always
user
sewing
electric
Do
not
allow
Use
this
the
manufacturer
operate
or
damaged,
examination,
Never
operate
foot
control
Never
drop
not
use
Do
not
operate
To
disconnect,
Do
not
unplug
Keep
fingers
Never
sew
not
use
Do
not
pull
the
unplug
servicing
outlet
unplug
IN
sewing
outdoors.
with
bent
or
sewing
needle,
machine
immediately
before
G
to
be
machine
as
this
or
dropped
repair,
the
sewing
free
from
or
insert
where
turn
by
pulling
away
from
a
damaged
needles.
push
machine
threading
sewing
adjustments
To
should
replacing
—
To
used
contained
sewing
electrical
the
any
aerosol
switch
all
fabric
machine
reduce
as
into
object
on
the
never
after
using
light
reduce
only
machine
machine
accumulation
to
moving
needle
while
loopers,
mentioned
a
toy.
for
water.
or
(spray)
the
cord.
stitching.
off
(“0”)
from
the
Close
its
in
this
mechanical
with
into
off
To
risk
be
bulb.
risk
intended
manual.
if
it
Return
any
products
(0”)
unplug,
parts.
plate
when
or
changing
the
in
of
electric
left
unattended
and
before
Replace
of
attention
has
a
the
any
air
of
lint,
opening.
position,
Special
as
this
It
may
making
electrical
the
instruction
shock:
cleaning.
bulb
burns,
fire,
is
necessary
use
as
described
damaged
sewing
adjustment.
openings
dust,
and
are
being
then
grasp
the
care
can
cause
deflect
any
presser
outlet
when
plugged
with
electric
cord
or
machine
blocked.
loose
used
remove
plug,
not
is
required
needle
the
needle
adjustments
foot,
etc.
when
removing
manual.
same
shock,
when
in
plug,
to
Keep
cloth.
or
where
plug
the
type
this
this
if
the
from
cord.
around
to
break.
causing
in
in.
Always
rated
or
injury
sewing
manual.
it
is
not
nearest
ventilation
oxygen
outlet.
the
it
the
needle
covers,
unplug
15
watts.
to
persons:
machine
Use
only
working
authorized
openings
is
being
sewing
to
break.
area,
lubricating,
this
is
attachments
properly,
dealer
of
administered.
machine
such
or
sewing
used
if
the
needle.
as
when
machine
by
or
recommende
it
has
or
service
sewing
threading
making
near
been
cente
machine
any
fror
chilc
dro
neec
otl
CAUTION
This
appliance
—
complies
Moving
machine.
parts-To
SAVE
with
EEC
reduce
THESE
This
product
Directive
risk
of
injury,
INSTRUCTIONS
is
for
household
8913361EEC
switch
use,
covering
off
before
or
equivalent.
servicing.
the
electromagnetic
Close
cover
before
operatinç
compatibilit3
Page 3
Cuando
Leer
las
P
ELIGRO
1.
La
máquina
inmediatamerite
Desconectar
2.
de
15
CU
I
DADO
1.
No
usar
niños
2.
Usar
por
el
3.
No
trabajar
correctamente,
4.
No
usar
coser
5.
No
introducir
6.
No
usar
7.
No
usar
8.
Para
desconectar,
9.
No
desconectar
10.
Mantener
11.
Usar
siempre
12.
No
usar
13.
No
presionar
14.
Situar
como
enhebrar
15.
Dosconectar
otro
tipo
se
usa
un
instrucciones
no
Ia
Watios.
Ia
maquina
o
cerca
do
Ia
maquina
fabricante
nunca
Ia
máquina
pedal
y
el
no
al
aire
libre.
mientras
los
dedos
Ia
agujas
el
de
despuntadas.
tirar
ni
interruptor
Ia
siompro
ajuste
aparato
antes
—
debe
después
máquina
—
ellos.
de
coser
que
y
con
en
caso
con
sin
acumulaciO
insertar
se
estén
girar
el
enchufe
alejados
placa
del
principal
aguja,
Ia
mocánico
eléctrico,
Para
dejarse
Para
como
vienen
Ia
de
los
objetos
el
de
agujas
tejido
cambiar
máquina
de
usar
reducir
nunca
de
su
de
Ia
red
reducir
un
juguete.Prestar
solamente
especificados
máquina
que
se
orificios
de
en
utilizando
interruptor
tirando
de
todas
apropiada.
mientras
do
Ia
do
moncionado
iri,
debe
Ia
maquina
el
desatendida
uso
y
antes
el
como
en
haya
de
polvo,
los
productos
hasta
del
máquina
Ia
aguja,
Ia
red
rui...I..IUi’1Iz
i
seguirse
riesgo
de
antes
de
de
cambiar
riesgo
de
so
describe
en
caso
de
caido,
ventilaciOn
suciedad
orificios
Ia
posiciôn
cable.
Para
las
partes
Una
so
está
on
posicion
hilar
oléctrica
en
ol
unas
de
coser.
una
descarga
mentras
limpiarla.
Ta
quemaduras,
atenciOn
este
manual.
que
tenga
haya
sido
bloqueados.
restos
y
de
ventilación.
aerosoles
Off
desconectar,
movibles
placa
do
cosiendo.
ancolas,
cuando
manual
precauciones
esté
bombilla,
fuego,
si
fuese
en
este
manuaLUsar
el
cable
dañada
de
tejido.
(spray)
(“0”),
luego
tirar
do
Ia
máuqina.
agujas
Esto
podria
Off
(“0”)
cambiar
so
retiren
do
instrucciones.
básicas
conectada.
Colocar
descargas
necesario
o
el
o
se
haya
Mantener
o
en
lugares
desconectar
de
Ia
impropia
doblar
cuando
ol
pie
las
tapas,
U
que
y
Desconectar
una
bombilla
cuando
ünicamente
enchufe
mojado.
los
orificios
donde
clavija,
Tener
un
puode
Ia
aguja
so
roalico
prensatelas
para
iIzUURIDAD
vienen
eléctricas
Ia
en
el
no
del
cuidado
producir
y
algün
y
Iubricar,
a
del
mismo
maquina
los
malas
de
ventilaciôn
se
esté
enchufe
cable.
Ia
romperla.
ajuste
similares.
incluidas
máquina
tipo
o
causar
está
accesorios
condiciones,
administrando
de
Ia
especial
rotura
do
en
o
cuando
daños
red.
el
a
de
con
siendo
de
con
Ia
area
so
continuaciOn.
Ia
red
eléctrica
una
potencia
a
personas.
usada
recomendados
si
no
cose
Ia
máquina
oxigeno,
Ia
aguja.
aguja.
de
Ia
aguja
realico
algün
por
de
CONSERVE
Esta
máquina
ste
instrumento
nterferencia
do
de
coser
se
radio.
ESTE
es
para
conforma
uso
MANUAL
doméstico.
con
directivo
de
DE
CEE
INSTRUCCIONES
89/336/EEC
cubriendo
supresión
contra
Page 4
I
1
ESURES
DE
SEC
URn
E
PORTANTES
Lorsquun
suivantes.
Lire
les
instructions
appareil
DANGER
1.
Un
appareil
Débranchez
Débranchez
2.
1U11S
lvii
1.
Cet
usage
2.N’utilisez
manufacturier
3.
N’utilisez
endommage
Reparation,
4.N’utilisezjamais
rheostat
5.Gardez
6.Utilisez
7.
N’utilisez
8.
Ne
9.Arrètez
enfilage
10.
Débranchez
effectuez
11.
N’insérez
12.
N’utilisez
13.
N’utilisez
14.
Pour
15.
Ne
EKI
E
appareil
par
ou
cet
jamais
libres
les
toujours
jamais
tirez
débranchez
ne
ni
(<<0>>)
de
Ia
ni
pas
pas
débrancher,
electrique
entier
en
devrait
ne
toujours
toujours
GARDE
l
ne
doit
pres
des
appareil
tel
qu’indique
cet
ou
immergé.
reglage
l’appareil
de
mousse,
doigts
loin
Ia
plaque
d’aiguilles
poussez
Ia
machine
canette
toujours
lubrification
ne
laissez
en
ou
pas
ou
plein
des
tournez
en
est
avant
Pour
jamais
lappareil
avant
de
pas
être
entants.
qu’aux
appareil
Retournez
electrique
lorsque
des
pièces
a
le
tissu
coudre
a
changement
Ia
machine
tout
ou
tomber
air.
produits
tous
tirant
en
usage,
d’utiliser
réduire
ètre
laissé
de
Ia
remplacer
utilisé
fins
dans
si
le
ou
mécanique.
poussiere
en
aiguille
gauchies.
pendant
de
autre
aucun
en
aerosol
les
le
cordon.
ii
faut
cette
le
risque
sans
prise
externe
l’ampoule.
Pour
réduire
—
personnelles:
comme
mentionnées
ce
cordon
les
recommandée.
lorsque
de
Ia
reglages
un
manuel.
ou
cet
appareil
ventilateurs
ou
de
mouvement
que
vous
vous
pied
presseur,
prise
externe
entretien
objet
dans
sont
en
Pour
toujours
machine
decharge
de
surveillance
de
Remplacez
le
jouet.
dans
Ia
fiche
au
Sont
tissu.
spécialement
Une
cousez.
faites
de
mentionné
aucune
en
usage
position
débrancher,
observer
a
coudre.
courant
risque
Une
ce
sont
concessionnaire
obstrués.
des
etc.
courant
d’arrêt
certaines
electrique:
Iorsqu’il
immédiatement
I’ampoule
de
brGlures,
stricte
surveillance
manuel.
endommages,
Gardez
autour
plaque
ouverture.
ni
Ceci
peut
reglages
lorsque
dans
ou
est
(<<0>>).
saisissez
inappropriee
le
mesures
est
branché.
de
N’utilisez
autorisé
les
de
faire
a
l’aiguille,
vous
manuel
administré
puis
Ia
fiche,
élémentaires
apres
par
une
feu,
de
décharge
doit
être
que
les
si
l’appareil
centre
ou
ventilateurs
l’aiguille
peut
causer
dévier
l’aiguille
enfilage,
retirez
d’instructions.
de
l’oxygene.
débranchez
non
pas
usage
ampoule
exercée
accessoires
fait
défaut,
de
de
Ia
de
machine
le
et
changement.
les
couvercies,
Ia
prise
le
cordon.
de
et
avant
similaire
électrique
lorsque
recommandés
s’il
reparations
Ia
machine
a
bris
de
Ia
briser.
externe
sécurité
le
nettoyage.
de
ou
l’appareil
a
été
coudre.
)‘aiguille.
de
y
15
de
echappE
pour
a
coudre
courant.
compri
watts.
blessur
es
par
exarr
et
CONSERVEZ
Cette
machine
Cet
appareil
électromagnetiques.
a
coudre
est
est
conforme
CES
coucue
pour
a
Ia
INSTRUCTIONS
usage
domestique
directive
CEE
seulement.
891336
EEC
concernant
les
normes
Page 5
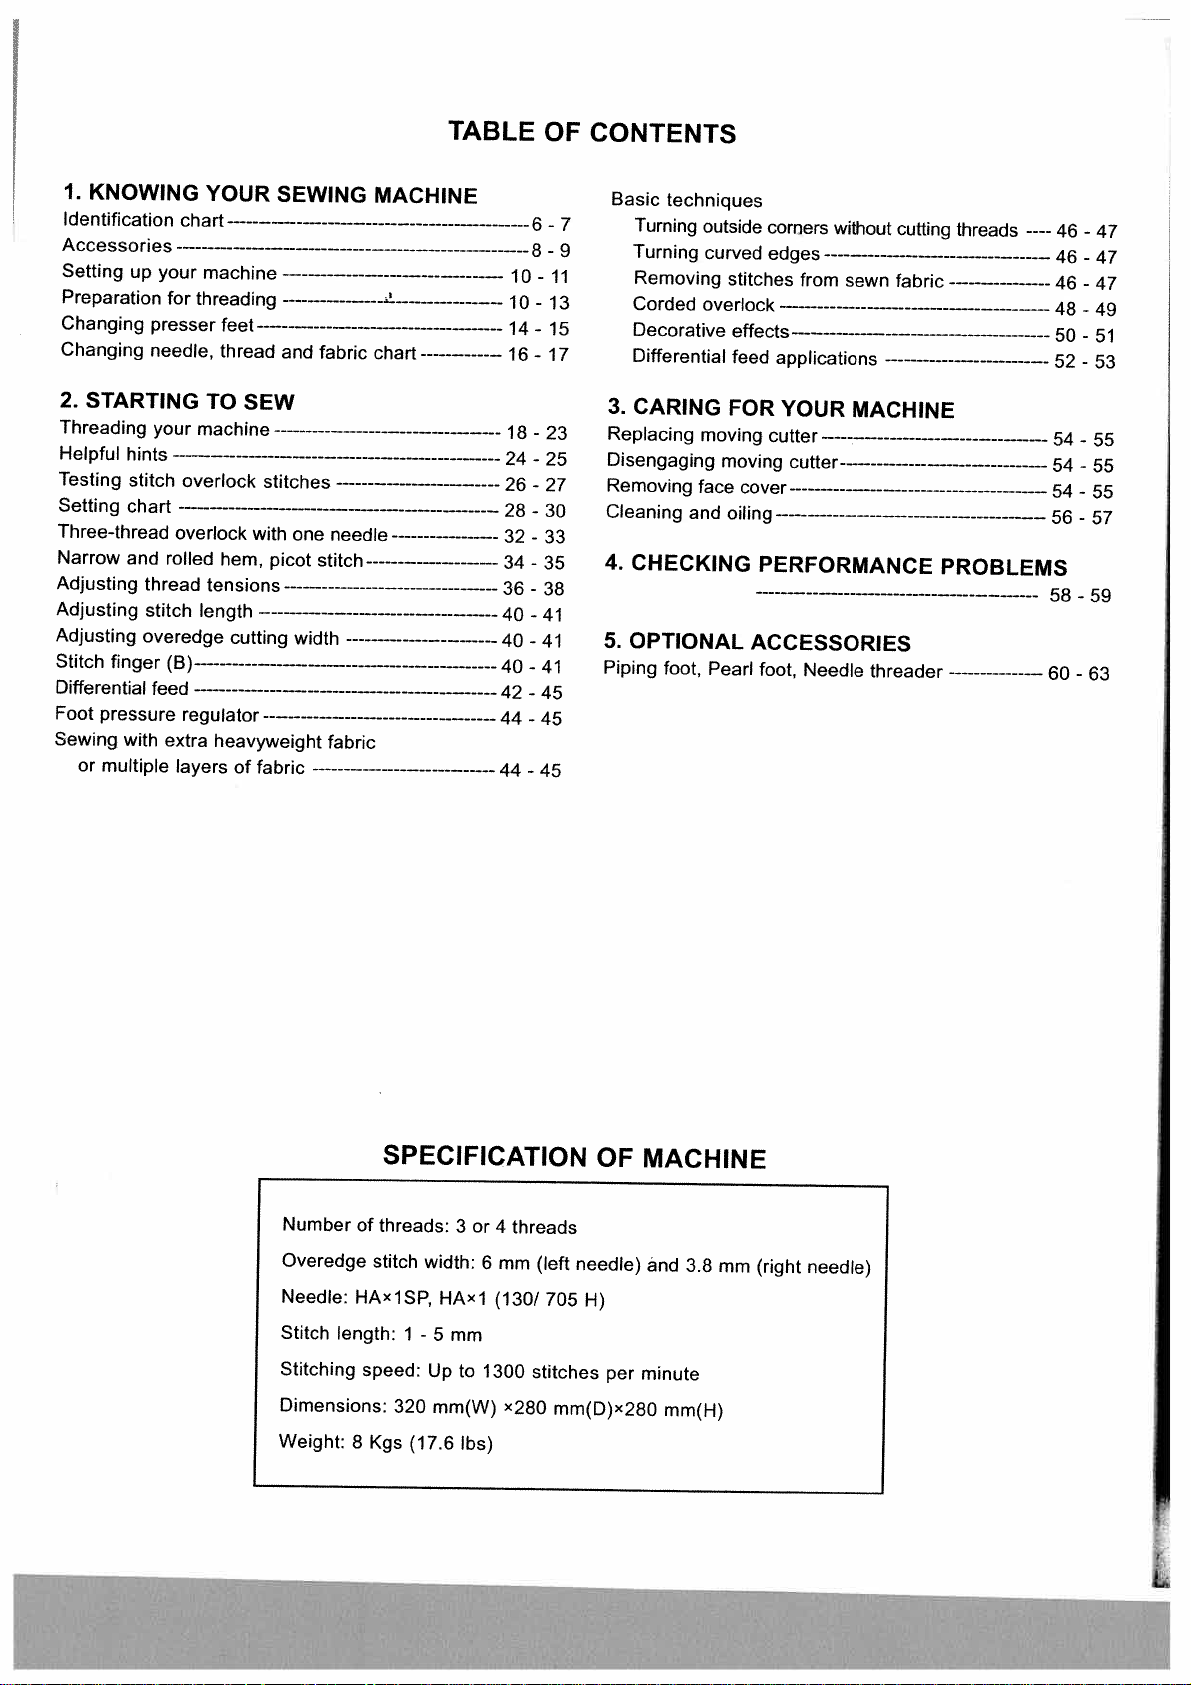
KNOWING
1.
Identification
Accessories
Setting
up
Preparation
Changing
Changing
STARTING
2.
Threading
Helpful
Testing
Setting
hints
stitch
chart
Three-thread
Narrow
and
Adjusting
Adjusting
Adjusting
Stitch
finger
Differential
Foot
pressure
Sewing
multiple
or
with
chart
your
threading
for
presser
needle,
your
machine
-——--
overlock
overlock
rolled
thread
stitch
overedge
(B)—
feed
regulator
extra
layers
YOUR
SEWING
—
machine
SEW
——---—
and
—
fabric
feet
thread
TO
stitches
—
with
one
hem,
picot
stitch
tensions----—---—
length
cutting
width
—
heavyweight
of
fabric
—----
—
needle
—
fabric
TABLE
MACHINE
chart
—-----
—
—
—
—
—---6
10
10
14
16
18-23
24
26
28
32
34
-
36
-
40
-
40
-
40
-
42
-
44
-
44
-
OF
CONTENTS
-
7
-
8
9
-
11
-
13
-
15
-
17
-
25
-
27
-
30
-
33
35
38
41
41
41
45
45
45
Basic
techniques
Turning
Turning
Removing
Corded
outside
curved
stitches
overlock
corners
edges
—
Decorativeeffects—----—-—
Differential
3.
CARING
Replacing
Disengaging
Removing
Cleaning
CHECKING
4.
OPTIONAL
5.
Piping
foot,
feed
FOR
moving
face
and
cutter
moving
cover
oiling
PERFORMANCE
ACCESSORIES
Pearl
foot,
applications
YOUR
from
cutter
Needle
without
----—---—
sewn
MACHINE
—--—
—
threader
cutting
—----—---—
fabric
—
—-—-—-—-—-—
-----
threads
—-—-—-------
—
—-—-—
----
—-—----—--
PROBLEMS
46
46
46
48
50-51
52
54
54
54
56
58-59
60
-
47
-
47
-
47
-
49
-
53
-
55
-
55
-
55
-
57
-
63
Number
of
Overedge
Needle:
Stitch
HAX1SP,
length:
Stitching
Dimensions:
Weight:
8
SPECIFICATION
threads:
stitch
speed:
320
Kgs
1
-
(17.6
3or4
width:
HAXI
mm
5
Up
to
mm(W)
Ibs)
mm
6
(130/
1300
x280
threads
(left
needle)
705
H)
stitches
mm(D)x280
OF
MACHINE
and
per
minute
3.8
mm(H)
mm
(right
needle)
Page 6
I
1.
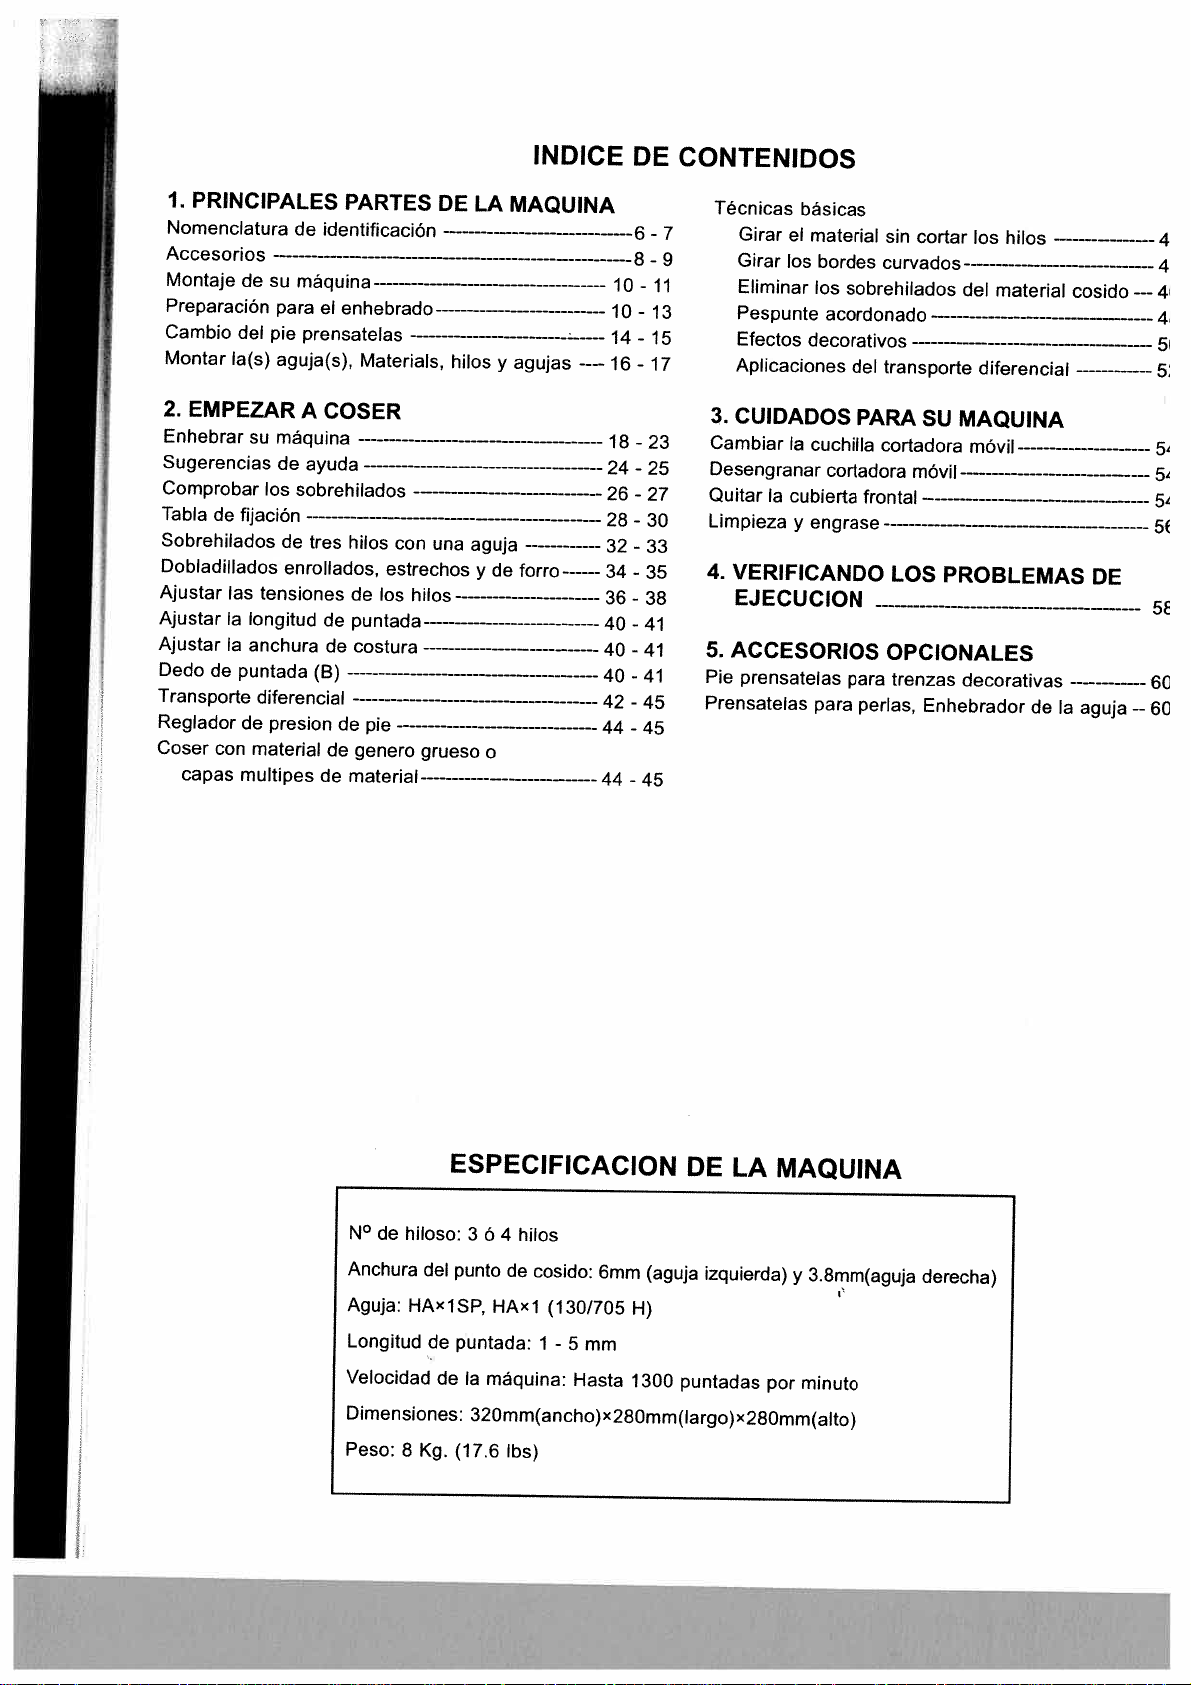
PRINCIPALES
Nomenclatura
Accesorios
Montaje
de
PreparaciOn
Cambio
Montar
2.
Enhebrar
del
la(s)
EMPEZAR
su
Sugerencias
Comprobar
Tabla
de
fijación
Sobrehilados
Dobladillados
Ajustar
Ajustar
Ajustar
Dedo
Ia
Ia
de
as
longitud
anchura
puntada
Transporte
Reglador
Coser
capas
con
multipes
de
material
de
identificaciôn
—-------
maquina---
su
para
el
pie
prensatelas
aguja(s),
A
COSER
máquina
de
ayuda
los
sobrehilados
—
de
tres
enrollados,
tensiones
de
de
(B)
diferencial
presion
de
PARTES
—
enhebrado
Materials,
—---——
hilos
de
los
puntada
costura
de
pie
de
genero
material
DE
—------------—--—-----------
—
con
una
estrechos
hilos
—---------—
grueso
—
hilos
LA
MAQUINA
agujas
y
—--—
aguja
de
forro------
y
—
o
INDICE
—
----
—
—
—------
DE
6-7
8
10
10
-
14
-
16-17
18
-
24
-
26-27
28
-
32
-
34
-
36
-
40
-
40
-
40
-
42
-
44
-
44
-
CONTENIDOS
Técnicas
Girar
-
-
41
41
41
45
45
45
9
11
13
15
23
25
30
33
35
38
Girar
Eliminar
Pespunte
Efectos
Aplicaciones
CUIDADOS
3.
Cambiar
Desengranar
Quitar
Limpieza
VERIFICANDO
4.
EJECUCON
5.
ACCESORIOS
Pie
prensatelas
Prensatelas
el
los
Ia
Ia
cubierta
básicas
y
material
bordes
los
sin
curvados——---——-------—-——4
sobrehilados
acordonado—
decorativos
del
transporte
PARA
cuchilla
engrase
para
cortadora
cortadora
frontal
__
para
perlas,
cortar
los
hilos
del
material
—-——---—--—-—---—-—--—
diferencial
SU
MAQUINA
móvil-—--—------—--——
-—
môvil
—
——---—-—-—--———---—---—
LOS
PROBLEMAS
__
OPCIONALES
trenzas
decorativas
Enhebrador
—
—
cosido
—---—--4
—---4
---
4
5’
————----
5
5’
—---—--—-—
—
5’
—---
5’
5(
DE
5
—-60
de
Ia
aguja
—
60
N°
de
hiloso:
Anchura
Aguja:
Longitud
Velocidad
del
HAx1SP,
de
de
Dimensiones:
Peso:
Kg.
8
ESPECIFICACION
3
4
ó
hilos
punto
de
HAx1
puntada:
máquina:
Ia
cosido:
(130/705
1
-
5
mm
Hasta
6mm
(aguja
H)
1300
DE
LA
izquierda)
puntadas
MAQUINA
por
320mm(ancho)x28Omm(Iargo)x28Omm(alto)
(17.6
Ibs)
3.8mm(aguja
y
minuto
derecha)
Page 7
1.
VOTRE
Description
Accessoires
Branchement
Preparation
Changement
Changement
Tableau
2.
Enfilage
Conseils
Tester
Tableau
Overlock
Ourlets
Reglage
Reglage
Regiage
Doigt
des
COMMENCER
de
d’utilisation
Ia
formation
de
a
étroits
des
de
de
mailleur
Entralnement
Regiage
Couture
de
do
epaisseurs
MACHINE
de
Ia
machine
——
de
Ia
a
l’enfilage---—---------—
do
pied
d’aiguille
fils
et
Ia
machine---—
reglage
3
fils
avec
et
ourlets
A
—
machine
presseur---—
—-------—
matières
A
COUDRE
-------
du
point——-—-—
de
Ia
machine---—
une
aiguiVe
roulés,
tensions
Ia
Iongueur
largeur
(B)
-—--------
de
du
coupe
point
différentiel
Ia
pression
matières
très
du
lourdes
pied
COUDRE
-——
-—
——--—
point
—--------—
--—
-——--
—
—
—---
ou
sur
—
-
-
-
-
-
—-—
picot
—
—
—
—
plusieurs
—
TABLE
—
—
--—
—
—40
—
40
42
44
44
32
34
36
40
18
24
26
28
10
1014
16
16
8-
-
-
-
-
-
-
-
-
-
-
-
-
-
-
45
DES
-
11
13
-
15
-
17
17
23
25
27
30
33
35
38
41
41
41
45
45
MATIERES
Techniques
9
Couture
Découdre
Surjet
Effets
Utilisations
3.
ENTRETIEN
Remplacement
Débrayer
Retirer
Nettoyage
4.
REMEDES
5.
ACCESSOIRES
Pied
Enfileur
Piquer
Ie
pour
d’Aiguille
do
base
un
angle
des
angles
une
renforçe
décoratifs
du
du
le
couteau
capot
frontal
et
lubrification
A
cordonnet
sans
couper
arrondis
couture
—
différentiel
DE
LA
MACHINE
couteau
mobile
—
-—------—-------—-——----—---
D’EVENTUELS
OPTIONNELS
enrobe,
-—
Pied
—----—--—---—---—----———
los
fils
—
—----—----—----
—---—
—------—----
—
PROBLEMES
pose
perles
46
-
—46
46
48
50
52
54
54
54
56
58
60
60
47
-
47
-
47
-
49
-
51
-
53
-
55
-
55
-
55
-
57
-
59
-
63
-
63
—
—
N°
de
hiloso:
Anchura
Aguja:
Longitud
Velocidad
del
HAx1SP,
de
de
Dimensiones:
Peso:
8
Kg.
ESPECIFICACION
3
ó
4
hilos
punto
do
HAXI
puntada:
Ia
maquina:
cosido:
(130/705
1
-
5
mm
Hasta
6mm
(aguja
H)
1300
DE
izquierda)
puntadas
LA
MAQUNA
por
320mm(ancho)x28Omm(Iargo)x28Omm(alto)
(176
lbs)
y
3.8mm(aguja
minuto
derecha)
Page 8
I
C
VOU!
E’!1C
1ACH!NE
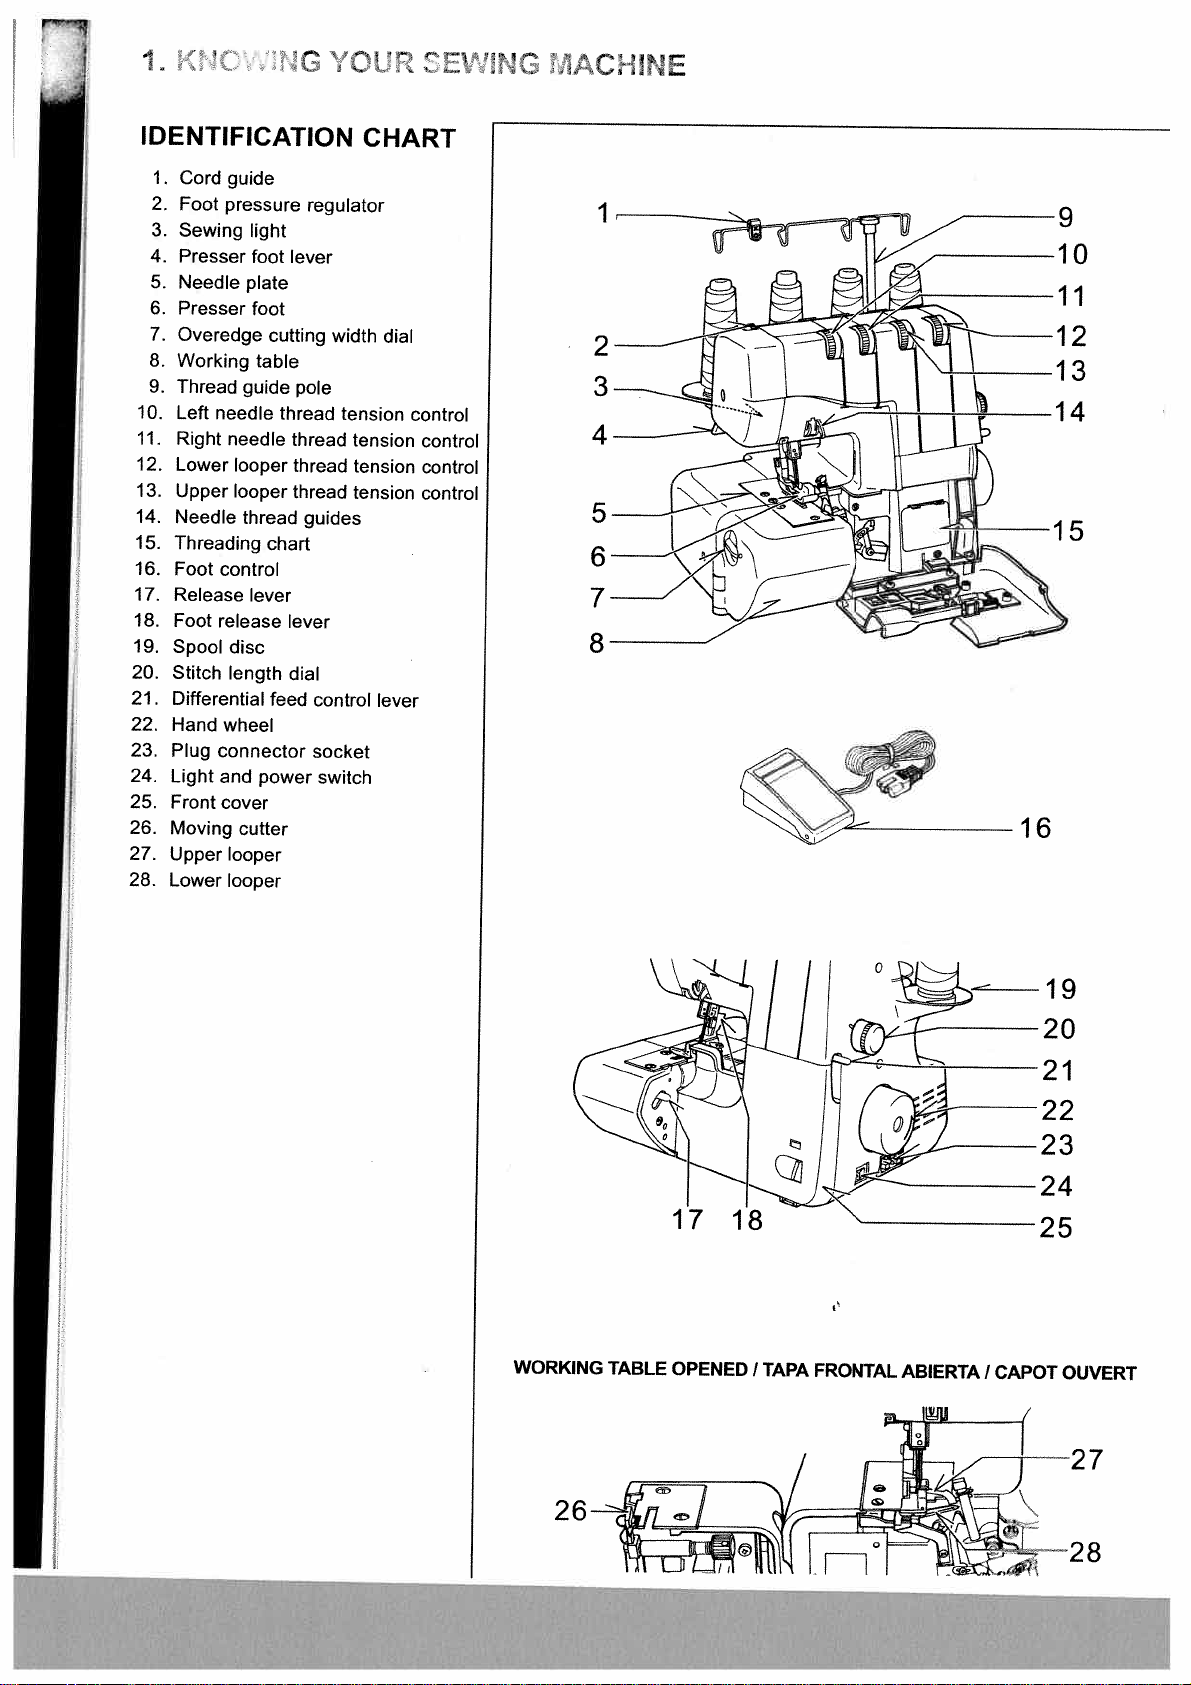
IDENTIFICATION
Cord
1.
2.
3.
4.
5.
6.
7.
8.
9.
10.
11.
12.
13.
14.
15.
16.
17.
18.
19.
20.
21.
22.
23.
24.
25.
26.
27.
28.
guide
Foot
pressure
Sewing
Presser
Needle
Presser
Overedge
Working
Thread
Left
needle
Right
needle
Lower
looper
Upper
looper
Needle
Threading
Foot
control
Release
Foot
release
Spool
disc
Stitch
length
Differential
Hand
wheel
Plug
connector
Light
and
Front
cover
Moving
Upper
Lower
cutter
looper
looper
light
foot
plate
foot
cutting
table
guide
thread
chart
lever
feed
power
regulator
lever
pole
thread
thread
thread
thread
guides
lever
dial
control
socket
switch
CHART
width
tension
tension
tension
tension
dial
lever
control
control
control
control
1
2
3
2
3
4
5
5
6
7
8
6
1
WORKING
26
TABLE
OPENED
TAPA
I
FRONTAL
ABIERTA
CAPOT
I
OUVERT
Page 9
MAQUINA
LIESDELA
i.
VOTRE
MACHINE
A
COUDRE
NOMENCLATURA
1.
Gula
del
cordon
2.
7.
8.
9.
10.
11.
12.
13.
14.
15.
16.
17.
18.
19.
20
21.
22.
23.
24.
25.
26.
27.
28.
Regulador
3.
Luz
4.
Palanca
5.
Placa
6.
Prensatelas
Dial
Mesa
Barra
Control
Control
Control
Control
Gula
Instrucciones
ReOstato
Palanca
Palanca
Placa
Control
Control
Volante
Clavija
Interruptor
Tapa
frontal
Cuchilla
Ancora
Ancora
de
elevadora
de
Ia
de
anchura
de
trabajo
de
porta
de
Ia
de
Ia
de
Ia
de
Ia
del
hilo
de
soltar
de
desprendimiento
para
prolongaciOn
de
longitud
de
transporte
manual
del
enchufe
de
cortadora
superior
inferior
aguja
tensiOn
tensiOn
tensiOn
tension
de
de
energia
presiOn
del
de
costura
carretes
Ia
aguja
enhebrado
Ia
tapa
puntada
diferencial
y
mOvil
DE
de
pie
prensatelas
del
hilo
del
hilo
del
hilo
del
hilo
luz
IDENTIFICACION
de
Ia
aguja
izquierda
de
Ia
aguja
derecha
del
ancora
del
ancora
prensatelas
inferior
superior
DESCRIPTION
1.
Guide-fil
2.
Reglage
3.
Ampoule
4.
Levier
pied
5.
Plaque-aiguille
6.
Pied
presseur
7.
Bouton
8.
Table
9.
Support
10.
Reglage
11.
Reglage
12.
Reglage
13.
Reglage
14.
Guide-fild’aiguilles
15.
Schema
16.
Rheostat
17.
Levier
18.
Bouton
19.
Extensions
20.
Bouton
21.
Levier
22.
Volant
23.
Fiche
24.
Interrupteur
25.
Capot
26.
Couteau
27.
Boucleur
28.
Boucleur
de
de
d’enfilage
d’ouverture
dattache
de
de
manuel
de
branchement
inférieur
mobile
supérieur
inférieur
cordonnet
de
Ia
d’eclairage
presseur
largeur
travail
guide-fils
de
tension
de
tension
de
tension
de
tension
pour
réglage
contrôle
lumière
frontal
DE
LA
pression
du
du
cOnes
de
d’entraInement
du
de
coupe
telescopique
du
fil
d’aiguille
du
ful
d’aiguille
du
fil
du
du
fil
du
capot
pied
presseur
longueur
extérieur
et
machine
MACHINE
pied
gauche
droite
boucleur
boucleur
lateral
du
point
différentiel
inférieur
supérleur
Page 10
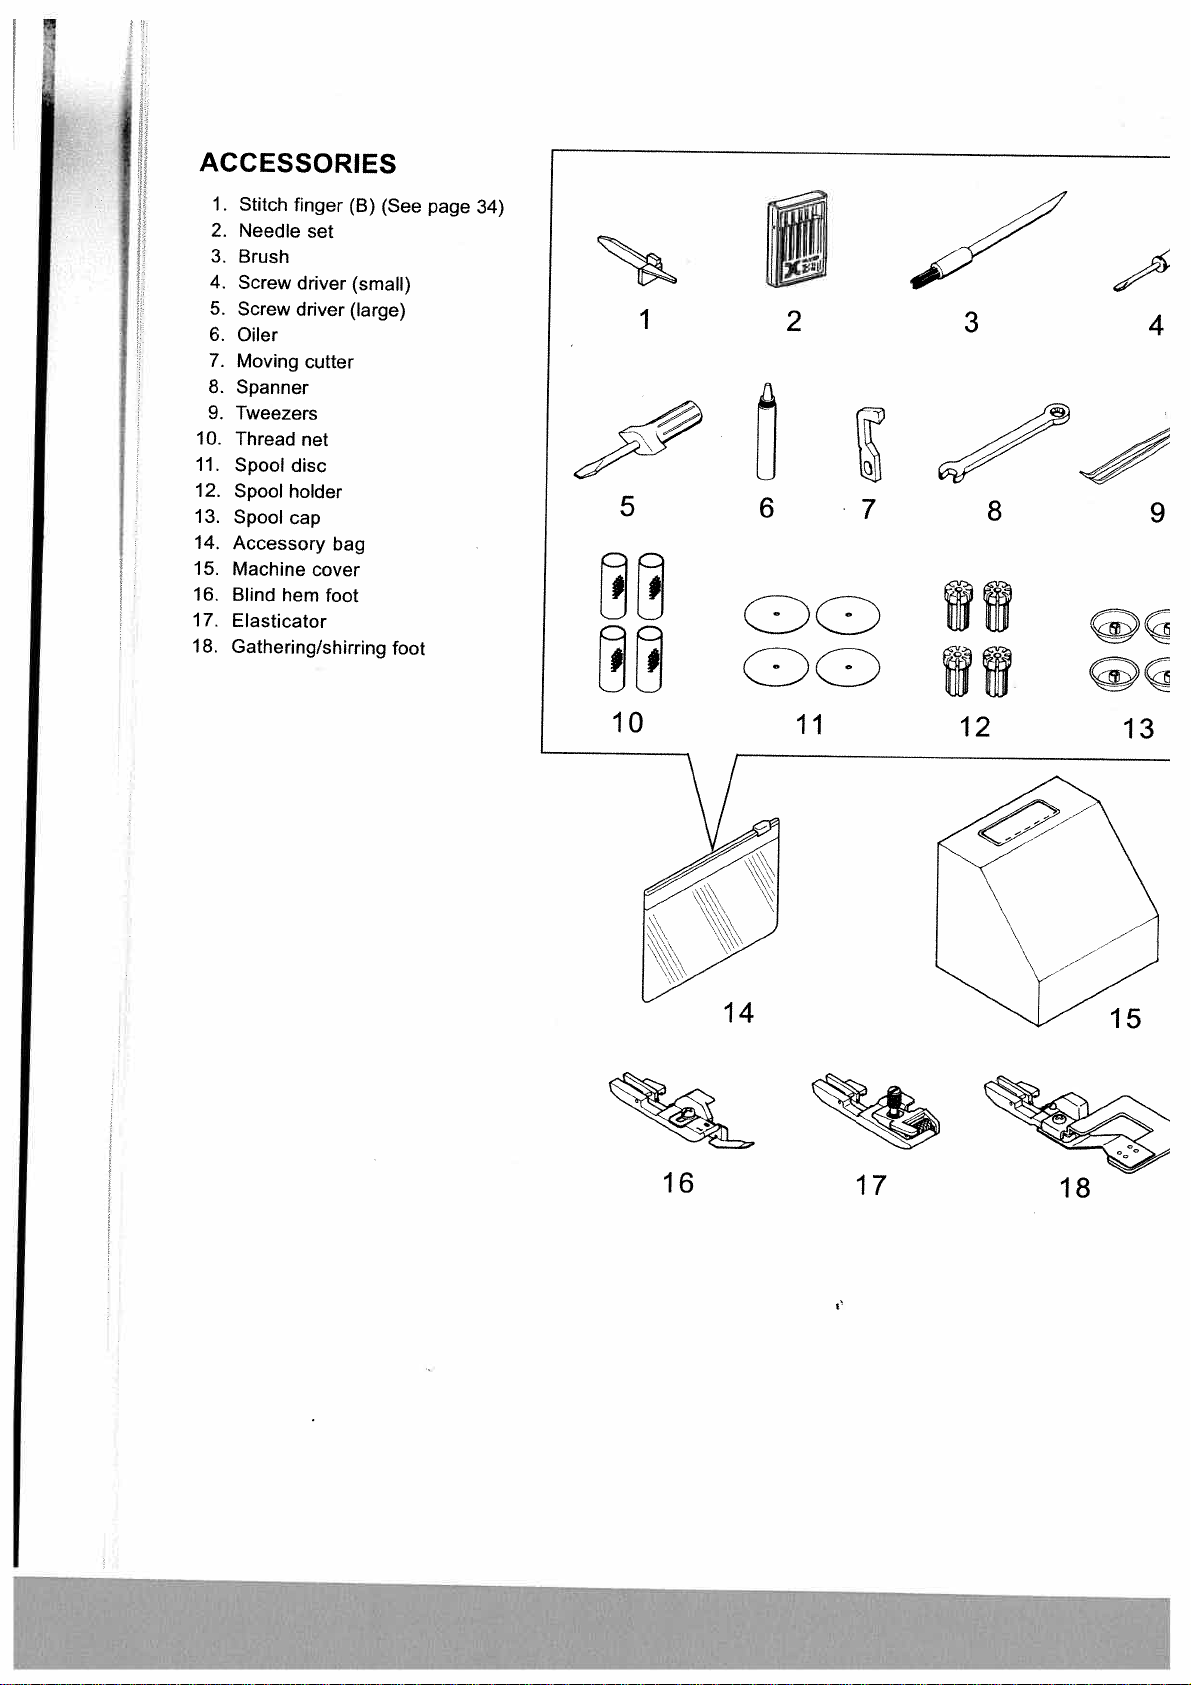
ACCESSORIES
1.
Stitch
finger
(B)
2.
Needle
3.
Brush
4.
Screw
5.
Screw
6.
Oiler
Moving
7.
8.
Spanner
Tweezers
9.
10.
Thread
11.
Spool
12.
Spool
13.
Spool
14.
Accessory
15.
Machine
16.
Blind
17.
Elasticator
Gathering/shirring
18.
set
driver
driver
cutter
net
disc
holder
cap
hem
(small)
(large)
bag
cover
foot
(See
foot
page
34)
1
5
2
6
3
8
9
10
16
14
11
17
12
15
18
Page 11
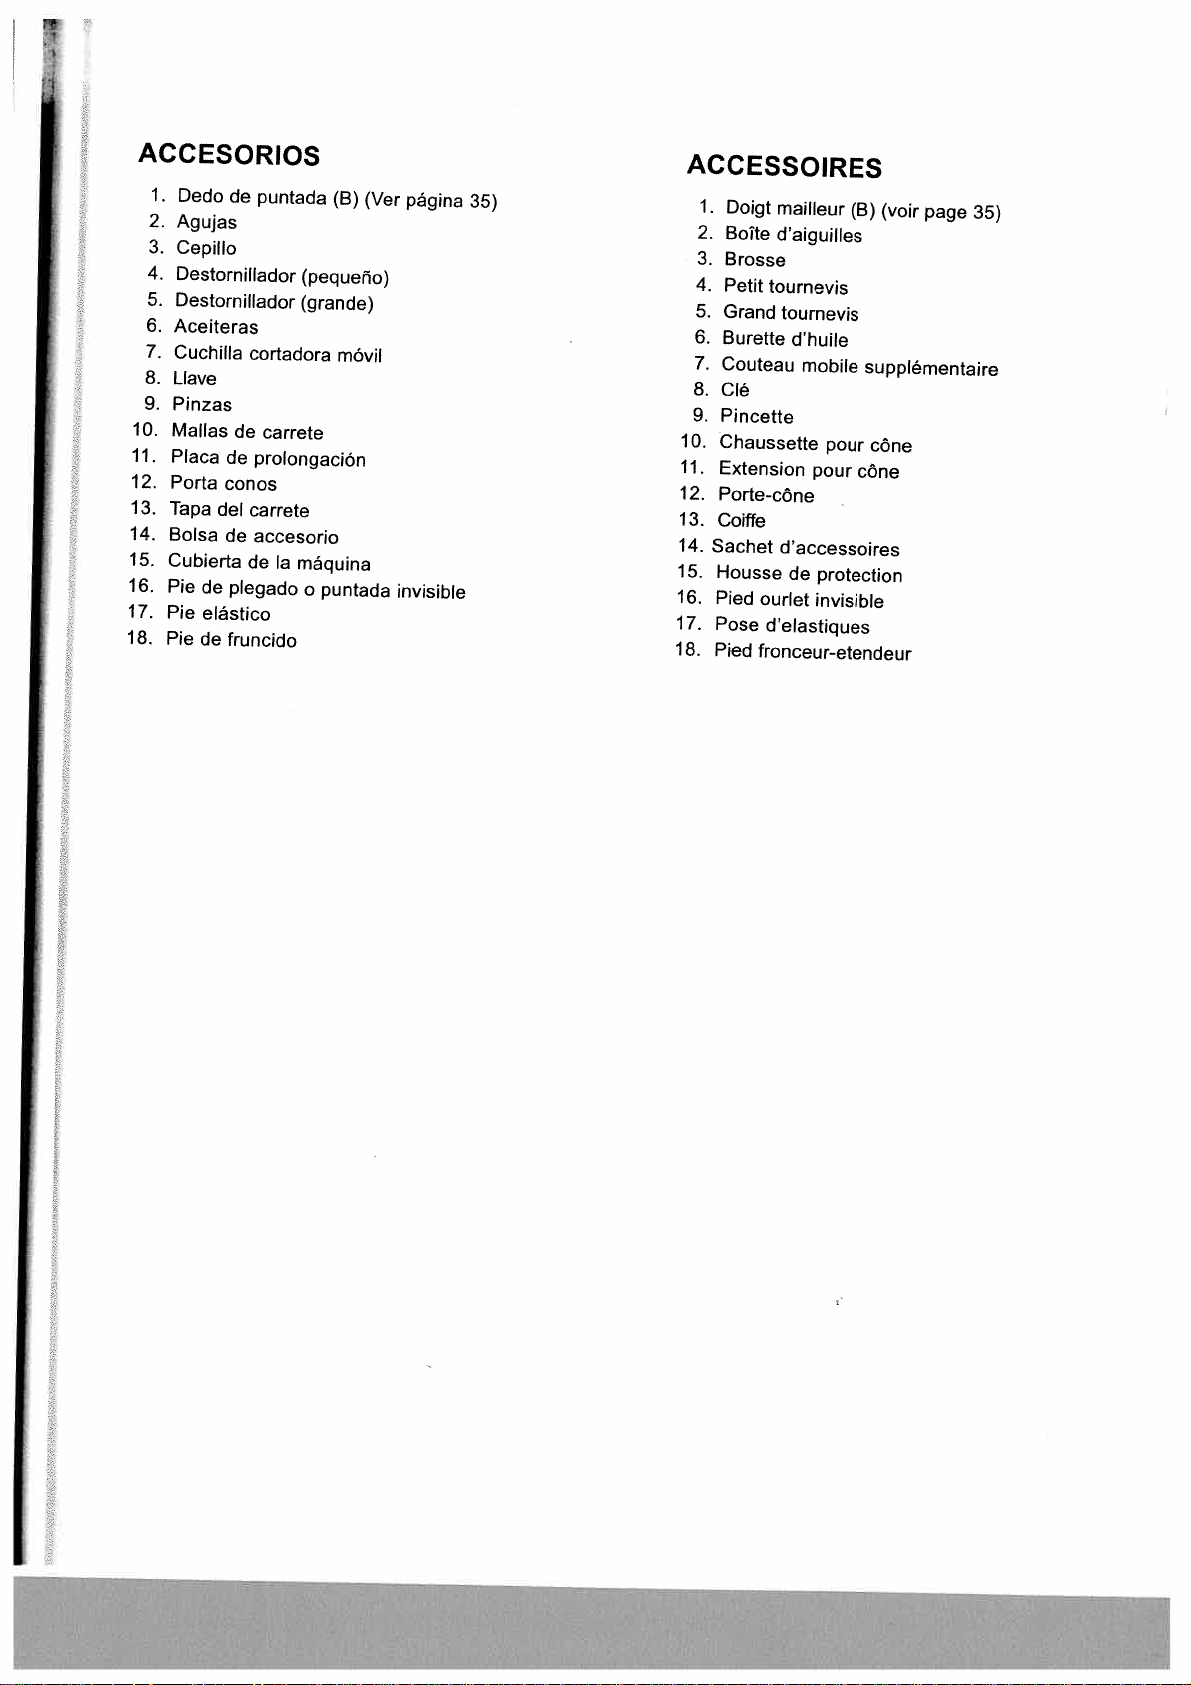
ACCESORIOS
1.
Dedo
de
puntada
2.
Agujas
3.
Cepillo
4.
Destornillador
5.
Destornillador
6.
Aceiteras
7.
10.
11.
12.
13.
14.
15.
16.
17.
18.
8.
9.
Placa
Porta
Tapa
Bolsa
Cubierta
Pie
Pie
Pie
Cuchilla
Llave
Pinzas
Mallas
de
de
conos
del
de
de
plegado
elástico
de
fruncido
cortadora
carrete
prolongaciôn
carrete
accesorio
de
(pequeno)
(grande)
Ia
máquina
o
(B)
(Ver
móvil
puntada
página
invisible
35)
ACCESSOIRES
1.
Doigt
mailleur
2.
BoIte
d’aiguilles
3.
Brosse
4.
Petit
tournevis
5.
Grand
tournevis
6.
7.
8.
9.
10.
11.
12.
13.
14.
15.
16.
17.
18.
Burette
Couteau
Clé
Pincette
Chaussette
Extension
Porte-cane
Coiffe
Sachet
Housse
Pied
Pose
Pied
d’huile
mobile
pour
pour
d’accessoires
de
protection
ourlet
invisible
delastiques
fronceur-etendeur
(B)
(voir
page
supplémentaire
cone
cOne
35)
Page 12
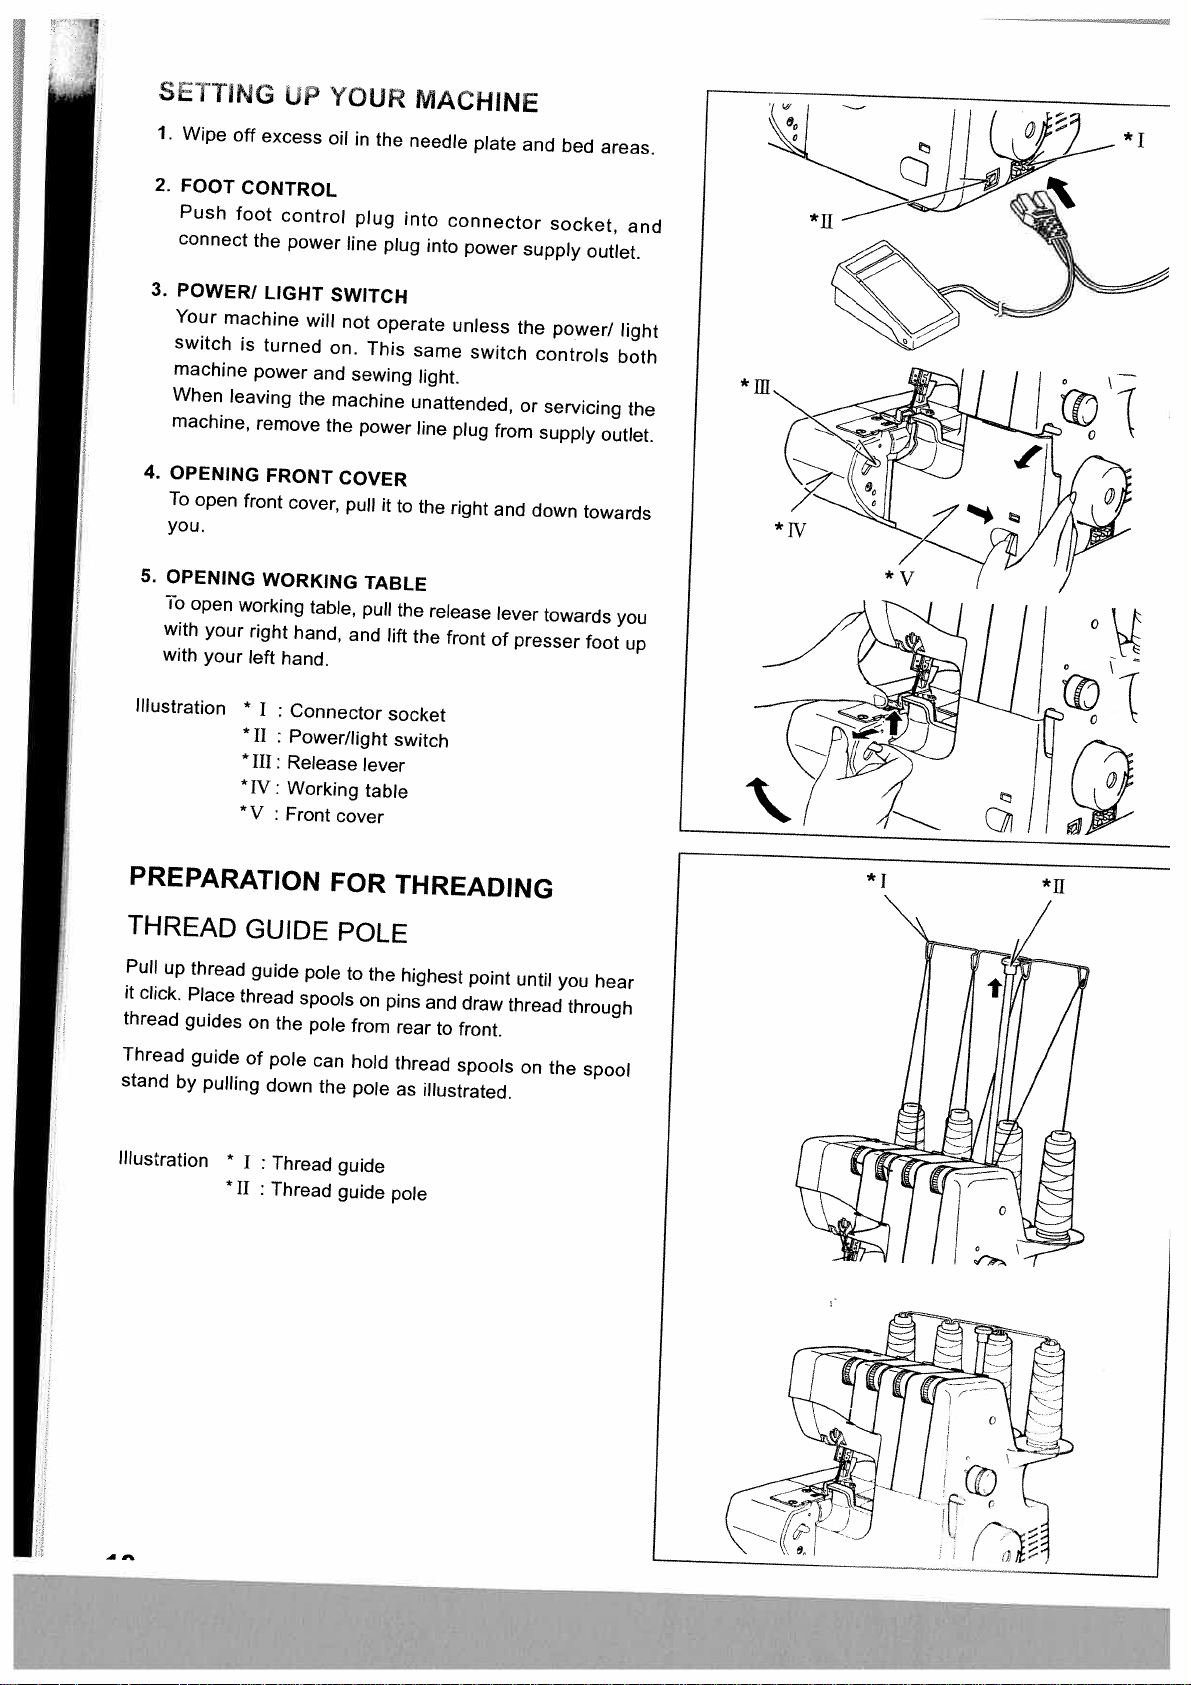
SETTING
1.
Wipe
2.
FOOT
Push
connect
3.
POWERI
Your
switch
machine
When
machine,
4.
OPENING
To
open
you.
5.
OPENING
To
open
with
your
with
your
off
excess
CONTROL
foot
control
the
LIGHT
machine
is
turned
power
leaving
remove
FRONT
front
WORKING
working
right
left
hand.
UP
power
will
and
the
cover,
table,
hand,
YOUR
oil
in
the
plug
line
plug
SWITCH
not
operate
on.
This
sewing
machine
the
power
COVER
pull
it
TABLE
pull
and
MACHINE
needle
into
connector
into
power
unless
same
light.
unattended,
line
plug
to
the
right
the
release
lift
the
front
plate
switch
from
and
lever
of
and
socket,
supply
the
power!
controls
or
servicing
supply
down
towards
presser
bed
towards
areas.
outlet.
both
outlet.
you
foot
and
light
the
up
*
III.
Illustration
*
*11
*
III:
*W:
:
PREPARATION
THREAD
Pull
up
it
click.
thread
Thread
stand
Illustration
guides
by
thread
Place
guide
pulling
GUIDE
guide
thread
on
of
pole
down
*
I
:
Thread
II
:
Thread
the
Connector
Power/light
Release
Working
Front
cover
FOR
POLE
pole
to
spools
pole
from
can
hold
the
pole
guide
guide
socket
switch
lever
table
THREADING
the
highest
on
pins
and
draw
rear
to
front.
thread
as
pole
spools
illustrated.
point
until
thread
on
you
through
the
hear
spool
*1
*11
Page 13
MONTAJE
1.
Asegürese
placa
base
2.
CONTROL
Enchufar
sftuado
3.
INTERRUPTOR
Su
máquina
energia/
controla
que
está
debe
estar
Cuando
las
cubiertas
estar
desconectada
del
enchufe.
4.
APERTURA
Para
abrir
usted.
5.
ABRIR
Para
hacia
frontal
llustración
Y
abrir
usted
del
DE
de
limpiar
antes
DEL
Ia
clavija
al
fondo
no
funcionará
luz
esté
tanto
Ia
cosiendo.
desconectada
esté
utilizando
cambiar
o
DE
Ia
tapa
CERRAR
Ia
mesa
con
pie
prensatelas
*
I:Conector
*
11
:
interruptor
*
III:
Palanca
*
IV:
Mesita
*
V:
Tapa
SU
MAQUINA
Ia
zona
de
coser
REOSTATO
de
control
en
el
lado
DE
ENERGIA1LUZ
conectado.
tensiOn
Cuando
Ia
Ia
de
Ia
red
LA
TAPA
frontal,
su
LA
de
trabajo
mano
de
frontal
tire
MESA
situado
energIa/luz
de
trabajo
de
Ia
vestido.
del
reôstato
menos
Este
Ia
máquina
deje
de
eléctrica
ella
DE
TRABAJO
tirar
su
mano
placa
que
de
a
Ia
levantando
un
derecho
a
de
completamete.
mãquina
Iámpara,
FRONTAL
de
derecha
con
soltar
de
Ia
el
mismo
como
coser,
coser
Ia
maquina
sacando
Ia
derecha
palanca
izquierda.
de
Ia
aguja
en
el
conector
máquina.
interruptor
interruptor
Ia
Ia
máquina
para
Ia
de
Ia
luz
quitar
DEBE
clavija
hacia
y
soltar
parte
y
de
de
BRANCHEMENT
Ia
1.
Nettoyer
alentours,
2.
RHEOSTAT
Placer
machine,
3.
INTERRUPTEUR
Votre
machine
de
lumière
lumière
Lorsque
nettoyage,
4.
OUVERTURE
Pour
ouvrir
l’abaisser
5.
OUVERTURE
TRAVAIL)
Pour
ouvrir
main
droite,
main
gauche
Illustration
Ia
et
*W:
*
vous
*
*
*
III:
l’excès
fiche
du
relier
ne
est
en
le
contact
n’utilisez
veillez
DU
le
capot
vers
vous.
DU
Ia
table
et
soulever
et
simultanément.
Prise
:
JJ
:
Interrupteur
Levier
Capot
V:
Capot
d’huile
rheostat
Ia
prise
LUMIERE
fonctionne
position
electrique
a
Ia
CAPOT
frontal,
CAPOT
de
travail,
de
lateral
inferieur
DE
LA
sur
dans
electrique
ET
de
pas
débrancher
INFERIEUR
le
LATERAL
tirer
I’avant
degagement
frontal
MACHINE
Ia
plaque-aiguille
Ia
prise
a
votre
MACHINE
que
lorsque
marche.
general
Ia
machine
de
Ia
prise
levier
pied
FRONTAL
vers
presseur
du
tirer
le
du
extérieure
prise
l’interrupteur
II
commande
de
Ia
machine.
ou
de
Ia
droite
(TABLE
vers
vous
carter
lateral
et
ses
de
murale.
lors
du
courant.
puis
DE
avec
avec
Ia
Ia
Ia
PREPARACION
BARRA
Extender
que
escuche
(le
las
La
barra
os
pasadores
hacia
IlustraciOn
gulas
del
abajo
DEL
Ia
como
*
*
barra
un
desde
porta
de
J
II:
click.
carretes
ilustrado.
:
Ojo-guia
Barra-gula
PARA
PORTA
guia
del
Colocar
atrás
al
los
carretes
del
EL
CARRETES
hilo
a
su
punto
los
hilos
frente.
puede
mantener
tan
sOlo
hilo
del
hilo
ENHEBRADO
más
alto
hasta
sobre
los
pasadores
los
hilos
sobre
bajando
Ia
barra
PREPARATION
SUPPORT
Tirer
vers
signale
et
Repousser
apres
place
Illustration
par
passer
utilisation.
méme
GUIDE-FILS
le
haut
un
“clic”.
es
fils
dans
l’ensemble
Les
avec
*
Guide-fil
*
jJ:
Support
Ie
Placer
Ia
housse.
A
L’ENFJLAGE
support
les
du
bobines
jusqu’à
les
bobines
guides
support
ou
guide-fils
TELESCOPIQUE
son
point
maximum
de
fil
sur
Ies
broches
d’arrière
dans
cOnes
telescopique
sa
position
peuvent
vers
I’avant.
originale
rester
en
Page 14
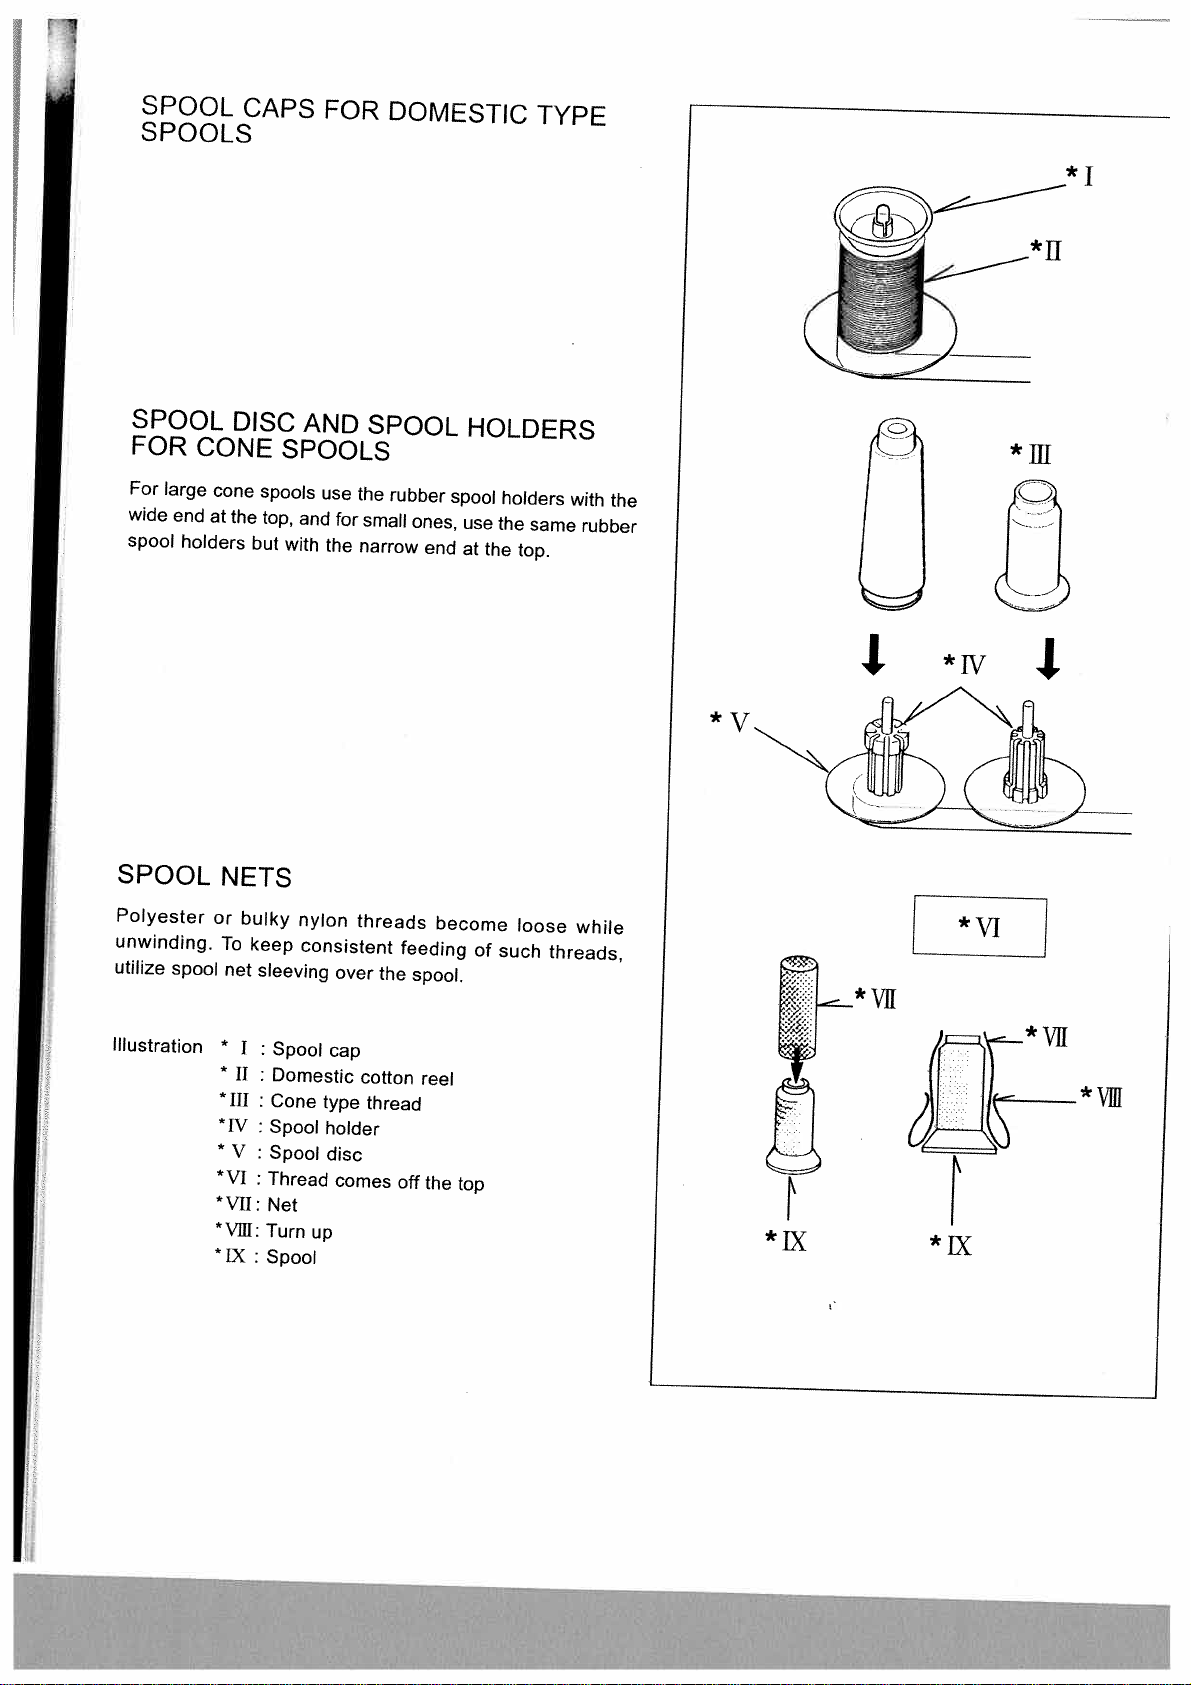
SPOOL
SPOOLS
CAPS
FOR
DOMESTIC
TYPE
I
SPOOL
FOR
For
large
wide
end
spool
holders
SPOOL
Polyester
unwinding.
utilize
spool
DISC
CONE
cone
at
the
but
NETS
or
bulky
To
keep
net
AND
SPOOLS
spools
top,
and
with
nylon
consistent
sleeving
use
for
the
over
SPOOL
the
rubber
small
ones,
narrow
threads
feeding
the
spool.
HOLDERS
spool
use
end
at
the
become
of
holders
the
same
top.
loose
such
with
rubber
while
threads,
the
*v
74:::
*fl
*w
*ffi
4
Illustration
*
J
*
J
*
JJJ
*Iv
*vI
*J:
*Vffl:
Spool
Domestic
Cone
Spool
Spool
Thread
Net
Turn
up
Spool
cap
type
holder
disc
comes
cotton
thread
off
reel
the
top
*Tx
*Vfl
*1x
Page 15
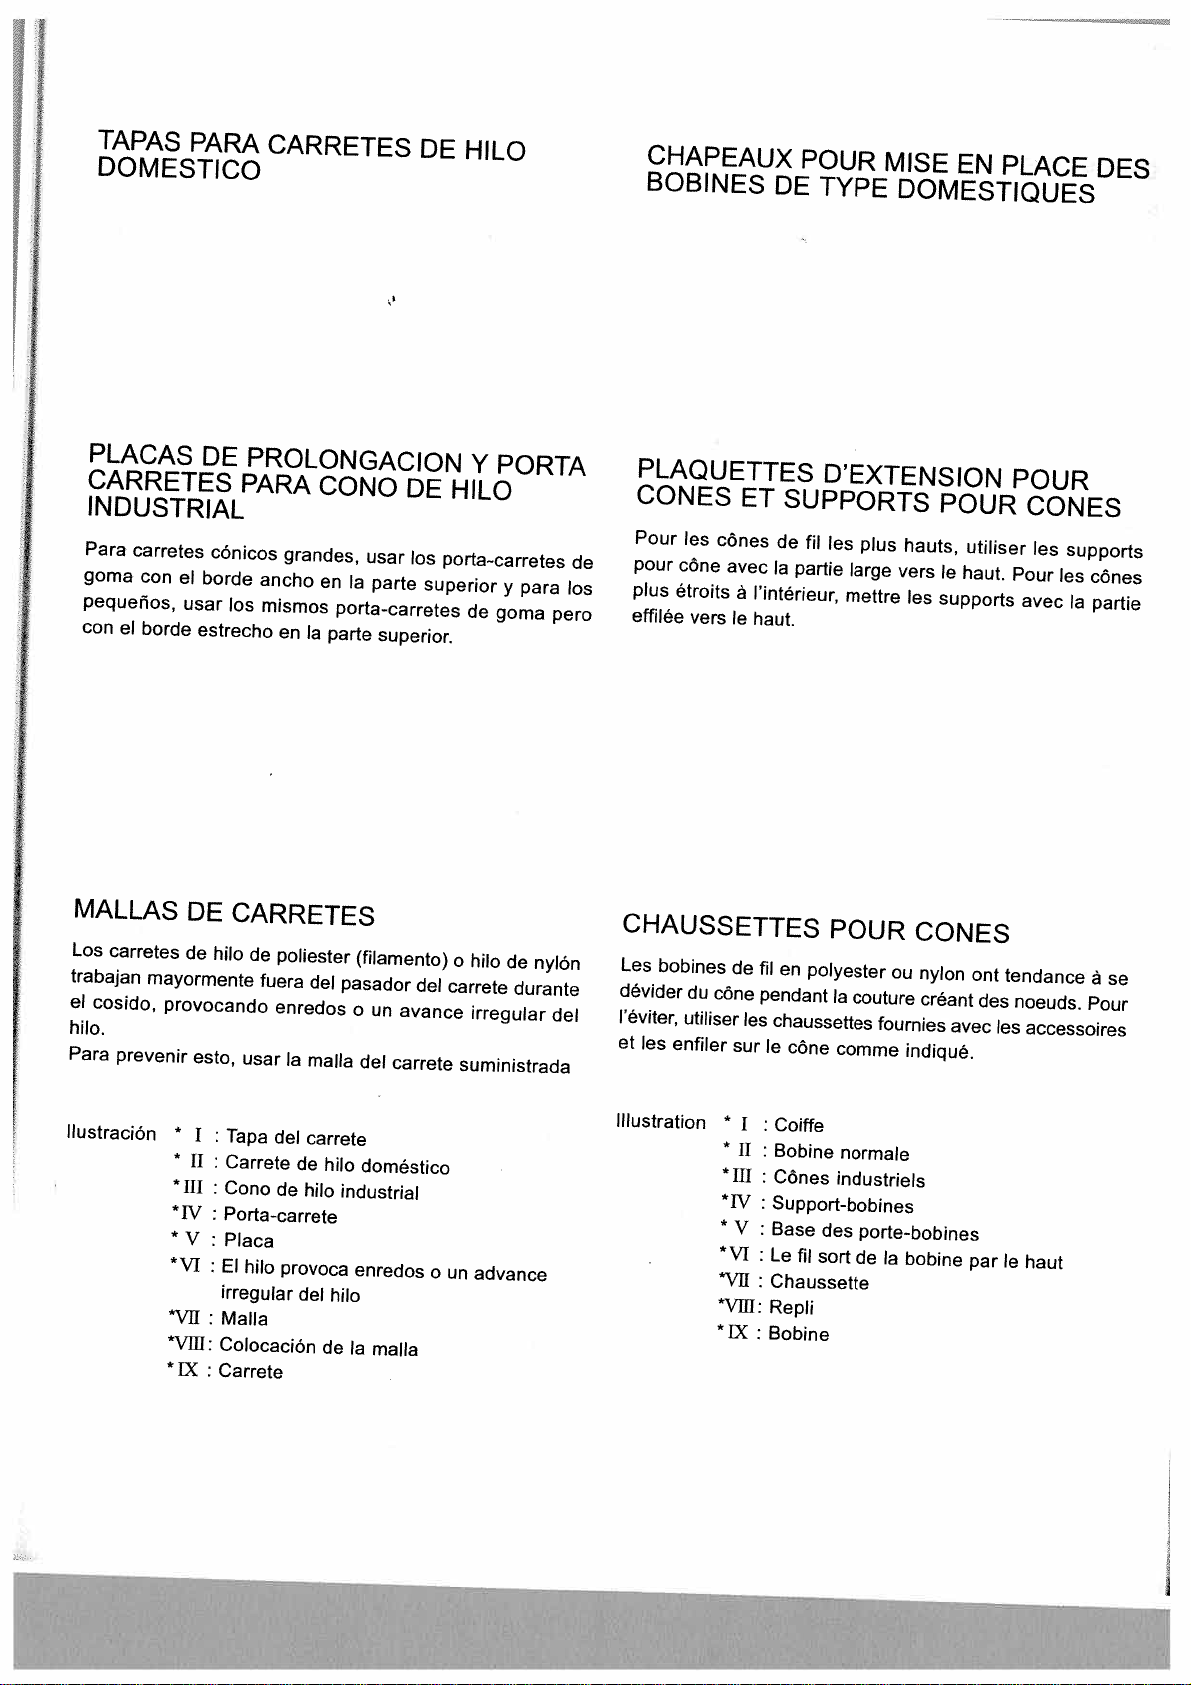
TAPAS
PARA
DOMESTICO
CARRETES
DE
HILO
CHAPEAUX
BOBINES
DE
POUR
TYPE
MISE
EN
PLACE
DOMESTIQUES
DES
PLACAS
CARRETES
INDUSTRIAL
Para
carretes
goma
con
el
pequenos,
con
el
MALLAS
Los
carretes
trabajan
el
cosido,
hilo.
Para
prevenir
usar
borde
estrecho
DE
de
mayormente
provocando
esto,
DE
PROLONGACION
PARA
cónicos
borde
los
grandes,
ancho
mismos
en
CONO
en
Ia
porta-carretes
Ia
parte
CARRETES
hilo
de
usar
poliester
fuera
enredos
Ia
del
malla
(filamento)
pasador
o
del
DE
usar
parte
superior.
un
avance
carrete
HILO
los
porta-carretes
superior
de
o
del
carrete
suministrada
Y
PORTA
y
para
goma
hilo
de
durante
irregular
pero
nylOn
del
PLAQUETTES
CONES
Pour
de
los
pour
plus
effilée
cone
étroits
CHAUSSETTES
Les
bobines
dévider
l’éviter,
et
les
utiliser
enfiler
les
vers
du
ET
cones
avec
a
le
de
cOne
sur
D’EXTENSION
SUPPORTS
de
fil
Ia
partie
l’intérieur,
haut.
fil
en
polyester
pendant
les
chaussettes
le
cone
les
plus
large
mettre
POUR
Ia
couture
fournies
comme
hauts,
vers
les
supports
CONES
ou
nylon
créant
indique.
POUR
utiliser
le
haut.
ont
des
avec
les
POUR
CONES
les
Pour
les
avec
tendance
noeuds.
accessoires
supports
cOnes
Ia
partie
a
se
Pour
Ilustraciôn
*
*
II
*
JJ
*IV
*V
*Cf
*Vfl
*Vffl:
Tapa
del
Carrete
Cono
de
Porta-carrete
Placa
:
El
hilo
irregular
:
Malla
Colocaciôn
Carrete
carrete
de
hilo
hilo
provoca
del
de
doméstico
industrial
enredos
hilo
Ia
malla
o
un
advance
Illustration
*
I
:
*
II
*111
Support-bobines
*
V
:
Base
Le
*Vril
:
Chaussette
*Vffl:
Repli
JX
Bobine
:
Coiffe
Bobine
COnes
fil
normale
industriels
des
porte-bobines
sort
de
Ia
bobine
par
le
haut
Page 16

CHANGING
Be
sure
needle
lever.
1.
Push
foot
release
2.
Place
the
desired
holes.
3.
Lower
the
presser
so
that
the
PRESSER
is
in
foot
foot
holder
the
lever
foot
up
to
on
lever
snaps
position.
remove
the
FEET
needle
and
on
the
push
the
Raise
plate
foot
foot.
foot.
aligning
presser
release
foot
needle
lever
Illustration
*
*11
J
Turn
upwards
Foot
release
lever
Page 17
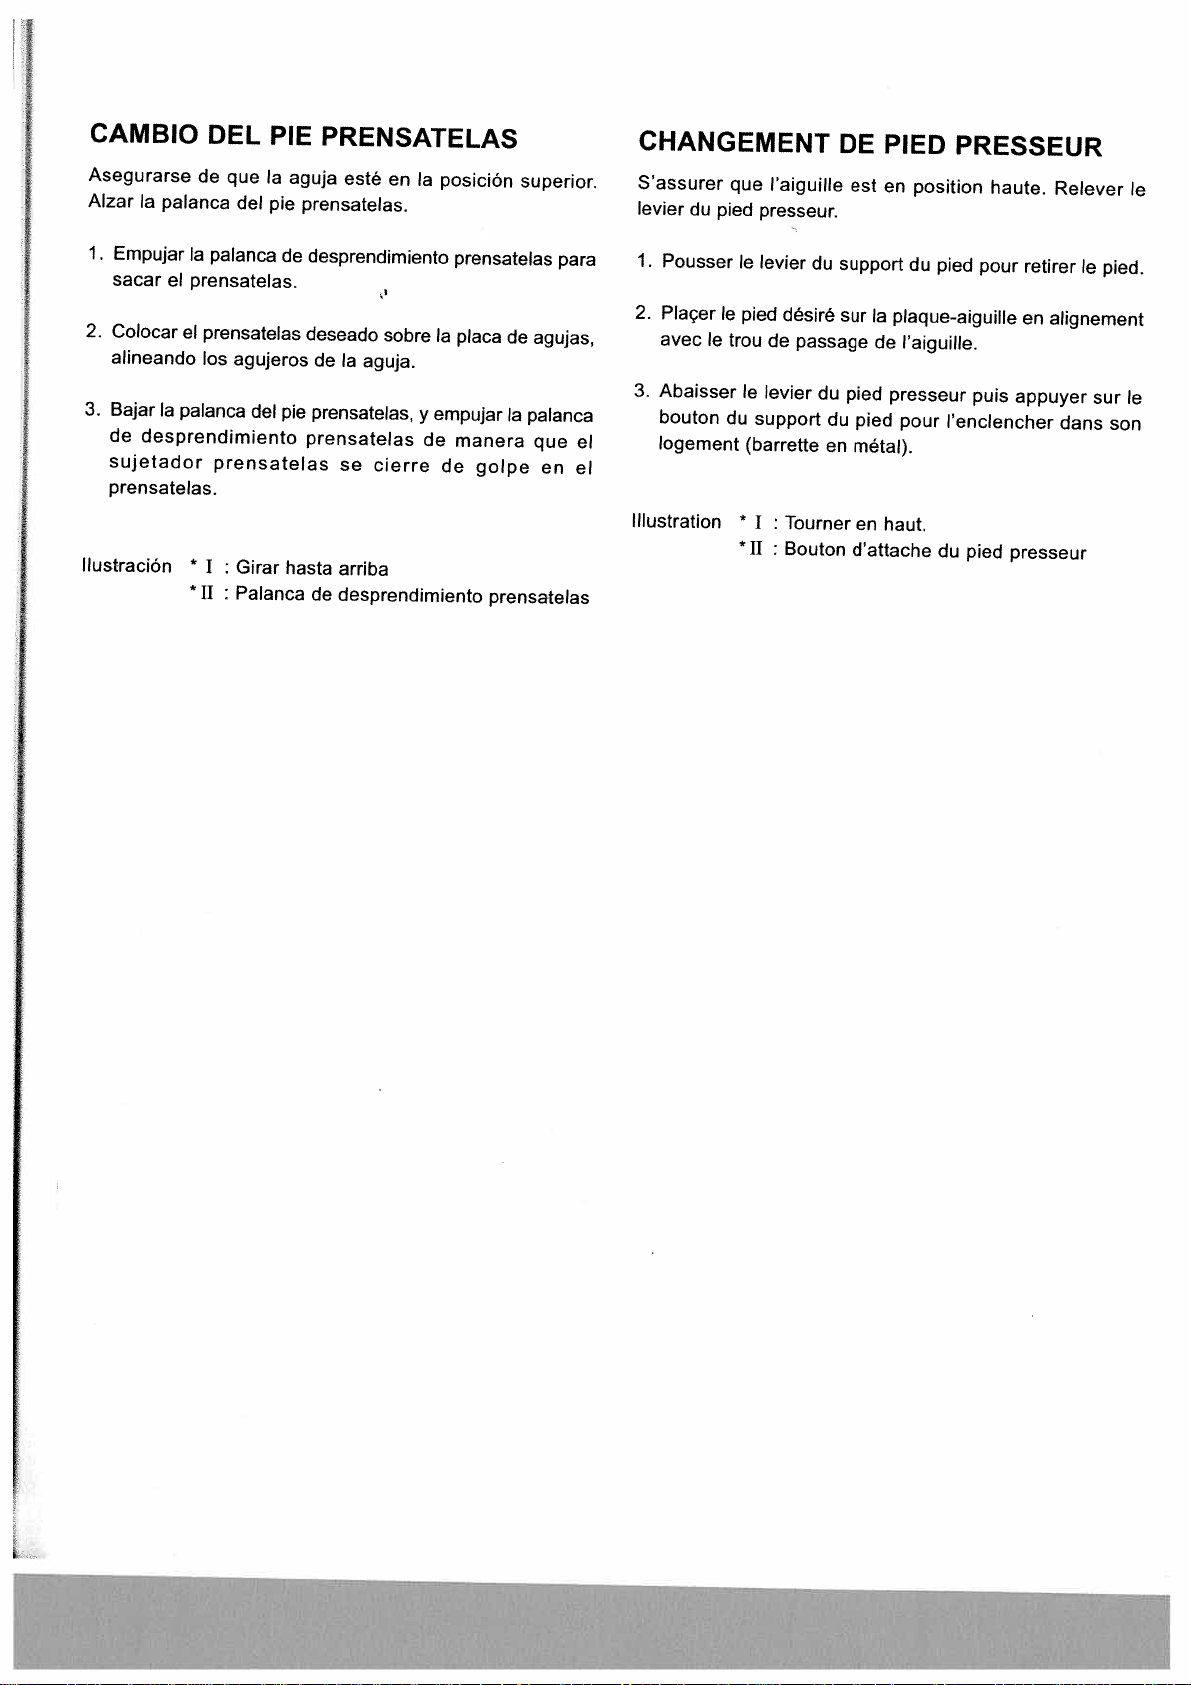
CAMBJO
Asegurarse
Aizar
Ia
palanca
1.
Empujar
sacar
el
2,
Colocar
alineando
3.
Bajar
Ia
desprendimiento
de
sujetador
prensatelas.
Ilustraciôn
DEL
de
que
del
Ia
palanca
prensatelas.
prensatelas
el
los
agujeros
palanca
prensatelas
*
Girar
:
*11
Palanca
:
PIE
Ia
pie
del
aguja
prensatelas.
de
deseado
pie
prensatelas
hasta
PRENSATELAS
esté
en
Ia
posiciôn
desprendimiento
sobre
de
Ia
aguja.
prensatelas,
se
cierre
arriba
de
desprendimiento
prensatelas
Ia
empujar
y
de
manera
de
placa
superior.
de
agujas,
Ia
palanca
que
golpe
prensatelas
en
para
el
el
CHANGEMENT
S’assurer
levier
1.
Pousser
2.
Placer
avec
3.
Abaisser
bouton
logement
Illustration
du
pied
le
le
que
le
pied
trou
le
du
support
(barrette
*
I
*11
l’aiguille
presseur.
levier
désiré
de
passage
levier
Tourner
:
Bouton
du
du
en
DE
est
support
sur
pied
du
pied
metal).
en
d’attache
PIED
en
position
du
pied
Ia
plaque-aiguille
de
I’aiguille.
presseur
pour
l’enclencher
haut.
du
PRESSEUR
haute.
pour
puis
pied
Relever
retirer
en
alignement
appuyer
dans
presseur
le
pied.
sur
le
le
son
Page 18
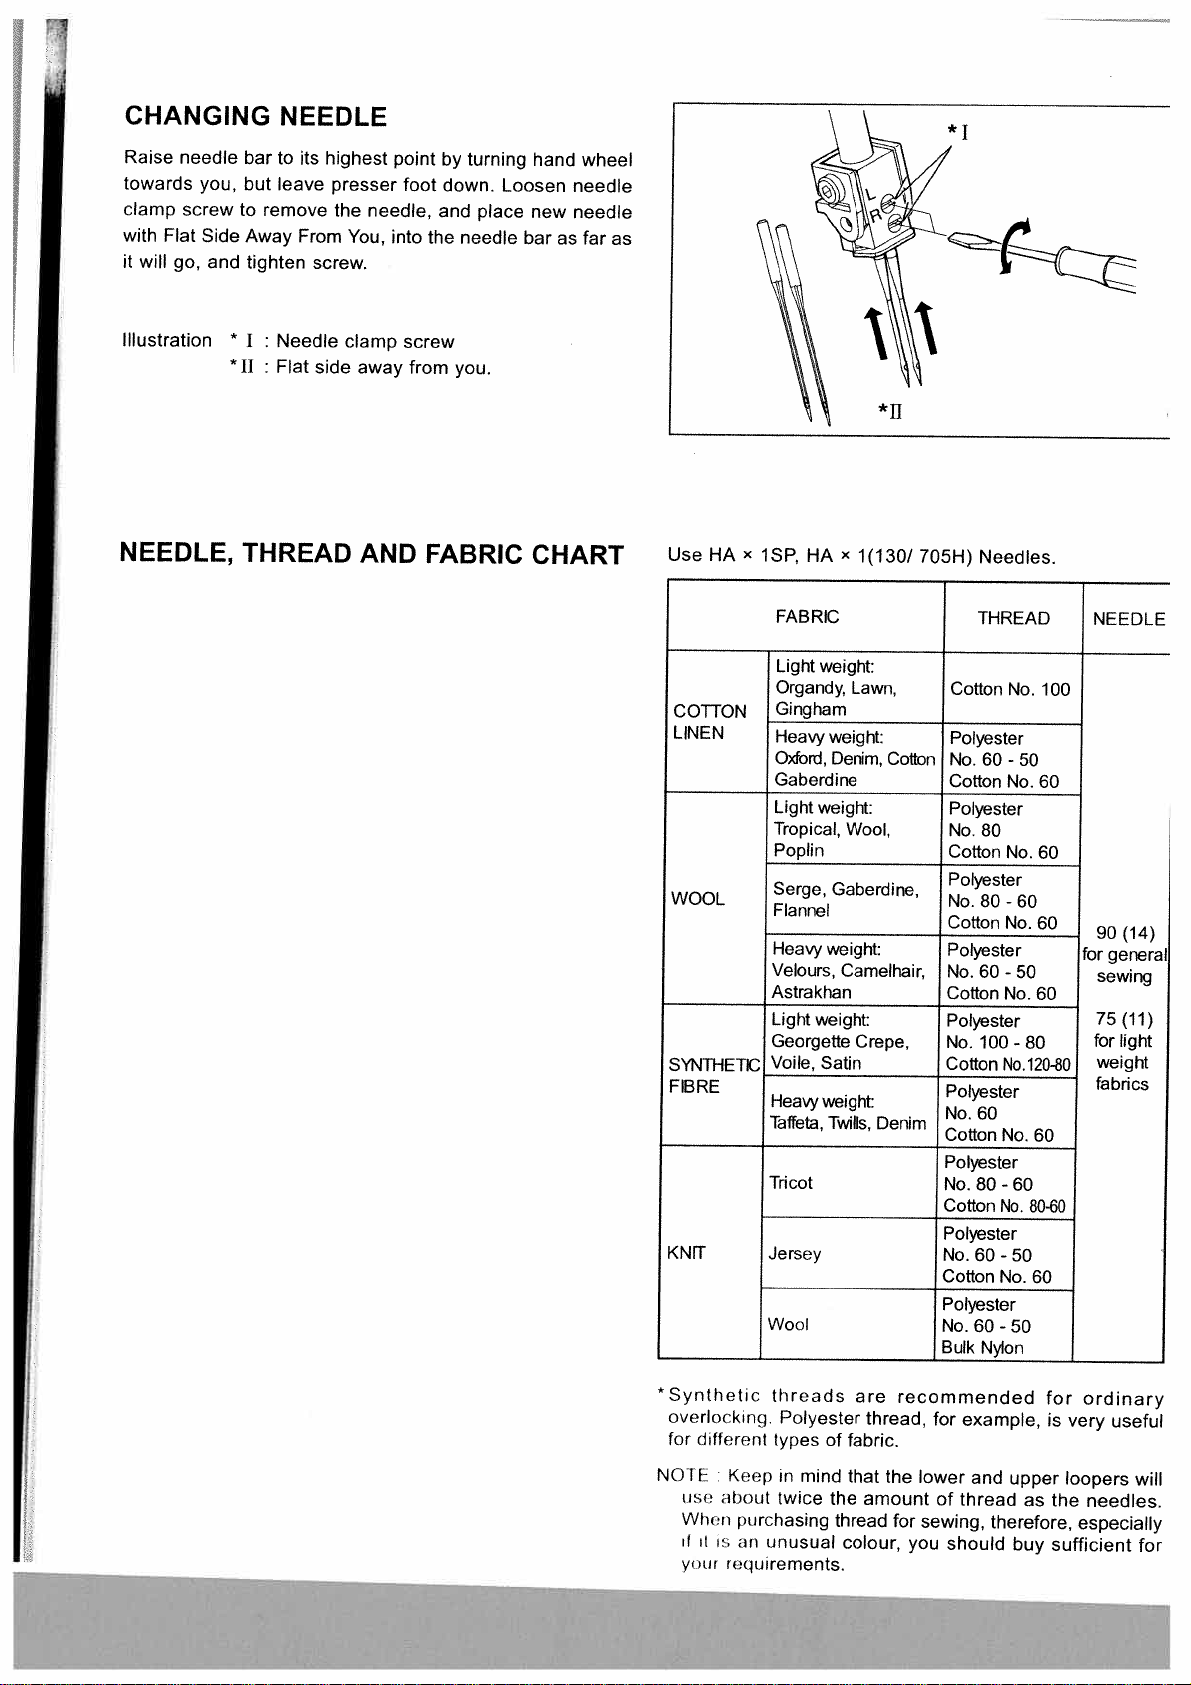
CHANGING
Raise
towards
clamp
with
Flat
will
it
needle
screw
go,
you,
Side
and
bar
but
to
Away
tighten
NEEDLE
highest
its
to
leave
presser
remove
the
From
screw.
needle,
You,
point
foot
into
by
down.
and
the
turning
place
needle
hand
Loosen
new
bar
needle
as
wheel
needle
far
*1
as
Illustration
NEEDLE,
*
Needle
J
:
*
Flat
11
:
THREAD
side
clamp
away
AND
screw
from
you.
FABRIC
CHART
HA
x
Use
COHON
LINEN
WOOL
SVNTHETIC
FIB
RE
KNIT
iSP,
HA
FABRIC
Light
weight:
Organdy,
Gingham
Heavy
weight:
Oxford,
Denim,
Gaberdine
Light
weight:
Tropical,
Poplin
Gaberdine,
Serge,
Flannel
Heavy
weight:
Velours,
Astrakhan
Lightweight:
Georgette
Voile,
Satin
Heavy
weight
Taffeta,
Tills,
Tricot
Jersey
Wool
*11
x
1(130/
Lawn,
Cotton
Wool,
Camelhair,
Crepe,
Denim
705H)
Cotton
Polyester
No.
Cotton
Polyester
No.
Cotton
Polyester
No.
Cotton
Polyester
No.
Cotton
Polyester
No.
Cotton
Polyester
No.
Cotton
Polyester
No.
Cotton
Polyester
No.
Cotton
Polyester
No.
Bulk
Needles.
THREAD
No.
60
-
50
No.
80
No.
80
-
60
No.
60
-
50
No.
100
-80
No.120-80
60
No.
80-60
80-60
No.
60
-
50
No.
60
-
50
Nylon
60
60
60
60
60
60
100
NEEDLE
(14)
90
general
for
sewing
75
(11)
light
for
weight
fabrics
*
Synthetic
overlocking.
different
for
NOTE
use
about
When
it
it
is
yew
threads
Polyester
types
Keepinmind
twice
purchasing
unusual
an
requirements.
fabric.
of
that
the
thread
colour,
recommended
are
thread,
the
amount
for
for
lower
sewing,
you
example,
thread
of
should
and
therefore,
upper
as
buy
for
ordinary
very
is
loopers
the
needles.
especially
sufficient
useful
will
for
Page 19
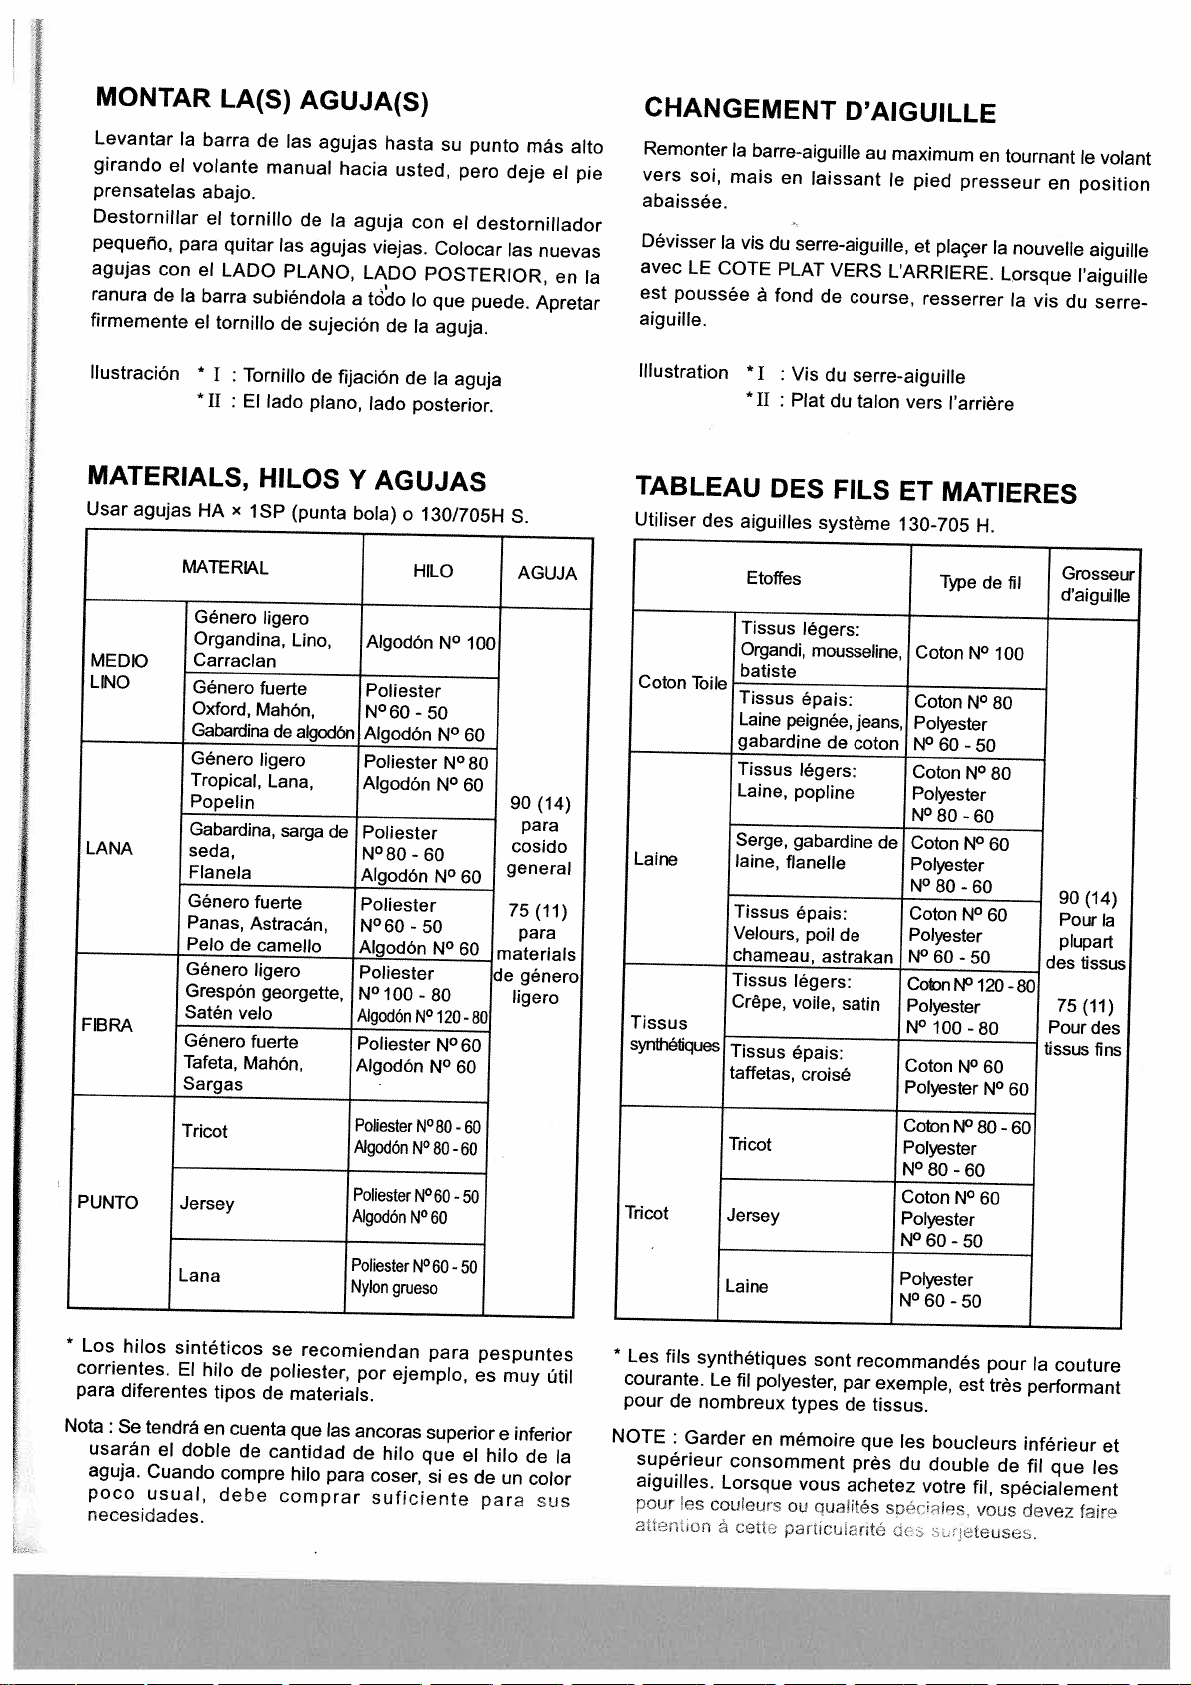
MONTAR
Levantar
girando
prensatelas
Destornillar
pequeno,
agujas
ranura
firmemente
de
Ia
el
para
con
Ia
LA(S)
barra
volante
abajo.
el
tornillo
quitar
el
LADO
barra
el
tornillo
AGUJA(S)
de
las
manual
de
las
agujas
PLANO,
subiéndola
de
sujeciOn
agujas
hacia
Ia
aguja
viejas.
LADO
tc5do
a
hasta
usted,
con
Colocar
POSTERIOR,
lo
que
de
Ia
aguja.
su
punto
pero
el
destornillador
puede.
deje
las
más
el
nuevas
en
Apretar
alto
pie
CHANGEMENT
Remonter
vers
soi,
abaissée.
Dévisser
avec
est
poussée
aiguille.
LE
Ia
Ia
barre-aiguille
mais
Ia
vis
COTE
a
en
laissant
du
serre-aiguille,
PLAT
fond
de
D’AIGUILLE
au
maximum
le
pied
et
placer
VERS
L’ARRIERE.
course,
resserrer
en
tournant
presseur
Ia
Lorsque
en
nouvelle
Ia
vis
volant
le
position
aiguille
l’aiguille
du
serre
llustraciôn
*
I
*
II:
MATERIALS,
Usar
agujas
MEDIO
LINO
LANA
FIBRA
HA
MATERLL
Género
Organdina,
Carraclan
Género
Oxford,
Gabardina
Género
Tropical,
Popelin
Gabardina,
seda,
Flanela
Género
Panas,
Pelo
Género
Grespón
Satén
Género
Tafeta,
Sargas
Tornillo
El
HILOS
x
iSP
ligero
fuerte
Mahôn,
ligero
.
fuerte
Astracán,
de
camello
ligero
georgette,
velo
fuerte
Mahôn,
Iado
de
Lana,
sarga
de
pIano,
(punta
Lino,
algodón
de
fijaciOn
lado
Y
AGUJAS
bola)
AlgodOn
Poliester
N°60
AlgodOn
Poliester
AlgodOn
Pohester
N°80
AlgodOn
Poliester
N°60
Algodón
Poliester
N°
100
AigodOn
Poliester
AlgodOn
de
posterior.
o
130/705H
HLO
-
.
-
-
50
-
N°
Ia
N°
50
N°
N°
N°
60
N°
N°
80
120-80
N°
N°
aguja
100
60
80
60
60
60
60
60
S.
AGUJA
90
(14)
para
cosido
general
75
(j)
para
materials
de
género
ligero
Illustration
TABLEAU
Utiliser
Coton
Lame
Tissus
des
Toils
Tissus
Velours,
chameau,
Tissus légers:
Crêpe,
Tissus
taffetas,
*
J
:
Vis
*
JJ
du
Plat
DES
aiguilles
Etoffes
Tissus
Organdi,
batiste
Tissus
Lame
gabardine
Tissus legers:
Lame,
Serge,
lame,
système
legers:
mousseline,
épais:
peignée,
de
popline
gabardine
flanelle
épais:
poil
astrakan
voile,
épais:
croisé
serre-aiguille
du
talon
FILS
jeans,
coton
de
de
satin
vers
l’arrière
ET
MATIERES
130-705
Coton
Coton
Type
H.
de
N°
N°
Polyester
N°
60
-
50
Coton
N°
Polyester
N°
80
-
60
Coton
N°
Polyester
N°
80
-
60
Coton
N°
60
Polyester
N°
60
-
50
CobnN°120-80
Polyester
N°
100-80
Coton
N°
Polyester
60
N°
100
80
80
60
fil
60
Grosseur
d’aiguille
90
(14)
Pour
plupart
des
tissus
75
(11)
Pourdes
Ia
fins
PUNTO
*
Los
corrientes.
para
Nota
:
Se
usarán
aguja.
poco
necesidades.
Lana
hilos
sintéticos
El
diferentes
tendrá
el
Cuando
usual,
Tricot
Jersey
hilo
en
doble
de
tipos
cuenta
de
compre
debe
se
recomiendan
poliester,
de
materials.
que
cantidad
hilo
comprar
las
para
Poliester
Algodón
Poliester
Algodón
Poliester
Nylon
grueso
por
ejemplo,
ancoras
de
hilo
coser,
suficiente
N°
80-60
N°
80-60
N°
60-50
N°
60
N°
60-
para
superior
que
si
50
el
es
pespuntes
es
muy
inferior
e
hilo
de
de
un
color
para
sus
titil
Ia
Tricot
*
Les
courante.
pour
NOTE
supérieur
aiguitles.
jour
aicn
fils
synthetiques
Le
de
nombreux
:
Garder
couleurs
es
Tricot
Jersey
Lame
fil
polyester,
en
mémoire
consomment
Lorsque
a
ceti
particuartü
types
vous
ou
sont
par
de
pres
achetez
auités
Coton
Polyester
N°
80
Coton
Polyester
N°
60
Polyester
N°
60
recommandés
exemple,
tissus.
que
les
boucleurs
du
double
votre
séciies.
N°
-
60
N°
-
50
-
50
est
tteuse.
80-60
60
fit,
vous
pour
Ia
couture
très
performant
inférieur
de
fit
que
spécialement
devez
et
les
fIre
Page 20
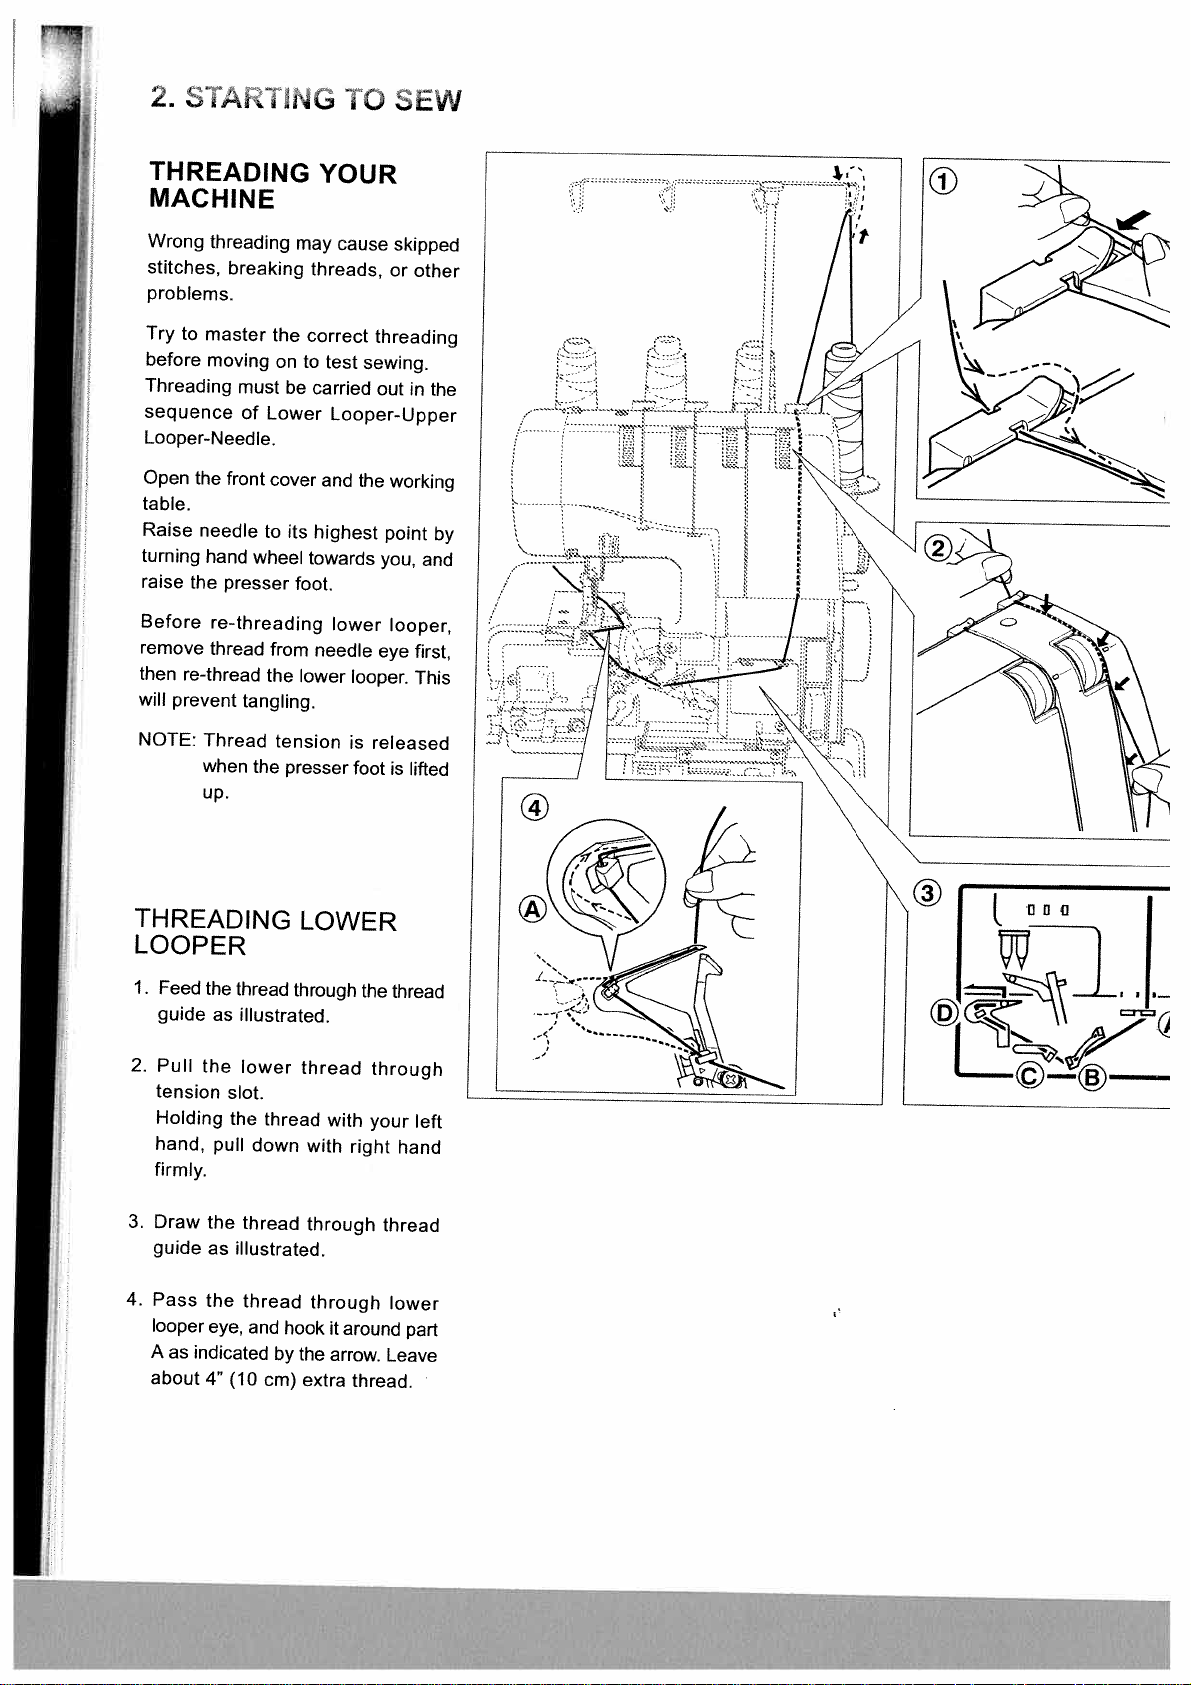
2.
STAuiEG
10
_
SEW
THREADING
MACHINE
Wrong
stitches,
problems.
Try
before
Threading
sequence
Looper-Needle.
Open
table.
Raise
turning
raise
Before
remove
then
will
NOTE:
threading
to
master
moving
the
needle
hand
the
re-threading
thread
re-thread
prevent
Thread
when
up.
breaking
must
of
Lower
front
cover
to
wheel
presser
from
the
tangling.
the
the
on
tension
YOUR
may
threads,
correct
to
test
be
carried
Looper-Upper
and
its
highest
towards
foot.
lower
needle
lower
presser
cause
sewing.
the
looper.
is
foot
skipped
or
other
threading
out
in
working
point
you,
and
looper,
eye
first,
This
released
is
lifted
the
by
THREADING
LOOPER
1.
Feed
the
thread
2.
3.
4.
guide
Pull
tension
Holding
hand,
firmly.
Draw
guide
Pass
looper
A
as
about
illustrated.
as
the
lower
slot.
the
pull
the
thread
as
illustrated.
the
thread
eye,
and
indicated
4”
(10
down
LOWER
through
thread
thread
hook
the
by
cm)
extra
with
with
through
through
it
around
arrow.
the
through
your
right
thread
lower
Leave
thread.
thread
left
hand
part
nnJ
I
I
Page 21

m
-
m
>1
C)
0
m
(_)
Q
m
z
m
C)
0
C
m
m
m
,,
-
t!2
0
7
CD
9.°-
-‘
°
.
D
z
Q
‘01-
W
rn
0
00D
Cc1OD
O3
coo.
D
‘
D$
CO
0(U
‘
(Uc
(UØ
m
ri
.(U0
(UD
,,
0
0.
CD
CD
CD
C)S2.3•
0
0
CDQ)C
0.D’
.DøCD
OCD
0.
C
CDO
7CD
‘0CD
—
CD
0.
0
CD
CD
(U’<0
.
D5’
._,
035
D(U
=
0
CD
0
=
co
CD
N
D.
CO
(U
C
£
(U’
CD
.
‘3’
C)o0
CD
o
C
—
o
C
—
g
C
0
(U
D
<Cfl(U
(U
0
5’
0.
0.
(U
-
CD
CD
D
—
a
“
(U
3
<
0
CD
o
.2.
(UO
-‘c9,(U
CD—,D
D
(U
CD
0.
C
(U
0.
CD0
-D
‘
-‘
—.
CD
‘0
C)
CD
D
CD
—
0
C
CDD.
C
CD
-
D
-
—
(U
0
CD
CD
D
C)
-,
C
3
D
CD
-‘
CD
0.
3
CD
CD(U.
CD
5’
-
co
.<
Co
)
0
0.
?.
CD
m
Z
‘
CD0
5’
g
CD
03
‘<CD
0.
CD
CD
5’
—
CD’
CD
CD
-‘
CDc5’
5’
z
o
m
-.
1-
5’
0.
-‘(U
CD
CD
4
0
‘•‘
CD
oc°
CD
0
00.
o
(U
3Z
(0
CD
CD
0
2,CD
3CD
5’0’
D5’
(UD
CCD
DE
CO
o.:’
CD
D
‘0
—
-
CD
Co
CO
D.C)CDCD-CD
DC
0
C0C)
CD5’
-‘
OCD
:5’(U
D
_.(U
‘
CD
0
0
0-.
CDco
C
>
C)
I
Z
m
CD
D
C
CD
0.
0
CD
.0
C
-
5’D
_CD’
CD
5’
CD.
0
5’CD
0.
CD
°
0
‘
C
(U
<
CD
‘0
CD
0
C
(U
D
—
0
‘0.
CD
D
CDD-
C(U’
C
‘
CD
o
C”
D—
-CD
CD
C)
C
a
CD
C
-‘
‘
C
.
(U
C
C
0.
C).
CD(U
a
0
.
CD
CD
3
-,
D
—.
CD
CD-
“(U
<-‘a
m
I
C)CD.0
0
z!
m
C0
°CDO-
CN
C°—C
W
(U
m
z
C’)
J
CD
cn-
0Cfl
0.
CD3CDO
D
(1)
“
-i;-
Q)CD
(U
CCDW
0
a
<
0.
CD
0
—.
.0
(U
‘
,,
CD
0.
CD’
0.
‘
CD
-
00.0
0)
(
CD
0.
CD
<
3
CD
CD
—
‘
0.
co
CD
0
E
N
3
i•
!L
0.
rn
0
.
.
0.
‘CD
—
CDC)
0.D(U
0(00
3D
o
0
(Uo°
0
0
CD(U
3
0
0
CD
CD
CD
5’CD0.
OOCD
0
0.
P
C)O
0”
m
z
D
-
(U
0
00
CD
(U0
0
0
-
0<0
•
CD
<.5’
CD
‘0
-,
CDCD
-,
—
C)D
5’
0)CD
—
0
m
3
CD-
0.
CD
0.
(U
3
CD
(UD
0.
CO
—
0
CDDo
D
‘(U(U
5’
0
CD
Q
C)
m
C
Z
m
5’
a:C
P
8
3
CD_
—
,
0
•CDCD
0
C
a:
C
-o
DD
0.
DCD
3
3
-.
5’
<C
(U-’
CD
DD
-
C
C
-.
CD
Q)C)
CDCD
‘
“CD’
CD’
Page 22

THREADING
LOOPER
1.
Feed
the
thread
guide
as
illustrated.
Pull
2.
3.
4.
the
upper
slot.
Holding
hand,
firmly.
Draw
guide
When
instruction,
pass
automatically
wheel.
Pass
thread
leaving
4”
(10
the
pull
the
thread
as
threading
the
the
guide
an
cm).
down
illustrated.
upper
thread
thread
excess
through
thread
thread
through
after
and
UPPER
the
through
with
with
right
the
according
looper
guide
rotating
through
looper
length
of
thread
your
thread
to
thread
about
the
left
hand
the
(A)
hand
wire
eye,
aDo
£®
I
-
Page 23

ENHEBRAR
Avanzar
1.
2.
3.
4.
Conducir
que
et
hacia
Tirar
Pasar
ancora
10
hito
cm.
et
abajo
et
et
el
et
hito
con
hito
hito
superior
hito
hito
pase
su
con
a
EL
a
a
mano
través
a
través
dejando
través
entre
su
ANCORA
de
a
través
de
los
discos
izquierda
mano
derecha.
de
ta
guia
de
Ia
gula
una
SUPERIOR
guia
del
Ia
ranura,
de
y”tirándoto
del
hito
del
longitud
hilo
como
asegurándose
tension,
firmemente
como
hito
y
et
de
más
se
itustra.
reteniendo
ilustrado.
ojo
de
de
unos
de
Ia
ENFILAGE
1.
Passer
2.
Tirer
gauche
3.
Passer
Quand
boucleur
automatiquement
4.
Passer
chas
supplémentaire.
te
te
fit
et
le
vous
te
d’aiguitte
DU
fit
dans
dans
en
te
fit
dans
enfitez
superieur
fit
dans
d’avant
BOUCLEUR
te
guide-fit
les
tensions
tirant
vers
te
es
guides-fit
seton
passe
aprés
avoir
le
guide-fit
vers
t’arrière.
comme
en
te
bas
comme
les
instructions,
par
tourné
en
cotimacon
SUPERIEUR
itlustré.
soutenant
avec
te
guide
Ia
Laisser
Ia
main
iltustré.
roue
de
de
manuetle.
puis
10
a
droite.
te
fit
dans
cm
main
fit
de
du
(A)
te
fit
Page 24

THREADING
1.
Feed
the
thread
2.
3.
4.
guide
Draw
tension
with
right
Draw
guide
Thread
back
the
passing
presser
length
as
the
slot.
your
hand
the
as
the
through
threads
of
illustrated.
needle
left
firmly.
thread
illustrated.
needles
along
foot,
about
NEEDLES
through
threads
Holding
hand,
pull
through
from
needle
towards
the
leaving
4”
(10
eye
right
the
the
down
the
the
an
cm).
thread
through
thread
with
thread
front
and
pull
back
side
extra
to
of
NEEDLE
Needle
threader.
is
(See
THREADER
threaded
page
easily
62.)
(OPTION)
needle
by
Page 25

ENHEBRAR
1.
2.
de
el
hacia
3.
Tirar
figura.
4.
Enhebrar
a
pasando
dejando
Avanzar
Conducir
través
que
hilo
el
con
abajo
et
et
os
hilo
hilo
las
del
a
una
AGUJAS
hilo
a
hilos
pase
su
mano
con
través
a
agujas
ojo
de
to
largo
tongitud
través
través
a
entre
su
mano
Ia
del
de
los
izquierda
de
Ia
desde
aguja,
tado
extra
Ia
gula
de
las
discos
derecha.
guia
el
frente
tirar
y
derecho
de
unos
del
hito
ranuras,
de
tensiOn,
y’tirándoto
del
hilo
a
Ia
los
hilos
del
pie
10
cm.
como
se
asegurandose
reteniendo
firmemente
como
se
parte
posterior
hacia
prensatelas,
itustra.
ye
en
atrás
ENFILAGE
1.
2.
3.
4.
Enfiter
daiguilte
pied
Passer
Tirer
gauche
Passer
te
te
fit
et
Ie
Ies
presseur.
DES
fit
dans
dans
en
te
fit
dans
aiguiltes
puis
AIGUILLES
le
guide-fit
tes
tensions
tirant
vers
es
guides-fit
d’avant
tirer
tes
fits
Laisser
10
en
cm
en
le
vers
comme
te
soutenant
bas
avec
comme
t’arrière
passant
de
fit
supplémentaire.
illustré.
Ia
main
itlustré.
dans
vers
Ia
de
droite.
les
droite
Ia
main
chas
du
ENHEBRADOR
La
aguja
se
enhebra
(Ver
página
63.)
DE
AGUJA
fácilmente
(OPCIONAL)
por
el
enhebrador
de
aguja
ENFILE-AIGUILLE
(OPTIONNEL)
Les
aiguitles
t’enfiteur
peuvent
d’aiguilte
automatiquement
(voir
page
63).
être
enfitées
avec
Page 26

HELPFUL
HINTS
REPLACING
When
replacing
helpful
1.
2.
3.
for
Cut
off
thread
Raise
Lower
wheel
threads
and
eye
quick
existing
from
presser
needle
AWAY
until
looper
THREAD
thread
changeover.
threads
new
spools
foot.
bar
to
FROM
the
connecting
eyes.
spools,
near
as
lowest
its
YOU.
SPOOLS
following
the
spools.
the
illustrated
position
Carefully
knots
pass
steps
Tie
the
(seamen’s
by
turning
pull
the
through
may
ends
cut
knot).
hand
existing
needle
be
CUTTING
Frayed
Draw
and
under
to
the
push
obtain
thread
the
thread
the
moving
clear
NEEDLE
may
make
near
the
thread
cutter
cutter
cut
end
THREAD
needle
thread
lever
and
turn
as
illustrated.
threading
cutter
on
draw
or
hand wheel
the
difficult.
the
needle
thread
towards
plate
passing
you
Page 27

Cl)C0
m
rn
0
_._‘
E°
0
m
z
C)
Cl)
CD
Cl)
g
CD
—
30)
!
00
CD
D.
0)
D
0
9
m
0
00)
•-‘
OV
QCD
-,
C
CD
CCD
0.
CD
—
0CD0
OCDOCD_
D0.
0
C,
z
Cl)
m
I
Cl)
C
-l
Cl)
I
CD
0
Sg2:
0.
D
C
CDCD
0)
D
0
0)
C
3
OCD
0
3
OCD
0
V
=
CD0)
-0)’
0
Ci)
CD’
0
CDr
-
CD
D
CD
3
CD
CD
_<i)
CD9.
0<
Cl)
0-
3’C
O
CDCD
D
V
0CDC°
CD
<‘
CD
0)_U
30
°CD-
CDCD-
3d)
CD
0
z
CD
0
-,
0
0
0)
D
-,
0)
CD
3
DCVCoD
VD
CD
Cl)C
“0.
V
-
0.
DCD
__0
DO’
0
CDCD
Cc)
(0
D.
3.
m
-o
0.
CD
0
0
0
—
0)
CD
-o
0.
0)
00)0)
C-)
D
(0
(0
CD
30)C
£
£
D
V
I-
0)D0
0
=
D
0)
0)
CD
00)
DCC
—.
0.
0
0
-
0)
D0)CDVCD
0)
CD0)
0)
0)
0)-,
0.
COo
•
000)
CD
—10.
CD
CD
3CD0
V0.
£
DQ
0
03
m
0)0
DCD
D
D
-,
—
C)
-‘
0)
=
0)
0’
V
CD
D
0.
0)CD
-S
CD
D
00)CD
0
0)
0’
D
2.
0)’
0.
CDCD
0)
V
G)
-S
CD3
—
0
CC>
‘<
0)—
0’
0
0)0
0
0
2:
R
CD
o
o
DC
CD
CD
0)
(DO)
o.
CD
D
E
00
(Do
V
0
m
D
0.
0)
CD
0
0)
0.
CD
CDV
D0CD
0
0)
0)
’C
0
V
0
CD
C
0.
CD0)
0)0
0
‘
3
<CD
I
>
0.
0-,,
Q)0.
00
0)
(02:
00)
0)0
—0.0’
DCD
CD
CO
C
0)0)
D
0)
CD
‘—-C
0.
DV
—
0)CD
CDCD
I”.)
0
CD
-‘
CD
?i
0.
_9.
Cl)
C
-
Cl)
-
——0)
0_<CD-
0
0
-,
0)
CD
0)—CD
-
C
CD
Ci)
I
m
0
0.
.
0
Cl)
o
CD
CD
0
0
-ti
C
m
0
CD
<
CD
Ci)
CD
CD
—
-o
0
o
o
CD
Cl)
-
0)
C
CD
s(0
D
Cl)
Cl)
2.
2
0)’
C
-
CD
C
2.
-n
I
>
0
—
—
CD
CD
0
C
V
CD
0
0
C
0
-,
2.
C
CDD
CDCDBC
CD
D
D
3’
CD
Z
0.
3
.
0
CD
•
CD
CD’
30)
‘
CD
0.
0)-,
C
0
D
0-So
CD
CD
CD
0.
—
0
<
CD
CD’
-D
D
0.
0)
Co
m
-:
C
cE’
C
-D
CD
-
()0)0)
—V
0
0’C
o
D)
—
CD
DC
0”
V
CD
0
C
C
D
CD-
0)
V
CD
D
oEo
D
COd)
=
—
0.
CD
CD
0)
—‘
0)
CD
=CD
-
-S
CD
=
DDD
CD
di)CD
0)—CO
Cl)CDO
CD
CD
V
<C
D
CD
0
CD
(0(l)
o
Page 28

TESTING
After
threading
plan
1.
2.
to
Gently
foot.
see
Start
under
can
except
Guide
the
material.
sew
Rotate
if
the
the
be
the
the
done
bulky
STITCH
and
pulling
lock
machine
presser
fabric
is
completed,
test
to
all
the
the
hand
stitches
at
foot
with
the
materials.)
gently
OVERLOCK
use
a
scrap
sew
in
the
following
threads
low
by
presser
wheel
are
speed
slightly
as
to
the
towards
properly
pushing
foot
machine
and
down
STITCHES
of
fabric
order.
left,
lower
the
you
a
few
formed.
feed
in
test
it
forward.
on
most
automatically
that
presser
times
fabric
(This
fabrics
feeds
you
to
Fig.
1
3.
4.
Check
(See
At
fabric
gently
to
6
Cut
thread
page
pulling
cm
of
thread
36.)
end,
extra
by
tensions
carry
the
fabric
lock
with
by
on
running
towards
stitches
scissors.
test
are
sewing
machine
the
back,
produced
on
at
without
spare
low
until
fabric.
speed,
about
fabric.
Fig.
Fig.
2
3
5
Page 29

z
-I
0
C
z
-‘Cc)
CD(D
CUCU
oCD
CD
0CD
<CD
Q)
a
CDCU_CD
0
CD
CD
a
.
—D)
U)
CD
0
‘
0CD
2.o
0
-g
—C
3
(Do
2.
C
(D.C
D
0
aC
00
Cl)
-‘
—-ia
CD
—
CU
C0
CD
CU
Cl)
CU
CD-’---
><
C
CD-
CU
CU
C0
-
CU
-
<
D(D-)
0CU-—-
=
—
Cl)
C
D—a-.
C-”CD
—-03asg-CD-CD(
000
CD
CU
CU-
Ci)
0
C
a
3C<cl)
CD’CD
0
Ci)
C
Cl)
CU-
O
(1)0(I)
70
-n
C3
D
(D.
CD
D)DD
OCDCD)
D0
-
_(D
—
CC
0
0
CU
CU_
0-n—
—O
0
0
OCD
C
*
a
C
=
a<0CD
CDoC
——
CD)
__Cl)
—.
_,C
0
m
03
Cl)
0
OD
CU<
D
(D(fl
C(D
(D(D
—so-c
<
a
CU
CD
3
CDCDCD
(Do—
D
CU
o-
0
3
D)
°
0
‘
D<
Cl)
<a
CDO
CU
Ra
-‘
CU
CD
CD
D
(
-D
CU2.
—afl-
0
CU
—
CU
•
C
O)0
Cl)
0
-
<0
DCU
<
CU<
CU
-s
3
-
—.
a
D
C
a
.
n,
OCU—
CU
oo
>
70
W
Q
-u
0
(D(D
oCD
Cl)
ZCD
CDC
fo
-
rT—l
a00(D
(D0CU
0
C0(D
CU
aOCDC
CUa—’
aCCD@
C
o-
N’
CU
—
D)(D
C)
CC
C_
03
-
CUa
—a-CU-
DCD
3
CD
3
0-
•CU.c)
Q)
CO
CU
)_‘
)(DD)
ao---’
:5-3
0
g
33
a
CD
3.0CU
o2.5
0
CD
CD
0
C
(DD
a>
CU
CU
o-
a
3
0
C
Co
C
D—
D)
oa
)CU
a-
o
z.
CD
3CU
—
3
ON
(•
CU
CU
0
C<D
33
0
o2
OC
CD
0
DCD
o
C,)
-,
C
2
-
CD
-‘
C>
-
-
-CD
CD-9Q
DCCU0
C(D.
0<
OCD—
0
0
s-•
<
C0
a
CU’C
a
0
c!
C
-,
a-%
C
-D
I
m
70
-I
-i
m
0
D
0
—
0
0
Page 30

-4
best
setting.
tension
incorrect.
the
is
Adjust
setting
needle
skipping.
when
stitch
problem
causes
have
setting
will
tension
setting
the
find
and
use
to
going
are
you
fabric
of
piece
a
with
CHART
ITING
dial
width
cutting
eredge
convertor
thread
o
Incorrect
Tension
5.
4.
general
Following
for
are
cases.
dial
many
in
width
cutting
stitching
your
overedge
improve
and
will
tension
tuning
of
fine
little
settings
A
above
guidance.
The
e:
test-sewing
settings.
Try
material.
thick
40)
or
thin
page
sew
(See
you
dial.
when
width
cutting
tensions
you.
needle
overedge
helps
Adjust
Turn
advice
1.
2.
Page 31

incorrecta.
es
Ajustarla.
aguja
de
a
vaya
que
al
irregulares.
fijaciOn
puntadas
cuando
causa
problema
incorrecta
tendrá
tension
tension
de
de
FijaciOn
FijaciOn
5.
4.
un
casos.
para
independiente
material
de
trozo
un
resultados.
con
mejores
las
puntadas
las
consiga
y
usar
Comprobar
FIJACION
DE
LA
costura
de
anchura
de
izquierda
dos-hilos
aguja
de
Hilo
nvertidor
inferior
superior
ancora
ancora
Hilo
Hilo
puntada
de
longitud
dc
ntrol
son
muchos
en
costura
de
pespuntes
sus
anchura
de
dial
mejorará
y
giro
tension
de
pequeno
Un
arriba
de
general.
Ilado
‘:meros
fino.
o
grueso
41).
material
página
ütil.
cose
(Ver
muy
cuando
será
costura
les
de
aguja
de
siguiente
anchura
de
tensiones
dial
star
ar
formaciOn
L
1.
2
grueso.
hilo
el
con
cose
cuando
tensiones
los
ucir
3
Page 32

—6
4
I
4
Droit
de
avant
coudre
a
tissu
du
gros.
adaptée.
fit
et
échantitlon
d’un
posee
—
—
—
—4
—
—
—4
—
—
—4
—4
—
—4
—
—4
—9
7
—9
7
—
Q
3—4
1—2
2—2.5
picot
Point
I
route
Ourlet
étroit
i’
Ourlet
correctement
35
taiguitle
si
Verifier
4.
un
sur
lutitisation
regtage
pour
te
tension
ta
essayer
Réduire
Toujours
5.
travail.
le
commençer
3
MACHINE
LA
4
DE
fits
REGLAGE
de
DE
Nombre
LEAU
—
—5
—
4
6
—
—6
de
targeur
de
reglage
de
ton
)e
Droit
Gauche
Droit
Gauche
et
Gauche
utitiser
a
iitte
0
0
0
0
0
maitteur
jt
—
—
0
—
—
—4
—
—4
gauche
fits
2
a
aiguitte
Fit
vertisseur
—
0
—
—
—4
—
—
—4
droite
aiguitte
Fit
e
lage
—
7
—4
—
7
—4
—
—4—
—4
—
—
—4
—4
—
—
—4
—4
supérieur
inférieur
boucteur
boucleur
Fit
Fit
3iOn
3—5
2.5—3.5
2.5—3.5
1$24
NrdeRef
itondelongueurdepoint
plat
a
51
Surfitage
i’
4
••
38
références
de
e
fines
matières
41).
des
page
couses
(voir
vous
coupe
de
aider.
largeur
de
vous
reglage
pourront
de
bouton
suivants
le
conseils
Tourner
1
Les
:
manque.
de
torsque
points
de
d’aiguilles
fits
cas
en
des
tensions
tensions
les
les
epaisses.
Régter
Regler
ou
3.
2.
Page 33

Page 34

THREE-THREAD
OVERLOCK
WITH
NEEDLE
ONE
threading
By
width
a
threading
by
width
a
Please
the
of
needle
6
of
keep
3.8
mm
pad
the
the
the
will
RIGHT
mm
as
LEFT
produced
be
be
will
unused
illustrated.
needle
needle
produced.
needle
only
and
only
on
Page 35

cco
m
ü)
C!)
DD
C)
ZO
z-
-‘
-‘
>I3
-
0
0.
D3
C
-
0.)0
Q.D-CD
2
C)
3Cfl(D
0.
•
DCD
0CD
OC
Z
0
(DO
—D
—
0(DmC-
C!)
OC
m
3g
;
CD’
Z
0
C)
0
CD
Cl)
>0
0
;.
>
OC
Z2.
m0.
=
m
5O
-rD
D
00
(0
0.C
-,
CD
N
BE
0
3
(DO
E
CD
—<
CD
m
0(DCl)
m
Cl)
>>
3
CD
(ZQ
D3CD
<Ø
D
ø3
CD
D
c
0
C
CDO
.0
0
C>
0
Q
3
o
>
_Cn
0.
:LC
D
0
CCD-s
CD
CO
_CDC
CDcE
Cl)
3(
0)
CD
C
C03)
C
D(D
C
O
OE
Page 36

NARROW
HEM,
PICOT
AND
STITCH
ROLLED
Narrow
use
on
georgette
etc.
Also,
picot
particularly
‘scarflike’
nature
unsuitable
materials.
1.
Raise
2.
Open the
table.
3.
Remove
needle
keep
illustrated
bag.
4.
Set
the
page
and
thin
crepe,
stitch
materials.
of
these
for
the
the
plate
it
in
machine
28.
rolled
materials
crepe
can
when
hems,
use
on
presser
front
cover
stitch finger
screw
by
the
or
in
edgeisideal
such
de
chine,
be
produced
sewing
In
viewofthe
on
they
hard’
or
‘heavy
foot.
and
working
from
driver
front
cover
the
accessory
according
for
silk
fine
are
the
and
as
as
Fig.
1
NOTE:
to
1.
2.
Please
After
it
deep
use
finishing,
as
illustrated
following
re-set
recommended
the
stitch
finger
in
1.
Fig
thread
in
its
for
place.
making
Please
ideal
ensure
seams.
insertii
RECOMMENDED
Narrow
Three
with
Thread
.
Lower
Illustration
needle
Upper
for
looper
looper
Polyester,
No.
50-1
Polyester,
-
No.50-100
Bulk
(less
*
I
:
*
II:Cross
*
III
:
*
V:Picot
nylon
stretchable)
Stitch
Narrow
Rolled
THREAD
overlock
Threads
Nylon,
00
Nylon,
finger
section
hem
hem
stitch
edge
Silk
Silk
(A)
with
Nylon
(less
Rolled
Three
No.
Bulk
nylon
stretchable)
edge
Threads
100
Page 37

C)
0
0
a
0
CD
XCD
CD)
D)
(00CDC-
—,
CD
H
5--
5-
C)
CDcD)CD
3
CD
5-
C_
<CD
D
3
03
CDCD
CDD)
C
Cfl
5-
C)CT)<
a
—
0
v3
C
0
o—,,
CD
Ci)
C-
00
5-
0D
CD
3_
3
00
3
0<
-
C
—1—f
C
<
—
C)0
CDD
(fl
0
D)
9-
rjC
Oo
00
CD
0
CCC’
-D)
><
0
o-
00,
C
.0—
Co.O_
cI)
-
CT)
C
C-
0
CD
=
CT)
a
CT)-
Ct)
CO
CD
0
CT)
a
CD
CD
.
co
-c
—
CT)
D(O
CD
P
(J)
Om
(-)CI)
HQ
-TZj
—--9
QC
3
0
5-
(1)
0
CD
C
CT)
2o
CT)
CD
CD
N
0
C,i
CD
CD
CD
CD
!
D
C-
,5-CD
C)
I
(fl
C
CT)
D<CD
C)
C
C)
Ci
C
0
z
o
35-
(0
C)
-Di
CT)
a
-c
C
CT)0
a
a
(I)
-
CD)
09.
k)
C
CD
0
-
C
c
-..
a
CD
CDD)
DCD
a
0
C
CDCTJ
r
0
C
-
‘J
-
E
1
Z
0
-
.-
-
OC
0
D
0
a-
CD
0
CD
CDa
—.
C)
0—
35-
DCD
CDCD
—i-c
n_C)
CDCDg3g
-“
o—
CD’
s3
a
C
0
Cl)
)
(j)
CD
_
D
.
D
C)
-
oo
CD
Q)
CD—
D
C)
‘-0
CT)
-
C-
0
CD
CD-
0
D)0
(I)
aaaD.
5
DD)D
C
OCT
C)
Q
‘
,ID
3C
N
)
(0
CD
CD
D
c:
C
—
.
a
.
.0
C-
0
3
Qr
0
C
CD
o
CD
o
0
0
0
a
-r
D
—
—
C
-
C)
°‘o
a
9
—
a
CD
-,.
—
aE.E
05-’
—1j
zg
-ga:
5’3
5-cm-
=
g
D
CD9.
5-
>
Z
EJC/)
Cl)
)
CcT)
C)
0CD
CD
—
oD
CT)
C)
—CD0
0
nz
xir
LI
m
CD
CD-.
a
g-
-‘
aQ
CD
CDD)
3o
C
0
0
CD
(1)
*C
(0
c
-
.
2
CD
—
CT)
a
-
—
CT)C
CT)
5a
C)
0
D
-
CT)
g-
a
3
CD
0
a
CD
CDC.
—LCD—
cE
N
.
0
CD
CD
0
CDCT
5
C)C
CT)Ci)CDa
C-
0
Cl)
CDDC)DN
0
0—CDD
—
CD
CT)
—CD
øD35o
C)
05-3
0
fli
F
O
z
c_)
-
-
m
0
a
-
.0
1
0
c_)
0.
CD
>
C)CD
ci
I—’
‘
C
CD
C
Ci)
-
C)
CD
CD
Cd)
0
Cl)
a
0
0
CD<00C-=
<
<CT)
CD
0
-_.=:
CDcE’3
C-
0CD.
o5_
CDCDCD-D
az!CD
D0(D1CD
‘
0
000CD10CDDCD
a
0
.
C0
0000CD
‘
2
c<
co9<
øCDD
a
CD
aaa
000
-
0200
0
D
)
-D)C)
0a
z
C(d)
I
1
5-
C-
—
—.
a
-Ti
=
CD-C)
C.C)
CD1Cl
CD-C1CC
1
5OJ’OW’
1
C
Cl)
0
C)
m
(0
CD
C
0
0
0
z0
I
‘
,
IC
—
D
I<
0
‘
(11
nza
=
3
*
*
*
•
*
9
o9
‘13
z
:1
OCDO
C
m
R.
D
a
C
0
<
c.
CT)
0
D
‘
iZ
3
—
—
o
‘
IH1.
=
CT)
C
0
CD
.s
Iz
‘-
(1)0
(
z
00
00
0-
0’-
—
CD
—
•
-c
CD
CDcj,
0CD
3
D)
0
C
-C
l_’
)l5•D)
t
CD
*
0
C)
Ci)
C
*
*
*
*
Page 38

and
loose
thread
needle
Left
needle
right
Increase
tension.
thread
threads.
decrease
needle
looper
left
and/or
or both
increase
either
tension
tighter
number
a
the number,
lower
gives
a
to
higher
TENSIONS
number
dial
The
higher
tension
a
tension.
to
THREAD
dial
Turning
thread
tension.
the
tension
looser
tension.
a
tighter
thread
Turning
gives
the
ADJUSTING
use.
to
plan
you
scrap
a
on
tensions
thread
Test
tension
Increase
tension
Decrease
to
pulled
thread
side.
top
side.
under
to
side
Under
side
Lower
Under
\
looper
Lower
pulled
thread
looper
Upper
USE
right.
Just
FOUR-THREAD
Lower
looper
thread
Upper
looper
Upper.
looper
thread
thread
3
thread
Fig.
decrease
looper
and/or
lower
Topside.
Increase
tension
2
thread
Fig.
decrease
looper
or
j
upper
and!
side
TGp
increase
tension
tension.
looper
upper
tension.
looper
lower
Page 39

de
lado
derecha
el
Ia
material.
de
del
sobre
aguja
Ia
visible
inferior
y
de
o
Fig
derecha.
tensiOn
LI
Ia
aguja
Ia
de
Ladodeama
lncrementar
hilo
yb
del
dos
las
o
tensiOn
izquierda
una
Ia
de
Ia
aguja
Ia
de
incrementar
hilo
disminuir
yio
del
del
ancoras.
del
LOS
DE
TENSIONES
LAS
AJUSTAR
tension
una
da
arriba
hacia
tensiOn
de
dial
el
HLOS
Girando
abajo nos
hacia
tensiOn
Ia
de
dial
el
menor.
Girando
tension
rna,or.
una
hilo
da
material
usar.
de
trozo
planee
un
que
sobre
tension.
hilo
material
de
al
mayor
Ia
similar
tensiOn
alto,
y
cada
más
obar
nirnero
El
Com.
indeperidiente
tensiOn
Ia
Aumentar
J
tensiOn
Ia
Disminuir
inferior
arriba.
de
ancora
a
lado
de
al
hilo
El
tirado
superior
abajo.
de
ancora
Ia
lado
de
al
hilo
El
tirado
HILOS
CUATRO
DE
EQ
correcto.
o
Coi
EL
abajo
e
L
de
ancora
Hilo
Ia
I.
inferior
Ia
de
ora.
de
Hilo
riör..
H
aguja
Ia
derecha
tensiOn
Ia
Incrementar
hilo
del
tensiOn
Ia
Incrementar
1
Fig.
I-’:
arrba’j
inferior
tensiOn
Ia
ancora
Ia
de
superior.
hilo
disminuir
Ia
yio
de
superior
tension
Ia
inferior.
ancora
Ia
disminuir
ancora
de
Page 40

Iâche
droite
I’envers
a
l’ai9uitte
de
visible
Fit
et
tâche
de
des
et/ou
non)
ou
bouton
diminue.
le
supérleur
Ia
haut)
chiffre
le
Tourner
un
(vers
sur
tension.
TENSION
DES
REGLAGE
Ia
tension
de
augmente
bouton
bas)
le
le
(vers
Tourner
inférieur
chiffre
un
sur
tension
de
que
tissu
du
morceau
un
sur
ideate
coudre.
tension
Ia
allez
Tester
vous
tension
Ia
Augmenter
I11J
IL
tensionj
Ia
Diminuer
gauche
lenvers
a
laiguille
de
visible
Fit
et
tire
inférieur
dessus
boucleur
le
du
Fit
sur
tire
supérieur
boucleur
I’envers
du
FILS
Fil
vers
QUATRE
A
correcte
Tension
UTILISATION
crochet:
drOit
.•
•
tension
Ia
encIrt.j
Cté
Augmenter
du
tension
Ia
Augmenter
du
tension
Ia
:endrft
COt
Augmenter
tension
gauche
Ia
(ensemble
I’ai9uille
diminuer
boucleurs
du
et/ou
tension
Ia
inférieur
superieur
boucleur
diminuer
boucleur
du
et/ou
tension
a
superieur
inférieur
boucleur
boucleur
diminuer
Page 41

I
1
I
a
ft
Page 42

ADJUSTING
LENGTH
stitch
the
Turn
the
This
from
length
number,
dial
1
to
required
higher
stitch.
length
ADJUSTING
OVEREDGE
WIDTH
from
overedge
to
at
delivered
towards
it
sewing.
cutting
the
standard
Overedge
adjusted
turning
according
set
is
It
when
Turn
while
STITCH
length
obtained.
is
the
adjust
can
5
mm.
CUTTING
width
mm
7
to
4
cutting
of
kind
width
the
from
fabric
if
“5”
1)
(Fig.
dial
longer
fabric.
factory.
until
the
can
by
width
of
edge
the
The
the
stitch
be
simply
dial
mm
6
curls
Fig.
4
3
2
1
Fig.
Fig.
Fig.
it
Turn
edge.
the
Stitch
Loops
sew
you
threads
3
setting
such
In
3).
finger
4).
(Fig.
Illustration
towards
(Fig.
finger
may
with
(right
cutting
to
(A)
“7”
2)
off
hang
lightweight
width
case
a
to
(B)
*
*
II:
*
III:
loops
if
(B)
the
needle
dial
change
neat
get
Stitch
Overedge
width
Stitch
edge,
fabric
only),
4
at
length
dial
finger
hang
when
using
(Fig.
-
5
stitch
the
stitching
dial
cutting
(B)
off
and
Stitch
Doigt
finger
mailleur
(B)
(B)
Stitch
Doigt
finger
mailleur
(A)
(A)
Page 43

AJUSTAR
dial
el
Girar
puede
Mayor
ajustar
deseada.
dial
de
LONGITUD
LA
nümero,
el
Ia
de
longitud
longitud
puntada
mayor
desde
DE
hasta
longitud
hasta
I
PUNTADA
puntada
de
Ia
puntada.
mm.
5
obtener
Este
REGLAGE
POINT
bouton
Tourner
requise.
bouton
le
Plus
regle
DE
chiffre
le
longueur
Ia
de
LONGUEUR
LA
Iongueur
est
de
élevé,
entre
DU
position
est
Ia
long.
Ce
jusqu’a
point
point
le
plus
mm.
5
et
1
AJUSTAR
COSTURA
anchura
hasta
(Fig.
hasta
2)
3).
de
1>
DE
de
de
y
En
obtener
anchura
La
de
dial
anchura
La
Girarlo
cose.
Girarlo
(Fig.
DEDO
forma
La
material
izquierda),
(Fig.
para
(B)
ANCHURA
LA
costura
Ia
costura
de
“5”
“7”
se
el
si
si
Ia
normal
el
el
PUNTADA
está
lazo
casos,
una
ligero
el
mejor
genero
fijando
estos
puede
se
segün
a
fija
borde
de
forma
demasiada
usando
de
dial
cambiar
puntada
Ia
mm
6
material
de
lazo
(B)
floja,
anchura
el
DE
ajustar
clase
desde
está
hilos
3
dedo
(Fig.
LA
solo
de
Ia
se
demasiada
cuando
costura
de
de
4),
girando
material.
fábrica.
riza
cose
(solo
puntada
cuando
floja.
con
aguja
Ia
4
en
(A)
el
el
-
5
a
REGLAGE
COUPE
avec
règlé
bord
(vers
boucles
7).
boucles
pour
de
simplement
du
(Fig.2)
MAILLEUR
des
Dans
(B)
le
largeur
La
tournant
relation
est
II
le
Si
coupe
les
Si
(vers
DOIGT
Des
surfilez
seulement),
(Fig.3).
(A)
DE
coupe
Ia
le
type
l’usine
a
tissu
(Fig.1)
5).
de
peuvent
matières
avec
et
ce
afin
LA
de
est
cOté
Ia
uniquement,
cas
de
LARGEUR
être
peut
bouton
le
matière
mm
a
6
resserré
trop
sont
(B)
apparaItre
legeres
largeur
rapprocher
reglee
reglage
de
coudre.
a
(standard).
le
par
hors
avec
coupe
changez
les
augmenter
du
3
points
Iâches,
de
DE
entre
surjet,
tissu
fils
réglee
le
mm
7
4
et
coupe
de
diminuer
coupe
Ia
lorsque
(aiguille
4
sur
doigt-mailleur
extérieurs.
en
en
vous
droite
ou
Ia
5
llustraciôn
*
Bouton
*
Dial
:
I
*
Control
II
*
Dedo
III:
de
Ia
de
de
longitud
anchura
puntada
de
(B)
puntada
costura
de
Illustration
I
*
Bouton
II:
*
III:
Doigt
mailleur
de
de
longueur
Ia
largeur
Ia
(B)
du
du
surjet
point
Page 44

DIFFERENTIAL
one
dog
feeding
feed
rear
has
The
front
Each
enables
differential
and
(A)
feed
the
FEED
has
(B).
an
of
material
independent
two
individual
at
feed
different
a
dogs,
feed
mechanism
ratio.
one
which
B
POSITIVE
FOR
dog
has
SET
foot
(A)
the
makes
to
WHEN
feed
(B).
This
presser
NEGATIVE
FOR
feed
(B).
has
to
SET
dog
the
offset
WHEN
front
dog
This
foot
DIFFERENTIAL
POSITIVE
a
effect
offset
DIFFERENTIAL
longer
accumulating
of
wavering
the
stroke
DIFFERENTIAL
DIFFERENTIAL
shorter
a
the
on
(A)
effect
the
NEGATIVE
makes
stretching
of
puckering
FEED
than
the
on
stroke
material
fabric.
FEED,
the
material
fabric.
FEED
than
under
rear
the
the
feed
under
FEED,
rear
the
front
dog
the
the
feed
presser
(
*1
*11
Illustration
*
I
*
II:
*111:
Differential
Positive
Negative
feed
differential
differential
dogs
feed
feed
*ffl
Page 45

-l
5m
CD
0*.DO
DE
z
-p
C’,
D
CD
DCO
q
0
CD
D
CD
-1
0
m
CD
DD
0
‘
00
V
—
CD
CDD
m
m
z
C)
I
0
Cl
0
CO
CD
o
CD
D
.
D
0
C
ID
fl
Q
o
.
0.
c
D.
o
3
D
C
0.CD
0
..—
C9CD
CD
m
z
0.CD
r
CDD
V
0.D
.CDC
VCDCl)
z
m
z
m
-i
-n
,‘
m
z
m
-4
m
I-
CD
)
Cl)CD
CD
3
CCl
COD
D
CD
CD
D.
-
z
—
o0.
D0
OCCO
CD
OCD
DC/)
DD
CD
——
—CD
—
0
CD
—
CD
CD
3
D
o
C
CD
CDCD.
3
DO
a.
CD
><
CD
0
(0
CD
CD
CD-
WCD
D
C
DV
Cl)
0.
CD
Cl)
CD
CDD
DCD
—.
0
.Dm
—f
m
m>
o
>
>
Z
_
Z
ci
mD
z
Z
(/)
cmD
CD
E5
Q
3>
D)
CD
J
cDm-
0
>_
0
CD
—
m
Q>
c1)SR,
0
CD
H
m
>
8
)>
ID
r,
CDO
CD
0
—1
0
-
CD
Q
<
CD
DCD
j,
o_
CD
o
71
m
m
Z
m
m
3
m
C
0
3
C
C
D
(l)
C
-.1
m
m
-n
C
CD
V
V
00.
)
CD
CD
—
rn
OQ
m
C
Cl)
0.
V
0-_
30
Z
m
C
0
-H
m
Z
m
C—
0
0
—
Cl)
CD
C
00
:-
zz
0
CD
30
CD
00
C>
mm
.aG)
C
.0
CD—I
CD
Cl)C
>
CD—
C17
COCD
CD0
9.T1
a-
j
m
Z
C)
oc>
Q
CDQ
om
D)
-‘°
EC
‘D)
-
D3
2.C
g3
0.
C
m
m
C)
5
—o
o
CD
CDC/)
—D
2
CD
H
—.
—
(/)
0
D
-c;>
-‘
—
3
.
z
G)
>m
-
—.
CD—
D.0
0
CD>
Cl)fll
C
D.CD
—
V
Q
D
.m
O
V
2.
Cl)
m
°-
o
ECD
m
—
.
CDDQ
Cl>CD
z
—
Z
m
Z
m
CD
DC
‘o
CDClm
r-
-‘
CD-
0
—
3CD—
CD0.
Z
m
—Z
0
C
—.
0_
m
-
©-,
0
—Q
CD-
C<V
H
z
—
m
C
D
CD
D3
m
C
D
DOD
CDrn
CDr-
z
—
g
C
0.
(DCl)
D
CD-
0
0
C
=
.
*
)
2.
D
-
*
-1
*
1
E
DDD
000
V
000
CDCD
-
z
-.
CDCDCD
;_-;
CDOCD
CO
-
.
9.
D
Co
oP
*
D
°
*
*
_
mm
DDD
Cl)D)CD
3’0
CDCDfl)
<
3
CD
CDCD
0
CD
0
DV
0_
CD
(Q
Page 46

SETTING
DIFFERENTIAL
FEED
Set
the
The
and
feeding.
For
The
FOOT
simply
by
direction
adjustment
(Positive
2
normal
lever
EFFECTAND
APPLICATION
Waver-free
Gathering
No
differential
Pucker-free
PRESSURE
moving
desired
canbemade
effect).
sewing,
canbereset
feed
Positive
differential
feed
Neutral
Negative
differential
feed
seams,
seams
the
differential
referringtothe
between
These
settings
the lever
TYPE
FEEDING
even
should
while
OF
feed
REGULATOR
feed
chart
0.7
give
be
sewing.
SElliNG
1-2
1
0.7-1
below.
(negative
the
set
control
best
1
at
FEED
REAR:
j
)
I
lever
effect)
ratio
RATIO
FRONT
in
of
Presser
so
If
to
pressure.
foot
you
do not
adjustment
higher
numbertoincreaseorto
pressure
SEWING
FABRIC
OR
FABRIC
A
wide
rangeoffabric
is
but
sewing
fabric.
Loosen the
fabricorturning
fabric
The
recommended
it
with
extra
Open
working
screw
may not
machineisset
has
been
needtoadjustitfor
necessary,
is
WITH
turn
EXTRA
MULTIPLE
canbeoverlocked
to
tighten
heavyweight
for
table
when sewing
overedge
well
be
for
cut.
normal
cutting
weight
correctly
mostofordinary
the
lower
setatthe
foot
pressure
numbertodecrease
HEAVYWEIGHT
LAYERS
screw
as
fabricsormulitiple
adjustment.
with
lighttonormal
width
fabrics
on
this
illustrated,
dial,
or
from
OF
the
factory,
sewing.
regulator
machine,
when
layers
weight
otherwise
factory.
of
Illustration
*
I
*
II:
*
Ill:
*
IV:
*
V:
*
VI:
:
Differential
Increase
Decrease
Tighten
Loosen
Scr”
feed
control
lever
Page 47

C_
CD
.-.CDC)
CD
0
mua.rna.co-
CD—
c,’n
D
D)E
m
g’
3
C
0
Cl)
C)
C
—
‘0
g
0
0,
.
w
CD
°-H
0-
C))
0,0
CD
c>
CD
m0.09.>
0-i,
CD’—
<C)
Oa)
a)CD
°
a,
CD
0
CDC
<D’O
m
—
m
Z
m
C)
a,CD
(a
5’
C)
m
(flU)
CDCD
0
C
CDCD
3’O
CCDD
CD’
Ca
Hm
gCi)
zm
a)
Ca
0
CDa’C
CD>
CDP3
0
o
5’
1
CD
F)
-‘
‘U
CC’)
CD’
0
—
a.
CD-
C
CD’
D
CO
a)a)
‘0
C
—
.
OCD
C’)
C
fl
m
>
=
-E
a)H
D
a
8
0
o
32.
o
CD
CD
0,
0-g)
OCO
0’
CD
a)
CD
a)
0
’D
i)’’
a,-’,
a)CD
D
—
3CD
CD
a
9’,<
.
—‘
a)
CD
‘
“
a-
D
-
a.
a)
.0
0
C
a
0
3
a)
r:’
‘03’
.‘
00,
U
-
-
mm
z
3
a)
a.
q
rn
c’
‘
CD
m
‘0
C)
QCD
CD
z
‘a)
CDD
-o
,
a’
mm
‘C
>
z
m
CD
CD
CCD
0—
CD
CD’
a)
CDD
a.
(a
CD
CD
a
0
CD’
D
CD
CD
C
CD’
‘0
;tj
‘—I
m
0
!2.
-
t)
a.
CD
DCD
OD
CD
CDa)C)
G’)
m
m
D3
‘0
ci
—I
z
CD’
a)
CO
CDCD
CD’
a)
‘C)
0DCD-
1’)
>‘Tl
(0
CDD
0
CD
CD’
3a
C
‘0
mm
C)
0
3
3
‘
9.
Cm
D
CD
a.
D
a)
r
Da)
CD
5’
CO
a)
G)C)
CD
C.
3
00.>
-“r
ø
c_)
o
>
m
;
CD
x
a)’
0)’
E
CDCOL.
D.
•
a
D
Cl)
—,
a)
C
s<
r
c
:
CD
D
Cl)
-
g
a)’
‘0
CD
_‘<
DO)
CC
a)CD
-Icc’)
mmm
—
-
C)
—
0
CCD
CD
CD
a.
“0CD
ma)—
a0
E.
)
D
-
D
0)
‘-I
C
—.—0.
D
>
a.
CD
C’)
;:-
a
o)
a)
CD
0.’
-‘
a)
-
—,D
CDO
D’O
0
0
-“
-,D
‘D’0
DHQ-1
CD
0
C
0
CD
a.
•0
CDC)
CD
m
D
0
a)
C
—
a)
0
0
0
.
Cl)
‘0
0
Ci)
.
—
.O
*::c
aO
-a
m
Cl)
0
a)
D’
Cl)
.
C)
CD
Da)
a)
‘
DD
CD
CD
‘2.
0
a)
3
C’
CD
‘-
‘
z
m
-o
m
a)
a,a.
0
CD
D
C’
0
3
0
‘-
.
CD
3
CD0
OC)a)
a)’
3
0
0)’
Cl)
C
CD
‘0CD.0
‘
‘.
‘
.
‘.
‘
a
Dl
0
1
a)
a)
‘0
C))
0)
D
B
C)
0
CD
C
fl)
‘
m
I
C)
>
C)
I—
Cl)
D
Cl)
5’
a
=
C)
—
0
‘0
0.
Ci)
a)
D
Cl)
CD’
‘0
C
0
0
)
C
D
CD0CD
NCD
—
0’
CD
O
C
-:
‘
C
CDD
D
CD
r
a)
‘0
C
CD
-
C
D
‘
m
Z
CD
=
I
CD’
C!)
CD’
D
CD
,
g-
c!L
CD-
.
Co
>
<
CD’
—
C
0
Ct)
CDCD
0
—‘
CD’
D
CD’
‘
CD
CD
C
CD
m
—.
Ca
—
-‘
C
-,
0
c
m
‘
0
0
‘
!‘
CD
•
a
D
CD
CD
D
5’
00-,
D
0
g
-.
=.
p
‘;J
-
0
a,
-‘
‘
CD’
—
0
CD
CD’
ci)
CD’
CD’
-,
CD’CD
D
COO
z
0
‘
C
D0)CCD
D
CD
a)’
CD
CDC0
-:
o
c
..CDC
CD
CD
r
D
0
‘2.
a.
C)
-a
—
D
C
(I)
‘0
•
I
I
m
CD
C
-
0
a.’
0
C
CD’O
CD’
00
CD’
0
C>
CD
<
‘0
z
‘
CD
CD’
.
a)
:ft,
CDCDCD
-‘-,
CD<C
CDQ
8
CD
•
0,
CD
a
0m
CD
0)0
C)a)
a)
m
0
o3
—
(a)
D
cj)
Ci
CO
C
o
C-,
fl)’’
-
0
-‘
—
0
-‘
—
CD
a)
mm
a)
D)CD
2
C)
a)
a)
CD’
C>
D00
co
rnio
>CC
mmJ
cnC
cOrn
0
cm
0,
D’
D’
OOCD
DEg
0a)0
j:i3
3
,
CD
CDC
C)OQ
1
a)
0)D
3
-,
0
—0CD’5’
‘U)
a)
C)
0
)CD
m
D
-
-,
“
CD
CaC5
003
-
‘
-‘
CD
‘0
C)_
_
a,t
0)
CDC
o
0
0CDa,
QOCD
CDCD
-
CCC)a)
t3
m
a.
0
CC_,
a-
C3Cfl
0
C_,
o
CD
CD
a.
Ca
aa,3
CD-,
CD3
:
Cl)
0)
5’
D
-om
0’CD.CD
CDO
-,DC
CD
‘0
CD
o
a-
cm
coo
a--sCD
3CD
a
rn-i
mCD
-‘
C)C2CD
OCDO
I
CC
Ci)
CD
—CD
00
’CD’
‘0Cl)
CD’
C!)—’
CD-a,0)
:
CD
C)-,
C<a)
OCD
CO
CC)C)
Ct)’00
CDC-
‘O_
0
‘3
CDcnO
CD’
3
a)
CC
DCD
00
-,OCDCD
corn
I00
>0C)
C)
—
CDD
C’)
3
D.
—
CD
=
D
)—C)
Ci)
CD
a)’
3
a)
2.
=
0
.?.
-,
03
a
-,
CD
0CD00
3ao
‘°
CD-CD
.0,Ci)
D0C)
0CD
C
Cl)
a)
E$•
0.
9.
-
=
—
*
a
0-
*
*
*
>>o
-0—-Co
—.,
,2.
3
)
H>
a)DD°
—
o
CD
-
CD
-
a)
ci
‘0
—
=
-,
*
-.
9.
—
CD
cg
a.
CD
D
CD
C
—.
CD
CD’
3
3ca
5’
CD
CDD
0
’CCD
CD
a.
—
CD
-,
1
9,
Page 48

BASIC
TECHNIQUES
TURNING
WITHOUT
When
1.
2.
Turn
3.
NOTE:
needle
Raise
just
in
the
you
above
the
enough
the
fabric,
new
When
cut
the
cm,
3
TURNING
For
inside
curves,
the
fabric
under
the
to
left),
applying
the
arrow
with
little
a
Fig.
opposite
3.
OUTSIDE
CUTTING
reach
the
the
fabric.
presser
before
foot
clear
to
lower
direction.
overlocking
fabric
along
turning
CURVED
guide
the
right
pressure
your
left
pressure
fabric
and
the
the
Fig.
fabric
front
hand,
CORNERS
THREADS
edge,
gently
stitch
finger.
presser
1.
and
trimming
the
new
the
fabric.
EDGES
gently
the
of
at
point
and
at
point
at
stop
pull
foot
stitching
with
presser
Ainthe
the
B
with
stitching
on
and
at
Fig.
same
your
the
thread
begin
same
the
line
2.
trimming
foot
(or
direction
time
right
with
chain
stitching
time,
for
about
line
little
a
applying
hand.
the
of
of
Fig.
1
*1
Fl
2
g.
A
outside
For
manner
Fig.
4.
but
curves
applying
REMOVING
FABRIC
remove
To
intervals
at
Illustration
stitches
and
*
I:Cut
place
under
the
pressure
STITCHES
already
pull
out
looper
sewn,
thread(s).
the
presser
in
FROM
snip
the
foot
opposite
SEWN
needle
off
inasimilar
directions.
thread(s)
Fig. 3
Fig.
4
Page 49

-4
m
C)
()
>
tF
_
>
-‘
GD
Q)
-
CD
—
3
)
—
3
C)
C•)
Cc
D
0
0)0
Ø
0
-CD
CC)
CT)
CDCD
G)ar
CD
D—CDCD
D-U)
CT)
c—
2.
9•:
—,—-D
CDU)
CD
‘1O
GD
—‘
U)
c3
-,
CL
CD
Cl)
C)
-‘
U)
CT)
DCDZU)
CD00
DU)
0)
=
0
OCD
0
8
Q)
CD
0
0
0U)D)
-°
D
Cl)
U)
;c
CDE
3zU)c0
gob)
‘‘
0)
CD
DCDCD
-0o
CD0CDU0
g’o
0
U)CD
o-
o•
-o-°°-
CD0)
•0
0
0U)CD
cCD
C
cCD
•
U)9
00
D
3.
CD
mCDCU)
00
Z
CD
aCD
-
.
m-
t)
C
•
0
Cl)
U)<
CL
0
CUb)
•
CD
:•-
CD
3
•
Q)ZU)
0)
CC
3
U)CC
U)
U)
ocg
3
CD0—
3
U)
U)
<
CD—
D
v
-CU)
0
=
z.
CDU)
<
0-39CD
m
()
—
C
CI
m
-
m
—cj)
D
CD_.
<ci,
0
CD
.CD
Cl)
.-
U)D
2Cfl
—
0
CD
CDD
f-fl
>0
CD
CD
9-CD
0
C.)
U)
c
2.T
U)<
CD<
0
3
0
c
QCDOD
3
CD
CD
—
CD
——CD
Z
O3CD0
—
c
—
CD8
GD
1
V
m
>0
CD
zm
-:
0)
3CD
CDCD
U)
CD
?
.--.-
CD
0
m
m
U
—
.
C
N
-
•
C
cU)
o
C)
0
U)
CD
U)
CD’
0
-,
CD
0
CD
FCD
7J
0
c
CD
—
CD
CD
.ø3CDCD
0
‘<O
CDcD
CDCDCD3
c
CD
--a
CD-
0
•C•
CD’
-
m
0
U)
F
-mu-4
!“
,)
Z
c•)
0
0CCCCU
00U)CD
C1
CD---
V
(j).d
0
U)
<
C
U)CD
CD
U)CD
‘N
0
-,
CD
oH
U)
0
m
CD
0
-1
c
CD
CD
c
CD
-
0Db)
•U)
CDCDC-
D
0YU)
CUCO
-,0
U)CD
—
0U)
0
0)
0CD
00
o
-o..
.CD
0—
000)00)
U)CD
—.
[!]
U)
3
—
D
-,
D)
o_
U)
U)
0
—%
-
U)
0-,
——•
-
U)
U)
CD3
0
0U)
•
U)
a
O•
U)
-
D
0
nC
*
—
.•
0
;:i
0
U)
CL
CD
—
3
,--
)
CD
—
C)
C
C))
o
U)
‘<
.-
-<
v-CD
0)N
Cl)
0
O
.0
‘z
-‘.
CD
U)—’
CD
CD
0
--
ID
0
m
C)
0
;a
m
C
Z
m
CD
O
C
H
C
m
-.i
—.
=
U)
—
Cl)
CDCD
*
—
CDU)
C)
=
U).
U)v)
—CD
0.
•
CDCD
o
CD
-‘
0
CD
0
Cl)
)
U)
C,.—
c
Page 50

CORDED
OVERLOCK
Corded
or
side
As
a
contrasting
machine
designed
stitch
1.
Place
wool,
machine
(1)
(3).
2.
Insert
(according
3),
the
3.
Place
speed
speed
FOR
JOINING
through
left
and
hole.
(Fig.
FOR
JOINING
rear
hole,
(Fig.
3).
overlock
seams
decorative
colours
is
equipped
to
or
to
the
“filler”
a
knitting
spool
and
(2)
See
Fig.
the
in
the
presser
foot.
the
material
observing
as
needed.
the
front
right
needle
2).
ensuring
can
be
when
joining
feature
to
further
with
feed
your
right.
Follow
cord,
yarn,
or
pin.
Pass
and
then
1.
cord
through
to
the
operation,
foot
to
if
cord
SHOULDERS
hole,
ensuring
threads
SIDE
SEAMS,
it
is
positioned
used
you
a
cord
or
such
shirring
the
through
and
pass
be
sewn
is
feeding
as
to
strengthen
or
making
can
enhance
presser
yarn
to
instructions
as
a
crochet
elastic
cord
through
the
left
either
OR
the
see
diagrams
it
under
as
SLEEVES,
that
it
it
is
guided
pass
the
to
the
correctly
up
use
your
foot
the
as
at
needle
front
and
normal.
is
fixed
through
cord
right
shoulder,
knitted
knitting
garment.
which
left
of
follows:
cotton,
the
the
cord
thread
or
Figures
to
Start
and
pass
between
through
needle
sleeve
garments.
yarn
has
the
safety
gimp,
rear
of
guides
guide
rear
2
the
rear
at
slow
increase
the
cord
the
front
thread.
Your
been
the
hole
and
the
the
of
of
Fig.
2
Fig.
3
FOR
DECORATIVE
colours
pass
cord
FOR
MAKING
gut
through
page
34).
This
is
either
used
or
the
for
through
yarn
through
WAVED
rear
the
EFFECTS,
the
front
each
HEM
hole
and
hem
of
WITH
start
skirt,
or
you
rear
hole.
etc.
may
hole
GUT
ROLL
pass
contrasting
or
if
you
(Fig.
4),
HEMMING
desire,
pass
the
(See
Fig.
4
Page 51

-o
m
Q-vCD<Dm
CDG)U)Q)CDO—
-
C
00
(CD
O>
4)CD>
)>
Cfl0O
CDC>
—m
;zj>
-
3Oør
cn
—
0
C)
—
)
.
DDBO
NCDC)
0DDa)
Z
D
C
c1CDZ
m
CD
1
>
‘<
C
0cD0o-
CD0CDo
DO
o3m
0t
z
3CD
C”
COD
0O3
m
CDcnC)D
COOOQ
.
.
g
w-
008
D
C)
m
a
CC)DØ’
3
Q
0.CDa
CDD)
—‘D)
cnm
Do
<c-
)CD
CD
0
r’
z
0’
Do
D.
CO
C’)
,
)
0’
0.
D
‘0
—a)
-
CD
.0
CD90>
0.
CDCI)
D,Q
CD’>
C)
o.
C)
D
D
-
D)Q)
03
C)
(DD
Q
CD0D
Drj
CDCD
(D
,
0
)CD
0.CD
CCD
D.Z’—
CD5:
0.
0
CD
0
QCD
DC
COam
CDQ
Z
0
CDCD
CflD)CDCnC
‘1j.—CD
-‘
CDCDCDCD0.
5
0
‘‘“OD
—
D(oCD0.
C
‘<D,
0)
0’
CD
CDOD
DDZ
0>
0
0.G)
co>
,Cr
>
CDo
CD.0
<‘0
0
3DO
CDC1)
E’CDg>
9C)
0.
C)CDCD
CCOCD
CD0.DC)
0.”
CD0CD
.00.’0
D’OD)
0
._
0
aaD-°oC)’0
3
CD
D)C)0,°0
COO
&aCDo
0
,CO
CD
3
-
CD
c
“,.DD)
CD
C).
OCDCD
CD
CDD
‘-°
0)
CD
CD—0C-
0
E0)o.3&.
D
300
0
3
C’)’
CDa3
C)CD
CCDC)
0C)
CD
<‘0CD
D0)
8
5
CO
0,
Q,
.0
CD
—
‘<
CD
‘
0
CD
D
Z
C
D
CO
o
5-.0CO
CD
,
C
‘C0
C)DD
0.
‘
J
0
0’
CD
CD
0)
(r)
._CDr
CD
D
CD
CD
C).
D
C).
D’
C)0).CDCD_
!“Ooo)CDDCD
o.oCD
0)
ci$’
øoa
CDO,
“o
2>
Cl)
;rj
C
C_.
r’
,
3
.
DDCJ)
,
-
C)
0)
CD
<
C)
C),
CD
<CD
.CDgg2.
0)
CD
D
‘C0.CD’CD
-
‘
-‘
CD
o0
CD-
•
D’
O3U3
C’)
.
—
.
CDC).u
CD
0_
E.C)C)
u—’CDCD
.0CD)
u
D0)
0
CDC
‘cG
0
’.C
00CD
D
—>
CDCI)
CD
‘0
CD
CD
U
0.
‘0
0.
0
C
0
m
COG
Cl)
0
CD
2.
CD
m
CD
C)
CD’
CD-
a
D.
OCD
,,
D_CD_C
‘0gCD
CD
(j)
0)
DD0.m
CD
2C
o
CJDm
cm
—-C)
C)0.’0C
0.
CD-
CD
coo
0.D.z
CD
0
CD
(MD
3
D
m
‘
‘0
t)
CD
0CD0)’—
0
D0,
—
—
.
CD
(MO)
—
—
DC
H
CD’
C
,
0
0.
0)
C),
-,
9.
CD
>
CCD
m
CD
CD
CD
‘‘00.f
C)W
0)0
0)
CDCD
‘rn
CD
00
—‘C-)
CDCD
‘Ti
o
0)—0)0C
—CDCD
0
C0,,
,,.
•0
-
0)-
D
00
‘C)—.,
0<0,
COCD.
(1)
C2,0.
‘oo
-CD0D
D(I
D
0’
CD
0)CC0)
0)C)
-
3-’C)
<0m
0
C)
CD,CDCD0
35D<0’
CD’
D’
0)
C
D.
0.
DOC
—
‘
‘
CD
mD_>
0
-,
‘‘00
‘0
c
z
,
0”
m
0)
$‘
0)’
D’
‘,.0
CDC
D
—
C),
CDCDCI)
-0)
CD’’
-c
m
CD-
‘‘8
C)
D’<
r—
-
0)G
—
C
,CD
CD
Z3CD
CD-C
CD0
CDD
0)
CC1)
COCI)
—-0)
D
C0
0)()
D’”
CD
CD-
C
—
CD
•
3CO
-
0)
CD’0
C”
(flCD
CD
V3
‘D
CD’
‘>
‘O_
“°‘
‘
CD0)
CDC)”
CD
CD
C
C).Cl)
—
0<
Cm
<CC
CD
00)
D
2CD
l(M
(MCD
r--
O)Cm
00)S
CCD
CDvCD
8
CØa)’0
oO
it
D
—COO
CD
CDCD
‘0
-
PCD
D’
CDCD
-DD
CD
COj
-
-‘
E
C
o
0
30’
CD’
‘OCD-
-
0
D
E.CD
=
CD
<
CD
!‘
;a
—-C)
0
0o
0’
C)
C
CD
,
CD
D
0,
-
D
CDCD
0
5
-a
Wa)
‘
0)CDCD,
>
CD
.0
(MC-
oN
01
C,.)
3CDc
CD
CD
‘0
<23
0)0
‘.Z
0.CD
D
00
—0
0’
CCDI
oCD
-.‘
CD
CD
00
CD
CD.-
0.-’
CD
C)
Cc,)
CD’..
‘
D
Page 52

DECORATIVE
In
addition
this
instruction
number
stitching,
decorative
Decorative
using
Fold
the
folded
Unfold
and
press
The
final
twist
of
butted
three
fabric
edge,
the
fabric,
flat.
appearance
embroidery
or
to
normal
book,
decorative
braid.
top-stitching
threads
along
making
EFFECTS
overlocking
your
applications
seams,
See
below.
(flat
the
line
pull
the
can
thread
machine
pin-tucking
—
using
seam)
to
be
sure
not
ends
of
be
enhanced
on
the
which
can
such
or
only
top-stitched
to
cut
into
the
threads
by
lower
looper.
is
fully
also
as
decorative
making
two
the
to
using
described
be
used
lengths
threads
and
sew
fold.
the
underside
buttonhole
Fig.
for
top-
or
over
A.
of
in
a
Fig.
A
Fig.
B
Butted
three
threads
Place
two
along
the
By
using
‘patchwork’
Pin-tucking
Fold
fabric
along
the
edge
of
the
underside
Making
Overlock
hands,
NOTE
making
:
**
seams
pieces
edge.
different
effect
—
along
folded
the
fabric.
and
decorative
over
a
*
If
you
made
Reduce
thick
—
using
(flat
of
Unfold
coloured
can
using
a
edge,
(See
press.
cord
sure
use
easily.
the
thread.
seam)
fabric
three
line
making
braid
or
not
blind
upper
only
wrong
and
be
achieved.
to
page
braid,
to
two
press.
fabrics
threads
pin-tucked
be
sure
54).
—
using
holding
the
cut
hem
looper
threads
sides
not
edge.
foot,
together
and
to
Pull
ends
three
carefully
it
decorative
tension
or
thread
and
cut
threads
(See
when
using
and
a
overlock
into
the
of
threads
with
page
stitch
you
overlock
pleasing
sew
folded
to
both
54).
is
use
Page 53

m
-n
m
C)
H
0
C/)
0
m
0
C)
-
>
a
CD
D
CD
Cl)
o
C
—
—
CC(j)3
‘)CDCD
•—‘
a
—
-‘
C’
a
D
0
-
CD
=
C’
-
0_C
CD
0)
a
0)00
0)
C
0)
Cl)
a
CD
—.
<
0-,CD
0)0)
g,
C
0
D
C)
0
CD3
0
‘0
—
D
0)0C
0
0,
,
CD
C
C
D
CD
-,
a
CDDCO
•
0).
3.
0)
o
0)3
C’
CD-CD
D
0
CD
‘0
3a
CCDO
-1,
m
-n
m
H
C/)
0
m
C)
0
m
E
-..
C’)
C
CD
0
C’
=
2.
C3’C’)
aCC#)
—
CD
U)
0)
CD
C’)
—
<
0.
(j)
CD
CX
0
OCCDC
—
0
C
-1,
0,
.
C)
CD-
—
D
0)
“CD
(I)
C’
CD
3
C
>C
CD-
0
CD
.
CD
3
‘0
CD
Ci)
0
C)
C)
(0
-
CD—oj
Ci)
CD
0
o
-
CD
0)0
or
0
‘<CDC
—
0)
0
CD
CD0U0
CD
D
=
CD
0
CD
CD
0.
0)n
-‘
ND)
0)
0)
‘9,
0’
ci
CD
0
C-0_,
‘00)
0)
-‘0
0)
CD
-s
—
CD
,
0.
0.o
-‘
—
(ft
CD
3
0
cDO
‘
000
CD
-,
0)
0
CD
—
C’
00
0)
0
CD
—.0
Cl)
‘
0)
0
—00
0)
0
-
U)
C
C
0,,
D
-
00)
D.
CD
C
-‘
‘<
a
0
C_
0
a
CD
D
CD
C
C).
0)CD
CD
QCD
0)
00
ac,0.
CD
—c
D
-‘-C
0)
-
og0)U)
CD
CC)
D.
a
(I)
CD
a_=
CD
0
CD<
D
,
•-
0.
<
,,
D.)CD
a;’
0)Cft
—
00
CD
(00)
C
0
‘<—0
CD
0<
CD
.
C0
0
0)
000
CD
o
CD
C
3
D
D
CD
3
OC’
0)
0
2.
0
0
0)
0.
CD
=
—‘
0)
-‘
C
a
0
(0(00,
‘fl0CD
0
a
0
C
0)
a
Ci)
ci
O)t
0)
0
=
COO
D
‘<
C
a
CD
-‘
C
D
0_
_
0)-
(C)
3
C’
0)
00)CDCD
301
‘0
C’)
--
0)
-
0
—
a
—
-
OD
-
—
CD
0
C
‘
D
C
CD
-,
o
O)
a
<
-,
0”-
C
D
CD
CD
0
D)CY1
D
CD
‘00)
0_CD
COO)
C).
0
CD
0
m
o
°D
r
13.0
=
0
0)
0)
-‘C
ø
-
—
C’
C
0)
.
—•
0)--
‘0
D
0
sg
-‘
_D_F.’
CDCD
(D-Q)
CD
—
-
CD
D
CD
0
0C
—
0)
r-
C<m
‘C
D
°
-
CD
nG)
D
m
.“
fl>
D
C’
0
aCD0CI)
-,
CD_
(D-U‘00)
0
-‘
CD
(I)
0
C
D
C
-‘-C
,CD
D0,
-n
<
CDCD•
OCI)
tmm
a
-‘
CD
0_
CD
Ci)
0
rm
C
C’CDcU
CD
D_
CD
C
C’
0
D
m
-:
CD
2.
C
—
C’
Ci
-,
CD
CD
D
‘0
CD-
CD
CDC>m
CD
2
‘0
j:
0
m
CD-
,
-
0)
CD
0
(D
—
D
<
CD0O
,:•i
-
C
D
C
-
0
<
CD
,
0
CD
-4
<
C)
m
C
CD
1
o0
m
0
-
C
C’
=
>
m
CD
0
CD
)
—0Z
CD
-‘0)
(DC
-
D
CD
-
0
CD’D
C)
D
CD
3—
CD
-,
0
ii
C
CD
—
D
CD
—
(
=
2.
‘)s
-‘
-‘
CD-—
-sC
CD
C<CD
0
0
0C
0
000x
z
aC’)C)
o
-
-
CDQC,..
CD
00.
-‘
CnD
—C
CDa
C
D
—.CD
CD
t2
0—i
<CD
-‘!
g0
•2.
(5’
C’D)
*
c)
*
*
0)
CD
CD
0
a
C9,3:
CD
C0)
2.
5
•
Ci)DU)
C7
0)CD
a
D
C’)
CDCDC
-i0)=
aD)
0
CD,
DQ.
COD
3o
C
0),
o
0_C
—
-.—
<0)
D)D
_,0)
0)—
0
•D
-—•
3.
(D2
0)
0)
D
0
C
CD
D.
C
-
00
a
CD
C
a
0
(Dc>
-C)C
Z
*
0
—4
m
--
*
*
C<
<0
-,
E.
—‘m
CD
—ø
—
<<•1
CD(D
DD
CCD
_.CDCD(fl
3N
DCD
ØCDCDCO
D
—
-‘
Q_
(0
01
xCDm
CD
02C
C
C’
o
C
•
m
CD>
D)
<
CD
XD
o
0.
—.
-
‘
CD-
00
o
-C
Page 54

DIFFERENTIAL
FEED
APPLICATIONS
Please
Differential
wavering.
1.
2.
3.
refer
Puckering
Puckering
obtain
at
dial
Wavering
Wavering
obtain
To
control
Gathering
Differential
fabric.
ruffles,
and
the
Set
obtain
pages
to
feed
also
It
is
tends
pucker-free
than
less
tends
waver-free
at
more
dial
feed
it
on
Use
etc.
differential
best
the
42
designed
is
effective
very
occur
to
seams,
1.
occur
to
than
makes
waistlines,
feed
gathering
DIFFERENTIAL
45
-
minimize
to
for
woven
on
the
set
on knitted
seams,
control
set
1.
gathering
sleeve
dial
effect
gathering.
or
differential
stretchable
or
the
easier
heads,
between
your
for
FEED.
puckering
fabrics.
sheer
feed
differential
lightweight
on
sleeve
1.5
use.
and
control
fabrics.
feed
bottoms
2
and
To
*1
*11
to
IMPORTANT
do
of
The
a
the
adjustment
fabric.
longer
test
best
*
I
*
II:
*
III:
*IV:
The
exact
elasticity
setting.
contracted.
Always
find
and
Illustration
Even
the
with
run
settings.
Pucker
:
Puckering
Wavering
Gathering
depends
stitch
the
stitches,
piece
a
waver-free
or
on
length
the
of
actual
the
can
more
seams
thickness
influence
the
fabrics
fabric
you
*ffl
and
the
is
use
*‘v
Page 55

h
mr
-n_o
D.
<
C
Cl)
0)0
D
D
DO.
0.-o
CDCDrnn
()•Q)
3
o
‘‘
-
DCD
(I)
D
rn
—1
Z
-
ZCD
H
()
—
>Z
D
•
ci
0.CD3
D
C
01
CD
0
9oD
CDD
0)
0
CD—
O
O
0
)O)-
DCD
og
D0
DO
3®o
0)
0)—.‘CD
O)D
u,
DC)
CDC0OD
—2
0
U)
-
0)Ds
D
U)
CCD
0
-
m
c
m
m
Z
0
>
30)
0
O-
:°
D0
3
czD)
co.
g3
Z
00)
O
‘<-i
3
0)
1
C
0
CD
-LU)
•
DO)
C)CD
0)0
3ocn
0)-CDU)
C)
U)U)
ci-..
-
U)
-g<
D.-
0
(DO)
30.
o
o
O)U)
:r
(D
DC
(DD
D
CD
-s
2
D
.
0)
-
:
CD
-,
o
D
D_
-cim
‘<
(ft
CD
CD
DC
CD
0.
0
D
p
D
“
00D
(V
fl
-
-°
0)
CD
-,
E5
D
D
00
U)
-‘
C(D
H
—
U)
>
-
—
,
SO
N
zo
-
‘
CD
O)CD
ig
JCE
3G)
g
cgz
oO
D)çom
-
—g
g
C
-g
o
—
‘1
r
—.
o
CCD
CD
-
r
U
C
D0U
CD
.
z
—
C
=omo
—,
.
(0
CD-
—
-,
m
m
Z
H
r
——
CD0...
0)-sU)
D3
(31
CU)
0)00
CU)Z
U)CD
CD
o
Z
-
—
Z
m
m
CD
0.
<
‘
g
C
CD-
CD-
U)
-0
o
0)
O-
D
U)
-
F\)
—
•U)(0
—
o
CD
CD
—;
0.
0.
C
-
0
C
0
•
CD
CD
(DC
O-0O)
CD(O
—,
CU)
D
Q’1
1
CZ?
.
2.
.
O-CD
CD’
—
CD
CD
C
D
o
C
-2.
Cl)
—.
DQ
2
—C(D
——
ci
0)CD
•‘
•
•
C
.
.
C
—
3—
c!.E5-
<
=
C
-o
0
A.
.
•C
0)
CD
CD
0
3
D)
_0
•
CD
0
CD
C.
‘<C,
U)
-s
0)
ci
*
*
rrs
CD
D
z
0
EO-
1
D
—0.
EcD
O-
C
0)
0
3
CD
D
0
—
O)
,.
*
•
‘1000
OCCC
OOo(j)
CDCD
CD
0
‘
O)
CO
D
-‘<
--
C
_c2_
CD
—•0
,ci
Eci
(DO)
DO-
g•
CD
CD
0
C)
0
0)
D.
C
.0
o
0
0
C
D
0)
3
0).
U)
—
N
3D
(DC
CDs
5•D
ci
0)
-‘
0.
o
-s!L
0)
0.3
00)
U)
C
o
D
—
ci
0)
CD
CD
—
r
=
E
‘
U)CD
-
C
0
H
>
Z
—1
CD
—
CD
L
CD
-
CD-
D
;-
.
*
g
.U)
>oo
3CD
g
D
(0DDU)
(0(0-
CD
(DOClID)
CC
0
(CD
—
O
c0)
0
C
D.
—D
CD
320.
—C
CD’
C
COO)
.-CD
U)
,O
—(DO-
U)D_
D
CD
U)
—
C
O)
<D
D
D
C
0.
2
C
3
-2-
CD
Page 56

I
•
I
I
9I
.
I
.l
I
I
REPLACING
moving
Replace
spare
NOTE:
FIRST
a
cutter
should
You
made
is
REMOVE
will
be
of
THE
SOCKET-OUTLET.
and
the
hand.
MM
screw
working
position
In
and
THE
OF
BELOW
this
secure
1.
2.
Loosen
Close
lowest
by
position
EDGE
0.5
CUTTER.
DISENGAGING
sew
to
want
you
If
to
fabric
upper
the
the
disengage
and
release
illustrated.
Ensure
selected
knob
that
or
MOVING
it
if
cutter
your
in
found
to
need
not
special
a
hard
POWER
out
take
Lower
table.
turning
by
pos[tion.,
screw,
with
it
THE
CUTTER
SURFACE
MOVING
MOVING
moving
left
is
and
cutting,
and
not
without
edge
looper
CUTTER
becomes
accessories.
replace
alloy
PLUG
moving
cutter
hand
the
replacement
set
ENSURING
open
by
cutter
turning
wider
needle
follows.
as
blunt
cutter,
fixed
material.
SUPPLY
FROM
THE
cutter.
driving
wheel
arm
towards
cutter
THAT
APPROXIMATELY
IS
THE
OF
CUTTER
working
the
pushing
it
than
can
be
the
towards
overedge
damaged.
which
to
you
THE
FIXED
table
cutter
you
width
A
its
in
as
REMOVING
the
from
screw
*
*
*
III:
*W:
II:
Disconnect
Remove
Illustration
I
power
:
FACE
supply
take
and
Screw
Moving
Cutter
cover
Face
COVER
before
off
cutter
release
the
face
knob
removing
cover.
face
cover.
Page 57

r’
C)
m
>
OOC)
oC2
CD
3
Z
m
-
CJ)
a-C)
cnm>Q-3
m
C
.CDC
W
—
—CD)
ON
CD
CO
öo
m
z
acCD
o
m
0
5-
‘>
O>-2I3
CO
—.
r
2
OD
Z
0r
OcDCTø
—OZNjCD
mXCO
mQD5--
z
C
o3
CD
>
CO
5-
0
CD.
C)
CD)
<
>>mm0j
C
3
OmjD
C
r
-
C)
3
.
CD
:
‘
m
r
CC
D
C)-o
Cc
0
r->
Ozjco’IP
Fm
ci’
>
C)
C
C
CDD)
CDg
>
-
5-ru
rm
D
2
C)
CD
D)
<
I
=
CO
C))
C))
C
CC)CD
CO
CD
CC.
CO
D
5-
<
=
5-
m$
o
-C
3
O
Qcooo
>
CD
0
m0ooD
0’
D3
3
CD
C°CoC
CD
C
C
m
D
CD
C))
P
r-
m.3
>
r
_
5-
CI)
Z
C—I
-
P’)
ØCD(I)
0
mO
OQ
CCD00I
m
C.<
m
5-CD-C
-o
a-
CCD
-C-
io
ICC
j>
—
CC
_IXCD
•
CD
D
J>0<CDI—
0-I<D3
COZ5-CCICD
o>m-’
3
CuCD
Q3
1
CC
m
5-C
CD-
mm
IX
fl)
E
CD
>OZCCcI
m
m
—I
C
C))C
—CD
3CD
fl1
I
Iz
<r-C3!CD
x
m
85-
L
m
C)
CO
3D)
CD
C’OD
I—
CO
C
C
COD-
C
,B
m
C’
C
°5-8
CCDC
CD
...4
D
>
CO
=
C
m
5-Q
ZCD
CD
>
CD
COC
2.
CCDØ
CCCD
-
C
C
CO
C
D)
C
CO
CJ
C
CO
CDCO<
—I
-,
DO
m
CD-
D)3
CD:
38CD
03
0
m
m-iV
0
CD
C
D
CD-
C
m
CD
zmrulC
Q><_COC))
03
F
Cfl
5-
—
mI
CD3
>
-
m
03
—
80
CO
COØ
CC
C
3
-•
C)3
-
R.
()QCD
1
0WIECD(D
3D)CD
r
CD
—
L_
ci
c2IQ
C
>
CD
U)
C
CD
C
C
C
CD
-.
Cl)
0
5-
*
D
*
*
*
C)
.
W
i’
c
$
C))
D
CD
8
C0C
—
5-
,1
CD
C
C)
D
5-
D)
-4
0
•
2
g5-z
C-
-
C))
1
-
D
•
I
-)
—C
5-
jm
D
*
* *
*
8CD
m
;:
0<0<
CC
o
_j
m
CC
io
C
C
-0
C
CO
CDC
5-
j
g
C’
-
)
CD
-
DC
CCCCDD
5-
0
<
3
CDCO
—4
lCD
ft2
Cl)
W
—CDC-
CD
Bc
3CD
1
ICD
5-
CD
—
CC>>
CD•C
0
—
C’
CDC))
Z
CO
C
V
C
-‘
C5-
C
COD
CC.
£CO
D
C
CD
-1
)<
CD
0
5-
-
CD
C
0
O
CD
V
C
C))
Page 58

CLEANING
AND
OILING
machine
keep
To
smoothly,
lubricated
the
at
keep
all
times.
FIRSTDISCONNECT
FROM
REMOVING
POWER
PLUG
OUTLET.
front
the
Open
1.
the
Using
table.
and
remove
dust
accumulated.
drops
few
Apply
2.
ALWAYS
a
indicated
points
QUALITY
USE
SEWING
OIL.
and
with
top
remove
the
Remove
3.
driver
inside
it
SUPPLY
FROM
cover
brush
by
cover
brush.
running
clean
MACHINE
SOCKET-
working
and
provided,
that
lint
oil
of
arrows.
GOOD
A
MACHINE
with
and
dust
and
BY
have
the
to
screw
lint
of
Illustration
*
I
*
II
*111:
*IV:
Screw
:
Top
:
Brushing
Oil
cover
Page 59

j
—
30
0)0)
0cj)-o
rc
F)
_
>_
00>
0
-g
3”O
Q0
>—4
-c
.DC
‘<o
LZfl
—
--—
0)
Ct)
0)
0)
—
m
N
-<
Z
D..
;u
0)
E3
2•
m
0
00
mos<Em
-0
mz
C
,,m
QH
Cl)
-
z>
m
D
2.
mr
0
c,>
-
0>
m
0
0)
CD
3
=-U
>z
cc
Z>
0
0
mo
><
H.>
Q
-<
;oo
mm
>
()
m
m
C
W
,1
<
ç
CC)
D
>m
m>
-‘ED
m
cm
—
-‘-‘
CD0
3_i
-,D
COD
tOD
m
r_Z
0
>
>
-
—
-
0
C
0
C
D
0)
Cl)
0
Q
>
c
Ocn
0)0)
.
U)
-‘<
c-co
0)0
mc
?;•0
0>
C)ø.
Cl)
cn0
00
•;-Cfl
CD
m
mrfl
Q
00
0
0)
CD
W
CD
CD
m
C
CflCD
—
>
—‘C
0
C)
CD
Cl)
0
CD
C
.o
—
C
0
0
0
0
>
=O_
•
>Q
O<C
CO
0H0
00<
CC)
3_
Q5
0r•
OØCD
0)•
C
0
g0
Cfl
mc
0
C
D
0
Ct)
00)
D
0
mc
00
0—
0_C
000
—•
<
—.
mc,,C
0
m-
CO0
D-D
CD
-
Cl)
‘-1
0•
rnr-o
D
0
D
D
CD
C—
cog
—o-
0)
—
—
CD
—D
0
>o5
Zo
m
CO
CD
-
CI)
•
-CD
=
C
*
0
0)
Ct)
*
*
•
OCDC
0
>00
0)
C
*
*
*
*
Io0<
CD’
CD
Page 60

ads
Thread
Thread
Incorrect
king
Thread
Improper
Bent
es
in
g
Bent
Incorrect
Incorrect
Improper
en
n
g
Differential
Differential
ering
Bent
Incorrect
e
Incorrect
Loose
11
mng
k
Pulling
Incorrect
Loose
Pulling
ilar
ies
Incorrect
Improper
OBLEM
Incorrect
HECKING
Spool
Guide
Tension(s)
setting
tangled.
Pole
of
Needle.
not
too
extended.
tight.
Reset
Reset
Reset
Fully
extend
Spool
Needle.
Thread
Guide
properly.
Tension(s).
Pole.
needle.
Threading.
Re-thread
Insert
new
Needle.
Machine.
or
blunt
setting
Needle.
of
Needle.
Thread
Reset
Insert
new
Needle.
and
Needle.
Fabric.
Threading.
size
Needle.
for
Re-thread
Choose
knitted
correct
fabrics.
Machine.
size
Needle
for
or
blunt
feed
feed
is
set
incorrectly.
Set
it
at
1
or
at
more than
1.
Needle.
is
set
incorrectly.
Set
Insert
it
at
new
less
Needle.
than
1.
Presser
Thread
Tension(s).
Reset
Thread
Tension(s).
setting
Foot.
of
Needle.
Reset
Reset
Needle.
Presser
Foot.
fabric.
size
Needle.
Thread
Choose
Do
not
pull
and Fabric.
correct
Fabric;
size Needle
guide
it
gently.
for
Presser
Fabric,
Threading.
Foot.
Re-thread
Do not
Reset
Presser
pull
Fabric;
Machine.
Foot.
guide
it
gently.
size
Needle.
Choose
Thread
Reset
Thread
and
correct
Fabric.
Tension(s).
size Needle
for
PROBABLE
Thread
Tension(s).
CAUSE
CORRECTION
PERFORMANCE
PROBLEMS
Page 61

adaptée
fit
tensions
aiguille
CORRECTION
au
les
et
une
tissu
Corriger
Choisir
au
renfilage
Refaire
Ne
PROBLEMES
PROBABLE
mauvaise
mauvaises
daiguille
Tensions
Taille
enfilage
tire
Mauvais
Tissu
D’EVENTUELS
CAUSE
A
mais
tissu
le
doucement
tirer
pas
regler
guider
le
La
mauvaise
pied
du
Pression
mais
adaptée
tissu
le
aiguille
doucement
tirer
une
pas
guider
Ne
Choisir
le
mauvaise
tire
d’aiguille
Tissu
Taille
fil
au
l’aiguille
et
tissu
Remettre
au
Remettre
presseur
plaçée
pied
mat
du
Perte
Aiguille
presseur
tensions
pied
le
es
Corriger
mauvaises
Tensions
1
de
moms
a
I’aiguille
regler
Le
Changer
différentiel
de
reglage
épointée
Mauvais
Aiguille
pour
1
de
tricotées
plus
a
I’enfilage
matières
régler
Le
les
Refaire
différentiel
de
reglage
Mauvais
enfilage
Mauvais
adaptée
aiguille
laiguille
l’aiguille
une
Remettre
Choisir
Changer
autissuetaufil
mauvaise
plaçee
épointée
mat
d’aiguille
Taille
Aiguille
Aiguille
tensions
laiguille
lenfilage
les
Refaire
Regler
Changer
fortes
trop
enfilage
tordue
Mauvais
Aiguille
Tensions
bobine
I’aiguille
Ia
fond
a
tirer
Remettre
Replacer
La
tirée
non
plaçee
emmêlé
support-bobine
mat
bobine
Fit
Aiguille
Antenne
REMEDES
PROBLEME
4.
hilo.
aguja
Ia
de
correcto
EJECUCON
DE
PROBLEMAS
probable
LOS
Causa
material.
el
y
tamaflo
fijarla(s)tension(es)del
hilo
a
el
el
Elegir
para
Volver
incorrecta.
incorrecta.
bib
de
aguja
Ia
de
Tension(es)
Tamaño
Points
irreguliers
guiarlo
máquina.
prensatelas.
a
pie
material:
el
el
enhebrar
fijar
a
a
estirar
No
Volver
suavemente.
Volver
suelto.
inadecuado.
tirante.
prensatelas
Enhebrado
Material
Pie
Casse
aguja
a
de
guiarlo
correcto
material:
el
tamaño
el
estirar
No
Elegir
suavemente.
incorrecto.
aguja
Ia
de
tirante.
Material
Tamaño
d’aiguille
prensatelas.
material.
pie
aguja.
el
el
Ia
y
fijar
fijar
hilo
a
a
el
para
Volver
Volver
aguja.
Ia
de
suelto.
incorrecta
prensatelas
FijaciOn
Pie
Plissements
hilo.
del
1.
aguja.
tension(es)
Ia
nueva
fijar
a
una
Poner
Fijarloenmenosde
Volver
fijado
incorrecto.
torcida.
hilo
o
diferencial
del
gastada
avance
El
Tensión(es)
incorrectamente.
Aguja
5
0
I
ua
para
1
de
más
en
punto.
o
I
de
en
Fijarlo
materials
fijado
diferencial
incorrectamente.
Avance
,.
+
.
aguja
Ia
de
máquina.
a
correcto
enhebrar
tamaflo
a
el
Elegir
Volver
incorrecto.
inadecuado.
aguja
de
Enhebrado
Grosor
e
oins
manque
nueva.
material.
aguja.
el
Ia
y
aguja
fijar
hilo
a
una
el
Poner
para
Volver
aguja.
Ia
de
torcida.
o
incorrecta
Fijacion
Agujagastada
,
(.
hilo.
del
maquina.
Ia
aguja.
tensiôn(es)
Ia
nueva
enhebrar
fijar
a
a
una
Poner
Volver
Volver
demasiado
hilo
del
inadecuado.
torcida.
Enhebrado
Tensión(es)
Aguja
tirante.
I
e
asse
adecuadamente.
Extenderlabarradegulatotalmente.
Colocarlo
Volveracolocarlaaguja.
está
no
incorrecta.
hilo
del
aguja
enredado.
Ia
gula
hilo
de
de
de
barra
Fijaciôn
La
Carrete
extendida.
IERIFICANDO
roblema
,4
auas
ulares
de
ira
o
a
JUGS
ulaciOn
ido
das
mitentes
los
ra
Page 62

CPTOL
CCE’ES
PIPING
Prepare
folded
Place
beyond
seam.
the
Braid
or
used
be
can
for
Use
PEARL
PEARLS
1.
Set
for
tensions
Set
Left
Upper
Lower
FOOT
of
piece
a
piping
line
seam
ribbon
may
in
decorating
FOOT
ALONG
left
needle
needle:
looper:
looper:
ready-made
between
toward
also
straight
edges
AN
(remove
follows:
as
4
1
7
be
seams.
EDGE:
2
-
-
8
piping
seam
garment.
used,
collars,
of
right
(corded
edges
Pin
either
cuffs,
needle)
bias
fold
with
baste,
or
flatorfolded
pockets,
3-thread
fold
tape).
extending
stitch
and
braid
etc.
overlock.
SEW:
•
•
*
•
*
•
•
•
2.
PEARLS
FABRIC:
SEW:
•
•
•
•
•
Remove
Remove
Swing
Raise
Place
2”
with
one
Take
Follow
pearls
Sew
Return
Medium
or
2
Set
Remove
Insert
Swing
Raise
Place
of
pearls
one
Take
Sew
pearls
the
of
regular
stitch
cutter
the
pearls
of
stitch
edge
cutter
SEWN
4
mm
a
for
regular
small
cutter
needle
pearls
extending
stitch
fabric.
away
needle
in
pearls
of
on
to
weight
pearls
3-thread
stitch
away
to
in
with
on
foot;
finger
to
to
channel
the
extending
the
with
fabric
edge
original
WITH
woven
flat
foot;
finger.
to
it’s
channel
behind
the
with
the
replace
you
as
lowest
highest
it’s
hand
along
fabric.
of
position
FLAT
A
lock,
replace
lowest
highest
on
hand
left
with
did
position,
the
on
behind
wheel
fabric
LOCK
needle
left
with
position.
position.
right
foot.
wheel
needle
pearl
for
a
close
position.
right
foot.
secure
to
guide.
when
pearl
of
side
secure
to
just
foot.
rolled
edge.
front
side
the
finished.
STITCH:
See
only.
foot.
foot
the
the
catching
of
covers.
foot
the
pearls.
pg.
with
pearls.
fold
the
28
2”
Page 63

•
1\LUtUkPJ
UUNIL
Z.
MUt’(t
IUNINtL
I
U
i4ENSATELAS
E
DECORATIVAS
Preparar
sin cordOn
dt
los
coStura.
pueden
Se
Usarlo
etc
El
pie
para
opcional.
pieza
una
interior).
materials
usar
trenzas
para bordes
trenza
a
con
PRENSATELAS
LO
LARGO
1.
PERLAS
Para
hilos
Fije
COSA:
•
Quite
pie
Quite
dobladillo
•
Fije
tapa
Levante
•
•
Coloque
pie
atras
Cosa
•
Siga
material.
Cosa
•
Regrese
termine.
PERLAS
2.
MATERIAL:
COSA;
Quite
para
•
Inserte
Fije
•
Levante
Coloque
pie
atras
Cosa
Cosa
doblado
Abra
A
fijaraaguja
overlock.
de
las
tensiones
izquierda:
Aguja
Ancora
Ancora
el
pie
prensatelas
dedo
el
Ia
cuchilla
frontal.
Ia
las
prensatelas
del
pie
una
puntada
el
borde
perlas
las
Ia
COSIDA
de
Tojido
fijarIacostura
Para
aguja
Ia
pie
el
perla.
el
Ia
cuchilla
Ia
las
prensatelas
pie
del
una
puntada
perlas
las
del
Ia
costura
superior:
interior:
prensatelas
de
enrollado.
de
móvil
aguja
perlas
pronsatelas.
del
cuchilla
peso
izquierda.
pronsatelas
dedo
aguja
perlas
prensatelas.
mater
trencilla
de
Colocar
planas
vivo
Sujetar
está
coser.
decorativos
PARA
DEL
izquierda
se
como
4
2
1
7
-
8
perlas.
para
puntada
a
su
su
posición
a
en
Ia
4
cm
con
conelvolante
material
enelborde
su
a
PUNTADA
CON
medio
Plana
Vea
normal;
puntada
de
môvil
con
con
plana
su
a
a
su posición
en
Ia
cmdeper
4
el
con
aguja
Ia
ial.
simplemente
F
ARA
(cinta
Ia
trencilla
0
plegadas
de
disponible
PERLAS
BORDE
(quitar
ilustra;
normal;
como
posiciOn
ranura
perlas
de
lo
a
de
posiciOn
4
2
0
a
página
pequeno.
posiciOn
ranura
volante
izquierda
TRENZAS
plegada
plegada
hilvanar
o
cuellos,
Ia
agula
reemplacelo
usted
más
más
el
en
extendiendolas
para
deIaguia
largo
material.
original
DE
COSTURA
perlas
mm
3-hilos,
29.
ponga
más
alta.
más
lado
del
las
para
jalandolo.
sesgada
el
en
coser
y
cintas
derecha)
para
y
izquierdo
las
cuando
prensatelas
baja.
derecho
las
hechas.
bolsillos,
un
con
cierre
perlas.
del
PLANA
perlas.
0
punos,
como
hizo
baja
alta.
lado
sujetar
solamente
pie
el
extendiendolas
sujetar
agarrando
con
borde
extra
a
el
el
del
use
del
el
NED
Permet
Placer
hors
Ia
Toutes
cousues
des
S’utilise
poches,
PIED
1.
3
Pour
Ia
2.
POUR
de
le
de
Ia
les
franges
pour
côtés
POSE
PERLES
Regler
gauche
Regler
Aiguille
Boucleur
Boucleur
coudre:
Retirer
Retirer
Abaisser
•
refermer
•
Lever
•
Placer
avec
•
Faire
prendre
•
Suivre
•
Coudre
Remettre
•
travail.
PERLES
LOCK):
Tissu:
Perles
Regler
fils,
Pour
coudre:
Retirer
•
•
Placer
•
Abaisser
•
Relever
•
Placer
avec
Faire
prendre
•
Coudre
le
repli
•
Tirer
•
Remettre
ce
travail.
confectionner
bord
couture.
en
Ia
(retirer
les
le
l’aiguille
les
2”
un
le
lainage
aiguille
les
2”
un
Ie
CORDONNET
façon
de
Bâtir
sortes
un
ou
réaliser
des
seul
des
cordons
de
surfilage
rubans.
trainings
PERLES
COUSUES
machine
l’aiguille
tensions
gauche:
superieur:
inférieur:
pied
le
de
les
le
le
de
les
du
<<flat
normal
doigt-mailleur
le
couteau
lateral.
capot
le
en
dans
perles
perles
point
les
côté
le
COUSUES
de
Ia
pied
petit
le
l’aiguille
perles
point
les
tissu.
le
tournant
en
perles.
tissu
du
perles
couteau
de
poids
ou4mm.
2
machine
gauche
normal
doigt-mailleur
couteau
en
dans
dépassant
plus
tournant
en
perles.
perles
lock>>
couteau
un
bord
quelebord
a
ce
ou
epingler,
des
bords
ou
LONG
LE
pour
l’overlock
droite).
ainsi:
4
1
-
7
-
8
et
comme
en
position
position
le
canal
dépassant
avec
le
long
en
position
AVEC
moyen
comme
seulement.
et
en
position
position
le
canal
I’aiguille
avec
pour
ouvrir.
en
position
plats
droit.
fuseaux,
2
mettre
haute
le
le
du
UN
mettre
a
le
ENROBE
un
avec
puis
plies
ou
On
décoratifs
DU
SURJET:
a
le
pied
pour
faire
basse
maximum,
sur
le
derriere
volant
guide-tissu
tissu.
de
POINT
un
pour
le
pied
(B).
basse
maximum.
haute
le
sur
l’arriére.
volant
gauche
haute
cordonnet
enroulé
coudre.
peuvent
aussi
peut
pour
etc
fils
3
pose
un
ourlet
(sans
cOté
droit
pied.
le
Ia
main
a
deIamachim
coupe
PLAT
A
<<flat
pose
(sans
côté
droit
Ia
main
a
attrapant
(coupe>
enrobi
soit
les
aiguill
et
perles.
roulotft
coupe)
du pie
afin
après
lock>>
perles.
coupe)
du
afin
plaç
ètr
utilis
coI
de
ce
(FLA
a
pie
de
just
apre
3
I
Page 64

NEEDLE
the
Feed
1.
illustrated.
as
to
bar
4”
(10
Lower
2.
hooking
the
the
Hold
3.
Guide
4.
your
with
THREADER
through
thread
Raise
clear.
presser
fork
thread
thread
another
position,
with
highest
cm)
the
the
foot.
enters
into
hand.
the
the
and
Set
the
hooking
presser
the
into
needle
thread
pull
needle
the
guide
foot.
thread
the
needle
threader
and
fork
needle
of
Raise
leaving
threader
hole.
with
pull
the
ensuring
your
the
clamp
needle
about
hand.
thread
5.
6.
7.
Move
release
Take
Pull
the
the
the
the
needle
hand
needle
thread
threader
which
threader
away
from
is
off
pulling
you.
backwards
the
needle
the
slightly.
thread.
clamp.
Then
For
right
needle
I
Para
Ia
aguja
derecha
Pour
I
aiguille
droite
/
‘IP4W
‘/!
/
jjip
iIIwi.
‘:irø’-
-4P
-
di!F
/
<
j4r,
Page 65

ENHEBRADOR
1.
4.
5.
6.
7.
2.
3.
Quitar
Tirar
con
Mover
Entonces
Avanzar
aguja
prensatelas.
alta,
Bajar
aguja
en
Guardar
mano.
Gular
el
dejando
tirar
y
el
pie
asegurándose
el
ojo
de
el
el
hilo
su
otra
el
enhebrador
soltar
el
enhebrador
el
hilo
hilo
el
hilo
mano.
hacia
DE
a
través
unos
Levantar
hilo.
prensatelas.
que
a
aguja.
con
el
en
a
horquilla
de
su
mano
de
atrás.
LA
de
a
10
cms
Ia
barra
Colocar
Ia
horquilla
enhebrador
de
Ia
aguja
que
está
Ia
aguja
AGUJA
gula
del
extra.
de
aguja
el
enhebrador
de
de
enganche
hacia
atrás
tirando
de
Ia
grapa
hilo
de
Levantar
a
Ia
posiciOn
enganche
Ia
aguja
y
tirar
ligeramente.
el
hilo,
de
grapa
el
con
el
aguja.
pie
más
de
entra
su
hilo
de
Ia
ENFILEUR
1.
Passer
montré.
sa
position
2.
Abaisser
d’aiguille
celui-ci
3.
Tenir
avec
4.
5.
6.
7.
Guider
main.
Tirer
Iâchant
Retirer
aiguille.
Tirer
le
doucement
l’enfileur
le
fil
le
Lever
entre
flu
le
vers
D’AIGUILLE
fil
par
le
le
pied
Ia
plus
haute,
le
pied
presseur.
de
facon
a
dans
le
votre
main
sur
Ia
pointe
I’enfileur
fil
tenu
par
d’aiguille
l’arrière.
passe-fil
presseur.
puis
ce
que
chas
le
fil
avec
fourchue
Ia
main.
de
du
Lever
tirer
Placer
Ia
petite
de
l’aiguille
I’enfileur.
et
d’aiguille
son
logement
serre-aiguille
Ia
barre-aiguille
environ
tirer
I’enfileur
pointe
a
enfiler.
le
fil
vers
sur
10
fourchu
avec
I’arrière
Ie
cm
de
co
c
I’a
sei
 Loading...