

Page 1

SI-85
Iron
Steam
Turbo
WHITE
Only
Manual
Use
Care
&
Use
Household
No.
Mode’
I”.
PAIB/A39
1
Page 2
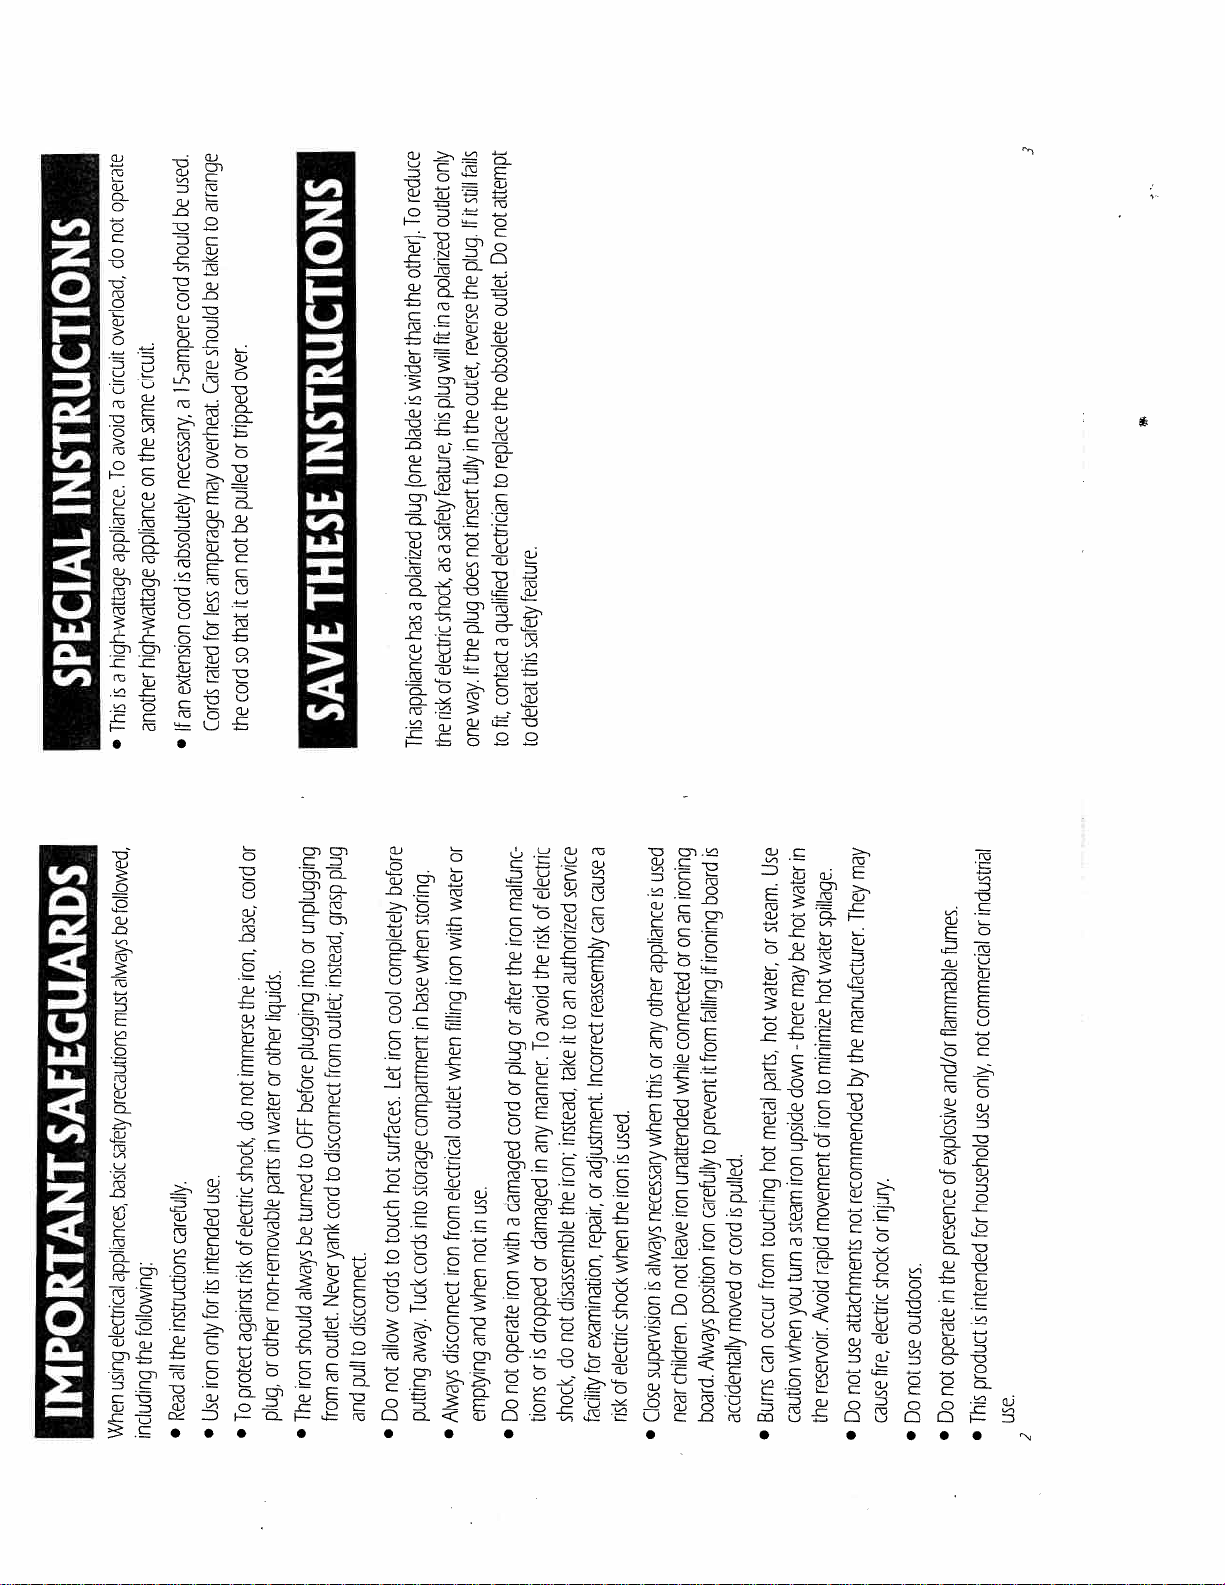
used.
operate
not
do
overload,
circuit.
circuit
a
same
avoid
the
To
on
INSTRUCTIONS
appliance.
appliance
high-wattage
high-wattage
a
SPECIAL
is
another
This
•
arrange
be
to
should
taken
be
cord
should
over.
15-ampere
Care
a
tripped
or
overheat.
necessary,
may
pulled
be
not
absolutely
is
amperage
can
it
less
cord
for
that
so
rated
extension
cord
an
Cords
If
the
•
INSTRUCTIONS
THESE
SAVE
only
reduce
To
outlet
other).
polarized
the
a
in
fit
than
will
wider
is
plug
this
blade
fone
feature,
plug
safety
a
as
polarized
a
shock,
has
electric
of
appliance
risk
the
This
fails
still
attempt
it
If
not
Do
plug.
the
outlet.
reverse
obsolete
outlet,
the
the
in
replace
fully
to
insert
not
electrician
does
qualified
plug
a
the
If
contact
way.
fit,
to
one
3
feature.
safety
this
defeat
to
or
followed,
be
always
must
precautions
SAFEGUARDS
safety
basic
carefully.
appliances,
instructions
following:
electrical
using
IMPORTANT
When
the
the
all
Read
including
•
cord
base,
iron,
the
immerse
not
do
shock,
use.
electric
of
intended
risk
its
for
against
only
iron
protect
Use
To
•
•
liquids.
other
or
water
in
parts
non-removable
other
or
plug,
plug
grasp
unplugging
or
into
instead,
outlet;
plugging
from
before
OFF
disconnect
to
to
cord
turned
be
yank
always
Never
disconnect.
should
to
outlet.
an
pull
iron
from
and
The
•
before
completely
cool
iron
Let
surfaces.
hot
touch
to
cords
allow
not
Do
•
or
malfunc
water
storing.
iron
with
when
base
in
when
outlet
compartment
storage
electrical
into
from
cords
iron
Tuck
away.
disconnect
putting
Always
•
iron
filling
use.
in
not
when
and
emptying
the
after
or
plug
or
cord
damaged
a
with
iron
operate
not
Do
•
a
service
electric
cause
of
can
risk
the
authorized
an
reassembly
avoid
to
it
To
take
Incorrect
manner.
instead,
any
in
adjustment.
iron;
or
the
repair,
damaged
or
disassemble
not
dropped
examination,
is
do
for
or
facility
tions
shock,
used
is
appliance
other
any
or
this
when
used.
is
iron
necessary
the
when
always
is
shock
electric
supervision
of
risk
Close
•
is
ironing
board
an
on
ironing
or
if
falling
connected
from
it
while
prevent
to
unattended
pulled.
is
iron
carefully
iron
cord
leave
or
not
position
Do
moved
Always
children.
near
board.
accidentally
in
Use
water
spillage.
steam.
hot
or
be
water
may
hot
water,
there
hot
-
minimize
parts,
to
down
iron
metal
of
upside
hot
iron
movement
steam
a
touching
rapid
turn
from
you
Avoid
occur
when
can
reservoir.
Burns
caution
the
•
may
They
fumes.
manufacturer.
the
by
recommended
injury.
not
or
shock
attachments
electric
use
fire,
not
Do
cause
•
flammable
and/or
explosive
of
presence
the
in
outdoors.
use
operate
not
not
Do
Do
•
•
industrial
or
commercial
not
only,
use
household
for
intended
is
product
use.
This
•
Page 3

carefully.
manual
Use
care
&
First
use
this
of
Your
sections
all
Before
Read
•
iron,
the
aside.
materials
Never immerse
cloth.
packaging
all
damp
Set
clean,
a
with
packaging.
completely.
the
Rest
unit
the
from
Storage
Dry
Iron
Iron
water.
in
and the
plug
Steam Station
or
Iron
the
the
cord
Remove
base
Wipe
•
•
the
with
of
iron,
some
the
and
operate
towel.
factory,
this,
the
clean
remove
old,
to
leaving
an
order
over
In
before
vents.
minutes,
polished
2
to
steam
I
been
the
for
in
has
iron
setting,
your
may remain
of
‘Turbo”
at
solution
soleplate
steam
buffing
the
The
•
filling
removing,
before
unplugged
is
iron
the
sure
be
Tank
Jways
•
Water
The
Filling
Tank
Water
the
inside
moisture
Tank.
Water
notice some
the
may
You
emptying
or
Note:
•
quality
the
from
is
and
factory.
normal,
is
the
at
This
done
use.
first
testing
your
to
prior
assurance
is
it
while
Tank
Water
the
fill
to
attempt
Base.
the
Never
to
attached
Warning:
•
the
Water
Fill
the
remove.
Slide
to
up
free.
Locks.
lift
is
it
and
Tank
until
Water
position
Base
two
the
OPEN
the
from
of
the
to
each
outward
Unlatch
Tank
•
counterclockwise
Knob
Fill
Water
the
Rotate
•
Locks.
CLOSE
the
Tank
to
Water
the
clockwise
of
rotate
each
and
Relatch
Knob
Fill
seated.
Water
until
the
Base
the
Replace
into
back
water.
tap
Tank
with
Water
Tank
the
position.•Slide
Water
S
Iron
Station
Steam
Your
Know
Knob
Fill
Tank
Tank
Water
Water
G.
H.
Light
Light
Indicator
On/Off
Power
Temperature
B.
A.
Compartment
Rest
Locks
Tank
Water
I.
Knob
Control
Temperature
C.
Storage
Storage
Iron
Cord
K.
J.
Control
Switch
Steam
Control
Steam
Variable
E.
0.
Hose
Steam
L.
Cartridge
Filter
Water
F.
Page 4

level
Tem
the
flat,
a
and
on
Switch
sitting
are
Control
Base
Steam
and
the
Iron
that
the
that
Check
sure
Be
surface.
•
V
Ironing
Dry
Water
the
to
position.
water
OFF
add
the
to
in
both
necessary
are
not
is
Knob
it
Control
ironing,
dry
perature
For
•
necessary
not
is
it
Tank,
Water
the
in
already
is
tank.
the
water
If
empty
to
Tank.
is
iron
outlet.
the
that
household
only
indicating
AC
20V
I
glow,
will
source.
standard
Light
a
power
into
a
On/Off
to
cord
the
Power
Plug
connected
The
•
you
light
the
fabric
of
When
type
the
to
heating.
is
iron
according
the
that
setting.
setting,
desired
indicating
the
appropriate
to
glow,
for
will
Knob
label
tight
Control
fabric’s
the
Indicator
Check
Temperature
the
Temperature
ironing.
Rotate
are
The
•
•
use.
for
position.
ready
OFF
is
the
and
in
Switch
temperature
Control
desired
Steam
your
the
keep
reached
to
has
sure
be
iron
the
ironing,
our,
goes
While
•
controlled
be
can
ironing
Control.
steam
Steam
during
Control
Variable
steam
of
the
rate
Steam
flow
adjusting
by
The
•
Variable
The
V
Setting
or
Turbo
clockwise.
either
in
Control
Steam
produced
Variable
steam
the
of
rotate
amount
mode,
the
Steam
increase
Pulse
To
•
or
counter
Turbo
either
Control
in
Steam
produced
Variable
steam
the
of
rotate
amount
the
mode,
Steam
decrease
Pulse
cIocl’ise.
To
•
into
down
Filter
Cartridge
the
Filter
Press
Water
Filter
Water
The
Tank.
the
drop
Water
the
in
position,
in
provided
already
slot
not
If
the
•
place.
in
firmly
seated
is
it
until
ward
Removing
and
Installing
or
or
any
filter
water
clothes
help
your
spring
will
damage
expensive
may
Cartridge
for
that
Filter
need
water
no
Water
is
your
the
from
There
Using
iron.
impurities
the
Note;
•
the
of
functions
steam
the
operate
not
can
You
water.
distilled
Important:
•
Water
the
press
place.
in
replacement),
Cartridge
)for
Filter
Filter
Water
Water
the
the
without
remove
iron
To
•
out
will
This
upwards
slightly.
Filter
base
Water
the
the
of
lift
Now
center
the
Filter.
Water
towards
the
in
Filter
unlock
Tank.
Water
the
of
Water
new
the
in
drop
and
Filter,
Water
used
the
Discard
Filter.
•
we
first
you
iron,
that
the
in
time
collect
some
for
may
that
stored
dirt
been
or
has
dust
iron
from
the
after
clothes
or
to
use
Iron
The
Starting
first
damage
the
for
avoid
that
To
Important:
recommend
•
level
Tem
the
flat,
a
and
on
Switch
functions.
sitting
are
steam
Control
Base
turbo
Steam
and
and
the
Iron
that
steam
the
that
Check
sure
continuous
Be
surface.
the
•
both
testing
cloth,
old
an
iron
outlet.
position.
household
only
OFF
the
in
2OVAC
I
both
are
standard
a
Knob
into
Control
cord
the
perature
Plug
•
is
iron
the
that
desired
the
to
indicating
Knob
glow,
will
Control
source.
Light
power
a
On/Off
to
Temperature
the
Power
Rotate
connected
The
•
the
setting,
Check
ironing.
are
you
fabric
of
type
the
to
according
light
the
When
heating.
is
iron
setting.
the
that
appropriate
temperature
for
indicating
label
desired
glow,
will
fabrics
your
tight
reached
has
Indicator
A
iron
the
out,
Temperature
goes
The
•
use.
for
ready
is
and
6
Page 5

of
series
wrinkles
stubborn
sustained
a
creates
removing
for
mode
perfect
Steam
is
Turbo
which
the
in
bursts,
Ironing
steam
•
Ironing
Steam
Turbo
level
fiat,
a
on
sitting
are
Base
and
crease.
Iron
sharp
a
the
in
that
sure
pressing
Be
or
•
Tem
the
and
position.
Switch
OFF
the
in
Control
both
Steam
are
the
Knob
that
Control
Check
perature
surface.
for
the
to
Tank”
water
Water
add
to
The
Filling
necessary
on
is
it
section
the
ironing,
See
steam
Tank.
turbo
For
details.
Water
•
will
tight
On/Off
all
Power
The
higher,
or
outlet.
source.
setting
power
a
household
nylon
to
the
only
to
AC
connected
20V
Knob
I
is
iron
Control
the
standard
a
that
into
Temperature
cord
the
indicating
the
Plug
glow,
Rotate
•
•
light
must
the
ironing
When
steam
information.
heating.
as
is
iron
additional
the
for
that
label
fabric’s
indicating
the
glow,
Check
will
Light
temperature.
Indicator
high
a
at
Temperature
done
be
The
•
the
Return
action.
use.
for
steaming
ready
is
the
and
begin
to
temperature
action.
position
steam
Turbo
desired
the
the
your
to
stop
to
Switch
reached
has
setting
Control
iron
OFF
the
the
Steam
to
out,
the
Press
goes
switch
•
when
ironing
for
control
deal
to
is
you
which
allows
mode
produced,
is
Steam
steam
Pulse
the
much
in
how
Ironing
and
•
Ironing
V
Steam
Pulse
level
flat,
a
on
sitting
are
fabrics.
Base
heavy
and
Iron
other
or
the
that
linens
sure
Be
cottons,
•
Tem
the
and
position.
Switch
OFF
the
in
Control
both
Steam
are
the
Knob
that
Control
Check
perature
surface.
for
the
to
Tank”
water
Water
add
to
The
“Filling
necessary
on
is
it
section
the
ironing,
See
steam
Tank,
pulse
details.
For
Water
•
will
must
Light
ironing
On/Off
steam
all
Power
as
The
higher,
or
outlet.
source.
setting
power
a
household
nylon
to
the
only
to
AC
connected
Knob
20V
I
is
iron
Control
the
standard
a
that
into
Temperature
cord
the
indicating
the
Rotate
Plug
glow,
•
•
light
the
When
use.
for
information.
heating.
is
ready
is
iron
additional
the
and
for
that
label
temperature
fabric’s
indicating
the
desired
glow,
Check
will
your
tight
reached
temperature.
has
Indicator
iron
high
a
the
at
out,
Temperature
done
be
goes
The
•
a
in
action.
action.
times
steam
steaming
the
several
in
the
stop
to
begin
Switch
to
setting
Control
OFF
position
the
Steam
to
Pulse
the
the
return
to
release
Switch
and
automatically
press
Control
will
it
steam,
Steam
and
of
the
switch
bursts
hold
the
and
shorts
For
Release
Press
•
•
Switch.
Control
Steam
the
hold
and
press
steaming,
extended
For
row.
8
Page 6

and
plug
the
position,
remove
OFF
to
the
cord
to
the
on
controls
all
yank
turn
not
Do
ironing,
iron.
the
done
unplug
When
•
Ironing
After
outlet.
the
from
pull
and
firmly
plug
the
grasp
outlet;
the
from
not
may
Do
iron
ironing.
cooling.
storing. The
done
while
before
Rest
when
Tank
Storage
completely
Iron
Water
cool
the
the
to
onto
iron
empty
the
placed
be
Always
low
•
•
Tank.
Compartment.
Water
the
Storage
in
Cord
still
the
water
into
with
tucked
iron
be
the
may
store
cords
the
storage,
convenient
For
•
iron,
the
storing.
or
immerse
cleaning
Never
before
cloth.
cool
damp
clean,
a
completely
with
and
Rest
unplugged
Storage
is
Iron
The
Cleaning
Iron
iron
the
the
and
sure
Iron
make
the
Wipe
AJways
•
•
or
harsh
any
use
not
Do
cloth.
damp
clean,
a
soleplate.
with
the
unit completely.
wiped
the
damage
be
Dfy
may
may
this
iron
water,
as
in
your
of
plug
or
cleansers,
cord
soleplate
abrasive
base
The
•
iron
hot
soleplate,
the
quality
a
on
using
collect
by
may
be removed
detergents
easily
and
can
This
starch
of
stores.
iron.
most
your
buildup
at
of
a small
available
use,
the performance
cleaner,
normal
Under
reducing
soleplate
•
iron
metal
a
not
as
do
such
soleplate,
surfaces,
the
rough
on
scratching
iron
the
prevent
To
place
not
easier.
Do
soleplate.
ironing
the
zippers.
as
makes
iron
such
can scratch
your
of
surfaces,
which
rough
rest,
soleplate
iron
over
The
•
II
by
useful
drapenes,
steamer
especially
is
curtains,
clothes
This
clothes,
hanging
a
position.
as
hanging
of
used
vertical
a
be
out
in
also
iron
creases
may
the
iron
getting
holding
for
The
•
Steaming
Vertical
etc.
the
worn.
steamed.
holding
being
Steam,
Pulse
garments
from
sustained
a
away
use
inches
6
effect,
to
4
about
maximum
iron
For
•
being
are
they
while
clothes
iron
Never
Warning:
•
directions.
follow
and
labels
Tips
garment
read
Ironing
Always
•
setting.
temperature
proper
the
select
to
care
take
fabrics,
of
burning
or
scorching
prevent
To
•
inside
or
ironed.
seam
being
a
as
fabric
such
the
for
area,
high
unseen
too
is
small,
iron
the
of
temperature
the
when
occurs
Scorching
•
find
to
heat
the
increase
gradually
remain,
a
test
garment.
wrinkles
If
entire
heat.
required,
the
lower
iron
a
to
with
temperature
the
start
of
proceeding
sure
doubt,
in
not
before
you
When
If
hem,
•
•
the
for
setting
heat
at the
blends
iron
iJways
fibers.
more
or
two
of
made
are
setting.
fabrics
best
Blended
the
•
best
for
steam
as
well
as
heat
Ironing.
require
before
may
fabrics
fabrics
certain
heavy
other
or
temperature.
premoisten
to
linen
lowest
want
the
may
cotton,
in
You
requiring
results.
Wrinkles
fiber
•
garment
the
read
this,
side.
area.
wrong
hidden
attempting
the
other
on
Before
or
iron
seam
ironed.
silks,
a
or
on
steam
first
be
to
synthetics
fabric
able
the
many
be
test
on
may
and
shine
fabrics
silk
carefully,
prevent
To
label
Some
•
•
/0
 Loading...