

Page 1
Page 2
INDEX
INDEX
REFERENCE
GUIDE
FEATURES
NEEDLE.ThREADFABRICSTITCHING
SETTING
WINDING
TO
TO
UPPER
SETTING
STITCH
SEWING
PREPARING
REMOVING
ADJUSTING
STRAIGHT
ADJUSTING
THE
THE
REMOVE
THREAD
THREADING
THE
LENGTH
IN
NEEDLE
BOBBIN
OR
REPLACE
THE
BOBBIN
STITCH
CHART
REVERSE
TO
SEW
THE
WORK
THE
TENSIONS
STITCHING
PRESSURE
BOBBIN
CASE
LENGTH
(APPROXIMATE)
AND
FEEDING
FABRIC
SEWING
DARNING
ZIGZAG
NEEDLE
CREATIVE
EMBROIDERY
SAMPLE
TWIN
NEEDLES-UpPER
OR
THIN
AND
LIGHT
MENDING
STITCHING
POSITION
CONTROL
EMBROIDERY
PATTERNS
EMBROIDERY
WEIGHT
PATTERNS
THREADING
SEWING
BUILT
BLIND
IN
DECORATIVE
HEMMING
STITCH
AND
PARTS.
GUIDE
CASE
OF
FABRICS
AND
DESIGNS
Page
2—
15
16
16
17
18
19
20
10
10
10
11
12
13
14
14
14
is’
1
3
4
5
6
7
8
9
BUTTONHOLES
SEWING
SEAM
NARROWHEMMER
LACE
LACE
FRENCH
HEMMINGACROSSASEAM
THE
FOOT
SEWINGINA
CARE
MACHINE
HOWTO
HOW
HOW
ACCESSORIES
TROUBLECHART
SOME
FORYQURMACHINE
ATTACHMENT
EDGESTITCHER
BINDER
FOLDED
TWO-TONE
HAND-CUT
THE
SETOF
HEMMER
ON
BUTTONS
GAUGE
OR
TRIMMED
EDGE
WITH
SEAM
ADJUSTABLE
ZIPPER
AND
MAINTENANCE
OILYQUR
TO
REPLACE
TO
CHANGE
OF
THE
ATTACHMENTS
FOOT
BINDING
BINDING
BIAS
HEMMERS
SET
CLOTH
HEM
INVISIBLE
CORDING
MACHINE
THE
THE
BELT
BINDING
GUIDE
OF
LIGHT
STITCHING
AND
ZIPPER
YOUR
BULB
AVAI
LABLE
Page
21—22
23
24
25
26
26
26
26
27
27
28
29
29
30
31
32—34
36
37
37—38
39
39
39
39
40
4041
Page 3
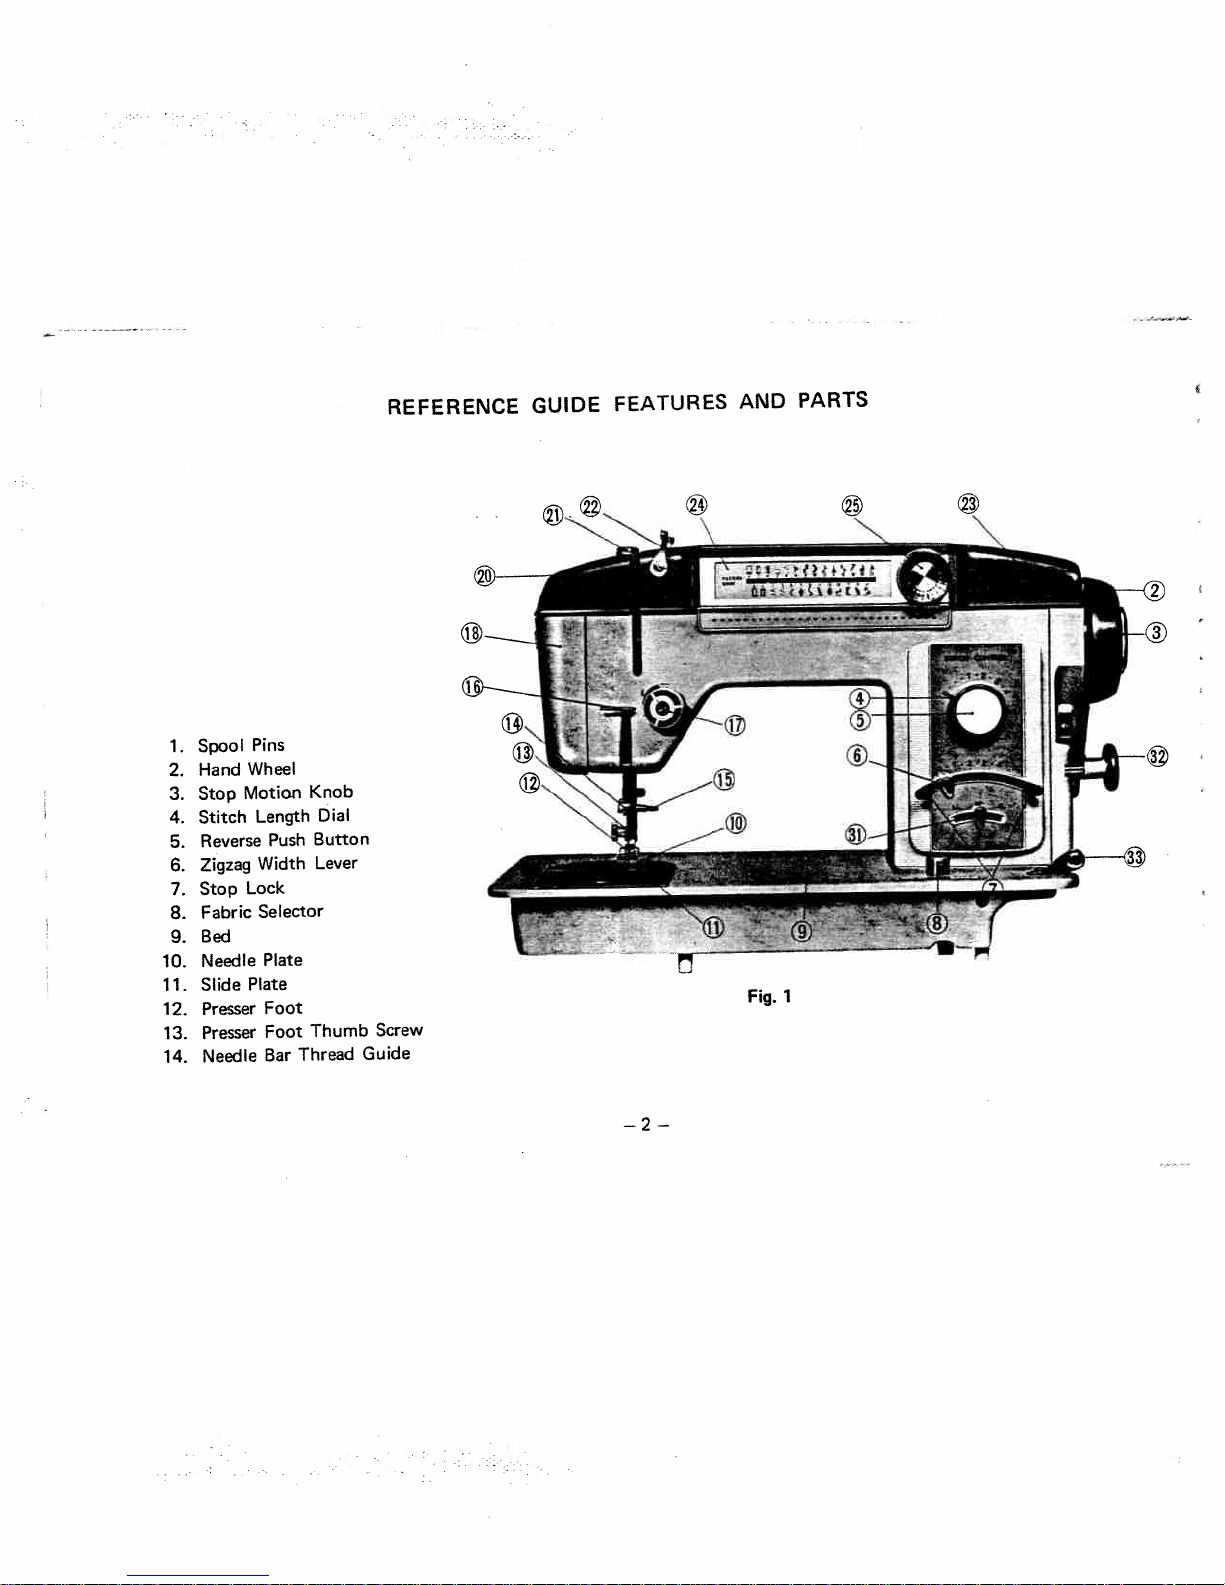
2.
3.
4.
5.
6.
7.
8.
9.
10.
11.
12.
13.
14.
Spool
Hand
Stop
Stitch
Reverse
Zigzag
Stop
Fabric
Bed
Needle
Slide
Presser
Presser
Needle
Pins
Wheel
Motion
Length
Push
Width
Lock
Selector
Plate
Plate
Foot
Foot
Bar
Knob
Dial
Button
Lever
Thumb
Thread
REFERENCE
Screw
Guide
GUIDE
FEATURES
AND
Fig.
PARTS
1
—2--
Page 4
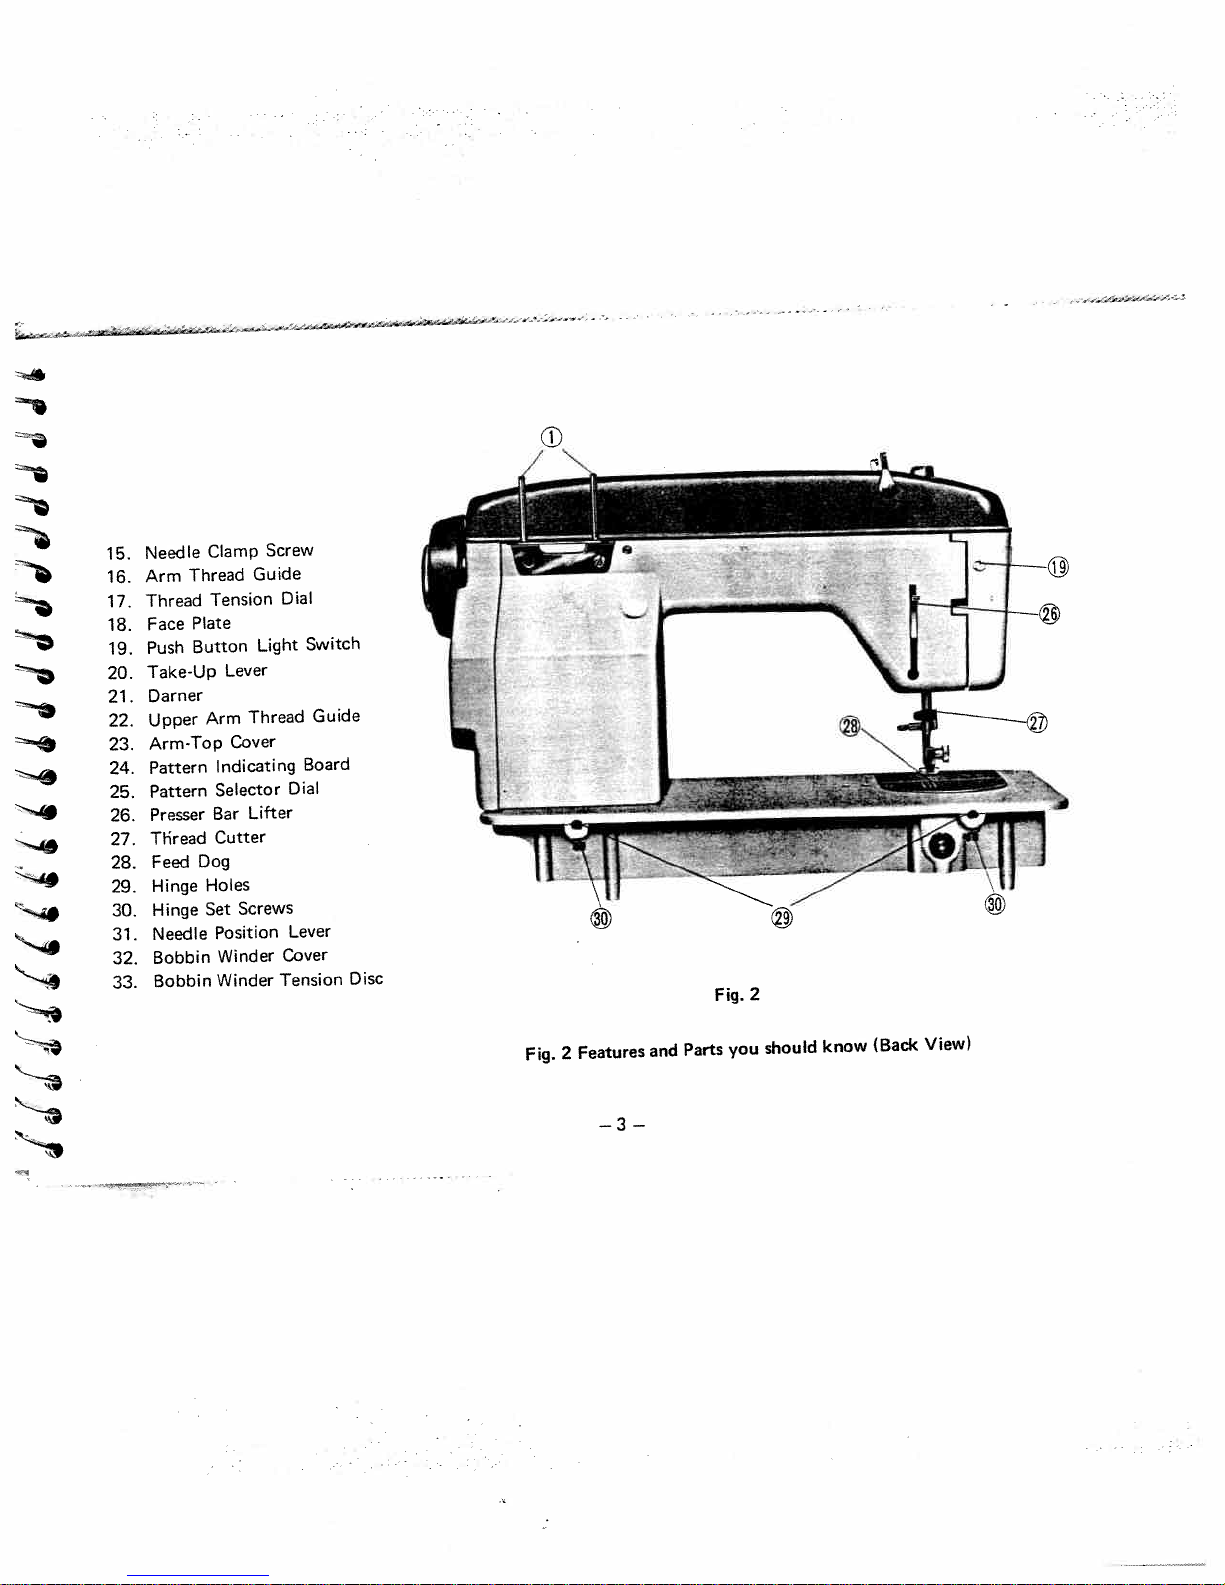
15.
16.
17.
18.
19.
20.
21.
22.
23.
24.
25.
26.
27.
28.
29.
30.
31.
32.
33.
Needle
Thread
Arm
Thread
Plate
Face
Button
Push
Take-Up
Darner
Upper
Arm-Top
Pattern
Pattern
Presser
Tliread
Feed
Hinge
Hinge
Needle
Bobbin
Bobbin
Clamp
Tension
Lever
Arm
Cover
Indicating
Selector
Bar
Cutter
Dog
Holes
Screws
Set
Position
Winder
Winder
Screw
Guide
Dial
Light
Thread
Lifter
Cover
Tension
Switch
Guide
Board
Dial
Lever
Disc
N
z
—--=—
—
2
Fig.
View>
(Back
know
should
you
Parts
Fig.
Features
2
and
—3—
Page 5

Fabric
Extremely
tarpaulin,
canvas,
Heavy
fabric,
denim,
Medium
duck,
upholstery
ticking,
leatherette
velveteen,
fabric,
Suiting,
Medium
percale,
chintz,
shantung,
wool,
volie,
Sheer
dimity,
handkerchief
Plastic
sheer
Very
batiste,
ninon,
heavy
sacking,
etc.
heavy
terry,
felt,
brodcloth,
gingham,
taffeta,
lawn,
crepe,
etc.
film,
chiffon,
organdy,
lace,
marquisette,
net,
drapery
etc.
linen,
sheer
etc.
linen,
NEEDLE-THREAD-FABRIC-STITCHING
etc.
Needle
No
4
3
2
1
0
00
Machine
Stitches
Inch
Per
6
to
8
8
to
10
10
to
12
12
to
14
14
to
16
(Plastic
to
8
16
to
20
—4—
film)
10
Cotton
Thread
10
to
30
30
to
40
40
60
60
100
100
150
to
to
80
80
to
to
GUIDE
Mercerized
Thread
Duty
Heavy
Duty
Heavy
Duty
Heavy
50
50
50
Silk
or
Nylon
A
A
A
Page 6
NEEDLE
toward
needle
the
into
needle
needle
the
securely.
the
wheel
the
by
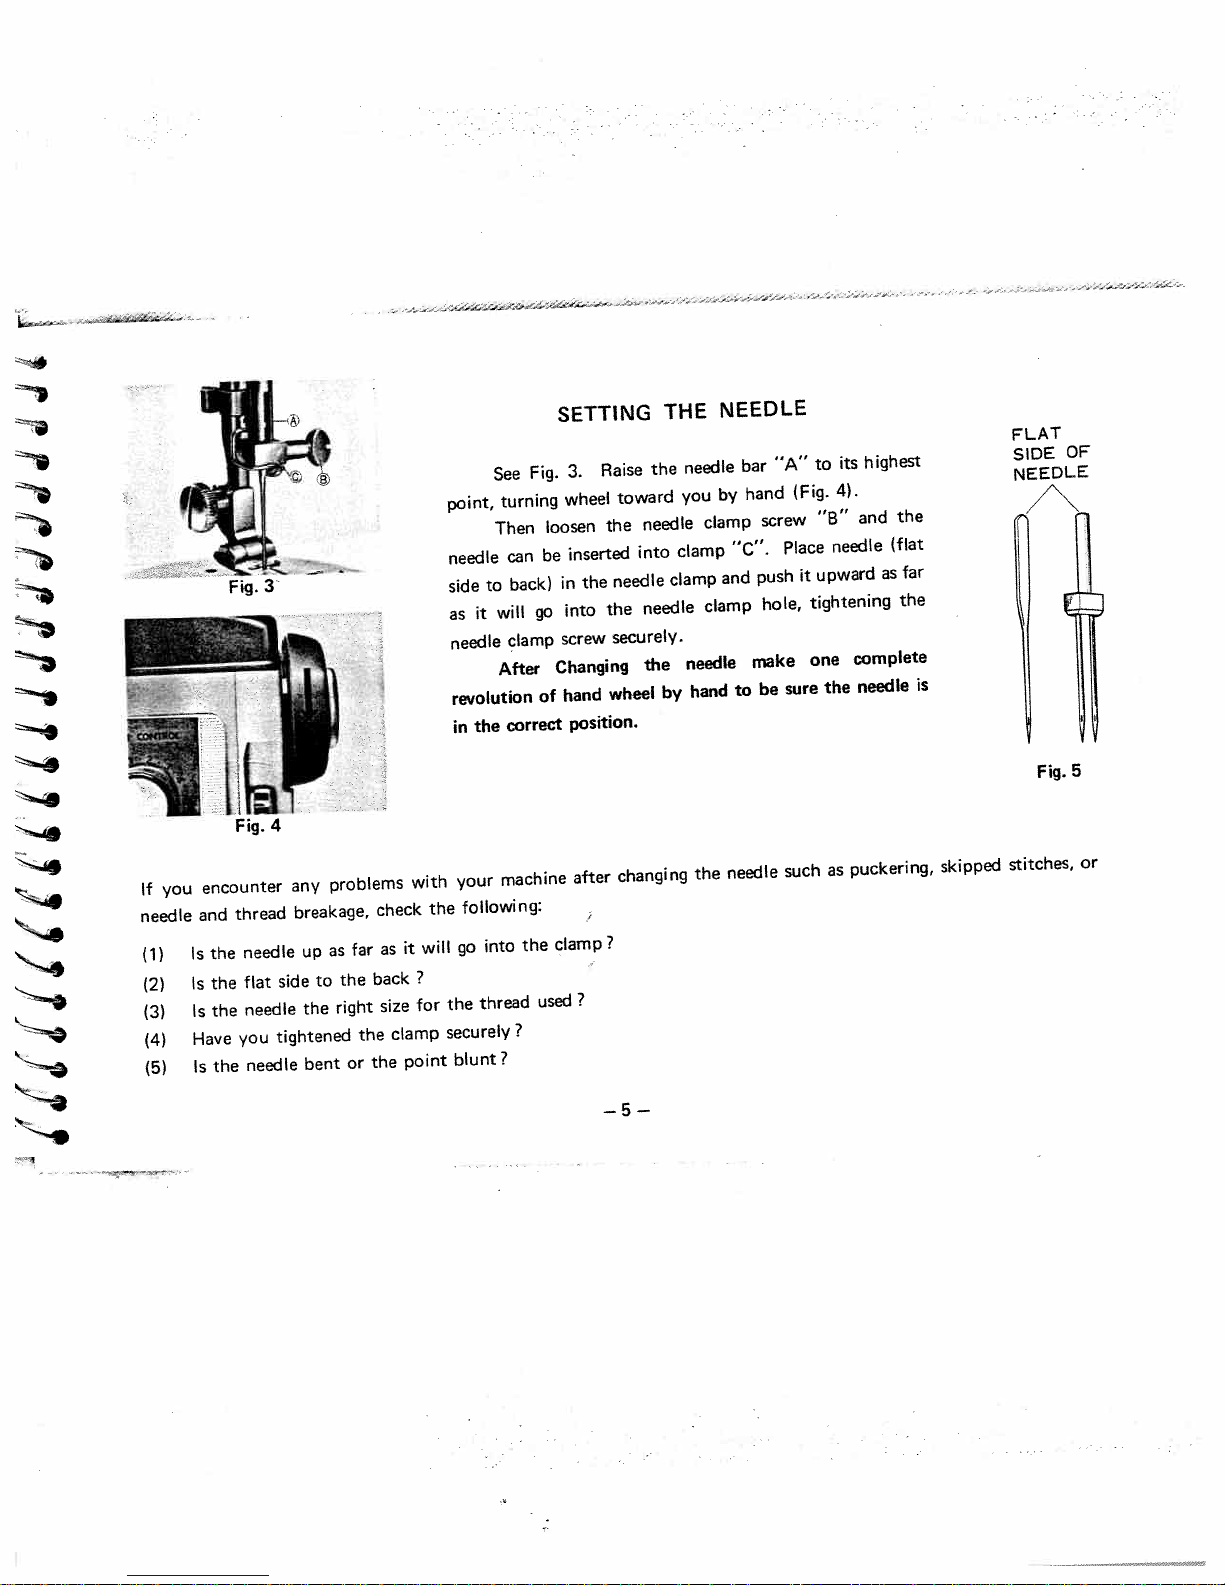
THE
need’e
you
clamp
clamp
needle
clamp
clamp
hand
by
and
bar
hand
“C”.
to
“A”
screw
push
hole,
make
be
(Fig.
Place
it
tightening
one
sure
its
to
4).
“8”
needle
upward
the
highest
the
and
(flat
far
as
the
complete
needle
FLAT
OF
SIDE
NEEDLE
is
Hf
Fig.5
SETTING
Raise
3.
Fig.
See
can
back)
go
clamp
of
correct
wheel
loosen
inserted
be
the
in
into
screw
Changing
hand
position.
turning
point,
Then
needle
to
side
will
it
I
as
needle
After
revolution
the
in
If
you
needle
(1)
(2)
(3)
(4)
(5)
encounter
thread
and
the
Is
Is
the
the
Is
you
Have
the
Is
needle
flat
needle
needle
any
breakage,
up
to
side
the
tightened
bent
problems
check
as
far
as
back
the
size
right
the
the
or
with
it
?
for
clamp
point
the
will
the
securely?
machine
your
following:
into
go
thread
blunt?
the
clamp?
used?
after
changing
—5—
the
needle
such
puckering,
as
skipped
stitches,
or
Page 7
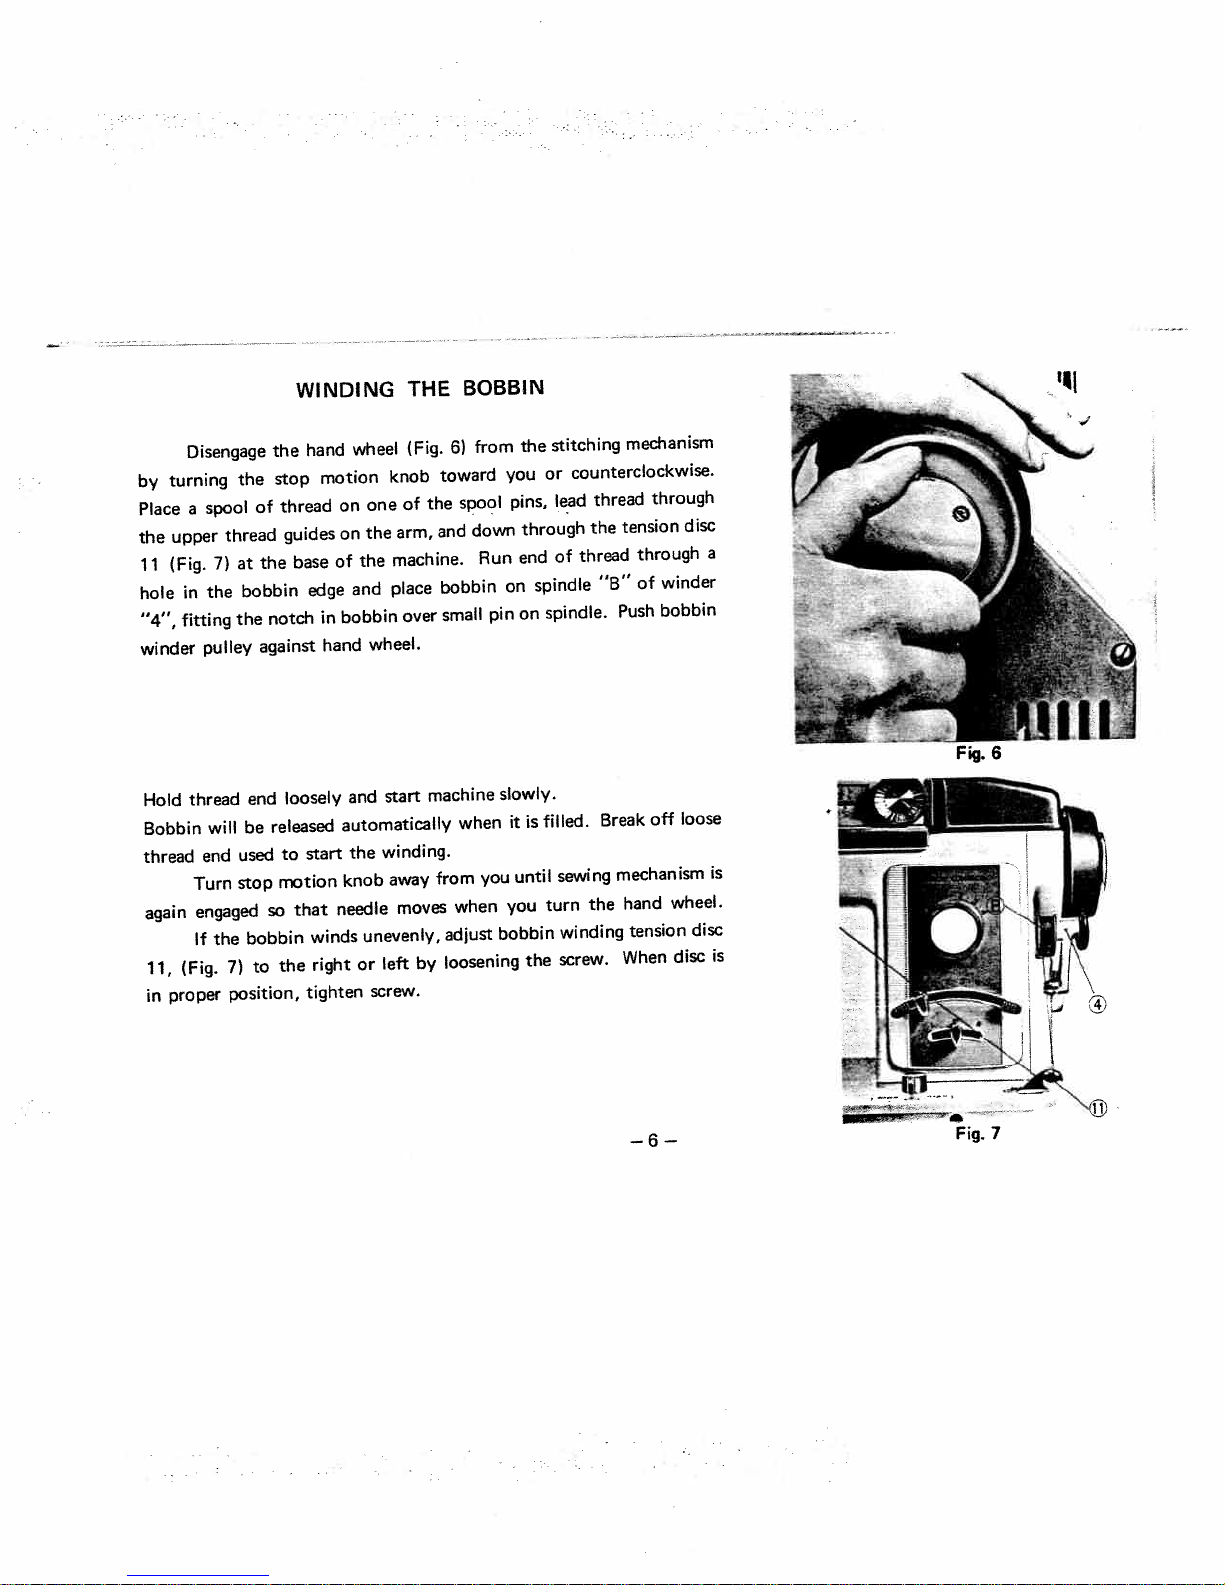
WINDING
THE
BOBBIN
turning
by
Place
the
(Fig.
11
hole
“4”,
winder
Hold
Bobbin
thread
again
11.
proper
in
Disengage
spool
a
upper
7)
the
in
fitting
pulley
thread
will
end
Turn
engaged
the
If
(Fig.
the
of
thread
the
at
bobbin
the
against
end
be
used
stop
bobbin
to
7)
position,
hand
the
stop
thread
guides
base
notch
loosely
released
start
to
motion
that
so
the
tighten
wheel
motion
on
on
the
of
and
edge
bobbin
in
hand
and
automatically
the
knob
needle
winds
or
right
(Fig.
knob
of
one
arm,
the
machine.
place
over
wheel.
start
winding.
away
moves
unevenly,
by
left
screw.
6)
toward
spool
the
down
and
bobbin
small
machine
when
from
when
adjust
loosening
from
Run
pin
you
the
you
pins,
through
end
spindle
on
on
slowly.
it
is
until
you
bobbin
the
stitching
or
lead
of
spindle.
filled.
sewing
turn
winding
screw.
mechanism
counterclockwise.
thread
tension
the
thread
“B”
Push
Break
mechanism
hand
the
tension
When
through
through
winder
of
bobbin
off
wheel.
disc
disc
a
loose
is
disc
is
—6—
Page 8

removed
be
bobbin
TO
Raise
Open
case
REMOVE
hinge
to
the
plate
latch
needle
unless
slide
OR
highest
its
needle
II
(Fig.
‘A”
REPLACE
position.
above
by
the
sliding
between
9)
is
1)
(Fig.
BOBBIN
The
needle
it
toward
thumb
bobbin
plate.
CASE
case
you.
and
cannot
the
Grasp
forefinger.
To
To
extending
Insert
D
Stud
shuttle
into
Then
releasing
after
Slide
remove,
replace
from
and
cover
the
the
that
far
as
release
latch
pull
with
top
bobbin
Finger
as
bobbin
to
plate
toward
full
bobbin,
the
of
case
fits
B
possible
sure
be
II
(Fig.
you.
in
case
case
into
until
it
1)
the
latch
is
leave
to
Notch
locked
into
the
shuttle
latch
A
position.
least
at
right.
C
catches
and
securely
being
(Fig.
press
three
sure
9).
on
inches
to
Press
notch
bobbin
place.
in
of
center
bobbin
Stud
in
case
—7—
thread
it
case
again
on
D.
FINGER
®
Fig.
I’—
LATCH
Fiq.9
8
©NOTCH
Page 9
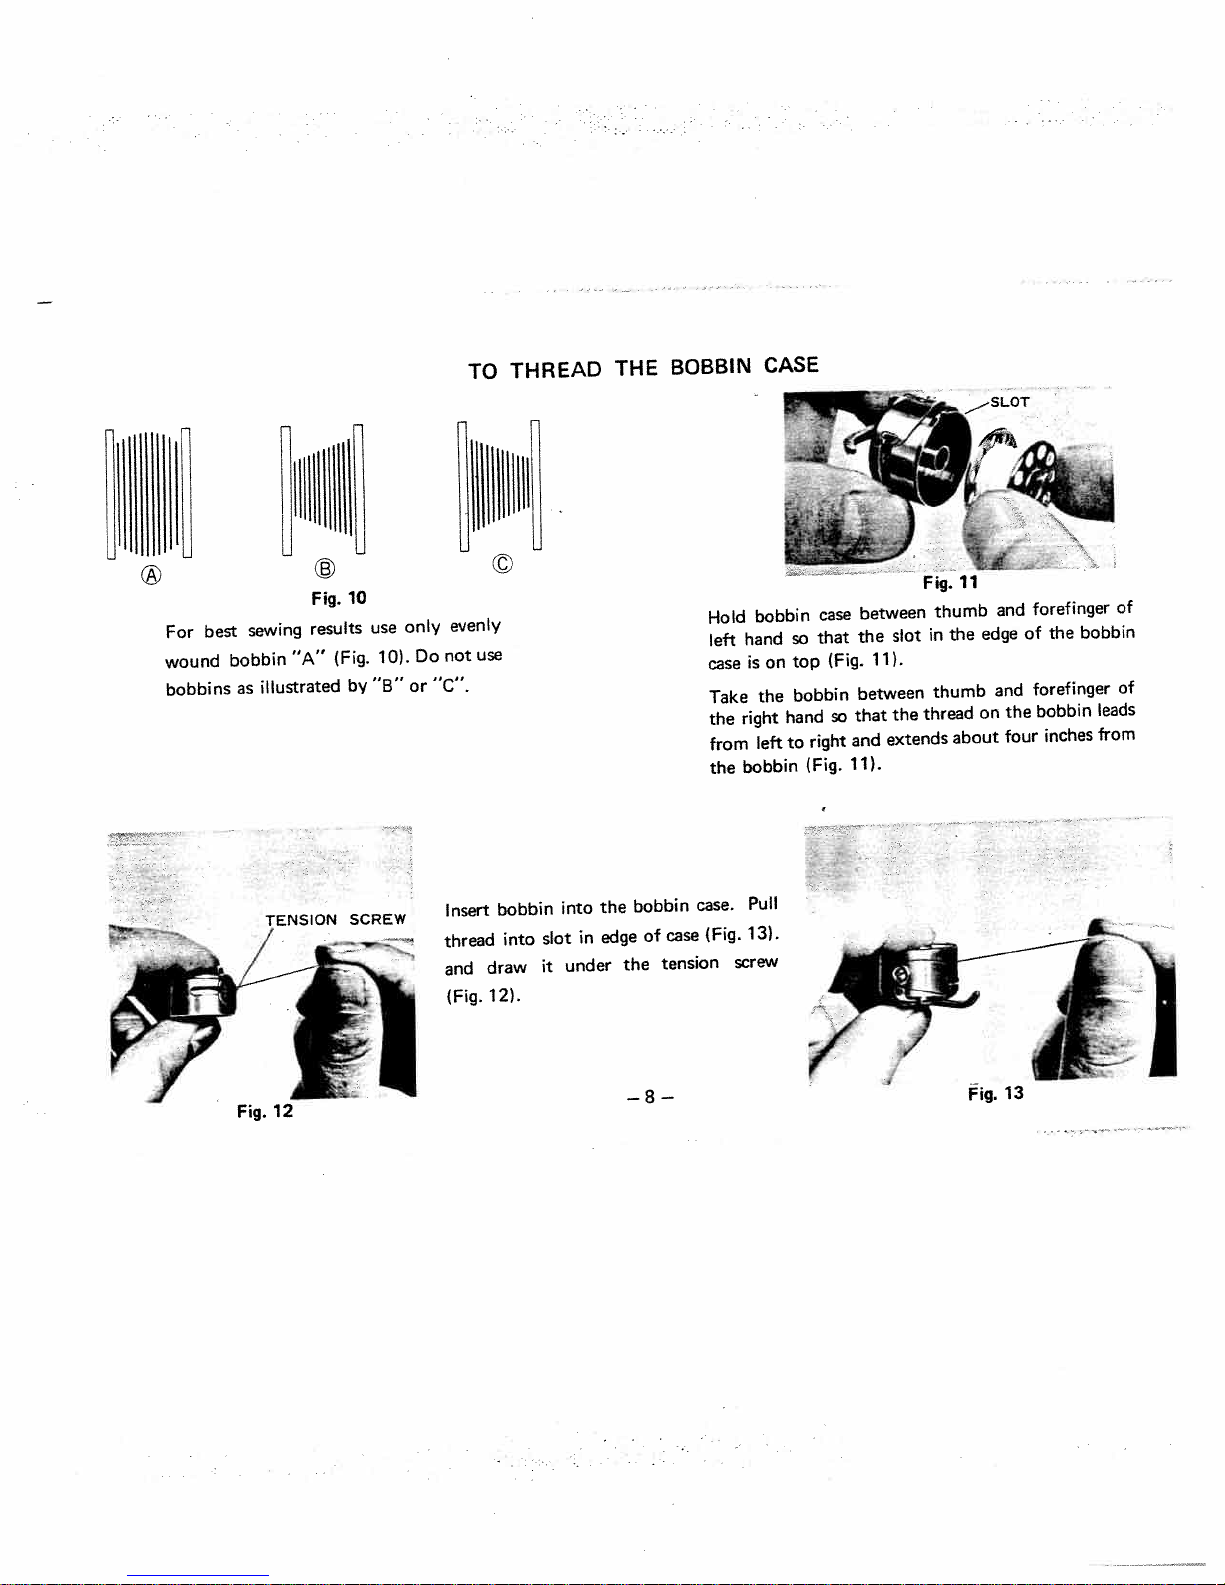
TO
THREAD
THE
BOBBIN
CASE
For
wound
bobbins
best
llllB
10
Fig.
sewing
bobbin
as
results
“A”
illustrated
TENSION
(Fig.
by
SCREW
use
10).
“B”
llllllll
evenly
only
use
not
Do
“C”.
or
the
into
slot
it
into
in
under
edge
Insert
thread
and
(Fig.
bobbin
draw
12).
bobbin
of
the
—8—
case.
case
tension
Hold
left
case
Take
the
from
the
(Fig.
bobbin
hand
is
the
right
left
bobbin
Pull
13).
screw
on
so
top
bobbin
hand
right
to
(Fig.
case
that
(Fig.
so
11).
between
the
11).
between
that
extends
and
slot
the
thumb
the
in
thumb
thread
about
edge
on
Fig.
and
and
the
four
13
forefinger
the
of
forefinger
bobbin
inches
of
bobbin
of
leads
from
Page 10
(1)
(2)
(3)
(4)
(5)
(6)
(7)
Hold
until
you
(Fig.
straight.
toward
four
Turn
(Fig.
Place
Lead
Down
and
Lead
Down
Into
front-to
end
the
15)
will
the
inches
hand
14)
spool
thread
and
over
thread
and
needle
the
Place
bacK
to.
wheel
and
of
between
hook
between
back.
the
of
needle
formed
be
both
of
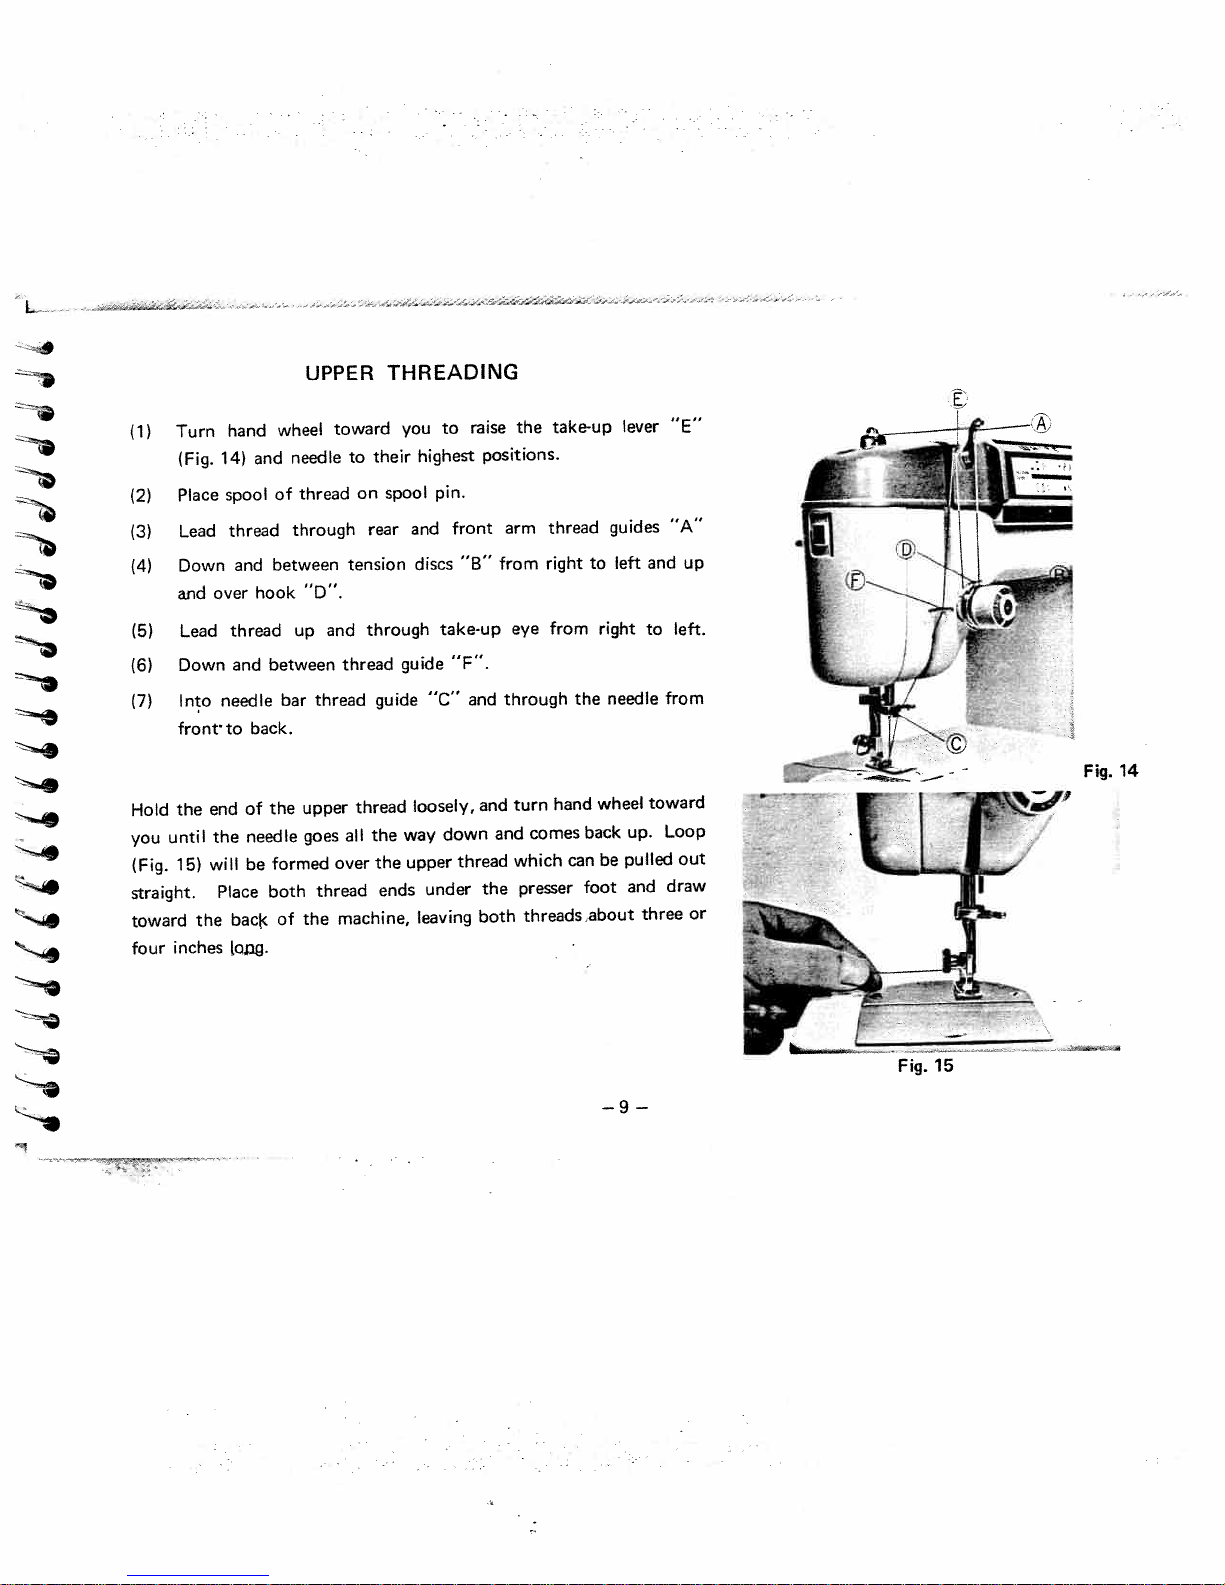
UPPER
needle
thread
through
“D”.
up
bar
upper
goes
the
toward
and
thread
thread
over
thread
machine,
THREADING
you
to
their
on
spool
rear
and
tension
through
guide
guide
thread
way
all
the
the
upper
ends
to
highest
pin.
front
discs
take-up
“F”.
“C”
loosely,
down
under
leaving
raise
positions.
“B”
and
and
thread
the
both
the
arm
from
eye
through
turn
and
which
presser
threads
take-up
thread
right
from
hand
comes
the
can
to
right
wheel
back
be
foot
about
lever
guides
left
needle
up.
pulled
and
and
to
from
toward
Loop
draw
three
“E”
“A”
up
left.
out
14
Fig.
or
—9—
Page 11

length
The
shortest
between
right
indicates
chart
See
to
of
stitch
markings
the
lengthen
number
this
below
SETTING
stitch
the
is
4
and
to
and
selected.
stitches
for
is
the
for
the
THE
regulated
longest,
variety
a
left
inch.
per
STITCH
dial
by
the
but
lengths.
of
shorten
to
LENGTH
Fig.
‘IA”
may
dial
Turn
stitch.
the
be
16.
set
the
Near
at
dial
The
is
0
any
to
pointer
the
spot
the
Figures
Number
When
(Fig.
you
16>
on
of
indicator
stitches
wish
as
in
far
to
as
STITCH
inch
per
backward
sew
will
it
go.
LENGTH
No
tie
to
machine
The
CHART
0
Feeding
SEWING
threads
the
will
(APPROXIMATE)
1
30
REVERSE
IN
beginning
the
at
backward
sew
—10—
seam,
a
button
12
3
press
is
held
2
24
of
end
or
the
as
long
as
the
in.
4
6
reverse
button
“B”
Page 12
-—-
SEW
to
presser
machine
the
sew.
foot.
it
THE
TO
foot
is
Do
and
not
is
try
not
lower
necessary
regulated
WORK
to
help
the
to
by
feeding
the
presser
touch
increasing
fot.
tte
by
You
hand
decreasing
or
pulling
are
wheel
th
now
the
to
material
ready
start
amount
to
the
this
as
begin
machine.
pressure
of
take-up
Have
may
NEVER
Place
sewing.
You
deflect
run
material
By
merely
exerted
lever
needle
the
machine
and
having
press
the
on
highest
at
without
threads
the
the
control.
and
in
needle
control.
point
cause
material
position
at
PREPARING
starting
before
ittobreak.
under
under
its
highest
The
speed
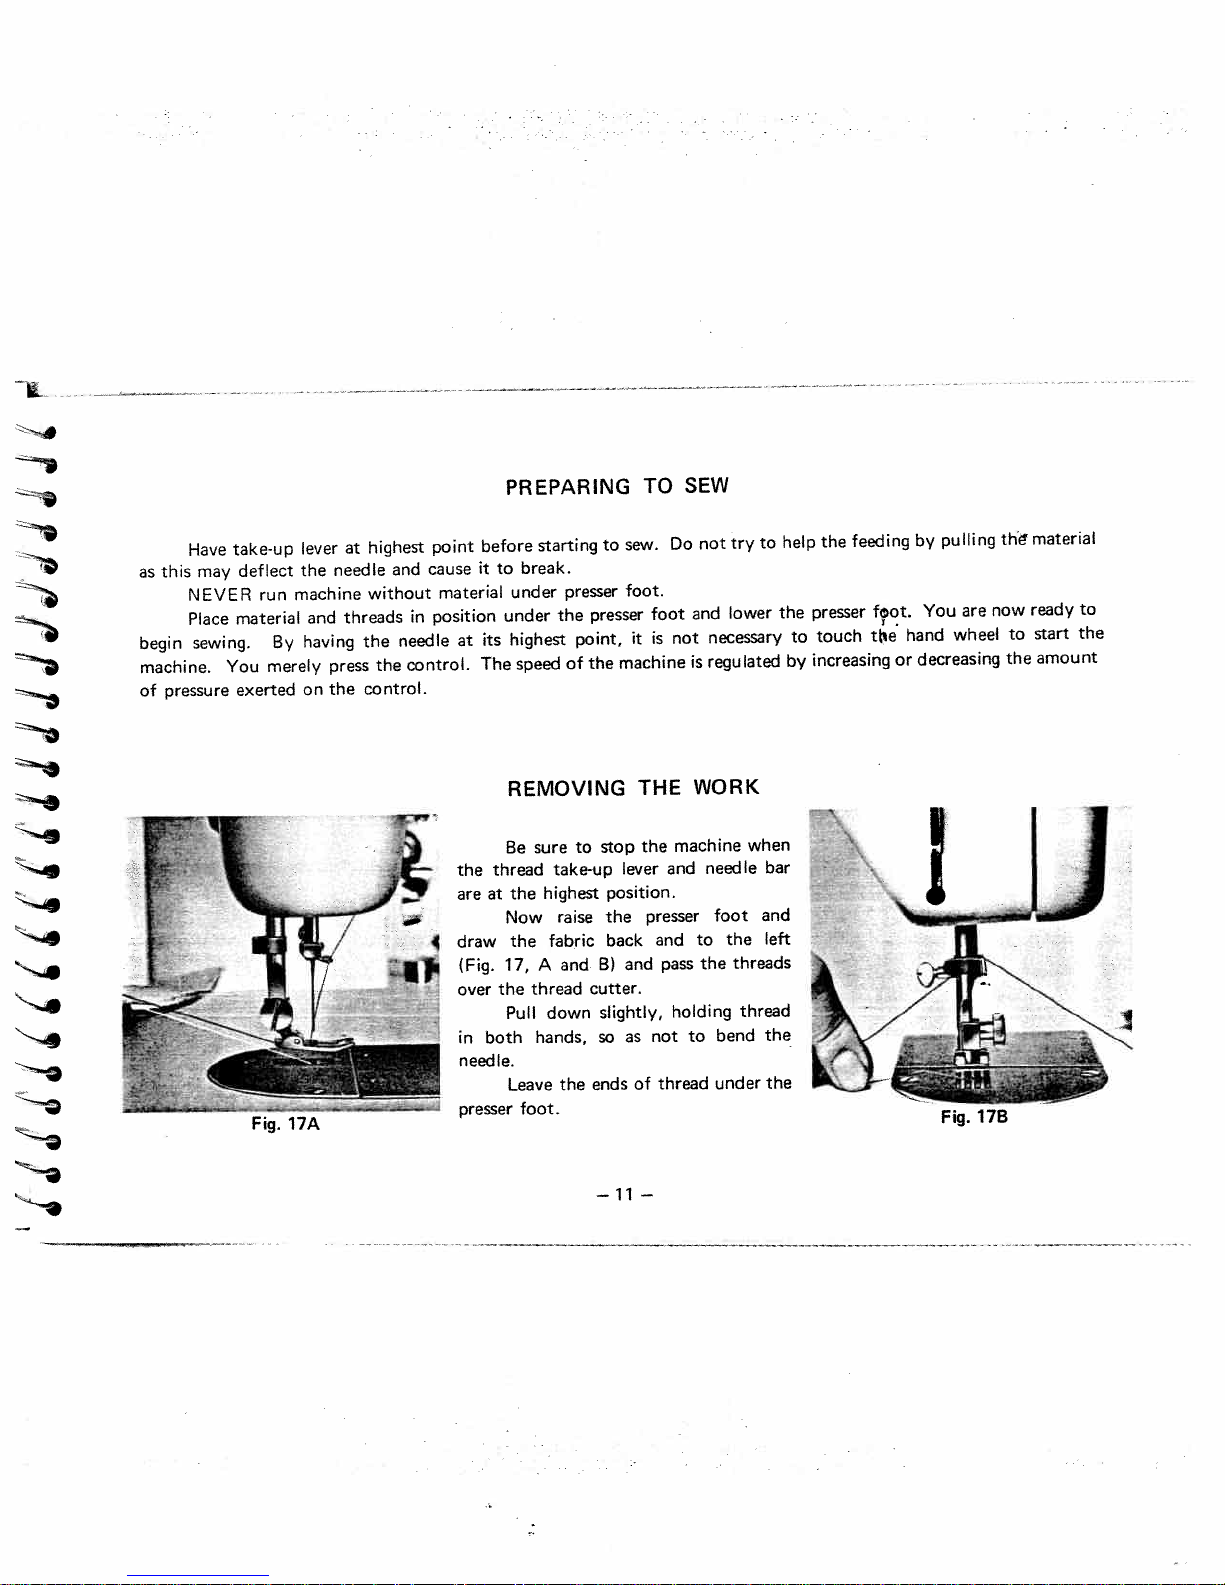
REMOVING
presser
the
point,
of
Be
the
thread
areatthe
Now
the
draw
17,
(Fig.
the
over
Pull
in
both
needle.
Leave
presser
sure
thread
hands,
foot.
take-up
highest
raise
fabric
and
A
down
the
to
cutter.
stop
lever
position.
the
back
and
B)
slightly,
as
so
ends
—11
the
presser
and
not
thread
of
—
machine
and
pass
holding
to
needle
foot
to
the
bend
under
when
the
threads
thread
bar
and
left
the
the
Page 13
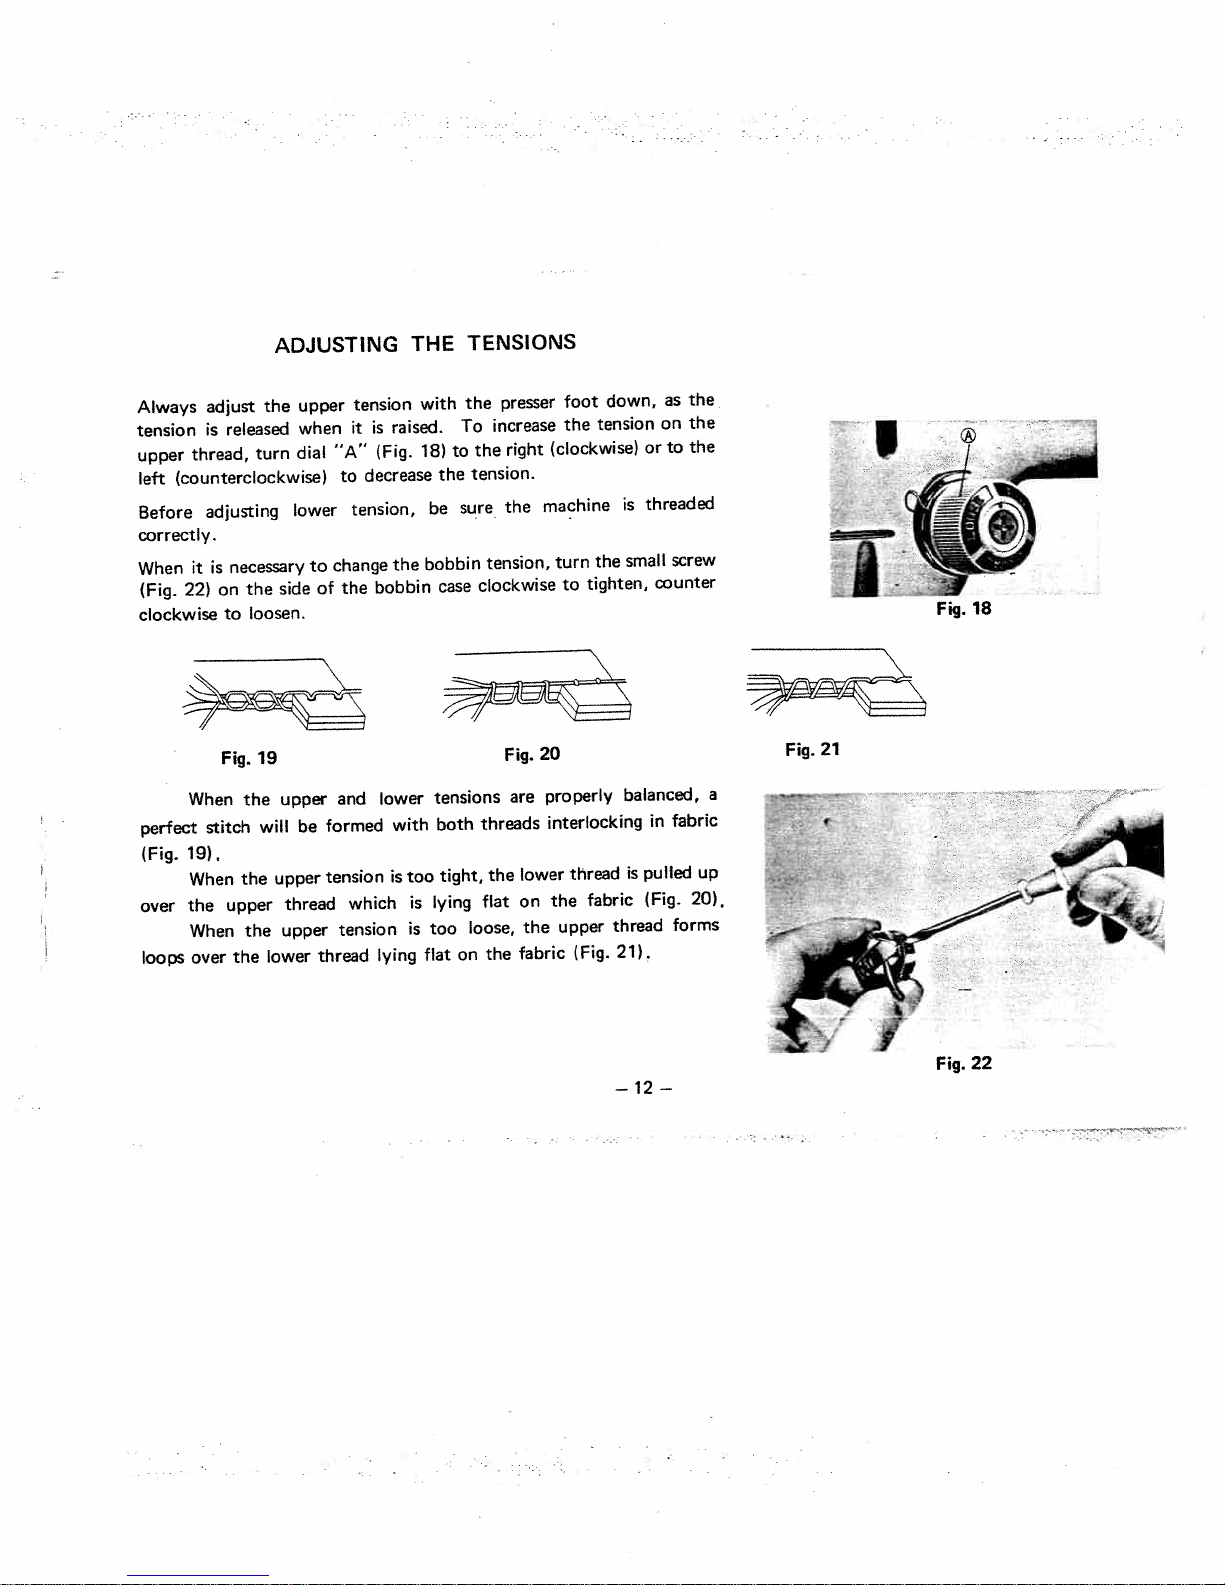
Always
tension
upper
left
Before
correctly.
When
(Fig.
clockwise
adjust
is
thread,
(counterclockwise)
adjusting
is
it
on
22>
Fig.
ADJUSTING
the
released
turn
necessary
the
loosen.
to
19
side
upper
when
dial
lower
to
of
tension
it
‘IA”
decrease
to
tension,
change
the
raised.
is
(Fig.
the
bobbin
THE
with
18)
the
be
bobbin
case
TENSIONS
presser
the
increase
To
right
the
to
tension.
the
sure
tension,
clockwise
Fig.
foot
the
(clockwise)
machine
the
turn
tighten,
to
20
down,
tension
is
small
as
the
the
on
the
to
or
threaded
screw
counter
Fig.
21
perfect
(Fig.
over
loops
When
stitch
19).
When
the
When
over
the
the
upper
the
the
will
upper
lower
upper
be
thread
upper
and
formed
tension
which
tension
thread
lower
with
is
lying
too
is
is
flat
tensions
both
tight,
lying
loose,
too
on
are
threads
the
flat
fabric
the
properly
interlocking
lower
the
on
upper
the
thread
fabric
(Fig.
balanced,
in
pulled
is
(Fig.
thread
21).
—12—
fabric
up
20).
forms
a
22
Fig.
Page 14
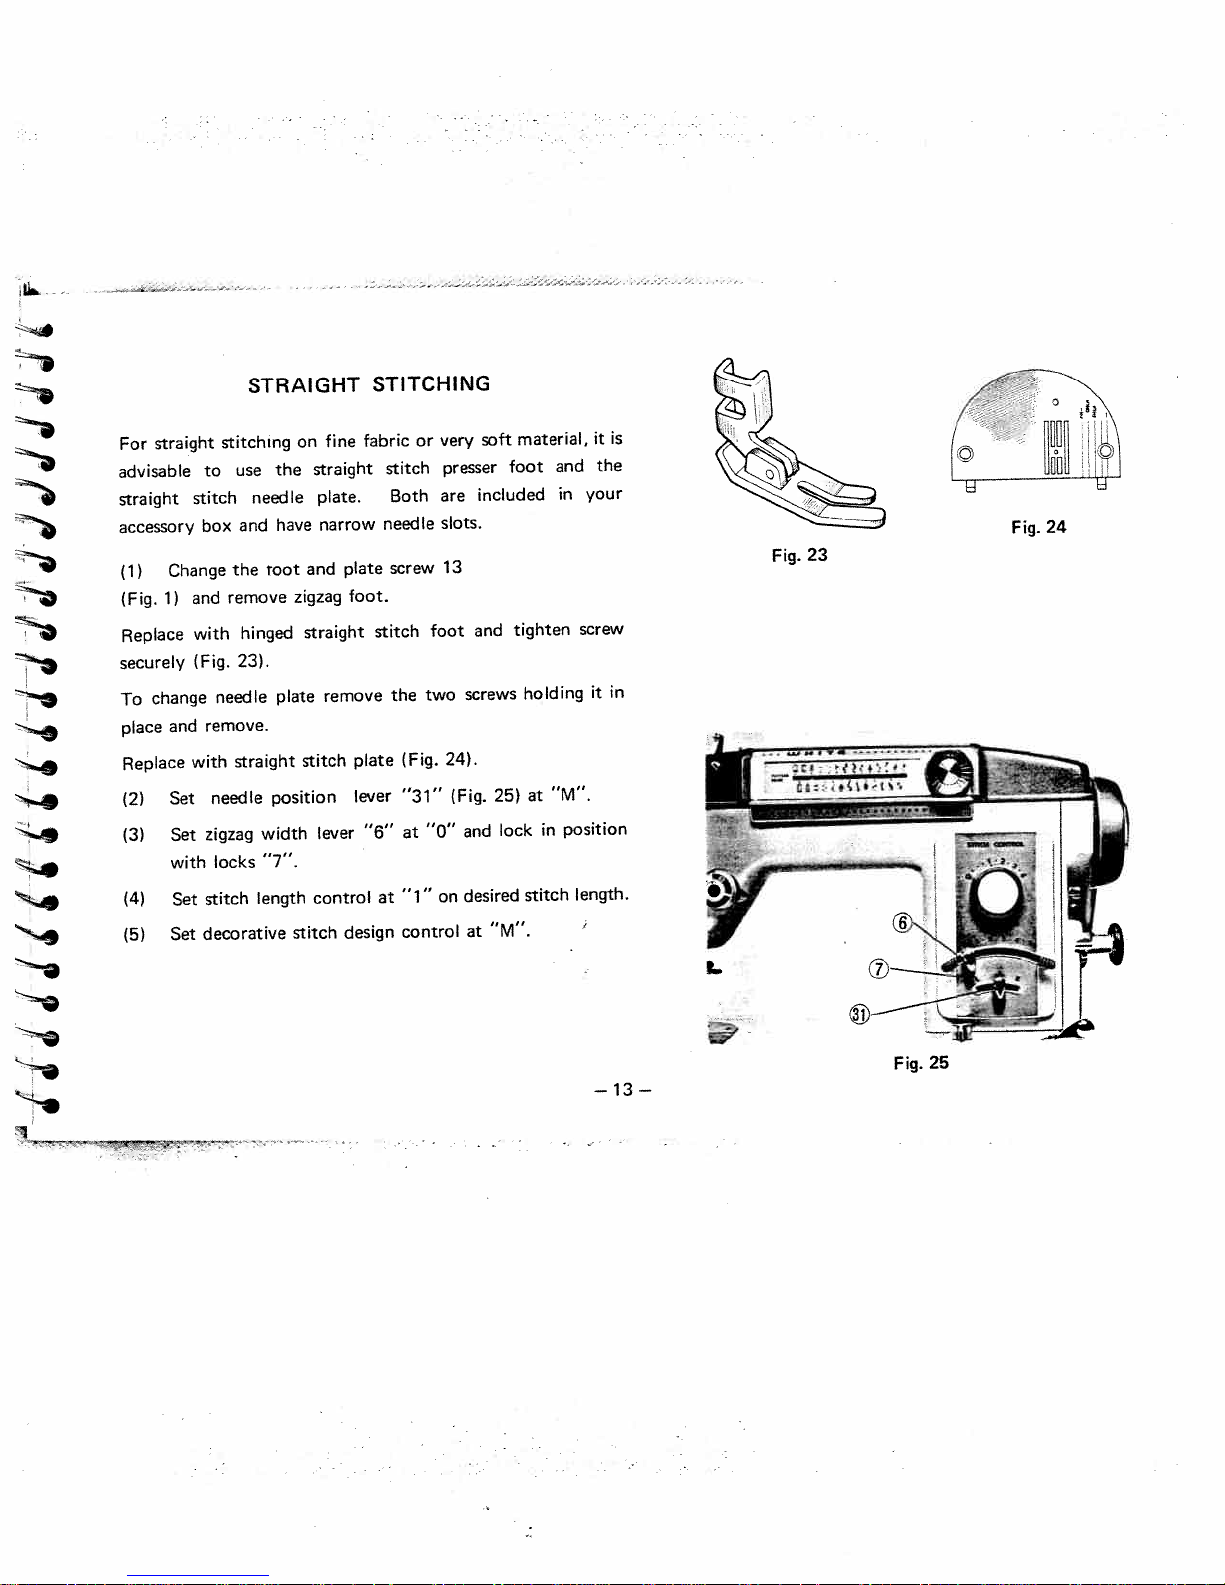
straight
For
advisable
straight
accessory
Change
(1)
(Fig.
1)
Replace
securely
change
To
and
place
Replace
Set
(2)
Set
(3)
with
(4)
Set
Set
(5)
stitching
use
to
stitch
and
box
the
remove
and
hinged
with
(Fig.
23).
needle
remove.
straight
with
needle
zigzag
locks
stitch
decorative
STRAIGHT
fine
on
straight
the
have
toot
plate
position
width
“7”.
length
plate.
narrow
and
zigzag
straight
remove
stitch
lever
control
stitch
needle
STITCHING
or
fabric
stitch
Both
needle
screw
plate
foot.
stitch
the
(Fig.
plate
lever
“31”
at
“6”
“1”
at
control
design
very
are
foot
two
“0”
on
presser
slots.
13
and
screws
24).
(Fig.
and
desired
at
material,
soft
foot
included
tighten
holding
25)
lock
“M”.
at
in
stitch
and
in
screw
“M”.
position
length.
it
the
your
it
is
LF1g.24
23
Fig.
in
a
—13—
Fig.
25
Page 15

(Fig.
way
GENERAL
at
is
27)
(Fig.
down
its
lowest
27)
ADJUSTING
SEWING.
position
Usually
and
PRESSURE
straight
for
feed
the
at
sewing
highest
its
AND
and
level-with
FEEDING
various
embroidery
drop
the
OF
feed
FABRIC
work,
button
the
pressure
marked
bar
UP
cap
ordarning
pressed
all
the
release
all
the
SEWING
When
or
silk
halfway
Release
(Fig.
Turn
In
order
mending
(Fig.
Turn
below
well
lighter
flimsy
down.
all
28)
drop
to
28)
drop
THIN
pressure
material,
way
the
then
and
feed
DARNING
the
move
monograming,
or
completely
knob
feed
needle
the
press
knob
OR
required
is
the
by
fabric
by
to
plate.
LIGHT
pressure
pressing
“B”
cap
(Fig.
“C”
AND
freely
release
pressing
down
WEIGHT
sew
to
bar
the
down
26)
MENDING
any
in
the
down
position
satisfactorily
should
cap
lock
snap
half-way
the
to
the
to
direction
presser
snap
the
on
drops
which
FABRICS
on
about
be
ring
position.
low
darning,
for
cap
bar
lock
the
thin
“A”
spot.
“B”
“A”.
feed
Fig.
26
Page 16

Be
(1)
(2>
(3)
sure
Set
By
right,
maintain
(Fig.
Left
controls
and
zigzag
needle
moving
29>
lock
moved
needle
it
will
determines
the
position
the
produce
selected
maximum.
to
the
ZIGZAG
and
plate
lever
width
zigzag
zigzag
widths
the
desired
STITCHING
“M”
lever
stitches
zigzag
of
can
position.
foot
position
“6”
presser
at
minimum
Locks
are
of
stitches,
width
be
(Fig.
ever
set
in
place.
(Fig.
29)
29)
increasing
stitch,
by
pressing
gradually
employ
while
width.
locks
right
in
slightly
I
the
to
To
“7”
j
lock
Fig.
29
needle
“31”
stitching
stitch
15—
CONTROL
position,
(Fig.
designs
to
and
1)
avoid
move
R—
tearing
desired
to
Position
blind
decorative
designs
fabric
the
position.
hemming
stitch
or
bending
the
M—
POSITION
adjusting
control
on
Position
straight
decorative
—
NEEDLE
when
its
highest
at
position
needle
be
for
on
pressing
by
buttons
sewing
stitch
designs
The
needle.
Select
needle
needle
L—
should
Position
buttonholes
sewing
twin
decorative
-
point
down
slightly
Page 17

stitch,
stitch
action.
needle
The
and
length
The
work.
satin
is
width
CREATIVE
stitch(Fig.
for
basis
the
“0”
near
as
be
may
EMBROIDERY
EMBROIDERY
31),which
embroidery,
most
possible
as
anywhere
set
just
really
is
obtained
is
without
from
stopping
“0”
PATTERNS
a
very
to
by
“5”
short
setting
the
feeding
for
zigzag
the
single
Fig.
Fig.
30
31
be
can
and
‘0”
yourself
machine,
hether
With
made
“5”
and
stitch
fast
the
machine
by
or
then
slow.
or
swinging
any
combination
proceed.
length
and
set
the
for
stitch
After
width
a
short
width
of
a
and
stitch
widths.
while
the
length,
lever
“6”
setting
Try
will
you
manipulation
different
(Fig.
the
become
—16—
30)
of
designs
between
locks
quite
lever
“1”
at
skillful,
“6”.
and
varying
Always
“5”,
run
“2”
your
the
“5”,etc.
and
designs
machine
by
at
Set
the
uniform
a
rhythm
a
speed
of
speed
for
the
Page 18

The
moderate
following
fast
or
patterns
speed.
will
SAMPLE
altered
be
EMBROIDERY
machine
the
by
speed.
PATTERNS
speed
slow
At
the
patterns
will
be
shorter
than
at
®
jiiM
__J\j_
WV’[”NVT
‘
Drop
-
E
fabric
stitch
H
feed,
on
width
®WM
lock
needle
at
4Vv’
WWV
Fig.
stitch
width
to
make
taking
and
“0”
next
lever
move
you
“1”,
slowly
fast.
to
machine
for
repeat.
setting
by
move
lever
“1”.
count
the
Pivot
quickly
then
width,
“4”
“0”
at
then
5,
at
speed.
Return
at
for
to
“21,4
operating
‘I
1
at
“1”
Stitch
stitch
fabric
in
is
complete.
short
a
establish
and
and
snap
and
“2-1/2”
at
to
period.
then
5”
machine
It
5
back
it
“4-1/2”,
“1”
at
“2-1/2”
left
side
Lock
rhythm.
a
move
rather
gradually
quickly
operate
while
“4-1/2”
and
and
of
stitches,
threads
stitches
few
a
Sew
-
A
to
back
lever
necessary,
width
width
width
moderate
“1,2,3”.
leave
flower
of
if
locks
setting,
.
1
to
count.
design
design.
loc.cs
lock
Then
needle
Count,
Set
-
B
between
Set
-
C
from
Set
-
D
at
same
stitches,
“4”
“3”
Continue
stitches
or
until
center
in
—
—
17
take
“5”,
at
petal.
daisy
“4”
or
“3”
Page 19

TWIN
1.
Be
Use
2.
Follow
3.
ceptions:
4.
Set
Zigzag
Straight
5.
the
NEEDLE-
sure
zigzag
only
left
threading
A
-
Place
spool
B-Pass
“16”
C
-
Down
between
discs.
D
-
Now
eye.
E-Pass
right
hand
lever
stitching
same
manner
needle
needle
thread,
pins.
threads
(Fig.
treat
one
zigzag
in
red
UPPER
position.
instructions
1)
around
the
both
thread
width
area
and
followed
as
THREADING
plate
and
matching
under
handle
one
thread
tension
back
discs
threads
through
stop
will
break
decorative
for
presser
Use
for
or
per
discs
and
as
each
at
needle.
stitch
single
foot
needles
single
contrasting
and
through
hole.
with
the
one,
until
needle
start
of
designs
threading.
AND
areinplace.
White
needle
in
arm
one
other
between
you
eye.
red area
can
SEWING
Part
with
color,
thread
thread
reach
(left
be
80999.
these
on
passing
the
the
needle
hand
produced
ex
both
guide
front
side).
Flat
side
of
the
shank
/
in
It
Fig.
34
Fig.35
..
....-..-......,-.
—18—
.-.,,
..-..
Page 20

BUILT
machine
Your
embroidery
the
sew
To
Select
(1)
The
Set
(2)
setting,
lever
For
(3)
feeding
DECORATIVE
IN
sews
designs
decorative
decorative
selected
design
width
zigzag
the
machine
no
“6”
best
the
action.
wide
a
with
stitch
stitch
lever
higher
pattern
variety
either
designs
design
indicated
is
“6”
will
than
designs,
STITCH
of
single
a
set
you
(Fig.
sew
“2-1/2”
set
beautiful
or
machine
desire
pattern
by
at
1)
straight
a
or
stitch
DESIGNS
and
twin
as
by
for
“5”
stitch
will
you
length
practical
needle.
foi
lows:
turning
indicator
designs
regardless
break
dial
pattern
“A”.
with
the
“4”
selector
the
of
needles.
(Fig.
greatest
pattern
the
as
1)
dial
close
“25”
width
to
(Fig.
single
for
selected.
“0”
36)
as
Fig.
36
to
needle
For
possible
either
twin
without
the
sewing.
needle
or
right
the
At
sewing
stopping
STITC
left.
“0”
set
the
Design
replacing
number
worn
“3”,
blanket
the
multiple
bindings
zigzag
and
/
stitch,
hundreds
\
v
Fig.
used
uses.
—19—
A
/
37
to
can
of
\
A
/,
v.
be
other
A
/
\
sew
V
stretch
A
\
/
\
to
fabrics,
sewing
elastic
waist
bands
skirts,
Page 21

Blind
stitch
pattern
number
“1”
(1)
(2)
(3)
(4)
Blind
comparable
and
Prepare
Step
Step
Step
Step
Use
Set
Set
Zigzag
smaller
stitch
the
STEP
1.
(Fig.
Turn
2.
Fold
3.
Place
4.
stitch
standard
stitch
pattern
width
the
hems
garment
39)
hem
hem
Make
zigzag
length
indicator
lever
sidewise
provide
hand
to
If
to
back
material
about
control
in
hem
the
every
blind
foot
to
stitch.
a
sewing.
the
with
depth
toward
under
(Fig.
“4”
for
suit
durable
same
STEP
folded
presser
3/4”
hem
38)
(Fig.
blind
material
hem
for
as
2
desired
right
an
of
as
hand
edge
side
foot,
inch
1)
hem
being
finish
and
of
follows
at
about
stitch
sewn
that
hemming.
is
used
baste
garment
with
sew
sewing.
of
“2.1/2”.
design
—
the
is
STEP
make
1/4”
stitch
lower
almost
Fig.
first
from
leaving
—
20
number
the
invisible
39
fold
upper
1/4”
length
—
“1”.
number,
3/8”
edge.
extended.
to
set
STEP
deep.
suit
the
Press
material
in
place.
being
COMPLETED
sewn
and
Fig.
make
38
wise
side
a
Page 22

I
dial.
the
To
the
to
which
thickness
used.
Various
“25”
establish
cutting
obtain
To
the
(B)
width
The
widths
(Fig.
space
button
of
Fig.
the
the
of
42
and
1).
the
for
length
passes,
button.
the
correct
BUTTON
lengths
length
tacks.
bar
the
of
measured
is
(Fig.
buttonhole
LES
HO
be
can
buttonhole
cutting
41)
sides
Set
number
lower
the
of
basting
one
rections
adjustments
1.
Replace
maximum
made
space,
adding
by
is
zigzag
“5”
number
Mark
buttonhole
line
on
below
automatically
required
the
the
governed
width
thick
for
for
beginning
the
or
tailor’s
fabric
scrap
to
are
correct.
presser
visibility
add
opening
width
the
by
lever
material
thin
fabric
on
chalk.
following
sure
be
foot
by
control
with
and
turning
inch
1/8
through
and
(A)
material
on
and
material.
end
and
with
Make
di
machine
special
allows
a
a
closely
purpose
spaced
Fig.
buttonhole
stitches
Fig.
to
40
41
foot.
feed
-Th
This
provides
evenly
(Fig.
40).
“L”
as
at
control
close
at
“A”.
to
position
needle
2.
Set
stitch
zigzag
3.
Set
the
4.
Stitch
Set
5.
widest
length
pattern
buttonhole)
selector
control
width
control
dial
position.
suit
to
as
0
material
possible
being
without
sewn
stopping
—21
for
buttonhole
of
width
or
feeding
the
—
action.
desired.
(Number
“5”
Page 23

Lower
6.
start
the
tack
bar
With
7.
position
buttonhole—forward
With
8.
“C”
With
9.
“D”
Reverse
Return
10.
stitches
4
11.
Cut
to
cut
Although
size
tarlaton
mercerized
50
If
you
on
You
procedure
needle
—“4”
the
and
the
position
the
position
stitching.
zigzag
buttonhole
the
the
plan
paper
can
noted
carefully
of
the
or
needle
sew
needle
and
needle
and
width
prevent
to
stitching.
buttonholes
are
to
under
make
above.
buttonhole.
stitches.
“5”
of
out
the
entire
stiching.
of
Out
the
sew
of
out
sew
control
ravelling.
opening
recommended
buttonholes
make
fabric
buttonholes
the
the
the
into
the
bar
can
which
length
cloth
cloth
right
to
with
by
the
Lower
pattern
tack
the
be
for
sewing
set
set
made
can
mark
of
—
hand
“0”
seam
best
on
be
on
presser
selector
the
pattern
4
or
pattern
side
position
ripper
with
results.
sheer
torn
the
the
left
selector
stitches.
5
selector
or
away
right
foot
of
most
soft
fabric
dial
hand
the
and
being
hand
indicating
and
at
side
dial
dial
buttonhole.
take
careful
any
material
after
side
the
sew
“B”
the
the
of
the
at
the
at
“3”
not
threads
place
stitching.
(reverse
or
stitching)
S
T
S
T
S
T
E
p
first
p
prefer
if
you
Fig.
44
by
p
just
S
T
E
p
reversing
the
22—
—
Page 24

SEWING
ON
BUTTONS
1.
2.
3.
4.
5.
6.
7.
8.
hooks
same
slightly
Remove
(Fig.
45).
drop
Turn
needle
Set
zigzag
Set
hand
hole
presser
zigzag
Move
down
Move
place.
enters
Correct
When
medium
at
needle
lock
To
at
width
may
you
two
the
toothpick
the
fasten.
Apply
and
snaps,
procedure
and
hinged
foot
exactly
left-hand
Turn
both
feed
position
stitch
comes
(Fig.
stitch
over
the
holes
presser
knob
width
directly
46).
width
zigzag
hand
in
lever
the
button
widthifnecessary.
needle
in
the
the
0,
holes,
the
move
speed,
place
above
above
into
goes
making
left
hole.
zigzag
take
and
a
rounded
sew
and
wind
and
method
If
etc.
a
for
fabrictopermit
Down
to
lever
right-hand
stitch
wheel
the
stitch
few
a
button
thread
four
the
two
foot
at
“L”.
under
lever
slowly
without
center
six
and
stitches
toothpick
to
hole
attach
and
position.
Place
0.
at
needle
the
right
the
to
hole
lever
width
by
deflecting
of
each
eight
or
prevent
in
the
fabricinregular
to
the
under
on
sew
button
button.
hole
stitching
(Fig.
the
then
until
in
the
stop
hand
hole
stitches,
ravelling,
same
the
over
button,
buttons
is
to
the
button
49).
button
gently
the
button
to
sure
to
be
needle.
run
stopping
hole.
button,
way.
forming
with
sewn,
be
lift
Now
remaining
sewing
needle
hold
the
set
If
four
follow
presser
two
its
so
lower
comes
(Fig.
lever
needle
the
machine
with
the
you
between
Remove
a
foot
left-
the
47).
the
stitch
wish
shank
holes,
the
foot
holes.
Fig.
45
in
Fig
46
Fig.
47
Fig.48
HIGH
.
.
(
I
LOW
Fig.
23
—
—
49
Page 25

SEAM
GAUGE
OR
CLOTH
GUIDE
top
stitching
threaded
regular
it
securely
zigzag
for
zigzag
position
the
Use
Fasten
hole
Narrow
presser
stitch
lever
seam
along
Gauge
in
Fig.
Hemmer:
foot
place.
in
width
stitched
at
gauge
edge
(Fig.
bed
50
with
lever
hem.
M”.
as
a
fabric
of
50)
of
machine.
NARROW
With
narrow
pattern
Set
0
for
at
Set
stitch
guide
with
needle
hemmer
straight
straight
for
(Fig.
52)
accompanying
Adjust
to
HEMMER
its
at
(Fig.
selector
stitched
length
control
seams
desired
Fig.
highest
53)
dial
screw
width.
being
at
hem
to
and
51
position
sure
manual
at
or
suit
rows
even
(Fig.
replace
to tighten
position,
number”3”
and
51)
needle
of
in
Fig.
52
Fig.
53
—
24
—
Page 26

Foraplain
two
inches
slip
underneath
fabric
bar lifter.
straight
Guide
through
The
or
any
along
forward
Gently
stitched
material slightly
scroll.
narrow
other
dainty
narrow
edge
hemmer.
to
end
pull
of
and
end
hem
fabric.
Bring
fasten
hem-Fig.55for
hem
provides
work.
make
Hold
foldupinto
with
of thread
zigzag
to
left
an
a
1/8
inch
each
the
pointofneedle.
as
you
start
stitched
anditwill
excellent
double
endofthe
scroll
stitching.
hem.)
takeadouble
finish
for
fold
two
of
hemmer,
edges
Lower
(Fig.
for
inch
of
about
fold,
draw
presser
for
54
turn
ruffles
Fig.
F.
54
55
—
25
—
Page 27

in
under
way.
the
To
slot
needle
sew
a
next
and
narrow
to
hem
LACE
hem
needle
into
TRIMMED
attach
and
(Fig.
56)
scroll.
Rick-rack
lace
sew
HEM
one
in
hem
may
stitching,
above
as
be
used
insert
guiding
the
in
lace
lace
same
insert
sew
and
wrong
the
material
of
hemmer
French
LACE
Hold
both
in
Place
scroll
seam.
lace
scroll
in
lace.
side.
material
1/8
EDGE
1/8
as
When
with
inch
allowing
For
WITH
inch
for
the
from
hem
cording
INVISIBLE
raw
from
narrow
plain
stitching
FRENCH
sides
right
hand
right
roll
to
effect,
edge
hem
completed
is
SEAM
facing
edge
over
use
catch
rolled
stitch.
chairs
ing
HEMMING
hemmer
the
edge
material
on
(Fig.
each
of
and
zigzag
both
hem
This
To
hold
to
slightly
right
sew
hem
STITCHING
side
hand
hem
let
57)
hem
the
and
other
piece.
lower
fabric
top
in
wide
stitch
of
edges
sew
and
used
be
can
forth
so
and
ACROSS
SEAM
A
across
gradually.
together
it
when
—
of
roll
pressed
is
top
the
Insert
enough
the
with
for
(Fig.
seam,
a
Press
and
hemming
—
26
fabric
over
to
piece
making
narrow
satin
cover
58).
cut
seam
for
in
to
the
added
over
seam
open.
the
*
folds
Stitch
firmness.
seam
.
at
(Fig.
-
an
across
It
may
59).
angle
—
0
Fig.
so
the
be
57
they
at
seam
necessary
will
the
lead
to
into
extreme
the
pull
Page 28

THE
This
insert
Loosen
or
right
over
cord.
so
foot
Machine
ADJUSTABLE
ZIPPER
AND
attachmentisused
thumb
left
needle
bastes
cording,
screwtoslide
needle.
of
Loosen
is
cord
covered
CORDING.
andtosew
Fold
thumb
centered
in
CORDING
FOOT
to
foottoeither
bias
strip
screw
in
place
make
in
of
needle
(Fig.
and
zippers.
fabric
set
and
hole.
61).
Fig.
61
and
so
center
(Fig.
closing.
is
needle
of
62).
more
To
stitches
L
Loosen
needle
Stitching
Adjust
convenient.
Fig.
62
sew
closer
hole.
should
to
-27-
covered
to
thumb
sew
cord
cord,
SEWING
screw
metal
Guide
closetozipper
be
from
and
either
on
and
of
edge
IN
zipper
right
of
A
slide
to
or
material,
to
reset
base
ZIPPER
foot
so
along
allow
left
adjustable
fabric.
needle
edge
easy
side,
foot
enters
foot
of
opening
whichever
Page 29

CLEANING
stitch
The
efficient
the
remove
To
1.
Turn
(Fig.
in
Remove
2.
Turn
3.
Clean
4.
Apply
5.
SHUTTLE
DRIVER
AND
operation
stitch
the
hand
63).
bobbin
two
the
the
drop
a
forming
wheel
Tilt
shuttle
of
OILING
mechanism
the
of
forming
until
head
case”E”.
shuttle
race,
oil
CARE
machine.
mechanism,
the
back
race
shuttle
with
AND
THE
MAINTENANCE
SHUTTLE
occasionaUybecomes
Cleaning
proceed
reaches
needle
hinges.
its
on
clamps
cover
shuttle
and
tip
SHUTTLE
A
Boo
to
Y
finger
its
“C”
outer
should
as
highest
outward
race
edge
clogged
be
follows:
position.
cover
of
done
and
by
shuttle.
YOUR
OF
with
a
with
The
remove
removing
BOBBIN
MACHINE
threads
loose
brush,
small
mechanism
shuttle
the
all
threads,
SHUTTLE
CASE
interfere
will
This
lint.
and
pointed
or
sharp
a
with
never
position
cover
etc.
COVER
the
“B”
BODY
and
‘SHUTTLE
RACE
covr
shuttle
assume
will
race
lint,
RACE
ASUrrLE
\\
\
with
tool.
illustrated
“A”.
Fig.
63
PIN
Fig.
64
—
28
—
Page 30

ii
a
65
Fig.
Use
gear
Lubricate only
HOW
Face
Open
correct
and
life
lubricant
when
TO
(Fig.
be
size,
HOW
at
removing
accessible
which
plate.
gears
on
machine
REPLACE
unscrew
65)
it
sure
OIL
TO
Avoid
over-oiling,
each
point.
Occasionally
screws
through
moving
To
oil
rarely
only
Oil
indicatedbywhite
seems
bulb
genuine
is
a
at
to
THE
spots
sew
LIGHT
and
remove
and
oil
parts
more
insert
White
YOUR
only
the
oil
holes.
inside
requires
indicated
arrows
slowly
BULB
new
part.
MACHINE
a
drop
top
moving
(Fig.
the
oiling,
in
in
than
one.
NUMBER
is
cover
parts
66)
face
(Fig.
(Fig.
For
needed
by
not
plate,
OPEN
65).
67)
usual.
long
6999
Fig.66
Fig.
4
67
-29-
Page 31

HOW
TO
CHANGE
THE
BELT
proceed
(1)
(2)
(3)
(4)
Ifitshould
follows:
as
Remove
Remove
Remove
small
out
lever
untilitcan
Before moving
will
as
it
ever
screws
rear cover.
motion
stop
screw
fall
off
Fig.
68
become
“A”
“C”.
be
hand
when
necessary
(Fig.
68)
knob “B”
Turn
lifted
off.
wheel,
changing
to
-
centerofhand
in
counter-clockwise
nut
positionoflips
note
the
belt.
(5)
(6)
(7)
(8)
(9)
and
wheel,
and replace
(10)
replace
Slide
“E”
Pull
the
old
(Fig.
hand
chine just
belttoslip
new
Put
wheel
hand
pulley.
Replace
position.
Replace
After
you
nism.
stop
doing
to
If
down
again
motion,
Replace
give
rear
—
on your
belt
wheel
(Fig.68)
holding
by
washer
on
over
belt
69).
wheel
away
far enough
over
wheel.
beltingrooved
then
and
motion
turn
needle
you
0
and
clutch toward
sewing
still
turn
washer
this,
disengage
the
as
remove
washer
the
“0”
nut.
cover.
30
—
the
“D”
motor
to
section
over
in
screw
a
machine,
taking
by
take-up
(Fig.
pulley
from
allow
motor
original
mecha
moves
the
the
half
69)
ma
the
of
“C”.
up
hand
stop
turn
Page 32

1.
2.
3.
4.
5.
6.
7.
8.
9.
10.
11.
12.
13.
14.
15.
16.
Plastic
Large
Small
Buttonhole
Package
ACCESSORI
Oiler
Screw
Screw
Needles
of
Twin
Package
Cloth
Thumb
Quilter
Presser
Button
Felt
Bobbins(3)
Buttonhole
Narrow
Needle
of
Guide
Screw
Guide
Foot
Sewing
Washes
Hemmer
Plate
(sealed
Driver
Driver
Cutter
for
(2)
Foot
for
ES
Needles
Straight
Foot
(for
Straight
and
Straight)
(5
spool
filled)
Sewing
pins)
Sewing
L4j
1
±L©
Fiq.71
—31
—
Page 33

TROUBLE
CHART
Trouble
If
Machine
Binds
Probable
Thread
race
way
in
case.
COVER
and
from
race
Correction
highest
NOTCH
remove
rim
cover.
case
all
of
by
position,
HOOK
race cover.
parts,
shuttle.
Snap
latch
tilt
CLAMPS
including
clamps
and
replace,
head
RACE
race.
into
back
place.
fitting
on
tongue
hinges
into
Cause
lint
in
or
.
-
1—With
remove
and
LATCH
2—Turn
3—Remove
4—Clean
5—Run
a
6—Replace
7—Grasp
notch
take-up
BOBBIN
CASE
clamps
hook.
thread
drop
shuttle,
threaded
of
race
lever
bobbin
BOBBIN
RACE
outward
and
of
oil
bobbin
cover.
ccc
lint
along
then
—32—
Page 34

Trouble
‘r
Bent
Probable
needle
Cause
Discard
and
Correction
replace.
4!
Skipping
stitches
Irregular
stitches
Uneven
stitches
Needle
clamp
Too
being
Upper
Improper
Bobbin
Pulling
Not
thread
Poor
Needle
used
placed
fine
used
thread
not
or
enough
quality
too
incorrectly
a
needle
tension
threading
wound
holding
tension
thread
fine
for
for
too
evenly
material
on
thread
in
thread
loose
upper
being
—
I
Avoid
Try
See
33
instruction
See
needle
See
Tighten
See
threading
Rewind
Increase
different
needle
—
upper
bobbin.
pulling
tension.
and
page
thread
and
tension.
instruction,
or
thread.
thread
No.
holding
chart,
material,
chart,
6.
page
page
page
No.
No.
just
No.
5.
and
9.
8
guide
it.
5.
Page 35

Trouble
Improperly
Probable
threaded
Cause
Refer
rethread
threading
to
machine.
Correction
instructions
see
page
No.
and
8
Upper
breaking
Material
puckering
thread
j
much
Too
Starting
correct
Improper
or
Bent
or
Bent
Tensions
Dull
needle
Stitch
tension
with
position
setting
eye
blunt
too
length
of
tight
too
take
of
needle
needle
tong
-
up
needle
too
in
sharp
in-
—
Loosen
tension
Always
position.
Refer
Try
Discard
new.
See
Change
Reduce
—
34
tension
knob
start
to
needle
new
a
all
tensions
needle.
stitch
on
lower
to
sewing
setting
needle.
blunt
adjustment
length.
upper
or
thread
number.
with
instructions
bent
page
take
needles
No.
up
by
10.
turning
lever
see
and
in
page
replace
thread
highest
No.
with
6.
Page 36

sewing
Your
this
book.
in
The following
machine comes
illustrate
pages
equipped with
additional
time
the
saving
basic
setofaccessories
attachments
that
described
have
been designed
earlier
available
are
your
specificaIIyfor
dealer
your
number.
formance
—
Ifasewing
cannot
Then
with
machine dealer
machine.
supply
willbeassuredofreceiving
you
your
machine.
WHITE
In
Canada
WHITE
SCARBOROUGH,
They
with
not
these
available
you
is
SEWING
11750
BEREA
CLEVELAND,
CONSOLIDATED
1470
BIRCHMOUNT
items,
mail
MACHINE
OHIO
ONTARIO,
modest
at
ask
him
to
the
genuine
inquiry
your
COMPANY
ROAD
44111
INDUSTRIES,
ROAD
CANADA
cost from
order
part
directly
LTD.
them
designed
to
your
for
dealer.
you
for
by
best
If
part
per
-35-
Page 37

SOME
OF
ATTACHMENTS
THE
AVAiLABLE
Fig.
72
I
FOR
YOUR
MACHINE
7/8
Ruffler
PART
Attachment
76552
Need’e
position
Foot
lever
must
PART
5/8
PART
be
1403
in
the
76552
left
PART
position
PART
Darning
Binder
Hemmers
when
—36—
74159
4990
Spring
using
3/8
these
PART
attachment.
76551
PART
76654
Edgestitcher
1/4
PART
76550
Page 38

ATTACHMENT
FOOT
The
lace
insertions,
The
in
sewing
If
you
or
lace
pieces
(Fig.
instance,
finished
and
the
edgestitcher
slots
together
want
and
of
material
75)
and
if
edge
lace
EDGESTITCHER
is
used
edgings
in
the
to
sew
tucked
the
you
of
in
slot
edgestitcher
various
lace,
strips
that
lower
are
sewing
fabric
“4”
and
will
fabric
place
(Fig.
piping.
pieces
lace
together,
be
the
in
making
serveasguides
of
material.
and
embroidery,
place
on
top
in
in
slot
“4’.’
lace
edging
fabric
in
74).
dainty
the
slot
For
to
slot
In
necessary
foot.
Mount
the
left
The
the
edge
before
1
a
1
to
order
to
(Fig.
73).
binder,
far
as
mounting
as
desired.
tightening
attach
remove
as
possible
slot
the
the
presser
edgestitcher
enables
Just
the
mounting
binder,
and
move
foot
or
tighten
you
the
screw.
edgestitcher
and
replaceitwith
hemmers,
screw.
to
sew
as
attachment
sliding
close
and
to
to
the
the
or
the
Fig.
hemmers,
the
attachment
attachment
far
as
correct
75
away
position
it
from
is
to
a
—37—
Page 39

Be
you
as
Rick-rack
To
place
Slot
See
sure
stitch.
trim
fabric
5
Fig.
to
with
may
76,
in
draw
Hold
can
slot
be
77,
the
be
wide
2
used
78
the
sewn
and
and
lace
fabric
to
piping,
the
a
as
79
and
the
folded
guide
for
material
the
in
edge
place
in
suggestions
under
left
of
fabric
the
edge
stitching
hand
the
of
the
the
material
in
the
French
a
how
on
needle
lace
in
solt’4’and
to
piping
seam.
use
to
in
and
the
the
the
back
right,
same
fold
the
right
edgestitcher.
the
the
of
being
manner.
of
slot”3’
in
edgestitcher
sure
piping
the
There
the
fabric
to
are
so
that
the
left
hundreds
the
overlaps
in
feed
the
slot”3’
other
of
will
lace
for
carry
slightly.
a
uses.
it
backward
narrow
piping
77
Fig.
Fig.
78
Fig.
—
38
—
79
Page 40

This
attachment
corresponding
open
The
point
Cut
a
under
and
slot
the
edge.
Two
bindings
used,
are
two
correct
binding
binder.
scroll.
,/
Cut
size
15/16
diagonally
Draw
Test
widths
mouth
folded
on
binder
Adjust
by
TWO-TONE
can
always
slot.
HAND-CUT
inch
back
stitching
bias
folds
commercially
of
binder
of
FOLDED
binding,
with
sliding
sewn
be
skip
bias
binding
toward
until
to
be
binding,
scroll
BINDING
strong
binder
on
one
BIAS
end,
opens
cut
sure
applies
folded
is
used
in
insert
pin.
right
to
BINDING
fabric
edge
between
size
BINDING
in
fold
almost
to
and
itison
it
to
bias
for
(Fig.
appropriate
stitching
Test
left.
or
(Fig.
alsoinone
widths,
foracouple
half
fold.
binding
the
BINDER
the
binding.
unfolded
82)
82)
(Fig.
Slip
encircles
edge
edge
bias
slot.
be
to
operation.
inserting
83)
of
fold
adjust
See
and
gestions
to
There
reds
of
Draw
sure
inches.
into
open
if
81
use
of
material
strips
through
it
each
center
end
necessary.
Fig.
for
on
binder.
the
hund
are
other
in
cut
is
on
When
in
Cut
of
of
80
sug
how
uses.
one
15/16
operation.
wide.
inch
Slots
on
scroll
are
binder
of
the
for
Fig.
I
80
Fig.
81
83
Fig.
—
39
—
Page 41

THE
SET
HEMMERS
OF
Before
pulled
is
turn
and
under
hemmer.
horizontally
loop
catch
material
Fold
of
fold.
material
in
stitching.
start
attaching
Then,
up.
handwheel
under
and
Slip
fold
back
can
You
Grasp
carry
to
of
any
with
hemmer
upper
suit
into
hemmer.
make
the
of
hemmerinplace,
one
bobbin
for
guide
a
full
toward
thread
two
and
hem
hemmers
turn
thread
inches
up
Draw
1/4”,
toward
back
to
over
forward
with
back.
along
spoon
3/8”,
sure
be
top
hold
you,
both
Bobbin
hemmer.
of
edge,
(Fig.
end
to
HEMMER
5/8”,
bobbin
thread
making
hands
hold
84).
of
or
thread
each
at
Fold
hem
7/8”
thread
loosely
a
and
and
in
loop
slip
will
end
hem
fasten
SET
width,
point
with
depending
of
upon
needle.
which
Fig.
Pull
hemmer
84
on
thereads
you
gentlyasyou
use.
—40
—
Page 42

‘3,,
85
Fig.
RUFFLER
Fig.
86
Fig.
—
87
The
ruffler
Ruffling
This
the
Use
Fig:
highly
ruffler
will
alsobedone
can
versatile
85
produce
making
for
yardsofdelicate
and
attachment
aprons,
sewn
despite
another
to
curtains,
ruffling
wide
its
pleating
Fig.
piece
range
86-A
—41—
precision
or
skirt,
a
of
fabric
of
use,
adding
pleating.
the
at
simple
is
fullness
same
to
to
time.
use.
the
bodice
Fig.
of
87-A
a
dress
and
etc.
Page 43

MEMO
Page 44

PART
SJH
4-70
*
I
OBTAIN
TO
YOUR
CARRYING
WITH
PRODUCrS.
MACNINE
YOUR
WHITE
OR
187€
PERFORMANCE
SURE
OTHER
ARE
SINCE
THE
CASE
MACHINE
BEST
BE
machines
THE
GENUINE
CABINET,
ITEMS
sewinil
FROM
USED
WHITE
Pthited
in
Japan
I.
 Loading...