

Page 1
Multibolt
The deadlocking multibolt
Components
Fixing Instructions
Q50010M 0907-2
Whitco Multibolt: For most aluminium and timber windows.
Operation: Key lockable bolt provides push to bolt and key to deadlock operation.
Application: Provides safe bolting or deadlocking of most window types.
CYL4®: Please see your local hardware retailer or locksmith prior to installation if you are having this product
keyed to other locks in your home.
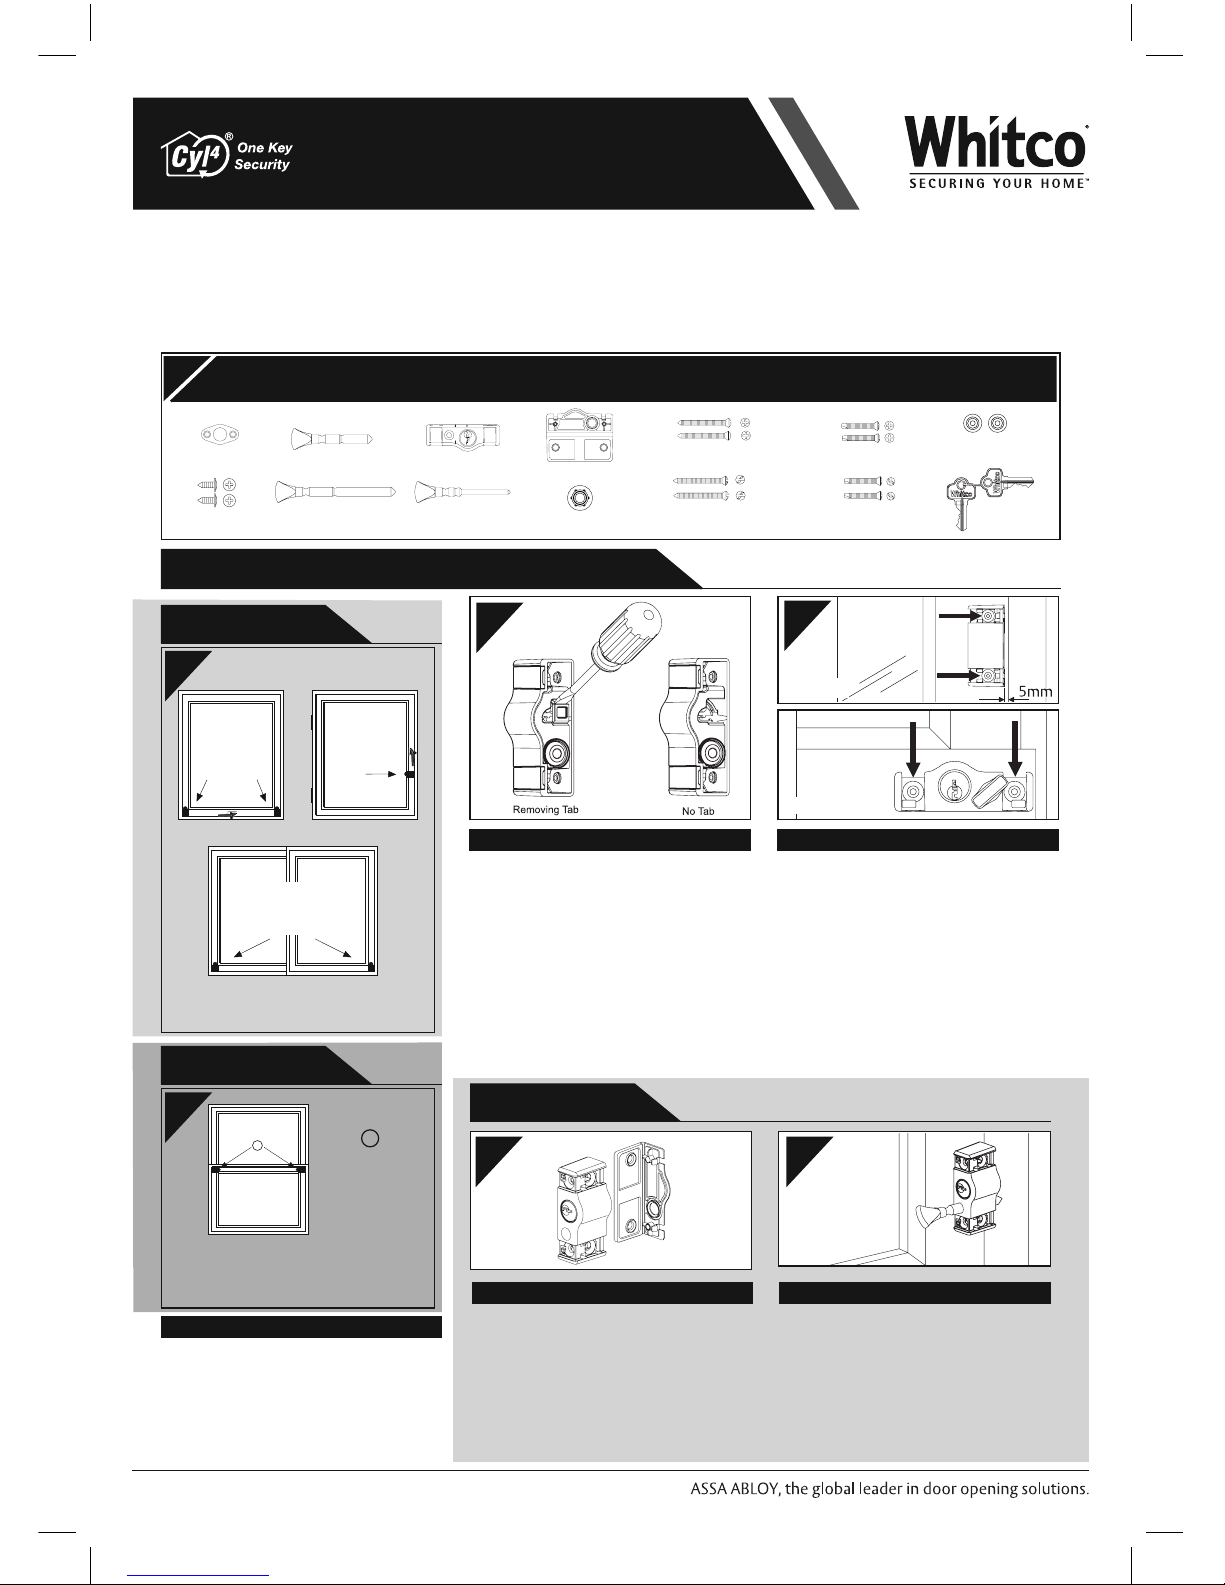
Determine fi xing location
Select mounting position, refer to
di
agrams above. Hold assembled lock
body in desired mounting position and
check for:
• Orientation of cy linder
• Bolt movement
Ferrule
Long Th ick Bolt
Lock Body
Side Fixing Packer
Timb er One Way
Security Fixing Screws
Alumi nium One Way
Security Fixing Screws
Aluminium Fixing Screws
2
Removing tab
When using a 5 pin key (keyed alike with
d
oor locks) the square shaped tab in the
base of the lock body will need to be
removed. Do this by bending tab so that
it snaps along the groove as shown.
Fit side mounting packer to lock
Fit plastic side mounting packer by
pushing rectangular upstands into the
recesses in the base of the lock body.
Bend side packer around side of lock body
and position on window with side packer
against the sash.
Mark and drill bolt hole
Fit lock body to window using standard
screws. To mark bolt hole position, insert
bolt and gently tap. Open window and
drill a 10mm hole for short thick bolt.
Drill hole to suffi
cient depth to suit bolt
length but do not break through frame.
Ferrule Screws
Shor t Thick Bol t Timb er Fixing S crews
4 5
Side Fixing
Note: For face fi xing please see over page.
3
Side Fix
Face Fix
KeysLong Thin Bolt
Scre w Plugs
Thin Bolt Guide
Sliding Windows
Fit lo ck
at end of
either window
Casement Windows
Fit lo ck
in middle
of window
Awning Windows
Fit lock at
bottom of
window
• Alumi nium windo ws use the lon g thin bolt .
Timb er windows u se the long th ick bolt.
• Alumi nium and tim ber window s use the
shor t thick bol t.
Doubl e Hung Windo ws
1
1
Face fi x to low er
sash locking into
upper sash
Mark and drill fi xing holes
Check clearance of screws with the
g
lass line. With window tightly closed,
position lock body where it is to be
mounted and mark mounting locations
by tapping a nail or marker through
screw holes. Drill t wo 3.5mm pilot holes
for timber or two 4mm pilot holes for
aluminium.
Note: When drilling screw and bolt holes
do not drill through the lock body as this
may damage the lock mechanism.
Side Fixing
1
1
Face Fixing
Page 2
Multibolt
The deadlocking multibolt
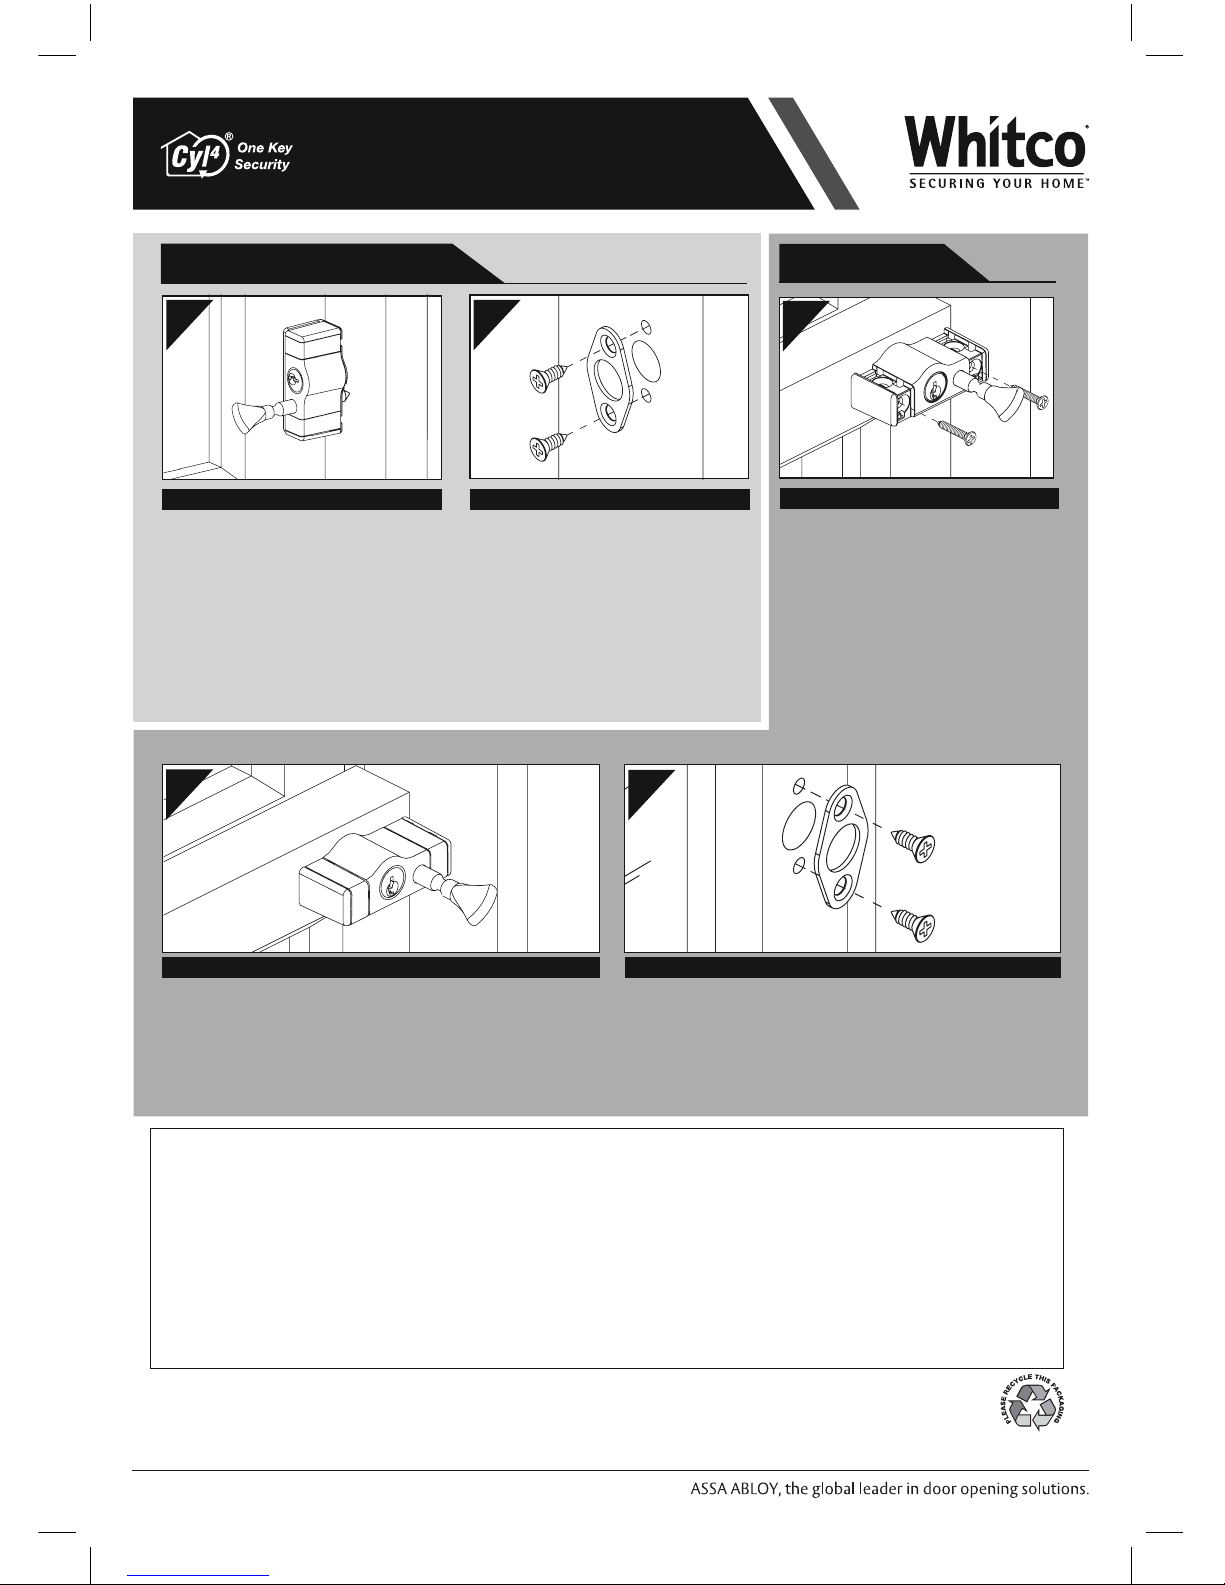
Check operation of lock
If lock operates correctly once bolt is
fi
tted, replace s tandard screw s with one
way screws for greater security (refer
to note below). Inser t L-shaped plas tic
cover s into slots on lock body.
Note: One way screws cannot be removed
once tightened.
6
4
7
Fit ferrule (if required)
Timber windows may require a ferrule.
Mark ferrule fi
xing holes by placing ferrule
centrally over bolt hole. Drill two 2.5mm
pilot holes and screw ferrule into place.
Mark and drill bolt hole
Temporarily fi
t lock body to window
using standard screws. To mark bolt
hole posit ion, insert bolt and gently tap.
Remove the bolt by pulling and t wisting.
Remove the lock body. Drill a 10mm hole
for long thick bolt or a 5.5mm hole for long
thin bolt. Drill hole for bolt through both
sashes on double hung or both stiles on
sliding windows to allow suf fi cient depth
for bolt but do not break through outside
sash or stile. If a thin bolt is being used, fi t
thin bolt guide supplied into recess at back
of bolt hole in lock body.
5
Fit lock
Fit lock body to window using standard screws. If lock operates
co
rrectly once bolt is fi tted, replace standard screws with one
way screws for greater security.
Insert L-shaped plas tic covers into slots on lock body and small
plastic plugs into unused side screw holes.
Note: One way screws cannot be removed once t ightened.
Fit ferrule (if required)
Timber windows may require a fer rule. Mark ferrule fi xing holes
b
y placing ferrule centrally over bolt hole. Drill two 2.5mm pilot
holes and screw ferr ule into place.
Note: Some double hung windows may not have suffi cient
clearance for fi tting ferrule between sashes.
6
Side Fixing (continued)
Face Fixing
ASSA ABLOY Aus tralia Pty Limited, 235 Huntingdale Road, Oakleigh, VIC 3166
ABN 90 086 451 907
©
2006
www.assaabloyasiapacifi c.com
Whitco Warranty
ASSA ABLOY Australia Pty Limited (“ASSA ABLOY”) warrants its Whitco products against defects in workmanship and materials for a period of 10 years from
the date of purchase by the retail customer, subject to the limitations and exclusions set out in this Warranty. If, within this period the product is found to be
defective, and none of the limitations and exclusions set out in this Warranty apply, ASSA ABLOY will supply the same or equivalent product free of charge.
This is the only remedy granted by ASSA ABLOY under this Warranty. Limitations: All window screen and door screen products are warranted for a period of
12 months from the date of purchase by the retail customer. This limitation does not apply to key locks and hinges included in window screen and door screen
products, to which the full ten year warranty applies. Exclusions: This Warranty does not cover: 1. Damage to or malfunction or failure of the Whitco product
caused or contributed to by: (a) misuse, abuse, accidental or intentional damage; (b) improper installation or failure to follow fi tting instructions; (c) improper
maintenance; (d) use contrary to instructions provided by ASSA ABLOY; (e) fair wear and tear; (f) any modifi cation or repair which has not been authorized by
ASSA ABLOY; (g) use of substitute or replacement parts or cylinders other than genuine ASSA ABLOY parts or cylinders. 2. The cost of:(a) removal, replacement
or reinstallation of the Whitco product; (b) freight costs and travelling time; (c) any modifi cation or repairs to a Whitco product, unless authorised by ASSA
ABLOY. 3. Damage caused by corrosion when the Whitco product is used in a corrosive environment. 4. Tarnish, damage to or deterioration of soft fi nishes such
as Bronze, Brass and other Antique fi nishes, which are subject to deterioration due to environmental conditions, frequency of use and other factors. 5. Damage
to Gold, Chrome and powder coated fi nishes caused by damage to the protective layer. 6. Deterioration in colour and performance of polymer materials. 7.
Personal injury, property damage or economic loss, however caused.
Patent: NZ 326495, AU 727454, GB 2325021
 Loading...