

Page 1

www.whistlergroup.com
The Whistler Group
13016 N. Walton Blvd.
Bentonville, AR 72712 USA
(877) 842-3630
Consumer Hotline
(800) 531-0004
P/N 501070 © 2003 The Whistler Group, Inc.
WhistlerMap™ Software
USER'S MANUAL
GLOBAL POSITIONING SYSTEM
www.whistlergroup.com
Page 2

Whistler Map™ Software License
ATTENTION: PLEASE READ THIS DOCUMENT CAREFULLY BEFORE
OPENING THE CD’S. THE INDIVIDUAL OR ENTITY OPENING THE CD’S
(THE "END USER") AGREES TO BE BOUND BY THE TERMS OF THIS
LICENSE. IF YOU OPEN THE CD’S, YOU CANNOT RETURN THE
GALILEO™ GPS OR GALILEO™ GPS ACCESSORY PACK FOR CREDIT.
The enclosed computer program and the accompanying documentation are provided to the End-User by The Whistler Group, Inc.
("Whistler") for use only under the following terms. Whistler
reserves any right not expressly granted to the End-User. The EndUser owns the disk on which the Software is recorded, but Whistler
retains ownership of all copies of the Software itself. The End-User
assumes sole responsibility for the installation, use and results
obtained from use of the Software.
1. License.
End-User is granted a limited, non-exclusive license to do only the
following:
A. Install and maintain the Software on one computer at any time
for use only in the End-User's own business.
B. Make one copy in machine-readable form solely for backup or
archival purposes for the computer which the Software is installed.
The Software is protected by copyright law. As an expressed
condition of this License, the End-User must reproduce on the copy
Whistler's copyright notice and any other proprietary legends on
the original copy supplied by Whistler.
C. Transfer the Software and all rights under this License to
another party together with a copy of this License and all written
materials accompanying the Software, provided (i) the End-User
gives Whistler written notice of the transfer (including in such
notice the identity of the transferee), and (ii) the other party reads
and agrees to accept the terms and conditions of this License.
2. Restrictions.
The End-User may NOT sublicense, assign, or distribute copies of
the Software to others. The End-User may NOT decompile, reverse
engineer, disassemble, or otherwise reduce the Software to a
human readable form.
THE END-USER MAY NOT MODIFY, ADAPT, TRANSLATE, RENT,
LEASE, LOAN, RESELL FOR PROFIT, DISTRIBUTE, OR OTHERWISE
ASSIGN OR TRANSFER THE SOFTWARE, OR CREATE DERIVATIVE
WORKS BASED UPON THE SOFTWARE OR ANY PART THEREOF,
EXCEPT AS EXPRESSLY PROVIDED IN SECTION 1.C. ABOVE.
3. Protection and Security.
The End-User agrees to use its best efforts and to take all
reasonable steps to safeguard the Software to ensure that no
unauthorized person shall have access thereto and that no
unauthorized copy, publication, disclosure or distribution in whole
or in part, in any form, shall be made. The End-User acknowledges
that the Software contains valuable confidential information and
trade secrets and that unauthorized use and/or copying are harmful to Whistler.
4. Termination.
This License is effective until terminated. This License will terminate
immediately without notice from Whistler if the End User fails to
comply with any of its provisions. Upon termination the End User
must destroy the Software and all copies thereof, and the End-User
may terminate this License at any time by doing so.
5. Export Law Assurances.
The End-User agrees that the Software is to be used only in North
America and the Software will not be transferred or exported,
directly or indirectly, outside North America.
6. Limited Warranty.
Whistler warrants that, for one year from the date of initial use by
the original End User, the Software shall operate substantially in
accordance with the published functional specifications current at
the time of shipment. If, during the warranty period, a defect
appears, End User shall return the Software to Whistler and
Whistler's only obligation shall be, at Whistler's election, to replace
the defective Software. The End-User agrees that the foregoing
constitutes the End-User's sole and exclusive remedy for breach by
Whistler under any warranties made under this Agreement. This
i ii
Page 3

warranty does not cover any Software that has been altered or
changed in any way by anyone other than Whistler. Whistler is not
responsible for problems associated with or caused by incompatible
operating systems or equipment, or for problems in the interaction
of the Software with software not furnished by Whistler . No oral or
written information or advice given by Whistler or its dealers, distributors, employees or agents shall in any way extend, modify or
add to the foregoing warranty. THE WARRANTY AND REMEDY
PROVIDED ABOVE ARE EXCLUSIVE AND IN LIEU OF ALL OTHER
WARRANTIES, EXPRESS OR IMPLIED, INCLUDING BUT NOT LIMITED
TO THE IMPLIED WARRANTIES OF MERCHANTABILITY AND FITNESS
FOR A PARTICULAR PURPOSE. THE END-USER ASSUMES ALL RISK AS
TO THE SUITABILITY, QUALITY, AND PERFORMANCE OF THE SOFTWARE. IN NO EVENT WILL WHISTLER, OR ITS DIRECTORS, OFFICERS,
EMPLOYEES OR AFFILIATES, BE LIABLE TO THE END-USER FOR ANY
CONSEQUENTIAL INCIDENTAL, INDIRECT, SPECIAL OR EXEMPLARY
DAMAGES (INCLUDING DAMAGES FOR LOSS OF BUSINESS PROFITS,
BUSINESS INTERRUPTION, LOSS OF DATA OR BUSINESS INFORMATION, AND THE LIKE) ARISING OUT OF THE USE OF OR INABILITY TO
USE THE SOFTWARE OR ACCOMPANYING WRITTEN MATERIALS,
EVEN IF WHISTLER HAS BEEN ADVISED OF THE POSSIBILITY OF
SUCH DAMAGES. WHISTLER'S LIABILITY TO THE END-USER (IF ANY)
FOR ACTUAL DIRECT DAMAGES FOR ANY CAUSE WHATSOEVER,
AND REGARDLESS OF THE FORM OF THE ACTION, WILL BE LIMITED
TO, AND IN NO EVENT SHALL EXCEED, THE AMOUNT ORIGINALLY
PAID TO WHISTLER FOR THE LICENSE OF THE SOFTWARE.
7. Enhancements.
From time to time Whistler may, in its sole discretion, advise the
End-User of updates, upgrades, enhancements or improvements to
the Software and/or new releases of the Software (collectively,
"Enhancements"), and may license the End-User to use such
Enhancements upon payment of prices as may be established by
Whistler from time to time. All such Enhancements to the Software
provided to the End-User shall also be governed by the terms of this
License. IN ORDER FOR THE END-USER TO BE ASSURED THAT IT
WILL BE ADVISED OF AND LICENSED TO USE ANY ENHANCEMENTS
TO THE SOFTWARE, THE END-USER MUST COMPLETE THE ONLINE
REGISTRATION FORM AT WWW.WHISTLERGROUP.COM OR CALL
1-800-531-0004.
8. General.
This License will be governed by and construed in accordance with
the laws of the state of Arkansas, and shall inure to the benefit of
Whistler and End-User and their successors, assigns and legal
representatives. If any provision of this License is held by a court
of competent jurisdiction to be invalid or unenforceable to any
extent under applicable law, that provision will be enforced to
the maximum extent permissible, and the remaining provisions of
this License will remain in full force and effect. Any notices or
other communications to be sent to Whistler must be mailed first
class, postage prepaid, to the following address:
This Agreement constitutes the entire agreement between the
parties with respect to the subject matter hereof, and all prior
proposals, agreements, representations, statements and
undertakings are hereby expressly cancelled and superseded. This
Agreement may not be changed or amended except by a written
instrument executed by a duly authorized officer of Whistler.
9. Acknowledgment.
BY OPENING THIS PACKAGE, THE END-USER ACKNOWLEDGES
THAT IT HAS READ THIS LICENSE, UNDERSTANDS IT, AND AGREES
TO BE BOUND BY ITS TERMS AND CONDITIONS. Should you have
any questions concerning this License, contact Whistler at the
address set forth above.
The Whistler Group, Inc.
13016 North Walton Blvd.
Bentonville, AR 72712
iii iv
Page 4

Welcome,
Thank you for purchasing the Whistler Map™
mapping software for the Galileo™ Handheld
GPS. We hope you find this software easy to
use and helpful in planning your adventure.
This software is protected under copyright
laws. Copyright laws and permission to use
this software, are located in the software
license agreement at the beginning of this
manual.
The Whistler Map
™
program is designed
primarily to download detailed maps of the
continental United States to the memory card
in your Galileo
™
Handheld GPS. In addition,
you can use Whistler Map™ to set up trips,
make waypoints, plan travel routes and view
detailed area maps with special points of
interest (POI’s). You can easily download and
upload this information to and from your
Galileo™ Handheld GPS.
Table of Contents
Installation 1
Features 2
Operation 3-8
Download Detailed Maps 3-8
New Files 2
Directly to Galileo 3-6
Using a CF Card Reader 6-8
Viewing Detailed Maps 8-9
Display County 9
Waypoints and Routes 10-17
Waypoints 10-13
Mark a Waypoint 10-11
Edit a Waypoint 11-12
Open a Waypoint File 12-13
Routes 13-16
Create a Route 13-14
Edit a Route 15-16
Delete a Route 16-17
Other Features 17-18
v
vi
Page 5

Installation
Thank you for purchasing a Whistler Galileo GPS receiver and
WhistlerMap™ Software CDs.
Note: If you plan to run the WhistlerMap™ program from the
CD-Rom, you do not need to make any of these changes. The
following steps are necessary only if you wish to run the
WhistlerMap™ program directly from your hard drive.
Follow the same file structure as the CD when copying the
WhistlerMap™ program (wmap.exe) to your hard drive.
You will need to make a folder on your main drive (Generally C:
Drive). You can name the folder whatever you want, but the
name must not contain any spaces “ “ or underscores “_”.
Dashes / hyphens “-” are acceptable. (i.e., Whistler-GPS)
Copy the following files from the CD-ROM into this new folder:
Wmap.exe
USA.cou
ZbaseUSA.crd
In your new folder, create another new folder named “USA”.
From the CD-ROMs, copy the desired state folder(s) to the
newly created USA folder.
Note: These files require approximately 500MB of hard drive
space. Additional hard drive space is needed to include more
state files. To include all of the 48 states on the CD’s, approximately 1 GB of hard drive space is needed.
You can now operate the WhistlerMap™ program with the
selected states from your computer’s hard drive.
For any questions, please refer to the user’s guide, our FAQ
page on our website (www.whistlergroup.com), or contact our
customer service department at 1-800-531-0004.
Features
1. WhistlerMap™ Toolbar
a.File
Ope
n, Save as, Exit
To open, save map files and exit the program.
b.S
how
Clear, Show Roads, Show POI’s, Display Icons, Show,
Hide, Show Base
To display POI’s, Waypoints, routes and roads in base and
detailed maps.
c.Tools
A
rrow, M
ove, Zoom Out, Zoom In, Search Object, New
Waypoints, Waypoints List, Routes and Metric System
To display, move, zoom out, zoom in, search map
information, create new Waypoints, list all Waypoints and
create routes.
d. L
ist
Add Item, Remove Item, Add Many Items
To add and remove map files.
e.Transfer
Download, Upload
To download Program (OS), Map, Presented map, Track Log,
Waypoints and Routes from PC to Galileo, and Upload Track
Log and Waypoints saved in Galileo to PC.
f.About
A
bout WhistlerMap™
Displays WhistlerMap’s™ release version information.
1 2
INSTALLATION
FEATURES
Page 6

Operation
The basic WhistlerMap™ download/upload functions are easy
to use. The following section outlines two methods for
downloading detailed mapping information. Other Whistler
Map functions operate very similar to the Galileo. If you are
familiar with Galileo functions then this program will be very
easy to use. See “Viewing Detailed Maps” for viewing street
details.
Downloading Detailed Maps - New Files
Note: Normal PC to Galileo download times average six
minutes per 1MB. For faster downloads use a Compact Flash
(CF) Card Reader.
Downloading Detailed Maps- Continued
Directly To Galileo™
1) Fully insert the headphone-style plug of the download cable
into the Galileo’s “Data” jack on the end of the GPS where
buttons are located. The other end of the USB cable connects
to your computer’s USB port.
2) Insert a Compact Flash (CF) Card into the Galileo and install
four fresh or fully charged AA batteries before continuing.
3) Press and hold “PWR” to turn on the Galileo.
4) From any screen, press the “MENU” key and select the
“Main Menu” option.
5) Select the “Loading” option from the Galileo’s Main menu.
Follow the on screen directions (Press MENU Key) and then
select the “Download Map” option.
6) Turn on the computer or have computer auto detect the USB
port.
7) If the computer displays a dialog box to locate new drivers
because it could not detect or could not find the drivers for the
3 4
OPERATION
OPERATION
Data
Page 7

Galileo, direct the computer to the USB Driver folder on either
Whistler Map CD. Open the folder corresponding to the type of
OS your computer is using and click “OK”.
8) Open the Whistler Map program.
9) Open the “Tools” menu and select “Search Object” or click
on the “Search Object” Icon
10) Select the state and major city (“Name”) You could also
choose the “Hand” from the top menu to move the map in
any direction.
11) Choose the arrowhead pointer from the top menu.
The lines within the states are county lines. Simply click on the
county or counties you need. The county name and file size will
be displayed on the left pane. If you make a selection
mistake, simply click that county again to deselect it.
12) You can use the pull down menu or the
magnifying glass icons to zoom in or out .
13) Select the “Transfer” menu and select “Download”. Choose
the “Presented Map” option. A dialog box will open up to
show the download status. At the same time the download
status will also be shown on the Galileo.
14) If needed, press “PAGE/ESC” on Galileo to abort the
downloaded process.
15) To save the selected detailed files (.lst) for another trip,
simply select “Save As” from the file menu and save the file in
a GPS folder called GPS, for example, on your computer. You
can leave the default name as is or make your own for easier
future reference.
Using A CF Card Reader/Writer
1) Place Compact Flash (CF) Card into card reader and make
sure it is properly connected to your computer. See CF reader
installation manual for details.
2) Open the Whistler Map program.
3) Open the “Tools” menu and select “Search Object” or click
on the “Search Object” Icon.
4) Select the state and a major city (“Name”) You could also
use the “Hand” from the top menu to move the map in
any direction.
5 6
OPERATION
OPERATION
Page 8

5) Choose the arrowhead pointer from the top menu. The
lines within the states are county lines. Simply click on the
county or counties you need. The county name and file size
will be displayed on the left pane.
6) You can use the pull down menu or the magnifying glass
icons to zoom in or out
7) Select “Save As” from the file menu and select the CF reader
location. You can leave the default name as is or make your
own for easier future reference.
8) To save the selected detailed files (.lst) for another trip,
simply repeat the above step but save the file in a GPS folder
on your computer.
9) Install CF card into Galileo.
Downloading Detailed Map - Previously Saved File
Directly to Galileo
1) Fully insert the headphone-style plug of the download cable
into the Galileo’s “Data” jack.
2) Insert a Compact Flash (CF) Card into Galileo and install fresh
or fully charged batteries before continuing.
3) Press and hold “PWR” to turn on Galileo.
4) From any screen, press the “MENU” key and select the “Main
Menu” option.
5) Select the “Loading” option from the Galileo’s Main menu.
Follow the on screen directions (Press “MENU” Key) and then
select the “Download Map” option.
6) Open the Whistler Map™ program.
7) From the “Transfer” menu, select “Download”. Choose the
“Map” option.
8) Select the desired .lst file for download and click “OK”. A
dialog box will open up to show the download status. At the
same time the download status will also be shown on the
Galileo.
9) Press “PAGE/ESC” on the Galileo to abort the download
process.
Using A CF Card Reader/Writer
1) Place Compact Flash (CF) Card into card reader and make
sure it is properly connected to your computer. See CF reader
installation manual for details.
2) Open the folder on your computer where you stored the .lst
file.
3) Copy the selected file to the CF reader.
4) Install CF card into Galileo.
7 8
OPERATION
OPERATION
Page 9

Viewing Detailed Maps
When the WhistlerMap™ program is opened, the viewing scale
of the base map and USA.COU does not show detailed street
information. The base map shown is mainly to identify the
state counties and allow those counties to be downloaded into
the Galileo. The following section will show the proper steps
to display detailed map information.
If you want to plan a trip and mark known POI’s as Waypoints,
you first need to know the county name for that location. The
name of the county will be displayed when the mouse is over a
county. Make notes of the counties that you need detailed
formation for.
Display A County
1) Under the “File” menu select “Open”. The open dialog box
is displayed.
2) Open the USA folder from either WhistlerMap™ CD or if
already saved to the PC, from a location on your PC.
3) Open the state folder and select a county. The center of that
county is displayed. Select the “Add Item” under the “Tools”
menu (or the “Add Item”icon ) to look for POI’s. You can
also add Waypoints or create a route at this time. When a road
or POI is selected, it is centered on the map with a “star” icon
and its information marks its location on the map.
To remove the “star” icon, select “hide/searchpoint” from the
show menu.
4) Select “Add Item” from the “List” menu (or the “Add Item”
icon ) to save this county for later download.
5) Select “Open” to display another county. This will replace
the county previously displayed.
6) To add multiple counties for later download, simply select
“Add Many Items” from the “List” menu (or the “Add Many
Items” icon. The “Open” dialog box is displayed. Click
on the counties that you want to download and click “Open”.
Waypoints and Routes
Waypoints
Waypoints can be added to either the base map or on a
detailed county map. For better accuracy however, use the
county map to make Waypoints.
Mark A Waypoint
1) From the base map or a detailed county map displayed,
select “New Waypoint” from the “Tools” menu or select the
Waypoint tool .
2) Click on a road or POI that you want to mark as a Waypoint.
A dialog box will open asking if you want to open a new
Waypoint file.
Click “NEW” and a “Save As” box will open.
9 10
VIEWING DETAILED MAPS
WAYPOINTS
Page 10

To add to or edit your waypoints (wrt file) at another time, simply name the waypoint file and save it in a GPS folder, for
example, on your computer. Note: A new Waypoint file is
created each time the Whistler Map program is opened. ALL
added Waypoints are stored in this wrt file no matter what
map file (crd or cou) is opened and displayed.
3) To open an already saved waypoint file see “Open A
Saved Waypoint File” section.
4) A Waypoint screen is displayed. At this time you have the
option to rename the Waypoint and add a comment line or
simply click “OK” to accept the default name. You can rename
or add comments to a Waypoint at any time. The longitude
and latitude of the Waypoint is shown along with the date and
time the waypoint was made.
Edit A Waypoint
This procedure allows you to rename, add or edit comments or
delete Waypoints.
1) Select “Waypoints List” from the “Tools” menu or the
“Waypoints List” icon.
2) Select the Waypoint you wish to edit or delete. Simply click
on “Delete” to remove a Waypoint.
3) Click “Edit”. A Waypoint screen is displayed. At this time
you have the option to rename the Waypoint, add a comment
or change the latitude/longitude setting.
Open A Saved Waypoint File
When the WhistlerMap™ program is opened and the first
Waypoint is made, the program saves all waypoints in one
saved wrt file. All added Waypoints are stored in this wrt file
no matter what map file (crd or cou) is opened or displayed.
1) Select “Show. . .” from the Show menu.
11 12
WAYPOINTS
WAYPOINTS
Page 11

2) Select “Waypoint_Route”. An Open dialog box appears.
3) Open the folder where the wrt Waypoint files are stored
and select the wrt file you wish to open. Note: If the map
displayed is not the map the Waypoints were made on, the
screen will only show the Waypoints.
Routes
You have created new Waypoints, but now you want to go
back to these favorite spots. Making a route will tie the
Waypoints together, such that the Galileo can lead you to each
Waypoint. Note: You must have at least two waypoints saved
for the routes feature to work.
Create A Route
1) Select “Routes” from the “Tools” menu or select the
“Routes” icon
2) A route screen is displayed. The first route’s default name
is “R001”. At this time you have the option to rename the
route (NAME field) and/or add a comment line. You can rename
or add comments to a route at any time.
3) Add Waypoints into the route by selecting the Waypoint you
want to reach first and click “ADD” under the “RT_WP”
choices. Repeat the same procedure for other Waypoints.
13 14
ROUTES
ROUTES
Page 12

4) Click “OK” when the route is finished.
Edit A Route
1) This procedure allows you to rename, add or edit comments,
insert or delete Waypoints in a route.
2) Select “Routes” from the “Tools” menu or select the
“Routes” icon
3) A route screen is displayed. Select the route you wish to edit.
At this time you have the option to rename the route (NAME
field) and/or add a comment line.
4) To remove a waypoint, select the Waypoint to delete. Simply
click on “Delete” from the “Rt_Wp” section to remove the
Waypoint.
5) To add a Waypoint at the end of your route, select the new
Waypoint from the “Waypoint” field and click “Add” from the
“Rt_Wp” section.
6) To insert a Waypoint between Waypoints, select the
Waypoint the new one will follow from the “Rt_Wp” field.
Select the new waypoint from the “Waypoint” field and click
“Insert” from the “Rt_Wp” section.
Delete A Route
1) Select “Routes” from the “Tools” menu or select the
“Routes” icon
2) A route screen is displayed. Select the route you wish to
delete.
15 16
ROUTES
ROUTES
Page 13
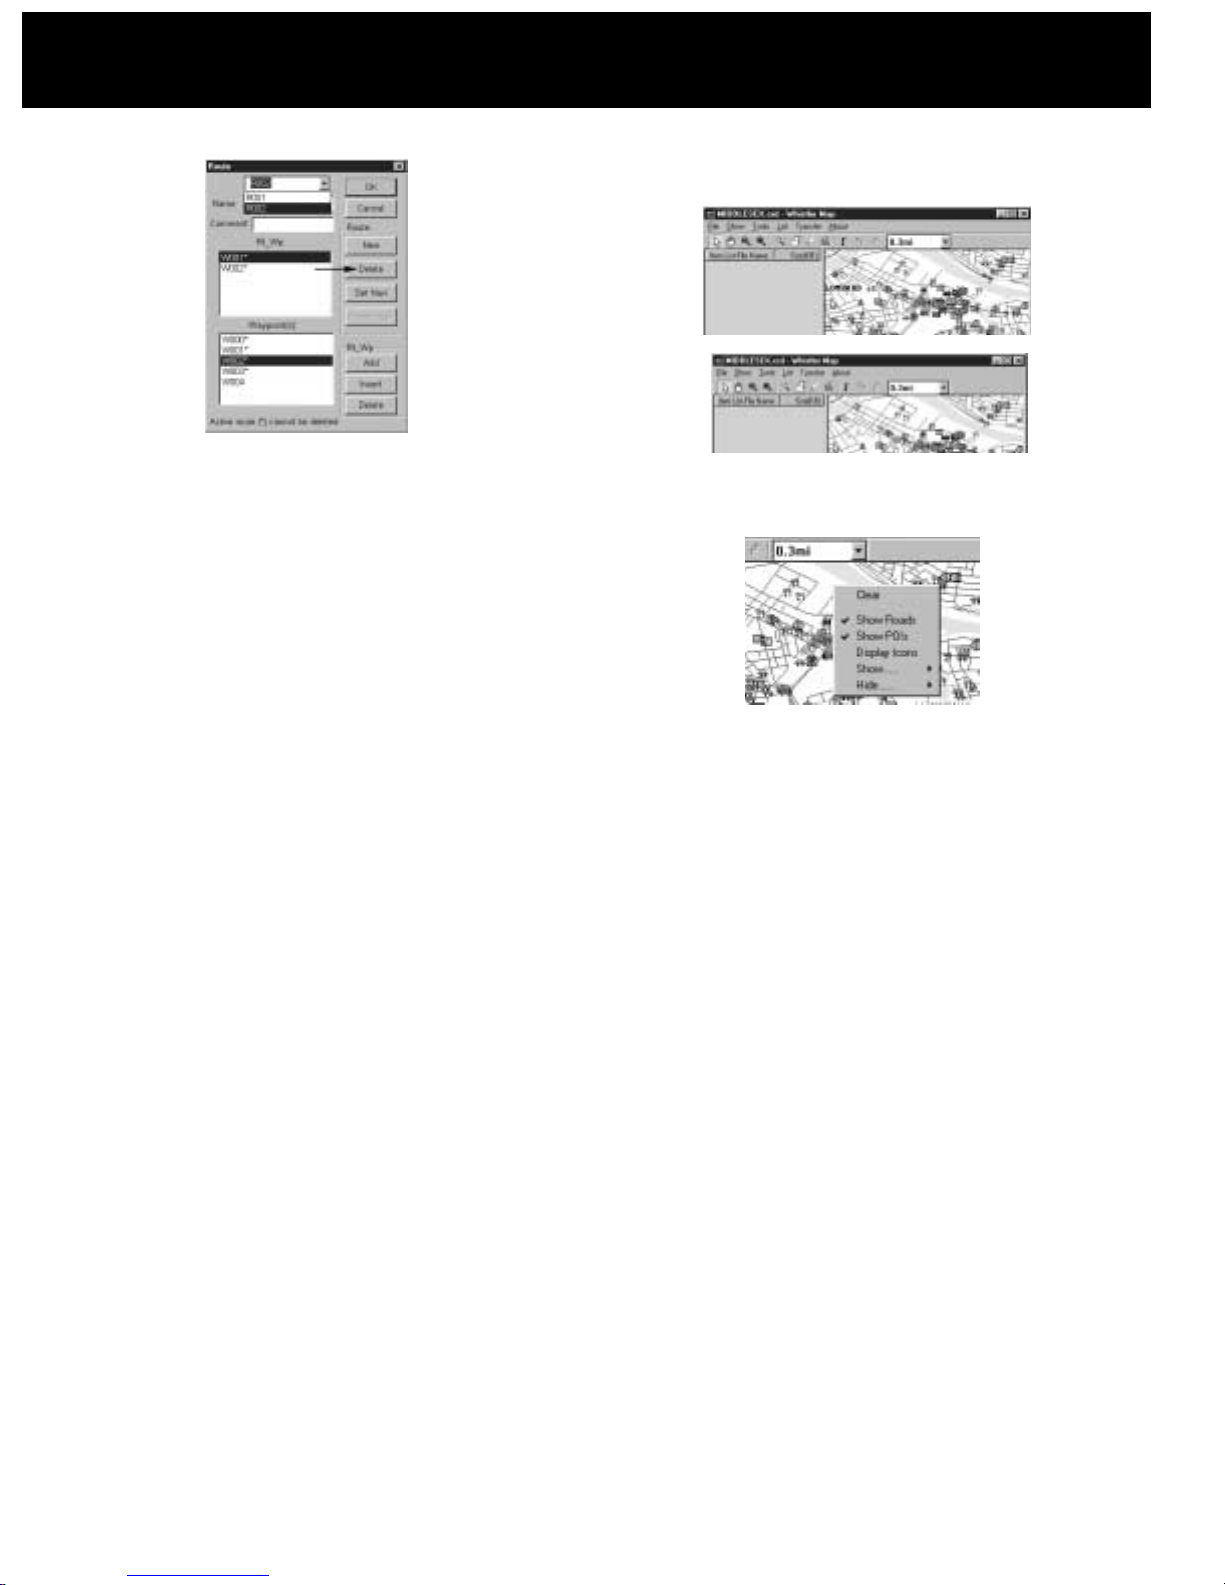
3) From the “Route” section, click “Delete”.
Other Features
Detail Callouts
When viewing a detailed map, moving the mouse over a street,
highway or POI, it will display the information about that area.
Clicking that area will leave that POI’s information temporarily
on the map.
Remove the Detail Callouts
1) Select “Clear” from the “Show” menu or right click on the
map and select “Clear”.
Menu Item Shortcuts
When the mouse is over the map area, right clicking will bring
up the map’s menu items.
17 18
ROUTES / OTHER FEATURES
OTHER FEATURES
 Loading...