

Page 1

The Whistler Group Inc. - Corporate Offices
3604 NW Frontage Road
Bentonville, AR 72712
1-800-531-0004
The Whistler Group Inc. - Customer Return Center
551 North 13th Street
Rogers, AR 72756
www.whistlergroup.com
P/N 303000 © 2009 The Whistler Group Inc.
OWNER’S MANUAL
Whistler Bluetooth Headsets
Models:
BT2200 (Class2/CH2)
BT2300 (Class2/CH2)
BT3200 (Class1/CH2)
BT3300 (Class1/CH2)
Page 2

Introduction . . . . . . . . . . . . . . . . . . . . . . . . . . . . . . . . . . . . . . . . . . . . . . .2-3
What is Bluetooth®? . . . . . . . . . . . . . . . . . . . . . . . . . . . . . . . . . . . . . . . . . . .4
Safety Instructions . . . . . . . . . . . . . . . . . . . . . . . . . . . . . . . . . . . . . . . . . . .5-6
Feature - Components . . . . . . . . . . . . . . . . . . . . . . . . . . . . . . . . . . . . . . . . .7
Match Unit to Helmet Type . . . . . . . . . . . . . . . . . . . . . . . . . . . . . . . . . . . . .8
Storing and Recharging the Headset . . . . . . . . . . . . . . . . . . . . . . . . . . . .9-11
Storage
Recharge Headset
Check battery status
Battery charging time and usage time
Installing Headset . . . . . . . . . . . . . . . . . . . . . . . . . . . . . . . . . . . . . . . . . . .12
Installation of Speakers and Microphone . . . . . . . . . . . . . . . . . . . . . . . . . .13
Button Callouts . . . . . . . . . . . . . . . . . . . . . . . . . . . . . . . . . . . . . . . . . . . . .14
Button Functions . . . . . . . . . . . . . . . . . . . . . . . . . . . . . . . . . . . . . . . . . . . .15
Basic Functions and Operation . . . . . . . . . . . . . . . . . . . . . . . . . . . . . . . . .16
Pairing to a Cell Phone . . . . . . . . . . . . . . . . . . . . . . . . . . . . . . . . . . . . .17-20
Automatic and manual call acceptance
Connection headset with cell phone
Play music from mobile phone
Receiving a call during listening to music
Disconnect cell phone and Bluetooth headset
Pairing to an Audio Device . . . . . . . . . . . . . . . . . . . . . . . . . . . . . . . . . .21-22
Connecting headset with audio device
Operating and disconnecting to the audio device
Intercom Function . . . . . . . . . . . . . . . . . . . . . . . . . . . . . . . . . . . . . . . . .23-28
Headset distance
VOX function
Adjustment of microphone sensitivity
Paring of headsets on channel 2
Cell phone and Intercom
Music and Intercom
Disconnect headset from music / cell phone
General Information . . . . . . . . . . . . . . . . . . . . . . . . . . . . . . . . . . . . . . . . . .29
Specifications . . . . . . . . . . . . . . . . . . . . . . . . . . . . . . . . . . . . . . . . . . . . . . .30
Troubleshooting . . . . . . . . . . . . . . . . . . . . . . . . . . . . . . . . . . . . . . . . . .31-32
FCC Information . . . . . . . . . . . . . . . . . . . . . . . . . . . . . . . . . . . . . . . . . .33-34
Warranty . . . . . . . . . . . . . . . . . . . . . . . . . . . . . . . . . . . . . . . . . . . . . . . .35-38
Table of Contents
Page 3

Introduction Introduction
Dear Whistler Owner,
Thank you for purchasing a Bluetooth
questions concerning the operation of this Whistler product please call:
®
Headset from the Whistler Group. If you have
Customer Service
1-800-531-0004
Monday - Friday • 8:00 am - 5:00 pm CT
or visit our website
www.whistlergroup.com
Please keep the receipt in a safe place. For warranty verification purposes, a copy of your
dated store receipt must accompany any unit sent in for warranty work. If the unit is
returned without a dated store receipt, an out of warranty service charge applies.
You now have the possibility to connect devices like cell phone, PDA, GPS system
(depending on the manufacturer), and 2-way radio systems wirelessly to your headset.
Furthermore, you can talk wirelessly to your passenger with 2 BTS2200/2300 headsets or
to another motorcycle operator with 2 BTS3200/3300 headsets.
Please read the instructions for the different models carefully regarding the pairing with
external devices and the intercom function. Design and specifications could be changed
without prior notice.
All intellectual property rights and copyrights for the manual, hardware, and related
software are protected by applicable law. This manual may not be copied, reprinted, or
reproduced in any manner without the written permission of the Whistler Group.
Note: Your warranty period begins at the time of purchase. The warranty is validated only
by the dated store receipt. Record the serial number of the unit in the space provided in
the warranty section of the manual.
To fully acquaint yourself with the operation of your Whistler we recommend reading this
entire manual or visiting our FAQ page on our website www.whistlergroup.com
Enjoy your Whistler and please drive safely.
Sincerely,
The Whistler Group, Inc.
2 3
Page 4

What is Bluetooth? Safety Instructions
WARNING
CAUTION
Bluetooth is a wireless protocol utilizing short-range communications technology facilitating
data transmissions over short distances from fixed and/or mobile devices, creating wireless
personal area networks (PANs).
The intent behind the development of Bluetooth was the creation of a single digital
wireless protocol, capable of connecting multiple devices and overcoming issues arising
from synchronization of these devices. Bluetooth provides a way to connect and exchange
information between devices such as mobile phones, telephones, laptops, personal
computers, printers, GPS receivers, digital cameras, and video game consoles over a
secure, globally unlicensed industrial, Scientific, and Medical (ISM) 2.4 GHz short-range
radio frequency bandwidth.
Important information concerning the Whistler Bluetooth Headsets.
1). The paring between 2 headsets or headset and another device will be
automatically interrupted if the reception distance is exceeded.
2). Please make sure that the paired devices will be in close proximity.
3). The Bluetooth function of other devices in the environment should be switched off
so that they won’t interfere with the pairing process.
4). Please note that in some cases, the headsets cannot be paired with external
devices because some manufacturers do not allow other Bluetooth devices than
their own.
Please read the “Safety Rules” carefully before using this product. Following the safety rules
prevents users from damages related with the misuse of the product. It is very important to
follow these safety rules. We state “Caution” and “Warning” to clarify any potential risk for
any damage associated with the misuse of the product.
May cause bodily harm or even
death if the user ignores these
warnings in the safety rules.
• Attach the Bluetooth unit to the helmet and check its security before driving. — If the
unit is not secure to the helmet, it could get damaged when falling and the user
assumes responsibility.
• Do not detach the unit forcibly during operation. — When detaching from the helmet, it
has to be powered off and detached safely.
• Do not pull on the power cord. — It may cause damage to the power cord.
• Do not use a multi-socket for external adapter. — It may cause unexpected heating, fire,
and malfunction.
• Do not place the unit near a magnet. — It may cause malfunction.
May cause damage or shorten the life of
the product if the user ignores these
cautions in the safety rules.
4 5
Page 5

Safety Instructions Features - Components
• When cleaning the exterior, switch off
the unit and wipe it with a dry cloth
only. — A wet cloth may cause and
electronic shock.
• Unplug the product when not using it
for a long time.
• Do not drop or throw the unit.
• Be careful with sharp surfaces when
attaching bracket.
• Do not overcharge the product.
Remove when complete.
• Do not disassemble, repair, or modify,
the unit.
• Do not rotate the BT2200/3200
microphone by 360°.
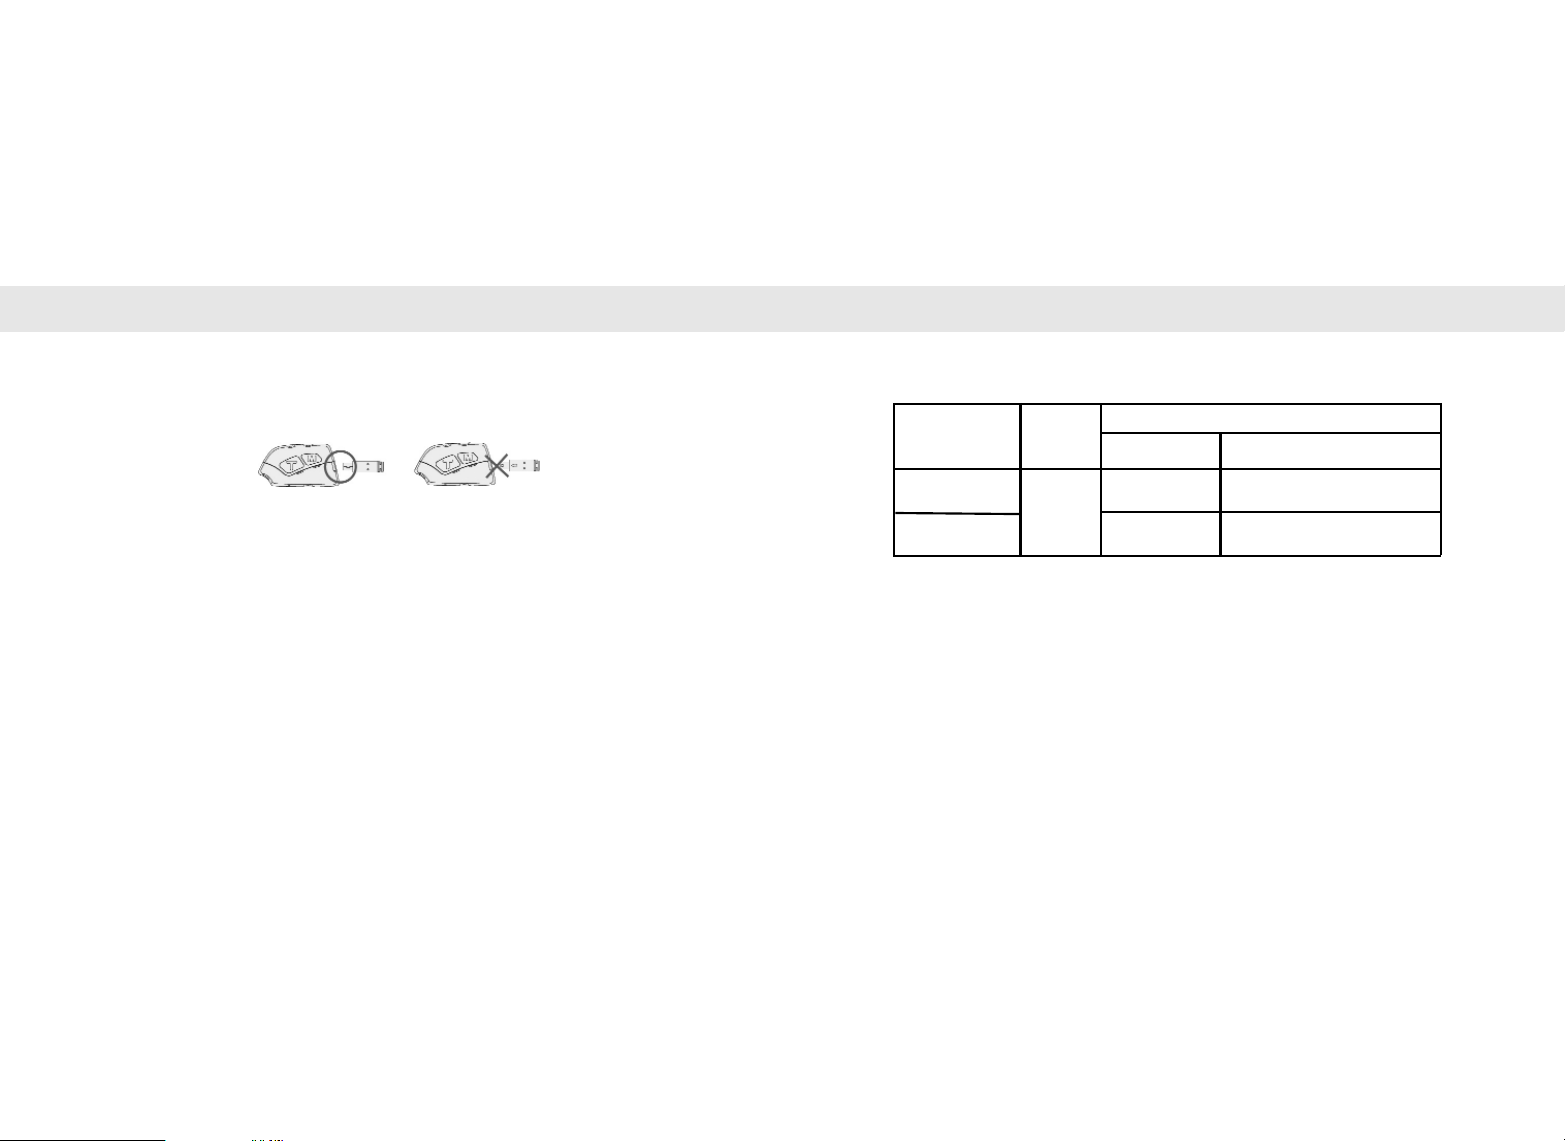
• Make sure that USB jack of the headset
and charger are correctly connected to
the USB socket on the module.
• Please completely charge the headset
prior to its first use.
6
• Disconnect charger when complete.
• Do not use damaged cables, jack, or loose
socket.
• Do not place the product in an area which the
temperature could suddenly increase.
• Keep the power socket clean and free from
dust.
• Do not clean the exterior with volatile or oily
solvents.
• Stop using the product in case of smoke or
burning smell.
• Do not substitute non Whistler cables, jacks, or
charger.
• Do not disassemble product.
• Keep away from children and pets.
• Keep charger away from metals to avoid
shorting the jack.
Main Unit Speakers Microphone Accessories
BT2300/3300
BT 2200/3200
Speakers A
Speakers B
Microphone A
Microphone B
Bracket A
Hook &
Loop
Charger
Bracket B
Protection
3M Tape
Tape
7
Page 6
Storing and Recharging HeadsetMatch Unit to Helmet Type
8 9
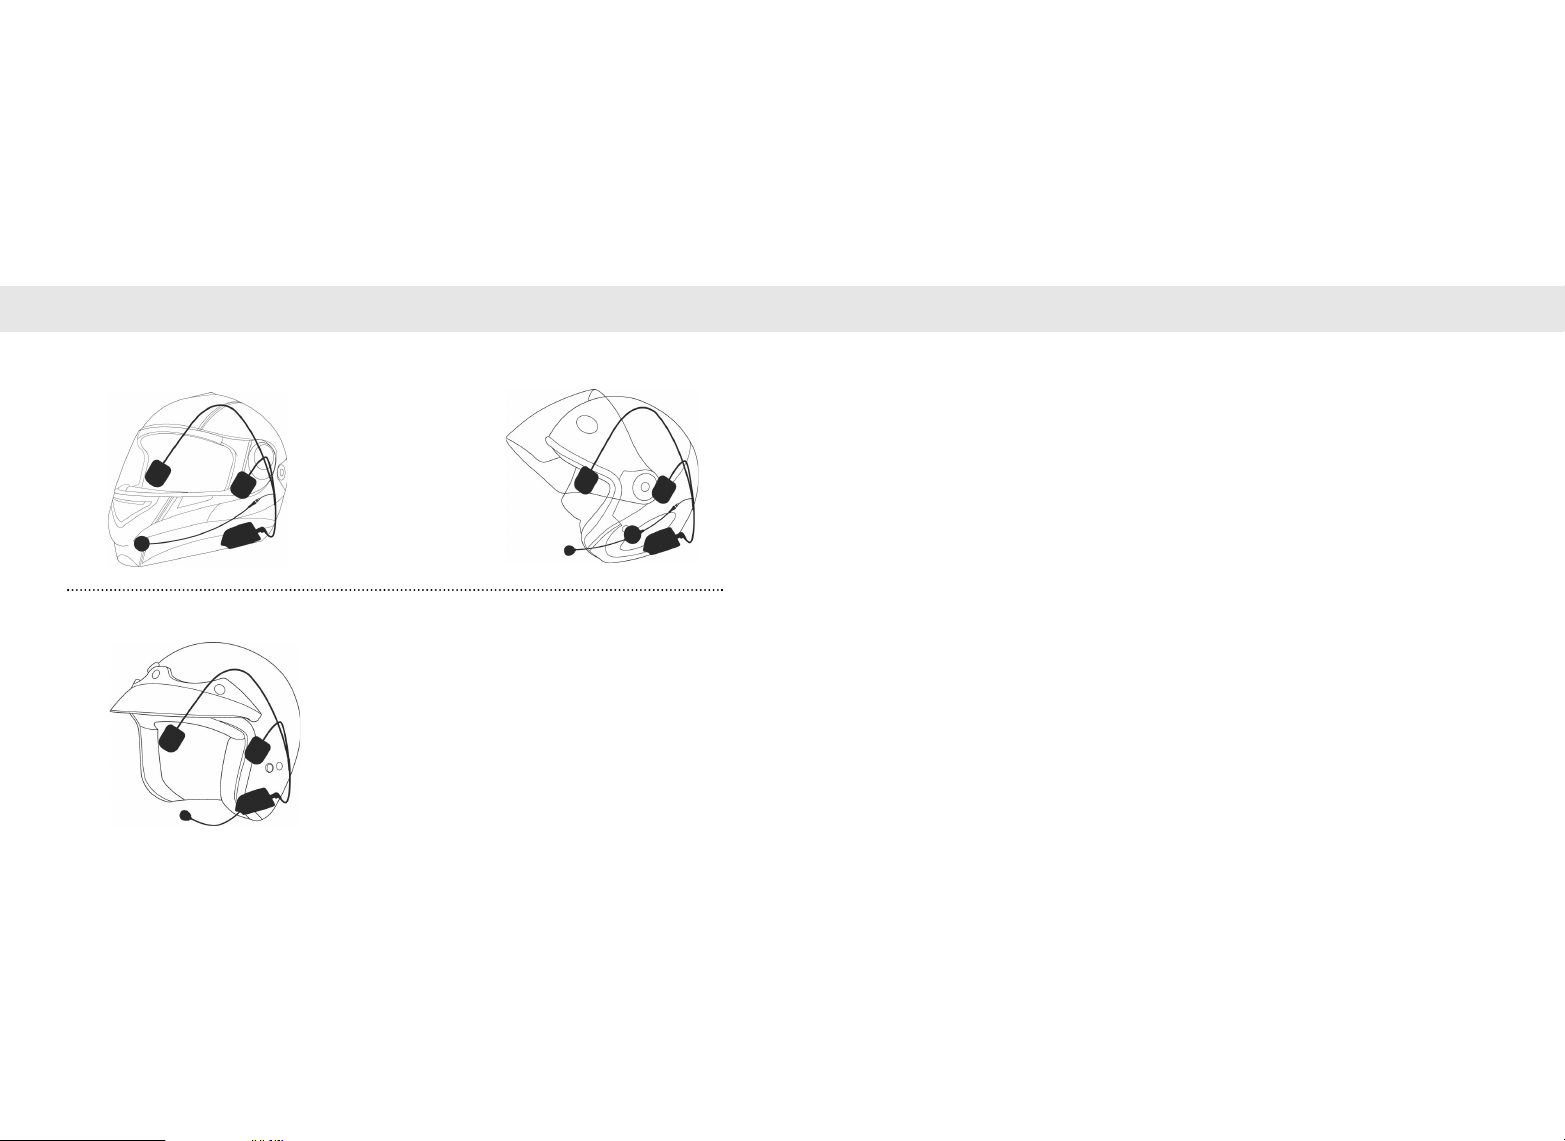
1) Full Face Helment W/microphone A
3) Open Face Helment
2) Flip-up Helment W/microphone B
BT2300/3300
BT2200/3200
Storing
When the unit is not in use please consider the following steps.
1). When not using the headset, please store it in a dry place and switch it off to save
battery power.
2). Do not place it in direct sunlight or extremely hot temperatures.
3). Store all accessories in a dry place.
Recharging Headset
The Bluetooth headset has a Li-Polymer rechargeable battery. Before using the headset for
the first time, the battery has to be charged completely.
1). Only charge the headset with the supplied charger. The headsets have a
charge voltage of 5V. Please note that the use of different charger could
damage the headset and void the warranty.
Page 7
Storing and Recharging Headset Storing and Recharging Headset
Recharging Headset - (continued)
2). Connect the headset to the charger as described. Please make sure that the
charger plug is inserted correctly into the headset.
3). The red LED is illuminated during the charging process. When the headset is fully
charged, the red LED turns off. Disconnect the charger unit from the headset after
the charging process.
4). If the battery status is low, you will hear a warning signal in the headset.
Check Battery Status
Press both volume keys (+&-) for 10 seconds from power off status and then release. The
red LED will indicate the battery status.
Low Battery: The red LED will flash approximately 4 times (fast)
Medium Battery: The red LED will flash approximately 2 times (slower)
Full Battery: The red LED will flash one time (long flash).
Battery Charge / Usage Time
Model
BT2200/2300
BT3200/3300
The usage times may vary depending on the number of connected systems.
The battery must be replaced by Whistler personnel.
Charge
Time
~ 3h
Stand-by Speaking/music/intercom
~180h ~14h
~90h ~7h
Usage Time
10 11
Page 8
Installing Headset Installation of Speakers and Microphone
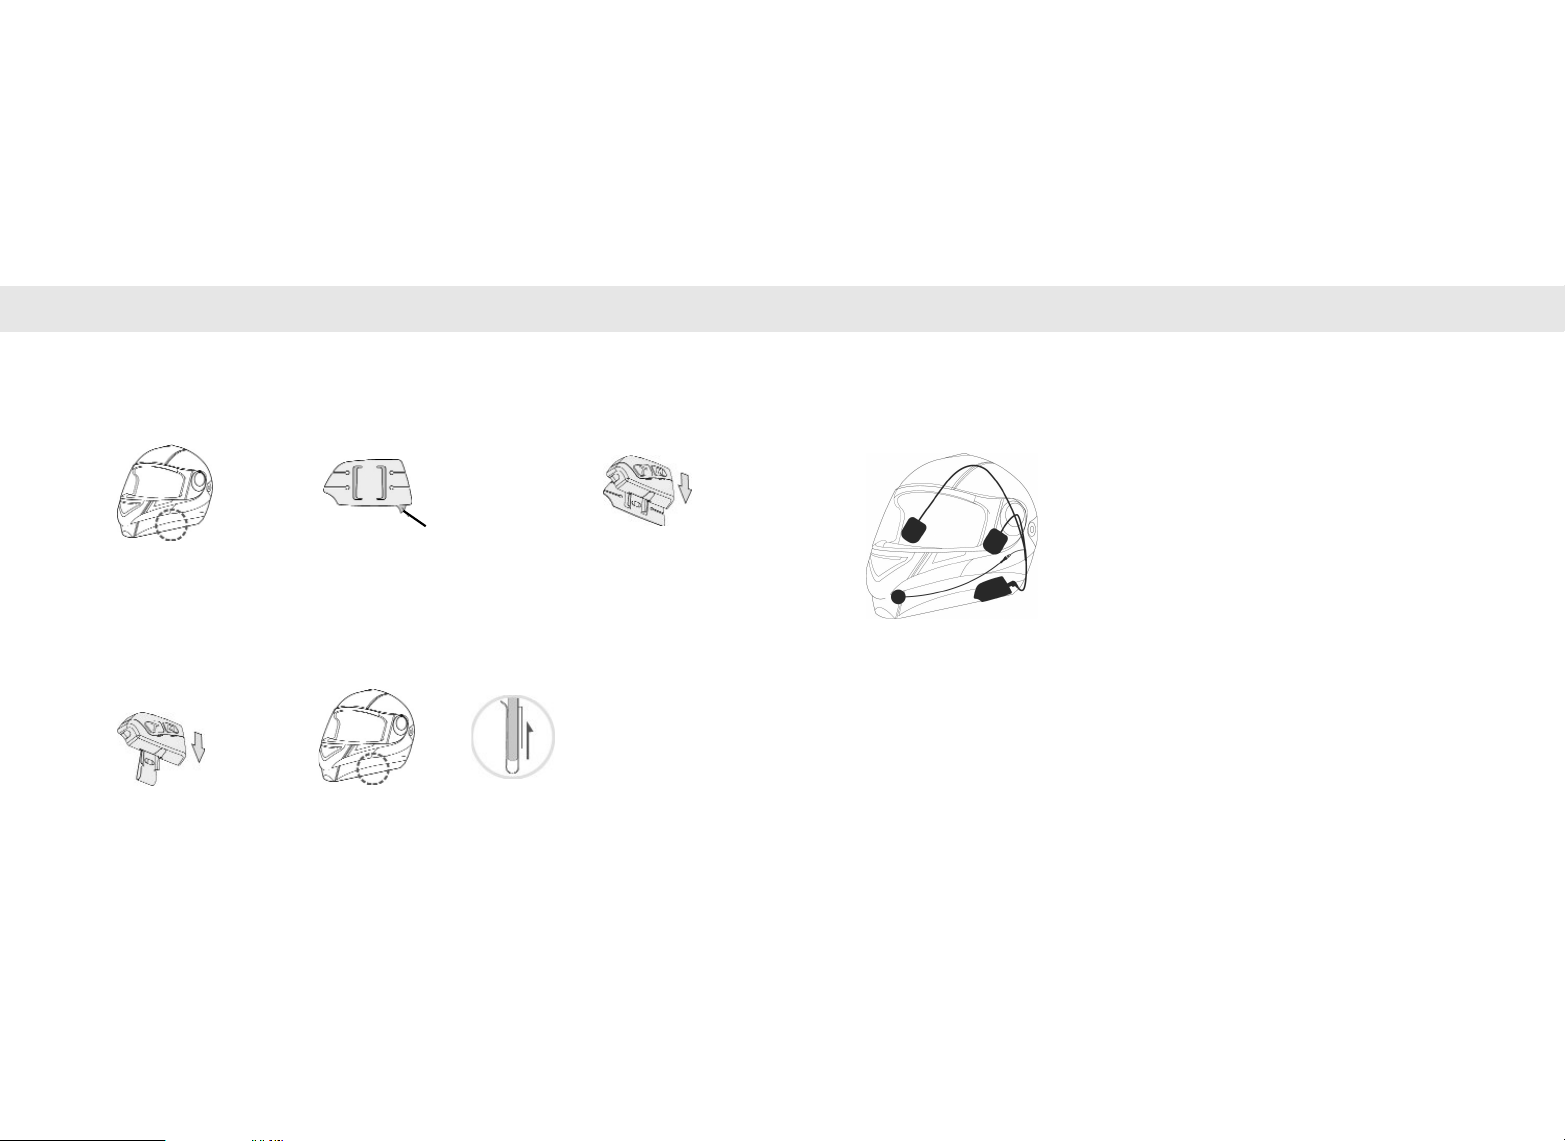
I. Please clean the
helment surface before
attaching the bracket.
I. Slip the Bluetooth
module top-down to
the bracket.
II. Please prepare the tape
on the bracket and
attach it to the helmet
II. The bracket should be attached vertically on the outer shell of
the helment. If neccessary, please protect the helment with the
protection tape against scratches.
III. After attaching the
bracket, the main
module will be slipped
on the bracket topdown.
Double sided
adhesive tape
Select mounting method based on helmet type.
Please note: Equipment will vary due to helmet type.
1) Using Bracket A (for attaching to helmet)incl. 3M adhesive tape.
Recommened to be placed on the left hand side
1). Please connect the headset cable (USB plug) with
the USB socket on the module.
2) Using Bracket B (for attaching to the helmet)
Please note: Not possible with every helmet type
2). Connect the microphone to the white plug on the
head set cable (BT2300/3300 only).
3). Apply the hook and Loop type to the inside of the
helmet near your ears. Depending on the helmet
type, the speakers can be placed on or under the
inside helmet liner.
4). Both speakers have different cable lengths. The
shorter cable is for the module side.
5). The microphone should be placed close to the
mouth inside the helmet.
12 13
Page 9

The volume adjustment will be acknowledged as tones through the speakers.
Key Function
[+] KEY
[-] KEY
MASTER KEY [M]
TALK KEY [T]
RESET
MUTE KEY
Button Callouts Button Functions
14 15
ACTIVATE/DEACTIVATE CHANNEL 2
INCREASE VOLUME
ACTIVATE/DEACTIVATE CHANNEL 1
DECREASE VOLUME
PAIRING CHANNEL 2 AS MASTER
REDIALING, ACCEPT CALL
TEMPORARY MUTING OF CHANNEL 1 & 2
RESET OF ALL FUNCTIONS, ALL CHANNELS OFF
Page 10

Basic Functions and Operation Pairing to a Cell Phone
Function Key/Action/LED Signal
Activate channel 1
Activate channel 2
Stand-by
Deactivate channel 1
Deactivate channel 2
Pairing
Connected
Redialing
Microphone sensitivity
Accept call
Stop/Play music
Start/Stop intercom
Low battery status
Reset
Press the [-’] key for 4 seconds until the red LED flashes.
Press the [+] key for 3 seconds until the green LED flashes. If the
headsets haven’t been paired before, the headset go into SLAVE
mode and starts flashing rapidly.
1 Flash per second
Press the [-] key for 3 seconds until the red LED flashes longer then
release.
Press the [+] key for 3 seconds until the green LED flashes longer
then release.
Press the [+] key from power off status until the green LED starts flashing
rapidly.
3 flashes per second
Briefly press/release the [T] key.
Press [-] & [+] simultaneously from power off status for 6 seconds and release.
Manual: Press [T] key when hearing the call signal.
Press mute key for 5 seconds
Press mute key momentarily
Interval sounds every 30 seconds
iPress [R] key when the headset is turned on;.All LEDs turn off.
low = 4 flashes
middle = 2 flashes
high = 1 long flash
4 Tones
4 Tones
-----------
4 Tones
4 Tones
5 Tones
4 Tones
-----------
-----------
4 Tones
-----------
1 Tone
-----------
-----------
Normally, you can connect every Bluetooth cell phone to the headset. However,
depending on the phone type, some functions cannot be operated through the headset.
This includes the automatic music rendering after a call, redialing, or other functions.
Therefore, if you have problems with your mobile phone, please consult the phone’s
owner’s manual.
Automatic and manual call acceptance
1). The headsets offer you the possibility to choose between automatic and manual
call acceptance. Factory settings will be “automatic” call acceptance.
2). To change to manual call acceptance, activate channel 1 and press the [T] key for
5 seconds. If you want to change it to automatic again, press the [T] key again for
5 seconds. You will also hear a sound signal in your headset.
3). If the automatic call acceptance in activated, you will hear the ringing of the
phone in your headset which will be automatically activated after 2-3 rings. To
hang up the phone, momentarily press the [T] key.
4). If the manual call acceptance is activated, you will have to accept the call by
pressing the [T] key during the call. To hang up the phone, you have to
momentarily press the [T] key again.
17
Page 11

Pairing to a Cell Phone Pairing to a Cell Phone
Connecting the headset with cell phone.
1). Activate the Bluetooth function of you phone and start searching for other phones
in our environment. If necessary, make use of your mobile phone manual. Please
make sure that all other Bluetooth devices in your environment as well as all
channels of other headsets are switched off.
2). After the search function of your cell hone has been activated, activate your
Bluetooth headset by pressing the [-] key, from the power off status, for
approximately 7 seconds until the red LED starts flashing rapidly.
3). On most cell phone’s displays, you will see the name of the headset now (Whistler
200/300). After you choose the headset, you will be asked for a password. This
will be 0000 in most cases. Alternatively, try 1234 or 1111. If these passwords do
not work, please consult your cell phone manual.
4). After entering the password, connect the cell phone to the headset by following
the directions provided by your cell phone or cell phone owner’s manual.
5). Cell phone and headset are now paired. If you reactivate both units, the
connection will be automatically activated again (paired).
Play music from mobile phone
The Bluetooth headsets have Bluetooth Version 2.0 and the A2DP protocol. With this
protocol, you can hear music in stereo quality. To hear music in stereo quality from your
cell phone depends on whether or not your cell phone has the A2DP protocol too.
Otherwise, you will hear the music in mono quality only.
1). Connect your cell phone with music to you Bluetooth headset as previously
described.
2). Activate the music on your cell phone. The volume can be adjusted with the [+] &
[-] keys. With the Whistler BT2000/3000 models, you can adjust the music volume
separately from the intercom volume.
3). To stop and start the music, press the Mute key on the headset.
4). If cell phone and headset have too much distance between each other, but get
together within 30 minutes, they will connect again automatically. After 30
minutes have passed, you have to switch off/on your headset can cell phone to
connect them again. If this does not work, please pair both units again.
18 19
Page 12

Pairing to a Cell Phone Pairing to an Audio Device
Receiving a call while listening to music
1). While listening to music from your cell phone, you can receive calls at any time.
2). If you receive a call, the music will be muted and you will hear the ringing of the
cell phone. Depending on your selection, the call will be accepted automatically
or manually.
3). After finishing the call, the music will be automatically activated again. Please refer
to the information on page 16.
4). If you press the [T] key while listening to music, the phone will redial the last called
number. With some phones, you have to press the [T] key twice because the
phone selects the caller list first.
Disconnect cell phone and Bluetooth headset
1). Switch off the Bluetooth of your cell phone and disconnect the headset.
2). Switch off channel 1 as described on page 15.
3). If you now activate both devices at the same time, the Bluetooth headset is still
existing in the phone and just has to be connected again (Last Device Search).
Connection headset with audio device
In addition to your cell phone, you can also connect a Bluetooth audio device on channel
1 at the same time (e.g. GPS system, MP3 player, BTA (Bluetooth Adapter). Before starting
the pairing, please switch off all other Bluetooth devices in your environment.
1). Activate channel 1 as described with the [-] key.
2). Activate the audio device and start the pairing process. Please make use of the
audio device user’s manual if necessary.
3). Please choose your headset so that you can connect both devices.
4). You can now use your cell phone and the audio device at the same time on
channel 1 or only the audio device. GPS systems often offer the possibility to
connect the phone directly with the GPS system.
If you use audio devices or GPS systems without
NOTE:
Bluetooth, you can use a BTA (Bluetooth Adapter)
to connect to the audio output of the device and
transfer the sound via Bluetooth to your headset.
20 21
Page 13

Pairing to an Audio Device Intercom Function
Operating and disconnecting the audio device
1). You can adjust the volume of the audio device with the [+] & [-] keys of the
headset.
2). You can start and stop the music with the Mute key.
3). If the audio device is out of range from the headset, the connection will be
interrupted.
4). If the audio device and headset are out of range of each other but come within
range within 30 minutes, they will connect again automatically. After 30 minutes
have passed while out of range, you will have to switch your headset and the
audio device off then on to connect them again. If this does not work, please pair
both units again.
5). To disconnect both devices, switch off channel 1 of the headset and the audio
device. If the headset has not been paired to any other device, they will connect
automatically after switching on.
NOTE:
The volume adjustment and other functions
may differ with some GPS systems.
Headset Distance
The BT2200/2300 is intended for communications between the driver and passenger. You
will need one headset for each person. The BT3200/330 is intended for communications
between the driver of one motorcycle to the driver of another. You will need one headset
for each person.
Vox Function
1). The headsets are equipped with VOX function. Channel 2 will be muted if there is
no active communication between headsets. Thus, no noise will be transferred
between headsets during this time and all connected audio devices will be active.
2). The VOX function mutes automatically after 30 seconds if the headset does not
detect any communication signals, perhaps because the signals are too low. 5
seconds before the intercom mutes, the headset paired as Master will get a signal.
The Slave headset will provide a sound when deactivation of the VOX occurs.
3). To keep the VOX on after the signal (sound), the Master [voice] has to speak
louder. It may be necessary to adjust the sensitivity of the microphone (page 24)
to ensure continuous communications. After the VOX has turned off, it can be
activated again by speaking with a loud voice into the microphone.
22 23
Page 14

Intercom Function Intercom Function
Vox Function (continued)
4). When activating the VOX after is has turned off, a delay of 3 seconds is required
before resuming conversation. The activation of the VOX will provide a sound in
the headset.
5). Depending on the helmet type and motorcycle, ambient noises could activate the
VOX at higher speeds (~60 MPH). In that case, please protect the microphone as
much as possible from ambient noises and lower the microphone sensitivity. If you
ride for long hours at high speeds, we recommend that you switch off channel 2
at one headset. If the channel is switched on again, the headsets are paired and
the communications can resume.
Adjustment of microphone sensitivity
If the VOX does not function appropriately, the microphone sensitivity should be adjusted.
The individual adjustment depends on the helmet, riding conditions, and the voice level.
1). Press [+] & [-] keys simultaneously for 6 seconds (from a power off status). Release
the keys.
2) Adjustments
Low: 4x flashing within 2 seconds
Middle: 2x flashing within 2 seconds
High: 1 long flash for 2 seconds
Repeat key presses until adjustment level desired.
Pairing of headsets on channel 2
Before you start to pair the headsets on channel 2, please switch off channel 1 as well as
all other Bluetooth devices in your environment.
1). Headset 1: Press the [+] key for 7 seconds (from a power off status) until the
green LED starts flashing rapidly. This headset will be the SLAVE.
Headset 2: Press the [M] key and the [+] simultaneously for 7 seconds until the
green LED starts flashing rapidly. This headset will be the MASTER.
2). As soon as the headsets have paired, the green LEDs will flash slower.
3). As long as the headsets have not been reset, they will connect automatically with
each other every time you turn them off then on again.
24 25
Page 15

Intercom Function Intercom Function
Cell phone and intercom
1). Please connect the phone to the headset on channel 1 as described.
2). Switch off channel 1 again and activate channel 2 as described.
3). Switch on both channels again.
4). You can now listen to music and make calls with your phone and use the
intercom on channel 2. Press the [+] & [-] keys to adjust the music volume.
5). The cell phone has first priority on channel 1. The intercom will be muted when a
call comes in. The music will also be muted during intercom use. If the VOX is
off, the music comes back on automatically (not possible will all cell phones).
6). Every headset can have two devices at the same time on channel 1 and also
intercom on channel 2. Phone calls, music, and GPS announcements can only be
received on the headset that they are actively paired with.
NOTE:
After the call has been finished, it will take approximately
5 seconds before the intercom is active again.
Music and Intercom
1). Connect the audio device (MP3 player, iPOD, etc.) with channel 1 of the headset
as described.
2). If the headsets have not been paired, switch off channel 1 and active the intercom
on channel 2 as described (See pairing on channel 2).
3). Please switch on both channels again.
4). You can now listen to music on channel 1 and communicate on channel 2. Press
the [-] or [+] key to adjust the volume level of the mute [M] key to stop or start the
music.
5). The music on channel 1 will be muted when the VOX is activated. As soon as the
VOX is muted, the music will be automatically active again.
During intercom on channel 2, you can have music and telephone on
separate devices on channel 1. The music is active as long as the VOX is
NOTE:
muted. When a call comes in, music and intercom will be muted as the
phone has first priority. During the call, the intercom cannot be activated.
Music and intercom volume will be adjusted separately from each other.
26 27
Page 16

Intercom Function General Information
Disconnect headset from music / cell phone
1). Switch off the headset on channel 1 as described.
2). Switch off your cell phone / MP3 player.
3). As soon as you switch on the headset and the last connected device, the devices
will automatically connected (last device search). With some cell phones, you
have to confirm the connection again on the phone menu.
Static Noise
In some cases, there could appear static noise for a short time but this does not influence
the general quality of the Bluetooth headset.
Some causes:
1). Headset not paired with proper device.
2). Headset and device out of Bluetooth range.
3). Strong radio interference in the environment.
4). Too many Bluetooth devices in the environment.
28 29
Page 17

Specifications Troubleshooting
Your Whistler headset is expertly engineered and designed to exacting quality standards to
Technical Data BT2200/2300 BT3200/3300
Bluetooth version Version 2.0
Frequency 2.4 GHz ISM Band (2.4 – 2.4835 GHz)
Output 0 dBm +17 dBm
Bluetooth Class Class 2: 10m Class 1: 100m
Channel/Devices 2/3
Operating Temperature -20 ~ 50 degrees C
Dimensions 84(W) x 44.5(H) x 20.5(D) mm
Weights 50g
Specifications subject to change without notice.
30 31
provide you with reliable, trouble-free operation. If your unit has been correctly installed
following the guidelines in this manual, but is not operating optimally, please refer to the
troubleshooting guide below.
Problem: Bluetooth Headset cannot be switched on
Please check the battery status (page 10) and charge the headset if necessary. Please
make sure the headset is charged completely before first time use.
Problem: After the headset has been switch off and on again, it does not
connect automatically to the last paired device.
Please make sure that the Bluetooth on the other device is activated. Switch all devices off
and on again and put them in pairing mode. If the problem still exists, reset the headset
and pair the headset and device again.
Problem: The headset is on, but you cannot hear any sound through the
speakers.
Please check the volume level and increase if necessary. Please check if the speakers are
OK and that the USB connector and jack are fully engaged. Also, please check the position
of the speakers in the helmet.
Page 18

Troubleshooting FCC Information
Problem: The voice over the microphone is too low.
Please make sure that the boom microphone is correctly placed close to your mouth. The
white marking has to be in the direction of your mouth (BT2200/3200). In addition, the
microphone sensitivity can be adjusted as required (page 24).
Make sure this white marking is in the
direction of your mouth.
Problem: The call cannot be accepted during music and intercom usage.
Make sure that the automatic call acceptance is activated. If it is set to manual call
acceptance, you will have to press the [T] button to accept the call.
FCC ID: U6CCAMOS-BTS200
FCC ID: U6CCAMOS-BTS300
This device complies with part 15 of the FCC rules. Operation is subject to the following
two conditions: (1)This device may not cause harmful interference, and (2)This device must
accept any interference received, including interference that may caused undesired
operation.
Note: This equipment has been tested and found to comply with the limits for a Class B
digital device, pursuant to part 15 of the FCC Rules. These limits are designed to provide
reasonable protection against harmful interference in a residential installation. This
equipment generates uses and can radiate radio frequency energy and, if not installed and
used in accordance with the instructions, may cause harmful interference to radio
communications. However, there is no guarantee that interference will not occur in a
particular installation.
32 33
Page 19

FCC Information Warranty Information
If this equipment does cause harmful interference to radio or television reception, which
can be determined by turning the equipment off and on, the user is encouraged to try to
correct the interference by one or more of the following measures:
-- Reorient or relocate the receiving antenna.
-- Increase the separation between the equipment and receiver.
-- Connect the equipment into an outlet on a circuit different from that to which the
receiver is connected.
-- Consult the dealer or an experienced radio/TV technician for help.
FCC Warning
This equipment may generate or use radio frequency energy. Changes or modifications to
this equipment not expressly approved by they manufacturer could void the user’s authority
to operate the equipment.
The manufacturer hereby declares that this Bluetooth Headset is in compliance with
the essential requirements and other relevant provisions of Directive 1999/5/EC.
34 35
Consumer Warranty
This Whistler product is warranted to the original purchaser for a period of one year from the date
of original purchase against all defects in materials and workmanship.
This limited warranty is void if the unit is abused, modified, installed improperly, if the
housing has been removed, or if the serial number is missing.
There are no express warranties covering this product other than those set forth in this warranty. All
express or implied warranties for this product are limited to one year. Whistler is not liable for
damages arising from the use, misuse, or operation of this product.
Service Out of Warranty
Units will be repaired at “out of warranty” service rates when:
• The units original warranty has expired.
• A dated store receipt is not supplied.
• The unit has been returned without its serial number.
• The unit has been abused, modified, installed improperly, or had its housing removed.
Service Under Warranty
During the warranty period, defective units will be repaired without charge to the purchaser when
returned with a dated store receipt to the address below. Units returned without dated store receipt
will be handled as described in section
“Service Out Of Warranty.”
Page 20

Warranty Information Warranty Information
Service Under Warranty (continued)
Due to the specialized equipment necessary for testing this product, there are no authorized service
stations for Whistler products other than Whistler.
When returning a unit for service under warranty, please follow these instructions:
1. Ship the unit in the original carton or in a suitable sturdy equivalent, fully insured, with
return receipt requested to:
Whistler Repair Dept.
551 N. 13th St.
Rogers, AR. 72756
Please allow 3 weeks turn around time.
IMPORTANT: Whistler will not assume responsibility for loss or damage incurred in shipping. Therefore,
please ship your unit insured with return receipt requested. COD’s will not be accepted!
2. In
clude with your unit the following information, clearly printed:
• Your name and street address
an e-mail address, if applicable.
• A detailed description of the problem (e.g., “Unit doesn’t have any audio”).
• A copy of your dated store receipt or bill of sale.
(for shipping via UPS)
, a daytime telephone number and
Service Under Warranty (continued)
3.
Be certain your unit is returned with its serial number. For reference, please write your
unit serial number in the following space: _____________.
Units without serial numbers are not covered under warranty.
IMPORTANT: To validate that your unit is within the warranty period, make sure you keep
a copy of your dated store receipt. You may have registered your unit at
www.whistlergroup.com, however, for warranty verification purposes, a copy of your dated
store receipt must accompany any unit sent in for warranty work.
Service Out of Warranty (Continued)
The minimum out of warranty service fee for your Whistler product is $75.00 (U.S.). If you
require out of warranty service, please return your unit as outlined in the section “Service
Under Warranty” along with a certified check or money order for $75.00. Payment may also
be made by MasterCard, VISA or American Express; personal checks are not accepted.
In the event repairs cannot be covered by the minimum $75.00 service fee, you will be
contacted by a Whistler technical service specialist who will outline options available to you. If you
elect not to have your unit repaired, it will be returned to you along with your certified check
or money order.
36 37
Page 21

Warranty Information
IMPORTANT:
number, and an email address (if applicable).
Customer Service
If you have questions concerning the operation of your Whistler detector, or require service
during or after the warranty period, please call Customer Service at:
When returning your unit for service, be certain to include a daytime telephone
1-800-531-0004.
Representatives are available to answer your questions
Monday - Friday from 8:00 a.m. to 5:00 p.m. (CT).
www.whistlergroup.com
Bluetooth is a registered trade mark of Bluetooth SIG Inc.
38 39
 Loading...