

Page 1

If you have questions concerning the operation of this Whistler product please call
customer technical service:
1-800-531-0004
Hours:
Monday - Friday
9:00 am - 5:00 pm EST
Page 2

INTRODUCTION
Dear Whistler Owner,
For many of us, a vehicle is more than just transportation. It
can be a mobile office, communications or entertainment
center, or simply an expression of our personality. Whistler
Corporation recognizes this and has created a selection of
products we call “Enhanced Driving Tools”. These products
are designed to make the time you spend in your vehicle
more productive, more fullfilling, safer, or just simply more
fun. Our mission is to provide products that improve your
driving experience though keeping you...
IN TOUCH • IN COMFORT • IN CONTROL
Your new Whistler 1540/1545 laser/radar detector detects all radar , laser and safety radar systems, plus offers Whistler’s exclusive
Safe Driving System
Safety Warning System™, keeping you informed of road hazards
and adverse weather . Whistler’ s 1540/1545 also offers a digital display to keep you informed while you drive.
T o fully acquaint yourself with the operation of the Whistler 1540/
1545 and to better understand the differences between detecting radar , laser and safety radar signals, we recommend reading
this entire manual.
Enjoy the Whistler 1540/1545 and please drive safely .
Sincerely,
WHISTLER CORPORATION
™
. This comprehensive safety system detects
1
Page 3

TABLE OF CONTENTS
Topic Page
Model Features Summary 3 - 4
Installation 5 - 7
• Mounting Guidelines
• Dash/Visor/Windshield Mounting
• Power Connection And Fuse Replacement
Operation 8 - 11
• Power On And Self-Test
• Feature Engaged Confirmation
• Audio Level Adjustment
• Auto Quiet/Mute Modes
• City Mode
• Engaging/Disengaging VG-2 Detection
• Teach/Tutorial Mode
Radar, Laser And VG-2 Alerts 12 - 14
• Speed Radar Audio/Visual Alerts
• Pulse Protection
• Safety Radar Audio/Visual Alerts
• Laser Audio/Visual Alerts
• VG-2 Audio/Visual Alerts
• Alert Priority
• Reset Features/Care Maintenance
Troubleshooting Guide 15
Are Detectors Legal? 16
Speed Monitoring Technologies 17 - 18
• Radar Facts
• Laser Facts
• Other Speed Detection Systems
• Radar Detector Detectors
Warranty Information 19 - 21
Specifications 22
Accessories 23
®
2
Page 4
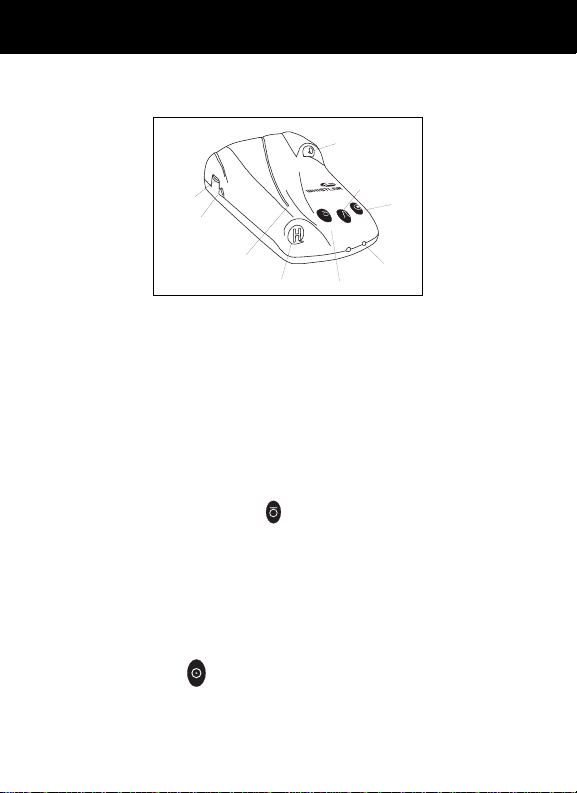
WHISTLER FEATURES
Whistler 1540/1545
9
8
1
2
3
5
1540
7
MUTE
CITY
PWR
6
4
Whistler’ s ergonomic and user -friendly design provides a new
level of operating convenience. Special features include:
1. Bracket Release Button - Provides quick and easy release of the mounting bracket.
2. Power Jack - Provides connection for the power cord.
3. Speaker - Provides distinct audio warnings for X, K, Ka band
radar , safety radar, laser and VG-2.
4. Power/Volume Button - Turns unit on/off and adjusts
audio level.
5. Digital Display - Provides distinct visual confirmation of signals detected, signal strength, and indicates engaged modes of
operation.
6. Band Identifying LEDs - Identifies type of radar detected.
7. MUTE Button - Pressing MUTE before a signal is detected
engages Auto Quiet Mode which automatically reduces the audio level after the initial warning to a low audio level setting. Pressing MUTE during a radar/laser encounter silences audio alerts,
3
Page 5
WHISTLER FEATURES
while allowing visual alerts to keep you informed.
8. CITY Button - Reduces the annoyance of false alerts
typically encountered in urban driving areas.
9. Laser Antenna (Rear) - An integrated optical waveguide
provides superior detection of laser signals transmitted from
behind.
12
13
11 12
10
11
10. Laser Antenna (Front) - High gain optical lens array
provides increased sensitivity and field of view for leadingedge laser detection.
11. Radar Antenna - Compact, high-efficiency antenna receives radar signals.
12. Mounting Bracket Location - Slot holds mounting
bracket firmly.
Accessories
Accessories included are highly functional and easy to use.
Coiled Power Cord - Connects to the unit’s power jack and
your vehicle’s lighter socket.
Windshield Bracket - Allows installation of unit on your
vehicle’s windshield.
®
Velcro
Fasteners - Designed to secure the unit on a level
dashboard.
4
Page 6

INSTALLATION
Mounting Guidelines
• Mount the unit as low as possible near the center of the
windshield.
• Do not mount your unit behind wipers, ornaments, mirrored
sunscreens, etc. These obstructions have metal surfaces which
can affect radar and laser signals and reduce critical warning
time. (Regular tinted glass does not affect reception.)
• Some newer windshields have an Instaclear™ or
Electriclear™ type coating, which affect radar signals. Consult your dealer or the owner’s manual supplied with your
vehicle to determine if your windshield has this coating.
• Avoid placing unit in direct contact with windshield.
• To reduce the possibility of theft, conceal your unit when
not in use.
Windshield Mounting
• Install the two suction cups and rubber bumper onto the bracket
by fitting them into their holes.
• Press the suction cups onto the windshield at the location you
have chosen.
• Slide the detector onto the bracket until it locks into place.
• If necessary, the unit may be leveled by bending the windshield bracket. Press the bracket release button and remove
the detector before bending.
5
Page 7
INSTALLATION
IMPORTANT : Some newer cars have a plastic safety coating on the inside of the windshield. The windshield bracket
may leave permanent marks on this type of surface. To
find out if your vehicle has this type of windshield, check
the owner’s manual or ask your dealer. We recommend
that you do not leave the suction cup bracket on the window in direct sunlight. If the detector is removed, this may
cause blistering of the dash in some vehicles.
Dash Mounting
• Make sure the mounting location you have chosen is relatively
level and is clean and dry . Clean with isopr opyl alcohol if necessary to remove any waxes or polishes.
• Separate the Velcro
ing off each strip and adhere one piece to the dash and the
other piece to the bottom of the unit, taking care not to
cover the serial number.
®
fastener strips. Peel the paper back-
Be careful not to place the Velcro® over the unit’s serial number. If the Velcro® is
removed, the serial number may be pulled off the unit. Units without serial numbers are not covered under warranty.
6
Page 8
INSTALLATION
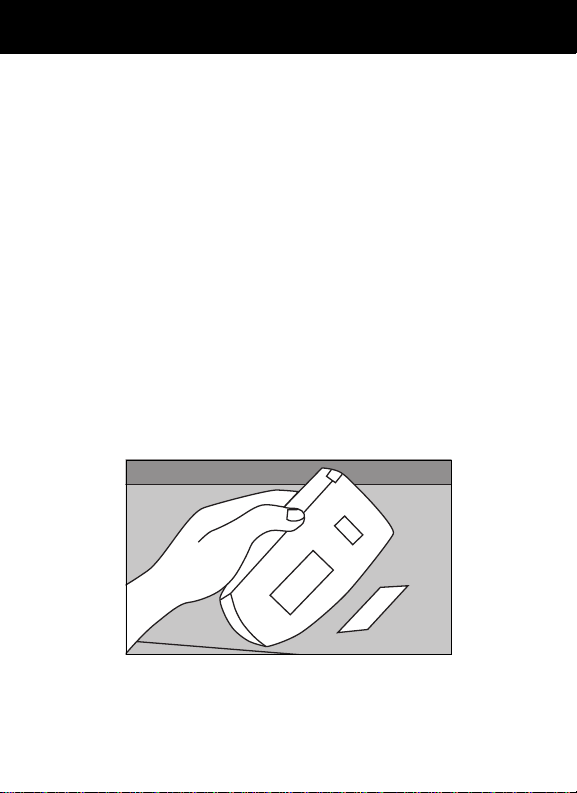
Visor Mounting (optional accessory)
• Slide the visor bracket into the bracket mounting slot.
• Clip the visor bracket onto the visor making sure it is relatively level and has a clear view of the road.
Slide on visor
Insert into bracket
mounting slot
Power Connection
• Plug the small end of the power cord into the unit’s power
jack.
• Plug the large end into the vehicle’s cigarette lighter.
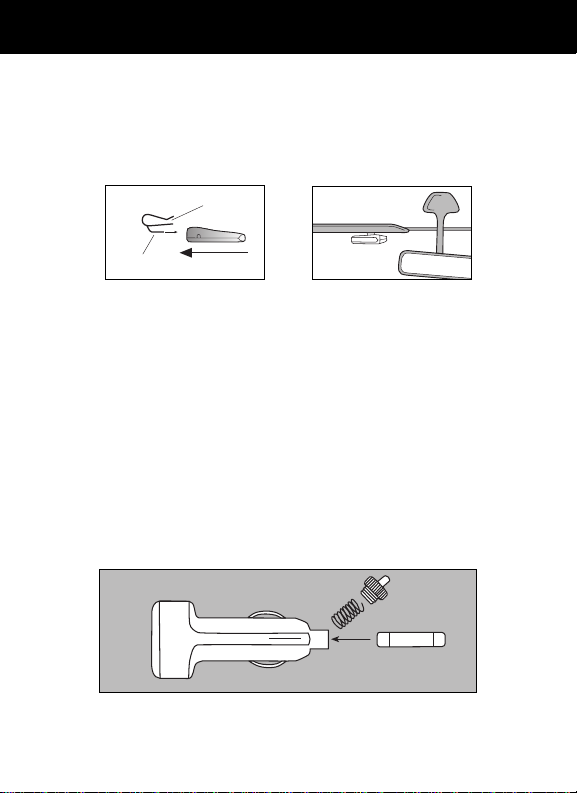
Fuse Replacement
The lighter socket plug is equipped with a replaceable 2 amp
3AG fuse located behind the silver tip. To replace the fuse,
carefully unscrew the tip of the plug. (IMPORTANT: Unscrew
slowly . The tip contains a spring which may fly out when disassembling.) Insert the new fuse with the spring and screw on
the tip. With use, screw cap on plug may loosen. Retighten
occasionally .
Unscrew the tip of the lighter socket plug carefully when replacing the 2
amp fuse.
7
Page 9

OPERATION
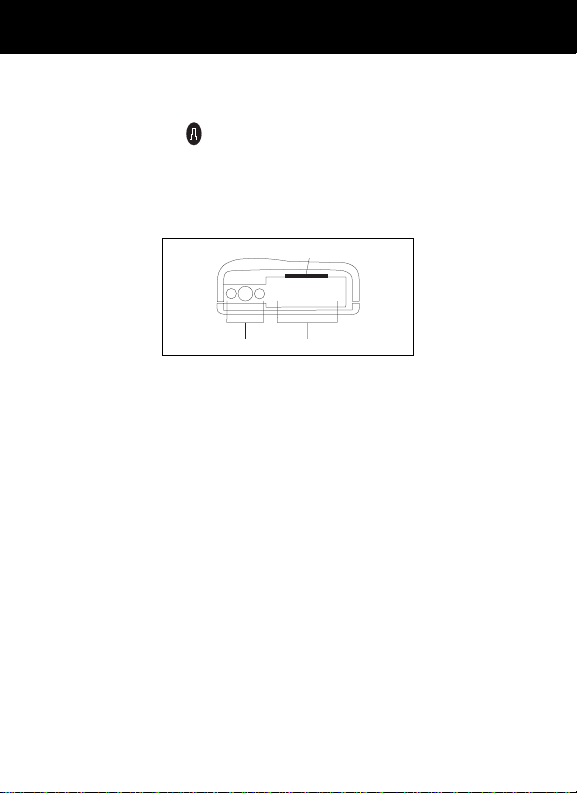
Power On And Self-Test
Each time your Whistler detector is turned on, an automatic
self-test sequence confirms that the speaker and visual displays are functional and displays the engaged features.
• Press (Power/Volume) or apply Power. Display reads:
K
X
8
X
8
8
5.
K
K
X
K
X
L
H
Memory/Beep Confirmation
All features selected (except Stay Alert) are retained in memory .
Each time a button is pressed one beep confirms feature “on”,
two beeps confirm feature “off”.
8
Page 10

OPERA TION
Audio Level Adjustment
The audio levels can be adjusted high to low, or low to high,
in four steps: (1) is the lowest audio level, (4) the highest.
• Press and hold (Power/Volume) (for more than 1.5 seconds).
• Release when desired level is reached.
As audio level is adjusted, beeps are provided and the dis-
play indicates volume level. Example:
1
Lowest Audio Level
4
Highest Audio Level
Auto Quiet Mode
Auto Quiet reduces the selected audio level to a level (1)
approximately 5 seconds after a radar or safety radar signal
is detected. The audio alert for any new signal within 20 seconds will resume at level (1). Auto Quiet does not affect VG2 or laser alerts.
• Press (Mute) (before a signal is detected) to engage
Auto Quiet. Display reads:
A
An “A” is displayed for 1 second.
• Once the Auto Quiet mode is engaged, you may cancel
the audio alarm by pressing .
• Press (when the unit is not alarming) to cancel Auto
Quiet mode.
9
Page 11

OPERATION
Mute Mode
Mute cancels audio during an alert and any new alert within
20 seconds. After 20 seconds, approximately 2 beeps are provided on any new alert and then unit remains quiet.
• Press to cancel the audio.
• Press a second time during an alert to restore the standard audio alert pattern or by turning the unit off then on.
City Mode
City Mode is designed to reduce the annoyance of automatic door openers, intrusion alarms and other devices which
share frequencies with police radar.
• Press (City) to engage City. Display reads:
C
• Pressing (City) a second time cancels City. Display
reads:
H
In City Mode, weak speed/safety radar signals give an initial alarm
of two beeps, and then remains quiet unless the signal becomes
very strong. When the signal strength increases, two additional
beeps are provided. City Mode does not change the audio alert
for laser or VG-2.
10
Page 12

OPERATION
Engaging VG-2
The Option Select Mode allows you to engage or disengage VG-2 Detection. (Your detector is shipped from the
factory with the VG-2 detection mode (VG2) disengaged).
• Press and hold (Mute) for 2 seconds and release.
• Press (City) to engage or cancel VG-2. Feature is displayed when engaged.
-
The “-” on the display confirms the VG-2 Detection mode is engaged.
• Press (Power/Volume) to exit.
Teach/Tutorial Mode
Provides simulated alerts for each type of signal.
• Press (City) and (Mute) simultaneously and release.
Dim, Dark, City and Mute modes can also be accessed while
Teach/Tutorial mode is engaged.
• Press to exit.
K
X
11
Page 13

RADAR/SAFETY RADAR ALERTS
Speed Radar Audio/Visual Alerts
When X, K or Ka is detected the band ID and signal strength is
displayed. The audio alert is continuous and has a geiger
counter-like pattern. The faster the beep the closer the radar
source. Example:
K
9
Display confirms a Ka band signal is detected.
Pulse Protection
When a pulse type signal (instant on strong signal) is
detected an urgent 3 second audio warning is sounded
and the display reads:
®
P
After 3 seconds standard alert pattern continues.
Safety Radar
When Safety Radar is detected the audio alert is geiger
counter-like.
X
Indicates K Band
Detected
K
X
S.
Flashing “S.” confirms detection of Safety Radar.
12
Page 14

LASER/VG-2 ALERTS
Laser Audio/Visual Alerts
When a laser signal is detected an “L” is displayed, the audio alert is continuous for a minimum of 3 seconds. Example:
L
Reception of laser signal is confirmed by “L” on the display.
VG-2 Audio/Visual Alerts
When a VG-2 signal is detected, the detector “hides” its own
radiated signal and becomes undetectable by the VG-2.
-
“-” confirms detection of a VG-2 signal.
Every 30 seconds, the detector checks for a VG-2 signal. If a
VG-2 signal is detected, the unit continues to hide and repeats the VG-2 alert. If no signal is detected, two beeps are
provided, indicating an “all clear” condition. During VG-2 Alert
X, K, and Ka band signals cannot be received.
Alert Priority
When two or more signals are received at the same time,
the alert priority is:
1. Laser
2. VG-2
3. Speed Radar
4. Safety Radar
Example:
If X band is alerting, then suddenly VG-2 is detected, the VG2 warning will override the X band alert.
13
Page 15

RESET FEA TURES/CARE & MAINTENANCE
Reset Features
All user features can be reset to factory set positions.
• Remove Power from unit.
• Press and hold (Power/Volume) and (Mute).
• Apply power to the unit.
• Wait for 2 beeps.
• Release and . Unit is now reset.
1. Audio to level (4).
2. Display reads H.
3. Auto Quiet Mode OFF.
4. VG-2 Detection Mode OFF.
5. Unit ON or OFF.
Care And Maintenance
During the summer months, avoid prolonged exposure to
direct sunlight by removing your unit from the dash when
your vehicle is parked for an extended period of time.
Do not spray water, cleaners or polishes directly onto the
unit. The spray may penetrate through the openings and
damage the unit. Also, do not use any abrasive cleaners on
the unit’s exterior.
14
Page 16

TROUBLESHOOTING GUIDE
Your Whistler detector is expertly engineered and designed
to exacting quality standards to provide you with reliable,
trouble-free operation. If your unit has been correctly installed
following the guidelines in this manual, but is not operating
optimally, please refer to the troubleshooting guide below.
PROBLEM: No display or audio.
• Check fuse in Whistler plug; replace if necessary with a 2 amp
3AG type.
• Check fuse for lighter socket; replace if necessary.
• Make sure lighter socket is clean.
PROBLEM: Unit alarms when vehicle hits bumps.
• Check for loose lighter socket; tighten and clean.
• Check connections at both ends of power cord. Substitute another cord to determine if cord is defective. Return defective
cord to the factory.
PROBLEM: Unit alarms when using vehicle equipment or
electrical accessories (brakes, power mirrors/windows,
directionals, horn, etc.).
• Vehicle’ s electrical system, including battery and alternator , may
have electrical noise. Install a filter capacitor (470mfd. 25 volt or
larger capacitance value) on the back of the lighter socket.
PROBLEM: Audio alerts are not loud enough.
• Cancel Auto Quiet Mode or City Mode.
• Check audio level setting (see page 9).
If difficulties occur which cannot be solved by information in
this Troubleshooting Guide, please call Whistler Customer
T echnical Service at 1-800-531-0004 before returning your unit
for service.
15
Page 17

ARE DETECTORS LEGAL?
In Most States YES!
Laser detectors are completely legal in every state when used
in automobiles or light trucks (under 10,000 lbs.). Similarly,
when used in automobiles or light trucks, radar detectors
are legal in almost every state. Exceptions are Virginia and
Washington, D.C., which have local regulations restricting
the use of radar receivers in any vehicle.
Concerning trucks over 10,000 lbs., the Federal Highway
Administration (FHwA) issued a regulation, effective January ,
1994 which prohibits radar and laser detector use in these types
of vehicles nationally.
Because of legal and legislative efforts underway to repeal
the regulation, and because enforcement varies from state
to state, we recommend contacting the Radio Association
Defending Airwave Rights (R.A.D.A.R.) for the most current
information concerning the status and enforcement of the
FHwA regulation in areas where you travel. RADAR can
be reached at:
Telephone: (513) 667-5472
FAX: (513) 667-3178
Prior to the FHwA regulation, laws existed in the state of
New Y ork restricting the use of radar detectors in trucks over
18,000 lbs. and in Illinois in trucks over 26,000 lbs.
16
Page 18

SPEED MONITORING TECHNOLOGIES
Radar Facts
A radar gun operates by transmitting radio waves at certain
frequencies which reflect off objects and are then picked up
by the radar gun’s receiving section. When a radar beam
reflects off a moving target, a measurable frequency shift
occurs. The radar unit converts this shift into miles per hour
to determine your vehicle’s speed.
Currently, the FCC (Federal Communications Commission)
permits operation of traffic radar guns at X Band (10.500 -
10.550 GHz), K Band (24.050 - 24.250 GHz), and Ka Band
(33.400 - 36.000 GHz).
Laser Facts
It’s well documented that many radar guns cannot reliably
provide the speed of a targeted vehicle that is traveling in a
group of vehicles. In contrast, a laser gun can target a specific vehicle out of a line of traffic and determine its speed.
The advantage of laser over radar in terms of target identification is the result of the laser gun’s narrow beam. A radar
transmission can cover more than a four-lane highway at a
distance of 1,000 feet, compared with a laser transmission
which covers about 6 feet at the same distance.
For best protection, keep these points in mind:
• Because your vehicle’s license plate or headlights are the
laser gun’s primary targets, mounting your Whistler detector
on the dashboard can improve laser detection at short range.
• Do not follow closely behind any vehicle you cannot see through.
If you can’t see past a vehicle ahead of you, chances are your
detector won’t either.
• The receiving range of your laser detector will not be the same
as a radar detector . Laser guns are most often used at short range.
17
Page 19

SPEED MONITORING TECHNOLOGIES
Other Speed Detection Systems
Several techniques other than radar or laser are used to measure vehicle speeds. When these methods are being used, no
detector can provide a warning. These techniques include:
• Pacing - A patrol car drives behind you and matches your
driving speed.
• Vascar/Aircraft - The time it takes a vehicle to travel a known
distance is measured.
Radar Detector Detectors
The Interceptor VG-2, or simply VG-2, is a microwave receiver
used by police to detect signals radiated by the local oscillator of a radar detector. Because its purpose is to identify
persons driving with radar detectors, the VG-2 is known as a
“radar detector detector”.
The VG-2 is the primary tool used by the police to identify
radar detector equipped vehicles. If caught, drivers risk losing their radar detector and receiving a fine. In addition, instant-on radar is almost always used in combination with a
VG-2, leaving unsuspecting motorists vulnerable to receiving two tickets — one potentially for speeding, the other for
possession of a detector.
Having a radar detector capable of detecting the VG-2 alerts
you to the presence of a speed trap and preserves your radar detector investment.
18
Page 20

WARRANTY INFORMATION
Consumer Warranty
Your Whistler detector is warranted to the original purchaser
for a period of one year for the 1540 (two years for the 1545)
from the date of original purchase against all defects in materials and workmanship. This limited warranty is void if the unit
is abused, modified, installed improperly, if the housing has
been removed, or if the serial number is missing. There are no
express warranties covering this product other than those set
forth in this warranty . All expr ess or implied warranties for this
product are limited to one year for the 1540 and two years for
the 1545. Whistler is not liable for damages of any type arising
from the use, misuse, or operation of this product.
Service Under Warranty
During the warranty period, defective units will be repaired or
replaced (with the same or a comparable model), at Whistler’ s
option, without charge to the purchaser when returned prepaid, with dated proof of purchase to the address below . Units
returned without dated proof of purchase will be handled as
described in section “Service Out Of Warranty.” Due to the
specialized equipment necessary for testing a radar/laser receiver, there are no authorized service stations for Whistler
brand detectors other than the factory.
When returning a unit for service under warranty, please follow these instructions:
1. Ship the unit in the original carton or in a suitable sturdy
equivalent, fully insured, with return receipt requested, and
shipping charges prepaid to:
Whistler CTS
16 Elizabeth Drive
Chelmsford, MA 01824
19
Page 21

WARRANTY INFORMATION
IMPORTANT: Whistler will not assume responsibility for
loss or damage incurred in shipping. Therefore, please
ship your unit insured with return receipt requested.
2. Include with your unit the following information, clearly
printed:
• Y our name and street addr ess (for shipping via UPS), and a
daytime telephone number. (No P.O. Box please.)
• A detailed description of the problem (e.g., “Unit performs
self-test but does not respond to radar”).
• A copy of your dated proof of purchase or bill of sale.
3. Be certain your unit is returned with its serial number. For
reference, please write your unit’s serial number in the following space: s/n __________________.
Units without serial numbers are not covered under warranty.
IMPORTANT: To validate that your unit is within the warranty period, make sure you keep a copy of your dated proof
of purchase.
20
Page 22

WARRANTY INFORMATION
Service Out Of Warranty
Units will be repaired at “out of warranty” service rates when:
• The unit’s original warranty has expired.
• Dated proof of purchase is not supplied.
• The unit has been returned without its serial number.
• The unit has been abused, modified, installed improperly,
or had its housing removed.
The minimum out of warranty service fee for your Whistler
detector is $55.00 (U.S.). If you require out of warranty service, please return your unit as outlined in the section “Ser vice Under Warranty” along with a certified check or money
order for $55.00. Payment may also be made by MasterCard
or VISA; personal checks are not accepted. In the event repairs cannot be covered by the minimum $55.00 service fee,
you will be contacted by a Whistler technical service specialist who will outline options available to you. If you elect not
to have your unit repaired/replaced, it will be retur ned to you along
with your certified check or money order.
IMPORTANT: When returning your unit for service, be cer-
tain to include a daytime telephone number.
Customer Service
If you have questions concerning the operation of your Whistler detector, or require service during or after the warranty
period, please call Customer Technical Service at 1-800-531-
0004. Representatives are available to answer your questions
Monday - Friday from 9:00 a.m. to 5:00 p.m. (EST).
21
Page 23

SPECIFICATIONS
• Dimensions: 1.1"H x 2.7"W x 4.6"L
• Weight: 6.5 oz.
• Laser Wavelength Detection Range:
905 ± 50 nanometers (nm)
• Radar Frequencies:
10.500 - 10.550 GHz (X Band)
24.050 - 24.250 GHz (K Band )
33.400 - 36.000 GHz (Ka Superwideband)
• Operating Temperature Range:
-20˚ C to +80˚ C (-4˚ F to +176˚ F)
• Power Requirements:
Operational 12 to 15 volts DC, 200mA nominal
One or more U.S. patents apply: #4,315,261; #5,146,227;
#5,379,456. Other patents pending.
Specifications are subject to change without notice.
22
Page 24

ACCESSORIES
The following accessories are available through Whistler
retailers or can be ordered dir ectly from Whistler by calling 1-800-531-0004.
Order Description Price
Code
202138 Visor Bracket $6.95
202139 Windshield Bracket $9.95
206294 *Modular Lighter Plug $7.95
(Requires 206550 or
206551)
206553 Coiled Power Cord (7”) $15.95
206552 Straight Power Cord (5’) $14.95
206550 *Modular Straight $6.95
Power Cord (5')
(Requires 206294)
206551 *Modular Coiled $7.95
Power Cord (7')
(Requires 206294)
206879 Velcro
206880 Hardwire Kit (10' ) $9.95
201998 Travel Case $9.95
®
for wiring to fuse box)
$1.95
*Modular: interconnecting pieces cord and plug.
Shipping and handling (per order) $3.00
Massachusetts residents please add applicable sales tax. Prices
are subject to change without notice.
23
Page 25

ACCESSORY ORDER FORM
PLEASE SHIP TO:
Name ___________________________________________
Street __________________________________________
City __________________ State_____ Zip _________
Telephone Number ( ______ ) ______________________
Order Code/DescriptionQuantity Total Price
$
Subtotal
Sales Tax (if Applicable)
Shipping and Handling $ 3.00
Total Enclosed $
SEND ORDER FORM WITH CERTIFIED CHECK OR
MONEY ORDER TO:
Whistler CTS
16 Elizabeth Drive
Chelmsford, MA 01824
IF PA YING BY MASTERCARD OR VISA PLEASE PROVIDE:
Type Of Card _____ MasterCard _____VISA
Name On Card ___________________________________
Card Number ____________________________________
Expiration Date __________________________________
Cardholder’s Signature ____________________________
24
 Loading...