

Whirlpool XW18500VW0 Owner’s Manual

T
Steam Steam T_
®
HE 4t HE s HE 't HE" HE "1
Steam SteamT_
MA "AG®
EPIC
SLIDE.OUTWORKSURFACEWITHSTACKKIT
SUPERFICIEDETRABAJODESLIZABLECONJUEGO
PARAAPILAR
ETAGEREESCAMOTABLE.
ACCESSOIREPOUR APPAREILSSUPERPOSES
P
W10103322A

Table of Contents / Indice /Table des matibres
STACK KIT SAFETY .................................. 2
INSTALLATION REQUIREMENTS ........... 2
INSTALLATION INSTRUCTIONS ............. 5
SLIDE-OUT WORK SURFACE USE ......... 6
SLIDE-OUT WORK SURFACE CARE ...... 6
LAUNDRY PRODUCT WARRANTY ......... 7
KENMORE ®LAUNDRY PRODUCT
WARRANTY ............................................... 7
WHIRLPOOL CORPORATION
LAUNDRY PRODUCT WARRANTY ......... 8
SEGURIDAD DEL JUEGO PARA APILAR ... 10
REQUISITOS DE INSTALACION .................. 10
INSTRUCCIONES DE INSTALACION .......... 12
USO DE LA SUPERFICIE DE TRABAJO
DESLIZABLE .................................................. 14
CUlDADO DE LA SUPERFICIE DE
TRABAJO DESLIZABLE ................................ 14
GARANTIA DE LOS PRODUCTOS DE
LAVANDERJA ................................................. 15
GARANTIA DE LOS PRODUCTOS DE
LAVAN DERIA KENMORE _............................ 15
GARANTIA DE LOS PRODUCTOS DE
LAVAN DERJA DE
WHIRLPOOL CORPORATION ...................... 16
SI_CURITI_ DE L'ACCESSOIRE POUR APPAREILS
SUPERPOSES ........................................................ 17
EXIGENCES D'INSTALLATION ............................ 17
INSTRUCTIONS D'INSTALLATION ...................... 20
UTILISATION DE L'ETAGERE ESCAMOTABLE. 21
ENTRETIEN DE L'ETAGERE ESCAMOTABLE.... 21
GARANTIE DES APPAREILS DE BUANDERIE ... 22
GARANTIE DES APPAREILS DE BUANDERIE
KENMORE ®............................................................. 22
GARANTIE DES APPAREILS DE BUANDERIE
WHIRLPOOL CORPORATION .............................. 23
STACKKITSAFETY
Your safety and the safety of others are very important.
We have provided many important safety messages in this manual and on your appliance. Always read and obey all safety
messages.
This is the safety alert symbol.
This symbol alerts you to potential hazards that can kill or hurt you and others.
All safety messages will follow the safety alert symbol and either the word "DANGER" or "WARNING."
These words mean:
You can be killed or seriously injured if you don't immediately
follow instructions.
You can be killed or seriously injured if you don't follow
instructions.
All safety messages willtell you what the potential hazard is, tell you how to reduce the chance of injury, and tell you what can
happen if the instructions are not followed.
INSTALLATIONREQUIREMENTS
• Hooked stack brackets (2) • %" (16 mm) pan head
• Plastic clips (2) screws (6)
• Foam pads (4) • Slide-out shelf
Gather the required tools and parts before starting installation.
Read and follow the instructions provided with any tools listed
here.
• Phillips screwdriver • Level
• Adjustable wrench that • Bucket
opens to 1" (2.5 cm) or • Pliers or slip-joint pliers (for
hex-head socket wrench drain and inlet hoses)
(for removing dryer feet)
IMPORTANT: The stacked washer/dryer can be installed in an
enclosure. Check the locations of the water supply faucets,
grounded electrical outlets, and gas supply line connection (gas
dryer only). Depending on your application, longer washer fill
hoses, longer electric power supply cords and a longer flexible
stainless steel gas connector line than those supplied with the
washer/dryer may be needed.
See the Installation Instructions that came with your washer and
dryer for more detailed information.
For closet installation, with a door, minimum ventilation openings
in the top and bottom of the door are required. Louvered doors
with equivalent ventilation openings are acceptable.
2

48 in.2 *
(310cm2)
+
3"* (7.6cm)
IMPORTANT: If your washer and dryer are already installed, they
must be uninstalled.
If you need to uninstall your washer or dryer, see the Installation
Instructions that came with your models for tools required.
o
m
!
+
24 in.2 *
(155cm2)
A B
A. Closet door minimum ventilation openings
B. Side view of stacked washer and dryer
*Required spacing
**For venting out the side, 1" (2.5 cm) spacing is allowed.
(11
,%
3"* (7.6cm)
_- 1"**(2.5cm)
6"* (;5.2 cm)
78"
(198.1cm) _
7"/_\X-
Excessive Weight Hazard
Use two or more people to move washer or dryer.
Failure to do so can result in back or other injury.
Uninstalling Your Washer (if not stacked)
1. Turn off the hot and cold water faucets.
2. Unplug the washer.
3. Slowly loosen the fill hoses at the faucets to relieve the water
pressure. Use a sponge or towel to absorb the released water.
4. Remove the "HOT" or "COLD" fill hoses from the back of the
washer. Drain water in the hoses into a bucket.
5. Remove the drain hose from the wall drain pipe or utility sink
and drain any water in the hose into a bucket.
Uninstalling Your Electric Dryer (if not stacked)
1. For power supply cord-connected dryers:
• Unplug the dryer.
For direct-wired dryers:
51/2"**--_ _ 1"
(14cm) (2.5cm)
A
A. Side view of stacked washer and dryer
B. Front view of stacked washer and dryer
(2.5cm) (68.6 cm)
B
*Required spacing
**For venting out the side, 1" (2.5 cm) spacing is allowed.
1-Depth with shelf fully extended
If the water supply faucets, electrical outlets, gas supply line or
power cord need modification, have a qualified plumber,
electrician or gas technician make the changes.
Mobile home - additional installation requirements
Your dryer is suitable for mobile home installations. The
installation must conform to the Manufactured Home
Construction and Safety Standard, Title 24 CFR, Part 3280
(formerly the Federal Standard for Mobile Home Construction
and Safety, Title 24, HUD Part 280).
Mobile home installations require:
• Metal exhaust system hardware, which is available for
purchase from your local dealer or service center.
• (Gas dryers only) Mobile Home Installation Kit Part Number
346764. See "Tools and Parts" section of your dryer Use and
Care Guide for information on ordering.
• Special provisions must be made in mobile homes to
introduce outside air into the dryer. The opening (such as a
nearby window) should be at least twice as large as the dryer
exhaust opening. See the dryer Installation Instructions for
more information on mobile home installation.
Electrical Shock Hazard
Disconnect power before servicing.
Replace all parts and panels before operating.
Failure to do so can result in death or electrical shock.
• Disconnect power.
• Disconnect wiring.
2. Pull the dryer away from the wall enough to loosen the vent
clamp. Loosen the clamp and gently remove the exhaust vent
from the dryer exhaust outlet.
Uninstalling Your Gas Dryer (ifnot stacked)
1. Unplug the dryer.
2. Turn off the gas supply.
3. Pull the dryer away from the wall enough to loosen the vent
clamp. Loosen the clamp and gently remove the exhaust vent
from the dryer exhaust outlet.
4. Disconnect the flexible gas supply line from the dryer. Put a
piece of tape over the open ends of the gas line connection
fittings.

If Your Washer and Dryer are Already Stacked
1. Remove the pan head screws that hold the bracket to the
washer. Lift up on bracket to remove it from the slot in the
back of the dryer.
A
A. Bracket
B. Slot
Repeat on other side.
2. Discard these brackets. Use the brackets that are provided
with the slide-out work surface.
3. Lift up on the plastic clip to remove it from the slot in the back
of the dryer.
4. Place a protective covering, such as cardboard or a blanket,
on the floor.
Excessive Weight Hazard
Use two or more peopJe to move washer or dryer.
Failure to do so can result in back or other injury.
5. Using two or more people, lift the dryer up off the washer and
set it on the floor.
If Your Washer or Dryer Is Still In Its Packaging
Excessive Weight Hazard
Use two or more people to move washer or dryer.
Failure to do so can result in back or other injury.
Position the packaged washer or dryer close to its final location.
• Follow unpacking instructions on the washer or dryer carton.
A. Plastic clip
B. Slot

INSTALLATIONINSTRUCTIONS
Excessive Weight Hazard
Use two or more people to move washer or dryer.
Failure to do so can result in back or other injury.
1. Move washer close to its final location. Leave space to work
behind washer. Do not remove the shipping bolts.
2. Level washer as described in the washer Installation
Instructions.
NOTE: Do not install the dryer feet.
3. If the dryer has the feet already installed, place a protective
covering, such as cardboard or a blanket, on the floor. Gently
lay the dryer down with its back on the covering.
4. Remove the dryer feet.
5. Place a protective covering, such as cardboard or a blanket,
on the floor. Gently place the Slide-Out Work Surface, with the
top side facing up, on the protective covering. See illustration.
B
8. Repeat Step 5 on the bottom side of the Slide-Out Work
Surface. See illustration.
A. Foam pads installed on bottom side
g.
Lift the Slide-Out Work Surface up and place it, top side facing
up, on top of the washer so that the back of the work surface
frame overhangs the back of the washer by about 1" (2.5 cm).
NOTE: The front of the work surface and dryer is positioned 1"
(2.5 cm) back from the front of the washer to provide easier
access to the washer's bleach dispenser.
10. Using two or more people, lift the dryer back to its upright
position and move to the front of the washer.
11. Using two or more people, lift the dryer up and set it on top of
the work surface. The back of the dryer and work surface
frame overhang the back of the washer by about 1" (2.5 cm).
A. Top side
B. Sheff frames
C. Bottom side
6.
Remove the opaque adhesive protective strip from the long
foam pads. Apply the adhesive side of the pads along the
shelf frames so that they cover the entire length of the shelf
frame surfaces and do not stick out past the sides or front
edges of the frames.
A.Foampads installed on top side
7,
Turn the Slide-Out Work Surface back over so that the bottom
side faces up.
12. Remove the plastic clips, brackets and the pan head screws
from the bag containing parts.
13. Take a plastic clip, and, with the flat side facing out, push it
down onto the lower edge of a slot in the dryer back. Repeat
on the other side with the second clip.
\ B
A. Plasticclip
B.Slot in dryer back
C
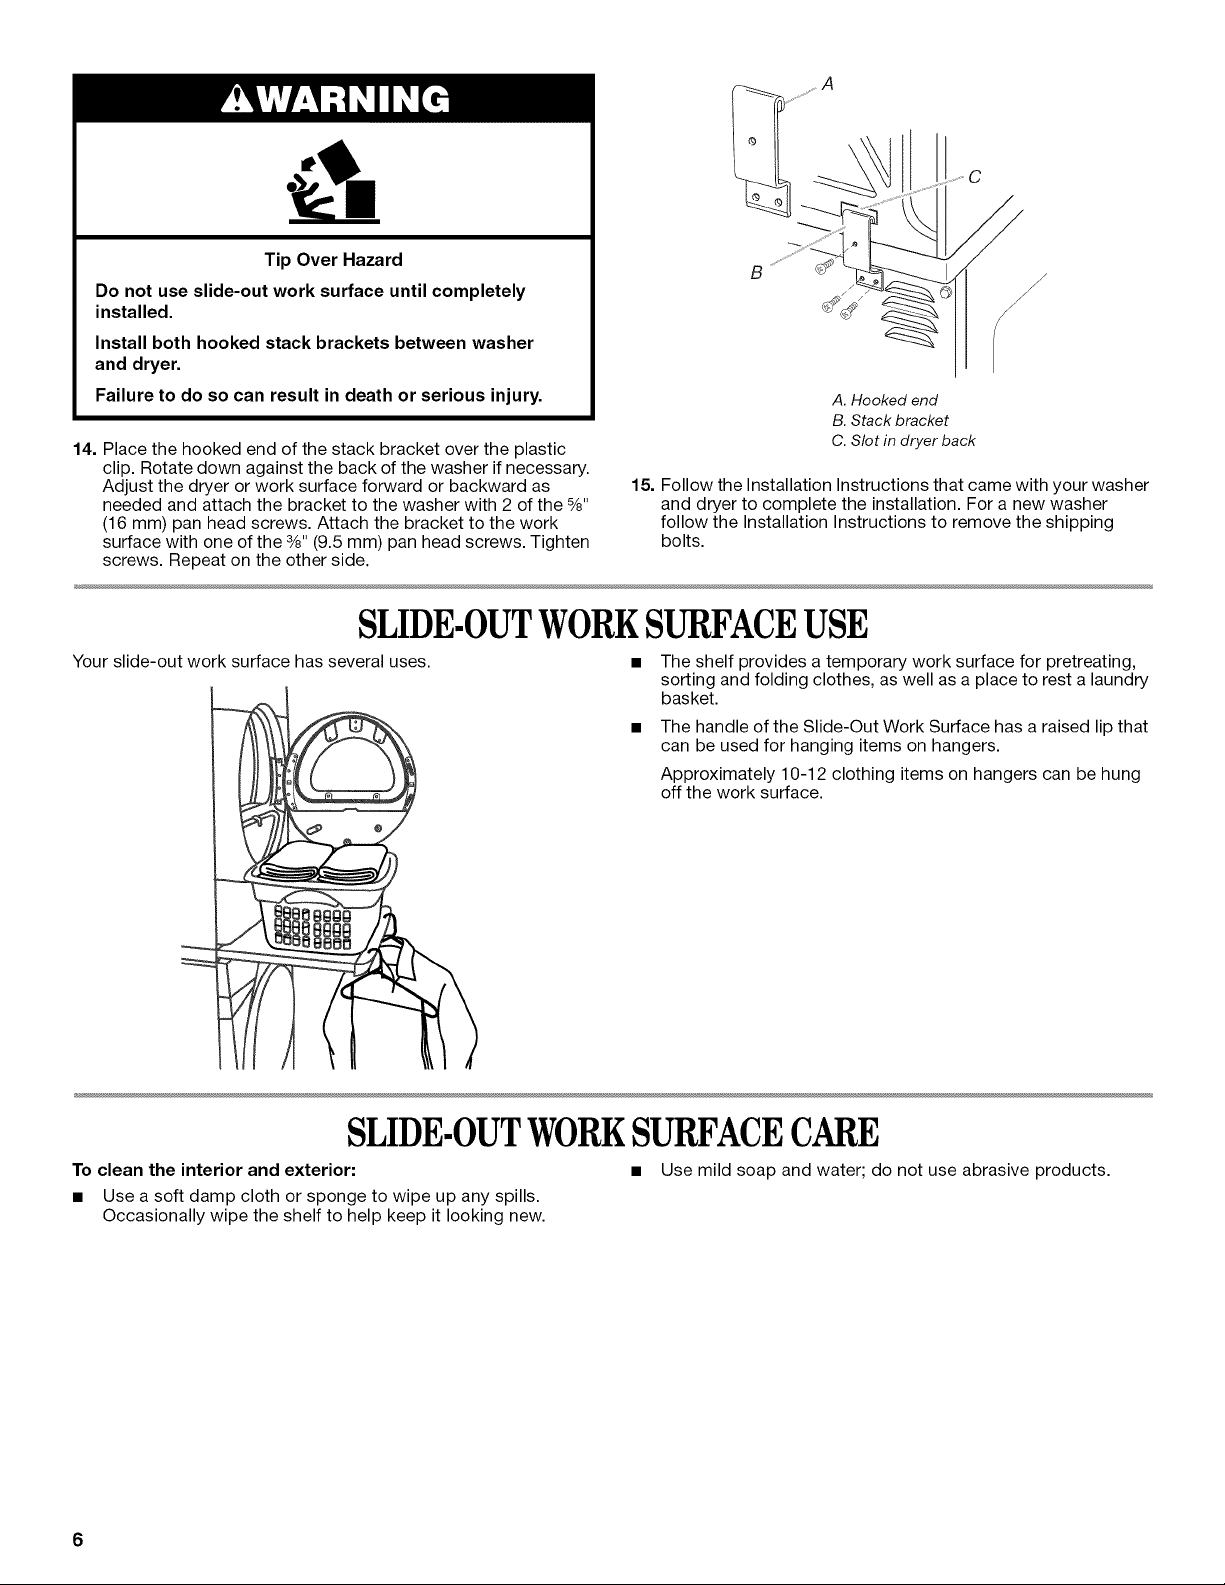
Tip Over Hazard
Do not use slide-out work surface until completely
installed.
Install both hooked stack brackets between washer
and dryer.
Failure to do so can result in death or serious injury.
14. Place the hooked end of the stack bracket over the plastic
clip. Rotate down against the back of the washer if necessary.
Adjust the dryer or work surface forward or backward as
needed and attach the bracket to the washer with 2 of the 3/8"
(16 mm) pan head screws. Attach the bracket to the work
surface with one of the 3/8"(9.5 mm) pan head screws. Tighten
screws. Repeat on the other side.
SLIDEIOUTWORKSURFACEUSE
Your slide-out work surface has several uses.
B
A. Hooked end
B. Stack bracket
C. Slot in dryer back
15. Follow the Installation Instructions that came with your washer
and dryer to complete the installation. For a new washer
follow the Installation Instructions to remove the shipping
bolts.
• The shelf provides a temporary work surface for pretreating,
sorting and folding clothes, as well as a place to rest a laundry
basket.
The handle of the Slide-Out Work Surface has a raised lip that
can be used for hanging items on hangers.
Approximately 10-12 clothing items on hangers can be hung
off the work surface.
/
/
SLIDE.OUTWORKSURFACECARE
To clean the interior and exterior: • Use mild soap and water; do not use abrasive products.
• Use a soft damp cloth or sponge to wipe up any spills.
Occasionally wipe the shelf to help keep it looking new.
6

LAUNDRYPRODUCTWARRANTY
__t+_ __+ +_/_+_ t_ +_++++_++_
If this laundry product was purchased at Sears, the "Kenmore ®Laundry Product Warranty" applies (see following).
If this laundry product was purchased elsewhere, the "Whirlpool Corporation Laundry Product Warranty" applies (see following). Please
have your sales receipt available when you call Whirlpool Corporation for service under the "Whirlpool Corporation Laundry Product
Warranty."
KENMORE®LAUNDRYPRODUCTWARRANTY
ONE YEAR LIMITED WARRANTY
When installed, operated and maintained according to all
instructions supplied with the product, if this laundry product fails
due to a defect in material or workmanship within one year from
the date of purchase, call 1-800-4-MY-HOME to arrange for free
repair. If this laundry product is used for other than private family
purposes, this warranty applies for only 90 days from the date of
purchase.
THIS WARRANTY COVERS ONLY DEFECTS IN MATERIAL
AND WORKMANSHIP. SEARS WILL NOT PAY FOR:
1. Expendable items that can wear out from normal use,
including but not limited to filters, belts, light bulbs, and bags.
2. A service technician to instruct the user in correct product
installation, operation or maintenance.
3. A service technician to clean or maintain this product.
4. Damage to or failure of this product if it is not installed,
operated or maintained according to all instructions supplied
with the product.
5. Damage to or failure of this product resulting from accident,
abuse, misuse or use for other than its intended purpose.
6. Damage to or failure of this product caused by the use of
detergents, cleaners, chemicals or utensils other than those
recommended in all instructions supplied with the product.
7. Damage to or failure of parts or systems resulting from
unauthorized modifications made to this product.
DISCLAIMER OF IMPLIED WARRANTIES; LIMITATION OF
REMEDIES
Customer's sole and exclusive remedy under this limited
warranty shall be product repair as provided herein. Implied
warranties, including warranties of merchantability or fitness for a
particular purpose, are limited to one year or the shortest period
allowed by law. Sears shall not be liable for incidental or
consequential damages. Some states and provinces do not allow
the exclusion or limitation of incidental or consequential
damages, or limitations on the duration of implied warranties of
merchantability or fitness, so these exclusions or limitations may
not apply to you.
This warranty applies only while this laundry product is used in
the United States and Canada.
This warranty gives you specific legal rights, and you may also
have other rights which vary from state to state.
Sears, Roebuck and Co.
Hoffman Estates, IL 60179
Sears Canada Inc.
Toronto, Ontario, Canada M5B 2B8
PRODUCT RECORD
In the space below, record your complete model number, serial
number, and purchase date. You can find this information on the
model and serial number label located on the product.
Have this information available to help you obtain assistance or
service more quickly whenever you contact Sears concerning
your laundry product.
Model number
Serial number
Purchase date
Save these instructions and your sales receipt for future
reference.

WHIRLPOOLCORPORATIONLAUNDRYPRODUCTWARRANTY
ONE YEAR LIMITED WARRANTY
For one year from the date of purchase, when this product is operated and maintained according to instructions attached to or
furnished with the product, Whirlpool or Whirlpool Canada (hereafter "Whirlpool") will pay for factory specified replacement parts and
repair labor to correct defects in materials or workmanship. Service must be provided by a Whirlpool designated service company.
ITEMS WHIRLPOOL WILL NOT PAY FOR
1. Service calls to correct the installation of your product, to instruct you how to use your product, to replace or repair house fuses or
to correct house wiring or plumbing.
2. Repairs when your product is used for other than normal, single-family household use.
3. Damage resulting from accident, alteration, misuse, abuse, fire, flood, acts of God, improper installation, installation not in
accordance with electrical or plumbing codes, or use of products not approved by Whirlpool.
4. Replacement parts or repair labor costs for units operated outside the United States or Canada.
5. Pickup and delivery. This product is designed to be repaired in the home.
6. Repairs to parts or systems resulting from unauthorized modifications made to the product.
7. Expenses for travel and transportation for product service in remote locations.
8. The removal and reinstallation of your product if it is installed in an inaccessible location or is not installed in accordance with
published installation instructions.
DISCLAIMER OF IMPLIED WARRANTIES; LIMITATION OF REMEDIES
CUSTOMER'S SOLE AND EXCLUSIVE REMEDY UNDER THIS LIMITED WARRANTY SHALL BE PRODUCT REPAIR AS PROVIDED
HEREIN. IMPLIED WARRANTIES, INCLUDING WARRANTIES OF MERCHANTABILITY OR FITNESS FOR A PARTICULAR PURPOSE,
ARE LIMITED TO ONE YEAR OR THE SHORTEST PERIOD ALLOWED BY LAW. WHIRLPOOL SHALL NOT BE LIABLE FOR
INCIDENTAL OR CONSEQUENTIAL DAMAGES. SOME STATES AND PROVINCES DO NOT ALLOW THE EXCLUSION OR LIMITATION
OF INCIDENTAL OR CONSEQUENTIAL DAMAGES, OR LIMITATIONS ON THE DURATION OF IMPLIED WARRANTIES OF
MERCHANTABILITY OR FITNESS, SO THESE EXCLUSIONS OR LIMITATIONS MAY NOT APPLY TO YOU. THIS WARRANTY GIVES
YOU SPECIFIC LEGAL RIGHTS AND YOU MAY ALSO HAVE OTHER RIGHTS, WHICH VARY FROM STATE TO STATE OR PROVINCE
TO PROVINCE.
Outside the 50 United States and Canada, this warranty does not apply. Contact your authorized Whirlpool dealer to determine if
another warranty applies. If you need service, in the U.S.A., call 1-800-422-1230. In Canada, call 1-800-807-6777. 6/06
Keep this book and your sales slip together for future
reference. You must provide proof of purchase or installation
date for in-warranty service.
Write down the following information about your major product to
better help you obtain assistance or service if you ever need it.
You will need to know your complete model number and serial
number. You can find this information on the model and serial
number label located on the product.
Dealer name
Address
Phone number
Model number
Serial number
Purchase date
8
 Loading...