

Whirlpool WTE2921 A+NFW, WTE2921 A+NFS, WTE3322 A+NFW, WTV4125 NF W, WTE3322 A+NF TS Programming table [fr]

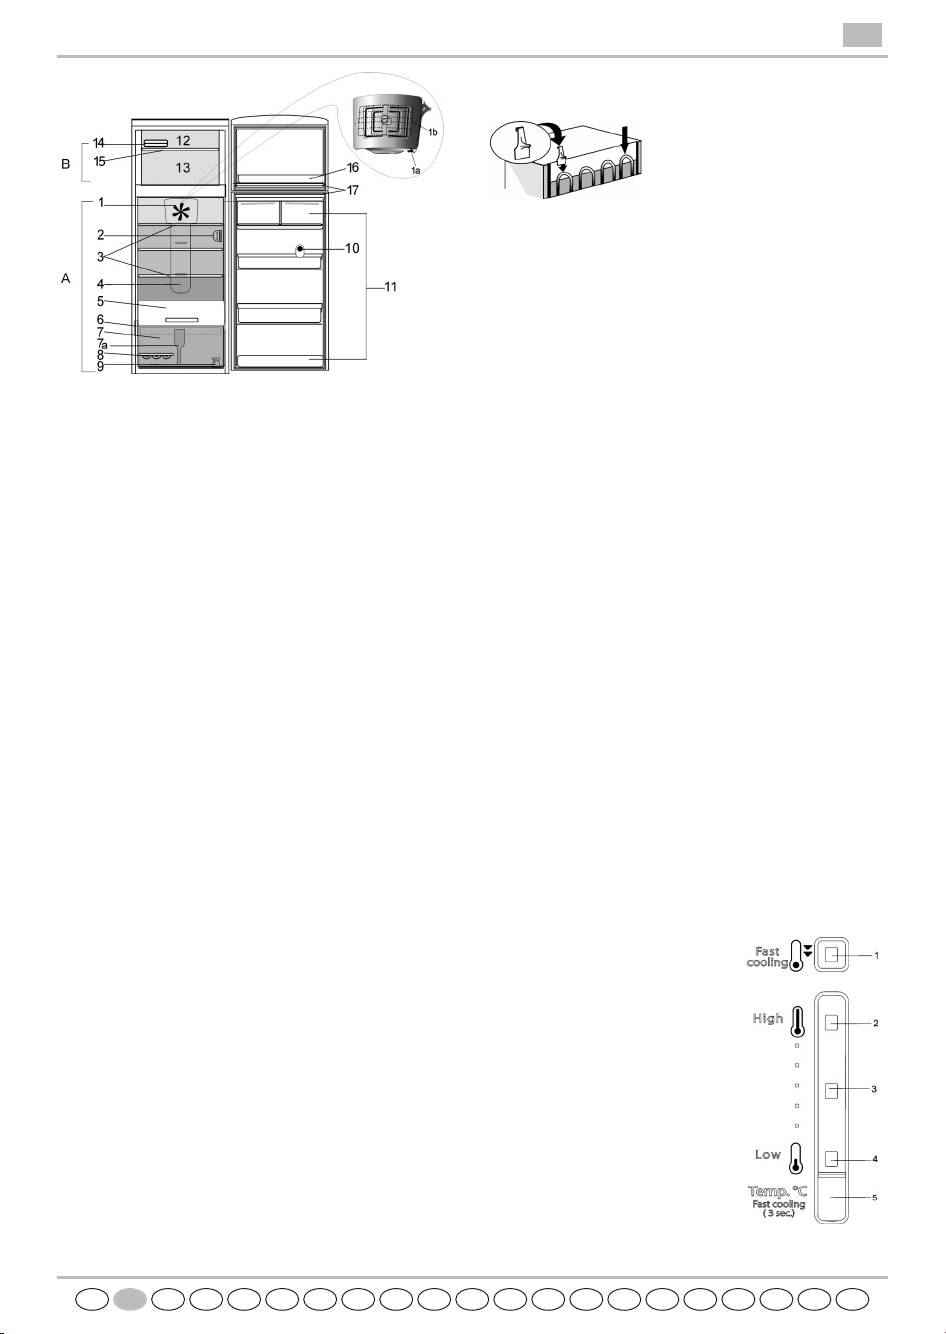
A. Kühlteil
1. Filter im Lüfter
2. Elektronisches Bedienfeld / Beleuchtungseinheit
3. Abstellflächen / Bereich für Abstellflächen
4. Multi-flow Kaltluftumwälzsystem
5. Frischhaltefach
6. Typenschild mit Handelsnamen
7. Obst- und Gemüsefach
7a. Trennelement für Obst- und Gemüsefach
8. Eierbehälter
9. Bausatz für Türanschlagwechsel
10. Trennelement
11. Türablagen
B. GEFRIERFACH
12. Einfrierbereich (mit/ohne Blende)
13.
Bereich zum Lagern von tiefgefrorenen Lebensmitteln
14. Eisbehälter
15. Kunststoffablage
16. Türeinsätze des Gefrierfachs für Pizza oder andere
Tiefkühlware mit kurzer Aufbewahrungszeit (2**
Aufbewahrungsfach)
17. Türdichtungen
Je nach Modell können die Zahl und die Form der
Zubehörteile verschieden sein.
Antibakterieller Schutz (modellabhängig):
- Bakterienfilter im Lüfter (1)
- Gemüsefach mit keimtötenden Zusätzen (7)
- Die Türdichtungen bestehen aus Material, das das
Wachstum von Bakterien hemmt (17).
Anm.:
- Falls eine Blende vorhanden ist, kann diese zum
Erweitern des Volumens entfernt werden.
- Alle Konsolen und Ablageflächen lassen sich
herausnehmen. Die Kunststoffablage des Gefrierteils
kann nicht herausgenommen werden, um die
Luftumwälzung im Gefrierteil nicht zu beeinträchtigen.
- Die Innentemperaturen des Gerätes hängen von der
Raumtemperatur, der Häufigkeit der Türöffnungen und
dem Gerätestandort ab. Bei der Temperatureinstellung
müssen diese Faktoren berücksichtigt werden.
- Das Gerätezubehör ist nicht zum Waschen im
Geschirrspüler geeignet.
INBETRIEBNAHME DES GERÄTES
Die Distanzstücke (falls
mitgeliefert) an der Hinterwand
des Kondensators auf der
Geräterückseite anbringen.
Den Netzstecker in die
Steckdose stecken; das Gerät startet automatisch.
Warten Sie nach der Inbetriebnahme des Gerätes
mindestens 4-6 Stunden mit dem Einlegen von
Lebensmitteln. Die Kontrollleuchten auf dem Bedienfeld
leuchten ca. 1 Sekunde lang auf. Nach der Initialisierung
wird der Einstellmodus angezeigt.
Hinweis:
- Lebensmittel, die vor dem Erreichen der
Kühltemperatur eingelagert werden, können verderben.
- Zum Einlagern frischer Lebensmittel in den Gefrierraum
die Position 3 am Bedienfeld wählen.
LÜFTER MIT SCHALTER
Der Lüfter sorgt für eine gleichmäßige
Temperaturverteilung im Kühlraum und somit für eine
optimale Konservierung des Kühlgutes.
Drücken Sie zum Einschalten des Lüfters die Taste (1a).
Es wird empfohlen, den Lüfter einzuschalten, wenn die
Raumtemperatur 27-28 °C übersteigt, sich auf den
Glasablagen Tropfen bilden oder bei hoher
Luftfeuchtigkeit.
Hinweis:
Den Luftansaugbereich nicht mit Lebensmitteln
verdecken. Das Lüfterrad dreht sich NUR bei
eingeschaltetem Kompressor.
Den Lüfter wieder ausschalten, wenn die
Raumtemperatur wieder abgesunken ist.
Wenn das Gerät mit einem Lüfter ausgestattet ist, kann es
mit einem Filter ausgerüstet werden. Den Filter aus der
Box (im Gemüsefach, Teil 7) nehmen und in das Gitter an
der Oberseite des Kühlabteils (Element 1b) einsetzen.
Die Einbauanleitungen liegen dem Filter bei.
BESCHREIBUNG DES
ELEKTRONISCHEN
BEDIENFELDES
1. sehr tiefe Temperatur
"Schnellkühlen"
2. hohe Temperatur
3. mittlere Temperatur
4. tiefe Temperatur
5. Temperaturwahl-
/Schnellkühltaste (mind. 3 Sek.
lang drücken)
CA
UKR
ROBGRUSHSKCZPLFINDKNSGRIPENLFGBD
PRODUKTANGABEN
D

HINWEISE ZUR BEDIENUNG
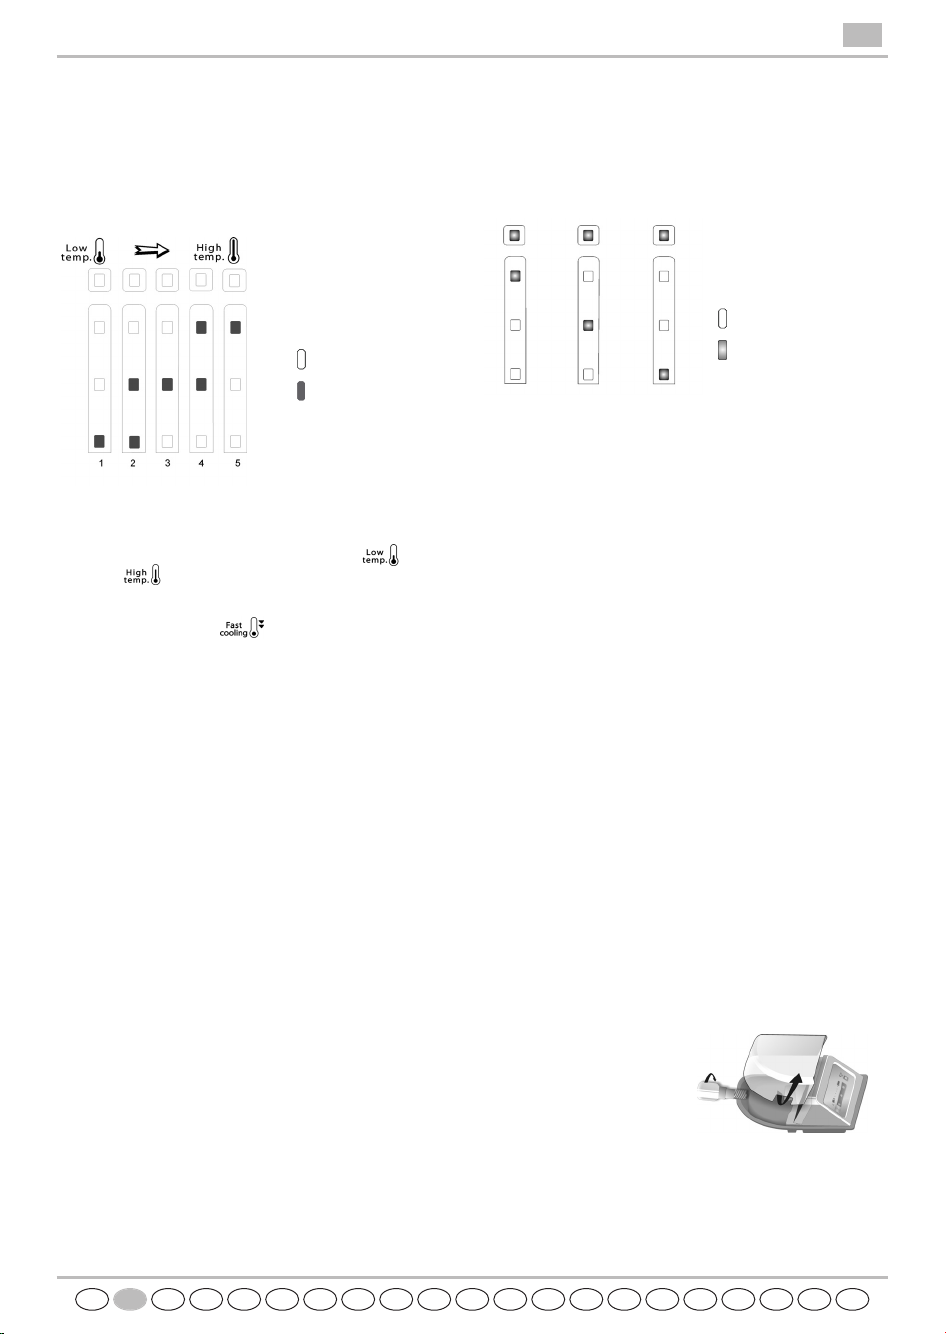
Die Temperatur wird mit der Taste (5) gewählt.
Die Temperatureinstellung gilt für beide Teile – Kühl- und
Gefrierteil. Beim ersten Anschluss des Gerätes wird
automatisch eine mittlere Einstellung gewählt (3).
In der folgenden Tabelle werden die Temperaturstufen
aufgeführt
Beschreibung:
LED AUS
LED AN
HINWEISE ZUR AUSWAHL DER
FUNKTIONEN
Mit der Temperaturwahltaste wird die gewünschte
Temperatur über den gesamten Bereich von der
höchsten bis zur tiefsten Temperatur eingestellt. Bei
jedem kurzen Drücken der Taste ändert sich die
Temperatureinstellung (zyklisch).
Schnellkühlen
Diese Funktion ist beim Einlagern einer größeren
Lebensmittelmenge in den Kühlraum praktisch.
Durch 3 Sek. langes Gedrückthalten der Taste (5) kann
der Abkühlvorgang im Kühlraum beschleunigt werden.
Die gelbe LED (1) leuchtet auf. Die Funktion wird
automatisch nach 6 Stunden abgeschaltet.
Die Schnellkühlfunktion kann auch vorher abgebrochen
werden, indem dieselbe Taste (5) 3 Sek. lang gedrückt
wird. Die gelbe LED (1) erlischt.
Hinweis:
- Die Schnellkühlfunktion sollte auch eingeschaltet
werden, bevor frische Lebensmittel in den Gefrierteil
eingelagert werden.
- Die Schnellkühlfunktion muss eingeschaltet werden,
wenn die maximale Kühlleistung erreicht werden soll
und ebenso vor dem Einlagern kleinerer
Lebensmittelmengen.
GESTÖRTER GERÄTEBETERIEB
Nach dem Anschließen des Geräts an das Stromnetz wird
u. U. während der ersten 10 Minuten des Betriebs eine
Störung des Temperatursensors gemäß folgender Tabelle
angezeigt:
Beschreibung:
LED AUS
LED blinkt
Das Gerät kühlt zwar weiterhin, aber Sie sollten den
Kundendienst anrufen und ihm den Alarmcode mitteilen.
Hinweis: Im Fall eines Stromausfalls kehrt das Gerät zum
normalen Betrieb zurück und die zuvor gewählten
Einstellungen werden wiederhergestellt.
GEFRIERRAUM ABTAUEN
Der Gefrierraum No Frost gewährleistet ein inneres
Umluftsystem das Eisbildungen vermeidet. Demzufolge
muss der Gefrierraum nicht abgetaut werden. Die
Tiefkühlware bleibt nicht an den Wänden haften, die
Etiketten sind immer leserlich und der Lagerungsraum
bleibt sauber und übersichtlich.
KÜHLRAUM ABTAUEN
Das Abtauen des Kühlraums erfolgt vollautomatisch.
Die von Zeit zu Zeit an der Innenrückwand des
Kühlraums auftretenden Wassertropfen zeigen die
automatische Abtauphase an. Das Tauwasser wird
automatisch in eine Abflussöffnung geleitet und
anschließend in einem Behälter gesammelt, in dem es
verdunstet.
AUSWECHSELN DER GLÜHBIRNE
Vor dem Auswechseln der Glühbirne immer zunächst den
Netzstecker ziehen.
Wenn die Innenbeleuchtung nicht funktioniert:
1. Lampenabdeckung abnehmen: nach oben drücken wie
auf der Abb. gezeigt.
2. Glühbirne kontrollieren.
Falls kaputt,
ausschrauben und durch
eine neue ersetzen.
3. Lampenabdeckung
wieder aufsetzen.
Die Glühbirne nicht ohne
Abdeckung lassen.
5019 636 01014 Printed in Poland 05/11
CA
UKR
ROBGRUSHSKCZPLFINDKNSGRIPENLFGBD
PRODUKTANGABEN
D
Kühlraum-
Verdampfersensor
defekt
Kühlraumsensor
defekt
Kühlraum-
Verdampfersensor &
Kühlraumsensor
defekt
A. Refrigerator Compartment
1. Filter in the fan
2. Electronic control panel / light unit
3. Shelves / Shelf area
4. Multi-flow cold air system
5. Cooler compartment
6. Rating plate with commercial name
7. Fruits and vegetables crisper
7a. Crisper divider
8. Egg tray
9. Reversibility kit
10. Separator
11. Door trays
B. Freezer Compartment
12. Area for freezing (with/without flap)
13. Area for storing frozen foods
14. Ice tray
15. Plastic shelf
16. The freezer door trays for pizza or other frozen
products with a short storage time (2** storage
compartment)
17. Door seals
Depending on the model the number and type of
accessories may vary.
Anti-bacterial protection (depending on the model):
- Antibacterial filter in the fan (1)
- Antibacterial additives in the Crisper (7)
- Door seals from materials that inhibit bacterial growth
(17).
Notes:
- In case it'll have a flap, please remember that to
maximize the storage volume it's suggested to remove it.
- All shelves and door trays are removable. Freezer plastic
shelf cannot be removed to have a good air flow rate
inside freezer compartment.
- The internal temperatures of the appliance depend on
the ambient temperature, frequency of opening the
doors, as well as location of the appliance. Temperature
setting must consider these factors.
- The appliance accessories are not suitable for washing in
dishwasher.
HOW TO START THE APPLIANCE
Fit the spacers (if supplied) on
the upper part of the condenser
at the rear of the appliance.
After plugging the appliance to
the mains, it starts the operation
automatically.
After starting the appliance, wait at least 4-6 hours before
placing food into the appliance .
The indicator LEDs on the control panel light up for
approximately 1 second, and after initialization process,
setpoint is displayed.
Note:
- If food is placed in the refrigarator before the appliance
has cooled completely, it may deteriorate.
- If fresh food is loaded in freezer position 3 on control
panel should be chosen.
FAN WITH A BUTTON
The fan improves temperature distribution inside the
refrigerator compartment, allowing better preservation of
stored food.
To switch on the fan press the button (1a). It is advisable
to activate the fan when the ambient air temperature is
over 27 ÷ 28°C or if you perceive drops of water on the
glass shelves or in the severe humidity conditions.
Note:
Do not obstruct the air intake area with food items.
The fan will run ONLY when the compressor is in
operation.
Remember to turn off the fan when there is a lower
ambient air temperature.
If the appliance has the fan it can be equipped with the
antibacterial filter.
Remove it from the box (found in the crisper drawer
(item 7) and insert into the cover of fan (item 1b).
The replacement procedure is attached with the filter.
ELECTRONIC CONTROL PANEL
DESCRIPTION
1. extra low temperature "Fast
cooling"
2. high temperature
3. medium temperature
4. low temperature
5. temperature selection/Fast
cooling (3 sec. minimum)
pushbutton
CA
UKR
ROBGRUSHSKCZPLIGB FINDKNSGRPENLFD
PRODUCT SHEET
GB
OPERATION DESCRIPTION
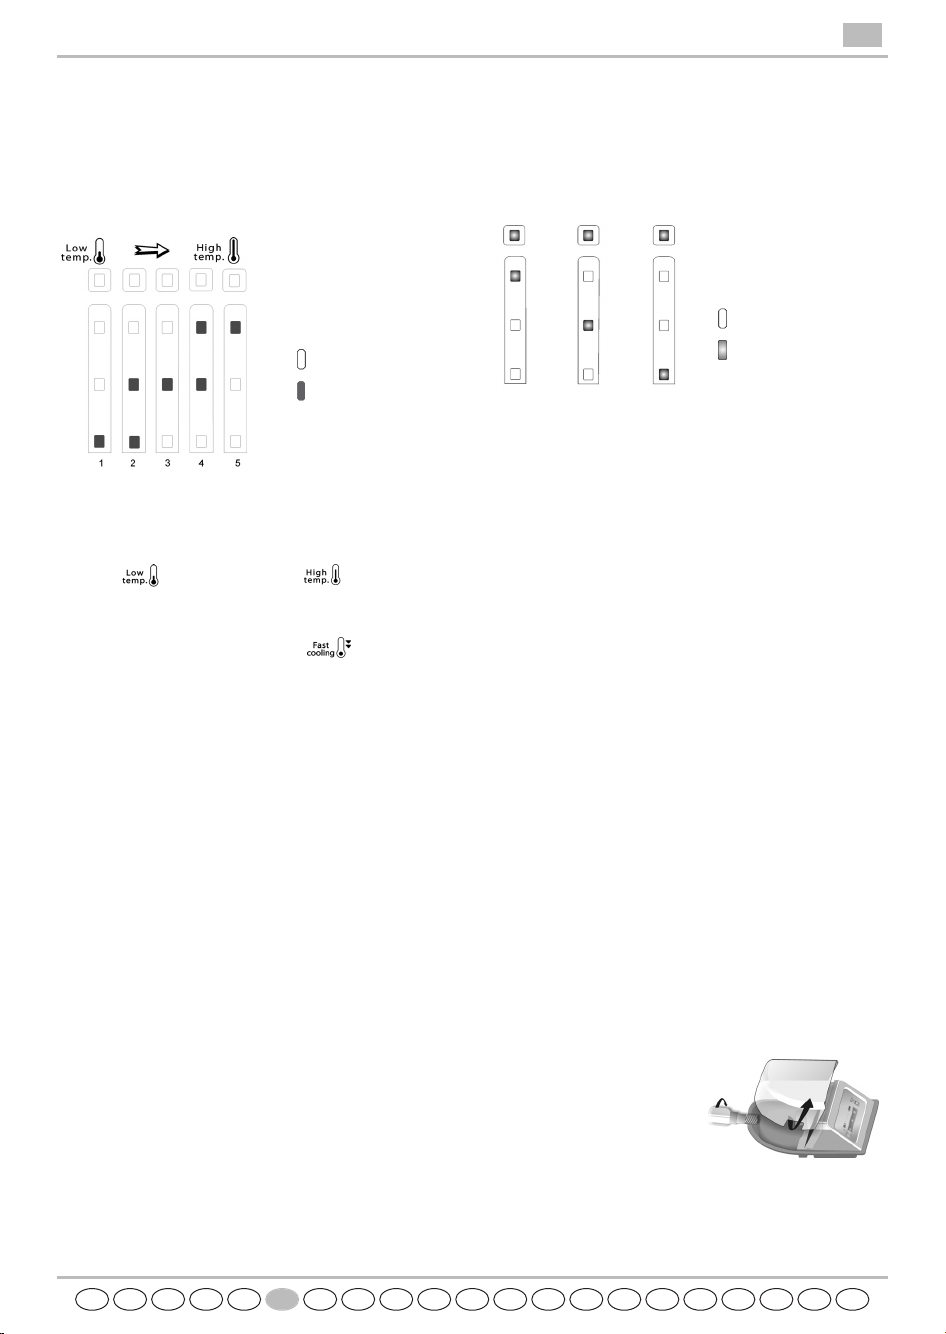
Temperature adjustment is made with pushbutton (item 5).
Temperature setpoint is done for both compartments at
one time – fridge and freezer.
At first plug-in of appliance factory setpoint is chosen –
medium position (item 3).
Following table shows set-points level
Description:
LED OFF
LED ON
GUIDE TO SELECTING FUNCTIONS
Temperature selection pushbutton (item 5) is used to
set desired temperature level, from coldest to
warmest . At each short pressure of the
pushbutton, the setpoint will change (cyclically).
Fast Cooling function
The use of this function is recommended when placing a
very high quantity of food in the refrigerator
compartment.
By pressing and hold the button (item 5) for 3 sec. it is
possible to increase the cooling speed of the foods inside
the refrigerator compartment. The yellow LED (item 1)
will come on. The function is automatically deactivated
after 6 hours.
The "Fast cooling" function can be manually deactivated by
pressing and hold the same button (item 5) for 3 sec., the
yellow LED (item1) is off.
Note:
- Fast Cooling function should be also switched ON
before placing fresh food to be frozen in the freezer
compartment.
- Fast Cooling function has to be engaged in order to
maximize freezing capacity, thus it has to be engaged
before to add light load.
ABNORMAL APPLIANCE OPERATION
When the product is plugged in to the mains, during first
10 minutes of its performance, possible temperature
sensor failure will be displayed according to following
table:
Description:
LED OFF
LED Flashing
The appliance will work preserving the food stored, but it
is necessary to contact after-sales service and provide
alarm code.
Note: in case of power failure, appliance goes back to
normal operation and previously chosen setpoint is
restored.
DEFROSTING THE FREEZER
COMPARTMENT
No Frost freezers provide chilled air circulation around
the storage areas and prevent the formation of ice,
thereby completely eliminating the need for defrosting.
Frozen items don't stick to the walls, labeling stays legible
and storage space remains neat and clear.
DEFROSTING THE REFRIGERATOR
COMPARTMENT
Refrigerator compartment defrosting is completely
automatic.
Droplets of water on the rear wall inside the refrigerator
compartment indicate that the automatic defrost phase is
in progress. The defrost water is automatically run into a
drain hole and collected in a container, where it
evaporates.
REPLACING THE LIGHT BULB
Always disconnect the refrigerator from the power supply
before replacing any light bulb.
If the inside light is not working, it is necessary to:
1. Remove the light cover:
move it upwards as
shown in figure.
2. Check the bulb. If
necessary unscrew the
broken bulb and replace
it with the new one.
3. Put on the light cover.
Do not leave the bulb uncovered.
CA
UKR
ROBGRUSHSKCZPLFINDKNSGRIPENLFGBD
PRODUCT SHEET
GB
Refrigerator
evaporator sensor
failure
Refrigerator sensor
failure
Refrigerator
evaporator &
refrigerator sensor
failure
5019 636 01014 Printed in Poland 05/11

A. Compartiment Réfrigérateur
1. Filtre de ventilateur
2. Bandeau de commande électronique / éclairage
3. Clayettes / Zone réservée aux clayettes
4. Système d'air froid Multi-flow
5. Compartiment de réfrigération
6. Plaque signalétique avec nom commercial
7. Bac à fruits et légumes
7a. Séparateur crisper
8. Plateau à oeufs
9. Kit pour l'inversion du sens d'ouverture de la porte
10. Séparateur interne
11. Balconnets
B. Compartiment Congélateur
12. Zone de congélation (avec/sans abattant)
13. Zone de stockage des aliments congelés
14. Bac à glaçons
15. Grille plastique
16.
Balconnets de la porte du congélateur pour pizzas ou
autres produits surgelés dont le temps de conservation
est court (compartiment de stockage 2**)
17. Joints de porte
Le nombre et la forme des accessoires peuvent
varier d'un modèle à l'autre.
Protection antibactérielle (selon modèle) :
- Ventilateur avec filtre antibactérien (1)
- Bac à fruits et légumes avec additifs antibactériens (7)
- Joints de porte antibactériens (17).
Remarques :
- Si le compartiment est doté d'un abattant, nous vous
conseillons de retirer celui-ci pour optimiser le volume
de stockage.
- Les clayettes et les balconnets sont amovibles. La grille
en plastique du congélateur ne peut être retirée, car elle
assure un bon débit d'air à l'intérieur du compartiment.
- La température intérieure de l'appareil dépendra de la
température ambiante, de la fréquence d'ouverture de la
porte et de l'endroit où est installé l'appareil. Le
thermostat doit être réglé en fonction de ces facteurs.
-
Les accessoires ne doivent pas être lavés au lave-vaisselle.
MISE EN MARCHE DE L'APPAREIL
Montez les entretoises (si elles
sont fournies) dans la partie
supérieure du condenseur situé à
l'arrière de l'appareil. L'appareil
se met automatiquement en
marche dès que vous le
branchez. Une fois l'appareil en marche, attendez au moins
4-6 heures avant d'y introduire des aliments. Les voyants
lumineux sur le bandeau de commande s'allument pendant
environ 1 seconde et, dès que le processus de
réinitialisation est terminé, la valeur de consigne s'affiche.
Remarque :
- Si vous placez des aliments dans le réfrigérateur avant
que l'appareil ne soit complètement refroidi, ceux-ci
risquent de se détériorer.
- Si vous rangez des aliments frais dans le congélateur,
sélectionnez la position 3 sur le bandeau de commande.
VENTILATEUR ÉQUIPÉ D'UNE TOUCHE
Le ventilateur assure une répartition homogène de la
température à l'intérieur du réfrigérateur, garantissant une
meilleure conservation des aliments. Pour activer le
ventilateur, appuyez sur la touche (1a). Il est recommandé
d'activer le ventilateur lorsque la température de l'air
ambiant dépasse 27 ÷ 28 °C ou si des gouttes d'eau sont
présentes sur les clayettes en verre, ou encore si le taux
d'humidité est particulièrement élevé.
Remarque :
Évitez d'obstruer les bouches d'entrée d'air avec des
aliments. Le ventilateur tourne UNIQUEMENT
lorsque le compresseur est en marche.
Rappelez-vous d'éteindre le ventilateur dès que la
température de l'air ambiant aura baissé.
Si votre appareil est équipé d'un ventilateur, celui-ci peut
être doté d'un filtre antibactérien. Extrayez le filtre de la
boîte (présente dans le bac Crisper (article 7)) et insérezle dans le couvercle du ventilateur (article 1b). La
procédure de remplacement du filtre est jointe au filtre.
DESCRIPTION DU
BANDEAU DE
COMMANDE
ÉLECTRONIQUE
1. Température très froide "Fast
Cooling" (Refroidissement
rapide)
2. Température moins froide
3. Température moyenne
4. Température froide
5. Bouton de sélection de la
température/Refroidissement
rapide (3 sec. minimum)
CA
UKR
ROBGRUSHSKCZPLIGB FINDKNSGRPENLFD
FICHE PRODUIT
F

DESCRIPTION DU FONCTIONNEMENT
Le bouton (5) permet de régler la température.
La valeur de consigne de la température est sélectionnée
simultanément pour les deux compartiments –
réfrigérateur et congélateur –. Lorsque l'appareil est
branché pour la première fois, c'est la valeur de consigne
définie en usine qui est sélectionnée – position
intermédiaire (article 3).
Le tableau ci-après illustre le niveau des points de
consigne
Description :
LED Arrêt
LED Marche
SÉLECTION DES FONCTIONS
Le bouton de réglage de la température (article 5)
permet de régler le niveau de température souhaité: de la
plus froide à la moins froide . À chaque
pression du bouton, la valeur de consigne passera d'une
température à l'autre de façon cyclique.
Fonction Refroidissement rapide
Il est recommandé d'activer cette fonction si vous rangez
une très grande quantité d'aliments dans le compartiment
réfrigérateur.
En appuyant sur la touche (article 5) pendant 3 secondes,
il est possible d'accélérer la vitesse de refroidissement des
aliments dans le réfrigérateur. Le voyant jaune (article 1)
s'allume. La fonction se désactive automatiquement au
bout de 6 heures.
Vous pouvez désactiver la fonction "Fast Cooling"
manuellement en appuyant sur cette même touche (article
5) pendant 3 secondes ; le voyant jaune (article 1) s'éteint.
Remarque :
- La fonction Fast Cooling doit également être activée
avant de ranger des aliments à congeler dans le
compartiment congélateur.
- Elle permet d'optimiser la capacité de congélation et
doit, par conséquent être activée si vous ajoutez une
petite quantité d'aliments dans le compartiment.
FONCTIONNEMENT ANORMAL DE
L'APPAREIL
Dès que vous avez branché l'appareil à l'alimentation
secteur, pendant les 10 premières minutes de
fonctionnement, l'affichage visualise une défaillance
éventuelle de la sonde de température, conformément au
tableau ci-dessous :
Description :
LED Arrêt
LED clignotante
L'appareil fonctionnera et assurera la conservation des
aliments qui y sont stockés, mais il est nécessaire de
contacter le Service Après-vente et de communiquer le
code d'alarme.
Remarque : En cas de coupure de courant, dès que le
courant sera rétabli, l'appareil se remettra en marche
normalement et la valeur de consigne précédemment
sélectionnée sera restaurée.
DÉGIVRAGE DU COMPARTIMENT
CONGÉLATEUR
Les congélateurs No Frost fournissent la circulation de
l'air froid autour des zones de stockage pour éviter la
formation de givre afin d'éliminer totalement la nécessité
de dégivrer l'appareil. Les aliments gelés ne collent pas
aux parois, les étiquettes restent lisibles et l'espace de
stockage reste ordonné et clair.
DÉGIVRAGE DU COMPARTIMENT RÉFRIGÉRATEUR
Le dégivrage du compartiment réfrigérateur est
entièrement automatique.
Des gouttelettes d'eau sur la paroi arrière à l'intérieur du
compartiment réfrigérateur indiquant que la phase de
dégivrage automatique est en cours. L'eau de dégivrage
est automatiquement conduite dans un trou de vidange et
récoltée par un récipient dans lequel elle s'évapore.
REMPLACEMENT DE L'AMPOULE
Avant de remplacer l'ampoule, débranchez toujours
l'appareil. Si l'éclairage intérieur ne fonctionne pas :
1. Enlevez le capot de l'ampoule : soulevez-le, comme
illustré dans la figure.
2. Contrôlez l'ampoule. Si
nécessaire, dévissez
l'ampoule défectueuse et
remplacez-la par une
ampoule neuve.
3. Réinstallez le capot.
Veillez toujours à remettre le capot de l'ampoule en
place après avoir remplacé celle-ci.
CA
UKR
ROBGRUSHSKCZPLFINDKNSGRIPENLFGBD
FICHE PRODUIT
F
Sonde de
l'évaporateur du
réfrigérateur
défectueuse
Sonde du
réfrigérateur
défectueuse
Sondes du réfrigérateur
et de l'évaporateur du
réfrigérateur
défectueuses
5019 636 01014 Printed in Poland 05/11

A. Koelvak
1. Filter in de ventilator
2. Elektronisch bedieningspaneel / verlichting
3. Schappen / Zone voor schappen
4. Multi-flow ventilatiesysteem
5. Vak voor koeling
6. Typeplaatje met handelsnaam
7. Crisper voor groente en fruit
7a. Verdeler crisper
8. Eierhouder
9. Set voor het omkeren van de deur
10. Afscheider
11. Deurvakken
B. Vriesvak
12. Zone voor invriezen (met/zonder klep)
13. Zone voor het bewaren van diepvriesproducten
14. IJsbakje
15. Plastic schap
16. De deurvakken van de vriezer voor pizza of andere
ingevroren producten met een korte bewaartijd
(2** bewaarvak)
17. Deurafdichtingen
Afhankelijk van het model kan het aantal en type
accessoires variëren.
Antibacteriële bescherming (afhankelijk van het
model):
- Antibacterieel filter in de ventilator (1)
- Antibacteriële toevoegingen in de Crisper (7)
- De deurafdichtingen zijn vervaardigd van materialen die
de groei van bacteriën remmen (17).
Opmerkingen:
- Bij modellen met een klep wordt geadviseerd de klep te
verwijderen om de bewaarruimte zo groot mogelijk te
maken.
- Alle planken en schappen kunnen worden verwijderd.
Het plastic schap van de vriezer kan niet verwijderd
worden in verband met een goede luchtcirculatie binnen
het vriesvak.
- De binnentemperatuur van het apparaat is afhankelijk
van de omgevingstemperatuur, de frequentie waarmee
de deuren geopend worden en de plaats waar het
apparaat staat. Bij de instelling van de temperatuur moet
u rekening houden met de volgende factoren.
- De accessoires van het apparaat zijn niet geschikt om
afgewassen te worden in de afwasmachine.
IN WERKING STELLEN VAN HET APPARAAT
Monteer de afstandsstukken
(indien bijgeleverd) op de
bovenkant van de condensator
die op de achterkant van het
apparaat zit. Nadat de stekker
in het stopcontact is gestoken,
begint het apparaat automatisch te werken.
Wacht nadat u het apparaat heeft ingeschakeld, minstens
4-6 uur voordat u levensmiddelen in het apparaat legt.
De indicatielampjes op het bedieningspaneel gaan
ongeveer 1 seconde branden en na het initialisatieproces
wordt de instelling weergegeven.
Opmerking:
- Als er voedsel in de koelkast wordt geplaatst voordat
het apparaat voldoende gekoeld is, kan het voedsel
bederven.
- Als er verse levensmiddelen in de vriezer worden
gelegd, kies dan stand 3 op het bedieningspaneel.
VENTILATOR MET DRUKKNOP
De ventilator verbetert de temperatuurverdeling in de
koelkast, waardoor het voedsel beter bewaard wordt.
Druk op knop (1a) om de ventilator in te schakelen.
Geadviseerd wordt om de ventilator aan te zetten als de
luchttemperatuur in de omgeving boven de 27 ÷ 28 °C
ligt, als er waterdruppels op de glazen schappen liggen of
als er sprake is van een hoge luchtvochtigheid.
Opmerking:
Blokkeer het gebied van de luchtinlaat niet met
levensmiddelen. De ventilator draait UITSLUITEND
wanneer de compressor werkt.
Denk eraan de ventilator uit te zetten als de
omgevingstemperatuur daalt.
Als het apparaat is voorzien van de ventilator kan het ook
uitgerust worden met het antibacteriële filter. Haal het
filter uit de doos, die zich in de crisper-lade bevindt
(element 7) en plaats het in de afdekking van de ventilator
(element 1b). De instructies voor de vervanging zijn bij
het filter gevoegd.
BESCHRIJVING
ELEKTRONISCH
BEDIENINGSPANEEL
1. extra lage temperatuur "Fast
cooling"
2. hoge temperatuur
3. gemiddelde temperatuur
4. lage temperatuur
5. drukknop
temperatuurselectie/Fast
cooling (min. 3 sec.)
CA
UKR
ROBGRUSHSKCZPLIGB FINDKNSGRPENLFD
PRODUCTINFORMATIEBLAD
NL

BESCHRIJVING VAN DE BEDIENING
U kunt de temperatuur instellen met drukknop (item 5).
De temperatuurinstelling wordt voor beide vakken tegelijk
uitgevoerd – koelkast en vriezer.
Bij de eerste inschakeling van het apparaat wordt de
fabrieksinstelling gekozen – de gemiddelde stand (item 3).
In de volgende tabel ziet u de instelpunten
Beschrijving:
LAMPJE UIT
LAMPJE AAN
RICHTLIJNEN VOOR HET SELECTEREN VAN
DE FUNCTIES
De drukknop voor temperatuurselectie (item 5) wordt
gebruikt om de gewenste temperatuur in te stellen, van
koudst tot warmst . Bij elke korte druk op de
knop verandert de instelling (cyclisch).
Fast Cooling-functie (Snelkoelen)
Het gebruik van deze functie wordt aanbevolen als u zeer
veel levensmiddelen in de koelkast plaatst.
Door de knop (item 5) 3 seconden ingedrukt te houden
kunt u de snelheid waarmee de levensmiddelen gekoeld
worden verhogen. Het gele lampje (item 1) gaat branden.
De functie wordt na 6 uur automatisch uitgeschakeld.
De "Fast cooling"-functie kan handmatig worden
uitgeschakeld door dezelfde knop (item 5) 3 seconden
ingedrukt te houden. Het gele lampje (item 1) gaat uit.
Opmerking:
- De Fast Cooling-functie moet ook op AAN worden
gezet voordat u vers voedsel in het vriesvak zet.
- De Fast Cooling-functie moet worden ingeschakeld om
de vriescapaciteit zo groot mogelijk te maken. De
functie moet dus ingeschakeld worden voordat u de
levensmiddelen in de vriezer legt.
ABNORMALE WERKING VAN HET APPARAAT
Als het apparaat wordt aangesloten op de netvoeding, kan
er gedurende de eerste 10 minuten een foutmelding van
de temperatuursensor worden weergegeven volgens de
volgende tabel:
Beschrijving:
LAMPJE UIT
LAMPJE KNIPPERT
Het apparaat blijft het voedsel conserveren, maar u moet
contact opnemen met de klantenservice en de alarmcode
doorgeven.
Opmerking: na een stroomuitval keert het apparaat
terug naar de normale werking en wordt de eerder
gekozen instelling hersteld.
HET VRIESGEDEELTE ONTDOOIEN
No Frost vriezers laten rondom de verschillende ruimtes
gekoelde lucht circuleren en voorkomen de vorming van
ijs, waardoor het niet langer nodig is om de vriezer te
ontdooien. Bevroren voorwerpen plakken niet langer aan
de wanden vast, de etiketten blijven leesbaar en de
opslagruimte blijft opgeruimd en schoon.
HET KOELGEDEELTE ONTDOOIENT
Het ontdooien van het koelgedeelte vindt geheel
automatisch plaats.
De aanwezigheid van waterdruppels op de achterwand
van het koelgedeelte geeft aan dat de automatische
ontdooifase in werking is. Het dooiwater loopt
automatisch naar de afvoeropening en wordt in een
recipiënt opgevangen, waar het vervolgens verdampt.
VERVANGEN VAN HET LAMPJE
Haal altijd de stekker van het apparaat uit het stopcontact
voordat u het lampje vervangt.
Als de binnenverlichting niet werkt, moet u het volgende
doen:
1. Verwijder het
lampenkapje: trek het
omhoog zoals
aangegeven in de
afbeelding.
2. Controleer het lampje.
Draai het kapotte lampje
indien nodig los en vervang het door een nieuw.
3. Plaats het lampenkapje terug.
Laat het lampje niet zonder kapje.
CA
UKR
ROBGRUSHSKCZPLFINDKNSGRIPENLFGBD
PRODUCTINFORMATIEBLAD
NL
Storing in sensor
verdamper koelkast
Storing in sensor
koelkast
Storing in sensor
verdamper koelkast
& sensor koelkast
5019 636 01014 Printed in Poland 05/11

A. Compartimento frigorífico
1. Filtro del ventilador
2. Panel de control electrónico/unidad de la luz
3. Estantes y zona para estantes
4. Sistema de aire frío Multi-flow
5. Compartimento de baja temperatura
6. Placa de datos con nombre comercial
7. Cajón para frutas y verduras
7a. Separador del cajón para fruta y verdura
8. Bandeja para huevos
9. Kit de reversibilidad
10. Separador
11. Bandejas de la puerta
B. Compartimento congelador
12. Área para congelar (con/sin balda)
13. Área para almacenar alimentos congelados
14. Bandeja de hielos
15. Estante de plástico
16. Bandejas de la puerta del congelador para pizzas u
otros productos congelados que se conservarán
durante poco tiempo (compartimento de
almacenamiento de 2**).
17. Juntas de la puerta
Dependiendo del modelo, el número y el tipo de
accesorios puede variar.
Protección antibacterias (según el modelo):
- Filtro antibacterias del ventilador (1)
- Aditivos antibacterias en el cajón para la fruta y verdura (7)
- Juntas de las puertas fabricadas con materiales que
impiden el crecimiento de las bacterias (17).
Notas:
- En caso de que haya una balda, recuerde que puede
quitarla para aumentar el espacio disponible para el
almacenamiento.
- Todas las repisas y estantes son extraíbles. El estante de
plástico del congelador no se puede desmontar para
mejorar el flujo de aire en el compartimento congelador.
- La temperatura en el interior del aparato depende de la
temperatura ambiente, la frecuencia de apertura de las
puertas y de la ubicación. Deben tenerse en cuenta
estos factores al ajustar la temperatura.
- No lave los accesorios del aparato en el lavavajillas.
PUESTA EN MARCHA DEL APARATO
Monte los separadores (si se
incluyen) en la parte superior
del condensador situado en la
parte posterior del aparato.
El aparato se pone en marcha
automáticamente una vez
enchufado. Después de poner en marcha el aparato,
espere al menos 4-6 horas antes de colocar alimentos
dentro. Los pilotos del panel de control se encienden
durante aproximadamente 1 segundo y, tras el proceso de
arranque, se muestra el valor de ajuste.
Nota:
- Si se introducen alimentos antes de que el frigorífico
alcance la temperatura adecuada, éstos pueden
deteriorarse.
- Si se introducen alimentos frescos en el congelador, sitúe
el mando del regulador en la posición 3.
VENTILADOR CON BOTÓN
El ventilador distribuye la temperatura de manera más
uniforme en el compartimento frigorífico y permite
conservar mejor los alimentos.
Para activar el ventilador, pulse el botón (1a). Se aconseja
activar el ventilador cuando la temperatura ambiente
supera los 27 ÷ 28 °C, si se forman gotas de agua en los
estantes de vidrio o hay una gran humedad.
Nota:
No obstruya la entrada de aire con alimentos.
El ventilador SÓLO gira cuando el compresor está
en marcha. Apague el ventilador cuando descienda
la temperatura ambiente.
Si el aparato incluye un ventilador, se puede instalar un
filtro antibacteriano.
Extráigalo de la caja, en el cajón para fruta y verdura (7), e
introdúzcalo en la cubierta del ventilador (1b).
El procedimiento para la sustitución del filtro se encuentra
en el filtro.
DESCRIPCIÓN DEL PANEL DE MANDOS
1. Temperatura extra baja "Fast
cooling" (Enfriamiento rápido)
2. Temperatura alta
3. Temperatura media
4. Temperatura baja
5. Botón de selección de
temperatura/Fast cooling
(mínimo 3 segundos)
CA
UKR
ROBGRUSHSKCZPLIGB FINDKNSGRPENLFD
FICHA DEL PRODUCTO
E

DESCRIPCIÓN DEL FUNCIONAMIENTO
El ajuste de la temperatura se realiza con el botón (5).
El ajuste de la temperatura se realiza en ambos
compartimentos al mismo tiempo: frigorífico y congelador.
La primera vez que se enchufa el aparato, se ajusta a la
temperatura definida en fábrica: posición media (3).
En la siguiente tabla se muestran los ajustes.
Descripción:
PILOTO APAGADO
PILOTO ENCENDIDO
GUÍA PARA SELECCIONAR LAS FUNCIONES
El botón de selección de la temperatura (5) se utiliza
para ajustar la temperatura deseada, desde la más cálida
a la más fría . Cada vez que se pulsa el botón,
el punto de ajuste cambia de forma cíclica.
Función Fast Cooling (Enfriamiento rápido)
El uso de esta función se recomienda cuando se coloca
una gran cantidad de alimentos en el compartimento
frigorífico.
Pulse y mantenga pulsado durante 3 segundos el botón (5)
para aumentar la velocidad de refrigeración de los
alimentos dentro del compartimento frigorífico. Se
enciende el piloto amarillo (1). Esta función se desconecta
automáticamente transcurridas 6 horas.
Para desactivar manualmente la función "Fast cooling",
pulse y mantenga pulsado el botón (5) durante 3
segundos. El piloto amarillo (1) se apaga.
Nota:
- La función "Fast Cooling" también debe activarse cuando
se introducen alimentos frescos para congelar en el
compartimento congelador.
- La función "Fast Cooling" debe activarse antes de
introducir alimentos para aumentar al máximo la
capacidad de congelación.
FUNCIONAMIENTO INCORRECTO DEL
APARATO
Tras enchufar el aparato a la toma de corriente, durante
los 10 primeros minutos de funcionamiento, es posible
que muestre una avería en el sensor de temperatura
según la tabla siguiente:
Descripción:
PILOTO APAGADO
PILOTO QUE PARPADEA
El aparato funciona preservando los alimentos, pero es
necesario ponerse en contacto con el Servicio de
Asistencia Técnica e indicar el código de alarma.
Nota: Si se produce una interrupción en el suministro
eléctrico, el aparato retoma el funcionamiento normal y se
restablecen los ajustes previamente seleccionados.
CÓMO DESCONGELAR EL
COMPARTIMENTO CONGELADOR
En los congeladores No Frost el aire refrigerado circula
alrededor de las zonas de almacenamiento para evitar la
formación de hielo y, por consiguiente, la eliminación
completa de la operación de descongelación. Los
alimentos congelados no se pegan en las paredes, las
etiquetas permanecen legibles y el espacio de
almacenamiento permanece nítido y despejado.
CÓMO DESCONGELAR EL
COMPARTIMENTO FRIGORÍFICO
La descongelación del compartimento frigorífico es
totalmente automática.
La presencia de gotas de agua en la pared posterior interna
del compartimento frigorífico indica que se está realizando la
fase de descongelación automática. El agua de descongelación
se envía automáticamente a un orificio de desagüe para luego
recogerla en un contenedor donde se evapora.
SUSTITUCIÓN DE LA BOMBILLA
Antes de cambiar la bombilla, desconecte el frigorífico de
la corriente eléctrica.
Si no funciona la luz interior, es necesario:
1. Quitar la tapa de la bombilla: levante la tapa hacia
arriba, como se muestra en la figura.
2. Compruebe la bombilla. Si
fuera necesario, quite la
bombilla fundida y coloque
una nueva.
3. Vuelva a colocar la tapa.
Do not leave the bulb
uncovered.
CA
UKR
ROBGRUSHSKCZPLFINDKNSGRIPENLFGBD
FICHA DEL PRODUCTO
E
Avería en el sensor
del evaporador del
frigorífico
Avería en el sensor
del frigorífico
Avería en el sensor y
evaporador del
frigorífico
5019 636 01014 Printed in Poland 05/11

A. Compartimento do frigorífico
1. Filtro na ventoinha
2. Painel de controlo electrónico/luz
3. Prateleiras/zona para prateleiras
4. Sistema de ar frio Multi-flow
5. Compartimento do frigorífico
6. Chapa de características com nome comercial
7. Gaveta para fruta e legumes
7a. Separador da gaveta para fruta e legumes
8. Caixa para ovos
9. Kit de reversibilidade
10. Separador
11. Prateleiras laterais
B. Compartimento do congelador
12. Zona para congelar (com/sem grelha)
13. Zona para armazenar alimentos congelados
14. Cuvete de gelo
15. Prateleira de plástico
16.
Balcões da porta do congelador para pizas ou outros
produtos congelados com um tempo de conservação
curto (compartimento de conservação de 2**)
17. Juntas da porta
Conforme o modelo, o número e o tipo de
acessórios pode variar.
Protecção antibacteriana (consoante o modelo):
- Filtro antibacteriano na ventoinha (1)
- Aditivos antibacterianos na gaveta para fruta e legumes (7)
- As juntas da porta são fabricadas em materiais que
evitam a proliferação de bactérias (17).
Notas:
- Caso tenha grelha lembre-se que, para maximizar o
volume de armazenamento, é recomendável tirá-la.
- Todas as prateleiras e balcões da porta são amovíveis. A
prateleira de plástico do congelador não pode ser
removida para obter um bom fluxo de ar dentro do
compartimento do congelador.
- As temperaturas internas do aparelho dependem da
temperatura ambiente, da frequência de abertura das
portas e da localização do aparelho. A definição da
temperatura deve ter em consideração estes factores.
- Os acessórios do aparelho não são adequados para
lavagem na máquina.
COMO LIGAR O APARELHO
Monte os espaçadores (se
disponíveis) na parte superior
do condensador, na parte
traseira do aparelho.
Depois de ligar o aparelho à
rede, este começa a trabalhar
automaticamente. Depois de ligar o aparelho, aguarde
pelos menos 4-6 horas antes de colocar alimentos no seu
interior. Os LEDs indicadores do painel de controlo
acendem-se durante aproximadamente 1 segundo e, após
o processo de inicialização, visualiza-se o setpoint.
Nota:
- Se colocar alimentos antes do frigorífico arrefecer
completamente, estes poderão ficar estragados.
- Se carregar alimentos no congelador, deve escolher a
posição 3 no painel de comandos.
VENTOINHA COM BOTÃO
A ventoinha melhora a distribuição da temperatura no
interior do compartimento do frigorífico, permitindo uma
melhor conservação dos alimentos.
Para ligar a ventoinha, prima o botão (1a). É aconselhável
activar a ventoinha quando a temperatura do ar do
ambiente ultrapassar 27 ÷ 28 °C ou se houver gotas de
água nas prateleiras de vidro ou em condições de muita
humidade.
Nota:
Não obstrua a entrada do ar com alimentos.
A ventoinha SÓ funciona quando o compressor está
em funcionamento.
Lembre-se de desligar a ventoinha no caso de
descida da temperatura ambiente.
Se o aparelho tiver ventoinha, pode ser equipado com um
filtro antibacteriano. Retire-o da caixa que se encontra na
gaveta para fruta e legumes (item 7) e introduza-o na
tampa da ventoinha (item 1b).
A descrição do procedimento de substituição é fornecida
juntamente com o filtro.
DESCRIÇÃO DO PAINEL
DE CONTROLO
ELECTRÓNICO
1. temperatura muito baixa
"Arrefecimento rápido"
2. temperatura alta
3. temperatura média
4. temperatura baixa
5. botão de selecção da
temperatura/Arrefecimento
rápido (3 seg. mínimo)
CA
UKR
ROBGRUSHSKCZPLIGB FINDKNSGRPENLFD
FICHA TÉCNICA DO PRODUTO
P
DESCRIÇÃO DO FUNCIONAMENTO
A regulação da temperatura é feita com um botão (item 5).
O setpoint da temperatura é estabelecido para ambos os
compartimentos de uma só vez – frigorífico e congelador.
Na primeira vez que o aparelho é ligado à corrente, é
escolhido o setpoint de fábrica – posição média (item 3).
A tabela seguinte mostra o nível dos set-points
Descrição:
LED apagado
LED aceso
GUIA PARA SELECCIONAR AS FUNÇÕES
O botão de selecção da temperatura (item 5) é usado
para regular o nível de temperatura desejado, desde o
mais frio até ao mais quente . De cada vez
que se carrega brevemente no botão, o setpoint muda
(ciclicamente).
Função de Arrefecimento rápido
Esta função é recomendada quando se coloca uma
quantidade de alimentos muito elevada no compartimento
do frigorífico.
Se se premir e mantiver o botão (item 5) premido
durante 3 seg. é possível aumentar a velocidade de
arrefecimento dos alimentos dentro do compartimento do
frigorífico. O LED amarelo (item 1) acende-se. A função é
automaticamente desactivada ao fim de 6 horas.
A função de "Arrefecimento rápido" pode ser
manualmente desactivada premindo e mantendo o mesmo
botão (item 5) premido durante 3 segundos; o LED
amarelo (item1) apaga-se.
Nota:
- A função de Arrefecimento rápido também deve ser
ligada antes de se colocarem alimentos frescos no
compartimento do congelador.
- A função de Arrefecimento rápido tem de estar activada
para maximizar a capacidade de congelação, pelo que
tem de ser ligada antes de se introduzir uma pequena
quantidade de alimentos.
FUNCIONAMENTO ANÓMALO DO APARELHO
Quando o produto é ligado à corrente, durante os
primeiros 10 minutos de funcionamento, é possível que
uma falha do sensor de temperatura seja apresentada de
acordo com a tabela seguinte:
Descrição:
LED apagado
LED intermitente
O aparelho continuará a manter os alimentos
conservados, mas é necessário contactar o serviço pósvenda e fornecer o código de alarme.
Nota: Em caso de falha de energia, o aparelho retoma o
funcionamento normal e o setpoint anteriormente
escolhido é restabelecido.
DESCONGELAMENTO PERIÓDICO DO
COMPARTIMENTO DO CONGELADOR
Os congeladores No Frost asseguram a circulação de ar
muito fria em volta das áreas de conservação dos
alimentos e evita a formação de gelo, portanto elimina
completamente a necessidade de descongelamento. Os
produtos congelados não se colam nas paredes, as
etiquetas ficam bem legíveis e o espaço para guardar os
alimentos permanecem limpos e em ordem.
DESCONGELAMENTO PERIÓDICO DO
COMPARTIMENTO DO FRIGORÍFICO
O descongelamento do compartimento do frigorífico
realiza-se de maneira completamente automática.
Eventuais gotas de água sobre a parede posterior dentro
do compartimento do frigorífico indicam que a fase de
descongelamento automático iniciou-se. A água de
descongelamento é conduzida directamente para um furo
de descarga e recolha em um recipiente apropriado, e
depois se evaporará.
SUBSTITUIÇÃO DA LÂMPADA
Desligue sempre o frigorífico da alimentação eléctrica
antes de substituir a lâmpada.
Se a luz interna não estiver a
funcionar:
1. Retire a tampa da lâmpada:
desloque-a para cima
conforme indicado na
figura.
2. Verifique a lâmpada. Se necessário, desaperte a
lâmpada fundida e substitua-a por uma nova.
3. Coloque novamente a tampa da lâmpada.
Não deixe a lâmpada sem tampa.
CA
UKR
ROBGRUSHSKCZPLFINDKNSGRIPENLFGBD
FICHA TÉCNICA DO PRODUTO
P
Sensor do
evaporador do
frigorífico avariado
Sensor do frigorífico
avariado
Sensor do
evaporador e do
frigorífico avariado
5019 636 01014 Printed in Poland 05/11

A. Comparto Frigorifero
1. Ventola con filtro
2. Pannello comandi elettronico / luce
3. Zona ripiani / Ripiano
4. Sistema ad aria fredda multi-flow
5. Comparto refrigerante
6. Targhetta matricola con nome commerciale
7. Zona frutta e verdura
7a. Separatore crisper
8. Porta uova
9. Kit reversibilità
10. Separatore
11. Balconcini
B. Comparto Congelatore
12. Zona per il congelamento (con/senza flap)
13. Zona per la conservazione di alimenti congelati
14. Vaschetta del ghiaccio
15. Ripiano in plastica
16. Balconcini del congelatore per pizza o altri prodotti
congelati con un tempo di conservazione breve
(comparto conservazione 2**)
17. Guarnizioni
Il numero e il tipo degli accessori possono variare a
seconda del modello.
Protezione antibatterica (a seconda del modello):
- Filtro antibatterico nella ventola (1)
- Additivi antibatterici nel crisper (7)
- Le guarnizioni sono fabbricate in un materiale che
impedisce l'accumulo di batteri (17).
Note:
- In presenza di flap, tenere presente che, per un migliore
sfruttamento dello spazio adibito alla conservazione, è
consigliabile rimuoverlo.
- Tutte le mensole ed i ripiani sono estraibili. Ai fini di una
buona circolazione dell'aria all'interno del reparto
congelatore, non è possibile rimuovere il ripiano in
plastica dello stesso.
- Le temperature interne dell'apparecchio dipendono dalla
temperatura ambiente, dalla frequenza di apertura delle
porte e dal posizionamento dell'apparecchio.
L'impostazione della temperatura deve tenere conto di
questi fattori.
- Gli accessori dell'apparecchio non sono adatti al lavaggio
in lavastoviglie.
AVVIAMENTO DELL'APPARECCHIO
Montare i distanziali (se in
dotazione) sulla parte superiore
del condensatore posto sulla
parte posteriore
dell'apparecchio.
Il funzionamento si avvia in
modo automatico, una volta collegato l'apparecchio alla
rete di alimentazione. Dopo aver avviato l'apparecchio,
attendere almeno 4-6 ore prima di introdurre alimenti
all'interno dello stesso. Le spie LED sul pannello comandi
si accendono per circa 1 secondo e, dopo il processo di
inizializzazione, viene visualizzata l'impostazione.
Nota:
- Qualora si introducano alimenti prima che il frigorifero
sia completamente raffreddato, questi possono
deteriorarsi.
- Qualora si introducano alimenti freschi nel congelatore,
selezionare la posizione 3 sul pannello comandi.
VENTOLA DOTATA DI PULSANTE
La ventola migliora la distribuzione della temperatura
all'interno del comparto frigorifero, migliorando di
conseguenza la conservazione degli alimenti.
Per azionare la ventola premere il pulsante (1a). Si
consiglia di attivare la ventola quando la temperatura
dell'aria dell'ambiente supera i 27 ÷ 28 °C o se sui ripiani
di vetro sono presenti gocce d'acqua oppure in condizioni
di forte umidità.
Nota:
Non ostruire l'ingresso dell'aria con alimenti.
La ventola gira SOLO quando il compressore è in
funzione.
Si ricorda di spegnere la ventola quando la
temperatura dell'aria ambiente sarà diminuita.
Se presente nell'apparecchio, la ventola può essere dotata
di filtro antibatterico. Rimuoverlo dalla scatola (che si
trova nel cassetto crisper - elemento 7) e inserirlo nel
coperchio della ventola (elemento 1b).
La procedura di sostituzione è allegata al filtro.
DESCRIZIONE
PANNELLO COMANDI
ELETTRONICO
1. temperatura molto bassa
"Raffreddamento rapido"
2. temperatura alta
3. temperatura media
4. temperatura bassa
5. impostazione della
temperatura/Pulsante
Raffreddamento rapido
(min. 3 sec.)
CA
UKR
ROBGRUSHSKCZPLIGB FINDKNSGRPENLFD
SCHEDA PRODOTTO
I

DESCRIZIONE DEL FUNZIONAMENTO
La regolazione della temperatura avviene attraverso il
pulsante (elemento 5). L'impostazione della temperatura
avviene contemporaneamente per entrambi i comparti, sia
frigorifero sia congelatore. Al primo collegamento
dell'apparecchio all'alimentazione, viene selezionata
l'impostazione di fabbrica – posizione media (elemento 3).
La tabella a seguire illustra i livelli di impostazione
Descrizione:
LED OFF
LED ON
GUIDA ALLA SCELTA E USO DELLE
FUNZIONI
Il pulsante di selezione della temperatura (elemento
5) imposta la temperatura desiderata, dalla più fredda,
alla più calda . Ad ogni breve pressione del
tasto, l'impostazione cambierà (ciclicamente).
Funzione Raffreddamento rapido
L'utilizzo di questa funzione è raccomandato qualora si
collochi all'interno del comparto frigorifero una quantità
elevata di alimenti.
Premendo e tenendo premuto il pulsante (elemento 5)
per 3 sec. è possibile aumentare la velocità di
raffreddamento degli alimenti posti all'interno del
comparto frigorifero. Il LED giallo (elemento 1) si
accenderà. Questa funzione si disattiva automaticamente
dopo 6 ore.
La funzione "Raffreddamento rapido" può essere
disattivata manualmente premendo e tenendo premuto lo
stesso pulsante (elemento 5) per 3 secondi, il LED giallo
(elemento 1) si spegne.
Nota:
- La funzione Raffreddamento rapido deve essere anche
ATTIVATA prima di disporre alimenti freschi da
congelare nel comparto congelatore.
- La funzione raffreddamento rapido deve essere attivata
per sfruttare al massimo la capacità di congelamento,
deve quindi essere attivata prima di aggiungere carico.
FUNZIONAMENTO ANOMALO DELL'APPARECCHIO
Una volta inserita la spina, durante i primi 10 minuti di
funzionamento dell'apparecchio l'eventuale guasto al
sensore della temperatura sarà visualizzato secondo la
tabella seguente:
Descrizione:
LED OFF
LED lampeggiante
L'apparecchio continuerà a funzionare, conservando gli
alimenti, ma è necessario contattare il servizio assistenza
fornendo il codice di errore.
Nota: In caso di interruzioni di corrente, l'apparecchio
riprende il normale funzionamento è viene ripristinata
l'impostazione scelta precedentemente.
SBRINAMENTO DEL COMPARTO
CONGELATORE
I congelatori No Frost assicurano la circolazione di aria
molto fredda attorno alle aree di conservazione
alimentare, evitando così la formazione di ghiaccio ed
eliminando completamente la necessità di sbrinamento. I
prodotti congelati non si incollano alle pareti, le etichette
risultano ben leggibili, lo spazio di conservazione rimane
ordinato e pulito.
SCONGELAMENTO DEL COMPARTO
FRIGORIFERO
Lo scongelamento del comparto frigorifero avviene
in maniera completamente automatica.
Eventuali goccioline di acqua sulla parete posteriore
all'interno del comparto frigorifero indicano che la fase di
scongelamento automatico è stata avviata. L'acqua di
scongelamento viene direttamente condotta in un foro di
scarico e raccolta in un apposito contenitore, da dove
evapora.
SOSTITUZIONE DELLA LAMPADINA
Prima di sostituire la lampadina, scollegare sempre il
frigorifero dalla rete di alimentazione.
Se la luce interna non funziona:
1. Rimuovere la copertura:
spostarla verso l'alto come
illustrato nella figura.
2. Controllare la lampadina.
Se necessario, svitare la
lampadina guasta e
sostituirla con una nuova.
3. Montare la copertura.
Non lasciare la lampadina senza copertura.
CA
UKR
ROBGRUSHSKCZPLFINDKNSGRIPENLFGBD
SCHEDA PRODOTTO
I
Sensore evaporatore
frigorifero guasto
Sensore frigorifero
guasto
Sensore evaporatore
e sensore frigorifero
guasto
5019 636 01014 Printed in Poland 05/11
 Loading...