

Page 1
5
For correct and safe installation of the appliance,
please carefully read this manual and the other documentation provided (see section "Precautions and general
advice").
Specifications, technical data, images and parts
supplied may be subject to change without prior
notice.
WATER CONNECTION
Disconnect the appliance from the mains power
supply before starting operations.
• In any case, make sure to comply
with the current local regulations
regarding connection to the water
system.
• The appliance is supplied with a
water tube, 1.8 m long, already
attached to the back of the
product.
• The water tube complies with IEC
61770.
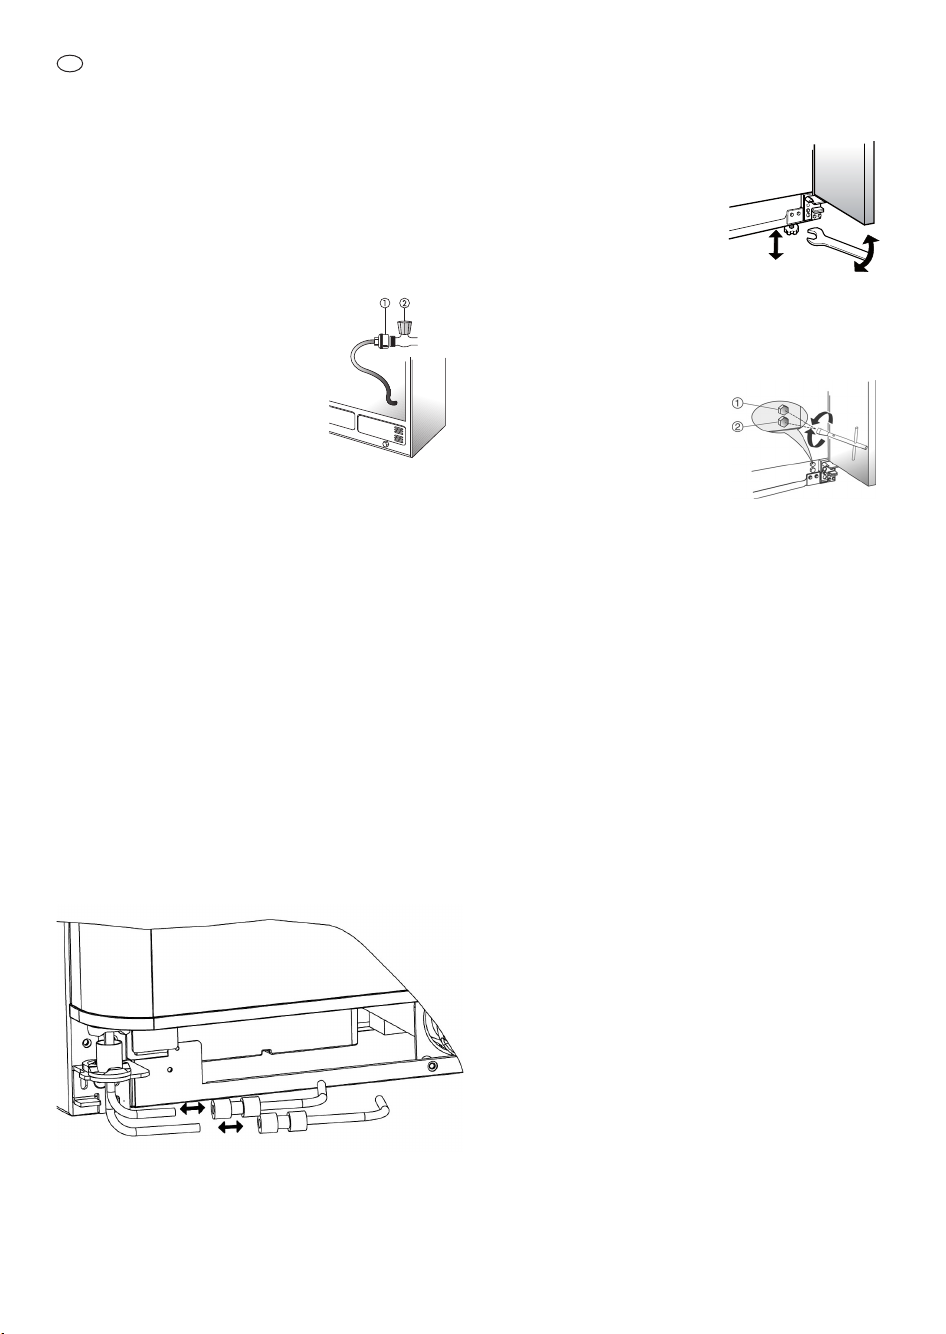
• Remove the shipping tape from the gray coiled water
tubing on the rear of the appliance.
• Connect the transition connector (1) to the household
water supply (2).
• Open the water tap and check for and eliminate any
leaks.
• The appliance does not require adjustments or a water
drain.
ELECTRICAL CONNECTION
Connect the appliance to the mains power supply.
Electrical safety of the appliance can only be guaranteed if
it is correctly connected to an efficient, approved earthing
system.
MOUNTING FREEZER DOOR
Important: If your appliance has two water fill pipes (see
figure), when mounting the door you must reconnect the
two pipes to the matching ones at the bottom of the
appliance, being careful to connect like colours with like:
- white-white: water
- blue-blue: ice.
- Check for leaks after connecting the water fill pipes.
- Clear up any spills on the floor.
POSITIONING AND LEVELLING YOUR
REFRIGERATOR
If the appliance seems unsteady or you want the doors to
close more easily, adjust the appliance's tilt following the
instructions below (depending on
the model, as shown in the
figures on the right).
The refrigerator has two front
and two rear wheels at the base
of the product on each side and
two adjustable feet at the front
(see figure A).
1. Check the installation location to be sure you have at
least 1 cm clearance on all sides including the top.
2. Connect the appliance to the mains power supply.
3. Move the refrigerator into its final position.
4. Open both doors and remove
the plinth to locate the feet
and levelling bolts at the left
and right of the refrigerator
base (where present). The top
bolt (1) will adjust the rear
wheel (if provided), and the
bottom bolt (2) will adjust the
front wheel (see figure B).
5. Use the wrench provided (if present) to adjust the
levelling bolts. Turn clockwise to raise the appliance, or
anticlockwise to lower it. It may take several turns of
the levelling bolts and/or feet to adjust the tilt of the
refrigerator.
6. After levelling the product, ensure that both feet touch
the ground for safe use.
Note: do not unscrew the levelling bolts and feet
too much as they could fall out.
Aligning the doors
If, after switching on the appliance and adjusting the
refrigerator and freezer doors, the doors are misaligned,
disconnect the appliance from the power supply and
adjust both doors as indicated in the diagram at the end
of this manual.
Any damage resulting from FAILURE TO FOLLOW
THE INSTRUCTIONS during installation will not be
covered by the warranty.
REMOVING THE FREEZER DOOR (A)
REMOVING THE REFRIGERATOR DOOR (B)
MOUNTING THE FREEZER DOOR (C)
MOUNTING THE REFRIGERATOR DOOR (D)
HORIZONTAL ALIGNMENT OF FREEZER
AND REFRIGERATOR DOORS (E)
VERTICAL ALIGNMENT OF FREEZER
AND REFRIGERATOR DOORS (F)
INSTALLATION DIMENSIONS
AND REQUIREMENTS (G)
GB
A
B
 Loading...