

Page 1
Owner's Manual
THANK YOU FOR BUYING A WHIRLPOOL PRODUCT
In order to receive a more complete assistance, please
register your product on www . whirlpool. eu/ register
Before using the appliance carefully read the Safety
Instruction.
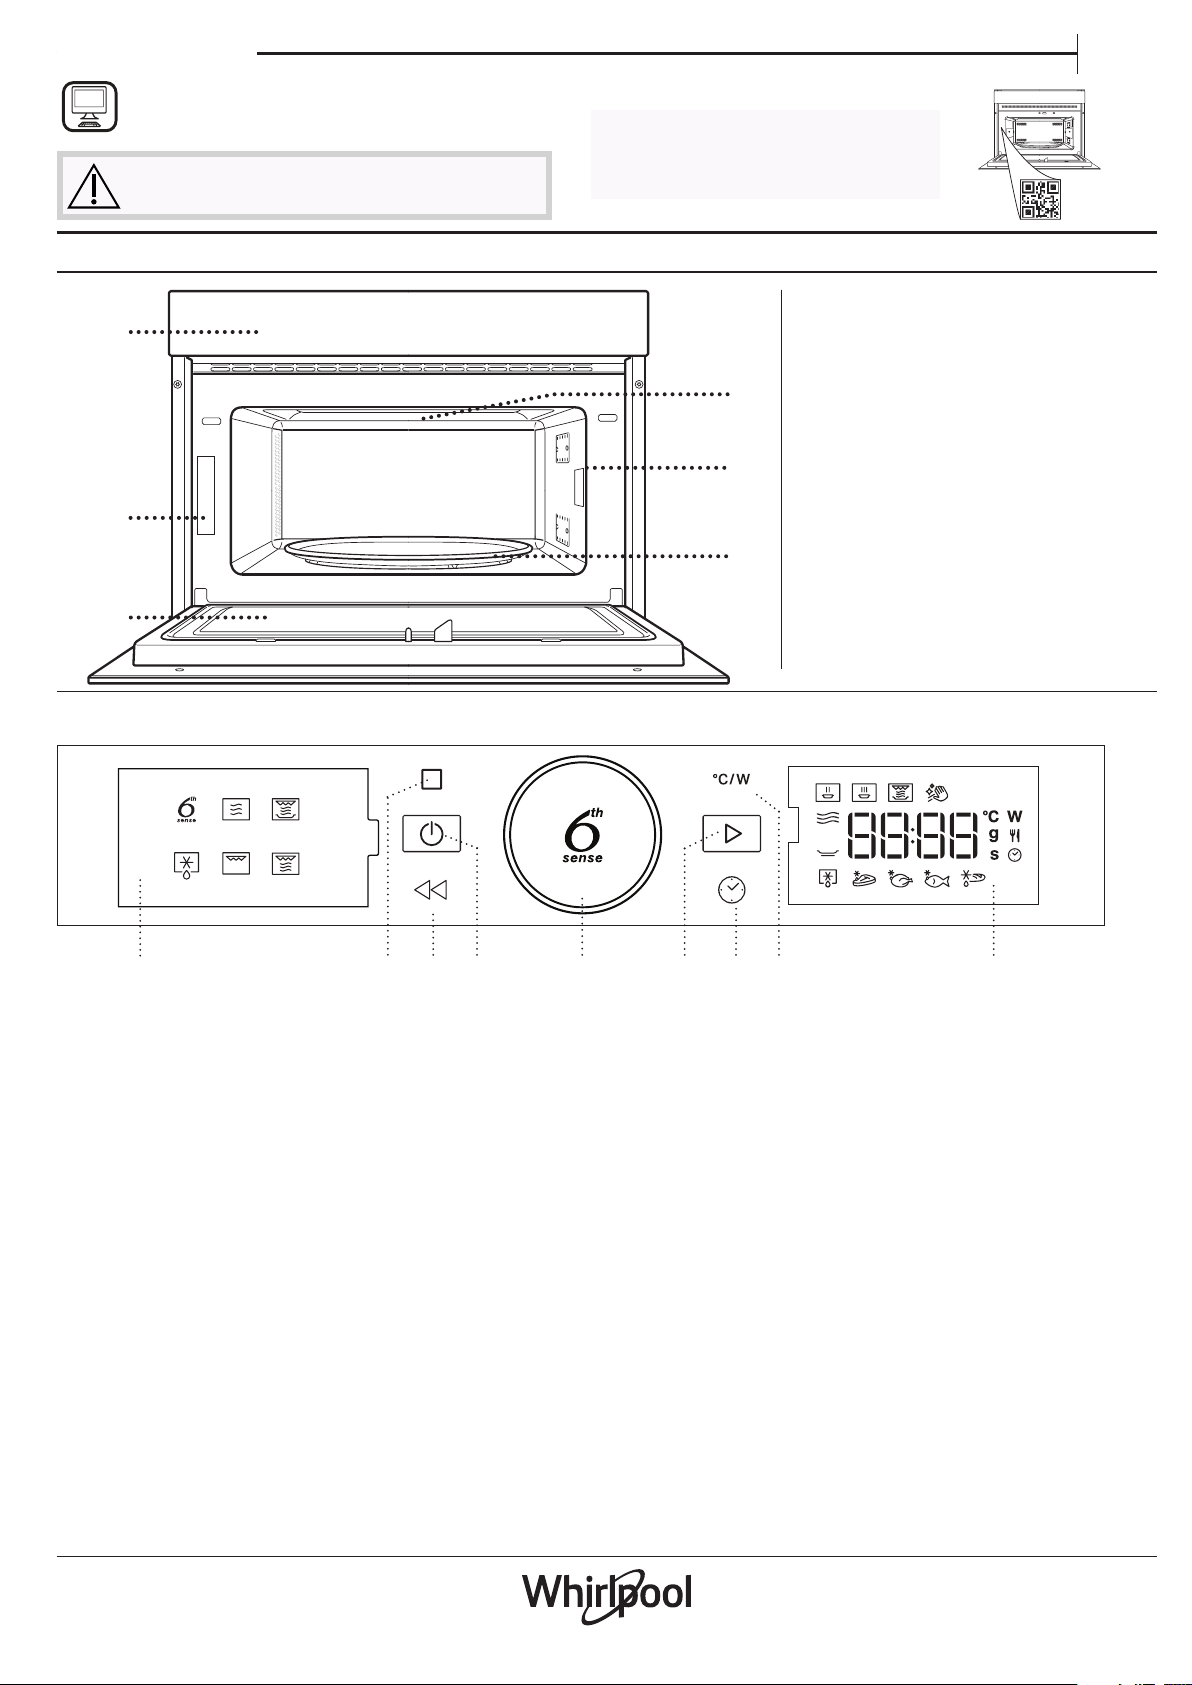
PRODUCT DESCRIPTION
1
2
3
PLEASE SCAN THE QR CODE ON
YOUR APPLIANCE IN ORDER TO
REACH MORE INFORMATION
1. Control panel
2. Identification plate
(do not remove)
4
5
3. Door
4. Upper heating element/grill
5. Light
6. Turntable
6
EN
CONTROL PANEL DESCRIPTION
21 3
1. LEFT-HAND DISPLAY
2. PAUSE
To pause a cooking cycle.
3. BACK
For returning to the previous screen.
4. ON/OFF
For switching the oven on and off
and for stopping an active function
at any time.
4 5 6 7 8 9
5. ROTARY KNOB / 6th SENSE
BUTTON
Turn this to navigate through the
functions and adjust all of the
cooking parameters. Press to select,
set, access or confirm functions or
parameters and eventually start the
cooking program.
7. T I ME
For setting the time as well as
setting or adjusting the cooking
time.
8. POWER
To adjust the microwave power.
9. RIGHT-HAND DISPLAY
6. START
For starting functions and
confirming settings.
1
Page 2
ACCESSORIES
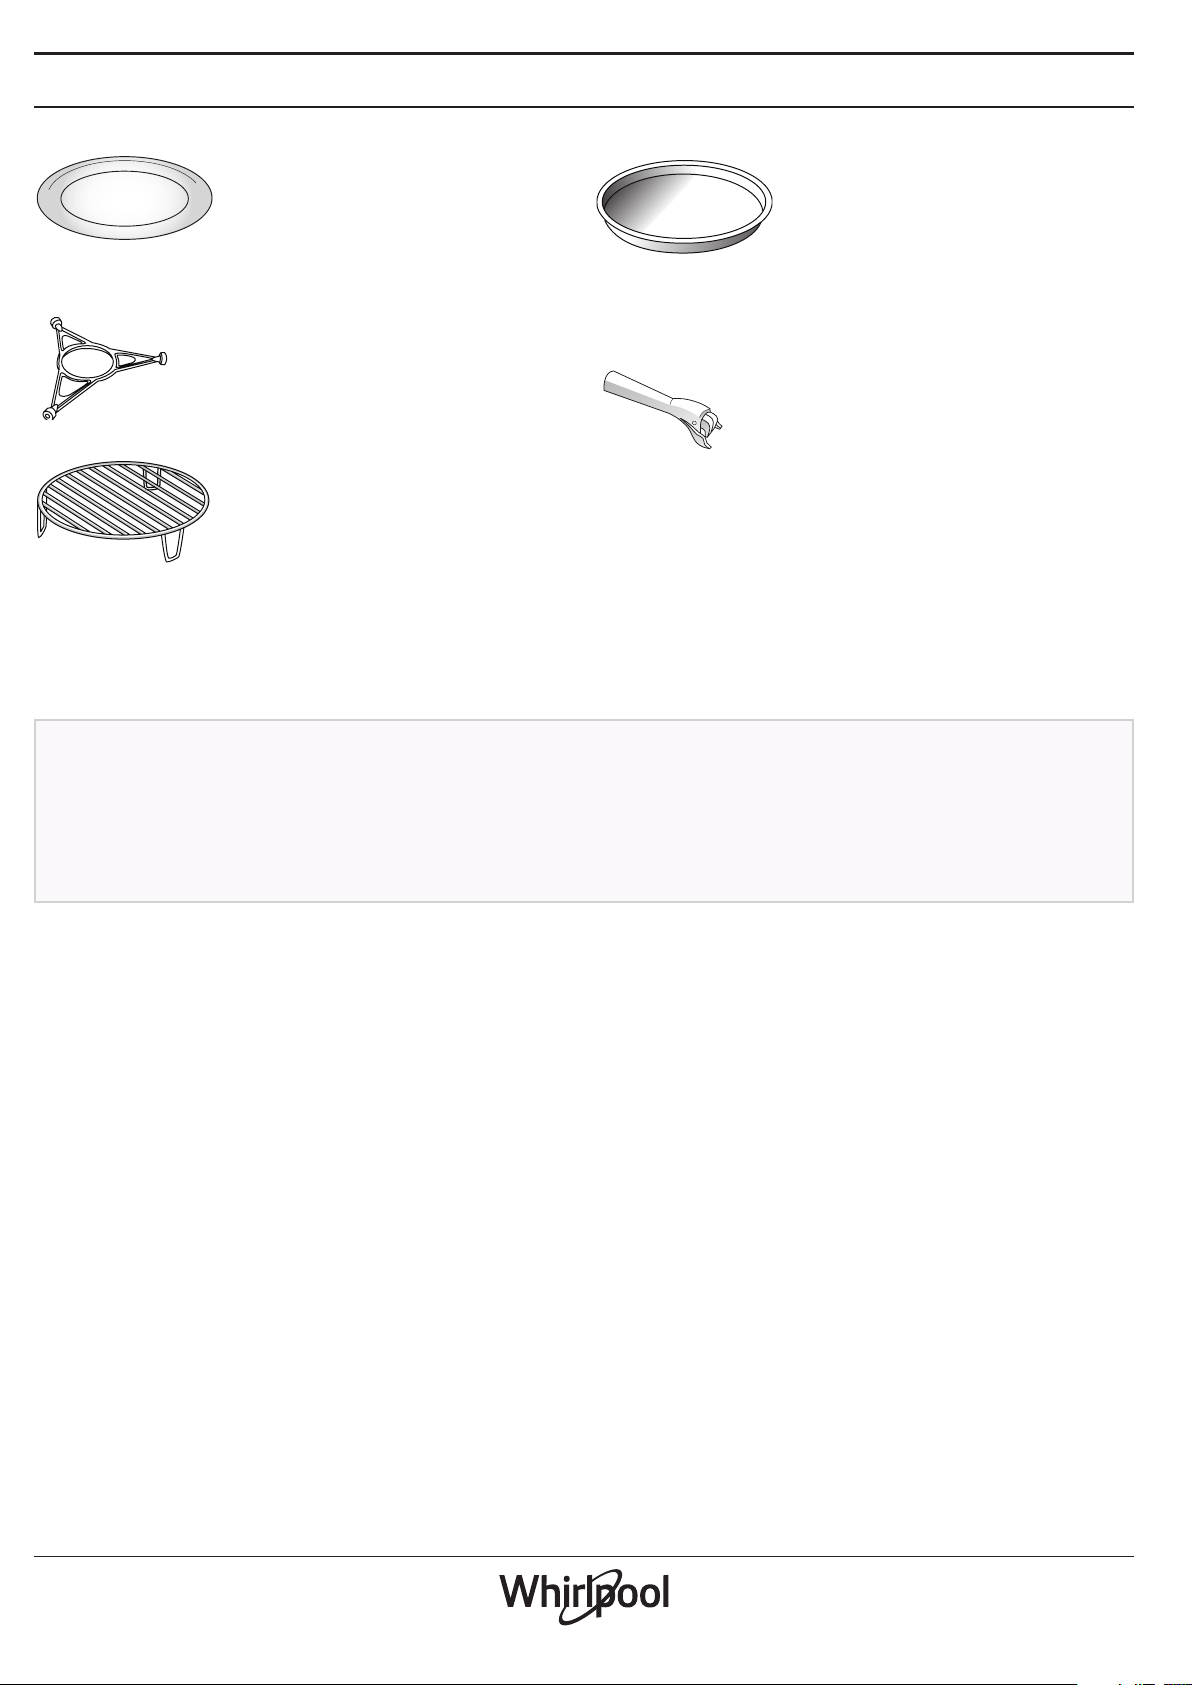
TURNTABLE
Placed on its support, the glass
turntable can be used with all
cooking methods.
The turntable must always be used
as a base for other containers or accessories.
TURNTABLE SUPPORT
Only use the support for the glass
turntable.
Do not rest other accessories on the
support.
WIRE RACK
This allows you to place food closer
to the grill, for perfectly browning
your dish.
Place the wire rack on the turntable,
making sure that it does not come
into contact with other surfaces.
The number and the type of accessories may vary depending
on which model is purchased.
CRISP PLATE
Only for use with the designated
functions.
The Crisp plate must always be
placed in the centre of the glass
turntable and can be pre-heated
when empty, using the special function for this purpose
only. Place the food directly on the Crisp plate.
HANDLE FOR CRISP PLATE
Useful for removing the hot Crisp
plate from the oven.
Other accessories that are not supplied can be purchased
separately from the After-sales Service.
There are a number of accessories available on the
market. Before you buy, ensure they are suitable for
microwave use and resistant to oven temperatures.
Metallic containers for food or drink should never be
used during microwave cooking.
Always ensure that foods and accessories do not
come into contact with the inside walls of the oven.
Always ensure that the turntable is able to turn freely
before starting the oven. Take care not to unseat
the turntable whilst inserting or removing other
accessories.
2
Page 3
FUNCTIONS
EN
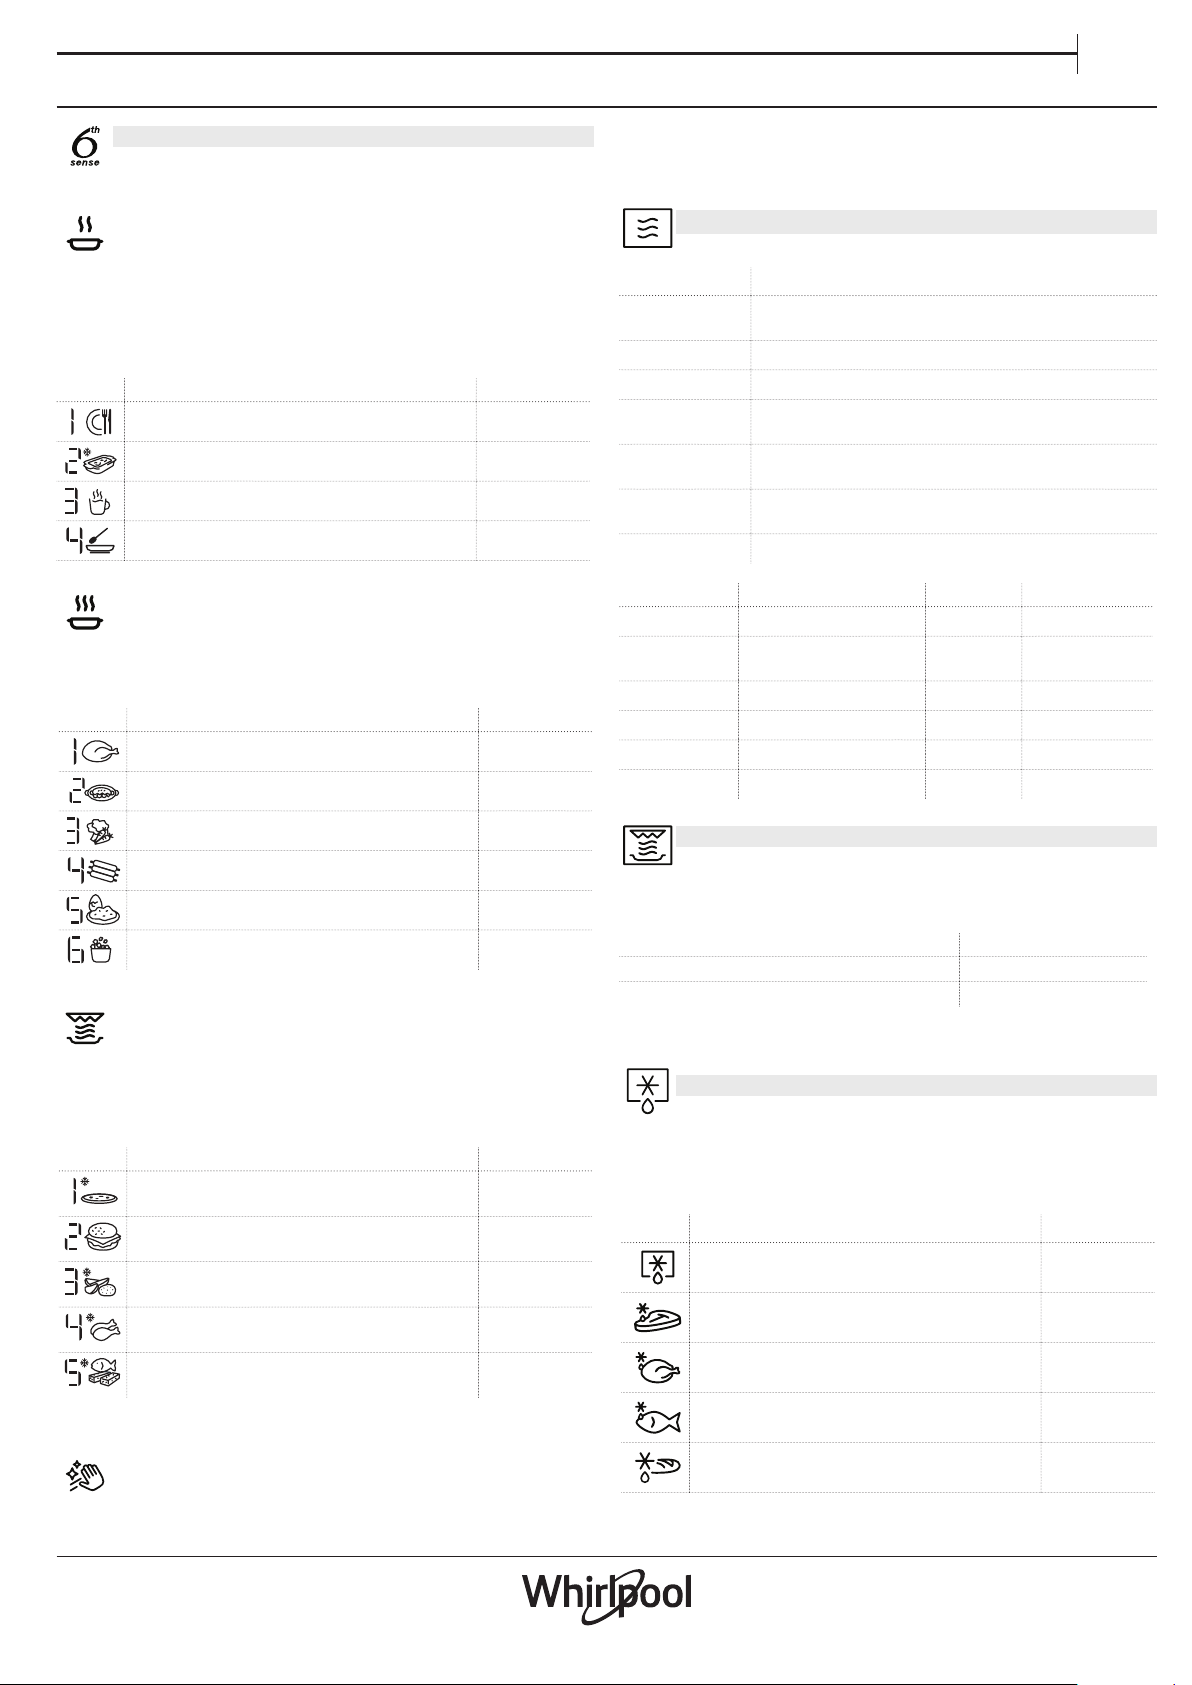
6TH SENSE
These functions automatically select the best
cooking method for all types of food.
REHEAT
For reheating ready-made food that is either
frozen or at room temperature. The oven automatically
calculates the settings required to achieve the best
results in the shortest amount of time. Place food on a
microwave-safe and heatproof dinner plate or dish.
FOOD WEIGHT (g)
PLATED MEAL 250 - 500
FROZEN LASAGNA 250 - 500
MILK/WATER 100 - 500
SOUP 200 - 800
COOK
For cooking foods quickly and achieving
optimal results. Use a heatproof container suitable for
microwave use.
FOOD WEIGHT (g)
ROAST CHICKEN 800 - 1500
POTATOES GRATIN 200 - 1000
be removed with ease. Pour a cup of drinking water
into a microwave proof container and activate the
function.
MICROWAVE
For quickly cooking and reheating food or drinks.
POWER (W) RECOMMENDED FOR
1000
800
650
500
350
160
90
ACTION FOOD POWER (W) DURATION (min.)
Reheat
Reheat
Defrost
Cook
Cook
Cook
Quickly reheating drinks or other foods with a high
water content.
Cooking vegetables.
Cooking meat and sh.
Cooking meaty sauces, or sauces containing cheese
or egg. Finishing o meat pies or pasta bakes.
Slow, gently cooking. Perfect for melting butter or
chocolate.
Defrosting frozen foods or softening butter and
cheese.
Softening ice cream.
2 cups 1000 1 - 2
Mashed potatoes
(1 kg)
Minced Meat (500 g) 160 13 - 14
Sponge cake 800 6 - 7
Egg custard 650 11 - 12
Meat loaf 800 18 - 20
1000 9 - 11
STUFFED VEGETABLES 200 - 800
PORK RIBS 200 - 800
SCRAMBLED EGGS 100 - 500
POPCORN 90
CRISP
For quickly reheating and cooking frozen foods
and giving them a golden, crunchy top. Only use this
function with the crisp plate provided. Turn the food
when prompted.
FOOD WEIGHT (g)
PIZZA [FROZEN] 200 - 800
BURGER PATTIES 200 - 600
POTATOES FRIED [FROZEN] 200 - 500
CHICKEN NUGGETS [FROZEN] 100 - 500
FISH FINGERS [FROZEN] 100 - 500
CRISP
For perfectly browning a dish, both on the top
and bottom of the food. This function must only be
used with the special Crisp plate.
FOOD DURATION (min.)
Leavened cake 7 - 10
Hamburger 8 - 10 *
* Turn food halfway through cooking.
Required accessories: Crisp plate, handle for the Crisp plate
DEFROST
For quickly defrosting various different types of
food simply by specifying their weight. Food should
be placed directly on the glass turntable. Turn the food
when prompted.
FOOD WEIGHT (g)
TIMED DEFROST -
MEAT 100 - 2000
POULTRY 100 - 2500
Required accessories: Crisp plate, handle for crisp plate
Hydro Self Clean
The action of the steam released during this
special cleaning cycle allows dirt and food residues to
FISH 100 - 1500
CRISP BREAD DEFROST 50 - 500
3
Page 4
GRILL
For perfectly browning a dish, both on the top
and bottom of the food. This function must only be
used with the special Crisp plate.
FOOD DURATION (min.)
Leavened cake 7 - 10
Hamburger 8 - 10 *
* Turn food halfway through cooking.
Required accessories: Wire rack
FIRST TIME USE
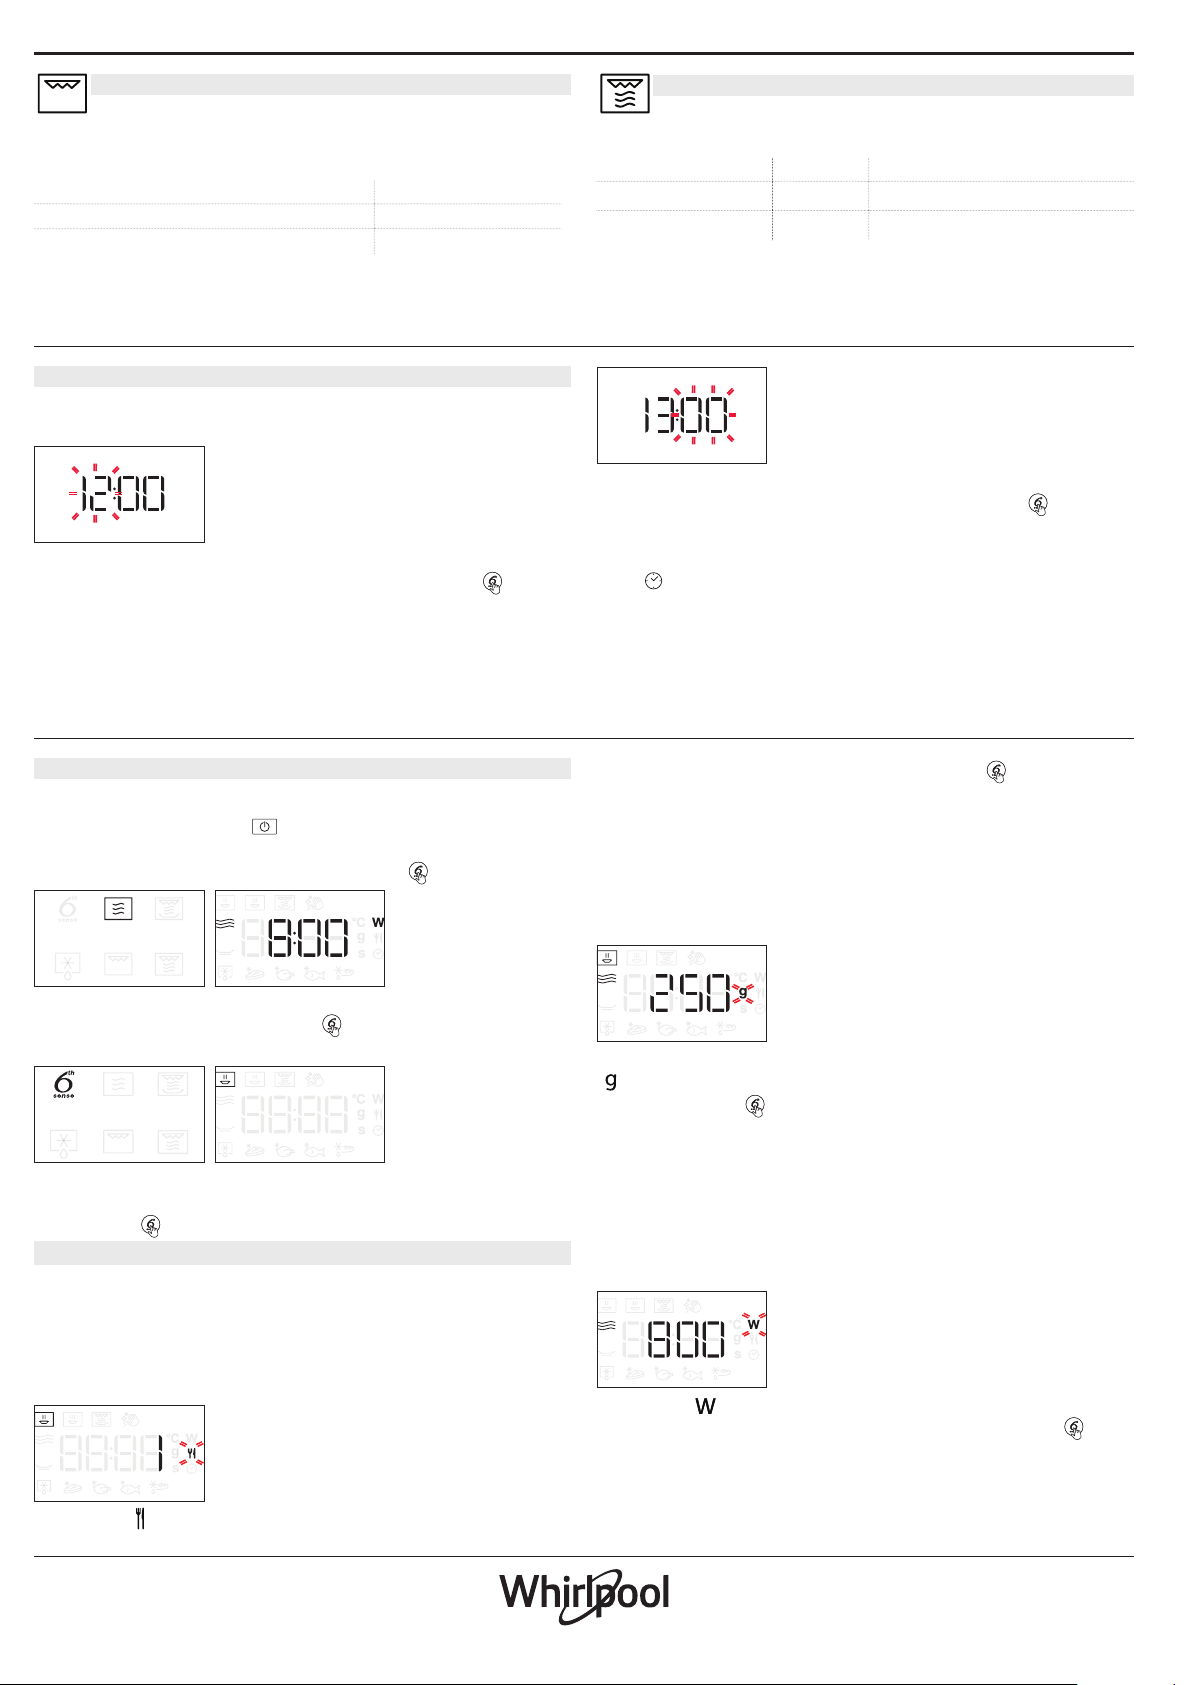
. SETTING THE TIME
You will need to set the time when you switch on the
oven for the first time.
The two digits for the hour will start flashing: Turn
the rotary knob to set the hour and then press to
confirm.
GRILL+MW
For quickly cooking and gratinating dishes,
combining the microwave and grill functions.
FOOD POWER (W) DURATION (min.)
Potatoes gratin 650 20 - 22
Roast chicken 650 40 - 45
Recommended accessories: Wire rack
The two digits for the minutes will start flashing. Turn
the rotary knob to set the minutes and press to
confirm.
Please note: To change the time at a later point, press and
hold for at least one second while the oven is o and
repeat the steps above.
You may need to set the time again following lengthy
power outages.
DAILY USE
1. SELECT A FUNCTION
When the oven is off, only the time is shown on the
display. Press and hold to switch the oven on.Turn the
rotary knob to view the main functions available on the
left-hand display. Select one and press .
To select a sub-function (where available), select the
main function and then press to confirm and go to
the function menu.
Turn the rotary knob to select from amongst the
subfunctions available on the right-hand display and
then press to confirm.
2. SET A FUNCTION
. 6TH SENSE / DEFROST
FOOD CLASS
Once you have chosen one of the automatic functions,
you will need to select a category for the food you are
cooking.
When the icon flashes, turn the rotary knob to select
the category you require and then press to confirm.
WEIGHT
To achieve the best results, the 6th Sense (and Jet
Defrost) require you to enter the weight of the food,
selecting from amongst the default settings: the oven
will calculate the ideal length of time for the function to
run for each category of food.
When the default setting appears on the display and the
icon flashes, turn the rotary knob to set the weight
and then press to confirm.
. MANUAL FUNCTIONS
After having selected the function you require, you can
change its settings.
The display will show the settings that can be changed
in sequence.
MICROWAVE POWER
When the icon flashes on the display, turn the rotary
knob to adjust the power setting and then press to
confirm and continue to alter the settings that follow (if
possible).
Please note: Once the function has been activated, the power
4
Page 5
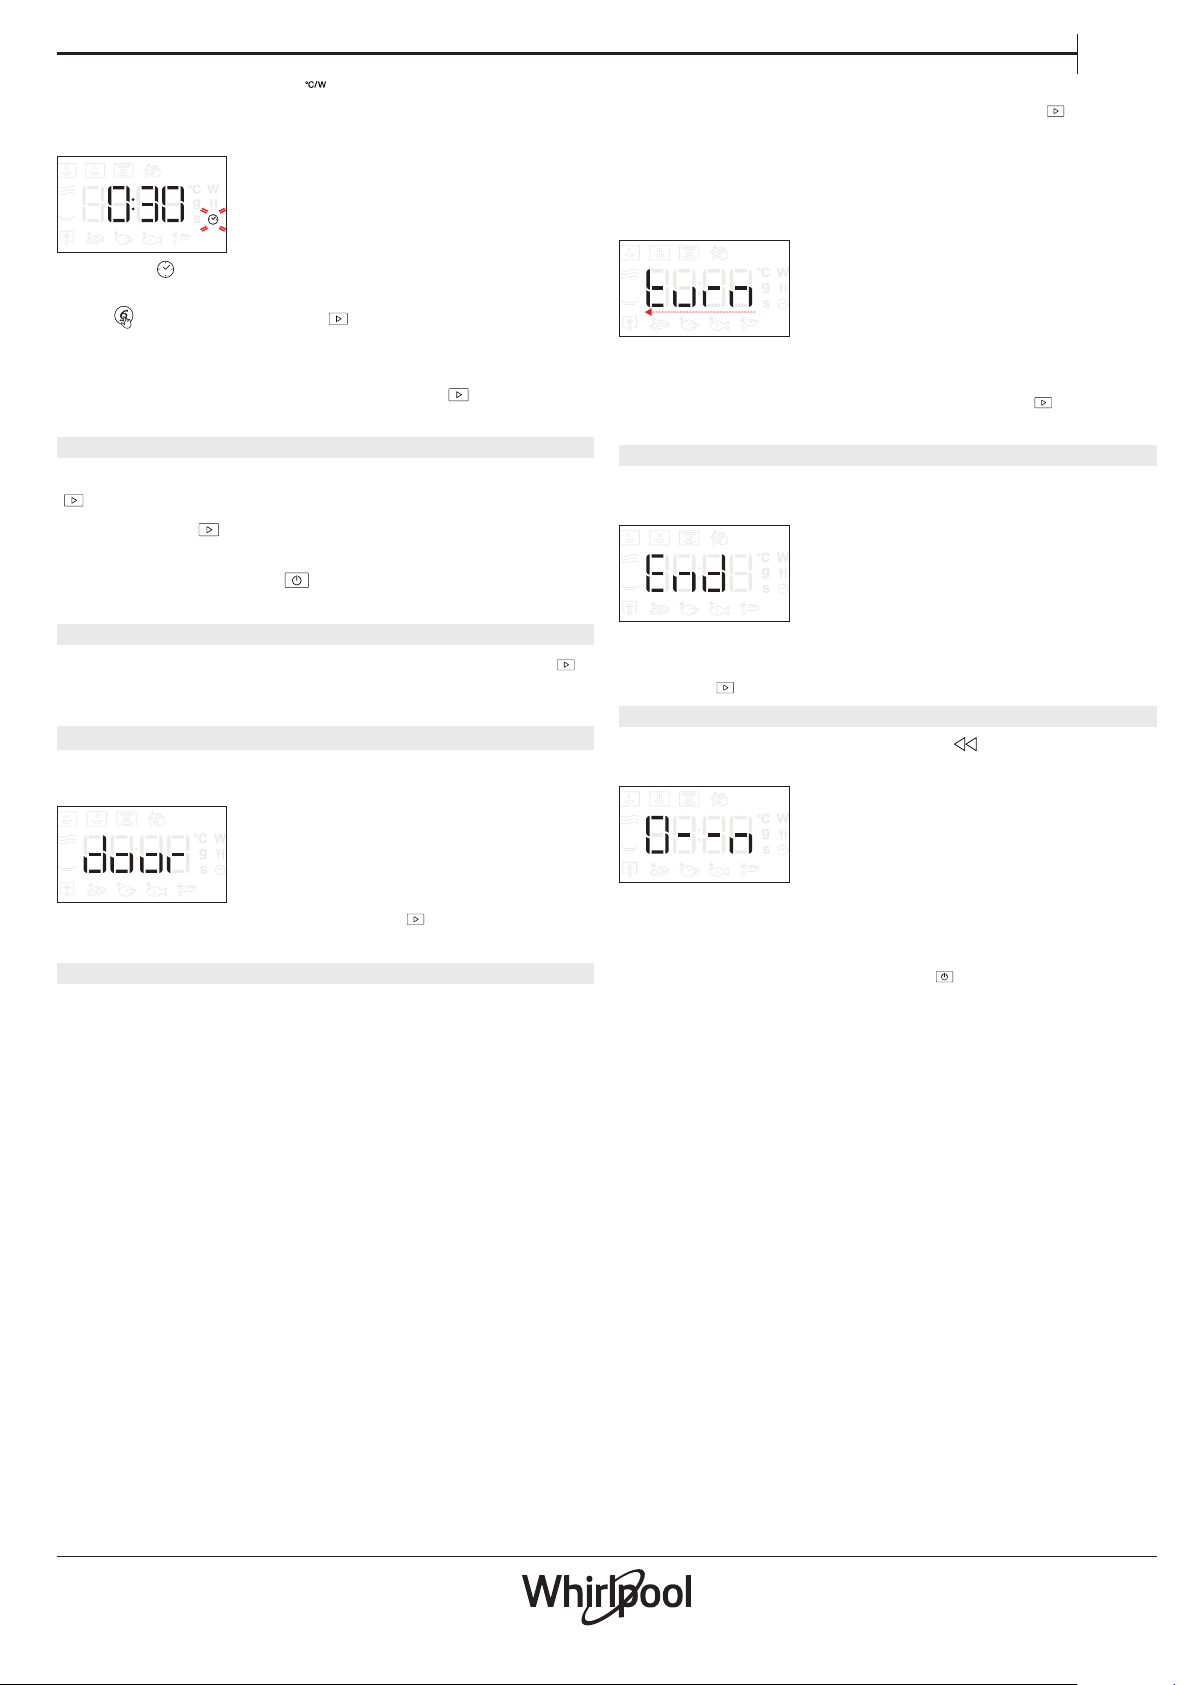
can be changed by pressing to access the settings menu,
then turning the rotary knob to change the setting.
DURATION
When the icon flashes on the display, use the rotary
knob to set the cooking time you require and then
press to confirm or press to confirm and start the
function.
Note: During cooking, you can adjust the cooking time by
turning the rotary knob; each time you press , the cooking
time increases by 30 seconds.
3. ACTIVATE THE FUNCTION
Once you have applied the settings you require, press
to activate the function.
Every time the button is pressed again, the cooking
time will be increased by a further 30 seconds.
Please note: You can press at any time to stop the function
that is currently active.
. JET START
When the oven is switched off, it is possible to press
to activate cooking with the microwave function set at
full power (1000 W) for 30 seconds.
. SAFETY LOCK
This function is automatically activated to prevent the
oven from being switched on accidentally.
EN
the food, simply open the door.
To start it up again, close the door and press .
AUTOMATIC PAUSE
(TURN OR STIR FOOD)
Certain functions will pause to allow you to turn or stir
the food.
Once the oven has paused cooking, open the door
and carry out the action you are prompted to perform
before closing the door again and pressing to
continue with cooking.
5. COOKING END
An audible signal will sound and the display will
indicate that cooking is complete.
To extend the cooking time without changing the
settings, turn the rotary knob to set a new cooking time
and press .
. KEY LOCK
To lock the keypad, press and hold for at least 5
seconds.
Open and close the door, then press to start the
function.
4. PAUSE
To pause an active function, for example to stir or turn
Do this again to unlock the keypad.
Please note: The key lock can also be activated while cooking
is in progress. For safety reasons, the oven can be switched o
at any time by pressing and holding .
5
Page 6
CLEANING
Make sure that the appliance has cooled down before
carrying out any maintenance or cleaning.
Never use steam cleaning equipment.
Do not use wire wool, abrasive scourers or abrasive/
corrosive cleaning agents, as these could damage the
surfaces of the appliance.
INTERIOR AND EXTERIOR SURFACES
• Clean the surfaces with a damp microfibre cloth.
If they are very dirty, add a few drops of pH-neutral
detergent. Finish off with a dry cloth.
• Clean the glass in the door with a suitable liquid
detergent.
• At regular intervals, or in case of spills, remove the
ACCESSORIES
All accessories are dishwasher safe with the exception
of the Crisp plate.
The Crisp plate should be cleaned using water and a
mild detergent. For stubborn dirt, rub gently with a
cloth. Always leave the Crisp plate to cool down before
cleaning.
turntable and its support to clean the bottom of the
oven, removing all food residue.
• The grill does not need to be cleaned as the intense
heat burns away any dirt. Use this function on a regular
basis.
TROUBLESHOOTING
Problem Possible cause Solution
The oven is not working.
The oven makes noises, even when it is
switched off.
The display shows the letter “F” followed
by a number.
Power cut.
Disconnection from the mains.
Cooling fan active.
Software fault.
Check for the presence of mains electrical power and
whether the oven is connected to the electricity supply.
Turn off the oven and restart it to see if the fault persists.
Open the door or hold or wait until the cooling process has
finished.
Contact the Call Center and state the number following the
letter “F”.
Policies, standard documentation and additional product information can be found by:
• Using the QR on your product
• Visiting our website docs . whirlpool. eu
• Alternatively, contact our After-sales Service (See phone number in the warranty booklet). When contacting
our After-sales Service, please state the codes provided on your product's identication plate.
6
400020002464
 Loading...