

Page 1
1
EN
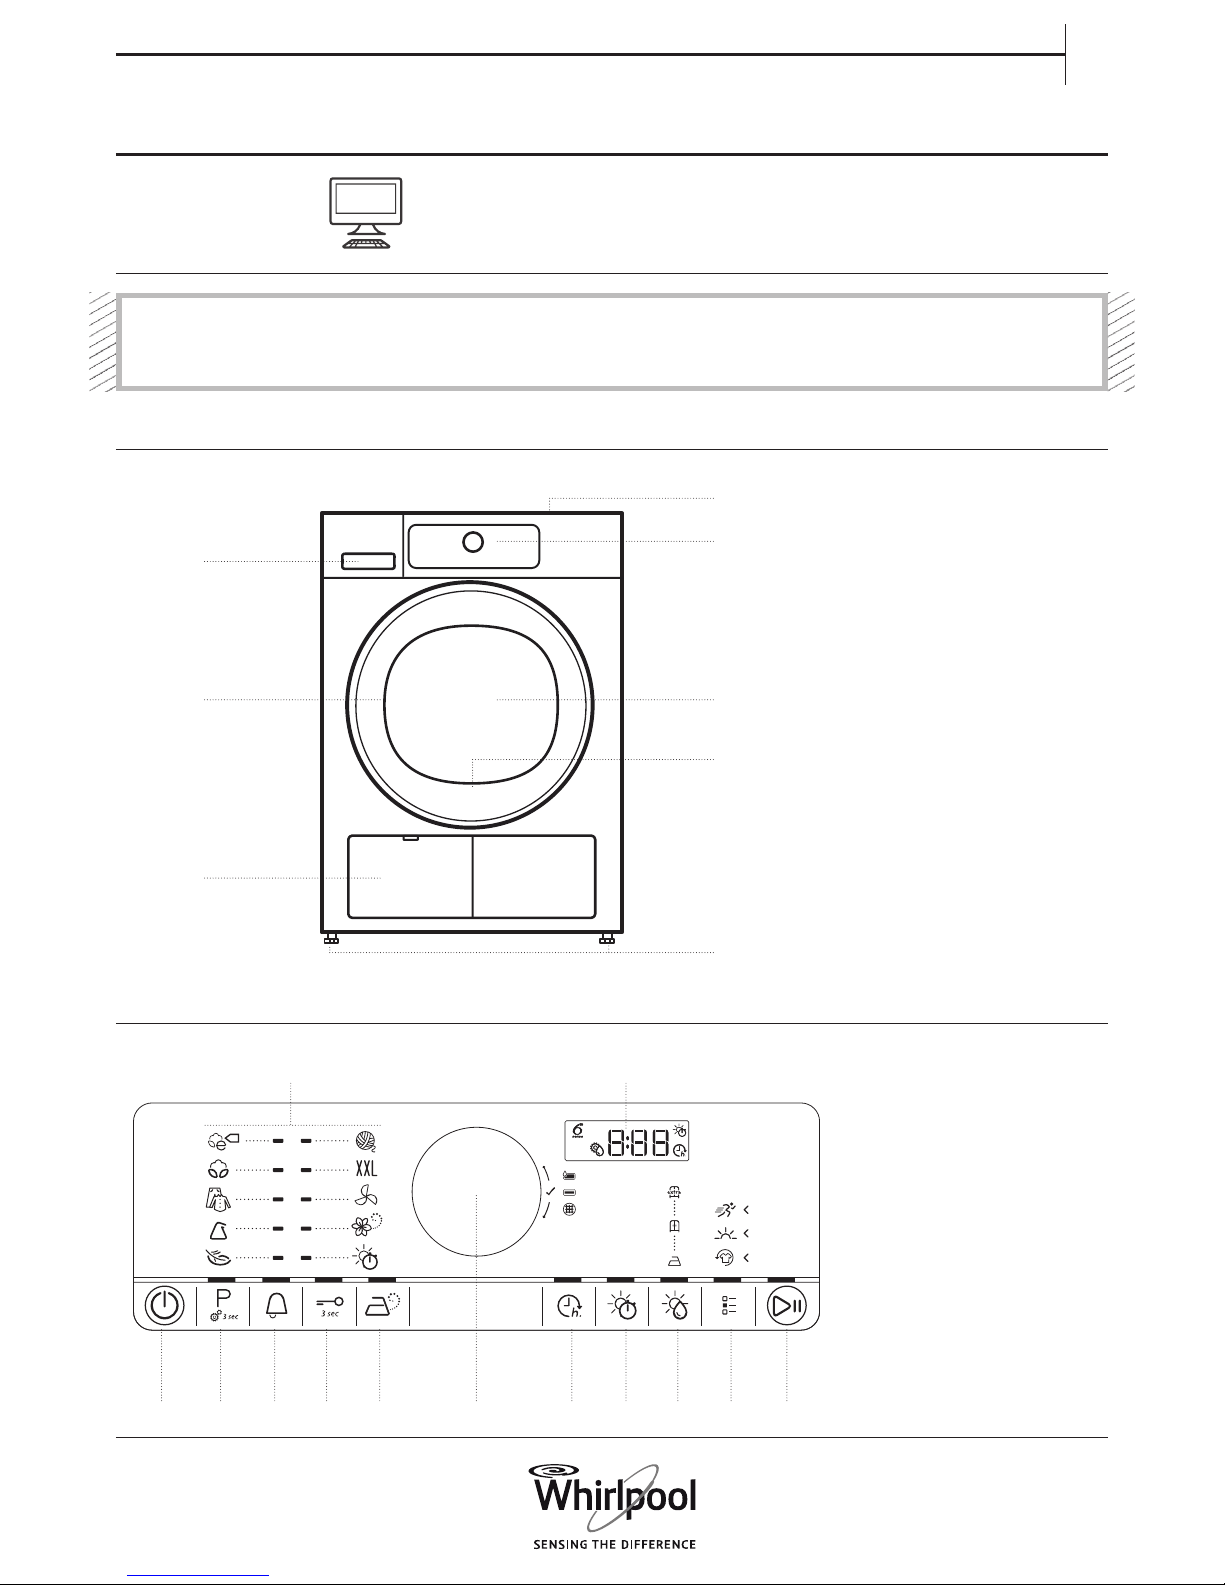
1. On/O button (Reset if long
pressed)
2. Programme button (Water
conductivity setting if long
pressed)
3. Cycle end alert
4. Key lock
5. Steam option
6. Knob (Turn to select / Press to
conrm)
7. Start delay
8. Drying time
9. Dryness level
10. Options button
11. Start / Pause button
12. Display
13. Programmes area
CONTROL PANEL
1. Worktop
2. Control panel
3. Water tank
4. Door
5. Door handle
6. Door lter (behind door)
7. Bottom lter (behind ap)
8. Adjustable feet (4)
Before using the appliance carefully read the
Health and Safety guide.
DAILY REFERENCE
GUIDE
PRODUCT DESCRIPTION
APPLIANCE
1. 2. 7.3. 8.
12.
4. 9.5. 10. 11.6.
13.
3.
5. 4.
2.
1.
6.
7.
8.
THANK YOU FOR BUYING A WHIRLPOOL PRODUCT.
In order to receive a more complete assistance,
please register your appliance on http://www.whirlpool.eu/register
Page 2
2
Make sure that no lighters
or matches remain in the
laundry.
Make sure that the laundry
is not soaked with
ammable liquids.
DAILY USE
FIRST TIME USE
BEFORE USING THE DRYER
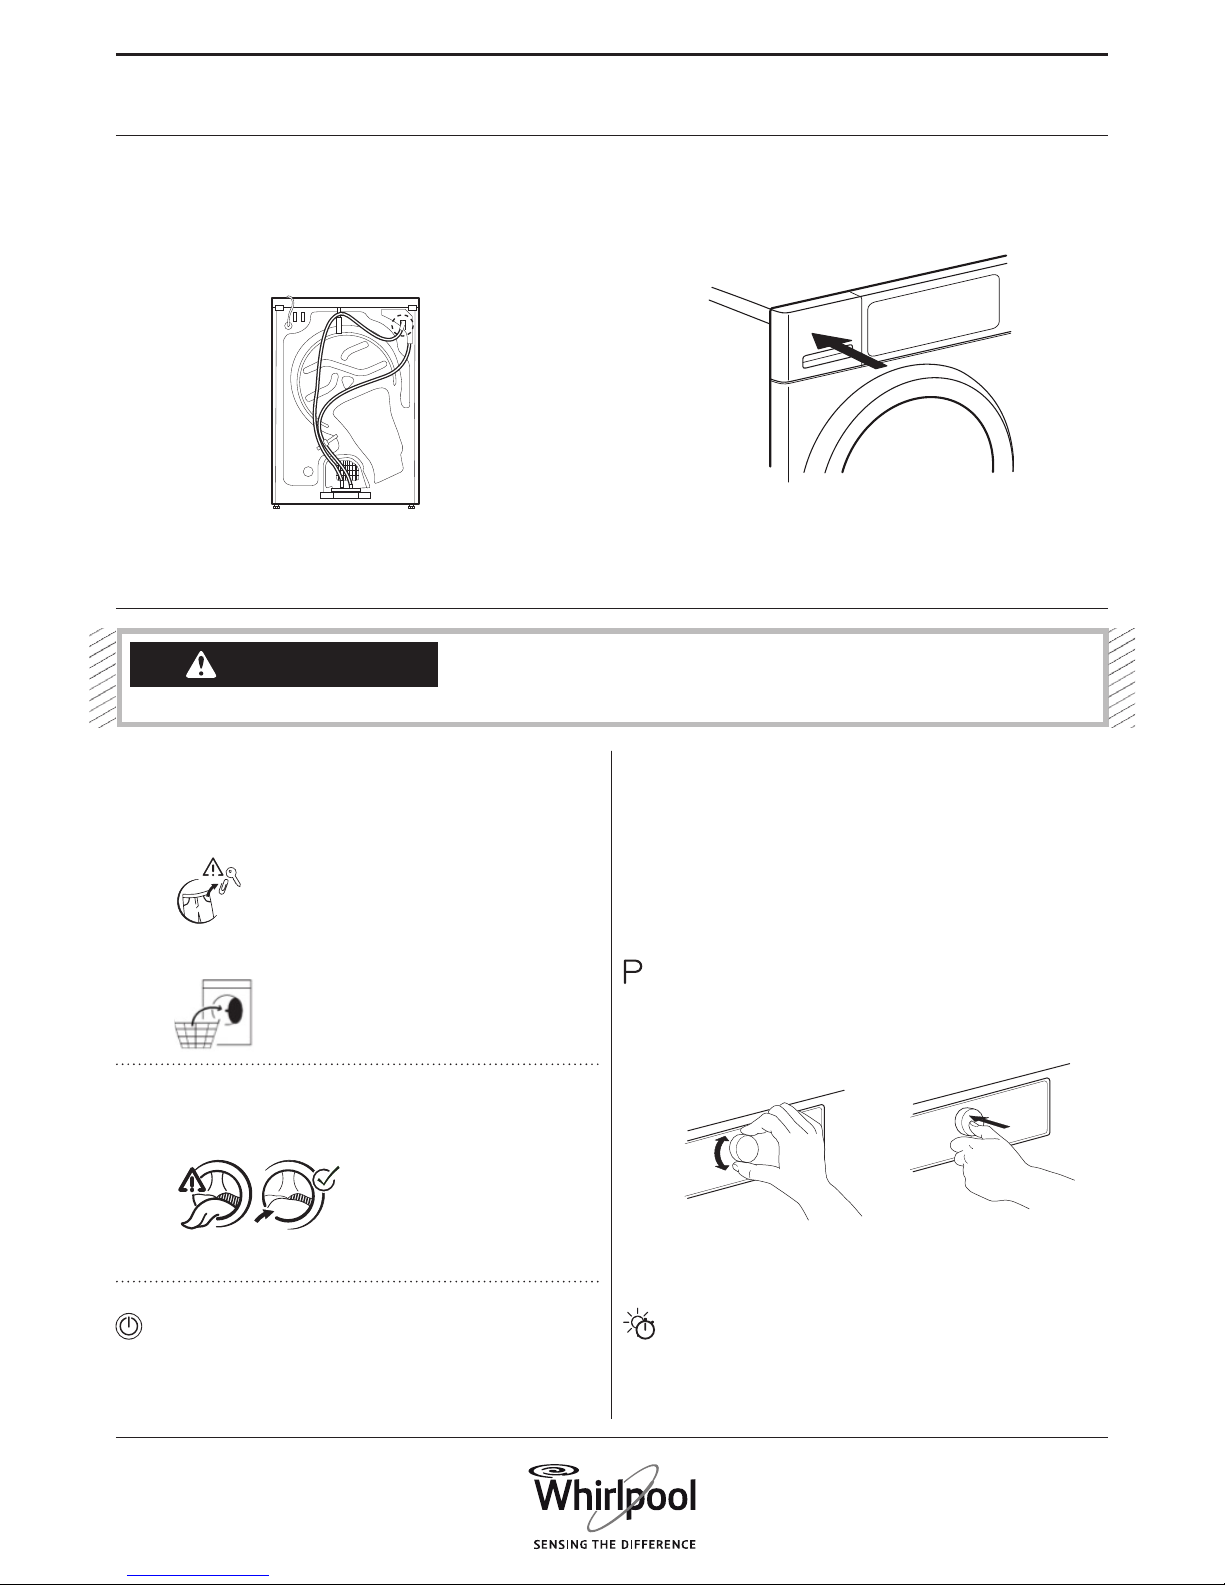
CHECK DRAIN HOSE AND WATER TANK
Make sure that the drain hose on the back of the dryer is xed
correctly, either to the dryer’s water tank (see picture), or to your
domestic sewage system (see Installation guide).
Also make sure that the water tank is correctly inserted.
See Use and Care Guide for more details on functions /
see last page for information on how to obtain the Use and Care Guide
1. LOAD LAUNDRY
Prepare your laundry according to the recommendations in
section HINTS AND TIPS.
Make sure that pockets are empty, fasteners closed and
ribbons tied together.
Open the door and load the laundry. Observe the
maximum load sizes given in the PROGRAMME CHART.
2. CLOSE DOOR
Make sure that no laundry gets stuck between door glass
and door lter.
Close the door so that you can hear it click shut.
3. SWITCH ON DRYER
Press the On/O button « until the programme button lights
up. An animation occurs, and there is a sound. Afterwards
the dryer is ready to be operated.
4. SET THE DESIRED PROGRAMME
GUIDED MODE – the button light will guide you through
setting your programme in the following order: selection of
programme / drying time (ONLY if Drying time or Airing
programme is selected) / dryness level (only if selectable /
adjustable) / options. As soon as you conrm a selection by
pressing the knob, the button light will jump to the next
step.
Select programme:
Make sure that the Programme button « lights up.
Turn the knob to select the desired programme.
The indicator next to the selected programme lights up.
Conrm the desired programme by pressing the knob.
1 2
Find more information regarding programmes in the
PROGRAMME CHART.
Select Drying time, if needed
Only if you have selected programme Drying time or Airing «,
you can set the desired drying time from a minimum of 10
minutes to maximum 180 minutes (three hours).
Make sure that the Drying time button lights up.
WARNING
Page 3
3
EN
Turn the knob to select the desired drying time. Conrm it
by pressing the knob.
Set dryness level, if needed
If you want to change the dryness level, make sure that the
Dryness level button « lights up.
Turn the knob to select the desired dryness level, then press
the knob to conrm.
Select options, if needed
If you want to select additional options, make sure that the
Options button « lights up. The options which are selectable
for your programme are indicated by lighting arrows.
Turn the knob to select the desired options. The symbol of
the selected option will blink. To conrm it, press the knob.
Some options / functions can be selected by directly
pressing the button.
Refer to section OPTIONS, FUNCTIONS AND
INDICATORS for more information.
INDIVIDUAL MODE
After you have switched on the dryer, you are not forced to
follow the GUIDED MODE.
It is up to you which order you choose to set your
programme. To do a setting, rst press the relevant button,
then turn the knob to select, and nally press the knob to
conrm.
The variety of options and dryness levels depends on the
programme selected. Therefore it is recommended to start
your setting with selecting the programme.
5. START PROGRAMME
Press and hold Start/Pause « until the button lights up
solidly; the drying process starts.
The duration can be recalculated and adapted in the course
of the programme.
During such phases, an animation occurs on the display.
6. CHANGE THE SETTINGS OF A RUNNING
PROGRAMME, IF NEEDED
You can still change some settings after a programme was
started:
• Adjust drying time (only if programme Drying time is
selected)
• Add or cancel an option, provided the progress of the
programme still allows it.
Press the relevant button. The selected setting will blink for
a few seconds.
While blinking, you can adjust the setting by turning the
knob. If the value or setting stopped blinking, press the
button again.
Press the knob to conrm the modication. If you do not
conrm, the modication will be conrmed automatically
— the modied setting will stop blinking.
The programme will continue automatically.
To change the settings of a running programme or start
delay, you can also:
• press Start/Pause to put the running programme on pause
• change your settings
• press Start/Pause again to continue the programme.
7. RESET A RUNNING PROGRAMME, IF NEEDED
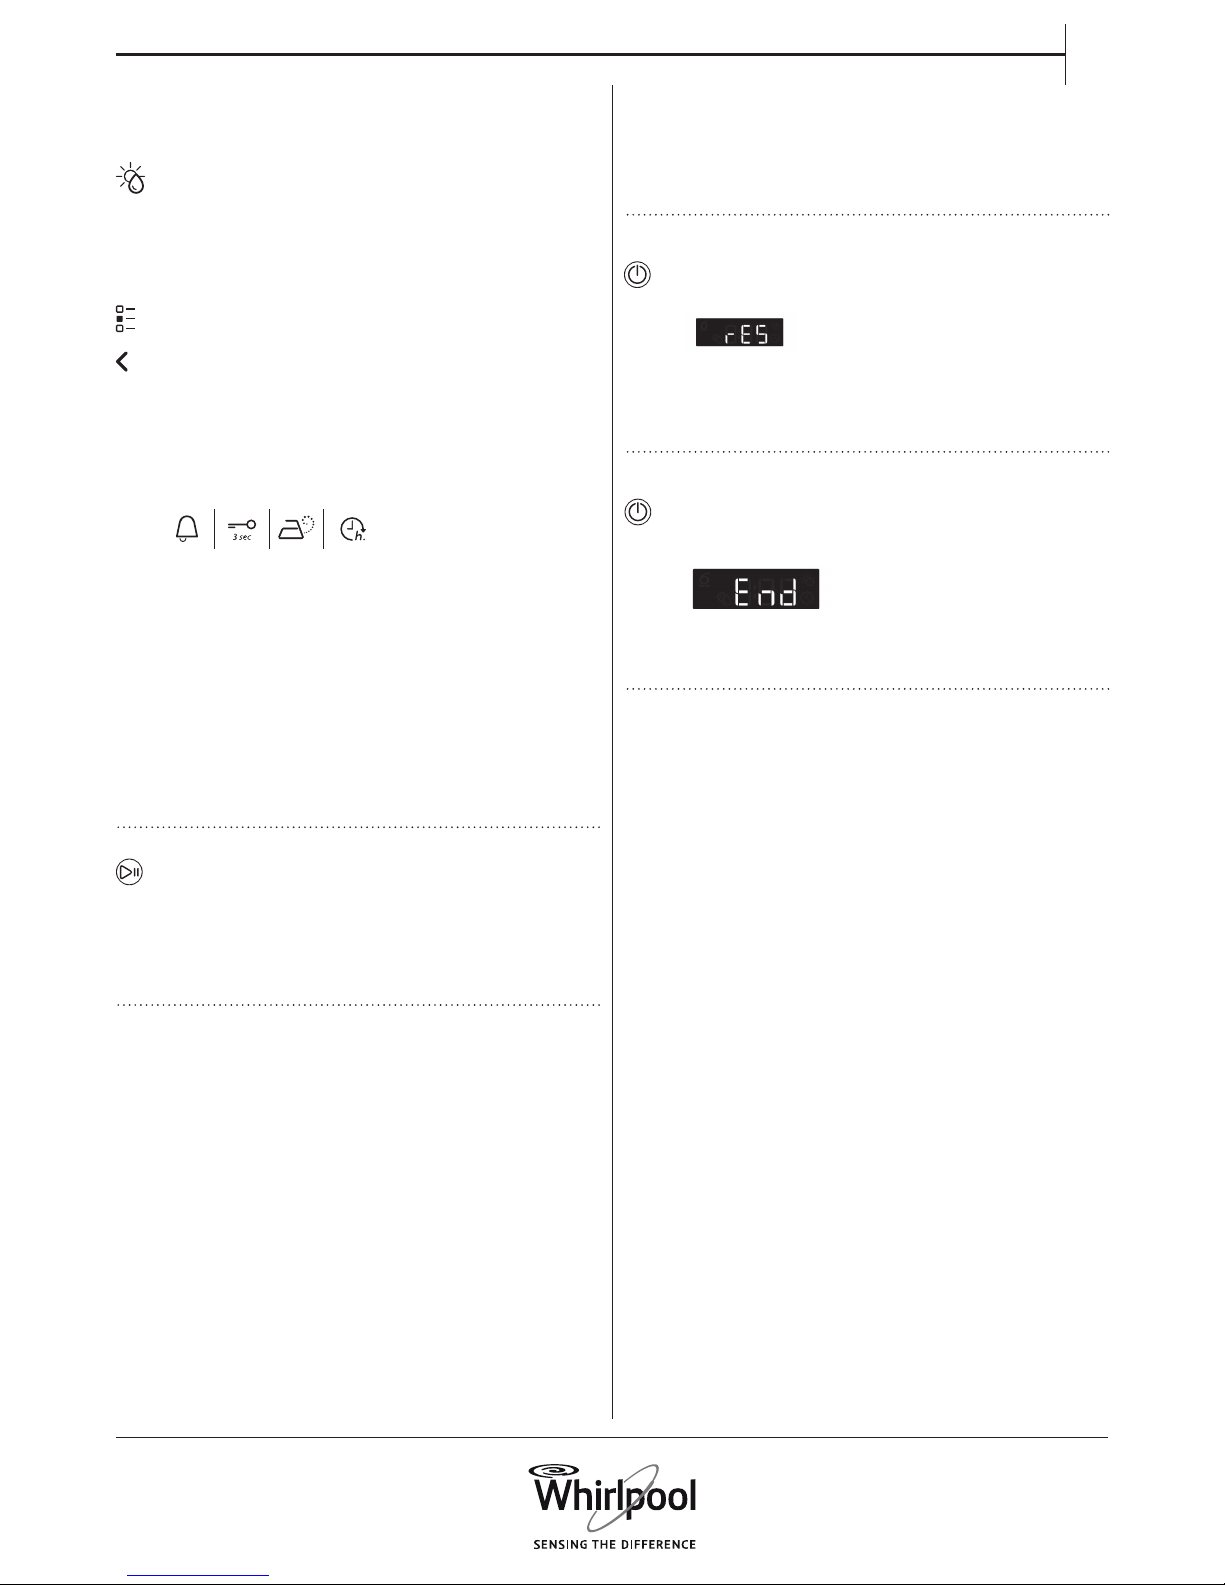
Press and hold the On/O button « until “rES” appears on
the display.
The programme is ended afterwards.
Immediately open the door and unload the laundry, so that
eventual heat in the laundry can dissipate.
8. SWITCH OFF THE DRYER AFTER PROGRAMME END
At the end of the programme, „End“ appears on the
display. Press On/O « to switch o the dryer. Open the
door and take out your laundry.
The dryer will switch o automatically in about a quarter of
an hour after programme end, to save energy.
9. EMPTY WATER TANK / CLEAN DOOR FILTER /
CLEAN BOTTOM FILTER
Refer to section CARE AND MAINTENANCE.
Page 4

4
Respect the care labels of your laundry; make sure that it is
appropriate for being treated in a dryer.
CARE LABELS
The dots indicate the temperature degree for drying the laundry.
Normal temperature
Reduced temperature
Do not tumble dry
EMPTY ALL POCKETS
Objects like coins or keys can damage your laundry as well as the
drum.
ADAPTING THE DRYER TO WATER CONDUCTIVITY
The drying results are aected by the conductivity of the water used
during washing. If, by modifyingthe available dryness levels (iron
dry; cupboard dry; extra dry), you are not satised withthe nal
drying results, you can adapt the water conductivity level. The dryer
comes with preset level 2. Choose between level 1 (most damp
results) and 5 (most dry results).
Press and hold the Programme button until the Conductivity
Adjustment symbol on the display blinks.
Turn the knob to adjust the level (1 –2 – 3 – 4 - 5).
Press the knob to conrm the selected level.
This operation is not needed for every drying cycle. Once the most
satisfying water conductivity level has been identied, you no
longer need to modify it.
Always dry a full load; this optimizes the relative energy
consumption. The maximum load sizes for the various programmes
are indicated in the programme chart.
To reduce the drying time, make sure that the laundry is spun with
the maximum possible spin speed of the wash programme. This
reduces the moisture content in the laundry.
HINTS AND TIPS
SAVING TIPS
Programme Load
(Kg)
Spin Speed
(rpm)
Humidity
(%)
Energy consumption
(kWh)
Drying Time (min)
ECO COTTON *
8
4
1000
1000
60
60
4.74
2.54
135
80
ECO COTTON
8
8
800
1400
70
50
5.52
3.96
154
117
COTTON IRON DRY 88
8
800
1000
1400
70
60
50
4.38
3.92
3.46
131
112
99
SYNTHETICS
CUPBOARD DRY
3.5 1000 40 1.44 46
CONSUMPTION DATA
Data can dier in your home, mainly depending on the moisture
content of the laundry load.
*Reference programmes for Energy Label / Regulation 392/2012 / EU
Values are based on the default programme setting, with clean door
and bottom lter. For consumer tests, the door lter and bottom
lter need to be cleaned after each cycle.
The energy consumption and drying time may dier from the values
above. They depend on the operation conditions in your home
(such as voltage uctuation, mixture of textiles, humidity of the
textiles after spinning, load volume).
The values are determined according to European Norm 61121 and
refer to the default programme setting; changing the setting also
impacts the consumption data.
Page 5
5
EN
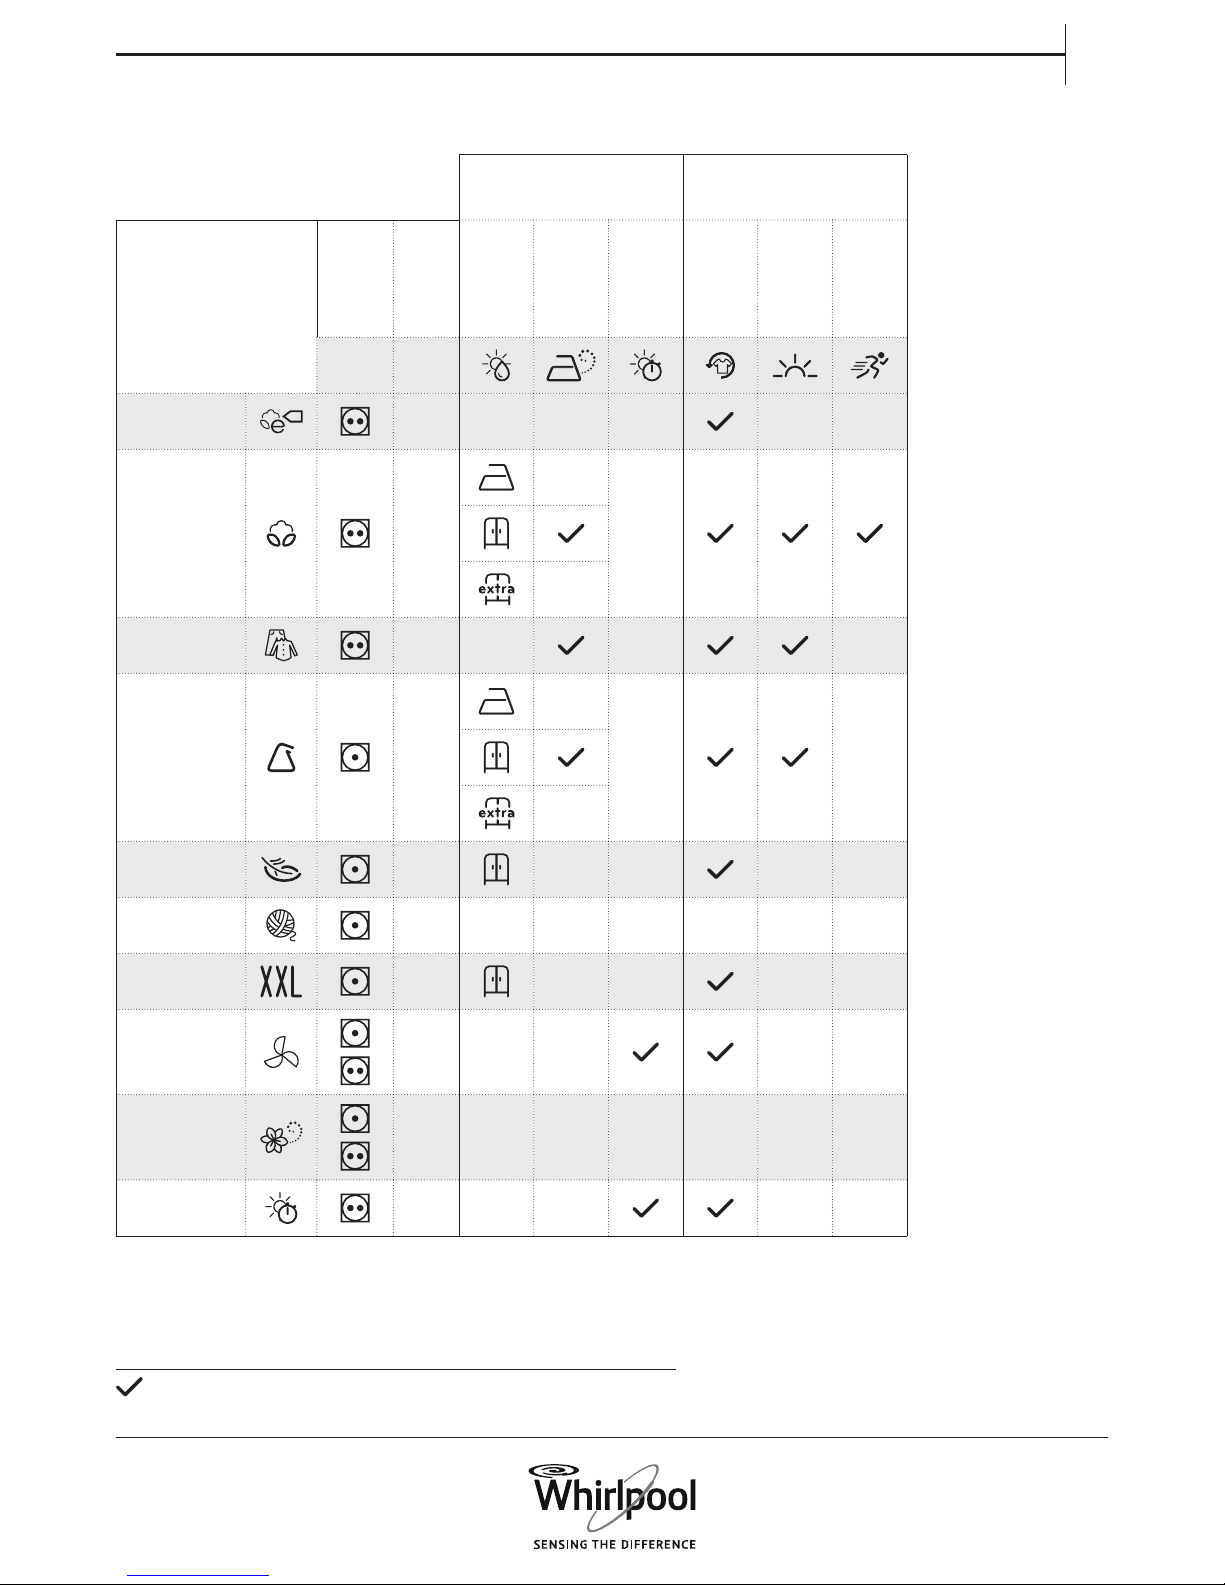
PROGRAMME CHART
Selectable / Optional
— Not Selectable / Applicable
Directly selectable Selectable by options button
Programme
Care Labels
Max Load (Kg)
Dryness level
Steam option
Drying time
Fresh Care
Gentle
Rapid
ECO COTTON
max — — — —
COTTON
max
—
—
—
MIXED
3.0 — — —
SYNTHETICS
3.5
—
— —
—
DELICATES
2.5 — — — —
WOOL FINISH
1.0 — — — — — —
BIG ITEMS
3.0 — — — —
AIRING
max — — — —
STEAM
REFRESH
1.5 — — — — — —
DRYING TIME
max — — — —
Page 6
6
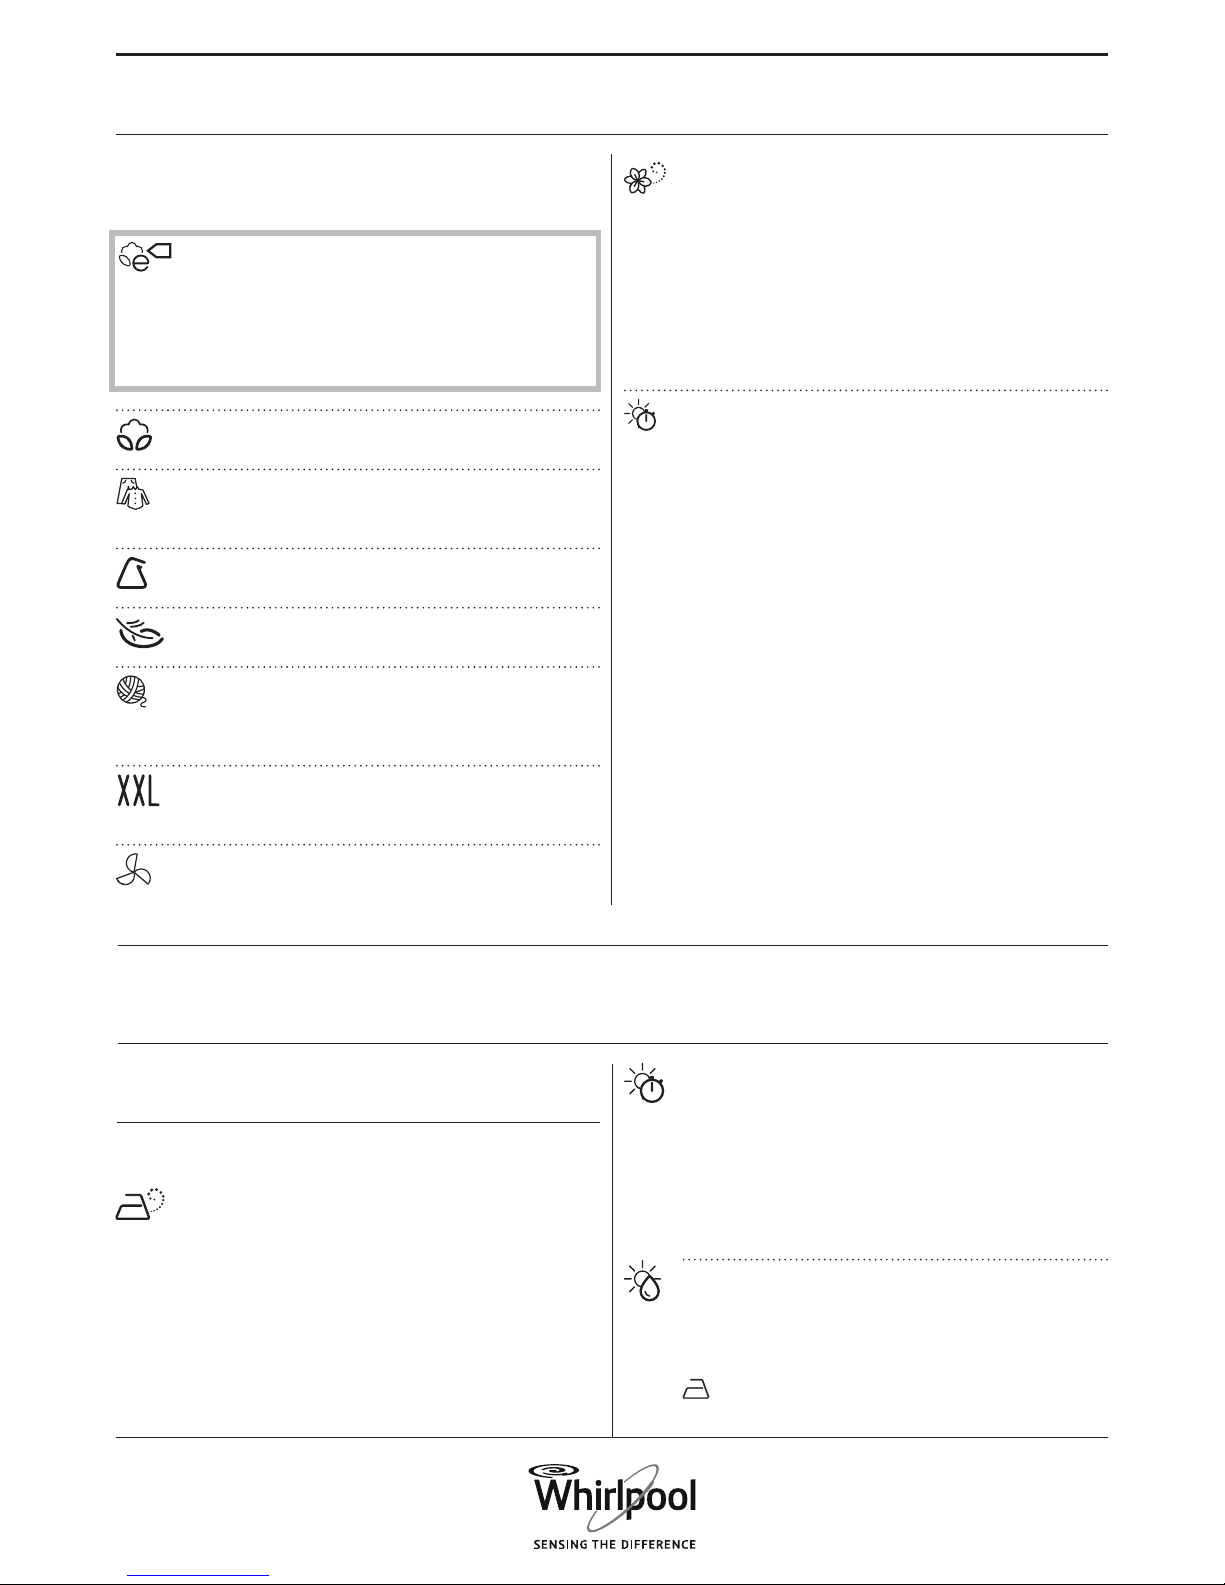
PROGRAMMES
Make sure that your laundry is suitable to be treated in a tumble
dryer. Refer to HINTS AND TIPS / Care labels.
ECO COTTON
For drying normally wet cotton laundry.
Standard cotton programme, suitable to dry normal wet
cotton laundry. Most ecient programme in terms of
energy consumption for drying cotton laundry.
The values on the Energy Label are based on this
programme.
COTTON
For drying cotton laundry.
MIXED
For drying mixed laundry made of cotton, linen, synthetic
bres and their blends.
SYNTHETICS
For drying laundry made of synthetic bres.
DE LIC ATES
For drying delicate laundry which needs gentle treatment.
WOOL FINISH
For nishing the air-drying process of woolen textiles.
Woolens get uy and smooth.
No drying programme.
BIG ITEMS
For drying big laundry items, such as sleeping bags,
blankets etc.
AIRING
For airing, refreshing and loosening up laundry without
heating. Select the airing duration with option Drying time.
STEAM REFRESH
For refreshing laundry with steam. Specically designed to
refresh and remove odors from dry and clean casual
garments like shirts, blouses, trousers made out of cotton,
synthetics and their blends. Before loading the laundry into
the drum, slightly humidify it by spraying it with water
(maximum 200 ml; use a water spray bottle). Dryness level
Cupboard dry is preset and cannot be changed. After
programme end, unload the laundry immediately and put
on clothes hangers to minimize creasing.
DRYING TIME
Time-restricted drying programme. Select programme
duration with option Drying time.
For all fabrics appropriate for tumble drying. Suitable to add
an additional short drying phase after programme end.
Refer to OPTIONS, FUNCTIONS AND INDICATORS / option
Drying time for more information.
OPTIONS WHICH ARE DIRECTLY SELECTABLE BY
PRESSING THE RESPECTIVE BUTTON
Steam option
Minimizes creasing of garments made of cotton, synthetics
and their blends by adding a humidifying phase at the end
of the drying cycle.
Use the option with small loads only, unload the garments
from the dryer immediately after programme end and put
them on clothes hangers.
The humidity level automatically adjusts to Cupboard dry
and cannot be changed with this option.
Not combinable with options Fresh care, Rapid and Gentle.
Drying time
To adjust the desired drying time, only if the Drying time or
Airing programme has been selected.
Press the button; the drying time symbol on the display
lights up. Turn the knob to select the desired drying time up
to maximum 180 minutes, then press the knob to conrm it.
Not selectable for any other programme except the Drying
time and Airing programme.
Dryness level
To select the desired dryness level for the laundry load.
Press the button, then turn the knob to select the desired
dryness level; chose between
Iron dry (suitable to be ironed after the drying cycle,
therefore still slightly humid)
OPTIONS, FUNCTIONS AND INDICATORS
Refer to the programme chart to check which options are available for
the selected programme.
Page 7
7
EN
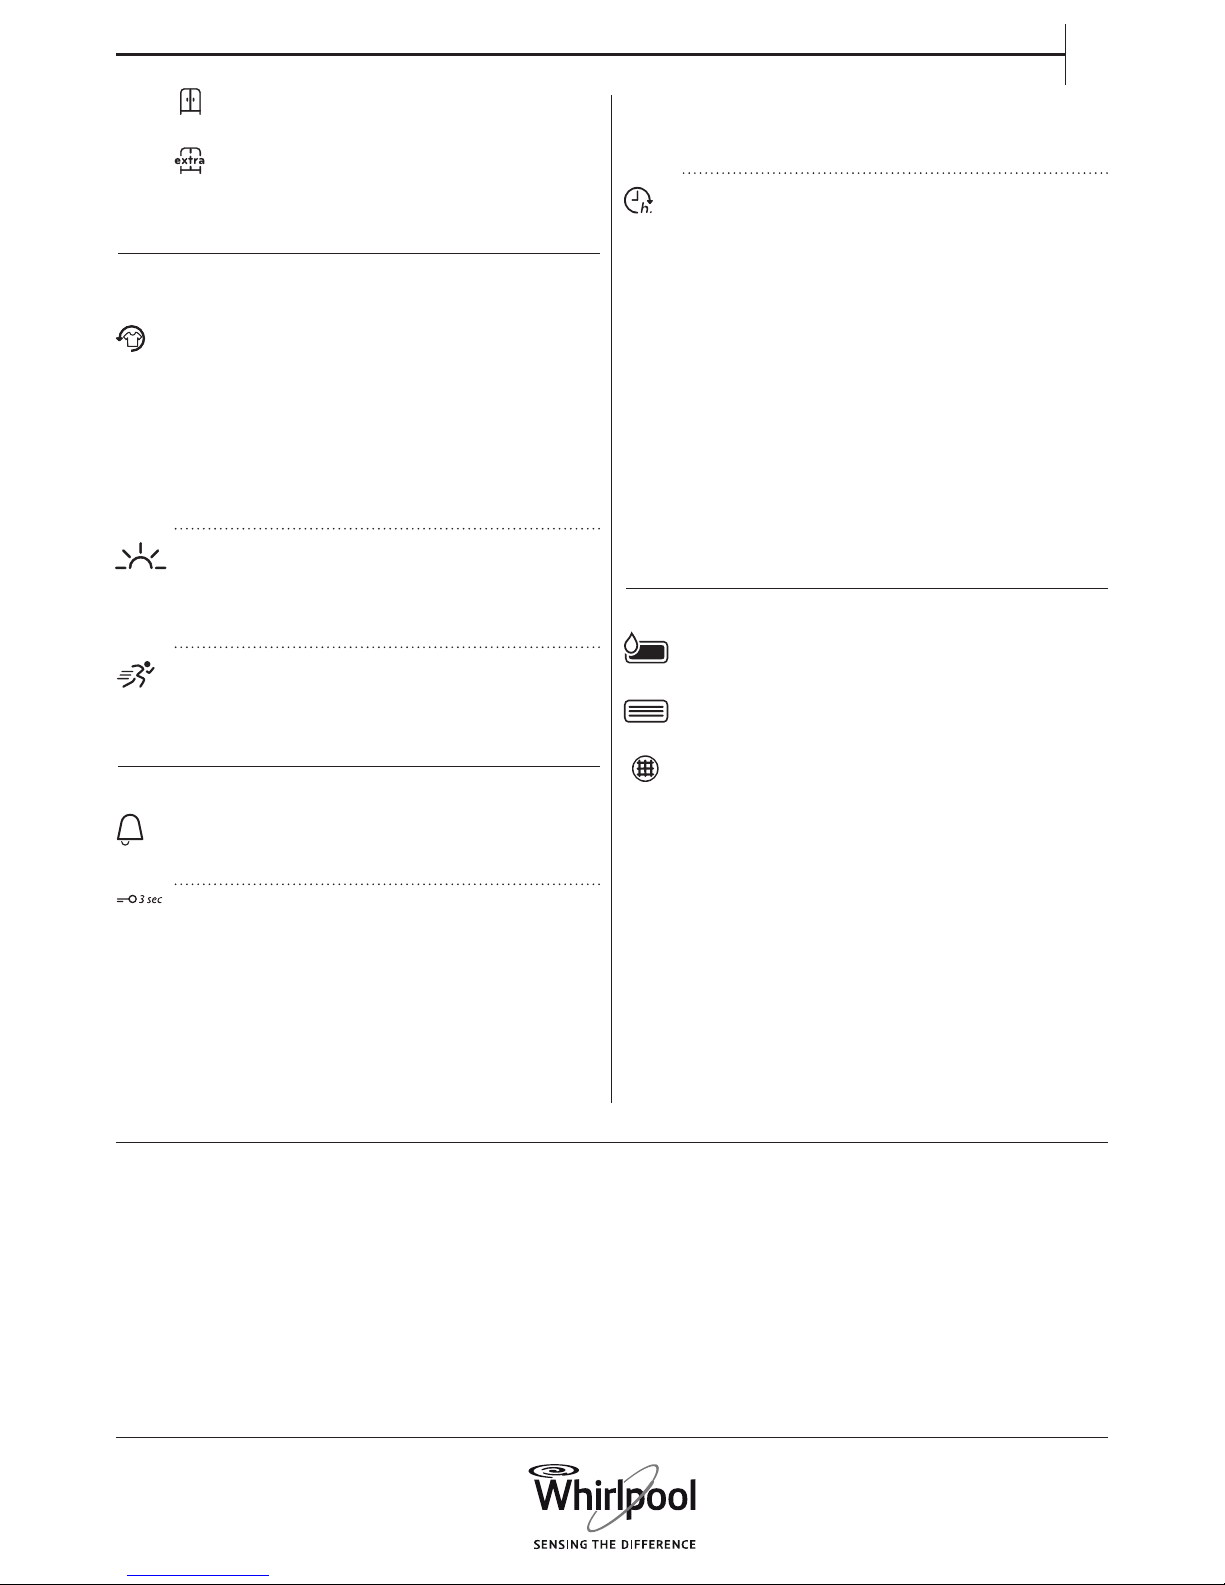
Cupboard dry (dry enough to be placed in a
cupboard at the end of the drying cycle)
Extra dry (maximum dryness level)
and conrm by pressing the knob.
OPTIONS WHICH ARE SELECTABLE WITH THE OPTIONS
BUTTON
Fresh Care
Helps to prevent creasing if you cannot unload the laundry
soon after programme end.
The dryer starts to tumble the laundry periodically a few
minutes after programme end. This tumbling will last up to
approximately 12 hours after end of the programme. You
can stop it at any time by switching o the dryer with the
On/O button.
Not combinable with Steam option.
Gentle
Enables a more gentle treatment of the laundry by reducing
the drying temperature.
Not combinable with Rapid and Steam option.
Rapid
Enables quicker drying.
Not combinable with Gentle and Steam option.
FUNCTIONS
End of cycle signal
To switch on and o the signal tone at the end of the
programme.
Key lock
To lock the keys and the knob of the control panel against
unwanted operation.
To lock the keys:
• The dryer must be switched on.
• Press and hold the Key lock button « until the button lights
up. Knob and keys are locked now.
Only the On/O button works.
If you switch the dryer o and on again, the key lock will
remain active until you unlock it.
To unlock the keys:
• Press and hold the Key lock button until the button light
goes o.
Start delay
Moves the start of your programme to a later time.
Choose a delay up to 23 hours.
• Select programme and options.
• Press the Start delay button « – the Start delay symbol on
the display blinks.
• Turn the knob to select a delay up to 23 hours, which will
be shown on the display. Press the knob to conrm.
• Press Start / Pause - the display shows the countdown of
the delay until start of the programme. The Start / Pause
button lights up. A sound by activation of the pump may
occur.
• After the delay has expired, the dryer starts automatically.
The display then indicates the remaining programme
duration.
To cancel the Start delay
• Press Start / Pause to cancel the start delay (and press Start
/ Pause again to start the selected programme immediately).
INDICATORS
Water tank full
(=> empty water tank)
Bottom lter clogged
(=> clean bottom lter).
Door lter clogged
(=> clean door lter)
In case of any failures, refer to section
TROUBLESHOOTING in the USE AND CARE GUIDE.
Page 8
8
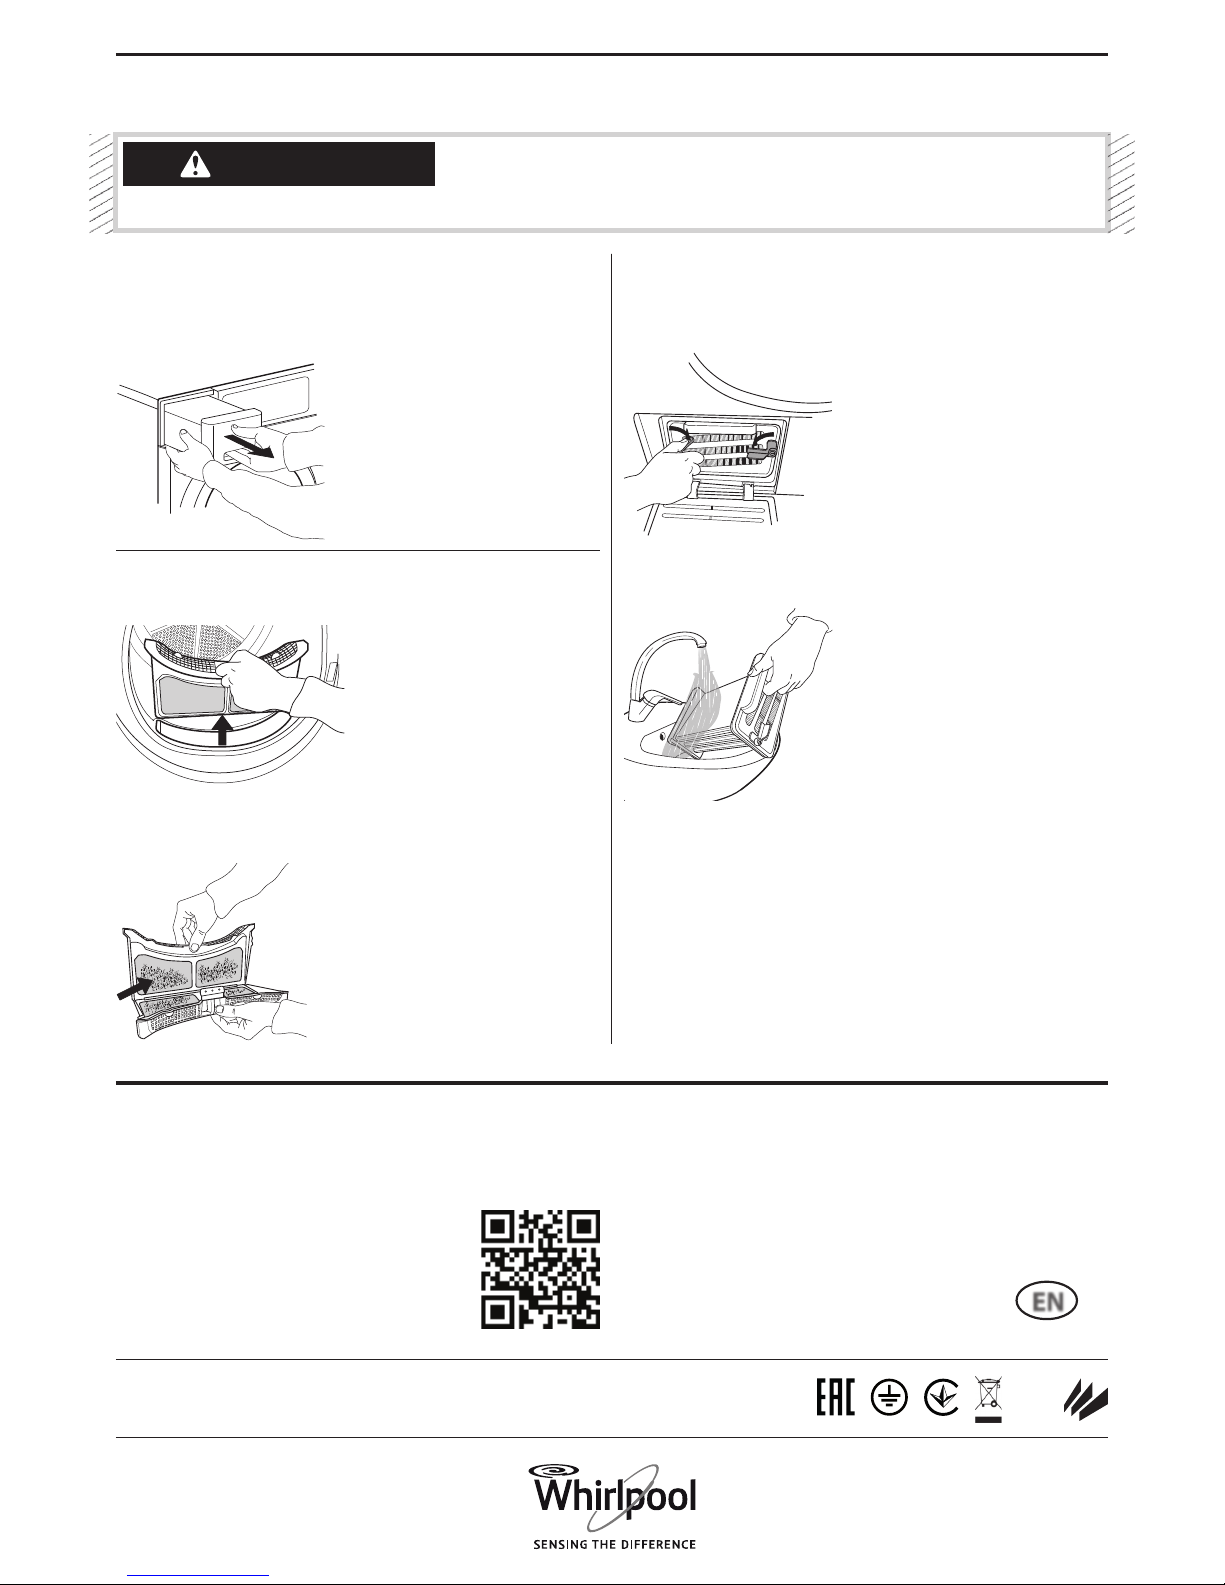
EMPT Y WATER TANK AFTER EACH DRYING CYCLE
Hold the handle and carefully pull out the water tank. Hold the full
water tank with both hands.
Empty the water and insert the container by pushing it back into
place. Make sure that it is properly inserted.
CLEAN DOOR FILTER AFTER EACH DRYING CYCLE
Open the door and remove the door lter by pulling it upwards.
Press the button to open the door lter. Remove the lint inside.
Close the lter and reinsert it in the right direction, so that it
completely integrates in the lter chamber.
CLEAN THE BOTTOM FILTER ABOUT EVERY THREE MONTHS
Open the bottom ap. Turn the locking bars right and left on the
bottom lter downwards in horizontal position. Hold the bottom
lter on the handle and pull it out.
Clean the bottom lter under running water; wipe away dust and
lint.
Clean the lter chamber of the dryer with a damp cloth or carefully
with a vacuum cleaner. Insert the bottom lter again. Turn the
locking bars upwards in vertical position. Close the bottom ap.
CARE AND MAINTENANCE
Switch o and unplug the
dryer before doing any
cleaning and maintenance.
Caution, the water in the
water tank can still be hot.
WARNING
EN
400010765167
Whirlpool is a registered trademark of Whirlpool, USA
001
n
MAINTENANCE AND CLEANING
AND TROUBLESHOOTING
Refer to the Use and Care Guide.
The Use and Care Guide can be obtained as
follows:
• After-Sales Service; using the phone number in
the warranty booklet
• Download from the Whirlpool website
http://docs.whirlpool.eu
CONTACTING AFTER-SALES SERVICE
Provide both numbers shown on the service sticker inside the door
when contacting the After-Sales Service team.
http://www.whirlpool.eu
The phone number can be found in the warranty booklet.
 Loading...