

Page 1
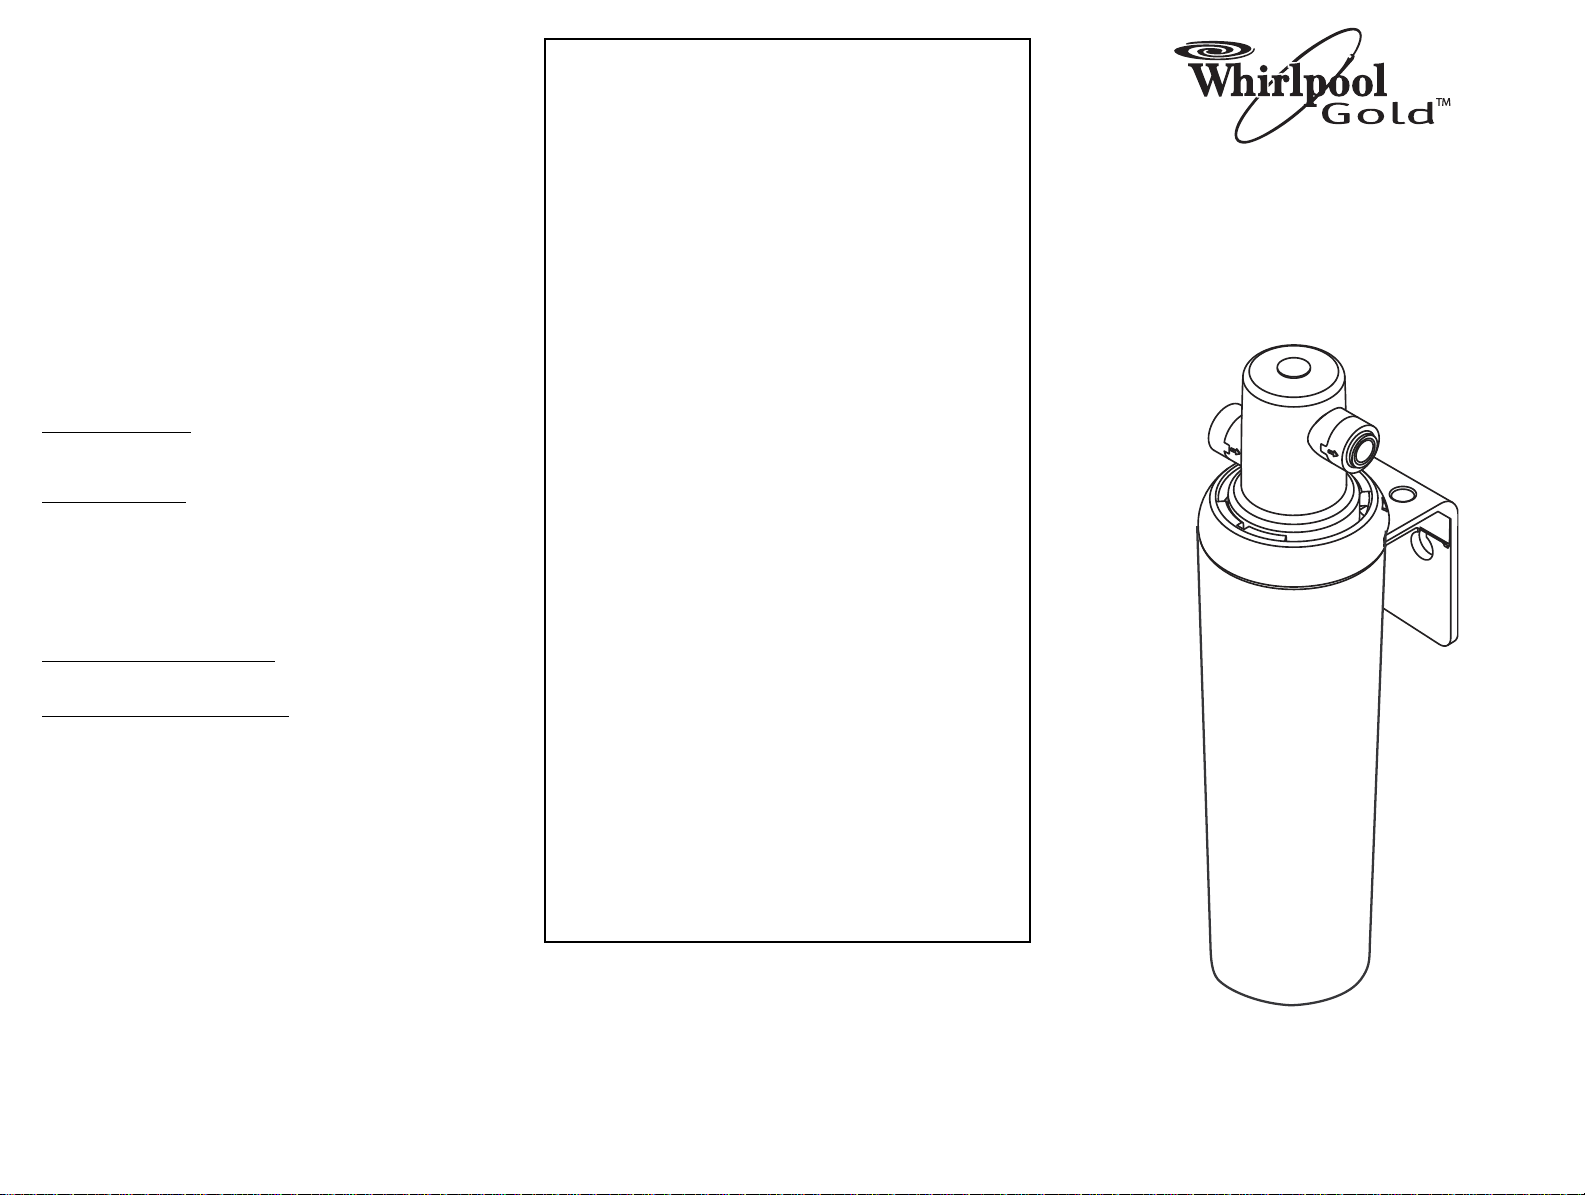
Models
WHCF-SUF and WHCF-SUFC
1 Y ear Limited Warranty
CUNO Incor porated warrants the original purchaser-consumer of its Product
that is free of defects in materials and workmanship.Any defect, malfunction, or
other failure of the Product to conform to this warranty will be remedied by
Warrantor in the manner provided below.
This Warranty, together with any warranties implied by law, shall be limited to a
duration of one (1) year from the original date of purchase by the consumer.
This Warranty does not apply to defects that result from abuse, misuse, alteration or damage not caused by CUNO Incorporated.
THIS WARRANTY DOES NOT COVER, AND IS INTENDED TO EXCLUDE ANY
LIABILITY ON THE PART OF WARRANTOR, WHETHER UNDER THIS WARRANTY OR UNDER ANY WARRANTY IMPLIED BY LAW, FOR ANY INDIRECT
OR CONSEQUENTIAL DAMAGES FOR BREACH HEREOF OR THEREOF.
Note: Some states prohibit limitations on the duration of implied warranties and
on the exclusion of indirect or consequential damages; and so the limitation on
implied warranties and on incidental and consequential damages may not be
applicable to you.
RESPONSIBILITY OF WARRANTOR
CUNO Incor porated’s responsibility under this warranty shall be to repair at its
expense, at no charge to the original purchaser-consumer any product that is
actually defective, malfunctioning or otherwise in violation of this warranty.If
CUNO Incor porated for any reason cannot repair a Product covered hereby
within two (2) weeks after receipt of the original purchaser-consumer’s notification of a Warranty claim and the Product, then CUNOIncorporated’s responsibility shall be, at its option, either to replace the defective Product with a comparable new unit at no charge to the consumer or to refund the full purchase price.
CUNO Incor porated’s obligations of repair, replacement, or refund are conditioned upon the return of the defective product to CUNO Incorporated.
If any Product hereby is actually defective within the terms of this Warranty, then
CUNO Incor porated will bear all the reasonable and proper shipping and mailing charges actually incurred in the consumer’s return of the Product set forth
herein. If the Product proves not to be defective within the terms of this
Warranty, then all costs and expenses in connection with the processing of the
consumer’s claim hereunder shall be borne by the consumer.
RESPONSIBILITY OF THE CONSUMER
The original purchaser-consumer’s sole responsibility in the instance of a warranty claim shall be to notify CUNO Incorporated of the defect, malfunction or
other manner in which the terms of this Warranty are violated.You may secure
performance or obligations hereunder by (in writing):
1. Identifying the Product involved (by model or serial number or other sufficient
description that will allow Warrantor to determine which product is defective).
2. Specifying where, when and from whom the Product was purchased.
3. Describing the nature of the defect, malfunction or other violation of this
Warranty.
4. Return the Product, with the above information to:
CUNO Incorporated, 400 Research Parkway,Meriden, CT 06450, U.S.A.
THIS WARRANTY GIVES YOU SPECIFIC LEGAL RIGHTS, AND YOU MAY
ALSO HAVE OTHER RIGHTS, WHICH VARY FROM STATE TO STATE.
UNDER SINK MAIN FAUCET
FILTRATION
UltraEase™Filtration System and
UltraEase™PLUS Filtration System
Installation, Use & Care Guide
8559764/INSTR7014 1203
04/04
INSTR7014 1203 Whirlpool Water Products
400 Research Parkway, P.O. Box 765
8559764 Meriden, CT 06450 U.S.A.
Filter Replacement:
The contaminants or other substances removed or reduced by
this water filter are not necessarily in all users’ water.
Filter life varies depending on local water conditions and the volume of water used.We recommend that you change your filter
every 6 months.However, it can be replaced earlier if there is a
drop in pressure at the faucet.
To reduce Chlorine Taste and Odor and Cysts,
use Replacement Filter: WHCF-SRC
To reduce Sediment and Chlorine Taste and Odor,
use Replacement Filter: WHCF-SR
Do not use with water that is microbiologically unsafe or of unknown quality without adequate disinfection before or after the system.
Systems certified for Cyst reduction may be used on disinfected water
that may contain filterable cysts.EPA Establishment #070595-CT-001
Filter Cartridge Replacement Instructions:
To remove old filter: Turn filter 1/4 turn to the left.Top surface
of filter will move away from the bottom of the head. Pull filter
down to disengage.
T
o insert new filter: Push filter into Filter Head/Bracket.Turn filter
1/4 turn to the right until it stops.Top surface of filter will become
flush with bottom of the Filter Head/Bracket when fully engaged.
Label will face forward.
Flush filter for 5 minutes to remove air.
Troubleshooting Guide
Water Leaks at Threaded Fittings:
Tighten slightly more until leak stops.
Water leaks at Push-in Connections
Push tubing in as far as it will go.If leaking continues, shut off
water at the original valve and remove water line by pushing in on
the connector collar while pulling the tubing away.Use a catch
basin (See Push-in Fittings Section) Inspect tubing for cracks and
scratches.If tubing is cracked or scratched, cut that portion away
and reinsert tubing into fitting.
Make sure tubing is cut straight.If not, recut.
Help Line 1-866-245-9474
Monday Through Friday
8:00 a.m. to 9:00 p.m. EST
or write us at
Whirlpool Water Products
PO Box 765
Meriden, CT 06450
® Registered trademark/TM Trademark of Whirlpool, USA,
used under license.
© 2004 Whirlpool Corporation.All rights reserved.
® Marca registrada/TM Marca de comercio de Whirlpool, USA,
usado bajo licencia.
Todos los derechos reservados.
Page 2
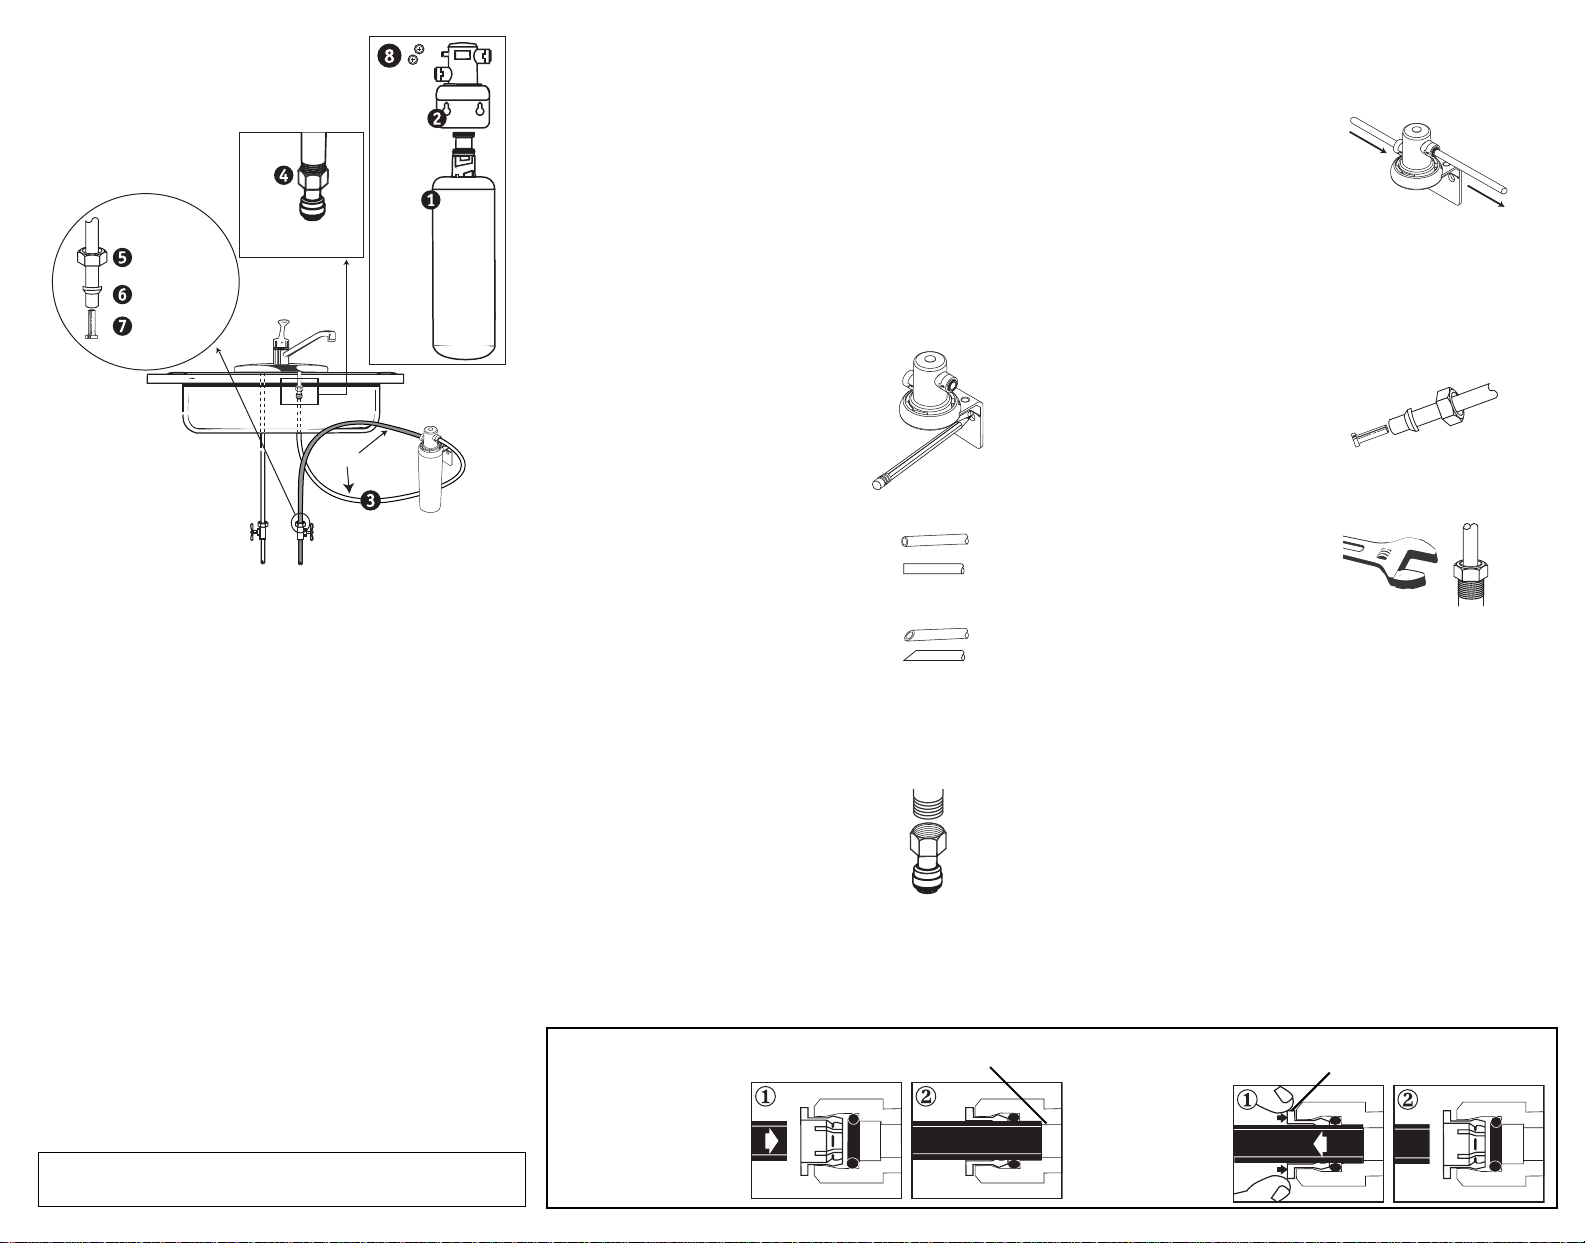
#2 Phillips
Mounting
Screws
Filter
Head/Bracket
Filter
Cartridge
3/8" Tubing
3/8" Compression
Hex Nut
3/8" Ferrule
3/8" T
ube Insert
3/8"x1/2"
Faucet Adapter
Hot
Cold
Parts and Materials Included:
1. Filter Cartridge
2. Filter Head/Bracket
3. 5’ of 3/8” Tubing
4. 3/8” x 1/2” Faucet Adapter
Kit contains components necessary to connect 3/8” outlet tube to 1/2”
faucet fitting and 3/8” water supply.If you have any other size faucet
connection, you may need other parts for installation as required.
5. 3/8” Compression Hex Nut
6. 3/8” Ferrule
7. 3/8”Tube Insert
8. #2 Phillips Mounting Screws
Tools Needed:
Gather the required tools before starting installation. Read and follow the instructions provided with any tools listed here.
• Phillips Head Screwdriver • Adjustable Wrench
• Utility knife or tube cutter for copper tubing
Installation Requirements:
• Proper ly tighten all fittings to ensure a leak-free assembly.
• Install in a location that is not susceptible to freezing tempera-
tures as damage to the housing could occur.
• Install away from direct sunlight as prolonged exposure to light
can weaken plastic components.
• Some local codes may require the use of a licensed plumber or
certified installer when disrupting a potable water line. Determine
and follow any and all local codes and requirements.
• Allow a minimum of 2 1/2” clear space below unit to facilitate
filter change.
This filter can be used at any sink where water is used for drinking.
Installation Instructions
For Use With Cold Water Only
NOTE: Remove items from under the sink.Place a catch basin there
to collect small amounts of water that may run out when disconnecting
water supply lines.
1.Turn off cold water supply valve and remove existing water supply
tubing and/or fitting.
2. Select and mark a location under the sink that allows access for filter change.
3. Using filter head/bracket as a guide, fasten Filter Head/Bracket to
wall with #2 Phillips mounting screws supplied.
Mark hole locations so that there is 1 1/2”
between the screws (see Figure 1), from
center of each screw.When installed, filter
bottom should be at least 2 1/2” from sink
cabinet floor to facilitate cartridge change.
Install screws, but only halfway, so you can
easily slip the bracket to wall before firmly
setting screws.
Figure 1
4. Deter mine length of tubing required from
filter head/bracket to faucet and from water
supply line to filter head/bracket by holding
tubing in place ensuring it is of appropriate
length. Do not kink tubing as this will impede
Correct
water flow. If necessary, loop tubing around
to avoid it being kinked.
Cut tubing straight with a utility knife or tube
cutter (for copper piping).(See Figure 2.)
Incorrect
Figure 2
5. Install faucet adapter fitting to faucet.This should be a snug fit. Do
not overtighten. (See Figure 3.)
Figure 3
“Using Push-In Fittings”
To Attach Tubing
Push tubing in as far as
it will go.Tubing must be
inserted past o-ring and
hit backstop.Pull tube
to ensure it is secured.
Backstop
6. Referring to section “Using
Push-In Fittings,” insert a section of the plastic tubing into
faucet adapter fitting, making
sure end of tubing is firmly seated to backstop.
B
A
Inlet
Hold the filter head/bracket
away from the wall, press other
end of tubing into outlet side as
indicated by arrow on Filter
Head/Bracket.(See Figure 4,
Outlet to
Equipment
Figure 4
A.)
7.Take the remaining section
of tubing, slide the compression hex nut and 3/8”ferrule
(tapered end away from compression hex nut) onto the
tubing and put in the tube
insert (see Figure 5). Fasten
this assembly onto 3/8” cold
water supply outlet. Do not
Figure 5
overtighten (see Figure 6).
Overtightening will cause tubing to separate from fitting.
Connect other end to the inlet
side as indicated by the arrow
on Filter Head/Bracket (see
Figure 4, B).
8. Place Filter Head/Bracket
Figure 6
holes over mounting screws,
press down to lock into place and tighten screws for a
snug fit.
9. Insert filter into Filter Head/Bracket.Turn filter 1/4 turn
to the right until it stops.Top surface of filter will become
flush with bottom of the Filter Head/Bracket when fully
engaged. Label will face forward.
10.Turn on water and open faucet to flush air from the
system. Run water for 5 minutes to flush out air. Check for
leaks.
Close sink faucet. System is now ready for use!
To Release Tubing
Collet
Push in grey
collet to release
tubing.With collet
held, pull tubing
straight out.
Page 3
Modelos
WHCF-SUF y WHCF-SUFC
Garantía Limitada de Un Año
CUNO Incorporated garantiza al comprador-consumidor original de su Producto
que éste se encuentra libre de defectos de material y de fabricación. El
Garante reparará cualquier defecto, malfuncionamiento u otra avería del
Producto amparado por esta garantía de acuerdo a lo estipulado a continuación.
Esta Garantía, juntamente con otras garantías implícitas por ley, se limitarán a
la duración de un (1) año a partir de la fecha de compra original del consumidor.
Esta Garantía no cubre defectos que resulten del abuso, mal uso, alteración o
daños no ocasionados por CUNO Incorporated.
ESTA GARANTÍA NO AMPARA, Y DE HECHO TIENE EL PROPÓSITO DE
EXCLUIR CUALQUIER RESPONSABILIDAD DE PARTE DEL GARANTE, SEA
EN VIRTUD DE ESTA GARANTÍA O DE LA GARANTÍA IMPLÍCITA DE LEY,
POR DAÑOS INDIRECTOS O CONSECUENCIALES POR LA VIOLACIÓN DE
LA MISMA.
Nota: Algunos estados prohíben limitaciones en la duración de garantías
implícitas y en la exclusión de daños indirectos o consecuenciales, de modo
que la limitación de garantías implícitas y de daños indirectos y consecuenciales quizás no le corresponda a usted.
RESPONSABILIDAD DEL GARANTE
La responsabilidad de CUNO Incorporated en virtud de esta garantía será de
reparar por cuenta propia, sin costo para el comprador-consumidor original
cualquier producto que esté realmente defectuoso, funcione mal o que de alguna otra manera esté en violación de esta garantía. Si por algún motivo, CUNO
Incorporated no pudiera reparar un Producto amparado por la presente garantía dentro de dos (2) semanas después de haber recibido la notificación original
del comprador-consumidor de un reclamo de Garantía, entonces la responsabilidad de CUNO Incorporated será, a elección propia, ya sea de sustituir el
Producto defectuoso con una unidad nueva equiparable sin costo alguno para
el consumidor o reembolsar el precio total de la compra. Las obligaciones de
CUNO Incorporated en cuanto a reparación, sustitución o reembolso son condicionales a la devolución del producto defectuoso a CUNO Incorporated.
Si cualquier Producto amparado por la presente garantía es en realidad defectuoso según las condiciones estipuladas en esta Garantía, entonces CUNO
Incorporated correrá con todos los gastos razonables y apropiados de envío
incurridos en la devolución del Producto por el consumidor tal como se estipula
en la presente Garantía. Si se compr ueba que el Producto no tiene defectos
de conformidad con las condiciones de esta Garantía, entonces todos los gastos relacionados con el procesamiento del reclamo serán por cuenta del consumidor
RESPONSABILIDAD DEL CONSUMIDOR
La única responsabilidad del comprador-consumidor original en el caso de
reclamo de la garantía será de notificar a CUNO Incorporated del defecto, malfuncionamiento o cualquier otra forma que viole las condiciones de esta
Garantía. Usted podrá garantizar el rendimiento u obligaciones, enumeradas a
continuación, al (por escrito):
1. Identificar el Producto en cuestión (por número de modelo o de serie u otra
descripción suficiente que permita al Garante determinar cuál producto es
defectuoso.)
2. Especificar dónde, cuándo y de quién se adquirió el Producto.
3. Describir la índole del defecto, malfuncionamiento u otra violación de esta
Garantía.
4. Devolver el Producto, con la información especificada arriba, a:
CUNO Incorporated, 400 Research Parkway,Meriden, CT 06450, U.S.A.
ESTA GARANTÍA LE OTORGA DERECHOS LEGALES ESPECÍFICOS Y
PUEDE QUE USTED TENGA TAMBIÉN OTROS DERECHOS, LOS
CUALES VARÍAN DE UN ESTADO A OTRO.
FILTRACIÓN BAJO LA LLAVE DE
AGUA PRINCIPAL DE LA PILA
Sistema de Filtración UltraEase™ y
Sistema de Filtration UltraEase™ PLUS
Guía de instalación, uso y cuidado
8559764/INSTR7014 1203
Reemplazo del filtro:
Los contaminantes u otras substancias que elimina o reduce
este filtro de agua no se encuentran necesariamente en el agua
de todos los usuarios.
La vida útil del filtro varía dependiendo de las condiciones del
agua local y del volumen de agua utilizado.Le recomendamos
que cambie su filtro cada 6 meses. Sin embargo, puede ser
reemplazado antes si se reduce la presión de agua en la llave de
agua.
Para reducir el nivel de sabor y olor a cloro y los quistes, use el
filtro de reemplazo WHCF-SRC
Para reducir los niveles de sedimentación y de sabor y olor a
cloro, use el filtro de reemplazo WHCF-SR
No lo utilice con agua que contenga microbios o con agua de calidad
dudosa sin una adecuada desinfección antes o después del sistema. Los
sistemas certificados para la reducción de quistes pueden ser utilizados
con agua desinfectada que podría contener quistes filtrables.
Establecimiento EPA Nº 070595-CT-001
Instrucciones de reemplazo del cartucho del filtro:
Para quitar el filtro usado: Gire el filtro ¼ de vuelta hacia la
izquierda. La superficie super ior del filtro se separará de la base
de la cabeza. Jale el filtro hacia abajo para desprenderlo.
P
ara inser
tar el nuevo filtro:
Inserte el filtro en la
cabeza/soporte del filtro. Gire el filtro 1/4 de vuelta hacia la
derecha hasta que se detenga. La superficie superior del filtro se
emparejará con la base de la cabeza/soporte del filtro cuando
éste quede bien asentado. La etiqueta queda de frente.
Enjuague el filtro durante 5 minutos para extraer el aire.
Guía de solución de problemas
Fugas de agua en los accesorios de rosca:
Apriete un poco más hasta que desaparezca la fuga.
Fugas de agua en los accesor
ios de presión
Empuje la tubería hacia adentro todo lo que pueda. Si la fuga
continúa, cierre el agua en la válvula original y retire la tubería de
agua oprimiendo sobre el collar del conector mientras jala hacia
fuera la tubería. Use un colector de agua (ver la sección
"Accesorios de presión"). Vea si la tubería tiene rajaduras o
rayaduras. Si la tubería está rajada o rayada, retire esa porción y
reinserte la tubería en el accesorio.
Cerciórese de que la tubería esté cortada recta. De lo contrario,
vuelva a cortarla.
Número de Ayuda 1-866-245-9474
De lunes a viernes
de 8:00 a.m. a 9:00 p.m. hora oficial del Este
o escríbanos a
Whirlpool Water Products
PO Box 765
Meriden, CT 06450
® Marca registrada/TM Marca de comercio de Whirlpool, USA, usada
bajo licencia.
© 2004 Whirlpool Corporation.Todos los derechos reservados.
6. Remítase a la sección
"Utilización de los accesorios de presión", inserte
una sección de la tubería
plástica en el accesorio
adaptador de la llave de
agua cerciorándose de
que el extremo de la
tubería quede firmemente
asentado en el tope trasero.
Sostenga la cabeza/soporte del filtro en dirección contraria a
la pared, empuje el otro extremo de la tubería hacia el orificio
de salida como lo indica la flecha en la cabeza/soporte del
filtro (ver Figura 4,A.)
7.Tome la sección de tubería
restante, deslice la tuerca hexagonal de compresión y la férula de
3/8" (con el extremo cónico hacia
afuera desde la tuerca hexagonal
de compresión) en la tubería y
coloque la inserción para tubo (ver
Figura 5). Sujete este conjunto a la
boquilla de salida de 3/8" de suministro de agua fría. No apr iete
demasiado (ver Figura 6). Apretar
en exceso hará que la tubería se
separe de su conexión.Conecte el
otro extremo al lado del orificio de
entrada, como lo indica la flecha que aparece en la
cabeza/soporte del filtro (ver Figura 4, B).
8. Coloque los hoyos de la cabeza/soporte del filtro sobre los
tornillos de montaje, presione hacia abajo para colocarlos en
su lugar y apriete los tornillos para obtener un cierre bien
ajustado.
9. Inserte el filtro en la cabeza /abrazadera del filtro. Gire el
filtro 1/4 de vuelta a la derecha hasta que éste se detenga.
La superficie superior del filtro se emparejará con la base de
la cabeza/soporte del filtro cuando éste quede bien asentado.La etiqueta queda de frente.
10. Abra la llave de agua para extraer el aire en el sistema.
Deje correr el agua durante 5 minutos para extraer el aire.
Verifique la presencia de fugas.
Cierre la llave de agua de la pila.¡Su sistema está listo para
usarse!
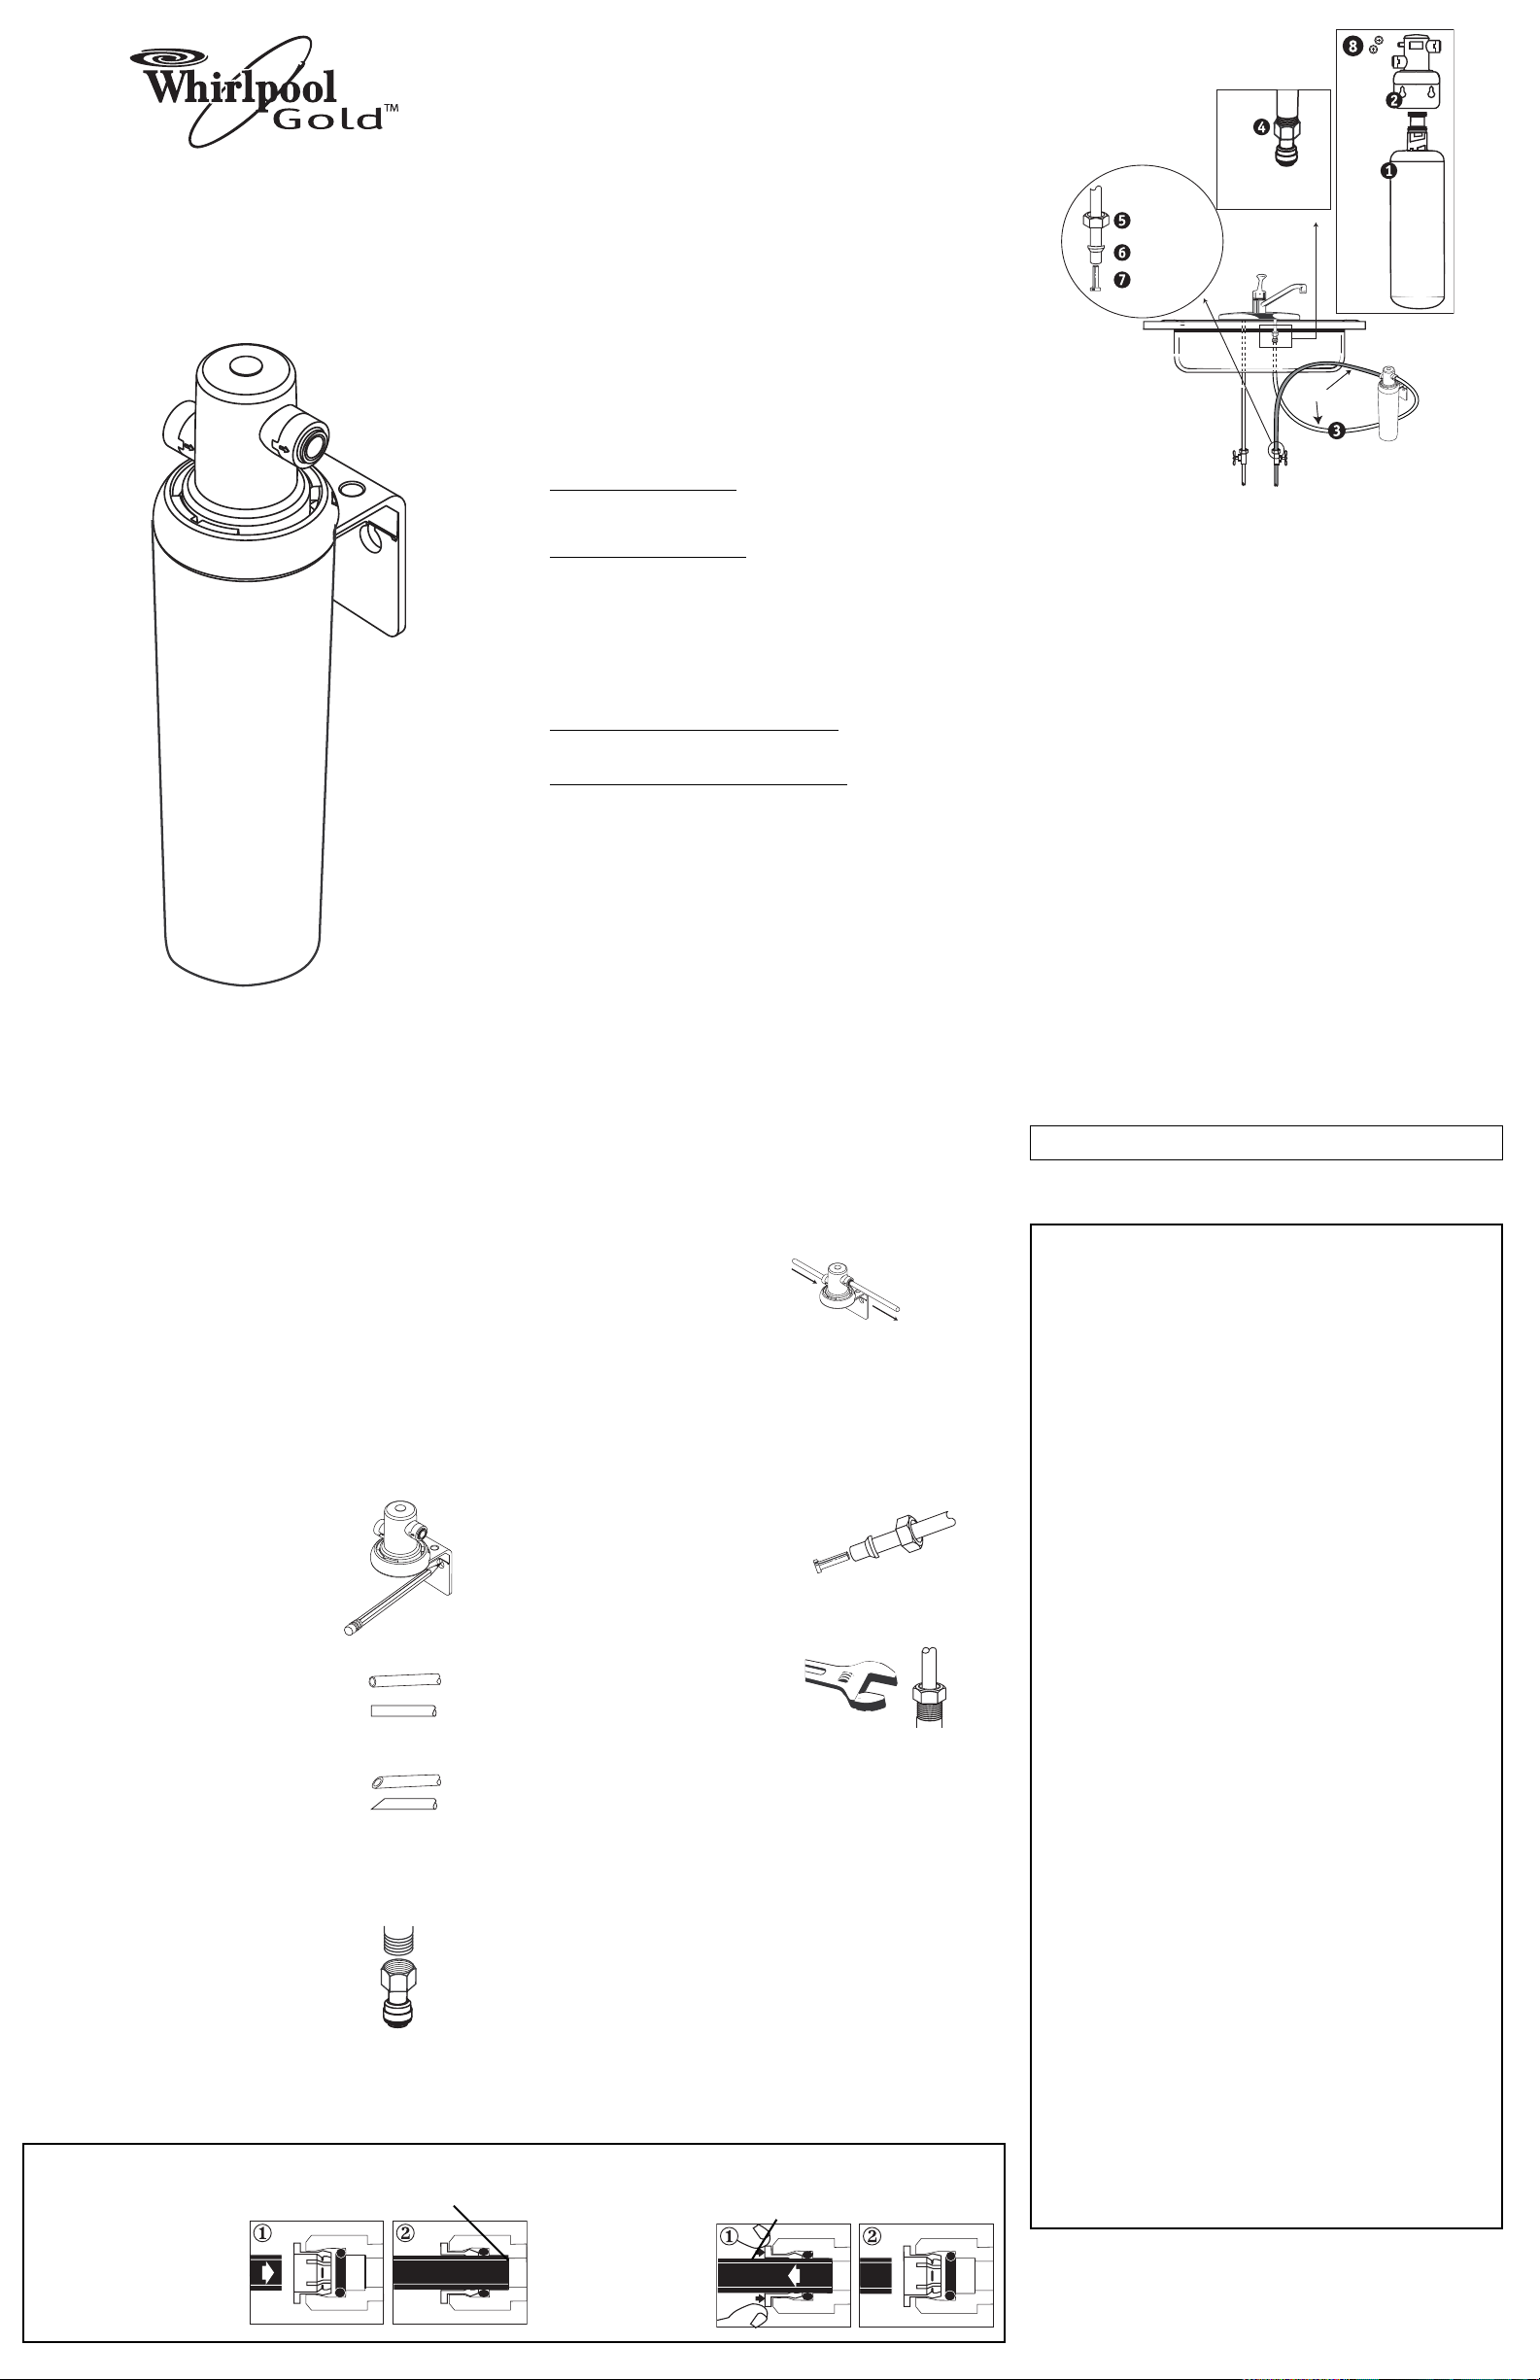
1. Cartucho del filtro
2. Cabeza/soporte del filtro
3. 5 pies de tubería de 3/8"
4. Adaptador de la llave de agua
de 3/8" x ½"
5. Tuerca hexagonal de
compresión de 3/8"
6. Férula de 3/8"
7. Inserción para tubo de 3/8"
8.Tornillos de montaje Phillips Nº 2
• Destornillador de cabeza • Llave ajustable
• Cuchillo de uso general o cortadora de tubo para tubería de cobre
Instrucciones de instalación
Para usar sólo con agua fría
NOTA: Retire los objetos que se encuentren bajo la pila. Ponga un
colector de agua para recoger las pequeñas cantidades de agua que
podrían salir cuando desconecte las tuberías de suministro de agua.
1. Cierre la válvula de suministro de agua fría y retire la tubería y/o
accesorio de suministro de agua existente.
2. Seleccione y marque un lugar bajo la pila que per mita el acceso
para cambiar el filtro.
3. Utilizando la cabeza/soporte del filtro como referencia, fije la
cabeza/soporte del filtro a la pared con los tornillos de montaje
Phillips Nº 2 incluidos.
Marque las ubicaciones de los hoyos de
manera que quede un espacio de 1½"
entre los tornillos (ver Figura 1), desde el
centro de cada tornillo. Una vez instalado,
la base del filtro debe tener al menos 2½"
desde el piso del gabinete de la pila para
facilitar el cambio del cartucho.Coloque los
tornillos, pero sólo hasta la mitad, para que
pueda deslizar fácilmente el soporte hasta
la pared antes de enroscar firmemente los
tornillos.
4. Deter mine la longitud de la tuber ía necesaria desde la cabeza/soporte del filtro
hasta la llave de agua y desde la tubería de
suministro de agua hasta la cabeza/soporte
del filtro sosteniendo la tubería en su posición para determinar que tiene la longitud
apropiada. No doble la tubería, pues esto
impedirá que el agua fluya.Si es necesario,
enrolle la tubería para evitar que ésta se doble.
Corte la tubería recta con un cuchillo
o con una cortadora de tubo (para
tubería de cobre) (ver Figura 2).
5. Instale el accesorio adaptador de
la llave de agua a la llave de agua.
Este debe ser de ajuste apretado.No
apriete demasiado (ver Figura 3).
Herramientas necesarias:
El juego contiene los componentes necesarios para conectar el tubo de
la boquilla de salida de 3/8" al accesorio de la llave de agua de ½" y al
suministro de agua de 3/8". Si tiene una conexión de llave de agua de
otras dimensiones, podría necesitar otras partes para realizar la instalación como se requiere.
Para liberar la tubería
Empuje hacia dentro la
pinza de sujeción gris
para liberar la tubería.
Sosteniendo la pinza de
sujeción, jale la tubería
en línea recta.
Para sujetar la tubería
Empuje la tubería hacia dentro tanto como pueda. La
tubería debe insertarse
detrás del anillo en o y llegar
hasta el tope trasero.Jale el
tubo para cerciorarse de que
esté bien sujeto.
Este filtro puede ser usado en cualquier pila de agua para beber.
Partes y materiales incluidos:
Pinza de sujeción
Tope trasero
"Utilización de los Accesorios de Presión"
Requisitos de instalación:
• Apriete todos los accesorios adecuadamente para asegurar un
ensamblaje libre de fugas.
• Haga la instalación en un lugar en que la temperatura no baje al
grado de congelación para evitar daños en la caja.
• Instale el filtro lejos de la luz solar, pues su exposición prolongada
podría debilitar los componentes plásticos.
• Algunas reglamentaciones locales podrían obligar a contratar los servicios de un plomero autorizado o de un instalador certificado cuando se corta una tubería de agua potable. Verifique lo anterior y
observe todos los reglamentos y códigos locales.
• Deje un mínimo de 2½" de espacio libre bajo la unidad que
permita el acceso para cambiar el filtro.
Figura 2
Figura 3
Figura 1
Figura 5
Figura 6
quip
Figura 4
Reúna las herramientas necesarias antes de comenzar la instalación.
Lea y siga las instrucciones incluidas con todas las herramientas enumeradas aquí.
Tornillos
de montaje
Phillips Nº 2
Cabeza/soporte
del filtro
Tuerca hexagonal
de compresión
de 3/8"
Férula de 3/8"
Inserción para
tubo de 3/8"
Adaptador de la llave
de agua de
3/8" x 1/2"Faucet Adapter
Caliente
Tubería de 3/8"
Fría
Cartucho
del filtro
Correcto
Incorrecto
Orificio
de entrada
B
A
Boquilla de
salida al e
o
 Loading...