

Whirlpool WFG515S0EW1, WFG515S0ES1 Owner’s Manual

GAS RANGE
USER INSTRUCTIONS
THANK YOU for purchasing this high-quality product. Register your range at www.whirlpool.com. In Canada, register your range
at www.whirlpool.ca.
For future reference, please make a note of your product model and serial numbers. These can be located on the oven frame behind
the top right side of the oven door.
Model Number___________________________________________ Serial Number___________________________________________
Para una versión en español, visite: www.whirlpool.com.
Deberá tener a mano el número de modelo y de serie, que está ubicado en el marco del horno detrás del lado superior izquierdo de
la puerta del horno.
Table of Contents
RANGE SAFETY .............................................................................2
The Anti-Tip Bracket ................................................................................. 3
FEATURE GUIDE ............................................................................4
COOKTOP USE ..............................................................................5
Sealed Surface Burners ............................................................................ 5
Burner Size ............................................................................................... 6
Cookware .................................................................................................. 6
Home Canning .......................................................................................... 7
OVEN USE .......................................................................................7
Electronic Oven Controls .......................................................................... 7
Sabbath Mode .......................................................................................... 8
Aluminum Foil ........................................................................................... 8
Positioning Racks and Bakeware ............................................................. 9
Oven Vent..................................................................................................9
Baking and Roasting ................................................................................ 9
Broiling ...................................................................................................... 9
Cook Time ............................................................................................... 10
RANGE CARE ...............................................................................10
Self-Cleaning Cycle ................................................................................ 10
General Cleaning .................................................................................... 11
Oven Light ............................................................................................... 11
TROUBLESHOOTING ..................................................................12
ACCESSORIES .............................................................................15
WARRANTY ..................................................................................16
W11122569A
RANGE SAFETY
Your safety and the safety of others are very important.
We have provided many important safety messages in this manual and on your appliance. Always read and obey all safety
messages.
This is the safety alert symbol.
This symbol alerts you to potential hazards that can kill or hurt you and others.
All safety messages will follow the safety alert symbol and either the word “DANGER” or “WARNING.”
These words mean:
You can be killed or seriously injured if you don't immediately
DANGER
WARNING
All safety messages will tell you what the potential hazard is, tell you how to reduce the chance of injury, and tell you what can
happen if the instructions are not followed.
WARNING: If the information in these instructions is not followed exactly, a fire or
explosion may result causing property damage, personal injury or death.
follow instructions.
You
can be killed or seriously injured if you don't
instructions.
follow
– Do not store or use gasoline or other flammable vapors and liquids in the vicinity of this
or any other appliance.
– WHAT TO DO IF YOU SMELL GAS:
Do not try to light any appliance.
•
Do not touch any electrical switch.
•
Do not use any phone in your building.
•
Immediately call your gas supplier from a neighbor's phone. Follow the gas supplier's
•
instructions.
If you cannot reach your gas supplier, call the fire department.
•
Installation and service must be performed by a qualified installer, service agency or
–
the gas supplier.
WARNING: Gas leaks cannot always be detected by smell.
Gas suppliers recommend that you use a gas detector approved by UL or CSA.
For more information, contact your gas supplier.
If a gas leak is detected, follow the “What to do if you smell gas” instructions.
State of California Proposition 65 Warnings:
WARNING: This product contains one or more chemicals known to the State of California to cause cancer.
WARNING: This product contains one or more chemicals known to the State of California to cause birth defects or other
reproductive harm.
2
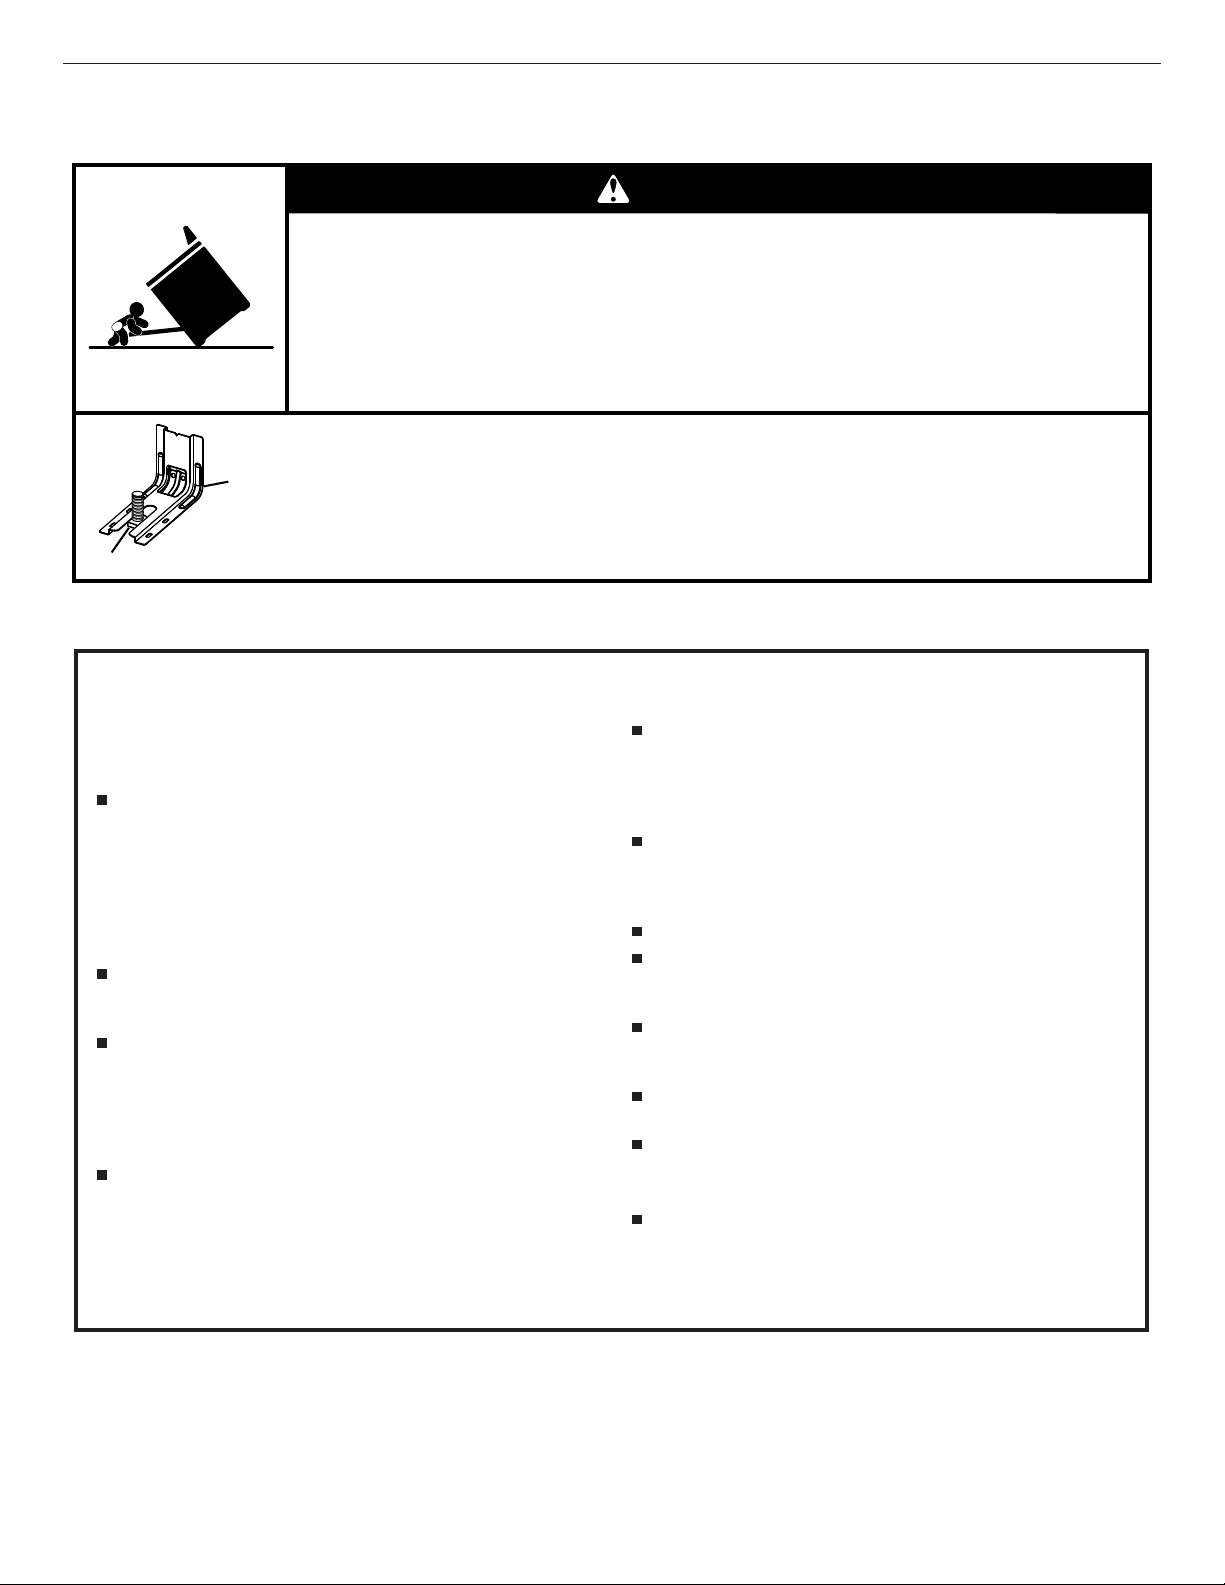
The Anti-Tip Bracket
The range will not tip during normal use. However, the range can tip if you apply too much force or weight to the open door without the
anti-tip bracket fastened down properly.
WARNING
Tip Over Hazard
A child or adult can tip the range and be killed.
Verify the anti-tip bracket has been properly installed and engaged per installation instructions.
Re-engage anti-tip bracket if range is moved.
Do not operate range without anti-tip bracket installed and engaged.
Failure to follow these instructions can result in death or serious burns to children and adults.
To verify the anti-tip bracket is installed and engaged:
Anti-Tip
Bracket
Range Foot
• Slide range forward.
• Look for the anti-tip bracket securely attached to floor or wall.
• Slide range back so rear range foot is under anti-tip bracket.
• See installation instructions for details.
IMPORTANT SAFETY INSTRUCTIONS
WARNING: To reduce the risk of fire, electrical shock,
injury to persons, or damage when using the range, follow
basic precautions, including the following:
WARNING: TO REDUCE THE RISK OF TIPPING OF
THE RANGE, THE RANGE MUST BE SECURED BY
PROPERLY INSTALLED ANTI-TIP DEVICES. TO CHECK
IF THE DEVICES ARE INSTALLED PROPERLY, SLIDE
RANGE FORWARD, LOOK FOR ANTI-TIP BRACKET
SECURELY ATTACHED TO FLOOR OR WALL, AND
SLIDE RANGE BACK SO REAR RANGE FOOT IS UNDER
ANTI-TIP BRACKET.
WARNING: NEVER use this appliance as a space
heater to heat or warm the room. Doing so may result in
carbon monoxide poisoning and overheating of the oven.
WARNING: NEVER cover any slots, holes or passages
in the oven bottom or cover an entire rack with materials
such as aluminum foil. Doing so blocks air flow through the
oven and may cause carbon monoxide poisoning.
Aluminum foil linings may also trap heat, causing a fire
hazard.
CAUTION: Do not store items of interest to children in
cabinets above a range or on the backguard of a range –
children climbing on the range to reach items could be
seriously injured.
Proper Installation – The range, when installed, must be
electrically grounded in accordance with local codes or, in
the absence of local codes, with the
Code, ANSI/NFPA 70
installed and grounded by a qualified technician.
This range is equipped with a three-prong grounding plug
for your protection against shock hazard and should be
plugged directly into a properly grounded receptacle. Do
not cut or remove the grounding prong from this plug.
Disconnect power before servicing.
Injuries may result from the misuse of appliance doors or
drawers such as stepping, leaning, or sitting on the doors
or drawers.
Maintenance – Keep range area clear and free from
combustible materials, gasoline, and other flammable
vapors and liquids.
Storage in or on the Range – Flammable materials should
not be stored in an oven or near surface units.
Top burner flame size should be adjusted so it does not
extend beyond the edge of the cooking utensil.
For self-cleaning ranges –
Before Self-Cleaning the Oven – Remove broiler pan and
other utensils. Wipe off all excessive spillage before
initiating the cleaning cycle.
. Be sure the range is properly
National Electrical
SAVE THESE INSTRUCTIONS
3
FEATURE GUIDE
This manual covers several models. Your model may have some or all of the items listed. Refer to this manual or the Frequently Asked
Questions (FAQs) section of our website at www.whirlpool.com for more detailed instructions. In Canada, refer to the Customer Service
Section at www.whirlpool.ca.
WARNING
Food Poisoning Hazard
Do not let food sit in oven more than one hour before
or after cooking.
Doing so can result in food poisoning or sickness.
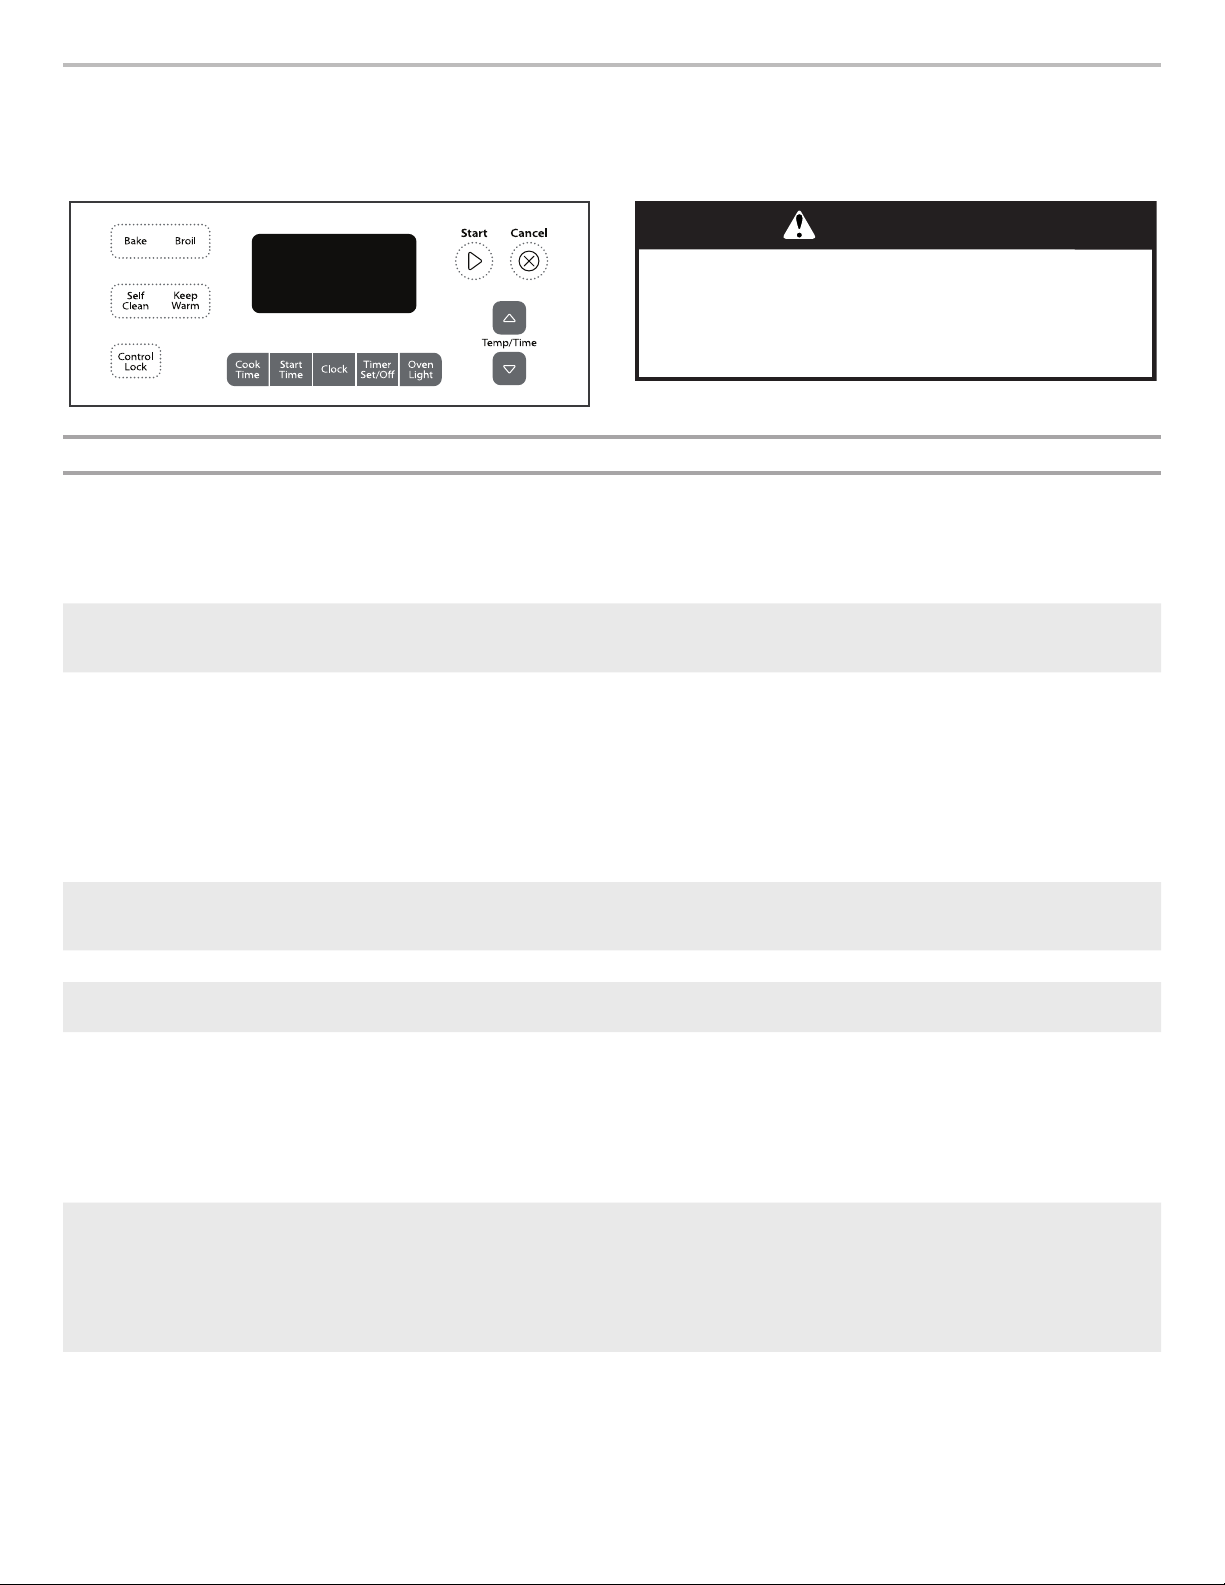
KEYPAD FEATURE INSTRUCTIONS
CLOCK Clock
OVEN LIGHT Oven cavity light
TIMER
(Set/Off)
START Cooking start
CANCEL Range function
TEMP/TIME Temperature and
BAKE Baking and
Oven timer
time adjust
roasting
The Clock uses a 12-hour cycle.
1. Check that the oven is off.
2. Press CLOCK.
3. Press TEMP/TIME “up” or “down” arrow pads to set the time of day.
4. Press CLOCK or START.
The oven light is controlled by a keypad on the oven control panel. While the oven door is closed,
press the oven light switch to turn the light on and off. The oven light will come on when the oven
door is opened.
The Timer can be set in hours or minutes up to 12 hours and 59 minutes.
1. Press TIMER.
2. Press TEMP/TIME “up” or “down” arrow pads to set the length of time.
3. Press START to begin the countdown. If enabled, end-of-cycle tones will sound at end of
countdown.
4. Press TIMER twice to cancel the Timer. Do not press the Cancel keypad because the oven will
turn off.
5. If the Timer is running, but not in the display, press TIMER to display the countdown for
5 seconds.
The Start pad begins any oven function. If Start is not pressed within 5 seconds, “PUSH” appears
in the display. If Start is not pressed within 1 minute after pressing a keypad, the function is
canceled and the time of day is displayed.
The Cancel keypad stops any function except the Clock, Timer and Oven Control Lockout.
The “up” or “down” arrow pads are used to adjust time and temperature settings.
1. Press BAKE.
2. Press TEMP/TIME “up” or “down” arrow pads to set a temperature other than 350°F (175°C)
in 5°F (5°C) increments between 170°F and 500°F (75°C and 260°C).
3. Press START.
4. To change the temperature repeat Step 2. Press START or wait 5 seconds for the change to
take effect.
5. Press CANCEL when nished.
BROIL Broiling
KEEP WARM Hold warm
4
1. Press BROIL.
2. Press TEMP/TIME “up” or “down” arrow pads to change the temperature in 5°F (5°C)
increments between 300°F and 500°F (150°C and 260°C).
3. Press START, and allow oven to preheat for 5 minutes.
4. Position cookware in oven and close the oven door.
5. Press CANCEL when nished.
Food must be at serving temperature before placing it in the warmed oven.
1. Press KEEP WARM.
2. Temperature is set at 170°F (75°C) for 60 minutes (1.00 hour).
3. Press START.
4. Press CANCEL when nished.
NOTE: The oven will automatically turn off after 60 minutes.
KEYPAD FEATURE INSTRUCTIONS
B
A
START TIME Delayed start
COOK TIME Timed cooking
The Start Time keypad is used to enter the starting time for an oven function with a delayed start.
Start Time should not be used for foods such as breads and cakes because they may not bake
properly.
To set a Timed Cook or a Delayed Timed Cook, see “Cook Time” section.
Timed Cooking allows the oven to be set to turn on at a certain time of day, cook for a set length
of time, and/or shut off automatically.
To set a Timed Cook or a Delayed Timed Cook, see “Cook Time” section.
SELF CLEAN Self-Cleaning
CONTROL
LOCK
cycle
Oven control
lockout
See the “Self-Cleaning Cycle” section.
1. Check that the oven is off.
2. Press and hold the CONTROL LOCK keypad for 3 seconds.
3. A tone will sound, and “Loc” will be displayed.
4. Repeat to unlock. Only the CLOCK, OVEN LIGHT and TIMER keypads will function with the
controls locked. The cooktop functions are not affected by the oven control lockout.
COOKTOP USE
WARNING
Fire Hazard
Do not let the burner flame extend beyond the edge of
the pan.
Turn off all controls when not cooking.
Failure to follow these instructions can result in death
or fire.
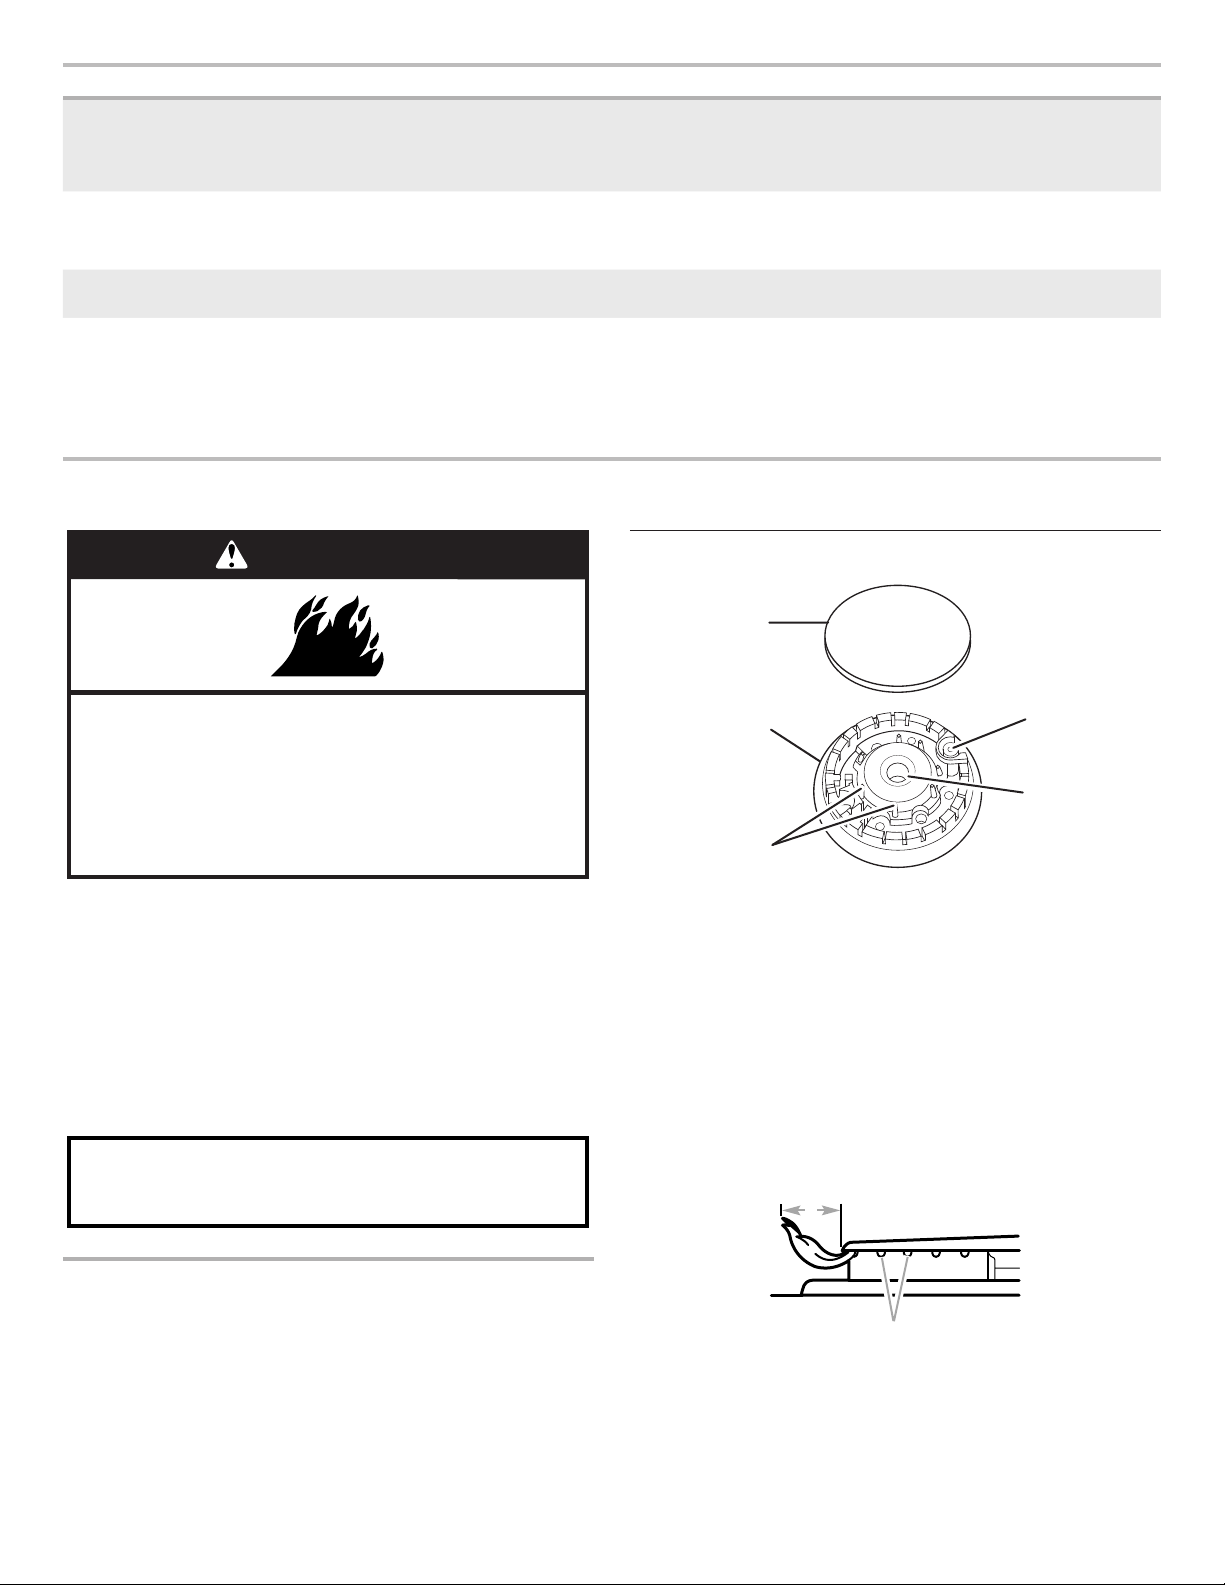
Sealed Surface Burners
A
B
C
D
E
Electric igniters automatically light the surface burners when
control knobs are turned to IGNITE.
Before setting a control knob, place lled cookware on the grate.
Do not operate a burner using empty cookware or without
cookware on the grate.
To Set:
1. Push in and turn knob counterclockwise to IGNITE.
All surface burners will click. Only the burner with the control
knob turned to IGNITE will produce a ame.
2. Turn knob to anywhere between HIGH and LOW.
REMEMBER: When range is in use or (on some models)
during the Self-Cleaning cycle, the entire cooktop area may
become hot.
Power Failure
In case of prolonged power failure, the surface burners can be lit
manually. Hold a lit match near a burner and turn knob
counterclockwise to IGNITE. After burner lights, turn knob to
setting.
A. Burner cap
B. Burner base
IMPORTANT: Do not obstruct the ow of combustion and
ventilation air around the burner grate edges.
Burner Cap: Always keep the burner cap in place when using a
surface burner. A clean burner cap will help avoid poor ignition and
uneven ames. Always clean the burner cap after a spillover and
routinely remove and clean the caps according to the “General
Cleaning” section.
Gas Tube Opening: Gas must ow freely throughout the gas tube
opening for the burner to light properly. Keep this area free of soil,
and do not allow spills, food, cleaning agents or any other material
to enter the gas tube opening. Keep spillovers out of the gas tube
by always using a burner cap.
A. 1 to 11/2" (2.5 to 3.8 cm)
B. Burner ports
Burner Ports: Check burner ames occasionally for proper size
and shape as shown in the previous illustration. A good ame is
blue in color, not yellow. Keep this area free of soil and do not
allow spills, food, cleaning agents or any other material to enter
the burner ports.
C. Alignment pins
D. Igniter
E. Gas tube opening
5
To Clean:
A
B
IMPORTANT: Before cleaning, make sure all controls are OFF and
the oven and cooktop are cool. Do not use oven cleaners, bleach
or rust removers.
1. Remove the burner cap from the burner base and clean
according to “General Cleaning” section.
2. Clean the gas tube opening with a damp cloth.
3. Clean clogged burner ports with a straight pin as shown. Do not
enlarge or distort the port. Do not use a wooden toothpick. If the
burner needs to be adjusted, contact a trained repair specialist.
4. Replace the burner cap, making sure the alignment pins are
properly aligned with the burner cap.
A. Incorrect
B. Correct
5. Turn on the burner. If the burner does not light, check cap
alignment. If the burner still does not light, do not service the
sealed burner yourself. Contact a trained repair specialist.
Cookware
IMPORTANT: Do not leave empty cookware on a hot surface
cooking area, element or surface burner.
Ideal cookware should have a at bottom, straight sides and a
well-tting lid, and the material should be of medium-to-heavy
thickness.
Rough nishes may scratch the cooktop or grates. Aluminum and
copper may be used as a core or base in cookware.
Cookware material is a factor in how quickly and evenly heat is
transferred, which affects cooking results.
Cookware with nonstick surfaces should not be used under the
broiler.
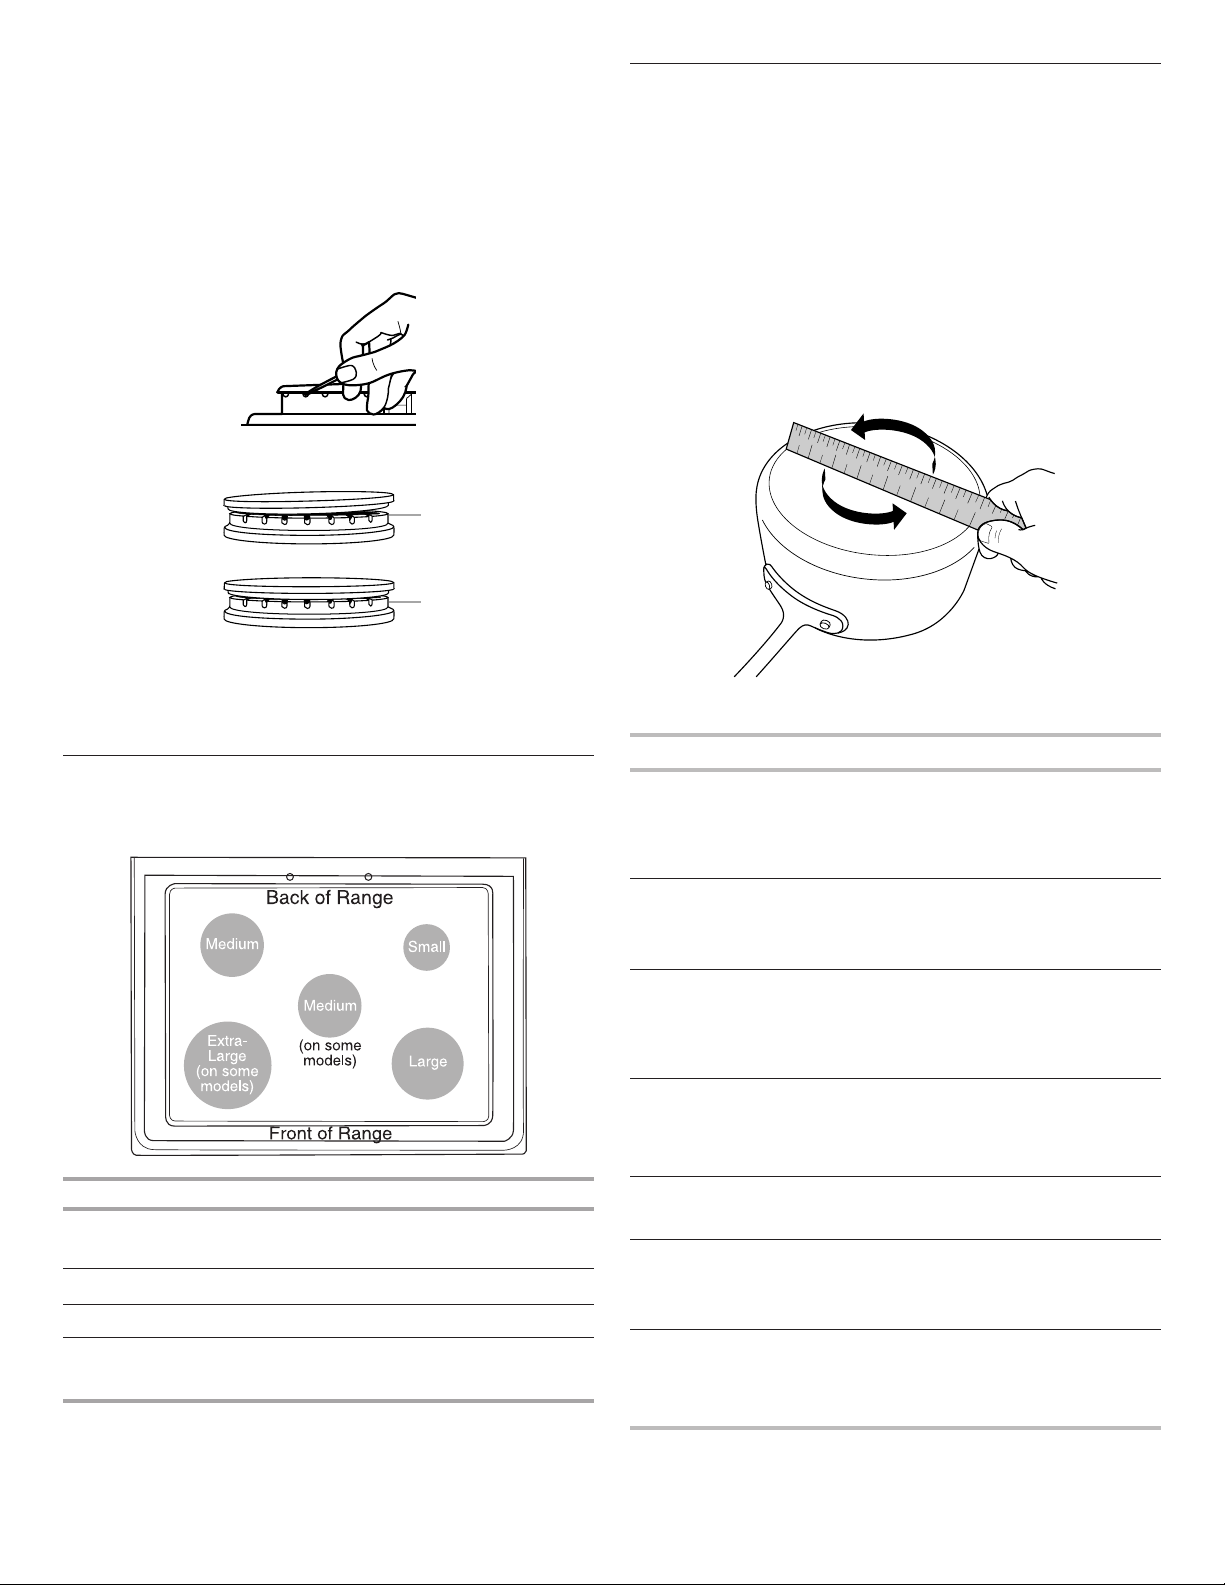
Check for atness by placing the straight edge of a ruler across
the bottom of the cookware. While you rotate the ruler, no space
or light should be visible between it and the cookware.
1
2
3
4
1
5
6
7
2
8
9
3
1 0
1 1
1 2
4
1 3
1 4
5
1 5
1 6
6
1 7
1 8
1 9
7
2 0
Use the following chart as a guide for cookware material
characteristics.
Cookware Characteristics
Burner Size
Select a burner that best ts your cookware. See the following
illustration and chart.
Burner Size Recommended Use
Small
Medium
Large
Extra-Large
■ Low-heat cooking
■ Melting chocolate or butter
■ Multipurpose burner
■ For large cookware
■ Most powerful burner
■ For large cookware
Aluminum
Cast iron
Ceramic or
Ceramic glass
Copper
Earthenware/
Stoneware
Porcelain
enamel-onsteel or cast
iron
Stainless steel
■ Heats quickly and evenly.
■ Suitable for all types of cooking.
■ Medium or heavy thickness is best for
most cooking tasks.
■ Heats slowly and evenly.
■ Good for browning and frying.
■ Maintains heat for slow cooking.
■ Follow manufacturer’s instructions.
■ Heats slowly but unevenly.
■ Ideal results on low to medium heat
settings.
■ Heats very quickly and evenly.
■ May leave copper residues, which
may be diminished if cleaned
immediately after cooking.
■ Follow manufacturer’s instructions.
■ Use on low heat settings.
■ See stainless steel or cast iron.
■ Heats quickly but unevenly.
■ A core or base of aluminum or copper
on stainless steel provides even
heating.
6
 Loading...