

Page 1
INSTRUCTION FOR USE
Page 2

2
Page 3
THANK YOU FOR PURCHASING A WHIRLPOOL PRODUCT.
A B C
I H G F
D ED
JK
3:30 P
M
1:20
To receive more comprehensive help and support, please register your product at:
www.whirlpool.eu/register
Before using the appliance carefully read Health and Safety guide.
The control panel of this dishwasher activates pushing by ON/OFF button.
For energy saving the control panel deactivates automatically after 10 minutes if no cycle has started.
PRODUCT DESCRIPTION
EN
8
9
10
11
12
Service:
0000 000 00000
13
CONTROL PANEL
1
2
3
4
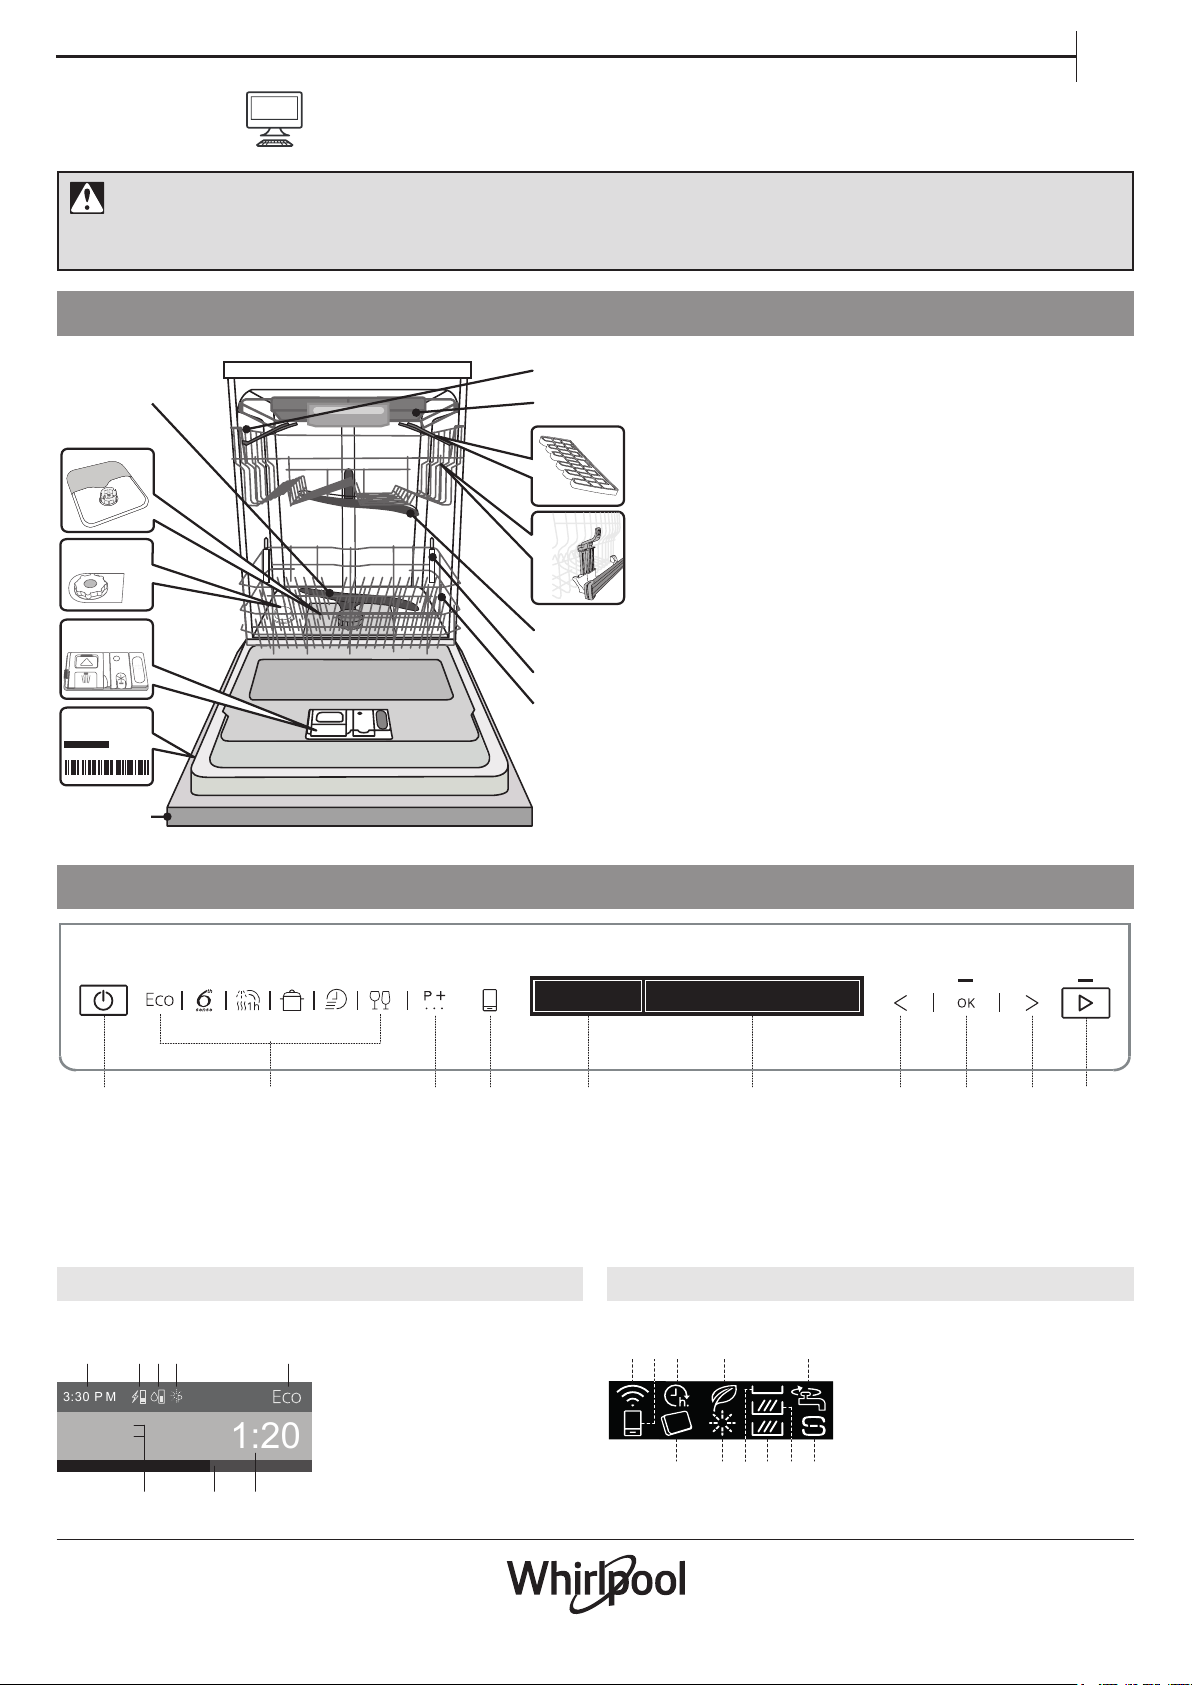
1. Upper rack
2. Cutlery rack
3. Foldable aps
4. Upper rack height adjuster
5. Upper sprayer arm
6. Power Clean support
7. Lower rack
8. Lower sprayer arm
9. Filter Assembly
10. Salt reservoir
11. Detergent and Rinse Aid dispensers
12. Rating plate
13. Control panel
5
6
7
1 2 3 4 5 6 7 8 9 10
1. ON-OFF button
2. CYCLES 6 buttons for direct acces popular cycles
3. EXTRA CYCLES button. Access to other cycles
4. CONNECTIVITY (Remote Control) button.
5. DISPLAY - Indicators area
DISPLAY (on the front of the control panel)
A. Current Time
A B C D E
Eco Cycle
WASHING
Cykle ends in:
B. Energy consumption
C. Water consumption
D. Available option
E. Cycle
F. Time to end of the cycle
G. Phase of the cycle as bar
H. Cycle name
Phase of the cycle
H G F
6. DISPLAY - Information area
7. PREVIOUS button for options/settings
8. OK button. Select/change options and settings
9. NEXT button for options/settings
10. START button
DISPLAY - Indicators
A. WiFi - connection status
B. CONNECTIVITY
C. S TART DELAY
D. ECO CYCLE / STANDBY
E. CLOSED WATER TAP
F. ADD SALT
G. MULTIZONE - Upper Rack
H. MULTIZONE - Lower Rack
I. MULTIZONE - Cutlery rack
J. ADD RINSE AID
K. TABLET
3
Page 4
EN
M
A
X
A
B
35
25
FIRST TIME USE
After connecting the appliance to the power supply for the rst time,
the display will guide you to set up the appliance for rst use.
1. The language selection
LANGUAGE: ENGLISH?
<> = CHANGE OK = YES
ENGLISH
SELECTED
After language conrmation, the appliance will go through the rst
time use conguration menu.
To select preferred language please
press button „<” or „>”.
Conrm by pressing „OK” button.
2. Setting the water hardness
WATER HARDNESS
(1=MIN, 5=MAX)
WATER HARDNESS = 3
<> = CHANGE OK = YES
To allow the water softener to work in a perfect way, it is essential that
the water hardness setting is based on the actual water hardness in your
house. This information can be obtained from your local water supplier.
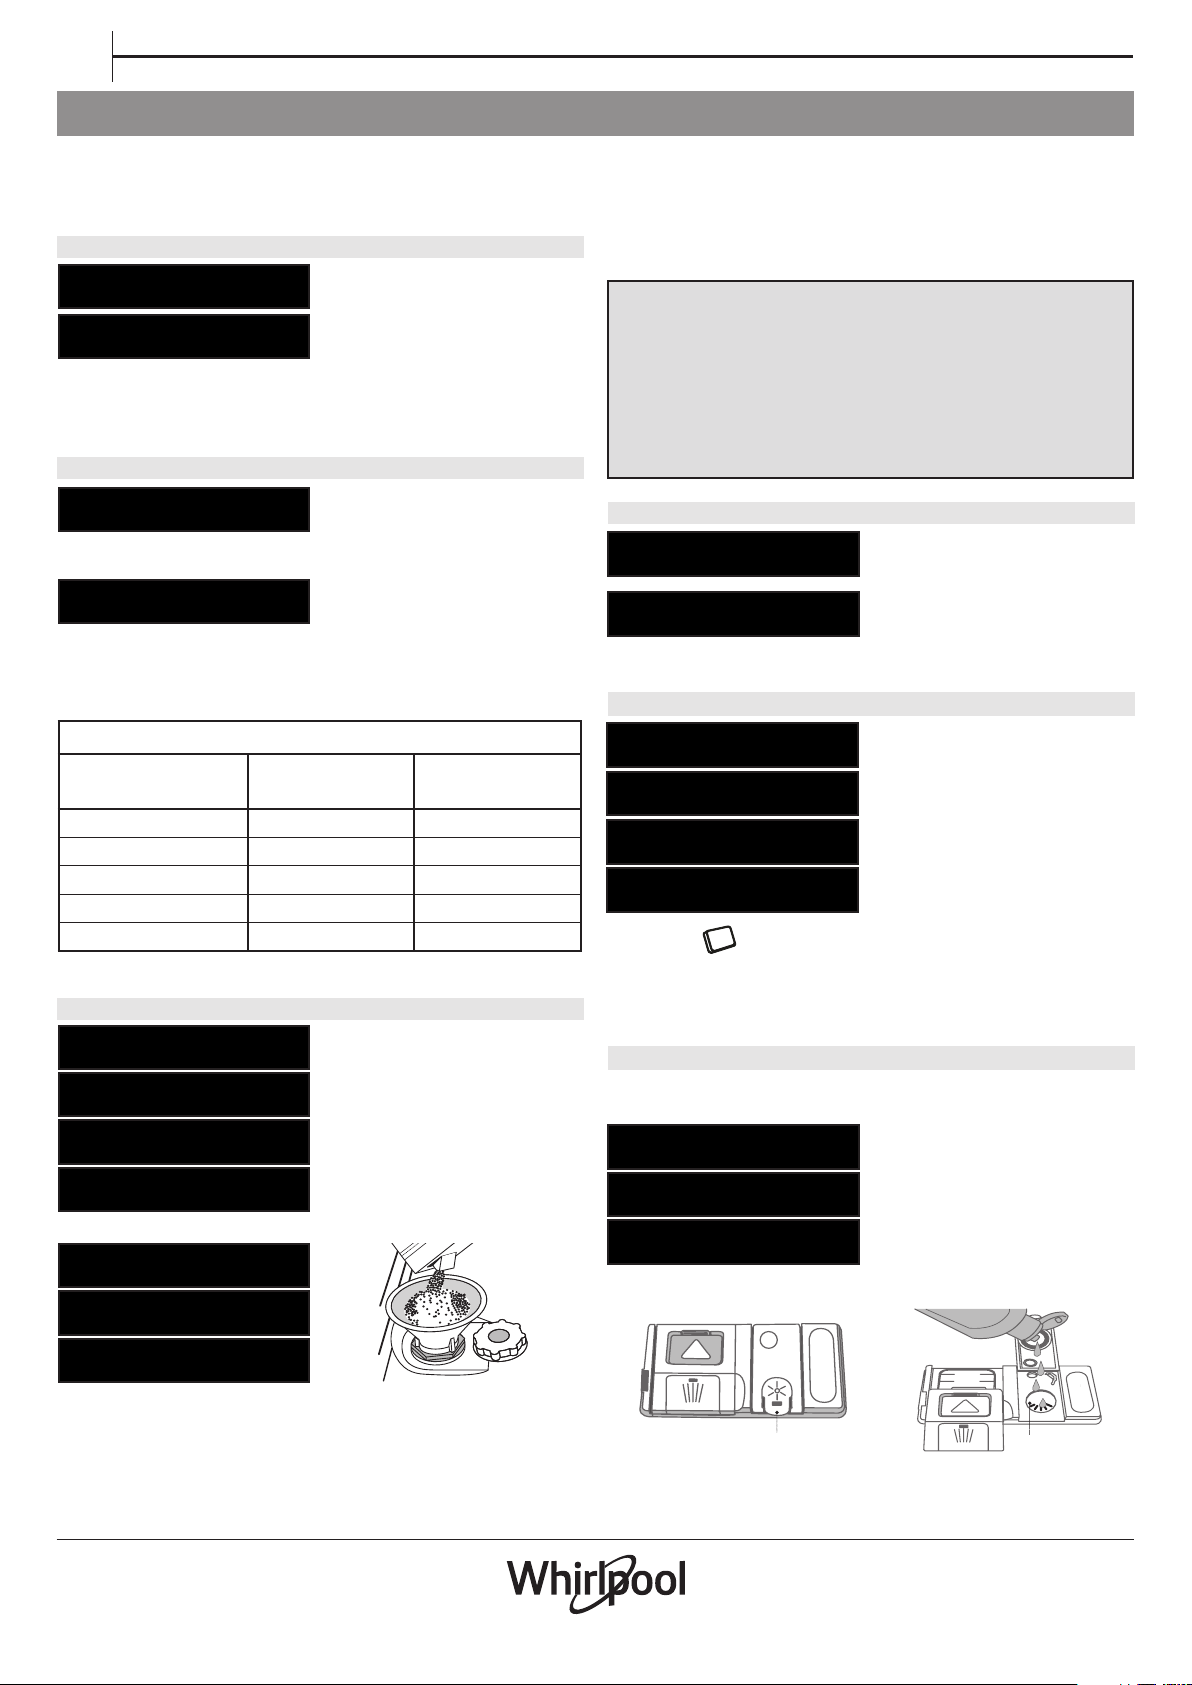
Water Hardness Table
Level
1 Soft 0 - 6 0 - 10
2 Medium 7 - 11 11 - 20
3 Average 12 - 17 21 - 30
4 Hard 17 - 34 31 - 60
5 Very hard 35 - 50 61 - 90
The water hardness is by default
set to level 3. To change water
hardness level press button „<” or „>”
repeatedly.
To conrm your choice press „OK”
button. The level must be set
according to the table below.
German
degrees °dH
French
degrees °fH
3. Filling the water softener
POUR WATER
OPERATION
INSERT 1,5 LITER OF
OK = DONE
WATER IN THE
OK = DONE
WATER SOFTENER
OK = DONE
INSERT SALT
OPERATION
ADD 1KG OF SALT
OK = DONE
IN THE SALT DISPENSER
OK = DONE
When water hardness is set, it is
required to ll water softener with
water and special regeneration salt.
Remove the lower rack and unscrew
the reservoir cap (anticlockwise)
As a rst step it is needed to ll
reservoir with water ( ~1.5 litres).
Once done, proceed to the next
step by pressing „OK” button.
Make sure the cap is screwed on tightly, so that no detergent can get
into the container during the wash program (this could damage the
water softener beyond repair).
Once done, proceed to the next step by pressing „OK” button.
Only use salt that has been specically designed for dishwashers.
Whenever you need to add salt, we recommend carrying out the
procedure just before the washing cycle is started.
Residual saline solution or grains of salt can lead to corrosion,
irreparably damaging the stainless steel components.
The guarantee is not applicable if faults are caused by such
circumstances.
If the salt container is not lled, the water softener and the
heating element may be damaged as a result.
4. Setting the brightness level
ADJUST BRIGHTNESS
(1=MIN, 5=MAX)
BRIGHTNESS = 5
<> = CHANGE OK = YES
The brightness level is by default set
to level 5. To change brightness level
press button „<” or „>” repeatedly.
To conrm Uour choice press „OK”
button.
5. Detergent type operation
DETERGENT TYPE
OPERATION
DO YOU USE
<> = NO OK = YES
“ALL IN ONE”
<> = NO OK = YES
DETERGENT?
<> = NO OK = YES
The symbol on display will be lit. If you prefer to use gel or
powder detergent for washing, press „<” or „>”, then go to step 6.
Rinse aid operation.
In this step it is very important to
choose what type of detergent will
be used (tablet/capsule or
gel/powder).
If you prefer to use All-in-one
detergent in tablet or capsule for
washing - press „OK”, then go to
step 7. Open tap operation on the
next page.
6. Rinse aid operation*
*If All-in-one detergent was chosen in the previous step, this step will
be skipped by the appliance.
RINSE AID
OPERATION
INSERT RINSE AID
IN THE DISPENSER
OK = DONE
OK = DONE
Position the funnel (see gure) and ll the salt reservoir right up to its
edge (approximately 1 kg); it is not unusual for some water will spill out.
Remove the funnel and wipe any salt residue away from the opening.
4
Page 5
EN
A
B
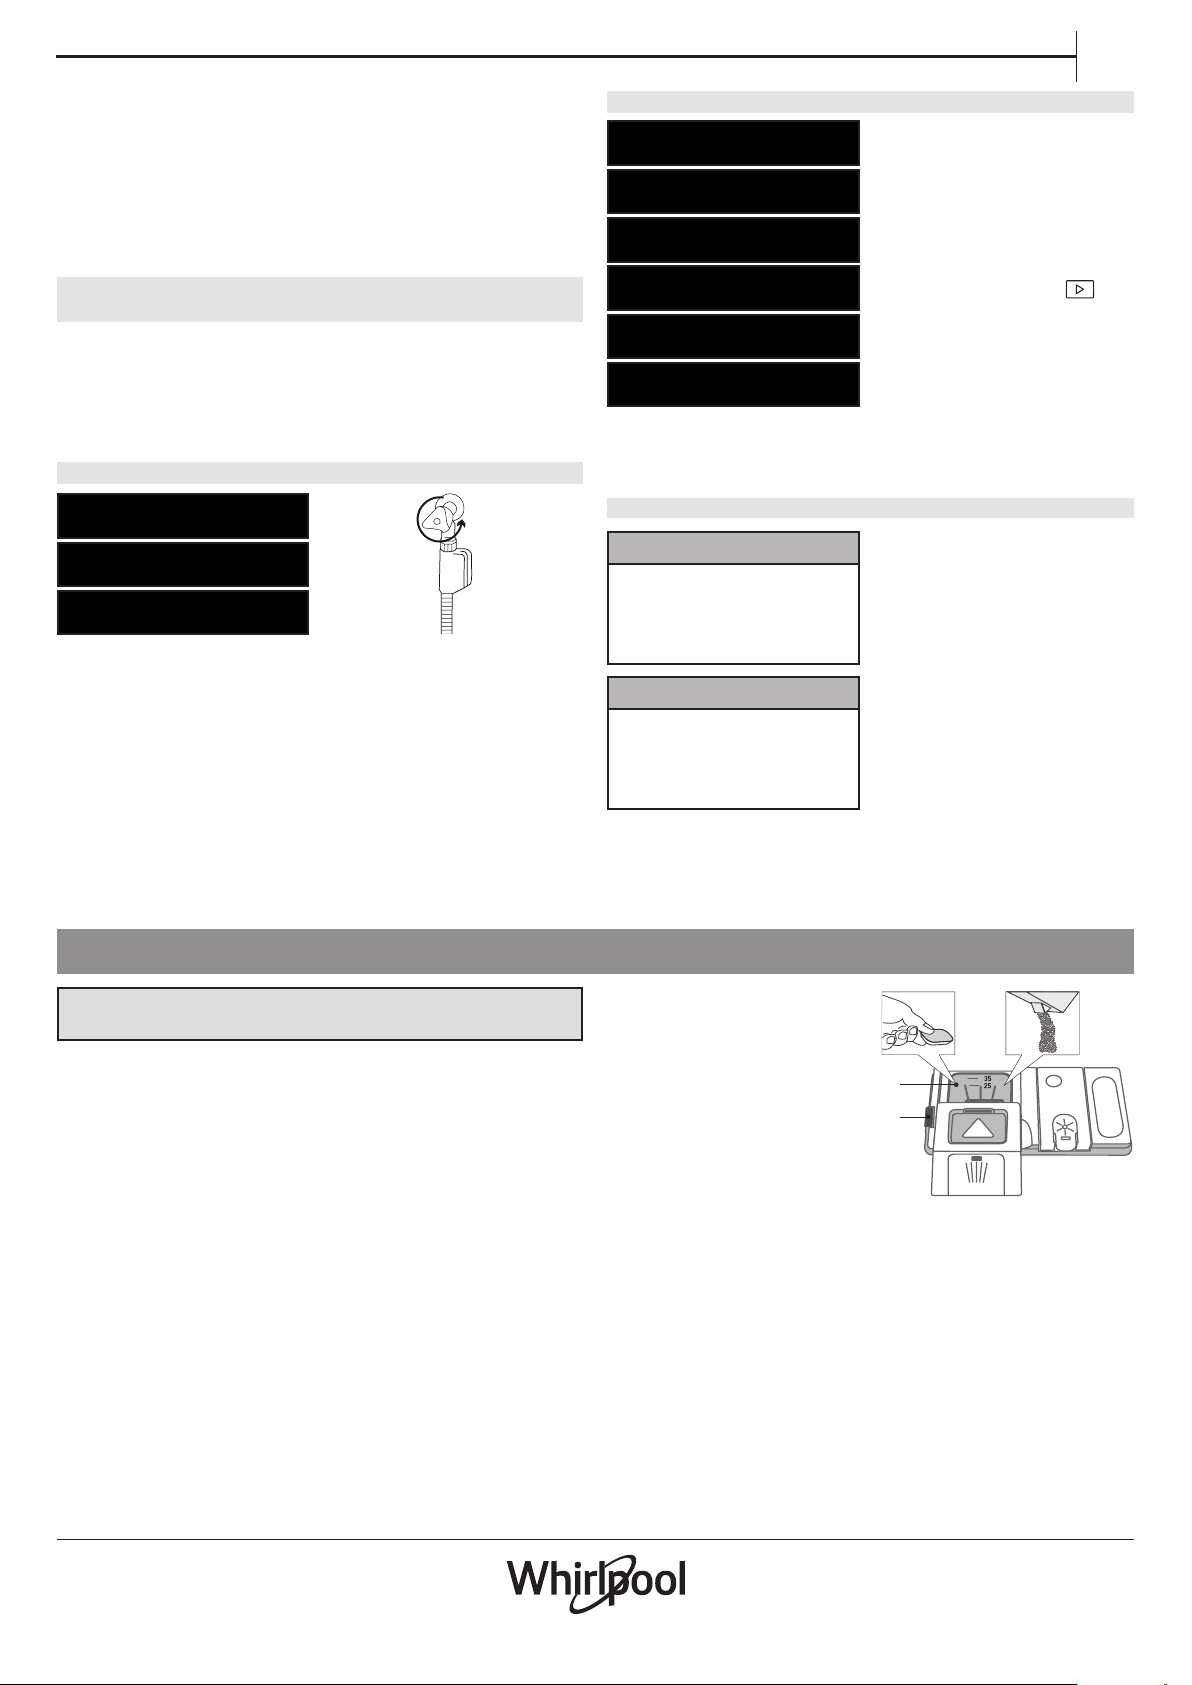
1. Open the dispenser B by pressing and pulling up the tab on the lid.
2. Carefully introduce the rinse aid as far as the maximum (110 ml) reference notch of the lling space A - avoid spilling it. If this happens,
clean the spill immediately with a dry cloth.
3. Press the lid down until you hear a click to close it.
4. Conrm operation by pressing „OK” button.
NEVER pour the rinse aid directly into the tub.
Setting rinse aid level
(not necessary when using tablets/capsules)
The rinse aid dosage can be adjusted to the detergent used. The lower
the setting, the less rinse aid is dispensed. The factory setting is for (4)
level.
To change, follow instructions in section “SETTINGS / MENU”.
7. Open tap operation
OPEN TAP
OPERATION
OPEN THE
OK = DONE
WATER TAP
OK = DONE
Check water tap is open. If closed, open it then conrm by pressing
„OK” button.
8. First cycle operation
FIRST CYCLE
OPERATION
REMEMBER TO RUN THE
INTENSIVE CYCLE
WITH EMPTY BASKETS
TO COMPLETE
THE FIRST SET UP
OK = DONE
OK = DONE
OK = DONE
OK = DONE
OK = EXIT
After this process the appliance is ready for normal use.
On the front of the control panel will be shown information:
Setup complete
Your Dishwasher is ready for use!
To enjoy added features launch Whirlpool
App using your smart device
Setup incomplete
You’re just a few steps away from setting up
your Dishwasher!
Please use the control panel to complete
the setup.
Before normal use of appliance it is
recommended to run Intensive cycle rst, to calibrate the appliance.
Insert a detergent into dispenser
chamber B (see below), then press
„OK” button.
Intensive cycle will be selected
automaticly. Press „START”
button and close the appliance
door.
This rst cycle can be up to 20
minutes longer as a result of the
automatic calibration process.
Download the 6th Sense Live App
from iTunes or Google Play. The
App will guide you through the set
up process to connect your smart
appliance.
When the setup has NOT been
completed because the the door
was closed during the setup, information is shown on the dispay to
remind to complete the setup.
ADDING A DETERGENT
Only use detergent which has been specically designed for
dishwashers.
To achieve the best washing and drying results, the combined use of
detergent, rinse aid liquid and rened salt is required.
We recommend using detergents that do not contain phosphates or
chlorine, as these products are harmful to the environment.
Good washing results also depend on the correct amount of detergent being used.
Exceeding the stated amount does not result in a more eective wash
and increases environmental pollution.
The amount can be adjusted to the soil level. In the case of normally
soiled items, use approximately either 35g (powder detergent) or
35ml (liquid detergent) and additional tea spoon of detergent directly
inside the tub. If tablets are used, one tablet will be enough.
If the crockery is only lightly soiled or if it has been rinsed with water
before being placed in the dishwasher, reduce the amount of detergent used accordingly (minimum 25 g/ml) e.g. skip the powder/gel
putted inside the tub.
To open the detergent dispenser,
press button A. Introduce the detergent into the dry dispenser B only.
Place the amount of detergent for
pre-washing directly inside the tub.
1. When measuring out the detergent refer to the mentioned earlier information to add the proper
quantity. Inside the dispenser B
there are indications to help the
detergent dosing.
2. Remove detergent residues from the edges of the dispenser and
close the cover until it clicks.
3. Close the lid of the detergent dispenser by pulling it up until the
closing device is secured in place.
The detergent dispenser automatically opens up at the right time
according to the program.
If you are using a All-in-one detergents, we recommend that you add
salt in any case, especially if the water is hard or very hard (follow the
instructions given on the packaging).
5
Page 6
EN
ADVICE AND TIPS
TIPS
Before loading the baskets, remove all food residues from the crockery
and empty the glasses. You do not need to rinse beforehand under
running water.
Arrange the crockery so that it is held in place rmly and does not tip
over; and arrange the containers with the openings facing downwards
and the concave/convex parts placed obliquely, thus allowing the
water to reach every surface and ow freely.
Warning: lids, handles, trays and frying pans do not prevent the sprayer arms from rotating.
Place any small items in the cutlery basket.
Very soiled dishes and pans should be placed in the lower basket
because in this sector the water sprays are stronger and allow a higher
washing performance.
After loading the appliance, make sure that the sprayer arms can
cotate freely.
HYGIENE
To avoid odour and sediment which can be accumulated in the
dishwasher please run a high temperature program at least once a
month. Use a tea spoon of detergent and run it without the loading to
clean your appliance.
UNSUITABLE CROCKERY
• Wooden crockery and cutlery.
• Delicate decorated glasses, artistic handicraft and antique crockery.
Their decorations are not resistant.
• Parts in synthetic material which do not withstand high temperatures.
• Copper and tin crockery.
• Crockery soiled with ash, wax, lubricating grease or ink.
The colours of glass decorations and aluminium/silver pieces can
change and fade during the washing process. Some types of glass (e.g.
crystal objects) can become opaque after a number of wash cycles too.
DAMAGE TO GLASS AND CROCKERY
• Only use glasses and porcelain guaranteed by the manufacturer as
dishwasher safe.
• Use a delicate detergent suitable for crockery
• Collect glasses and cutlery from the dishwasher as soon as the wash
cycle is over.
LOADING THE RACKS
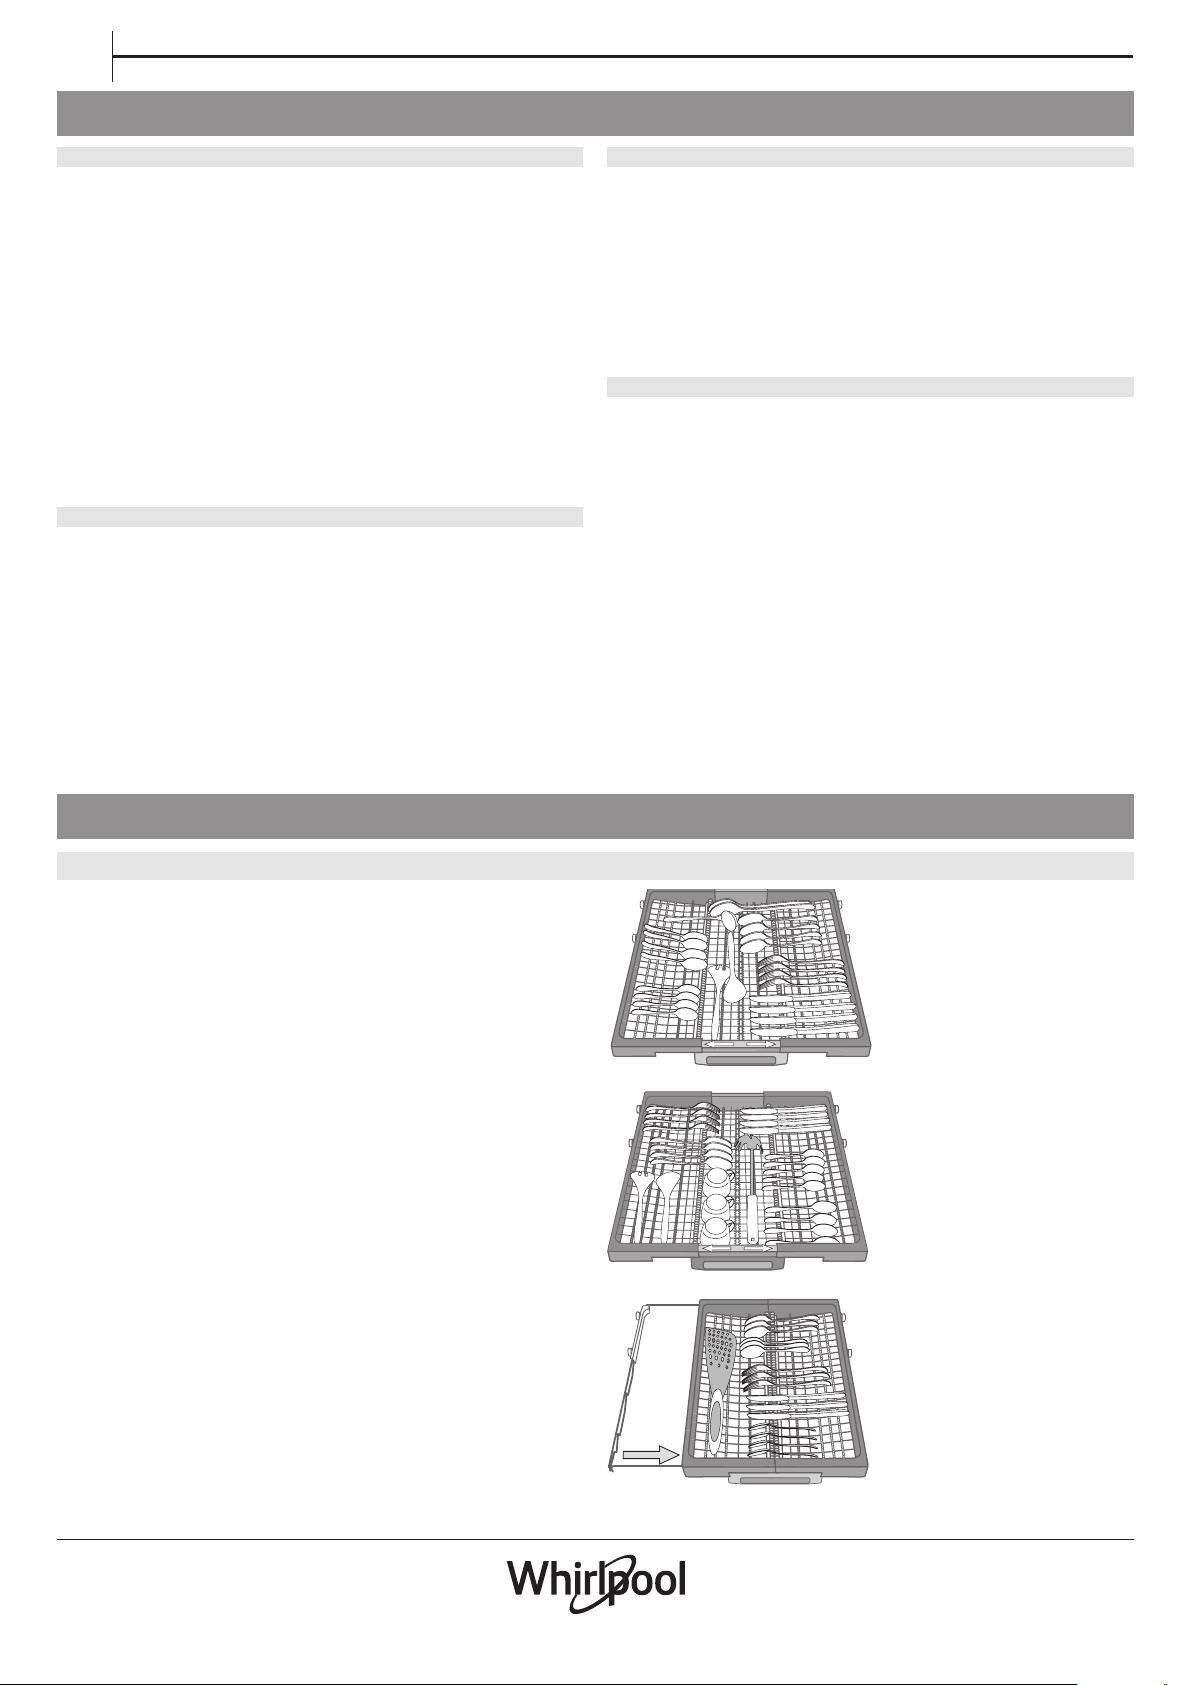
CUTLERY RACK
The third rack was designed tohouse the cutlery.
Arrange the cutlery as shown in the gure.
A separate arrangement of the cutlery makes collection easier after
washing and improves washing and drying performance.
Knives and other utensils with sharp edges must be positioned
with the blades facing downwards.
The geometry of the rack makes it possible to place such small items
as coee cups in the area in the middle.
The cutlery basket is equipped with two sliding side trays to make the
most of the height of the space below and enable the loading of high
items into upper rack.
6
Page 7
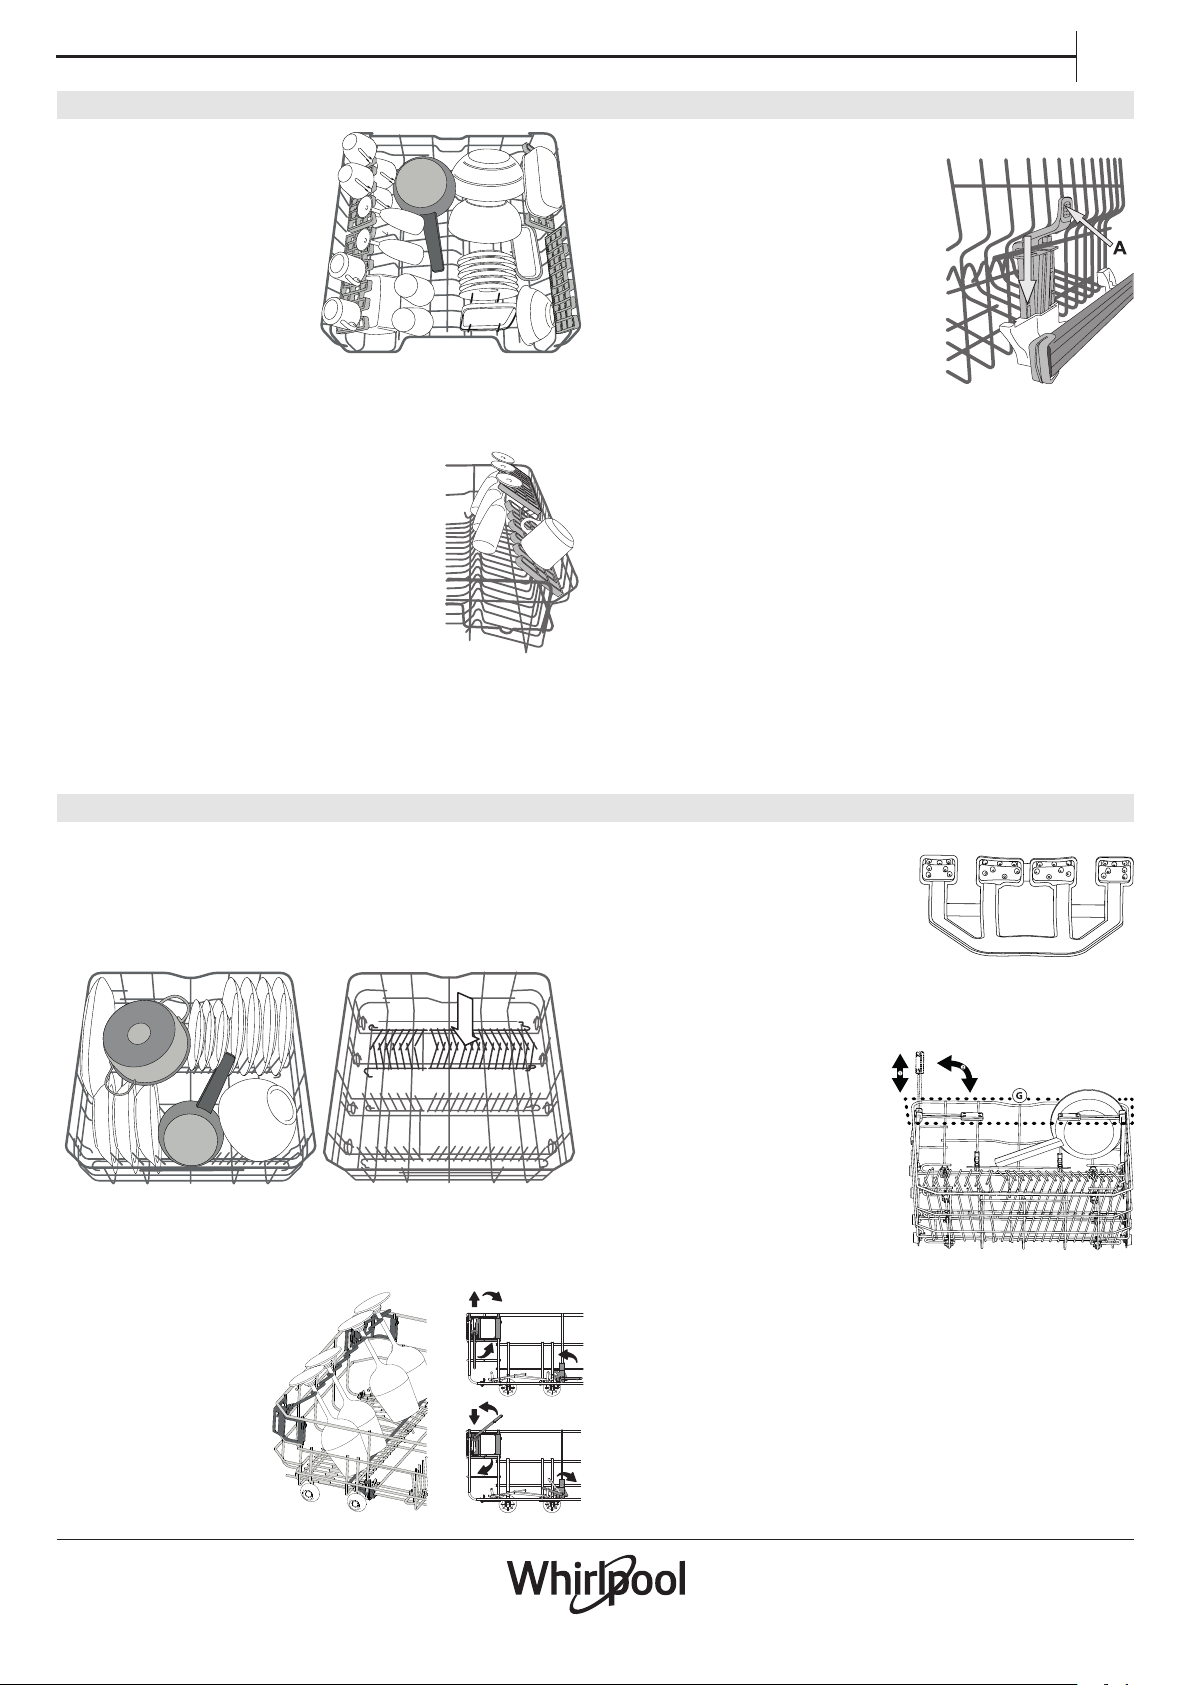
UPPER RACK
2
3
Load delicate and light dishes:glasses, cups, saucers, low salad
bowls.
The upper rack has tip-up
supports which can be used in a
vertical position when arranging
tea/ dessert saucers or in a lower
position to load bowls and food
containers.
(loading example for the upper rack)
FOLDABLE FLAPS WITH ADJUSTABLE POSITION
The side foldable aps can be positioned at three
dierent heights to optimize the arrangement of
crockery inside the rack.
Wine glasses can be placed safely in the foldable
aps by inserting the stem of each glass into the
corresponding slots.
For optimum drying results incline the foldable
aps more. To change the inclination, pull up the
foldable ap, slide it slightly and position it as you
wish.
EN
ADJUSTING THE HEIGHT OF THE UPPER RACK
The height of the upper rack can be adjusted: high position to place bulky crockery in
the lower basket and low position to make
the most of the tip-up supports by creating
more space upwards and avoid collision
with the items loaded into lower rack.
The upper rack is equipped with a Upper
Rack height adjuster (see gure), without pressing the levers, lift it up by simply
holding the rack sides, as soon as the rack is
stable in its upper position.
To restore to the lower position, press the
levers A at the sides of the rack and move the basket downwards.
We strongly recommend that you do not adjust the height of the
rack when it is loaded.
NEVER raise or lower the basket on one side only.
LOWER RACK
For pots, lids, plates, salad bowls, cutlery etc. Large plates and lids
should ideally be placed at the sides to avoid interferences with the
spray arm.
The lower rack has tip-up supports which can be used in a vertical
position when arranging plates or in a horizontal position (lower) to
load pans and salad bowls easily.
(loading example for the lower rack)
GLASS CARE
Dedicated accessory that
allows you to safely store
dierent types of stem
glasses in the lower rack.
It enables cleaning &
drying results by allowing
an optimised and stable
positioning of the glasses.
1
1
2
3
B
A
POWER CLEAN IN LOWER RACK
Power Clean® uses the special water jets
in the rear of cavity to wash more intensively the high dirty items.
Placing the pots/casseroles faced to the
Power Clean® component please activate the POWER CLEAN on the panel.
The lower rack has a Power Clean, a special pull-out support in the rear
of the rack that can be used to support frying pans or baking pans in
upright position, thus taking up less space.
How to use Power Clean®:
1. Adjust the Power Clean® area (G)
folding down the rear plate holders
to load pots.
2. Load pots and casseroles inclined
vertically in Power Clean® area. Pots
have to be inclined towards the
power water jets.
7
Page 8
EN
3:30 P
M
1:20
5:00 P
M
1:20
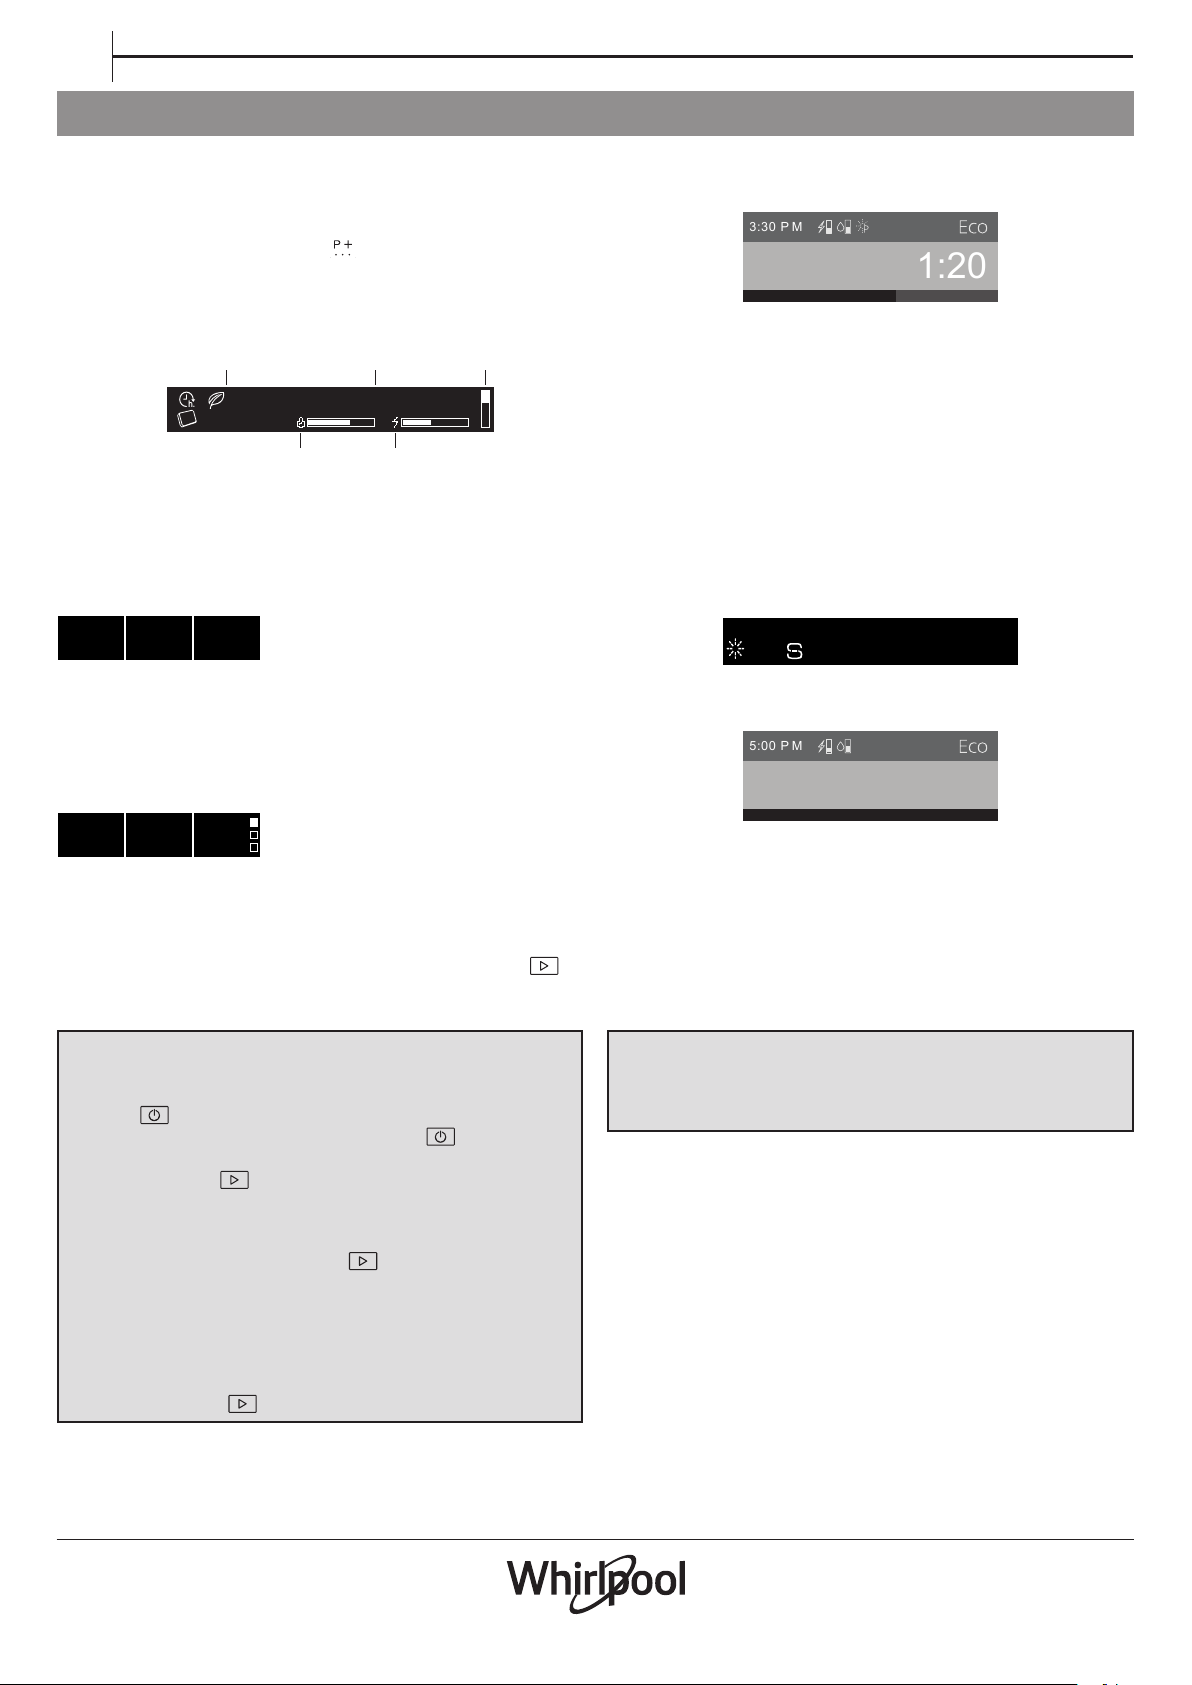
SELECTING A CYCLE AND OPTIONS
The list of available cycles and options can be found in Cycles Table
on next page. Eco cycle is selected by default. If you want to have Last
Used cycle selected by default, you can change it in „Settings Menu”.
It is possible to select a cycle by pressing 1 of 6 cycles direct access
buttons or by pressing „Extra Cycles” button repeatedly. When the
last one is reached a further press goes back to the rst.
Press cycle button to choose cycle in accordance with the level
of soiling of the dishes and with Cycles Table. Information will be
shown on the display:
1 2 3
ECO CYCLE
45
1. Indicators
2. Name of the selected cycle
3. Vertical bar showing the position of the extra cycle list only
4. Energy consumption of the selected cycle
5. Water consumption of the selected cycle
50° 3:40h
POWER
CLEAN
Three seconds after selecting a cycle, its
time and temperature will be displayed
(if available).
Additional options are available for most cycles (see „Options and
Settings” section). When any option is selected, its name is shown on
the display on the right.
50° 3:40h
POWER
CLEAN
If more than one option is selected one
bullet point for each option is displayed.
Each option name is displayed for 3 sec.
with its bullet point fulled.
When the cycle and option selection is complete, press „START”
button and close the door within 4 seconds to start chosen cycle.
During the cycle, the progress is shown on the display
the control panel
(as bar) as well as phase of cycle, and time to the end
on the front of
of the cycle.
Eco Cycle
WASHING
Cykle ends in:
Depending at the selected cycle, the display may provide additional
information:
• 6TH SENSE - sensor is adjusting time and energy and water
consumption to the level of soil amount on the dishes.
Present only in 6th Sense cycle.
• PRE-WASH - extra items can be added.
• WASHING - main washing.
• ACTIVE DRY - drying using PowerDry technology.
• DRYING - drying phase of cycle.
After the cycle nishes, there is an acustic signal and the dispaly
shows:
CYCLE FINISHED
Display on the front of the control panel is shown:
YOUR DISHES ARE READY!
Cycle ended at 5:00
On the display additional information can be shown:
• ADD SALT - rell salt reservoir.
• ADD RINSE AID - rell rinse aid.
• DEGREASE AND CLEAN THE MACHINE WE RECOMMEND
TO USE WPRO - every 50 cycle, will be recommended to use the
WPRO cleaner (according to instruction on the consumable).
MODIFYING A RUNNING PROGRAM
If a wrong program was selected, it is possible to change it, provided
that it has only just begun: open the door, press and hold the
„ON/OFF” button, the machine will switch o.
Switch the machine back on using the „ON/OFF” button and
select the new wash cycle and any desired options; start the cycle by
pressing the „START” button and closing the door.
TO PAUSE THE CYCLE (ADDING EXTRA ITEMS)
Open the door and place the crockery inside the dishwasher,
(beware of HOT steam!). Press „START” button and close the
door within 4 sec. to resume the cycle from the point at which it was
interrupted.
ACCIDENTAL INTERRUPTIONS
If the door is opened during the wash cycle, or if there is a power
cut, the cycle stops. To resume the cycle from where it was interrupted, press the „START” button and close the door within 4 sec.
8
Open appliance door (beware of hot steam!) and unload the racks,
starting from the lower rack rst.
If it is needed to rell salt reservoir or rinse aid dispenser, it is recommended to do this operations right before start of the next cycle.
After 10 minutes the appliance switches o.
Page 9
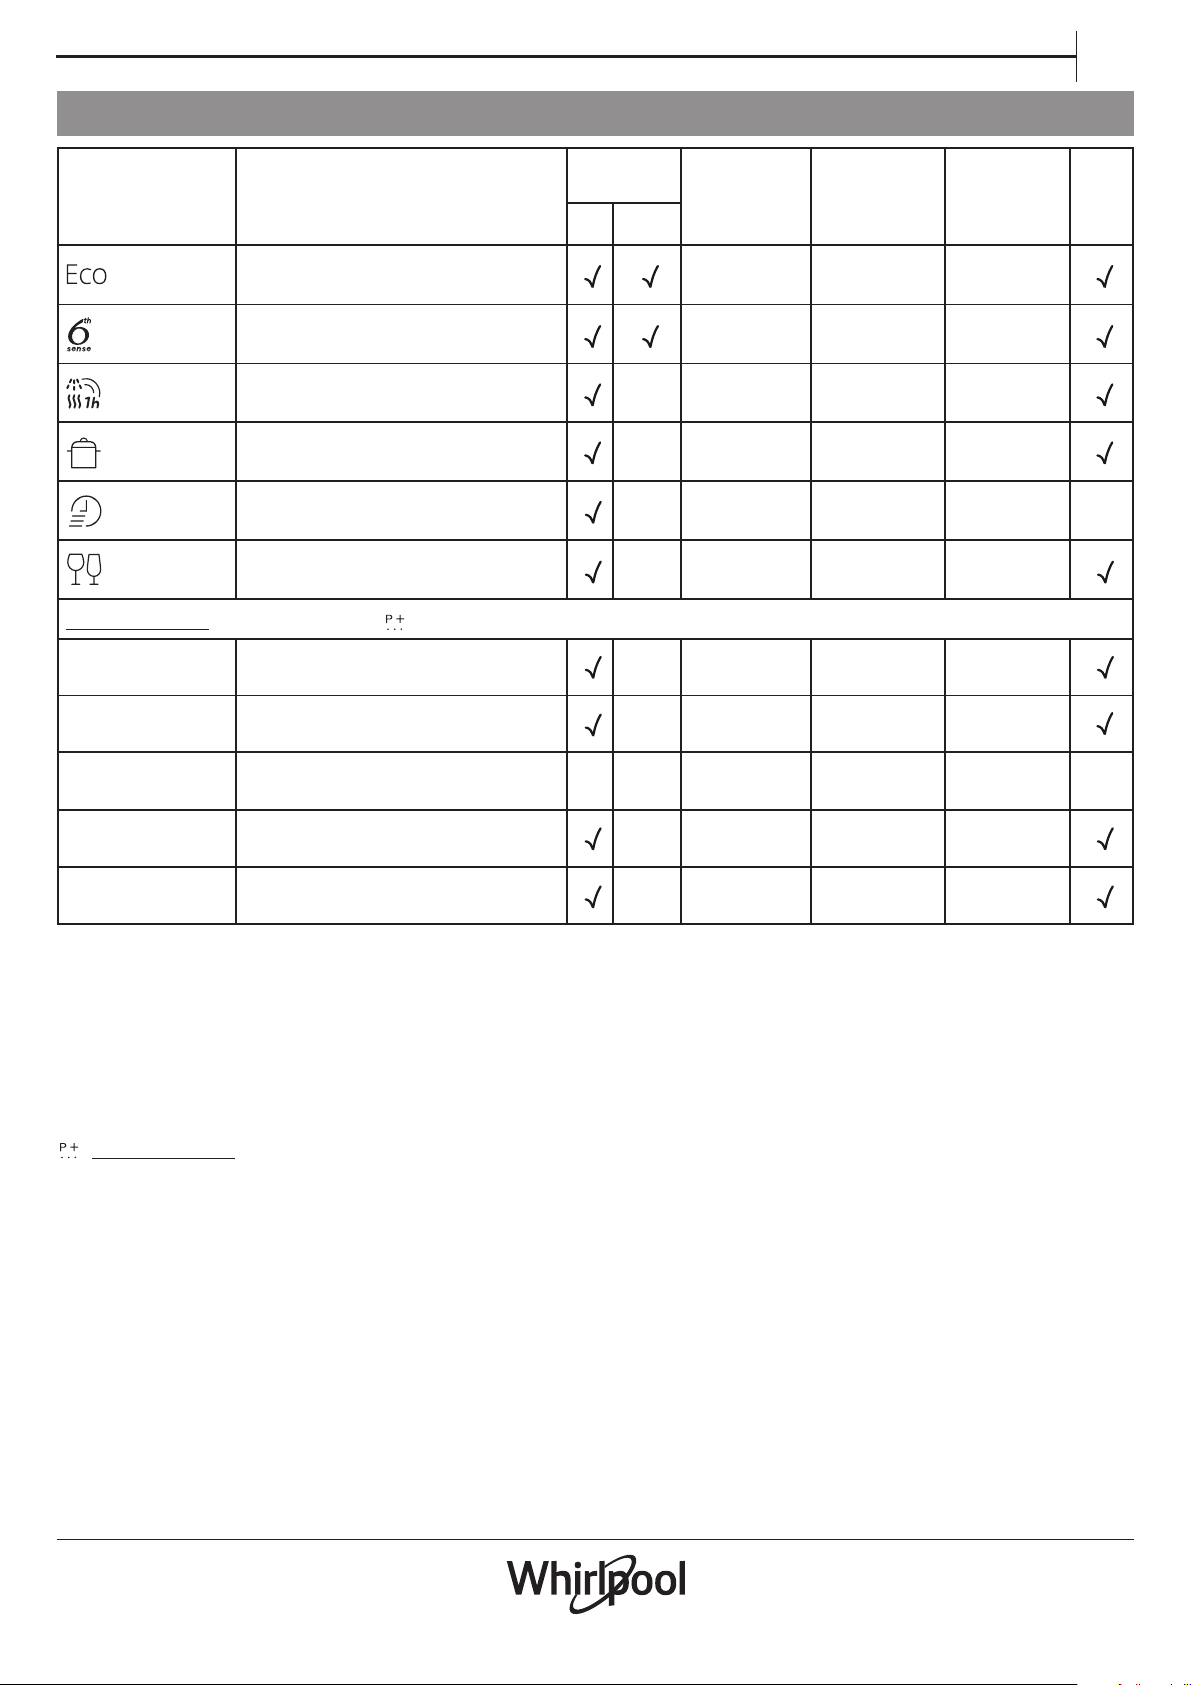
CYCLES TABLE
EN
CYCLE Available options *
ECO
50°
6TH SENSE
50-60°
1H WASH
& DRY 55°
INTENSIVE
65°
RAPID 30’
50°
CRISTALS
45°
TABLET, START DELAY, POWER CLEAN
TABLET, START DELAY, MULTIZONE,
POWER CLEAN, TURBO
TABLET, START DELAY, MULTIZONE,
TABLET, START DELAY, MULTIZONE,
POWER CLEAN, TURBO
TABLET, START DELAY
TABLET, START DELAY, MULTIZONE
EXTRA CYCLES - available by pressing button
DAILY 50°
SILENT 50°
TABLET, START DELAY, MULTIZONE
TABLET, START DELAY
Detergent
dispenser
B TUB
- 1:00 10.5 1.20
- 2:50 16.0 1.60
- 0:30 9.0 0.55 -
- 1:40 11.5 1.20
- 1:30 13.0 1.15
- 3:30 15.0 1.15
Duration of
wash cycle
(h:min)
*
Water
consumption
(l/cycle)
Energy
cosumption
(kWh/cycle)
3:40 9.5 0.83
1:25 - 3:00 7.0 - 14.0 0.90 - 1.40
phase
Drying
PRE-WASH cold
SANITIZING 65°
SELF CLEAN 65°
START DELAY, MULTIZONE
START DELAY
START DELAY
- - 0:12 4.5 0.01 -
- 1:40 10.0 1.30
- 0:50 8.0 0.85
1. ECO - Normally soiled crockery. Standard program, the most ecient in terms of its combined energy and water consumption.
2. 6TH SENSE - For normally soiled dishes with dried food residues. Senses the level of soiling on the dishes and adjusts the program accordingly.
3. 1H WASH & DRY - Light to normally soiled crockery. everyday program suitable for non-dried and fresh soiling, assuring clean and dried
dishes in just 60 min of time.
4. INTENSIVE - Program recommended for heavily soiled crockery, especially suitable for pans and saucepans (not to be used for delicate items).
5. RAPID 30’ - Program to be used for lightly-soiled dishes with no dried food residues.
6. CRISTALS - Program for delicate items, which are more sensitive to high temperatures, for example glasses and cups.
EXTRA CYCLES
7. DAILY - Normally soiled crockery. everyday cycle, that ensures optimal cleaning performance in shorter time.
8. SILENT - Suitable for night-time operation of the appliance. Optimum performance ensured.
9. PRE-WASH - Crockery to be washed later. No detergent to be used with this program.
10. SANITIZING - Normally or heavily soiled crockery, with additional antibacterial wash.
11. SELF CLEAN - Program to be used to perform maintenance of the dishwasher. It cleans the interior of the appliance using hot water.
Notes:
To reduce consumption even further, only run the dishwasher when it is full.
Please note that programs like Rapid or Fast are most eective for lightly soiled dishes.
ECO program data is measured under laboratory conditions according to European Standard EN 50242.
* Not all options can be used simultaneously.
** The duration of the program shown on the display or in the booklet is an estimate calculated on standard conditions. The actual time may vary
depending on many factors such as temperature and pressure of the incoming water, room temperature, amount of detergent, quantity and type of
load, load balancing, additional selected options and sensor calibration. The sensor calibration can increase program duration up to 20 min.
Standby consumption: Left-on mode consumption: 7 W - O mode consumption: 0.63 W
9
Page 10
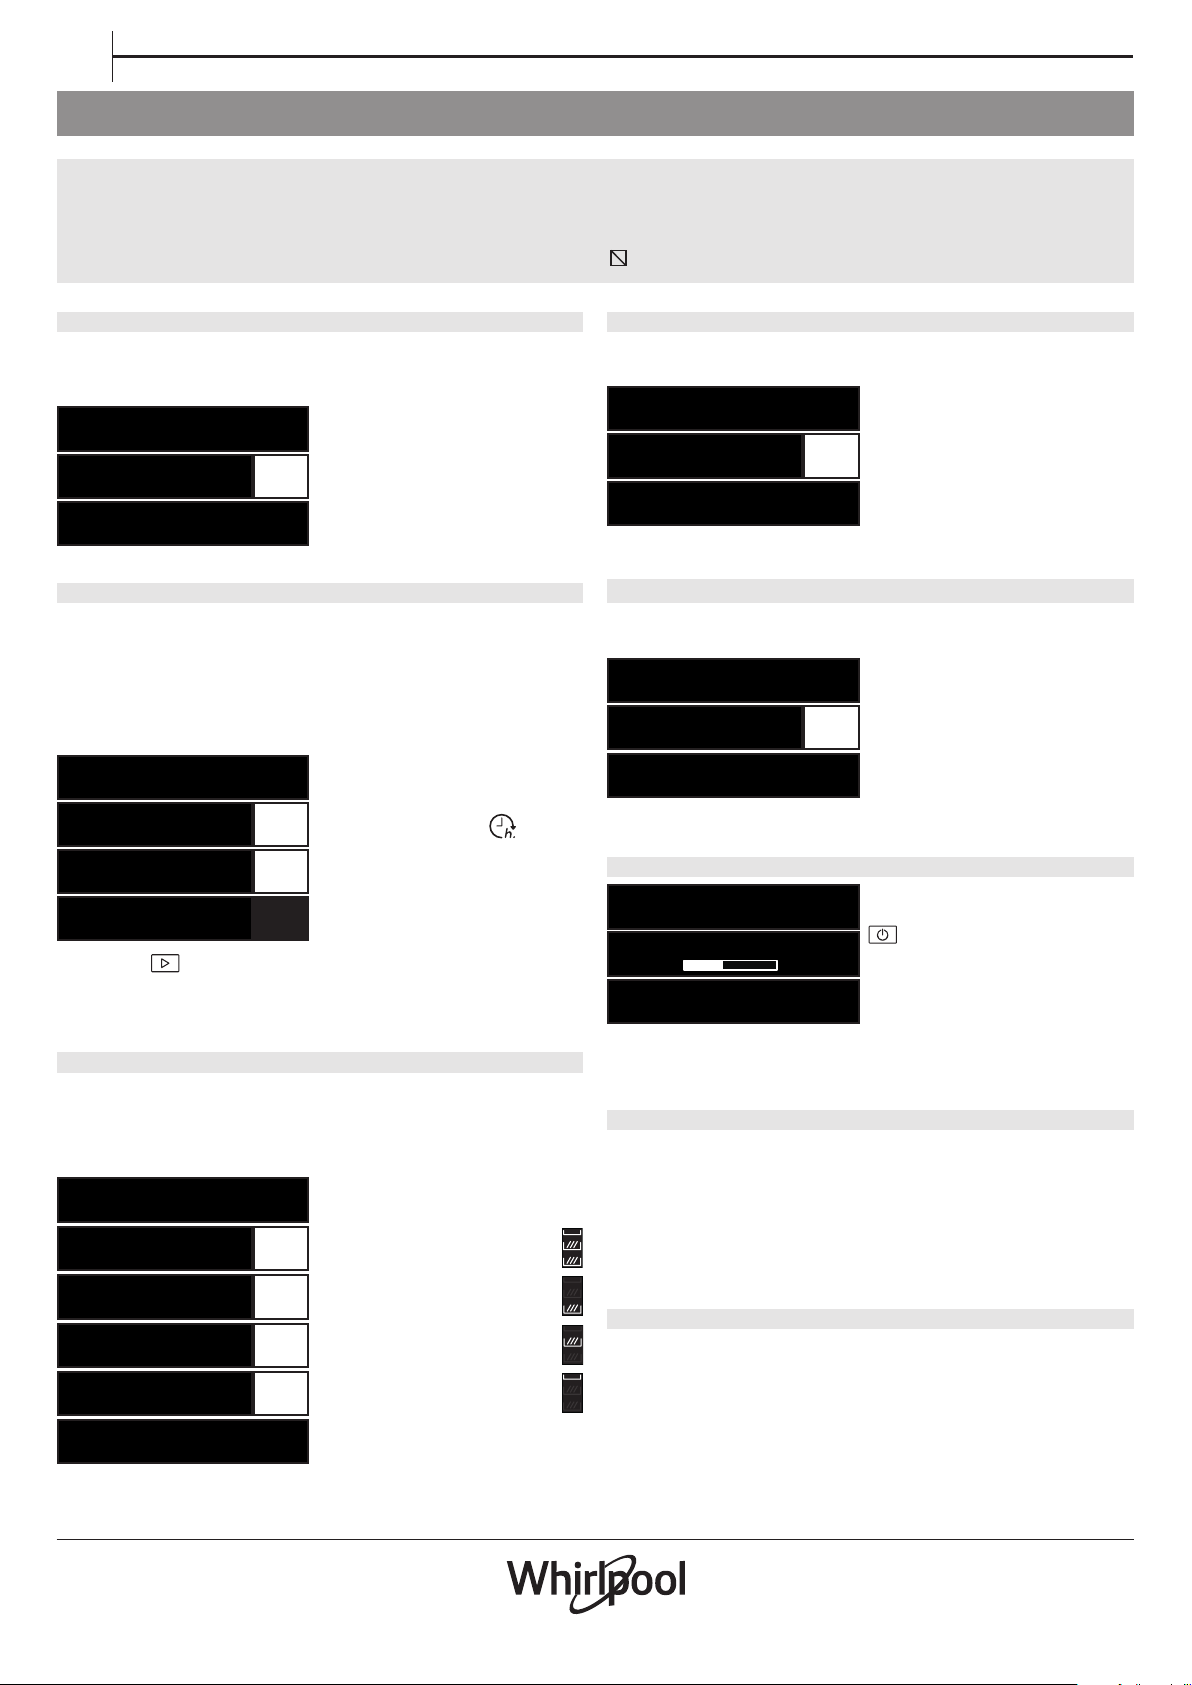
EN
OPTIONS AND SETTINGS
With each cycle additional options can be used. A full list of available options working with specic cycles can be found in the Cycles Table on
the previous page. All active options are shown on the display.
To set an option press „OK” button. SET OPTIONS message is shown for a few seconds. Then use „<” or „>” button to navigate through the
option list. Press „OK” to select the option, in the setting menu the LED above „OK” button is lit.
If the option is not available, it will be still visible in its position but with „ ”
TABLET (All-in-one)
This setting allows you to optimise the performance of the cycle
according to the type of detergent used. Enable it if you use combined
detergents in tablet form (rinse aid, salt and detergent in 1 dose).
TABLET OFF
TABLET ON
TABLET ON
To set the Tablet, enter in the setting
menu by pressing „OK” button and
navigate with „< , >” until „TABLET”
is shown, then press „OK” button.
START DELAY
The start of the cycle may be delayed for a selected period of time.
To set a delay, enter in the setting menu by pressing „OK” button and navigate with „< , >” until „START DELAY” is shown, then press „OK” button.
With each press of the button “>” or “<“, the delay start increases by:
• every 0:30 if selection below 4 hours,
• every 1:00 if selection is below 12 hours,
• every 2 hours if selection is above 12 hours.
START DELAY OFF
<STARTS IN h> OFF
Default value is OFF.
If delay is selected, the is lit.
Once „OK” button is pressed the
<STARTS IN h> 4:00
delay is conrmed and the machine
comes back to the cycle selection
<STARTS IN h> 4:00
screen with delay value visible.
Press „STAR T” button and close the door within 4 sec. to start the delay.
To remove the delay, press „<” or „>” button until „OFF” is displayed.
MULTIZONE
If there are not many dishes to be washed it can be loaded in one rack
only. Using this option you can select which rack you want to wash.
To set the Multizone, enter in the setting menu by pressing „OK”
button and navigate with „< , >” until „MULTIZONE” is shown, then
press „OK” button.
MULTIZONE OK
<ALL RACKS> <>
By default the MULTIZONE is not
active and all racks icons are lit.
POWER CLEAN
Thanks to additional water jets this option provides a more intensive
and powerful wash in the specic area of lower rack.
POWER CLEAN OFF
POWER CLEAN ON
POWER CLEAN ON
Default value is OFF.
To set the Power Clean, enter in
the setting menu by pressing „OK
button and navigate with „< , >”
until „POWER CLEAN” is shown,
then press „OK” button.
TURBO
This option can be used to reduce the duration of the main cycles
while maintaining washing and drying performance levels.
TURBO OFF
To set the Turbo, enter in the setting
menu by pressing „OK” button and
navigate with „< , >” until „TURBO”
TURBO ON
is shown, then press „OK” button.
With each press of the button
TURBO ON
„>” or „<“ option will be ON or OFF.
Conrm by pressing „OK” button.
KEYLOCK
KEYLOCK ACTIVATED
PRESS OK FOR 3 SEC.
KEEP PRESSED…
KEYLOCK DEACTIVATED
Once set, to deactivate it keep pressing „OK” button for a few seconds.
The KEYLOCK function blocks the
control panel except the „ON/OFF”
button.
To activate the Keylock, enter in the
setting menu by pressing „OK” button
and navigate with „< , >” until
„KEYLOCK” is shown, then press OK.
TUB LIGHT
When the feature is active the LEDs in the tub are automatically
switched on/o as soon as the user open/close the door respectively.
If the door remains opened for more than 10 min, the LEDs in the
tub switch o (to turn them on again, the door has to be closed and
opened again).This feature is active by default, but it is possible to
deactivate it in the “SETTINGS MENU”.
<LOW ONLY> <>
<HIGH ONLY> <>
<CUTLERY ONLY> <>
<CUTLERY ONLY>
10
The multizone icon becomes lit.
The multizone icon becomes lit.
The multizone icon becomes lit.
CONNECTIVITY (Remote Control)
When the Remote Control function is activated, you can control the
dishwasher through your
For more information - see section „CONNECTIVITY (Remote Control)
MENU”
Tablet / Smartphone
.
Page 11
CONNECTIVITY (Remote Control) MENU
Wi-Fi connectivity allows your Smart dishwasher to connect to the Internet and interact with the „6th Sense Live” application from your
Tablet / Smartphone
. This connection opens up several Smart options to you.
EN
LIVE APPLICATION REMOTE CONTROL / SET UP PROCEDURE
The „6th Sense Live” application feature allows to operate and
supervise the appliance remotely by external device. To enable the
appliance to be remotely controlled, you rst have to complete
successfully the connectivity set up process. This process is necessary
to register your appliance and connect to your home network. The
set up procedure has to be carried out only once. You have to carry it
out again if you change your router set up properties (network name
or password or data provider).
BEFORE STARTING THE SET UP PROCESS
1. To use this feature You need to own:
• a smart phone running Android 4.3 (or higher) with a 1280x720
(or higher) screen or a tablet or a smart phone running iOS 8
(or higher);
• a wireless router 2.4Ghz WiFi b/g/n connected to internet (verify
with your smart device that the signal strength of your home
wireless network close to the appliance is good).
2. Download & Install the free „6th Sense Live” application on your
Android smart-phone or iPAD/iPhone from the store. The App will
guide you, step by step, through the installation process.
3. If You do not have an account already, create one and subscribe
(legal terms) to service to be able to benet the features provided
through the appliccation.
4. Register your appliance following the App instructions. For
the registration process You will need the „Smart Appliance
IDentier” (SAID) number, in Connectivity Menu of HMI.
The SAID is composed by numbers and letters (10 chars ). You can take
a note of your appliance SAID here:
SAID: ... ... ... ... ... ... ... ... ... ...
PROVISIONING
• Before starting the installation process turn on your router and
verify that the wireless signal of your home router is reaching the
appliance. To verify the WiFi strength signal use a Tablet / Smartphone
connected only to the Wi-Fi router, disable any other data
connections, and place the device close to the appliance. Open any
internet web page in a browser and check that it is downloaded
fast correctly. If the internet connection of your home is working
correctly but the page is not downloaded, you may need to install a
Wi-Fi extender device (not provided with the appliance).
• If your router supports WPS 2.0 (or gather ), follow the automatic set
up procedure to connect your appliance to router. If your router is
not supported by WPS, follow the scan to connect setup procedure .
Follow the instructions on your „6th Sense Live” application on your
Tablet / Smartphone to connect the appliance to your wi network.
Otherwise read the next section for Scan to Connect or WPS methods.
SETUP INSTRUCTION (rst time use) – scan to connect method
This procedure uses the Easy connect technology and is always
applicable in particular if your router does not support WPS
1. Install in your smart device the „6th Sense Live” application.
2. Assure that you smart device is connected to same WiFi network
where you want to join the appliance.
3. On internal UI select Connectivity menu and active, pressing OK, the
scan to connect item.
4. On APP select + to add a new appliance, selecting dishwasher and
Easy connect/scan to connect method.
5. The SAID code may be scanned from label on the inner door
SAID: 0123456789
QR
code
MAC ID: 88:E7:12:XX:YY:ZZ
or displayed on internal UI and manually inputted on APP.
6. Proceed following the App suggestions (provisioning wizard).
AUTOMATIC SETUP INSTRUCTION – WPS
This procedure is applicable only if your router supports (WiFi Protected
Setup) WPS2.0 (or greater).
1. On your appliance activate the WPS provisioning process.
The appliance is being set to a “search” mode for a local network.
The Connectivity icon on the appliance starts blinking fast.
2. On wireless router press the WPS button to establish a
connection between the two products. An indicator light on your
router will begin blinking.
3. When the appliance successfully connects to the local router, the
WiFi icon switches from fast to slow blinking (supported not in
all appliances).
4. The appliance try to connect to Backend system. Connectivity icon
be comes steady.
If the WiFi icon does not stop blinking after few minutes, then the
appliance has failed to nd the connections to home network using
WPS. Try the procedure again and if not successful.
QUICK IDENTIFICATION OF APPLIANCE CONNECTION STATE
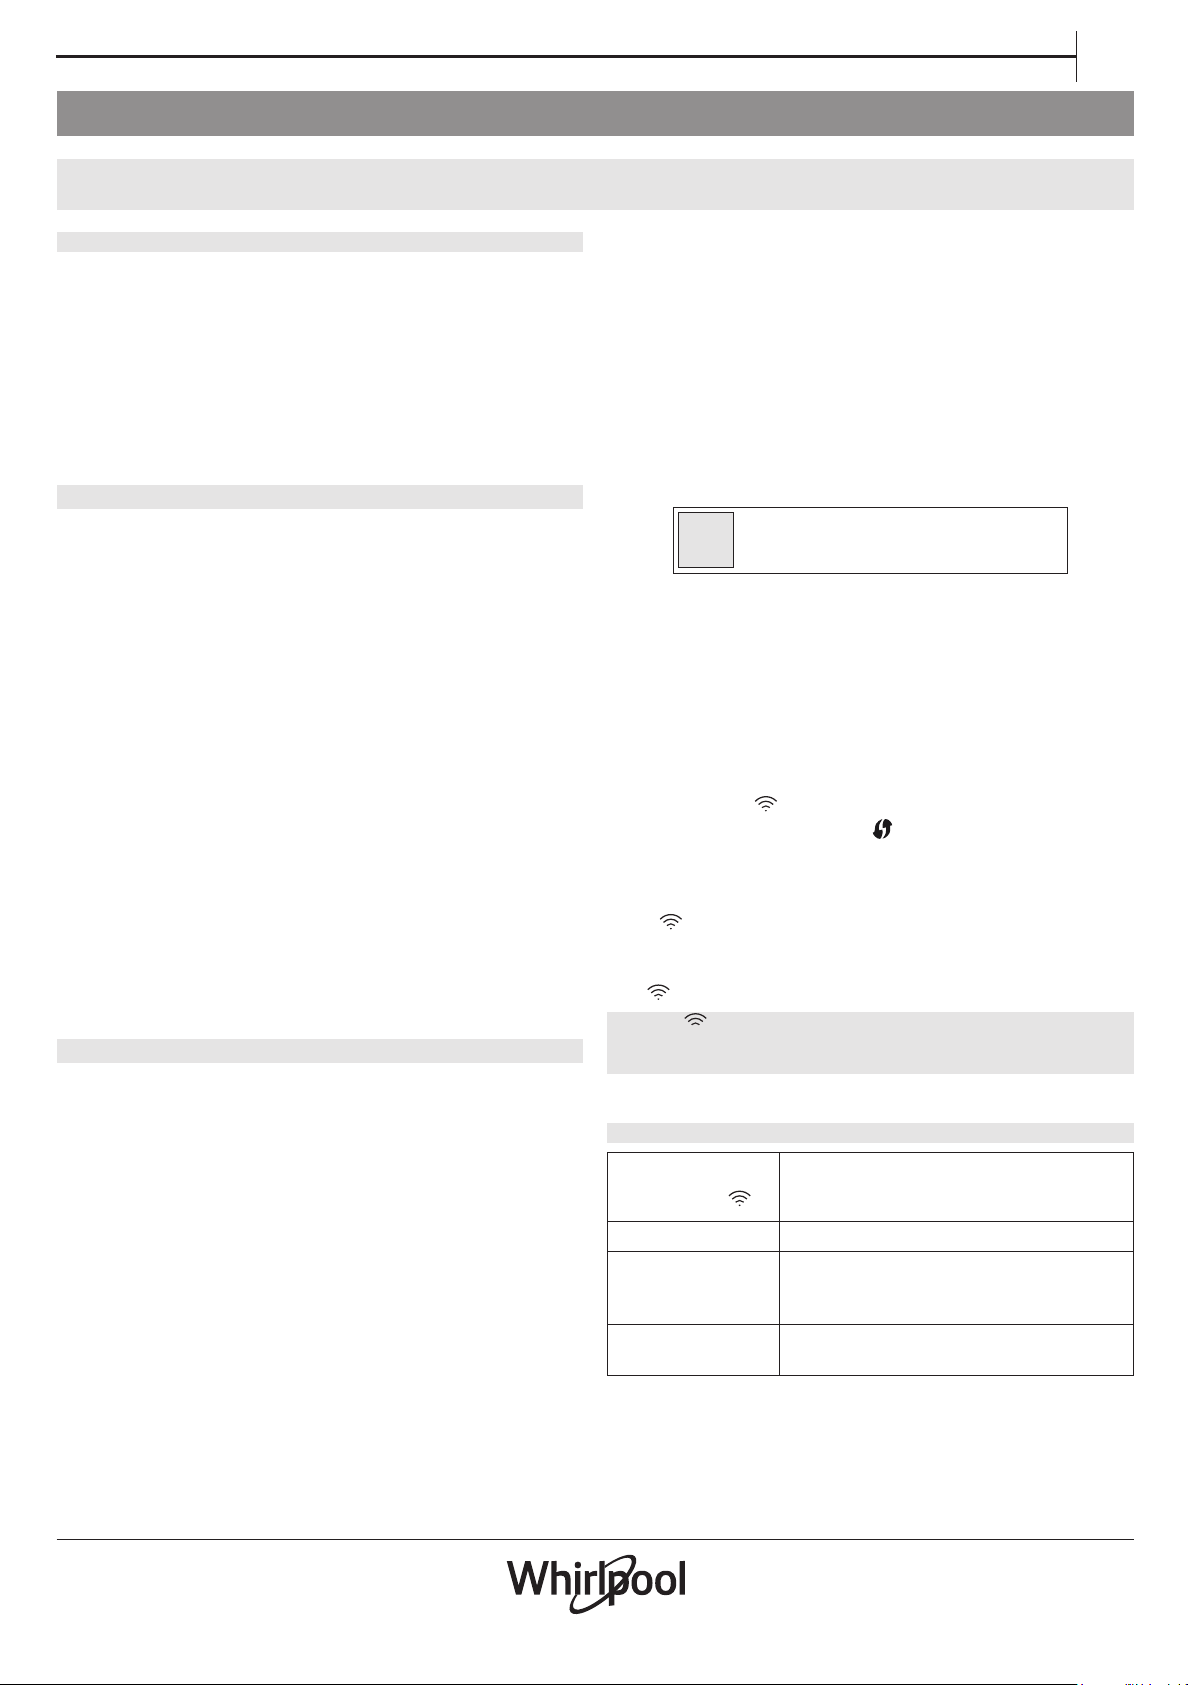
WiFi Connection
State indicator
• blinks fast Appliance is searching connection to router
• blinks slowly
• solid ON Appliance is connected to internet and to
Connection description
Appliance is connected to router but it is not
able to connect to internet (for example ADSL
not working)
the Whirlpool’s cloud system
Contains FCC ID: A5UWICHIN01
Contains ID: 10248A- WICHIN01
11
Page 12
EN
SWITCH OFF / ON Wi-Fi feature
To switch o the connection of the appliance to the wi network,
press the item Radio On/O on internal UI in connectivity menu.
The WiFi icon on the appliance display should turn o.
To turn on again the WiFi connection on the appliance, press again the
item Radio On/O on internal UI in connectivity menu.
When appliance is provisioned, user can disengage this function and
disconnect it from the WiFi network by reset WiFi option.
To connect the appliance again to the home WiFi network follow the
procedure on section “Provisioning”.
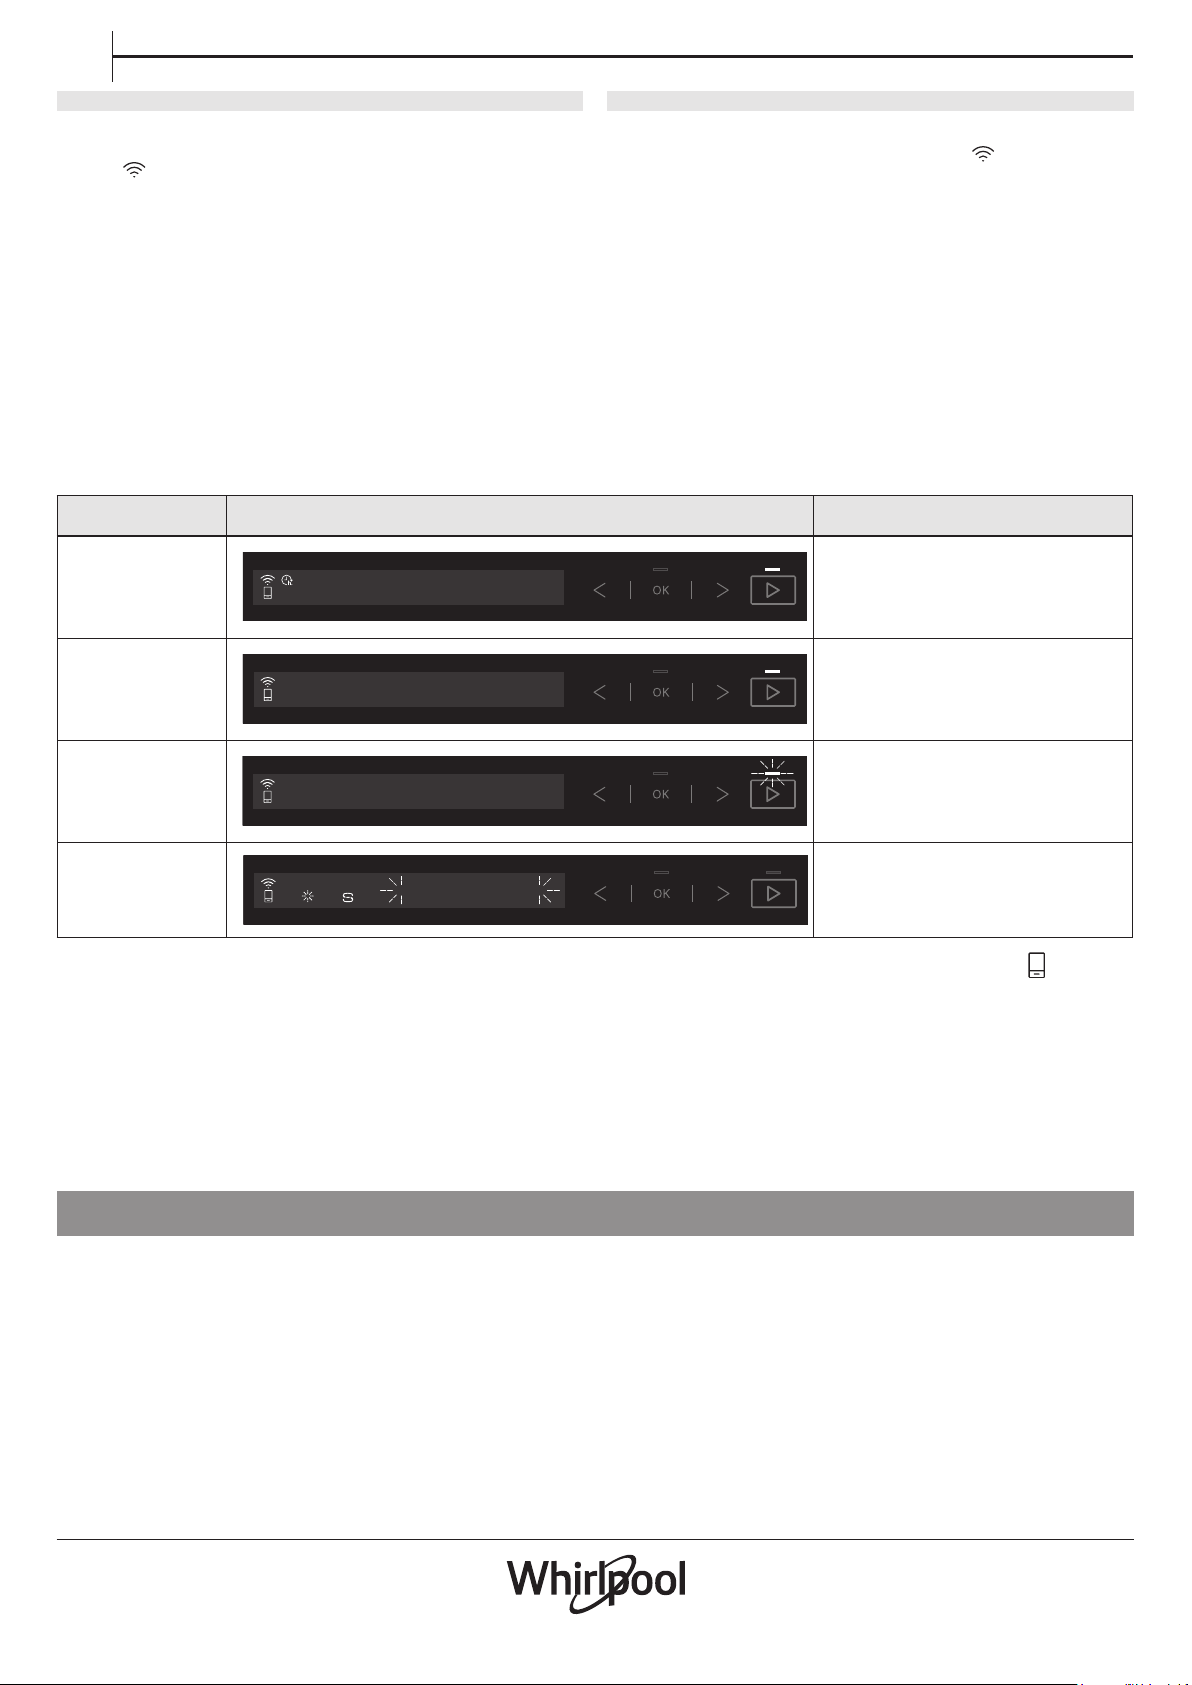
State Control panel Description
Delay scheduled
Cycle in progress
REMOTE CONTROL
CYCLE IN DELAY
REMOTE CONTROL
CYCLE IN RUN
REMOTE CONTROL / DAILY USE
1. Make sure the Your router is ON and connected to the Internet
2. Make sure the WiFi Connection State indicator status on the
product’s display is solid
3. Act on internal UI in connectivity menu to enable remote control
mode and appliance is ready to be operated via App.
4. Use the Whirpool App to control the appliance by remote, so You can
• check your appliance and activate options also when you are out
of home
• access additional functions, for instance the smart energy mode
• optimize energy consumptions leveraging for example the best
energy tari
• access further information on best use of your appliance
• receive feedback about appliance status in case of alarms
The appliance is scheduled to start.
Check the application to get more
information.
The machine has started the cycle.
Check the application to get more
information.
:
Cycle paused
Cycle nished
When the door is opened the Remote Control is temporarily disabled. To keep the Remote Control enabled, should be pressed the button
before closing the door within few seconds.
The machine inform you by playing „beeps” and in the dispay shows „PRESS REMOTE CONTROL” to re-enabled the Remote Control.
REMOTE CONTROL
CYCLE IN PAUSE
REMOTE CONTROL
CYCLE FINISHED
The machine was put in pause from
remote controler (smartphone/ tablet).
The cycle will be restarted automatically.
The display will then be switched o to
save energy.
DECLARATION OF CONFORMITY
The Manufacturer, Whirlpool EMEA S.p.A., declares that this
WFF 4O33 DLTG @ UK model of household appliance with radio
equipment Indigo is compliant with directive 2014/53/UE.
The complete text of the declaration of conformity is present at the
following website: https://www.whirlpool.eu
The radio equipment operates in the 2.4 GHz ISM frequency band,
the maximum radio-frequency power transmitted does not exceed
20 dBm (e.i.r.p.).
12
Page 13
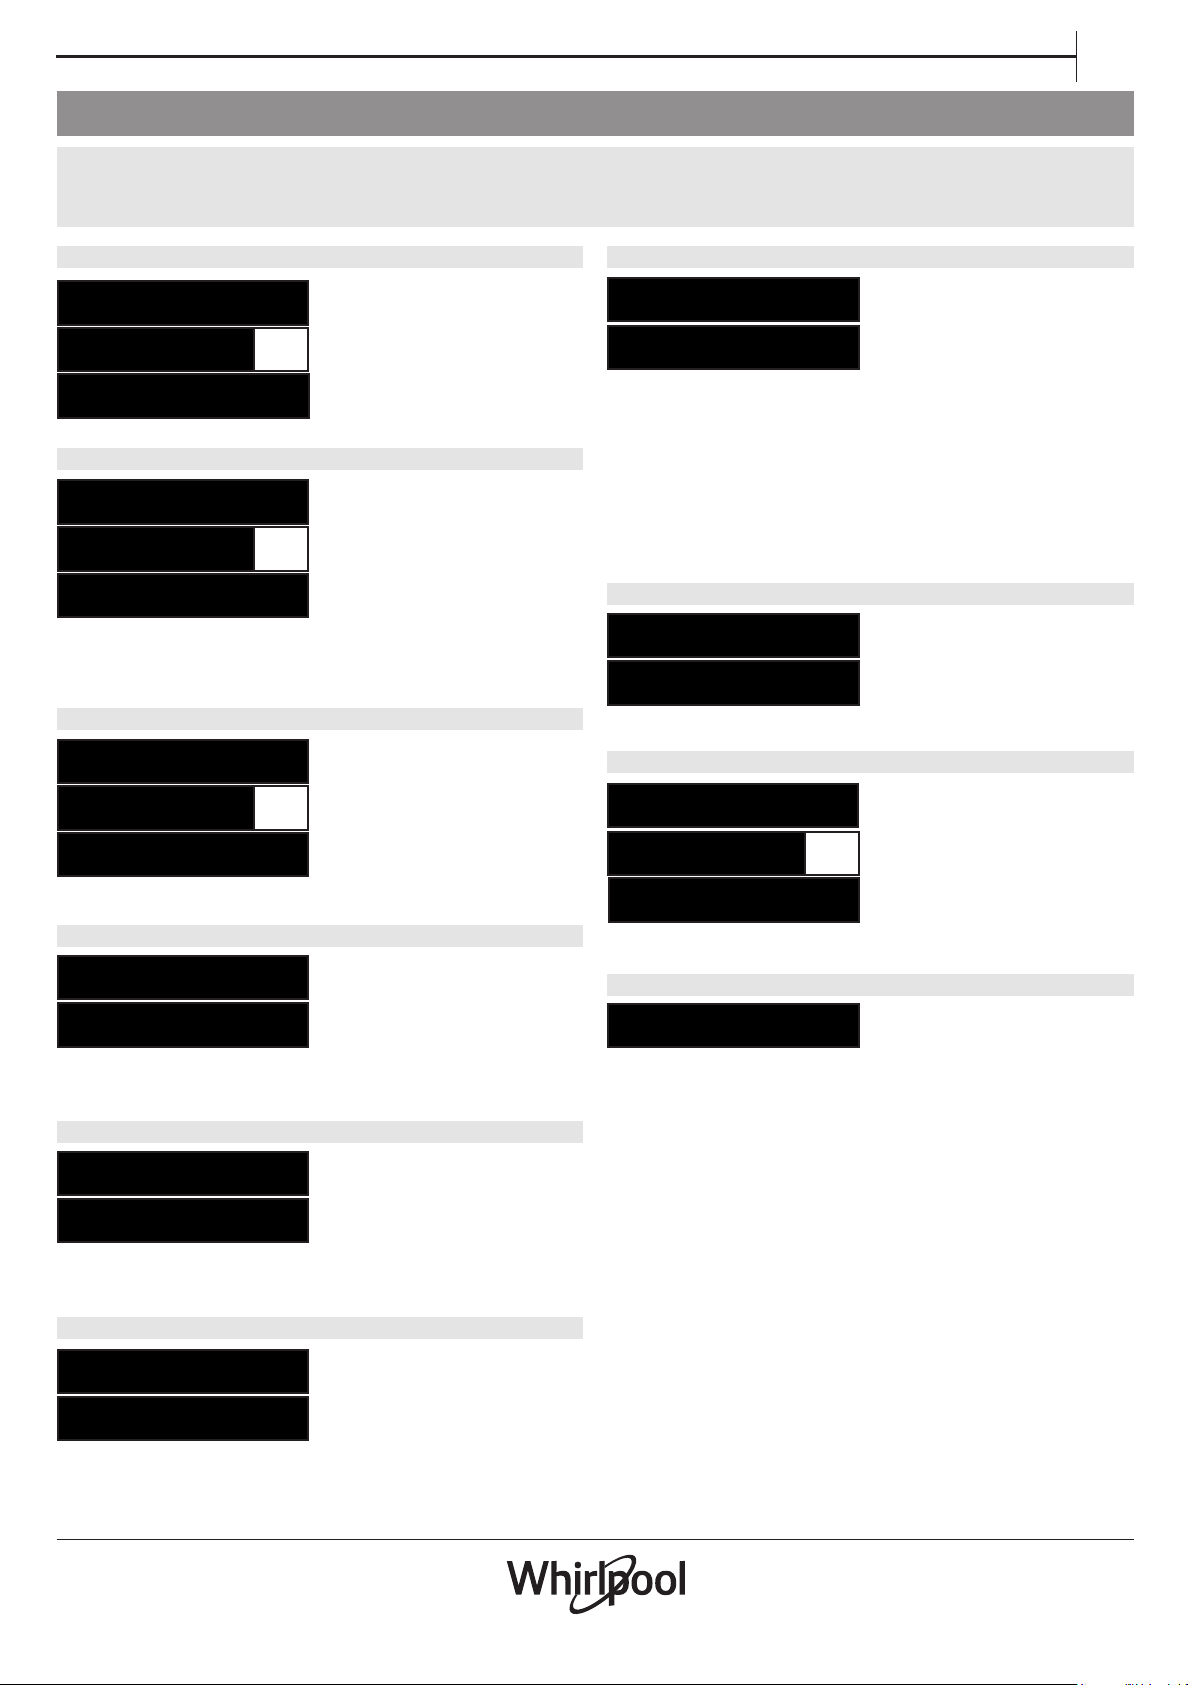
SETTINGS MENU
To change machne settings you need to enter into the Settins Menu.
Press „OK” button and navigate with „< , >” until SETTINGS is shown, then press „OK” button.
To exit the setting menu, press any cycle button or press „< , >” button untill EXIT is shown, then press „OK” button.
EN
Language
1.LANGUAGE OK
1.ITALIANO <>
1.ENGLISH
First cycle
2.FIRST CYCLE OK
2.<ECO> <>
2.<LAST USED>
Sounds
3.SOUNDS OK
3.<HIGHT> <>
3.<OFF>
To change language, enter in the
setting menu by pressing „OK”
button and navigate with „< , >”
until „LANGUAGE” is shown, then
press „OK” button.
You can choose which cycle is
selected by default when switching
on the appliance: ECO or the LAST
USED one.
To change rst cycle, enter in the
setting menu by pressing „OK” button and navigate with „< , >” until
„FIRST CYCLE” is shown, then press
„OK” button.
To change sounds, enter in the
setting menu by pressing „OK”
button and navigate with „< , >”
until „SOUNDS” is shown, then press
„OK” button.
Choose between 2 levels: High;
Low. Can be also OFF.
Rinse Aid level
7.RINSE AID LEV. 4
7.RINSE AID LEV. 5
Choose between ve levels: 1, 2, 3, 4 and 5.
If the rinse aid level is set to 1, no rinse aid will be supplied. The LOW
RINSE AID indicator light will not be lit if you run out of rinse aid.
The factory setting is for (4)level .
• If you see bluish streaks on the dishes, set a low number (2-3).
• If there are drops of water or limescale marks on the dishes, set
a high number (4-5).
To change rinse aid level, enter in
the setting menu by pressing „OK”
button and navigate with „< , >”
until „RINSE AID LEV.” is shown, then
press „OK” button.
Demo mode
8.DEMO MODE ON
8.DEMO MODE OFF
To see to demo mode, enter in the
setting menu by pressing „OK”
button and navigate with „< , >”
until „DEMO MODE” is shown, then
press „OK” button.
Reset to factory default
9.RESET TO DEF. OK
9.ON <>
9.OFF
To reset to factory default, enter in
the setting menu by pressing „OK”
button and navigate with „< , >”
until „RESET TO DEF.” is shown, then
press „OK” button.
Water Hardness
4.WATER HARDNESS 3
4.WATER HARDNESS 4
To setup correct level according to water hardness, see table on page 4.
To change water hardness level,
enter in the setting menu by
pressing „OK” button and navigate
with „< , >” until „WATER HARDNESS”
is shown, then press „OK” button.
Screen Brightness
5.SCREEN BRIGHT. 5
5.SCREEN BRIGHT. 3
Choose between ve levels: 1, 2, 3, 4 and 5.
To change screen brightness
level, enter in the setting menu by
pressing „OK” button and navigate
with „< , >” until „SCREEN BRIGHT.” is
shown, then press „OK” button.
Tub Light
6.TUB LIGHT ON
6.TUB LIGHT OFF
To change tub light, enter in the
setting menu by pressing „OK”
button and navigate with „< , >”
until „TUB LIGHT” is shown, then
press „OK” button.
Exit
10.EXIT <>
To exit the setting menu, press any
cycle button or press „< , >” button
untill EXIT is shown, then press
„OK” button.
13
Page 14
EN
12
34
CARE AND MAINTENANCE
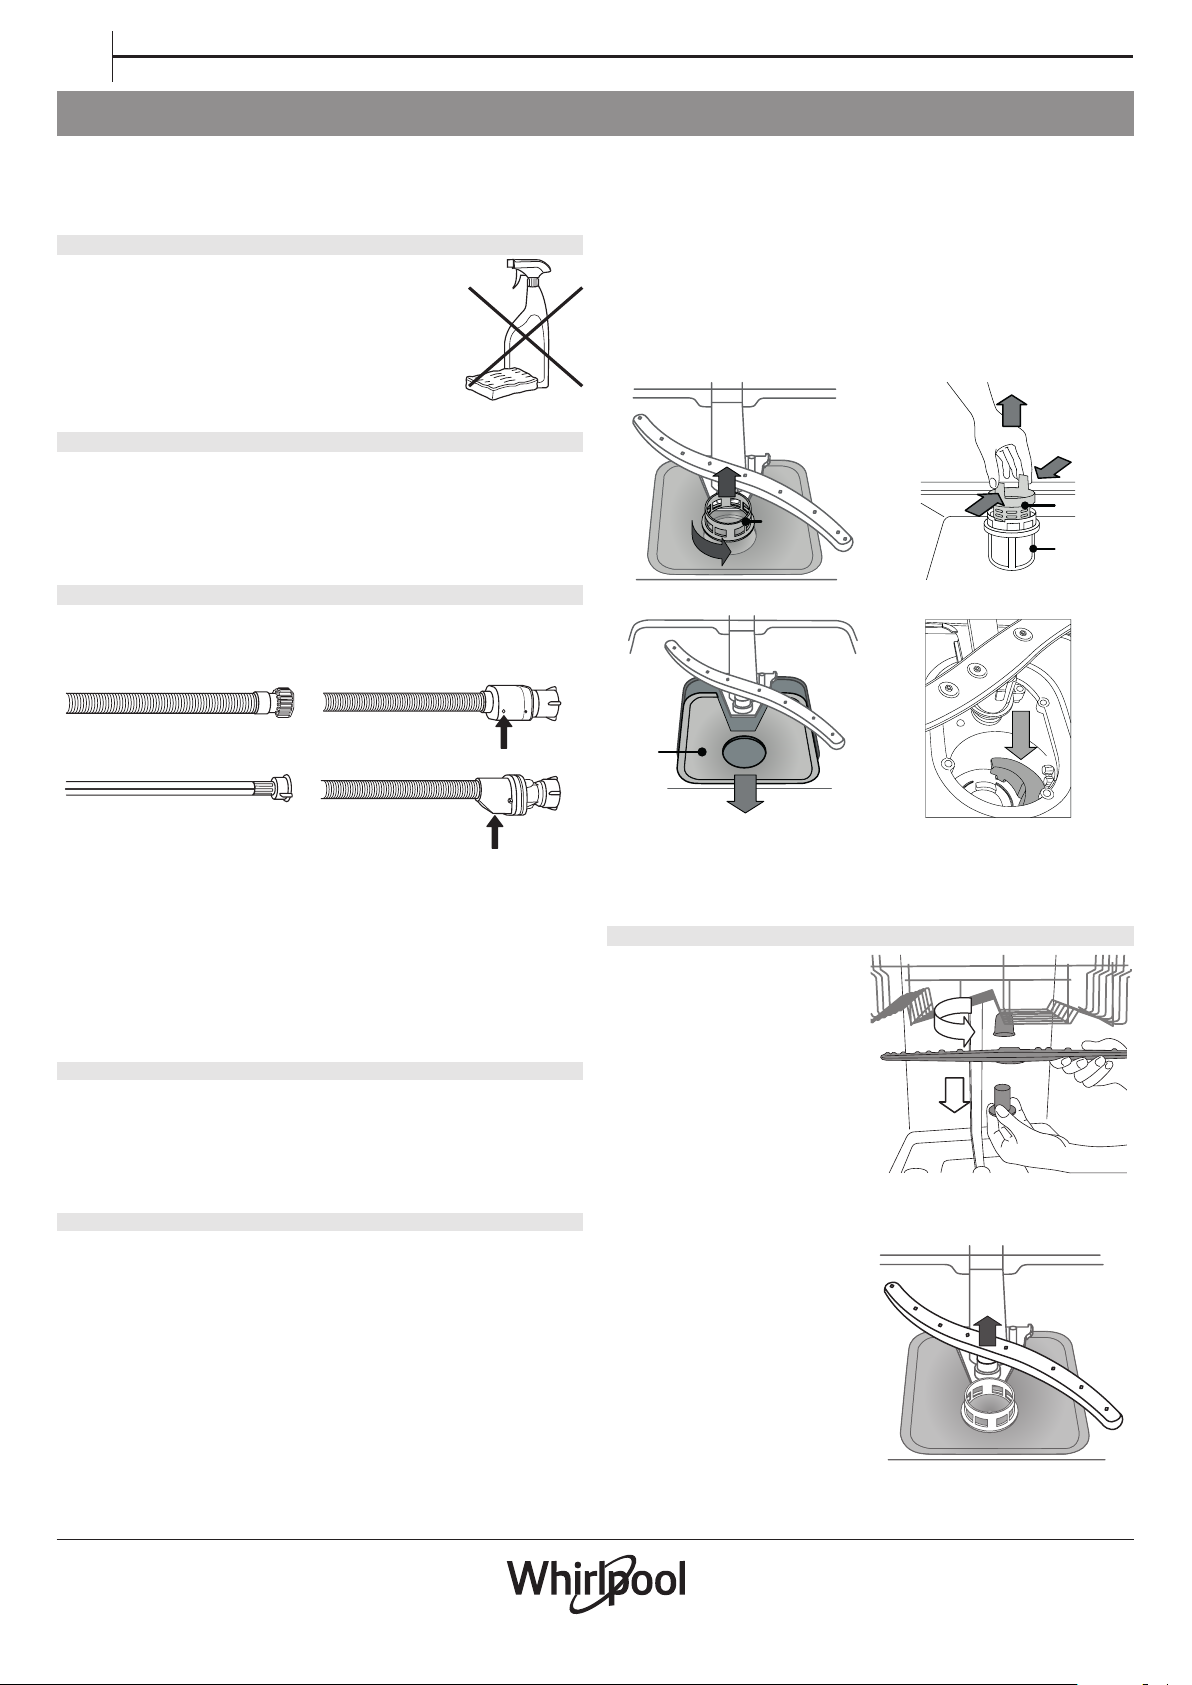
ATTENTION: Always unplug the appliance when cleaning it and when
performing maintenance work.Do not use ammable liquids to clean
the machine.
CLEANING THE DISHWASHER
Any marks on the inside of the appliance may be
removed using a cloth dampened with water and a
little vinegar.
The external surfaces of the machine and the control
panel can be cleaned using a non-abrasive cloth
which has been dampened with water. Do not use
solvents or abrasive products.
PREVENTING UNPLEASANT ODOURS
Always keep the door of the appliance ajar in order to avoid moisture
from forming and being trapped inside the machine.
Clean the seals around the door and detergent dispensers regularly
using a damp sponge. This will avoid food becoming trapped in the seals, which is the main cause behind the formation of unpleasant odours.
CHEKING THE WATER SUPPLY HOSE
Check the inlet hose regularly for brittleness and cracks. If damaged,
replace it by a new hose available through our After-Sales Service or
your specialist dealer. Depending on the hose type:
After several washes, check the lter assembly and if necessary clean
it thoroughly under running water, using a non-metallic brush and
following the instructions below:
1. 1. Turn the cylindrical lter A in an anti-clockwise direction and pull
it out (Fig 1).
2. Remove the cup lter B by exerting a slight pressure on the side
aps (Fig 2).
3. Slide out the stainless-steel plate lter C (Fig 3).
4. Inspect the trap and remove any food residues. NEVER REMOVE
the wash-cycle pump protection (black detail) (Fig 4).
B
A
A
If the inlet hose has a transparent coating, periodically check if the
colour intensies locally. If yes, the hose may have a leak and should
be replaced.
For water stop hoses: check the small safety valve inspection window
(see arrow). If it is red, the water stop function was triggered, and the
hose must be replaced by a new one.
For unscrewing this hose, press the release button while unscrewing
the hose.
CLEANING THE WATER INLET HOSE
If the water hoses are new or have not been used for an extended
period of time, let the water run to make sure it is clear and free of impurities before performing the necessary connections. If this precaution is not taken, the water inlet could become blocked and damage
the dishwasher.
CLEANING THE FILTER ASSEMBLY
Regularly clean the lter assembly so that the lters do not clog and
that the waste water ows away correctly.
The lter assembly consists of three lters which remove food residues
from the washing water and then recirculate the water: to obtain the
best washing results, you need to keep them clean.
The dishwasher must not be used without lters or if the lter is
loose.
C
After cleaning the lters, re-place the lter assembly and x it in position correctly; this is essential for maintaining the ecient operation
of the dishwasher.
CLEANING THE SPRAY ARMS
On occasions, food residue may
become encrusted onto the spray
arms and block the holes used
to spray the water. It is therefore
recommended that you check the
arms from time to time and clean
them with a small non-metallic
brush.
To remove the upper spray arm,
turn the plastic locking ring in an
anti-clockwise direction. The upper
spray arm should be replaced so that the side with the greater number
of holes is facing upwards.
The lower spray arm may be removed by pulling it upwards.
14
Page 15
INSTALLATION
EN
ATTENTION: If the appliance must be moved at any time, keep it in an
upright position; if absolutely necessary, it may be tilted onto its back.
CONNECTING THE WATER SUPPLY
Adaptation of the water supply for installation should only be performed by a qualied technician.
The water inlet and outlet hoses may be positioned towards the right
or the left in order to achieve the best possible installation.
Make sure the dishwasher does not bend or squash the hoses.
CONNECTING THE WATER INLET HOSE
• Run the water until it is perfectly clear.
• Screw the inlet hose tightly into position and turn on the tap.
If the inlet hose is not long enough, contact a specialist store or an
authorised technician.
The water pressure must be within the values indicated in the Technical Data table - otherwise the dishwasher may be function properly.
Make sure the hose is not bent or compressed.
SPECIFICATIONS FOR THE CONNECTION OF THE WATER SUPPLY HOSE:
WATER SUPPLY cold or hot (max. 60°C)
WATER INTAKE 3/4”
POWER OF WATER PRESSURE
0,05 ÷ 1 MPa (0.5 ÷ 10 bar)
7,25 – 145 psi
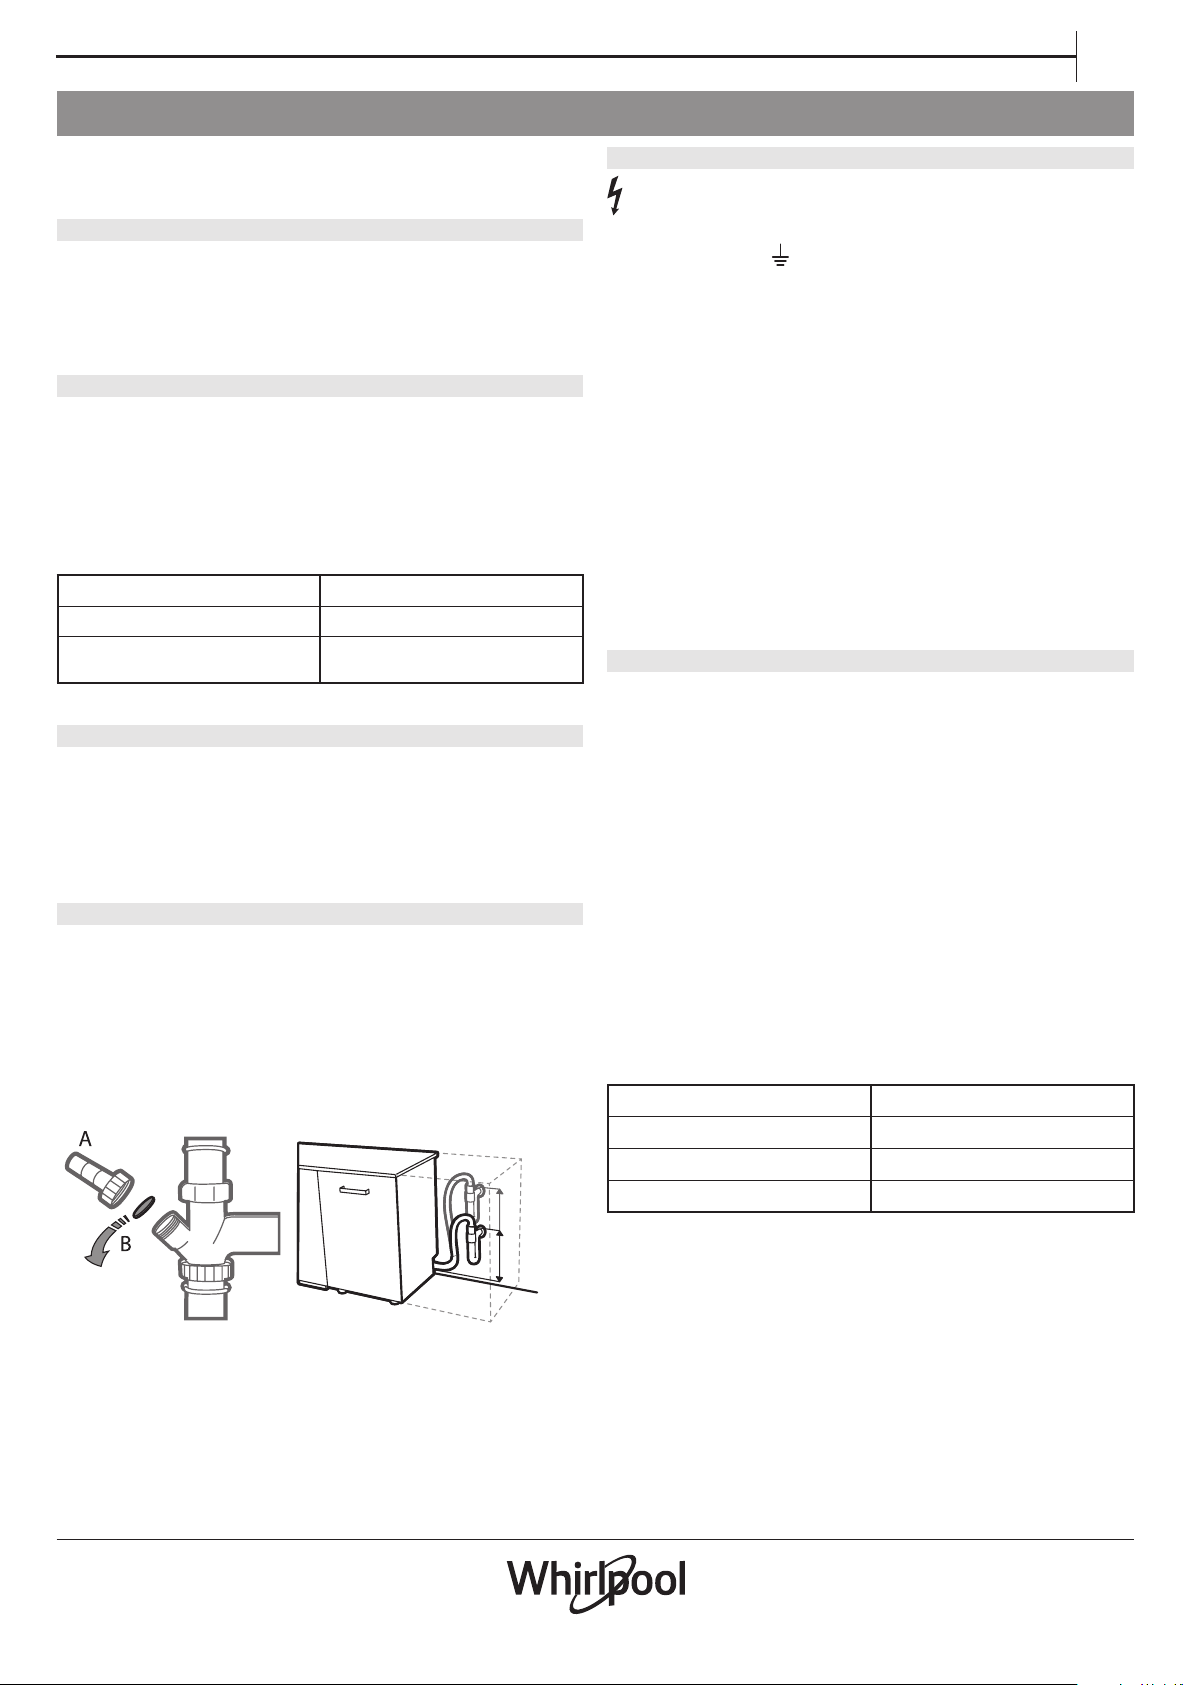
CONNECTING THE WATER OUTLET HOSE
Connect the outlet hose to a drain duct with a minimum diameter of
2 cm A.
The outlet hose connection must be at a height ranging from 40 to
80 cm from the oor or surface where the dishwasher rests.
Before connecting the water outlet hose to the sink drain, remove the
plastic plug B.
ANTI-FLOODING PROTECTION
Anti-ooding protection. To ensure oods do not occur, the dishwasher:
- is provided with a special system which blocks the water supply in
the event of anomalies or leaks from inside the appliance.
Some models are also equipped with the supplementary safety device
New Aqua Stop, which guarantees anti-ooding protection even in
the event of a supply hose rupture.
Under no circumstances should the water inlet hose be cut as it contains live electrical parts.
MAX 80 cm
ELECTRICAL CONNECTION
WARNING: Under no circumstances should the water inlet hose
be cut as it contains live electrical parts.
Before inserting the plug into the electrical socket, make sure that:
• The socket is earth and complies with current regulations;
• The socket can withstand the maximum load of the appliance as
shown on the data plate located on the inside of the door (see
PRODUCT DESCRIPTION).
• The power supply voltage falls within the values indicated on the
data plate on the inside of the door.
• The socket is compatible with the plug of the appliance.
If this is not the case, ask an authorised technician to replace the plug
(see AFTER-SALES SERVICE). Do not use extension cables or multiple
sockets. Once the appliance has been installed, the power supply
cable and the electrical socket should be easily accessible.
The cable should not be bent or compressed.
If the power supply cable is damaged, have it replaced by the manufacturer or its authorised Technical Assistance Service in order to
prevent all potential hazards.
The Company shall not be held responsible for any incidents, if these
regulations are not observed.
POSITIONING AND LEVELLING
1. Position the dishwasher on a level sturdy oor. If the oor is uneven,
the front feet of the appliance may be adjusted until it reaches
a horizontal position. If the appliance is levelled correctly, it will be
more stable and much less likely to move or cause vibrations and
noise while it is operating.
2. Before recessing the dishwasher, stick the adhesive transparent strip
under the wooden shelf in order to protect it from any condensation
which may form.
3. Place the dishwasher so that its sides or back panel are in contact
with the adjacent cabinets or the wall. This appliance can also be
recessed under a single worktop.
4. To adjust the height of the rear foot, turn the red hexagonal bushing
on the lower central part at the front of the dishwasher using a
hexagonal spanner with an opening of 8 mm. Turn the spanner in
a clockwise direction to increase the height and in an anticlockwise
direction to decrease it.
DIMENSIONS AND CAPACITY:
WIDTH 600 mm
HEIGHT 850 mm
DEPTH 590 mm
CAPACITY 14 standard place-settings
MIN 40 cm
15
Page 16
EN
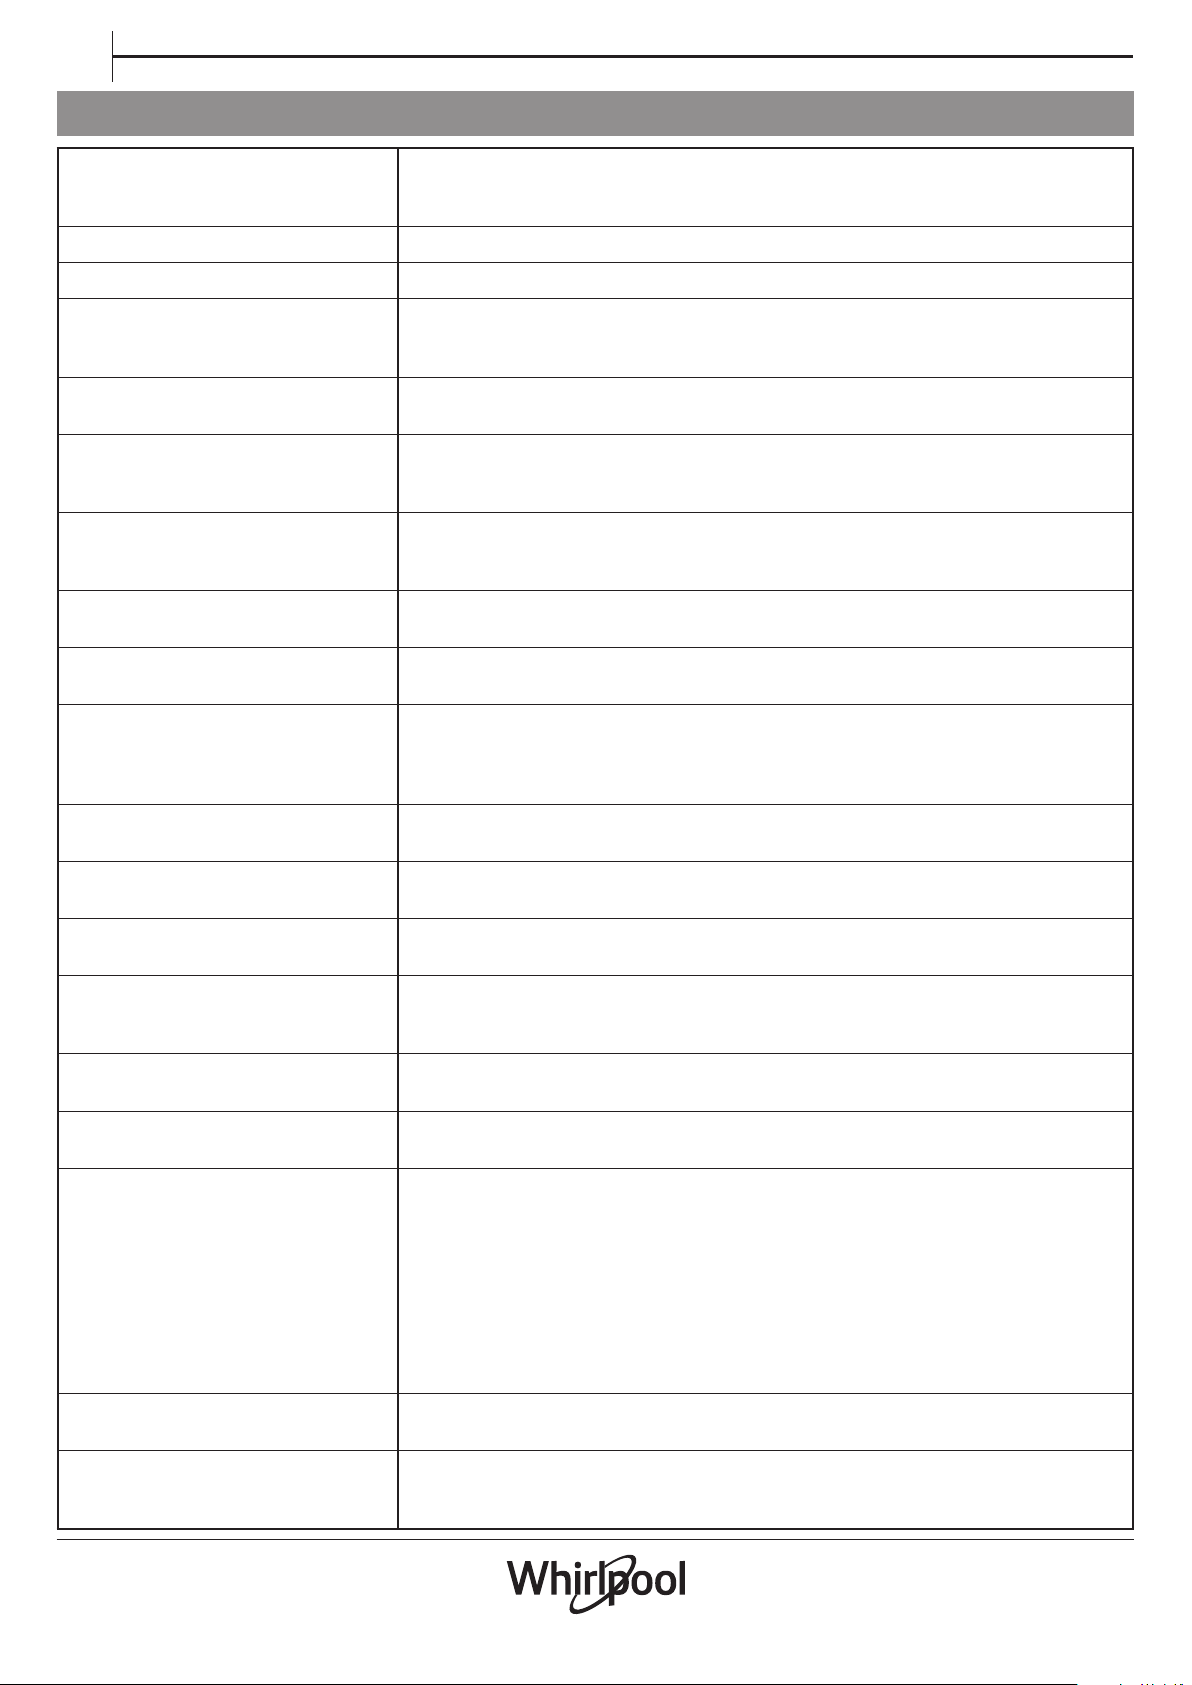
TROUBLESHOOTING - CONNECTIVITY
Are there any dierences between using
a smart phone (or a tablet) with Android
or iOS?
Which WiFi protocols are supported? WiFi radio installed supports WiFi b/g/n for European countries.
Which Version of WPS is supported? Appliance supports from WPS 2.0 or greater, please check the router documentation.
What settings/conguration has to be
set on router software?
Is there the possibility to use Tethering
over a mobile 3G instead of a router?
How can I verify that my home Internet
connection works and that wireless
functionality is on?
How can I nd out my wireless
NETWORK name and password?
What to do if the WiFi canal is used from
the neighborhood?
How do I verify that wireless functionality on the appliance is on?
How much is the distance from router to
the appl. (one room / two room)?
You can use the operating system you prefer, there are no dierences.
Main router settings all requested:
• 2.4 GHz enabled, WiFi b/g/n
• DHCP and NAT activated
Yes, but cloud services are designed for continuous connected devices.
You can search for your network either with your tablet or with your smartphone. Remember to
disable any other data connections (i.e the one of your mobile phone) before trying.
See Customer Router documentation. Suggestions: Sometime using “http://IP number” of the
router the customer can access to the router setup from a connected device. A router label usually
reports login information to reach the device setup page using a connected device (iPad or tablet).
The router decides the channel used for home WiFi (see Router manual) and force router to use
the wished channel.
Verify the status light is stable ON. Using your smart device , check out the Live app if the appliance
network is visible and connected to the cloud.
Normally the coverage is for few rooms but WiFi signal is strongly dependent to wall materials. If
appliance wi is o, customer can check connection strength with iPAD (or other Wireless HAN
devices)close to appliance (for example specic software tools downloadable from internet to
check signal strength).
How can I change my whirlpool account
preserving my connectivity appliances.
Is there anything that can prevent the
signal to reach the appliance?
What can I do if my wireless connections
does not reach the appliance?
I changed the router, what do I have to do?
What can I verify that my appliance is
connected to home wireless network ?
Where do I nd the MAC address of the
appliance ?
What can I do if the Connection State
indicator continues to blink slowly and
never lits solid on or unable to make a
stable provision to home router?
You can make a new account but remember to unclaim your appliances from the old account
before to move them to new one.
Verify not having connected some devices using together all the internet bandwidth and make
sure that all the internet home devices don’t overcame the router max limit device connected.
You can use specic devices to extend the home WIFi coverage as: Access Point, WiFi repeaters
and Power-line bridge (not provided with appliance).
You can either maintain the same set up properties (network name and password) or erase the
previous set up from the appliance (reset process) and carry out the setup again (see “Live-Remote Control/Setup procedure”).
Enter in router conguration (see router manual) and check if the appliance MAC address is
listed in wireless connected devices page.
On your Smart Appliance: there is sticker label with SAID & MAC address.The MAC address is
made by 6 combination of numbers and letters starting with: 88 E7 … … … ..
If the wi Connection State indicator doesn’t lit up solidly, the appliance has been successfully
connected to the router, but it is not able to connect the Internet. In order to get the appliance
connected to the Internet, you have to check the router and/or the bearer settings. Correct router settings: NAT must be on, Firewall and DHCP must be properly set. Password cryptography
supported: WEP, WPA,WPA2 to try dierent cryptography, please refer to router manual.
Bearer settings: if Your Internet service provider has established the numbers of MAC address
able to connect to the Internet, you may not be able to connect appliance to the cloud.
The MAC address is the unique identier of device, e.g the one of your computer. Please ask
your Internet service provider about the procedures to connect a new device other then a com
puter (e.g a dryer, washer,...) to the Internet.
How to set up the wireless connection on
your appliance?
How to check if data is being transmitted?
16
See detailed literature and application wizard on your Smartphone / iPad: there are alternative
approachs on each appliance.
After network setup power o , wait 20 sec and power on the appliance, verify that the App
shows the UI status of the appliance. Set a cycle or another option and verify on the App the
status (NOTE: some settings take several seconds before it is delivered to the App).
Page 17
TROUBLESHOOTING
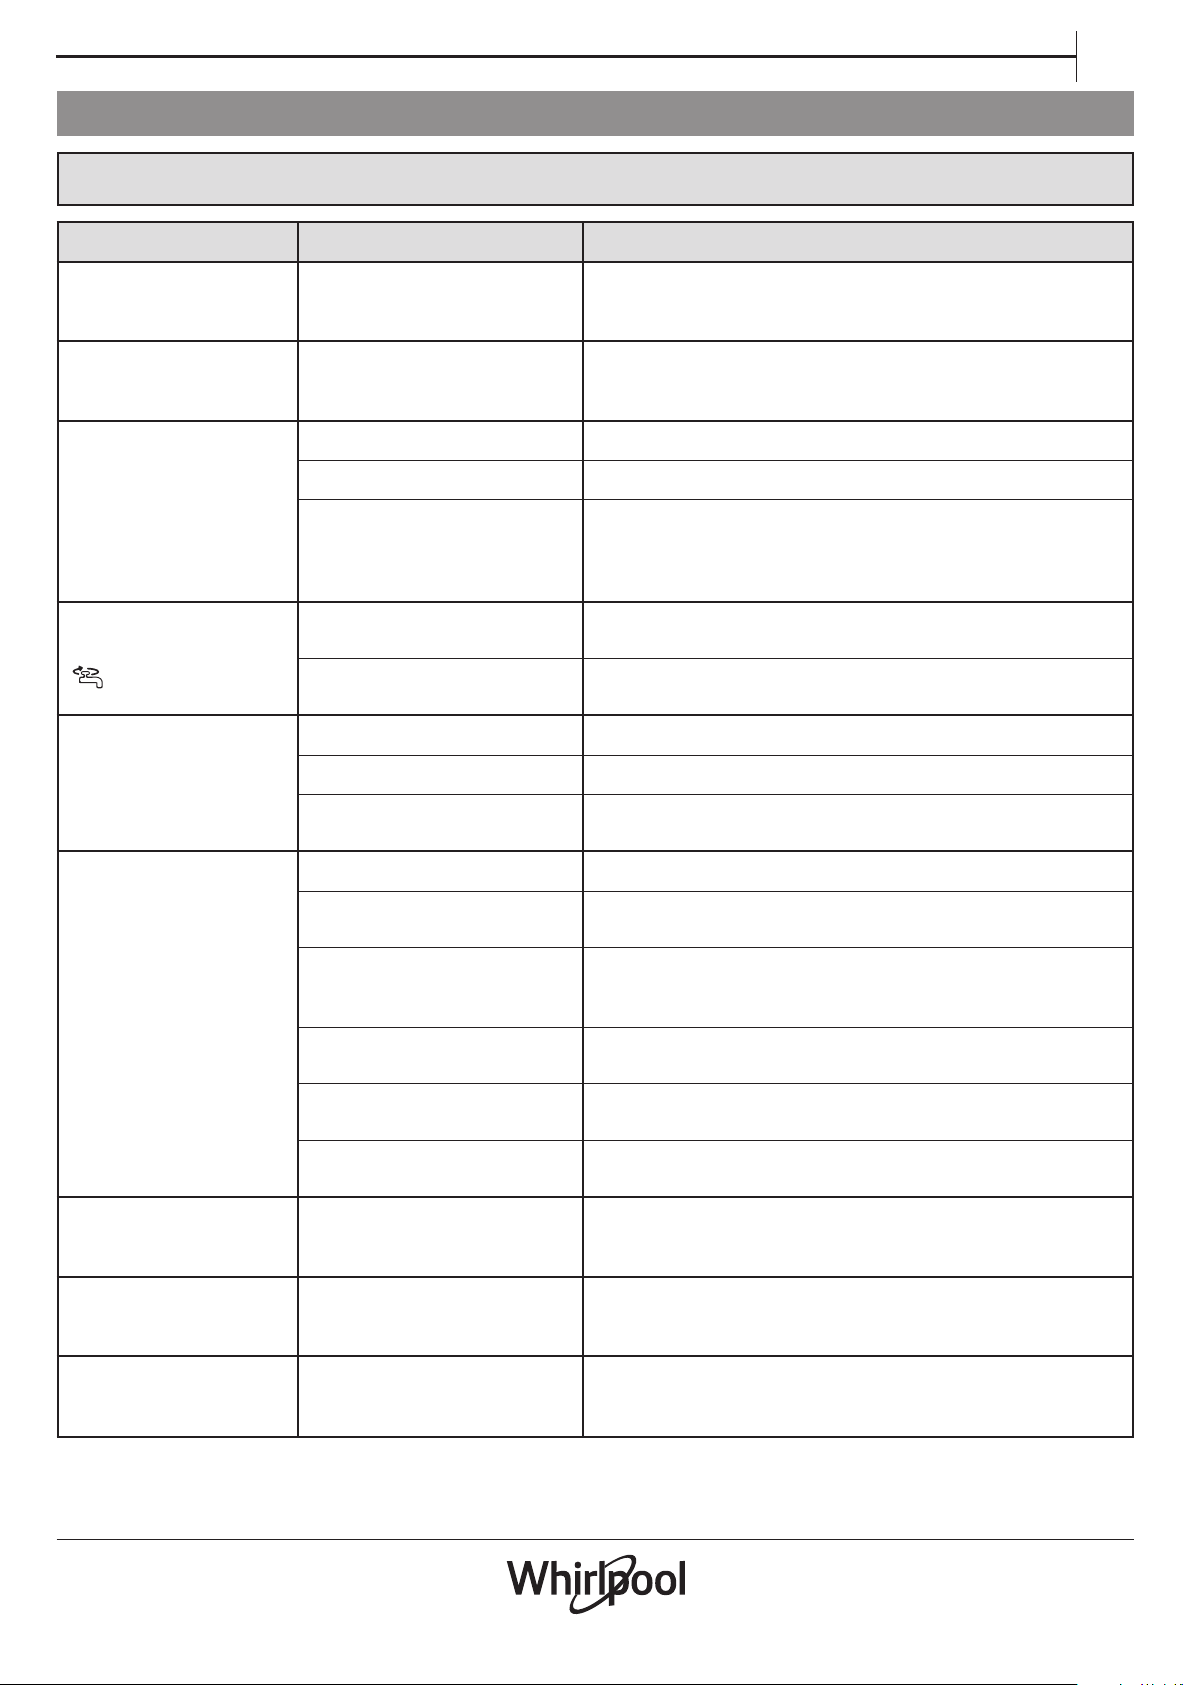
Your dishwasher may not work properly.
Before contacting the After-sales Service, check if the problem can be solved by going through the following list.
PROBLEMS POSSIBLE CAUSES SOLUTIONS
EN
Display shows:
CHECK SALT or
ADD SALT
Display shows:
CHECK RINSE AID or
ADD RINSE AID
... is not working / will not
start.
Display shows: F6
symbol on the display
indicators
Display shows: F3
Salt reservoir is empty.
Rinse aid dispenser is empty. Rell dispenser with rinse aid (see page 4).
The appliance must be switched on. Check the household circuit fuse if there is no power supply.
The appliance door doesn’t close. Check if the appliance door is closed.
“Start Delay” option is ON.
Water pressure is too low.
Kinked water inlet hose or cloged
inlet lters.
Dirty lters. Clean the lters.
Kinked drain hose. The drain hose must not be kinked.
Syphon hose connection closed.
Rell reservoir with salt (see page 4).
Adjust water hardness (see page 4).
Check whether the „Start Delay” option has been selected. If it has, the
appliance will start once the set time has elapsed. If necessary, Reset
the current cycle by switching OFF the dishwasher, then switch it on
again, select a new cycle, press START and close the door.
The water tap must be fully open during water inlet (minimum capacity: 0.5 litres per minute).
The water inlet hose must not be kinked and the inlet lter in the water
tap connector must not be dirty or clogged.
The closure disk of the syphon hose connection
must be removed.
Display shows: F2
Display shows:
PRESS START AND
CLOSE THE DOOR
Display shows:
OPEN AND CLOSE
THE DOOR
Display shows: Fx
Dirty lters or spray arms. Clean lters and spray arms.
Too little water in the appliance
system.
Drain hose incorrectly tted.
High level of foam inside.
Water pressure is too low.
Kinked water inlet hose or cloged
inlet lters.
Door is not closed within
4 seconds of button press.
The door was not open between
cycles.
Appliance has technical defect.
Concave items (e.g. bowls, cups) must be arranged
facing downwards in the rack.
The drain hose must be tted correctly (for high mounted appliances,
leave min. 200 - 400mm from the lower edge of the appliance) - see
Installation.
Repeat without detergent or wait until foam
disappears..
The water tap must be fully open during water inlet (minimum capacity: 0.5 litres per minute).
The water inlet hose must not be kinked and the inlet lter in the water
tap connector must not be dirty or clogged.
Press again and close the appliance door within 4 seconds.
Unload appliance (if not unloaded before), open and close the door.
Call customer service (state fault displayed).
Close the water tap.
17
Page 18
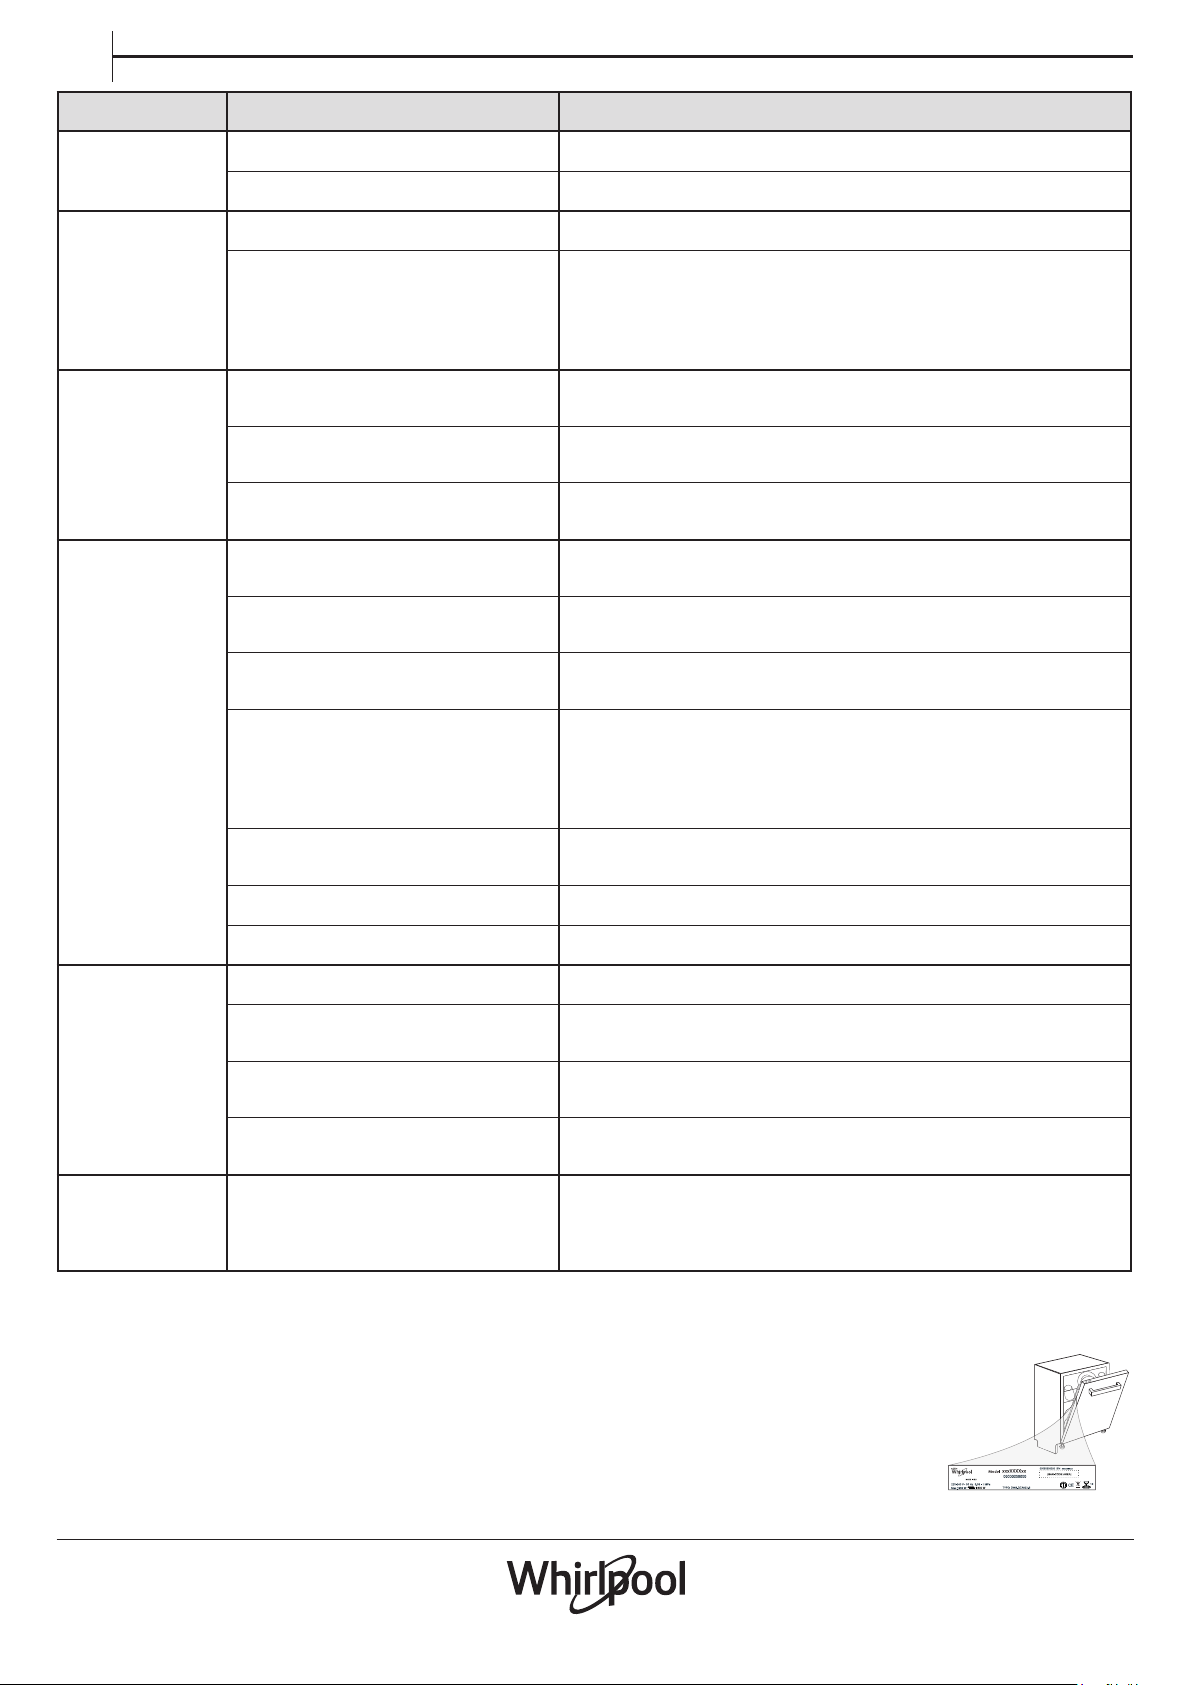
EN
PROBLEMS POSSIBLE CAUSES SOLUTIONS
The door doesn’t
lock.
The dishwasher
makes excessive
noise.
The dishes have not
been dried.
The dishes are not
clean.
Racks are not t to the end. Verify that racks are t to the end.
The door is not lock. Vigorously push the door until you hear the “clack” sound.
The dishes are rattling against each. Arrange the crockery correctly (see Loading the Racks).
The detergent has not been measured out correctly or it is not suitable for
An excessive amount of foam has been
produced.
The selected program hasn’t any drying
phase.
The rinse aid has run out or the resolution
is not adequate.
The dishes are made of non-stick or
plastic.
The crockery has not been arranged
properly.
The spray arms cannot rotate freely, being
hindered by the dishes.
The wash cycle is too gentle and/or detergent eciency is low.
An excessive amount of foam has been
produced (see AFTER-SALES SERVICE).
The cap on the rinse aid compartment has
not been shut correctly.
use in dishwashers (see Filling the Detergent Dispenser). Reset the current
cycle by switching OFF the dishwasher, then switch it on again, select
a new program, press START and close the door. Please do not add any
detergent.
Verify on the programs table if the selected program has the drying phase.
Add the rinse aid or adjust the dosage levels higher (see Filling the Rinse
Aid Dispenser).
It is normal the presence of drops of water (see Tips).
Arrange the crockery correctly (see Loading the Racks).
Arrange the crockery correctly (see Loading the Racks).
Select an appropriate wash cycle (see Programs Table).
The detergent has not been measured out correctly or it is not suitable for
use in dishwashers (see Filling the Detergent Dispenser). Reset the current
cycle by switching OFF the dishwasher, then switch it on again, select
a new program, press START and close the door. Please do not add any
detergent.
Make sure the cap of the rinse aid dispenser is closed.
The lter is soiled or clogged. Clean the lter assembly (see Care and Maintenance).
There is no salt. Fill the salt reservoir (see Filling the Salt Reservoir).
The salt level is too low. Fill the salt reservoir (see Filling the Salt Reservoir).
The adjustment of the water hardness is
The dishes and glasses show calcination
or a whitish lm.
The dishes and
glasses are blue
streaked or have
a bluish tinge.
not adequate.
The cap of the salt reservoir is not properly closed.
The rinse aid is used up or the dosage is
insucient.
The rinse aid dosage is excessive. Adjust the dosage rates below.
PRODUCT FISCHE
The technical data containing the energy consumption data can be
downloaded from the website: docs. whirlpool.eu
Increase the values (see Water Hardness Table).
Check to have properly closed the salt reservoir cap.
Add the rinse aid or adjust the dosage levels higher.
CONTACTING AFTER-SALES SERVICE
You can nd our contact details in the warranty manual. When contacting our Client
After-sales Service, please state the codes
provided on your product’s rating plate.
:
IEC 436
18
Page 19

19
Page 20

19515754700B
02/2018 as - Xerox Fabriano
 Loading...