

Page 1

ELECTRIC RANGE
USER INSTRUCTIONS
THANK YOU for purchasing this high-quality product. If you should experience a problem not covered in TROUBLESHOOTING,
please visit our website at www.whirlpool.com for additional information. If you still need assistance, call us at 1-800-253-1301.
You will need your model and serial number located on the oven frame behind the storage drawer panel.
Para obtener acceso a “Instrucciones para el usuario de la estufa eléctrica” en español, o para obtener información adicional acerca
de su producto, visite: www.whirlpool.com
Tenga listo su número de modelo completo. Puede encontrar su número de modelo y de serie en la etiqueta, ubicada en el marco
del horno, detrás del panel del cajón de almacenamiento.
Table of Contents
RANGE SAFETY.......................................................................................2
The Anti-Tip Bracket .............................................................................2
FEATURE GUIDE .....................................................................................4
COOKTOP USE........................................................................................5
Cookware..............................................................................................7
Home Canning ......................................................................................7
OVEN USE ................................................................................................8
Electronic Oven Controls......................................................................8
Sabbath Mode (on some models) ........................................................8
Aluminum Foil........................................................................................9
Positioning Racks and Bakeware.........................................................9
Oven Vent............................................................................................10
Baking and Roasting...........................................................................10
Broiling ................................................................................................10
Cook Time (on some models).............................................................10
RANGE CARE.........................................................................................11
Self-Cleaning Cycle (on some models) ..............................................11
General Cleaning.................................................................................12
Oven Light...........................................................................................13
TROUBLESHOOTING............................................................................13
ACCESSORIES ......................................................................................15
WARRANTY............................................................................................15
W10394383A
Page 2
RANGE SAFETY
Your safety and the safety of others are very important.
We have provided many important safety messages in this manual and on your appliance. Always read and obey all safety
messages.
This is the safety alert symbol.
This symbol alerts you to potential hazards that can kill or hurt you and others.
All safety messages will follow the safety alert symbol and either the word “DANGER” or “WARNING.”
These words mean:
You can be killed or seriously injured if you don't immediately
DANGER
WARNING
All safety messages will tell you what the potential hazard is, tell you how to reduce the chance of injury, and tell you what can
happen if the instructions are not followed.
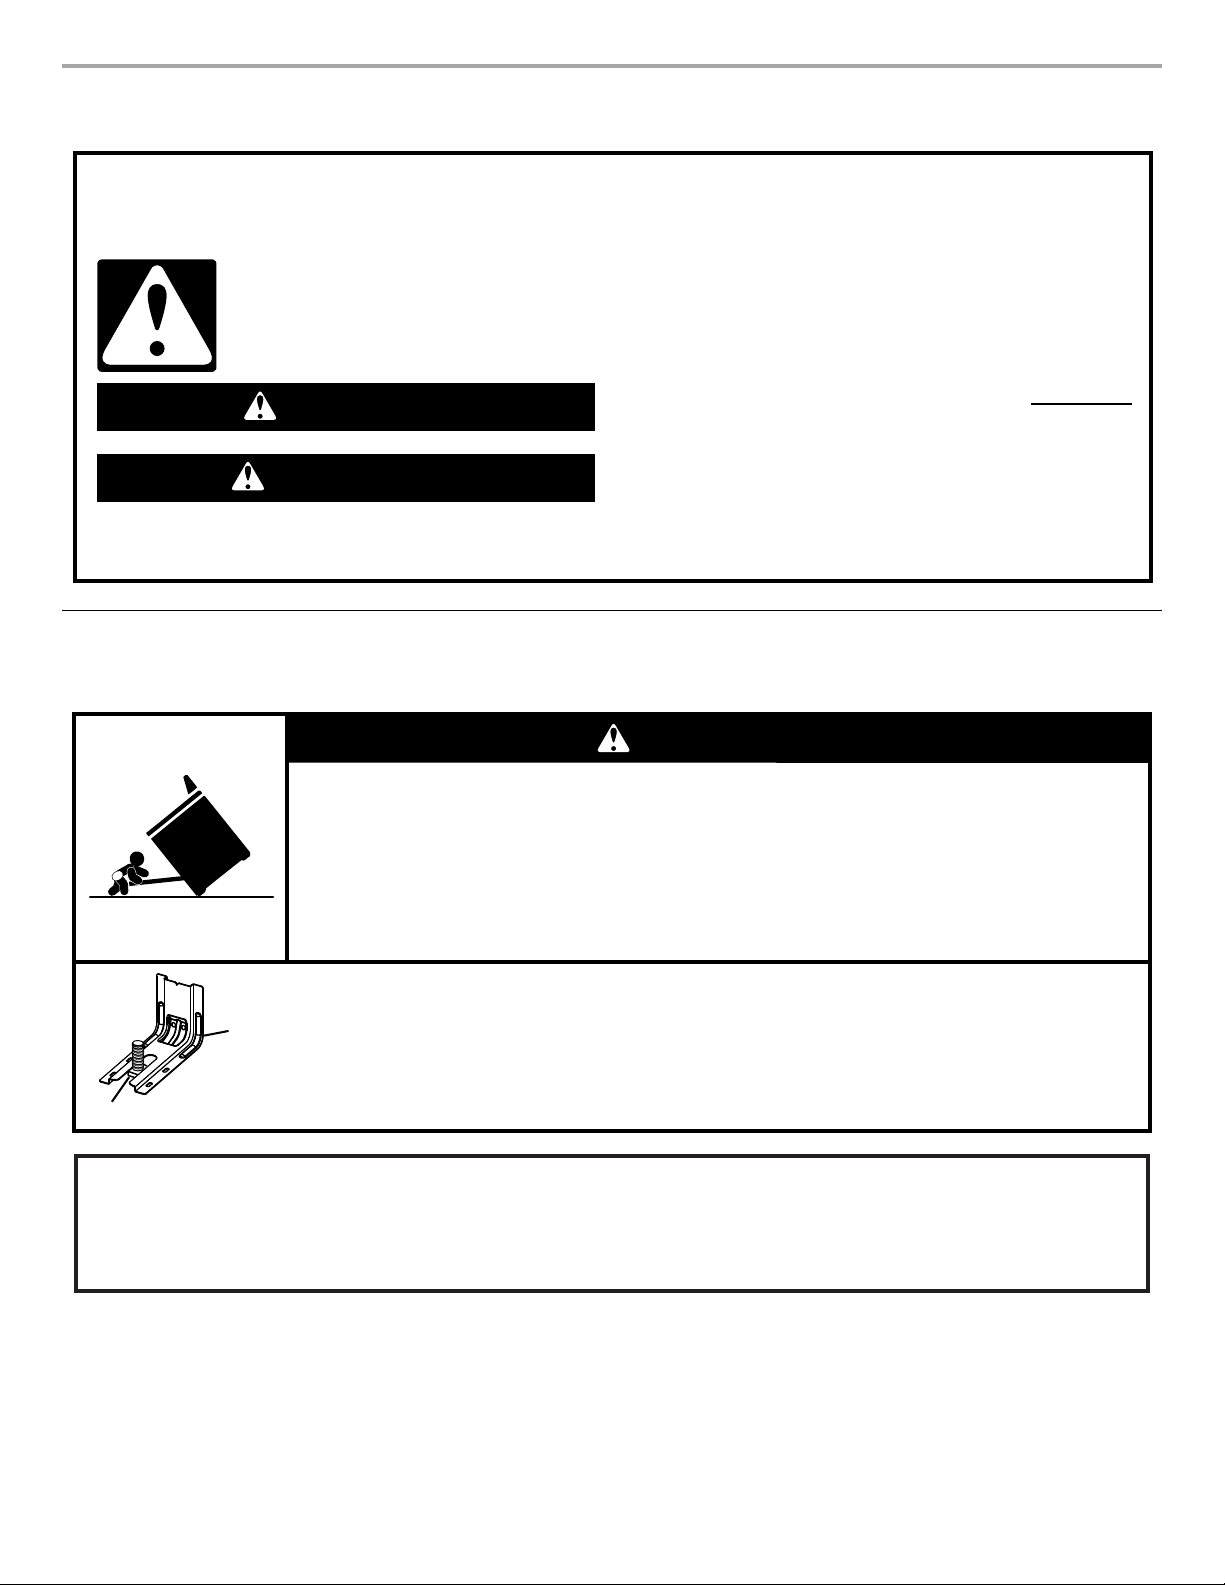
The Anti-Tip Bracket
The range will not tip during normal use. However, the range can tip if you apply too much force or weight to the open door without having
the anti-tip bracket fastened down properly.
follow instructions.
can be killed or seriously injured if you don't
You
instructions.
follow
WARNING
Tip Over Hazard
A child or adult can tip the range and be killed.
Verify the anti-tip bracket has been properly installed and engaged per installation instructions.
Re-engage anti-tip bracket if range is moved.
Do not operate range without anti-tip bracket installed and engaged.
Failure to follow these instructions can result in death or serious burns to children and adults.
To verify the anti-tip bracket is installed and engaged:
Anti-Tip
Bracket
Range Foot
State of California Proposition 65 Warnings:
WARNING: This product contains one or more chemicals known to the State of California to cause cancer.
WARNING: This product contains one or more chemicals known to the State of California to cause birth defects or other
reproductive harm.
• Slide range forward.
• Look for the anti-tip bracket securely attached to floor or wall.
• Slide range back so rear range foot is under anti-tip bracket.
• See installation instructions for details.
2
Page 3

IMPORTANT SAFETY INSTRUCTIONS
WARNING: To reduce the risk of fire, electrical shock,
injury to persons, or damage when using the range, follow
basic precautions, including the following:
■ WARNING: TO REDUCE THE RISK OF TIPPING OF
THE RANGE, THE RANGE MUST BE SECURED BY
PROPERLY INSTALLED ANTI-TIP DEVICES. TO CHECK
IF THE DEVICES ARE INSTALLED PROPERLY, SLIDE
RANGE FORWARD, LOOK FOR ANTI-TIP BRACKET
SECURELY ATTACHED TO FLOOR OR WALL, AND
SLIDE RANGE BACK SO REAR RANGE FOOT IS
UNDER ANTI-TIP BRACKET.
■ CAUTION: Do not store items of interest to children in
cabinets above a range or on the backguard of a range –
children climbing on the range to reach items could be
seriously injured.
■ Proper Installation – Be sure the range is properly installed
and grounded by a qualified technician.
■ Never Use the Range for Warming or Heating the Room.
■ Do Not Leave Children Alone – Children should not be left
alone or unattended in area where the range is in use.
They should never be allowed to sit or stand on any part of
the range.
■ Wear Proper Apparel – Loose-fitting or hanging garments
should never be worn while using the range.
■ User Servicing – Do not repair or replace any part of the
range unless specifically recommended in the manual. All
other servicing should be referred to a qualified technician.
■ Storage in or on the Range – Flammable materials should
not be stored in an oven or near surface units.
■ Do Not Use Water on Grease Fires – Smother fire or flame
or use dry chemical or foam-type extinguisher.
■ Use Only Dry Potholders – Moist or damp potholders on
hot surfaces may result in burns from steam. Do not let
potholder touch hot heating elements. Do not use a towel
or other bulky cloth.
■ DO NOT TOUCH SURFACE UNITS OR AREAS NEAR
UNITS – Surface units may be hot even though they are
dark in color. Areas near surface units may become hot
enough to cause burns. During and after use, do not touch,
or let clothing or other flammable materials contact surface
units or areas near units until they have had sufficient time
to cool. Among those areas are the cooktop and surfaces
facing the cooktop.
■ Use Proper Pan Size – The range is equipped with one or
more surface units of different size. Select utensils having
flat bottoms large enough to cover the surface unit heating
element. The use of undersized utensils will expose a
portion of the heating element to direct contact and may
result in ignition of clothing. Proper relationship of utensil to
burner will also improve efficiency.
■ Never Leave Surface Units Unattended at High Heat
Settings – Boilover causes smoking and greasy spillovers
that may ignite.
■ Make Sure Reflector Pans or Drip Bowls Are in Place –
Absence of these pans or bowls during cooking may
subject wiring or components underneath to damage.
■ Protective Liners – Do not use aluminum foil to line surface
unit drip bowls or oven bottoms, except as suggested in
the manual. Improper installation of these liners may result
in a risk of electric shock, or fire.
■ Glazed Cooking Utensils – Only certain types of glass,
glass/ceramic, ceramic, earthenware, or other glazed
utensils are suitable for range-top service without breaking
due to the sudden change in temperature.
■ Utensil Handles Should Be Turned Inward and Not Extend
Over Adjacent Surface Units – To reduce the risk of burns,
ignition of flammable materials, and spillage due to
unintentional contact with the utensil, the handle of a
utensil should be positioned so that it is turned inward, and
does not extend over adjacent surface units.
■ Do Not Soak Removable Heating Elements – Heating
elements should never be immersed in water.
■ Do Not Cook on Broken Cooktop – If cooktop should
break, cleaning solutions and spillovers may penetrate the
broken cooktop and create a risk of electric shock. Contact
a qualified technician immediately.
■ Clean Cooktop With Caution – If a wet sponge or cloth is
used to wipe spills on a hot cooking area, be careful to
avoid steam burn. Some cleaners can produce noxious
fumes if applied to a hot surface.
■ Use Care When Opening Door – Let hot air or steam
escape before removing or replacing food.
■ Do Not Heat Unopened Food Containers – Build-up of
pressure may cause container to burst and result in injury.
■ Keep Oven Vent Ducts Unobstructed.
■ Placement of Oven Racks – Always place oven racks in
desired location while oven is cool. If rack must be moved
while oven is hot, do not let potholder contact hot heating
element in oven.
■ DO NOT TOUCH HEATING ELEMENTS OR INTERIOR
SURFACES OF OVEN – Heating elements may be hot even
though they are dark in color. Interior surfaces of an oven
become hot enough to cause burns. During and after use,
do not touch, or let clothing or other flammable materials
contact heating elements or interior surfaces of oven until
they have had sufficient time to cool. Other surfaces of the
appliance may become hot enough to cause burns – among
these surfaces are oven vent openings and surfaces near
these openings, oven doors, and windows of oven doors.
For self-cleaning ranges –
■ Do Not Clean Door Gasket – The door gasket is essential
for a good seal. Care should be taken not to rub, damage,
or move the gasket.
■ Do Not Use Oven Cleaners – No commercial oven cleaner
or oven liner protective coating of any kind should be used
in or around any part of the oven.
■ Clean Only Parts Listed in Manual.
■ Before Self-Cleaning the Oven – Remove broiler pan and
other utensils.
For units with ventilating hood –
■ Clean Ventilating Hoods Frequently – Grease should not
be allowed to accumulate on hood or filter.
■ When flambeing foods under the hood, turn the fan on.
SAVE THESE INSTRUCTIONS
3
Page 4
FEATURE GUIDE
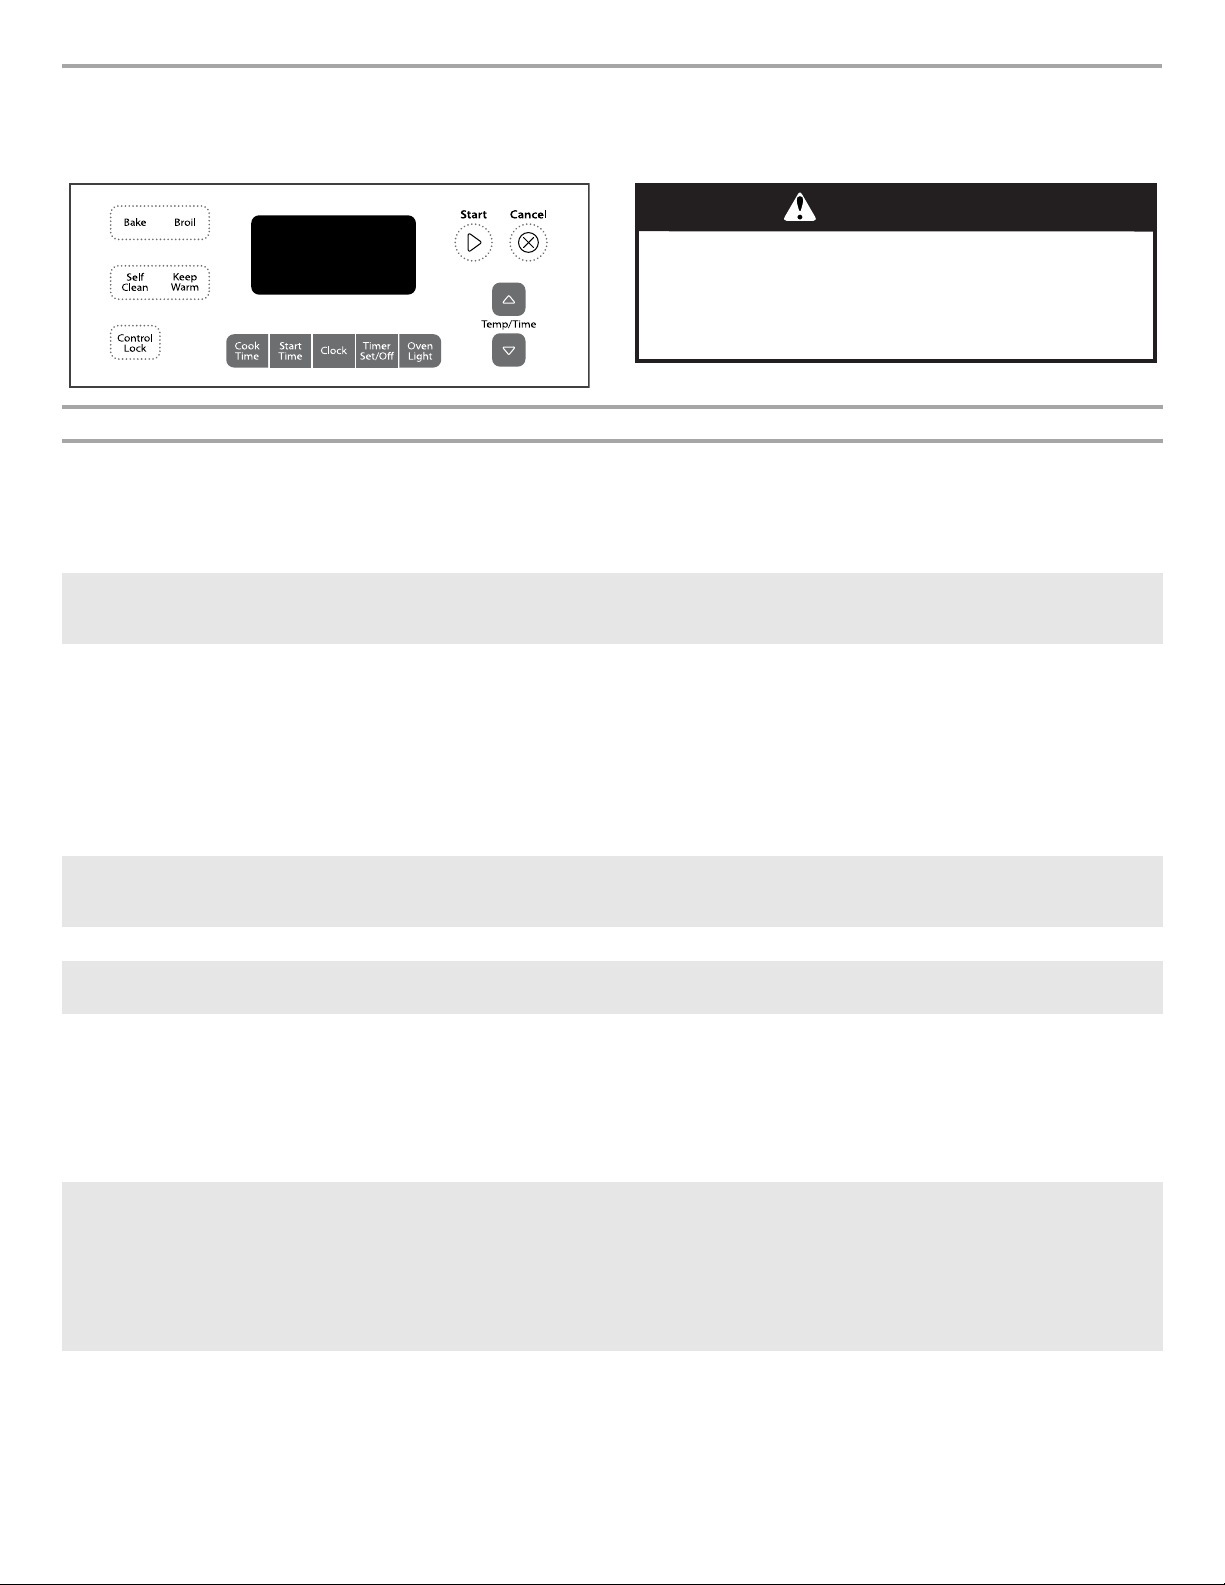
This manual covers several models. Your model may have some or all of the items listed. Refer to this manual or the Frequently Asked
Questions (FAQs) section of our website at www.whirlpool.com for more detailed instructions.
WARNING
Food Poisoning Hazard
Do not let food sit in oven more than one hour before
or after cooking.
Doing so can result in food poisoning or sickness.
KEYPAD FEATURE INSTRUCTIONS
CLOCK Clock The Clock uses a 12-hour cycle.
1. Check that the oven is off.
2. Press CLOCK.
3. Press TEMP/TIME “up” or “down” arrow pads to set the time of day.
4. Press CLOCK or START.
OVEN LIGHT Oven cavity light The oven light is controlled by a keypad on the oven control panel. While the oven door is closed,
TIMER
(Set/Off)
START Cooking start The Start pad begins any oven function. If Start is not pressed within 5 seconds, “PUSH” appears
CANCEL Range function The Cancel keypad stops any function except the Clock, Timer and Oven Control Lockout.
TEMP/TIME Temperature and
BAKE Baking and
Oven timer The Timer can be set in hours or minutes up to 12 hours and 59 minutes.
time adjust
roasting
press the oven light switch to turn the light on and off. On some models, the oven light will come
on when the oven door is opened.
1. Press TIMER.
2. Press TEMP/TIME “up” or “down” arrow pads to set the length of time.
3. Press START to begin the countdown. If enabled, end-of-cycle tones will sound at end of
countdown.
4. Press TIMER twice to cancel the Timer. Do not press the Cancel keypad because the oven will
turn off.
5. If the TIMER is running, but not in the display, press TIMER to display the countdown for
5 seconds.
in the display. If Start is not pressed within 1 minute after pressing a keypad, the function is
canceled and the time of day is displayed.
The “up” or “down” arrow pads are used to adjust time and temperature settings.
1. Press BAKE.
2. Press TEMP/TIME “up” or “down” arrow pads to set a temperature other than 350°F (175°C) in
5°F (5°C) increments between 170°F and 500°F (75°C and 260°C).
3. Press START.
4. To change the temperature, repeat Step 2. Press START or wait 5 seconds for the change to
take effect.
5. Press CANCEL when finished.
BROIL Broiling 1. Press BROIL.
2. Press TEMP/TIME “up” or “down” arrow pads to change the temperature in 5°F (5°C)
increments between 300°F and 500°F (150°C and 260°C).
3. Press START, and allow oven to preheat for 5 minutes.
4. Position cookware in the oven and close the oven door to the broil stop position so that the
door is open approximately 6" (15 cm).
5. Press CANCEL when finished.
KEEP WARM
(on some
models)
Hold warm Food must be at serving temperature before placing it in the warmed oven.
1. Press KEEP WARM.
2. Temperature is set at 170°F (75°C) for 60 minutes (1.00 hour).
3. Press START.
4. Press CANCEL when finished.
NOTE: The oven will automatically turn off after 60 minutes.
4
Page 5
KEYPAD FEATURE INSTRUCTIONS
START TIME
(on some
models)
COOK TIME
(on some
models)
SELF CLEAN
(on some
models)
Delayed start The Start Time keypad is used to enter the starting time for an oven function with a delayed start.
Timed cooking Timed Cooking allows the oven to be set to turn on at a certain time of day, cook for a set length of
Self-Cleaning
cycle
Start Time should not be used for foods such as breads and cakes because they may not bake
properly.
To set a Timed Cook or a Delayed Timed Cook, see “Cook Time” section.
time, and/or shut off automatically.
To set a Timed Cook or a Delayed Timed Cook, see “Cook Time” section.
See the “Self-Cleaning Cycle” section.
CONTROL
LOCK
Oven control
lockout
1. Check that the oven is off.
2. Press and hold the CONTROL LOCK keypad for 3 seconds.
3. A tone will sound, and “Loc” will be displayed.
4. Repeat to unlock. Only the CLOCK, OVEN LIGHT and TIMER keypads will function with the
controls locked. The cooktop functions are not affected by the oven control lockout.
COOKTOP USE
WARNING
Fire Hazard
Turn off all controls when done cooking.
Failure to do so can result in death or fire.
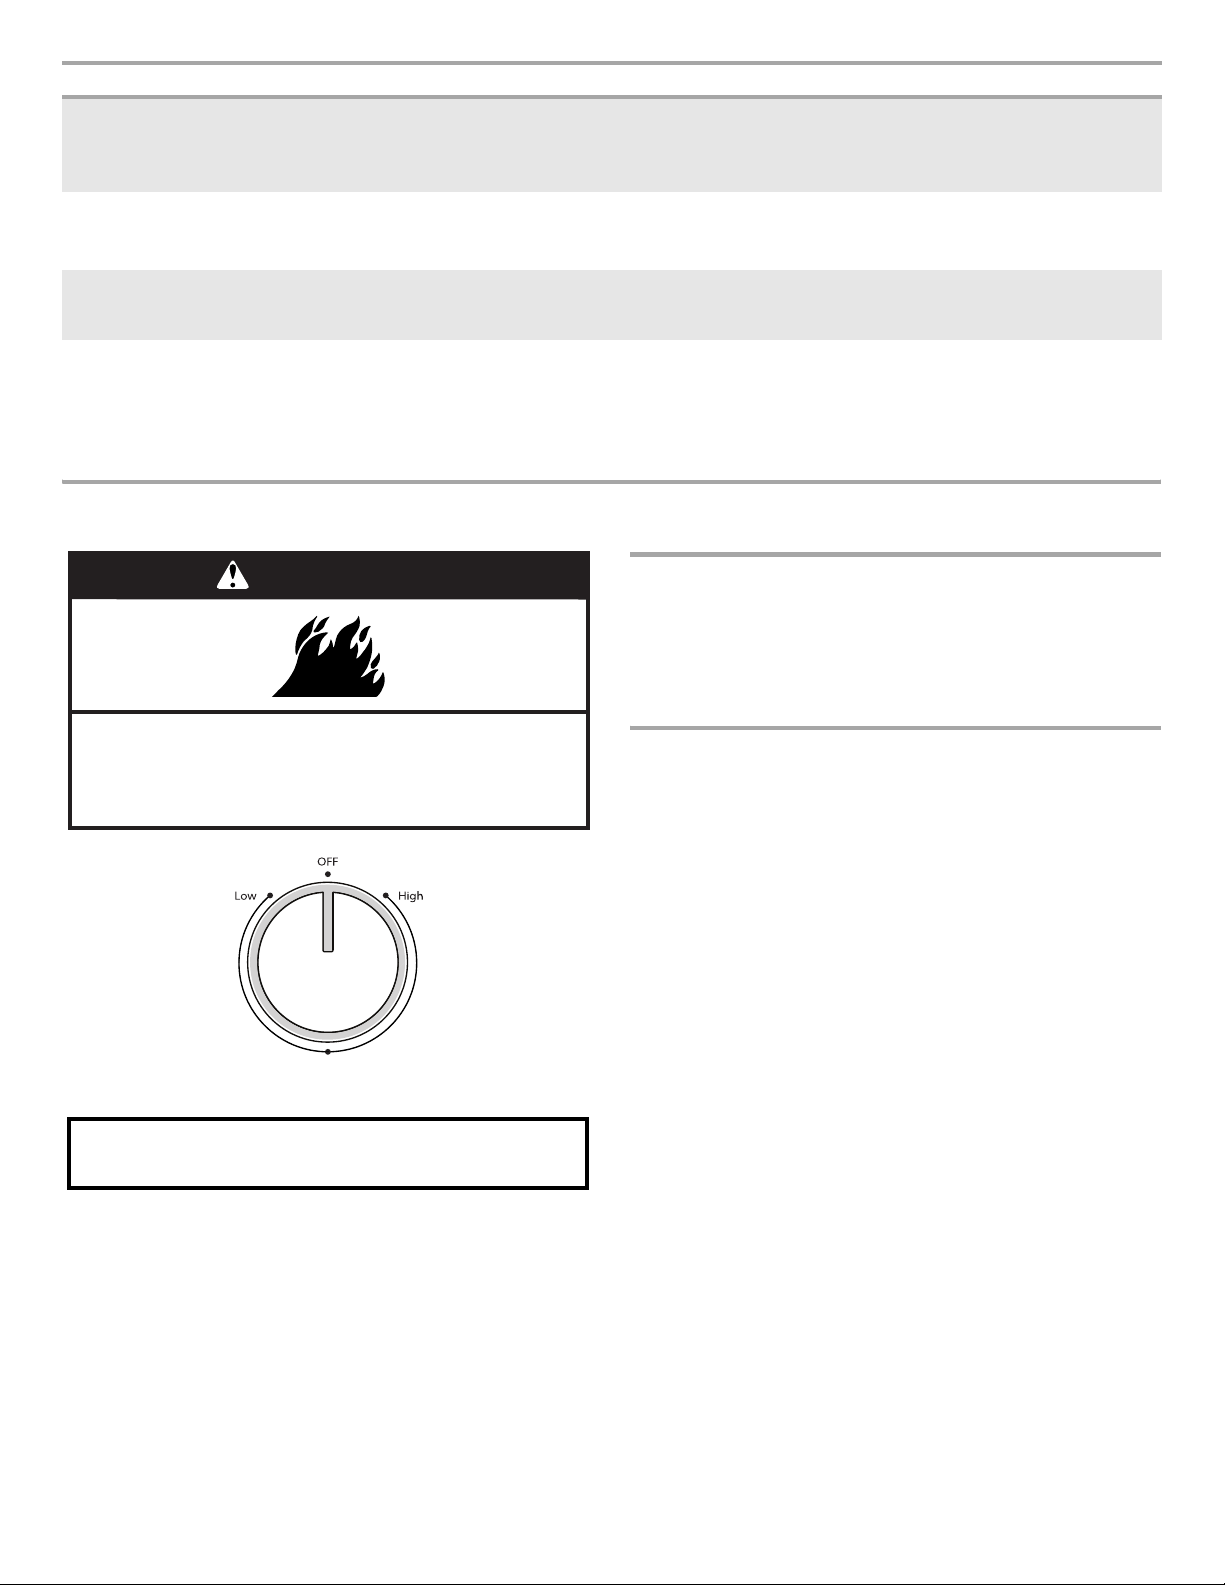
The control knobs can be set to anywhere between HIGH and
LOW. Push in and turn to setting.
REMEMBER: When range is in use, the entire cooktop area
may become hot.
Coil Elements and Burner Bowls (on some models)
Coil elements should be level for optimal cooking results. Burner
bowls, when clean, reflect heat back to the cooktop. They also help
catch spills.
Cookware should not extend move than ½" (1.3 cm) over the coil
element. If cookware is uneven or too large, it can produce excess
heat, causing the burner bowl to change color.
Ceramic Glass (on some models)
The surface cooking area will glow red when an element is on.
Some parts of the surface cooking area may not glow red when an
element is on. This is normal operation. The burner will cycle on
and off to maintain the selected heat level. It will also randomly
cycle off and back on again even while in High to keep the cooktop
from extreme temperatures.
It is normal for the surface of light colored ceramic glass to appear
to change color when surface cooking areas are hot. As the glass
cools, it will return to its original color.
Clean the cooktop after each use to help avoid scratches, pitting,
abrasions and to condition the glass surface. Ceramic glass
cooktop cleaner and a cooktop scraper are also recommended for
stubborn soils. Do not use abrasive cleaners, cleaning pads or
harsh chemicals for cleaning. The Cooktop Care Kit Part Number
31605 contains all of the items needed to clean and condition your
ceramic glass cooktop. Refer to the “Range Care” section for
additional information.
IMPORTANT: To avoid permanent damage to the cooktop surface
and to make soils easier to remove, clean the cooktop after each
use to remove all soils.
■ Avoid storing jars or cans above the cooktop. Dropping a heavy
or hard object onto the cooktop could crack the cooktop.
■ To avoid damage to the cooktop, do not leave a hot lid on the
cooktop. As the cooktop cools, air can become trapped
between the lid and the cooktop, and the ceramic glass could
break when the lid is removed.
5
Page 6
■ For foods containing sugar in any form, clean up all spills and
C
B
soils as soon as possible. Allow the cooktop to cool down
slightly. Then, while wearing oven mitts, remove the spills using
a scraper while the surface is still warm. If sugary spills are
allowed to cool down, they can adhere to the cooktop and can
cause pitting and permanent marks.
■ To avoid scratches, do not slide cookware or bakeware across
the cooktop. Aluminum or copper bottoms and rough finishes
on cookware or bakeware could leave scratches or marks on
the cooktop.
■ Do not cook popcorn in prepackaged aluminum containers on
the cooktop. They could leave aluminum marks that cannot be
removed completely.
■ To avoid damage to the cooktop, do not allow objects that
could melt, such as plastic or aluminum foil, to touch any part
of the entire cooktop.
■ To avoid damage to the cooktop, do not use the cooktop as a
cutting board.
■ Use cookware about the same size as the surface cooking
area. Cookware should not extend more than ½" (1.3 cm)
outside the area.
B
A
A. Surface cooking area
B. Cookware/canner
C. ½" (1.3 cm) maximum overhang
Ceramic Glass Cooktop Cleaning (on some models)
Clean the cooktop after each use to help avoid scratches, pitting,
abrasions and to condition the glass surface. Ceramic glass
cooktop cleaner and a cooktop scraper are also recommended for
stubborn soils. Do not use abrasive cleaners, cleaning pads or
harsh chemicals for cleaning. The Cooktop Care Kit Part Number
31605 contains all of the items needed to clean and condition your
ceramic glass cooktop. Refer to the “Range Care” section for
additional information.
IMPORTANT: To avoid permanent damage to the cooktop surface
and to make soils easier to remove, clean the cooktop after each
use to remove all soils.
Cooktop On Indicator Light
The Cooktop On indicator light is located on the console panel.
When any control knob on the console panel is turned on, the
Cooktop On indicator light will glow.
Hot Surface Indicator Light (on some models)
On ceramic glass models, the hot surface indicator light is located
on the console panel.
The hot surface indicator light will glow as long as any surface
cooking area is too hot to touch, even after the surface cooking
area is turned off.
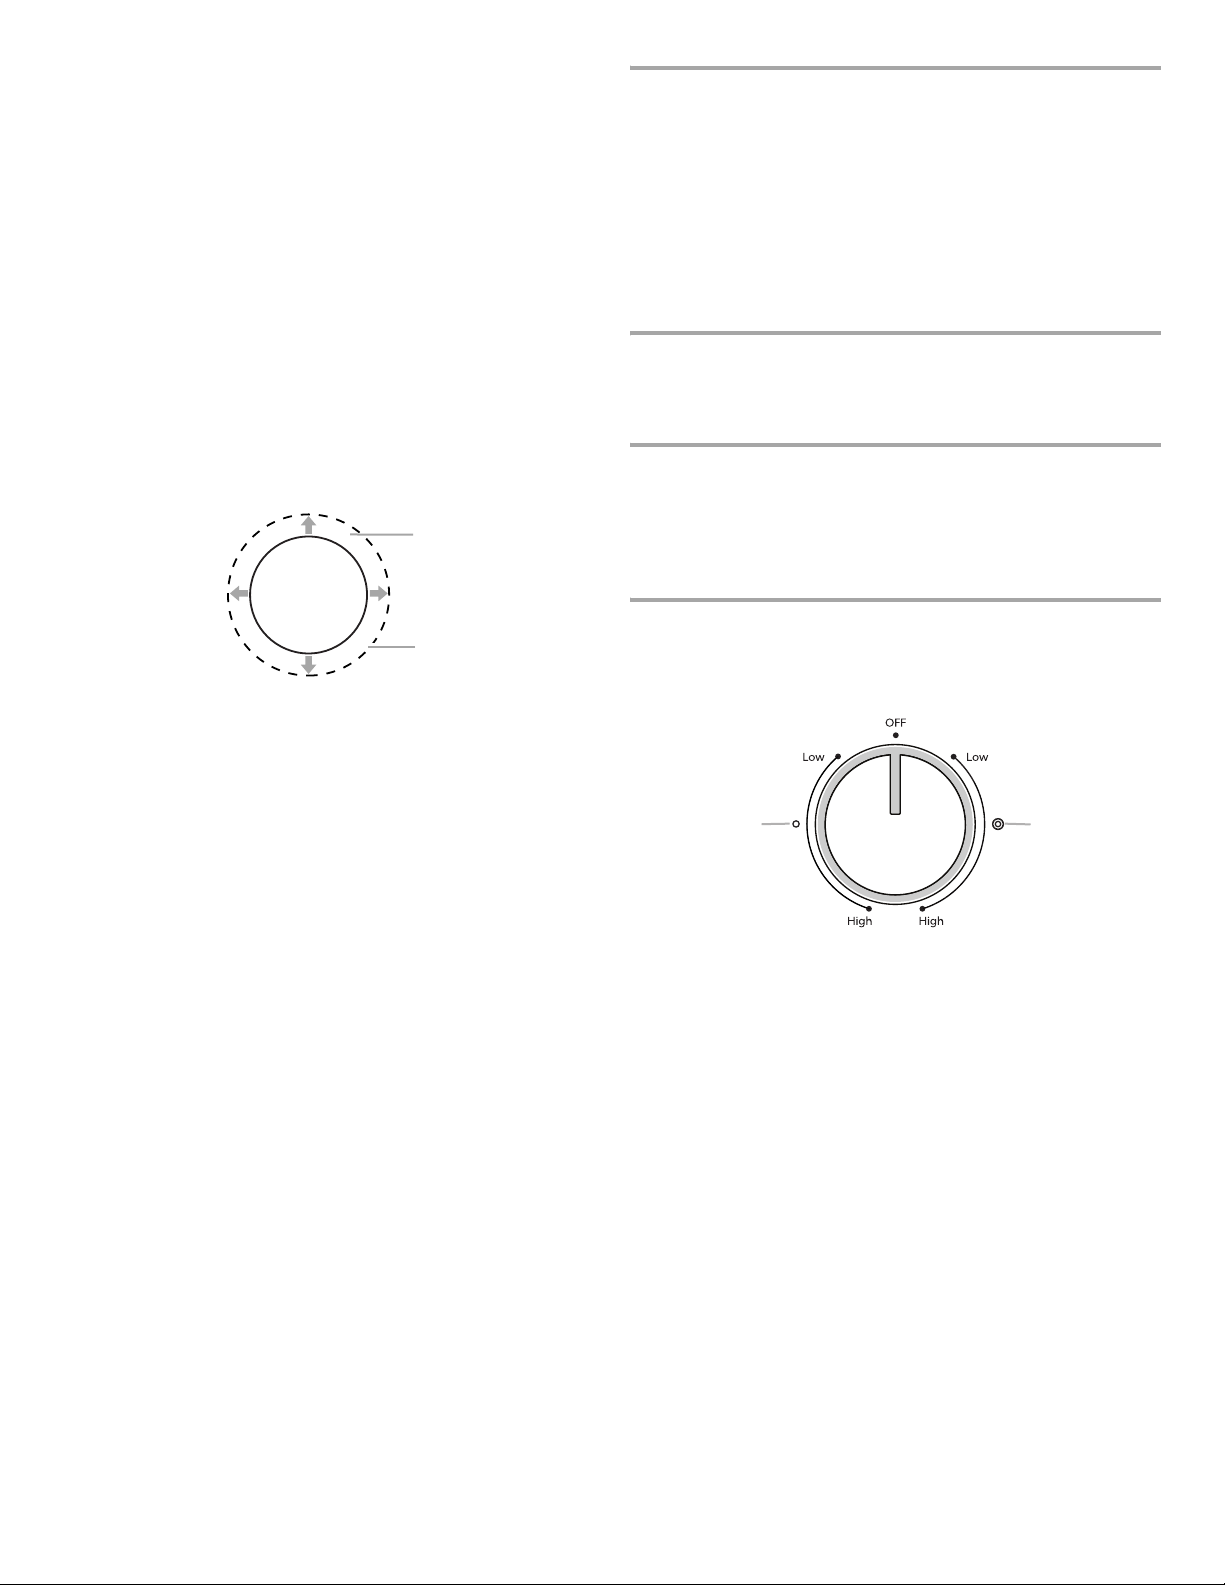
Dual Zone Cooking Element (on some models)
The Dual Zone Cooking Element offers flexibility depending on the
size of the cookware. Single size can be used in the same way as a
regular element. The dual size combines both the single and outer
element and is recommended for larger size cookware.
■ Use flat-bottomed cookware for best heat conduction and
energy efficiency. Cookware with rounded, warped, ribbed or
dented bottoms could cause uneven heating and poor cooking
results.
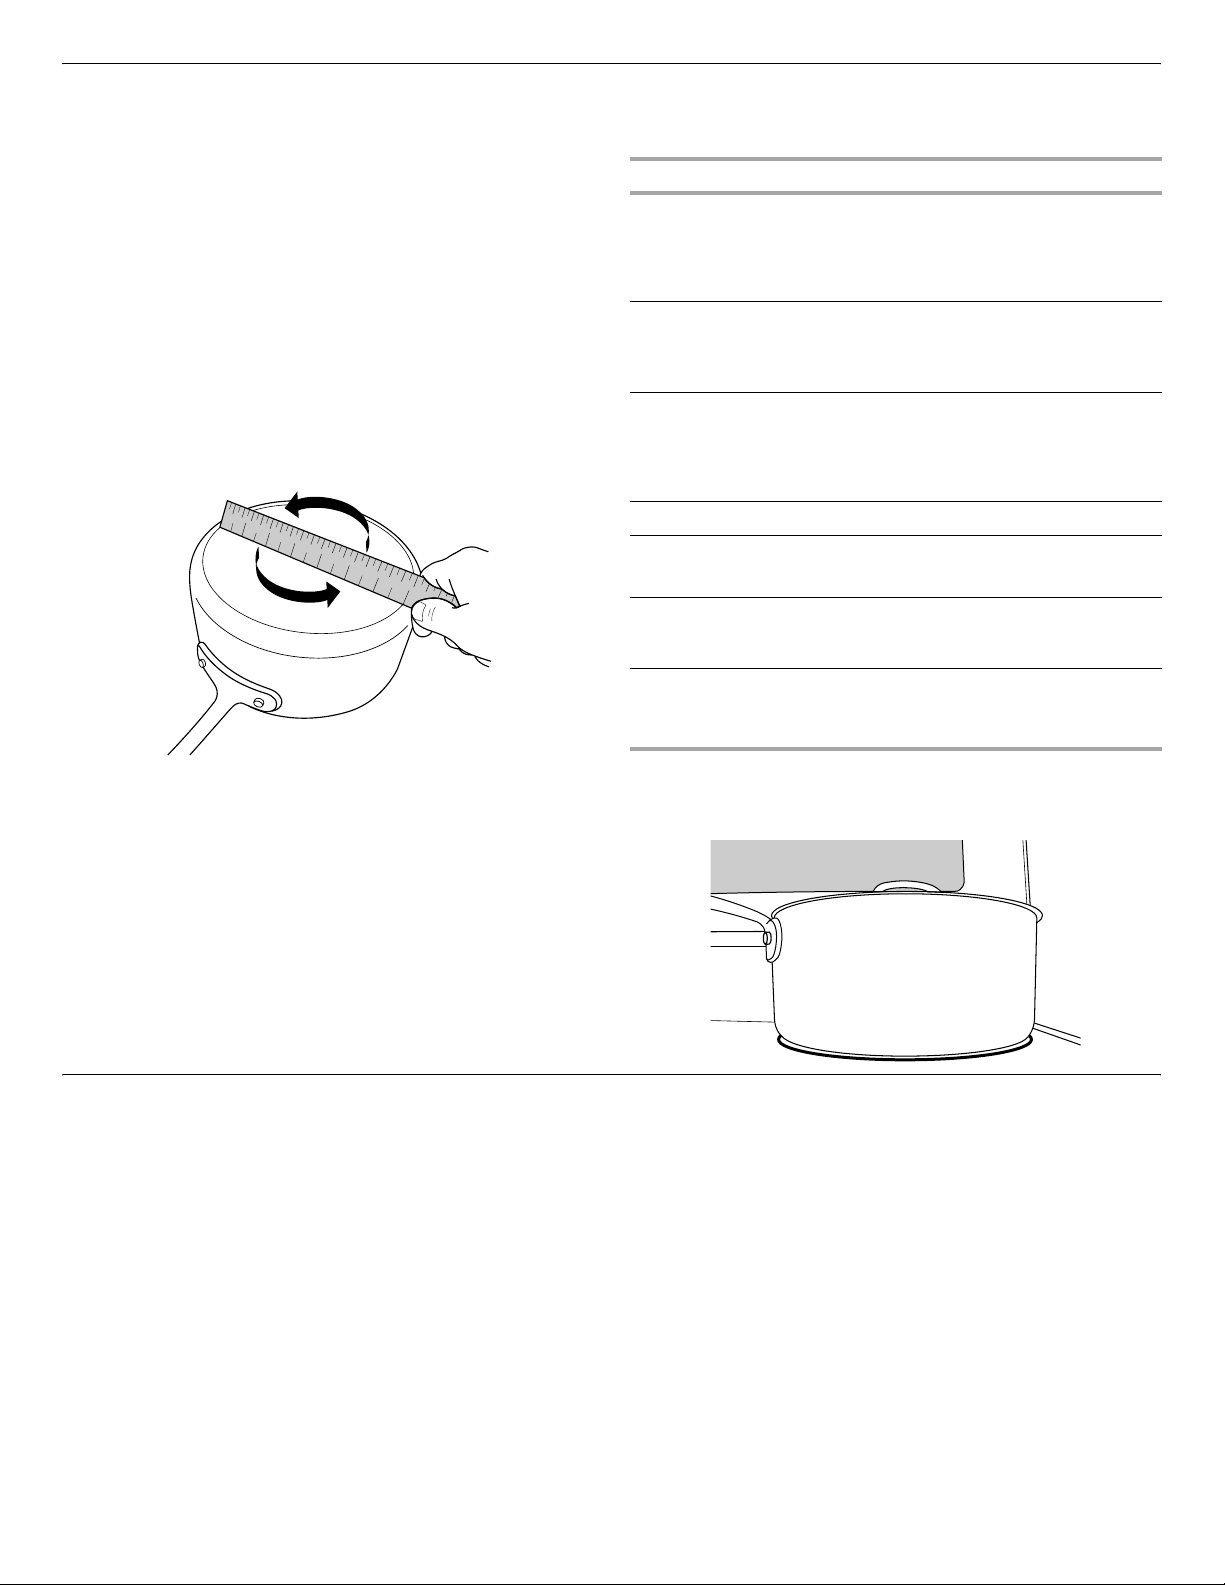
■ Determine flatness by placing the straight edge of a ruler
across the bottom of the cookware. While you rotate the ruler,
no space or light should be visible between it and the
cookware.
■ Cookware designed with slightly indented bottoms or small
expansion channels can be used.
■ Make sure the bottoms of pots and pans are clean and dry
before using them. Residue and water can leave deposits when
heated.
■ To avoid damage to the cooktop, do not cook foods directly on
the cooktop.
A
A. Single
B. Dual
6
Page 7
Cookware
IMPORTANT: Do not leave empty cookware on a hot surface
cooking area, element or surface burner.
Ideal cookware should have a flat bottom, straight sides and a wellfitting lid, and the material should be of medium-to-heavy
thickness.
Rough finishes may scratch the cooktop. Aluminum and copper
may be used as a core or base in cookware. However, when used
as a base they can leave permanent marks on the grates.
Cookware material is a factor in how quickly and evenly heat is
transferred, which affects cooking results. A nonstick finish has the
same characteristics as its base material. For example, aluminum
cookware with a nonstick finish will take on the properties of
aluminum.
Cookware with nonstick surfaces should not be used under the
broiler.
Check for flatness by placing the straight edge of a ruler across the
bottom of the cookware. While you rotate the ruler, no space or
light should be visible between it and the cookware.
1
2
3
4
1
5
6
7
2
8
9
3
1 0
1 1
1 2
4
1 3
1 4
5
1 5
1 6
6
1 7
1 8
1 9
7
2 0
Use the following chart as a guide for cookware material
characteristics.
COOKWARE CHARACTERISTICS
Aluminum
■ Heats quickly and evenly.
■ Suitable for all types of cooking.
■ Medium or heavy thickness is best for
most cooking tasks.
Cast iron
Ceramic or
Ceramic glass
■ Heats slowly and evenly.
■ Good for browning and frying.
■ Maintains heat for slow cooking.
■ Follow manufacturer’s instructions.
■ Heats slowly, but unevenly.
■ Ideal results on low to medium heat
settings.
Copper
Earthenware
Porcelain
■ Heats very quickly and evenly.
■ Follow manufacturer’s instructions.
■ Use on low heat settings.
■ See stainless steel or cast iron.
enamel-on-steel
or cast iron
Stainless steel ■ Heats quickly, but unevenly.
■ A core or base of aluminum or copper
on stainless steel provides even heating.
Home Canning
Canning can be performed on a glass smooth top cooking surface.
When canning for long periods, alternate the use of surface
cooking areas or elements between batches. This allows time for
the most recently used areas to cool.
■ Center the canner on the largest surface cooking area or
element. On electric cooktops, canners should not extend
more than ½" (1.3 cm) beyond the surface cooking area or
element.
Use flat-bottomed cookware for best cooking results and energy
efficiency. The cookware should be about the same size as the
cooking area outlined on the cooktop. Cookware should not extend
more than ½" (1.3 cm) outside the area.
■ Do not place canner on 2 surface cooking areas or elements at
the same time.
■ On ceramic glass models, use only flat-bottomed canners to
avoid damage to the cooktop and elements.
■ For more information, contact your local agricultural extension
office, or refer to the USDA Home Canning Guides. Companies
that manufacture home canning products can also offer
assistance.
7
Page 8

OVEN USE
Odors and smoke are normal when the oven is used the first few
times, or when it is heavily soiled.
Electronic Oven Controls
IMPORTANT: The health of some birds is extremely sensitive to the
fumes given off. Exposure to the fumes may result in death to
certain birds. Always move birds to another closed and wellventilated room.
Control Display
The display will flash when powered up or after a power loss. Press
CANCEL to clear. When oven is not in use, the time of day is
displayed.
Options Mode
Press and hold TIMER for 5 seconds, and “Opt” will appear. Use
the Temp/Time “up” or “down” arrow pads to cycle through the
following options. Press CANCEL to exit the mode.
Fahrenheit and Celsius
The temperature is preset at Fahrenheit, but can be changed to
Celsius. Press TIMER to toggle between Fahrenheit and Celsius.
Press CANCEL to exit.
End of Cycle Tones
“b1” (beep once) or “b” (continue to beep) will be displayed. Press
TIMER to toggle through selections. Press CANCEL to exit.
Oven Light with Door Open
“LOn” indicates that the oven light will turn on when the door is
open. If “LOFF” is displayed, the oven light will turn on only with the
oven light switch. Press TIMER to toggle through selection. Press
CANCEL to exit.
12-Hour Shutoff
If “12 Hr” is displayed, the oven will automatically shut off after
12 hours. Press TIMER to toggle to “- - Hr” to disable the 12-hour
shutoff. Press CANCEL to exit.
To n e s
Tones are audible signals, indicating the following:
Basic Functions
One tone
■ Valid pad press
■ Oven is preheated (long tone)
■ Function has been entered
■ Reminder (on some models), repeating every 20 seconds after
the end-of-cycle tones
Three tones
■ Invalid pad press
Four tones
■ End of cycle
Oven Temperature Control
IMPORTANT: Do not use a thermometer to measure oven
temperature because opening the oven door may cause element
cycling to give incorrect readings.
The oven provides accurate temperatures; however, it may cook
faster or slower than your previous oven, so the temperature can
be adjusted to personalize it for your cooking needs. It can be
changed in Fahrenheit or Celsius.
To Adjust Oven Temperature:
1. Press and hold BAKE for 5 seconds until the oven display
shows the current setting, for example “0°F CAL” or “00.”
2. Press the Temp/Time “up” or “down” arrow pads to increase or
to decrease the temperature in 10°F (5°C or 6°C) amounts. The
adjustment can be set between 30°F (17°C) and -30°F (-17°C).
3. Press START.
Sabbath Mode
The Sabbath Mode sets the oven to remain on in a Bake setting
until turned off. A Timed Bake can also be set to keep the oven on
for only part of the Sabbath. The Oven Control Lockout Feature (if
present) will be disabled during the Sabbath Mode. After the
Sabbath Mode is set no tones will sound, the display will not show
the temperature, the Kitchen Timer Mode will be canceled (if active)
and only the following pads will function:
■ “up” or “down” arrow pads
■ Cancel
When the oven door is opened or closed, the oven light will not turn
on or off and the heating elements will not turn on or off
immediately.
When power is restored after a power failure, the oven will return to
Sabbath Mode and remain Sabbath compliant with the bake
elements off until the Cancel keypad is pressed.
Pressing the Cancel keypad at any time returns the oven to the
normal cooking mode (not Sabbath Mode compliant).
Before entering the Sabbath Mode, it must be decided if the oven
light is to be on or off for the entire Sabbath Mode period. If the
light is on when entering Sabbath Mode, it will remain on for the
entire time Sabbath Mode is in use. If the light is off when entering
Sabbath Mode, it will remain off for the entire time Sabbath Mode is
in use. Opening the oven door or pressing the Oven Light keypad
will not affect the oven light once Sabbath Mode has been entered.
8
(on some models)
If the oven has the Convection Bake feature, the oven light is
controlled by a separate Oven Light switch on the console. If the
oven light is on when entering the Sabbath Mode, it will remain on
for the entire time Sabbath Mode is in use. For the oven light to be
off during the Sabbath Mode, the light bulb must be removed from
the oven prior to entering the Sabbath Mode. Not performing these
steps will cause the oven light to turn on when the oven door is
opened, resulting in the oven being not Sabbath compliant.
On the Holiday, the oven temperature can be changed once the
oven is in Sabbath Mode by pressing the “up” or “down” arrow
pads. The oven temperature will change 25°F (14°C) each time the
keypad is pressed. The display will not change, and there will be no
sounds during this adjustment.
To Bake Using Sabbath Mode:
1. Press BAKE.
2. Press the “up” or “down” arrow pads.
3. Press START.
4. Press and hold the TIMER keypad for 5 seconds. “SAb” will
flash in the display.
5. Press START within 5 seconds to enter Sabbath Mode;
otherwise, the entire cycle cancels out. “SAb” will stop flashing
and remain on in the display. The oven is now in Sabbath Mode
and is Sabbath compliant.
Pressing the Cancel keypad at any time returns the oven to the
normal cooking mode (not Sabbath Mode compliant).
Page 9
To set a Timed Bake using Sabbath Mode
(on some models):
WARNING
Food Poisoning Hazard
Do not let food sit in oven more than one hour before
or after cooking.
Doing so can result in food poisoning or sickness.
1. Press BAKE.
2. Press the “up” or “down” arrow pads to enter a temperature
other than the one displayed.
3. Press COOK TIME. The Cook Time oven indicator light will light
up.
4. Press the “up” or “down” arrow pads to enter a cook time
length.
5. Press START.
6. Press and hold the TIMER keypad for 5 seconds. “SAb” will
flash in the display.
7. Press START within 5 seconds to enter Sabbath Mode;
otherwise, the entire cycle cancels out. “SAb” will stop flashing
and remain on in the display. The oven is now in Sabbath Mode
and is Sabbath compliant. The Bake, On and Cook Time
indicator lights will be displayed.
When the set cook time ends, the oven will shut off automatically
and the indicator lights will turn off, indicating the end of the cycle.
Pressing the Cancel keypad at any time returns the oven to the
normal cooking mode (not Sabbath Mode compliant).
To set a Delayed Timed Bake using Sabbath Mode
(on some models):
1. Press BAKE.
2. Press the “up” or “down” arrow pads to enter a temperature
other than the one displayed.
3. Press COOK TIME. The Cook Time oven indicator light will light
up.
4. Press the “up” or “down” arrow pads to enter a cook time
length.
5. Press START TIME. The Start Time indicator light will light up.
6. Press the “up” or “down” arrow pads to enter a start time.
7. Press START.
8. Press and hold the TIMER keypad for 5 seconds. “SAb” will
flash in the display.
9. Press START within 5 seconds to enter Sabbath Mode;
otherwise, the entire cycle cancels out. “SAb” will stop flashing
and remain on in the display. The oven is now in Sabbath Mode
and is Sabbath compliant. The On and Delay indicator lights
will be displayed.
When the start time is reached the Bake, On and Cook Time
indicator lights will automatically turn on. When the set cook time
ends, the oven will shut off automatically and the indicator lights
will turn off, indicating the end of the cycle.
Pressing the Cancel keypad at any time returns the oven to the
normal cooking mode (not Sabbath Mode compliant).
Aluminum Foil
IMPORTANT: To avoid permanent damage to the oven bottom
finish, do not line the oven bottom with any type of foil or liner.
Positioning Racks and Bakeware
IMPORTANT: To avoid permanent damage to the porcelain finish,
do not place food or bakeware directly on the oven door or bottom.
Bakeware
To cook food evenly, hot air must be able to circulate. Allow
2" (5 cm) of space around bakeware and oven walls. Make sure
that no bakeware piece is directly over another.
Racks
■ Position racks before turning on the oven.
■ Do not move racks with bakeware on them.
■ Make sure racks are level.
To move a rack, pull it out to the stop position, raise the front edge,
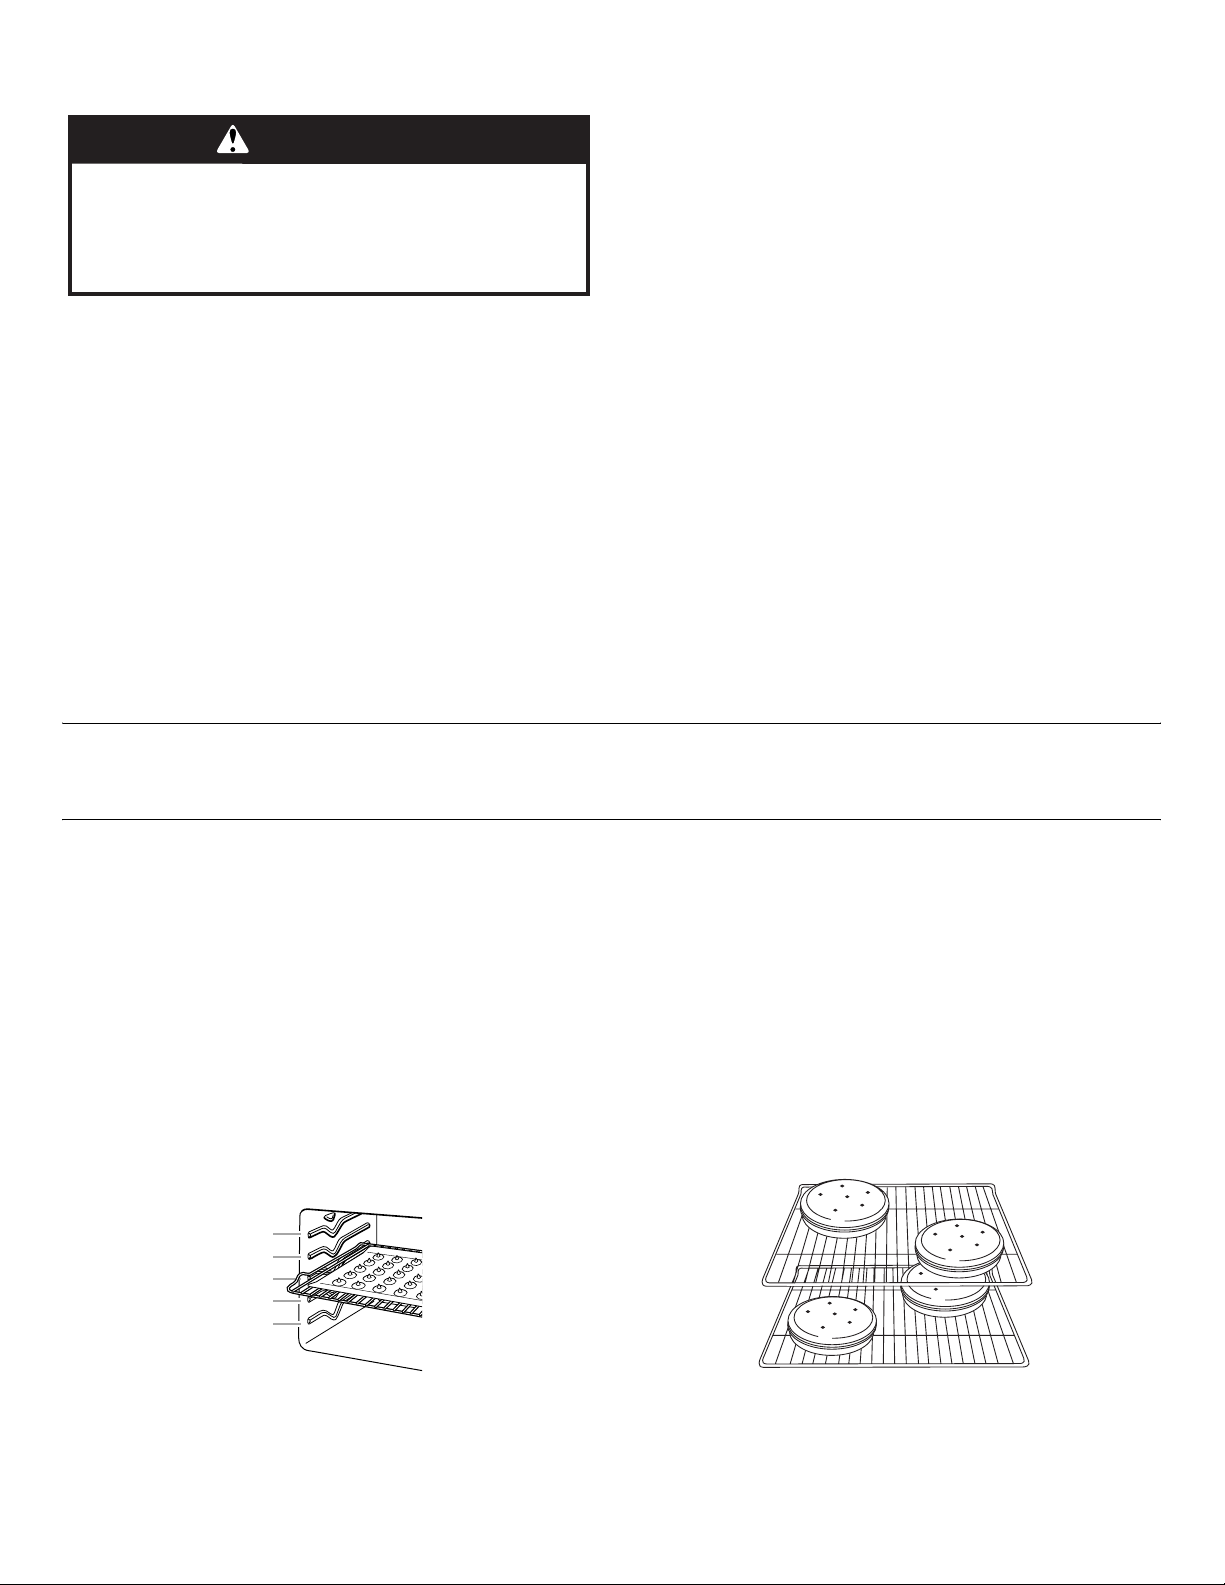
and then lift out. Use the following illustration and charts as a
guide.
5
4
3
2
1
For best cooking results, do not cover entire oven rack with foil
because air must be able to move freely.
Rack Positions
Rack 5: Toasting bread or broiling thin, non-fatty foods.
Rack 4: Use for 2-rack baking and broiling.
Rack 3: Most baked goods on a cookie sheet or jelly roll pan, layer
cakes, frozen convenience foods. Broiling chicken pieces.
Rack 2: Roasting small cuts of meat, pies, casseroles, bundt
cakes, and 2-rack baking.
Rack 1: Roasting large cuts of meat and poultry.
Multiple Rack Cooking
2-rack: Use rack positions 2 and 4.
Baking Layer Cakes on 2 Racks
For best results when baking cakes on 2 racks, use racks 2 and 4
for baking. Place the cakes on the racks as shown.
9
Page 10
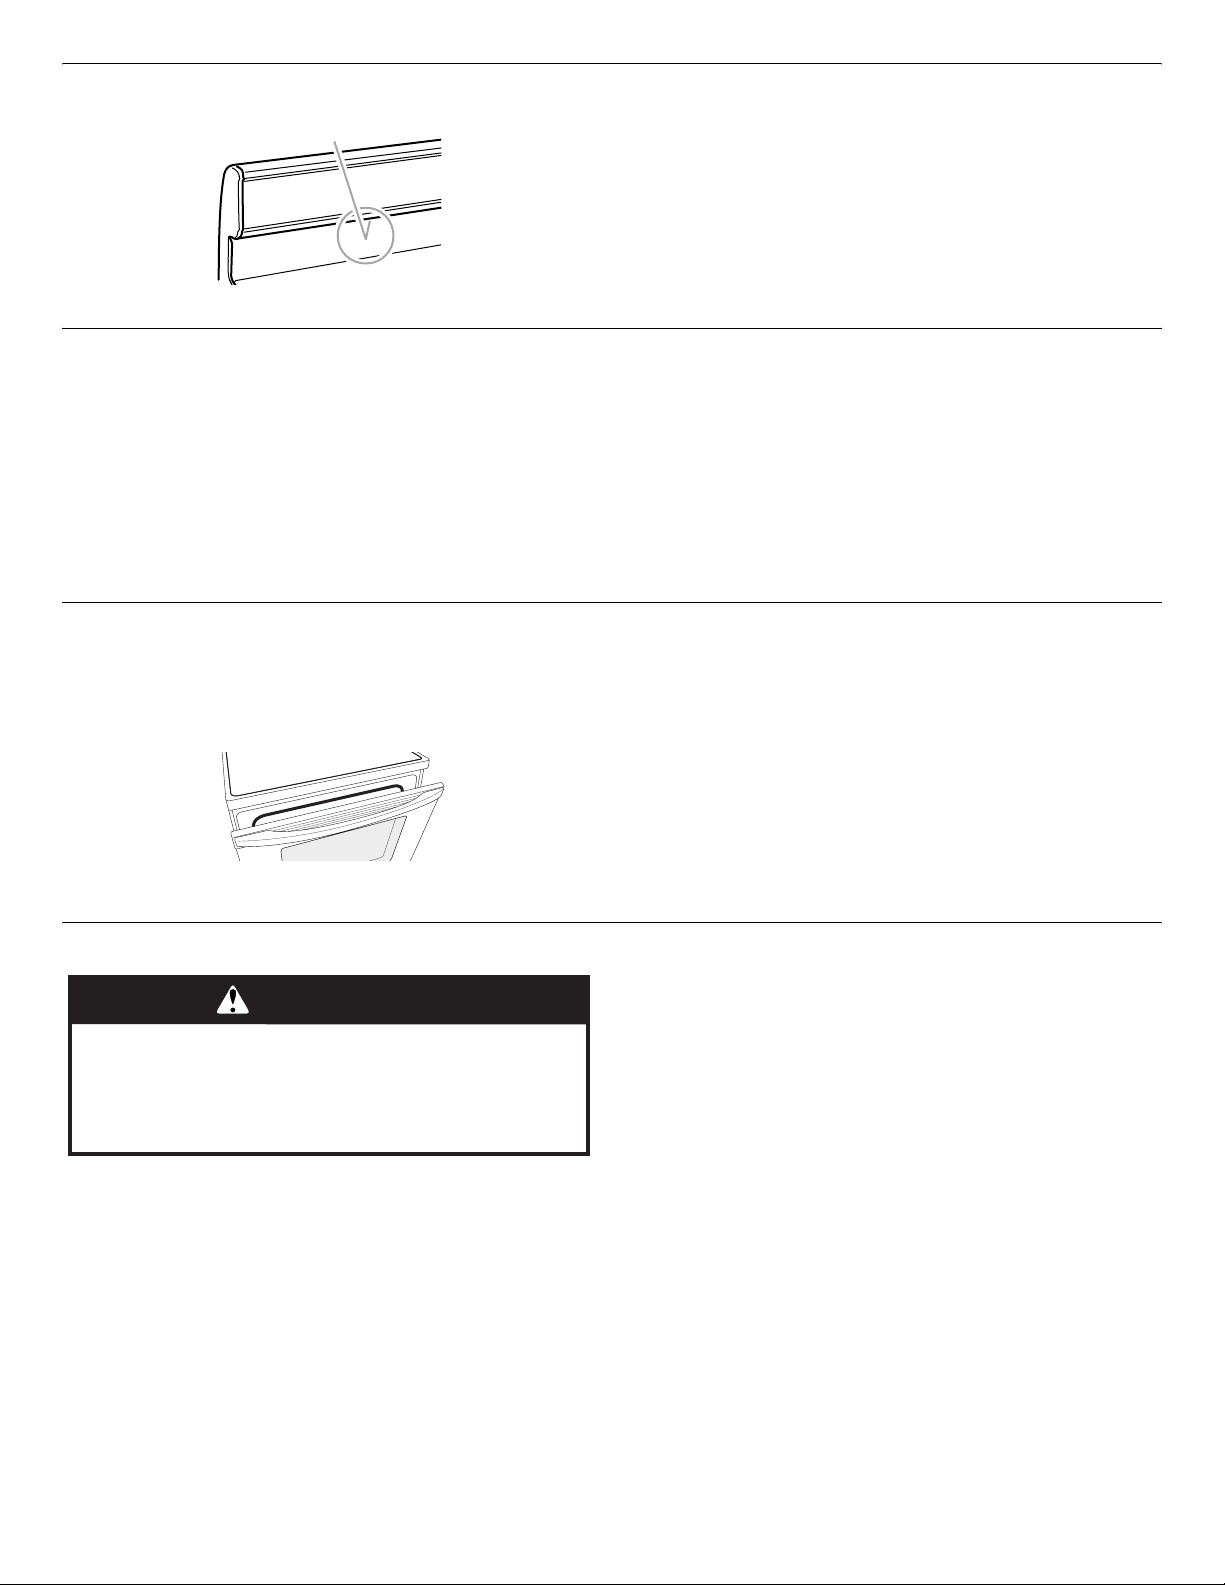
Oven Vent
A
A. Oven vent
Baking and Roasting
ACCUBAKE® Temperature Management System
The ACCUBAKE® system electronically regulates the oven heat
levels during preheat and bake to maintain a precise temperature
range for optimal cooking results. The bake and broil elements
cycle on and off in intervals. The bake element will glow red when
cycling on; the broil element will not. This feature is automatically
activated when the oven is in use.
Before baking and roasting, position racks according to
“Positioning Racks and Bakeware” section. When roasting, it is not
necessary to wait for the oven preheat cycle to end before putting
food in unless it is recommended in the recipe.
Broiling
Leave the door open 6" (15 cm) at the broil stop position to ensure
proper broiling temperature. Preheat the oven for 5 minutes before
putting food in unless recommended otherwise in the recipe.
Position food on grid in a broiler pan, then place it in the center of
the oven rack.
NOTE: Odors and smoke are normal the first few times the oven is
used or if the oven is heavily soiled.
The oven vent releases hot air and moisture from the oven, and
should not be blocked or covered. Blocking or covering the vent
will cause poor air circulation, affecting cooking and cleaning
results. Do not set plastics, paper or other items that could melt or
burn near the oven vent.
Preheating
When START is pressed, the oven will begin preheating. Once
100ºF (38ºC) is reached, the display temperature will increase as
the actual temperature of the oven increases. When the preheat
temperature is reached, a tone will sound, and the selected
temperature will appear on the display.
Changing the temperature when broiling allows more precise
control when cooking. The lower the broil setting, the slower the
cooking. Thicker cuts and unevenly shaped pieces of meat, fish
and poultry may cook better at lower broil settings. Use racks 4 or
5 for broiling. Refer to the “Positioning Racks and Bakeware”
section for more information.
On lower settings, the broil element will cycle on and off to maintain
the proper temperature.
■ For best results, use a broiler pan and grid. It is designed to
drain juices and help avoid spatter and smoke.
If you would like to purchase a broiler pan, one may be ordered.
Please refer to the “Accessories” section for more information.
Cook Time
WARNING
Food Poisoning Hazard
Do not let food sit in oven more than one hour before
or after cooking.
Doing so can result in food poisoning or sickness.
To Set a Timed Cook:
1. Press BAKE. The bake indicator light will light up.
2. Press the TEMP/TIME “up” or “down” arrow pads to enter a
temperature other than the one displayed.
3. Press COOK TIME. The cook time oven indicator light will light
up.
4. Press the TEMP/TIME “up” or “down” arrow pads to enter the
length of time to cook.
5. Press START. The display will count down the time. When the
time ends, the oven will shut off automatically and “End” will
appear on the display.
6. Press CANCEL to clear the display.
(on some models)
To Set a Delayed Timed Cook:
Before setting, make sure the clock is set to the correct time of day.
See the “Clock” keypad feature in the “Feature Guide” section.
1. Press BAKE.
2. Press the TEMP/TIME “up” or “down” arrow pads to enter a
temperature other than the one displayed.
3. Press COOK TIME. The cook time oven indicator light will light
up.
4. Press TEMP/TIME “up” or “down” arrow pads to enter the
length of time to cook.
5. Press START TIME. The start time/delay oven indicator light will
light up.
6. Press TEMP/TIME “up” or “down” arrow pads to enter the time
of day to start.
7. Press START.
When the start time is reached, the oven will automatically turn on.
The temperature and/or time settings can be changed anytime
after pressing Start by repeating steps 1-7. When the set cook time
ends, the oven will shut off automatically and “End” will appear on
the display.
8. Press CANCEL to clear the display.
10
Page 11
RANGE CARE
Self-Cleaning Cycle
WARNING
Burn Hazard
Do not touch the oven during the Self-Cleaning cycle.
Keep children away from oven during
Self-Cleaning cycle.
Failure to follow these instructions can result in burns.
IMPORTANT: The health of some birds is extremely sensitive to the
fumes given off during the Self-Cleaning cycle. Exposure to the
fumes may result in death to certain birds. Always move birds to
another closed and well-ventilated room.
Do not block the oven vent(s) during the Self-Cleaning cycle. Air
must be able to move freely. Depending on your model, see “Oven
Vent” section.
Do not clean, rub, damage or move the oven door gasket.
Prepare Range
■ Remove the broiler pan, grid, cookware and bakeware, all
cooking utensils, oven racks and aluminum foil and, on some
models, the temperature probe from the oven.
■ Use a damp cloth to clean inside door edge and the
1½" (3.8 cm) area around the inside oven cavity frame, being
certain not to move or bend the gasket.
■ Remove plastic items from the cooktop because they may
melt.
■ Remove all items from the storage drawer.
How the Cycle Works
IMPORTANT: The heating and cooling of porcelain on steel in the
oven may result in discoloring, loss of gloss, hairline cracks and
popping sounds.
Before self-cleaning, make sure the door is completely closed or
the door will not lock and the self-cleaning cycle will not begin.
Once the oven has completely cooled, remove ash with a damp
cloth. To avoid breaking the glass, do not apply a cool damp cloth
to the inner door glass before it has completely cooled.
To stop the self-cleaning cycle at anytime, press the CANCEL
keypad. If the temperature is too high, the oven door will remain
locked and “cool” and “locked” will be displayed.
The oven light will not function during the self-cleaning cycle.
(on some models)
Style 1 - Electronic Oven Control with Adjustable Clean
Time (on some models)
The SELF CLEAN self-cleaning cycle is time adjustable between
2 hours 30 minutes and 4 hours 30 minutes in 15-minute
increments. Suggested clean times are 2 hours 30 minutes for light
soil, and 4 hours 30 minutes for heavy soil. The last 30 minutes of
the cycle is for cool down.
To Self-Clean:
1. Press SELF CLEAN.
2. Press the TEMP/TIME “+” or “-” arrow pads to enter the
desired self-clean cycle time.
3. Press START.
The oven door will automatically lock. The DOOR LOCKED and
CLEAN indicator lights will be displayed. The time remaining
will also be displayed.
4. When the self-clean cycle is complete and the oven cools, the
DOOR LOCKED and CLEAN indicator lights will turn off.
5. When the oven is completely cooled, remove ash with a damp
cloth.
Style 2 - Electronic Oven Control with Adjustable Self-Clean
(HI - LO) (on some models)
The self-cleaning cycle can be set at HI self-clean time (4 hours
30 minutes) or LO self-clean time (3 hours 30 minutes). The
suggested clean times are 3 hours 30 minutes for light soil, or
4 hours 30 minutes for heavy soil. The last 30 minutes of the cycles
is for cool down.
To Self-Clean:
1. Press SELF CLEAN to set the clean time to HI (4 hours
30 minutes).
2. Press the TEMP/TIME “+” or “-” arrow pads to cycle between
LO and HI clean time.
3. Press START.
The oven door will automatically lock. The CLEAN indicator
light will be displayed. The time remaining will also be
displayed.
4. When the self-clean cycle is complete and the oven cools, the
CLEAN indicator light will turn off.
5. When the oven is completely cooled, remove ash with a damp
cloth.
11
Page 12

General Cleaning
IMPORTANT: Before cleaning, make sure all controls are off and
the oven and cooktop are cool. Always follow label instructions on
cleaning products. For additional information, you can visit the
Frequently Asked Questions (FAQs) section of our website at
www.whirlpool.com.
Soap, water and a soft cloth or sponge are suggested first unless
otherwise noted.
EXTERIOR PORCELAIN ENAMEL SURFACES (on some
models)
Food spills containing acids, such as vinegar and tomato, should
be cleaned as soon as the entire range is cool. These spills may
affect the finish.
Cleaning Method:
■ Glass cleaner, mild liquid cleaner or nonabrasive scrubbing
pad:
Gently clean around the model and serial number plate
because scrubbing may remove numbers.
■ affresh™ Kitchen and Appliance Cleaner Part Number
W10355010 (not included):
See the “Accessories” section for more information.
STAINLESS STEEL (on some models)
NOTE: To avoid damage to stainless steel surfaces, do not use
soap-filled scouring pads, abrasive cleaners, Cooktop Cleaner,
steel-wool pads, gritty washcloths or abrasive paper towels.
Damage may occur to stainless steel surfaces, even with one-time
or limited use.
Cleaning Method:
Rub in direction of grain to avoid damaging.
■ affresh™ Stainless Steel Cleaner Part Number W10355016:
See the “Accessories” section for more information.
Liquid detergent or all-purpose cleaner:
Rinse with clean water and dry with soft, lint-free cloth.
Burned-on soil
■ Clean with Cooktop Cleaner, Cleaning Pad and Cooktop
Scraper.
Metal marks from aluminum and copper
■ Clean with Cooktop Cleaner and Cleaning Pad as soon as
cooktop has cooled down. The marks will not totally disappear,
but after many cleanings they will become less noticeable.
Tiny scratches and abrasions
■ Use Cooktop Cleaner and Cleaning Pad for scratches.
Scratches and abrasions do not affect cooking performance,
and after many cleanings they will become less noticeable.
COOKTOP CONTROLS
To avoid damage to the cooktop controls, do not use steel wool,
abrasive cleansers or oven cleaner.
To avoid damage, do not soak knobs.
When replacing knobs, make sure knobs are in the OFF position.
On some models, do not remove seals under knobs.
Cleaning Method:
■ Soap and water:
Pull knobs straight away from control panel to remove.
CONTROL PANEL AND OVEN DOOR EXTERIOR
To avoid damage to the control panel, do not use abrasive
cleaners, steel-wool pads, gritty washcloths or abrasive paper
towels.
Cleaning Method:
■
Glass cleaner and soft cloth or sponge:
Apply glass cleaner to soft cloth or sponge, not directly on panel.
■ affresh™ Kitchen and Appliance Cleaner Part Number
W10355010 (not included):
See the “Accessories” section for more information.
METALLIC PAINT (on some models)
Do not use abrasive cleaners, cleaners with bleach, rust removers,
ammonia or sodium hydroxide (lye) because paint surface may
stain.
CERAMIC GLASS (on some models)
Cleaning Method:
Use affresh™ Cooktop Cleaner Part Number W10355051 and
Cooktop Scraper Part Number WA906B to clean and remove
stains from the cooktop. Use Cooktop Protectant Part Number
31463A regularly to avoid stain buildup, pitting and scratching,
while conditioning the cooktop for easier future cleaning. These
can be ordered as accessories. See the “Accessories” section for
more information. The Cooktop Scraper uses razor blades. Store
razor blades out of the reach of children.
Do not use steel wool, abrasive powder cleansers, chlorine bleach,
rust remover or ammonia because damage may occur.
Light to moderate soil
■ Can be cleaned with damp paper towels or sponge. Light
stains should be addressed with cleaner and cleaning pad.
Sugary spills (jellies, candy, syrup)
■ Clean with cooktop scraper and cooktop cleaner. Scrape off
sugary spills while the cooktop is still warm. You may want to
wear oven mitts while cleaning the cooktop.
Heavy soil, dark streaks, specks and discoloration
■ Clean with Cooktop Cleaner or nonabrasive cleaner and
cleaning pad.
COIL ELEMENTS (on some models)
Cleaning Method:
■ Damp cloth: Make sure control knobs are off and elements are
cool.
Do not clean or immerse in water. Soil will burn off when hot.
BURNER BOWLS (on some models)
Before removing or replacing coil elements and burner bowls,
make sure they are cool and the control knobs are in the OFF
position.
Remove the coil element by pushing the edge of the coil element
toward the receptacle. Lift it enough to clear the burner bowl. Pull
the coil element straight away from the receptacle to remove. Lift
out the burner bowl.
Cleaning Method:
Chrome burner bowls
Wash frequently in warm, soapy water. (It is not recommended to
wash chrome bowls in a dishwasher.) A mild abrasive cleaner and a
plastic scrubber can be used to remove stubborn stains.
For heavily soiled bowls, place an ammonia soaked paper towel on
the stains and allow to soak for a short time, then gently scrub with
a plastic scrubber.
OVEN RACKS
Cleaning Method:
■ Steel-wool pad
■ For racks that have discolored and are harder to slide, a light
coating of vegetable oil applied to the rack guides will help
them slide.
12
Page 13

STORAGE DRAWER OR WARMING DRAWER (on some
models)
Check that storage drawer or warming drawer is cool and empty
before cleaning.
Cleaning Method:
■ Mild detergent
OVEN CAVITY
Do not use oven cleaners on models with self-clean.
Food spills should be cleaned when oven cools. At high
temperatures, foods react with porcelain and staining, etching,
pitting or faint white spots can result.
Cleaning Method:
■ See the “Self-Cleaning Cycle” section, if available on your
model.
Oven Light
The oven light is a standard 40-watt appliance bulb. Before
replacing, make sure the oven and cooktop are cool and the
control knobs are in the off position.
To Replace:
1. Unplug range or disconnect power.
2. Turn the glass bulb cover in the back of the oven
counterclockwise to remove.
3. Turn bulb counterclockwise to remove from socket.
4. Replace bulb, then bulb cover by turning clockwise.
5. Plug in range or reconnect power.
TROUBLESHOOTING
First try the solutions suggested here or visit our website and reference FAQs (Frequently Asked Questions)
to possibly avoid the cost of a service call.
www.whirlpool.com
Operation
PROBLEM POSSIBLE CAUSES SOLUTIONS
Nothing will operate Power supply cord is unplugged. Plug into a grounded outlet.
Household fuse is blown, or a
circuit breaker is tripped.
The control displays an F9 or F9
E0 error code.
Cooktop will not operate The control knob is not set
Excessive heat around
cookware on cooktop
Cooktop cooking results not
what expected
Cooktop element cycles on
and off on High setting.
Oven will not operate Delay start is set. See “Cook Time” section.
Oven temperature too high or
too low
Oven indicator lights flash Power to range is turned on or
correctly.
On ceramic glass models, the
oven control lockout is set.
Cookware is not the proper size. Use cookware about the same size as the surface cooking
Control knob set to incorrect heat
level
Range is not level. Level the range. See the Installation Instructions.
Element cycling due to a
temperature limiter
Control lock is on. Press and hold START for 3 seconds to unlock.
Control is in Demo Mode. Press and hold START TIME for 10 seconds to exit Demo
Electronic oven control set
incorrectly
Oven temperature needs
adjustment.
restored.
Replace the fuse or reset the circuit breaker. If the problem
continues, call an electrician.
The electrical outlet in the home may be miswired. Contact a
qualified electrician to verify the electrical supply.
Push in knob before turning to a setting.
See the control lock keypad feature in the “Feature Guide.”
area, element or surface burner. Cookware should not extend
more than ¹⁄₂" (1.3 cm) outside the cooking area.
See “Cooktop Use” section.
This is normal operation. The element may cycle on and off to
keep the cooktop from overheating.
Mode. Demo Mode is used for display models in a showroom.
See “Electronic Oven Controls” section.
See “Oven Temperature Control” in the “Electronic Oven
Controls” section.
See “Control Display” in the “Electronic Oven Controls”
section. If the indicator lights keep flashing, call for service. See
cover for contact information.
13
Page 14

PROBLEM POSSIBLE CAUSES SOLUTIONS
Display shows messages Power failure (display shows
Self-Cleaning Cycle will not
operate
Oven cooking results not what
expected
flashing time)
Error code (display shows letter
followed by number)
Start needs to be pressed so a
cycle can begin (display shows
“PUSH” or “PSH”).
The oven door is not closed. Make sure the oven door is fully closed.
The Self-Cleaning function has
not been entered correctly.
A Timed Cooking function has
been entered.
The range is in Sabbath Mode. See the “Sabbath Mode” section.
Range is not level. Level the range. See the Installation Instructions.
The temperature set was
incorrect.
Oven temperature needs
adjustment.
Oven was not preheated. See “Baking and Roasting” section.
Racks were positioned
improperly.
Not enough air circulation around
bakeware.
Batter distributed unevenly in pan Check that batter is level in the pan.
Darker browning of food caused
by dull or dark bakeware
Lighter browning of food caused
by shiny or light colored
bakeware
Incorrect length of cooking time
was used.
Oven door was not closed. Be sure that the bakeware does not keep the door from closing.
Oven door was opened during
cooking.
Rack is too close to bake burner,
making baked items too brown
on bottom.
Pie crusts browning too quickly. Use aluminum foil to cover the edge of the crust and/or reduce
Clear the display. On some models, reset the clock, if needed.
See “Clock” keypad feature in the “Feature Guide” section.
Depending on your model, press CANCEL to clear the display.
See “Control Display” in the “Electronic Oven Controls”
section. If it reappears, call for service. See cover for contact
information.
See the “Start” keypad feature in the “Feature Guide” section.
See the “Self-Cleaning Cycle” section.
See the “Cook Time” section.
Double-check the recipe in a reliable cookbook.
See “Oven Temperature Control” in the “Electronic Oven
Controls” section.
See “Positioning Racks and Bakeware” section.
See “Positioning Racks and Bakeware” section.
Lower oven temperature 25°F (15°C) or move rack to a higher
position in the oven.
Move rack to a lower position in the oven.
Adjust cooking time.
Oven peeking releases oven heat and can result in longer
cooking times.
Move rack to higher position in the oven.
baking temperature.
14
Page 15

ACCESSORIES
For accessories, you can visit our website at www.whirlpool.com/cookingaccessories.
Cooktop Care Kit
(ceramic glass models)
(includes cleaner, protectant, scraper, and
applicator pads)
Order Part Number 31605
Cooktop Protectant
(ceramic glass models)
Order Part Number 31463A
affresh™ Stainless Steel Cleaning Wipes
(stainless steel models)
Order Part Number W10355049
affresh™ Cooktop Cleaner
(ceramic glass models)
Order Part Number W10355051
affresh™ Stainless Steel Cleaner
(stainless steel models)
Order Part Number W10355016
affresh™ Kitchen and Appliance
Cleaner
Order Part Number W10355010
Cooktop Scraper
(ceramic glass models)
Order Part Number WA906B
Granite Cleaner and Polish
Order Part Number W10275756
Gas Grate and Drip Pan Cleaner
Order Part Number 31617A
Gourmet Griddle
Order Part Number 4396096RB
Standard Flat Oven Rack
Order Part Number W10268578
Porcelain Broiler Pan and Grid
Order Part Number 4396923
Premium Broil Pan and Roasting Rack
Order Part Number W10123240
www.whirlpool.com/broilerpan
WHIRLPOOL CORPORATION MAJOR APPLIANCE WARRANTY
LIMITED WARRANTY
For one year from the date of purchase, when this major appliance is operated and maintained according to instructions attached to or
furnished with the product, Whirlpool Corporation or Whirlpool Canada LP (hereafter “Whirlpool”) will pay for Factory Specified Parts and
repair labor to correct defects in materials or workmanship. Service must be provided by a Whirlpool designated service company. This
limited warranty is valid only in the United States or Canada and applies only when the major appliance is used in the country in which it
was purchased. Outside the 50 United States and Canada, this limited warranty does not apply. Proof of original purchase date is required
to obtain service under this limited warranty.
ITEMS EXCLUDED FROM WARRANTY
This limited warranty does not cover:
1. Service calls to correct the installation of your major appliance, to instruct you on how to use your major appliance, to replace or repair
house fuses, or to correct house wiring or plumbing.
2. Service calls to repair or replace appliance light bulbs, air filters or water filters. Consumable parts are excluded from warranty
coverage.
3. Repairs when your major appliance is used for other than normal, single-family household use or when it is used in a manner that is
contrary to published user or operator instructions and/or installation instructions.
4. Damage resulting from accident, alteration, misuse, abuse, fire, flood, acts of God, improper installation, installation not in accordance
with electrical or plumbing codes, or use of consumables or cleaning products not approved by Whirlpool.
5. Cosmetic damage, including scratches, dents, chips or other damage to the finish of your major appliance, unless such damage
results from defects in materials or workmanship and is reported to Whirlpool within 30 days from the date of purchase.
6. Any food loss due to refrigerator or freezer product failures.
7. Costs associated with the removal from your home of your major appliance for repairs. This major appliance is designed to be
repaired in the home and only in-home service is covered by this warranty.
8. Repairs to parts or systems resulting from unauthorized modifications made to the appliance.
9. Expenses for travel and transportation for product service if your major appliance is located in a remote area where service by an
authorized Whirlpool servicer is not available.
10. The removal and reinstallation of your major appliance if it is installed in an inaccessible location or is not installed in accordance with
published installation instructions.
11. Major appliances with original model/serial numbers that have been removed, altered or cannot be easily determined. This warranty is
void if the factory applied serial number has been altered or removed from your major appliance.
The cost of repair or replacement under these excluded circumstances shall be borne by the customer.
DISCLAIMER OF IMPLIED WARRANTIES; LIMITATION OF REMEDIES
CUSTOMER'S SOLE AND EXCLUSIVE REMEDY UNDER THIS LIMITED WARRANTY SHALL BE PRODUCT REPAIR AS PROVIDED
HEREIN. IMPLIED WARRANTIES, INCLUDING WARRANTIES OF MERCHANTABILITY OR FITNESS FOR A PARTICULAR PURPOSE,
ARE LIMITED TO ONE YEAR OR THE SHORTEST PERIOD ALLOWED BY LAW. WHIRLPOOL SHALL NOT BE LIABLE FOR INCIDENTAL
OR CONSEQUENTIAL DAMAGES. SOME STATES AND PROVINCES DO NOT ALLOW THE EXCLUSION OR LIMITATION OF INCIDENTAL
OR CONSEQUENTIAL DAMAGES, OR LIMITATIONS ON THE DURATION OF IMPLIED WARRANTIES OF MERCHANTABILITY OR
FITNESS, SO THESE EXCLUSIONS OR LIMITATIONS MAY NOT APPLY TO YOU. THIS WARRANTY GIVES YOU SPECIFIC LEGAL
RIGHTS, AND YOU MAY ALSO HAVE OTHER RIGHTS WHICH VARY FROM STATE TO STATE OR PROVINCE TO PROVINCE.
If outside the 50 United States and Canada, contact your authorized Whirlpool dealer to determine if another warranty applies. 9/07
15
Page 16

For additional product information, in the U.S.A., visit www.whirlpool.com.
If you do not have access to the Internet and you need assistance using your product or you would like to schedule service, you may
contact Whirlpool at the number below.
Have your complete model number ready. You can find your model number and serial number on the label, located on the oven frame
behind the storage drawer panel.
For assistance or service in the U.S.A., call 1-800-253-1301.
If you need further assistance, you can write to Whirlpool with any questions or concerns at the address below:
Whirlpool Brand Home Appliances
Customer eXperience Center
553 Benson Road
Benton Harbor, MI 49022-2692
Please include a daytime phone number in your correspondence.
Please keep this User Instructions and model number information for future reference.
W10394383A
SP PN W10395091A
© 2011 Whirlpool Corporation.
All rights reserved. ® Registered Trademark/TM Trademark of Whirlpool, U.S.A.
Printed in U.S.A.
11/11
 Loading...