

Page 1
產品安全指引、使用說明及安裝指南
Model : WFCI75430
產品型號
:
WFCI75430
Page 2
3
繁體中文
18
2
Page 3
Index
USER MANUAL 3
CONTROL PANEL 5
WASH CYCLE TABLE 5
PRODUCT DESCRIPTION 5
DETERGENT DISPENSER 5
WASH CYCLES 6
FIRST-TIME USE 6
DAILY USE 6
PAUSING A CYCLE 6
OPENING THE DOOR, IF NECESSARY 6
CHANGING A RUNNING WASH CYCLE 6
END OF THE CYCLE 6
OPTIONS 6
CHILD LOCK 7
TIPS AND SUGGESTIONS 7
CARE AND MAINTENANCE 7
LOAD BALANCING SYSTEM 7
TROUBLESHOOTING 8
CLEANING AND MAINTENANCE 9
CLEANING THE OUTSIDE OF THE WASHER-DRYER 9
CHECKING THE WATER SUPPLY HOSE 9
CLEANING THE MESH FILTERS IN THE WATER SUPPLY HOSE 9
3
Page 4
CLEANING THE DETERGENT DISPENSER 10
CLEANING THE WATER FILTER / DRAINING RESIDUAL WATER 10
TRANSPORT AND HANDLING 11
AFTER-SALES SERVICE 11
SAFETY INSTRUCTIONS 12
INSTALLATION GUIDE 14
4
Page 5
GB
Quick Guide
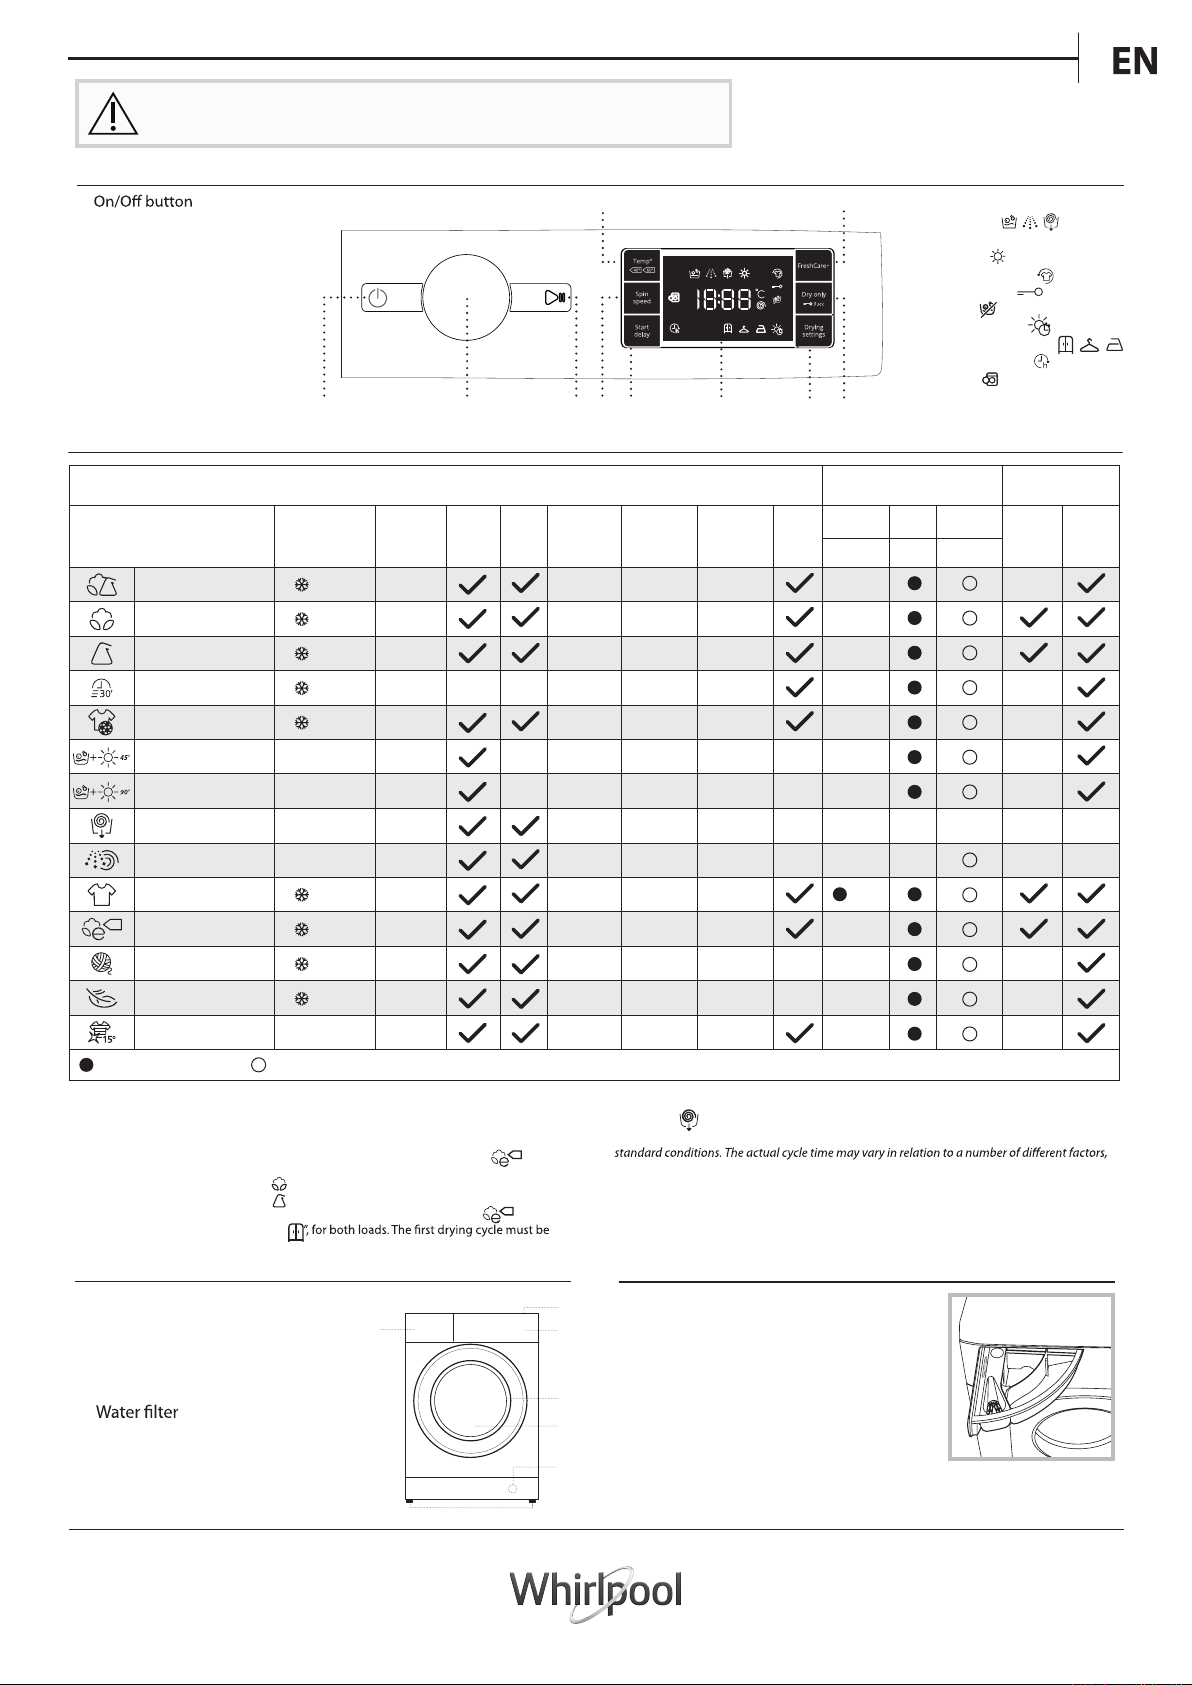
CONTROL PANEL
Before using the appliance carefully read the Safety Instruction.
Before using the machine, it is imperative that the transport bolts are removed.
For more detailed instructions on how to remove them, see the Installation Guide.
DETERGENT DISPENSER
Compartment 1: Pre-wash detergent
(powder)
Compartment 2: Washing detergent
(powder or liquid)
Compartment 3: Additives (fabric softeners,
etc.)
The fabric softener must not exceed the “MAX”
level.
! Use powder detergent for white cotton
garments, for pre-washing, and for washing at
temperatures over 60°C.
! Follow the instructions given on the detergent packaging.
1
2
3
PRODUCT DESCRIPTION
1. Worktop
2. Detergent dispenser
3. Control panel
4. Door handle
5. Door
6.
7. Adjustable feet (4)
1.
3.
2.
5.
4.
6.
7.
1.
2. Programme selector
3. Start/Pause button
4. Temperature button
5. FreshCare+ button
6. Dry Only button / Lock button
7. Drying settings button
8. Display
9. Start delay button
10. Spin speed button
21
9
3410
6
5
7
8
DISPLAY INDICATORS
Washing phase
Indicates washing phase of the cycle
Drying phase
FreshCare+ activated
Key lock activated
Drying only
Timer drying mode
Drying automatic levels
Start delay activated
Door locked
* Select the programme and set the spin speed to “0“ to drain only.
The cycle duration indicated on the display or in the manual is an estimated time calculated for
such as inlet water temperature and pressure, ambient temperature, quantity of detergent, size
and type of load, load balancing and any additional optional functions selected.
6th Sense - the sensor technology adapts water, energy and programme duration to your
wash load.
For wash programmes with temperatures above 50°C, we recommend using powder
detergent rather than liquid, and following the directions given on the detergent package.
For all Test Institutes
1) Test programme in compliance with standard EN 50229 (Wash): select the “
”
programme with a temperature of 60°C.
2) Long cotton programme: set the “ “ programme with a temperature of 40°C.
3) Synthetic program along: set the “
“ programme with a temperature of 40°C.
Test programme in compliance with standard EN 50229 (Drying): select the “
“ wash
programme and set the drying level to “
carried out with the nominal load.
WASH CYCLE TABLE
Programme
MIXED
COTTON (2)
SYNTHETICS (3)
RAPID 30’
SPORT
WASH&DRY 45 min
WASH & DRY 90
min
SPIN & DRAIN *
RINSE & SPIN
WHITE
ECO COTTON (1)
WOOL
DELICATES
COLOUR 15°
Required dosage Optional dosage
Maximum load 7 kg
Available
temperatures
- 40°C
- 60°C
- 60°C
- 30°C
- 40°C
30°C
30°C
-
-
- 90°C
- 60°C
- 40°C
- 30°C
15°C
Max. spin
speed
(rpm)
1000
1400
1200
800
600
1400
1200
1400
1400
1400
1400
800
0
1000
Drying
-
Dry
Only
-
-
-
Max. load
for wash
cycle (kg)
4.5
7
4.5
3.5
4
1
2
7
7
7
7
2
1
4.5
Max. load
for drying
cycle (kg)
4.5
5
4.5
-
4
1
2
5
5
5
5
2
1
4.5
Default
wash cycle
duration
(hh:mm)
1:00
3:50
3:15
0:30
1:30
0:45
1:30
0:10
0:50
2:50
2:55
1:15
1:20
1:30
Detergents and additives
Prewash
Fresh
Care+
1
-
-
-
-
-
-
-
-
-
-
-
-
-
(90°)
-
-
-
-
-
-
Main
2
-
-
Softener
3
-
Recommended
detergent
Powder
Liquid
-
-
-
-
-
-
-
-
-
-
-
-
5
Page 6
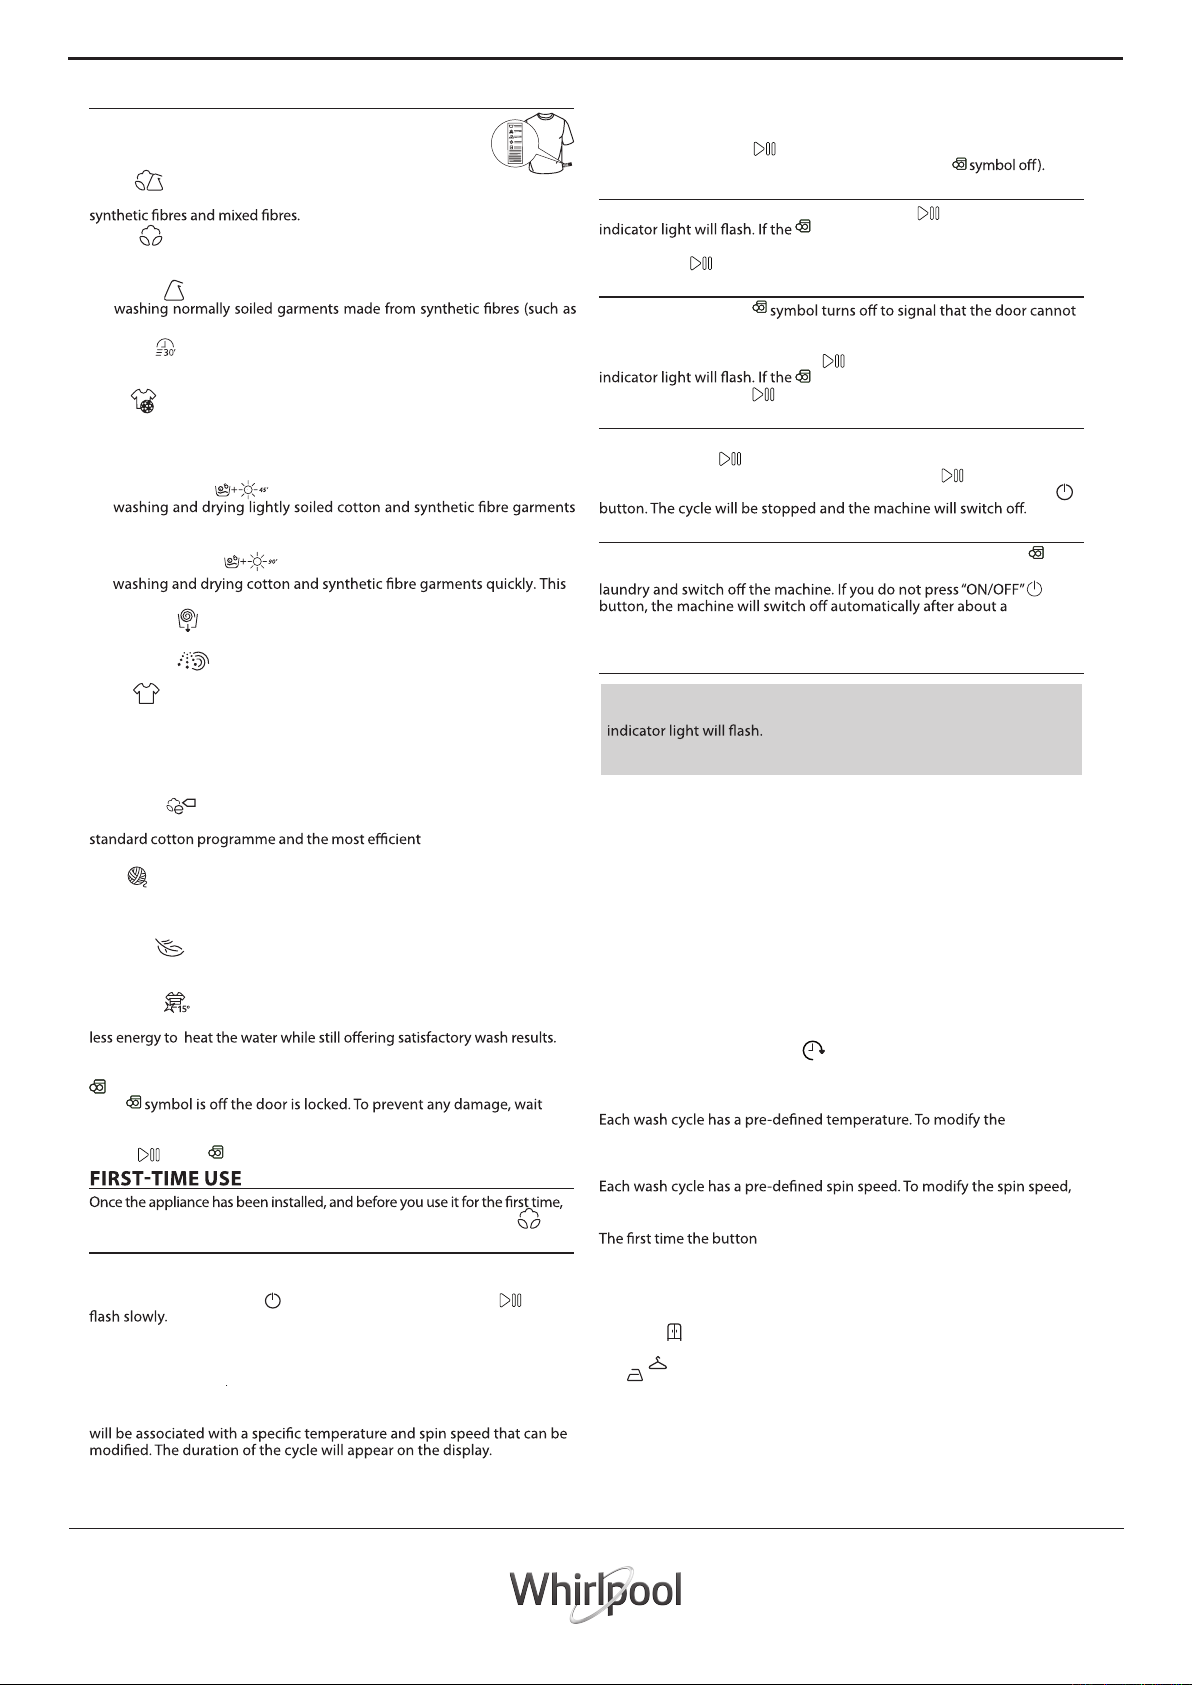
WASH CYCLES
Follow the instructions on the symbols of the garment’s wash
care label. The value indicated in the symbol is the maximum
recommended temperature for washing the garment.
Mixed
For washing lightly to normally soiled resilient garments in cotton, linen,
Cotton
For washing normally to heavily soiled towels, underwear, table and bed
linen etc. in resilient cotton and linen.
Synthetics
For
polyester, polyacrylic, viscose etc.) or cotton/synthetic blends.
Rapid 30’
For washing lightly soiled garments quickly: this cycle lasts only 30 minutes,
saving time and energy. Maximum load 3.5 Kg.
Sport
For washing lightly soiled sports clothing (tracksuits, shorts, etc.). For best
results, we recommend not exceeding the maximum load indicated in
the ‘‘WASH CYCLE TABLE‘‘. We recommend using liquid detergent , and
adding the amount suitable for half-load.
Wash&Dry 45 min
For
quickly. This cycle washes and dries a laundry load of up to 1 Kg in just 45
minutes.
Wash & Dry 90 min
For
cycle washes and dries a laundry load of up to 2 Kg in just 90 minutes.
Spin & Drain
Spins the load then empties the water. For resilient garments.
Rinse & Spin
Rinses and then spins. For resilient garments.
White
For washing normally to heavily soiled towels, underwear, table and bed linen,
etc in resilient cotton and linen. Only when the temperature is selected at 90°C
the cycle is provided with a prewash phase before main washing phase. In this
case it is recommended to add detergent both, in the prewash and main wash
sections.
Eco Cotton
For washing normally soiled cotton garments. At 40°C and 60°C, this is the
energy consumption.
Wool
All wool garments can be washed using programme “Wool“ even those
carrying the “hand-wash only “ label. For best results, use special detergents
and do not exceed max kg declaration of laundry.
Delicates
For washing particularly delicate garments. Preferably turn garments inside
out before washing.
Colour 15°
This cycle helps protect colours by washing in cold water (15°C) and uses
Suitable for lightly soiled, unstained garments. This cycle oers wash results
comparable to 40°C mixed at just 15°C
If the
until the symbol turns on before opening the door.
To open the door while a cycle is in progress, press the START/PAUSE
button
run a wash cycle with detergent and no laundry, using the wash cycle (60°).
in terms of water and
Door locked indicator
; if the symbol is lit, the door can be opened.
DAILY USE
Prepare the laundry by following the suggestions appearing under the
“TIPS AND SUGGESTIONS” section.
- Press the ON/OFF button
- Open the door. Load the laundry while making sure not to exceed the
maximum load quantity indicated in the “WASH CYCLE TABLE”.
- Pull out the detergent dispenser drawer and pour the detergent into the
relevant compartments as described in “DETERGENT DISPENSER” section.
- Close the door.
- Use the WASH CYCLE selector knob to select the desired wash cycle: it
- The machine automatically displays the default temperature and spin
speed values for the selected cycle, or the most recently used settings if
; the START/PAUSE indicator light will
they are compatible with the selected cycle.
- Select the drying cycle if desired.
- Select the desired options.
- Press the START/PAUSE
indicator light will light up steady and the door will lock (
button to start the wash cycle; the relative
PAUSING A CYCLE
To pause the wash cycle, press the START/PAUSE button again; the
start the wash cycle from the point at which it was interrupted, press the
START/PAUSE
button again.
symbol is lit, the door may be opened. To
OPENING THE DOOR, IF NECESSARY
Once a cycle starts, the
be opened. While a wash cycle is running, the door remains locked. To
open the door while a cycle is under way, for example, to add or remove
garments, press the START/PAUSE
Press the START/PAUSE
button again to continue the cycle.
button to pause the cycle; the
symbol is lit, the door may be opened.
CHANGING A RUNNING WASH CYCLE
To change a wash cycle while it is in progress, pause the machine using
the START/PAUSE button (the relative indicator light will ash), then
select the desired cycle and press the START/PAUSE button again.
! To cancel a cycle that has already begun, press and hold the ON/OFF
END OF THE CYCLE
This will be indicated by the word “END” on the display; when the
symbol switches on, the door may be opened. Open the door, unload the
hour. Close the water tap, open the door and unload the machine. Leave
the door ajar to allow the drum to dry.
half of an
OPTIONS
! If the selected option is incompatible with the programme set, the
incompatibility will be signalled by a buzzer and the corresponding
! If the selected option is incompatible with another previously set
option, only the most recent selection will remain active.
Freshcare+
If associated with wash cycles, this option increases their performances by
generating steam to block proliferation of the main sources of unpleasant
odours inside the appliance (exclusively for the wash). After the steam
phase, the machine runs a delicate cycle with slow drum rotations. When
the Freshcare+ option is associated with drying cycles, it prevents
stubborn creases from stabilising on garments, thanks to slow drum
rotations.
The FreshCare+ cycle starts at the end of the wash or drying cycle and
continues for maximum 6 hours; it can be interrupted at any time by
pressing any button on the control panel, or by turning the knob. Wait
roughly 5 minutes before opening the door.
Start delay
To set the selected programme to start at a later time, press the button to
set the desired delay time. The
function is enabled. To cancel the delayed start, press the button again
until the value “0” is shown on the display.
Temperature
temperature, press the “Temp.” button. The value will appear on the
display.
Spin
press the “Spin speed” button. The value will appear on the display.
Setting the drying cycle
automatically select the maximum drying cycle which is compatible with
the selected wash cycle. Subsequent presses will decrease the drying level
and then the drying time, until the cycle is excluded completely (“OFF”).
Drying may be set as follows:
A- Based on the desired laundry dryness level:
Cupboard
without being ironed.
Hanger
Iron
remaining dampness softens creases, making them easier to remove.
B - Based on a set time period: between 30-210 minutes.
If your laundry load to be washed and dried is much greater than the
maximum stated load (see “WASH CYCLE TABLE” ), perform the
wash cycle, and when the cycle is complete, divide the garments into
groups and put some of them back in the drum.
symbol lights on the display when this
h.
“Drying settings” is pressed, the machine will
: suitable for laundry which can be put back in a cupboard
: ideal for clothes which do not need to be dried fully.
: suitable for clothes which will need ironing afterwards, the
6
Page 7
At this point, follow the instructions provided for a “Drying only” cycle.
Repeat this procedure for the remainder of the load. Note: a cooling-down
period is always added to the end of each drying cycle.
Drying only
Press button “Dry only” to perform the drying-only cycle. After selecting
the desired cycle (compatible with the type of garments), press button
“Dry only” to exclude the washing phase and start the drying phase at the
maximum level for the selected cycle. The drying level or t
and changed by pressing the drying button “Drying settings”.
ime may be set
CHILD LOCK
To lock the control panel, press and hold the button “Dry only” for
approximately 3 seconds. the symbol
that the control panel is locked (with the exception of the
prevents unintentional changes to programmes, especially with children
near the machine.
If any attempt is made to use the control panel, the symbol
the display.
To unlock the control panel, press and hold the button “Dry only” for
approximately 3 seconds.
lights on the display to indicate
button). This
TIPS AND SUGGESTIONS
Divide the laundry according to:
hand-washed). Colour (separate coloured garments from whites, wash
new coloured garments separately). Delicates (small garments – such as
nylon stockings – and items with hooks – such as bras: insert them in a
fabric bag).
Empty the pockets:
Objects such as coins or lighters can damage the washer-dryer and
the drum. Check all buttons.
CARE AND MAINTENANCE
Before performing cleaning and maintenance, switch the washer-dryer
clean the washer-dryer.
Disconnect the water and power supplies
Close the water tap after every wash. This will limit wear on the hydraulic
system inside the washer-dryer and help to prevent leaks.
Unplug the washer-dryer when cleaning it and during all maintenance work.
Clean the washer-dryer
The outer parts and rubber components of the appliance can be cleaned
using a soft cloth soaked in lukewarm soapy water. Do not use solvents or
abrasives.
Care for the door and drum
Always leave the porthole door ajar in order to prevent unpleasant
odours from forming.
LOAD BALANCING SYSTEM
Before every spin cycle, to avoid excessive vibrations before every spin and
to distribute the load in a uniform manner, the drum rotates continuously
at a speed which is slightly greater than the washing rotation speed. If,
after several attempts, the load is not balanced correctly, the machine
spins at a reduced spin speed. If the l
washer-dryer performs the distribution process instead of spinning. To
encourage improved load distribution and balance, we recommend small
and large garments are mixed in the load.
oad is excessively unbalanced, the
7
Page 8
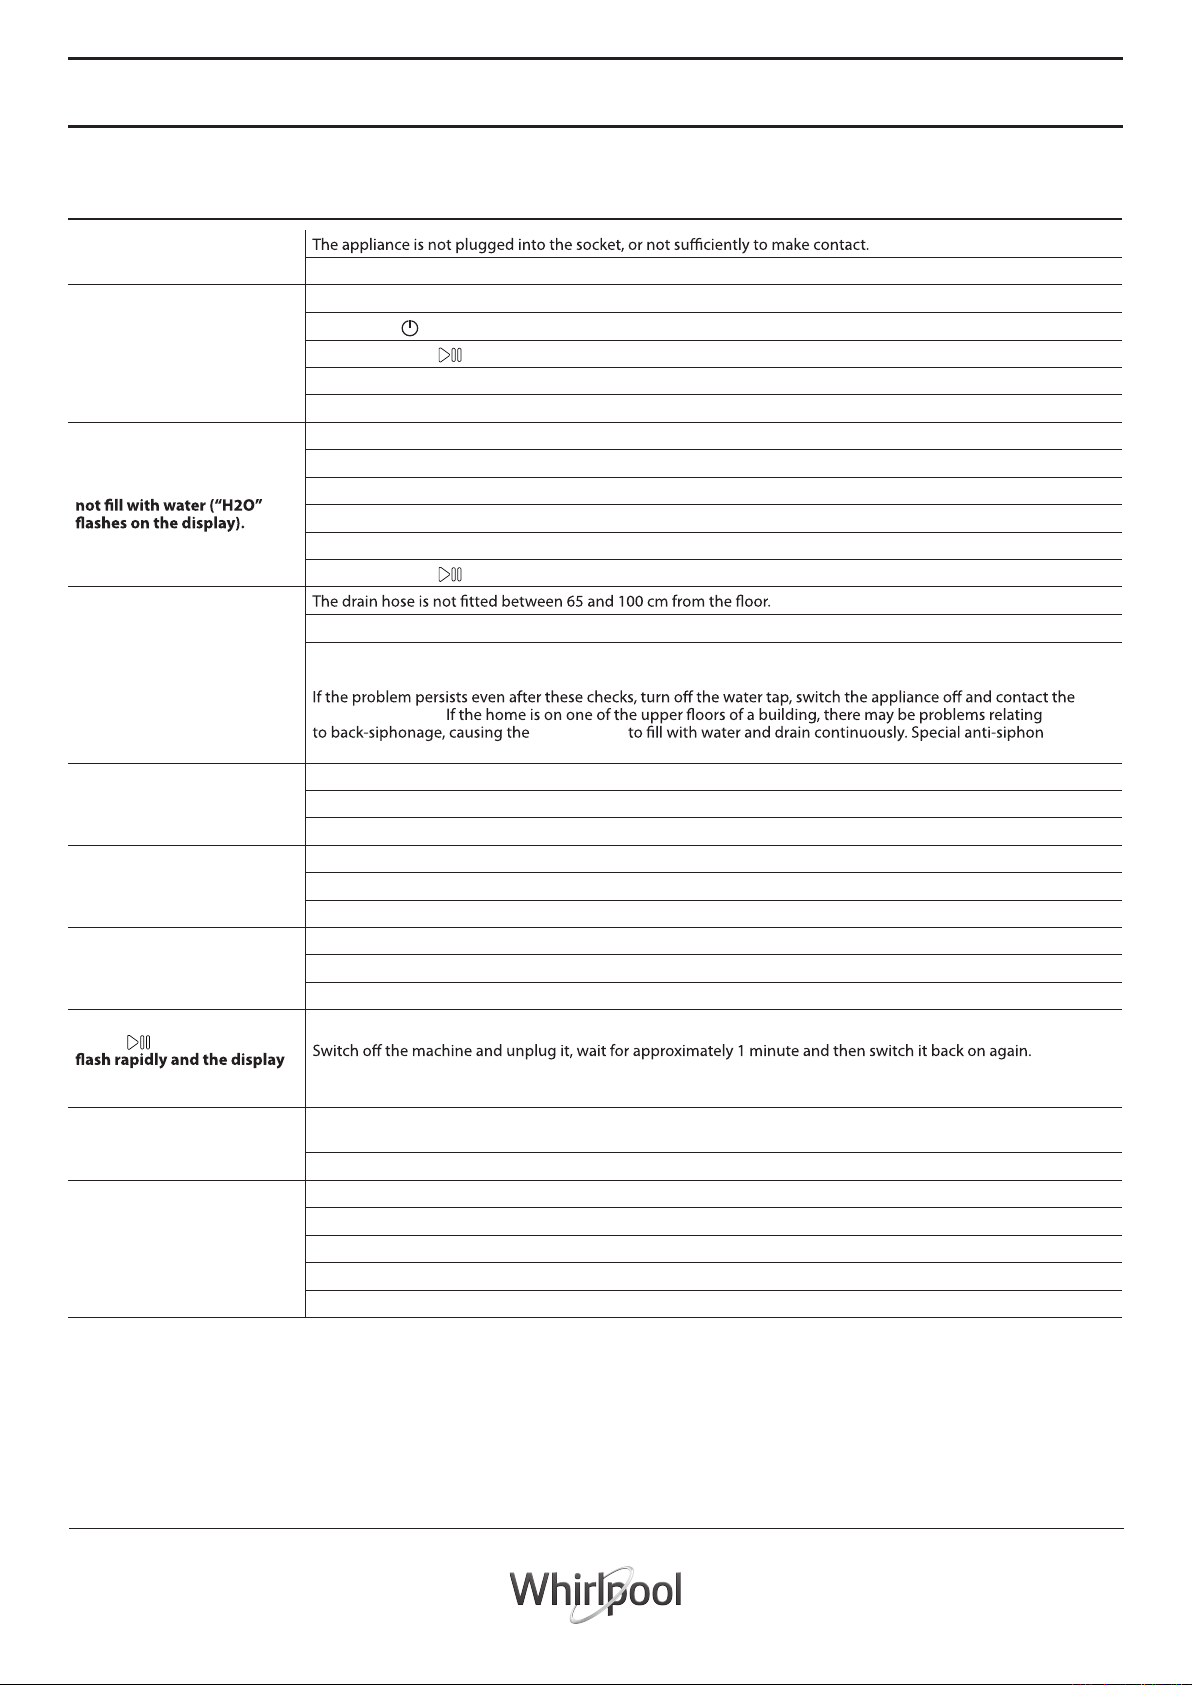
TROUBLESHOOTING
TROUBLESHOOTING
The machine may occasionally fail to work. Before contacting the After-Sales Service, make sure that the problem cannot be easily
solved using the following list.
Anomalies Possible causes / Solution
The washer-dryer does
not start.
The wash cycle does not start.
The washer-dryer does
The washer-dryer
continuously loads and
unloads water.
The washer-dryer does
not drain or spin.
The washer-dryer
vibrates a lot during the spin
cycle.
The washer-dryer leaks.
The “Options” and START/
PAUSE
visualises an error code (e.g.:
F-01, F-...).
There is too much foam.
The washer-dryer does not
dry.
indicator lights
There is no power in the house.
The washer-dryer door is not closed properly.
The ON/OFF
The START/PAUSE
The water tap has not been opened.
A delay has been set for the start time.
The water inlet hose is not connected to the tap.
The hose is bent.
The water tap has not been opened.
There is no water supply in the house.
The pressure is too low.
The START/PAUSE
The free end of the hose is immersed in water.
The wall drainage system does not have a breather pipe.
After-Sales Service.
valves are available in shops and help to prevent this inconvenience.
The cycle does not include drainage: with certain cycles it must be started manually.
The drain hose is bent.
The drainage duct is clogged.
The drum was not unlocked correctly during installation.
The washer-dryer is not level.
The washer-dryer is tucked between furniture cabinets and the wall.
The water inlet hose is not screwed on properly.
The detergent dispenser drawer is obstructed.
The drain hose is not properly attached.
If the problem persists, contact the After-Sales Service .
The detergent is not suitable for machine washing (it should be marked with “for washing machine use” or “hand
wash and machine wash” or similar).
Too much detergent was used.
The appliance is not plugged into the socket, or not enough to make contact.
There has been a power failure.
The appliance door is not shut properly.
A DELAY TIMER has been set.
DRYING is in the OFF position.
button has not been pressed.
button has not been pressed.
button has not been pressed.
washer-dryer
8
Page 9
CLEANING AND MAINTENANCE
washer-dryer.
washer-dryer.
CLEANING THE OUTSIDE OF THE WASHER-DRYER
Use a soft damp cloth to clean the outer parts of the washerdryer.
Do not use glass or general purpose cleaners, scouring
powder or similar to clean the control panel – these
substances might damage the printing.
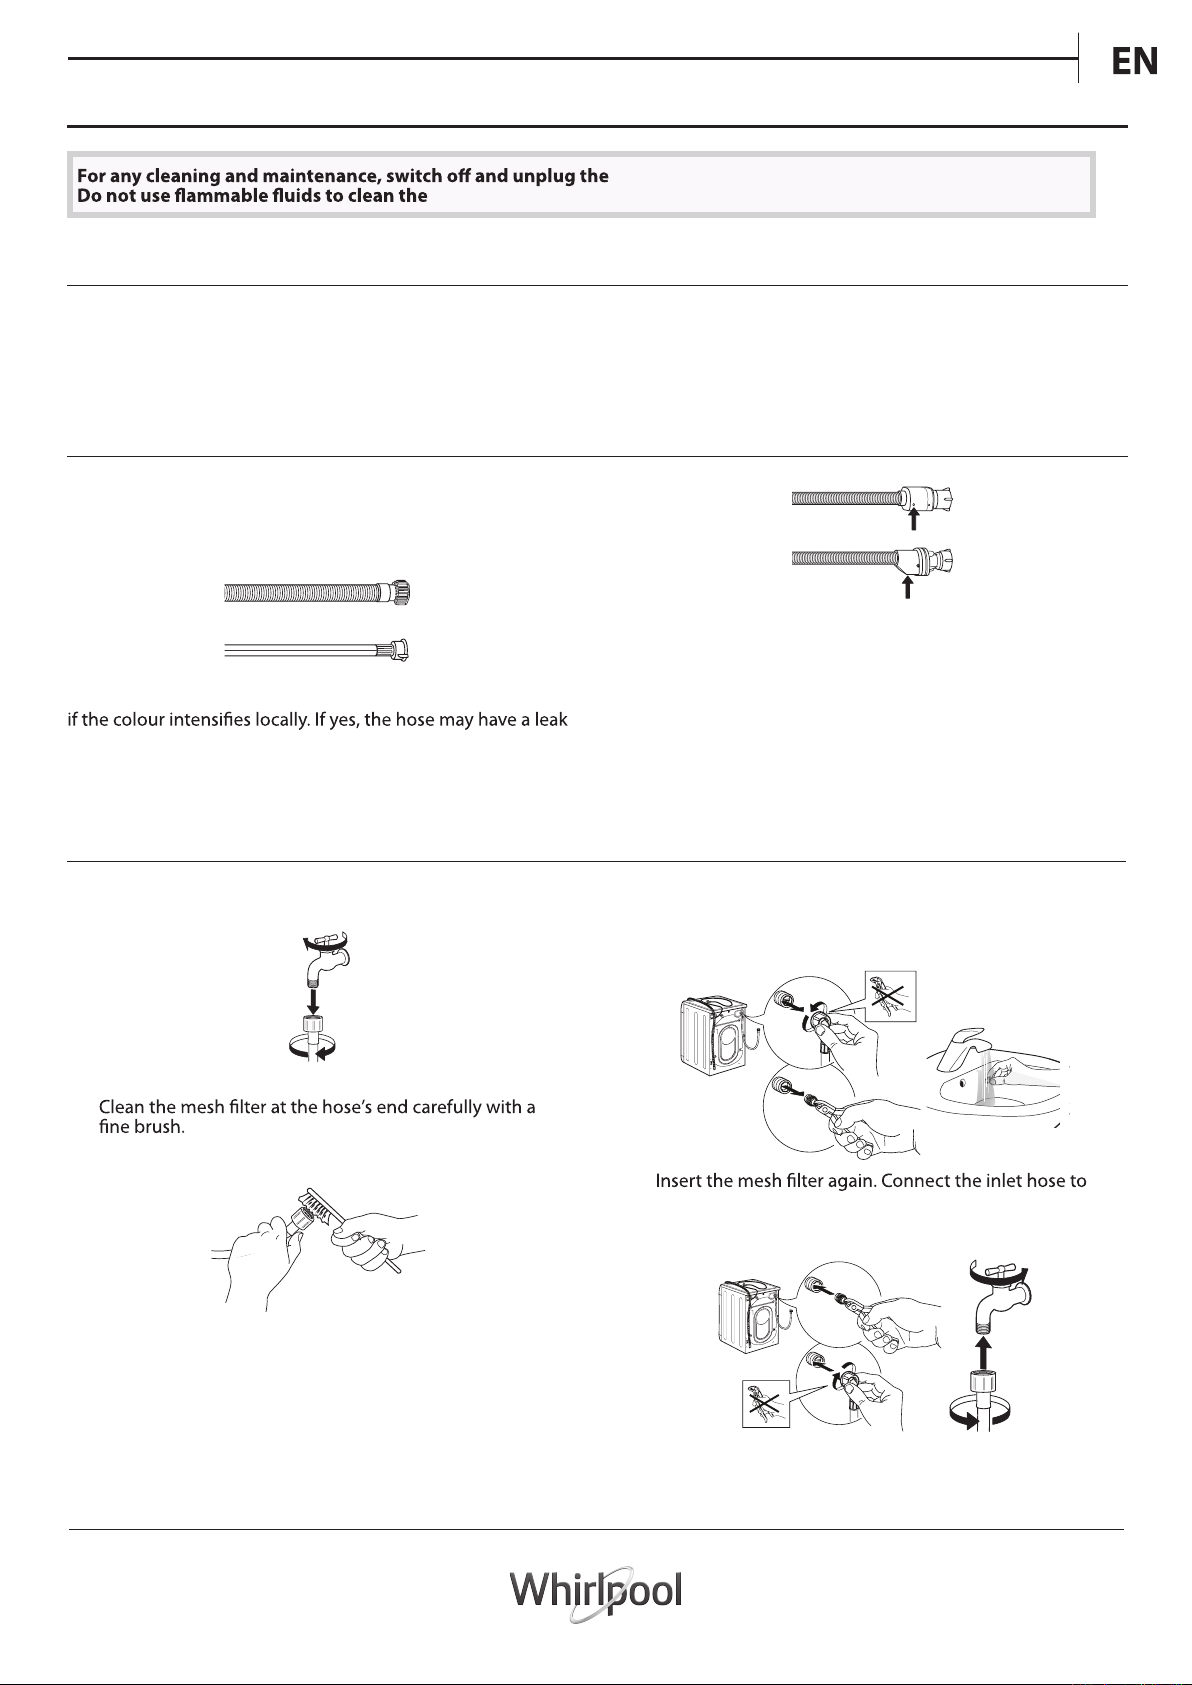
CHECKING THE WATER SUPPLY HOSE
Check the inlet hose regularly for brittleness and cracks. If
damaged, replace it by a new hose available through our
After-Sales Service or your specialist dealer.
Depending on the hose type:
For water stop hoses: check the small safety valve inspection
window (see arrow). If it is red, the water stop function was
triggered, and the hose must be replaced by a new one.
If the inlet hose has a transparent coating, periodically check
and should be replaced.
For unscrewing this hose, press the release button (if
available) while unscrewing the hose.
CLEANING THE MESH FILTERS IN THE WATER SUPPLY HOSE
1. Close water tap and unscrew the inlet hose.
1
2
2.
3. Now unscrew the inlet hose on the back of the washer-
dryer by hand. Pull out the mesh lter from the valve
on the back of the washer-dryer with pliers and
carefully clean it.
4.
water tap and washer-dryer again. Do not use a tool
to connect the inlet hose. Open the water tap and check
that all connections are tight.
2
1
9
Page 10
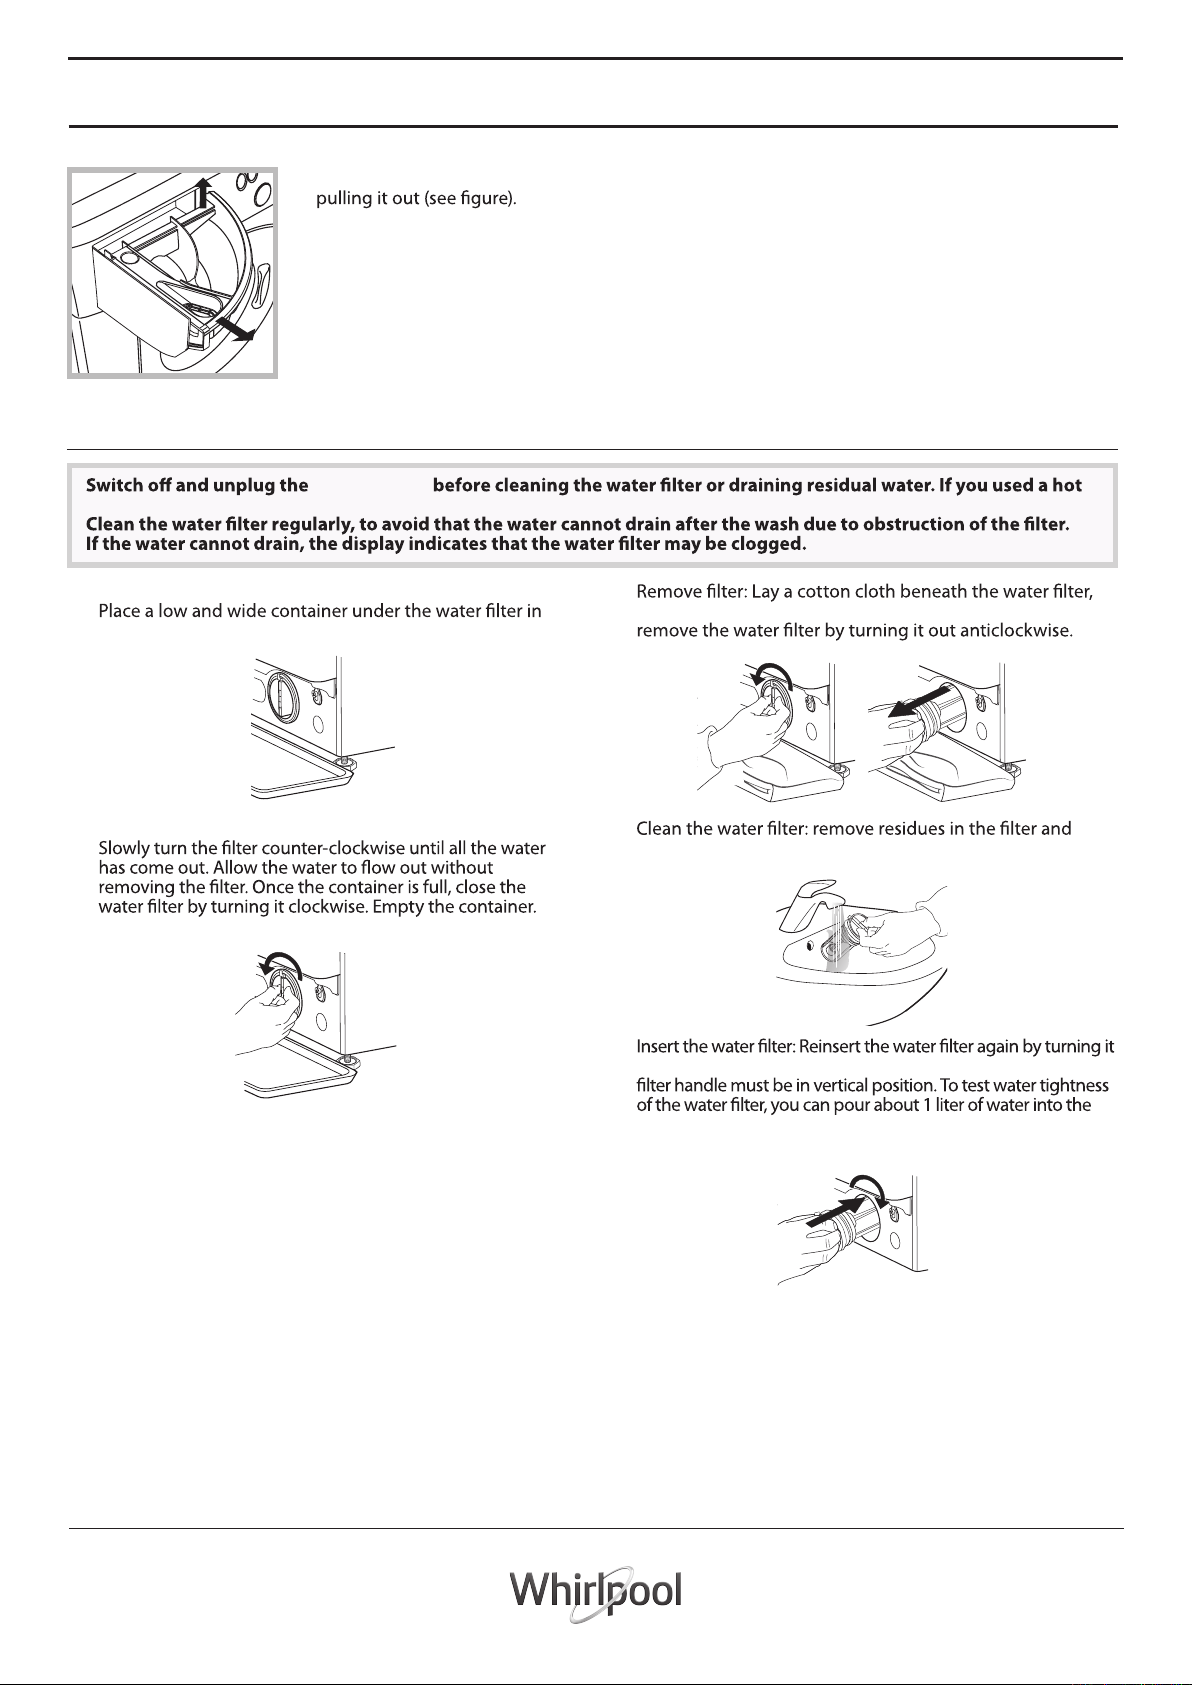
CLEANING THE DETERGENT DISPENSER
1
Remove the dispenser by raising it and
Wash it under running water; this
operation should be repeated frequently.
2
CLEANING THE WATER FILTER / DRAINING RESIDUAL WATER
wash programme, wait until the water has cooled down before draining any water.
1. Container for the drained water:
order to collect the residual water.
washer-dryer
3.
which can absorb a small amount of rest water. Then
Drain the water:
2.
Repeat the procedure until all the water has been drained.
4.
clean it under running water.
5.
in clockwise direction. Make sure to turn it in as far as it goes; the
detergent dispenser.
2
1
10
Page 11
TRANSPORT AND HANDLING
Never lift the washer-dryer by holding it at the worktop.
1. Pull out the mains plug, and close the water tap.
2. Make sure that door and detergent dispenser are properly
closed.
3. Disconnect the inlet hose from the water tap, and remove
the drain hose from your draining point. Remove all rest
damaged during transport.
1. See if you can solve the problem by yourself with the help
of the suggestions given in the TROUBLESHOOTING
IF AFTER THE ABOVE CHECKS THE FAULT STILL
OCCURS, GET IN TOUCH WITH THE NEAREST
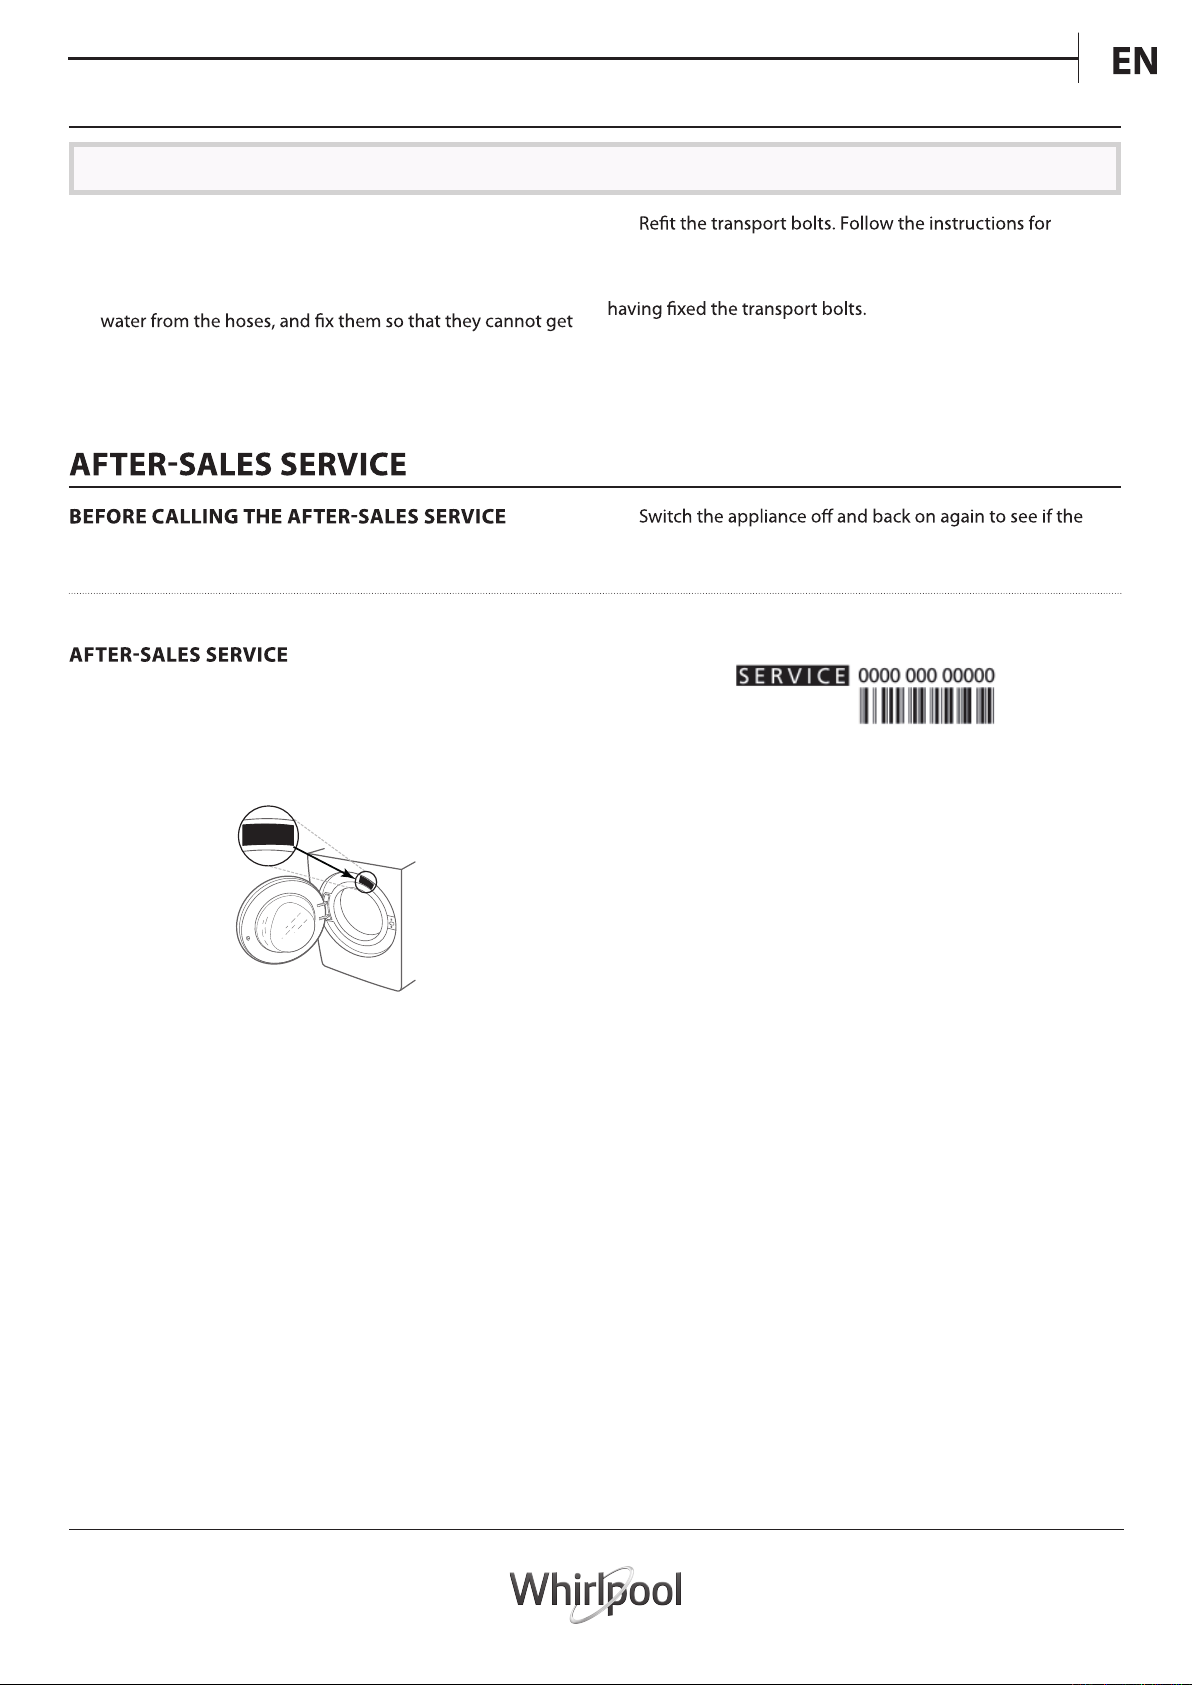
To receive assistance, call the number shown on the warranty
booklet or follow the instructions on the website
www.whirlpool.com.hk
When contacting our After-Sales Service, always specify:
• a brief description of the fault;
• the type and exact model of the appliance;
xxxxxxxxxxxx
4.
removing the transport bolts in the “INSTALLATION GUIDE”
in reverse order.
Important: Do not transport the washer-dryer without
2.
fault persists.
• the service number (number after the word Service on the
rating plate);
your full address;
•
• your telephone number.
If any repairs are required, please contact an authorised AfterSales Service (to guarantee that original spare parts will be
used and repairs carried out correctly).
11
Page 12
SAFETY INSTRUCTIONS
IMPORTANT TO BE READ AND OBSERVE
Before using the appliance, read these safety instructions. Keep them nearby for future reference.
These instructions and the appliance itself provide
important safety warnings, to be observed at all times. The manufacturer declines any liability for failure
to observe these safety instructions, for inappropriate
use of the appliance or incorrect setting of controls.
away from the appliance. Young children
appliance unless continuously supervised.
with reduced physical, sensory or mental
capabilities or lack of experience and knowledge
can use this appliance only if they are supervised
or have been given instructions on safe use and
understand the hazards involved. Children must
not play with the appliance. Cleaning and user
maintenance must not be carried out by children
without supervision. Never open the door forcibly
or use it as a step.
PERMITTED USE
CAUTION: The appliance is not intended to be
operated by means of an external switching
device, such as a timer, or separate remote
controlled system.
This appliance is intended to be used in
environments; farm houses; by clients in hotels,
motels, bed & breakfast and other residential
environments.
Do not load the machine above the maximum
capacity (kg of dry cloth) indicated in the
programme table.
This appliance is not for professional use. Do
not use the appliance outdoors.
Do not use any solvents (e.g. turpentine,
benzene), detergents containing solvents,
scouring powder, glass or general purpose
wash fabrics that have been treated with solvents
Do not dry unwashed items in the tumble
dryer.
Items that have been soiled with substances
such as cooking oil, acetone, alcohol, petrol,
kerosene, spot removers, turpentine, waxes and
wax removers should be washed in hot water with
an extra amount of detergent before being dried
in the tumble dryer.
Items such as foam rubber (latex foam), shower
caps, waterproof textiles, rubber backed articles
pads should not be dried in the tumble dryer.
Fabric softeners, or similar products, should be
instructions.
without heat (cool down cycle) to ensure that the
items are left at a temperature that ensures that
the items will not be damaged.
Never stop a tumble dryer before the end of
the drying cycle unless all items are quickly
removed and spread out so that the heat is
dissipated.
During the drying phase, the door tends to get
quite hot.
Do not use the appliance to dry clothes that
trichlorethylene).
Do not use the appliance to dry foam rubber or
similar elastomers.
Make sure that the water tap is turned on
during the drying cycles.
Remove all objects from pockets such as
lighters and matches.
INSTALLATION
The appliance must be handled and installed
cuts.
If you want to stack a dryer on top of your
machine, rst contact our After-Sales Service or
your specialist dealer to verify whether this
is possible. This is only possible if the dryer is
attached to the machine by means of appropriate
stacking kit available through our After- Sales
Service or your specialist dealer.
Move the appliance without lifting it by the
worktop or top lid.
Installation, including water supply (if any) and
electrical connections and repairs must be carried
replace any part of the appliance unless
children away from the installation site. After
unpacking the appliance, make sure that it has not
been damaged during transport. In the event of
problems, contact the dealer or your nearest
After-Sales Service. Once installed, packaging
waste (plastic, styrofoam parts etc.) must be
The appliance must be disconnected from the
risk of electric shock. During installation, make
sure the appliance does not damage the power
the appliance when the installation has been
completed.
12
Page 13
Do not install your appliance where it may be
exposed to extreme conditions, such as: poor
ventilation, temperatures below 5 °C or above 35 °C.
When installing the appliance make sure that
adjusting them as required, and check that the
appliance is perfectly to level using a spirit level.
If the appliance is being installed on wood or
Do not use extension leads, multiple sockets or
adapters. The electrical components must not be
accessible to the user after installation. Do not use
the appliance when you are wet or barefoot. Do
not operate this appliance if it has a damaged
power cable or plug, if it is not working properly,
or if it has been damaged or dropped.
If the supply cord is damaged, it must be
replaced with an identical one by the
manufacturer, its service agent or similarly
on top of this.
Connect the water inlet hose(s) to the water
supply in accordance with the regulations of your
local water company.
hot water supply.
The washer dryer
bolts to prevent any possible damage to the
interior during transport. Before using the
machine, it is imperative that the transport bolts
are removed. After their removal, cover the
openings with the 4 enclosed plastic caps.
After installation of the device, wait a few
hours before starting it so that it acclimates to the
environmental conditions of the room.
Make sure that the ventilation openings in the
base of your washer-dryer (if available on your
model) are not obstructed by a carpet or other
material.
Use only new hoses to connect the appliance
to the water supply. The old hose-sets should not
be reused.
The supply water pressure must be in the 0.1-1
Mpa range.
ELECTRICAL WARNINGS
It must be possible to disconnect the appliance
from the power supply by unplugging it if plug is
accessible, or by a multi-pole switch installed
upstream of the socket in accordance with the
wiring rules and the appliance must be earthed in
conformity with national electrical safety
standards.
of electric shock.
CLEANING AND MAINTENANCE
WARNING: Ensure that the appliance is
supply before performing any maintenance
risk of electric shock.
DISPOSAL OF PACKAGING MATERIALS
The packaging material is 100% recyclable and is marked with the
recycle symbol
The various parts of the packaging must therefore be disposed of
responsibly and in full compliance with local authority regulations
governing waste disposal.
DISPOSAL OF HOUSEHOLD APPLIANCES
This appliance is manufactured with recyclable or reusable materials.
Dispose of it in accordance with local waste disposal regulations.
For further information on the treatment, recovery and recycling
of household electrical appliances, contact your local authority,
the collection service for
purchased the appliance. This appliance is marked in compliance
with European Directive 2012/19/EU, Waste Electrical and Electronic
Equipment (WEEE). By ensuring this product is disposed of correctly,
you will help prevent negative consequences for the environment and
human health.
The symbol
indicates that it should not be treated as domestic waste but must be
taken to an appropriate collection center for the recycling of electrical
and electronic equipment.
.
household waste or the store where you
on the product or on the accompanying documentation
13
Page 14
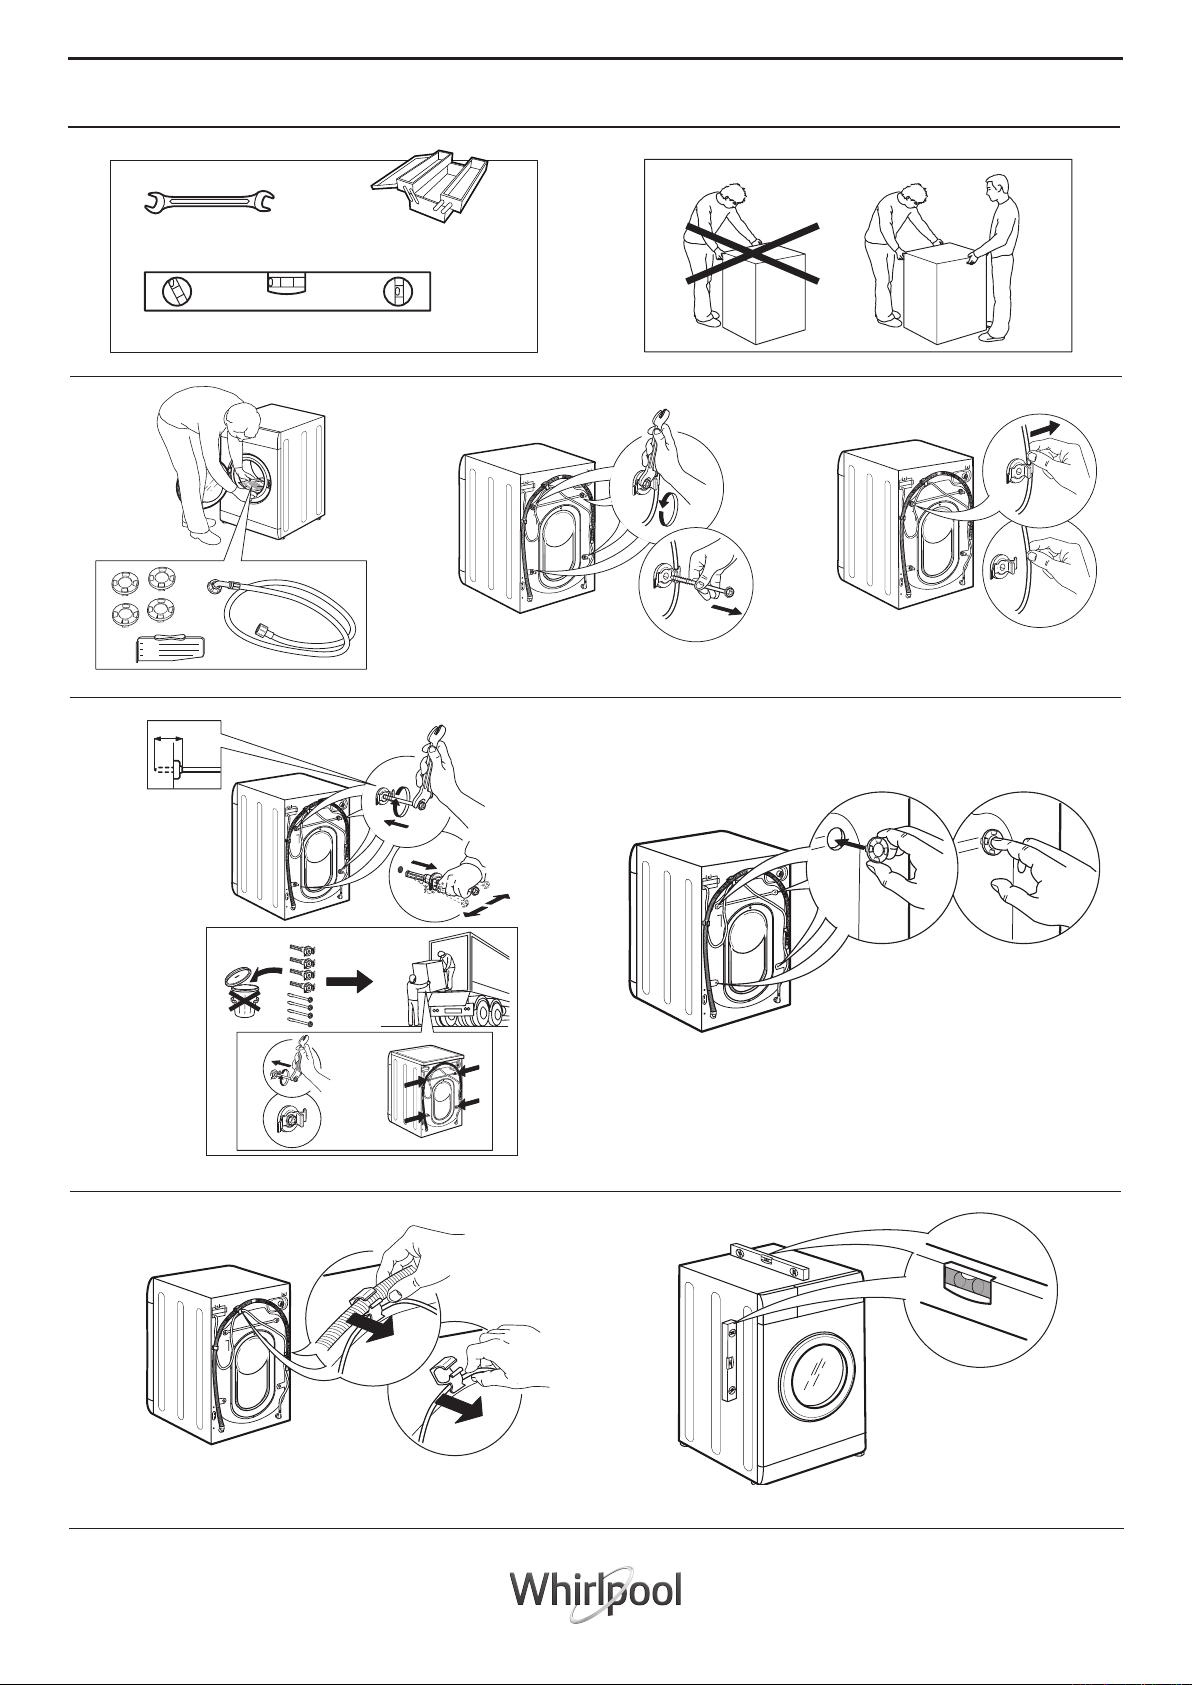
10 mm - 0.39 inch
INSTALLATION GUIDE
1.
150 ml
100 ml
50 ml
4. 5.
2 cm - 0.7 inch
2.
3.
14
6.
7.
Page 15
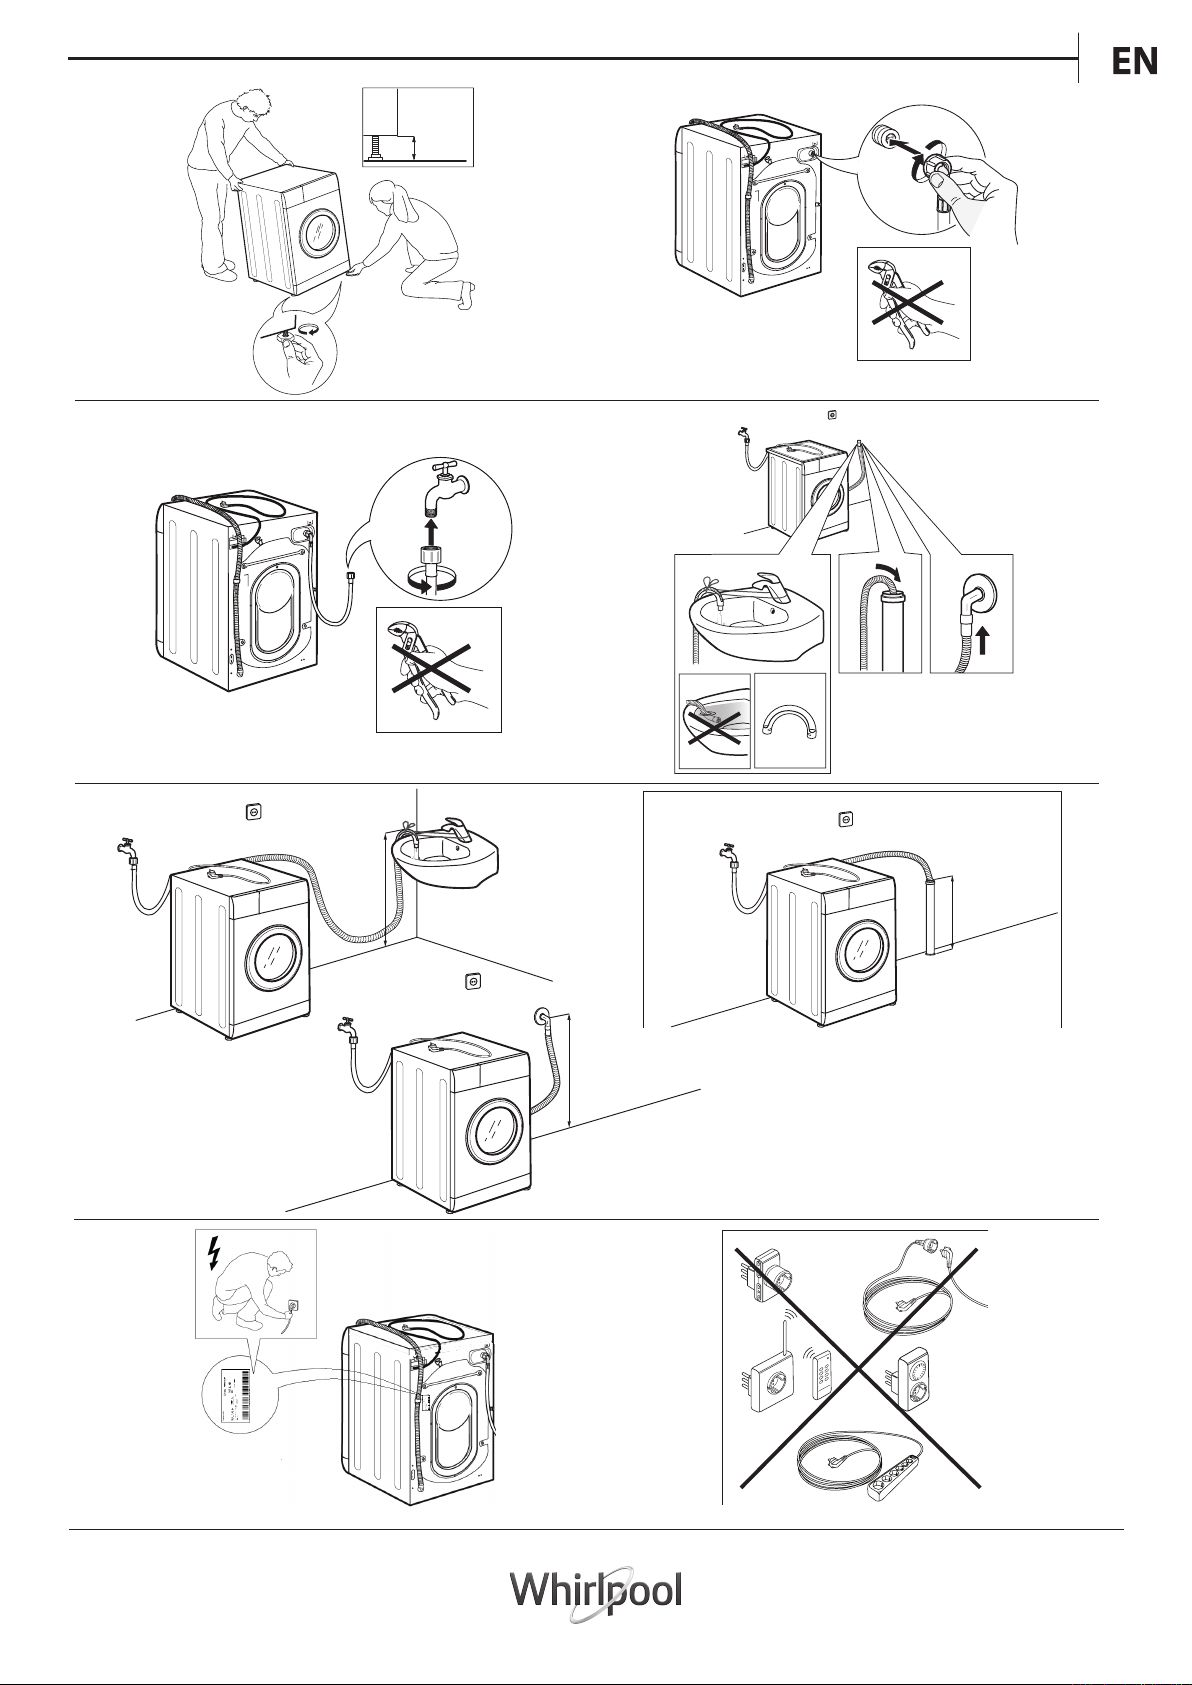
9.8.
max 0.5 cm
max 0.2 inch
10. 11.
12.
13.
max 100 cm
39 inch
min 65 cm
25 inch
max 100 cm
39 inch
min 65 cm
25 inch
14.
max 100 cm
39 inch
min 65 cm
25 inch
15
Page 16
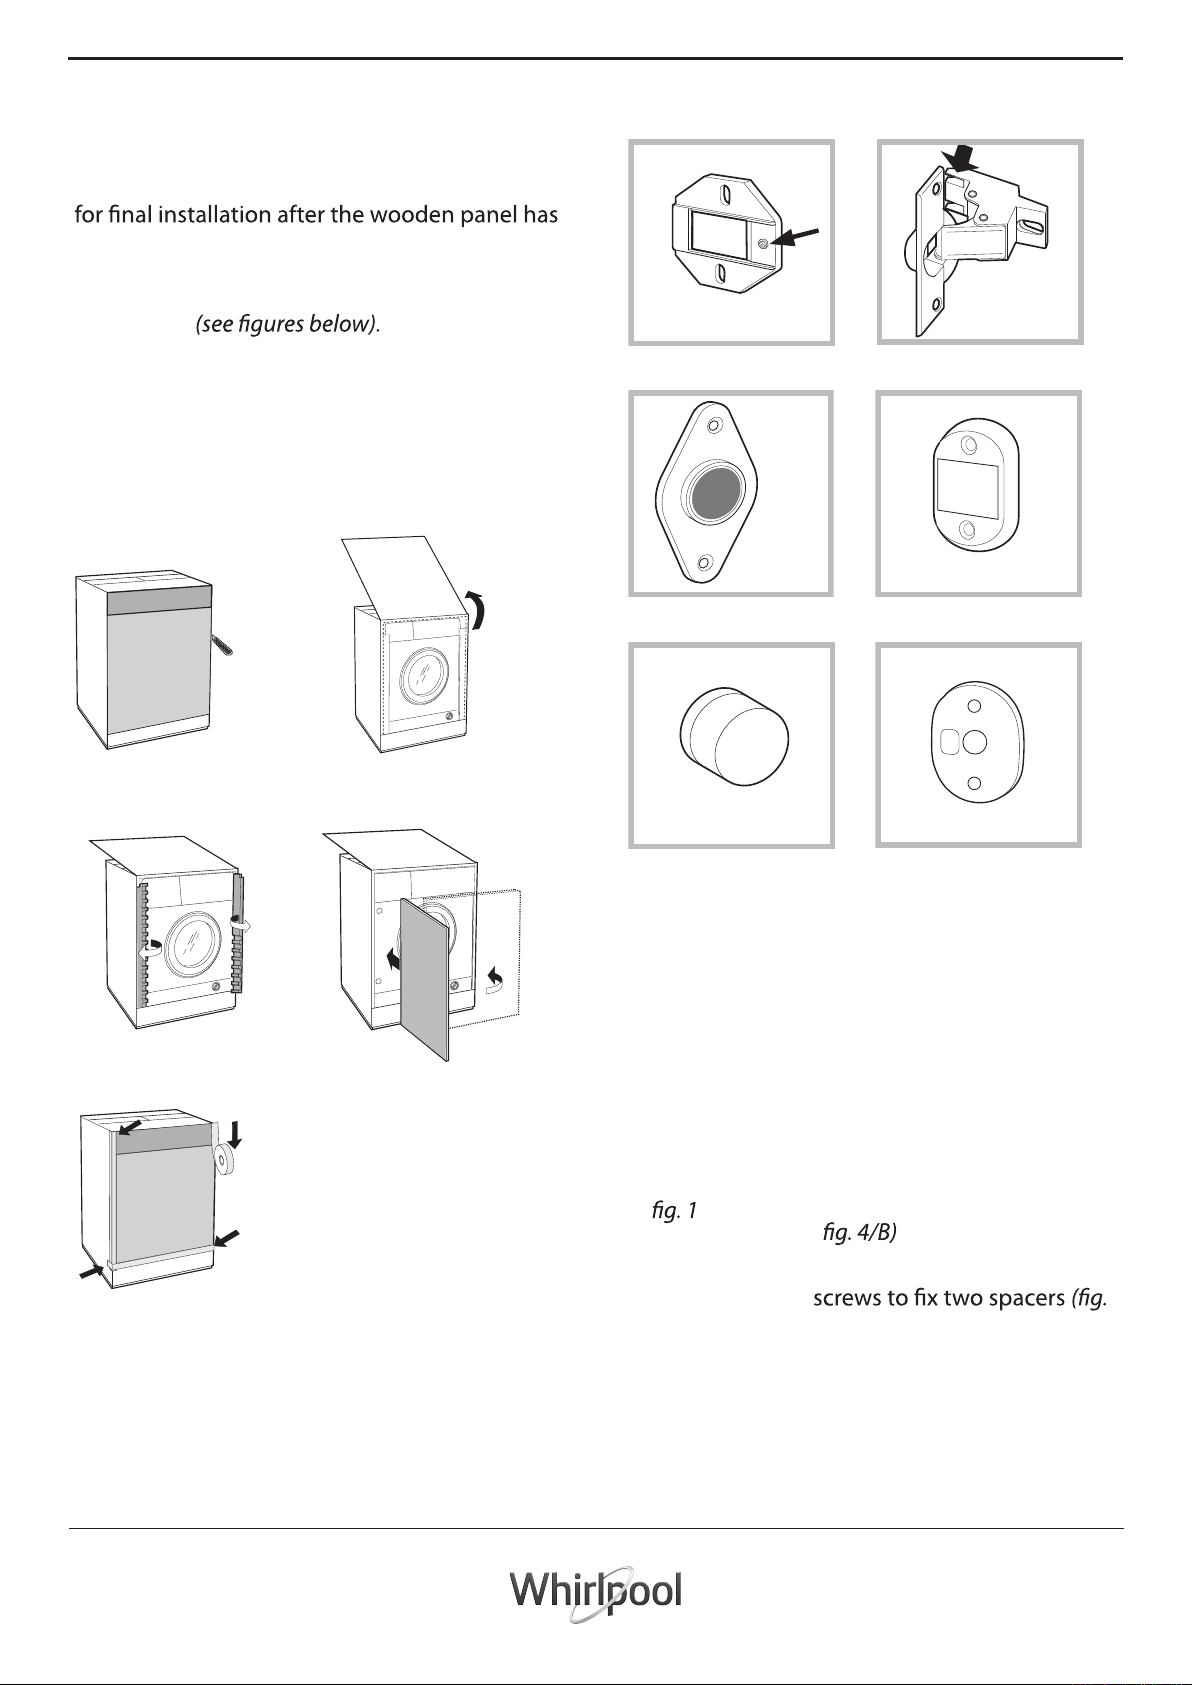
INSTRUCTIONS FOR THE FITTER
Mounting the wooden panel onto the door
Door Mounting Accessories (Fig. 1-2-3-4-5).
, l =25mm;
EN
and inserting the machine into cabinets:
In the case where the machine must be shipped
been mounted, we suggest leaving it in its
original packaging. The packaging was designed
to make it possible to mount the wooden panel
onto the machine without removing it
completely
The wooden panel that covers the face of the
machine must not be less than 13 mm in
thickness and can be hinged on either the right
or left. For the sake of practicality when using the
machine, we recommend that the panel be
hinged on the same side as the door for the
machine itself - the left.
N° 2 Hinge Supports
Fig. 1
Fig. 2
N° 2 Hinges
N° 1 Magnet N° 1 Magnet plate
Fig. 3 Fig. 4
A
B
N° 1 Rubber plug
Fig. 5
N° 4 Spacers
Fig. 4/B
- No. 6 type A self-threading screws, l =13 mm.
- No. 2 type B metric, countersunk screws
for fastening the magnet plate to the cabinet.
- No. 4 type C metric screws, l =15 mm; for
mounting the hinge supports to the cabinet.
C
D
- No. 4 type D metric screws, l =7 mm; for
mounting the hinges on the supports.
Mounting the Parts onto the Face of the
Machine.
- Fit the hinge supports to the appliance front
panel, positioning the hole marked with an arrow
in
panel. Fit a spacer (
e
t
ei
s
r
u
T
using type C screws.
so that it is on the inner side of the front
between the surfaces
- Fit the magnet plate at the top of the opposite
E
side, using type B
4/B) between the plate and the surface.
16
Page 17
Using the Drilling Template.
- To trace the positions of the holes on the lefthand side of the panel, align the drilling template
to the top left side of the panel using the lines
traced on the extremities as a reference.
- To trace the positions of the holes on the righthand side of the panel, align the drilling template
to the top right side of the panel.
- Use an appropriately sized router to mill the holes
for the two hinges, the rubber plug and the magnet.
Mounting the Parts onto the Wooden Panel (Door).
- Insert the hinges into the holes (the movable part of
the hinge must be positioned facing away from the
panel) and fasten them with the 4 type A screws.
- Insert the magnet into the top hole on the opposite
side of the hinges and fasten it with the two type B
screws.
- Insert the rubber plug into the bottom hole. The
panel is now ready to be mounted onto the
machine.
Mounting the Panel into the machine.
Insert the nib of the hinge (indicated by the arrow
in
) into the hole for the hinge and push the
panel towards the front of the machine. Fasten
the two hinges with the type D screws.
Fastening the plinth guide.
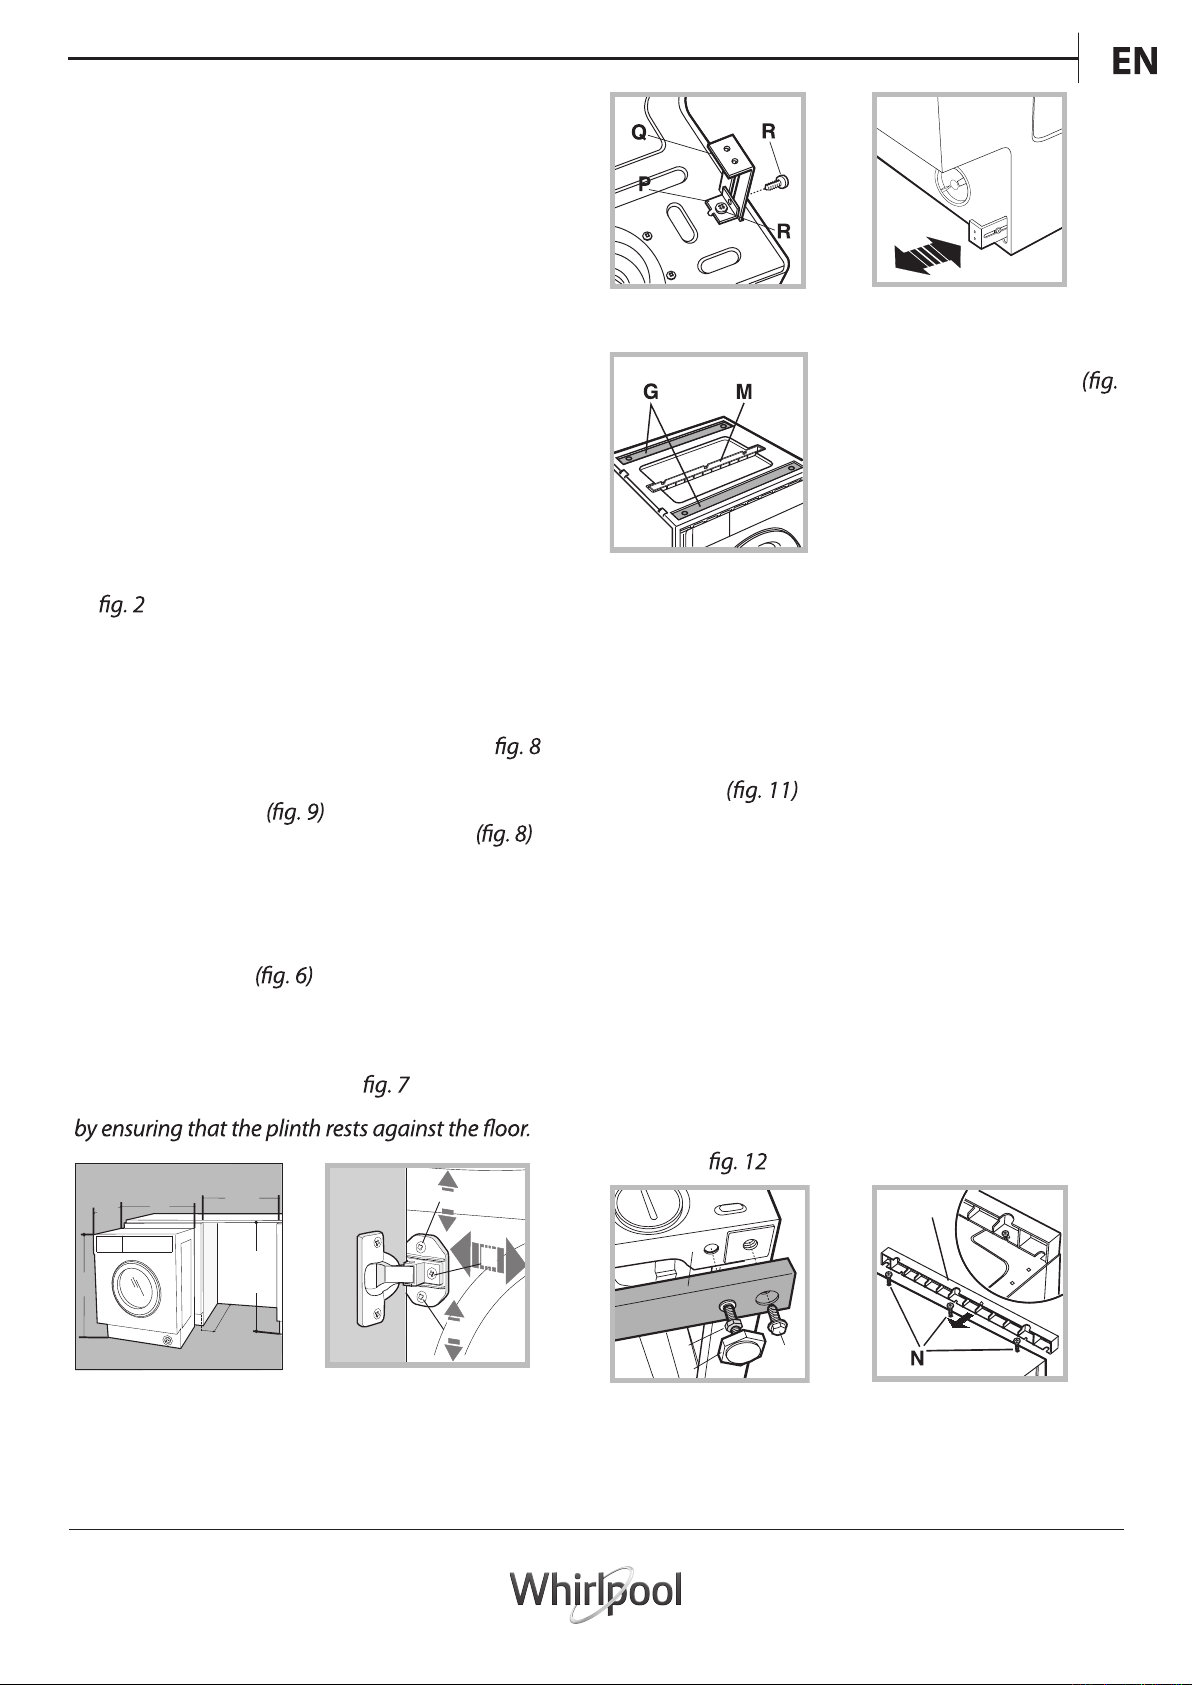
If the machine is installed at the end of a set of
modular cabinets, mount either one or both of the
guides for the base molding (as shown in
).
Adjust them for depth based on the position of
the base molding, and, if necessary, fasten the
base to the guides
This is how to assemble the plinth guide
.
:
Fasten angle P using screw R, insert plinth guide Q
into the special slot and once it is in the desired
position, lock it in place using angle P and screw R.
Inserting the machine into the Cabinet.
- Push the machine into the opening, aligning it
with the cabinets
.
- Regulate the adjustable feet to raise the machine
to the appropriate height.
- To adjust the position of the wooden panel in
both the vertical and horizontal directions, use the
C and D screws, as shown in
.
Important: close the lower part of the appliance front
595
545
600 min
C
Fig. 8 Fig. 9
Accessories provided for the height adjustment.
The following can be found
inside the polystyrene lid
10): 2 crossbars (G), 1 strip
(M)
The following can be found
inside the appliance drum:
4 additional feet (H),
4 screws (I),
4 screws (R),
Fig. 10
2 plinth guides (Q)
4 nuts (L),
Adjusting the appliance height.
The height of the appliance can be adjusted (from
815 mm to 835 mm), by turning the 4 feet.
Should you require the appliance to be placed
higher than the above height, you need to use the
following accessories to raise it to up to 870 mm:
the two crossbars (G); the 4 feet (H); the 4 screws
(I); the 4 nuts (L) then perform the following
operations
:
remove the 4 original feet, place a crossbar G at
the front of the appliance, fastening it in place
using screws I (screwing them in where the original
feet were) then insert the new feet H.
Repeat the same operation at the back of the
appliance.
Now adjust feet H to raise or lower the appliance
from 835 mm to 870 mm.
Once you have reached the desired height, lock
nuts L onto crossbar G.
To adjust the appliance to a height between 870
mm and 900 mm, you need to mount strip M,
adjusting feet H to the required height.
Insert the strip as follows:
loosen the three screws N situated at the front of
the Top cover of the appliance, insert strip M as
shown in
, then fasten screws N.
M
009 ÷ 028
518
570
min
Fig. 6 Fig. 7
D
C
Fig. 11 Fig. 12
G
L
H
I
17
Page 18
繁體中文
產品安全指引、使用說明及安裝指南
感謝您購買惠而浦產品
為了獲得更完善的服務,
請於www.whirlpool.com.hk註冊您的產品
索引
使用說明
控制面板 20
程序表 20
產品介紹 20
洗衣劑盒 20
洗衣程序 21
首次使用 21
日常使用 21
暫停程序 21
打開機門 (如有需要) 21
變更正在運行的程序 21
結束程序 22
選項 22
兒童安全鎖 22
提示及應用 22
18
保養和維護 22
衣物平衡系統 22
故障排除 23
清潔和保養 24
清潔洗衣乾衣機的外部 24
檢查進水喉 24
清潔進水喉內的濾網 24
清潔洗衣劑盒 25
清潔濾網/排走積水 25
18
Page 19
搬運和處理 26
售後服務 26
安全指引 27
安裝指南 29
CH
19
Page 20
使用洗衣乾衣機前請先細閱產品安全指引。
在使用洗衣乾衣機之前,必須卸下搬運螺栓。有關如何移除它們,
更詳細說明,請參閱「安裝指南」。
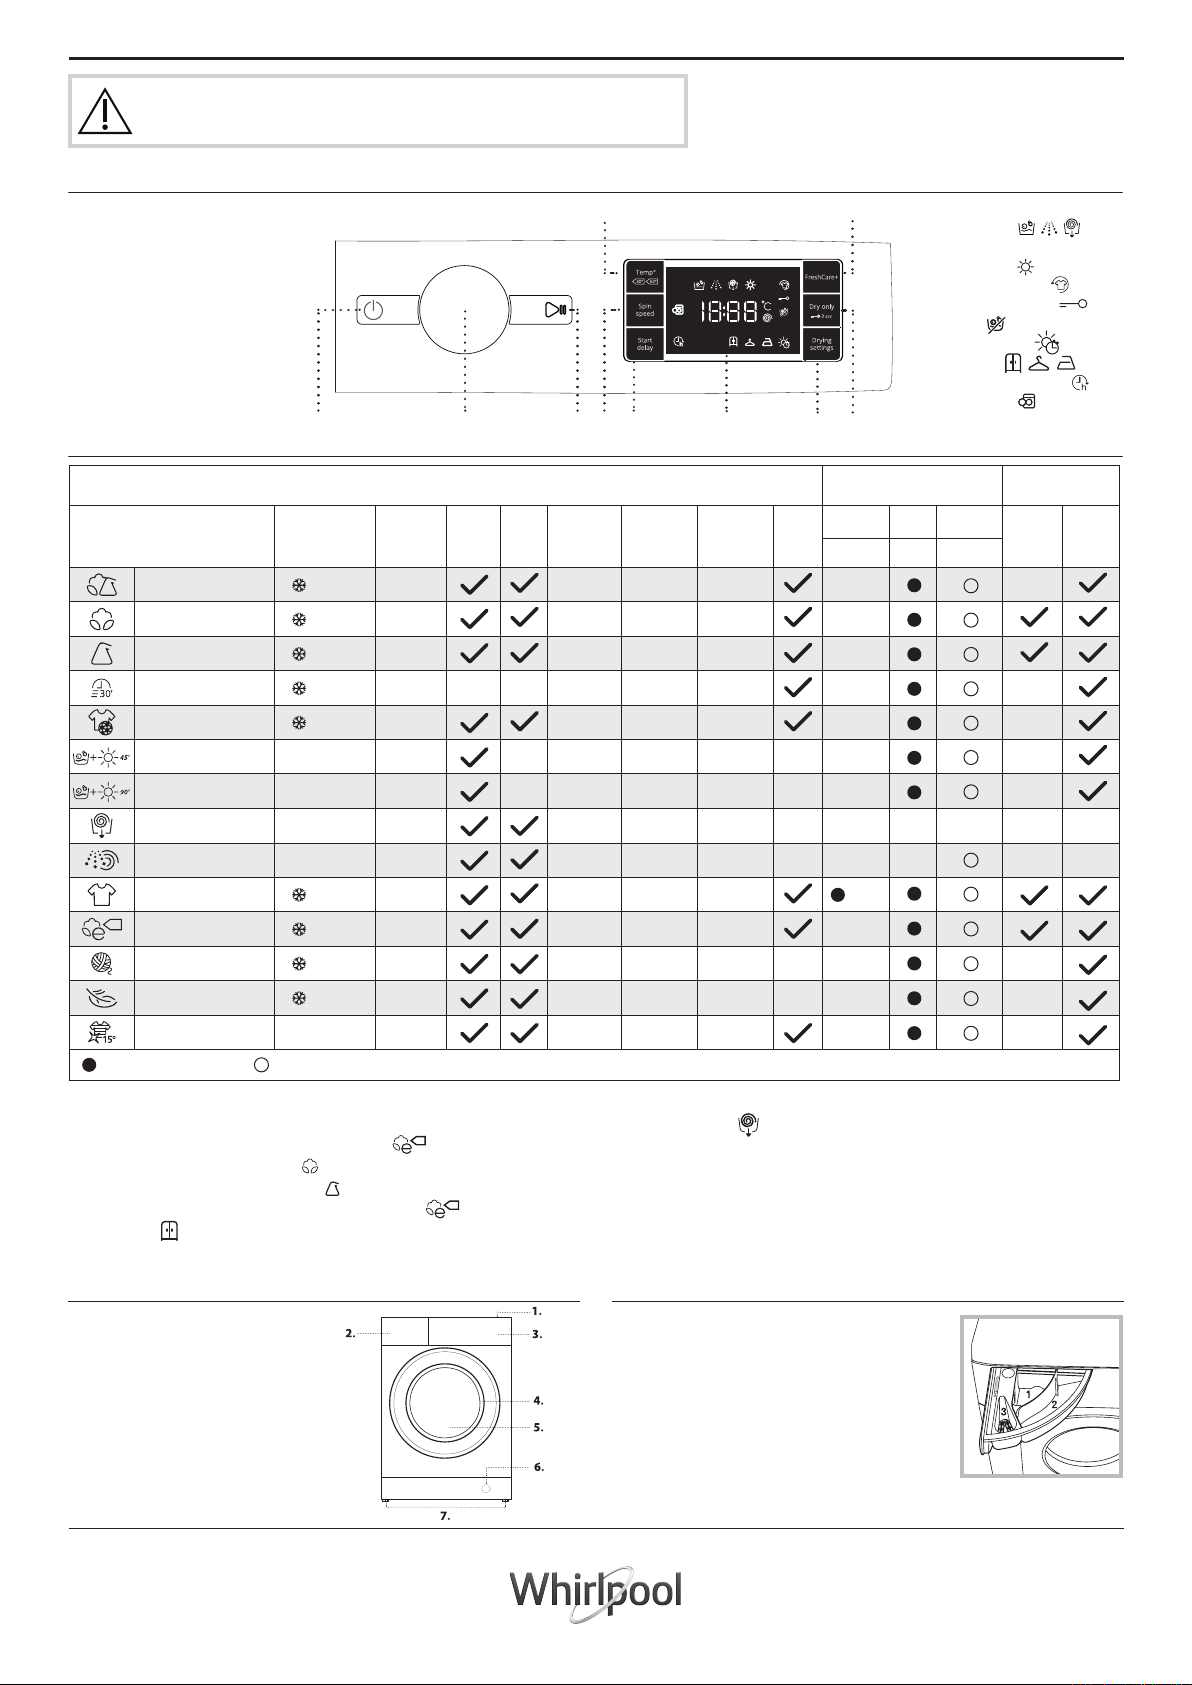
控制面板
1. 電源「開/關」鍵
2.「程序」旋鈕
3.「啟動/暫停」鍵
4.「溫度」鍵
5.「蒸氣抗菌+」鍵
6.「乾衣」鍵 /「兒童安全鎖」鍵
7.「乾衣選項」鍵
8. 顯示屏
9.「預校開機時間」鍵
10.「脫水轉速」鍵
程序表
5
21
3410
9
8
6
7
顯示屏指示燈
洗衣階段指示
該指示顯示當前的洗衣階段
乾衣階段指示
「蒸氣抗菌+」啟動
「兒童安全鎖」啟動
獨立乾衣
「乾衣時間模式」
「乾衣選項」
「預校開機時間」啟動
「開門提示燈」
最大負載量7公斤
程序
60分鐘混合洗
棉質 (2)
合成纖維 (3)
30分鐘速洗
運動衣物
45分鐘極速洗乾
90分鐘混合洗乾
脫水及排水 *
過水及脫水
白色衣物
棉質節能洗 (1)
羊毛 / 手洗
纖細衣物
護色15°
需要使用洗衣劑 選擇性使用洗衣劑
溫度°C
- 40°C
- 60°C
- 60°C
- 30°C
- 40°C
30°C
30°C
-
-
- 90°C
- 60°C
- 40°C
- 30°C
15°C
最高脫水
轉速 (轉/
分鐘)
1000
1400
1200
800
600
1400
1200
1400
1400
1400
1400
800
0
1000
乾衣
功能
-
獨立
乾衣
-
-
-
最大
洗衣量
(公斤)
4.5
7
4.5
3.5
4
1
2
7
7
7
7
2
1
4.5
最大
乾衣量
(公斤)
4.5
5
4.5
-
4
1
2
5
5
5
5
2
1
4.5
預設洗衣
程序時間
(小時:分鐘)
1:00
3:50
3:15
0:30
1:30
0:45
1:30
0:10
0:50
2:50
2:55
1:15
1:20
1:30
蒸氣
抗菌+
-
-
-
-
-
-
洗衣劑和添加劑 建議洗衣劑類別
柔順劑
主洗
預洗
1
-
-
-
-
-
-
-
-
-
(90°)
-
-
-
-
2
-
洗衣粉
3
-
-
-
-
-
--
-
-
-
-
-
洗衣液
-
-
若使用溫度高於50°C的程序,建議使用洗衣粉,並按照洗衣粉包裝的指示使用。
能源標籤測試程序
1)
符合標準EN50229(洗衣)測試程序:使用60°C的 「 棉質節能洗」 程序。
2) 較長的棉質程序:使用40°C的 「棉質」程序。
3) 合成纖維程序:設定「合成纖維」 的洗衣程序溫度為40°C。
符合標準EN50229(乾衣)測試程序:「棉質節能洗」 程序,及設定一
般乾衣程度“ ”。首次負載會根據額定的負載量進行。
1. 頂板
2. 洗衣劑盒
3. 控制面板
4. 機門門把
5. 機門
6. 底座
7. 可調機腳(4)
20
* 選擇脫水及排水 程序並設定「脫水轉速」為「0」以進行免旋排水。
在顯示器上或說明書中的程序時間是以標準的情況下計算,實際程序時
間會因不同的因素自動調整,如進水溫度和水壓,環境溫度,洗衣劑
量,衣物的類型,負載平衡及附加選項等。
第6感智能感應 - 智能感測調控技術可通過水流,節能和負載量而調節程
序時間。
洗衣劑盒產品介紹
1. 預洗用洗衣劑 (洗衣粉)
2. 主洗用洗衣劑 (洗衣粉或洗衣劑)
3. 添加劑 (如: 衣物柔順劑)
添加劑只能添加到“MAX”標誌。
! 白色棉質衣物:請使用洗衣粉,並進行預洗
過程,以及在超過60°C的溫度下進行清洗。
! 請按照洗衣劑包裝上的說明進行操作。
Page 21
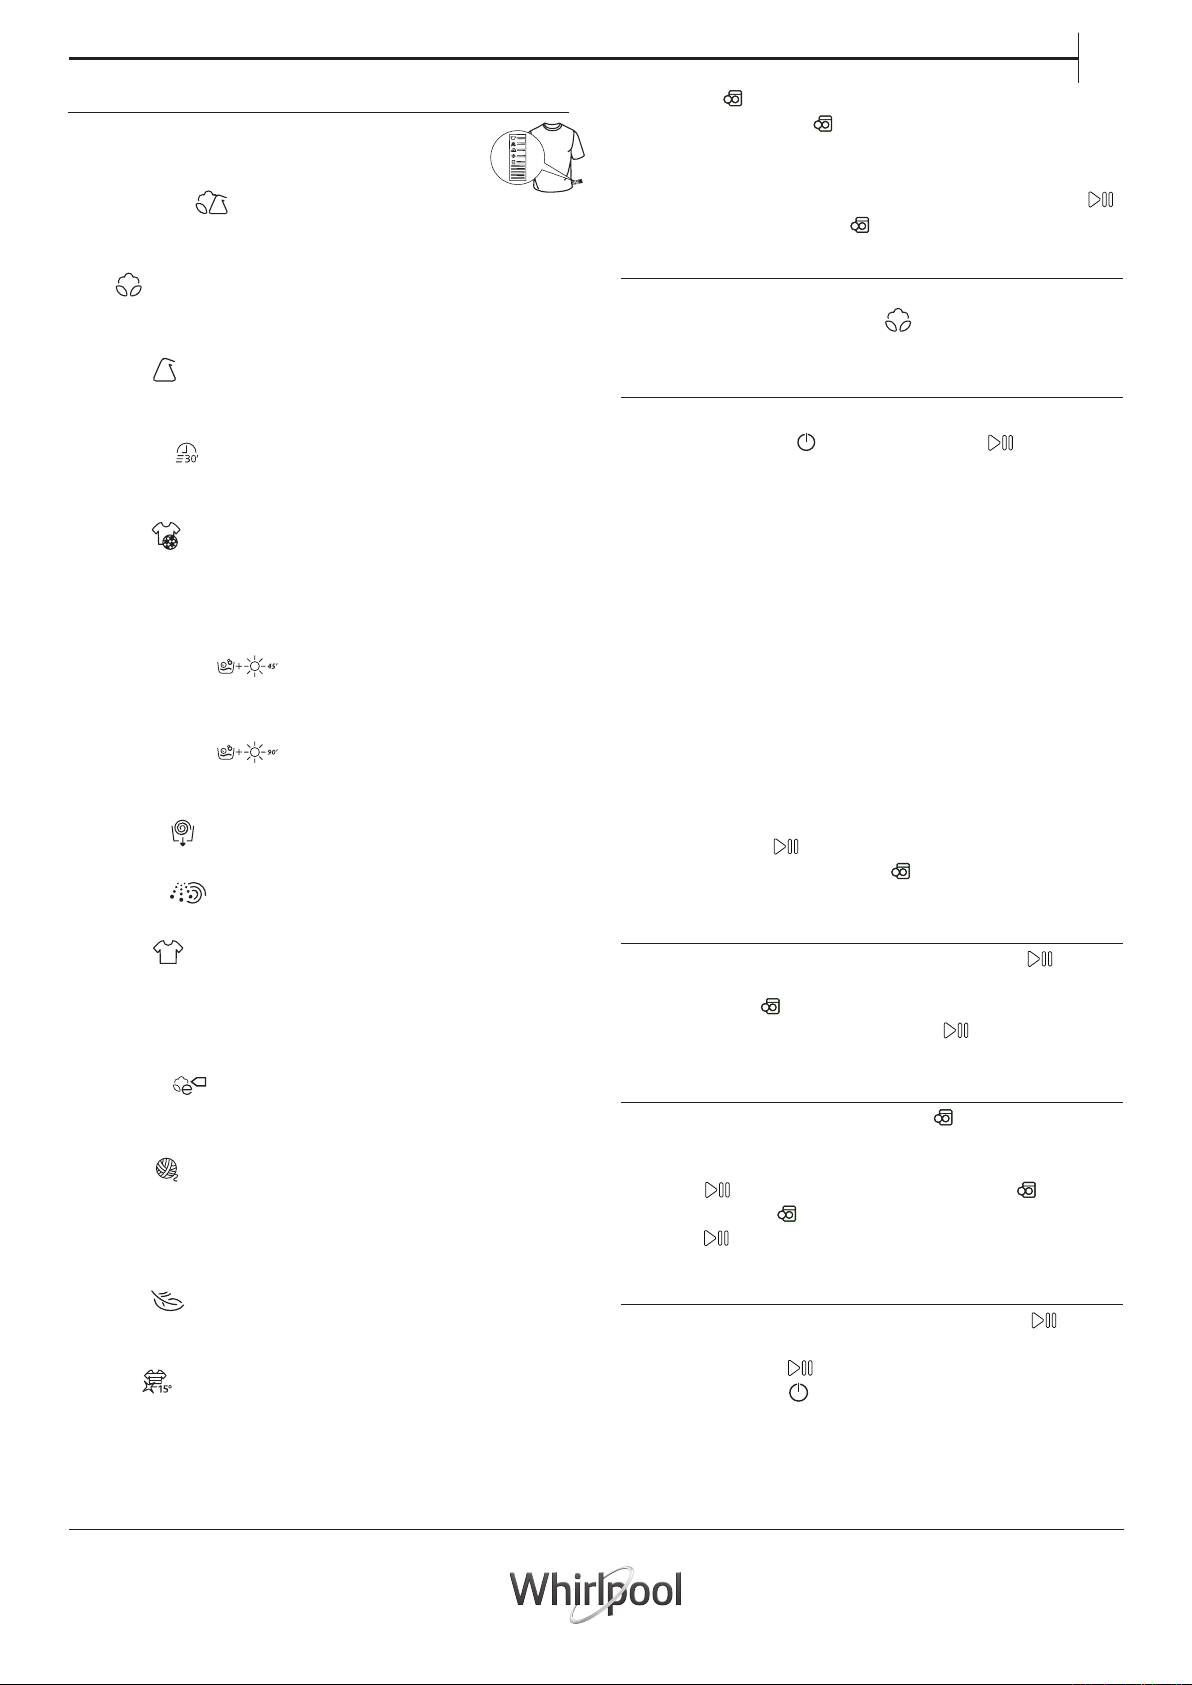
洗衣程序
請根據衣物上的護理標籤指示及合適的洗衣溫
度,選擇合適的程序於您的衣物種類。
60分鐘混合洗
適用於由棉、麻、人造纖維及其混合織物製成的輕微或一
般骯髒的彈性衣物。
棉質
通常對於洗滌非常骯髒的毛巾、內衣褲、棉麻桌布及床單
等。如彈性的棉、麻布料。
合成纖維
適用於一般骯髒的人造衣物纖維,例如滌綸、綸、黏膠纖
維等或混棉織物。
30分鐘速洗
適用於快速清洗較少污漬的衣物:30分鐘的快洗程序,可
節省時間及能源。最多可負載3.5公斤的衣物。
運動衣物
用於洗滌較少污漬的運動服裝(運動服,短褲等)。為了獲
得最佳的洗衣效果,我們建議載入不超過「程序表」中所
示的最大負載量。我們建議使用洗衣液,並加入最大負載
量一半的洗衣量。
45分鐘極速洗乾
適用於快速清洗及烘乾較少污漬而由棉、合成纖維製成的
衣物。可於45分鐘內清洗及烘乾最多1公斤的衣物。
90分鐘混合洗乾
適用於快速清洗及烘乾較少污漬而由棉、合成纖維製成的
衣物。可於90分鐘內清洗及烘乾最多2公斤的衣物。
脫水及排水
脫水及排水程序。適合彈性的衣物。
過水及脫水
過水及脫水程序。適合彈性的衣物。
白色衣物
通常對於洗滌非常骯髒的彈性棉、麻布料毛巾、內衣褲、
棉麻桌布及床單等。只有當選擇溫度為90°C的情況下,預
洗過程會被提供在主洗程序前。在這種情況下,建議在預
洗和主洗格一併添加洗滌劑。
CH
開門指示燈
- 如果「開門指示燈」 沒有亮起,表示機門已上鎖。為
避免任何損壞,請等待「開門指示燈」亮起,才打開機
門。
- 如需要在洗衣過程中打開機門,按下「啟動/暫停」
鍵;如果「開門指示燈」 亮起,機門可以打開。
首次使用
一旦安裝了洗衣乾衣機,並且在您在第一次使用它之前,
請在沒有衣物的情況下,使用 (60°)的洗衣程序,並加
入洗衣劑運行一次程序。
日常使用
按照「提示及應用」部分中的建議準備衣物。
- 按下電源「開/關」 鍵;「啟動/暫停」 鍵的指示燈
會慢慢閃爍。
- 打開機門,放入衣物,不要過量。請查閱「程序表」中
所指出的最大建議洗衣量。
- 拉出洗衣劑盒和加入洗衣劑 (及添加劑 / 柔順劑) 在相關
的容器隔間內,請參閱「洗衣劑盒」篇章。
- 關閉機門。
- 轉動程序按鈕,以選擇所需程序:它可以修改特定溫度
和脫水轉速,兩者是互相關聯,而程序時間會顯示在顯
示屏上。
- 洗衣乾衣機會自動顯示所選程序預定的溫度和脫水轉速。
或者如果溫度和轉速與所選程序相互兼容,則採用最近
使用的設定。
- 如有需要,選擇乾衣程序。
- 選擇所需的選項。
- 按「啟動/暫停」 鍵。開始洗衣程序;相應符號指示燈
將慢慢亮起及「開門指示燈」 符號將會熄滅。
暫停程序
如需要暫停洗衣程序,再次按下「啟動/暫停」 鍵;指
示燈便會閃爍。
如果符號指示燈 亮起,機門便可打開。從暫停點重新開
始洗衣程序,再次按下「啟動/暫停」 鍵。
棉質節能洗
適用於一般骯髒的棉質衣物。在40°C及60°C水溫下清洗棉
質衣物能達致最佳耗水和耗電量。屬能源標籤的參考程序。
羊毛/手洗
所有羊毛衣物都可以使用「羊毛」程序進行清洗,甚至印
有“只可手洗”標籤的衣物,亦可使用此程序。為了獲得
最佳的洗衣效果,請使用專用的洗衣劑,不得超過最大的
負載洗衣量。
纖細衣物
適用於一般骯髒的纖細衣物,建議在洗滌之前將衣服翻出
來。
護色15°
此程序將衣物使用冷水(15°C)洗衣,幫助保護衣物的顏
色,也可以節省用於把水加熱的大部分電量,同時保持良
好的洗淨效果。適用於較少污漬的未染色的衣物。此程序
可提供的效果作對比,只需15°C水溫,便可達40°C的潔
淨效能。
打開機門(如有需要)
當程序仍然運行中,「開門指示燈」 會熄滅,表示機門
不能被開啟,當程序運行中,機門仍然會上鎖。如需要在
程序運行時打開機門,例如添加或拿出衣物,請按下「啟
動/暫停」 鍵以暫停程序;「開門指示燈」 會閃爍。
如「開門指示燈」 符號亮起,機門便可打開。按下「啟
動/暫停」 鍵,繼續運行程序。
變更正在運行的程序
如要變更正在運行的程序,按下「啟動/暫停」 鍵,暫
停程序(相應指示燈會閃爍),然後選擇所需的程序並再次
按下「啟動/暫停」 鍵。如要取消已經開始的程序,請
按下電源「開/關」 鍵,程序將暫停,洗衣乾衣機亦將
關閉。
21
Page 22
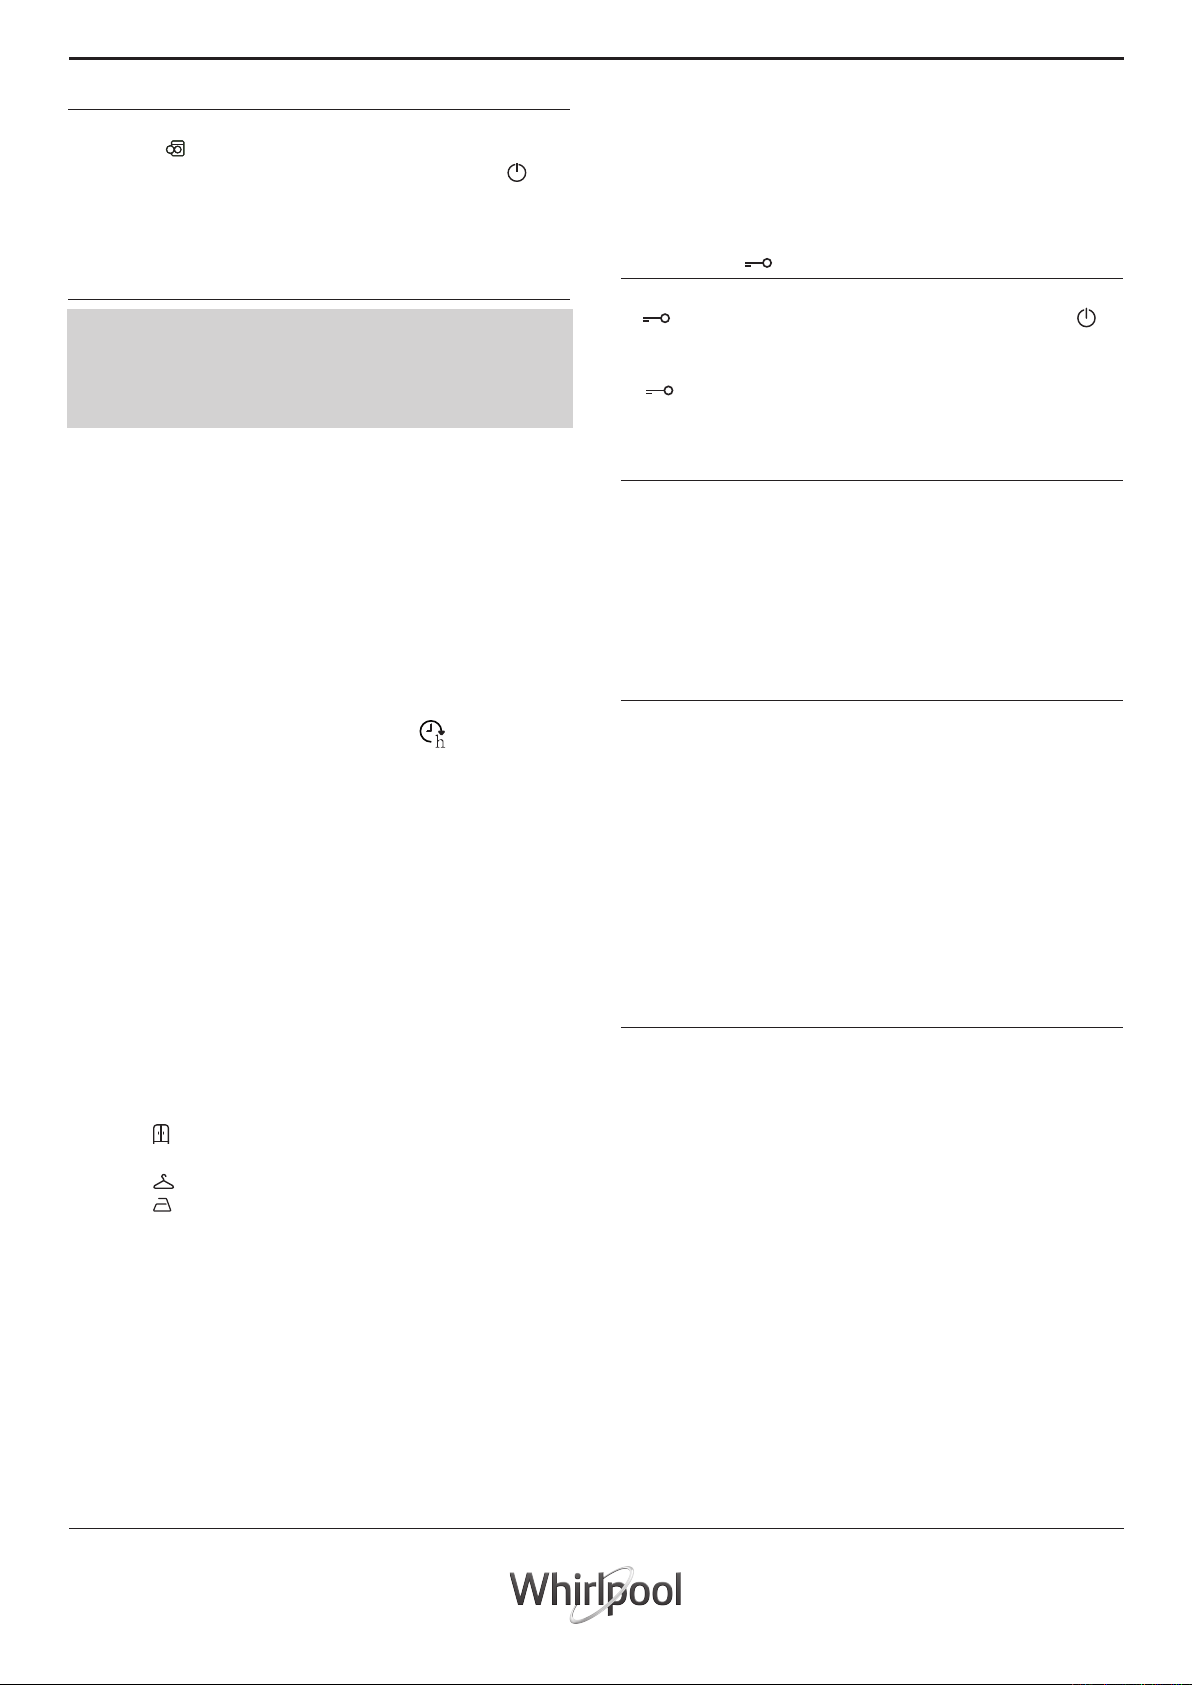
結束程序
結束程序時,將在顯示屏上顯示“END”字樣;當「開
門指示燈」 亮起,機門可以打開。打開機門後,拿出機
內衣物及關閉洗衣乾衣機。如沒有按下「開 / 關」 鍵,
洗衣乾衣機會在約半小時後自動關閉。關閉水龍頭,打開
機門及拿出機內所有衣物,並關閉洗衣乾衣機,讓機門半
開,使洗衣乾衣機的內部可以風乾。
選項
! 如選項不適用於所選擇的程序,會發出錯誤提示音,
相應的指示燈會閃爍。
! 如選項與另一早前所選擇的選項不可兼容,只有最近
選擇的選項才會保持啟用狀態。
獨立乾衣
按下「乾衣」鍵,進行獨立乾衣程序。選擇所需的程序(
與衣物類型兼容),按下「乾衣」鍵,免去洗衣程序,在
所選程序下的最高乾衣程度,並開始乾衣過程。也可以透
過按下「乾衣選項」鍵,來設定和改變乾衣的程度或時
間。
兒童安全鎖
要鎖定控制面板,按住「乾衣」鍵約3秒鐘,直到顯示屏上
的 符號指示燈亮起,控制面板即被鎖定(「開/關」 鍵
除外)。這特別是避免兒童不必要的操作,尤其是針對洗
衣乾衣機附近的兒童。如觸碰到控制面板的按鈕,指示
燈 會於顯示屏閃爍。要解除鎖定控制面板,按住「乾
衣」鍵約3秒鐘。
蒸氣抗菌+
此功能可加強洗淨效能,透過產生蒸氣來抑制機內不良氣
味,清新衣物,完成蒸氣過程後,洗衣乾衣機會溫和地
將衣物翻滾。當「蒸氣抗菌+」功能與乾衣程序相互關聯
時,由於滾筒以慢速旋轉,這可以防止頑固的摺痕在衣物
產生。
「蒸氣抗菌+」功能會在程序結束後開始進行,最長可達
約6小時,並且您可以在任何時段透過按下控制面板上的
任何按鍵或轉動旋鈕中斷功能。及後等待大約5分鐘,機
門才能打開。
預校開機時間
按此選項鍵可讓您將程序延遲開始,此 指示燈亮起表
示功能已啟用。最高長達24小時。如取消此功能,再次按
此選項鍵直至顯示屏上出現“0”。
溫度
每個程序都有一個預定的溫度。如您想改變溫度,按「溫
度」鍵,溫度會顯示在顯示屏上。
脫水轉速
每個程序都有一個預定的轉速。如您想改變轉速,按「脫
水轉速」鍵,轉速會顯示在顯示屏上。
設定乾衣程序
當首次按下「乾衣選項」鍵,洗衣乾衣機會自動選擇所選
程序最高的乾衣程度,這與所選的洗衣程序是互相兼容
的。隨後按下此鍵乾衣程度及時間會續漸遞減,直到完全
關閉乾衣程序(“OFF”)。乾衣程度的設定如下:
A - 可選擇以下的乾衣程度:
一般乾衣 :足夠乾燥,將在乾衣程序結束後直接放入衣
櫃,而不需使用熨燙。
防皺乾衣 :衣物剩下微濕以減少褶皺,必須掛起風乾。
熨燙乾衣 :衣物仍略顯潮濕,可以柔化摺痕,使其更
容易去除。
B - 根據時間設定:可設定30-210分鐘的乾衣時間。
若洗衣量大於最大允許的乾衣量(請參閱程序表中的「最
大乾衣量」),請於洗衣程序完成時及乾衣程序開始前,
取出部分衣物。
提示及應用
根據以下建議分類衣物:衣料類型/護理標籤符號(棉,
請
混合纖維,合成纖維,羊毛,手洗項目)。請將白色衣物
與顏色衣物分開,並將簇新的顏色衣物分開清洗。纖細
衣物(清洗小件衣物,如尼龍絲襪;有鉤扣的衣物,如
胸罩。),請放入有拉鍊的布袋。
清空衣物口袋:錢幣,別針等會損毀洗衣乾衣機及洗衣
筒。檢查所有鈕扣。
保養和維護
執行任何清潔和保養之前,請先拔下電源插頭。請勿使用
易燃液體來清潔洗衣乾衣機。
關閉水龍頭和電源插頭
每次洗滌後,關閉水龍頭。這會減少洗衣乾衣機內部液壓
系統的磨損並有助於防止洩漏。進行清洗和所有維護工作
期間,請拔掉洗衣乾衣機的電源插頭。
潔淨洗衣乾衣機機身
可以使用浸泡在溫熱肥皂水中的軟布清潔洗衣乾衣機的外
部部件和橡膠部件。不要使用溶劑或研磨劑。
保養機門及滾筒
經常把機門半開,以防止形成難聞氣味。
衣物平衡系統
在進行脫水之前,為了避免在每次脫水旋轉之前過度振動
並以均勻的方式分配負載,滾筒會以略高於洗滌的旋轉速
度連續旋轉。如果在多次嘗試之後,負載未達到正確平
衡,洗衣乾衣機則以較低的旋轉速度旋轉。如果負載過度
不平衡,洗衣乾衣機只會執行分配衣物的過程而不是脫水
旋轉。為了改善滾筒中衣物的分配和平衡,我們建議混合
細小及大件的衣物放入滾筒中清洗。
此時,請按照「獨立乾衣」部分提供的說明進行操作。對
剩餘的負載重複此過程。注意:在每個乾衣程序結束時,
會有額外添加的冷卻階段。
22
Page 23
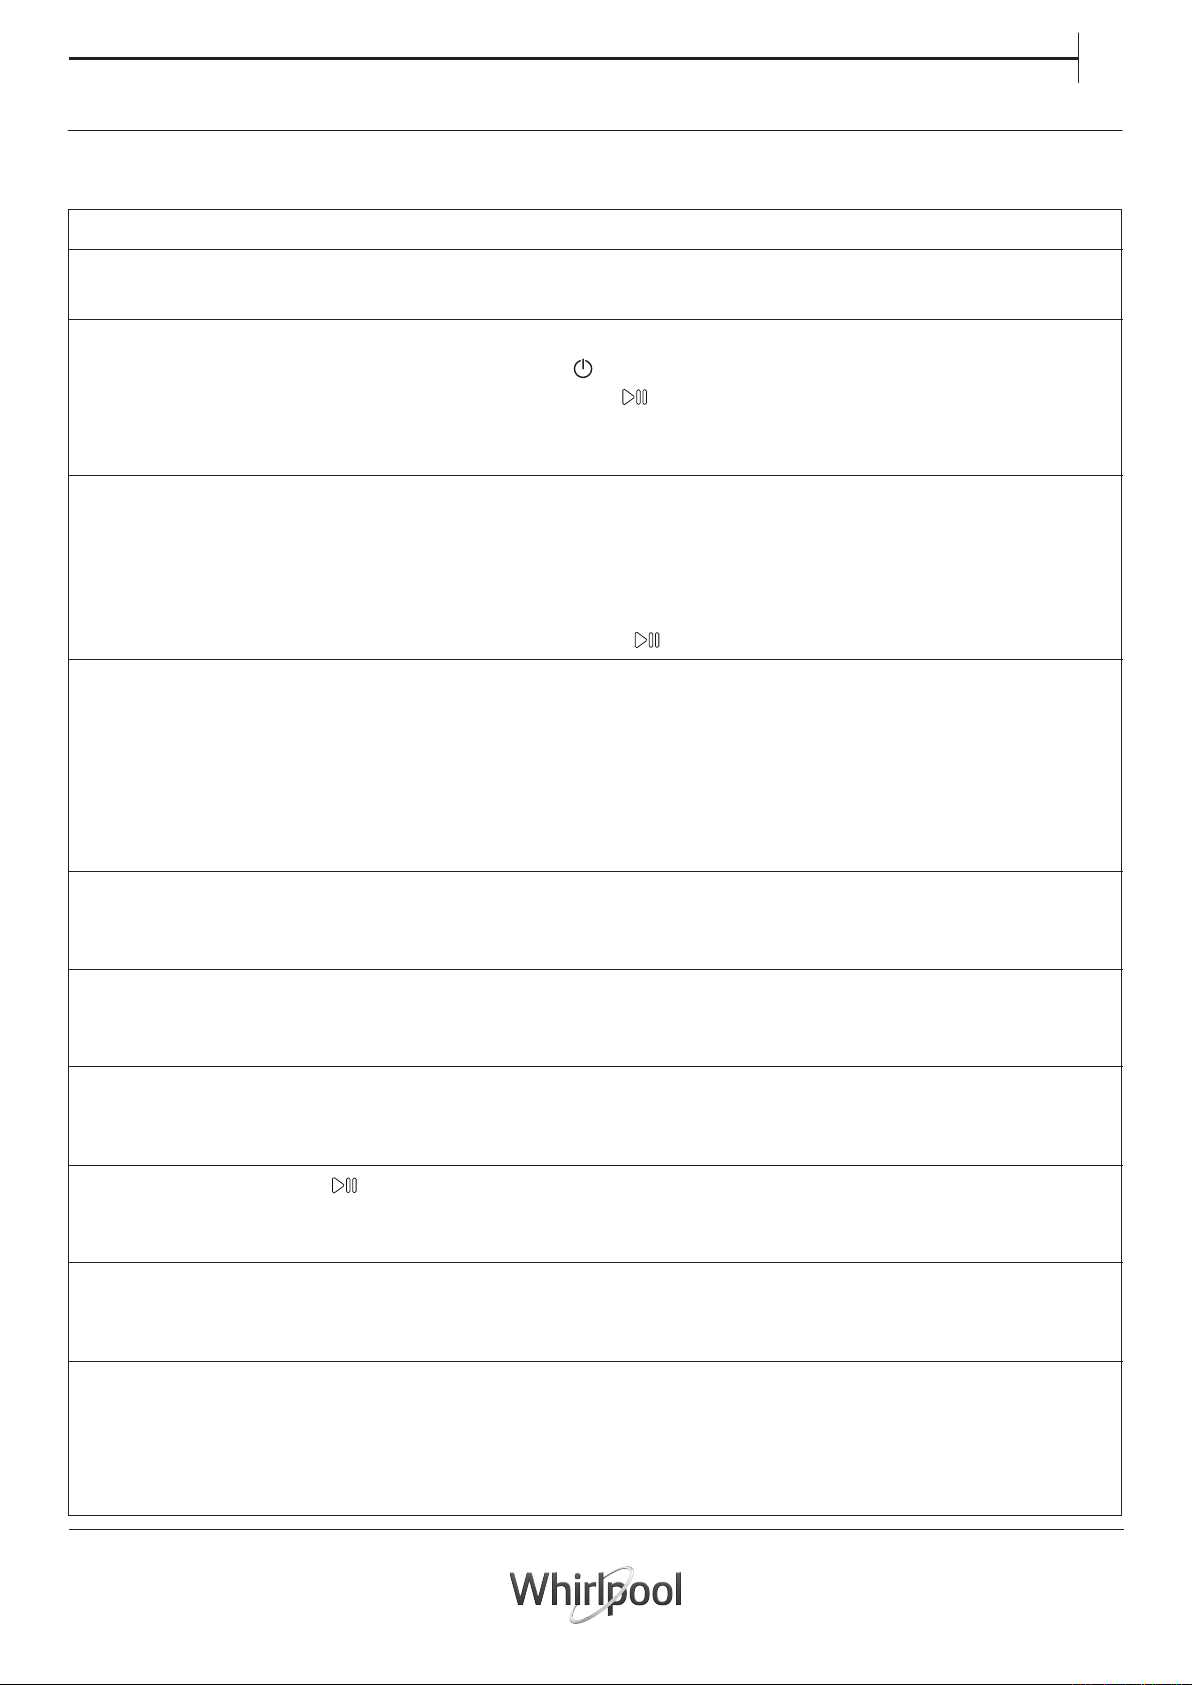
故障排除
洗衣乾衣機可能因為某些原因而不能正常運作。聯絡售後服務中心之前,建議先自行進行檢查,看
問題是否可以使用以下的簡易方法解決。
CH
異常問題
洗衣乾衣機無法正常啟動
洗衣程序無法正常啟動
洗衣乾衣機無法進水。
信息「“H2O”」顯示在顯示
屏上。
洗衣乾衣機不斷加載和排水
原因/解決方法:
• 插頭沒有正確插在插座內。
• 電源故障。
• 機門未正確關閉。
•「開/關」 鍵沒有被按下。
•「啟動/暫停」 鍵沒有被按下。
• 水龍頭關閉。
• 已設定預校開機時間。
• 進水喉未連接到水龍頭。
• 進水喉可能扭曲。
• 水龍頭關閉。
• 自來水供應關閉。
• 供水壓力過低。
• 「啟動/暫停」 鍵沒有被按下。
• 排水喉尚未正確地安裝於離地面65至100厘米的位置。
• 排水喉的端部浸於水中。
• 牆壁上的排水管通氣孔不足。
如果檢查後問題仍然存在,關閉水龍頭,關閉洗衣乾衣
機,並聯絡售後服務中心。如果住宅樓層位於建築物的最
上層,有時會發生虹吸現象,從而使洗衣乾衣機不停入水
和排水。
洗衣乾衣機無法進行排水及脫水
脫水時機身過分震動
洗衣乾衣機漏水
「選項」和「啟動/暫停」指示
燈快速閃爍,顯示屏顯示錯誤
代碼(例如:F-01,F-..)
過多的泡沫形成
洗衣乾衣機無法乾衣
•
所選程序不包括排水功能:某些程序必須手動設定排水功能。
• 排水喉可能扭曲。
• 排水喉阻塞。
• 搬運螺栓未被正確移除。
• 洗衣乾衣機四個機腳不水平。
• 洗衣乾衣機被擠壓於家具和牆壁之間。
• 進水喉尚未正確地擰緊。
• 洗滌劑盒堵塞
• 排水喉尚未正確地擰緊。
• 關閉洗衣乾衣機電源並拔下電源插頭。約一分鐘後重開
洗衣乾衣機。如果故障仍然存在,請聯絡我們的售後服
務中心。
• 洗衣劑不適用於洗衣乾衣機 (參考洗衣劑的註明,「適用於
洗衣機」或者類似的註解)。
• 劑量過大。
• 插頭沒有正確插在插座內。
• 電源故障。
• 機門未正確關閉。
• 已設定預校開機時間。
• 乾衣功能的設置是OFF。
23
Page 24
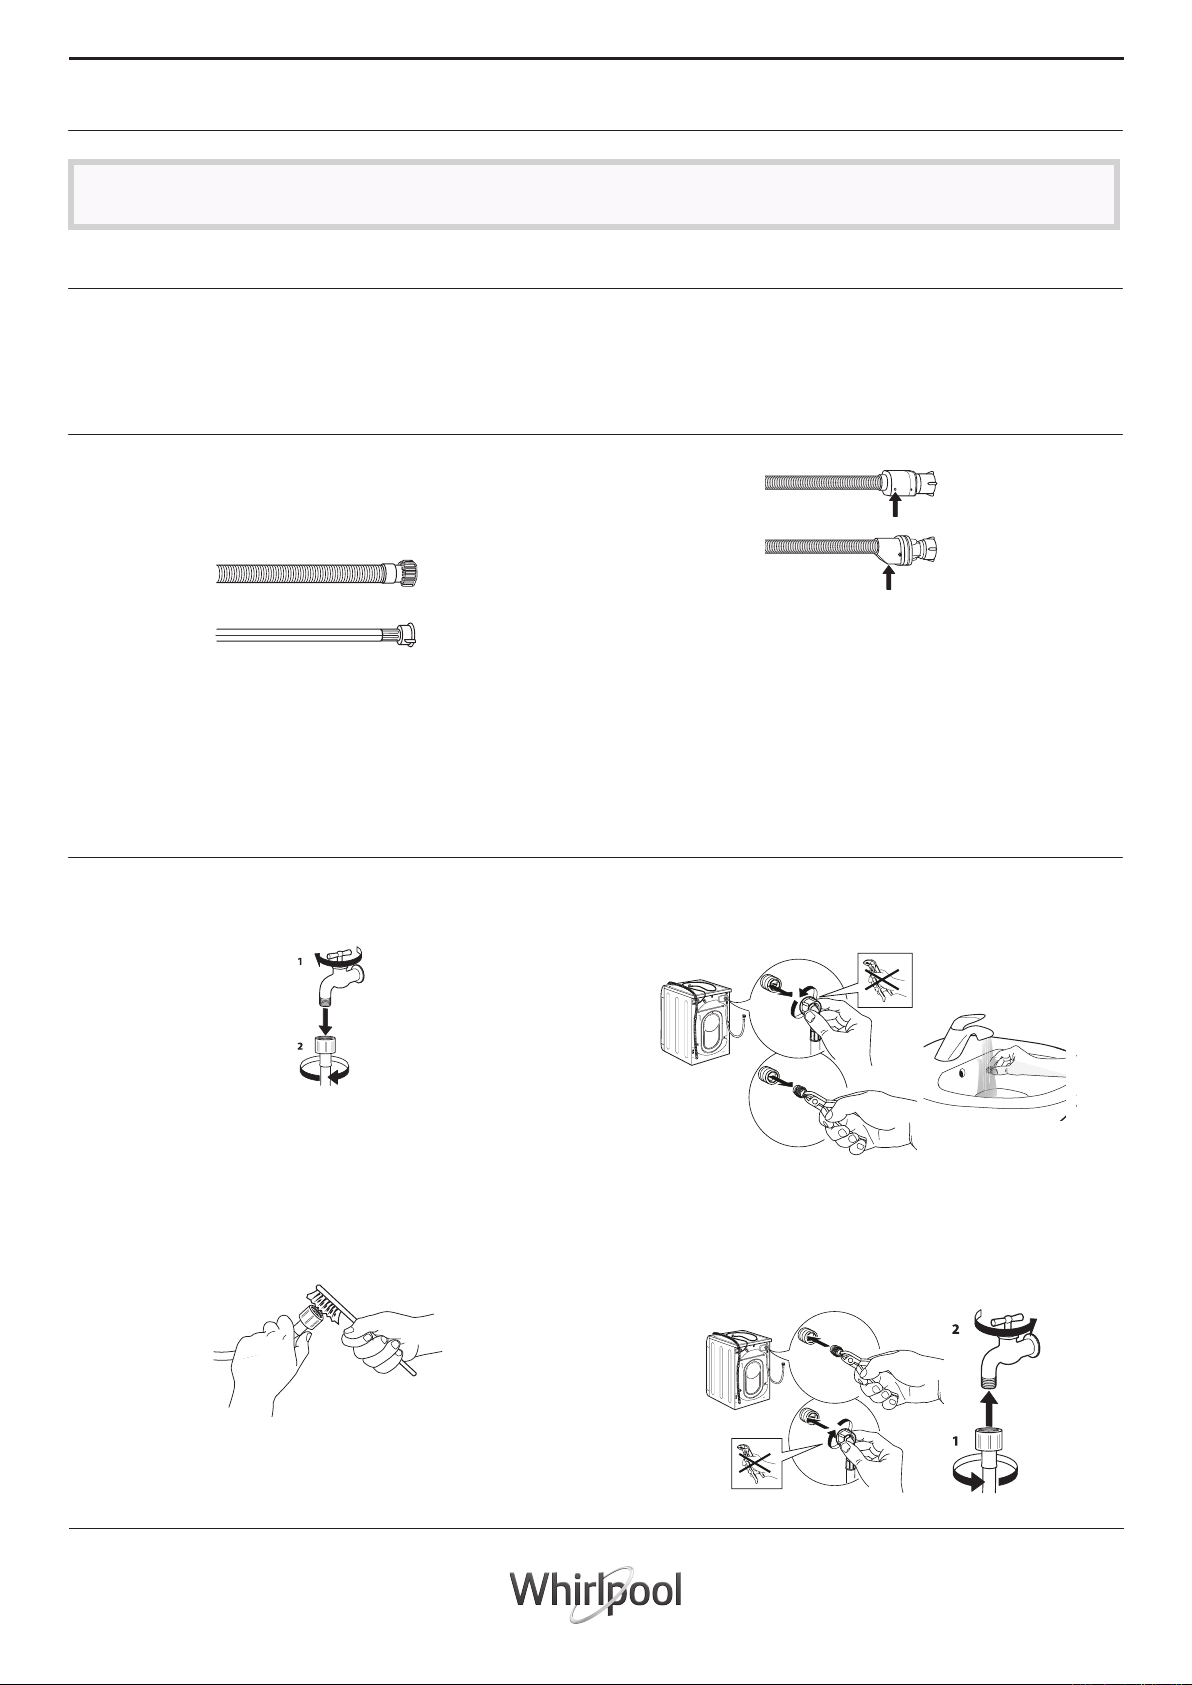
清潔和保養
執行任何清潔和保養之前,請先拔下電源插頭。 請勿使用易燃液體來清潔洗衣乾衣機。
清潔洗衣乾衣機的外部
用柔軟濕布清洗。用軟布抹乾洗衣乾衣機的外
部。
檢查進水喉
定期檢查進水喉是否變脆和爆裂。如進水軟管損
壞,應聯絡售後服務中心或您的經銷商購買同類
型新水喉進行更換。軟管類型:
如您的進水喉帶有一層透明管道覆蓋層,應定
期檢查透明覆蓋層的顏色;如透明管局部顏色
變暗,這就意味著水喉可能有滲漏並應該予以
更換。
清潔進水喉內的濾網
1. 關掉水龍頭並從水龍頭上鬆開進水喉。
不要使用玻璃或通用的清潔劑,去污粉等清潔
控制面板。
保險入水喉:應定期檢查安全閥檢視窗(見箭
咀):如呈紅色,說明安全閥已經啟用,此時就
必須更換水喉。按下釋放按鈕(如有),以擰開
軟管。
3. 拆下洗衣乾衣機後方的進水喉。用通用鉗子
將濾網從洗衣乾衣機接頭上拆下並清潔。
2. 用刷子仔細清潔在水喉端的濾網。
24
4. 裝回濾網並將進水喉擰回機上。不要使用工
具來連接進水喉。打開水龍頭並確認各連接
位均完全不漏水。
Page 25
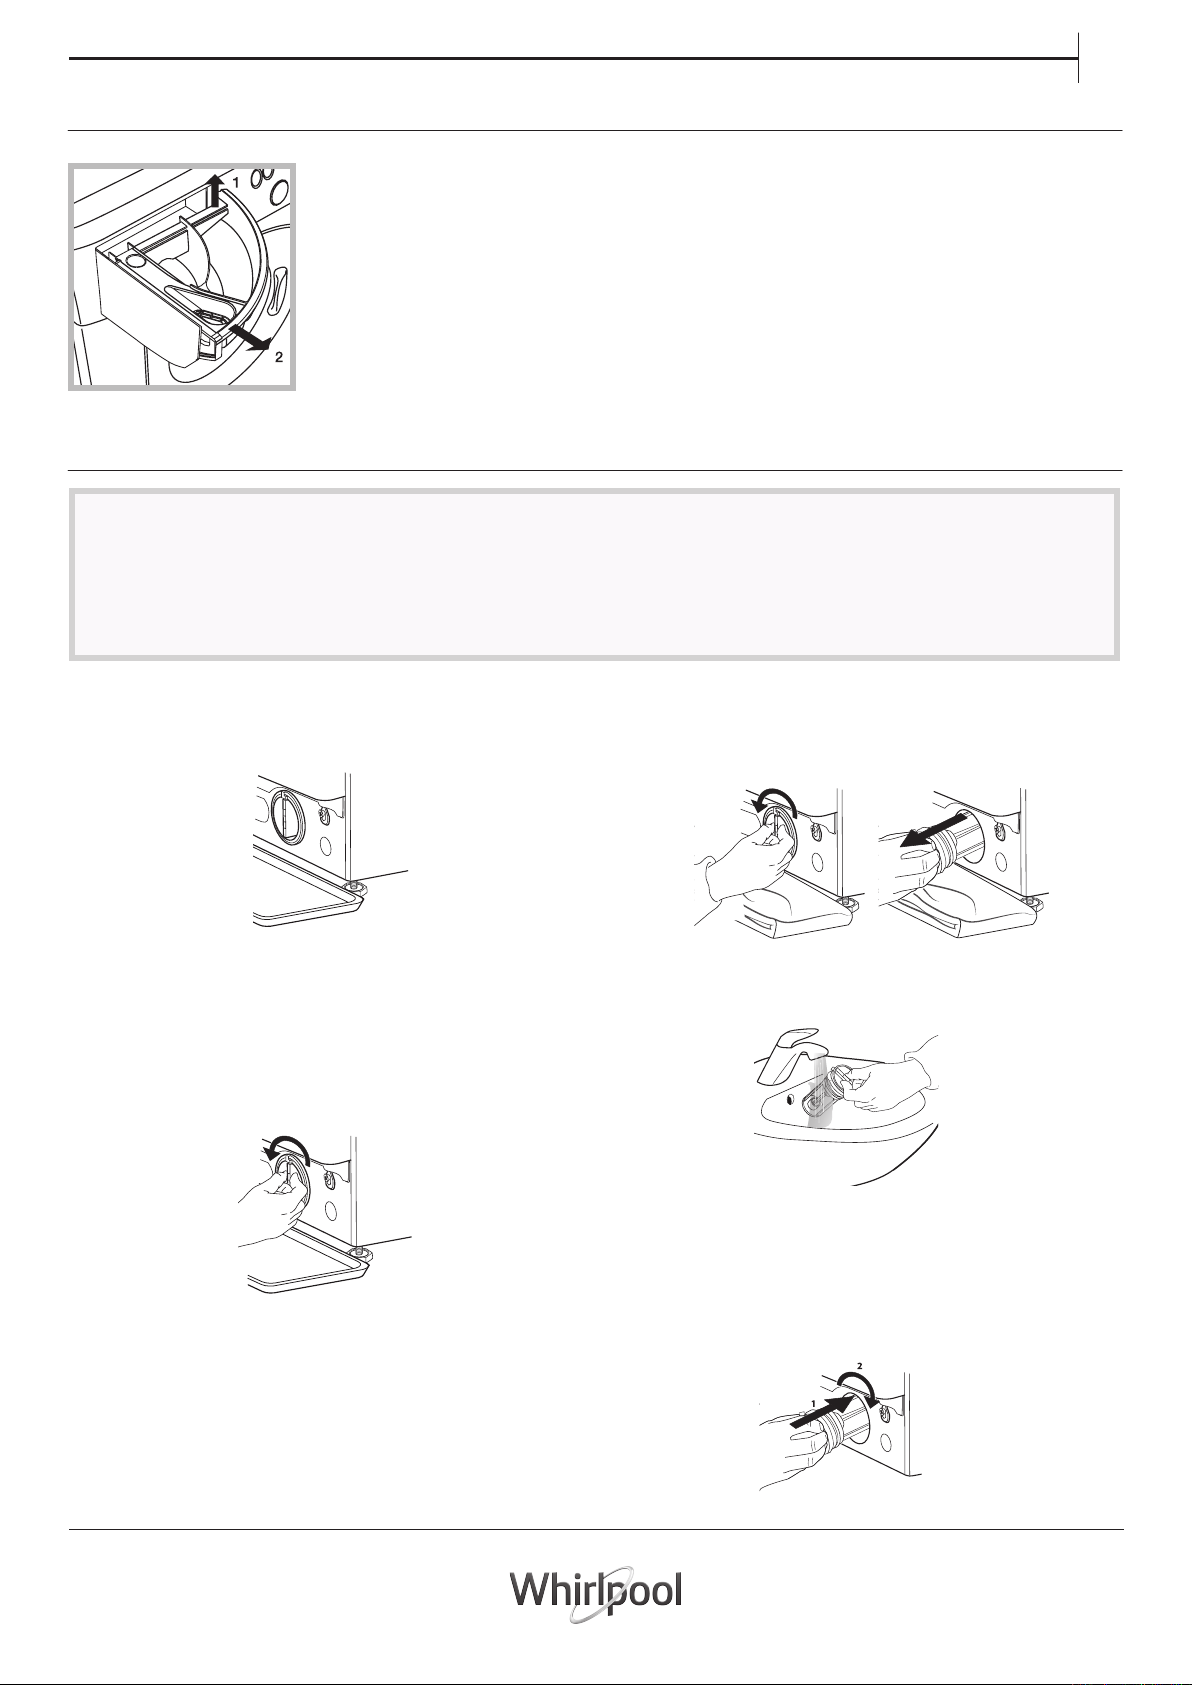
清潔洗衣劑盒
輕輕抬起並將洗衣劑盒拉出(見圖),並
取下分隔器。
用水沖洗所有部件,這個步驟應該經
常重複,以確保潔淨。
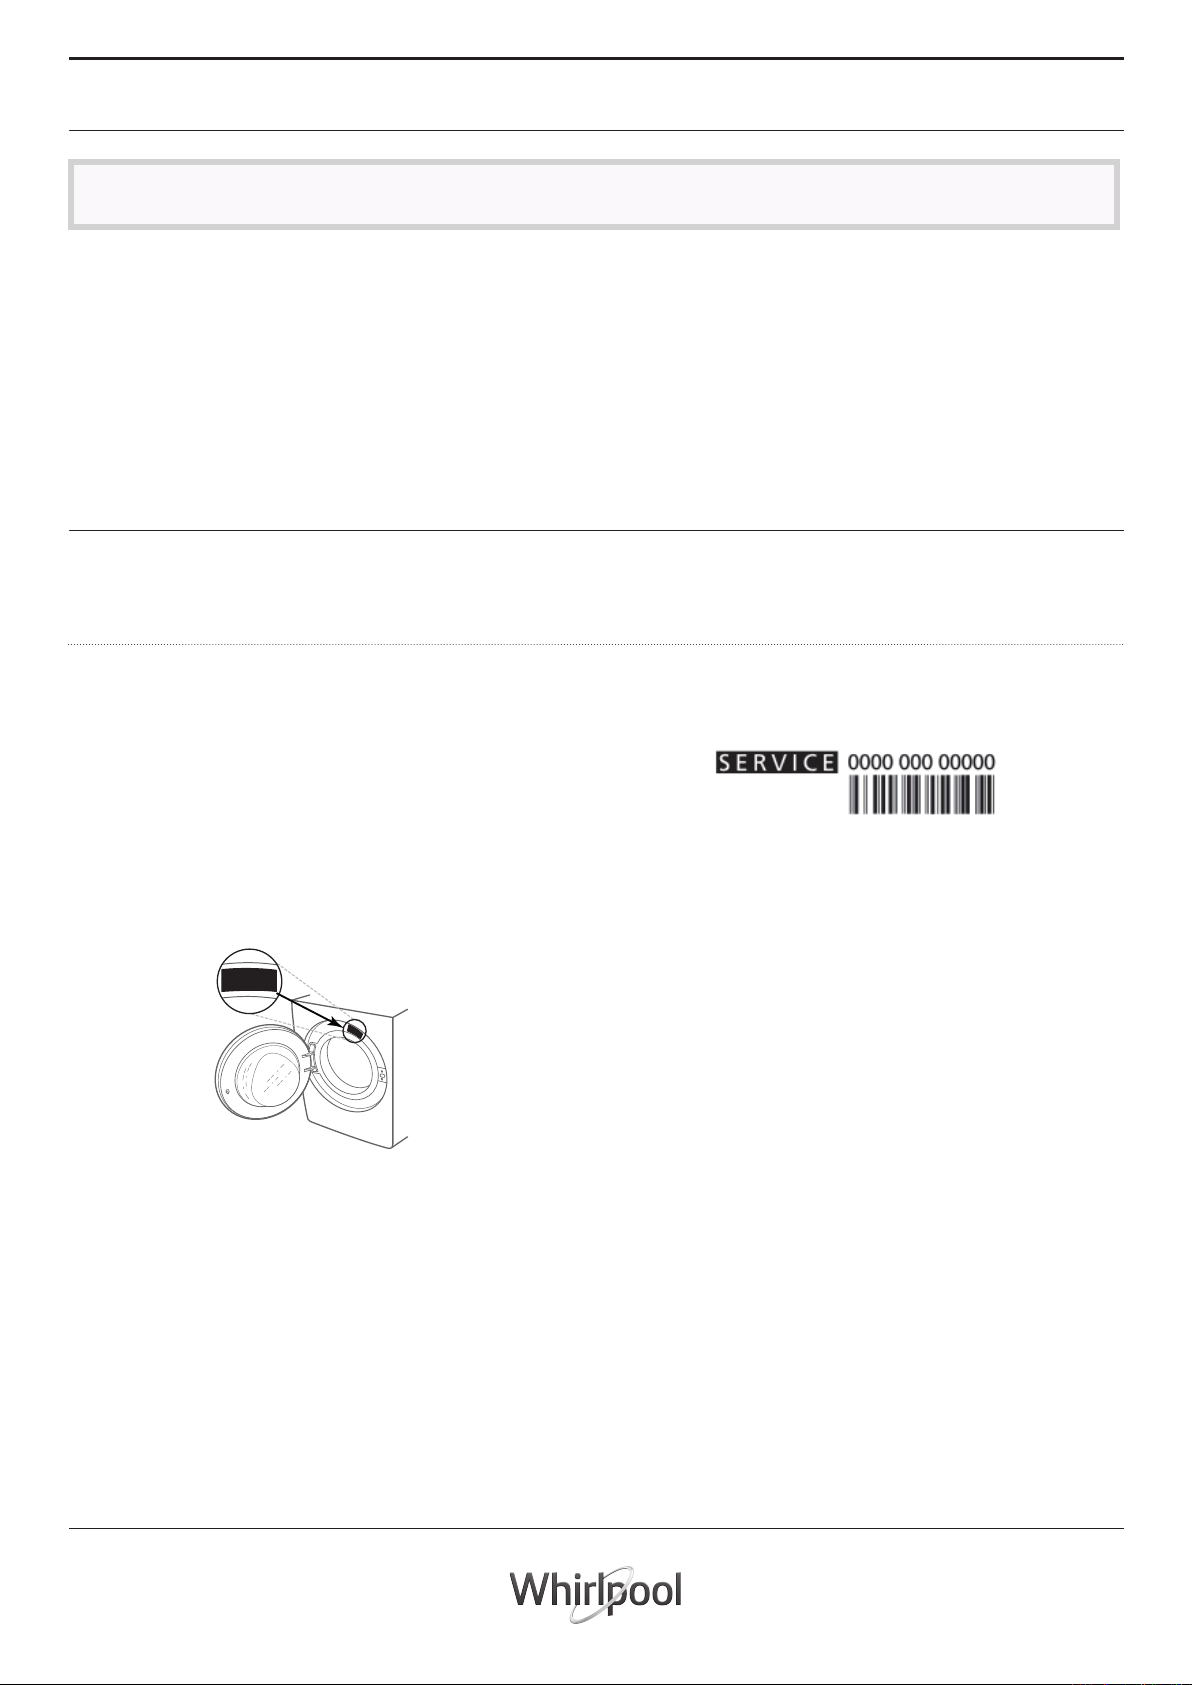
清潔濾網/排走積水
清潔濾網或排走積水前先讓洗衣乾衣機停止運轉並拔除洗衣乾衣機電源插頭。如果您使用過熱
洗程序,排走積水前應等待水冷卻下來。
請對過濾器進行定期檢查並清潔,以避免由於阻塞過濾器導致水不能排出。如果水不能排出,
顯示屏會顯示過濾器可能被堵塞。
CH
1. 放置一個容器:將寬闊且扁平的容器放在濾
網下方收集排水。
2. 排走積水:逆時針轉動濾網,而不用拆開濾
網,並緩慢打開直至排走全部水。當該容器
是滿水,將濾網按順時針方向轉緊。清空容
器,重複這個步驟,直到水全部流出。
3. 抽出濾網;把棉布放在濾網下方以吸收餘下
的少量積水,然後按逆時針方向打開抽出濾
網。
4. 清洗濾網:用水沖洗並除去濾網殘渣。
5. 插入濾網塞並裝回底座:將濾網塞回原位,
然後按順時針方向轉緊到最深位置。濾網手
柄必須處於垂直位置。可以倒入約1公升的水
於洗衣劑盒測試濾網是否已轉緊。
25
Page 26
搬運和處理
搬運時,切勿提拉洗衣乾衣機的頂板。
1. 拔除洗衣乾衣機電源插頭及關閉水龍頭。
2. 檢查並確定機門和洗衣劑盒都已正確關閉。
3. 拆除水龍頭與入水喉和排水管與排水喉的連
接位,排出軟管內的所有積水,整理以使它
們不會在運輸過程中損壞。
售後服務
致電售後服務中心前:
1. 請參閱「故障排除」嘗試自行解決問題。
若洗衣乾衣機仍舊無法正常運作,請致電售後服
務中心。
請致電保用證上顯示的號碼,或按照以下網址上
的指引www.whirlpool.com.hk
當聯絡我們的售後服務中心,請說明:
• 簡單的故障說明;
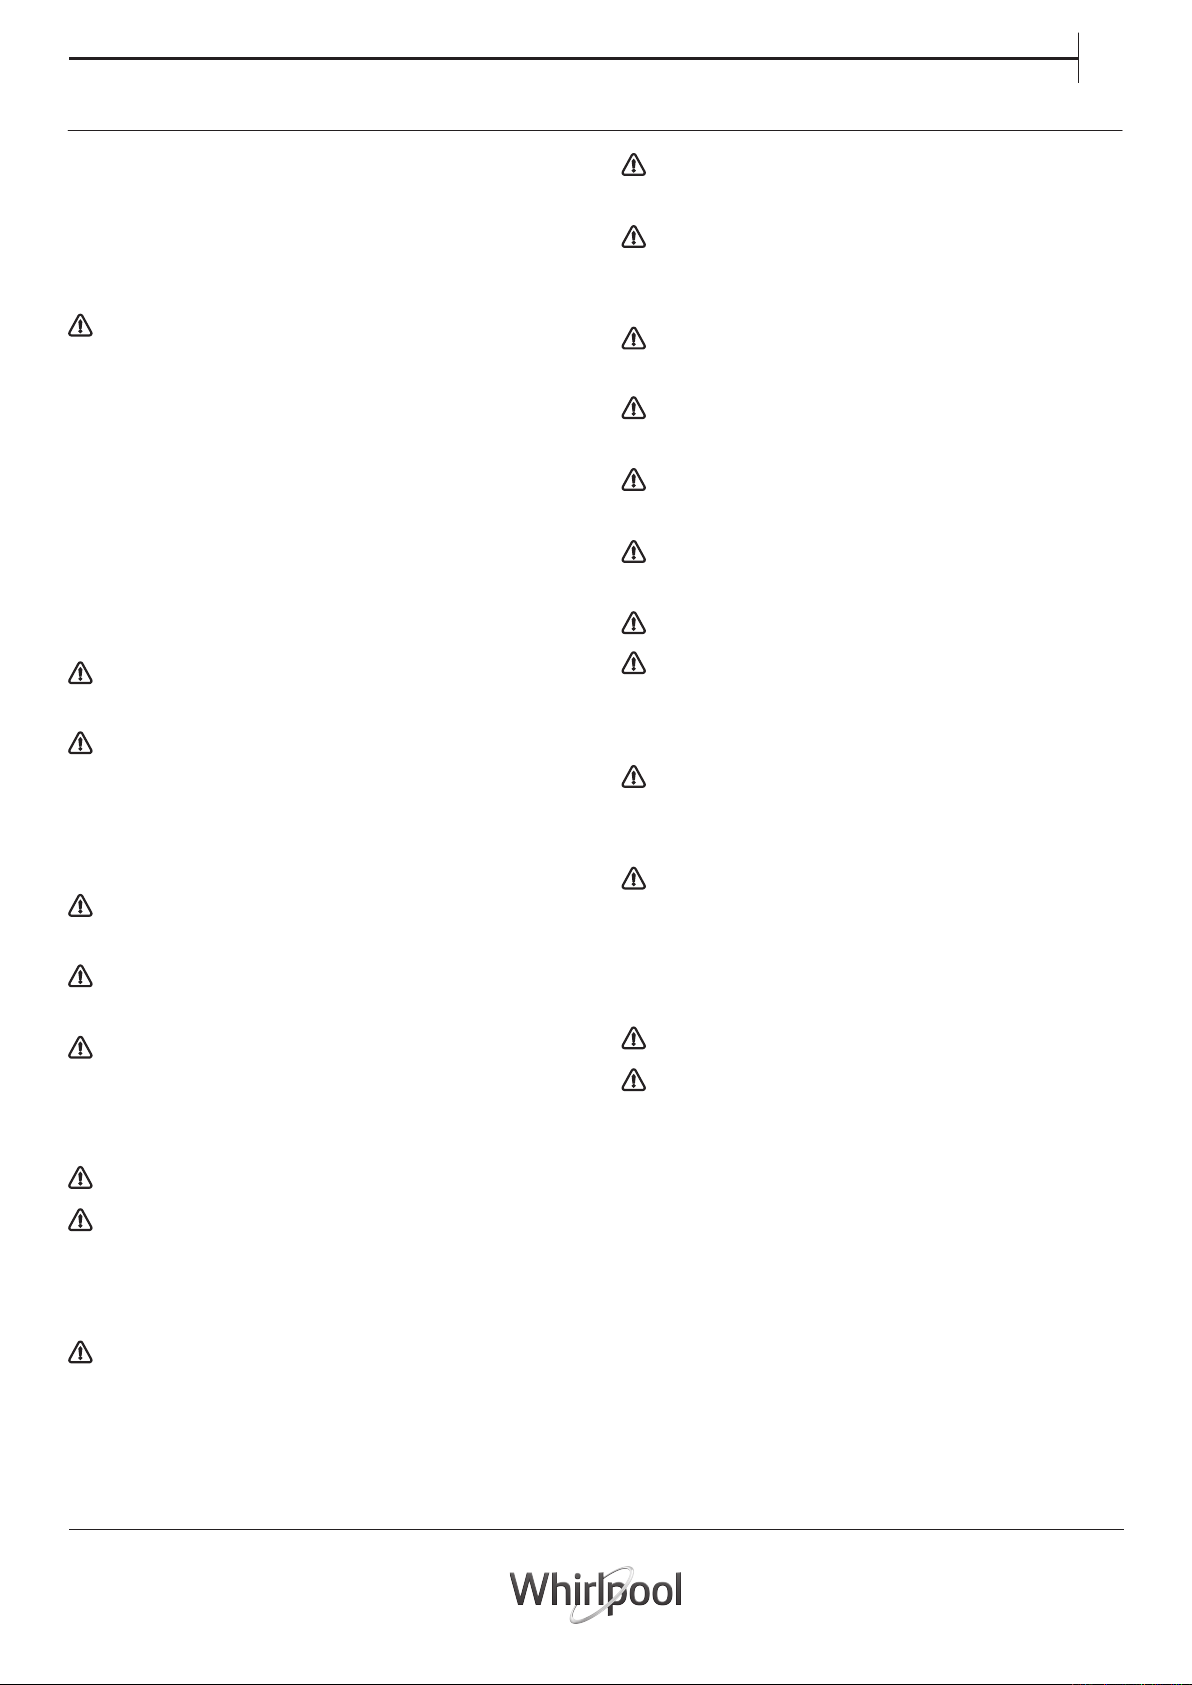
洗
衣乾衣機的類型及型號(請參閱機門內
•
的銘牌);
xxxxxxxxxxxx
4. 重裝搬運螺栓。到達搬運目的地後,按照「安
裝指南」並以反向操作卸下搬運螺栓。
重要:未有固定搬運螺栓時請勿搬運洗衣乾衣
機。
2. 重新啟動洗衣乾衣機,檢查洗衣乾衣機是否
仍舊無法正常運作。
•
服務碼(機門內「維修」字樣後的號碼);
• 您的完整地址;
• 您的電話號碼。
對於任何維修,使用我們授權的售後服務中
心,以確保適當的維修和使用原廠零配件。
26
Page 27
CH
安全指引
使用洗衣乾衣機前請先細閱產品安全指引。請妥
善保存此產品安全指引及使用說明作將來參考。
本手冊和洗衣乾衣機本身提供重要的安全警告,
請按需要隨時讀取及查察。因不當的使用及操作
會導致的風險,製造商將不負任何責任。
除非得到持續監視,否則幼兒(0-3歲)和兒童
(3-8歲)應遠離洗衣乾衣機。洗衣乾衣機可由8歲
以上之兒童及身體,感官或精神障礙或經驗知識
不足的人士操作,前提是此等人士已接受洗衣乾
衣機的安全指導及指引,且瞭解使用洗衣乾衣機
的相關危險。兒童不可胡亂玩弄洗衣乾衣機。未
經指導,兒童不可進行洗衣乾衣機的清潔及保養
工作。
切勿強行打開機門或以它作為踏板使用。
允許使用
注意:此洗衣乾衣機不能透過外部控制器或
遙控裝置進行操作。
重要事項:請閱讀並遵循
衣物柔順劑或類似產品應按照產品內所列
說明使用。
乾衣程序的最後一個階段是無熱(冷卻階
段),以確保衣物保持在一個溫度水平而不導
致衣物損壞。
除非迅速地取出所有衣物並攤開散熱,否則
於乾衣程序結束之前,請勿停止洗衣乾衣機。
在乾衣過程,機門會因應程序運行而漸漸變
得很熱。
請勿使用此洗衣乾衣機來乾洗用易燃溶劑(如
三氯乙烯)清洗過的衣服。
請不要使用本機來乾洗泡沫橡膠(膠乳泡沫)
或相類似有彈性的物質。
確保在乾衣過程中水龍頭是打開。
移除衣物袋子內所有物品如打火機,火柴
等。
此洗衣乾衣機只適用於家居或下列之類似環
境:如一般商店、辦公室及其他工作環境的職
員專用廚房;農莊;供入住酒店、汽車旅館及
其他住宅式旅店之顧客使用;提供簡單住宿及
早餐服務之旅舍。
請確保負載不超過最大洗衣或乾衣量(請參
閱「程序表」中的指示)。
洗衣乾衣機禁止作為商業用途。洗衣乾衣機
不適合戶外使用。
切勿使用任何溶劑(如鬆節油、汽油等)、
含有溶劑之洗滌劑、去污粉、玻璃或通用清潔
劑、易燃液體等進行洗滌;請勿清洗經溶劑或
易燃液體處理過的衣物。
不要在洗衣乾衣機中乾洗未經清洗的衣服。
物品如沾了烹調油、丙酮、乙醇、汽油、煤
油、除斑、松節油、蠟物質或除蠟劑應在放入
洗衣乾衣機烘乾之前,先以額外洗衣劑並用熱
水清洗。
物品如泡沫橡膠(膠乳泡沫)、淋浴帽、防水
織物、橡膠備份製品和衣服或裝有泡沫橡膠墊
的枕頭不應放入洗衣乾衣機進行烘乾。
安裝
此洗衣乾衣機建議由兩個或更多的人進行安
裝處理,避免受傷風險。使用防護手套來執行
所有拆封和安裝操作,避免割傷風險。
如果要在洗衣乾衣機頂部放置乾衣機,請首
先聯繫我們的售後服務中心或您的經銷商,以
確認是否可行。只允許使用我們的售後服務中
心或您的經銷商提供的專業疊裝工具將乾衣機
固定在洗衣乾衣機上。
請勿提拉頂板來移動洗衣乾衣機。
安裝,包括供水(如有)及電源連接,必須由
合資格的技術人員按照製造商的說明和本地標準
安全法規進行維修。除非在用戶手冊特別聲明,
切勿維修或更換任何洗衣乾衣機的部件。兒童應
遠離洗衣乾衣機安裝地點。卸下包裝後,確認洗
衣乾衣機沒有在運輸過程中損壞。在出現問題
時,請聯絡經銷商或售後服務中心。當完成安裝
後,包裝材料(如塑膠,發泡膠件等),應置於幼
童無法取得的地方,避免意外。此洗衣乾衣機進
行安裝前,必先斷開它的電源連接避免觸電危
險。進行安裝時,確保洗衣乾衣機電源線沒有損
壞,避免火災或觸電危險。只有當安裝步驟完成
後才可啟動洗衣乾衣機。
27
Page 28
不要在極端的環境下安裝洗衣乾衣機,如:
通風不良,溫度低於5°C或高於35°C。
確保洗衣乾衣機的四隻機腳穩固坐落在地面
上,如有需要可作調整,並檢查洗衣乾衣機是
否完全處於水平位置(利用水平尺量度)。
如果是木地板或所謂的「浮隔地板」(例如
某些鑲木或層壓地板),請將機器放在至少寬x
深為60x60厘米以及厚度至少3厘米的一塊夾板
上。
根據本地供水公司的法規將進水喉管連接到
水龍頭上。
請切勿使用接駁電線或萬能插座,安裝後電
線部份不可被使用者易於接觸。手濕或赤腳時
請勿使用本產品。若本產品的電源線或插頭有
損壞,不能正常運作,請勿操作本機。
如果電源線損壞,必須根據相同產品更換電
源線。電源線只能由製造商指定的合格的技術
人員更換,以避免觸電的危險。
清潔和保養
注意:執行任何維修或清潔操作之前,請
先關閉及拔下電源插頭。切勿使用蒸氣清洗本
產品。
對於只能使用冷水的型號:切勿連接有熱水
供應的水龍頭上。
對於帶有熱水供水的型號:熱水進水的溫度
絕對不能超過60°C。
本洗衣乾衣機用搬運螺栓作固定,以防止運
輸途中對其內部造成任何損壞。使用機器前必
須拆除搬運螺栓。然後,請使用4個附帶的塑
膠蓋把開口蓋好。
安裝完成後等待數小時使其適應室內的環
境,才可開始使用。
確保地毯或其他材料不會阻塞洗衣乾衣機底
部的通風孔(如您的型號適用)。
必須使用新水喉將洗衣乾衣機連接到水源。
用過的水喉絕對不能再使用。
水壓必須於0.1 -1 MPa內。
電氣警告
插座必須能夠拔掉,以切斷電源,或安裝設
有開關鍵的插座及按照本地的電器安全標準法
連接地線。
處理包裝物料
包裝材料完全可回收,並設有可回收標誌 。
包裝的各個部分必須根據當前本地廢品處理法
規進行處理。
廢棄家用電器
必須根據當前本地廢品處理法規進行處理。有
關處理、修復和回收本產品的詳細資訊,請聯
繫售後服務中心、家庭廢品處理服務中心或您
購買本產品的商店。
本洗衣乾衣機依照有關廢棄電器和電子設備
(WEEE)的歐盟標準2012/19/EU標示。確保
以正確的方式廢棄本產品,可避免因不當的廢
棄處理方式而對環境和人體健康造成潛在的負
面影響。
這符號 表示此機器不能作為家庭廢品處理。
您應將它交給回收電器和電子設備的適用收
集點。
28
Page 29
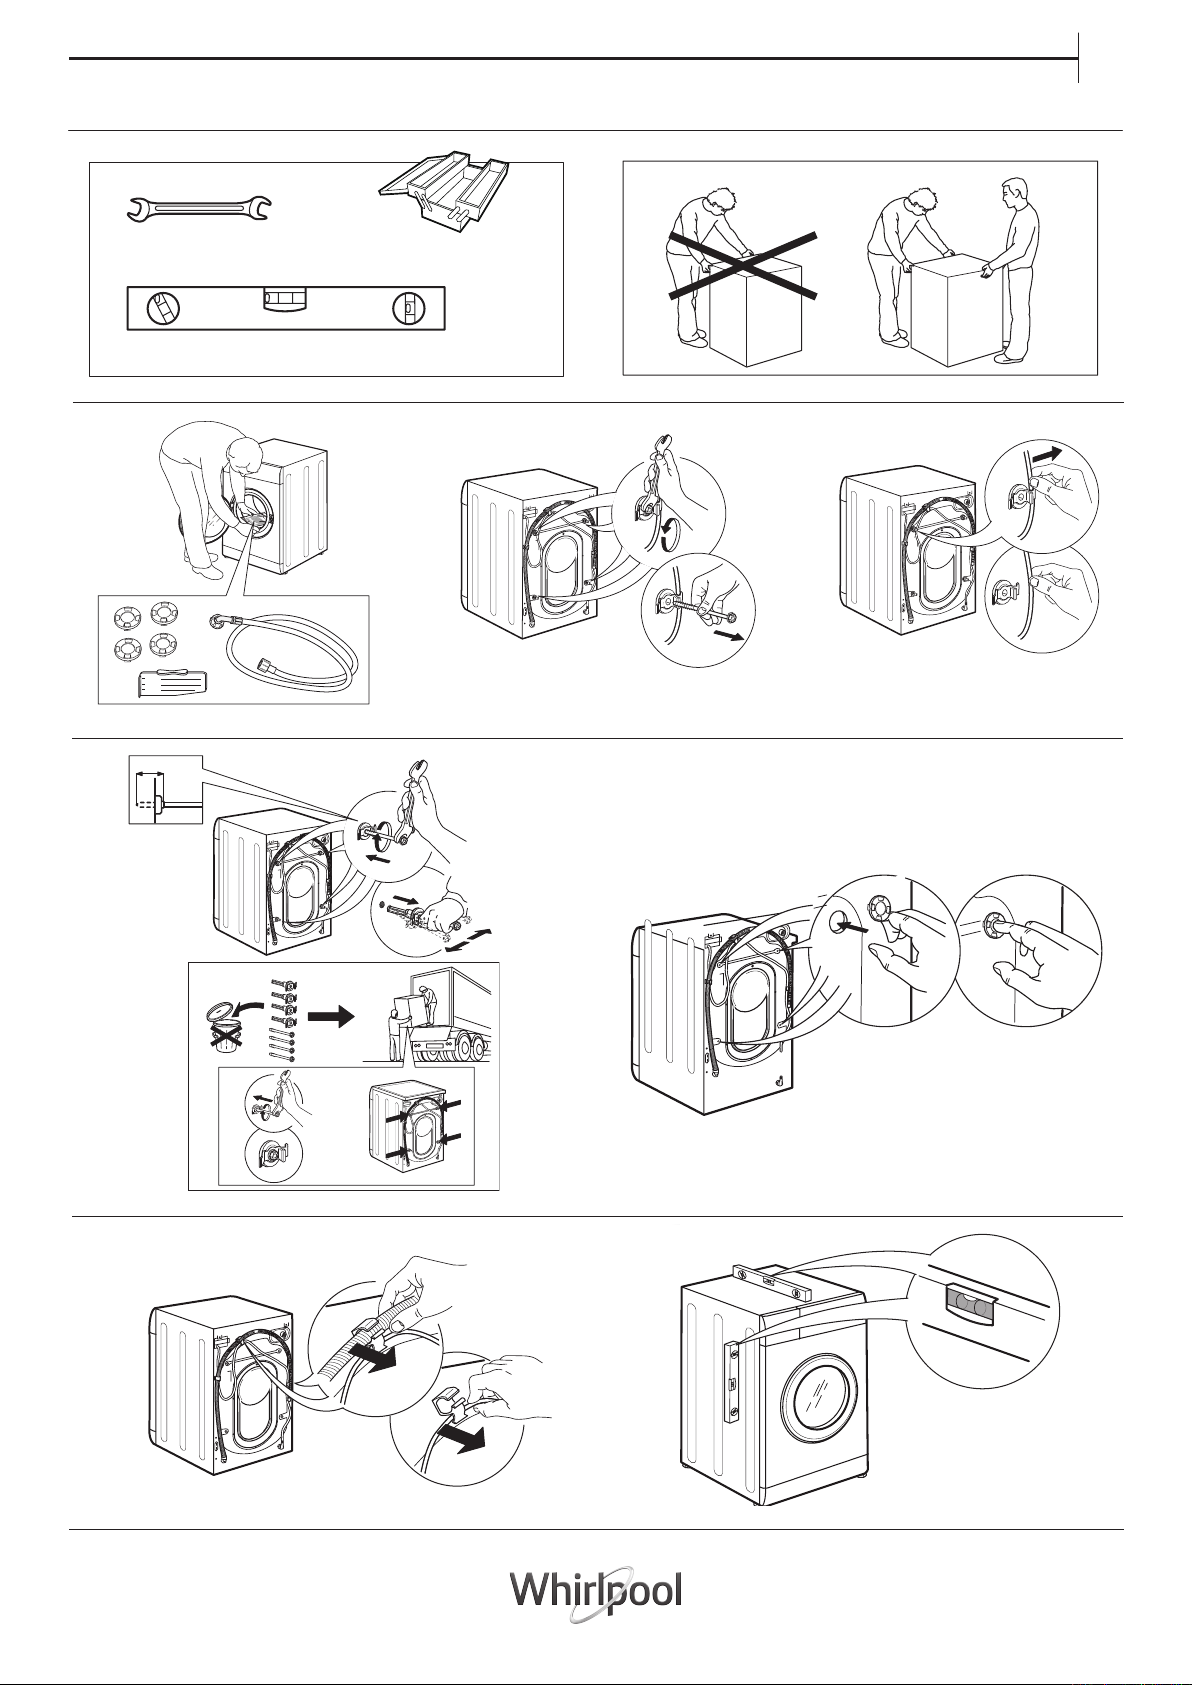
安裝指南
10mm(毫米)-0.39inch(吋)
CH
1.
150毫升
100毫升
50毫升
2毫米 - 0.7吋
4. 5.
2.
3.
6.
7.
29
Page 30
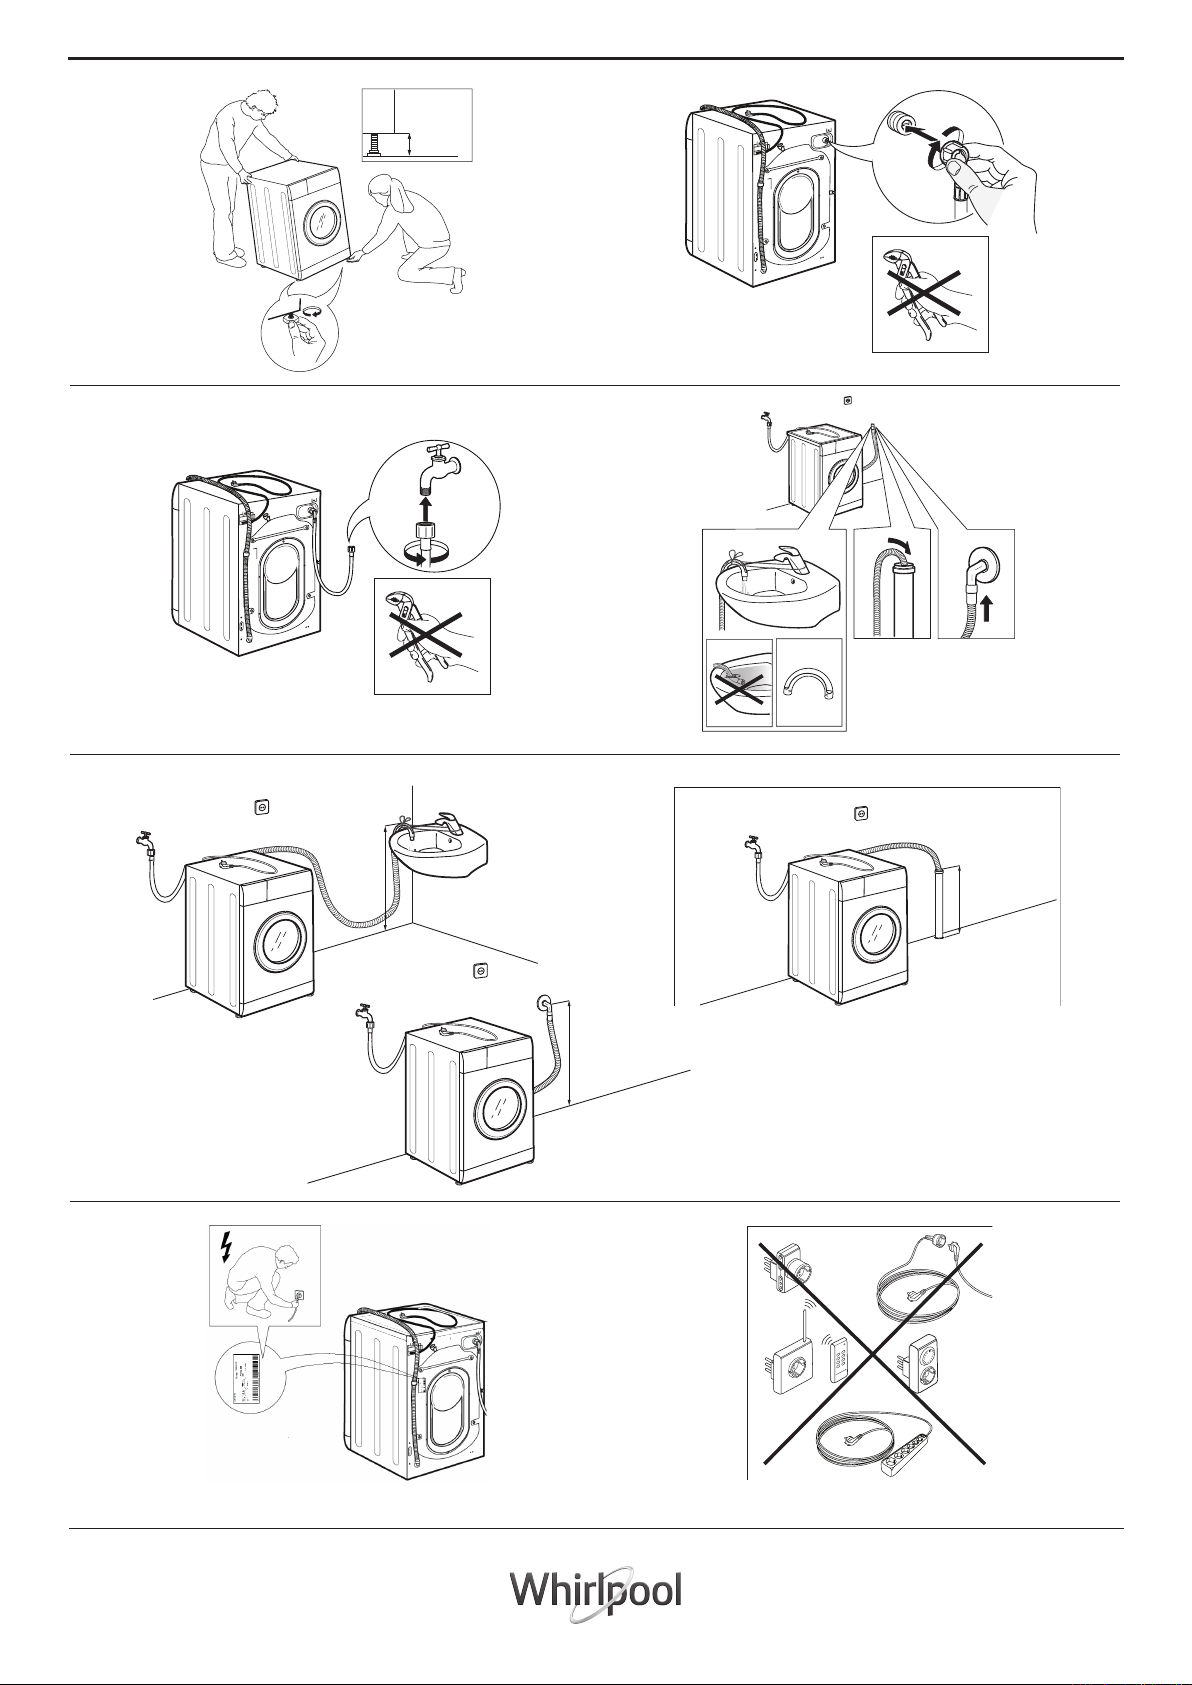
9.8.
Max.最高
0.5cm (厘米)
Max.最高
0.2inch (吋)
10. 11.
12.
13.
Max.最高
100cm(厘米)
39inch(吋)
Min.最低
65cm(厘米)
25inch(吋)
Max.最高
100cm (厘米)
39inch(吋)
Min. 最低
65cm(厘米)
25inch(吋)
14.
Max. 最高
100cm (厘米)
39inch (吋)
Min. 最低
65cm(厘米)
25inch(吋)
30
Page 31
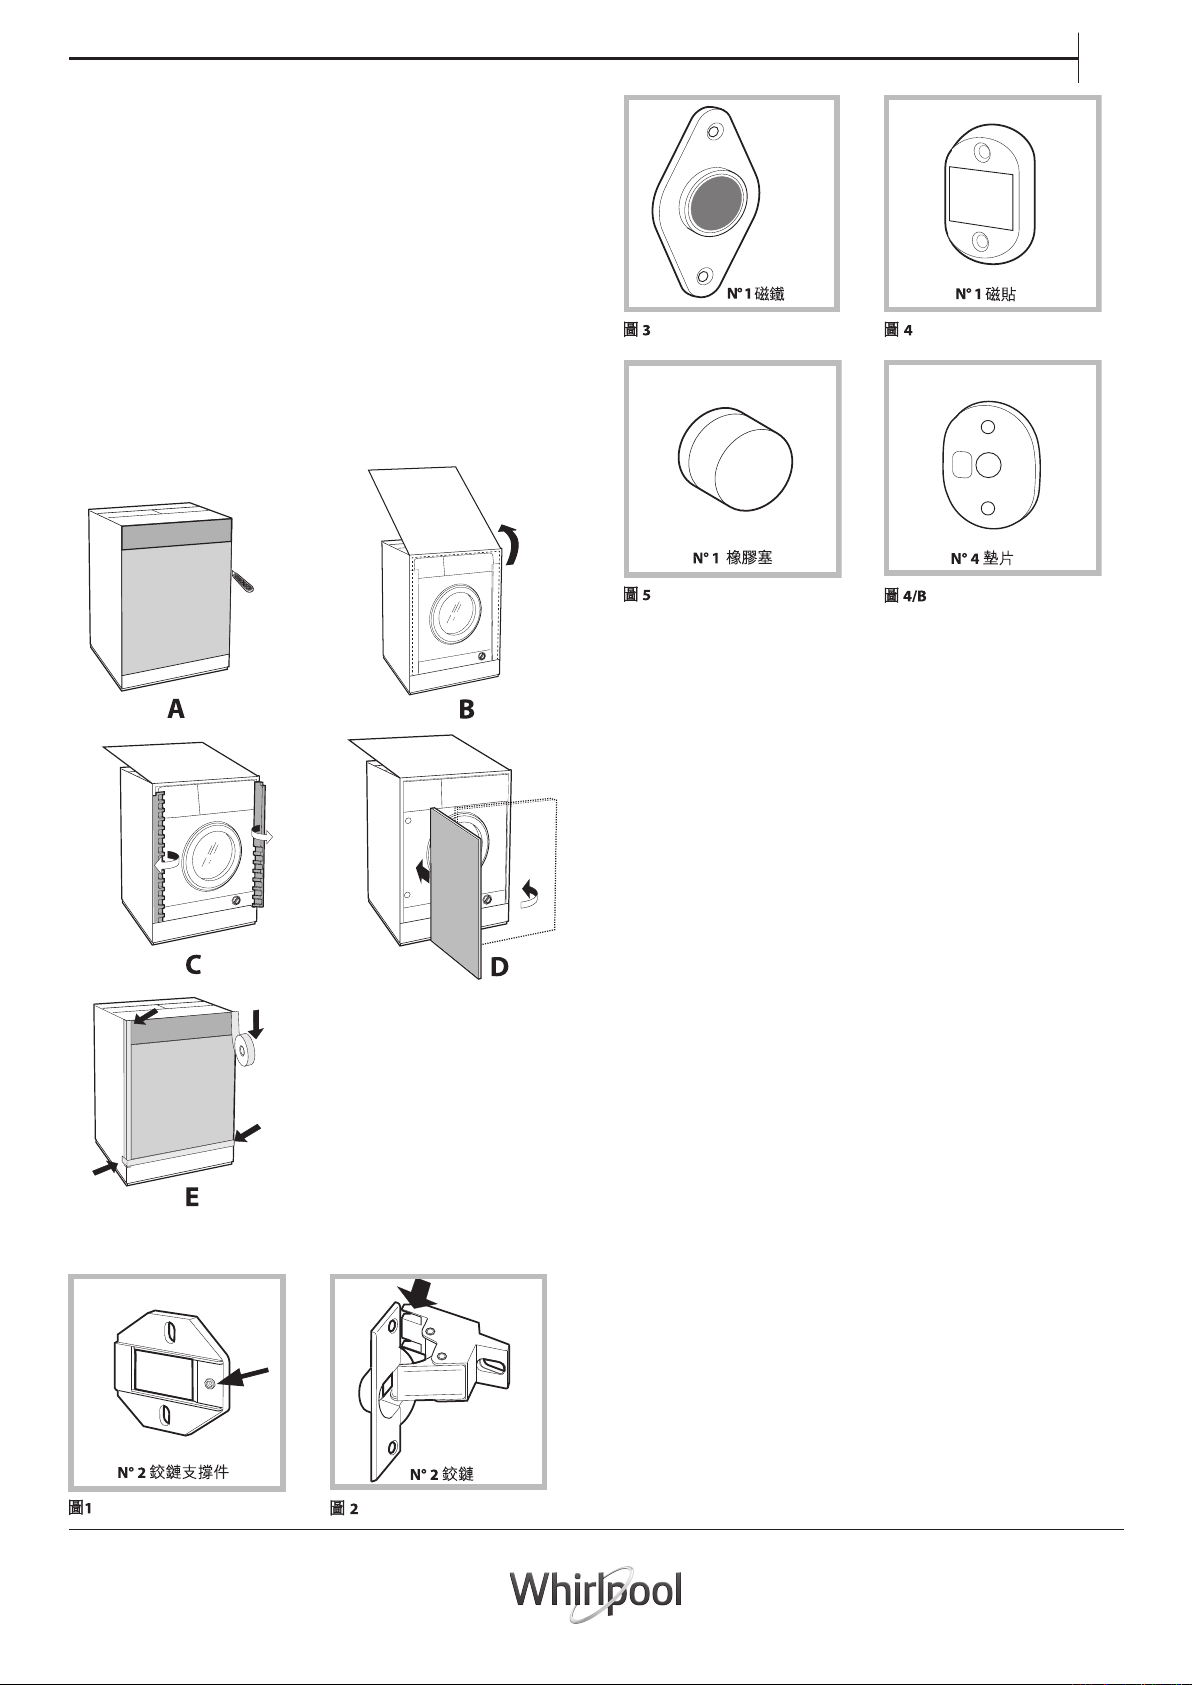
適用於內置式的安裝說明
將木製的面板安裝到機門上,並將洗衣乾衣機推
入櫃內
如在安裝木製的面板後才需要將洗衣乾衣機推入
至最終安裝的位置,在此情況下,我們建議將其
保留在原包裝中。木製面板的包裝設計,可使它
完整安裝到洗衣乾衣機上,而無需將其包裝完全
拆下(見下圖)。
覆蓋在洗衣乾衣機表面的木製面板厚度不得少
於13毫米,可以在右側或左側鉸接。我們建議
將木製面板鉸接在與洗衣乾衣機機門相同的一
側 - 左側。
CH
機門固定零件 (參考圖. 1-2-3-4-5)
- 6粒A型螺釘,長度為 13 毫米。
- 2粒B型螺釘,長度為 25毫米;用於將磁貼固
定到洗衣乾衣機上。
- 4粒C型螺釘,長度為15毫米;用於將鉸鏈支撐
件安裝到洗衣乾衣機上。
- 4粒D型螺釘,長度為7毫米;用於將鉸鏈安裝
在支撐件上。
將零件安裝到洗衣乾衣機的表面上
- 將鉸鍵支撐件(圖1)安裝在左側兩個孔位(箭頭
所示部分應面向機身內側),使用C型螺釘將墊
片(圖4/B)固定在支撐件和表面之間。
- 將磁貼安裝在另一側的頂部,使用B型螺釘將
兩個墊片(圖4/B)固定在磁貼和表面之間。
使用鑽孔模板
- 要追蹤面板左側孔的位置,將鑽孔模板對準木
製面板的左上側並開孔。
- 要追蹤面板右側孔的位置,將鑽孔模板對準木
製面板上的右上側並開孔。
- 在面板上鑽開適當大小的孔,用於放置鉸鏈、
橡膠塞及磁鐵。
將零件放到木板(門)上
- 將鉸鏈插入孔中並用四粒A型螺釘固定。
- 將磁鐵插入鉸鏈另一側的頂孔,並用兩粒B型
螺絲固定。
- 將橡膠塞放入木製面板的底孔。並將木製面板
安裝到洗衣乾衣機上。
31
Page 32
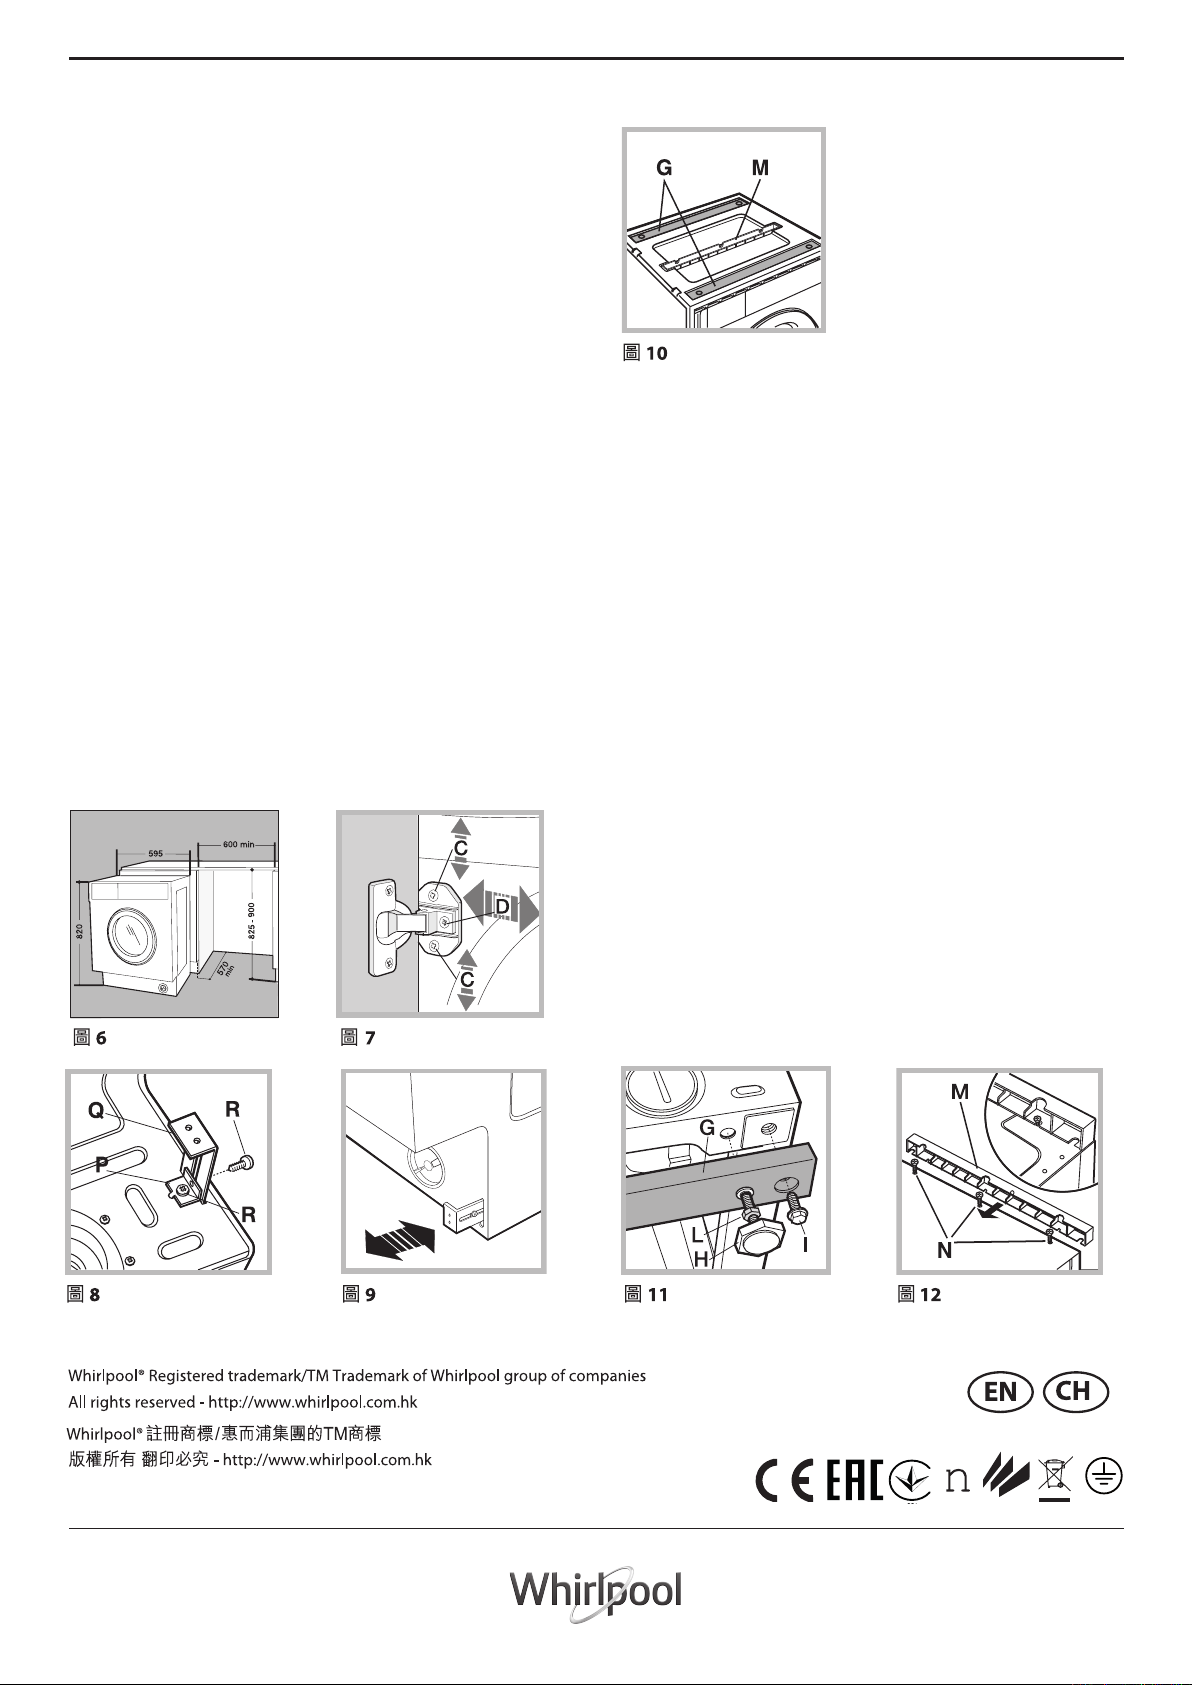
將面板安裝到洗衣乾衣機上
提供調節洗衣乾衣機高度的配件
將鉸鏈的頂端位置(圖2中的箭頭所示)插入鉸鏈
孔中,然後將面板推向洗衣乾衣機的表面。用
D型螺釘固定兩個鉸鏈。
固定底座
如果洗衣乾衣機安裝在廚櫃底內,則需要安裝
一個或兩個導向器用於固定底座(如圖8所示)。
根據底座模具的位置調整深度,如有必要,將
底座固定在導軌上(圖9)。
如何組裝底座導軌(圖8):
使用螺釘R固定角度P,將底座導軌Q插入機身
預設的插槽,於合適位置,使用螺釘R將其鎖
定到角度P。
將洗衣乾衣機推入櫃內
- 將洗衣乾衣機推入廚櫃底內,將其與廚櫃對齊
如圖6所示。
- 調節可調腳架,將洗衣乾衣機提升到合適的高
度。
- 如要因地腳線的高度調整木製板的水平,請使
用C和D螺釘調校鉸鏈位置,如圖7所示。
重要:確保洗衣乾衣機底座靠在地板上。
以下配件可在頂蓋找到(圖
10):2個橫桿(G),1個裝
飾條(M)
在洗衣乾衣機的滾筒內可
以找到以下配件:
4個機腳(H),
4個螺絲(I),
4個螺絲(R),
4個螺母(L),
2個底座導軌(Q)
調整洗衣乾衣機的高度
- 洗衣乾衣機的高度可從815毫米調至835毫米。
如果您需要將洗衣乾衣機放置在高於上述高度
的位置,則需要使用以下配件將其提升至最高
870毫米:2個橫桿(G);4個機腳(H);4個螺絲
(I);4個螺母(L),然後執行以下操作(圖11):
- 移除4個原有的機腳,在洗衣乾衣機前部放置
橫桿G,使用螺釘I將其固定到位(將其轉入原
有的機腳位置),然後插入新機腳H。
- 在洗衣乾衣機背面重複相同的動作。
- 現在調整機腳H,將洗衣乾衣機從高度835毫米
調高到870毫米。
- 達到所需高度後,將螺母L鎖定在橫桿G上。
- 要將洗衣乾衣機高度調整到870毫米至900毫米
之間,您需要安裝裝飾條M,先將機腳H調整
到所需高度。
如以下安裝裝飾條:
鬆開位於洗衣乾衣機頂蓋前部的三個螺釘N,安
裝裝飾條M,如圖12所示,然後轉緊螺絲N。
32
 Loading...