

WHIRLPOOL WEI 9FF LR IX User Manual

Instructions for use
Mode d’emploi
Gebruiksaanwijzingen
Betriebsanleitung
Istruzioni per l’uso
Instrucciones de uso
Instruções de uso
Brugsanvisning
Bruksanvisning
Brugsanvisning
Käyttöohje


GENERAL SAFETY
• Before any cleaning or maintenance operation, disconnect hood from the mains by
removing the plug or disconnecting the mains electrical supply.
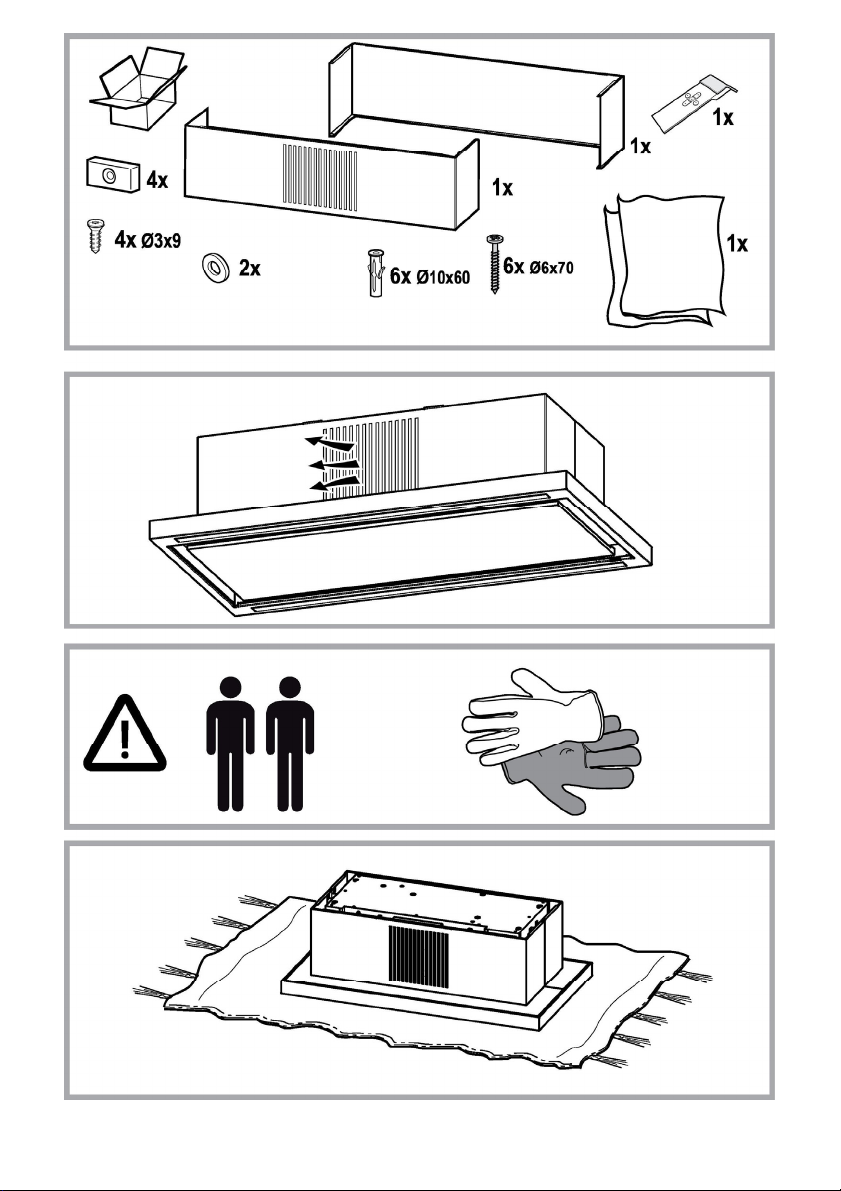
• Always wear work gloves for all installation and maintenance operations.
• This appliance can be used by children aged from 8 years and above and persons with
reduced physical, sensory or mental capabilities or lack of experience and knowledge if
they have been given supervision or instruction concerning use of the appliance in a
safe way and understand the hazards involved.
• Children shall not be allowed to tamper with the controls or play with the appliance.
• Cleaning and user maintenance shall not be made by children without supervision.
• The premises where the appliance is installed must be sufficiently ventilated, when the
kitchen hood is used together with other gas combustion devices or other fuels.
• The hood must be regularly cleaned on both the inside and outside (AT LEAST ONCE
A MONTH).
• This must be completed in accordance with the maintenance instructions provided.
Failure to follow the instructions provided regarding the cleaning of the hood and filters
will lead to the risk of fires.
• Do not flambé under the range hood.
• Do not remove filters during cooking.
• For lamp replacement use only lamp type indicated in the Maintenance/Replacing
lamps section of this manual.
The use of exposed flames is detrimental to the filters and may cause a fire risk, and
must therefore be avoided in all circumstances.
Any frying must be done with care in order to make sure that the oil does not overheat
and ignite.
CAUTION: Accessible parts of the hood may become hot when used with cooking
appliances.
• Do not connect the appliance to the mains until the installation is fully complete.
• With regards to the technical and safety measures to be adopted for fume discharging it is important to closely follow the
regulations provided by the local authorities.
• The air must not be discharged into a flue that is used for exhausting fumes from appliance burning gas or other fuels.
• Do not use or leave the hood without the lamp correctly mounted due to the possible risk of electric shocks.
• Never use the hood without effectively mounted grids.
• The hood must NEVER be used as a support surface unless specifically indicated.
• Use only the fixing screws supplied with the product for installation or, if not supplied, purchase the correct screws type.
• Use the correct length for the screws which are identified in the Installation Guide.
• In case of doubt, consult an authorized service assistance center or similar qualified person.
WARNING!
• Failure to install the screws or fixing device in accordance with these instructions may result in electrical hazards.
• Do not use with a programmer, timer, separate remote control system or any other device that switches on automatically.
Very young children(0-3years)should be kept away from the appliance.Young children (3-8 years)should be kept away from the
appliance unless continuously supervised.
CAUTION:The appliance is not intended to be operated by means of an external switching device, such as a timer,or separate
remote controlled system.
This appliance is not for professional use. Do not use the appliance outdoors.
The appliance must be handled and installed by two or more persons-risk of injury.
10
Installation, including water supply (if any),electrical connections and repairs must be carried out by a qualified technician.
Once installed,packaging waste (plastic,styrofoam parts etc.) must be stored out of reach of children – risk of suffocation.
Do not use the appliance when you are wet orbarefoot.
Never use steam cleaning equipement – risk of electric shock.
The packaging material is 100% recyclable and is marked with the recycle symbol
The hood can look different to that illustrated in the drawings in this booklet. The instructions for use, maintenance and
installation, however, remain the same.
Closely follow the instructions set out in this manual. All responsibility, for any eventual inconveniences, damages or fires
caused by not complying with the instructions in this manual, is declined. This appliance is intended to be used in household and
similar application such as: - staff kitchen areas in shop, offices and other working environments; - farm houses; - by clients in hotels,
motels and other residential type environments; - bed and breakfast type environments.
• It is important to conserve this booklet for consultation at any moment. In the case of sale, cession or move, make sure it is
together with the product.
• Read the instructions carefully: there is important information about installation, use and safety.
• Do not carry out electrical or mechanical variations on the product or on the discharge conduits.
• Before proceeding with the installation of the appliance verify that there are no damaged all components. Otherwise contact
your dealer and do not proceed with the installation.
The minimum distance between the supporting surface for the cooking equipment on the hob and the lowest part of the range hood
must be not less than 60cm from electric cookers and 70cm from gas or mixed cookers.
If the instructions for installation for the gas hob specify a greater distance, this must be adhered to.
ELECTRICAL CONNECTION
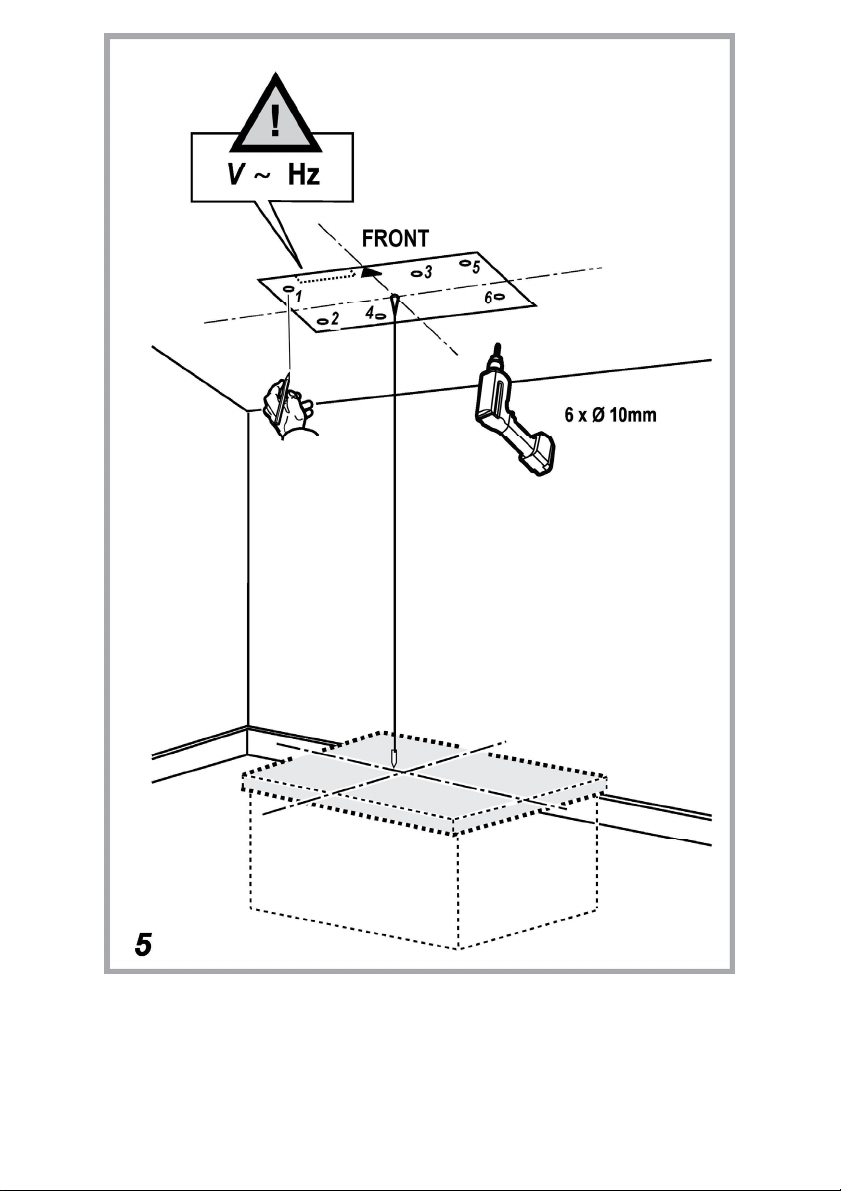
The mains power supply must correspond to the rating indicated on the plate situated inside the hood. If provided with a plug
connect the hood to a socket in compliance with current regulations and positioned in an accessible area, after installation. If it not
fitted with a plug (direct mains connection) or if the plug is not located in an accessible area, after installation, apply a double pole
switch in accordance with standards which assures the complete disconnection of the mains under conditions relating to over-current
category III, in accordance with installation instructions.
WARNING!
Before re-connecting the hood circuit to the mains supply and checking the efficient function, always check that the mains cable is
correctly assembled.
If the cable is not fitted with a plug, connect the wires according to the following table:
Mains voltage and frequency Wire connection
Refer to the rating indicated on the plate inside of the hood
: yellow/green
N : blue
L : brown
Replacing the power cable
The hood is provided with a special power cable ; if the cable is damaged, request a new one from Technical Service.
FILTERING OR DUCTING ?
The hood is designed to be used solely as a FILTER version.
The aspirated air will be degreased and deodorised before being fed back into the room.
In order to use the hood in this version, you have to install a system of additional filtering based on activated charcoal.
11
CONTROLS
REMOTE CONTROL
The remote control must be recognized by the hood through the following procedure:
Hood and remote control pairing procedure
Press the "◄" or "►" button until the remote control shows the symbol
Press the middle button "■" for 5 seconds.
At this point, the pairing procedure is completed and the hood is configured to operate with the remote control.
N.B.: Pairing procedure can be done any time the hood is disconnected from and re-connected to the Mains within the first 60 secs.
Hob light ON/OFF:
Press the "◄" or "►" button until the remote control shows the symbol
Press the "+" button to switch the lights on.
Press the "-" button to switch the lights off.
Press the button "■" to change light status from off to on and vice versa.
Extraction power selection
:
Press the "◄" or "►" button until the remote control shows the symbol
Press the "+" button, "-" button or the button "■" respectively to increase, decrease or switch OFF (standby) the extraction power.
N.B.: during hood operation, the LED remains ON; it will switch OFF as soon as the motor status changes to OFF.
Filter RESET
The hood is fitted with a device indicating when filters maintenance needs to be done.
Grease filter saturation is indicated (while the hood is switched from OFF to ON) by means of the LED flashing (green).
Charcoal filter saturation is indicated (while the hood is switched from OFF to ON) by means of the LED flashing (red).
To reset the function:
While LED is flashing, press the "◄" or "►" button until the remote control shows the symbol
Press and hold the "■" button until LED stops flashing.
If both filter alarm are flashing, reset one and then the other.
Filter management
The grease filter alarm is always active.
The charcoal filter alarm MUST BE ACTIVATED at the first use.
To activate/disable the charcoal filter alarm:
Set hood to OFF.
Press the "◄" or "►" button until the remote control shows the symbol
Press the "+" button for at least 5secs , led light aside hood flashes for 5secs to advice charcoal filter alarm si activated.
Press the "-" button for at least 5secs , led light aside hood switches ON for 5secs to advice charcoal filter alarm is disabled.
/
/
12
MAINTENANCE
Cleaning
Clean using ONLY a cloth dampened with neutral liquid
detergent. DO NOT CLEAN WITH TOOLS OR
INSTRUMENTS. Do not use abrasive products. DO NOT USE
ALCOHOL!
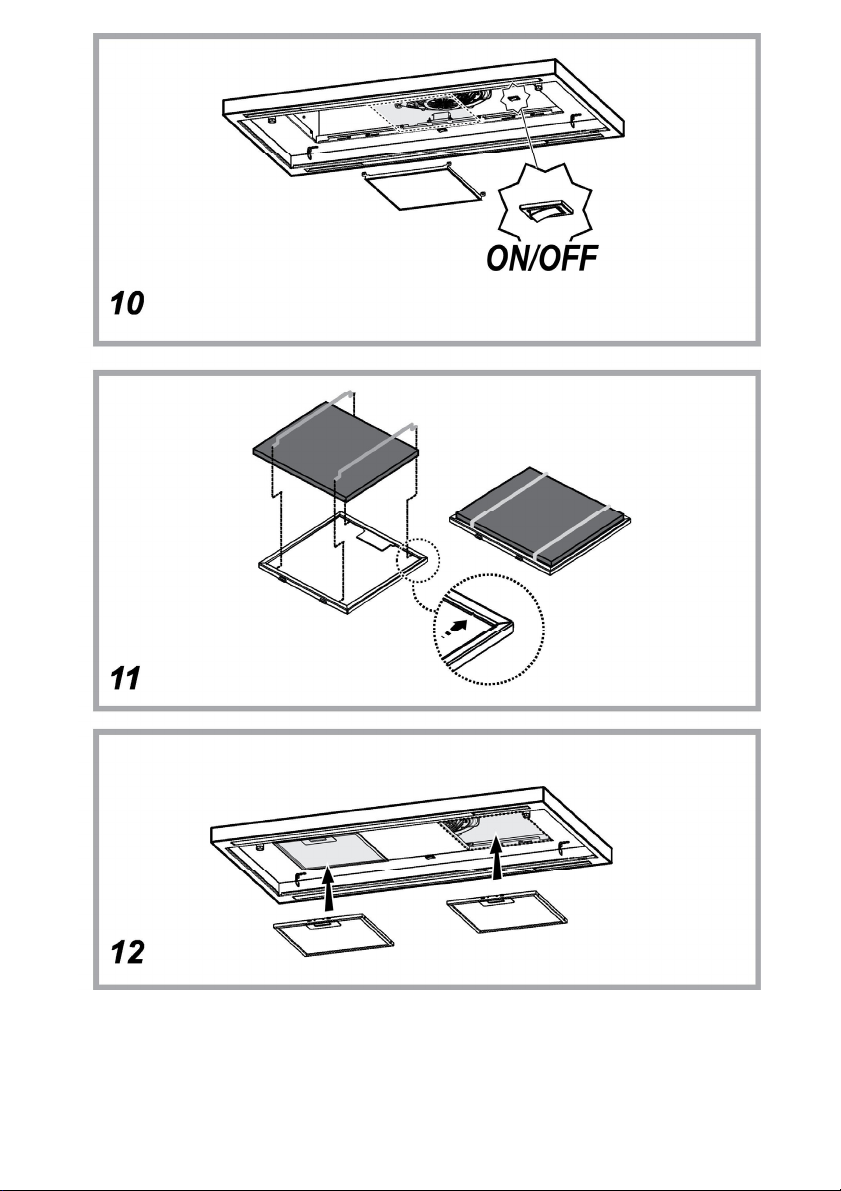
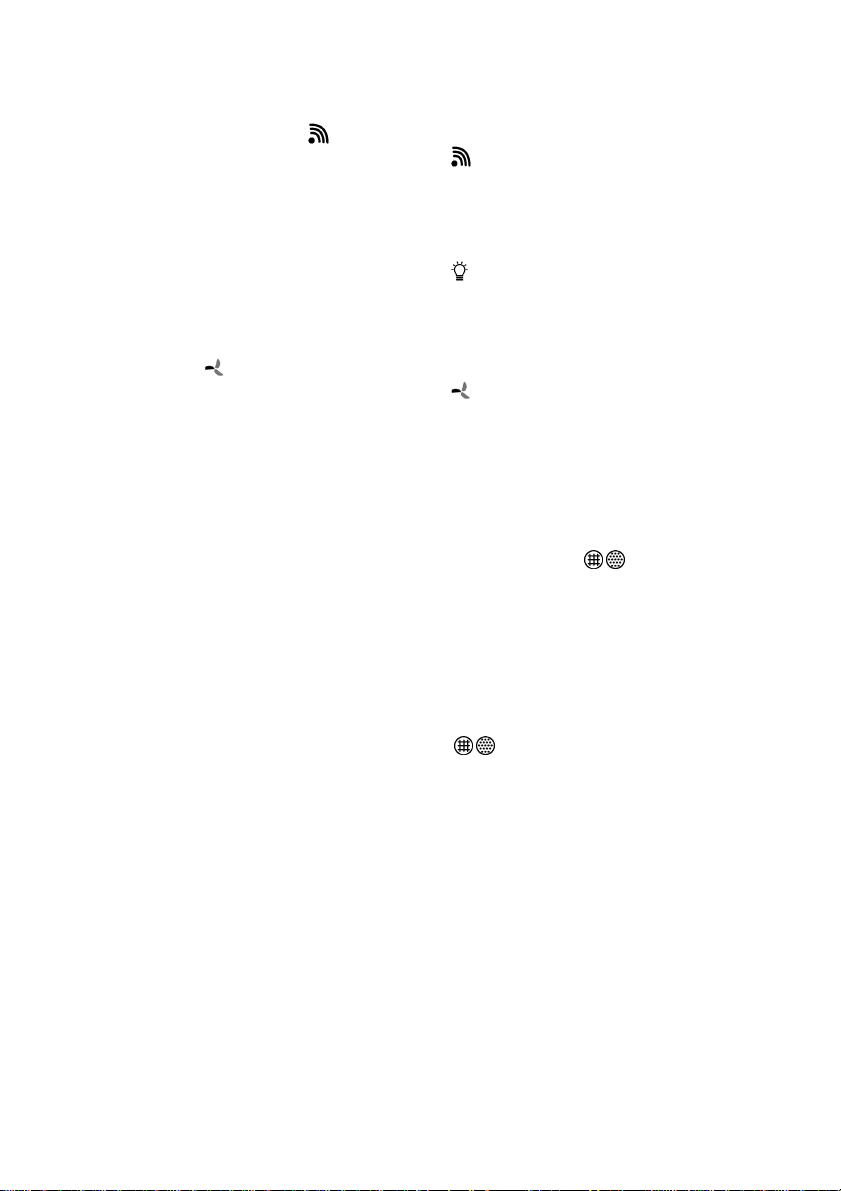
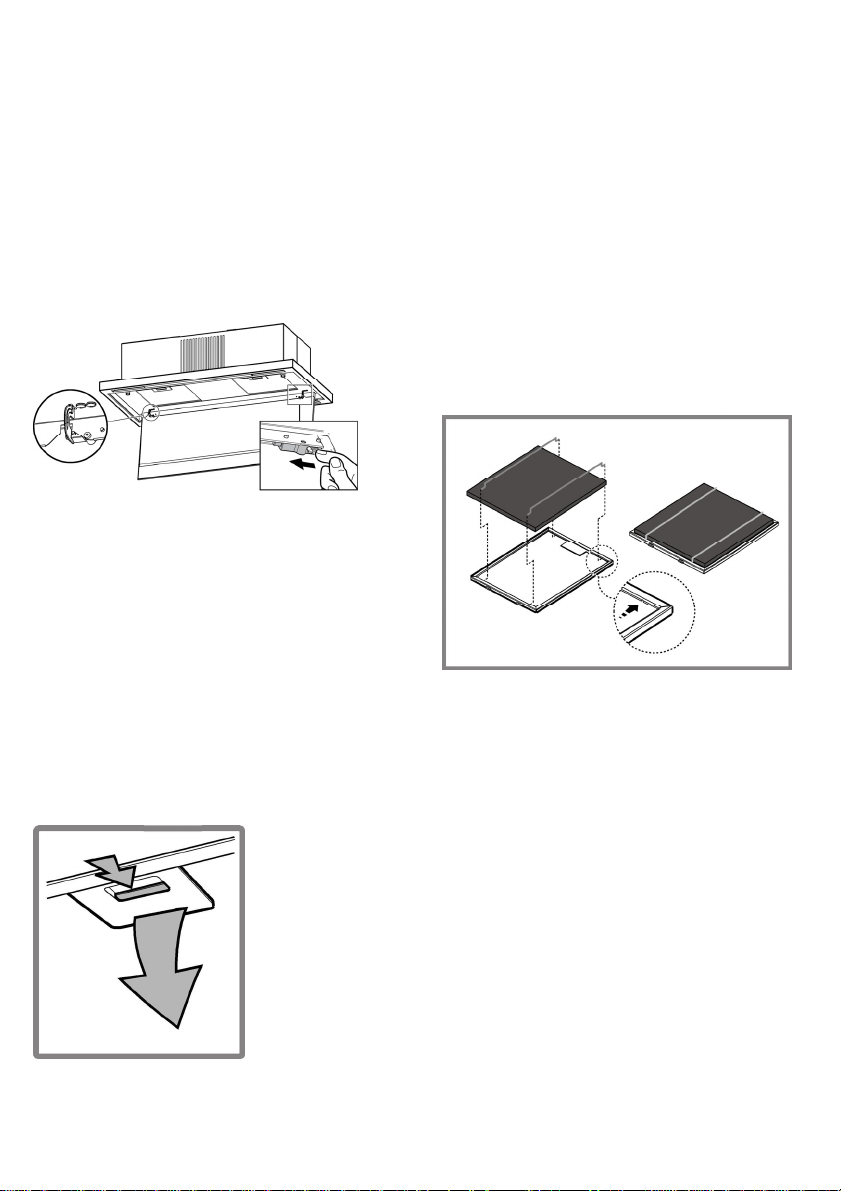
Perimeter aspiration panel
Fig. 15
The panel for perimeter suction should always be left closed
and should only be opened in case of maintenance
interventions (eg cleaning or replacing filters).
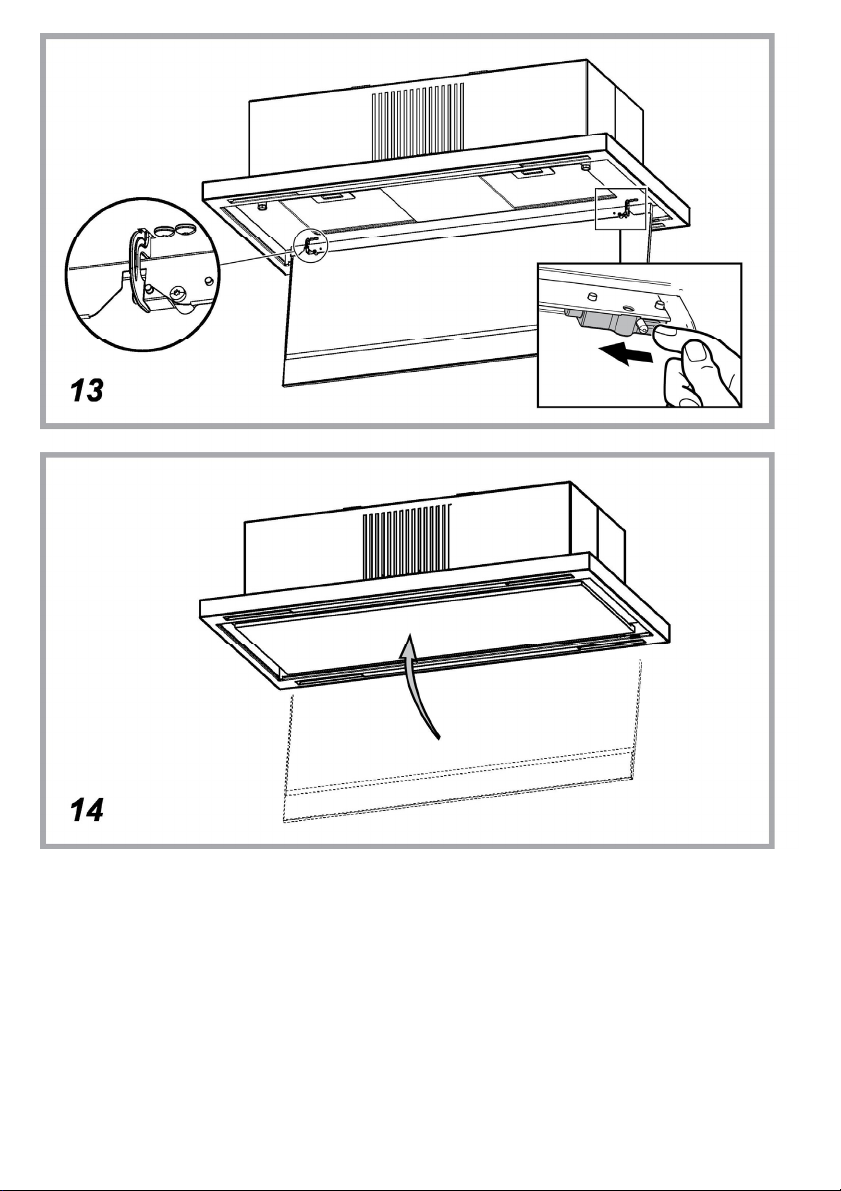
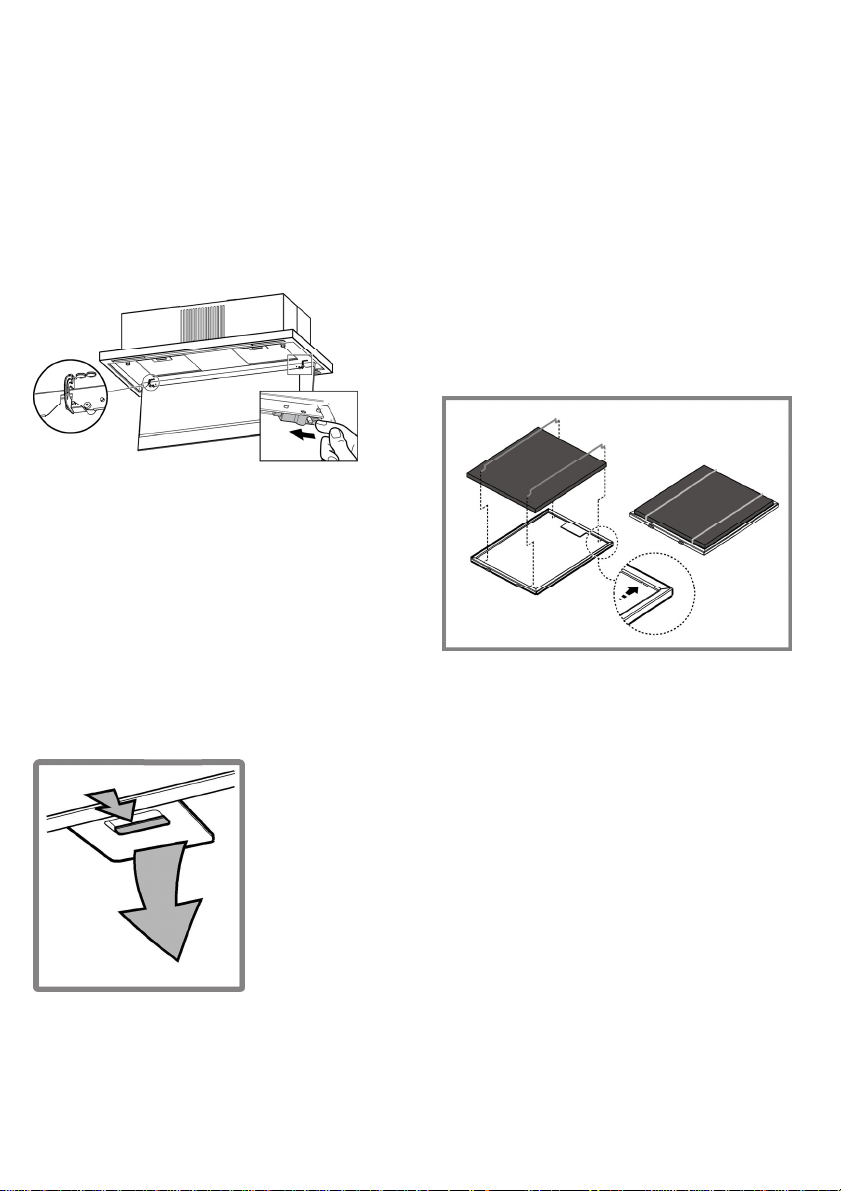
Maintenance of the charcoal filter
It absorbs unpleasant odors caused by cooking.
The charcoal filter can be washed every two months (or when
the filter saturation signal system - if present on your model shows such need) in hot water and suitable detergents or in
the dishwasher at 65°C (in this case run a complete wash
cycle with no dishes inside).
Remove excess water without damaging the filter and then put
the filter back in the oven for 10 minutes at 100°C to dry it
definitively.
Replace the pad every 3 years and every time the cloth is
damaged.
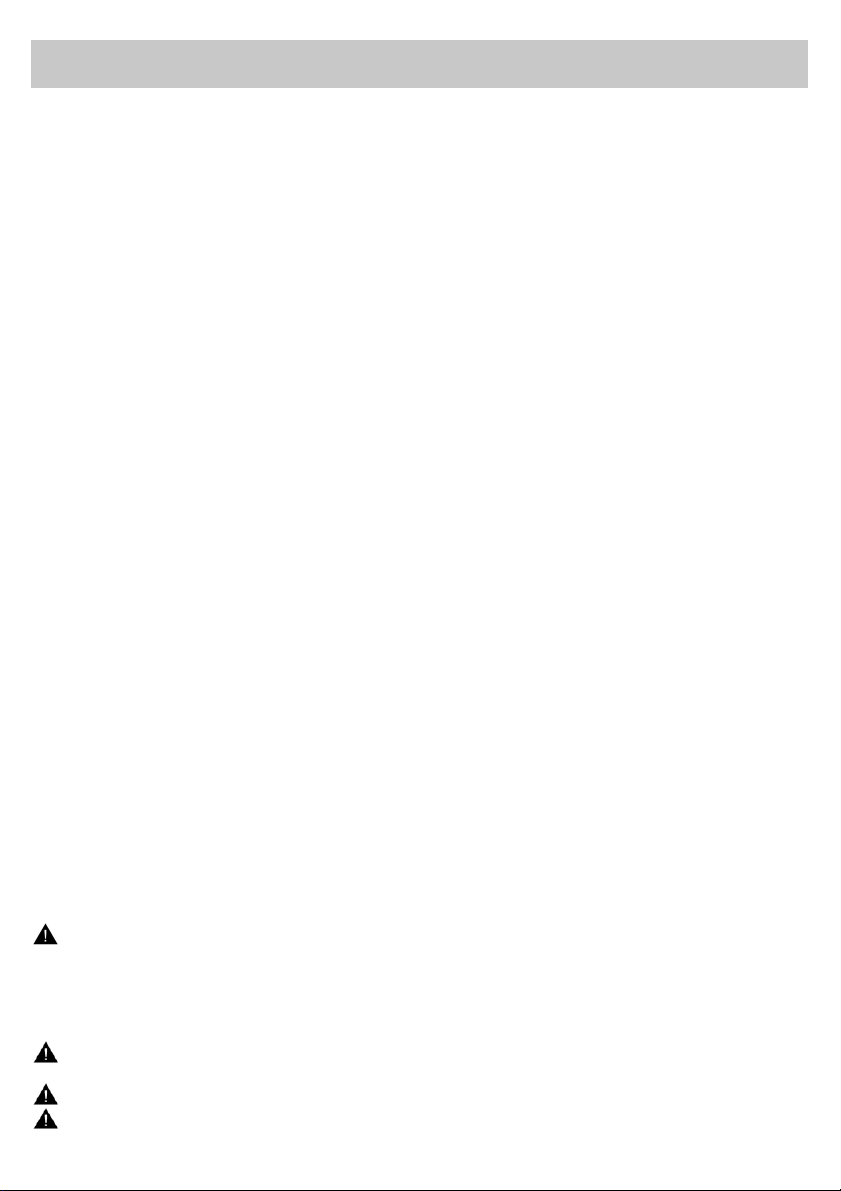
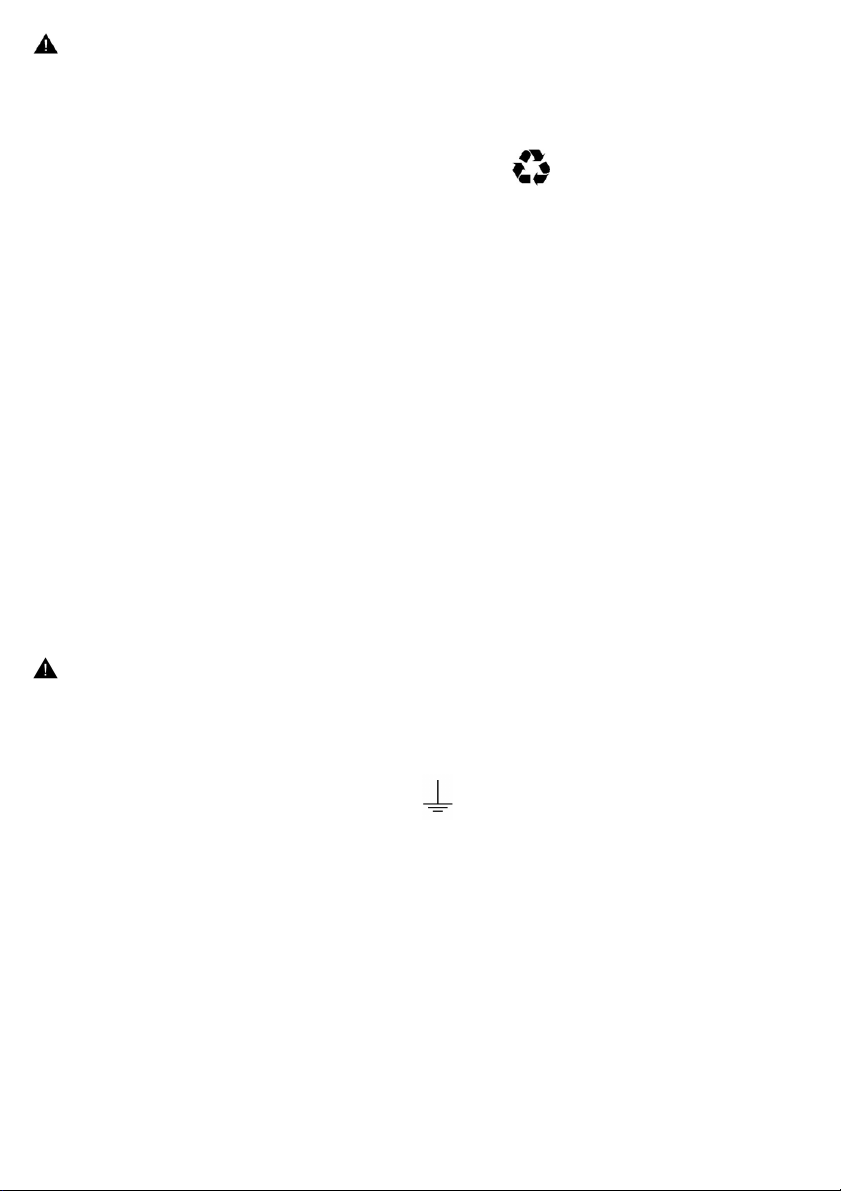
Maintenance of the anti-grease filters
It absorbs unpleasant odors caused by cooking.
This must be cleaned once a month (or when the filter
saturation indication system – if envisaged on the model in
possession – indicates this necessity) using non aggressive
detergents, either by hand or in the dishwasher, which must
be set to a low temperature and a short cycle.
When washed in a dishwasher, the grease filter may discolor
slightly, but this does not affect its filtering capacity.
To remove the grease filter, pull the spring release handle.
Replacing lamps
The hood is equipped with a lighting system based on LED
technology.
The LEDs guarantee an optimum lighting, a duration up to 10
times as long as the traditional lamps and allow to save 90%
electrical energy.
For replacement, contact the technical service.
13
DISPOSAL
• This appliance is marked according to the European directive 2012/19/EC on Waste Electrical and Electronic Equipment (WEEE).
• By ensuring this product is disposed of correctly, you will help prevent potential negative consequences for the environment and
human health, which could otherwise be caused by inappropriate waste handling of this product.
• The symbol
on the product, or on the documents accompanying the product, indicates that this appliance may not be treated
as household waste. Instead it should be taken to the appropriate collection point for the recycling of electrical and electronic
equipment. Disposal must be carried out in accordance with local environmental regulations for waste disposal.
• For further detailed information regarding the process, collection and recycling of this product, please contact the appropriate
department of your local authorities or the local department for household waste or the shop where you purchased this product.
Appliance designed, tested and manufactured according to:
• Safety: EN/IEC 60335-1; EN/IEC 60335-2-31, EN/IEC 62233.
• Performance: EN/IEC 61591; ISO 5167-1; ISO 5167-3; ISO 5168; EN/IEC 60704-1; EN/IEC 60704-2-13; EN/IEC 60704-3; ISO
3741; EN 50564; IEC 62301.
• EMC: EN 55014-1; CISPR 14-1; EN 55014-2; CISPR 14-2; EN/IEC 61000-3-2; EN/IEC 61000-3-3. Suggestions for a correct use in
order to reduce the environmental impact: Switch ON the hood at minimum speed when you start cooking and kept it running for few
minutes after cooking is finished. Increase the speed only in case of large amount of smoke and vapor and use boost speed(s) only
in extreme situations. Replace the charcoal filter(s) when necessary to maintain a good odor reduction efficiency. Clean the grease
filter(s) when necessary to maintain a good grease filter efficiency. Use the maximum diameter of the ducting system indicated in this
manual to optimize efficiency and minimize noise.
MALFUNCTIONS
If something appears not to be working properly, do the following simple checks before calling Technical Service:
• If the hood is not working:
Check that:
- The power has not been disconnected.
- A speed has been selected.
• If the hood performs inefficiently:
Check that:
- The motor speed selected is sufficient for the amount of smoke and vapours released.
- The kitchen is sufficiently ventilated to allow air intake.
- The charcoal filter is not worn (hood in filtering version).
• If the hood has turned off during normal functioning:
Check that:
- The power has not been disconnected.
- the omnipolar disconnection device has not tripped.
If the hood fails to operate correctly, briefly disconnect it from the mains power supply for almost 5 sec. Then connect it in again and
try once more before contacting the Technical Assistance Service.
14
TECHNICAL DATA
Components not provided with the product
height (cm) Width (cm) depth (cm)
24
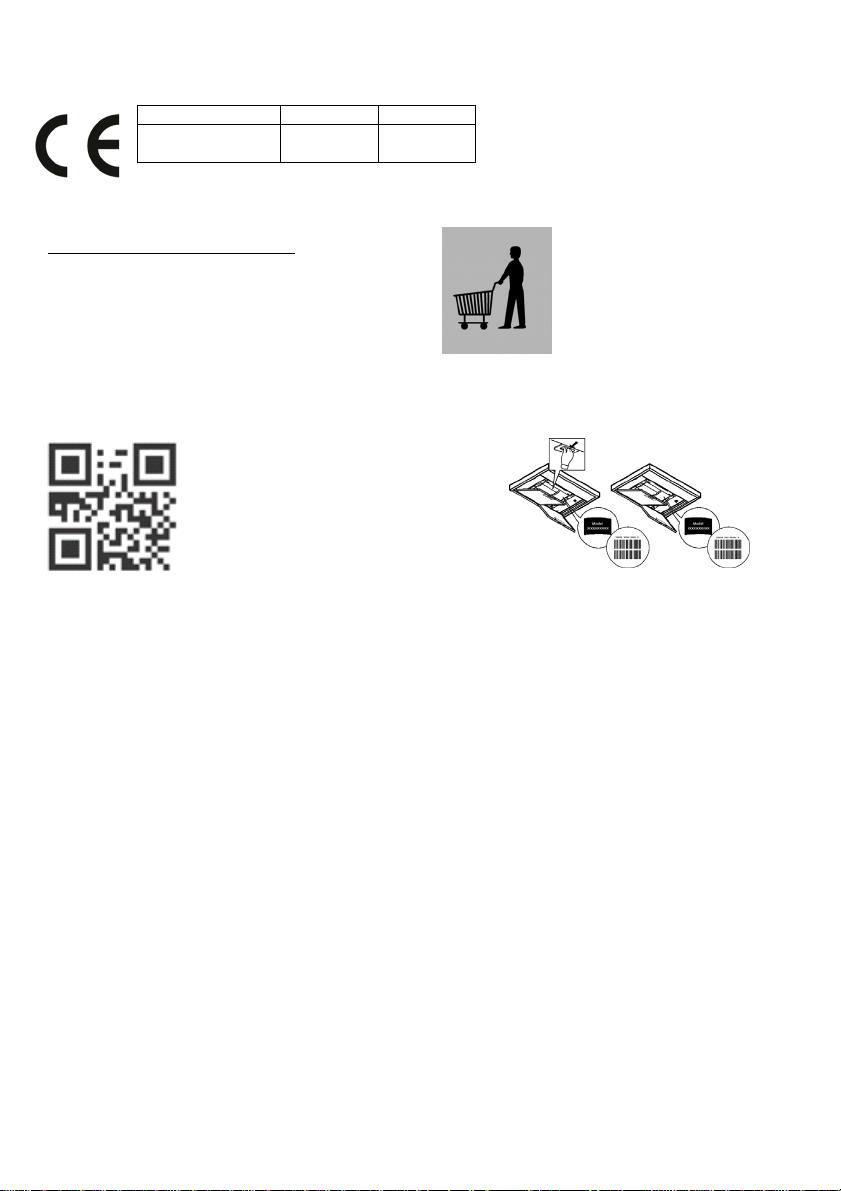
You can download the Safety Instructions,
User Manual, Product Fiche and Energy data
by:
• Visiting our website docs.whirlpool.eu
• Using QR Code
• Alternatively, contact our After-sales Service
(See phone number in the warranty booklet).
When contacting our After-sales Service, please
state the codes provided on your product's
identification plate.
89,9
50
15
SÉCURITÉ GÉNÉRALE
• Avant tout entretien ou nettoyage du produit débranchez l'alimentation électrique en
retirant la fiche électrique ou en coupant l'interrupteur général.
• Utilisez des gants de travail pour toute opération de nettoyage ou d'entretien.
• Cet appareil peut être utilisé par des enfants âgés d’au moins 8 ans et par des
personnes ayant des capacités physiques, sensorielles ou mentales réduites ou
dénuées d’expériences ou de connaissances, sauf si ces personnes sont correctement
surveillées ou si des instructions relatives à l'utilisation correcte de l'appareil permettant
d'éviter tout danger leur ont été communiquées.
• Les enfants ne doivent pas jouer avec l’appareil.
• Le nettoyage et l’entretien par l’usager ne doivent pas être effectués par des enfants
sans surveillance.
• La pièce doit avoir une aération suffisante lorsque la hotte est utilisée conjointement
avec d'autres appareils fonctionnant au gaz ou autres combustibles.
• La hotte doit être régulièrement nettoyée à la fois à l'intérieur et à l'extérieur (AU
MOINS UNE FOIS PAR MOIS); cela devrait se faire en conformité avec les instructions
d'entretien. Le non respect des instructions expressément fournies concernant le
nettoyage de la hotte et des filtres peut provoquer des risques d'incendie.
• Ne pas flamber d’aliments sous la hotte.
• Pour le remplacement de la lampe, utilisez uniquement le type de lampe spécifié dans
la section remplacement/maintenance lampe dans ce manuel.
L'utilisation d'une flamme nue est dommageable pour les filtres et peut causer un
incendie, par conséquent, il est déconseillé de l'utiliser.
La friture doit être faite avec soin afin de s’assurer que l’huile surchauffée ne prenne pas
feu.
AVERTISSEMENT: Lorsque la table de cuisson est en fonctionnement, les parties
accessibles de la hotte peuvent devenir très chaudes.
• Ne pas brancher l'appareil au réseau électrique avant que l'installation ne soit
complètement terminée.
• En ce qui concerne les mesures techniques et de sécurité à prendre pour l'évacuation des fumées, respectez strictement les
dispositions des règlements locales.
• L’air ne doit pas être envoyé dans un conduit utilisé pour évacuer les fumées d’appareils utilisant du gaz ou un autre combustible.
• Ne pas utiliser ou laisser la hotte sans les lampes correctement montées, car un éventuel risque de choc électrique est possible.
• N’utilisez jamais la hotte sans la grille montée correctement!
• La hotte ne doit JAMAIS être utilisée comme une surface d'appui, sauf indication expresse.
• Utilisez uniquement les vis de fixation fournies avec le produit pour l'installation, ou, si non fournies, acheter le type correct de vis.
• Utilisez la longueur correcte pour les vis qui sont identifiées dans le Guide d'installation.
• En cas de doute, consultez votre centre de service agréé ou du personnel qualifié.
ATTENTION !
• Le défaut d'installer les vis et les dispositifs de fixation conformément à ces instructions peut entraîner des risques
électriques.
• Ne pas mettre en marche au moyen d’un programmateur, d’une minuterie, ou d’un système de commande à distance séparé
ou tout autre dispositif qui met l’appareil sous tension automatiquement.
Les enfants de moins de 3 ans ne doivent pas s’approcher de l’appareil. Sans la surveillance constante d’un adulte, garder l’appareil
hors de la portée des enfants de moins de 8 ans.
ATTENTION : l’appareil ne peut être mis en marche par le biais d’un dispositif externe ou d’un système de commande à
16
distance séparé.
Cet appareil n’est pas destiné à un usage professionnel. Ne pas utiliser l’appareil à l’extérieur.
Pour éviter le risque de lésions personnelles, l’appareil doit être déplacé et installé par deux ou plusieurs personnes.
L'installation, comprenant éventuellement aussi les raccords pour l’alimentation hydriques (si prévus) et les branchements
électriques , et les interventions de réparation doivent être effectués par un personnel qualifié.
Après avoir complété l’installation, conserver le matériel d’emballage (plastique, polystyrène, etc.) hors de la portée des enfants pour
éviter le risque d’étouffement. .
Ne jamais utiliser l’appareil pieds nus ou mouillés.
Ne jamais utiliser d’appareils de nettoyage à vapeur pour éviter le risque de choc électrique.
Comme indiqué par le symbole, le matériel d’emballage est 100 % recyclable
La hotte peut avoir des configurations esthétiques différentes par rapport à ce qui est illustré dans les dessins de ce
manuel, cependant les instructions pour l’utilisation, l’entretien et l’installation restent identiques.
Suivre impérativement les instructions de cette notice. Le constructeur décline toute responsabilité pour tous les inconvénients,
dommages ou incendies provoqués à l’appareil et dûs à la non observation des instructions de la présente notice. Cet appareil est
destiné à être utilisé dans des applications domestiques et analogues telles que : - des coins cuisines réservés au personnel dans
des magasins, bureaux et autres environnements professionnels ; - des fermes ; - l’utilisation par les clients des hôtels, motels et
autres environnements à caractère résidentiel ; - des environnements du type chambre d’hôtes.
• Il est important de conserver ce livret pour pouvoir le consulter à tout moment. En cas de vente, de cession ou de
déménagement, assurez-vous que la notice d'utilisation l'accompagne.
• Veuillez lire attentivement les instructions, vous trouverez des informations importantes sur l'installation, le mode d'emploi et la
sécurité.
• Ne pas effectuer des modifications électriques ou mécaniques sur le produit ou sur les conduits d’évacuation.
• Avant d'installer l'appareil, vérifiez qu’il n’y a aucun composant endommagé. Sinon, contactez votre revendeur et ne continuez
pas l'installation.
La distance minimum entre la superficie de support des récipients sur le dispositif de cuisson et la partie la plus basse de la hotte de
cuisine ne doit pas être inférieure à 60cm dans le cas de cuisinières électriques et de 70cm dans le cas de cuisinières à gaz ou
mixtes.
Si les instructions d’installation du dispositif de cuisson au gaz spécifient une plus grande distance, il faut en tenir compte.
BRANCHEMENT ÉLECTRIQUE
La tension électrique doit correspondre à la tension reportée sur la plaque signalétique située à l’intérieur de la hotte. Si une prise
est présente, branchez la hotte dans une prise murale conforme aux normes en vigueur et placée dans une zone accessible
également après l’installation. Si aucune prise n’est présente (raccordement direct au circuit électrique), ou si la prise ne se trouve
pas dans une zone accessible également après l’installation, appliquez un disjoncteur normalisé pour assurer de débrancher
complètement la hotte du circuit électrique en conditions de catégorie surtension III, conformément aux règlementations de montage.
ATTENTION!
Avant de rebrancher le circuit de la hotte à l’alimentation électrique et d’en vérifier le fonctionnement correct, contrôlez toujours que
le câble d’alimentation soit monté correctement.
Si le câble n'est pas équipé d'une fiche,branchez les fils selon le tableau suivant:
Tension principale et fréquence Branchement des fils
Se référer à la valeur indiquée sur l’étiquette des caractéristiques
à l’intérieur de la hotte.
: jaune/vert
N : bleu
L : brun
Changement du câble d'alimentation
La hotte est pourvue d'un câble d'alimentation spécial; en cas de détérioration du câble, en demander un neuf au service
d'assistance technique.
17
FILTRANTE OU ASPIRANTE ?
La hotte est conçue pour être utilisée uniquement en version FILTRANTE.
L'air d'aspiration sera dégraissé et désodorisé avant d'être renvoyé dans la pièce.
Pour utiliser la hotte dans cette version, vous devez installer un système de filtrage supplémentaire basé sur charbon actif.
COMMANDES
TÉLÉCOMMANDE
La télécommande doit être reconnue par le couvercle selon la procédure suivante :
Procédure d'appariement hotte et télécommande
Presser le bouton "◄" ou "►" jusqu'à ce que la télécommande affiche le symbole
Presser le bouton du milieu "■" pendant 5 secondes.
À ce stade, la procédure d’appariement est terminée et la hotte est paramétrée pour fonctionner avec la télécommande
N.B. : La procédure d’appariement peut être effectuée chaque fois que la hotte est déconnectée du secteur et reconnectée à celui-ci
dans les 60 premières secondes.
Éclairage table de cuisson ON/OFF :
Presser le bouton "◄" ou "►" jusqu'à ce que la télécommande affiche le symbole
Presser le bouton "+" pour allumer les lumières.
Presser le bouton "-" pour éteindre les lumières.
Presser le bouton "■"pour passer de l'état éteint à l'état allumé, et inversement.
Sélection de la puissance d'extraction
Presser le bouton "◄" ou "►" jusqu'à ce que la télécommande affiche le symbole
Presser le bouton "+" , le bouton "-" ou le bouton "■" pour respectivement augmenter, diminuer ou éteindre (veille) la puissance
d'extraction
N.B. : pendant le fonctionnement de la hotte, le voyant LED reste allumé ; il s'éteindra dès que l'état du moteur passe à OFF.
RÉINITIALISATION DU FILTRE
La hotte est équipée d'un dispositif indiquant le moment où l’entretien des filtres doit être effectué.
La saturation du filtre à graisse est indiquée (lorsque la hotte est commutée de OFF à ON) au moyen du LED clignotant (vert).
La saturation du filtre à charbon est indiquée (lorsque la hotte est commutée de OFF à ON) au moyen du LED clignotant (rouge).
Pour réinitialiser la fonction :
Quand le LED clignote, presser le bouton "◄" ou "►" jusqu’à ce que la télécommande affiche le symbole
Presser et maintenir enfoncé le bouton "■" jusqu’à ce que le voyant LED arrête de clignoter.
Si les deux alarmes de filtre clignotent, réinitialiser l'une puis l'autre.
Gestion du filtre
L'alarme du filtre à graisse est toujours active.
L'alarme du filtre à charbon DOIT ÊTRE ACTIVÉE à la première utilisation.
Pour activer/désactiver l’alarme du filtre à charbon :
Régler la hotte sur OFF.
Presser le bouton "◄" ou "►" jusqu’à ce que la télécommande affiche le symbole
Presser le bouton "+" pendant au moins 5 sec., la lumière du led à côté de la hotte clignote pendant 5 sec. pour avertir que l’alarme
du filtre à charbon est activée.
Presser le bouton "-"pendant au moins 5secs , la lumière du led à côté de la hotte s’allume pendant 5 sec. pour avertir que l’alarme
du filtre à charbon est désactivée.
:
/
/
18
ENTRETIEN
Nettoyage
Pour le nettoyage, utiliser EXCLUSIVEMENT un
chiffon humidifié avec des détergent liquides neutres.
NE PAS UTILISER D'OUTILS OU D'INSTRUMENTS
POUR LE NETTOYAGE ! Éviter l'usage de produits
abrasifs, NE PAS UTILISER D'ALCOOL!
Panneau d’aspiration périmétral
Fig. 15
Le panneau d’aspiration périmétrale doit être laissé toujours
fermé et il sera ouvert seulement en cas d’entretien (par
ex..nettoyage ou remplacement des filtres).
Entretien des filtres au charbon
Retient les odeurs désagréables de cuisson.
Le filtre au charbon peut être lavé tous les deux mois (ou
quand le système d’indication de saturation des filtres - si
prévu sur le modèle - indique cette nécessité) à l’eau chaude
et avec des détergents adaptés ou au lave-vaisselle à 65°C
(en cas de lavage au lave-vaisselle, effectuer le cycle de
lavage complet sans vaisselle à l’intérieur).
Enlever l’eau en excès sans abîmer le filtre, et le placer
ensuite dans le four pendant 10 minutes à 100°C pour le
sécher complètement.
Remplacer le tissus matelassé tous les 3 ans et chaque fois
qu’il apparaît abîmé.
Entretien des filtres anti-graisses
Retient les odeurs désagréables de cuisson.
Le filtre doit être nettoyé une fois par mois (ou lorsque le
système d’indication de saturation des filtres – si prévu sur le
modèle – indique cette nécessité) avec des détergents non
agressifs, à la main ou dans le lave-vaisselle à faibles
températures et cycle rapide.
Le lavage du filtre anti-graisse métallique au lave-vaisselle
peut en provoquer la décoloration. Toutefois, les
caractéristiques de filtrage ne seront en aucun cas modifiées.
Pour démonter le filtre anti-graisse, tirer la poignée de
décrochement à ressort.
Remplacement des lampes
La hotte est dotée d’un système d’éclairage basé sur la
technologie LED.
Les LEDS garantissent un éclairage optimal, une durée
jusqu’à 10 fois supérieures aux ampoules traditionnelles et
permettent une épargne de 90% en énergie électrique.
Pour le remplacement, s’adresser au service d’assistance
technique.
19
ÉLIMINATION
Cet appareil porte le symbole du recyclage conformément à la Directive Européenne 2012/19/EC concernant les Déchets
d’Équipements Électriques et Électroniques (DEEE ou WEEE).
En procédant correctement à la mise au rebut de cet appareil, vous contribuerez à empêcher toute conséquence nuisible pour
l’environnement et la santé de l’homme.
Le symbole
présent sur l’appareil ou sur la documentation qui l’accompagne indique que ce produit ne peut en aucun cas
être traité comme déchet ménager. Il doit par conséquent être remis à un centre de collecte des déchets chargé du recyclage des
équipements électriques et électroniques.
Pour la mise au rebut, respectez les normes relatives à l’élimination des déchets en vigueur dans le pays d’installation.
Pour obtenir de plus amples détails au sujet du traitement, de la récupération et du recyclage de cet appareil, veuillez vous adresser
au bureau compétent de votre commune, à la société de collecte des déchets ou directement à votre revendeur.
Appareil conçu, testé et fabriqué conformément aux normes suivantes :
• Sécurité : EN/IEC 60335-1; EN/IEC 60335-2-31, EN/IEC 62233.
• Performances : EN/IEC 61591; ISO 5167-1; ISO 5167-3; ISO 5168; EN/IEC 60704-1; EN/IEC 60704-2-13; EN/IEC 60704-3; ISO
3741; EN 50564; IEC 62301.
• EMC: EN 55014-1; CISPR 14-1; EN 55014-2; CISPR 14-2; EN/IEC 61000-3-2; EN/IEC 61000-3-3. Suggestions pour une
utilisation correcte afin de réduire l’impact environnemental : Allumer la hotte à la vitesse minimum pendant la cuisson et la laisser
fonctionner pendant quelques minutes après la fin de la cuisson. Augmenter la vitesse uniquement en présence d’une grande
quantité de fumée ou de vapeur et n’utiliser la/les vitesse(s) accélérées que dans les cas extrêmes. Remplacer le(s) filtre(s) au
charbon lorsque cela est nécessaire afin de maintenir une réduction efficace des odeurs. Nettoyer le(s) filtres à graisse lorsque cela
est nécessaire afin de maintenir un filtrage efficace des graisses. Utiliser un système de tuyauterie du diamètre maximum indiqué
dans ce manuel afin d’optimiser le rendement et de minimiser le bruit.
ANOMALIES DE FONCTIONNEMENT
En cas d'anomalie de fonctionnement, avant de faire appel au service d'assistance, effectuer les contrôles suivants:
• Si la hotte ne fonctionne pas:
S'assurer:
- de l'absence de coupure de courant.
- qu'une vitesse a été sélectionnée.
• Si la hotte a un faible rendement:
S'assurer:
- que la vitesse du moteur sélectionnée est suffisante pour la quantité de fumée et de vapeurs libérées.
- que la cuisine est insuffisamment aérée pour assurer une prise d'air.
- que le filtre à charbon n'est pas usé (hotte en version filtrante).
• Si la hotte s'éteint durant son fonctionnement normal:
S'assurer:
- de l'absence de coupure de courant.
- que le dispositif d'interruption omnipolaire ne s'est pas déclenché.
Si la hotte ne fonctionne pas correctement, débranchez la prise pendant environ 5 secondes, puis rebranchez-la. Si le problème
persiste, contactez le service de réparation compétent.
20
DONNÉES TECHNIQUE
Éléments non fournis avec la hotte
Hauteur
(cm)
24
Vous pouvez télécharger les consignes de
sécurité, le manuel de l’utilisateur, la fiche
produit et les données énergétiques en :
• Visitant notre site internet docs.whirlpool.eu
• Utilisant le Code QR
• Vous pouvez également contacter notre
service après-vente (voir numéro de téléphone
dans le livret de garantie). Lorsque vous
contactez notre Service Après-vente, veuillez
indiquer les codes visibles sur la plaque
signalétique de l’appareil.
Largeur
(cm)
89,9
Profondeur
(cm)
50
21

ALGEMENE VEILIGHEID
• Zorg voordat u de afzuigkap schoonmaakt of onderhoudt eerst dat hij geen stroom
heeft door de stekker uit het stopcontact te halen, de tweepolige schakelaar uit te zetten
of de betreffende elektriciteitsgroep geheel uit te schakelen.
• Draag tijdens installatie en onderhoud altijd werkhandschoenen.
• Dit apparaat is geschikt voor bediening door kinderen vanaf 8 jaar, personen met
lichamelijke, zintuiglijke of verstandelijke beperkingen, onervaren personen en degenen
die over onvoldoende kennis beschikken, onder voorwaarde dat ze hierbij eerst worden
begeleid en geïnstrueerd over veilig gebruik en bediening van het apparaat, en
voldoende inzicht hebben in de bijbehorende gevaren.
• Laat kinderen niet aan de knoppen zitten of met het apparaat spelen.
• Schoonmaken en onderhoud door kinderen van voor de gebruiker toegankelijke
onderdelen mag alleen onder toezicht van een volwassen.
• Wanneer de afzuigkap wordt gebruikt voor apparaten die op gas of een andere
brandstof werken, moet de ruimte waar de apparaten zijn geïnstalleerd voldoende
worden geventileerd.
• De afzuigkap moet regelmatig van binnen en van buiten worden schoongemaakt
(MINSTENS 1 KEER PER MAAND).
• Hierbij moeten de verstrekte onderhoudsinstructies worden opgevolgd. Als de
verstrekte instructies voor het reinigen van de afzuigkap en de filters niet worden
opgevolgd, ontstaat de kans op brand.
• U mag niets flamberen onder de afzuigkap.
• Vervang de lampen uitsluitend door het type dat staat aangegeven onder "Onderhoud
> Lampjes vervangen" van deze gids.
Blootstellen aan vlammen is slecht voor de filters en kan tot brand leiden. Dit moet dus
onder alle omstandigheden worden vermeden. Werk bij bakken en braden dus extra
zorgvuldig en zorg dat vet of olie niet oververhit raakt en in brand vliegt.
LET OP: het is mogelijk dat toegankelijke onderdelen van de afzuigkap heet worden
tijdens het afvoeren van kookdampen.
• Sluit het apparaat niet op het lichtnet aan voordat de installatie is voltooid.
• Bij technische maatregelen en veiligheidsmaatregelen voor installaties die kookdampen afvoeren, is het belangrijk dat de lokale
wet- en regelgeving nauwkeurig wordt gevolgd.
• De afgezogen lucht mag niet worden afgevoerd naar een uitvoer voor dampen van apparaten die op gas of andere brandstoffen
werken.
• Zorg dat de lamp op de juiste manier is geplaatst omdat anders de kans ontstaat op elektrische schokken, zelfs als de kap niet
wordt gebruikt.
• Gebruik de afzuigkap nooit zonder op de juiste manier geplaatste roosters.
• Laat NOOIT andere zaken op de afzuigkap rusten, tenzij specifiek aangegeven.
• Gebruik voor de installatie alleen de meegeleverde schroeven, of koop schroeven van het juiste type.
• Raadpleeg de installatiegids voor de correcte afmetingen van de schroeven.
• Raadpleeg bij twijfel een geautoriseerd service center of iemand met vergelijkbare kwalificaties.
WAARSCHUWING!
• Wanneer niet de in deze instructies vermelde schroeven worden gebruikt of als het apparaat niet volgens deze instructies wordt
bevestigd, kunnen elektrische risico's ontstaan.
• Sluit het product niet aan op een (programmeerbare) timer, externe afstandsbediening of ander apparaat waardoor het product
automatisch wordt ingeschakeld.
22
Houd kinderen jonger dan 3 jaar uit de buurt van het apparaat. Zonder het voortdurende toezicht van een volwassene moeten
kinderen jonger dan 8 jaar uit de buurt van het apparaat gehouden worden.
OPGELET: het apparaat is niet bedoel om in werking te worden gesteld door middel van een extern apparaat of een
afzonderlijk afstandsbedieningssysteem.
Dit apparaat is niet bedoeld voor een professioneel gebruik. Gebruik het apparaat niet in de open lucht.
Om het risico op persoonlijk letsel te voorkomen, moet het apparaat verplaatst en geïnstalleerd worden door twee of meer
personen.
De installatie, waaronder ook de eventuele aansluiting op de watervoorziening (indien voorzien) en de elektrische aansluitingen,
evenals de reparatie-ingrepen moeten worden uitgevoerd door gekwalificeerd personeel.
Na het voltooien van de installatie moet het verpakkingsmateriaal (plastic, polystyreen, enz.) buiten het bereik van kinderen bewaard
worden om verstikkingsgevaar te voorkomen. .
Gebruik het apparaat niet wanneer u nat bent of op blote voeten.
Gebruik voor de reiniging nooit stoomreinigers - gevaar voor elektrische schokken.
Het verpakkingsmateriaal is 100% recycleerbaar en is gemarkeerd met het betreffende symbool
De afzuigkap kan er anders uitzien dan de afbeeldingen in dit boekje. De instructies voor bediening, onderhoud en
installatie blijven echter hetzelfde.
Houd u altijd aan de instructies in deze gids. Wij aanvaarden geen enkele aansprakelijkheid voor problemen, schade of brand die
voortvloeien uit nalatigheid, zoals het niet opvolgen van de instructies in deze gids. Dit apparaat is bedoeld voor huishoudelijk
gebruik en vergelijkbare toepassingen zoals: - personeelskeukens in winkels, kantoren en andere werkomgevingen; - boerderijen; gebruik door klanten in hotels, motels en andere verblijfsomgevingen zoals bed and breakfast.
• Het is belangrijk om dit boekje goed te bewaren zodat u er altijd dingen in kan opzoeken. Zorg dat het boekje bij verhuizing,
verkoop of overdracht met het apparaat meegaat.
• Lees de instructies zorgvuldig: het gaat hier om belangrijke informatie over installatie, bediening, onderhoud en veiligheid.
• Voer nooit zelf elektrische of mechanische veranderingen uit op het product of de afvoerbuizen.
• Controleer alle onderdelen op beschadigingen voordat u verder gaat met de installatie van het apparaat. Neem bij beschadiging
contact op met uw leverancier, en begin niet aan de installatie.
De minimale afstand tussen het kookoppervlak en de onderkant van de afzuigkap is 60cm bij een elektrische kookplaat en 70cm, in
geval van een gas- of gemengd fornuis.
Als in de installatie-instructies van een gaskookplaat een grotere afstand wordt genoemd, moet de grotere afstand worden
gebruikt.
ELEKTRISCHE AANSLUITING
De aansluiting op het lichtnet moet overeenkomen met de waarde op het plaatje aan de binnenkant van de afzuigkap. Als de
afzuigkap een stekker heeft, moet deze in een stopcontact dat aan de nieuwste regelgeving voldoet en ook na de installatie
bereikbaar blijft. Als het product geen stekker heeft (rechtstreekse aansluiting op lichtnet), of als de stekker na de installatie niet
meer bereikbaar is, moet gebruik worden gemaakt van een tweepolige aan/uitschakelaar, zodat het product (bijvoorbeeld bij een te
hoge stroomsterkte, categorie III) geheel kan worden losgekoppeld van het lichtnet.
WAARSCHUWING!
Controleer eerst of het netsnoer correct is gemonteerd voordat de afzuigkap op het lichtnet wordt aangesloten om de juiste werking
te controleren.
Als de kabel niet is voorzien van een stekker,sluit u de kabels aan overeenkomstig de volgende tabel:
Spanning en frequentie net Aansluiting draden
Verwijs naar de waarde aangegeven op het typeplaatje dat is
aangebracht in de afzuigkap.
: geel/groen
N : blauw
L : bruin
23
 Loading...