

Whirlpool WED97HEXW, MED6000XW, WED97HEXL, WED96HEYW, WED95HEXW Installation Instructions
...Page 1

ELECTRIC DRYER INSTALLATION INSTRUCTIONS
Table of Contents
DRYER SAFETY ......................................................................... 2
INSTALLATION REQUIREMENTS ............................................. 3
Tools and Parts ...................................................................... 3
LOCATION REQUIREMENTS ....................................................4
ELECTRICAL REQUIREMENTS ................................................ 5
INSTALL LEVELING LEGS ......................................................... 6
ELECTRICAL INSTALLATION ................................................... 7
Power Supply Cord Connection ........................................... 8
Direct Wire Connection .......................................................10
VENTING ................................................................................... 12
Venting Requirements .........................................................12
Plan Vent System .................................................................13
Install Vent System .............................................................. 14
CONNECT INLET HOSE .......................................................... 15
CONNECT VENT ...................................................................... 16
LEVEL DRYER .......................................................................... 17
COMPLETE INSTALLATION CHECKLIST ..............................17
DOOR REVERSAL (OPTIONAL) ..............................................17
Para una version de estas instrucciones en español, visite www.Whirlpool.com
INSTALLATION NOTES
Date of purchase: _________________________________
Date of installation: _______________________________
Installer: ________________________________________
Model number: ___________________________________
Serial number: ___________________________________
W10423118A
W10423119A - SP
1
Page 2
DRYER SAFETY
IMPORTANT: When discarding or storing your old clothes dryer, remove the door.
2
Page 3
INSTALLATION REQUIREMENTS
TOOLS AND PARTS
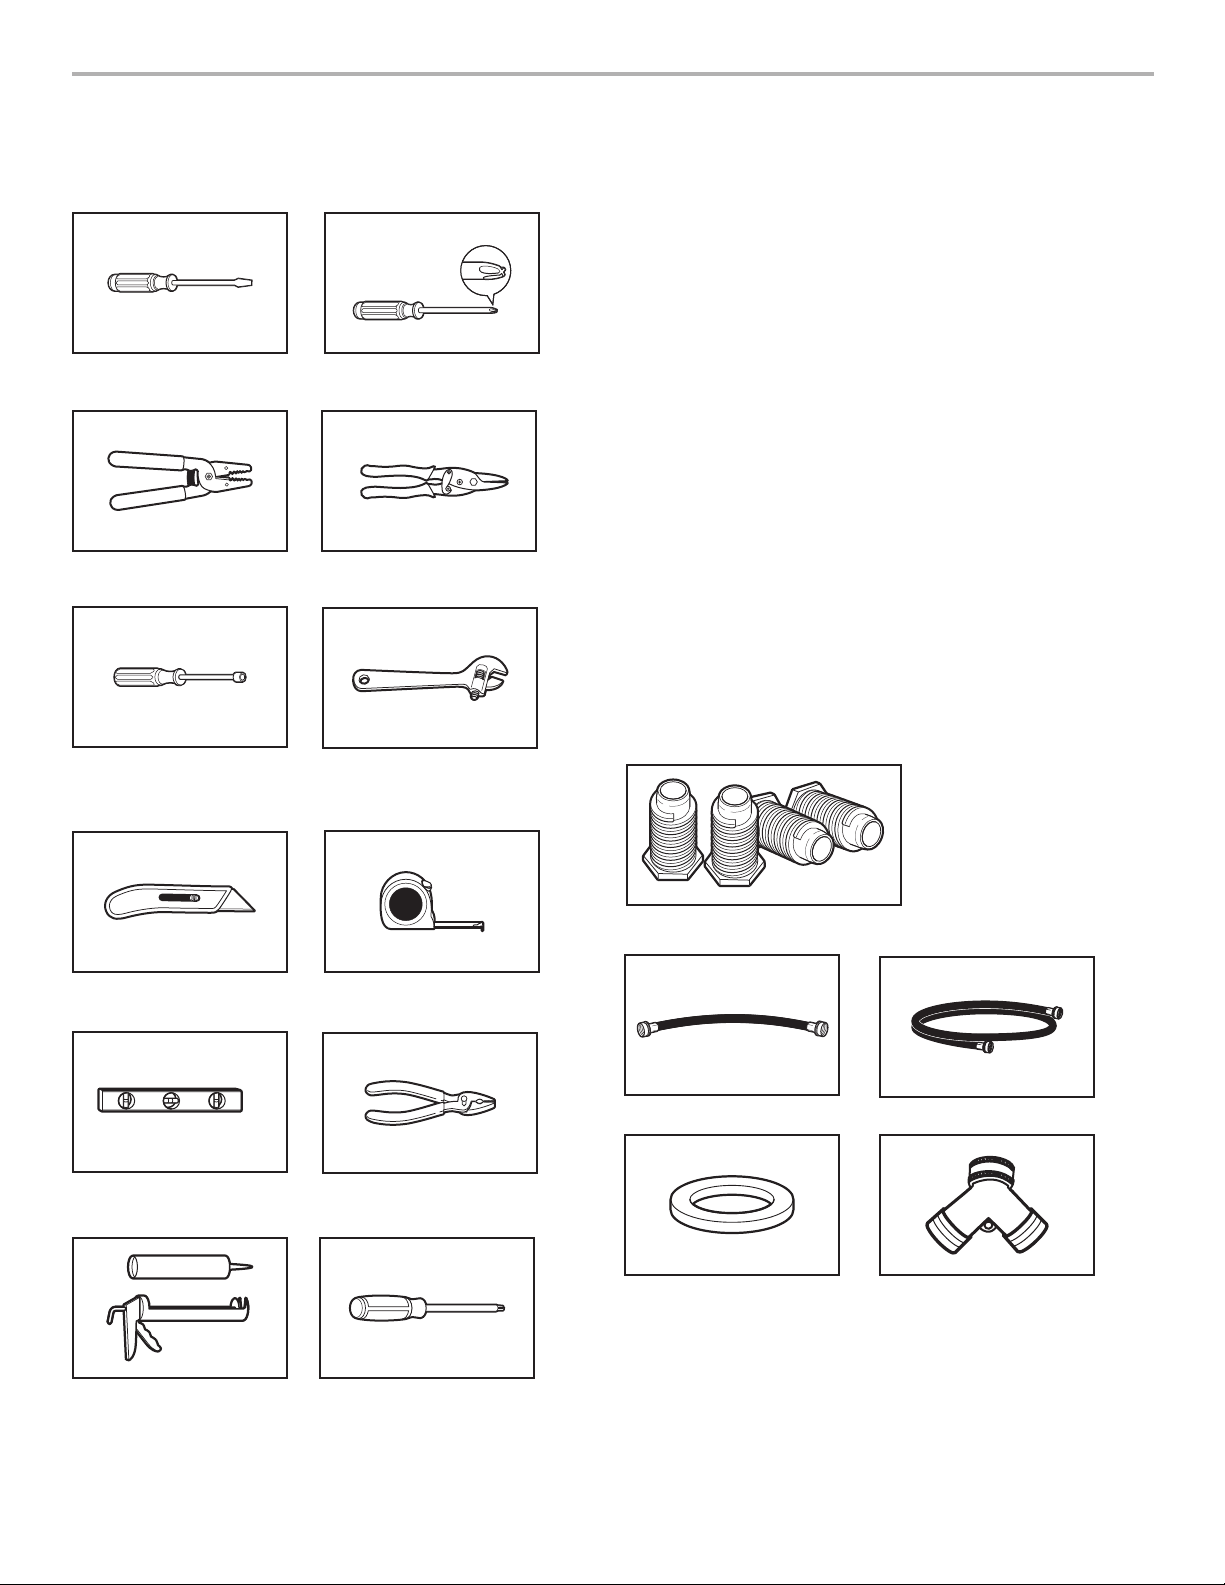
Gather the required tools and parts before starting installation.
Tools needed:
Flat-blade screwdriver #2 Phillips screwdriver
Wire stripper (direct wire
installations)
1/4" and 5/16" nut driver
(recommended)
Tin snips (new vent
installations)
Adjustable wrench that
opens to 1" (25 mm) or
hex-head socket wrench
Parts needed: (Not supplied with dryer)
Vent clamps ■
Vent elbows and ductwork ■
Additional parts may be required, depending in your installation.
Check local codes. Check existing electrical supply and venting.
Read “Electrical Requirements” and “Venting Requirements”
before purchasing parts.
If using a power supply cord:
Use a UL listed power supply cord kit marked for use with
clothes dryers. The kit should contain:
A UL listed 30-amp power supply cord, rated 120/240 volt ■
minimum. The cord should be type SRD or SRDT and be
at least 4 ft. (1.22 m) long. The wires that connect to
the dryer must end in ring terminals or spade terminals
with upturned ends.
A UL listed strain relief. ■
Parts supplied:
Parts package is located in dryer drum. Check that all parts
are included.
NOTE: Do not use leveling legs supplied if installing with a
pedestal or a stack kit.
Utility knife
Level
Caulking gun and
compound (for installing
new exhaust vent)
® TORX is a registered trademark of Saturn Fasteners, Inc.
Tape measure
Pliers
Min. 8" long Torx® T25
screwdriver
(for door reversal only)
Leveling legs (4)
Short inlet hose
Rubber washers
Long inlet hose
“Y” connector
Optional Equipment: (Not supplied with dryer)
Refer to your “Use and Care Guide” for information about
accessories available for your dryer.
3
Page 4
27"
(686 mm)
3
/4"*
(18 mm)
38
1
/8"
(968 mm)
61/2"
(165 mm)
29
7
/8"*
(759 mm)
3
1
/2"*
(89 mm)
6
1
/8"*
(156 mm)
14
3
/8"
(365 mm)
3
/4"*
(18 mm)
LOCATION REQUIREMENTS
Check code requirements. Some codes limit, or do not permit,
installing dryer in garages, closets, mobile homes, or sleeping
quarters. Contact your local building inspector.
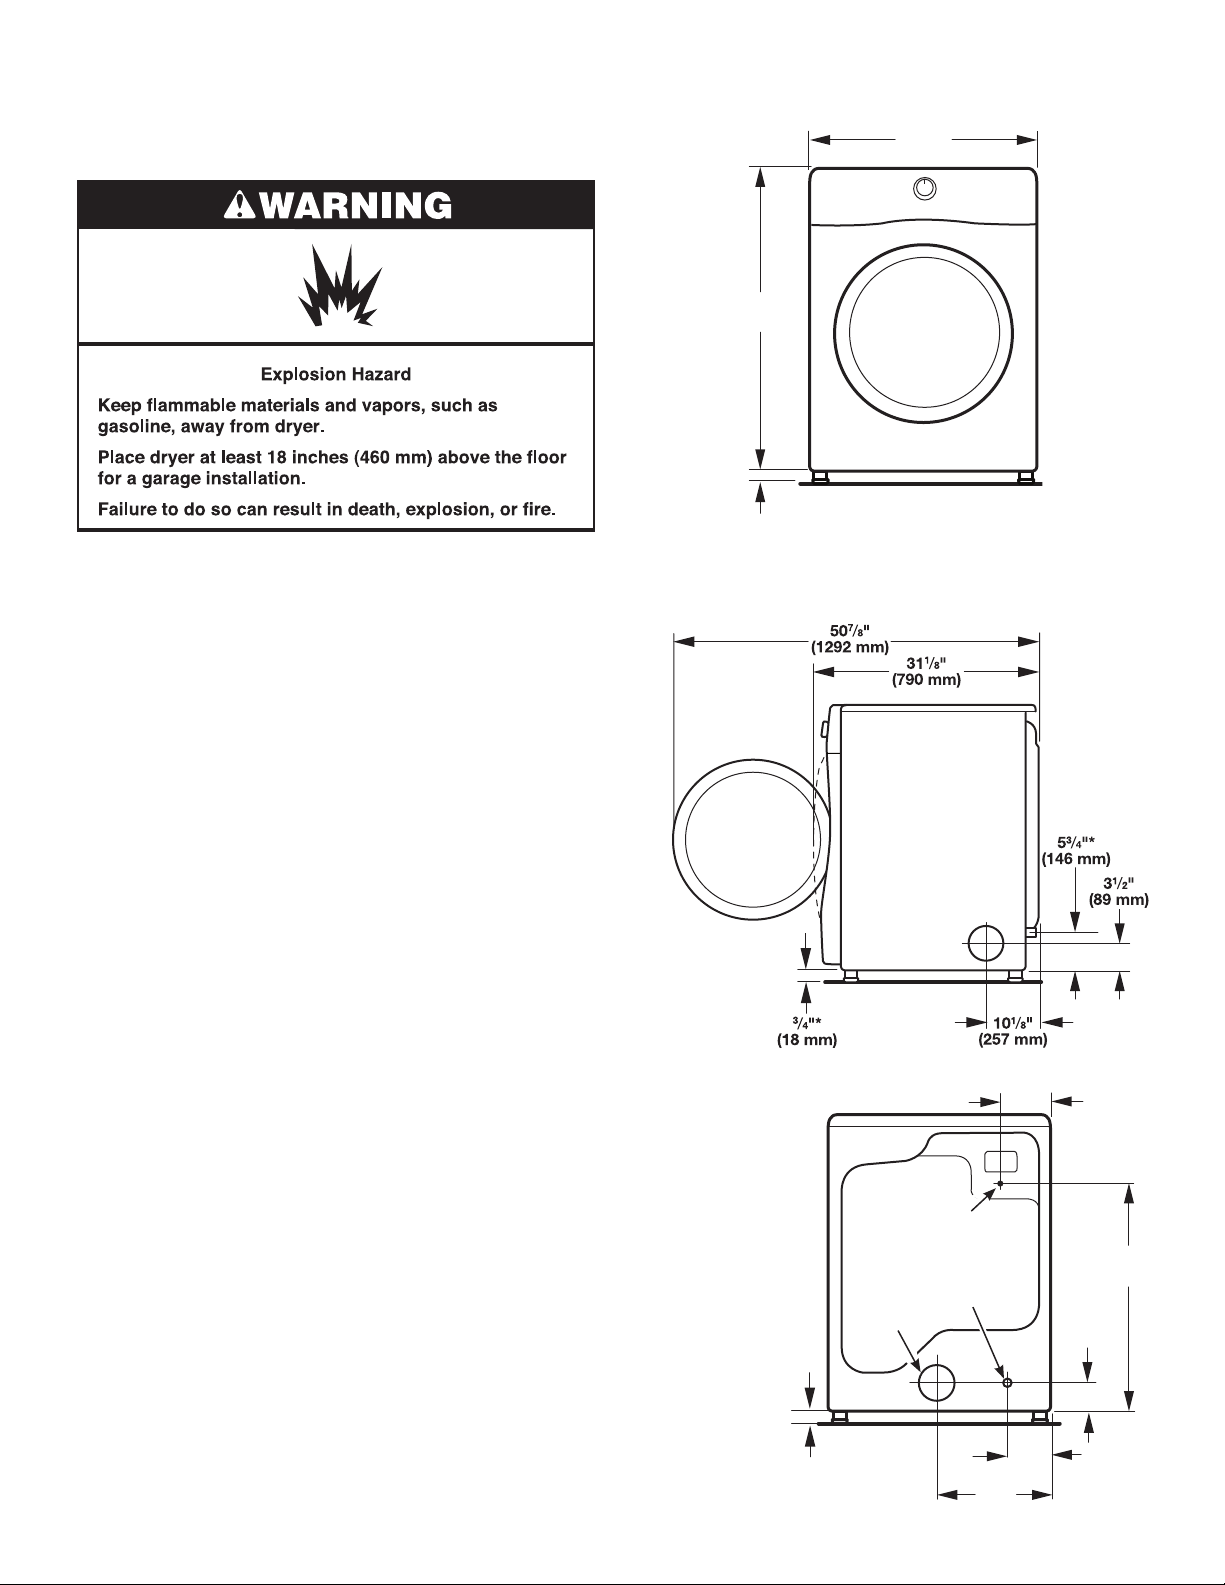
DRYER DIMENSIONS
Front view:
You will need:
A location allowing for proper exhaust installation. See ■
“Venting Requirements.”
A separate 30 amp circuit. ■
If using power supply cord, a grounded electrical outlet ■
located within 2 ft. (610 mm) of either side of dryer. See
“Electrical Requirements.”
Floor must support dryer weight of 200 lbs. (90.7 kg). Also ■
consider weight of companion appliance.
Cold water faucets located within 4 ft. (1.2 m) of the water ll ■
valves, and water pressure of 20 - 120 psi (138 - 827 kPa).
You may use the water supply for your washer using the “Y”
connector and short hose (if needed) which are provided.
Level oor with maximum slope of 1" (25 mm) under entire ■
dryer. If slope is greater than 1" (25 mm), install Extended
Dryer Feet Kit, Part Number 279810. If not level, clothes
may not tumble properly and automatic sensor cycles may
not operate correctly.
For garage installation, place dryer at least 18" (460 mm) above ■
oor. If using a pedestal, you will need 18" (460 mm) to bottom
of dryer.
The dryer must not be installed or stored in an area where it will ■
be exposed to water and/or weather.
IMPORTANT: Do not operate, install, or store dryer where
it will be exposed to water, weather, or at temperatures below
40° F (4° C). Lower temperatures may cause dryer not to
shut off at end of automatic sensor cycles, resulting in longer
drying times.
Installation Clearances
For each arrangement, consider allowing more space for ease
of installation and servicing; spacing for companion appliances
and clearances for walls, doors, and oor moldings. Space
must be large enough to allow door to fully open. Add spacing
on all sides of dryer to reduce noise transfer. If a closet door
or louvered door is installed, top and bottom air openings
in door are required.
Check code requirements. Some codes limit, or do not permit,
installation of the dryer in garages, closets, mobile homes, or
sleeping quarters. Contact your local building inspector.
Side view:
Back view:
NOTE: Most
installations
require a minimum
of 5" (127 mm)
clearance behind
dryer for exhaust
vent with elbow.
See “Venting
Requirements”.
* Approx. measurement.
Power supply
cord/cable
Water inlet
Vent
4
* Approx. measurement.
Page 5
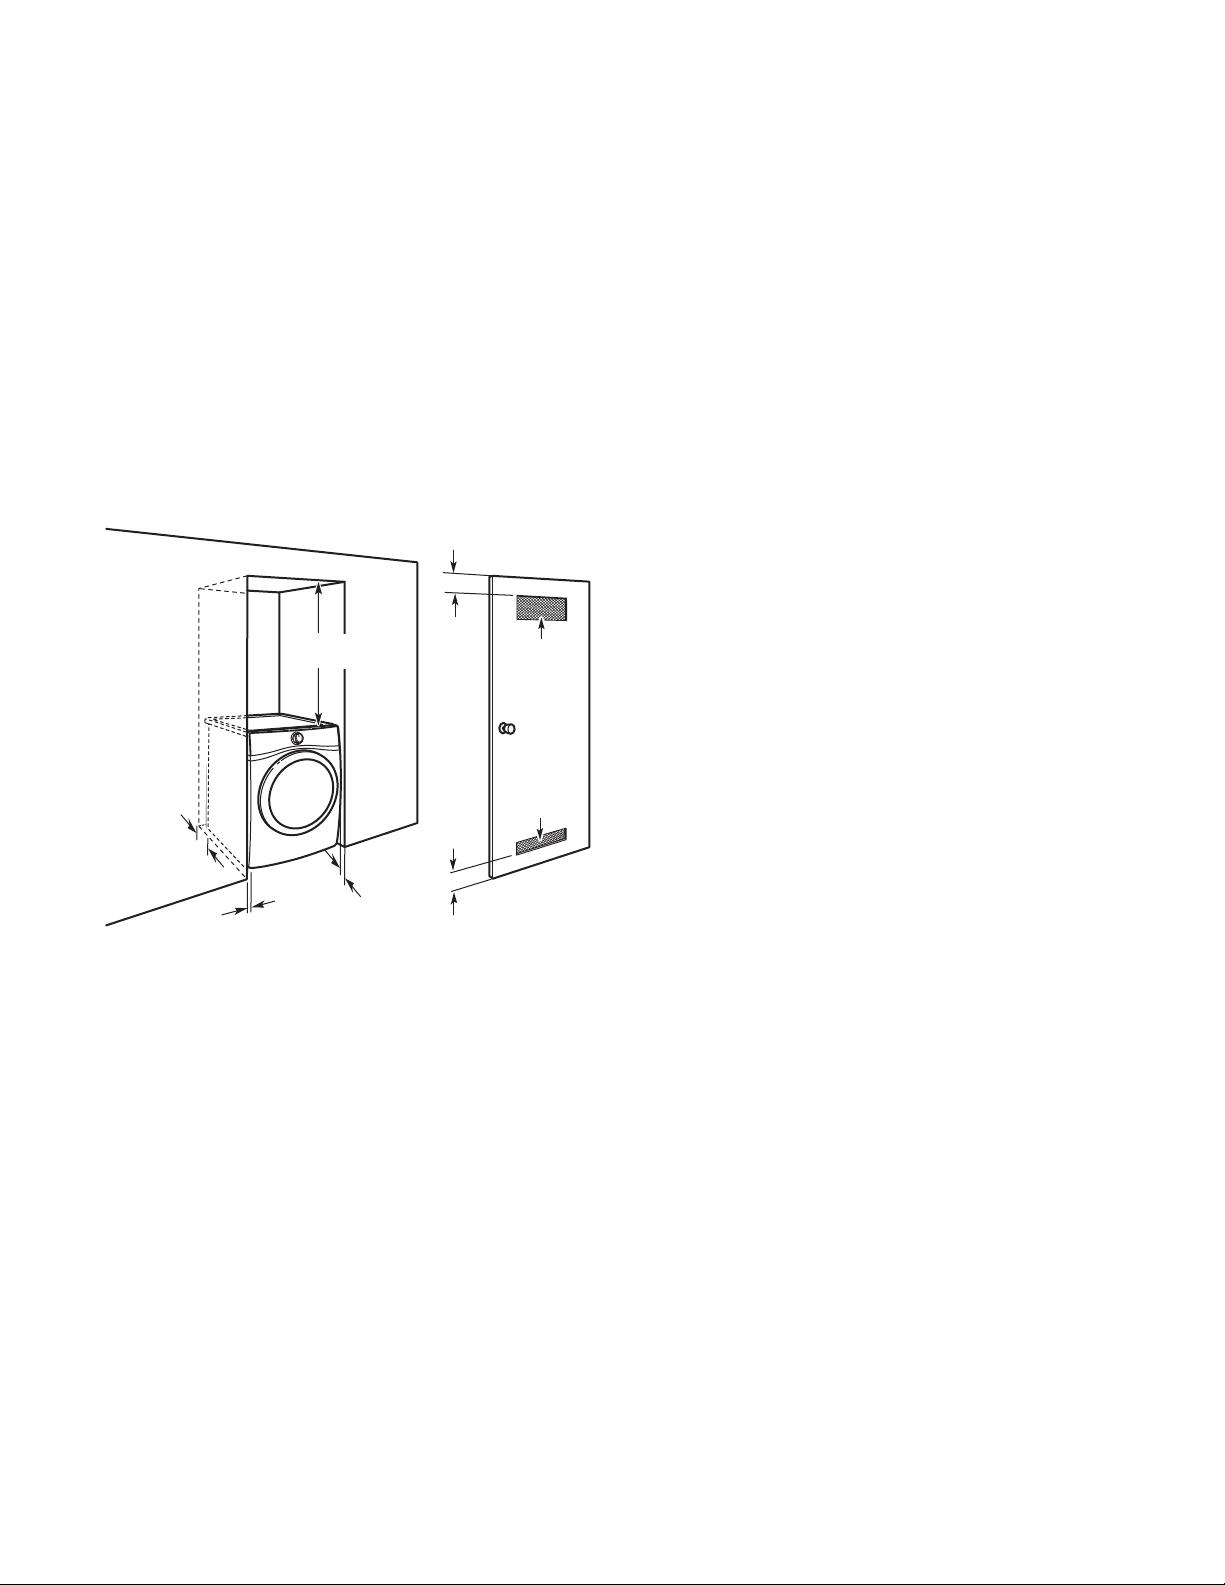
Installation spacing for recessed area
18" min.
(457 mm)
1"
(25 mm)
5"
(127 mm)
24 in.2 min.
(155 cm2)
48 in.2 min.
(310 cm
2
)
3"
(76 mm)
3"
(76 mm)
1"
(25 mm)
or closet installation
All dimensions show recommended and minimum spacing
allowed.
Additional spacing should be considered for ease of installation ■
and servicing.
Additional clearances might be required for wall, door, oor ■
moldings, and dryer venting.
Additional spacing should be considered on all sides of the ■
dryer to reduce noise transfer.
For closet installation, with a door, minimum ventilation ■
openings in the top and bottom of the door are required.
Louvered doors with equivalent ventilation openings are
acceptable.
Companion appliance spacing should also be considered. ■
Recommended installation clearances (dryer only):
ELECTRICAL REQUIREMENTS
It is your responsibility:
To contact a qualied electrical installer. ■
To be sure that the electrical connection is adequate and in ■
conformance with the National Electrical Code, ANSI/NFPA 70
- latest edition and all local codes and ordinances.
The National Electrical Code requires a 4-wire power supply
connection for homes built after 1996, dryer circuits involved in
remodeling after 1996, and all mobile home installations.
A copy of the above code standards can be obtained from:
National Fire Protection Association, One Batterymarch Park,
Quincy, MA 02269.
To supply the required 3 or 4 wire, single phase, 120/240 ■
volt, 60 Hz, AC only electrical supply (or 3 or 4 wire, 120/208
volt electrical supply, if specied on the serial/rating plate)
on a separate 30-amp circuit, fused on both sides of the line.
Connect to an individual branch circuit. Do not have a fuse in
the neutral or grounding circuit.
Do not use an extension cord. ■
If codes permit and a separate ground wire is used, it is ■
recommended that a qualied electrician determine that the
ground path is adequate.
Electrical Connection
To properly install your dryer, you must determine the type of
electrical connection you will be using and follow the instructions
provided for it here.
*
*
* 0" (0 mm) spacing is allowed.
Mobile home - Additional installation requirements:
This dryer is suitable for mobile home installations.
The installation must conform to the Manufactured
Home Construction and Safety Standard, Title 24 CFR,
Part 3280 (formerly the Federal Standard for Mobile home
construction and Safety, Title 24, HUD Part 280) or Standard
CAN/CSA-Z240 MH.
Mobile home installations require:
Metal exhaust system hardware, available for purchase from ■
your dealer. For further information, see “Assistance or
Service” section in your “Use and Care Guide”.
Special provisions must be made in mobile homes to ■
introduce outside air into dryer. Openings (such as a nearby
window) should be at least twice as large as dryer exhaust
opening.
This dryer is manufactured ready to install with a 3-wire ■
electrical supply connection. The neutral ground conductor
is permanently connected to the neutral conductor (white wire)
within the dryer. If the dryer is installed with a 4-wire electrical
supply connection, the neutral ground conductor must be
removed from the external ground connector (green screw),
and secured under the neutral terminal (center or white wire)
of the terminal block. When the neutral ground conductor is
secured under the neutral terminal (center or white wire) of the
terminal block, the dryer cabinet is isolated from the neutral
conductor. The green ground wire of the 4-wire power cord
must be secured to the dryer cabinet with the green
ground screw.
If local codes do not permit the connection of a neutral ■
ground wire to the neutral wire, see “Optional 3-wire
connection” section.
A 4-wire power supply connection must be used when the ■
appliance is installed in a location where grounding through
the neutral conductor is prohibited. Grounding through the
neutral is prohibited for (1) new branch-circuit installations after
1996, (2) mobile homes, (3) recreational vehicles, and (4) areas
where local codes prohibit grounding through the neutral
conductors.
If using a power supply cord:
Use a UL listed power supply cord kit marked for use with
clothes dryers. The kit should contain:
A UL listed 30-amp power supply cord, rated 120/240 volt ■
minimum. The cord should be type SRD or SRDT and be
at least 4 ft. (1.22 m) long. The wires that connect to
the dryer must end in ring terminals or spade terminals
with upturned ends.
A UL listed strain relief. ■
5
Page 6
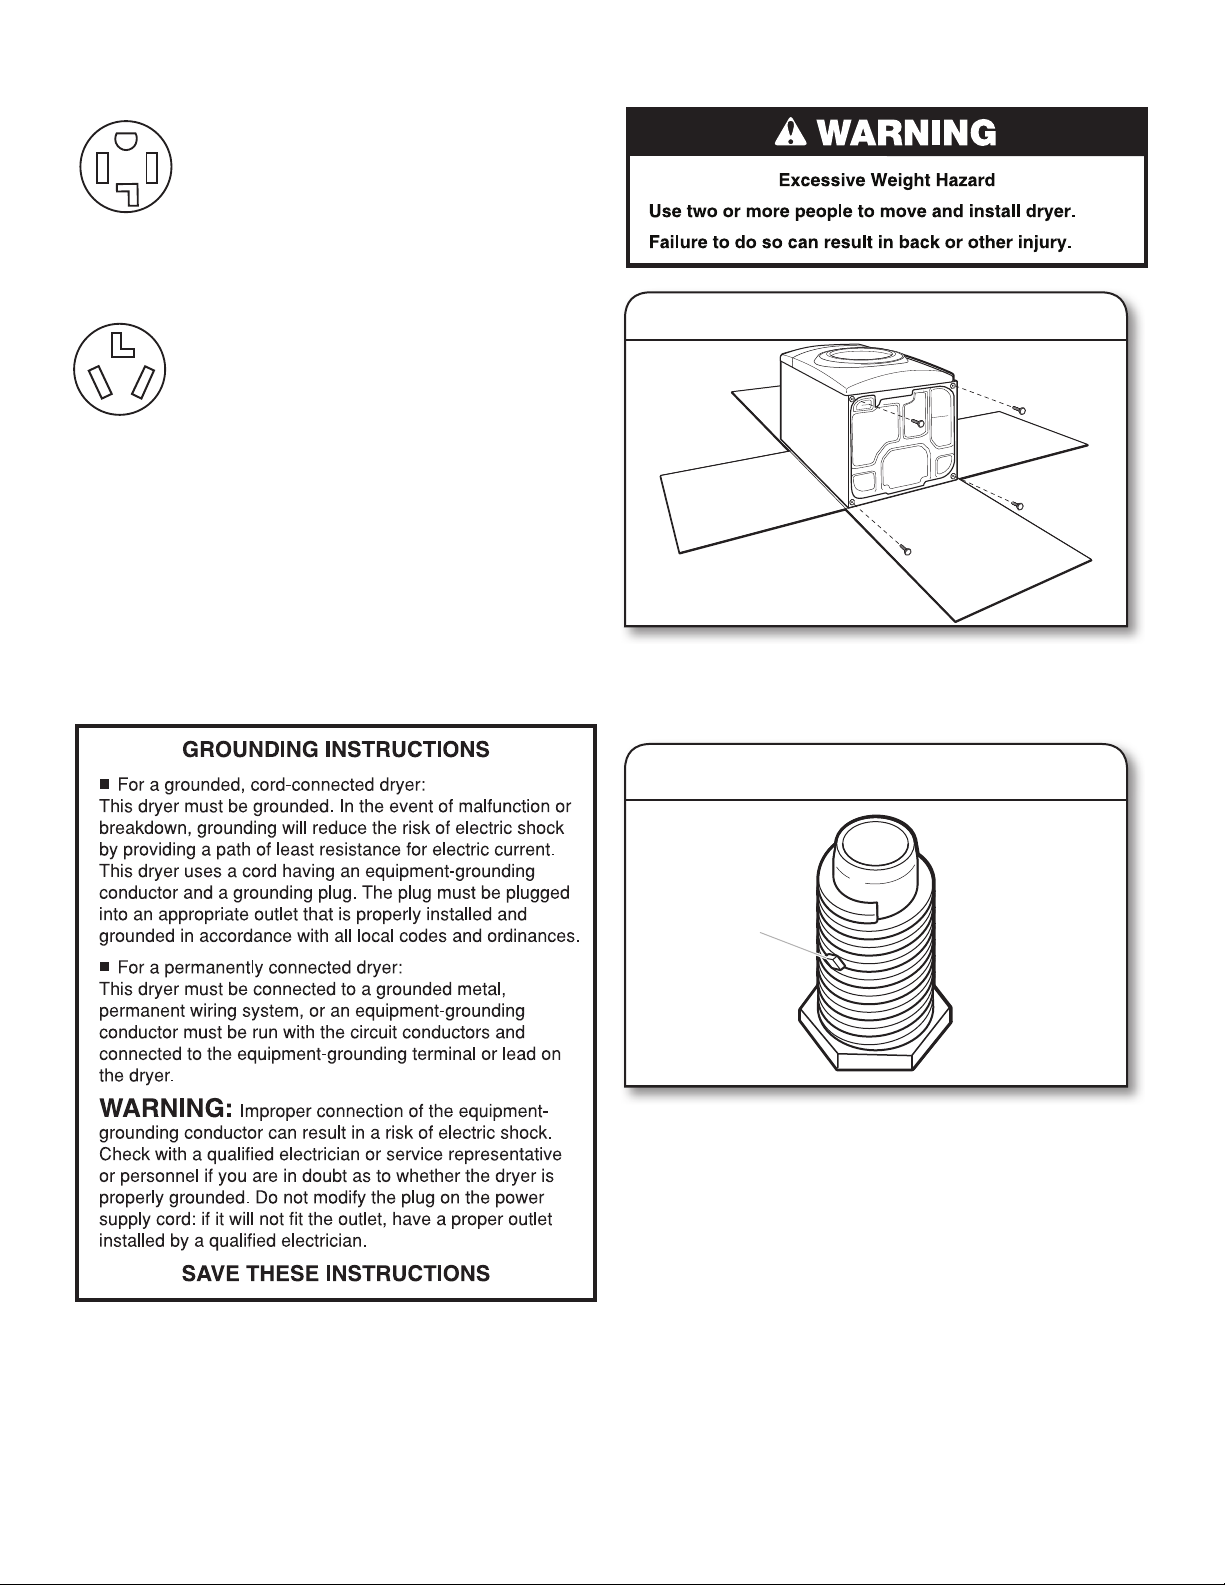
If your outlet looks like this:
diamond
marking
Then choose a 4-wire power supply cord with
ring or spade terminals and UL listed strain
relief. The 4-wire power supply cord, at least
4 ft. (1.22 m) long, must have four 10-gauge
copper wires and match a 4-wire receptacle of
NEMA Type 14-30R. The ground wire (ground
4-wire receptacle
(14-30R)
3-wire receptacle
(10-30R)
conductor) may be either green or bare. The
neutral conductor must be identied by a white
cover.
Then choose a 3-wire power supply cord with
ring or spade terminals and UL listed strain
relief. The 3-wire power supply cord, at least
4 ft. (1.22 m) long, must have three 10-gauge
copper wires and match a 3-wire receptacle of
NEMA Type 10-30R.
If connecting by direct wire:
Power supply cable must match power supply (4-wire or 3-wire)
and be:
Flexible armored cable or nonmetallic sheathed copper cable ■
(with ground wire), covered with exible metallic conduit. All
current-carrying wires must be insulated.
10-gauge solid copper wire (do not use aluminum) at least ■
5 ft. (1.52 m) long.
INSTALL LEVELING LEGS
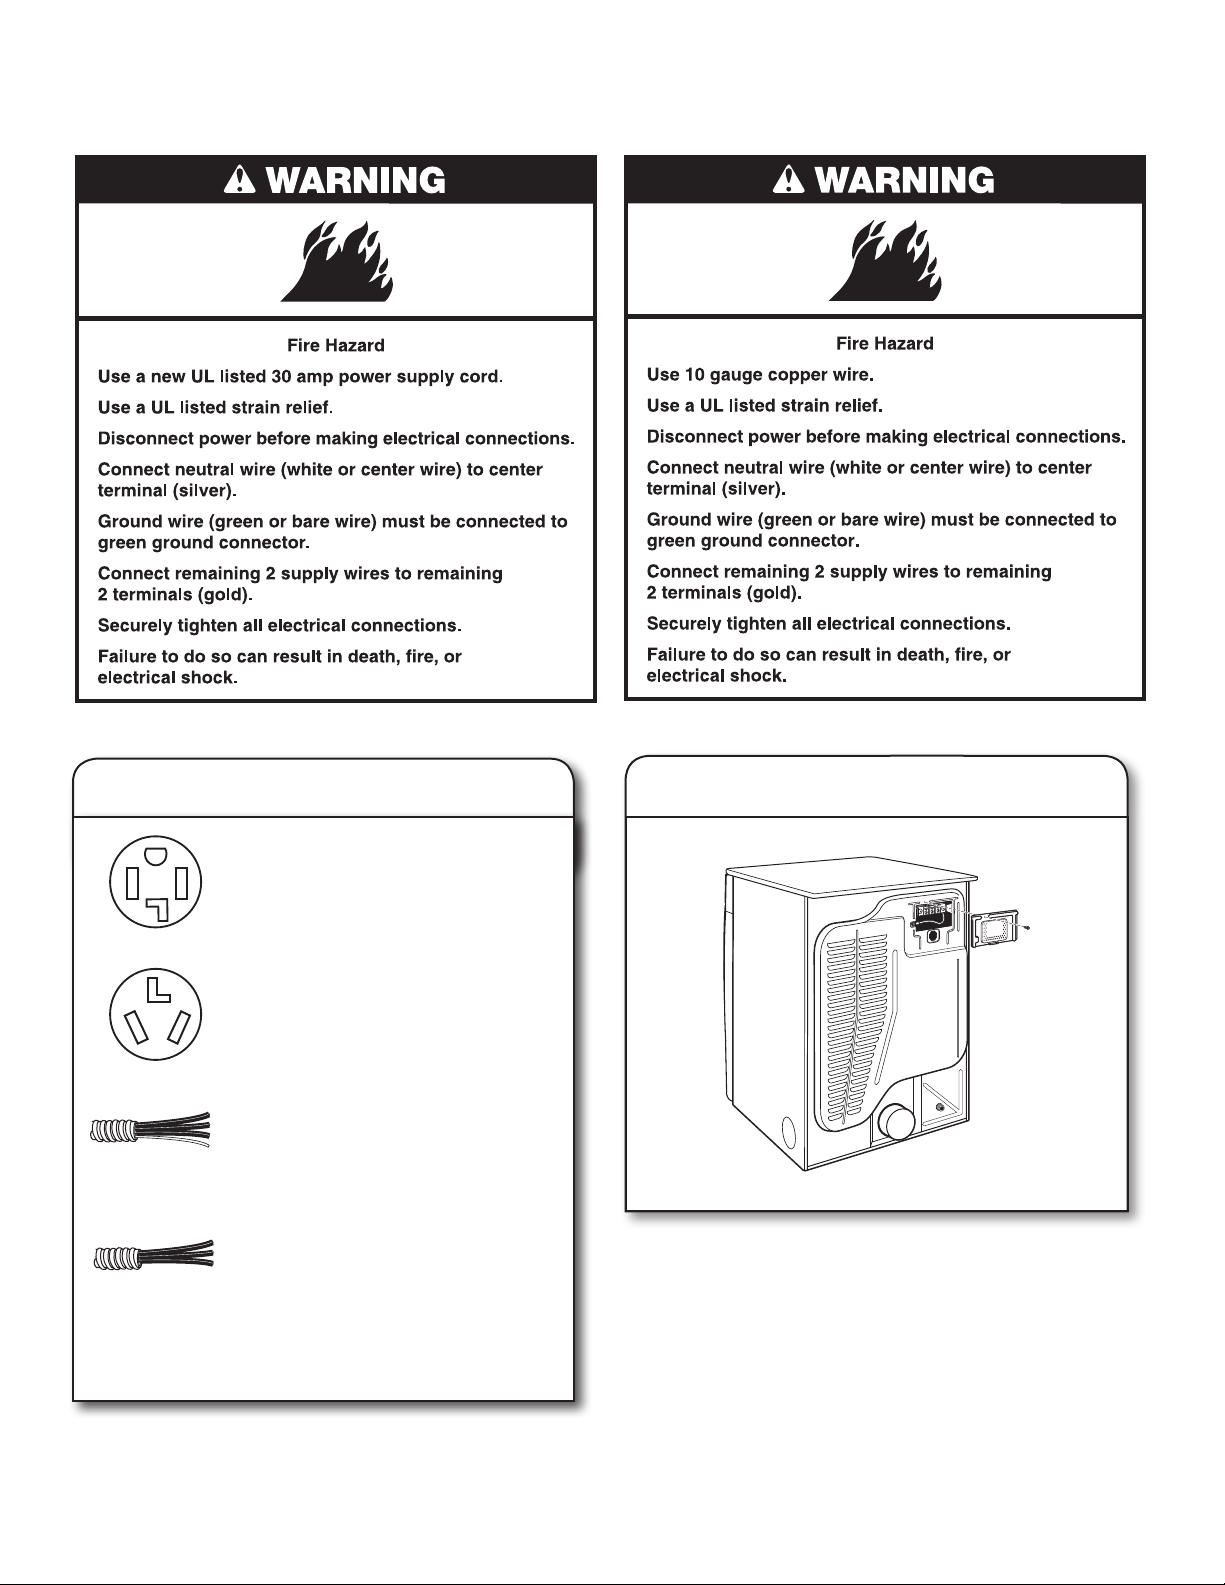
1. Prepare dryer for leveling legs
To avoid damaging oor, use a large at piece of cardboard
from dryer carton; place under entire back edge of dryer.
Firmly grasp dryer body (not console panel) and gently lay
dryer down on cardboard.
2. Screw in leveling legs
Examine leveling legs, nd diamond marking. Screw legs into
leg holes by hand, use a wrench to nish turning legs until
diamond marking is no longer visible.
Place a carton corner post from dryer packaging under each
of the 2 dryer back corners. Stand the dryer up. Slide the
dryer on the corner posts until it is close to its nal location.
Leave enough room to connect the exhaust vent.
6
Page 7
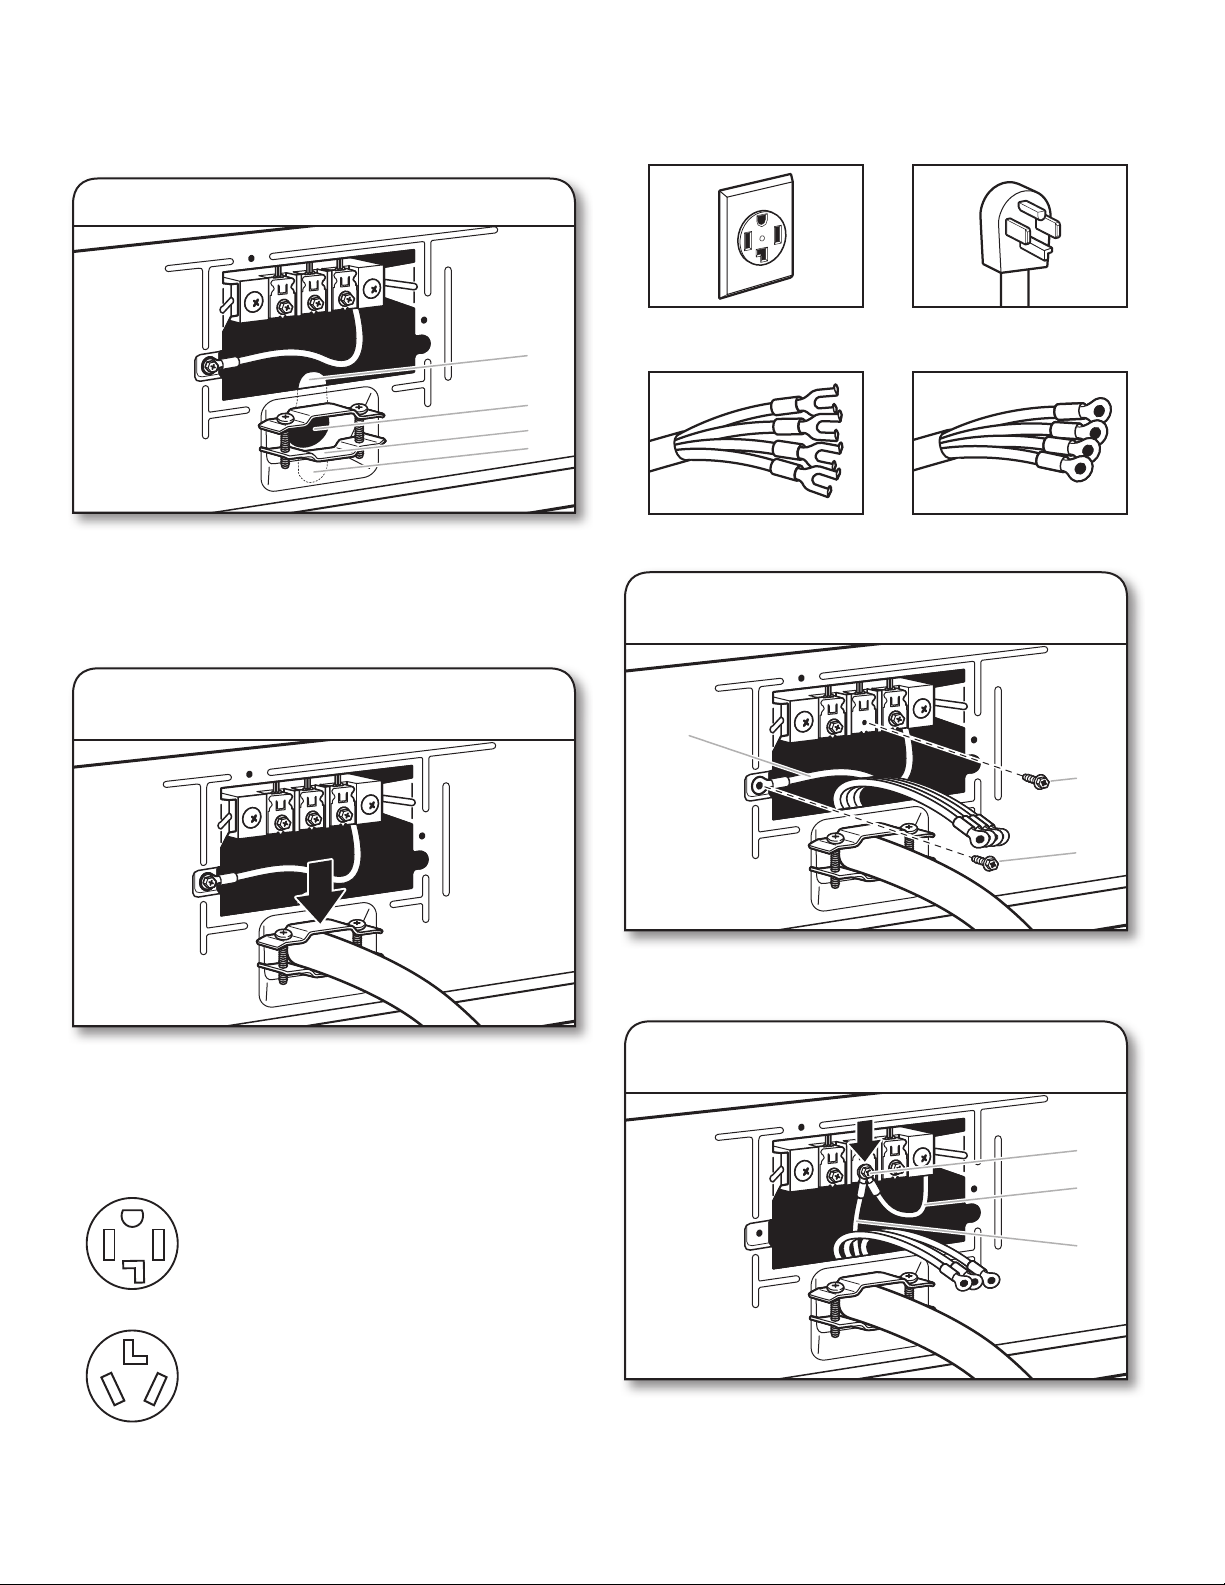
ELECTRIC INSTALLATION
For power supply cord installations:
For direct wire installations:
Before you start: disconnect power.
1. Choose electrical connection type
Power supply cord 4-wire receptacle
(NEMA Type 14-30R).
Go to Power Supply Cord Connection.
Power supply cord 3-wire receptacle
(NEMA Type 10-30R).
Go to Power Supply Cord Connection.
4-wire direct connection:
Go to Direct Wire Connection.
3-wire direct connection:
Go to Direct Wire Connection.
2. Remove terminal block cover
Remove hold-down screw and terminal block cover.
NOTE: If local codes do not permit connection of a
cabinet-ground conductor to neutral wire, go to “Optional
3-wire connection”. This connection may be used with
either a power supply cord or a direct wire connection.
7
Page 8
Power Supply Cord Connection
E
B
A
C
E
B
D
C
B
A
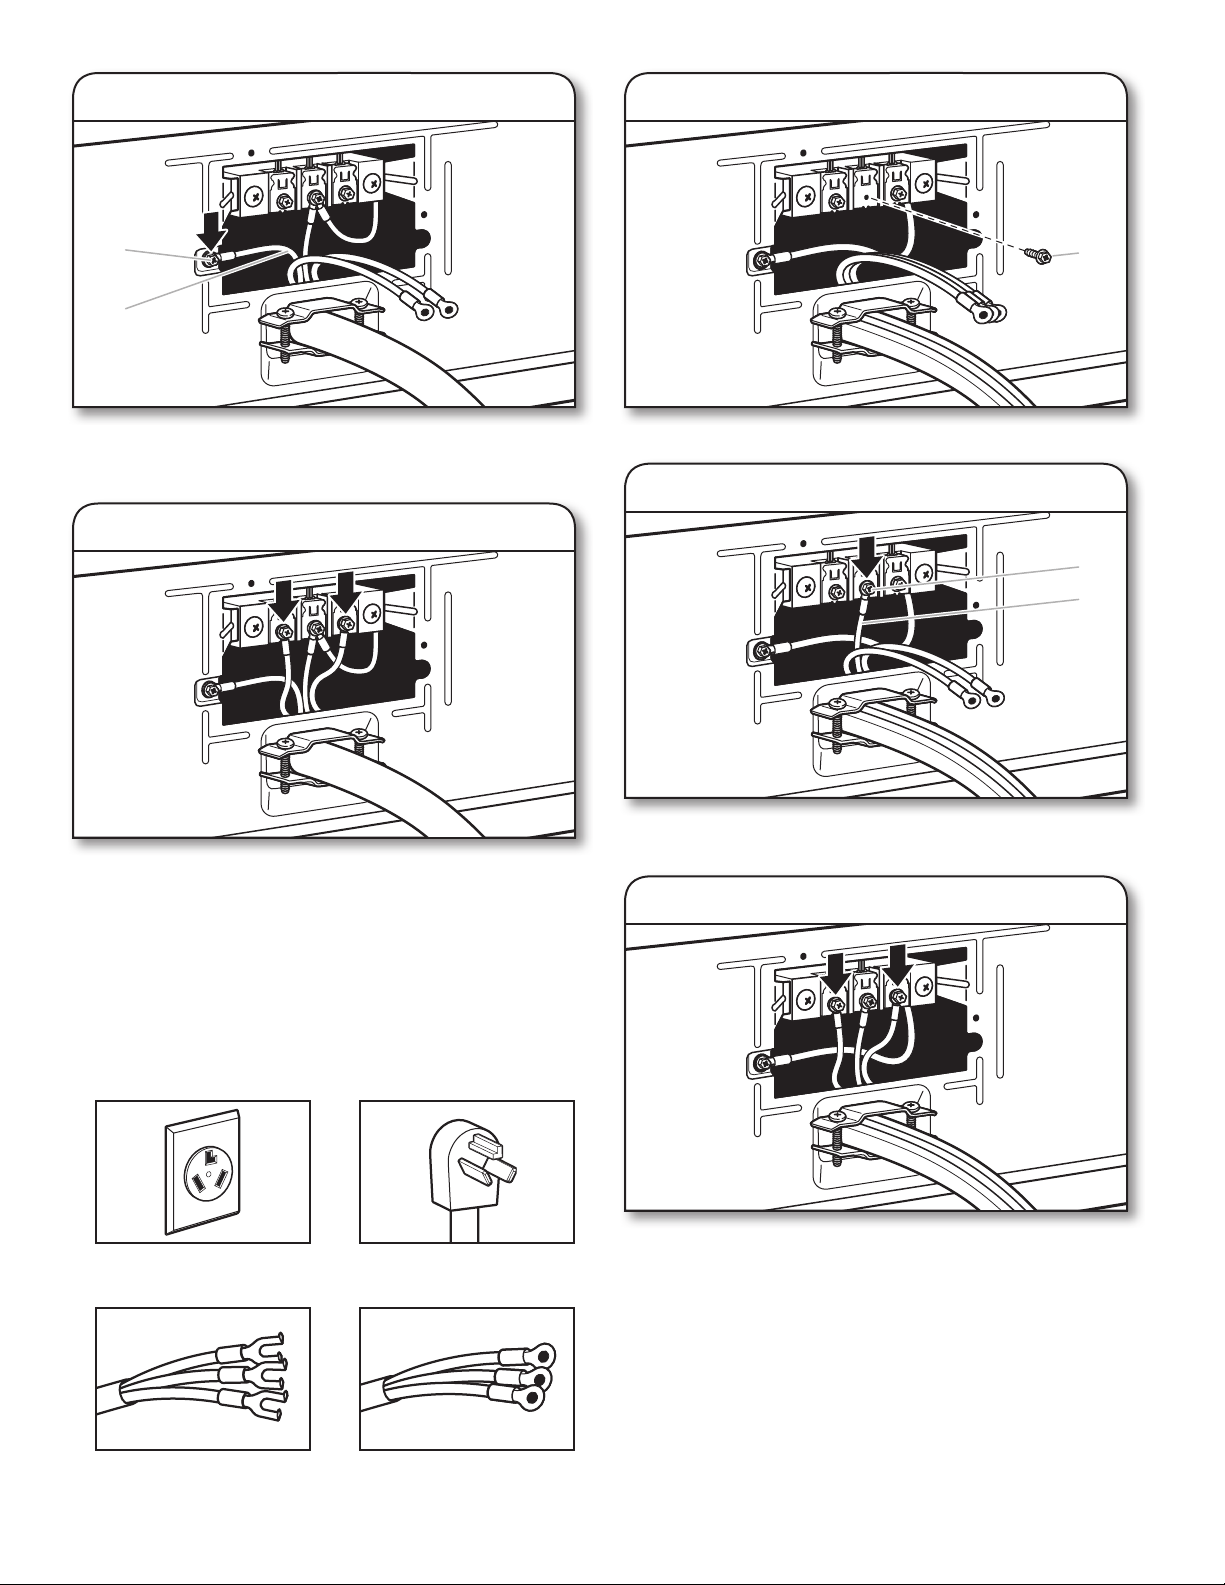
Power supply cord strain relief:
1. Attach power supply cord strain relief
4-Wire Power Supply Cord Connection
IMPORTANT: A 4-wire connection is required for mobile homes
and where local codes do not permit the use of 3-wire connections.
Remove the screws from a 3/4" (19 mm) UL listed strain relief
(UL marking on strain relief). Put the tabs of the two clamp
sections (C) into the hole below the terminal block opening
(B) so that one tab is pointing up (A) and the other is pointing
down (D), and hold in place. Tighten strain relief screws just
enough to hold the two clamp sections (C) together.
2. Attach power supply cord
to strain relief
4-wire receptacle (NEMA
type 14-30R)
Spade terminals with
upturned ends
4-prong plug
Ring terminals
1. Prepare to connect neutral ground
wire and neutral wire
Put power supply cord through the strain relief. Be sure that
the wire insulation on the power supply cord is inside the
strain relief. The strain relief should have a tight t with the
dryer cabinet and be in a horizontal position. Do not further
tighten strain relief screws at this point.
If your outlet looks like this:
Power supply cord 4-wire receptacle
(NEMA Type 14-30R):
Go to “4-Wire Power Supply Cord
Connection” on this page.
Power supply cord 3-wire receptacle
(NEMA Type 10-30R):
Go to “3-Wire Power Supply Cord
Connection” on page 9.
8
Remove center terminal block screw (B). Remove neutral
ground wire (E) from green external ground conductor screw (A).
2. Connect neutral ground wire and
neutral wire
Connect neutral ground wire (E) and neutral wire (white or
center) (C) of power supply cord under center terminal block
screw (B). Tighten screw.
Page 9
C
B
B
3. Connect ground wire
F
A
under green external ground conductor screw (A). Tighten
screw.
4. Connect remaining wires
1. Remove center screw
Remove center terminal block screw (B).Connect ground wire (F) (green or bare) of power supply cord
2. Connect neutral wire
Connect remaining wires under outer terminal block screws.
Tighten screws. Finally, reinsert tab of terminal block cover
into slot of dryer rear panel. Secure cover with hold-down
screw. Now, go to “Venting Requirements”.
3-Wire Power Supply Cord Connection
Use where local codes permit connecting cabinet-ground
conductor to neutral wire.
3-wire receptacle (NEMA
type 10-30R)
3-prong plug
Connect neutral wire (white or center) (C) of power supply cord
under center terminal block screw (B). Tighten screw.
3. Connect remaining wires
Connect remaining wires under outer terminal block screws.
Tighten screws. Finally, reinsert tab of terminal block cover
into slot of dryer rear panel. Secure cover with hold-down
screw. Now, go to “Venting Requirements”.
Spade terminals with
upturned ends
Ring terminals
9
Page 10
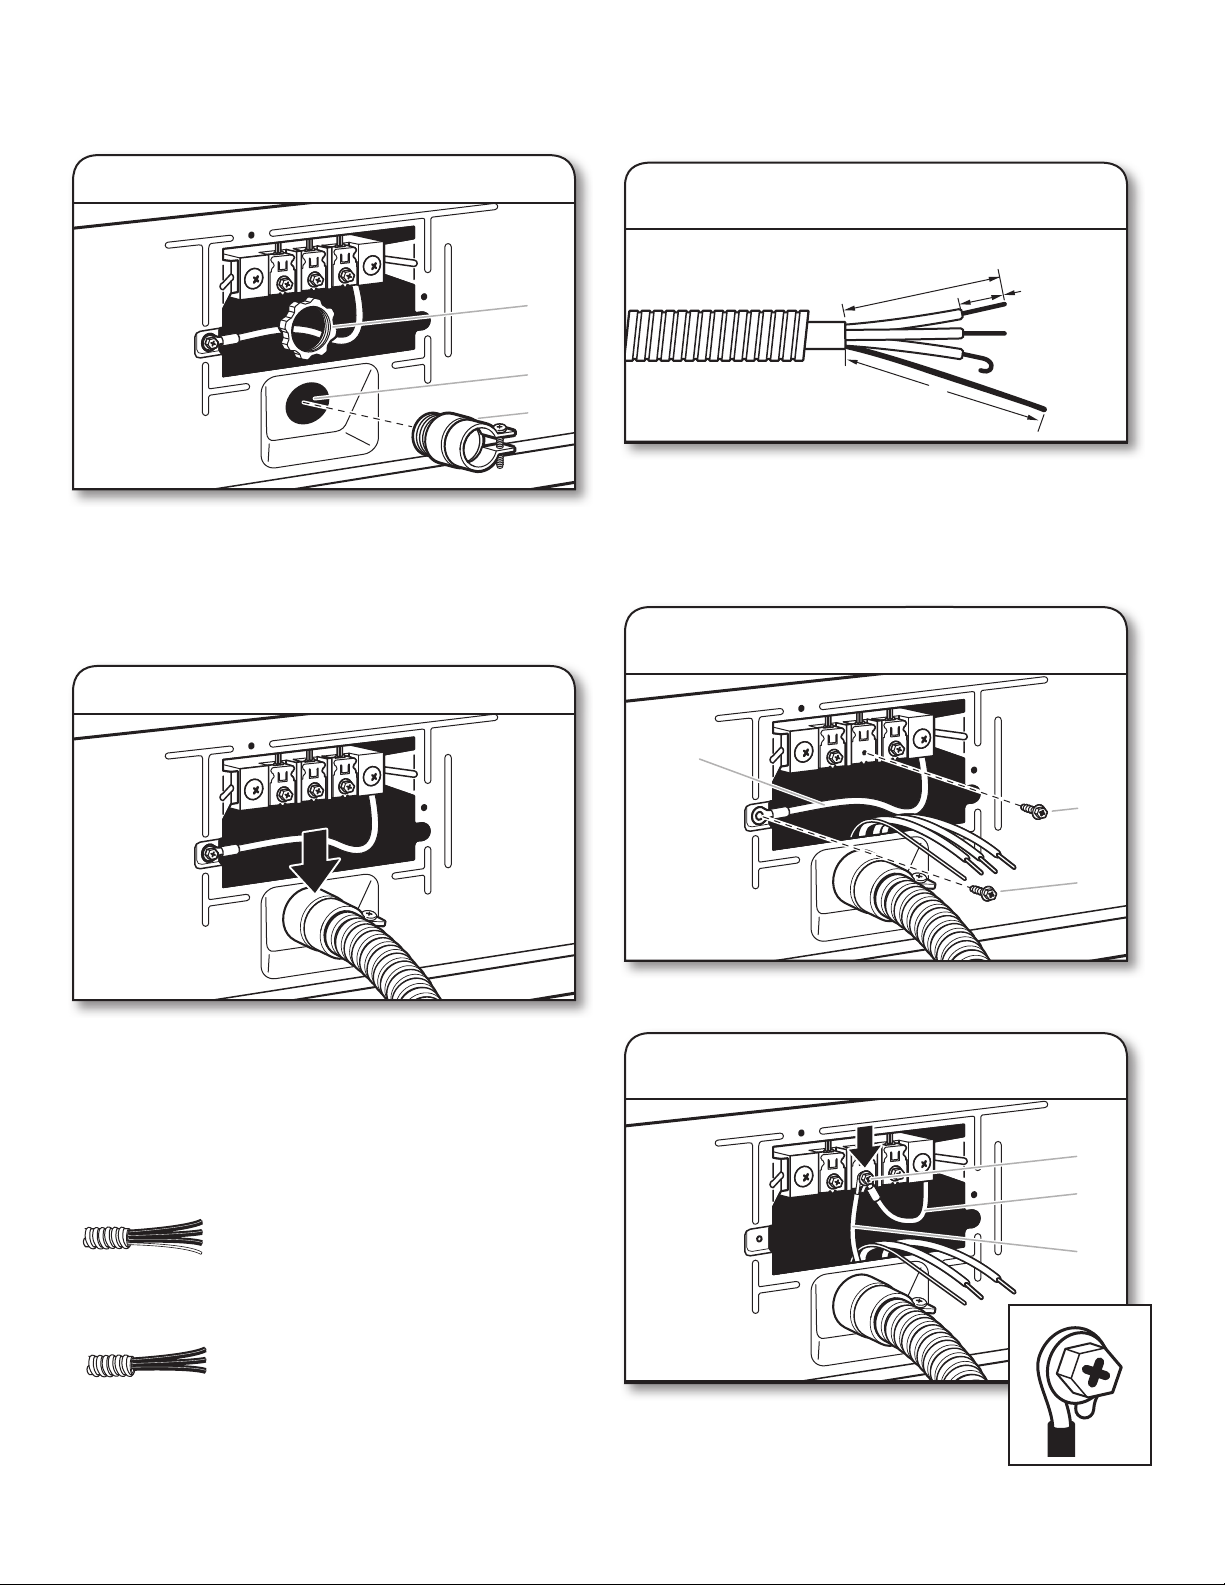
Direct Wire Connection
1"
(25 mm)
3
1
⁄
2
"
(89 mm)
5"
(127 mm)
E
B
A
C
B
A
C
E
B
Direct wire strain relief
4-Wire Direct Wire Connection
IMPORTANT: A 4-wire connection is required for mobile homes
and where local codes do not permit 3-wire connections.
1. Attach direct wire strain relief
Unscrew the removable conduit connector (A) and any
screws from a 3/4" (19 mm) UL listed strain relief (UL marking
on strain relief). Put the threaded section of the strain relief
(C) through the hole below the terminal block opening (B).
Reaching inside the terminal block opening, screw the
removable conduit connector (A) onto the strain relief threads
and tighten securely.
2. Attach direct wire cable to strain relief
1. Prepare your 4-wire cable
for direct connection
Direct wire cable must have 5 ft. (1.52 m) of extra length so
dryer may be moved if needed.
Strip 5" (127 mm) of outer covering from end of cable,
leaving bare ground wire at 5" (127 mm). Cut 11/2" (38 mm)
from remaining 3 wires. Strip insulation back 1" (25 mm).
Shape ends of wires into hooks.
2. Prepare to connect neutral ground
wire and neutral wire
Put direct wire cable through the strain relief. The strain
relief should have a tight t with the dryer cabinet and be in
a horizontal position. Tighten strain relief screw against the
direct wire cable.
If your wiring looks like this:
4-wire direct connection:
Go to “4-Wire Direct Wire Connection”
on this page.
3-wire direct connection:
10
Go to “3-Wire Direct Wire Connection”
on page 11.
Remove center terminal block screw (B). Remove neutral
ground wire (E) from green external ground conductor screw (A).
3. Connect neutral ground wire and
neutral wire
Connect neutral ground wire (E) and place
hooked end (hook facing right) of neutral
wire (white or center wire) (C) of direct wire
cable under center screw of terminal block
(B). Squeeze hooked ends together and
tighten screw.
Page 11
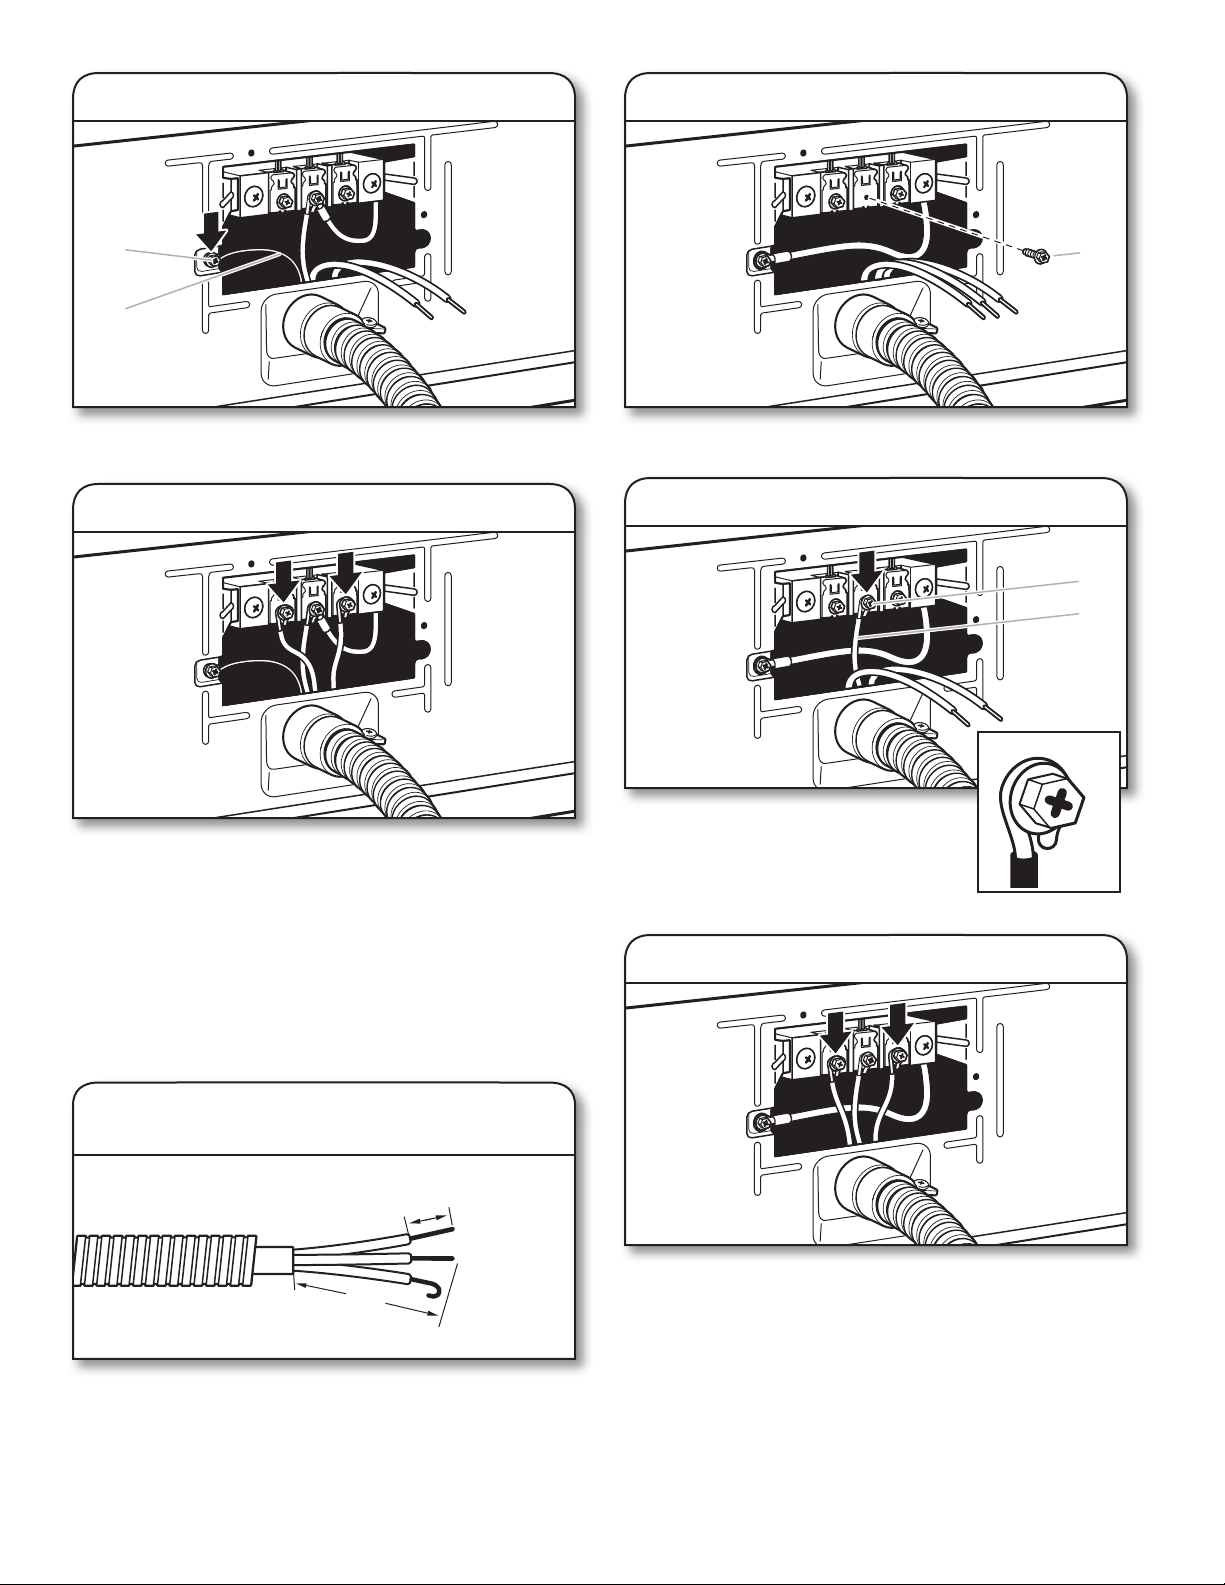
1"
(25 mm)
3½"
(89 mm)
B
4. Connect ground wire
F
A
C
B
2. Remove center screw
Connect ground wire (green or bare) (F) of direct wire cable
under green external ground conductor screw (A). Tighten screw.
5. Connect remaining wires
Place hooked ends of remaining direct wire cable wires under
outer terminal block screws (hooks facing right). Squeeze
hooked ends together and tighten screws. Finally, reinsert tab
of terminal block cover into slot of dryer rear panel. Secure
cover with hold-down screw. Now, go to “Venting Requirements”.
3-Wire Direct Wire Connection
Remove center terminal block screw (B).
3. Connect neutral wire
Place hooked end of neutral wire (white
or center) (C) of direct wire cable under
center terminal block screw (B), hook
facing right. Squeeze hooked end together.
Tighten screw.
4. Connect remaining wires
Use where local codes permit connecting cabinet-ground
conductor to neutral wire.
1. Prepare your 3-wire cable
for direct connection
Direct wire cable must have 5 ft. (1.52 m) of extra length so
dryer may be moved if needed.
Strip 31/2" (89 mm) of outer covering from end of cable. Strip
insulation back 1" (25 mm). If using 3-wire cable with ground
wire, cut bare wire even with outer covering. Shape wire ends
into hooks.
Place hooked ends of remaining direct wire cable wires under
outer terminal block screws (hooks facing right). Squeeze hooked
ends together and tighten screws. Finally, reinsert tab of terminal
block cover into slot of dryer rear panel. Secure cover with
hold-down screw. Now, go to “Venting Requirements”.
11
Page 12
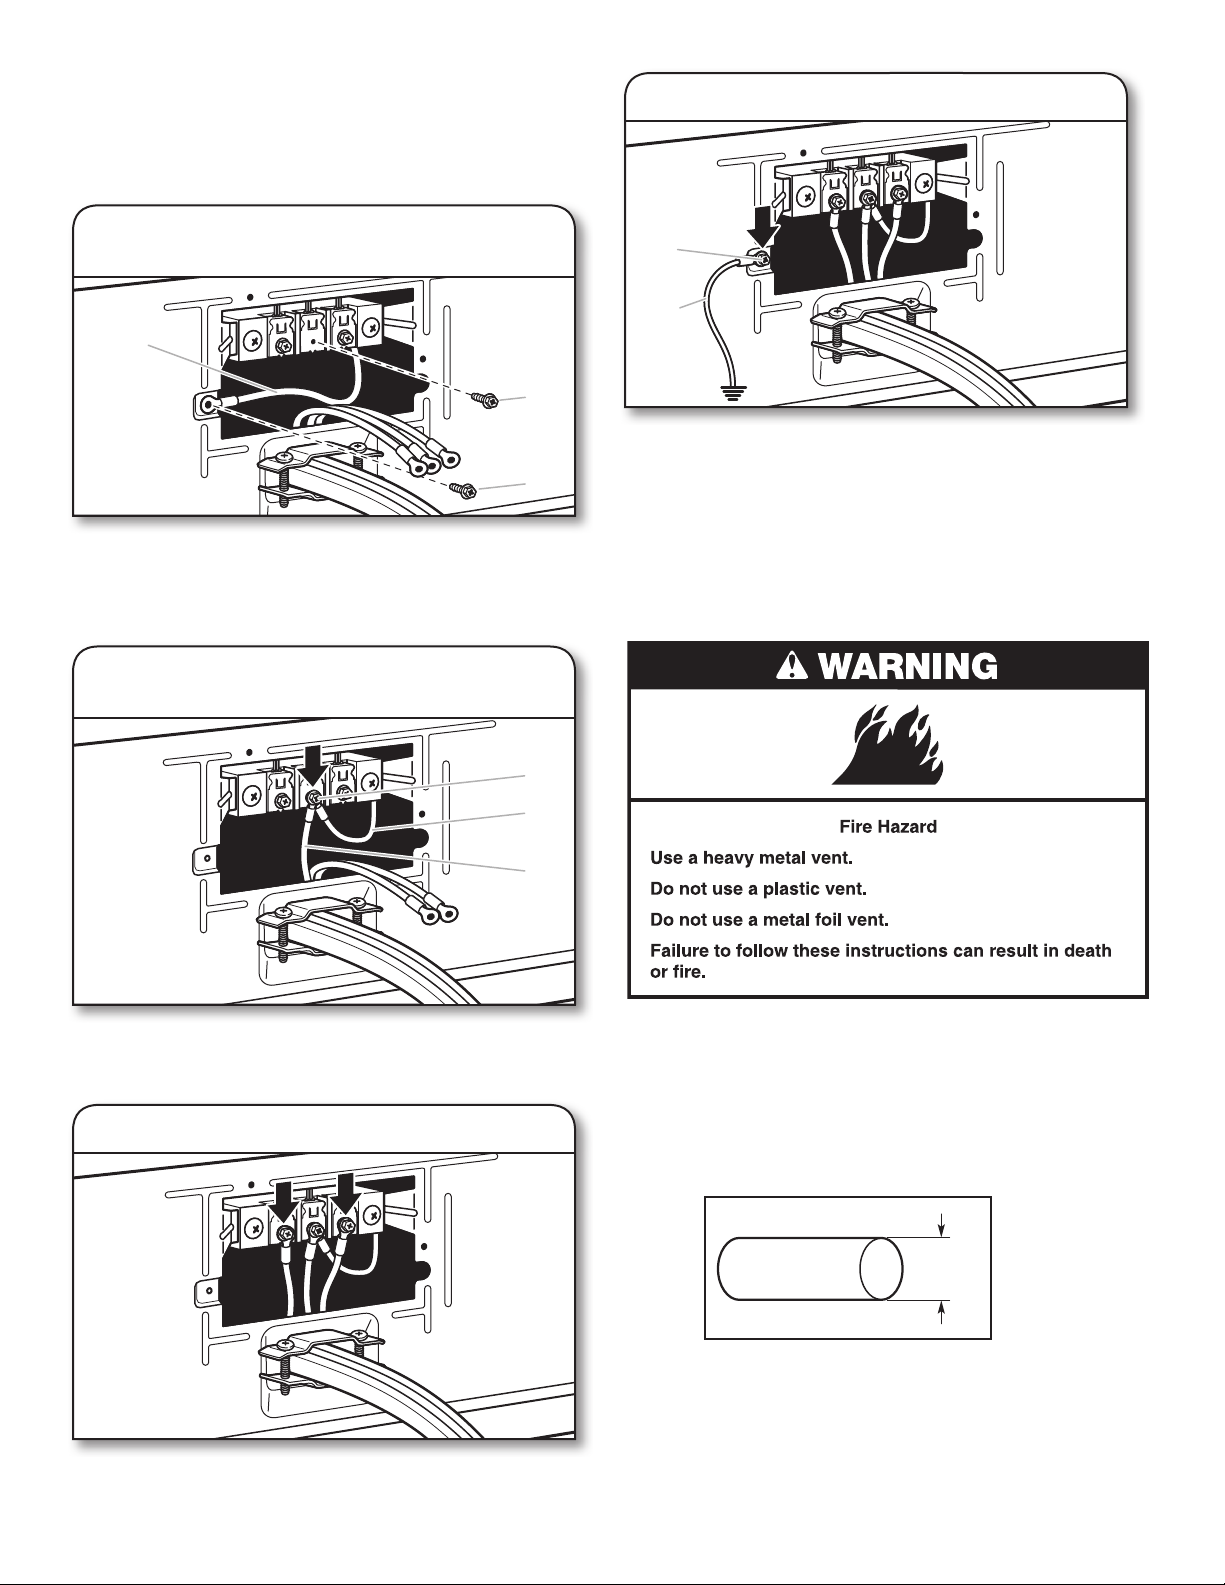
Optional External Ground for 3-Wire
C
E
B
E
B
A
G
A
4"
(102 mm)
Connection (Power Supply Cord Shown)
IMPORTANT: You must verify with a qualied electrician that this
grounding method is acceptable before connecting.
1. Prepare to connect neutral ground
wire and neutral wire
Install the correct strain relief for your electrical connection
method, as shown on page 8 or 10.
Remove center terminal block screw (B). Remove neutral ground
wire (E) from green external ground conductor screw (A).
4. Connect external ground wire
Connect a separate copper ground wire (G) under the green
external ground conductor screw (A) to an adequate ground.
Finally, reinsert tab of terminal block cover into slot of dryer
rear panel. Secure cover with hold-down screw. Now, go to
“Venting Requirements”.
VENTING
Venting Requirements
2. Connect neutral ground wire and
neutral wire
Connect neutral ground wire (E) and neutral wire (white or
center wire) (C) of power supply cord or cable under center,
terminal block screw (B). Tighten screw.
3. Connect remaining wires
WARNING: To reduce the risk of re, this dryer MUST BE
EXHAUSTED OUTDOORS.
IMPORTANT: Observe all governing codes and ordinances.
Dryer exhaust must not be connected into any gas vent,
chimney, wall, ceiling, attic, crawlspace, or a concealed space
of a building. Only rigid or exible metal vent shall be used for
exhausting.
Place ends of remaining wires under outer terminal block
screws. Tighten screws.
12
4" (102 mm) heavy metal exhaust vent
Only a 4" (102 mm) heavy metal exhaust vent and clamps ■
may be used.
Do not use plastic or metal foil vent. ■
Page 13
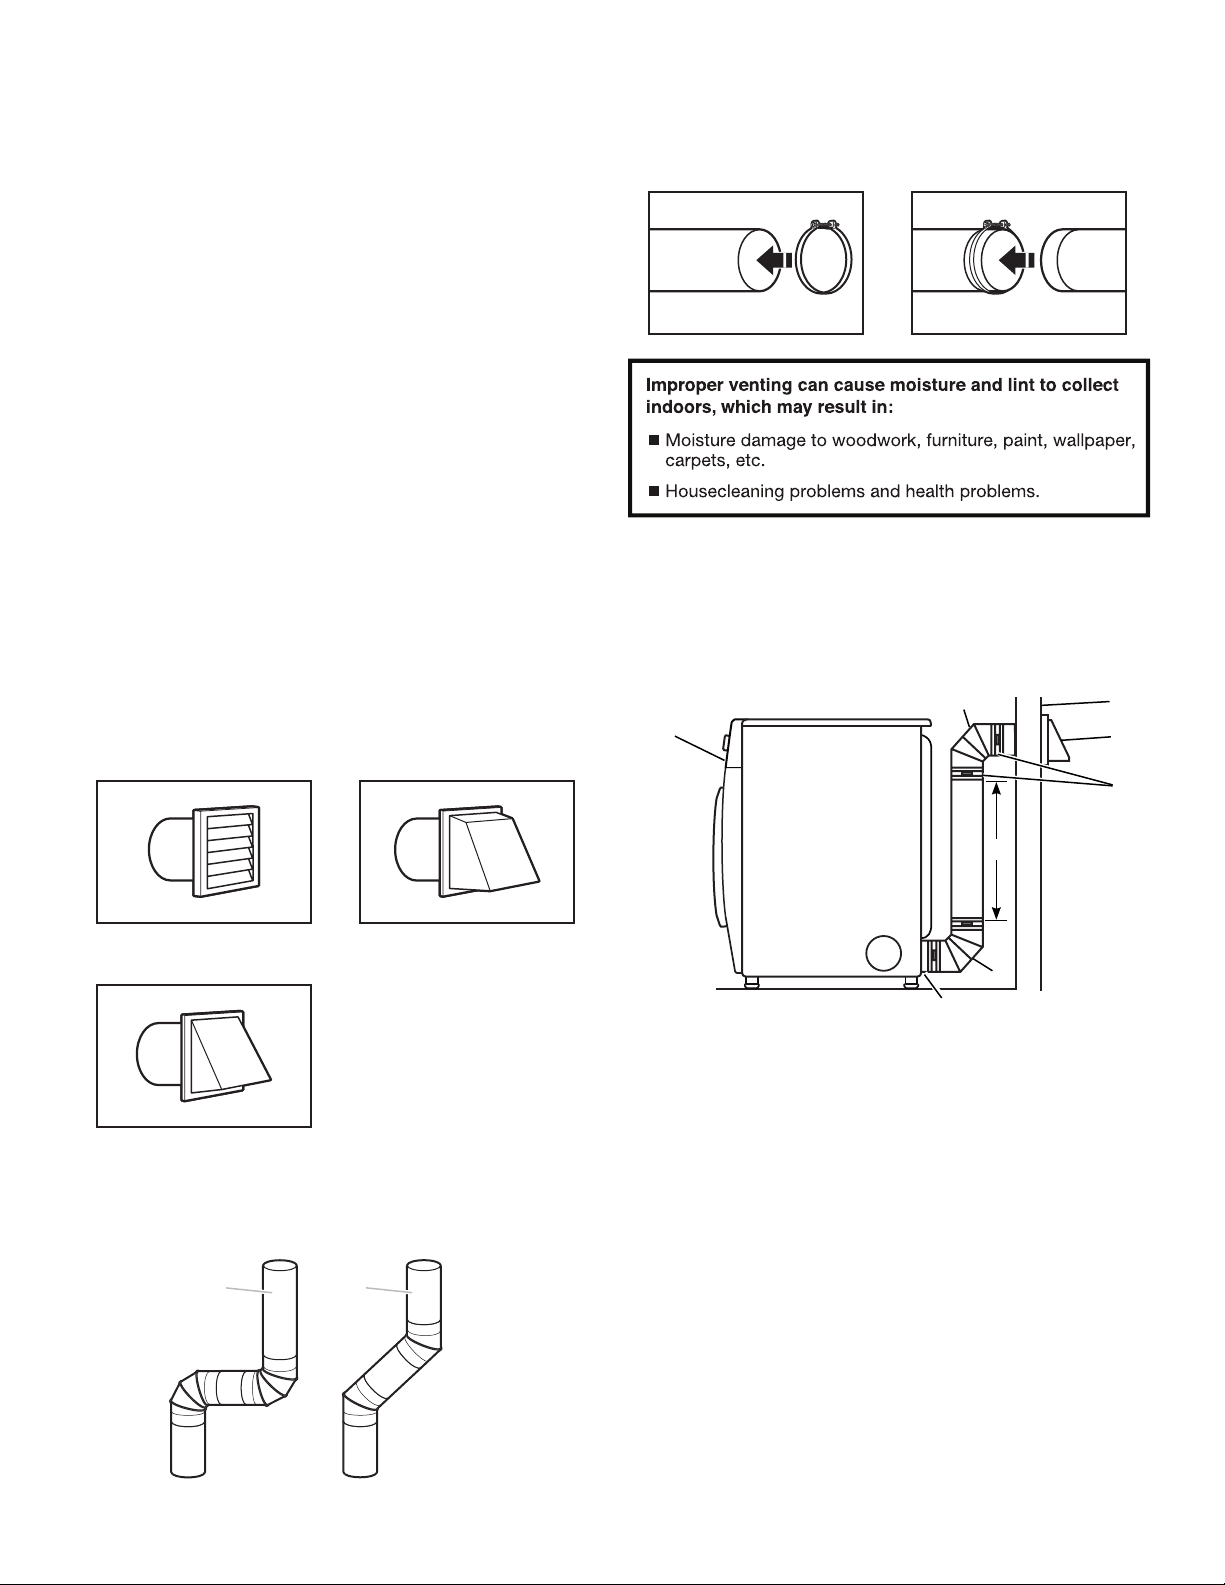
Rigid metal vent:
Recommended for best drying performance and to avoid ■
crushing and kinking.
Flexible metal vent: (Acceptable only if accessible to clean)
Must be fully extended and supported in nal dryer location. ■
Remove excess to avoid sagging and kinking that may result ■
in reduced airow and poor performance.
Do not install in enclosed walls, ceilings, or oors. ■
The total length should not exceed 7 ■
The length of exible metal vent used must be included in ■
the overall vent system design as shown in the “Vent System
Chart”.
3
/4 ft. (2.4 m).
NOTE: If using an existing vent system, clean lint from entire
length of the system and make sure exhaust hood is not
plugged with lint. Replace plastic or metal foil vents with rigid
metal or exible metal vents. Review “Vent System Chart” and
if necessary, modify existing vent system to achieve best drying
performance.
Exhaust hoods:
An exhaust hood should cap the vent to keep rodents and ■
insects from entering the home.
Must be at least 12" (305 mm) from ground or any object ■
that may obstruct exhaust (such as owers, rocks, bushes,
or snow).
Do not use an exhaust hood with a magnetic latch. ■
Recommended Styles:
Clamps:
Use clamps to seal all joints. ■
Exhaust vent must not be connected or secured with screws ■
or other fastening devices that extend into interior of duct
and catch lint. Do not use duct tape.
Plan Vent System
Choose your exhaust installation type
Recommended exhaust installation:
B
A
F
C
D
E
Louvered Hood
Acceptable Style:
Angled Hood
Elbows:
45° elbows provide better airow than 90° elbows. ■
Good
Better
Box Hood
A. Dryer
B Elbow
C. Wall
D. Exhaust hood
E. Clamps
G
B
H
F. Rigid metal or
exible metal vent
G. Vent length
necessary to
connect elbows
H. Exhaust outlet
13
Page 14
12" min.
(305 mm)
12" min.
(305 mm)
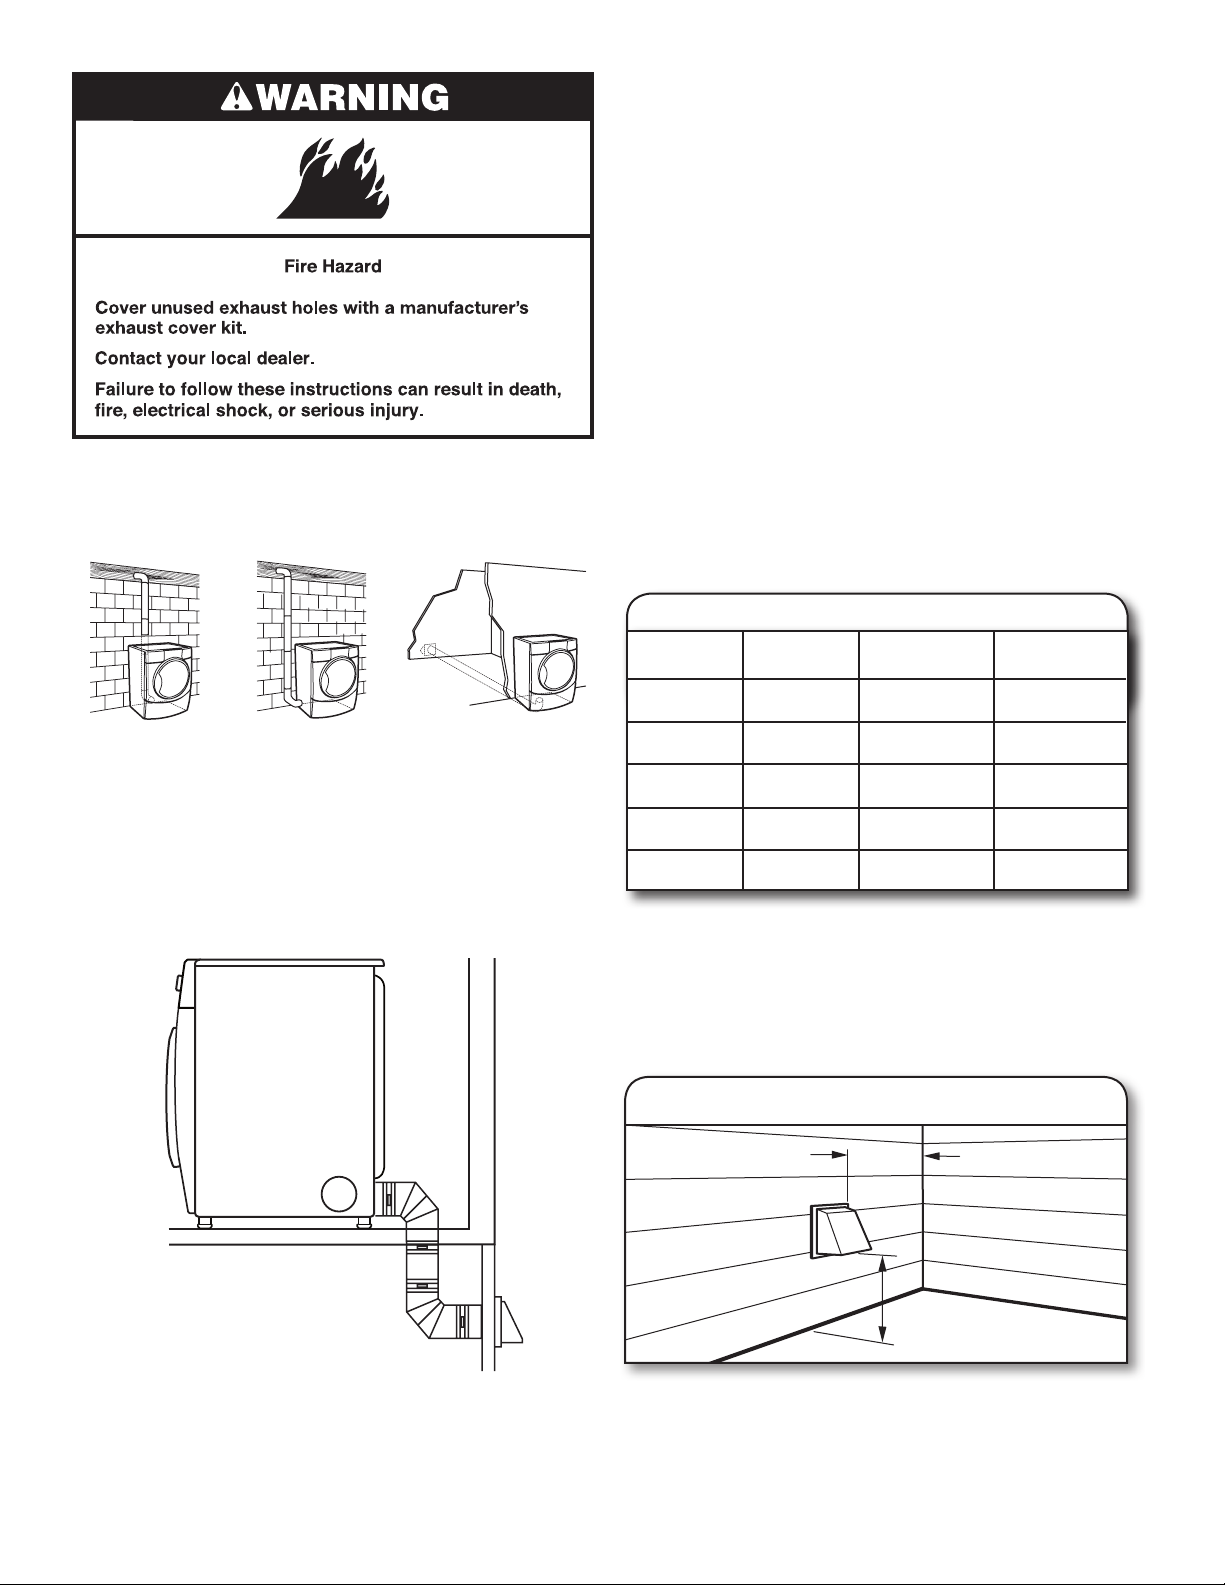
Optional exhaust installations:
This dryer can be converted to exhaust out the right side, left
side, or through the bottom. If you prefer, you may contact your
local dealer to have the dryer converted.
Determine vent path:
Select route that will provide straightest and most direct ■
path outdoors.
Plan installation to use fewest number of elbows and turns. ■
When using elbows or making turns, allow as much room ■
as possible.
Bend vent gradually to avoid kinking. ■
Use as few 90° turns as possible. ■
Determine vent length and elbows needed for best
drying performance:
Use the following “Vent System Chart” to determine type of ■
vent material and hood combinations acceptable to use.
NOTE: Do not use vent runs longer than those specied
in “Vent System Chart”.
Exhaust systems longer than those specied will:
Shorten life of dryer. ■
Reduce performance, resulting in longer drying times ■
and increased energy usage.
The “Vent System Chart” provides venting requirements that will
help achieve best drying performance.
Vent System Chart
Number of
90° elbows
Type
of vent
Box/louvered
hoods
Angled
hoods
A B C
A. Standard rear offset exhaust installation
B. Left or right side exhaust installation
C. Bottom exhaust installation
Special provisions for mobile homes:
Exhaust vent must be securely fastened to a noncombustible
portion of mobile home and must not terminate beneath the
mobile home. Terminate exhaust vent outside.
0
1
2
3
4
NOTE: Side and bottom exhaust installations have a 90° turn
inside the dryer. To determine maximum exhaust length, add
one 90° turn to the chart.
Rigid metal
Rigid metal
Rigid metal
Rigid metal
Rigid metal
64 ft. (20 m)
54 ft. (16.5 m)
44 ft. (13.4 m)
35 ft. (10.7 m)
27 ft. (8.2 m)
58 ft. (17.7 m)
48 ft. (14.6 m)
38 ft. (11.6 m)
29 ft. (8.8 m)
21 ft. (6.4 m)
Install Vent System
1. Install exhaust hood
14
Install exhaust hood and use caulking compound to seal
exterior wall opening around exhaust hood.
Page 15
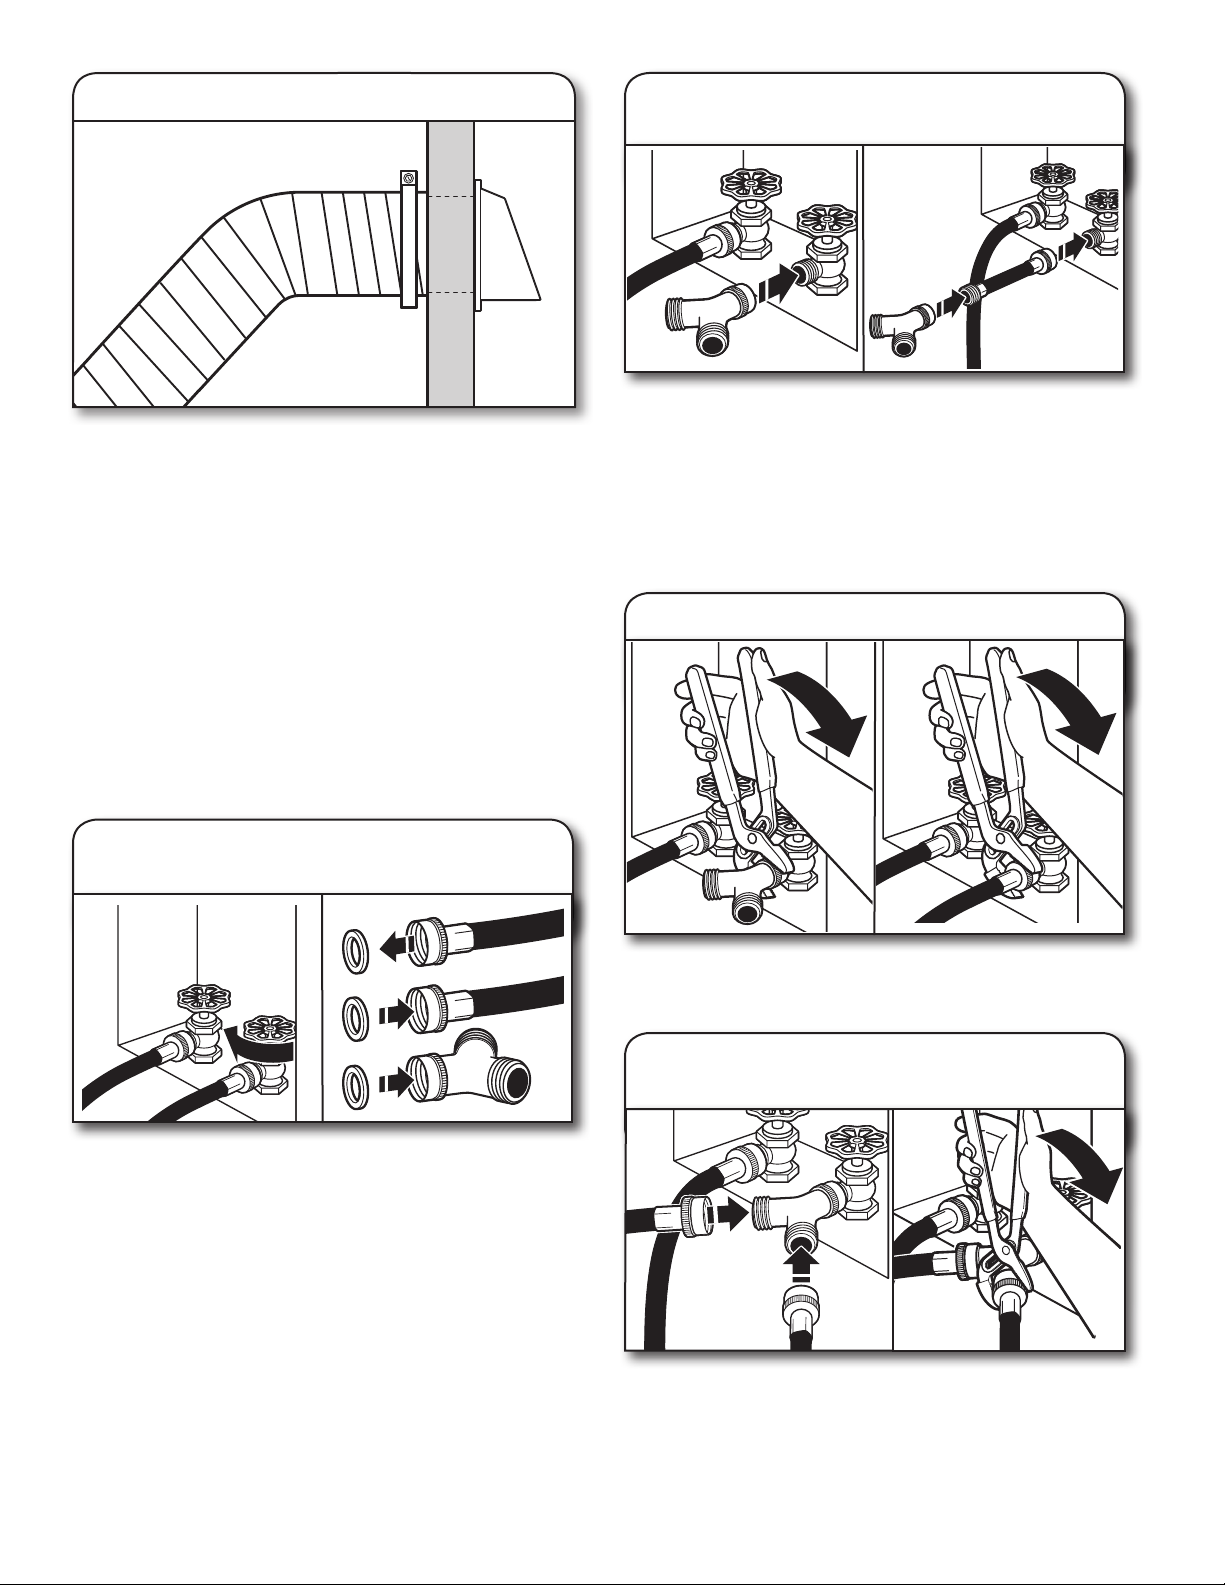
2. Connect vent to exhaust hood
2. Attach short hose and
“Y” connector
Vent must t over the exhaust hood. Secure vent to exhaust
hood with 4" (102 mm) clamp. Run vent to dryer location using
straightest path possible. Avoid 90° turns. Use clamps to seal
all joints. Do not use duct tape, screws, or other fastening
devices that extend into interior of vent to secure vent,
because they can catch lint.
CONNECT INLET HOSE
The dryer must be connected to the cold water faucet using the
new inlet hoses. Do not use old hoses.
NOTE: Replace inlet hoses after 5 years of use to reduce the risk
of hose failure. Record hose installation or replacement dates on
the hoses for future reference.
Periodically inspect and replace hoses if bulges, kinks, cuts,
wear, or leaks are found.
1. Turn cold water off, remove hose,
and replace rubber washer
A
If space permits, attach the female end of the “Y” connector
to the cold water faucet. See gure A.
If “Y” connector cannot be attached directly to the cold water
faucet, the short hose must be used. See gure B. Attach
short hose to cold water faucet. Screw on coupling by hand
until it is seated on faucet. Then attach “Y” connector to male
end of the short hose. Screw on coupling by hand until it is
seated on connector.
B
3. Tighten couplings
Turn cold water faucet off and remove washer inlet hose.
Check and see if rubber washer is in the “Y” connector.
Remove old rubber washer from inlet hose and replace with
new rubber washer provided.
Using pliers, tighten the couplings with additional two-thirds turn.
NOTE: Do not overtighten. Damage to the coupling can result.
4. Attach long hose to “Y”
connector and tighten couplings
One end of the long hose has a wire mesh strainer inside the
coupling. Attach this end to the “Y” connector. Attach washer
cold inlet hose to other side of “Y” connector. Screw on
coupling by hand until it is seated on connector. Using pliers,
tighten the couplings an additional two-thirds turn.
NOTE: Do not overtighten. Damage to the coupling can result.
15
Page 16
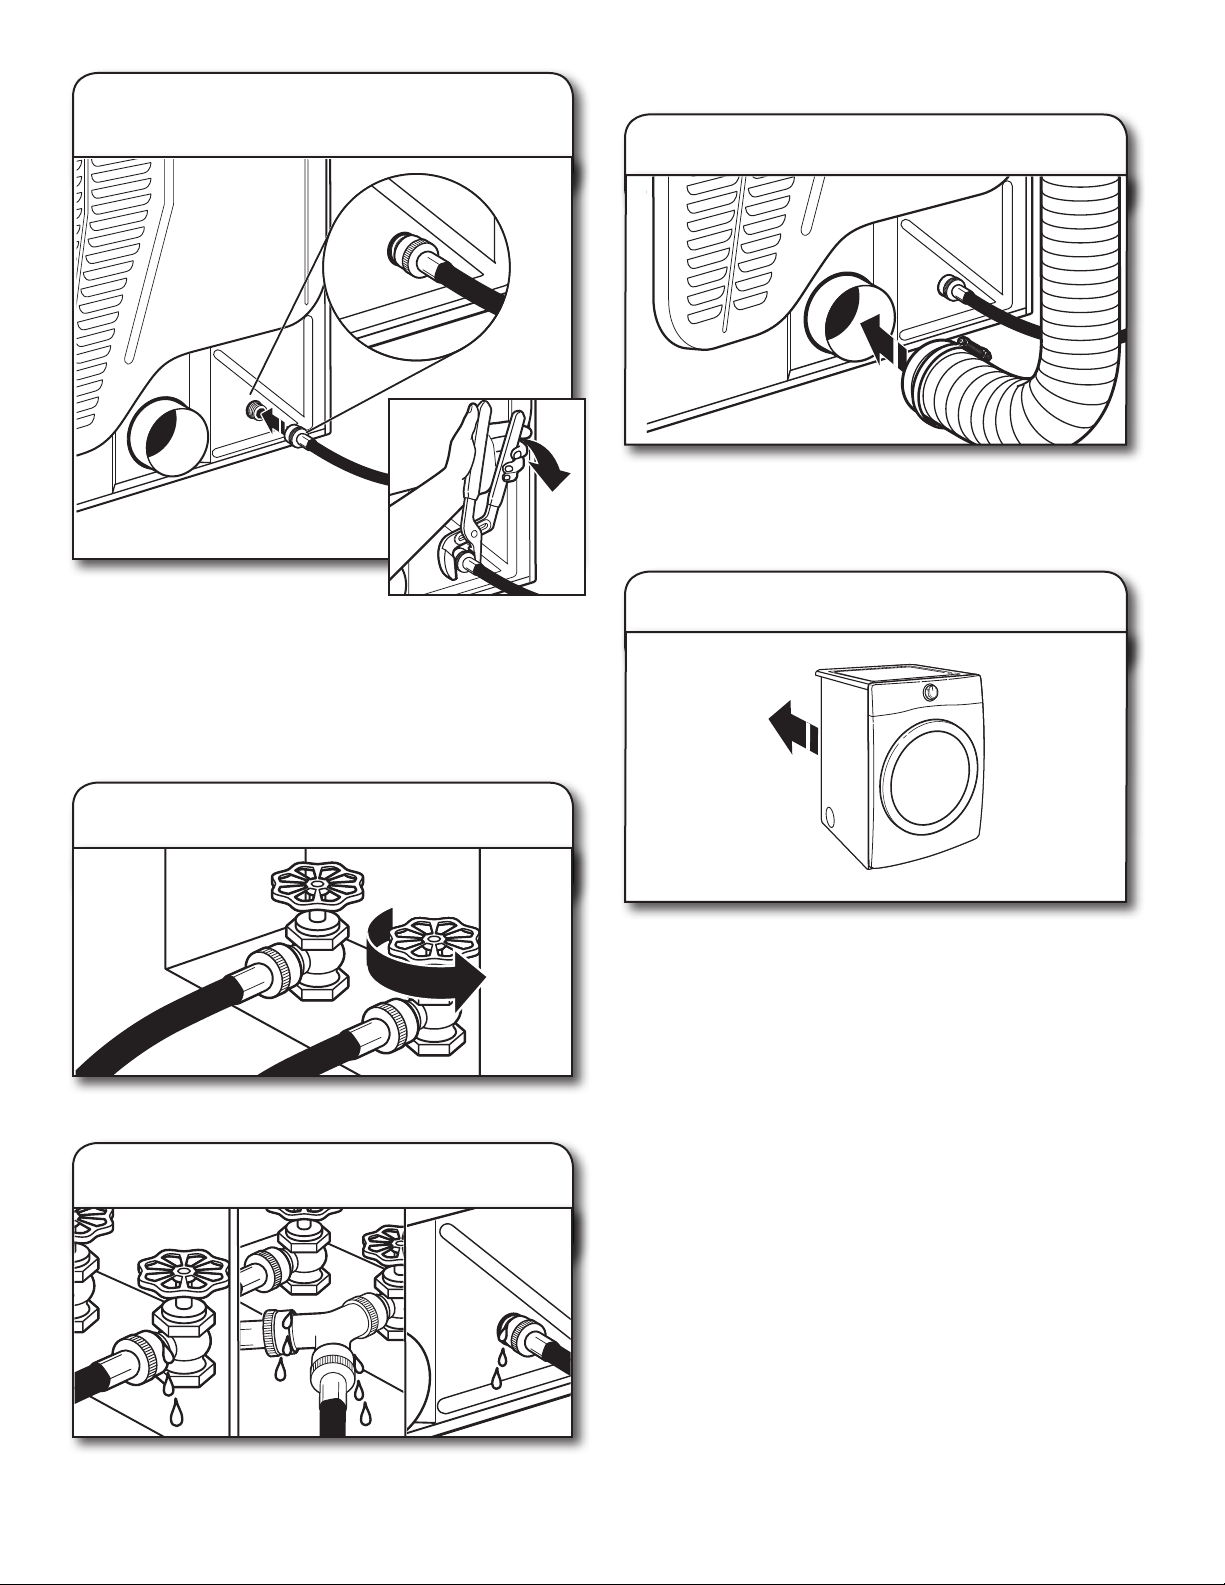
5. Attach long hose to dryer ll valve
and tighten coupling
CONNECT VENT
1. Connect vent to exhaust outlet
Using a 4" (102 mm) clamp, connect vent to exhaust outlet
in dryer. If connecting to existing vent, make sure vent is
clean. Dryer vent must t over dryer exhaust outlet and inside
exhaust hood. Check that vent is secured to exhaust hood
with a 4" (102 mm) clamp.
Remove protective cap from
water inlet valve. Attach other end
of long hose to ll valve at bottom of dryer
back panel. Screw on coupling by hand until it is seated on
ll valve connector. Using pliers, tighten the couplings an
additional two-thirds turn.
NOTE: Do not overtighten. Damage to the coupling
can result.
6. Turn on cold water faucet
Check that the water faucets are turned on.
2. Move dryer to nal location
Move dryer to nal location, taking care not to crush or
kink vent.
After dryer is in place, remove corner posts and cardboard
from under dryer.
7. Check for leaks
Check for leaks around “Y” connector, faucet, and hoses.
16
Page 17
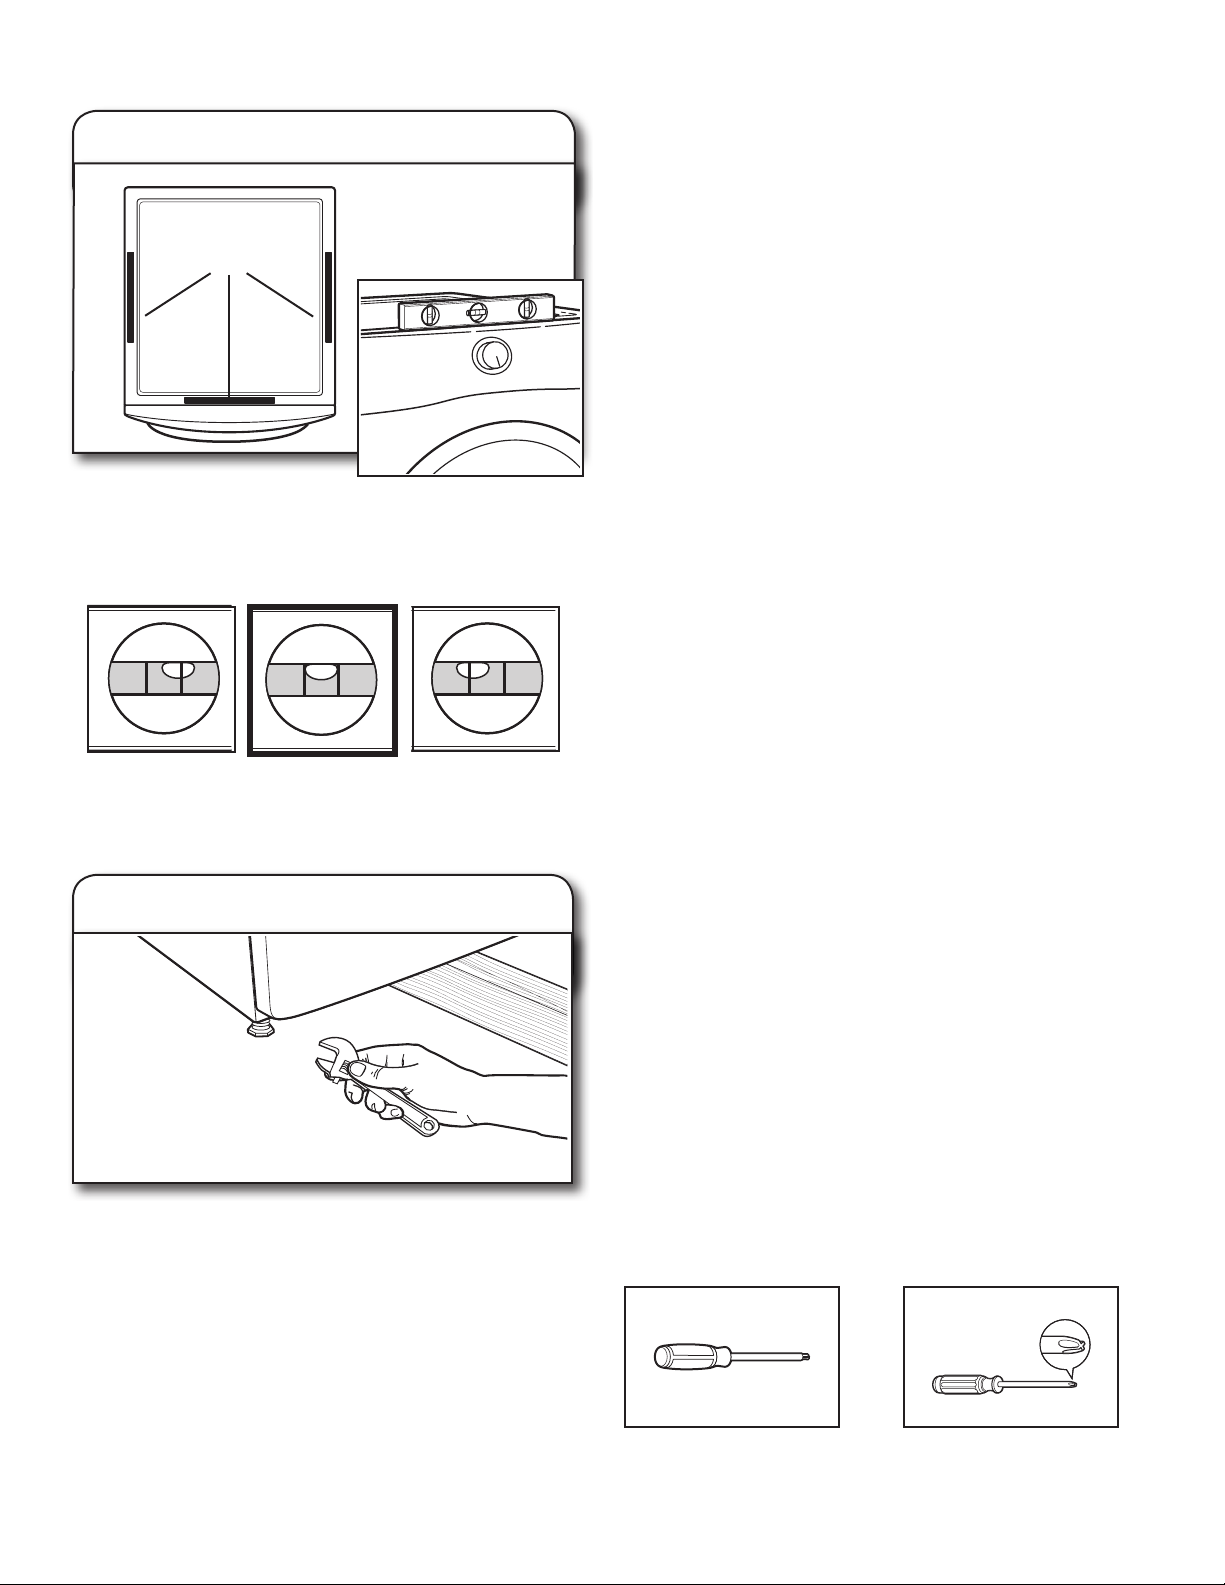
LEVEL DRYER
1. Level dryer
Place
level here
Check levelness of dryer from
side to side. Repeat from front to back.
NOTE: The dryer must be level for the moisture sensing system
to operate correctly.
Not Level LEVEL Not Level
2. Adjust leveling legs
COMPLETE INSTALLATION
CHECKLIST
Check that all parts are now installed. If there is an extra
q
part, go back through steps to see what was skipped.
Check that you have all of your tools.
q
Dispose of/recycle all packaging materials.
q
Be sure the water faucets are on.
q
Check for leaks around “Y” connector, faucet, and hoses.
q
Check dryer’s nal location. Be sure vent is not crushed
q
or kinked.
Check that dryer is level. See “Level Dryer”.
q
Remove lm on console and any tape remaining on dryer.
q
Wipe dryer drum interior thoroughly with a damp cloth to
q
remove any dust.
Read “Dryer Use” in your “Use and Care Guide”.
q
For power supply cord installation, plug into a grounded
q
outlet. For direct wire installation, turn on Power.
If you live in a hard water area, use of a water softener is
q
recommended to control the buildup of scale through the
water system in the dryer. Over time, the buildup of lime
scale may clog different parts of the water system, which
will reduce product performance. Excessive scale buildup
may lead to the need for certain part replacement or repair.
Select a Time Dry heated cycle, and start dryer. Do not
q
select Air Only Temperature setting.
If dryer will not start, check the following:
•Controlsaresetinarunningor“On”position.
•Startbuttonhasbeenpushedrmly.
•Dryerispluggedintoanoutletand/orelectrical
supply.
•Householdfuseisintactandtight,orcircuitbreaker
has not tripped.
•Dryerdoorisclosed.
This dryer automatically runs an installation diagnostic routine
at the start of its rst cycle.
NOTE: You may notice an odor when dryer is rst heated.
This odor is common when heating element is rst used.
The odor will go away.
If dryer is not level, prop up using a wood block, use wrench
to adjust legs up or down, and check again for levelness.
Once dryer is level, make sure all four legs are snug against
the oor and dryer does not rock.
DOOR REVERSAL (OPTIONAL)
The following instructions are for models with a round-shaped
door.
IMPORTANT: For models with a square shaped door, an
additional kit is needed. Please contact your retailer, or see
the “Assistance or Service” page in your “Use and Care Guide”.
Tools needed:
Min. 8" long Torx
screwdriver
† ® TORX is a registered trademark of Saturn Fasteners, Inc.
® †
T25
#2 Phillips screwdriver
17
Page 18
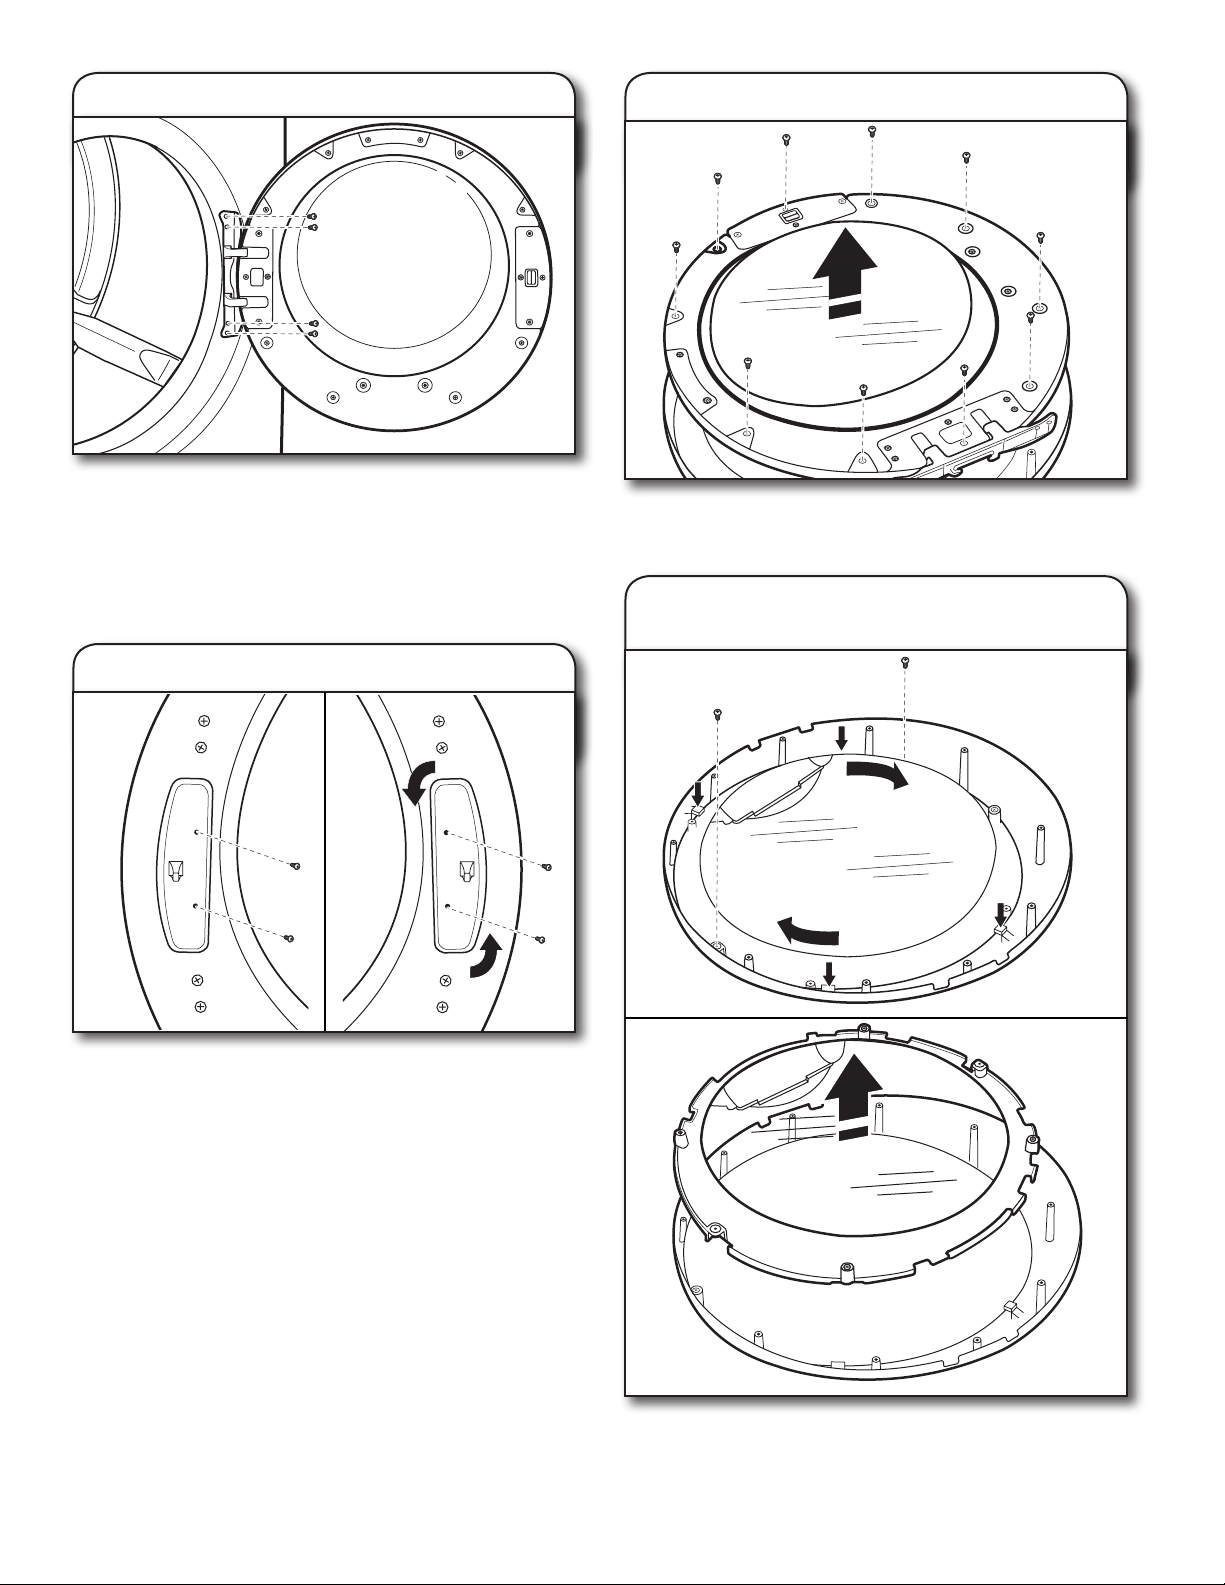
1. Remove door from dryer
IMPORTANT: If the protective lm has not yet been removed
from the dryer, peel the lm from the dryer door before
proceeding.
Using a Torx
the door hinge to the dryer and lift up and out to remove the
door. Place the door on a soft towel or other non-scratch
surface. Reinstall the 4 screws in the holes.
® †
T25 screwdriver, remove the 4 screws securing
2. Move the door strike
3.
Remove inner door from outer door
Position the door with the inside of the door facing up. Using
a Phillips screwdriver, remove the 10 screws securing the inner
door to the outer door. Lift off the inner door and set aside.
4. Remove outer window assembly
from trim ring
Using a Torx®† T25 screwdriver, remove the 2 screws securing
the door strike to the door frame of the dryer. Rotate the
strike 180° and attach to the opposite side of dryer door
frame, as shown.
† ® TORX is a registered trademark of Saturn Fasteners, Inc.
18
A
B
Using a Phillips screwdriver, remove the 2 screws from the outer
window retainer and rotate the outer window assembly clockwise
until the square notches line up with the 4 tabs on the trim ring
indicated with arrows in the gure A above. Then lift out the outer
window and retainer up and off the trim ring and set aside (B).
Page 19
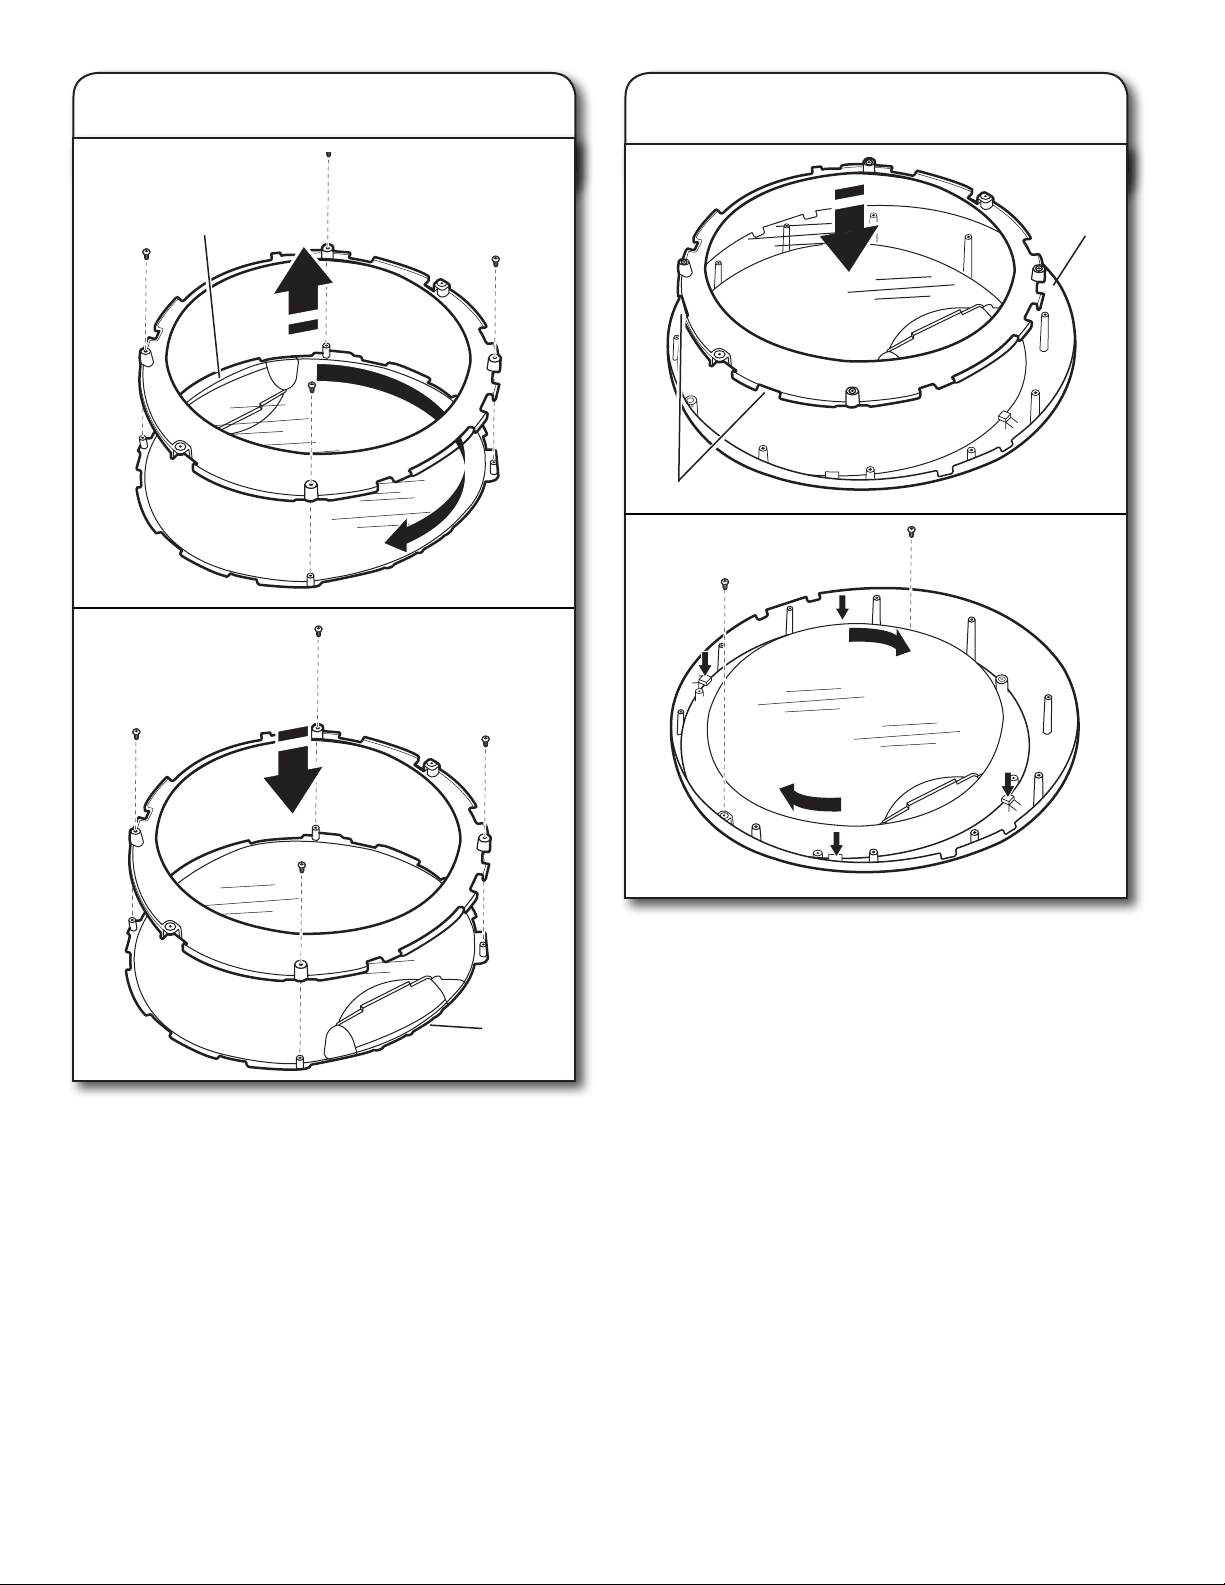
5. Reverse outer window assembly
6. Rotate and reassemble outer window
assembly to trim ring
Handle
Bottom
of door
Notches
A
A
Handle
Using a Phillips screwdriver, remove the 4 screws from the
outer window retainer and lift off the trim ring off the window
(A). Rotate trim ring 180° and secure with the 4 screws
removed earlier (B).
B
With the edge with 2 notches at the top, align the notches on
the outer window assembly with the tabs on the trim ring and
lower into place as shown in gure A.
Rotate the outer window assembly counterclockwise to lock
tabs into place (gure B). Using a Phillips screwdriver, secure
with 2 screws removed earlier.
B
IMPORTANT: Do not overtighten.
19
Page 20
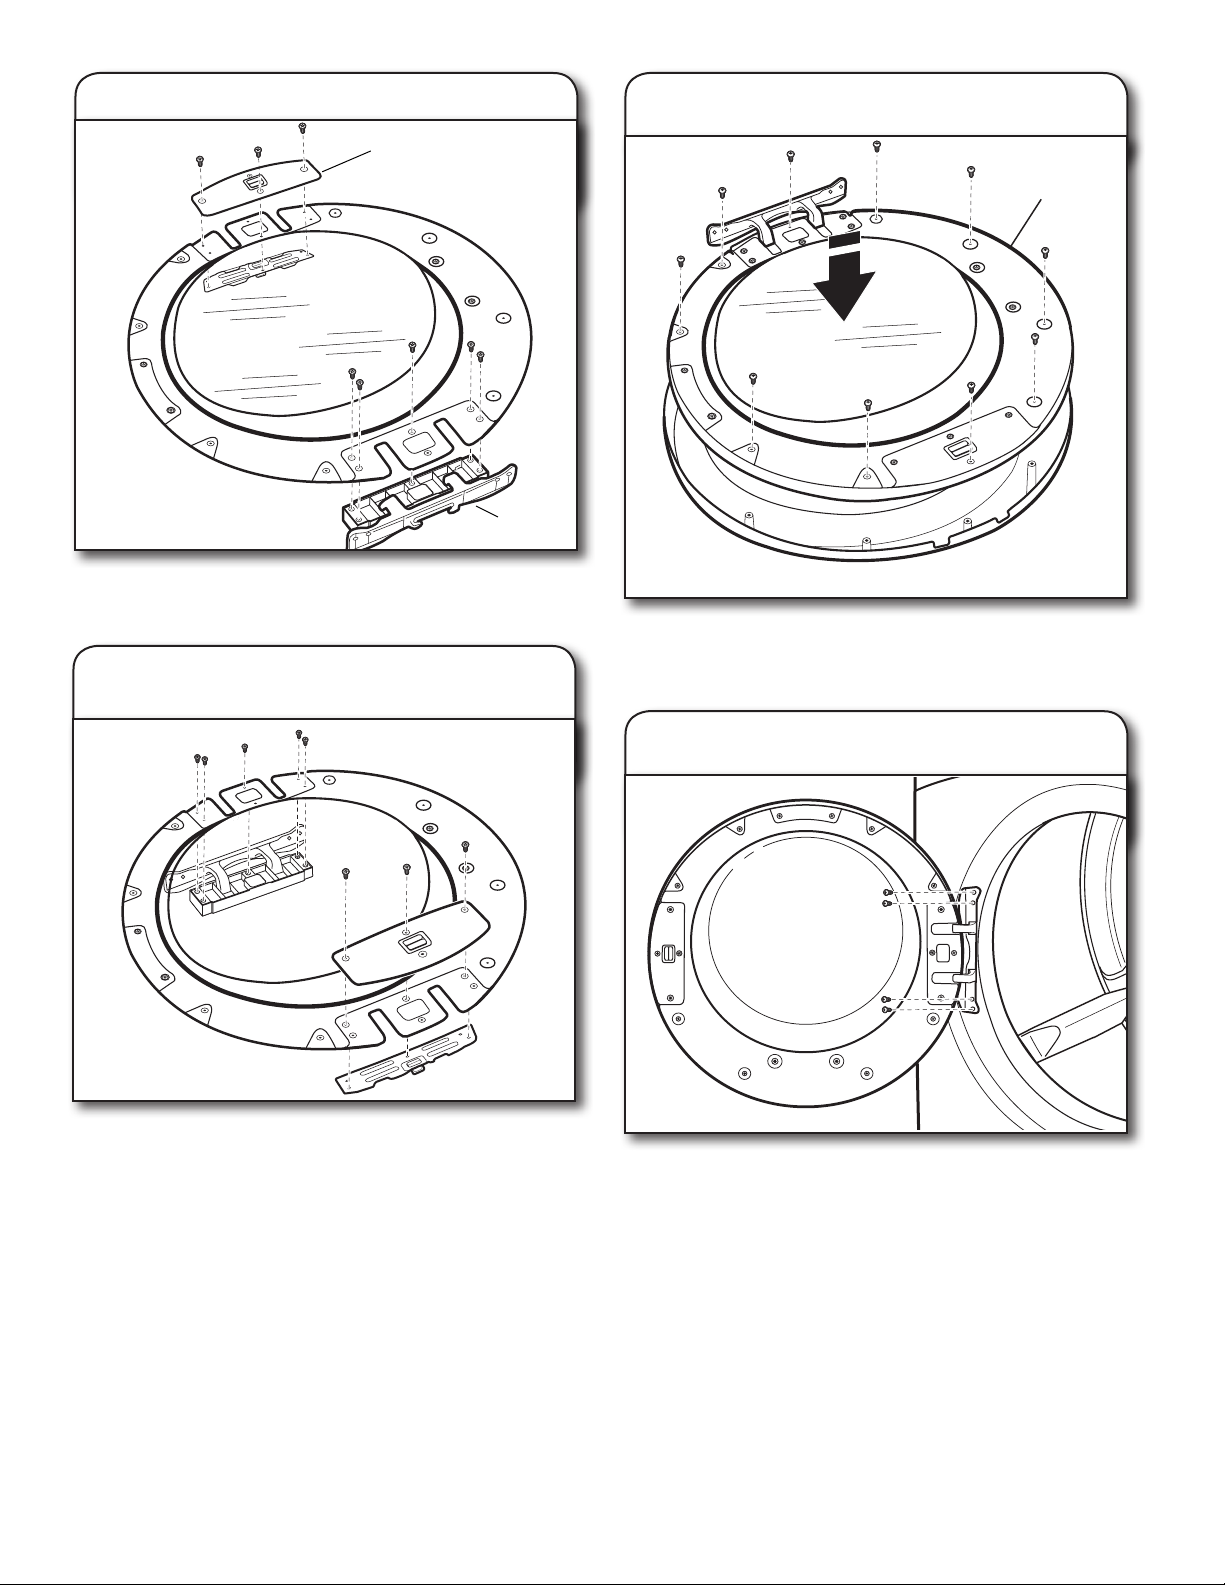
7. Remove hinge and latch
9. Reinstall inner door assembly
Latch
Hinge
Using a Torx
securing the latch plate and latch backing plate and the 5
screws holding the hinge assembly in place.
® †
T25 screwdriver, remove the 3 Torx screws
8. Reinstall hinge and latch on
opposite sides
Bottom
of door
Position the door with the inside of the door facing up.
Reinstall the 10 screws securing the inner door to the
outer door.
Using a Torx
backing plate, and hinge assembly on the opposite sides from
which they were removed.
® †
T25 screwdriver, reinstall the latch plate, latch
10. Reinstall door on dryer
Using a Torx
dryer. Insert the tabs on the hinge into the mounting slot and
slide down to engage the top tab. Secure in place with
the 4 Torx
† ® TORX is a registered trademark of Saturn Fasteners, Inc.
® †
T25 screwdriver, remove the 4 screws on the
® †
T25 screws removed earlier.
W10423118A
W10423119A - SP
© 2011 6/11
All rights reserved Printed in U.S.A.
 Loading...