

Page 1
User Manual
Washer-Dryer WDFB8614AJW
www.whirlpool.com.sg
Page 2
Quick Guide
1
2
A
B
*
THANK YOU FOR BUYING A WHIRLPOOL PRODUCT.
In order to receive a more complete assistance,
please register your appliance on
www.whirlpool.com.sg
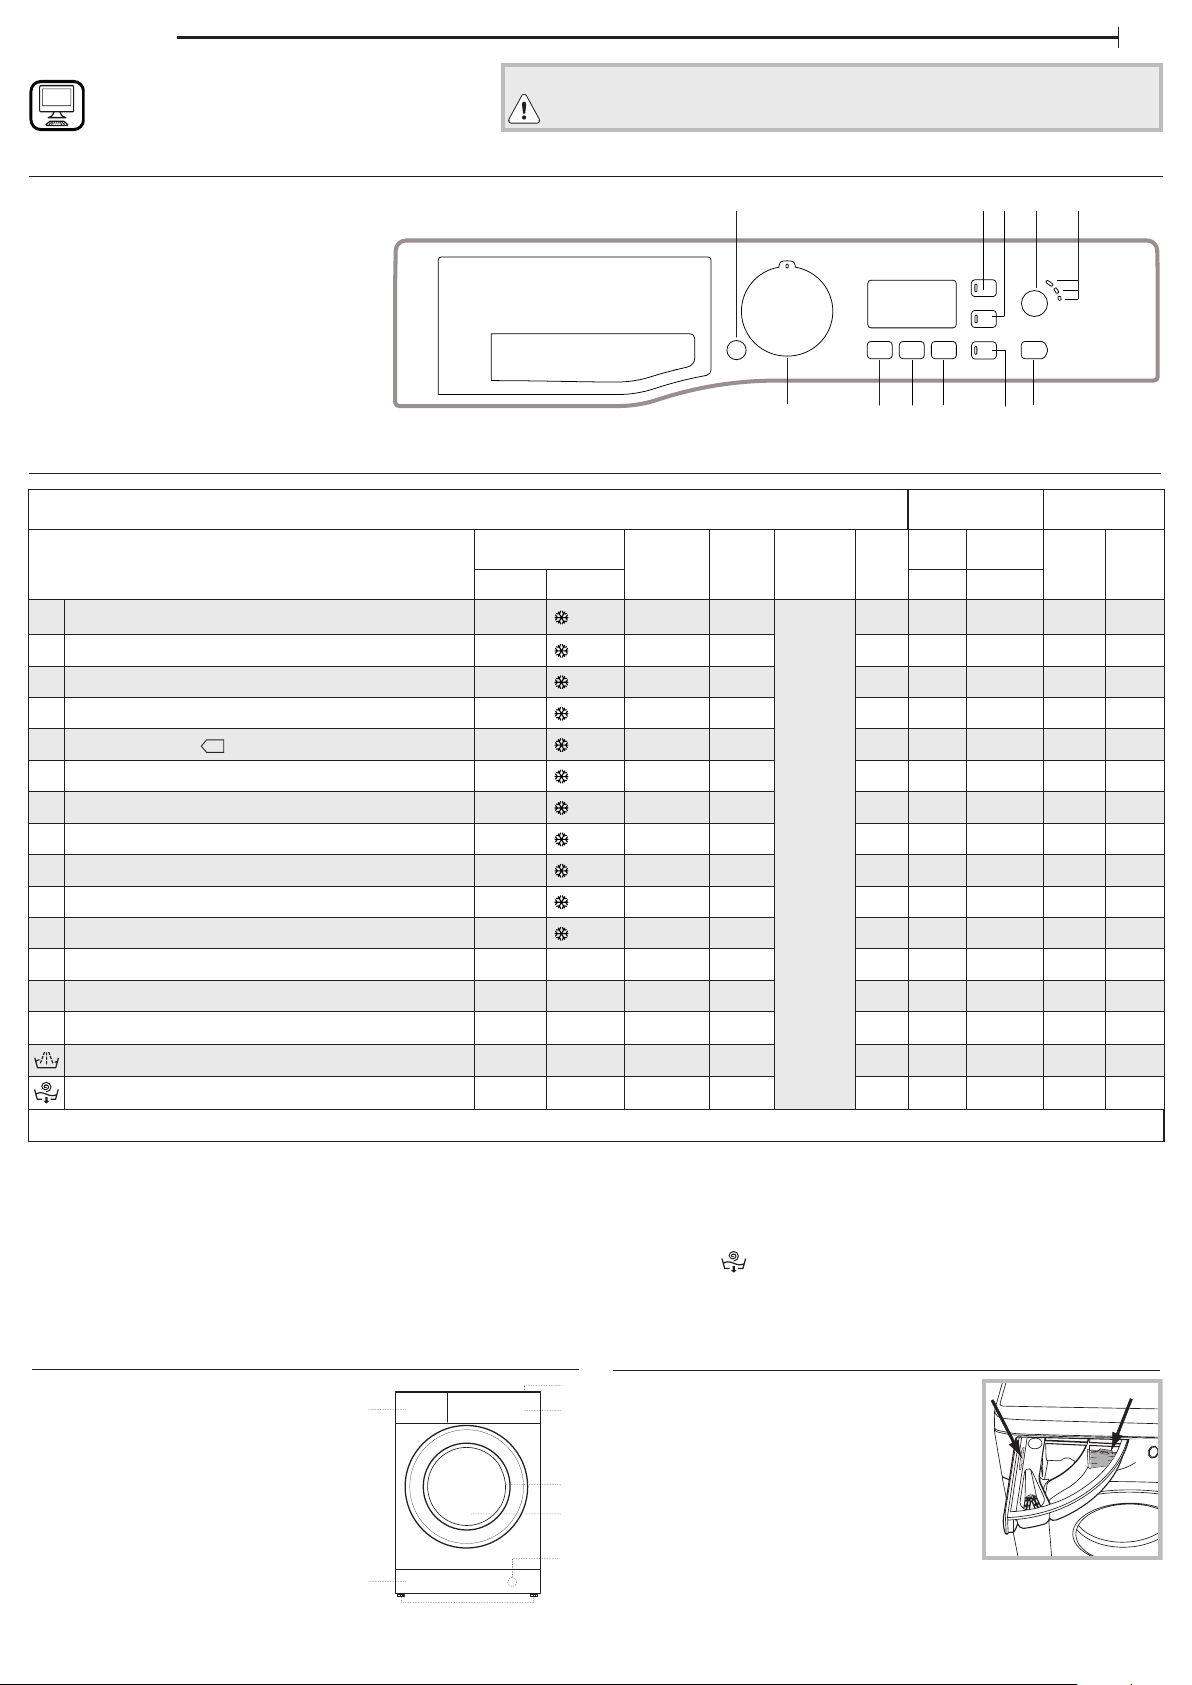
CONTROL PANEL
EN
Before using the appliance carefully read the Health and Safety guide.
Before using the machine, it is imperative that the transport bolts are removed. For more
detailed instructions on how to remove them, see the Installation Guide.
1. ON/OFF button
2. KEY LOCK button and indicator light
3. OPTION button and indicator light
4. CLEANING ACTION button
5. CLEANING ACTION indicator lights
6. START/PAUSE button and indicator light
7. DELAY TIMER button and indicator light
8. DRY button
9. SPIN button
10. TEMPERATURE button
11. WASH CYCLE SELECTOR knob
WASH CYCLE TABLE
Maximum load 8 kg
Power input in o mode 0.5 W / in left-on mode 8 W
Wash cycle
1 Anti-Stain 40 °C
2 Anti-Stain Quick 40 °C
3 Whites 60 °C
4 Cotton (2) 40 °C
5
Eco Cotton (1) 60 °C - 60 °C 1400 8
6 Synthetics (3) 40 °C
7 Anti Allergy 60 °C
8 Wool 40 °C
9 Delicates 30 °C
10 Fast Wash 30’ 30 °C
11 Wash & Dry 45’ 30 °C
Temperature
Default Range
- 40 °C 1400 5
- 40 °C 1200 4,5
- 90 °C 1400 5
- 60 °C 1400 8
- 60 °C 1000 4,5
- 60 °C 1400 5
- 40 °C 800 2
- 30 °C 0 1
- 30 °C 800 3,5 –
- 30 °C 1400 1
12 Drying Cotton – – – 6
13 Drying Synthetics – – – 4
14 Drying Wool – – – 2
Rinse – – 1400 8
Spin+Pump Out * – – 1400 8
Required dosage Optional dosage
The cycle duration indicated on the display or instruction manual is an estimate based on
standard conditions. The actual duration may vary in relation to several factors, such as
the temperature and pressure of the incoming water, ambient temperature, amount of
detergent, load quantity and type, load balancing and any additional options selected.
1) Test programme in compliance with standard EN 50229 (Wash):
This cycle is designed for normally soiled cotton loads and is the most ecient in terms of
both electricity and water consumption; it should be used for garments washable at 60°C or
at 40°C. The actual washing temperature may dier from the indicated value.
Test programme in compliance with standard EN 50229 (Drying): select the “Drying
Cotton” programme and set the drying level to “A4”, for both loads. The rst drying cycle must
be carried out with the nominal load.
Maximum
spin
(r.p.m.)
For all testing institutes:
The programme used for the evaluation of (WDFB8614AJW) under the mandatory Water
Eciency Labelling Scheme (WELS) and the recommended Washing Programme for soiled
clothes is as follows : Eco Cotton 60°C.
2) Long cotton cycle: set wash cycle 4 with a temperature of 40°C.
3) Long synthetics cycle: set wash cycle 6 with a temperature of 40°C.
* By selecting the cycle and excluding the spin cycle, the washer-dryer will drain only.
1
Max.
load
(kg)
11
Duration
(Minutes)
The duration of the wash cycles can be checked on the display.
43
2
DISPLAY
10
9
8
Detergents and
Additives
Wash
Drying
Fabric
softener
1 2
7
5
6
Recommended
detergent
Powder Liquid
–
–
–
–
– – – –
– – – –
– – – –
–
– – – –
–
–
–
–
– –
PRODUCT DESCRIPTION
1. Top
2. Detergent dispenser drawer
3. Control panel
4. Handle
5. Porthole door
6. Drain pump (behind the plinth)
7. Plinth (removable)
8. Adjustable feet (2)
DETERGENT DISPENSER DRAWER
1.
2.
7.
8.
Compartment *:
3.
Do not insert detergent in this compartment.
Compartment 1: Washing detergent (powder
or liquid)
If liquid detergent is used, the removable plastic
4.
partition A (supplied) should be used for proper
dosage.
5.
If powder detergent is used, place the partition
into slot B.
6.
Compartment 2: Additives (fabric softeners, etc.)
The fabric softener must not exceed the “MAX” level.
! Use powder detergent for white cotton garments, for pre-washing, and
for washing at temperatures over 60°C.
! Follow the instructions given on the detergent packaging.
Page 3
WASH CYCLES
Follow the instructions on the symbols of the garment’s wash
care label. The value indicated in the symbol is the maximum
recommended temperature for washing the garment.
Anti-Stain
the programme is suitable to heavily-soiled garments with resistant colours.
It ensures a washing class that is higher than the standard class (A class).
When running the programme, do not mix garments of dierent colours.
We recommend the use of powder detergent. Pre-treatment with special
additives is recommended if there are obstinate stains.
Anti-Stain Quick
this programme is ideal for washing the most dicult daily stains in 1 hour. It is
ideal for mixed fabrics and coloured garments, caring for your clothes as it washes.
If the drying function is selected, a drying cycle automatically activates at
the end of the wash cycle that resembles open-air drying, with the added
advantages of preserving garments from yellowing due to sunlight
exposure and preventing loss of whiteness caused by the possible
presence of dust in the air. Drying cycles can only be selected on a level
basis. Dryness level “A2” recommended.
Whites
use this cycle to wash white clothes. The programme is designed to maintain
the brightness of white clothes over time. Use powder detergent for best
results.
If the drying function is selected, a drying cycle automatically activates at the
end of the wash cycle that resembles open-air drying, with the added
advantages of preserving garments from yellowing due to sunlight exposure
and preventing loss of whiteness caused by the possible presence of dust in
the air. Drying cycles can only be selected on a level basis.
Cotton
Suitable for washing towels, underwear, table cloths, etc. made of
resistant linen and cotton that are moderately to heavily soiled.
Eco Cotton
Suitable for washing moderately soiled cotton garments. At 40°C and
60°C it is the standard cycle for washing cotton garments, and is the most
ecient in terms of combined water and electricity consumption.
Synthetics
Suitable for washing moderately soiled garments made of synthetic bres
(e.g. polyester, polyacrylic, viscose, etc.) or mixed synthetic-cotton bres.
Anti Allergy
use programme to remove major allergens such as pollen, mites, cat’s
and dog’s hair.
Wool - Woolmark Apparel Care - Green:
the wool wash cycle of this machine has been approved by The Woolmark
Company for the washing of wool garments labelled as “hand wash”
provided that the products are washed according to the instructions on
the garment label and those issued by the manufacturer of this washing
machine. (M1318)
Delicates
use programme to wash very delicate garments having strasses or
sequins.
We recommend turning the garments inside out before washing and
placing small items into the special bag for washing delicates. Use liquid
detergent on delicate garments for best results.
When selecting an exclusively time-based drying function, a drying cycle
is performed at the end of the wash cycle that is particularly delicate,
thanks to light handling and appropriate temperature control of the
water jet.
The recommended durations are:
1 kg of synthetic garments --> 150 min
1 kg of synthetic and cotton garments --> 180 min
1 kg of cotton garments --> 180 min
The degree of dryness depends on the load and fabric composition.
To wash silk garments and curtains: select the cycle 9 and set the
“Delicate” level from option .
Fast Wash 30’
For washing lightly soiled garments in a short time. Not suitable for wool,
silk and garments to be washed by hand.
Wash & Dry 45’
select programme for washing and drying lightly soiled garments (Cotton
and Synthetic) in a short time. This cycle may be used to wash and dry a
laundry load of up to 1 kg in just 45 minutes. To achieve optimum results,
use liquid detergent and pre-treat cus, collars and stains.
Drying Cotton
To dry cotton garments.
Drying Synthetics
To dry synthetics garments.
Drying Wool
To dry wool garments.
Rinse
Designed for rinsing and spinning.
Spin + Pump out
Designed for spinning and draining the water.
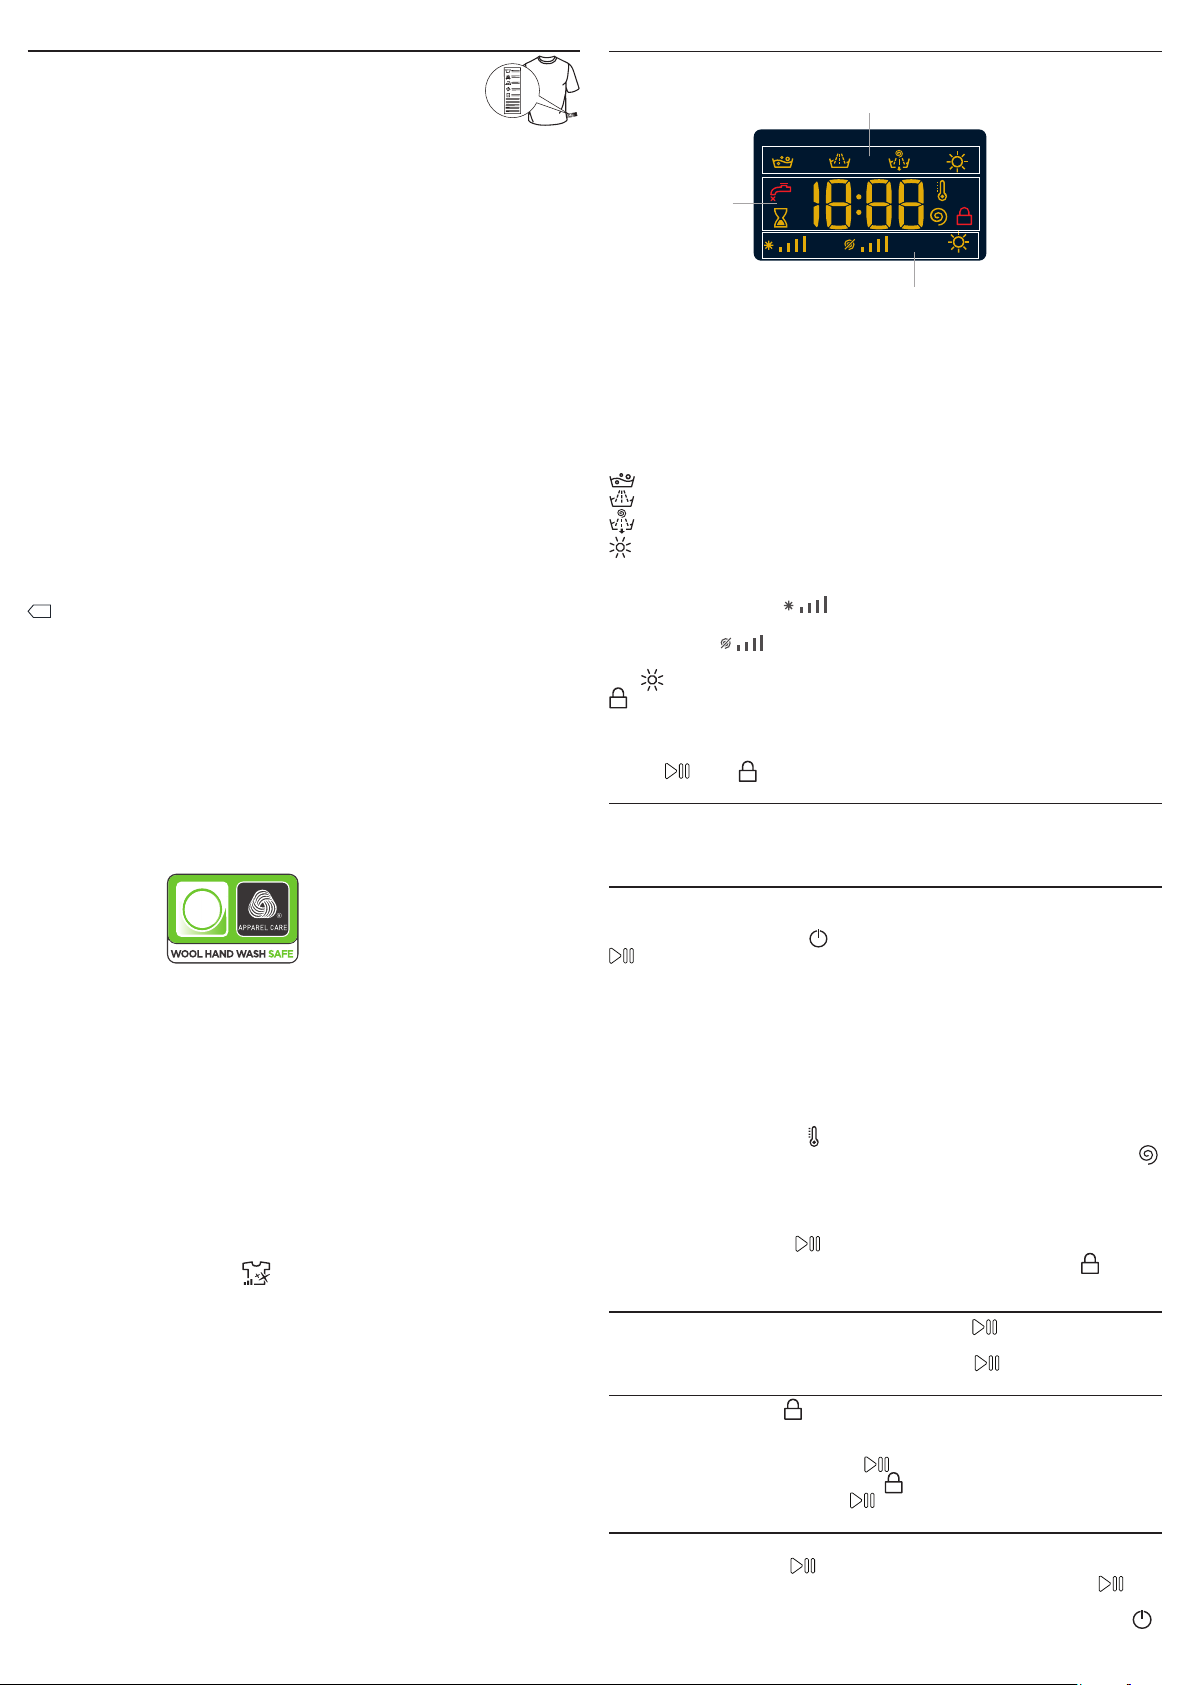
DISPLAY
The display is useful when programming the machine and provides a
great deal of information.
B
A
C
The duration of the available wash cycles and the remaining time of a
running cycle appear in section A; if the DELAY TIMER option has been
set, the countdown to the start of the selected wash cycle will appear.
Moreover, pressing the relative button allows for visualising the maximum
values for the temperature, spin speed or type of drying relative to the
selected programme or the most recently selected ones, if compatible
with the selected programme.
The “wash cycle phases” corresponding to the selected wash cycle and the
“wash cycle phase” of the running wash cycle appear in section B:
Main wash
Rinse
Spin/Pump out
Drying
The icons corresponding to “temperature”, “spin” and “drying” (working
from the left) are displayed in section C.
The “temperature” bars indicate the maximum temperature level
which may be selected for the set cycle.
The “spin” bars indicate the maximum spin level which may be
selected for the set cycle.
The symbol lights up while the drying settings are being adjusted.
Locked door indicator
When lit, the symbol indicates that the door is locked. To prevent any
damage, wait until the symbol turns o before opening the door.
To open the door while a cycle is in progress, press the START/PAUSE
button ; if the symbol is o, the door can be opened.
FIRSTTIME USE
Once the appliance has been installed, and before it is used for the rst
time, run a wash cycle with detergent and no laundry, by setting the
“Auto-Clean” cycle.
DAILY USE
Prepare the laundry by following the suggestions appearing under the
“TIPS AND SUGGESTIONS” section.
- Press the ON/OFF button ; the indicator light relative to START/PAUSE
will ash slowly green.
- Open the door. Load the laundry while making sure not to exceed the
maximum load quantity indicated in the wash cycle table.
- Pull out the detergent dispenser drawer and pour the detergent into the
relevant compartments, as described in the “DETERGENT DISPENSER
DRAWER” section.
- Close the door.
- The machine automatically displays the maximum temperature and spin
speed values set for the selected cycle, or the most recently-used settings
if they are compatible with the selected cycle. The temperature can be
decreased by pressing the button, until the cold wash “OFF” setting is
reached. The spin speed may be progressively reduced by pressing the
button, until it is completely excluded (the “OFF” setting). If these buttons
are pressed again, the maximum values are restored.
- Select the desired wash cycle.
- Select the desired options.
- Press the START/PAUSE button to start the wash cycle; the relative
indicator light will light up steady green and the door will lock ( symbol
on).
PAUSING A CYCLE
To pause the wash cycle, press the START/PAUSE button again; the
indicator light will ash amber. To start the wash cycle from the point at
which it was interrupted, press the START/PAUSE button again.
OPENING THE DOOR, IF NECESSARY
Once a cycle starts, the symbol turns on to signal that the door cannot
be opened. While a wash cycle is running, the door remains locked. To
open the door while a cycle is under way, for example, to add or remove
garments, press the START/PAUSE button to pause the cycle; the
indicator light will ash amber. If the symbol is not lit, the door may be
opened. Press the START/PAUSE button again to continue the cycle.
CHANGING A RUNNING WASH CYCLE
To change a wash cycle while it is in progress, pause the washer-dryer
using the START/PAUSE button (the relative indicator light will ash
amber), then select the desired cycle and press the START/PAUSE
button again.
! To cancel a cycle that has already begun, press and hold the ON/OFF
button. The cycle will be stopped and the machine will switch o.
Page 4
AT THE END OF THE WASH CYCLE
This will be indicated by the word “END” on the display; when the
symbol switches o, the door may be opened. Open the door, unload the
laundry and switch o the machine. If you do not press ON/OFF button,
the washer-dryer will switch o automatically after about a half of an hour.
OPTIONS
- If the selected option is not compatible with the set wash cycle, the
indicator light will ash and the option will not be activated.
- If the selected option is not compatible with a previously selected
one, the indicator light corresponding to the rst function selected will
ash and only the second option will be activated; the indicator light
for the option which has been activated will be illuminated.
Eco
The Eco option saves energy by not heating the water used to wash your
laundry – an advantage both to the environment and to your energy bill.
Instead, intensied wash action and water optimisation ensure great wash
results in the same average time of a standard cycle. For the best washing
results we recommend the usage of a liquid detergent.
By selecting the drying function as well, an automatic drying cycle
automatically activates at the end of the wash cycle – it too allows for
saving energy, thanks to the optimal combination of air temperature and
cycle duration.
Delay Timer
To set a delayed start for the selected cycle, press the corresponding
button repeatedly until the required delay period has been reached.
When this option is enabled, the corresponding indicator light will remain
lit. To remove the delayed start setting, press the button until the text
“OFF” appears on the display.
Temperature
Each wash cycle has a pre-dened temperature. To modify the
temperature, press the button. The value will appear on the display.
Spin
Each wash cycle has a pre-dened spin speed. To modify the spin speed,
press the button. The value will appear on the display.
Dry
The rst time the button is pressed, the machine will automatically
select the maximum drying cycle which is compatible with the selected
wash cycle. Subsequent presses will decrease the drying level and then
the drying time, until the cycle is excluded completely (“OFF”).
Drying may be set as follows:
A- Based on the desired laundry dryness level:
Iron “A1”: suitable for clothes which will need ironing afterwards. the
remaining dampness softens creases, making them easier to remove.
Hanger “A2”: ideal for clothes which do not need to be dried fully.
Cupboard “A3”: suitable for laundry which can be put back in a cupboard
without being ironed.
Extra “A4”: suitable for garments which need to be dried completely,
such as sponges and bathrobes.
B - Based on a set time period: between 30 and 180 minutes.
If your laundry load to be washed and dried is much greater than the
maximum stated load, perform the wash cycle, and when the cycle is
complete, divide the garments into groups and put some of them back in
the drum. At this point, follow the instructions provided for a “Drying
only” cycle. Repeat this procedure for the remainder of the load.
A cooling-down period is always added to the end of each drying cycle.
Dry Only
Use the cycle selector knob to select a drying cycle (12-13-14) in
accordance with the type of fabric. The desired drying level or time may
also be set using the DRY button .
Selecting the cotton drying cycle through the programme selector
knob and pressing the “Eco” button activates an automatic drying cycle
that allows for saving energy, thanks to an optimal combination of air
temperature and cycle duration; the display will visualise the “A2” dryness
level.
Cleaning action
Option makes it possible to optimise washing based on the level of
soil in the fabrics and on desired wash cycle intensity.
Select the wash programme: the cycle will be automatically set to
“Normal” as optimised for garments with an average level of soil (this
setting is not applicable to the “Wool” cycle, which is automatically set to
“Delicate”).
For heavily-soiled garments press button until the “Intensive”
level is reached. This level ensures a high-performance wash due to a
larger quantity of water used in the initial phase of the cycle and due to
increased drum rotation. It is useful when removing the most stubborn
stains.
For lightly-soiled garments or a more delicate treatment of the fabrics,
press button until the “Delicate” level is reached.
The cycle will reduce drum rotation to ensure washing results that are
perfect for delicate garments.
KEY LOCK
To activate the control panel lock, press and hold the “KEY LOCK” button
for approximately 2 seconds. When the “KEY LOCK” symbol is lit, the
control panel is locked (except for the ON/OFF button). This will
prevent accidental modications to wash cycles, especially when children
are at home. To deactivate the control panel lock, press and hold the “KEY
LOCK” button for approximately 2 seconds.
TIPS AND SUGGESTIONS
Divide the laundry according to:
Type of fabric (cotton, mixed bres, synthetics, wool, garments to be
hand-washed). Colour (separate coloured garments from whites, wash
new coloured garments separately). Delicates (small garments – such as
nylon stockings – and items with hooks – such as bras: insert them in a
fabric bag).
Empty the pockets:
Objects such as coins or lighters can damage the washer-dryer and the
drum. Check all buttons.
CARE AND MAINTENANCE
Before performing cleaning and maintenance, switch the washer-dryer o
and disconnect it from the mains power. Do not use ammable liquids to
clean the washer-dryer.
Cutting o the water and electricity supplies
Close the water tap after every wash. This will limit wear on the hydraulic
system inside the washer-dryer and help to prevent leaks.
Unplug the washer-dryer when cleaning it and during all maintenance
work.
Cleaning the washer-dryer
The outer parts and rubber components of the appliance can be cleaned
using a soft cloth soaked in lukewarm soapy water. Do not use solvents
or abrasives.
The washer-dryer has a “Auto-Cleaning” cycle for its internal parts; it
must be run without any load in the drum.
To optimise this cycle, it is possible to use either detergent (10% of the
quantity specied for lightly soiled garments) or special additives to
clean the washer-dryer. We recommend running a cleaning cycle every
40 wash cycles.
To start the programme press button for 5 seconds.
The programme will start automatically and will run for about 70
minutes.
Caring for the door and drum
Always leave the porthole door ajar in order to prevent unpleasant
odours from forming.
LOAD BALANCING SYSTEM
Before every spin cycle, to avoid excessive vibrations before every
spin and to distribute the load in a uniform manner, the drum rotates
continuously at a speed which is slightly greater than the washing
rotation speed. If, after several attempts, the load is not balanced
correctly, the machine spins at a reduced spin speed. If the load is
excessively unbalanced, the washer-dryer performs the distribution
process instead of spinning. To encourage improved load distribution
and balance, we recommend small and large garments are mixed in the
load.
ACCESSORIES
Contact our Technical Assistance Service to check whether the following
accessories are available for this washer-dryer model.
Stacking kit
With this accessory you can secure the tumble dryer to the upper part of
your washer-dryer to save space and facilitate loading and unloading of
the tumble dryer.
TRANSPORT AND HANDLING
Do not lift the washer-dryer by gripping it from the upper section.
Unplug the appliance and close the water tap. Check that the door and
detergent dispenser drawer are tightly closed. Detach the lling hose
from the water tap then detach the drain hose. Empty all the water
remaining in the hoses and secure the latter so that they do not get
damaged during transport. Apply the transport bolts back on. Repeat, in
reverse order, the transport bolt removal procedure described in the
“Installation instructions”.
Page 5
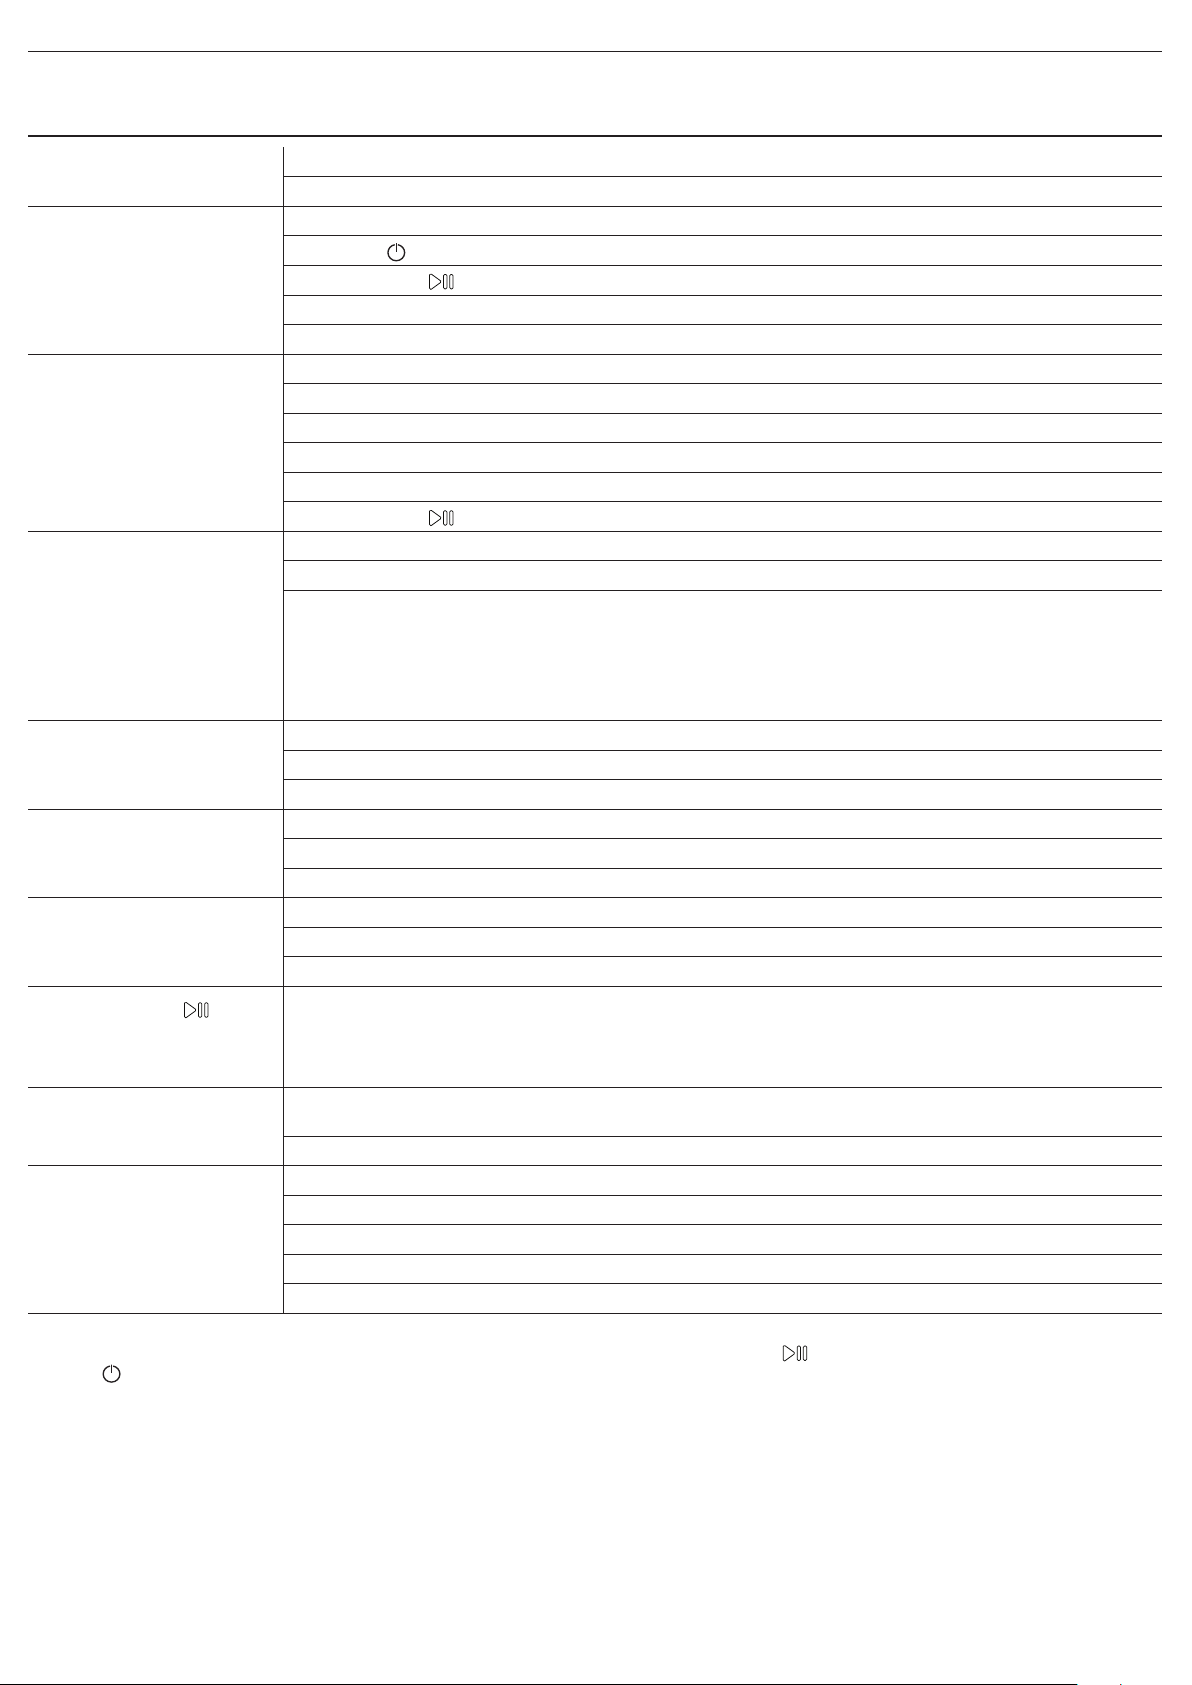
TROUBLESHOOTING
Your washer-dryer could occasionally fail to work. Before contacting the Technical Assistance Service, make sure that the problem cannot be easily
solved using the following list.
Anomalies Possible causes / Solution
The washer-dryer does not
start.
The wash cycle does not start.
The washer-dryer does not ll
with water (“H2O” appears on
the display).
The washer-dryer
continuously loads and
unloads water.
The washer-dryer does not
drain or spin.
The washer-dryer vibrates a
lot during the spin cycle.
The washer-dryer leaks.
The appliance is not plugged into the socket fully, or not enough to make contact.
There is no power in the house.
The washer-dryer door is not closed properly.
The ON/OFF button has not been pressed.
The START/PAUSE button has not been pressed.
The water tap has not been opened.
A delay has been set for the start time.
The water inlet hose is not connected to the tap.
The hose is bent.
The water tap has not been opened.
There is no water supply in the house.
The pressure is too low.
The START/PAUSE button has not been pressed.
The drain hose is not tted between 65 and 100 cm from the oor.
The free end of the hose is immersed in water.
The wall drainage system is not tted with a breather pipe.
If the problem persists even after these checks, turn o the water tap, switch the appliance o and contact the
Technical Assistance Service. If the home is on one of the upper oors of a building, there may be problems relating
to back-siphonage, causing the washer-dryer to ll with water and drain continuously. Special anti-siphon valves
are available in shops and help to prevent this inconvenience.
The cycle does not include drainage: with certain cycles it must be started manually.
The drain hose is bent.
The drainage duct is clogged.
The drum was not unlocked correctly during installation.
The washer-dryer is not level.
The washer-dryer is tucked between furniture cabinets and the wall.
The water inlet hose is not screwed on properly.
The detergent dispenser drawer is obstructed.
The drain hose is not properly attached.
The START/PAUSE
indicator light ash rapidly
and an error code appears on
the display (e.g.: F-01, F-..).
There is too much foam.
The washer-dryer does not
dry.
DEMO MODE: to deactivate this function, switch the washer-dryer OFF. Than press and hold “Start/Pause” button, within 5 seconds press also
“ON/OFF” button and hold both buttons for 2 seconds.
Switch o the machine and unplug it, wait for approximately 1 minute and then switch it back on again.
If the problem persists, contact the Technical Assistance Service.
The detergent is not suitable for machine washing (it should display the text “for washer-dryers” or “hand and
machine wash”, or the like).
Too much detergent was used.
The appliance is not plugged into the socket, or not enough to make contact.
There has been a power failure.
The appliance door is not shut properly.
A Delay Timer has been set.
DRYING is in the OFF position.
Page 6
CLEANING & MAINTENANCE
2
1
For any cleaning and maintenance, switch o and unplug the washing machine.
Do not use ammable uids to clean the washing machine.
CLEANING THE OUTSIDE OF THE WASHING MACHINE
Use a soft damp cloth to clean the outer parts of the washing
machine.
Do not use glass or general purpose cleaners, scouring
powder or similar to clean the control panel – these
substances might damage the printing.
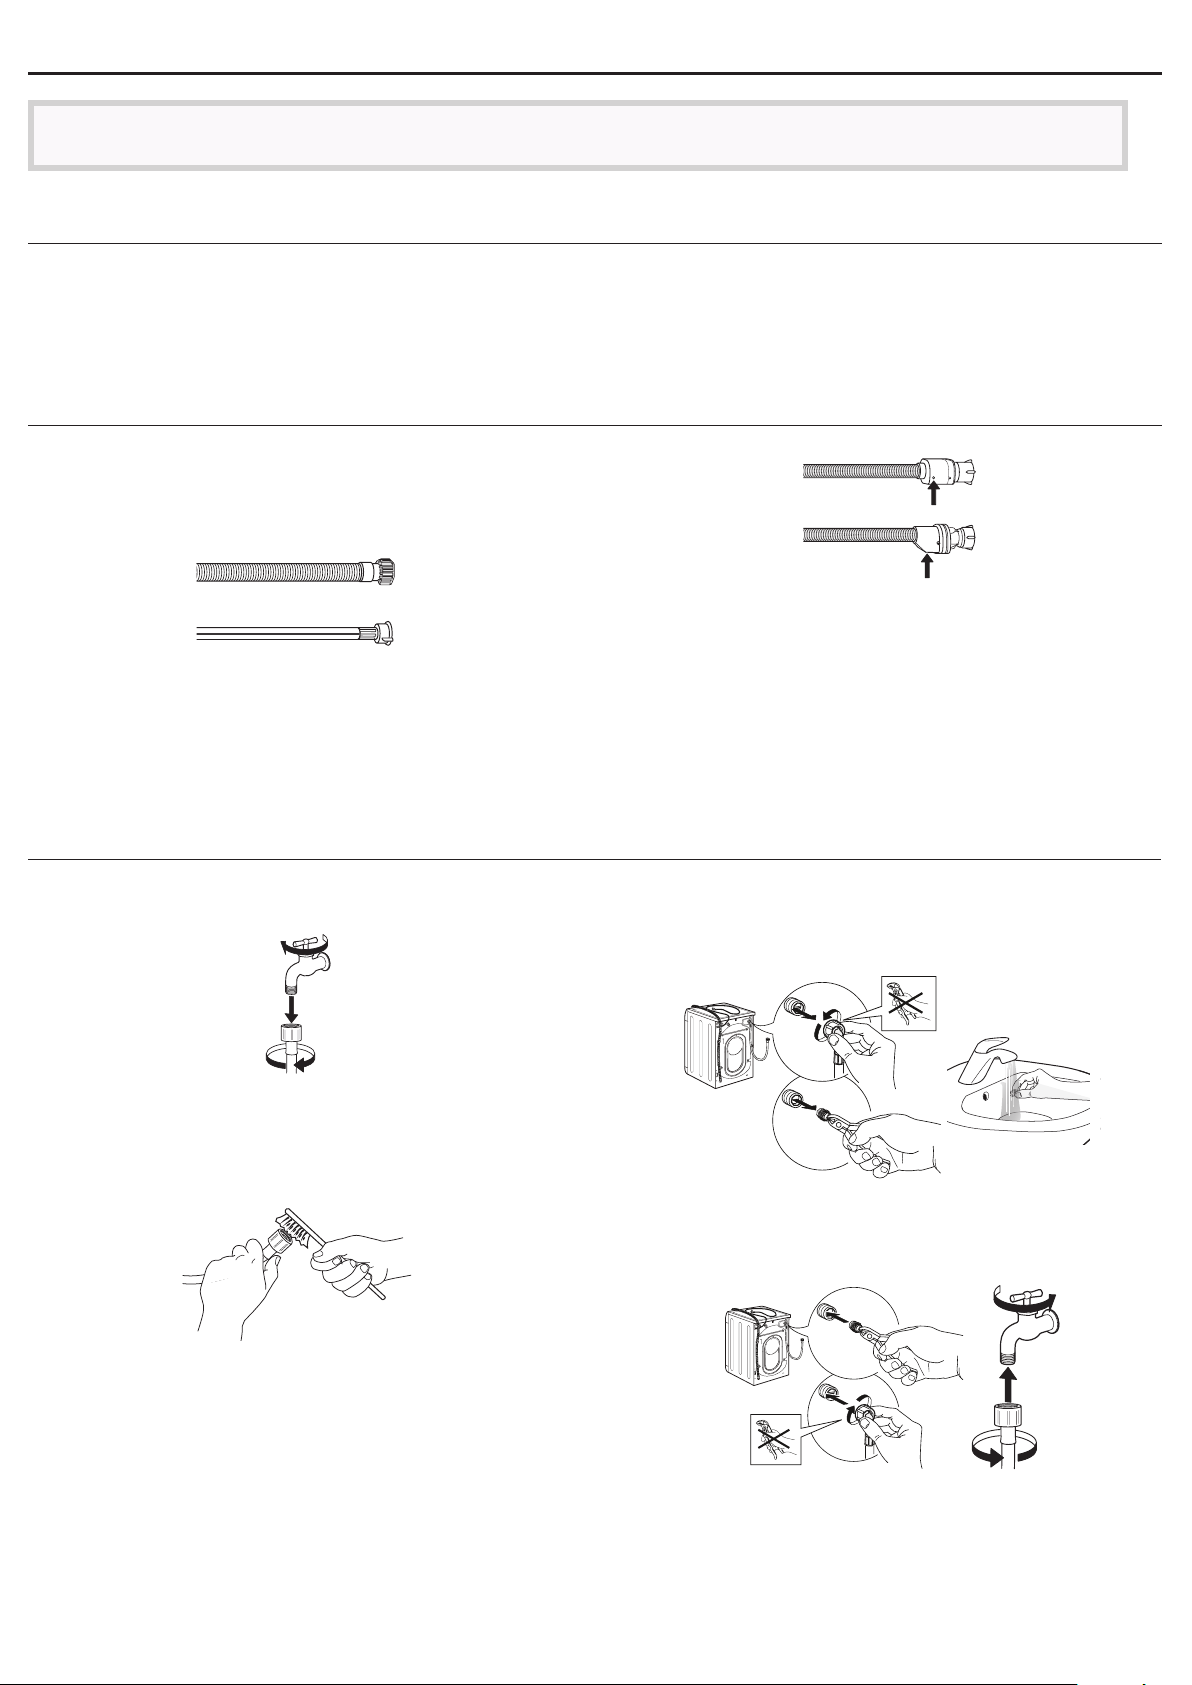
CHECKING THE WATER SUPPLY HOSE
Check the inlet hose regularly for brittleness and cracks. If
damaged, replace it by a new hose available through our
After-Sales Service or your specialist dealer.
Depending on the hose type:
For water stop hoses: check the small safety valve inspection
window (see arrow). If it is red, the water stop function was
triggered, and the hose must be replaced by a new one.
For unscrewing this hose, press the release button (if
If the inlet hose has a transparent coating, periodically check
if the colour intensies locally. If yes, the hose may have a leak
and should be replaced.
available) while unscrewing the hose.
CLEANING THE MESH FILTERS IN THE WATER SUPPLY HOSE
1. Close water tap and unscrew the inlet hose.
1
2
2. Clean the mesh lter at the hose’s end carefully with a
ne brush.
3. Now unscrew the inlet hose on the back of the washing
machine by hand. Pull out the mesh lter from the valve
on the back of the washing machine with pliers and
carefully clean it.
4. Insert the mesh lter again. Connect the inlet hose to
water tap and washing machine again. Do not use a tool
to connect the inlet hose. Open the water tap and check
that all connections are tight.
Page 7
CLEANING THE DETERGENT DISPENSER
1
2
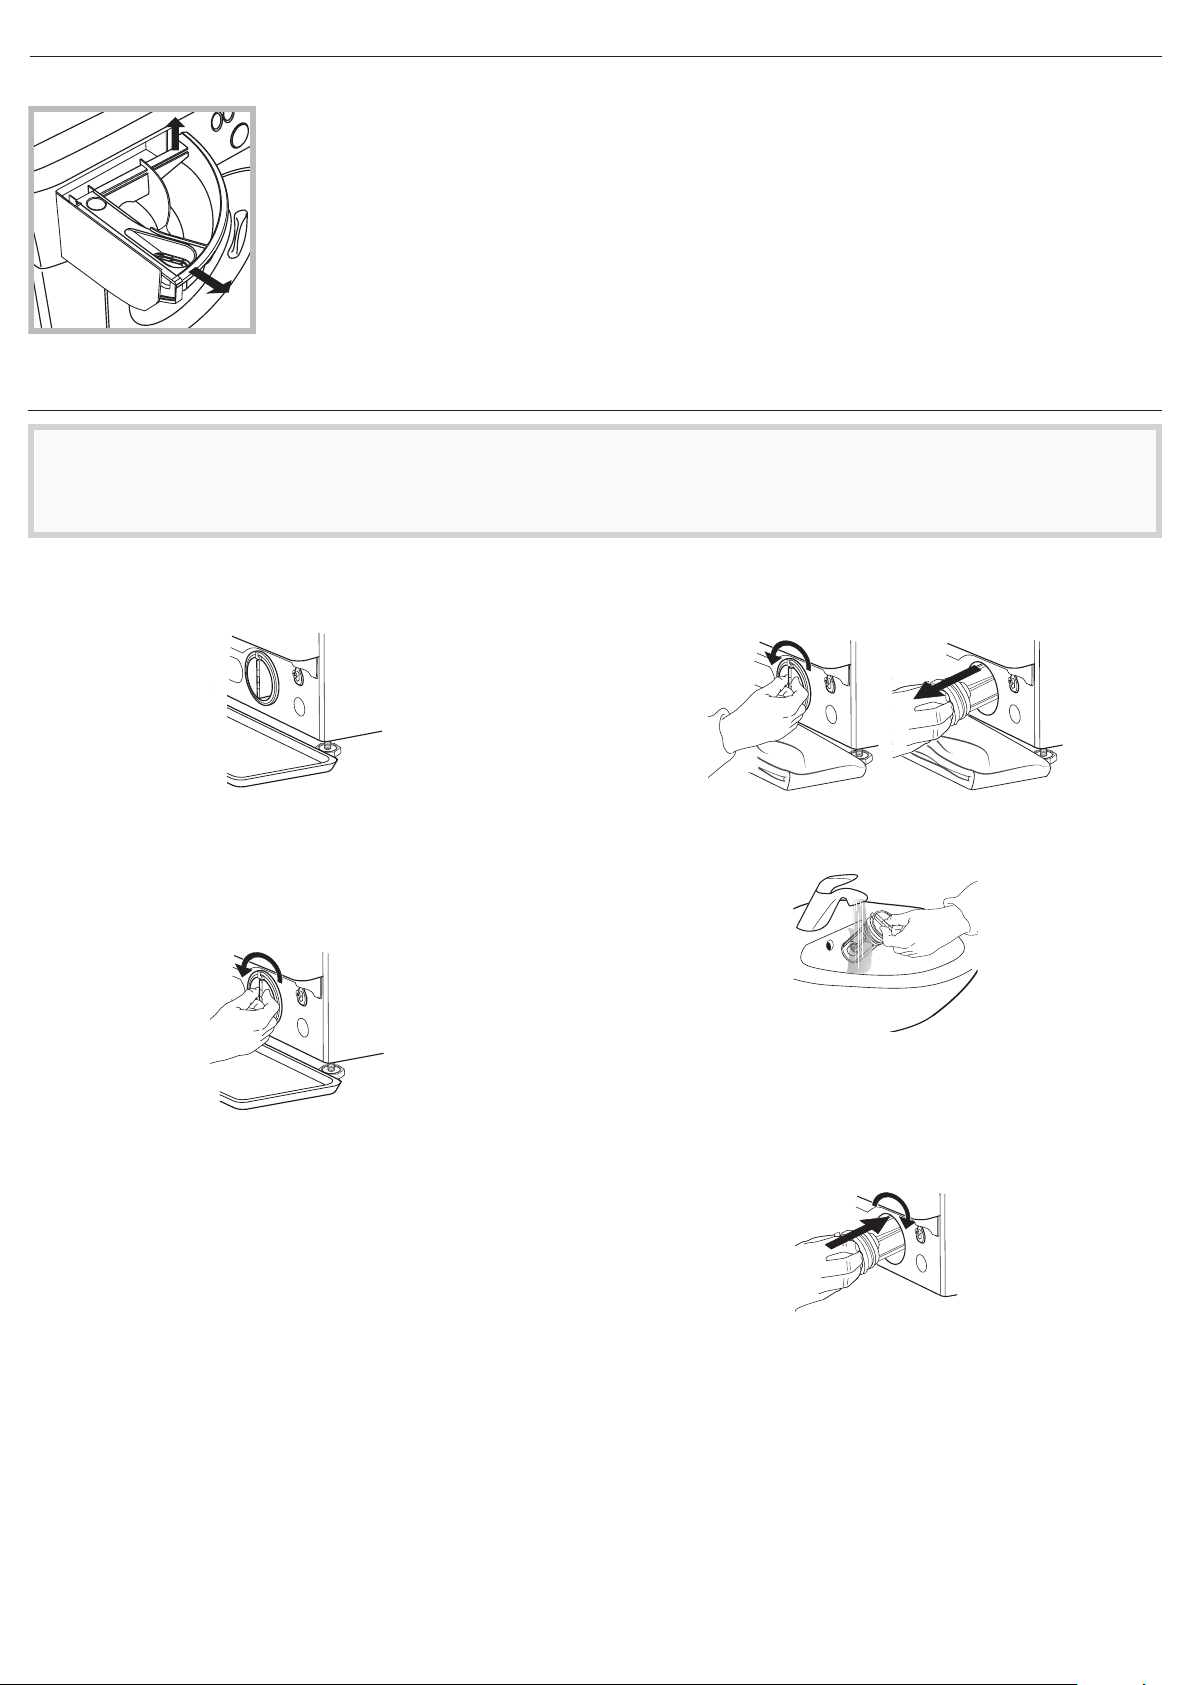
Remove the dispenser by raising it and
pulling it out (see gure).
Wash it under running water; this
operation should be repeated frequently.
CLEANING THE WATER FILTER / DRAINING RESIDUAL WATER
Switch o and unplug the washing machine before cleaning the water lter or draining residual water. If you used a hot
wash programme, wait until the water has cooled down before draining any water.
Clean the water lter regularly, to avoid that the water cannot drain after the wash due to obstruction of the lter.
If the water cannot drain, the display indicates that the water lter may be clogged.
1. Container for the drained water:
Place a low and wide container under the water lter in
order to collect the residual water.
2. Drain the water:
Slowly turn the lter counter-clockwise until all the water
has come out. Allow the water to ow out without
removing the lter. Once the container is full, close the
water lter by turning it clockwise. Empty the container.
Repeat the procedure until all the water has been drained.
3. Remove lter: Lay a cotton cloth beneath the water lter,
which can absorb a small amount of rest water. Then
remove the water lter by turning it out anticlockwise.
4. Clean the water lter: remove residues in the lter and
clean it under running water.
5. Insert the water lter: Reinsert the water lter again by turning it
in clockwise direction. Make sure to turn it in as far as it goes; the
lter handle must be in vertical position. To test water tightness
of the water lter, you can pour about 1 liter of water into the
detergent dispenser.
2
1
Page 8
TRANSPORT AND HANDLING
Never lift the washing machine by holding it at the worktop.
1. Pull out the mains plug, and close the water tap.
2. Make sure that door and detergent dispenser are properly
closed.
3. Disconnect the inlet hose from the water tap, and remove
the drain hose from your draining point. Remove all rest
water from the hoses, and x them so that they cannot get
damaged during transport.
AFTERSALES SERVICE
BEFORE CALLING THE AFTERSALES SERVICE
1. See if you can solve the problem by yourself with the help
of the suggestions given in the TROUBLESHOOTING
IF AFTER THE ABOVE CHECKS THE FAULT STILL
OCCURS, GET IN TOUCH WITH THE NEAREST
AFTERSALES SERVICE
To receive assistance, call the number shown on the warranty
slip or follow the instructions on the website
www.whirlpool.com.sg
When contacting our Client After sales service, always specify:
• a brief description of the fault;
• the type and exact model of the appliance;
xxxxxxxxxxxx
4. Ret the transport bolts. Follow the instructions for
removing the transport bolts in the “Installation Guide” in
reverse order.
Important: Do not transport the washing machine without
having xed the transport bolts.
2. Switch the appliance o and back on again to see if the
fault persists.
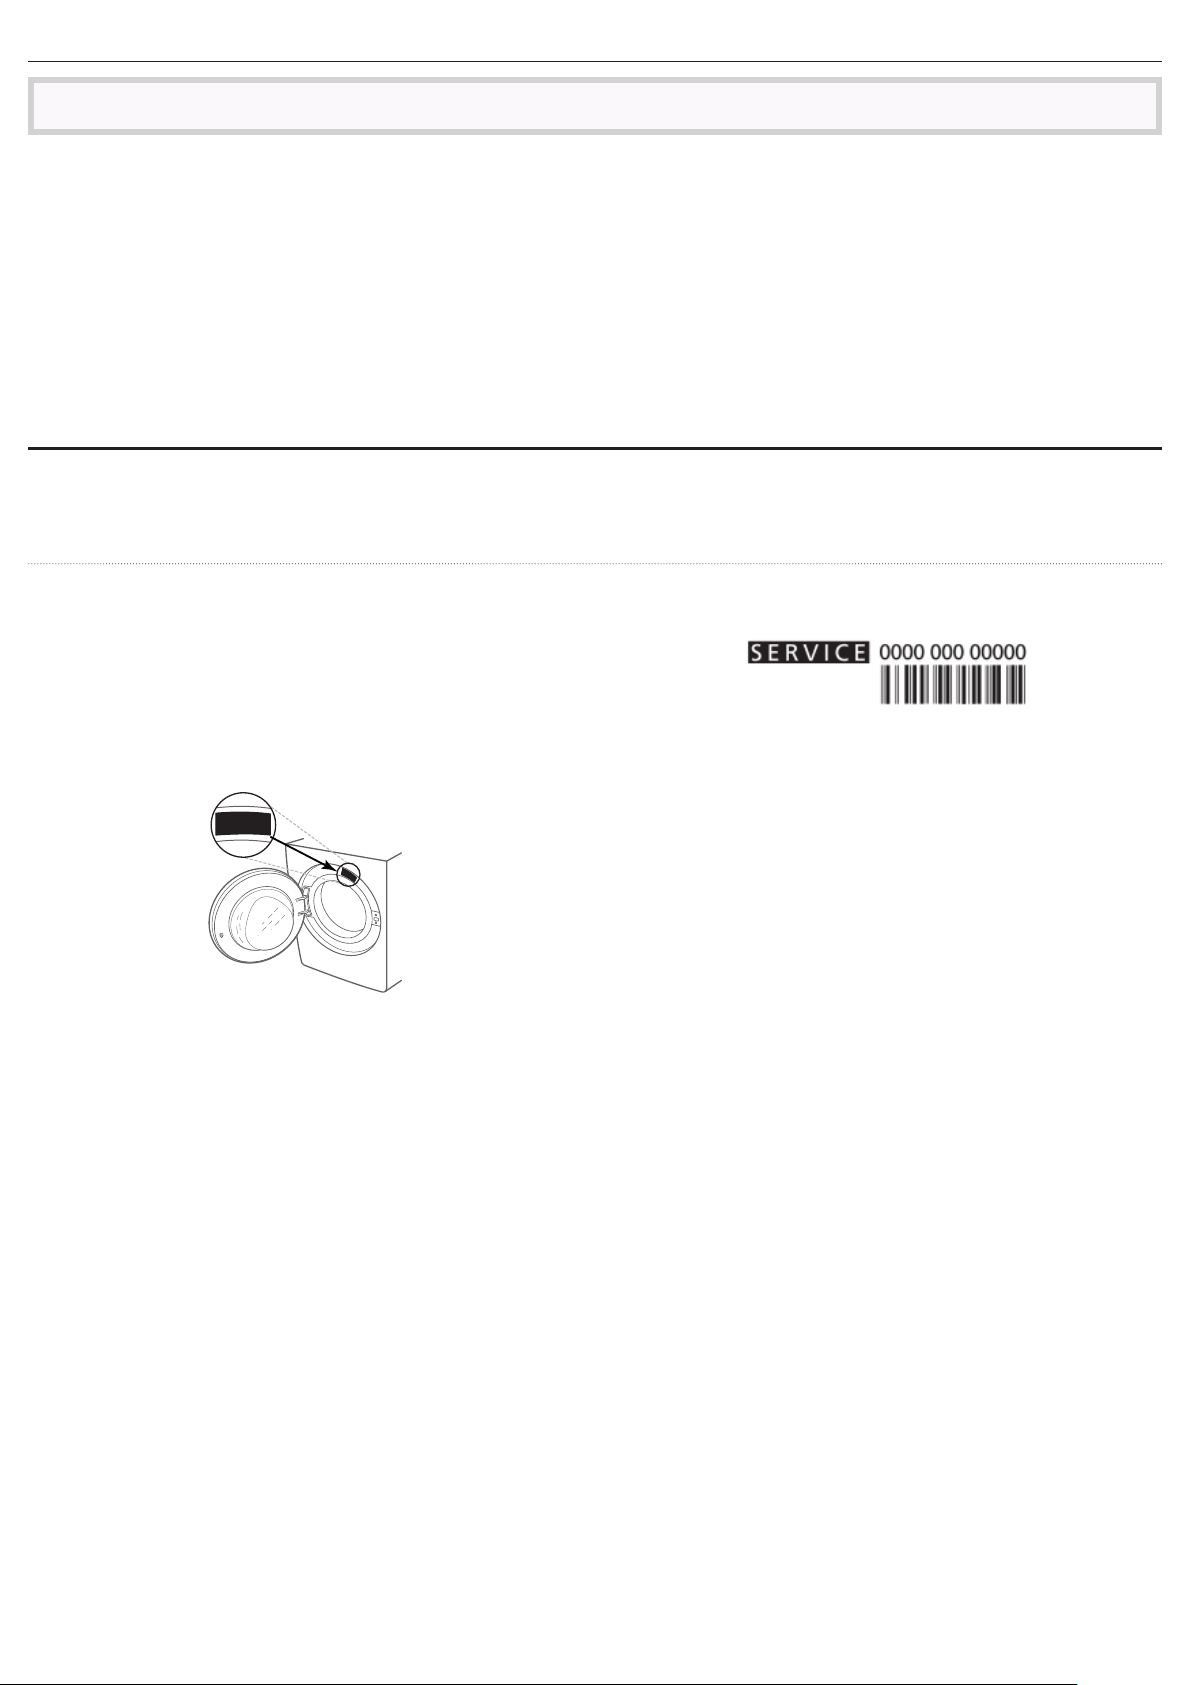
• the service number (number after the word Service on the
rating plate).
• your full address;
• your telephone number.
If any repairs are required, please contact an authorised aftersales service (to guarantee that original spare parts will be used
and repairs carried out correctly).
Page 9
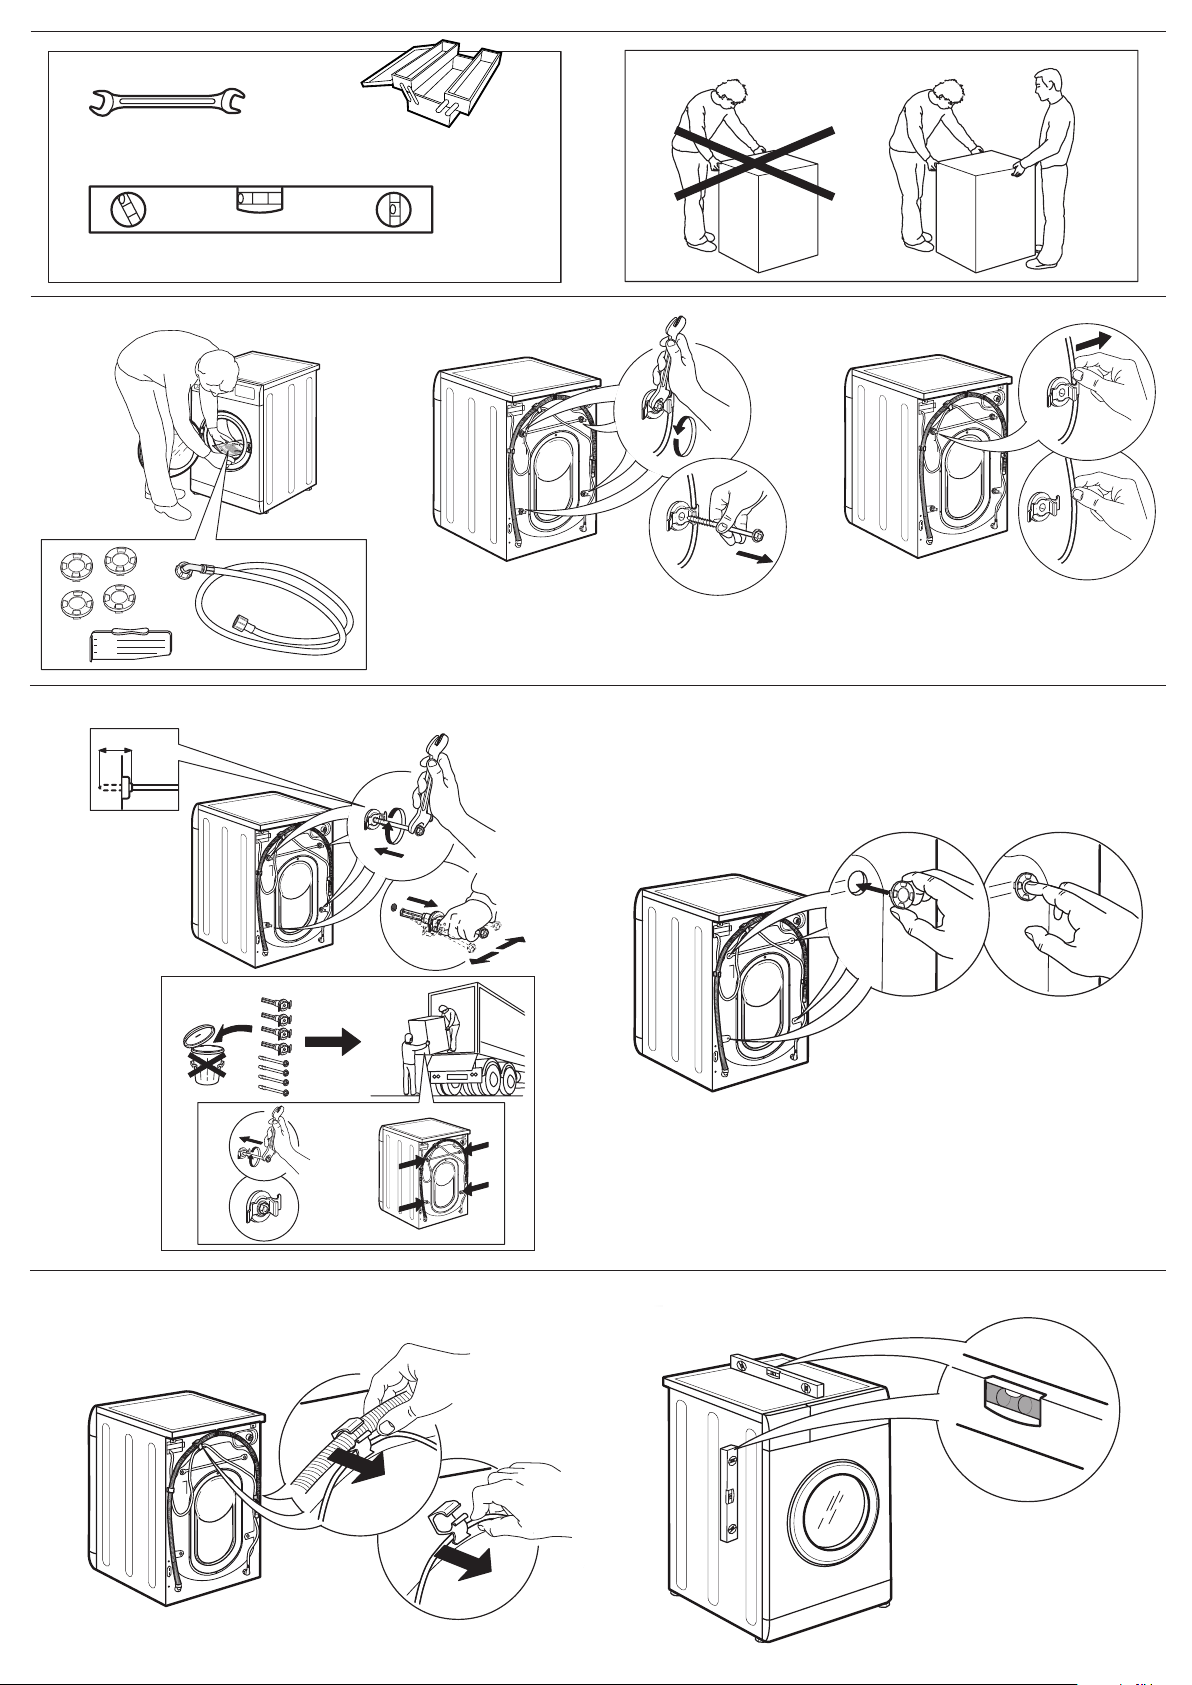
10 mm - 0,39 inch
1.
150 ml
100 ml
50 ml
2.
4. 5.
2 cm - 0,7 inch
3.
6.
7.
Page 10
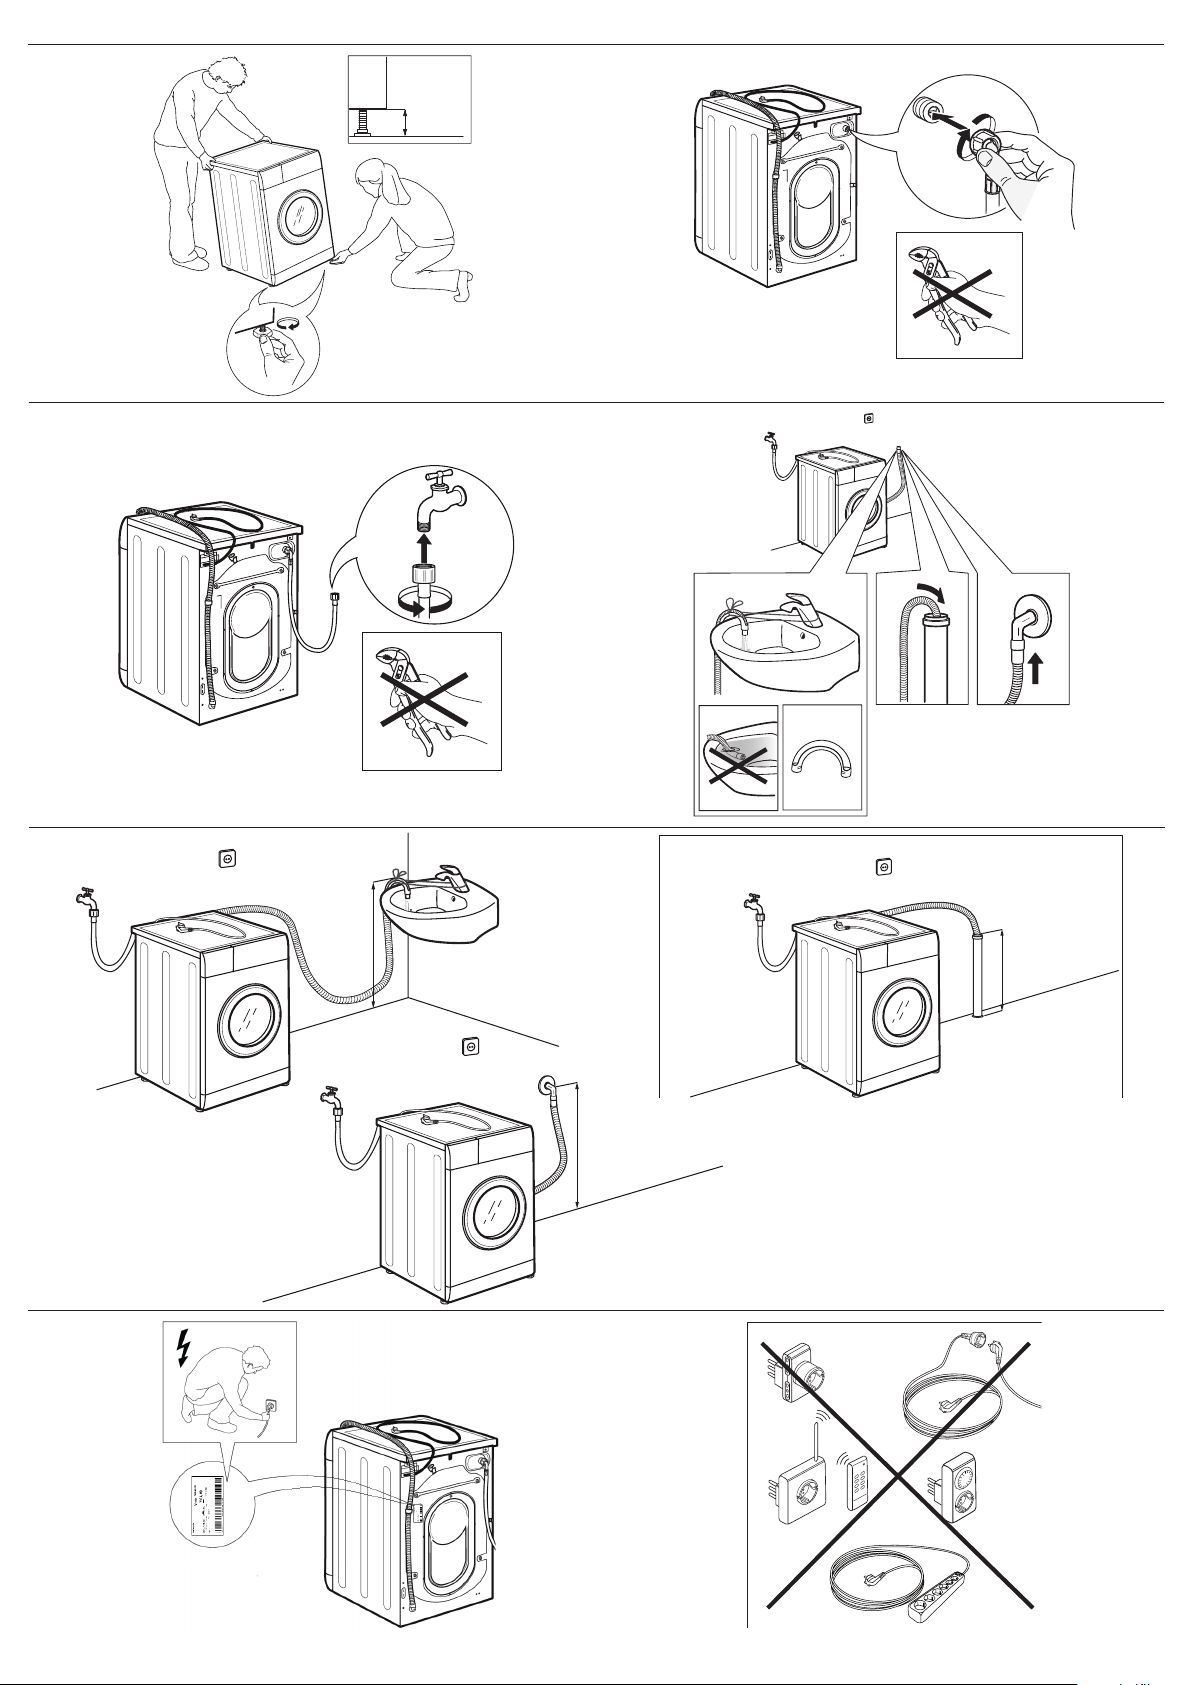
9.8.
max 0,5 cm
max 0,2 inch
10. 11.
12.
13.
max 100 cm
39 inch
min 65 cm
25 inch
max 100 cm
39 inch
min 65 cm
25 inch
14.
max 100 cm
39 inch
min 65 cm
25 inch
Page 11
SAFETY INSTRUCTIONS
IMPORTANT TO BE READ AND OBSERVE
Before using the appliance, read these safety instructions. Keep them nearby for future reference.
These instructions and the appliance itself provide
important safety warnings, to be observed at all times. The manufacturer declines any liability for failure
to observe these safety instructions, for inappropriate
use of the appliance or incorrect setting of controls.
Very young children (0-3 years) should be kept
away from the appliance. Young children
(3-8years) should be kept away from the
appliance unless continuously supervised.
Children from 8years old and above and persons
with reduced physical, sensory or mental
capabilities or lack of experience and knowledge
can use this appliance only if they are supervised
or have been given instructions on safe use and
understand the hazards involved. Children must
not play with the appliance. Cleaning and user
maintenance must not be carried out by children
without supervision. Never open the door forcibly
or use it as a step.
PERMITTED USE
CAUTION: The appliance is not intended to be
operated by means of an external switching
device, such as a timer, or separate remote
controlled system.
This appliance is intended to be used in
household and similar applications such as: sta
kitchen areas in shops, oces and other working
environments; farm houses; by clients in hotels,
motels, bed & breakfast and other residential
environments.
Do not load the machine above the maximum
capacity (kg of dry cloth) indicated in the
programme table.
This appliance is not for professional use. Do
not use the appliance outdoors.
Do not use any solvents (e.g. turpentine,
benzene), detergents containing solvents,
scouring powder, glass or general purpose
cleaners, or ammable uids; do not machine
wash fabrics that have been treated with solvents
or ammable liquids.
Do not dry unwashed items in the tumble
dr yer.
Items that have been soiled with substances
such as cooking oil, acetone, alcohol, petrol,
kerosene, spot removers, turpentine, waxes and
wax removers should be washed in hot water with
an extra amount of detergent before being dried
in the tumble dryer.
Items such as foam rubber (latex foam), shower
caps, waterproof textiles, rubber backed articles
and clothes or pillows tted with foam rubber
pads should not be dried in the tumble dryer.
Fabric softeners, or similar products, should be
used as specied by the fabric softener
instructions.
The nal part of a tumble dryer cycle occurs
without heat (cool down cycle) to ensure that the
items are left at a temperature that ensures that
the items will not be damaged.
Never stop a tumble dryer before the end of
the drying cycle unless all items are quickly
removed and spread out so that the heat is
dissipated.
During the drying phase, the door tends to get
quite hot.
Do not use the appliance to dry clothes that
have been washed with ammable solvents (e.g.
trichlorethylene).
Do not use the appliance to dry foam rubber or
similar elastomers.
Make sure that the water tap is turned on
during the drying cycles.
Remove all objects from pockets such as
lighters and matches.
INSTALLATION
The appliance must be handled and installed
by two or more persons- risk of injury. Use
protective gloves to unpack and install- risk of
cuts.
If you want to stack a dryer on top of your
washing machine, rst contact our After-Sales
Service or your specialist dealer to verify whether
this is possible. This is only possible if the dryer is
attached to the washing machine by means of
appropriate stacking kit available through our
After- Sales Service or your specialist dealer.
Move the appliance without lifting it by the
worktop or top lid.
Installation, including water supply (if any) and
electrical connections and repairs must be carried
out by a qualied technician. Do not repair or
replace any part of the appliance unless
specically stated in the user manual. Keep
children away from the installation site. After
unpacking the appliance, make sure that it has not
been damaged during transport. In the event of
problems, contact the dealer or your nearest
After-sales Service. Once installed, packaging
waste (plastic, styrofoam parts etc.) must be
stored out of reach of children- risk of suocation.
The appliance must be disconnected from the
power supply before any installation operationrisk of electric shock. During installation, make
sure the appliance does not damage the power
cable - risk of re or electric shock. Only activate
the appliance when the installation has been
completed.
Page 12
Do not install your appliance where it may be
exposed to extreme conditions, such as: poor
ventilation, temperatures below 5 °C or above 35 °C.
When installing the appliance make sure that
the four feet are stable and resting on the oor,
adjusting them as required, and check that the
appliance is perfectly to level using a spirit level.
If the appliance is being installed on wood or
“oating” oors (certain parquet and laminate
materials), secure a 60x60x3cm (at least) sheet
of plywood to the oor then place the appliance
on top of this.
Connect the water inlet hose(s) to the water
supply in accordance with the regulations of your
local water company.
For cold ll only models: do not connect to the
hot water supply.
For models with hot ll: the hot water inlet
temperature must not exceed 60°C.
The washing machine is tted with transport
bolts to prevent any possible damage to the
interior during transport. Before using the
machine, it is imperative that the transport bolts
are removed. After their removal, cover the
openings with the 4 enclosed plastic caps.
After installation of the device, wait a few
hours before starting it so that it acclimates to the
environmental conditions of the room.
Make sure that the ventilation openings in the
base of your washing machine (if available on
your model) are not obstructed by a carpet or
other material.
Use only new hoses to connect the appliance
to the water supply. The old hose-sets should not
be reused.
The supply water pressure must be in the 0.1-1
MPa range.
ELECTRICAL WARNINGS
It must be possible to disconnect the appliance
from the power supply by unplugging it if plug is
accessible, or by a multi-pole switch installed
upstream of the socket in accordance with the
wiring rules and the appliance must be earthed in
conformity with national electrical safety
standards.
Do not use extension leads, multiple sockets or
adapters. The electrical components must not be
accessible to the user after installation. Do not use
the appliance when you are wet or barefoot. Do
not operate this appliance if it has a damaged
power cable or plug, if it is not working properly,
or if it has been damaged or dropped.
If the supply cord is damaged, it must be
replaced with an identical one by the
manufacturer, its service agent or similarly
qualied persons in order to avoid a hazard- risk
of electric shock.
CLEANING AND MAINTENANCE
WARNING: Ensure that the appliance is
switched o and disconnected from the power
supply before performing any maintenance
operation; never use steam cleaning equipmentrisk of electric shock.
DISPOSAL OF PACKAGING MATERIALS
The packaging material is 100% recyclable and is marked with the
recycle symbol .
The various parts of the packaging must therefore be disposed of
responsibly and in full compliance with local authority regulations
governing waste disposal.
DISPOSAL OF HOUSEHOLD APPLIANCES
This appliance is manufactured with recyclable or reusable materials.
Dispose of it in accordance with local waste disposal regulations.
For further information on the treatment, recovery and recycling
of household electrical appliances, contact your local authority,
the collection service for household waste or the store where you
purchased the appliance. This appliance is marked in compliance
with European Directive 2012/19/EU, Waste Electrical and Electronic
Equipment (WEEE). By ensuring this product is disposed of correctly,
you will help prevent negative consequences for the environment and
human health.
The symbol on the product or on the accompanying documentation
indicates that it should not be treated as domestic waste but must be
taken to an appropriate collection center for the recycling of electrical
and electronic equipment.
11401365
 Loading...