

Page 1

CONTENTS
BEFORE USI NG THE WASHI NG MACHI NE
PRECAUTI ONS AND GENERAL RECOMMENDATI ONS
DESCRI PTI ON OF THE WASHI NG MACHI NE
DOOR
CHI LD SAFETY ( I F AVAI LABLE)
BEFORE THE FI RST WASH CYCLE
PREPARI NG THE WASH
DETERGENTS AND ADDI TI VES
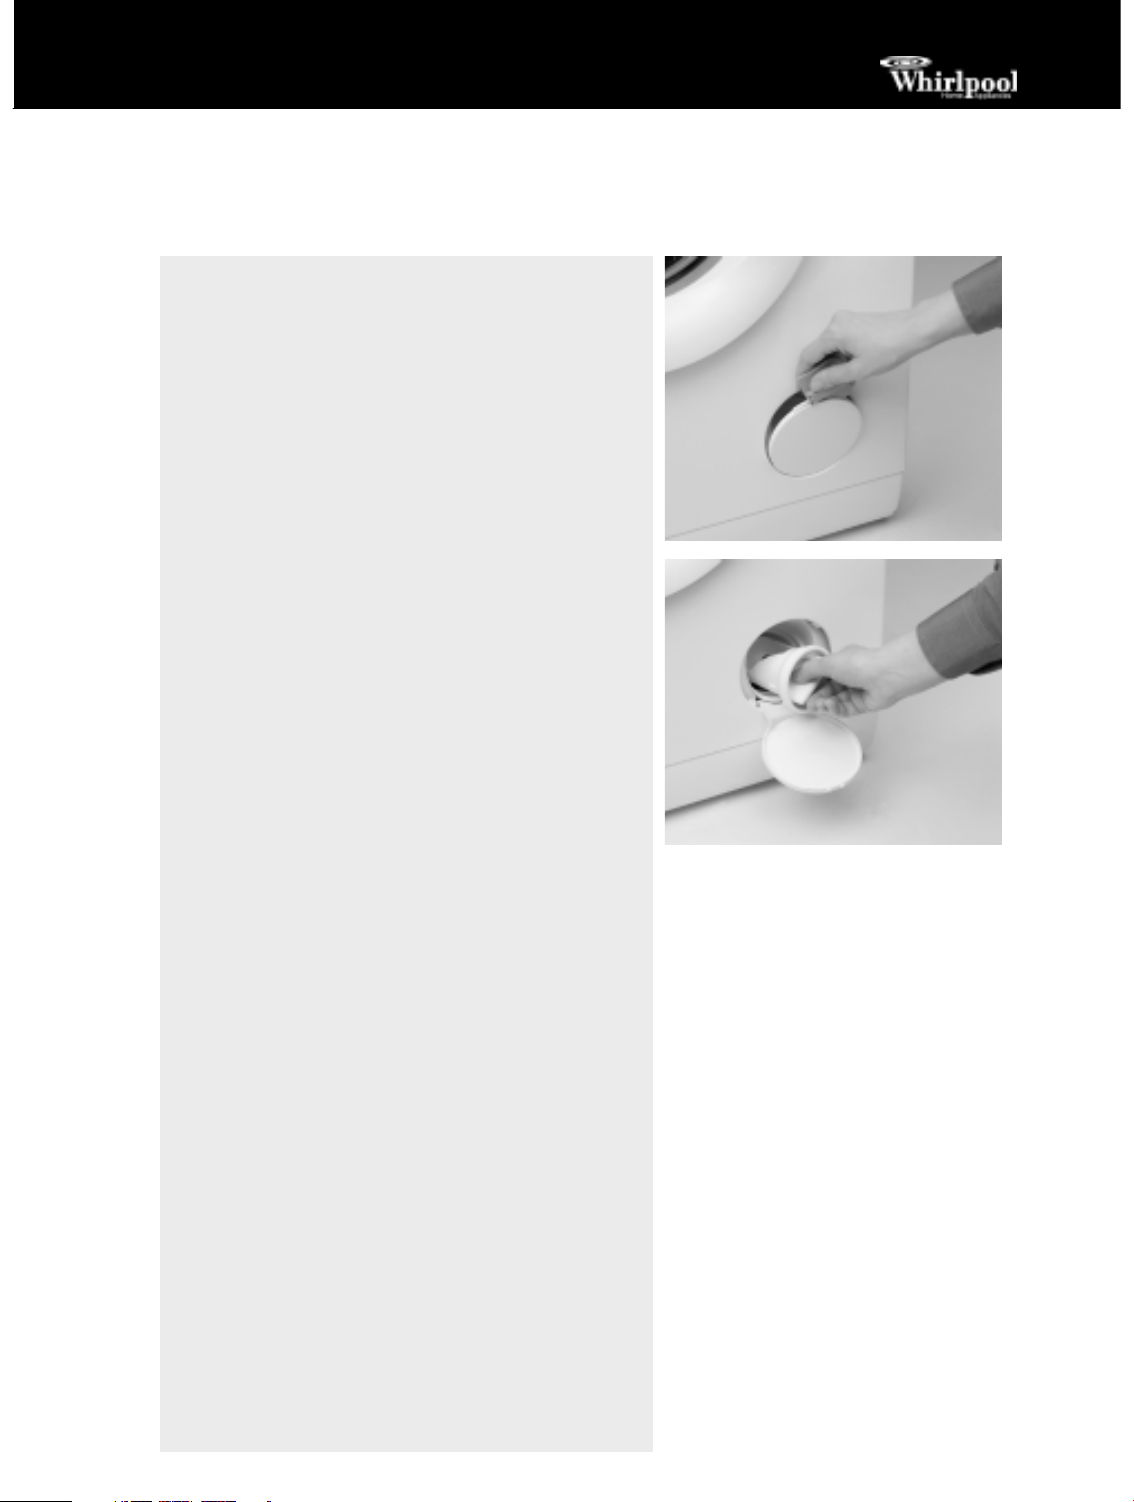
REMOVI NG THE FI LTER
DRAI NI NG RESI DUAL WATER
CARE AND MAI NTENANCE
TROUBLESHOOTI NG GUI DE
AFTER-SALES SERVI CE
TRANSPORT/ HANDLI NG
ELECTRI CAL CONNECTI ON
Page 2

19
BEFORE USI NG THE WASHI NG MACHI NE
1.Remove t he packagi ng and check
•
Aft e r un p ac king , m ake s ure t hat the wa sh ing
machi ne is un d am ag ed. I f in d o ubt, d o no t use
th e washing mac h in e . Cont act Afte r- Sale s
Servic e o r yo ur lo cal ret aile r
•
Ch e ck th at t he ac ce ss o rie s an d su pp lie d pa rts are
all prese nt
•
Keep th e p acking mate rial ( p la st ic b ag s,
po lystyrene p arts, e tc .) o ut of rea ch o f childre n,
as the y are p o tent ia lly dan g e ro us
2.Remove t he t ransport bol t s
•
The wa sh ing mac hin e is f itt e d wi th a t ran sp o rt
bo lt s to avo id a ny p o ssib le damag e to t he
inte rio r du ring transpo rt. Be f o re usin g t he
was hing mac h in e , it is imp e rat ive t hat the
tran sp o rt b o lts are remo ved
3.I nstall t he washing machine
•
Remo ve the pro tec tive fo i l f ro m the co ntro l
panel
•
Move the ap p li an c e wit ho ut lif t in g i t b y t h e
wo rkto p
•
In st all t he ap p lianc e o n a so lid an d le v e l f lo or
surfac e , p refe rably in a co rner o f the ro o m
•
Make sure that all f o ur f e e t are restin g firmly o n
th e f lo or and c heck th at t h e app li an c e i s
pe rf e c t ly level ( use a spirit le ve l)
4.Wat er i nlet
•
Co nne ct the wate r supply inle t ho se in
ac c o rdanc e wit h reg ulatio ns o f yo ur lo cal water
co m pan y
•
Wate r in le t : Co ld wat e r o n ly
•
Tap : 3/ 4 ” threa ded ho se c on necti on
•
Wate r Pressure
( f lo w p re ssure ) : 100- 1 0 0 0 kPa ( 1- 1 0 b a r)
5.Drai n hose
•
Co nnec t th e d rain ho se to the sip ho n o r ho o k it
o ver t he e d g e o f a sink b y me ans of t he “ U” bend
sup p lied
•
If t he wa sh ing mac hine is c o nne cted to a b uilt- in
pump ing o ut sy st e m, e nsure t hat the latt e r is
equip p e d with a ve n t to a vo id simultaneo us
lo adin g and drainin g o f water ( sip ho n in g e ffe c t)
6.Electri cal connect i ons
•
Elec tric al c o nne c t io ns m ust be c arried o ut b y a
quali fie d t e c h nic ian in c omp lianc e with the
manufac t ure r’s inst ruc t io ns and lo c a l saf e ty
reg u lati o n s
•
Data c o nc e rnin g vo lt ag e, co n sump ti o n and fus es
are lo cat e d o n th e insid e o f the app lian c e d o or
•
The app lian c e must be c o nne c ted to the main s
exc lu sive ly b y means o f a so c ket with an e arth
co n nec tio n in ac co rdanc e with est ablished
reg u lati o n s. The washin g mac h ine must b e
earth e d b y law. The manuf ac turer d e c line s all
liabili ty f o r damag e to p ro p e rty o r injury t o
pe rso ns o r anim als d ue to no n- c o mpli an c e w it h
th e d ire c t io ns g ive n ab o ve
•
Do no t use e xt e n si o n le ad s o r mult i so ckets
•
Befo re an y main t e nan c e o n th e washing
machi ne disco n nec t it f ro m the main s supp ly
•
Acc e ss to t h e mains plug or t o disc on nec tio n
fro m ma ins su ppl y v ia a do ub le- p ol e swi tc h must
be e nsured at all times fo llo wing t he in stallat ion
•
Do no t o p e rat e t he wa sh ing mac hin e if it has
been damag e d d uring transpo rt . I nfo rm t he
Aft e r- Sale s Servic e
•
Mains c ab le re pla ce me nt is o n ly to b e c arrie d o ut
by Af ter-Sale s Servic e
•
The wash ing mac hin e must o nly b e used in the
ho useho ld f o r th e p resc rib e d uses
Mini mum housing di mensions:
Width: 6 0 0 mm
Heig h t: 825 mm
Depth: 600 mm
Page 3

20
PRECAUTI ONS AND GENERAL RECOMMENDATI ONS
1.Packaging
•
The p ac kagin g is 100% rec yc lab le an d is ma rked
wit h the rec yclin g symbo l. Adhe re to
current lo cal regula tio ns wh e n d ispo sin g o f
pac kag i ng mate rial
2. Disposing of packagi ng and ol d washing
machi nes
•
The wa sh ing mac hin e is b uilt f ro m reusab le
mate rials. I t must b e dispo sed o f in c o mplianc e
wit h c urrent local waste d ispo sal reg ulatio ns
•
Befo re scrapping , re mo ve all de tergent residue s
and c ut of f the po wer c able so that the wa sh ing
machi ne is ma de un us ab le
3.General recommendati ons
•
Do no t le ave t he wash in g m ac hin e c o nne c t e d
when no t in u se
•
Turn of f t he tap
•
Befo re an y c lea ning and main tenanc e switc h off
th e mac h in e o r disco n ne c t it f ro m the main s
•
Cl ean t he o ut side o f th e washi ng ma ch ine w ith a
da mp c loth. Do no t use abrasive d e t e rg e nts
•
Neve r o pen t h e d o or f o rcib ly o r use it as a st e p
•
Ch ildren must n o t be allo wed t o p lay with the
was hing machine o r to c limb in to the d rum ( see
also the fo llo w in g p age c h ap t e r “ Child Saf e t y” )
•
If n e c e ssary, the p o w e r c ab le m ay b e re placed
wit h an ident ical on e o btaine d f ro m o ur Afte rSale s Servic e. The p o wer c able must o nly be
rep lac e d b y a q uali fie d t e c h nic ian
4.EC Declarat ion of Conformit y
•
Thi s a pplianc e c o mplie s with t he EC Directive s:
73/ 23 / EEC Lo w Voltag e Di rective
89/ 3 3 6 / EEC EMC Direc tive
93/ 68/ EEC CE Marking Dire c t ive
Page 4
21
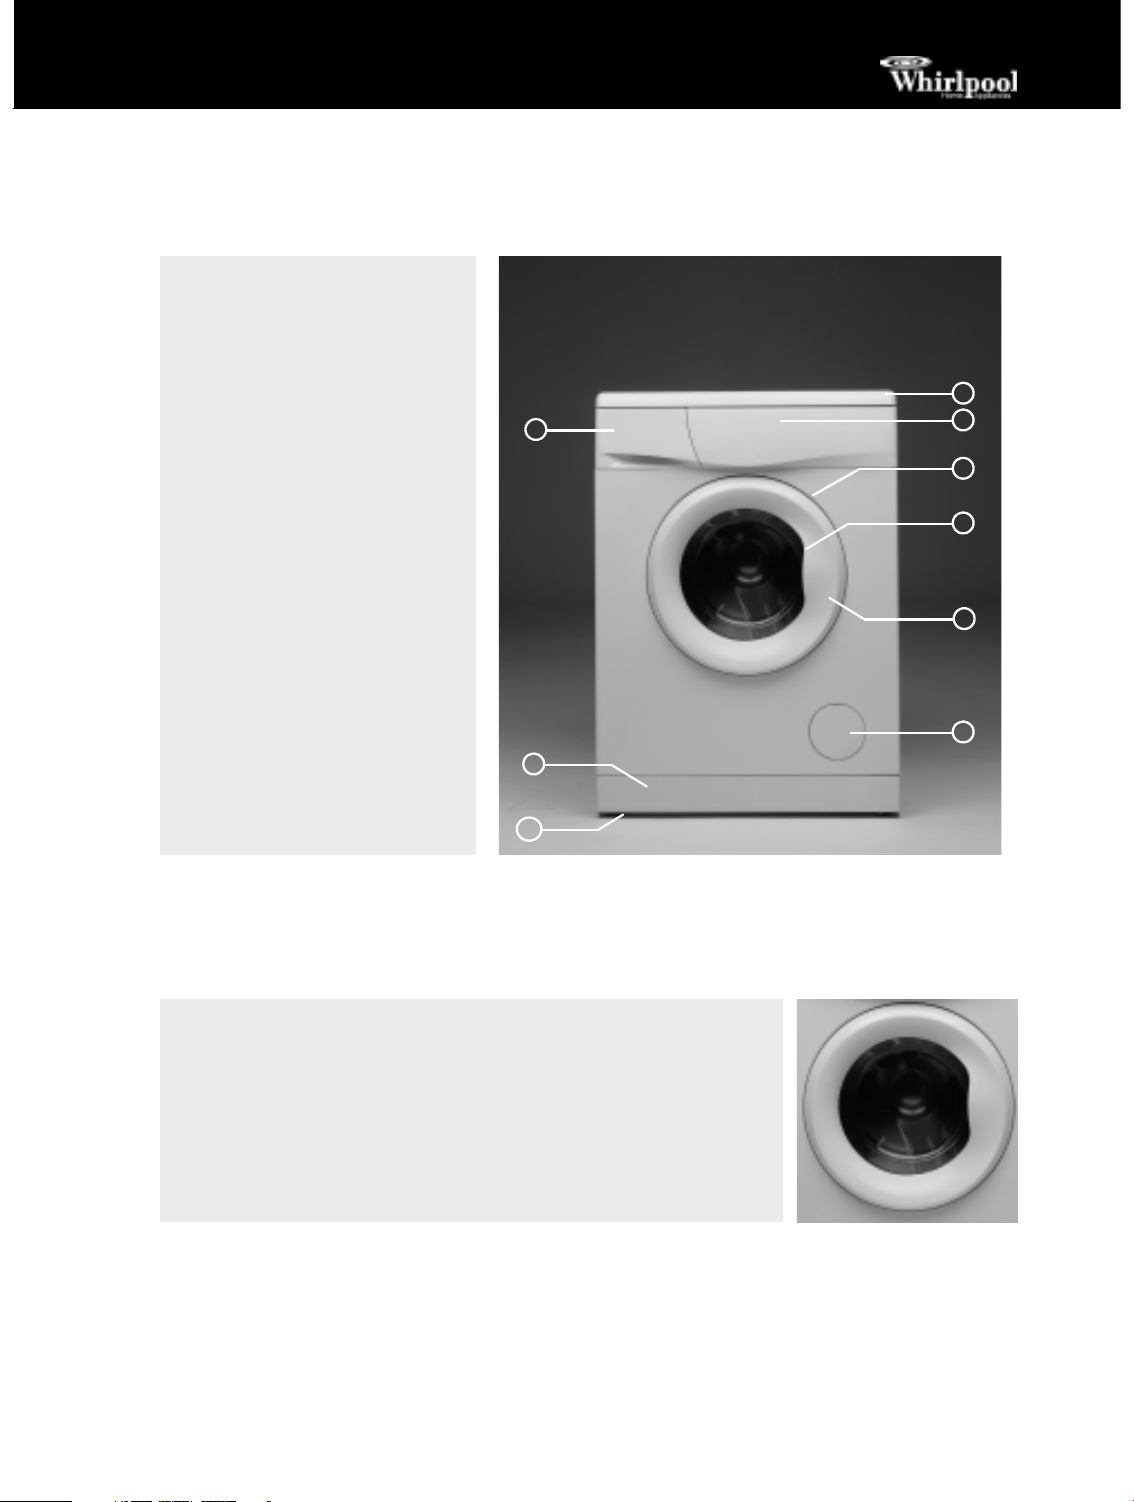
DESCRI PTI ON OF THE WASHI NG MACHI NE
DOOR
1.
Workto p
2.
Co ntrol p an e l
3.
Detergent d ispe nse r
4.
Aft e r- Se rvic e stic ker
( insid e d o or)
5.
Doo r
6.
Ch ild safety ( i nside do o r, if
ava ilab le )
7.
Filt e r ( insid e co mpa rtme nt do or)
8.
Plinth
9.
Adj ustab le fee t
To o pe n the single g lass d o or h o ld the do o r handle, p ress the insid e
hand le and p ull the d o or up. Clo s e the d o o r with li g h t fo rc e , it will lo ck
ho me audib ly .
1
2
4
5
6
7
3
8
9
Page 5
22
CHI LD SAFETY ( I F AVAI LABLE)
BEFORE THE FI RST WASH CYCLE
PREPARI NG THE WASH
1.Sort the laundry accordi ng t o...
• Type of f abri c / care label symbol
Co tto n s, mixe d fib re s, easy care / syn the t ics,
wo ol, handwashed it e ms
• Col our
Sep arate c o loured and wh it e items. Wash new
co lo ured article s sep arately
• Size
Laund ry ite ms o f dif fe rent sizes d istrib ut e
th e mse lve s be tte r in the drum and o ptimise th e
was hing and spinni ng acti o n
• Delicates
Wash small it e ms ( e. g . nylo n sto c king s, be lt s
etc .) and ite m s with h o oks ( e . g. b ras) in a
was hbag o r pillo w c as e with a zip f aste ner.
Always rem o v e c urtai n g lides o r wash c urtains
wit h the gli des i nside a c ot to n b ag
2.Empty al l pockets
Co ins, safe ty p ins etc. c an d amag e t he laundry,
drum and t ub
3.Closures
Clo se zips and ho oks an d eye s; Tie lo o se be lts or
straps t o ge t her
Stai n removal
•
Blo o d, m ilk, eg g s etc. are g ene ra lly remo ved b y
th e auto m at ic e nzyme p h as e o f th e p ro g ramme
•
To re mo ve red wine , co ffe e, t e a, g rass and f ruit
stains e tc . add a stain remo ver t o t he dete rge nt
di sp e n se r c hamber
•
Pre- tre at h eav ily- so il ed a re as wit h sta in rem o ver
if nec e ss ary
Dyei ng
•
Only use dy es th at are suit able f or wash ing mac hin es
•
Fo llo w th e man uf actu rer’s ins tructi o ns
•
Plasti c and rub be r parts o f the washing mac hine
can b e sta in e d b y dy e s
Loading t he laundry
1.
Open the do o r.
2.
Unfo ld t he laundry an d place it lo ose ly in t he
drum . Obse rve t he lo ad size s g ive n in t he Quic k
Ref e renc e Guid e .
Not e:
o verlo ading the ma c hin e wi ll result in
unsatisf acto ry washing re sults and c reased laundry.
3.
Clo se the do o r.
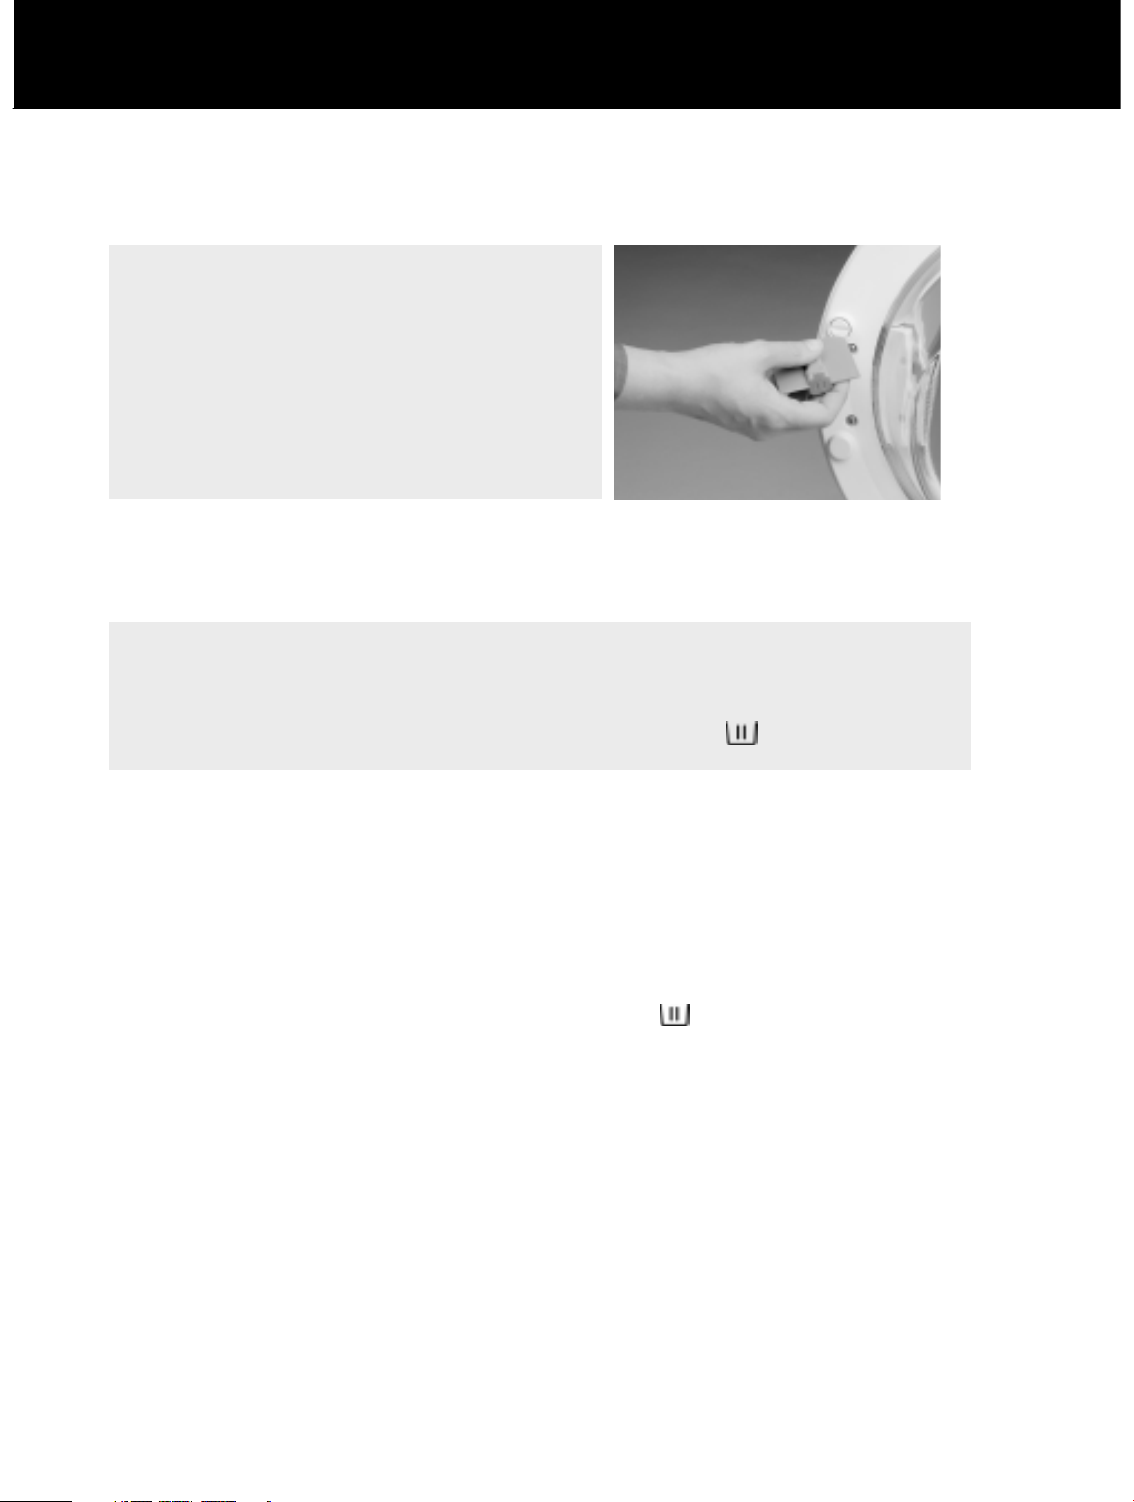
To s e c ure t h e app li an c e again st i mp ro per use turn the
plastic sc re w o n the interio r o f t he d o or. To d o thi s, use
th e t hic k ro u nde d c orne r o f t he c o loured insert f ro m the
de t e rg e n t dispe nse r o r a c o in:
•
Slo t ve rtic a l: t he d o or will no t lo ck
•
Slo t ho riz o ntal: t he do o r c an b e lo c ke d ag ain
To remo ve any re si dual water use d in te st ing b y the manufac t ure r, we reco m me nd that you c arry o ut a
sho rt wash c yc le witho ut la un dry.
1.
Turn on t he tap .
2.
Clo se the do or.
3.
Po ur a litt le d e t e rg e nt (a b o ut 3 0 ml) int o the de tergent c o mpartment .
4.
Select and st art a sho rt pro g ramme ( see quick ref e re nc e g uid e ) .
Page 6
23
DETERGENTS AND ADDI TI VES
The choice of detergent depends on:
•
type o f f abric ( co tto ns, e asy care / synth e t ic s,
de lic ate it e ms, wo o l).
Not e:
Use o n ly sp e c i fic de terge nts fo r wa sh ing
wo ol
•
co lo ur
•
th e wash tempe rature
•
de g ree and t yp e o f so iling
Remark s:
Whitish residu e s on d ark f ab rics are cause d by
inso luble c o mpo und s u se d in mo dern p ho sphate -
fre e p o wde r deterge nts. If th is o cc urs, shake o r
brush o ut the fab ric or use liquid dete rg e n ts.
Use o n ly dete rg e nts an d additive s s pec if ic ally
pro duc e d f o r do mest ic wa sh in g m achi nes.
When usin g desc aling ag en ts, d ye s o r b leac hes fo r
th e p re- wash , make sure th at the y are suitable f o r
use in do mestic wash ing mac hin e s. Desc aler c ould
c o nta in c o mpo n en ts wh ic h can a tt ack pa rts o f yo ur
was hing mac h in e .
Do no t u se an y s ol ven ts ( e. g . turp en tin e, b en zin e) .
Do no t wash f ab ric s i n the m ac hine wh ich ha ve
been treate d with so lve nts o r flam ma b le liq uids.
Dosage
Fo llo w th e d o sage rec o mme ndatio ns o n th e
de t e rg e n t pac k. The y depend o n:
•
de gree an d t yp e o f so iling
•
size o f wash
full lo ad fo llo w the d e t e rg e nt manufac t urer’s
inst ruc t io ns;
half lo ad: 3 / 4 t he am o unt use d fo r a full lo ad;
Minim um lo ad ( abo ut 1 kg ) :
1/ 2 the amo unt used fo r a full lo ad
•
wat e r hard ne ss in yo u r area ( re que st i nf o rma tio n
fro m th e wate r co m pan y) . So f t wa ter req ui res
le ss deterge n t tha n ha rd wat e r ( re f e r to wate r
hardness tab le )
Not es:
To o muc h de tergent c an result in e xc ess fo am
fo rmatio n .
The cle ani ng e ffect dete rio rate s.
If t he wash in g mac hine dete c t s to o mu c h fo am, i t
may p reve nt spin nin g .
In su ffi c ie nt de tergent may result in grey laund ry in
ti me a nd a lso ca lci fi es t he h ea ti ng s yst em , d rum a nd
ho s es .
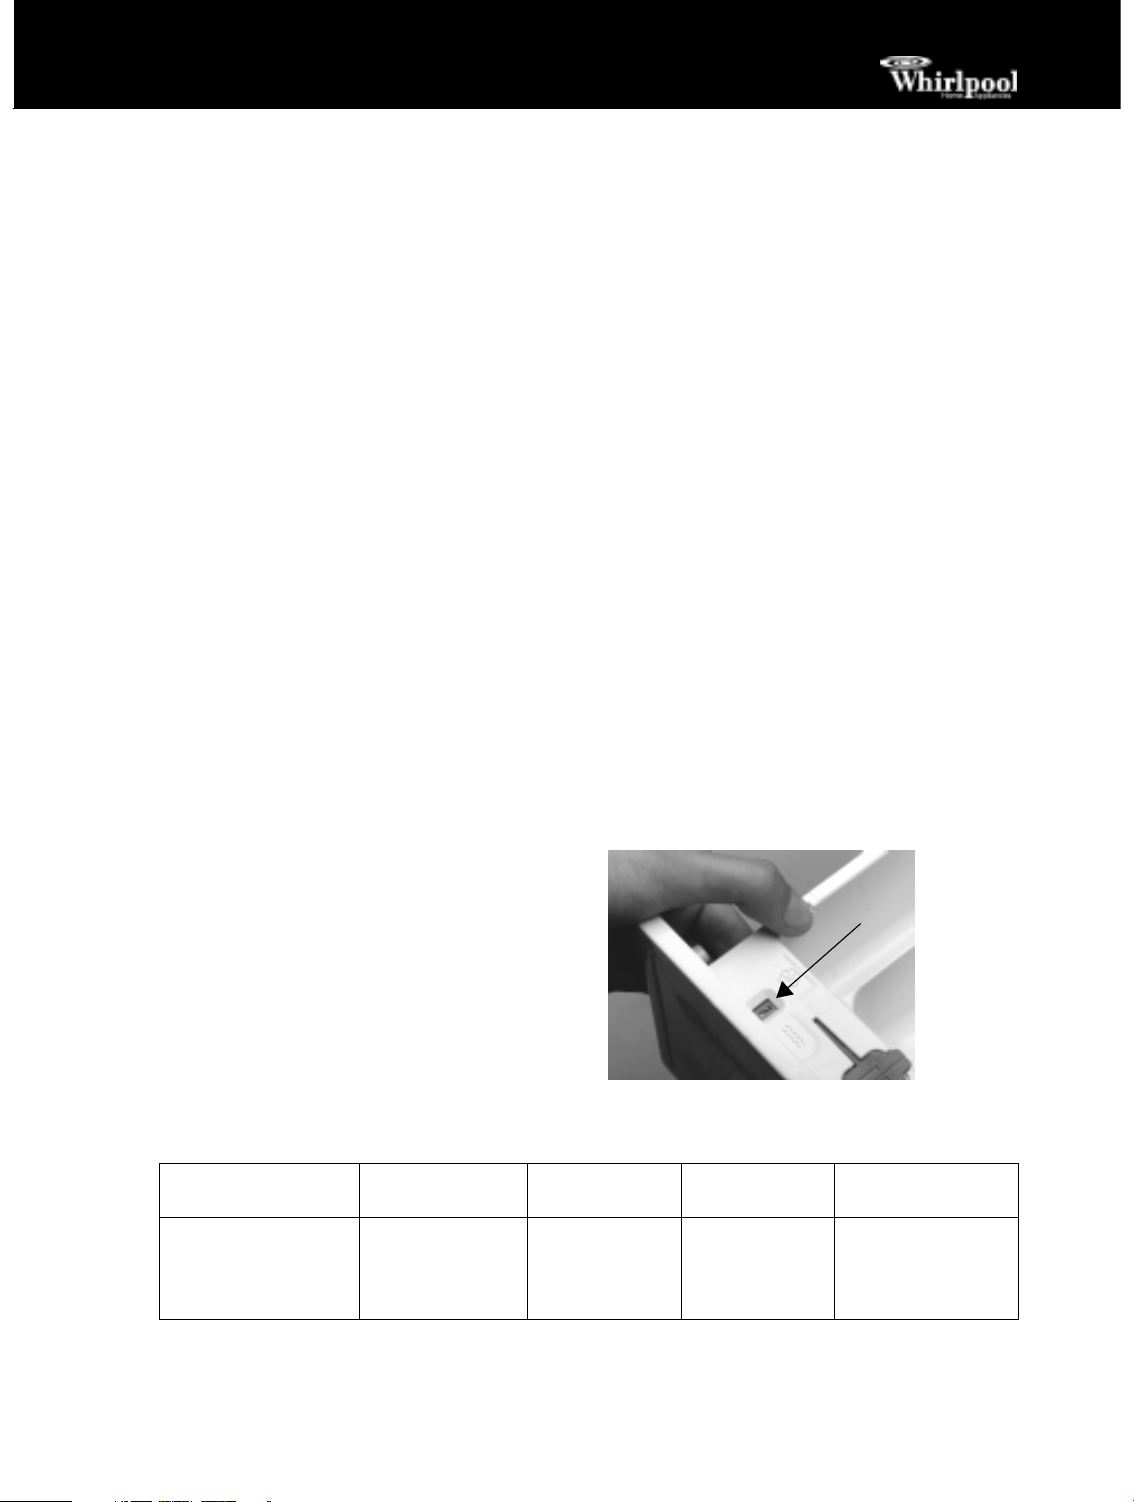
If t he ma c hin e h as a thre e c h amb e r deterge nt d isp e nse r, yo u c an set the water h ardness le ve l o f yo ur
ho useho ld sup ply (1 to 4 ) b y means o f the c olo ured “p o inter”
( A)
. To do t h is , mo ve the slid e r o n t he
bo t to m o f the d isp e n se r t o the desired p o siti o n.
A
Wat er hardness chart
Wat er hardness Charact eri stics
German
° dH
French
° fH
English
° eH
1
2
3
4
so ft
me d ium
hard
ve ry h ard
0- 7
7- 1 4
14-21
o ver 2 1
0- 1 2
12- 2 5
25- 3 7
o ver 37
0- 9
9- 1 7
17-26
o ver 2 6
Page 7
24
Pouring i n t he detergent s and addit i ves
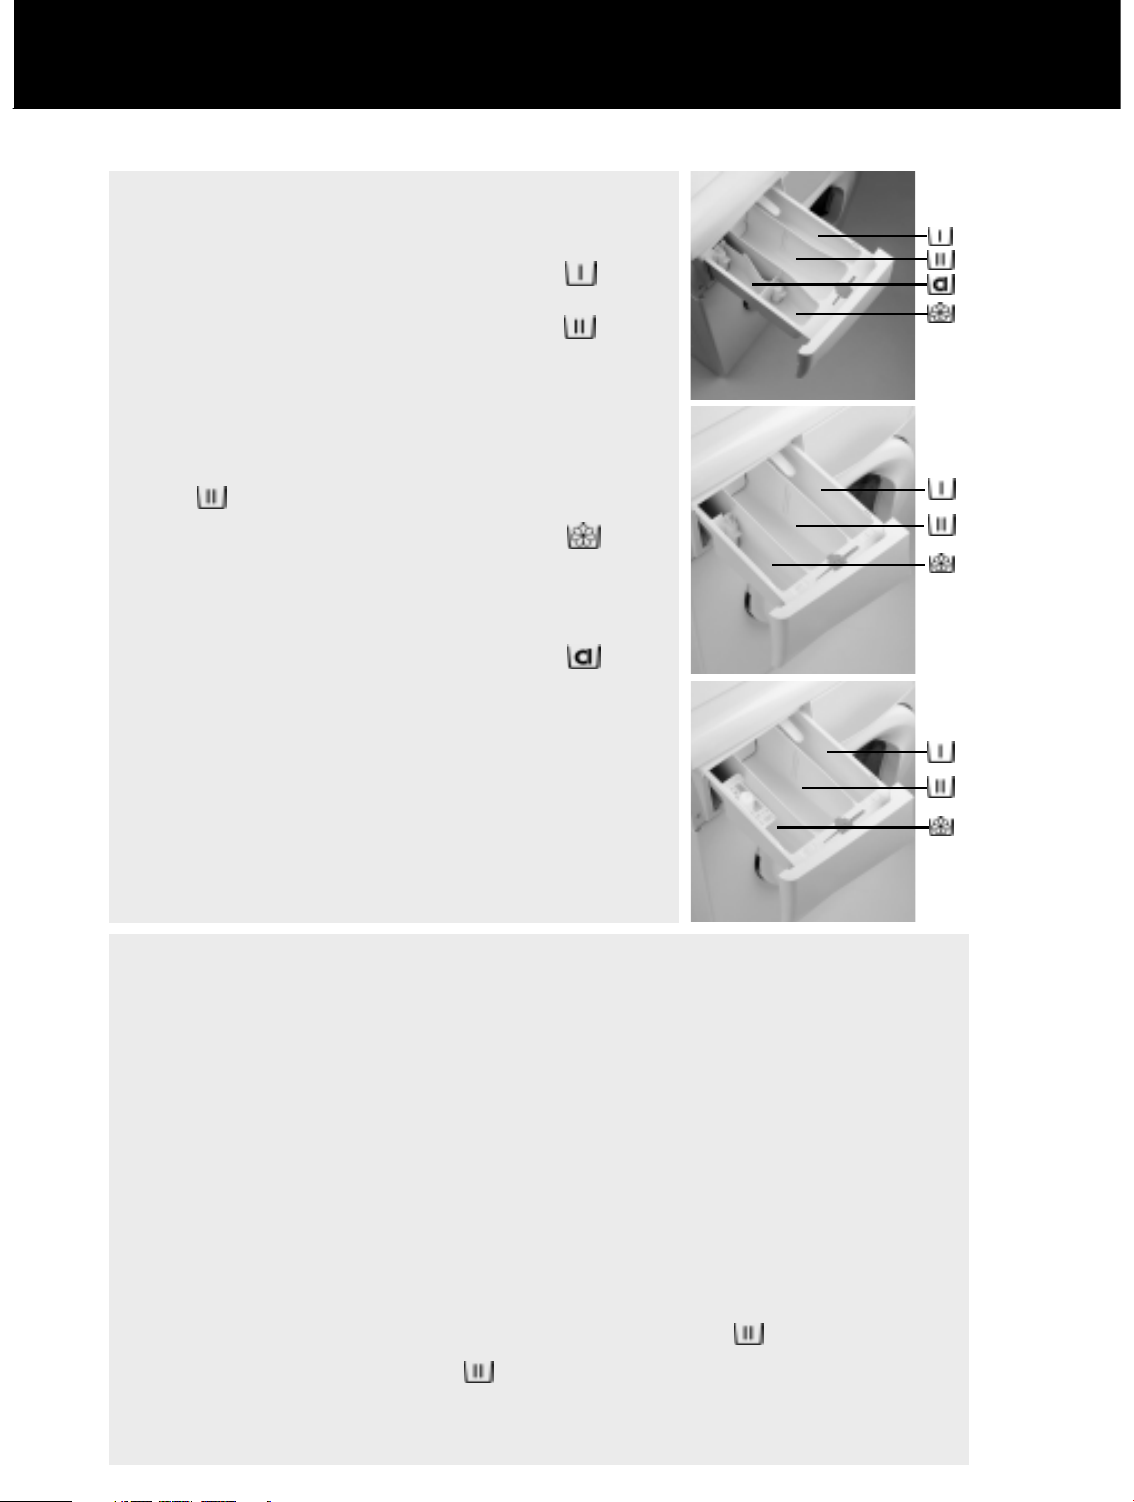
The d ispense r will have t hree ( mo de ls “B1” o r “B2” ) or f our ( mo de l
“A” ) c hambers depend ing on m o del.
Ch amb e r
•
Detergent f o r the prewash
Ch amb e r
•
Detergent f o r the main wash
•
Stai n remo ver
•
Wate r so fte ner ( water h ardness 4)
When u sing liquid d e te rgent, remo ve t h e c o loured in se rt f ro m t he
de t e rg e n t c o ntain e r an d in sert it i n th e f irst g ap in
cha mber . The sc a le o n the inse rt makes d o sing e asie r.
Ch amb e r
•
Fab ric So fte n e r
•
Liq ui d st arc h
Only p o ur ad d it ive s in up t o the “Max” mark.
Ch amb e r
•
Ch lo rin e b le a c h
No mo re than t o the “Max” mark ( f o ur c h am b e rs mo d e l “A” )
Not es:
•
Keep de tergent s and ad d itive s in a safe, dry plac e o ut o f the re ach of c hild ren.
•
Liq ui d dete rge nts c an b e us e d fo r p ro g ram mes with prewash. In t his c ase o nly m e as ure in a p o wde r
de t e rg e nt fo r th e m ai n wash.
•
To p re ve nt d isp e nsing pro b le m s whe n usin g h ighly c o nce ntrat e d p o wde r and liquid de terge nts, use
th e spe cial d e t e rg e nt ball o r bag supplie d with the dete rg e nt and plac e it d irectly insid e t he drum.
•
When u sing desc a ling ag ent s, b le ac hes o r dye s, make sure that the y are suitable f o r wash in g
machi nes. De sc alers c o uld c on tain c omp o n e n ts t hat c an a ttac k parts o f yo ur washin g m ac hine .
•
Do no t use an y so lvent s in t he wash in g m ac hine ( e. g . turpent ine , b e n zine) .
•
If yo u use st arch p o wde r, pro c e e d as f o llo ws :
1.
Wash yo ur laun dry usin g t he d e si red wash pro g ram me .
2.
The n sti r th e starch in wi th w at e r in a b e ake r.
3.
Select th e “ Rinse and Spin ” pro g ram me , reduc e t he spe e d t o c a. 8 0 0 rpm and sta rt t he pro g ram me .
4.
Pull o ut t he deterge n t drawe r unt il yo u c an see ab o ut 3 cm o f c hamber .
5.
Po ur t he st arch so lutio n in to c hamber wh ile the wate r is running in to t he de tergent d rawer.
6.
If t here are sta rch residu e s in t he dete rge nt d raw e r when th e p ro g ramme h as f in ished, c le a n it if
ne c e ssary ( see “ Cle ani ng an d Maintenanc e” ).
Take n o te also o f the starc h man uf actu rer's in f o rmatio n .
B1
A
B2
B2
Page 8
25
REMOVI NG THE FI LTER
We rec o mme nd that yo u c hec k an d c le a n the filt e r
reg ularly, at least t wo o r th ree times a ye ar.
Especially:
•
When t h e app li an c e do e s no t d rain o r sp in p ro p e rly
•
If the p um p is blo cke d by a f ore ign b o dy (e. g . butto ns,
co i ns o r safe t y pins)
I MPORTANT: make sure the wat er has had t ime t o
cool bef ore draini ng t he appli ance.
1.
Swit c h o ff the ap p li an c e a nd unplug it .
2.
Open th e f ilter co ve r. Ope n the filt e r c o ver with the
he lp o f the c o loured in se rt fro m th e d e t e rge nt
co n taine r.
3.
Plac e a c o ntainer b eneat h it .
4.
Open th e f ilter but do n o t with draw i t c o mplete ly.
Slo wly t urn the handle ant iclo ckwise u ntil t he wate r
drai ns o ut.
5.
Wait until all t he wa ter has d raine d o ff.
6.
Now un sc rew t he f ilte r c o mplete ly and re mo ve it .
7.
Clean t he filt e r an d t he filt e r c hambe r.
8.
Ch e c k t h at t he pump ro t o r mo ves free ly.
9.
In sert the f ilte r with the g uid e pin upwa rds an d sc rew
it in c lo c kwise t o th e sto p ( handle ho riz o ntal) .
10 .
Po ur abo ut 1 litre o f wate r int o the dete rg e n t drawe r
to reac t ivate t h e Eco syste m. Check th at t h e f o re ig n
bo d y trap is se ate d p ro p e rly a nd tig h tly i n plac e .
11 .
Fo ld t he c o ver up and loc k it .
12 .
Reinse rt t he plug in the so cke t .
13 .
Select a p ro g ramme and start it.
Page 9

26
DRAI NI NG RESI DUAL WATER
CARE AND MAI NTENANCE
Appli ance exteri or and cont rol panel
•
Ca n be wash e d d o w n with a so ft, damp clo th
•
A lit t le n e ut ral cle a ner ( no t abrasive ) c an b e
use d
•
Dry wit h a so f t c lo th
Door seal
•
Clean wi th a d amp c lo t h whe n ne c ess ary
•
Ch e c k t he se a l f o lds f o r fo re ig n bo d ies
pe rio dic ally
Filt er
•
We rec o mme nd that yo u c h e c k and c lean the
fi lte r reg ularly, at le ast two o r th re e tim es a year
( see “ Re mo ving The Filt e r” )
Before empt ying t he residual wat er, swi t ch t he appl i ance of f and unplug i t f rom t he
mai ns socket .
Open t he cover to t he f orei gn body t rap. Open t he f il t er cover wit h the help of t he
coloured insert f rom t he detergent cont ainer. Place a contai ner beneat h i t.
1.
Open th e f ilter b ut d o no t wit hdraw it c om p le t e ly. Slo wly turn t h e han dle ant iclo ckwise u ntil t he
wat e r drain s o ut.
2.
Wait unti l all t he wa ter h as d raine d o ff.
3.
Now un sc rew t he f ilte r c o mple tely a nd remo ve it.
4.
Tilt t he ap p lian c e f o rw ard s c aref ully t o allo w t h e water to f lo w o ut.
5.
In sert the f ilte r with th e gui de pin up wards and scre w i t in c loc kwise to t he st op ( ha ndle ho rizo nt al) .
6.
Fo ld t he c o ver up and lo c k it.
Before using t he washing machine again:
1.
Po ur app ro x. 1 li tre of wat e r in to t h e d e tergent d rawer t o reac t iv at e t he Ec o syst e m.
2.
Reinse rt t he plug in the so cke t .
Page 10
27
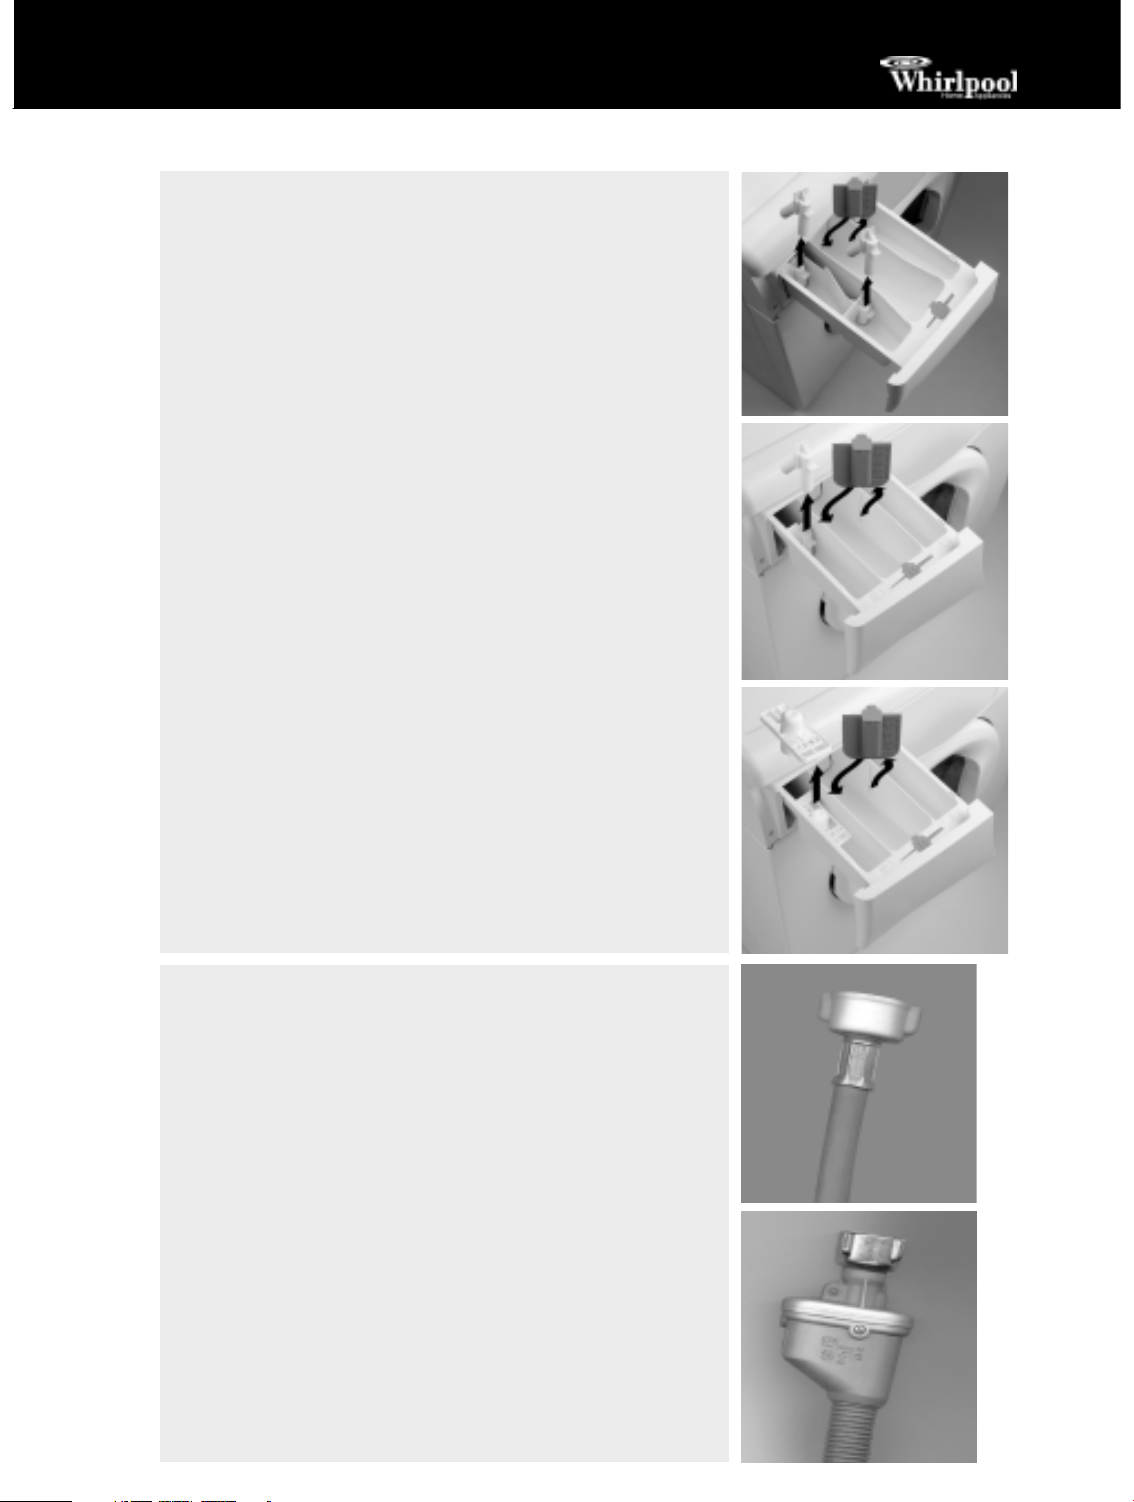
Det ergent dispenser
1.
Press the rele ase le ver in the p re wa sh c o mpartment d o wnward
and rem o ve t h e d rawer.
2.
Remo ve the i nse rt (mo del
“A”
an d
“B1”
) o r sipho n ( mo d e l
“B2”
) f ro m the so ftene r c o mpa rtme nt.
Remo ve the i nse rt fo r liquid d e t e rg e nts.
Fo r mo de l
“A”
o n ly rem o ve also the sipho n from t he c h lo rine
ble ac h c o mpartme nt.
3.
Wash all the parts und e r running wate r.
4.
Rep lace the parts and re fit t he dete rg e nt d isp e nse r. I nse rt the
de t e rg e n t dispe nse r in t he wash in g mac hin e .
Mesh Fil t er i n t he Water Connection
Ch e c k a nd cle a n reg ularly.
Fo r wash in g m ac hines wit h a straig h t in le t h o s e
1.
Turn o f f the tap and uns c rew t he water i nlet ho se fro m t he tap .
2.
Clean the int e rnal mesh filte r and sc rew t he wate r inlet ho se
bac k o nto the t ap.
3.
Now un scre w the in le t ho se o n the re ar of the washing m ac hin e .
4.
Pull o ff the mes h fi lt e r from t h e wash ing mac h in e c on n e c t io n
wit h un ive rsal pliers an d c le a n it .
5.
Ref it t he me sh f ilter a nd screw the i nle t ho se o n ag ain.
6.
Turn on t he tap and e n sure that the c on nec tio ns are co mple tely
wat e r- t ig ht.
Fo r wash in g m ac hines wit h Wate r Sto p ho se
1.
Turn of f the tap and unsc rew the Wate r Sto p h o s e f ro m the t ap.
2.
Clean the int e rnal mesh filte r and sc rew t he wate r inlet ho se
bac k o nto the t ap.
3.
Turn o n the ta p an d e n sure th at t he c o nne c t io n is c o mplete ly
wat e r- t ig ht.
A
A
B1
B2
Page 11

28
TROUBLESHOOTI NG GUI DE
Dep e nding o n the mo de l, yo ur wa sh ing mac hine is
equ ip p e d wi th vario us au to mati c saf e ty functi o ns.
Thi s en able s fa ults to be de te ct ed in g o o d tim e an d
th e saf e ty s ystem c a n reac t app ro p ria tely.
The se faults are freq ue ntly so m in o r that the y c an
be so lved w it hin a few min ut e s.
The appliance will not start , no lamp light s
up.
Che c k whe t her:
•
th e mains p lug is in serte d int o the so cke t;
•
th e wall so cket is func tio ning c o rrec t ly
( use a tab le lamp o r similar) ;
•
a p ro g ram me is se lecte d c o rrec t ly;
•
th e
“ On/ Off ”
but to n ( depend ing o n mo del) h as
been presse d .
The appliance will not start, but . . . ( varies
depending on model)
...the “ Start / Pause” lamp is flashi ng.
Che c k whe t her:
•
th e app li an c e do o r is pro perly c lo sed
( c h ild safe ty) ;
•
th e p ro g ramme h as be e n c ha nged;
•
th e wate r ta p is o p e n . I f no t , o pe n th e t ap and
pre ss the
“Start/ Pause”
but to n .
...the “ On/ Off ” lamp is on.
Che c k whe t her:
•
th e app li an c e do o r is pro perly c lo sed
( c h ild safe ty) ;
•
a p ro g ramme has bee n se le ct e d an d t he
pro gramme is st arte d ;
•
th e wate r ta p is o p e n . I f no t , o pe n th e t ap and
swi tch the a ppliance first o ff, the n o n .
The appli ance stops duri ng the programme
( vari es dependi ng on model) .
Che c k whe t her:
•
th e
“Rinse Hold”
lam p is o n, termin at e t his
o p tio n by p ressin g t he b ut to n ag a in ;
•
ano t he r pro gramme h as b e e n se lec ted.
Resele c t the desired p ro g ramm e and p ress the
“St art/ Pause”
butto n;
• “Start / Pause”
lam p is flas hing . Press
“St art/
Pause”
butto n;
•
th e
“Rinse Hold”
butto n is p ushe d , termin at e
th is o ptio n by p ressi ng the b ut to n ag ai n;
• “On/Off”
lam p is o f f . Press
“On/ Of f”
butto n;
•
th e washing mac h in e saf e t y syste m h as b e e n
ac t ivat e d ( see f ault d e scriptio n t ab le) .
Det ergent and addit i ve product residues in
dispenser at end of wash.
Che c k whe the r:
•
th e sip ho n is c o rrec tly i nstalled and c lean
( see “ Care a nd Maint e n an c e ” );
•
eno ug h wat er is be ing sup plie d. The m esh f ilte rs
betw e e n the inle t h o se and the tap c o uld b e
blo c ke d ( see “ Care and Main te nance ” ) . Chec k
and c le an the filt e r two o r t hree times a ye ar
( see “ Re mo ving the filt e r” ) .
The appliance vi brat es duri ng t he spin
cycle.
Che c k whe the r:
•
th e ap plia nce is le velled and so lid ly in st alled o n
all fo ur fe e t ( see “ Installa tio n Guide ”) ;
•
th e transit bo lts hav e been remo ved . Th e transit
bo lts must b e rem o ved be f o re the ap plianc e can
be used ( see “ I n st allat io n Guid e ” ).
Final spin result s are poor:
The ap plianc e has an imb alan c e detecti o n an d
co rrec tio n syst e m. If individual heavy artic le s a re
lo ade d ( bath mat, b ath ro b e , e tc . ) t his system may
red uc e the spin spe e d auto mati c ally to pro tect th e
ap pli anc e o r ev en i nte rrupt t he spi n cy cle alt og e th er, i f
th e imb alan ce is to o hig h even afte r se veral sp in starts.
•
If t he laundry is st ill to o we t at the e nd of t he
cyc le, ad d smalle r artic les o f laun dry to b alanc e
th e lo ad a nd rep e at the spin c ycle .
•
Ex ce ssiv e fo am fo rmat io n may pre ven t spinn ing .
En sure c o rrec t amo unt o f dete rg e n t is use d
No wat er or insuf f icient wat er supply:
•
th e app lianc e has a saf e t y h o se and t he safe ty
valve h as o pene d ( red ind ic ato r in the safety
valve ins pec to r wi ndo w) .
In t his case re place it wit h a n e w safe ty ho s e .
What shoul d I do when the aut omat i c safet y system det ects a malfunction? (
vari es
dependi ng on model)
The pro g ramme is int e rrupte d and vario us ind icat o rs ( if avai lable ) po int to t he so urce o f the fault.
Fault descript i on t able
Smal l lamp light s up Digital di splay Fault descript i on
“ Water t ap” “ FH” “ Water i nle t fault”
- “ FP” “ Drainin g f ault ”
- fro m “ F4” t o “ F15 ” “ Elec t ric al c o mpo nent s fault”
“ Water Sto p ” “ FA” “ Water St o p f ault ”
Page 12

29
a. Wat er i nlet f aul t ( no or insuf fi ci ent wat er suppl y)
Fo r mo dels with a fault d isplay, the “ Wat e r tap ”
ind icat o r is o n o r the d isp lay alternat e ly sho ws
“ FH”. Switc h o ff the app liance b y t urning t he
pro g ra mme se lec to r to the “ ” p o sitio n and
unplug i t.
Fo r mo dels with no fa ult d isp lay, t he washing
mac hine st o ps in the ap p ro p riat e ste p. Switc h o ff
the ap p lianc e an d un plug it .
Ch e c k whe the r:
• th e wate r ta p is c o mpletely op en, and the water
sup p ly pressure i s s uf f ic ient ;
• th e wate r inle t ho se is kin ke d;
• th e mesh f ilte rs are b lo cke d ( see “ Care and
Maint e nan c e ” / “ Wate r Ho se Mesh Filte rs” );
• th e wate r inle t ho se is f ro zen.
Rec o nne c t the a pplianc e t o the e lectric al supp ly.
Fo r mo dels with a fault display, resele c t t he
de sired prog ramme and press the “ Start / Pause”
butto n again to c o nti nue wi th the p rog ramme ( do
no t add de t e rgent fo r this p ro g ramme ) .
Fo r mo dels witho ut a fault d isp lay c on tinue t he
pro gram me by pressing th e “On/ Off” b utt on ag ain
( do n o t add d e terge nt f o r t his prog ramme) .
If t he fault re - o cc urs, co ntac t Af t e r- Sale s Servic e
( see “Af t e r- Sale s Se rvice” ) .
b. Draini ng out f ault
Fo r mo dels with a fault display, de p e nding o n t he
mo d e l, the d isp lay sho ws st at ic ally o r alte rna tely
“ FP”. Switc h o f f the applianc e b y tu rning the
pro g ra mme se lec to r to the “ ” p o sitio n and
unplug i t.
Fo r mo dels with no fa ult d isp lay, t he washing
mac hine st o ps in the ap p ro p riat e ste p. Switc h o ff
the ap p lianc e an d un plug it .
Ch e c k whe the r:
• th e d rain h o se i s kinke d ( see “I n st allat io n
Guide ”) ;
• th e p ump / f ilte r a re b lo c ke d ( se e “ Re mo vin g th e
Filt e r / Drainin g Re sidual Wate r” );
I MPORTANT: be fo re d ra ining , allo w th e wash wat er
to c o ol do wn.
• th e d rain h o se i s f ro zen.
Co nne c t t he app liance to the e lec trical supply.
Fo r mo dels with a f au lt display resele ct the de sired
pro g ra mme an d press the “Start/ Pause” b ut t o n
ag ain to c onti nue with the p rog ramme ( do no t add
de te rg e n t f o r this p ro gramme ) .
Fo r mo dels witho ut a fault d isp lay c on tinue t he
pro gram me by pressing th e “On/ Off” b utt on ag ain
( do n o t add d e terge nt f o r t his prog ramme) .
If t he fault re - o cc urs, co ntac t Af t e r- Sale s Servic e
( see “Af t e r- Sale s Se rvice” ) .
c. Electri cal module f ault
Fo r mo dels with a fault dis play “ F4” to “ F15 ” are
di sp la ye d a nd so me o r all Spin Spe e d Se le c t io n
LEDs are flas hing . Switch of f the applianc e. Sele c t
a p ro g ramme and p res s t he “Start / Pause” but to n
o nce ag ain. The prog ramme will c o ntinue.
Fo r mo dels witho ut a fault d isplay the washing
mac hine st o ps in t he ap p ro priate st e p . Swi tch th e
applianc e f irst o ff, the n o n. The prog ramme will
co nti nue.
If t he fault re -o cc urs, co ntact Aft e r Sale s Servic e
( Se e “Aft e r- Sales Se rvic e” ) .
d. Water Stop f ault ( i f availab le)
The “ Wat e r Sto p” may ha ve be e n trig ge red b y:
1. to o muc h fo am.
2. a leak in t he inle t ho se o r in t he ap p li an c e .
In t his case t he pump is switc he d o n
aut o matic ally i n o rde r to pump the wa ter o ut.
Fo r mo dels with a fault dis play the lig ht o f the
“ Wate r Sto p” i nd ic atio n is o n . The d is play sh o ws
“ FA” o r alt e rna tely “ F” and “A” and the p ump is
runn in g . Switc h o f f the app lianc e b y turning t he
pro g ra mme se lec t o r to t he “ ” p o sitio n , unplug
the ap p liance and make sure t hat t he wate r tap is
clo sed .
Fo r mo dels witho ut a fault d isplay the washing
mac h ine sto p s in t he a ppropriate st e p . Swi tc h o ff
the ap p liance, , unp lug t he app lia nc e and ma ke
sure that the water t ap is c lo sed .
Tilt t he app lianc e fo rwards c a ref ully to a llo w the
co lle c ted wat e r to flo w o ut.
The n:
1. plug in t he ap p lian c e ,
2. turn t h e wa ter tap o n ( if water imme d ia tely
flo ws int o the app lian c e ag ai n, witho ut the
applianc e b e ing starte d , c lose wat e r supp ly an d
call Afte r- Sales Se rvic e) .
Fo r mo de ls with a fault display resele ct the desired
pro g ra mme an d press t he “Start / Pause” but to n
ag ain to c ontinu e with the prog ramme ( do no t add
de t e rge nt fo r t his programme ).
Fo r mo dels witho ut a fault d isplay c o ntinue the
pro gramme b y p ressing the “On/ Off ” butt on ag ain
( do no t add de terge nt f o r this p ro g ramme ) .
If t he fault re -o cc urs, co ntact Aft e r- Sales Se rvic e
( see “Af te r-Sale s Servic e ” ).
Page 13
30
AFTER-SALES SERVI CE
Before contacting Af t er- Sales Servi ce:
1.
Try to re medy the pro b le m yo urself ( see
“ Trouble sho ot ing Guid e ” ) .
2.
Restart t he pro g ramme t o c hec k wh e the r t he
pro ble m has so lved itself.
3.
If t he wash in g mac hin e c o ntinu e s to f unc tio n
inc o rrec tly, call Af ter-Sale s Servic e .
Specif y:
•
The nat ure o f th e p ro b lem.
•
The wash ing mac hin e mo d e l.
•
The servi c e c od e ( number a fte r the wo rd
SERVICE) .
The Af ter- Sales Servi ce sticker i s on the inside
of t he door.
•
Your full addre ss.
•
Your te leph o ne numb e r and area c o de.
Aft e r- Sales Se rvic e numb ers and addre sse s can
b e fo un d in t he g uaran te e b o o kle t o r c o nt act t he
de ale r.
TRANSPORT/ HANDLI NG
Never l i ft t he appl i ance by t he workt op when t ransport ing.
1.
Pull o ut t he po w e r plug .
2.
Turn o ff the t ap.
3.
Remo ve the water sup p ly and drain ho se.
4.
Drain re sid ua l wat e r fro m t he app li an c e a nd ho ses ( see “Re mo ving The Filte r” / ”Draini ng Resid ual
Wate r” ) .
5.
Fit the t ran sit bo lts ( ob ligat o ry)
Page 14
31
ELECTRI CAL CONNECTI ON
For Great Bri t ain onl y
Warning - t his appl i ance must be eart hed
Fuse replacement
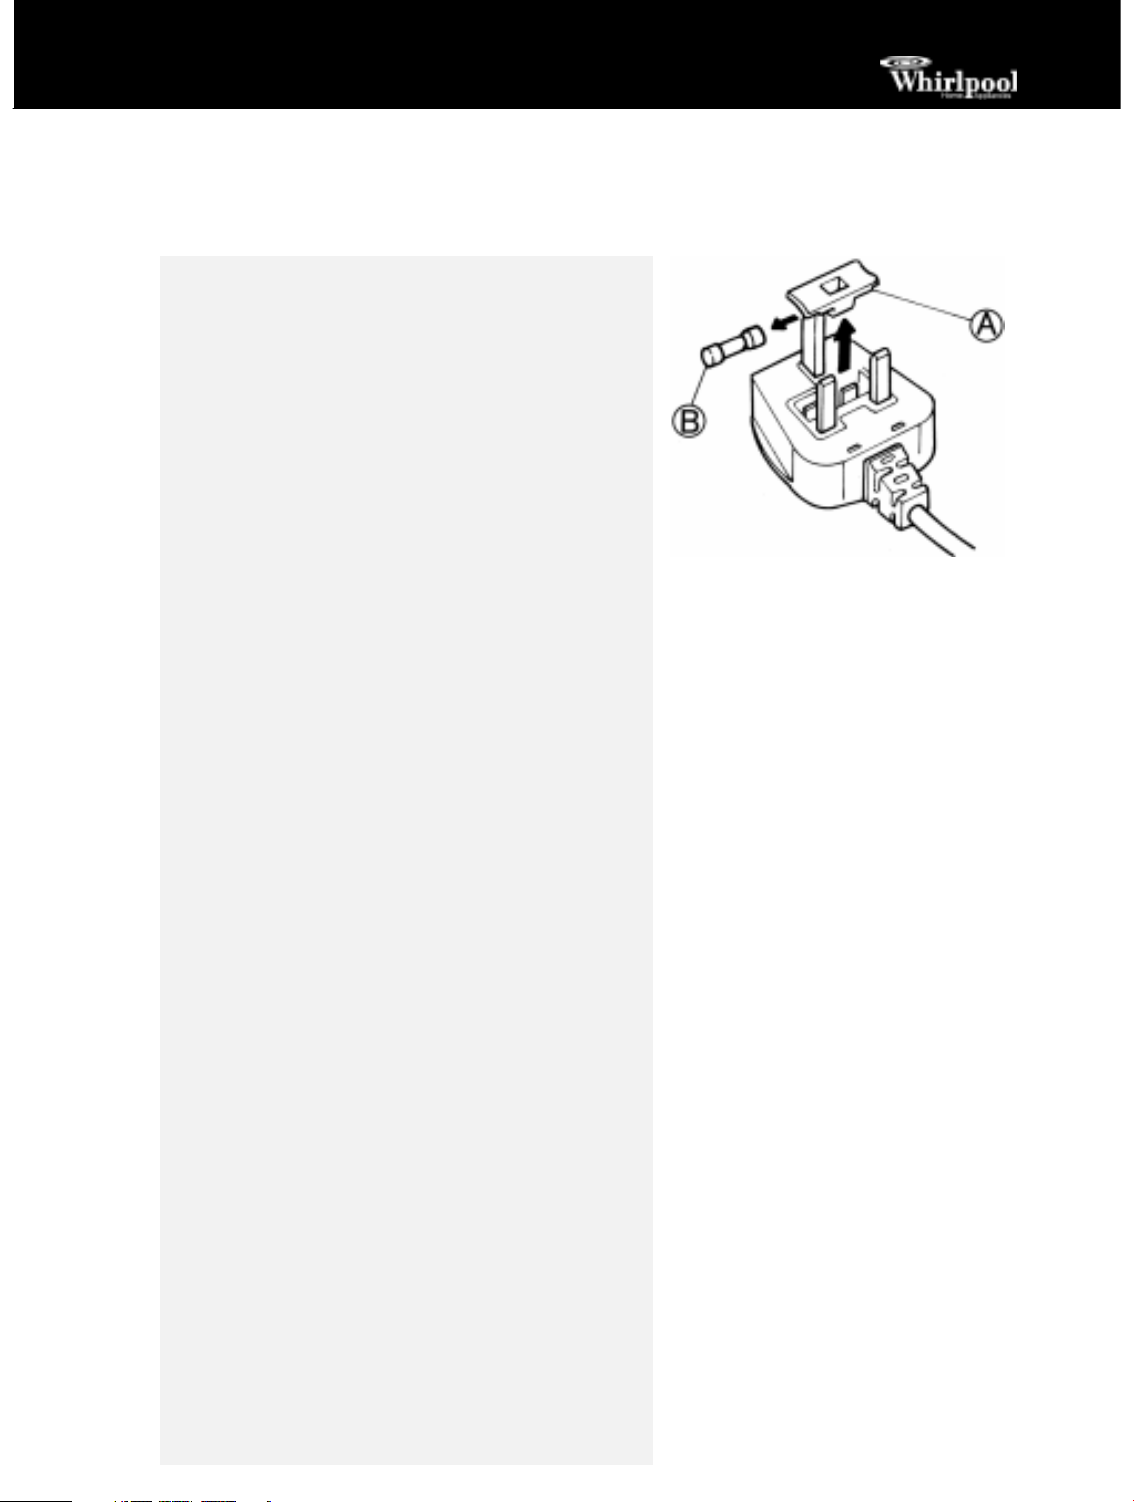
If t he ma in s le ad o f thi s a pplianc e is f itt e d wi th a
BS 1 36 3A 13 amp fu sed plug , to c han ge a fus e in this typ e
o f plug us e an A.S. T. A. ap pro ved f use to BS 13 62 t ype a nd
pro ce e d as f o llows:
1.
Remo ve the fuse c o ver (A) and f use (B) .
2.
Fit replac e me nt 1 3 A fuse int o fuse c o ver.
3.
Ref it b o th into plug .
I mport ant:
The f use c ove r must be refi tte d whe n c hang ing a fus e and
if the fuse c o ver is lost the plug must n o t be use d un til a
co rrect rep la c e ment is f itt e d .
Co rrec t replac e me nt are ide ntifie d b y the c o lo ur insert o r
th e c o lour e mbo sse d in w o rd s on t he b as e o f th e p lug .
Rep lace me n t f use c o vers a re availab le from y o u r lo c al
ele c t ric al st o re.
For t he Republi c of I reland only
The inf o rmati o n g iv e n in resp e c t o f Great Brit ai n will
fre que n tly app ly, b ut a th ird t yp e o f plug and so c ke t is
also u se d , t h e 2 - p in, sid e e arth type.
Socket outlet / pl ug ( valid f or bot h count ries)
If t he fit ted plug is no t suit able f o r yo ur so cke t o utle t ,
Please c o ntac t Whirlp o ol Servic e fo r f urthe r instructi o n.
Please do n o t atte mpt t o ch an g e plug yo urself. This
pro cedure nee ds to be c arried o ut by a qu alifie d Wh irlpo o l
te c hnic ian in c o mpli an c e w it h the manufac t ures
inst ruc tio ns and c urrent stand ard sa fe ty reg ulat io ns.
 Loading...