

Page 1

YOUR ELECTRONIC WASHING MACHINE GB
This washing machine is equipped with all-e lectron ic con trol, wh ich ope ns up a host of possi bi litie s for
you. Amongst others, these include: precise determination of load,
imbalance detection and correct ion system, fast prog ramme changing, accurat e programme sequence
indicator, start delay, soaking, safety feature
The
•
•
•
•
•
load determining facility
optimises the washing procedure accordingly. The machine adapts automatically to the prevailing
circumstances: if you are washing a minimum load, the programme carries out only two rinse cycles
during the cotton and synthetics programmes, while keeping the rinse results very good. You save
on water, energy and time as a result.
Thanks to its
circumstances, achieving favourable consumption figures even in the case of small loads. Water
supply temperature and pressure, quantity of water and degree of loading, are the parameters taken
into account. The progamme duration is influenced by these factors. This is checked and updated
at particular stages of the programme. Consequently, the programme duration can vary by up to 60
minutes.
The
imbalance detection and correction system
imbalance is too great on initiating a spin cycle. This may occur with a badly distributed load or in
the case of single large laundry item. The laundry is re-distributed and the spin speed is not
increased until satisfactory laundry distribution has been achieved.
If you happen to have selected the wrong programme, you can quickly change programme at any
time, without needing to add new detergent. Select the desired programme and start the
appliance. The new program resumes the wash programme at the same stage at which the
preceding one was interrupted.
The
accurate sequence indicator
LED indicators coming on: after starting the programme, the programme sequence indicator
moves from left to right passing through “Wash”, “Rinse”, “Spin”. Once the current stage of the
programme has been completed that LED indicator goes out.
Dynamic-Sense Technology
evaluates the laundry load at the start of the wash cycle and
“intelligent (anti-flood) Water Stop system”
the appliance adapts optimally to the prevailing
protects your washing machine if the
shows what stage of the programme has been reached by
Dynamic-Sense Technol ogy
,
.
The washing process is subdivided into three phases which corresponds to the three wash LEDs:
1.
Enzyme phase
dissolved.
2.
Heating-up phase
3.
Washing phase
Using the
•
hours in advance. You can set th e programme start t ime so that t he laun dry will b e compl eted by a
particular time, thus allowing you to t ak e adv an ta ge of f av oura bl e l owe r e lec tricity tariffs at night.
In order to soak particularly heavily soiled colourfast laundry, select the “Coloured” programme and,
•
once the water has been fed in, press the
you can leave the laundry to
You can continue the programme by pressing the
Depending on the washing machine type, it may be equ ipped with the anti-fl ood s afety fea tur e
•
“
intelligent Water Stop system
water leakage and brings this to your attention with an audible alarm.
“Start Delay”
: at low temperature, organic soiling such as e.g. blood, milk and egg are
: the water is heated up to the selected washing temperature.
: the laundry is washed and, if the temperature is raised, whitened.
option (if present) you can select the programme start time from 1 to 19
“Start/Pause”
as long as you want.
soak
”: Even while switched off your washing machine is able to detect
button. The programme is interrupted and
“Start/Pause”
button once again.
21
Page 2
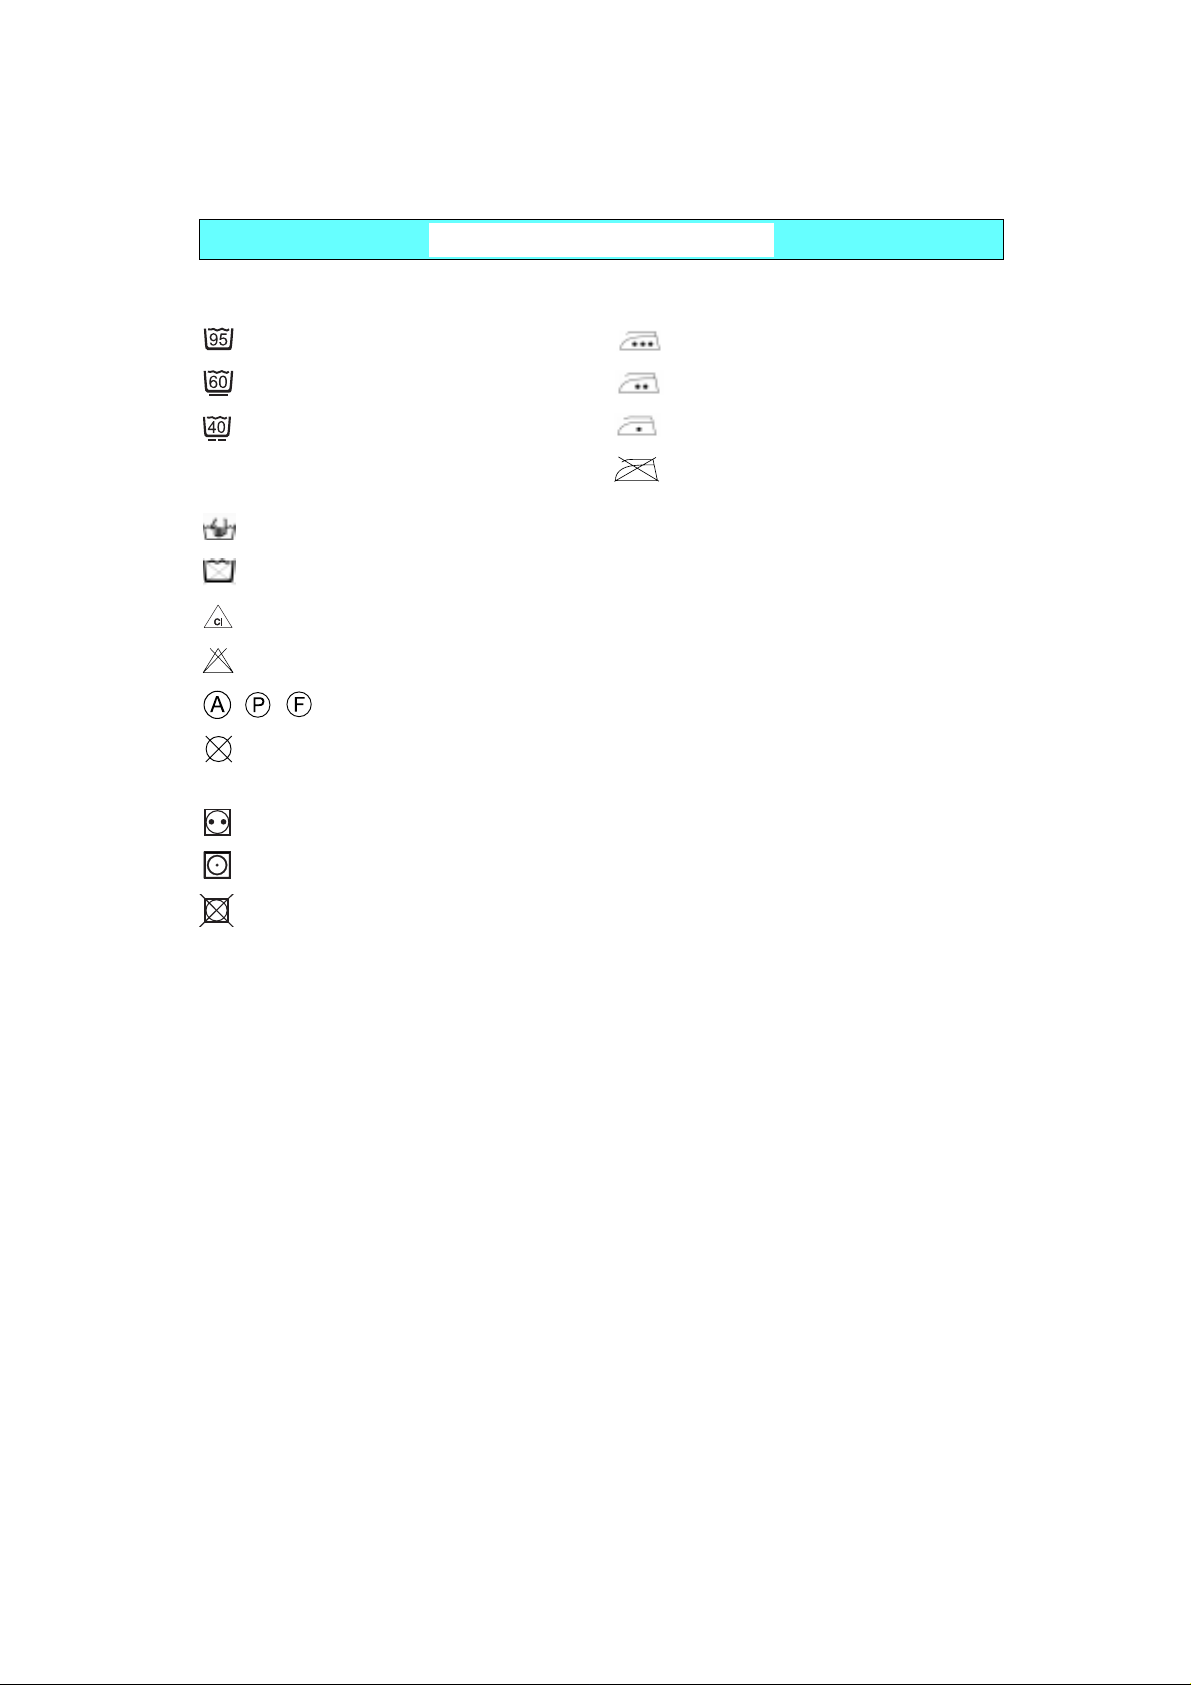
LAUNDRY CARE LABELS
WASH
Resistant cotton
Synthetics
Delicates
The figures correspond to the maximum permitted
washing temperatures.
Hand-washed items
Do not wash
Chlorine bleaching possible
Chlorine bleaching not possible
Dry cleanable
Not dry cleanable
DRY
Dry at normal temperature
Dry at a lower temperat ure
IRON
Hot iron
Use medium hot iron
Do not use hot iron
Do not iron
Do not dry in tumble dryer
22
Page 3
QUICK REFERENCE GUIDE GB
BEFORE USING THE APPLIANCE FOR THE FIRST TIME:
• FOLLOW THE “INSTALLATION INSTRUCTIONS
• REMOVE THE TRANSIT BOLTS BEFORE USING THE APPLIANCE.
• First wash cycle without laundry:
Turn on the tap.
1.
Close the appliance door.
2.
Pour a small amount of detergent (about 30 ml) into the detergent dispenser .
3.
Select a short program (see programme chart).
4.
The
5.
6.
This initial cycle serves to eliminate any water remaining after your appliance was tested at
the factory.
NORMAL DAILY USE:
1.
2.
3.
4.
5.
6.
IMPORTANT:
During the first 15 minutes of the “Cotton”, “Coloured cotton” and “Synthetics”
programmes the door can be opened for adding laundry (“Door Free” indicator).
This is not possible if “Rapid” is selected.
“Power On”
The pilot lamp of the
Press the
Turn on the tap.
Sort the wash according to fabric type and colour and load the appliance.
Close the door.
Put in detergent and any additives required into the dispenser.
Select the programme, the temperature and any special options required.
The pilot lamp of the
Press the
indication shows that the machine is switched on.
“Start/Pause”
“Start/Pause”
“Start/Pause”
“Start/Pause”
button.
button.
button flashes.
button flashes.
”.
23
Page 4

GB CONTENTS
YOUR ELECTRONIC WASHING MACHINE
LAUNDRY CARE LABELS
APPLIANCE AND ACCESSORIES
CHILD SAFETY
PROTECTING THE ENVIRONMENT
SAFETY INSTRUCTIONS
TRANSPORT / HANDLING
PREPARING THE WASH
DETERGENT AND ADDITIVES
DYEING AND BLEACHING
PAGE
PAGE
PAGE
PAGE
PAGE
PAGE
PAGE
PAGE
PAGE
PAGE
21
22
25
25
26
26
26
27
28
29
PROGRAMME SELECTION / PROGRAMME START
START DELAY
DOOR LOCK / PROGRAMME END
CHANGING / INTERRUPTING /
CLEARING PROGRAMME
REMOVING THE FILTER / DRAINING RESIDUAL WATER
CARE AND MAINTENANCE
TROUBLESHOOTING GUIDE
AFTER-SALES SERVICE
INSTALLATION INSTRUCTIONS
PAGE
PAGE
PAGE
PAGE
PAGE
PAGE
PAGE
PAGE
PAGE
29
29
30
30
30
32
33
35
35
24
Page 5
APPLIANCE AND ACCESSORIES
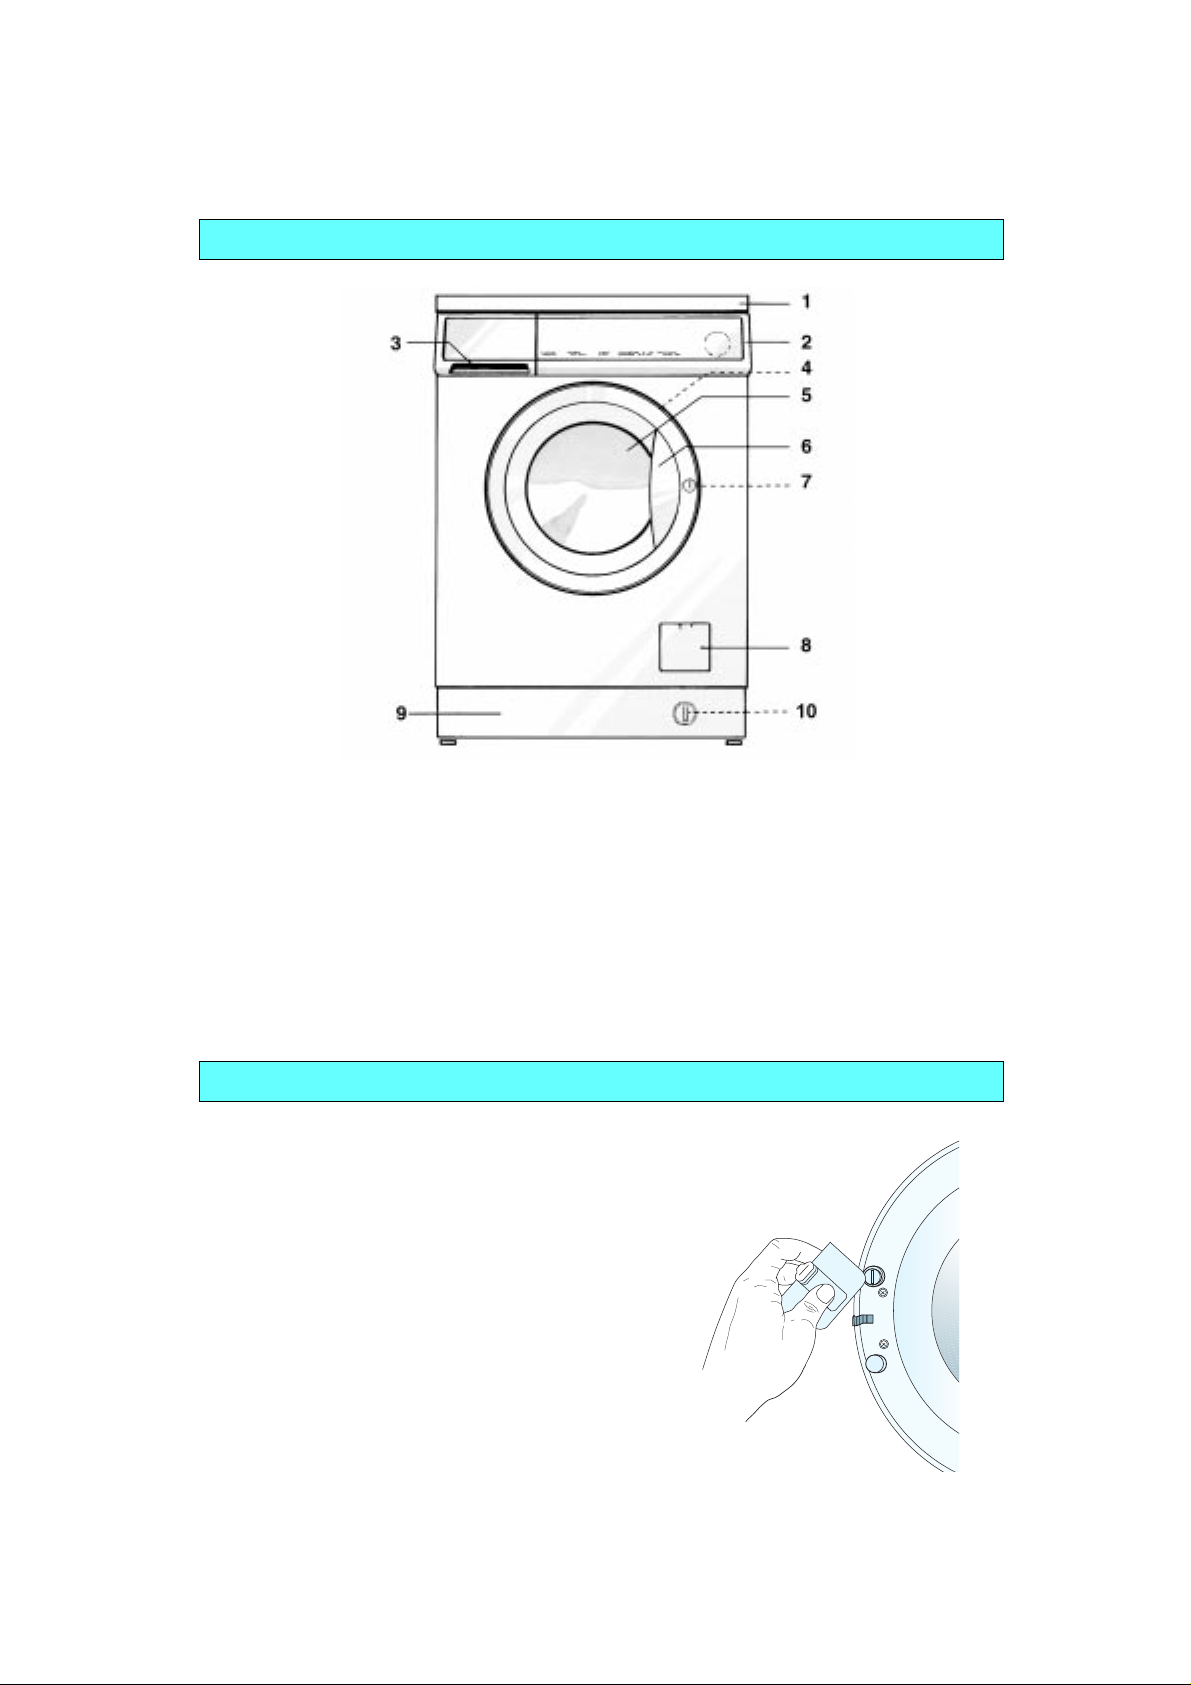
1. Worktop
2. Control panel
3. Detergent dispenser
4. After-Sales Service sticker (on the back side of the door)
5. Door
6. Door handle
- To open the door press the button on the inside of the handle and pull
- Close the door by pushing it firmly (the lock will click into place)
7. Child safety (inside door)
8. Filter (behind cover)
9. Plinth
10.Residual water drain (behind the plinth)
CHILD SAFETY
To protect the appliance from improper use, turn the plastic
screw on the interior of the do or using a coin or the thick
rounded plastic projection on the coloured insert from the
detergent dispenser.
1. Slot vertical: safety position, i.e. the door will not lock.
2. Slot horizontal: normal position, i.e. the door can be
locked again.
25
Page 6

PROTECTING THE ENVIRONMENT
PACKING
•
The packing material is 100% recyclable
(marked with the recycling symbol ).
Adhere to local regulations when disposing of
packaging material.
•
The packaging material (plastic bags,
polystyrene parts, etc.) is potentially
dangerous and must be kept out of reach of
children.
PRODUCT
•
The appliance is made from recyclable
materials and must be scrapped in
accordance with local waste di spo sal
regulations.
•
Before scrapping, cut off the po wer c ab le so
the appliance cannot be connected to the
mains.
ENVIRONMENTAL TIPS
•
Do not exceed the deterg en t do sag es
indicated in the Manufactu re r’s in st ru ct ion s.
•
The Eco Flap - a special system in the outlet
will prevent detergent loss from t he d r um t o
avoid detergent loss into the environment.
•
Remove detergent from compartment if you
intend scrapping your appliance.
MAXIMIZE THE LOAD SIZE
•
Achieve the best use of energy, water,
detergent and time by using th e
recommended maximum load size.
DO YOU NEED TO PREWASH?
•
Use “Prewash” for heavily soiled laundry only!
Save detergent, time, water and between 5 to
15% energy consumption by not s el ectin g
“Prewash” for slight to normally soiled laundry.
IS A HOT WASH REQUIRED?
•
Pretreat stains with stain remover or soak
dried in stains in water before washing to
reduce the necessity of a hot wa sh pro gram.
•
Save up to 50% energy by using a 60° C
instead of a 90° C wash programme or a
40° C instead of a 60 °C wash programme.
BEFORE USING A DRYING
PROGRAMME
•
Save energy and time by selecting a high spin
speed to reduce the water content in laundry
before using a drying programme (for
machines with adjustable spin s pee d).
SAFETY INSTRUCTIONS
•
Use the appliance only for domestic washing
and for its intended application.
•
Ensure the installation of electrical and water
connections have been made in accordance
with the Manufacturer’s instructio ns and in
observance of local safety regulations (refer to
“Installation Instructions”).
•
Before cleaning or maintaining the appliance ,
switch it off and unplug it.
•
When the appliance is not in use unplug it and
turn off the tap.
TRANSPORT / HANDLING
1.
Unplug the appliance.
2.
Turn off the tap.
3.
Remove the water supply and drain hose.
•
Do not attempt to force the do or o pe n.
•
Do not allow children to play with the
appliance or enter the drum. Do not rest any
weight on the door.
•
Packing materials can be dangerous for
children: keep all packing materials (plastic
bags, polystyrene, etc.) well out of their rea ch.
•
The appliance conforms to European safety
regulations, to Directive n . 93 /6 8/ EEC an d
standard 93/68/EC.
4.
Eliminate all water from the hoses and from
the appliance (see “Removing the Filter /
Draining Residual Water”).
5.
Fit the transit bolts (obligatory)
(see “Installation Instructions”).
26
Page 7
PREPARING THE WASH
1. Sort the laundry according to…
• Type of fabric / care label symbol
Cottons, mixed fibres, easy c are/ sy nth et ic s,
wool, handwashed items.
• Colour
Separate whites and coloureds. Wash new
coloured items separately.
•Size
Wash items of different sizes in the same load
to improve washing efficiency and distri bute
the load more evenly inside the drum.
• Fabric delicacy
Wash delicate articles separately: use a
special programme for Pure New Wool ,
curtains and other delicates. Always remove
curtain glides or wash curtains wi th the gl ides
inside a cotton bag.
Use the special program for handwash
fabrics.
Wash stockings, belts and other small items or
articles with hooks (e.g. bras) in special cotton
bags for washing machines or in zipped pillow
cases.
2. Empty pockets
Coins, safety pins and similar can d amage
your laundry and the appliance drum and tub.
3. Fasteners
Close zips and fasten buttons or hooks; loose
belts or ribbons should be tied together.
STAIN REMOVAL
• Blood, milk, egg and other organic substances
are generally removed by the enzyme phase
of the programme.
• To remove red wine, coffee, tea, gra ss an d
fruit stains etc. add a stain removing agent in
detergent dispenser compartment .
• Particularly stubborn stains should be treated
before the wash.
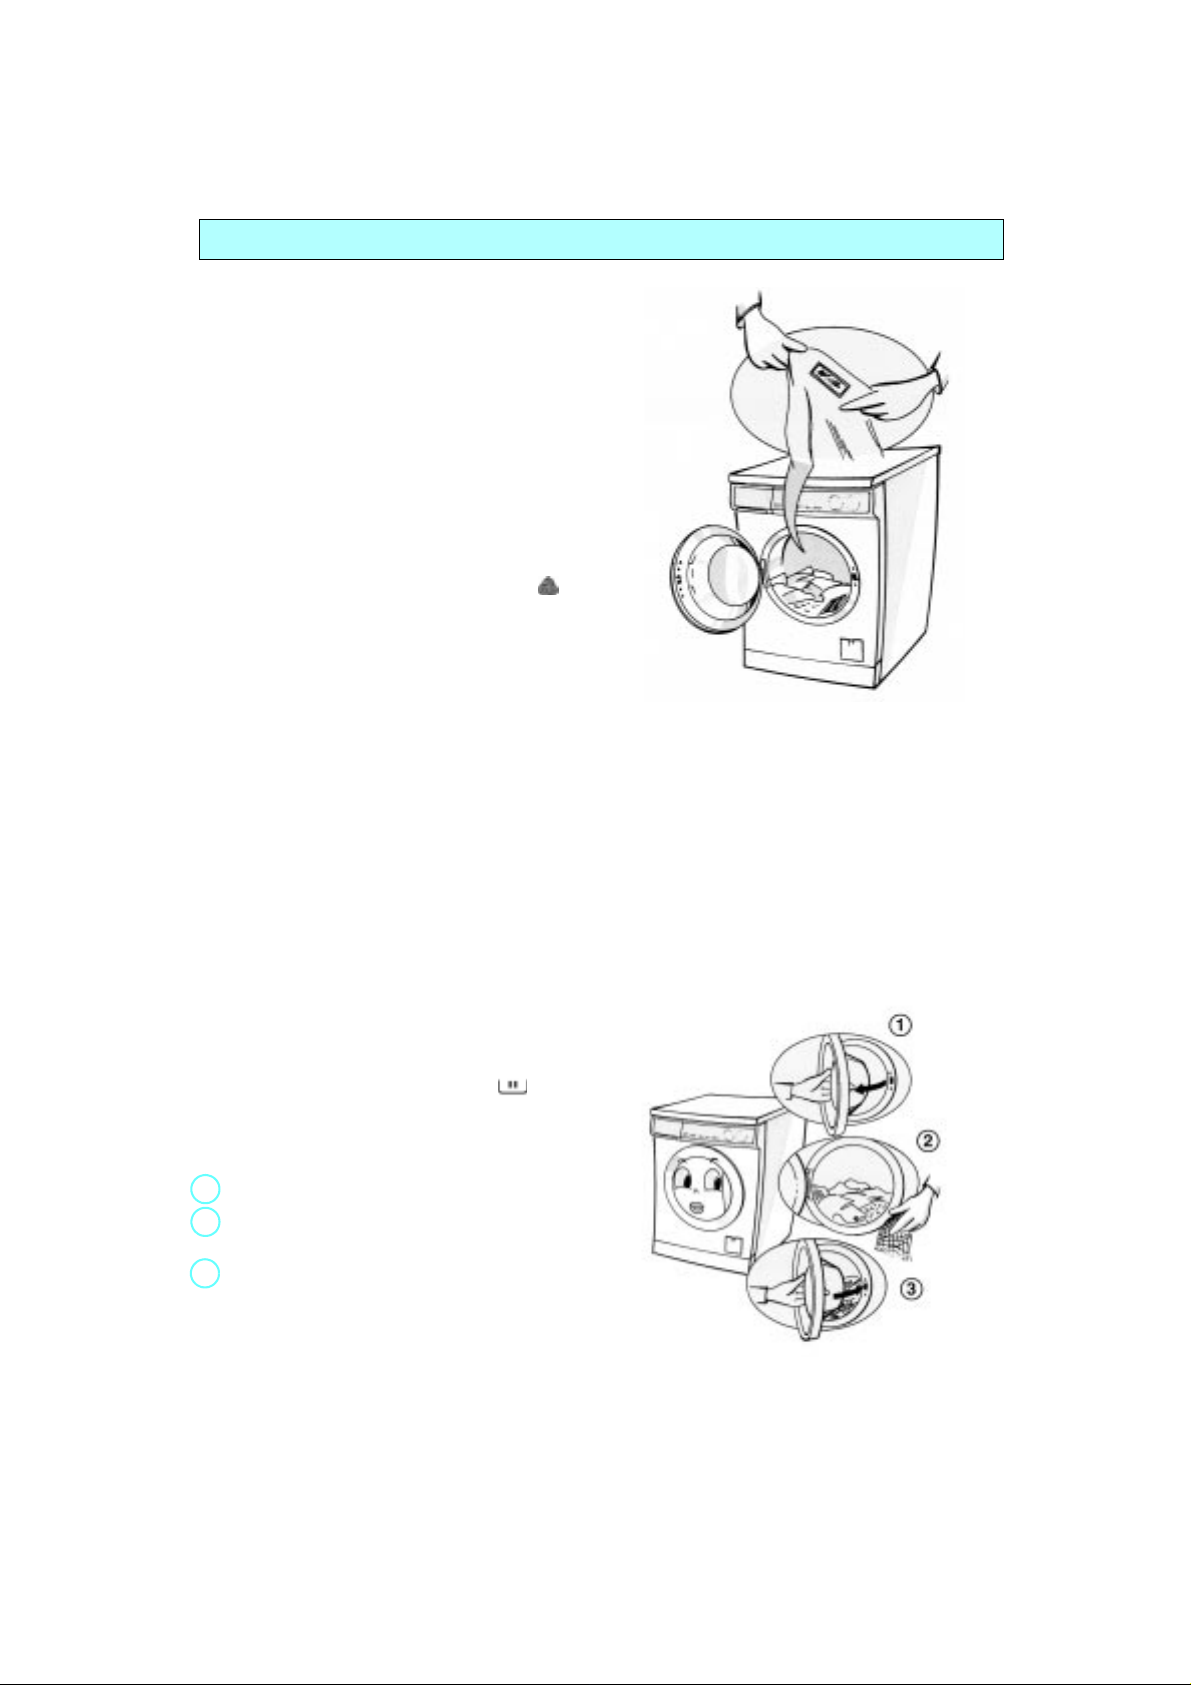
LOADING THE LAUNDRY
1. Open the door.
2. Unfold the laundry and place it loosely in the
drum.
3. Close the door.
RECOMMENDED LOADS
See separate programme chart.
N.B. Overloading will result in unsatisfactory
washing results and creased laundry.
27
Page 8
DETERGENT AND ADDITIVES
CHOOSING THE RIGHT DETERGENT
The type of detergent depends on:
•
type of fabric (cottons, easy ca re /s ynt he ti cs,
delicate items, wool).
Note:
use only specific detergents for wool.
•
colour;
•
washing temperature;
•
degree and type of soiling.
Notes:
•
Whitish residues on dark fabrics are ca use d
by insoluble detergents components used in
modern phosphate-free powder detergents.
If you notice this problem, shake or brush the
affected items or use a liquid detergent.
•
Keep detergents and additives in a d r y p la ce
and out of reach of children.
•
Use only detergents and a dditives specificall y
produced for domestic washing machines.
•
If you use descaling agents, dyes or bleaches ,
make sure they are suitable for washing
machine use. Descaler could contain
components that can attack pa rts of your
washing machine.
WATER HARDNESS
Water hardness
area
1
2
3
4
Characteristics
soft
average
hard
very hard
•
Do not use solvents (turpentine , be nzi ne ,
etc.).
Do not machine wash fabrics that ha ve b een
treated with solvents or flammable liquids.
DOSAGE
Follow the instructions on the de terg en t pack in
relation to:
•
the degree and type of soiling;
•
the size of the load;
-
full load: follow the detergent
Manufacturer’s instructions;
-
half load: 3/4 the amount used for a full
load;
-
minimum load (about 1 kg): half the
amount used for a full load;
•
water hardness in your area (ask for
information from your water company): soft
water requires less detergent than hard water.
Notes:
•
Too much detergent can result in excess fo am
formation, which reduces washing e ff i ci en cy.
If the appliance detects ex cessive foam it may
prevent spinning.
•
The laundry will become grey if you use too
little detergent. Too little detergent will also
lead to increased scale deposi ts on t he
heating element and drum.
German scale
°dH
0-7
7-14
14-21
over 21
French scale
over 37
°fH
0-12
12-25
25-37
Clarke scale
°eH
0-9
9-17
17-26
over 26
Adjust the water hardness level po in ter in t he de te rgen t di sp ens er i n ac cord anc e wit h th e h ard nes s of
the water in your area. Move t he po in te r si dew ays t o the re qu ired p osi ti on.
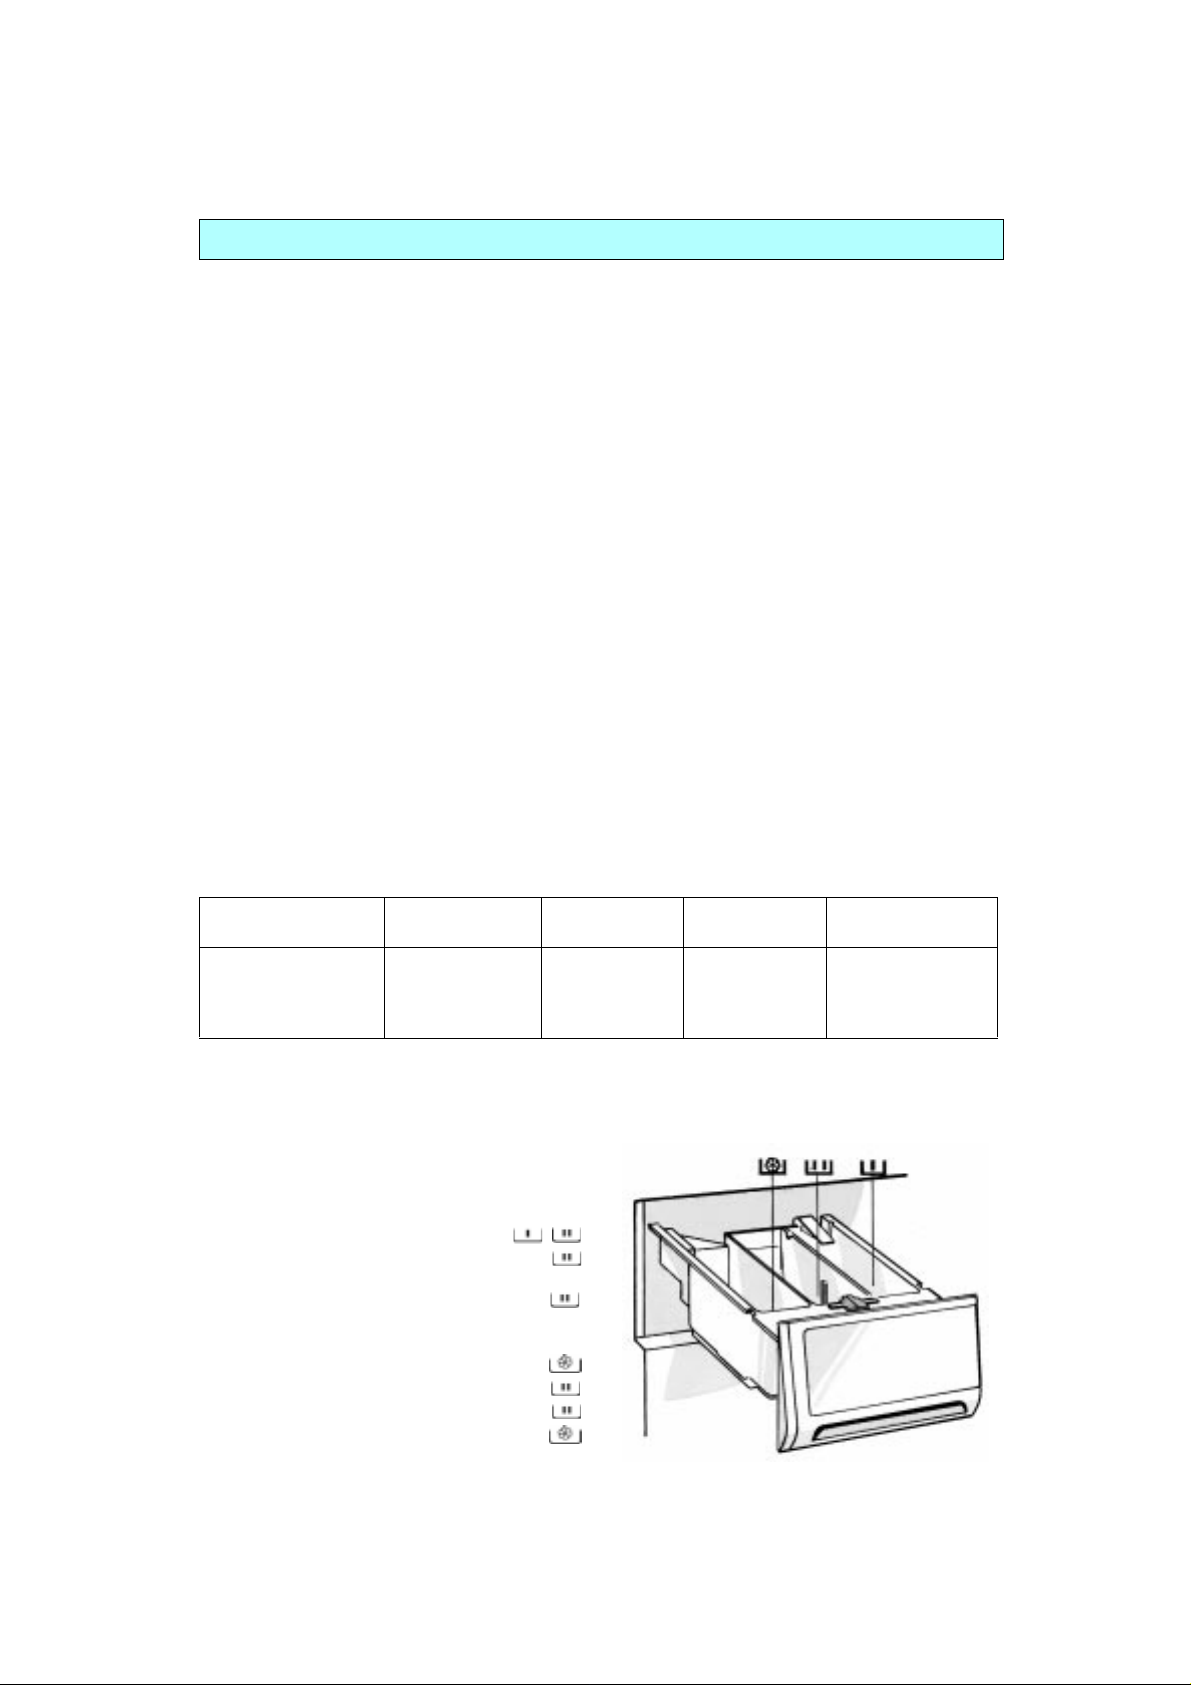
FILLING THE DETERGENT AND
ADDITIVES
1.
Pull out the detergent dispenser completely,
until the limit.
2.
Add the detergent:
•
Programme with pre and main wash
•
Main wash programme without prewash
When using liquid detergent, remove the
coloured insert and fit it in compartment .
The graduate scale on the insert
makes dosing easier.
•
Fabric softeners (no more “MAX” mark)
•
Stain remover agents
•
Water softeners (water hardness 4)
•
Starch (dissolved in water)
3.
Close the detergent dispenser completely.
28
Page 9

DETERGENT AND ADDITIVES
Notes:
• You can use liquid detergent in the “Prewash”
phase for programmes with this option. In this
case use only powder detergents for the main
wash.
• If the “Start Delay” option is used, put liquid
detergent into the drum with a detergent ball.
DYEING AND BLEACHING
Dyeing: Usual products consist of dye colour,
fixing agent and salt. Pour the dye colour, the
fixing agent and then the salt directly into the
empty drum. Fill in the laundry only afterwards.
PROGRAMME SELECTION / PROGRAMME START
See also separate programme overview.
1. Set Programme Selector to the desired
programme. The indicator above the “Start/
Pause” button flashes and the programme
duration is shown on the display (if available).
2. Select additional options, if desired, pressing
the corresponding button.
The indicator for the option is lit up.
N.B.An audible tone is sounded if the
combination of programme and additional
option does not make sense. Unsuitable
combinations of additional options are
deselected automatically.
• By a further pressing of the button the
additional option can be turned off again.
• When using concentrated fabric softeners,
add water in the detergent dispenser up to
“MAX” level mark.
• To prevent dispensing problems when using
highly concentrated powder and liquid detergents,
use the special detergent bal l supplied wit h the
detergent and place it inside t he drum.
• Use exclusively dyes and bleaches
recommended for washing machines.
• Follow the Manufacturer’s instructions.
• Plastic and rubber parts of the machine may
be stained by dyes or bleaches.
• The Final Spin Speed is related to the
selected programme and is shown by means
of the indicator lamp.
• The Final Spin Speed can be altered by
pressing the “Spin” button.
• In some programmes the maximum final spin
speed is limited to go easy on your laundry
items. Selection of a higher spin speed is not
possible.
• If “0” is selected, the laundry is not spun
following the final rinse cycle. The water is
simply pumped out. Intermediate spinning is
carried out at reduced speed.
Press the “Start/Pause” button to start the
3.
program
.
START DELAY
(If available)
1. Select the program and temperature, any
additional options and the spin speed.
2. Press the “Start Delay” button. The
associated lamp comes on and the indicator
above the “Start/Pause” button flashes.
Either keep the start delay button pressed or
else press it repeatedly until the desired
number of hours is reached. If the maximum
number of hours is reached for the delayed
start, further pressing of the button starts the
counter at zero again.
3. Press the “Start/Pause” button in order to
start the program.
• The start delay hours can be corrected even
after the “Start/Pause” button has been
pressed. Again here either keep the “Start
Delay” button pressed or else press it
repeatedly until the desired number of hours is
reached. Once the display has counted down
to “00” the selected programme is started.
• Cancelling the start delay: If, in fact, no start
delay was actually desired turn the
programme selector switch and then set it to
the desired position. The remaining time of the
selected programme is displayed and the
indicator above the “Start/Pause” button
flashes. The programme can now be started
immediately by pressing this button.
• If the programme is changed after the start
delay, the start delay option is cleared and the
remaining time is displayed. The indicator
above the “Start/Pause” button flashes.
The programme is not started.
Note: With liquid detergent, a dosing a id placed
directly in the drum should be used if a start delay
has been selected.
29
Page 10

DOOR LOCK / PROGRAMME END
DOOR LOCK
The door locks automatically after the
programme starts until the end of the
programme.
The “Door free” indicator goes out.
Exception
Synthetics and during the prewash for these
programmes, the door can be opened in order to
add further items during the first 15 minutes after
the start of the programme. This is not possible if
“Rapid Wash” is selected.
If the programme selector is moved to the “ ”
position or if the electricity supply is interrupted,
then after approximately two minutes the door is
released.
: In the programmes Cotton and
PROGRAMME END
The programme end is indicated b y:
•
The “Door Free” indicator coming on and the
remaining time indicator (if available)
showing “0:00”,
•
An audible tone is sounded three times,
•
The programme sequence indicators are all
off.
CHANGING / INTERRUPTING / CLEARING PROGRAMME
CHANGING PROGRAMME OR OPTIONS
1.
Set programme selector knob to new
programme. Reselect additional options and
spin speed if appropriate. The indicator light
above the
Note:
2.
Press the
programme will continue in the same
programme section during which the current
programme was interrupted.
Note:
“Start/Pause”
The options “Start delay” and “Prewash”
cannot be reselected when the
programme is changed.
“Start/Pause”
Do not add more detergent for this
programme.
button will blink.
button. The new
PROGRAMME INTERRUPTION / PAUSE
To interrupt the running programme for a certain
period and continue it at a la ter ti me :
1.
Press the
The indicator flashes.
2.
Following the desired pause press the
“Start/Pause”
“Start/Pause”
button once again.
button.
CANCELLING THE PROGRAMME
If the current programme is to be terminated
prematurely and cancelled, the water must be
pumped out first before the door can be op ened :
1.
Set the programme selector to programme
“Drain”
setting
The indicator above the
button flashes. The spin indicator shows “0”
and the remaining time indicator (if available)
shows “0:02” minutes.
2.
Press the
start the
.
“Start/Pause”
“Drain”
programme.
“Start/Pause”
button in order to
REMOVING THE FILTER / DRAINING RESIDUAL WATER
WHEN SHOULD I REMOVE THE FILTER?
Check the filter two or three times a year and
clean it if necessary.
•
Check the filter if the appliance is not draining
properly or if it fails to perform spin cycles.
•
Remove the filter if the pump is blocked by an
object (buttons, coins, safety pins, etc.).
IMPORTANT:Make sure the water has had
time to cool before draining
the appliance.
30
Page 11
REMOVING THE FILTER / DRAINING RESIDUAL WATER
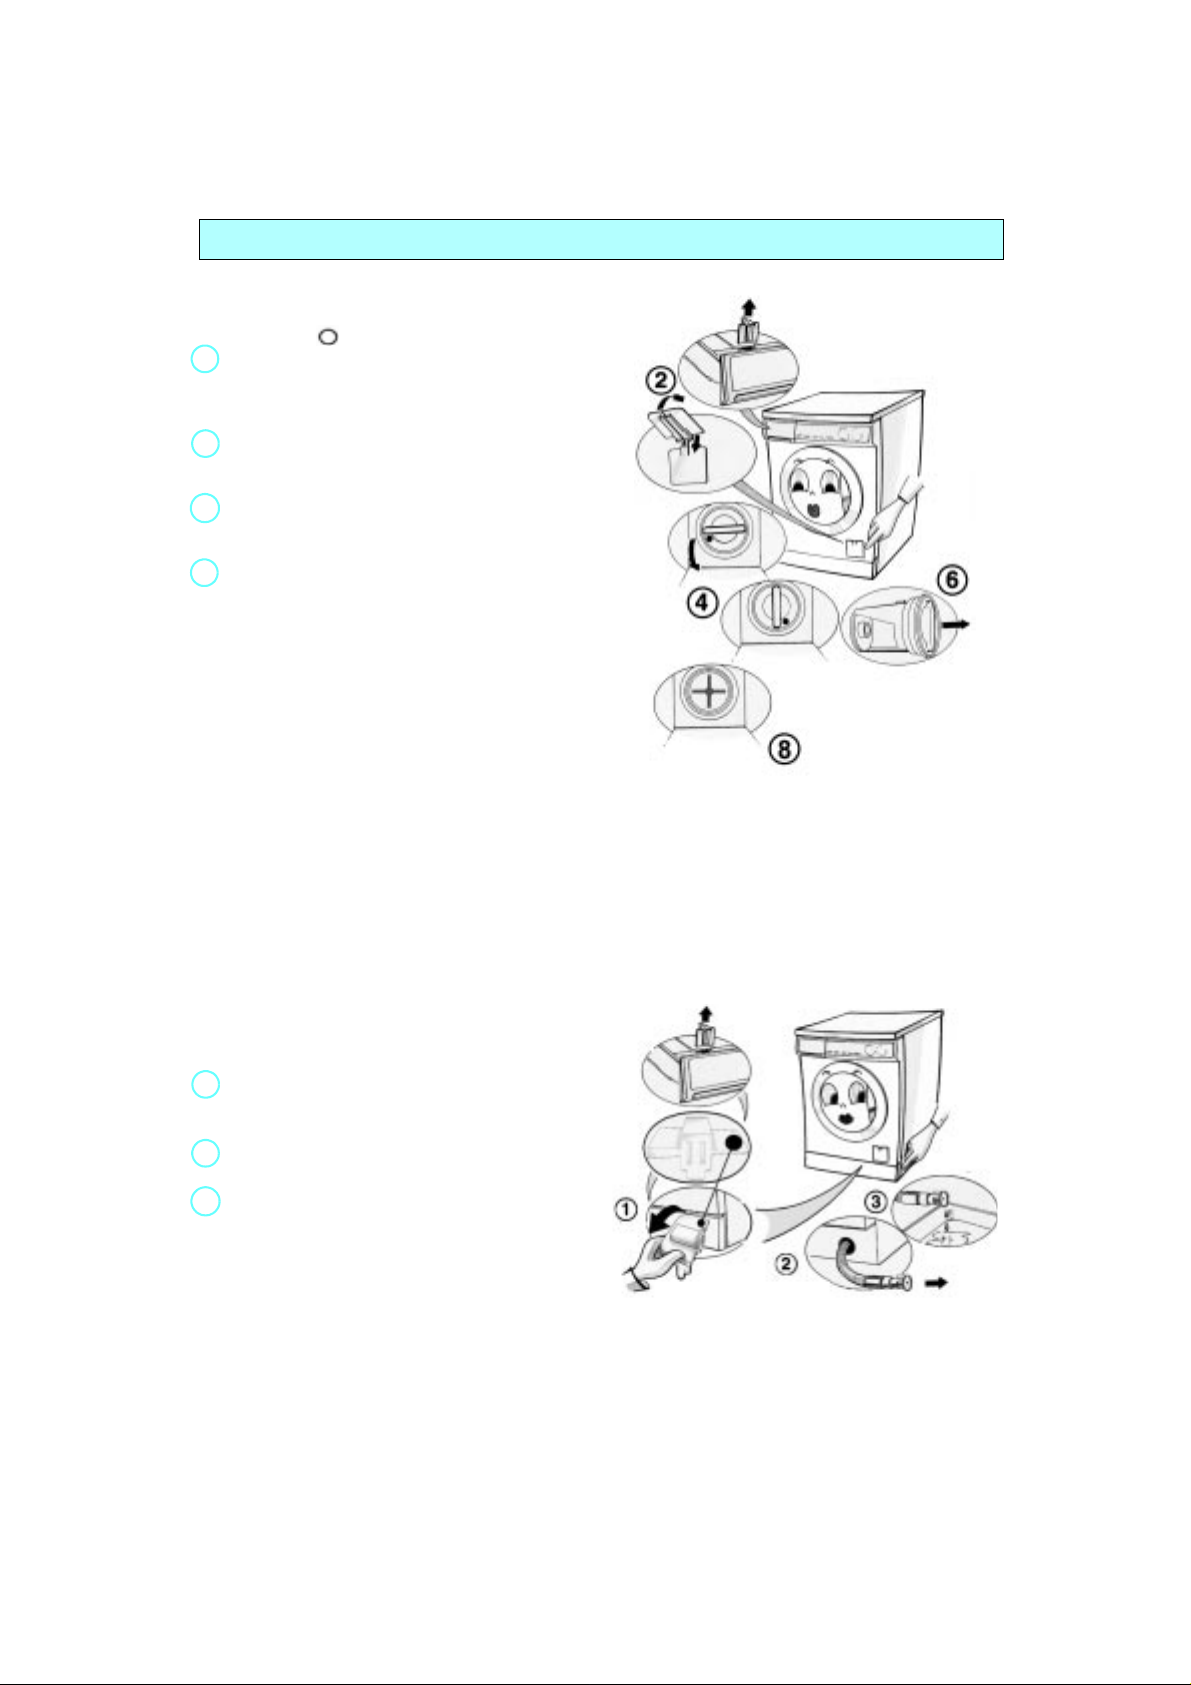
REMOVING THE FILTER
1.
Switch off the appliance (set the programme
selector to and unplug it).
2.
Remove the coloured insert from the
detergent dispenser and use it to open the
filter cover.
3.
Place a bowl beneath the filter.
4.
Turn the filter slowly anti-clockwise until the
grip is vertical; do not extract filter as yet.
5.
Wait until all the water has drained out.
6.
Now unscrew the filter completely and extract
it.
7.
Remove any foreign material from the filter.
8.
Make sure the pump impeller is not
obstructed.
9.
Insert the filter and screw it fully down in a
clockwise direction (until the grip is
horizontal).
10.
Close the cover.
11.
Pour 0.5 l of water into the detergent
dispenser to reactivate the “Eco System”.
12.
Connect the appliance to the electrical outlet.
13.
Select a programme and start it.
WHEN SHOULD I DRAIN RESIDUAL
WATER?
•
Before transporting (moving) the machine.
•
If the appliance is installed in a roo m subject to
sub-zero temperatures. It is bes t in this case to
drain the machine after every wash.
DRAINING RESIDUAL WATER
The residual water drain hose is accommodated
behind the appliance plinth.
Before draining residual water unplug the
machine.
1.
Remove carefully the plinth using the thin
rounded projection of the coloured insert
from the detergent drawer.
2.
Grip the cap and pull it out. Remove the cap
from the end of the tube.
3.
Allow all the water to flow into a flat bowl, then
refit the cap and stow the drai n tube back in its
compartment.
4.
Before using the machine again, po ur about 1
litre of water into the detergent dispenser to
reactivate the “Eco System”.
31
Page 12
CARE AND MAINTENANCE
APPLIANCE EXTERIOR AND CONTROL
PANEL
•
Clean using normal household c leaner (do not
use abrasive products).
•
Dry with a soft cloth.
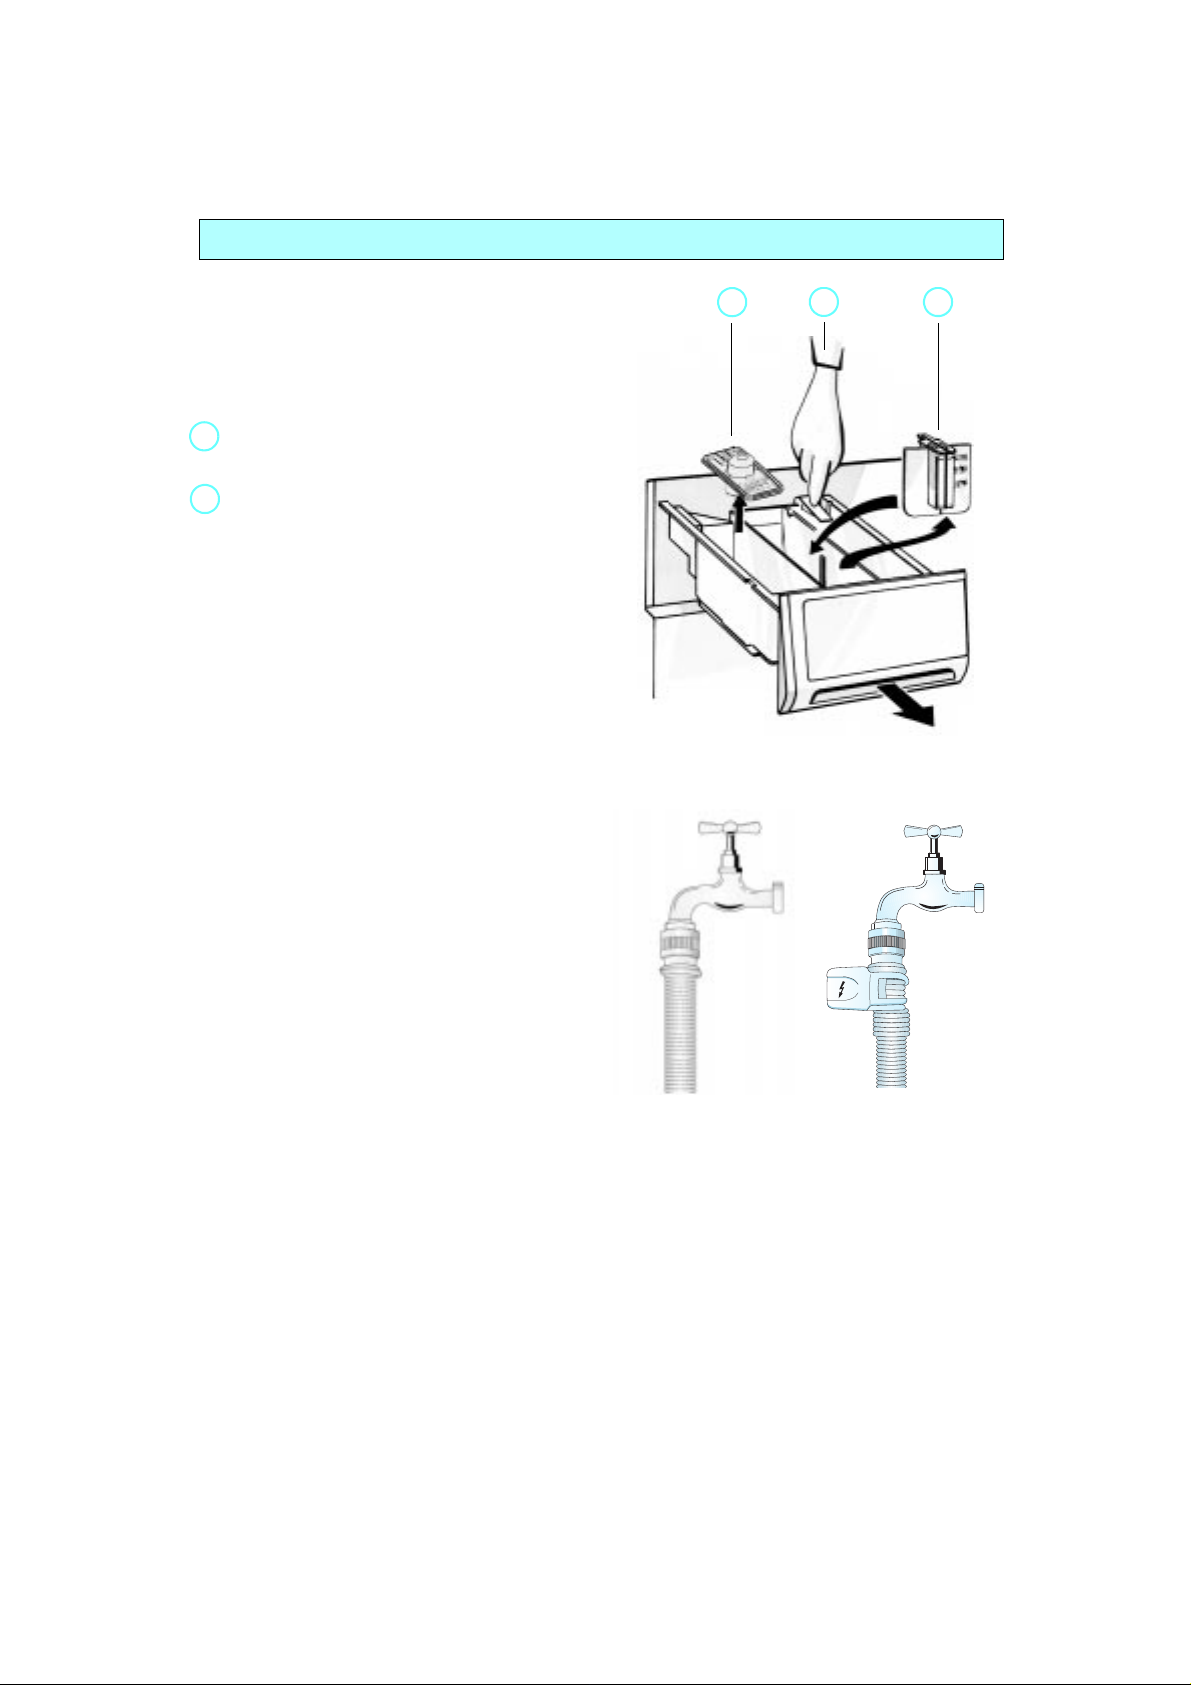
DETERGENT DISPENSER
1.
Disengage the detergent dispenser by
pressing the release lever in the prewash
compartment and extract it.
2.
Remove the inserts (the siphon f ro m th e
softener compartment and the insert for liquid
detergents).
3.
Wash all the parts under running water.
4.
Replace the parts and refit the detergent
dispenser. Push the siphon firmly into place.
DOOR SEAL
•
Clean with a damp cloth when nece ssa ry.
•
Periodically check the fold of t he se al for
foreign objects.
WATER HOSE MESH FILTERS
•
Check and clean periodically.
For machines with a straight water supply
hose (see figure)
1.
Turn off the tap.
2.
Unscrew the hose from the tap.
3.
Clean the internal strainer.
4.
Screw the supply hose back onto the tap.
5.
Unscrew the hose from the machine.
6.
Remove the filter from the washing machine
with pliers and clean it.
7.
Replace the filter and screw the hose
connection back on to the machine.
8.
Turn on the tap and
connection is completely water-tight.
For machines with Water stop hose
(see figure)
1.
Turn off the tap.
2.
Unscrew the hose from the tap.
3.
Clean the strainer.
4.
Screw the water stop hose back onto the tap.
5.
Turn on the tap and
connection is completely water-tight.
ensure that the
ensure that the
FILTER
Check and clean the filter two or three times a
year (see “Removing the Filter / Drain ing Residual
Water”).
2
Straight hose Water Stop hose
1
2
32
Page 13

TROUBLESHOOTING GUIDE
This washing machine is equipped with au tomatic
safety functions which detect and diagn ose faults
at an early stage and react appropriately.
Often, however, the faults detected are small
enough to be solved in a matter of minutes.
For example:
The appliance will not start, no lamp
lights up.
Check whether:
•
the appliance is plugged in;
•
the wall socket is functioning co rre ct ly
(use a table lamp or similar).
The appliance will not start, but the
“Start/Pause” lamp is flashing.
Check whether:
•
the appliance door is properly closed
(child safety);
•
a programme has been selected and the
programme is started;
•
the water tap is open.
The appliance stops during the
programme.
Check whether:
•
“Rinse Hold”
the
this option by pressing the button again;
•
another programme has been selected.
Reselect the desired programme and press
“Start/Pause”
the
• “Start/Pause”
Pause”
•
the door was opened and the
lamp is flashing. Press it again;
•
Safety system of the appliance was acti vated.
See fault description table.
button;
lamp is flashing, terminate
button;
lamp is flashing. Press
“Start/Pause”
“Start/
Detergent and additive product residues
in dispenser at end of wash.
Check whether:
•
the siphon is correctly installed and clean
(see “Care and Maintenance”);
•
enough water is being supplied. The mesh
filters could be clogged (see “Care and
Maintenance” / “Water Hose Mesh Filters”).
The appliance vibrates during the spin
cycle.
Check whether:
•
the appliance is level and s oli dl y i ns ta lle d on
all four feet (see “Installation Instructions”);
•
the transit bolts have been removed. The
transit bolts must be removed before t he
appliance can be used (see “Installation
Instructions”).
Final spin results are poor:
The appliance has an imbalance det ectio n and
correction system. If individual hea vy art icl es a re
loaded (bathmat, bathrobe, etc.) this system ma y
reduce the spin speed automatical ly to protect the
appliance or even interrupt the spin cycle
altogether, if the imbalance is too great eve n after
several spin starts.
•
if the laundry is still too wet at the end of the
cycle, add smaller articles of laundry to
balance the load and repeat the spin cycle.
•
excessive foam formation may prevent
spinning. Ensure correct amount of detergent
is used.
33
Page 14
TROUBLESHOOTING GUIDE
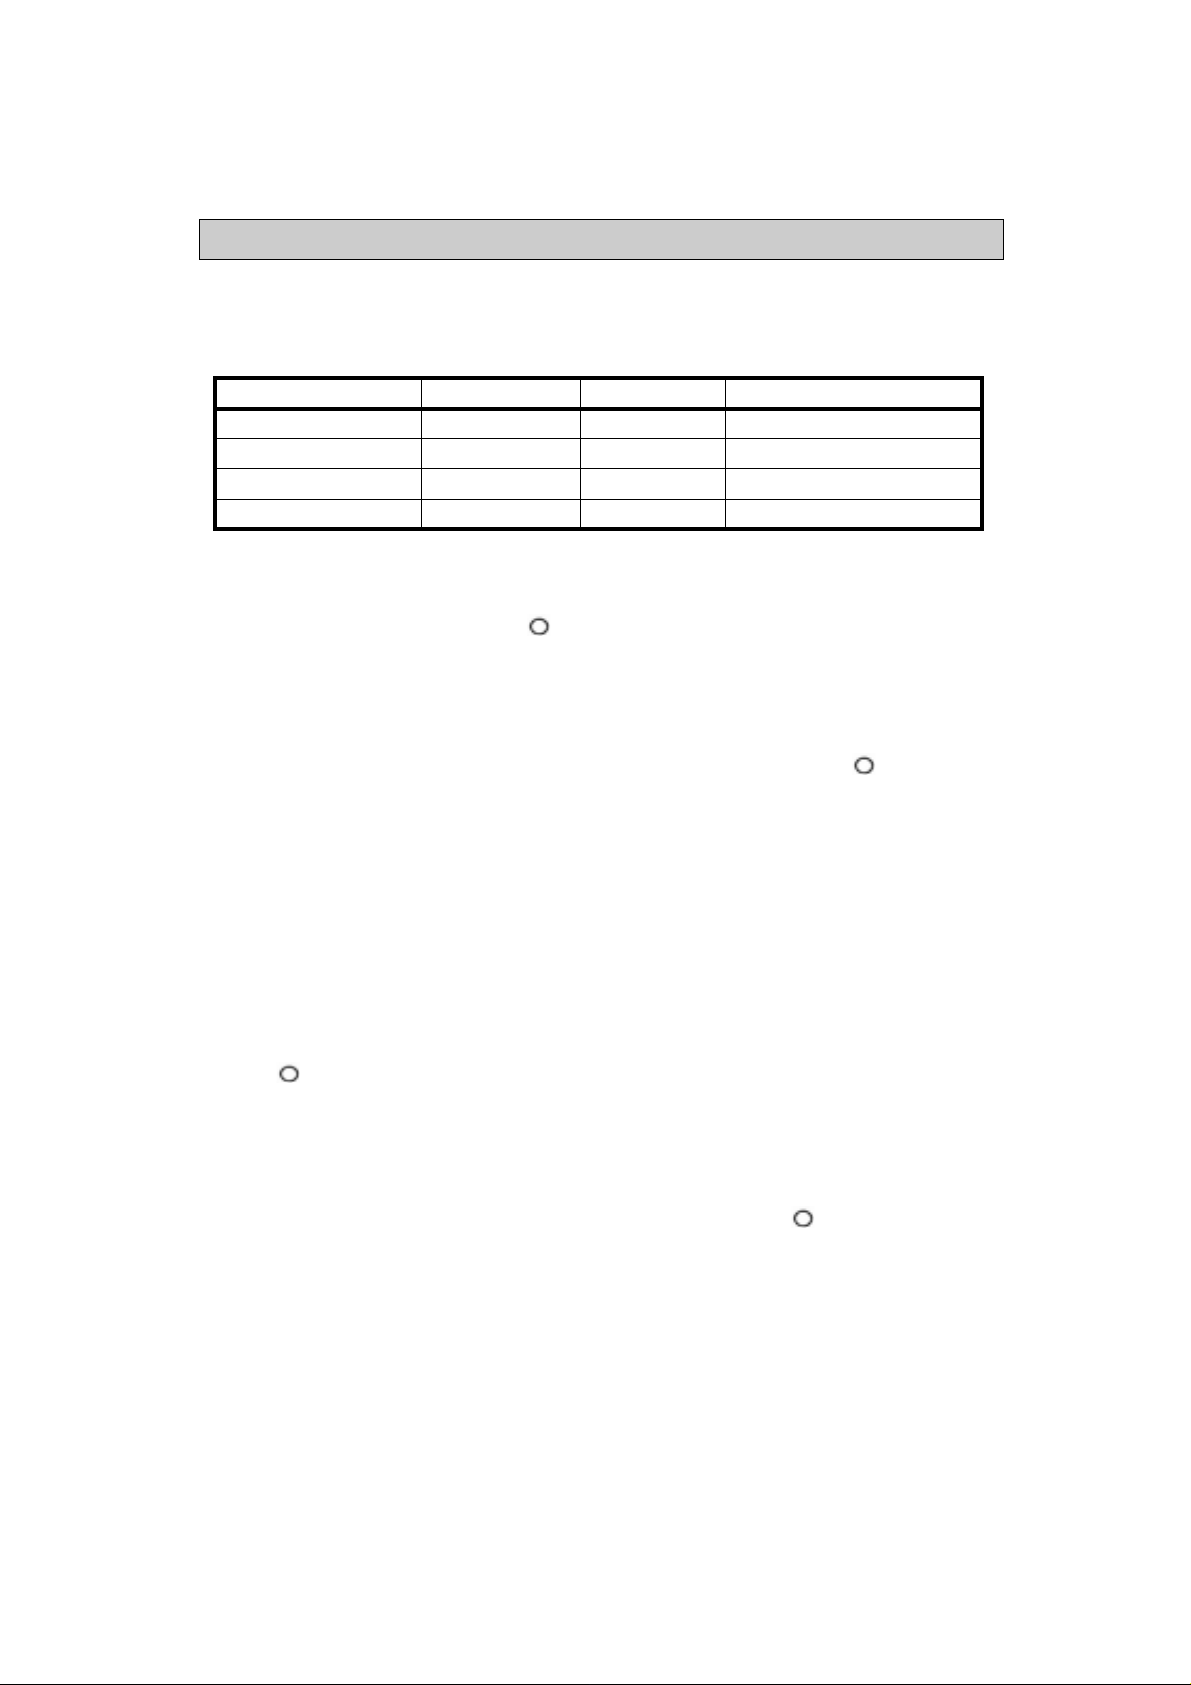
What should I do when the automatic safety system detects a malfunction?
The programme is interrupted, an audible tone sound and various indicators (if available) point to the
source of the fault.
Fault description table
Small lamp lights up Digital display Audible tone Fault description
“Water tap” “H” and “F” 30 sec “Water inlet fault”
- “P” and “F” 30 sec “Draining fault”
- “F4” to “F16” 30 sec “Electrical components fault”
“Water Stop” “A” and “F” 30 sec “Water Stop fault”
a. Water inlet fault (no or insufficient water supply)
The “Water tap” indicator is on or the display
alternately shows “H” and “F” and an audible
tone sounds. Switch off the appliance by
turning the programme selector to the
position and unplug it.
Check whether:
•
the water tap is completely open, and the
water supply pressure is sufficient;
•
the water inlet hose is kinked;
•
the mesh filters are clogged (see “Care and
Maintenance” / “Water Hose Mesh Filters”);
•
the water inlet hose is frozen;
•
the appliance has a safety hose and the
safety valve has opened (red indicator in the
safety valve inspection window); In this case
replace with a new safety hose.
Connect the appliance to the electrical outlet.
Reselect the desired programme and press
“Start/Pause”
the
with the programme (do not add detergent for
this programme)
b. Draining out fault
The display alternately shows “P” and “F” and
an audible tone sounds. Switch of f th e
appliance by turning the programme selector
to the position and unplug it.
Check whether:
•
the drain hose is kinked (see “Installation
instructions”);
•
the pump / filter are blocked (see “Removing
the Filter / Draining Residual Water”).
IMPORTANT
wash water to cool down.
•
the drain hose is frozen.
Connect the appliance to the electrical outlet.
Reselect the desired programme and press
“Start/Pause”
the
with the programme (do not add detergent for
this programme).
If the fault re-occurs, contact Af te r-Sa les
Service (see “After-Sales Service”).
c. Electrical module fault
“Spin Speed”
The
Delay”
option are flashing and an audible tone
sounds. The display shows “F4” to “F16”.
button again to continue
: before draining, allow the
button again to continue
indicator and the
“Start
•
Switch off the appliance. Select a
programme and press the
button once again.
The programme will continue.
•
If the fault re-occurs, contact After Sales
Service (See “After-Sales Service”).
d. Water Stop fault
An audible tone sounds. The light of th e
Water Stop indication is on.
The display alternately shows “A” and “F”.
Switch off the appliance by turning the
programme selector to the position,
unplug the appliance and make sure tha t th e
water tap is closed.
The “Water Stop” may have been
triggered by:
1. too much foam.
2. a leak in the inlet hose or in the appliance.
Tilt the appliance forwards carefully to allow
the collected water to flow out.
Then:
1. connect the appliance to the electrical outlet,
2. open water supply to machine (if
“Start/Pause”
machine begins to fill, close water supply
and call After-Sales Service),
3. reselect the desired programme and
press the
no need to add additional detergent).
The programme will continue.
If the faults occurs again, cal l Af te r-Sa le s
Service with details about the fa ult (see
“After-Sales Service”).
Fault “Water Stop” when the programme
selector is on the position.
The appliance identifies a wate r leakage even
when the power is off.
An audible tone sounds. The display
alternately shows “A” and “F”.
•
The water leakage can be caused by a
leak in the inlet hose or in the appliance.
Unplug the appliance and make sure that the
water tap is closed, lean the appliance over
onto its front side to allow the collected water
to flow out.
Call After-Sales Service with details about the
fault (see “After-Sales Service”).
button is not pressed, but
“Start/Pause”
“Start/Pause”
button (there is
34
Page 15
AFTER-SALES SERVICE
Before contacting After-Sales Service:
1. Try to remedy the problem yourself (see
“Troubleshooting Guide”).
2. Restart the programme to check whether the
problem has solved itself.
3. If the machine continues to function
incorrectly, call After-Sales Service.
Specify:
• The nature of the problem.
• The exact model of the appliance.
• The service code (number after the word
SERVICE).
The After-Sales Service sticker is on the
inside of the door.
INSTALLATION INSTRUCTIONS
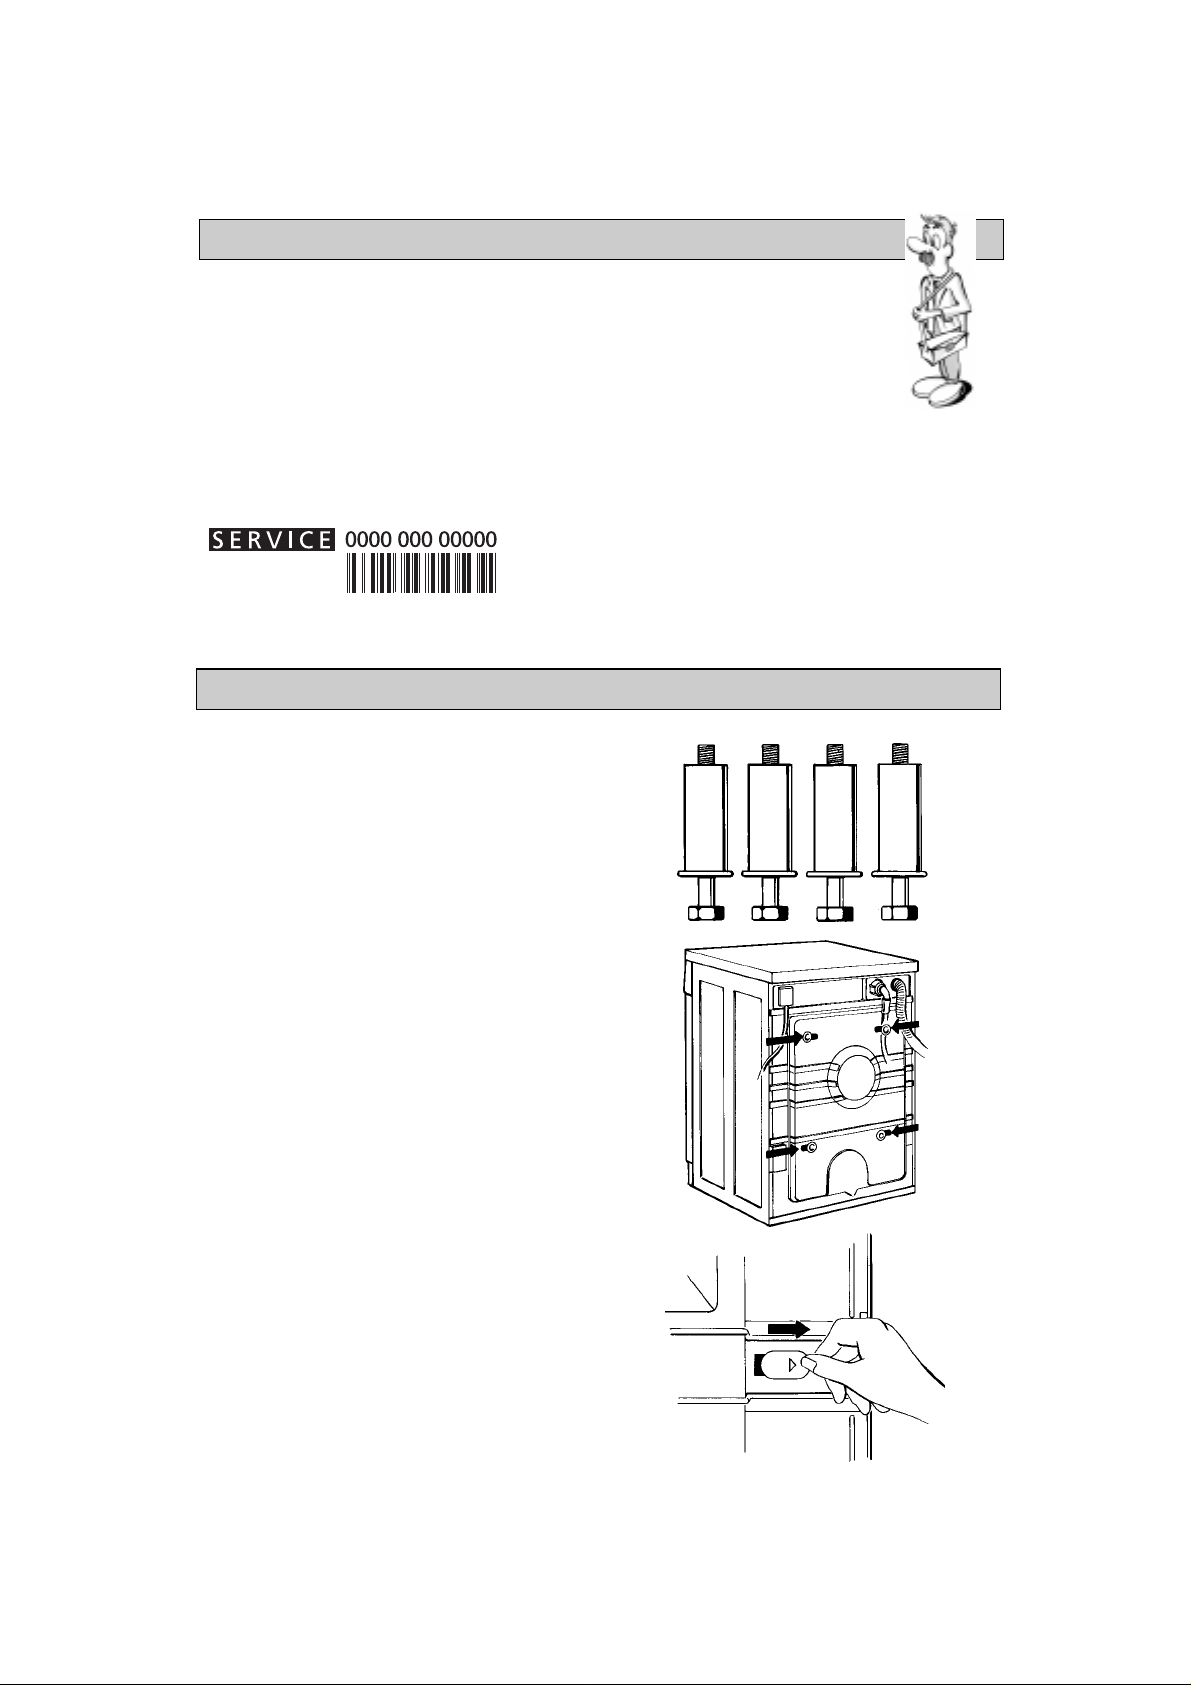
TRANSIT BOLTS
The appliance is fitted with transit bolts to prevent
internal damage during transport.
Before using the machine you must remove
the transit bolts (Fig. 1).
1. Slacken the four bolts with the spanner
supplied (Fig. 2).
2. Unscrew the bolts by hand.
3. Holding the bolt head, pull each bolt through
the wide part of the holes.
4. Close the holes with the plastic covers supplied;
insert the covers in the wide part of the hole and
slide them toward the narrow part until they click
into place (Fig. 3).
5. Keep the transit bolts for future use.
Important
Whenever the appliance is transported, the transit
bolts must be refitted.
Pry up the plastic covers with a screwdrive r, slide
them in the opposite direction to the arrow and
remove. Insert the transit bolts, performing the
steps for removal in reverse order.
• Your full address.
• Your telephone number and area code.
After-Sales Service phone numbers and
addresses are given on the guarantee card.
Alternatively, consult the dealer where you
purchased the appliance.
Fig. 1
Fig. 2
Fig. 3
35
Page 16
INSTALLATION INSTRUCTIONS
INSTALLATION
•
Install the appliance on a so lid and level floor
surface, preferably in a corner of the room.
•
Make sure that all four feet are stable and resting on
the floor and then check that the appliance is
perfectly level (use a spirit level).
•
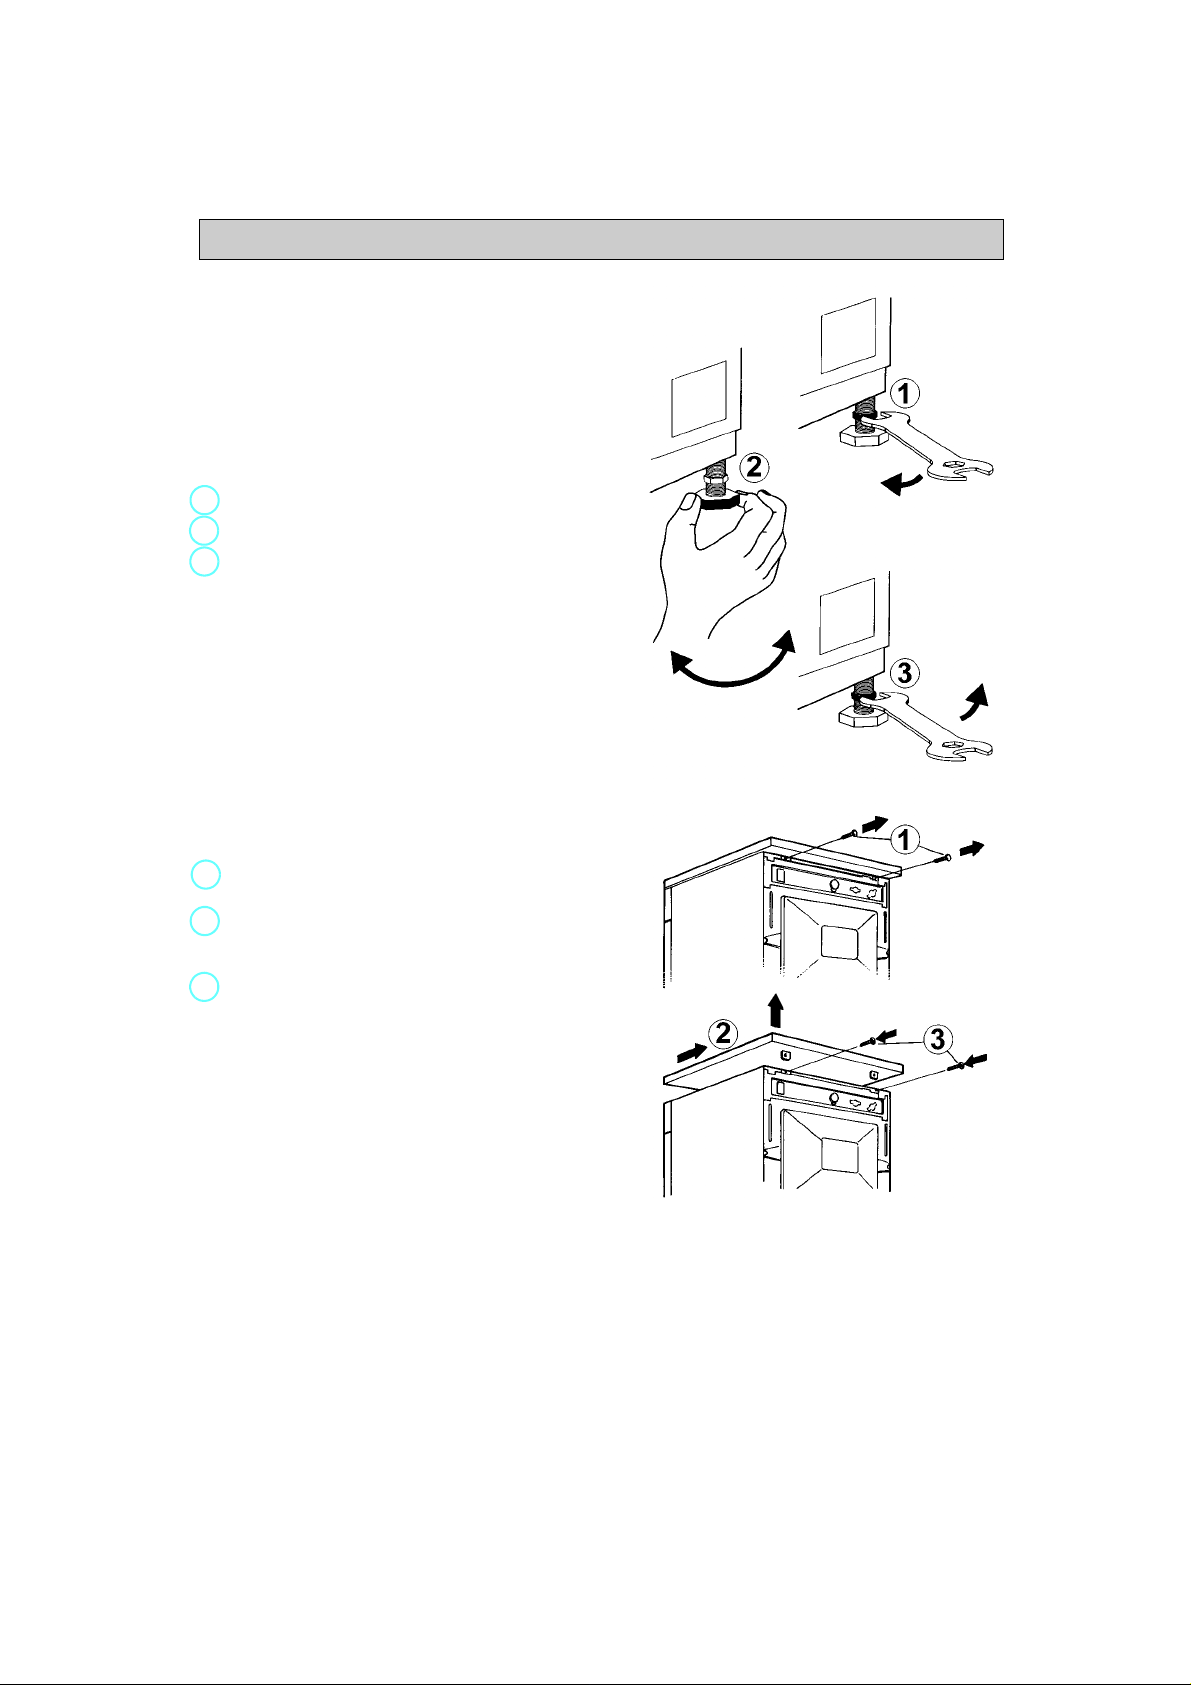
If the floor is uneven, adjust the levelling feet as
required (do not insert pieces of wood etc. under the
feet):
1.
Slacken the locknut using the s pa nne r s upp lied.
2.
Adjust the height of the foot, turning it by hand.
3.
Tighten the locknut by turning it anti-clockwi se
towards the appliance casing.
•
If the appliance is to be installed on a wooden floor,
distribute the weight by placing it on a 60 x 60 cm
sheet of plywood at least 3 cm in thickness.
Secure the plywood sheet to the fl oo r.
WORKTOP / COVER PANEL
The appliance must only be installed beneath a
continuous fitted kitchen worktop.
If the appliance will be built under it is mandatory
to use the cover panel UBS. This can be obtained
from specialist shops or from After-Sales Service.
•
Unplug the appliance.
1.
Unscrew the worktop fixing screws from the rear of
the appliance.
2.
Slide the worktop fully backward and lift it upwards
to remove. Install the cover panel following the
relative instructions.
3.
Refit the fixing screws and t igh te n th em.
BUILD-UNDER OPENING DIMENSIONS
Width 600 mm
Height 825 mm
Depth 600 mm
WARNING:
Only plug the appliance into th e mai ns p owe r so cke t
after you have fitted the cover panel or the appliance
worktop.
36
Page 17
INSTALLATION INSTRUCTIONS
WATER SUPPLY
•
Water supply: cold water only
•
Tap: 3/4” threaded hose connection
•
Pressure: 100-1000 kPa (1-10 bar).
WATER INLET HOSE
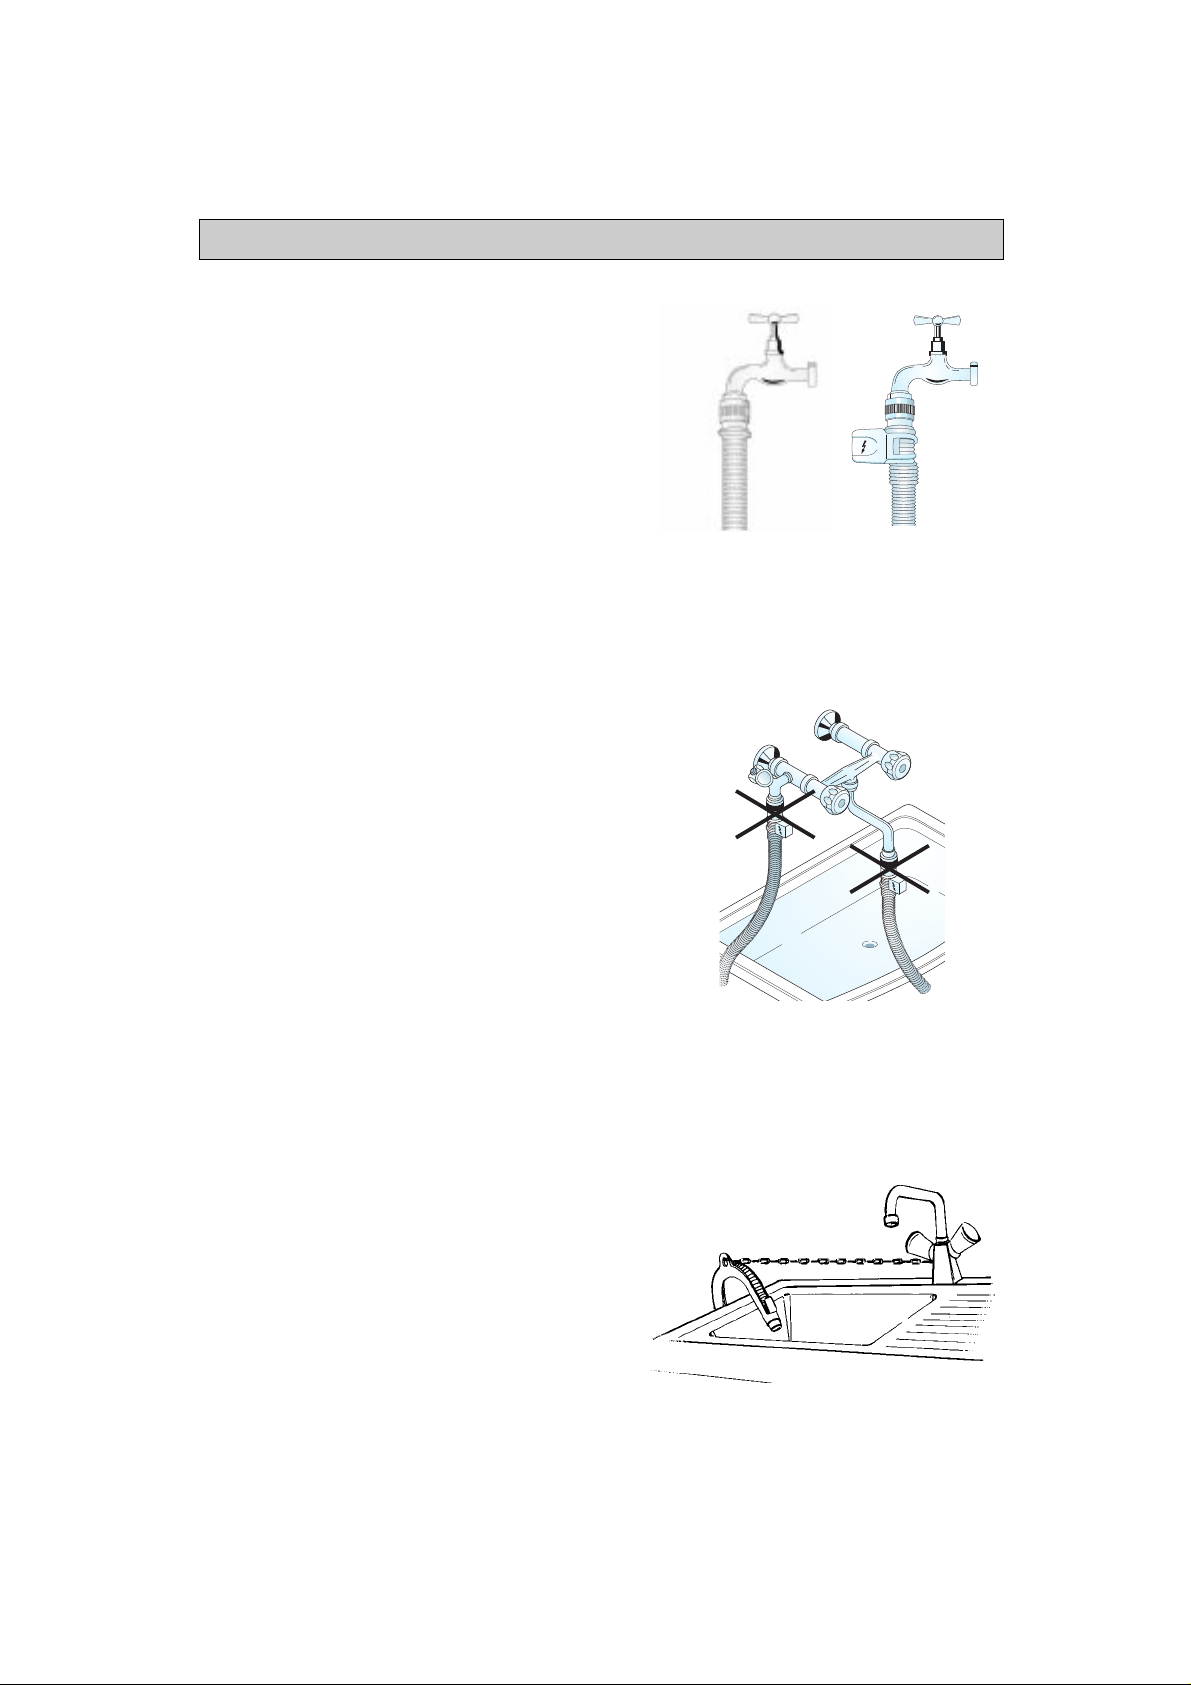
1.
Carefully screw the hose connection onto the tap
preferably by hand. Make sure there are no kinks
in the hose.
2.
Check water-tightness of tap and appliance
connections by turning the tap completely on.
•
If the hose is too short, repla ce it w i th a s uit ab le
length of pressure resistant ho se (10 00 kPa min,
EN 50084 approved type).
•
Periodically check the hose for brit tl en ess a nd
cracks and replace if necessary.
•
The appliance can be connected without an antibackpressure valve.
•
Install the appliance in accordance wit h regulations
of your local water company.
WATER STOP (depends on model)
•
Screw the threaded connector with the filter in serted
onto the tap. Open the water tap fully and chec k the
water-tightness of the connect io n p oi nt .
•
The appliance must not be connected to the mixing
tap of a non-pressurized water heater.
•
The inlet hose and the plastic enclosure at the tap
connection contain electrical co mp on en ts.
N.B. Do not cut the hose and do not immerse
the plastic enclosure in water.
•
If the flexible hose is damaged, un plug th e
appliance from the mains immediately.
•
If the hose is too short, repla ce it w i th a 3 m Wa te r
Stop hose (available from After-Sales Service or
from your dealer). This operation must be carried
out exclusively by a licensed electrician.
DRAINING
•
Connecting the water drain hose.
Connect the drain hose to the siphon or hook it
over the edge of a sink by means of the “U” bend
(see figure).
The drain hose should not be hooked onto small
washbasins.
Max. drain height: 1.25 m
If you need to add an extension, use a flexible
hose of the same type and secure t he un io n wit h
screw-on hose clips.
Max. drain hose length: 2.50 m
Important:
Make sure there are no kinks in the hose. Secure
the hose so that it cannot f al l dow n w hil e th e
appliance is running.
Straight hose Water Stop hose
37
Page 18

INSTALLATION INSTRUCTIONS
ELECTRICAL CONNECTIONS
•
Electrical connections must be made in accordance
with local regulations.
•
The appliance must be connected to the mains
exclusively by means of a so cke t wit h an e arth
connection in accordance with es ta bli sh ed
regulations. The appliance must be earthed b y law.
The manufacturer declines all liability for damage to
property or injury to persons or animals deriving
either directly or indirectly from failure to observe
the above directions.
•
Voltage, power consumption and electrical
protection data are supplied on the inside of the
appliance door.
•
The electrical power cable must be replaced, if
necessary, exclusively by original power cable by
authorised After-Sales Service.
•
The appliance conforms to European safety
regulations, EC directive 93/68/EEC and standard
93/68/EC.
•
Do not use extension leads or multi sockets.
•
Access to the mains plug or to disconnection
from mains supply via a double-pole switch must
be ensured at all times following the installation.
38
 Loading...